Through Microsoft Outlook’s Scheduling Poll (formerly FindTime), you can select a few possible meeting times and send attendees a link to a poll that allows them to vote for what meeting time works best for them. Once a consensus is reached, you schedule the meeting for the preferred time.
- Like the Scheduling Assistant, the Scheduling Poll allows you to preview attendees’ FDU Outlook calendars (if available) so that the best possible options can be selected. This particular aspect of the feature will be less useful for attendees who…
- DO NOT have FDU Outlook calendars
- Have FDU Outlook calendars, but don’t keep them up-to-date
- DO NOT have FDU Outlook calendars
- The Scheduling Poll has other convenient features, including email updates, the ability to schedule a meeting automatically, and more.
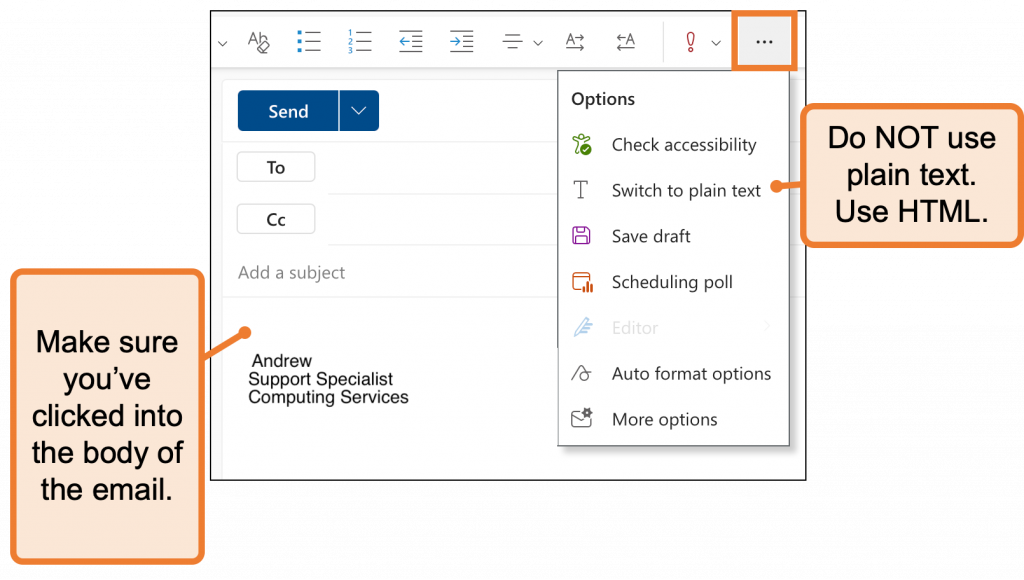
- When using the Outlook web client, the Scheduling Poll feature is not available for emails composed in plain text. Emails must be composed in HTML.
Note
Doodle, a meeting scheduler add-in for Outlook, is not an approved application for use at FDU. Please use Microsoft Scheduling Poll as your meeting scheduling tool, as detailed in this article.
Where can I access the Scheduling Poll feature?
You can access the Scheduling Poll via the Mail or Calendar tabs of the Outlook desktop application.
In Mail, you can access the Scheduling Poll as follows:
- Select “Reply with Scheduling Poll” on the “Home” tab when an email is open in the reading pane

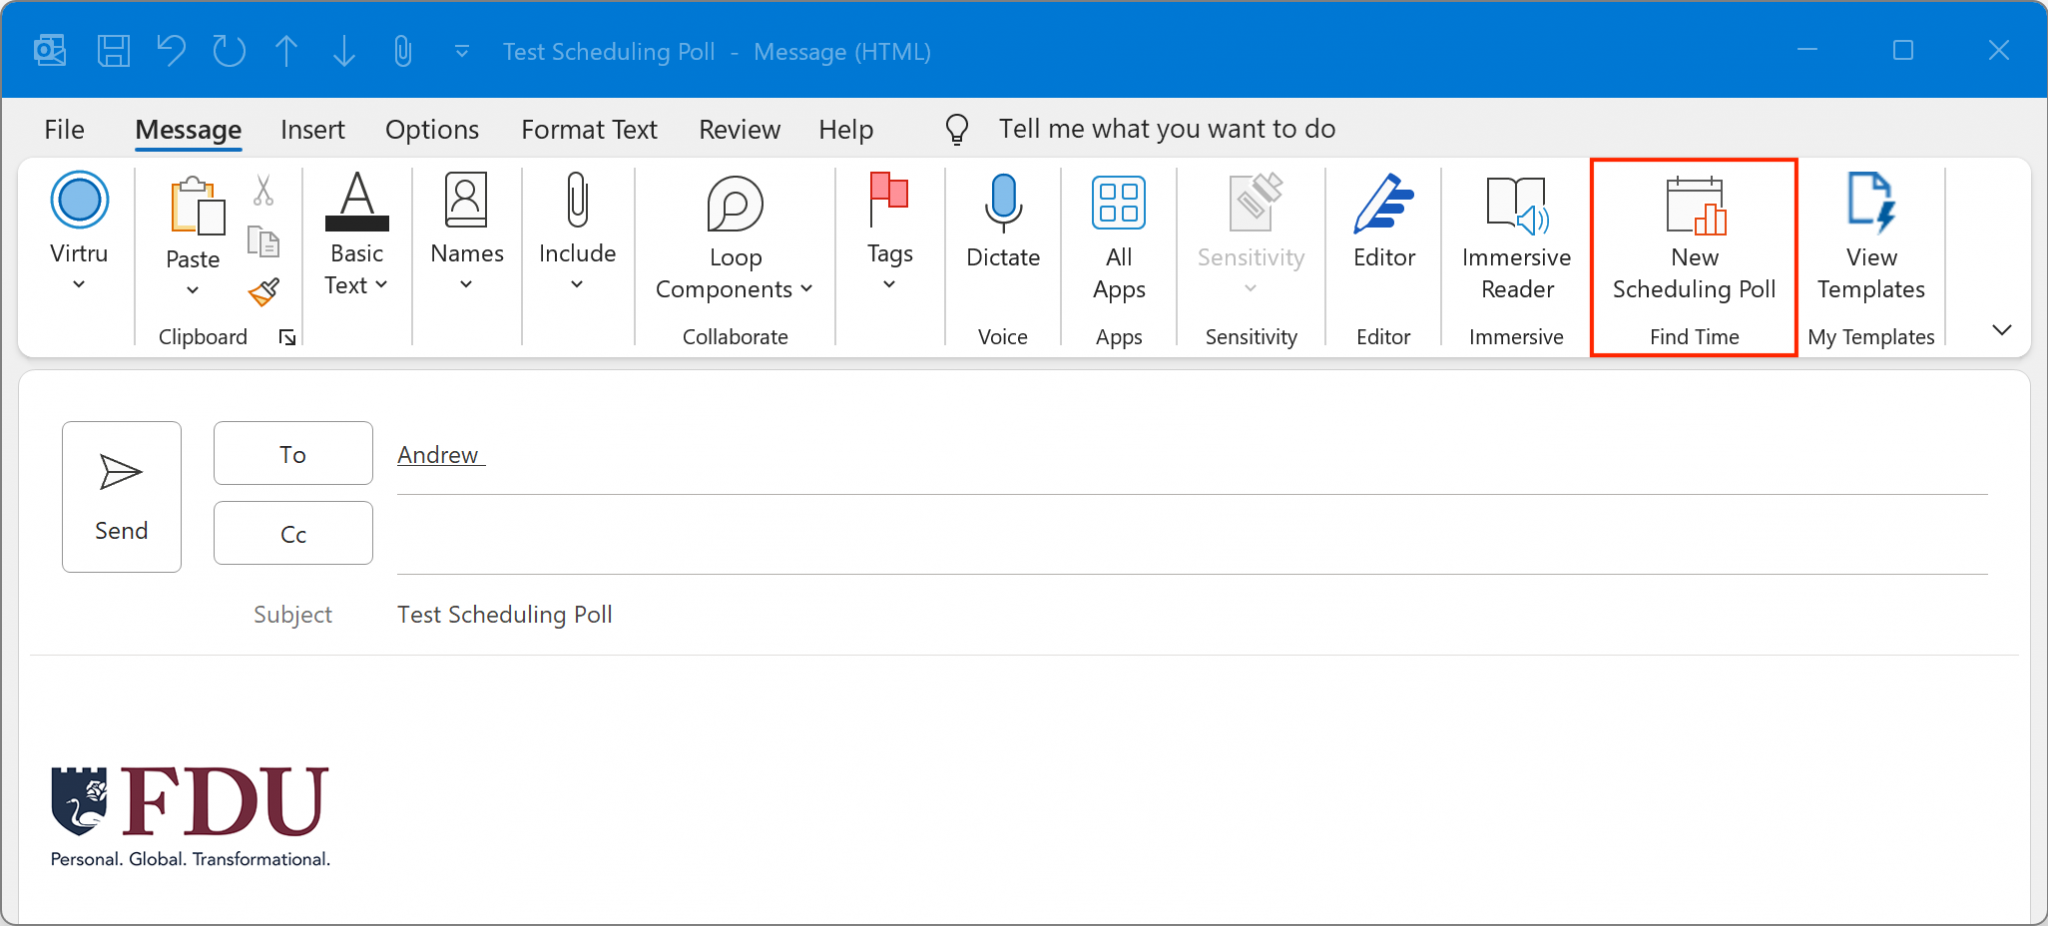
- Launch the compose pane by either creating a new message or hitting reply/forward for an existing message. List required recipients in the “To” field and optional recipients in the “CC” field. Then, on the “Message” tab, select “New Scheduling Poll”
In Calendar, you can access the Scheduling Poll as follows:
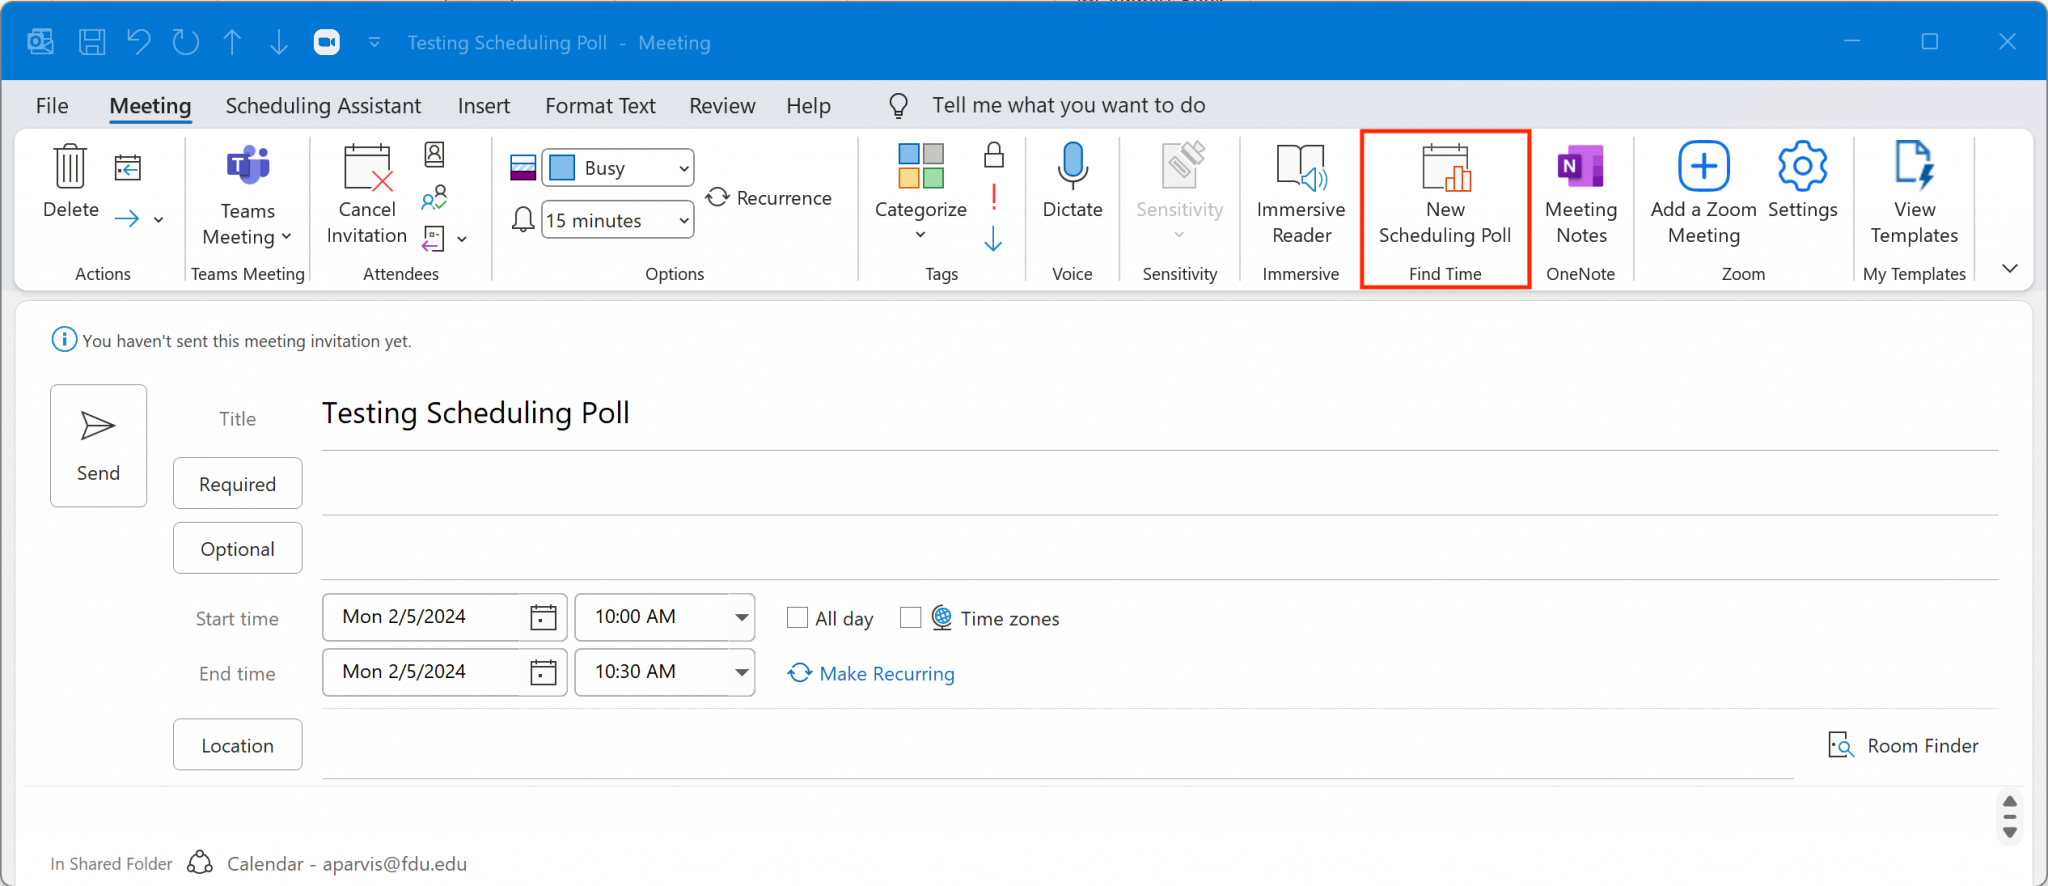
- Either by launching the compose form to create a new meeting event or opening an existing event in the edit form. List required attendees in the “Required” field and optional attendees in the “Optional” field. Select “New Scheduling Poll” under the “Meeting” tab
- Start a new message or event
- In the “Subject/Title” field, type what will eventually become the event’s name.
- For example, “Team Meeting”
- For example, “Team Meeting”
- In the “To/Required” or Optional fields, add the people who will be attendees for this meeting. They do not all have to be from FDU. Scheduling Polls can be sent to and completed by non-FDU email addresses
- Press into the body of the email and compose a message
- Press into the area of the email body where you want the link to the Scheduling Poll to show up
- Select the “Scheduling Poll” tab
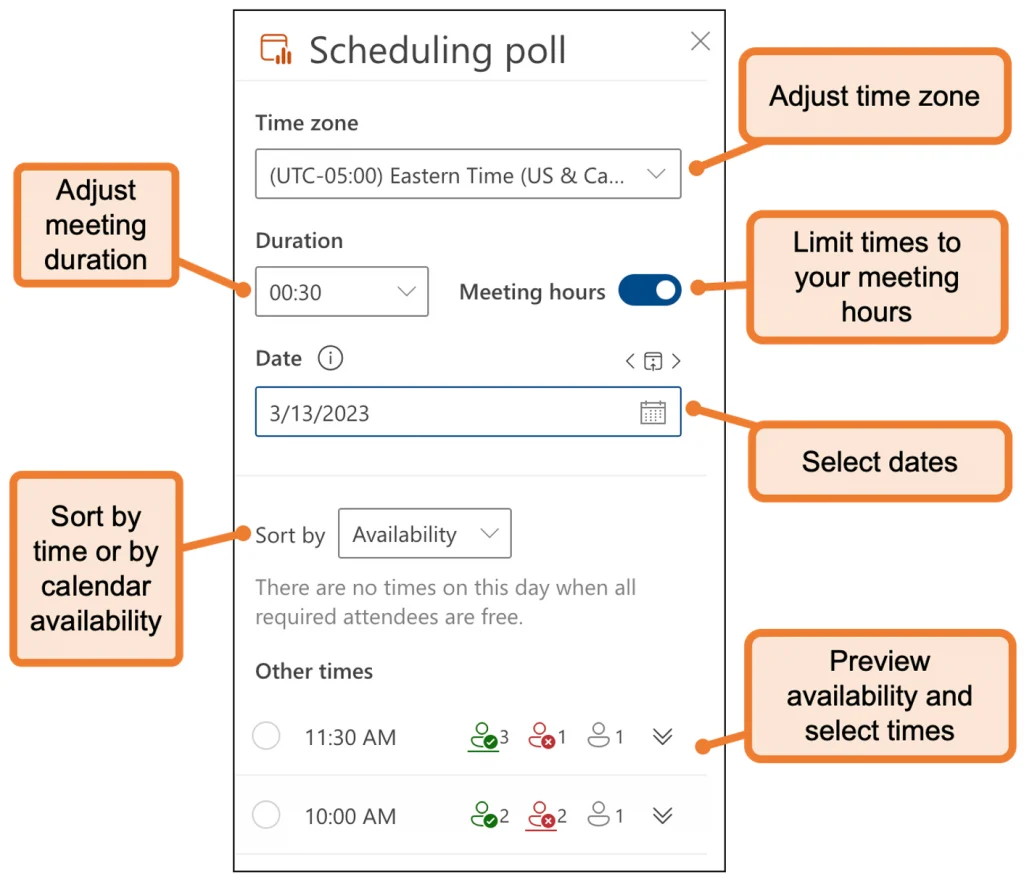
- A Scheduling Poll panel will open. From here, you can adjust your meeting duration, move between dates, and preview the availability of your attendees
Note
When selecting times for your poll, you can preview attendees’ FDU Outlook calendars, if available.
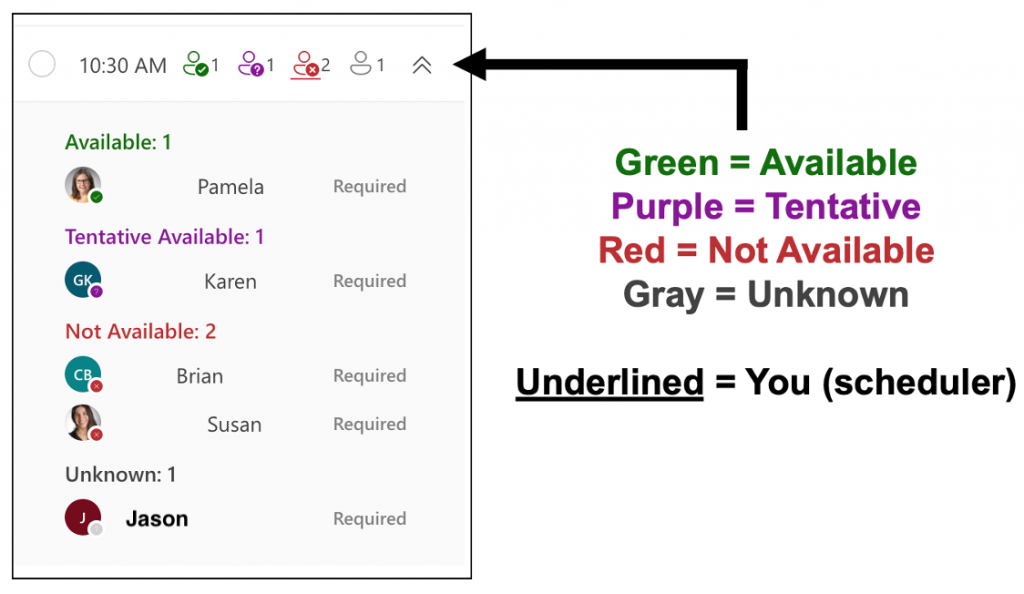
- Select times that work for as many attendees as possible, paying particular attention to the attendees whose attendance is most critical
- Press “Next” to proceed to the next step
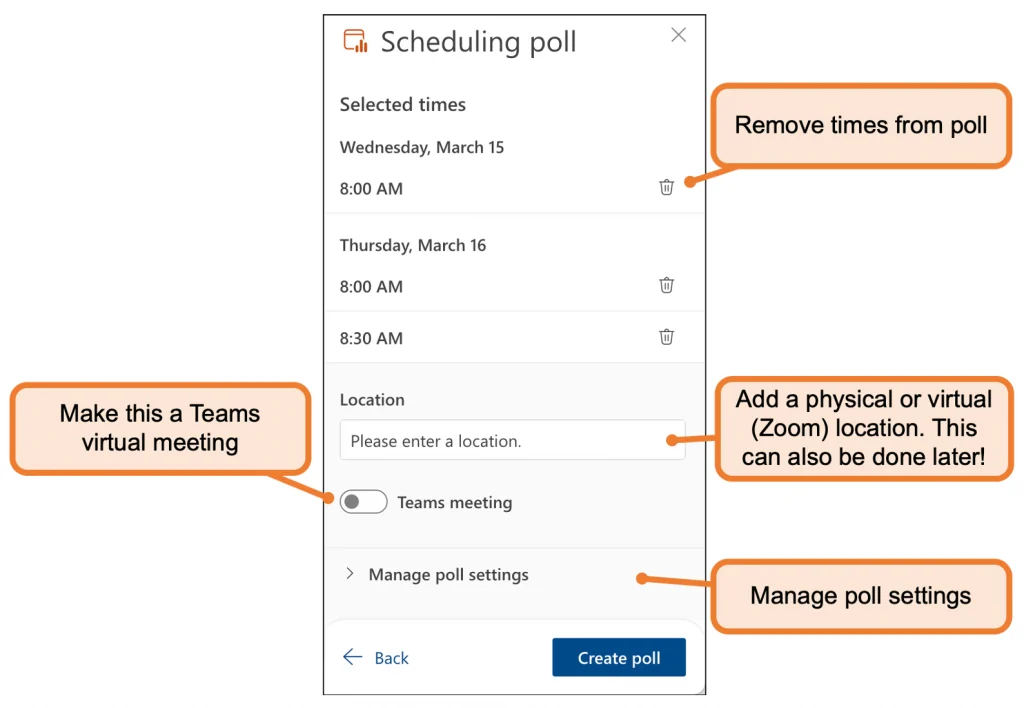
- A new panel will open with the ability to delete selected times or adjust the meeting location
Note
You can also turn the Teams meeting feature on if you want Outlook to automatically schedule a Teams virtual meeting for this event.
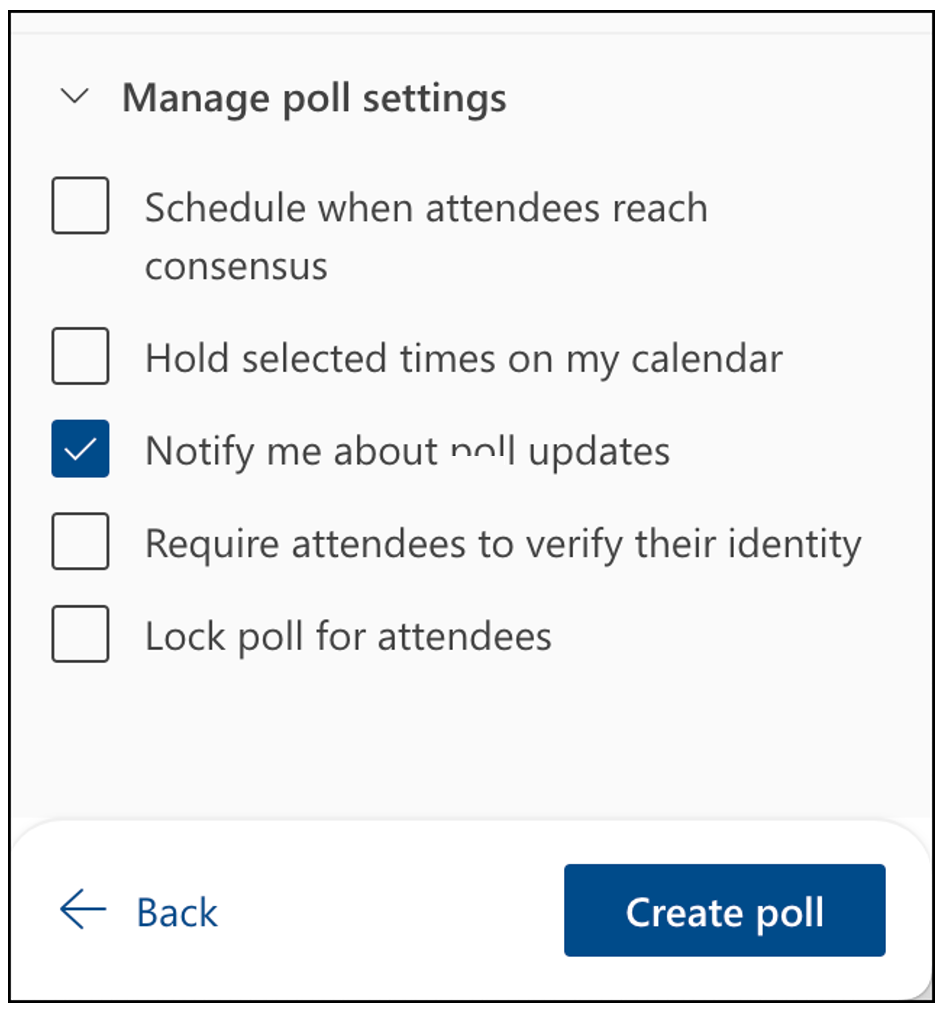
- Press “Manage Poll Settings” to expand the menu. Options include:
- Schedule when attendees reach consensus – Automatically schedules a meeting and sends out an invite to attendees if everyone agrees on a particular time. If multiple times work, the earliest one will be selected.
- Hold selected times on my calendar – Puts a temporary hold on the scheduler’s calendar for each of the selected times. These holds are removed when the final invite is sent out.
- Notify me about poll updates – Outlook will send an email update to the scheduler whenever an attendee submits their poll response.
- Require attendees to verify their identity – Forces respondents to verify their identity either by logging in to their Outlook account or entering a numerical code that Microsoft sends them.
- Lock poll for attendees – Prevents attendees from adding more people to the meeting or suggesting new meeting times.
- Schedule when attendees reach consensus – Automatically schedules a meeting and sends out an invite to attendees if everyone agrees on a particular time. If multiple times work, the earliest one will be selected.
- When you’re ready, press “Create Poll”
- A Scheduling Poll meeting link will be inserted into your email
You can access “Scheduling Poll” via the Mail tab on the Outlook desktop application.
- Open the Outlook desktop application on your Mac
- Start a new email message
- In the “Subject” field, type what will eventually become the name of the event. For example: “Team Meeting”
- In the “To” field, add the people who will be attendees for this meeting. They do not all have to be from FDU (Scheduling Polls can be sent to and completed by non-FDU email addresses)
- Press into the body of the email and compose a message
- Press into the area of the email body where you want the link to the Scheduling Poll to show up
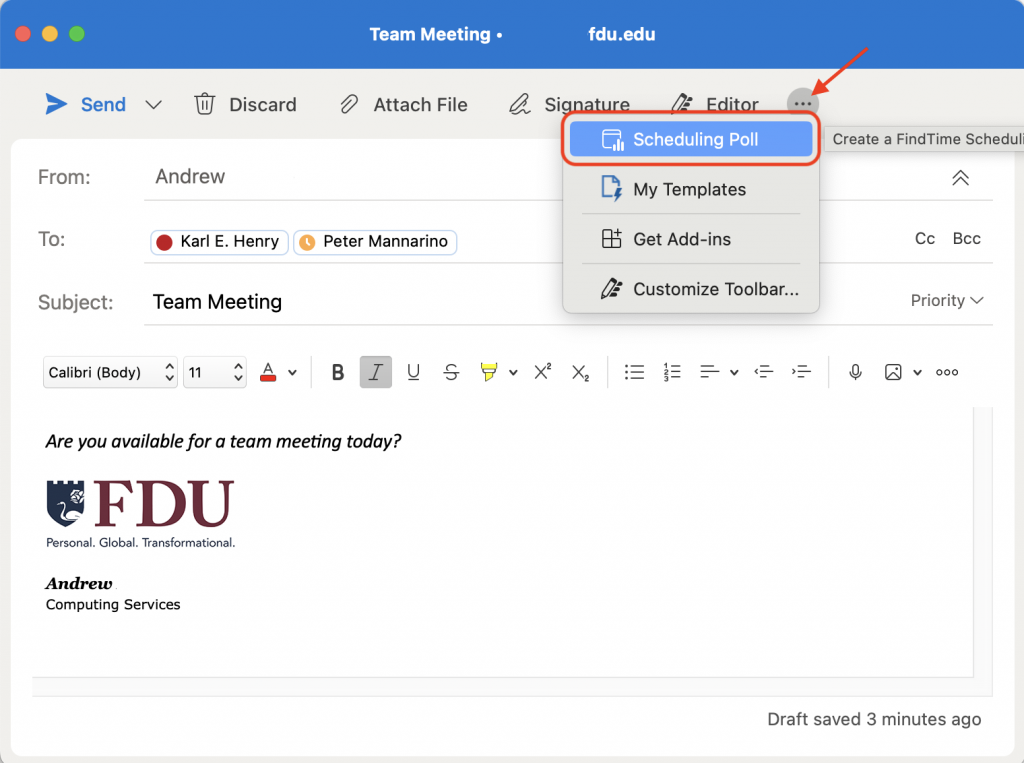
- Press on the “More Options” button and select “Scheduling Poll”
- A “Scheduling Poll” panel will open. From here, you can adjust your meeting duration, move between dates, and preview your attendees’ availability
Note
When selecting times for your poll, you can preview attendees’ FDU Outlook calendars, if available.
- Select times that work for as many attendees as possible, paying particular attention to the attendees whose attendance is most critical
- Click “Next” to proceed to the next step
- A new panel will open with the ability to delete selected times or adjust the meeting location
Note
You can also turn the Teams meeting feature on if you want Outlook to automatically schedule a Teams virtual meeting for this event.
- Press on “Manage Poll Settings” to expand the menu
- When you’re ready, press “Create Poll”
- A Scheduling Poll meeting link will be inserted into your email
You can access the “Scheduling Poll” feature via the Mail or Calendar web apps.
- Login to the FDU Office 365 Portal
- Create a new email or select an email to reply to
- In the “Subject” field, type what will eventually become the name of the event. For example, “Team Meeting”
- In the “To” field, add the people who will be attendees for this meeting. They do not all have to be from Fairleigh Dickinson University (Scheduling Polls can be sent to and completed by non-FDU email addresses)
- Press into the body of the email and compose a message
- Press into the area of the email body where you want the link to the Scheduling Poll to show up
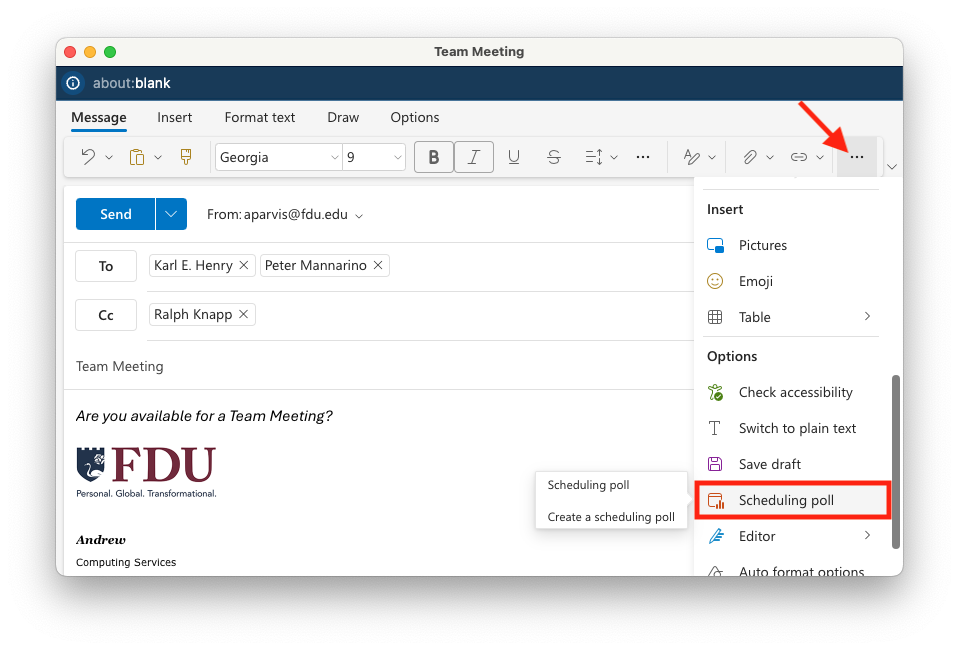
- Press on the “More Options” button and select “Scheduling Poll”
Note
If the “Scheduling Poll” option is grayed out, make sure you have clicked into the body of the email and that your email is being composed in HTML and not plain text.
- A “Scheduling Poll” panel will open. From here, you can adjust your meeting duration, move between dates, and preview your attendees’ availability
Note
When selecting times for your poll, you can preview attendees’ FDU Outlook calendars, if available.
- Select times that work for as many attendees as possible, paying particular attention to the attendees whose attendance is most critical
- Press “Next” to proceed to the next step
- A new panel will open with the ability to delete selected times or adjust the meeting location
Note
You can also turn the Teams meeting feature on if you want Outlook to automatically schedule a Teams virtual meeting for this event.
- Press on “Manage Poll Settings” to expand the menu
- Schedule when attendees reach consensus – Automatically schedules a meeting and sends out an invite to attendees if everyone agrees on a particular time. If multiple times work, the earliest one will be selected.
- Hold selected times on my calendar – Puts a temporary hold on the scheduler’s calendar for each of the selected times. These holds are removed when the final invite is sent out.
- Notify me about poll updates – Outlook will send an email update to the scheduler whenever an attendee submits their poll response.
- Require attendees to verify their identity – Forces respondents to verify their identity either by logging in to their Outlook account or entering a numerical code that Microsoft sends them.
- Lock poll for attendees – Prevents attendees from adding more people to the meeting or suggesting new meeting times.
- Schedule when attendees reach consensus – Automatically schedules a meeting and sends out an invite to attendees if everyone agrees on a particular time. If multiple times work, the earliest one will be selected.
- When you’re ready, press “Create Poll”
- A Scheduling Poll meeting link will be inserted into your email
How do I finalize, vote, and manage a Scheduling Poll?
This section describes how to manually send an invite from scheduling poll results. When setting up your poll, you can also have Outlook automatically send an invite if/when your attendees reach a consensus.
- Visit the Scheduling Poll Dashboard on the Web and enter your FDU NetID credentials
- Your scheduling polls will be listed. Press on a “Poll” to view attendees responses
- Find a time that works for as many people as possible and press “Schedule Meeting”
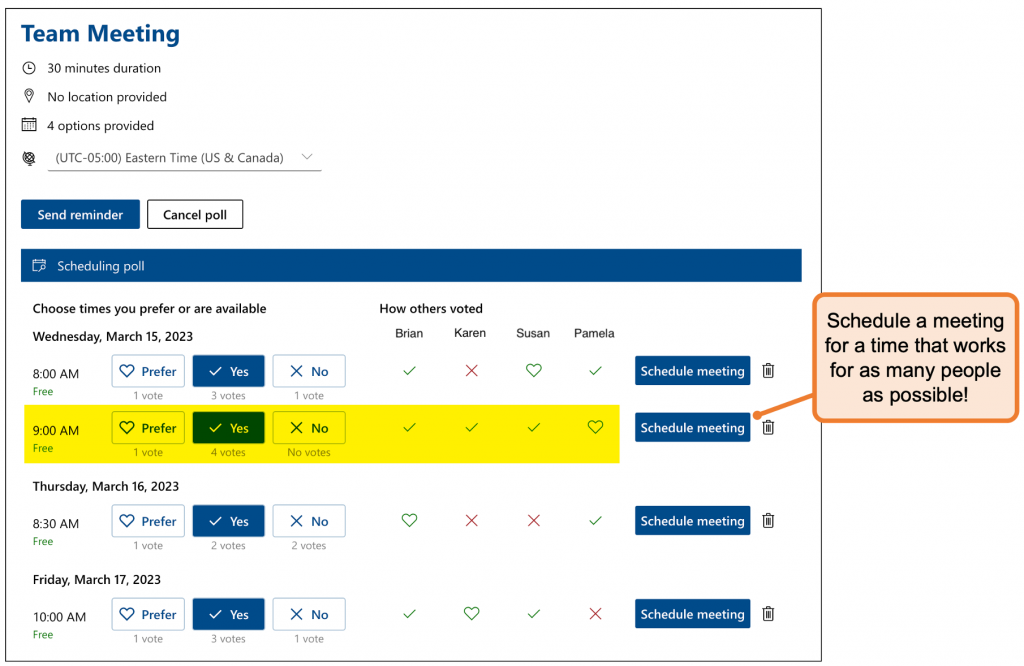
- A new event invitation will open with all of your attendees listed. Make modifications as necessary, once done, press “Send”
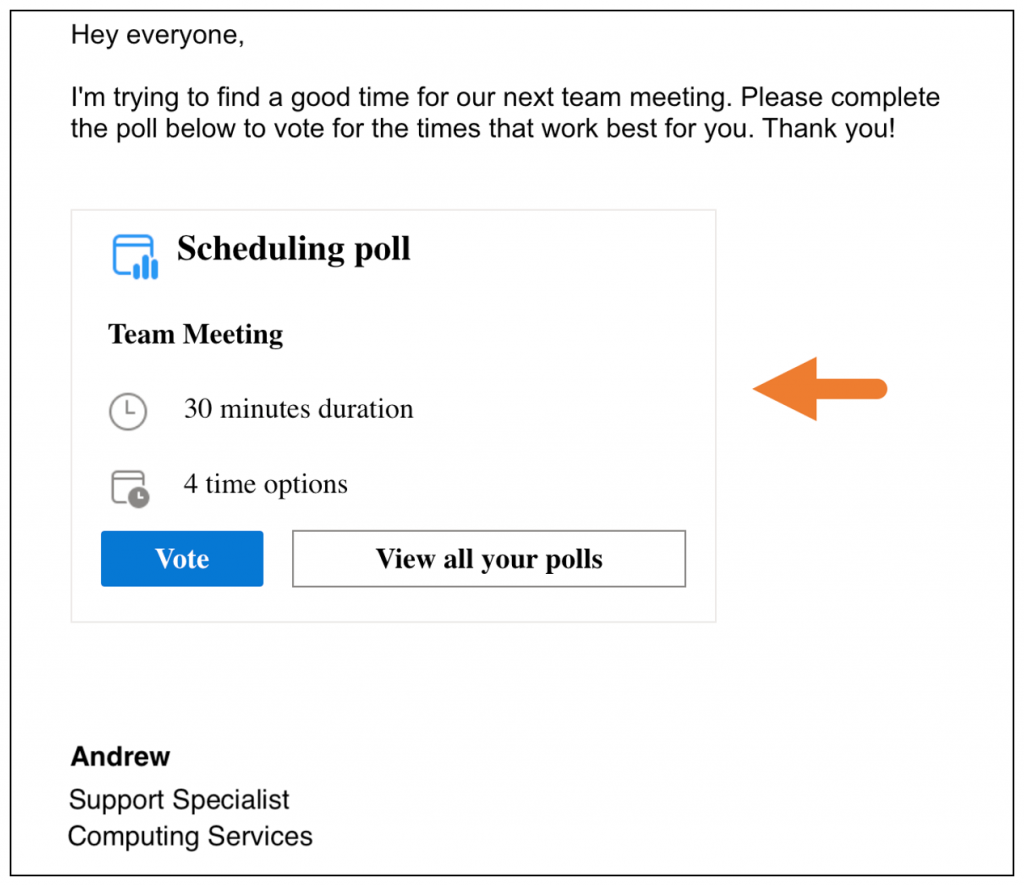
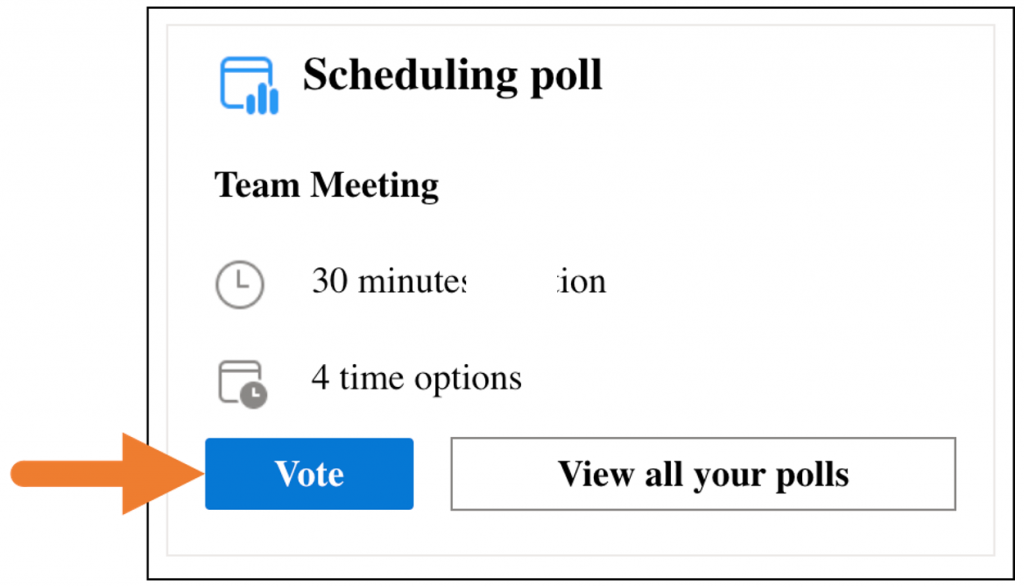
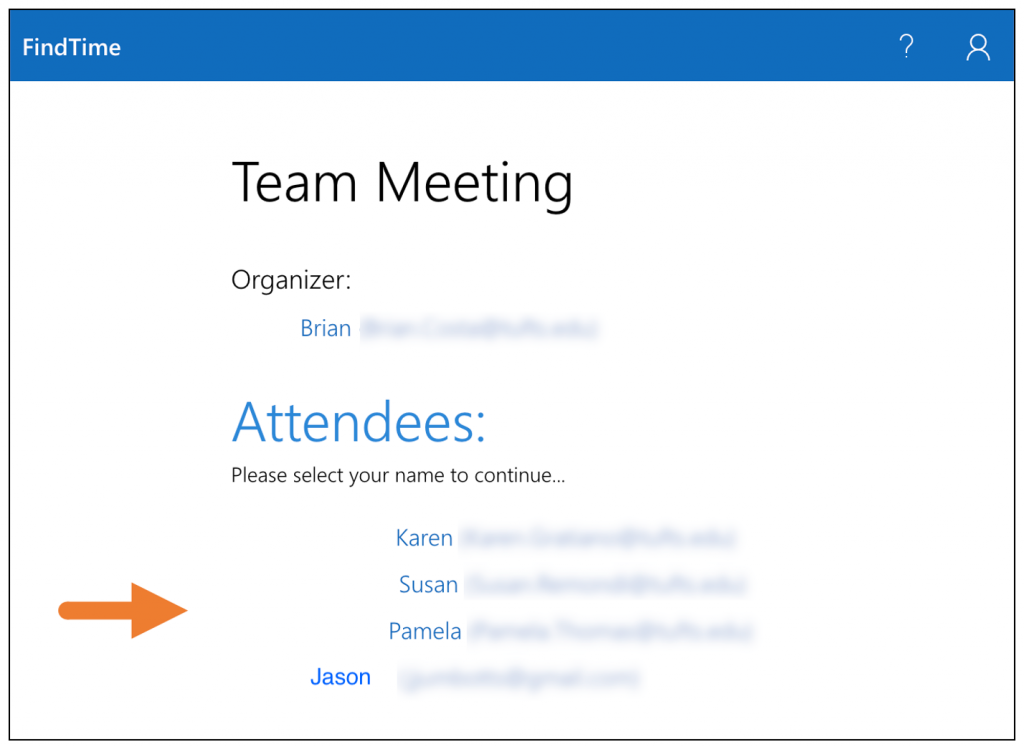
- When a scheduling poll is sent to you via email, press “Vote”
- If necessary, select your name from the list of attendees
- Vote for meeting times by selecting “Preferred, Yes, or No”
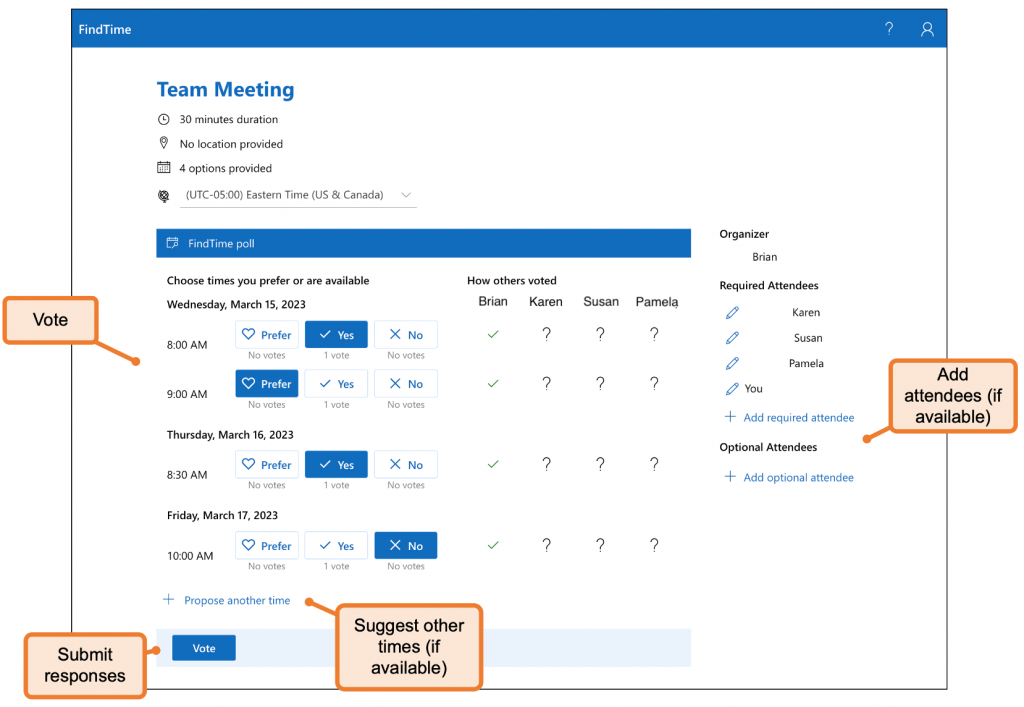
- Depending on how the poll was set up, you may be able to add more attendees or meeting times to the poll
- When you’re ready, press “Vote” to submit your responses
Tip
If you need to change your responses, you can press the “Vote” button again in the original email and repeat the process.
The Scheduling Poll Dashboard allows organizers to view all the polls they have created, manage them, and change default settings for new polls.
- Visit the Scheduling Poll Dashboard and enter your FDU NetID credentials
- Your scheduling polls will be listed. From here, you can manage polls and your default poll settings
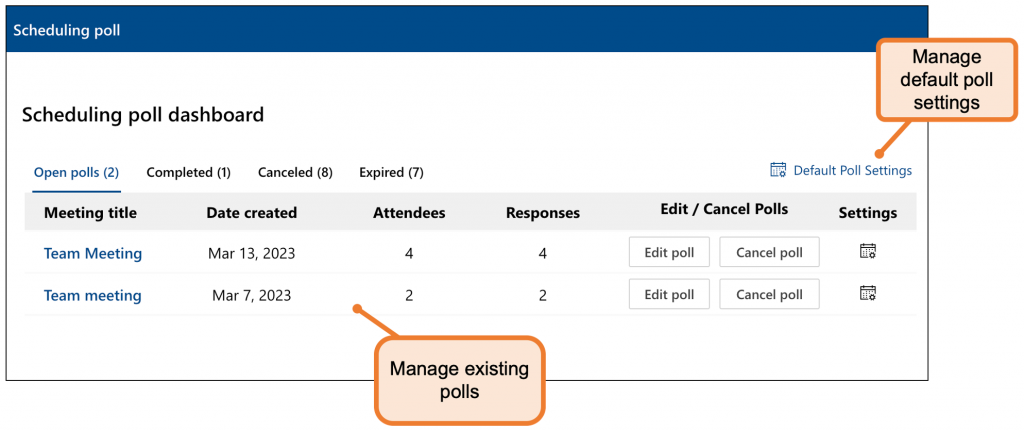
- Press on the name of a poll to view responses
- A window will open where you can…
- Send poll reminders
- Cancel the poll
- View attendee responses
- Adjust your responses
- Add/edit attendees and times
- Send a meeting invite
- Send poll reminders


