

Zoom comes equipped with numerous security features to help control online classrooms, prevent disruptions, and support educators in teaching remotely. Below are best practices for securing your virtual classroom using Zoom.
See also
Blackboard Ultra gives instructors a modern, streamlined way to manage courses, communicate with students, deliver engaging content, and assess learning in one centralized platform. This guide brings together essential instructor resources—covering navigation, announcements, discussions, grading, assessments, course content, and student management—to help you work more efficiently and get the most out of Blackboard Ultra, whether you’re setting up a course for the first time or refining an existing one.
Navigation & Getting Started
Find Your Courses
Locate your course list immediately after logging in. You can view current, past, and upcoming courses from the “Courses” page in the global navigation menu.
close
Navigate Outside Your Course
Access global tools such as your Profile, Activity Stream, Calendar, Messages, and Grades from the main menu on the left side of the screen, outside of any specific course context.
close
Navigate Inside a Course
Use the course navigation bar (usually at the top) to access Course Content, Calendar, Discussions, Gradebook, and Messages specific to that course.
close
Activity Page
This page (often the “Activity Stream”) highlights important updates such as new content, grades, and due dates, featuring institutional announcements at the top.
close
Calendar
Helps students stay organized by automatically populating due dates from assessments and content. Instructors can also add custom events.
close
Announcements
A tool to share updates, reminders, and weekly overviews with students. You can schedule them in advance to maintain consistent communication.
close
Course Preview
View your course exactly as students will see it before making it available. Use this feature to verify content visibility, layout, and the overall student-facing experience without publishing live changes.
close
Student Preview
Enter a temporary student account within your course to experience it as a student would. You can submit test submissions and review results to confirm that content and assessments behave as intended.
close
Notification Settings
Customize how and when you receive alerts about student activity, discussion posts, assignment submissions, and course updates. Proper configuration helps you stay informed without being overwhelmed by notifications.
close
Accessibility Overview
Learn how Blackboard Ultra supports an inclusive learning environment through built-in accessibility features, including screen reader compatibility, keyboard navigation, and tools for creating accessible course content.
close
Discussions & Communication
Create Discussions
Facilitate class-wide conversations to encourage peer interaction and critical thinking. You can set up graded or ungraded forums.
close
Respond to Discussions
Instructors and students can reply to threads and posts directly within the discussion board to maintain the conversation flow.
close
View Discussion Performance and Analytics
Monitor student engagement and participation levels within discussion forums to assess their activity.
View Discussion Performance and Analytics
close
Group Discussions
Create discussions specific to groups of students to foster smaller, focused collaboration.
close
Manage Discussions
Edit, delete, or organize discussion threads and forums to keep the conversation relevant and appropriate.
close
Search and Collect Discussions
Find specific posts or threads within the discussion board for review or grading.
Search and Collect Discussions
close
Send Messages
Communicate privately with students or groups within the course context. This is distinct from email and keeps course-related queries in one place.
close
Roster
View the list of enrolled students and other course members. It is often used to manage course roles and accommodations.
close
Student Overview
Access detailed progress reports and activity logs for individual students to track their performance and engagement.
close
Create a Journal
Set up private or shared student journals to support individual reflection, formative writing, and ongoing communication between you and each student throughout the course.
close
Feedback Recording
Record audio or video feedback directly within the gradebook to provide students with richer, more personal responses to their work—an effective alternative to written-only comments.
close
Attendance Tracking
Monitor and record student attendance directly within your course. You can manually update attendance records or configure automatic tracking tied to participation or login activity.
close
Grading & Assessments
Gradebook
Use the Gradebook to review student submissions, manage grades, track progress, and keep assessment information organized within your course.
close
Grading Assignments
Review assignment submissions, enter grades, and provide feedback so students can understand their performance and next steps.
close
Flexible Grading Tests
Use flexible grading tools to review test submissions efficiently, move between students and questions, and focus on the grading workflow that works best for the assessment.
close
How to Grade Discussions
Grade student discussion participation, review responses, and provide feedback from the discussion grading workflow.
close
Rubrics
Create and manage rubrics to define grading criteria, communicate expectations, and support more consistent evaluation of student work.
close
Grade Using Rubrics
Apply rubric criteria while grading submissions to provide structured feedback and align scores with the expectations shared with students.
close
Timed Assessments
Set time limits for tests and other assessments to manage availability, pacing, and completion expectations for students.
close
Display One Question at a Time
Configure tests to show one question at a time when you want students to move through an assessment in a more controlled sequence.
close
Content Management
Add Content
The primary action to build your course. You can create new items, upload files, or import content from other sources using the plus (+) sign in the Course Content area.
close
Creating Documents
Build content pages directly in the course that can combine text, images, and other media elements into a single viewable item.
close
Add Text
Use the content editor to type instructions, descriptions, or lessons directly into Documents, Assignments, or Tests.
close
Insert Local File in the Content Editor
Upload files (documents, images, slides) from your computer directly into the text editor for students to view or download.
Insert Local File in the Content Editor
close
Supported File Types
Blackboard supports a wide range of file formats for upload, including standard office documents, PDFs, and media files.
close
Course Links
Create shortcuts within your course content that link students directly to other tools or materials (e.g., a link in Week 1 content that leads to a Test).
close
Web Links
Add direct links to external websites and resources as standalone items in your course content.
close
Create Learning Modules
Build structured, step-by-step learning paths that guide students through course materials in a set sequence. Learning Modules support conditional release to help you control the pace of student progress.
close
Release Conditions
Set rules that control when content, assessments, or activities become accessible to students based on criteria such as specific dates, prior completions, or group membership.
close
Copy Content From Other Courses
Reuse materials by copying content items, folders, or entire banks from your previous courses into the current one.
Copy Content From Other Courses
close
Export and Archive Courses
Create a downloadable package of your course content for backup purposes or to share with another institution.
close
FDU faculty can access these recorded Zoom training sessions to learn the essentials of teaching with Blackboard Ultra. The three-part series covers key areas of course setup and management, including Getting Started with Blackboard Ultra, creating and managing Assignments and Tests, and using the Gradebook to track student performance. These recordings are designed to help instructors become more comfortable navigating Blackboard Ultra and preparing their courses for students.
Getting Started
Gradebook
Assignments and Tests
See also
FDU has a number of technology enhanced classrooms that are capable of video/computer projection. To find out if your classroom is on this list please review the charts below for your campus:
Metropolitan Campus Technology Chart
Tip
Scroll left to right on the chart if viewing on a Mobile device or in Desktop preview mode. To view the full chart, rotate your Mobile device into landscape mode. On Desktop, press the full screen button (icon with expanding arrows inside of a circle) on the top right of the article header.
| Building Name | Projector Enabled Rooms | DVD/VCR Combo Rooms | Speaker Enabled | HDMI Jack | Smartboard |
|---|---|---|---|---|---|
| Becton Hall | 202 | Yes | Yes | Laser | |
| Becton Hall | 205 | Yes | Yes | Laser | |
| Becton Hall | 208 | Yes | Yes | Laser | |
| Becton Hall | 302 | Only DVD | Yes | Yes | Yes |
| Becton Hall | 304 | Only DVD | Yes | Yes | Yes |
| Becton Hall | 305 | Yes | Yes | ||
| Becton Hall | 306 | Yes | Yes | ||
| Becton Hall | 402 | Yes | Laser | ||
| Becton Hall | 403/404 (LED Screen) | Yes | Yes | Yes | Yes |
| Becton Hall | 405 | Yes | Laser | ||
| Becton Hall | 406 | Yes | Laser | ||
| Becton Hall | 407 | Yes | Laser | ||
| Becton Hall | 408 | Yes | Laser | ||
| Becton Hall Conference Room | 307 | ||||
| Dickinson Hall | 1104 | Yes | Yes | Laser | |
| Dickinson Hall | 1128 | Yes | Yes | Yes | |
| Dickinson Hall | 1129 | Yes | Yes | Yes | |
| Dickinson Hall | 1142 | Yes | Yes | Laser | |
| Dickinson Hall | 1143 | Yes | Yes | Yes | |
| Dickinson Hall | 1144 | Yes | Yes | Laser | |
| Dickinson Hall | 1148 | Yes | |||
| Dickinson Hall | 1149 | Yes | Yes | Yes | |
| Dickinson Hall | 1150 | Yes | Yes | Yes | |
| Dickinson Hall | 1151 | Yes | Yes | Laser | |
| Dickinson Hall | 1152 (LED Television) | Yes | Yes | Yes | |
| Dickinson Hall | 1153 (LED Televison) | Yes | Yes | Yes | |
| Dickinson Hall | 1165 (LED Televison) | Yes | Yes | Yes | |
| Dickinson Hall | 1170 (LED Television) | Yes | Yes | Yes | |
| Dickinson Hall | 2135 | Yes | Yes | Laser | |
| Dickinson Hall | 2137 | Yes | Yes | Yes | |
| Dickinson Hall | 2177 | Yes | Yes | Laser | |
| Dickinson Hall | 2178 | Yes | Yes | Laser | Yes |
| Dickinson Hall | 2230 | Yes | Yes | Laser | |
| Dickinson Hall | 2249 | Yes | Yes | Yes | |
| Dickinson Hall | 2262 | Individual DVD & VCR | Yes | ||
| Dickinson Hall | 2263 | Yes | Laser | ||
| Dickinson Hall | 4468 | Yes | Laser | ||
| Dickinson Hall | 4469 | Yes | Yes | Laser | |
| Dickinson Hall | 4473 | Yes | Yes | Laser | |
| Dickinson Hall | 4475 | Yes | Yes | Laser | |
| Dickinson Hall | 5504 | Yes | Yes | Laser | |
| Dickinson Hall | 5506 | Yes | Yes | Laser | |
| Dickinson Hall | 5509 | Laser | |||
| Dickinson Hall | 5520 | Yes | Laser | ||
| Dickinson Hall | 5523 | Yes | Yes | ||
| Dickinson Hall | 5529 | Yes | Yes | Laser | |
| Dickinson Hall | 5534 | Yes | Yes | Laser | |
| Dickinson Hall – Conference Room | 1191 | Laser | |||
| Dickinson Hall – Conference Room | 2245 | Yes | Laser | ||
| Dickinson Hall – Continuing Education | 1127 | Yes | Yes | Laser | |
| Dickinson Hall (Lab A) | 2163 | Yes | Laser | ||
| Dickinson Hall (Lab B) | 2164 | Yes | Laser | ||
| Giovatto Library | Writing Lab | Yes | Laser | ||
| Giovatto Library | WLB 3 | Yes | Yes | Laser | |
| Giovatto Library | WLB 4 | Yes | Yes | Laser | |
| Giovatto Library | Auditorium | Yes | Yes | ||
| Giovatto Library | WLB 1 (LED Screen) | Yes | Yes (TV Speakers) | ||
| Giovatto Library | WLB2 (LED Screen) | Yes | Yes (TV Speakers) | ||
| Multipurpose Room | Yes | Yes | Yes | Laser | |
| Muscarelle | 105 | Yes | Yes | Laser | |
| Muscarelle | 202 | Yes | Yes | ||
| Muscarelle | 203 | Yes | Yes | Laser | |
| Muscarelle | 204 | Yes | Laser | ||
| Muscarelle | 205 | Yes | Yes | Yes | |
| Muscarelle | 206 | Yes | Yes | Yes | |
| Muscarelle | 207L | Yes | Laser | ||
| Muscarelle | 207R | Yes | Yes | Yes | |
| Robison Annex | 100 | Yes | Yes | Laser | |
| Robison Annex | 101 | Yes | Yes | Laser | |
| Robison Annex | 203 | Yes | Yes | Yes | |
| Robison Annex | 204 | Yes | Yes | Yes | |
| Robison Annex | 205 | Yes | Yes | Laser | |
| Robison Annex | 300 | Yes | Laser | ||
| Robison Annex | 301 | Yes | Yes | ||
| Robison Annex | 303 | Yes | Laser | ||
| Robison Annex | 304 | Yes | Yes | Laser | |
| Robison Annex | 305 | Yes | Laser | ||
| Robison Hall | 23B | Yes | Yes | Laser | |
| Robison Hall | 501 | ||||
| Robison Hall | 503 | Laser | |||
| Rutherford Room | Yes | Yes | Yes | Laser | |
| University Hall Theatre | LED Screen | Yes | |||
| University Hall | Front Lab | Yes | Laser | ||
| University Hall | Back Lab | Yes | Laser | ||
| University Hall | Multimedia Lab | Yes | Yes | Laser | |
| Williams Hall | Yes | ||||
| Williams Hall | 102 | Yes | Yes | Laser | |
| Williams Hall | 107 | Yes | Yes | Laser | |
| Williams Hall | 201 | Yes | Laser | ||
| Williams Hall | 202 | Yes | Laser | ||
| Williams Hall | 203 | Yes | Laser | ||
| Williams Hall | 206 | Yes | Laser | ||
| Williams Hall | 207 | Yes | Yes | ||
| Wilson Auditorium | Yes | Yes | Yes | Laser |
close
Florham Campus Technology Chart
Tip
Scroll left to right on the chart if viewing on a Mobile device or in Desktop preview mode. To view the full chart, rotate your Mobile device into landscape mode. On Desktop, press the full screen button (icon with expanding arrows inside of a circle) on the top right of the article header.
| Building Name | Projector Enabled Rooms | DVD/VCR Combo Rooms | Speaker Enabled | HDMI Jack | Smartboard |
|---|---|---|---|---|---|
| Dreyfuss Building | 102 | Yes | Yes | Laser | |
| Dreyfuss Building | 103 | Yes | Yes | Laser | |
| Dreyfuss Building | 104 | Yes | Yes | Laser | |
| Dreyfuss Building | 105 | Yes | Yes | Laser | |
| Dreyfuss Building | 106 | Yes | Yes | Laser | |
| Dreyfuss Building | 107 | Yes | Yes | Laser | |
| Dreyfuss Building | 121 | Yes | Laser | ||
| Dreyfuss Building | 125 | Yes | Yes | Laser | |
| Dreyfuss Building | 206 | Yes | Yes | ||
| Dreyfuss Building | 207 | Yes | Yes | ||
| Dreyfuss Building | 208 | Yes | Yes | ||
| Dreyfuss Building | 209 | Yes | Laser | ||
| Dreyfuss Building | 210 | Yes | Yes | ||
| Dreyfuss Building | 211 | ||||
| Dreyfuss Building | 212 | ||||
| Dreyfuss Building | 213 | ||||
| Dreyfuss Building | Theater | ||||
| Hennessey Room 1 | Yes | Yes | Yes | ||
| Hennessey Room 2 | Yes | Yes | Yes | ||
| Library | Library Classroom | Yes | Yes | Laser | |
| Mansion | 11 | Yes | Yes | Laser | |
| Mansion | 12 | Yes | Yes | Laser | |
| Mansion | 13 | Yes | Yes | Laser | |
| Mansion | 17 | Yes | Yes | Laser | |
| Mansion | 30 | Yes | Yes | Laser | |
| Mansion | 33 | Yes | Yes | Yes | |
| Mansion | 35 | Yes | Yes | Laser | |
| Mansion | 36 | Yes | Yes | Yes | |
| Mansion | 38 | Yes | Yes | Laser | |
| Moninger 105 | Just DVD | Yes | Yes | Yes | |
| Moninger 106 | Just DVD | Yes | Yes | Yes | |
| Moninger 107 | Yes | Just DVD | Yes | Laser | |
| Moninger 113 | Yes | Yes | Yes | ||
| Moninger 118 | Just DVD | Yes | LCD Screen | Yes | |
| Moninger 119 | Just DVD | Yes | LCD Screen | Yes | |
| Moninger 205 | Yes | ||||
| Moninger 206 | Yes | ||||
| Moninger 210 | Yes | ||||
| Moninger 228 | Yes | Yes | Laser | ||
| Orangerie | Yes | Yes | Yes | ||
| Science Building | 1 | Yes | Yes | ||
| Science Building | 3 | Yes | |||
| Science Building | 6 | Yes | |||
| Science Building | 7 | Yes | Yes | Yes | |
| Science Building | 9 | Yes | Yes | ||
| Science Building | 11 | Yes | Yes | Laser | |
| Science Building | 15A | Yes | Yes | ||
| Science Building | 17 | Yes | Yes | Yes | |
| Science Building | 18 | Yes | Yes | ||
| Science Building | 19 | Yes | Laser | ||
| Student Center | Sammartino Room | Yes | Yes | Yes | |
| Student Center | Florham Room | Yes | Yes | Yes | |
| Student Center | Wroxton Room | Yes | Yes | ||
| Student Center | Bottle Hill Room | ||||
| Twombly Lounge | Yes | Yes | Yes | Laser | |
| Zen Building | 102 | Yes | Yes | Laser | |
| Zen Building | 103 | Yes | Yes | Laser | |
| Zen Building | 104 | Yes | Yes | LCD Panel | |
| Zen Building | 105 | Yes | Yes | ||
| Zen Building | 106 | Yes | Yes | ||
| Zen Building | 107 | Yes | Yes | Yes | |
| Zen Building | 108 | Yes | Yes | Yes | |
| Zen Building | 109 | Yes | Yes | Laser | |
| Zen Building | 110 | DVD only | Yes | LCD Panel | Yes |
| Zen Building | 202 | Yes | Yes | Yes | |
| Zen Building | 203 | Yes | Yes | Yes | |
| Zen Building | 204 | Yes | Yes | Yes | |
| Zen Building | 205 | Yes | Yes | Yes | |
| Zen Building | 206 | Yes | Yes | LCD Panel | |
| Zen Building | 207 | Yes | Yes | Yes | |
| Zen Building | 208 | DVD only | Yes | LCD Panel | Yes |
| Zen Building | 209 | Yes | Yes | Yes | |
| Zen Building | 210 | Laser | |||
| Zen Building | 211 | Yes | Yes | Yes | |
| Zen Building | 212 | Yes | Yes | Yes |
close
See also
Echo360 helps instructors capture and extend those moments to improve student engagement before, during and after class.
Through our technology platform, students have 24/7 access to classroom discussion, presentation materials, and the lecture itself.
Getting Started with “Echo 360 Universal Capture: Personal“
Universal Capture: Personal is a stand-alone application designed to be used by instructors on their personal computers to generate video recordings. The software enables you to create video recording across multiple computing platforms via a unified interface. That means instructors can record and share video on Mac and Windows computers, inside or outside of the classroom, with an identical user experience on each device.
For those faculty members who do not yet have an Echo 360 account, it is necessary for you to login to Webcampus first. Therefore, please follow the directions below in order for you to have access to Echo360 environment. Once you have completed these steps via webcampus, thereafter users will be able to login directly to echo360.fdu.edu with their FDU NetID credentials.
Note
For those who already have an account in Echo360 please go to Step 13.
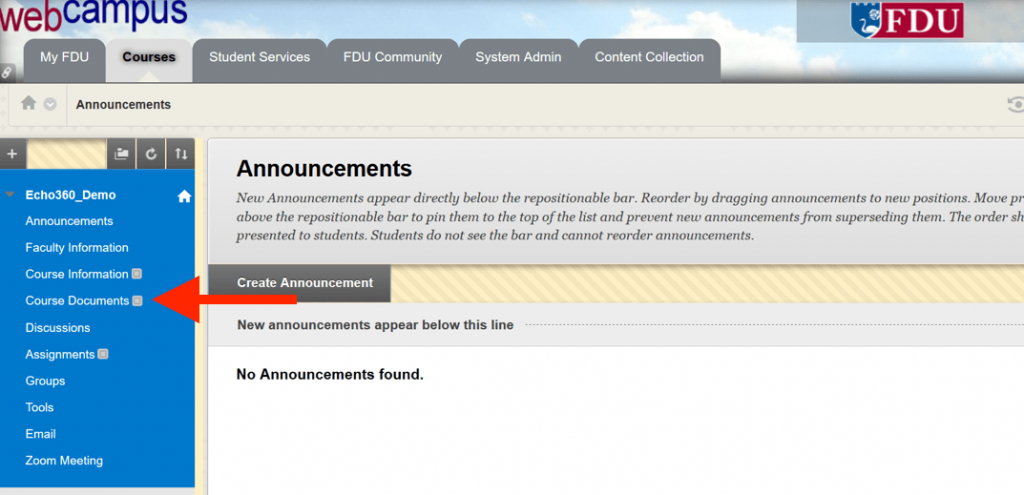
- Login to Webcampus using your FDU NetID
- Click on “Your Course“
- Click on “Course Documents“
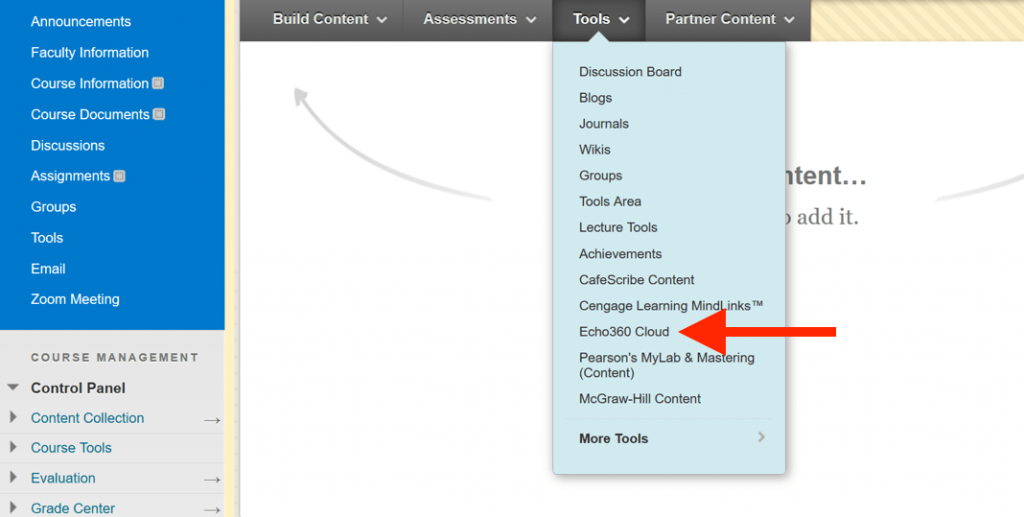
- Click on “Tools“
- Click on “Echo360 Cloud“
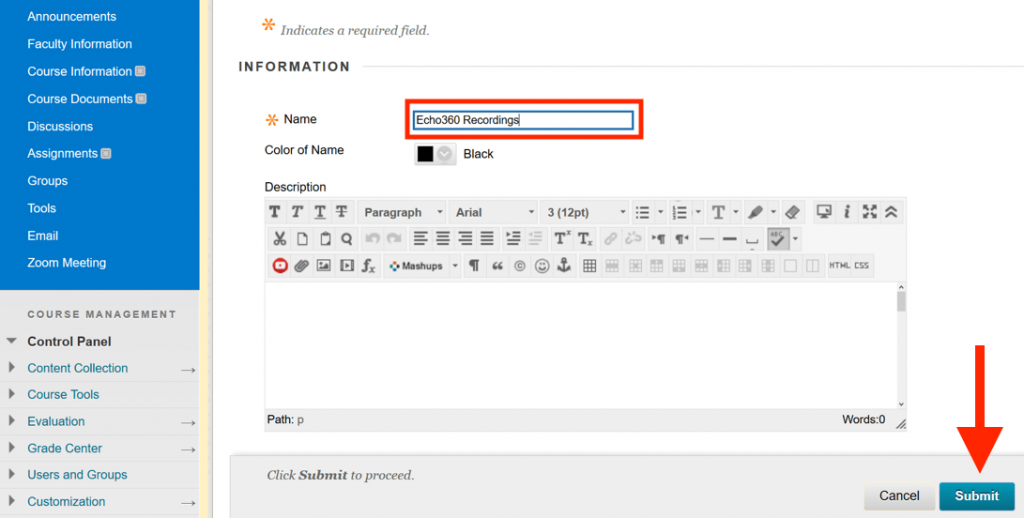
- In this page, enter a Name that makes it clear this is the link for Echo360 class content, for example: “Echo360 Recordings”
- Click “Submit“
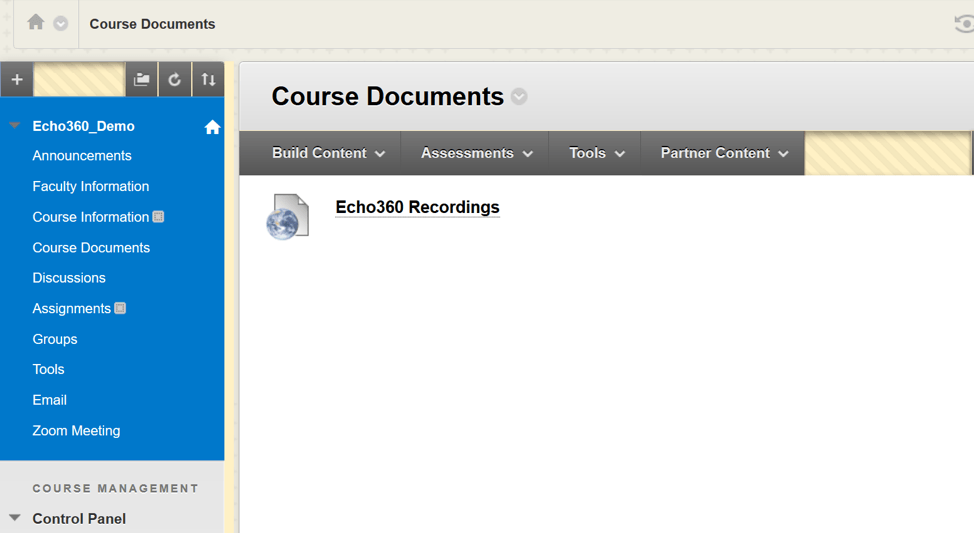
- A new link will appear on your Course Documents page titled “Echo360 Recordings“. This maybe at the bottom of the Course Documents page
- Click on the “Echo360 Recordings” link. This will redirect you to the Echo environment
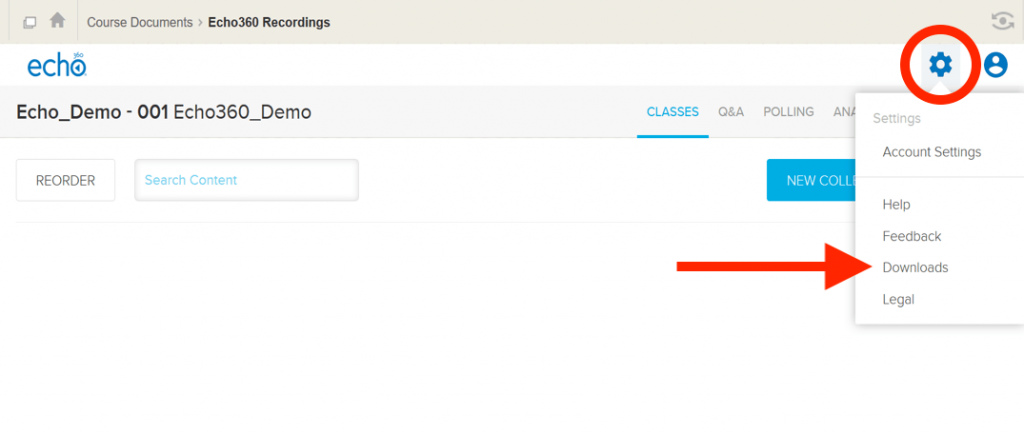
- Click on the “Gear Icon” on the top right
- Click on “Downloads“
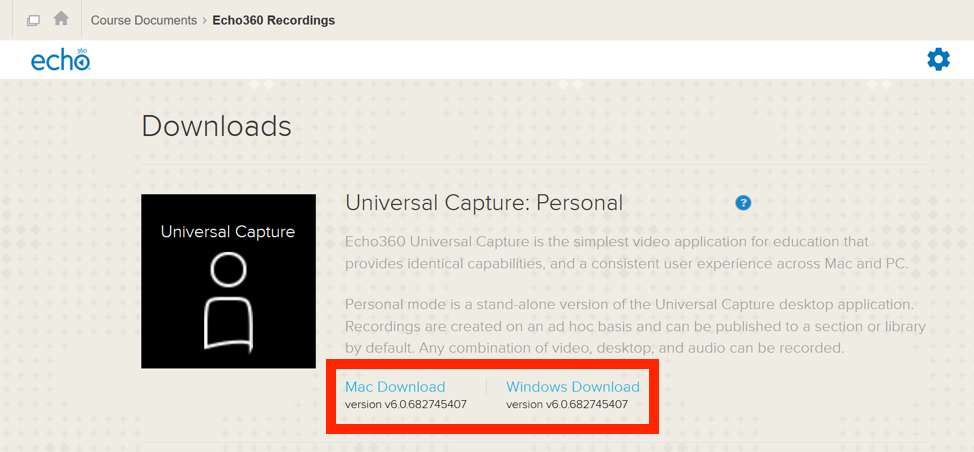
- From the Universal Capture: Personal area of the Downloads page, select the link to download the installer appropriate for the type of computer/operating system you are running. After you have downloaded the personal capture, follow the instructions on how to capture your lectures using this tool
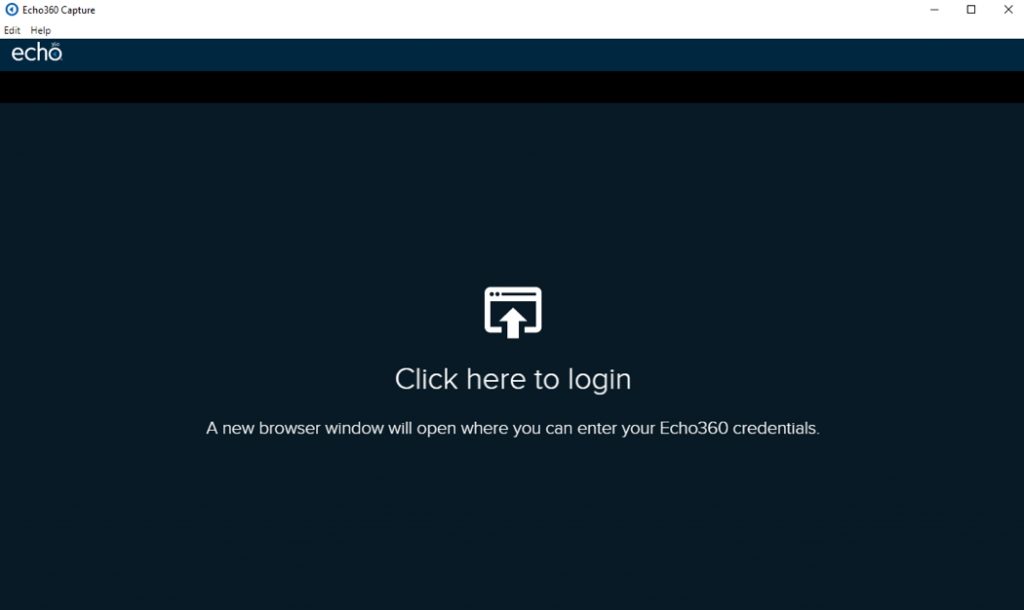
- Once you have installed the software, please launch the Universal Capture: Personal application. If you see the following login screen, click on the link and login with your FDU NetID credentials
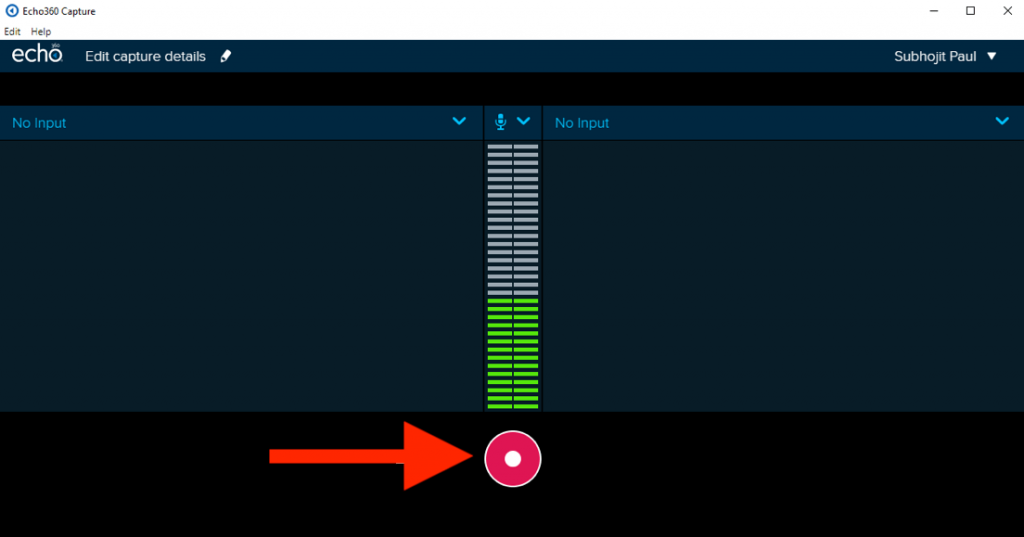
- After logging in select the inputs you want to capture from the two drop down menu. If the drop down menu says No Input just select the option you want from the available sources
- Left Input: Click on the dropdown menu to select your input for the left video channel (e.g. display, webcam, etc.).
- The bars in the middle shows the volume levels of the audio capture.
- Right Input: Click on the dropdown menu to select your input for the right video channel (e.g. display, webcam, etc.).
- The Display option from the drop down menu chooses the application that you want to record from your computer for example a PowerPoint presentation.
- Preview the inputs on the screen; to be sure, they will record properly.
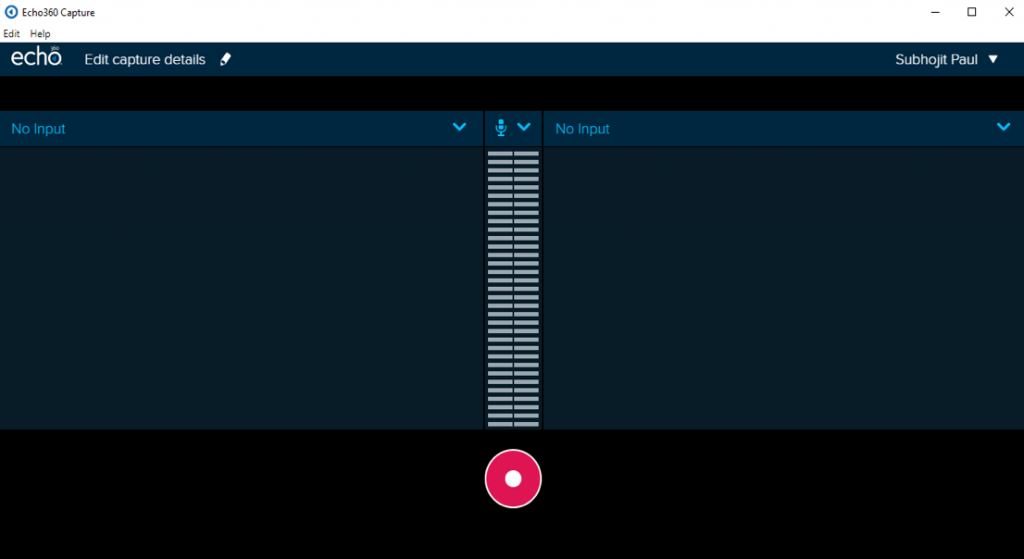
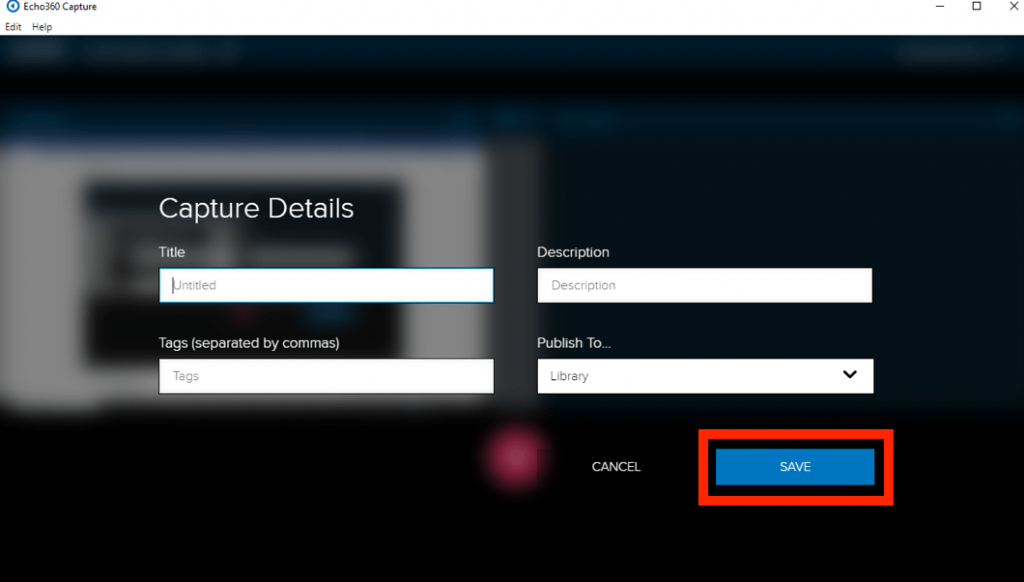
- Click the “Pencil Icon” or title to launch the Capture Details dialog box

- Enter a Title, add a Description or Tags and select a Publishing location for the recording. By default, your recordings are published to your “Library” folder
- Click “Save”
- At this point, if you are going to present any materials via PowerPoint, Web or any other applications open it and minimize it
- When you are ready, click the “Record” button. You will have 5 seconds before recording starts so you can switch to the material you want to present
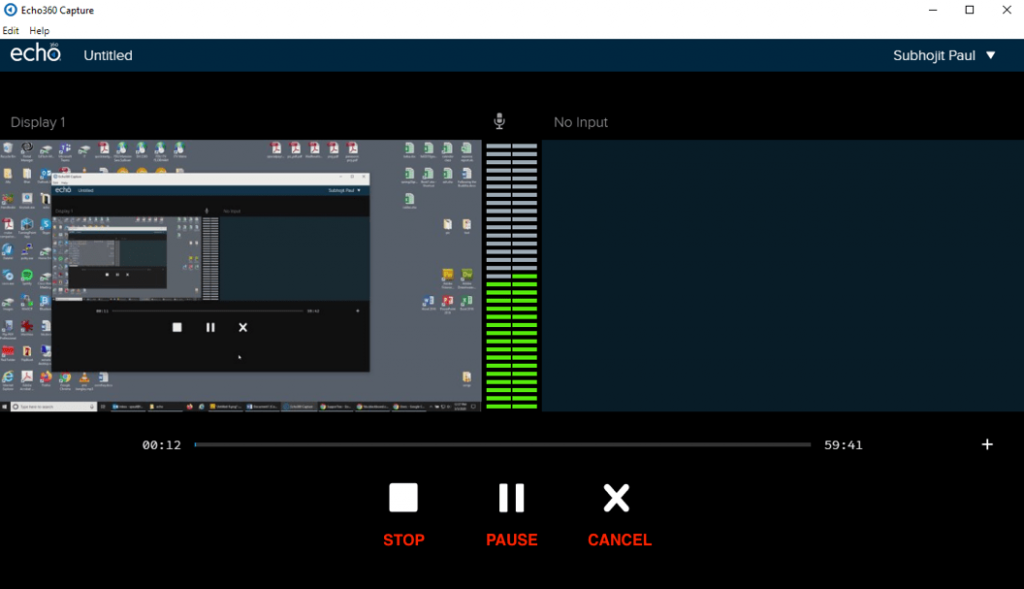
- During a recording, you will have the option to Stop, Pause, or Cancel recording. Do not stop recording until you are totally finished with the session. If you click on the cancel button, it will cancel the entire recording
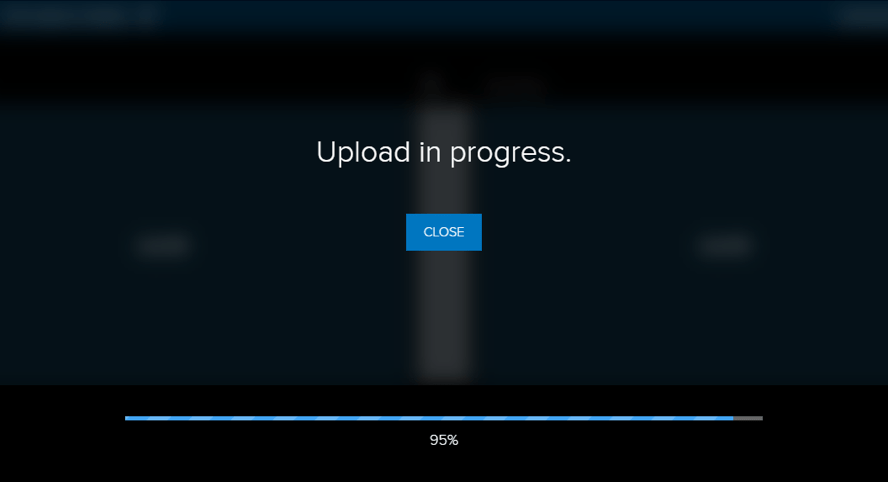
- Once you stop the recording, you will receive a message and you can click on the “Close” option to exit the program. Once your recording process is finished, it will automatically publish to the location that you have specified. You will receive an email when processing is finished and you are able to view your recording
Viewing Recording
Once you receive the email, your video is online and ready to be viewed.
- Log back into echo360.fdu.edu
- Click on the “My Content” tab on the left side of the window.
- Click on the recording that you want to view
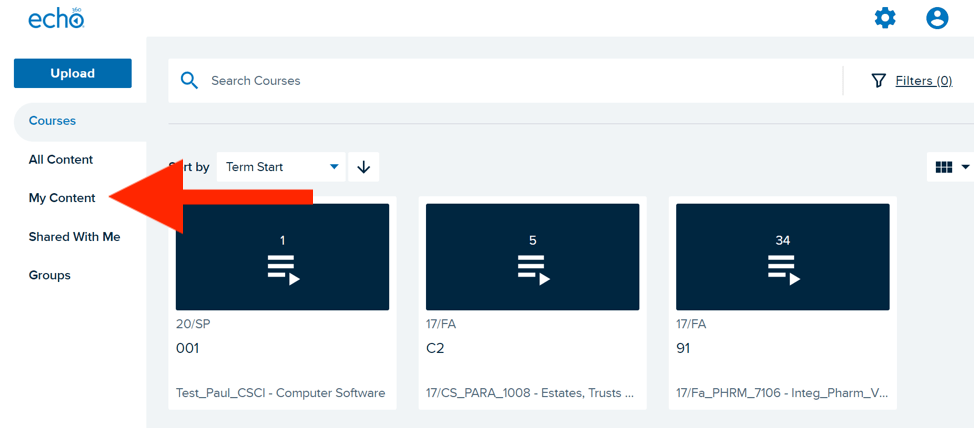
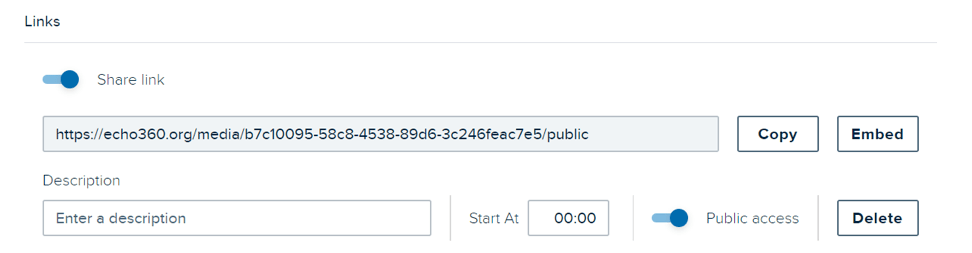
- If you want users to view your recording, scroll down towards the bottom of the screen to the “Links” section. Copy the link and you can send it to users via email
The SAMI Service Desk serves as the primary support center for all university technology-related support. Students, faculty, and staff can easily reach out to the service desk through the SAMI Support portal, email, or phone for assistance with application software, desktop setups, peripheral devices, network issues, password management (such as for Microsoft 365), and configuration support for hardware and software. The service desk also addresses inquiries related to Blackboard and classroom projector troubleshooting.
There are four ways to create a ticket and get support:
SAMI Support Portal
In the SAMI Support portal, you can:
- Create SAMI Support requests by filling out a quick form
- Access the most updated status of your SAMI support request
- Interact with the technician currently assigned to resolve your SAMI support request
- Review all your open and closed SAMI support request history
- Access our knowledge base to view information about our current systems
- Access solutions for the most frequently asked questions
close
SAMI Support Public Form
You can submit a request for support by filling out the form below
Tip
The form below is not compatible with Dark Mode. For an optimal experience, disable dark mode either in your device’s system settings or directly from the FDU IT website menu bar.
close
Call Center
While the SAMI Support Portal is our preferred support option, assistance is available by phone at (973)-443-8822.
Our Technical Assistance Center is available Monday–Friday, 9:00 AM–8:00 PM for you to log a support ticket.
close
Email
Users can submit a support ticket by sending an Email
The email address is samisupport@fdu.edu
close
When preparing for a Zoom class, the 15 minutes before it begins are crucial for setting yourself up for success. In these final moments, finding a quiet, well-lit space with a strong internet connection is key. Ensuring your camera, microphone, and environment are ready will help you avoid any distractions or technical difficulties during class. With everything in place, you can focus on fully engaging in the session, confident that you’re ready to participate seamlessly.
15 Minutes Before Class Starts
- 15 minutes before class starts, find a quiet place with strong internet that is free of distractions. Remember that everyone in the class will be able to see you! Find an appropriate background and make sure the room is well-lit. Make sure that you have your device plugged in so you don’t need to worry about battery issues mid-class
- Open Zoom. You can open Zoom by clicking the link your professor sends you or downloading the Zoom app or program on your device. If you have headphones, plug them in now
- Test your microphone and camera
- To test your microphone, click “Test Computer Mic & Speakers” in the pop-up window that appears when first opening a test meeting or beginning your scheduled meeting
- To test your camera, just look at the Zoom window to see that you are visible, non-pixellated, and can move and speak without noticeable delays
- You may need to permit Zoom to access your camera and microphone beforehand. Typically, the request for permission will appear in a pop-up window the first time you open a Zoom Meeting, and will carry over to future meetings. If you declined permissions in the past, you will need to go into your PC or Mac’s settings to allow Zoom to access your camera and microphone
- To test your microphone, click “Test Computer Mic & Speakers” in the pop-up window that appears when first opening a test meeting or beginning your scheduled meeting
- Close any windows or programs open on your device that are unrelated to class.
During Class
- Click Start Video to begin broadcasting from your webcam
- Use the Chat bubble as appropriate. You can chat with everyone in the meeting, the professor, or a specific person
- Find out who else is in the meeting by clicking Participants. This is also where you can “raise your hand” to ask or respond to a question
- Be prepared to share your screen with the class (If you do so, we will see all tabs you have open. We could also see your email, messages, etc. Please ensure that anything you would like to keep private is closed before class begins)
The Zoom Menu
The Zoom menu contains several features that can be used during class meetings. For laptops, PCs, and Macs the menu can be found by hovering over the bottom of the Zoom window. In the Zoom app, the menu can be accessed by tapping the bottom of the app window. Here is a picture of the menu bar.

- Mute: Silences and unsilences your microphone. Your professor will “Mute” the whole class to reduce background noises, but if you’d like to speak, you need to click “Unmute” first
- Share Screen: Allows you to share a variety of windows and applications. Participants can share views of their desktops and specific windows currently open on their computer, write on a digital whiteboard, and even share a screen directly from their iPhone or iPad
- Chat: You can send messages to everyone, just the professor, or a specific person
General Zoom Etiquette
- Getting a clear video is a lot like taking a good selfie. Light your face more brightly than the background to make it easier to see you
- Remember that everyone else can see you
- Be yourself, move physically, and make facial expressions
- Microphones pick up all ambient noise, so keep your mic muted until it’s your time to speak.
- Remember that when on camera, other activities such as eating, drinking, shuffling papers, etc are extremely distracting
If you’re having trouble joining a Zoom meeting or class, refer to the article below for troubleshooting tips.
See also
Using MediaSpace from Kaltura
MediaSpace is a campus video distribution platform from Kaltura, similar to YouTube, where you can securely upload and share your videos anytime and anywhere with an internet connection. It supports multiple devices and provides powerful control and governance tools.
There are various ways that content can be locked down. It can be visible to only specific NetIDs, specific course members or to the general public.
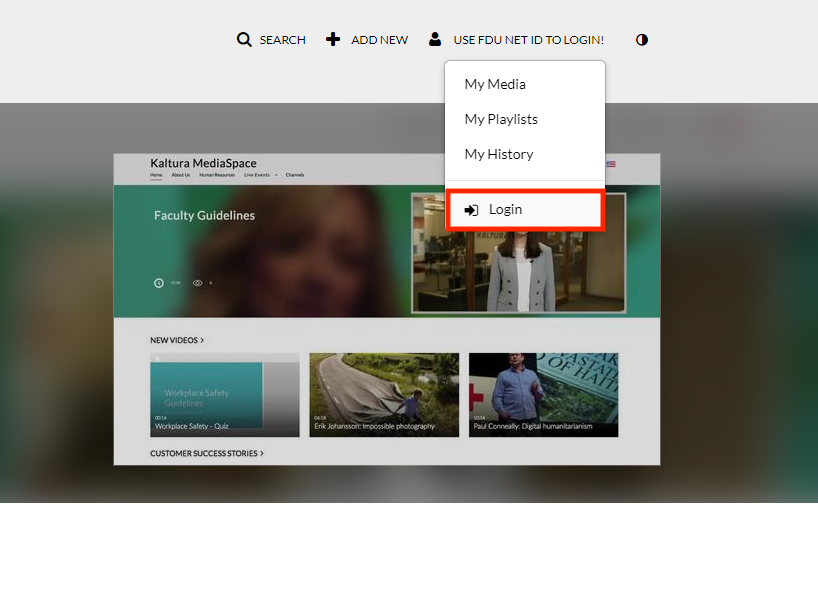
- Log into your Kaltura account:
- Click on use FDU NetID to Login and enter your credentials
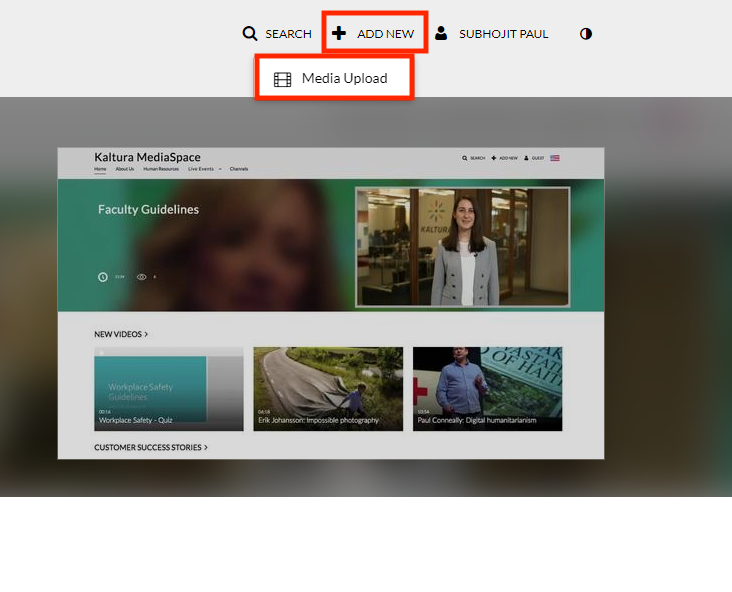
Adding Content to MediaSpace
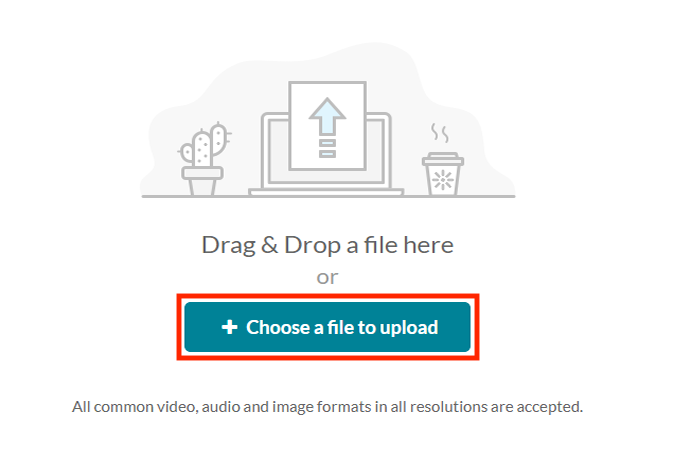
- In the upper right corner of the page, select the ‘Add New‘ drop-down list, and choose ‘Media Upload,’ to open the ‘Upload Media‘ page
- Click the ‘+ Choose a file to upload‘ button to search your computer for the media file that you would like to upload; select the file; and click the ‘Open‘ button to upload the file
- While the file is uploading, you can add the metadata in the following fields:
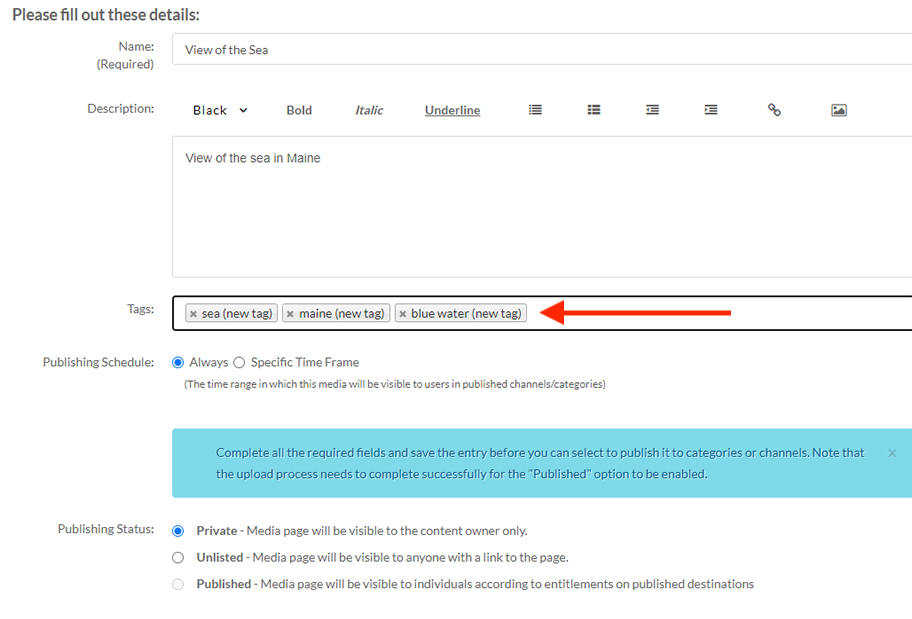
Name
- The name of the media being uploaded.
- This is a required field and is by default the filename of the media being uploaded.
Description
- This is displayed below the media or on the player info pane.
- This is a required field for publishing and/or adding the media to a playlist.
Tags
- These are used to help describe your media and are used as keywords when searching for media.
- Multiple tags can be separated by commas or new lines.
- When you have finished editing details, click the ‘Save‘ button
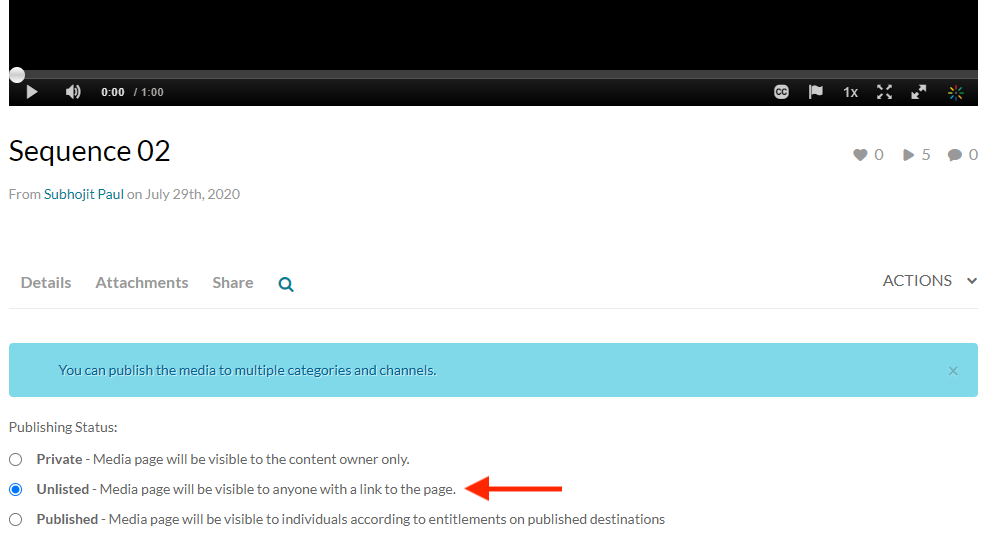
- Once the media has uploaded and you have given it at least a title and description, you will need to select one of three file sharing permission settings. This setting can be changed later, so pick the setting that best applies at the moment:
- Private: Only you will be able to access the file.
- Unlisted: Only those with a link to the file that you provide will be able to access it. Select this option if you want to share your video using a direct link to the video that you might share via email.
- Published: Assign the file to a MediaSpace channel. It will be visible individuals that have viewing rights to that channel.
You may continue uploading more files by clicking the ‘+ Choose another file‘ button and repeating the steps above.
NOTE: At this point you may not be able to view your media and you may see the message: “Media is being processed” This is completely normal. Your media will continue to process even if you navigate away from MediaSpace.
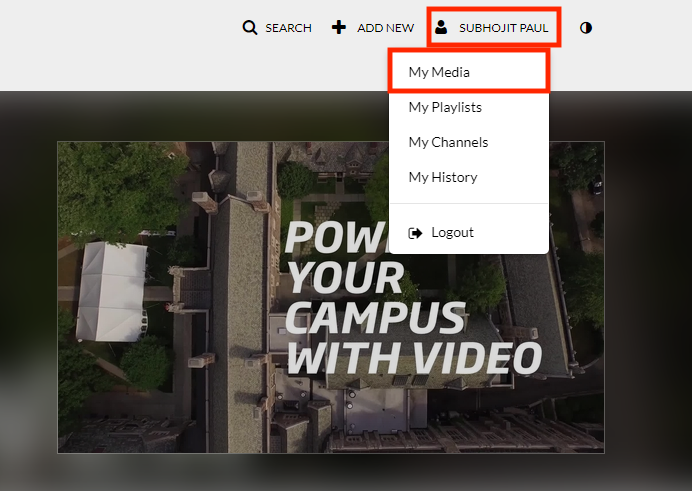
How To Access My Media
Click on your name in the upper right side of your screen and select My Media from the dropdown list. When your list comes up, choose which one you want to access
How To Share a Media
- While in the “My Media” section, select the video that you want to share and click on the “Actions” button and click Publish
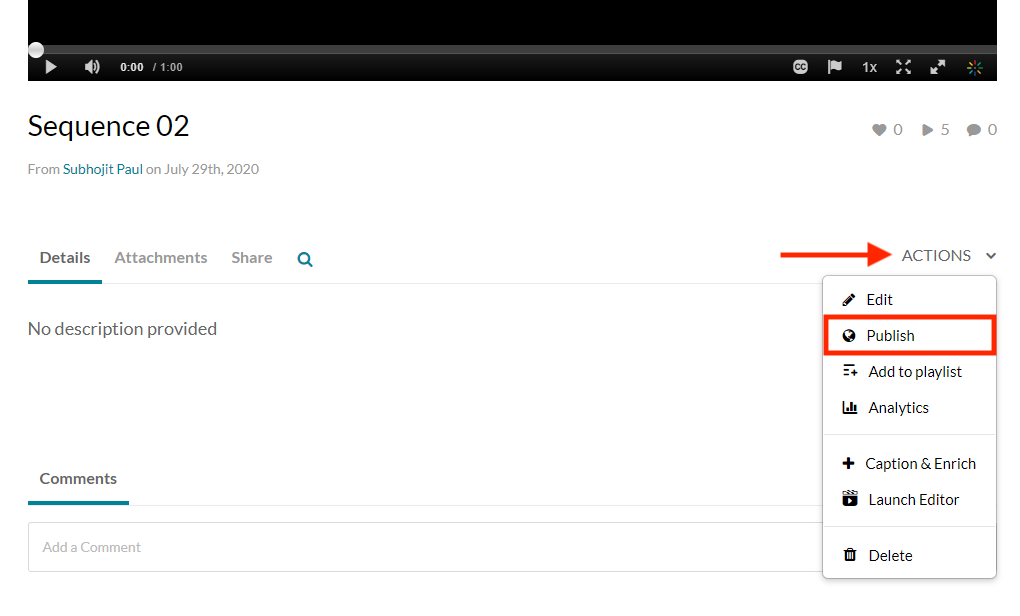
NOTE: Make sure your video is set to Unlisted. Any other choice will have some access restrictions associated with it.
- Click on the “Save” button
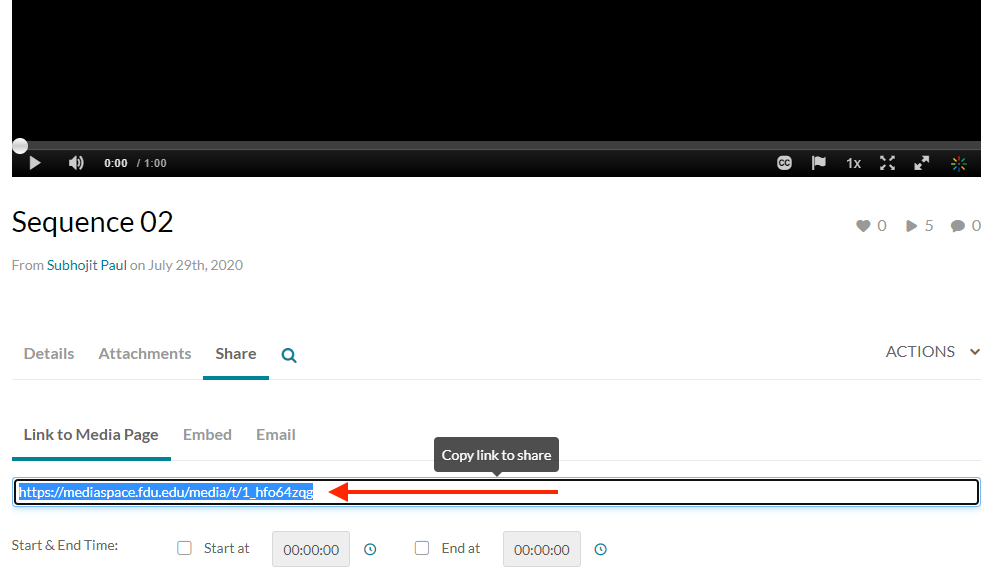
- Click on your video to get to the video details and click the share option under the video. You can copy the link and send that to anyone you would like to share it with
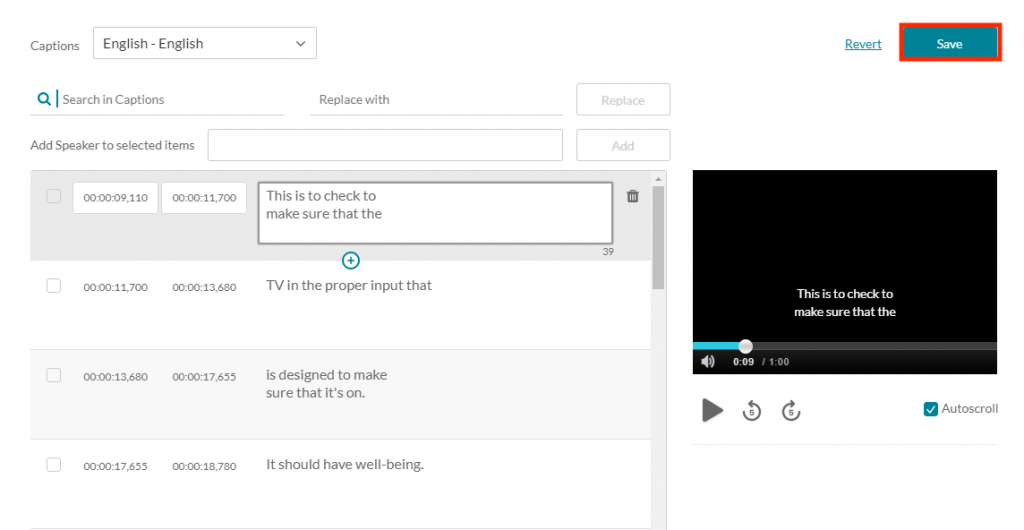
How to Edit Closed Captioning
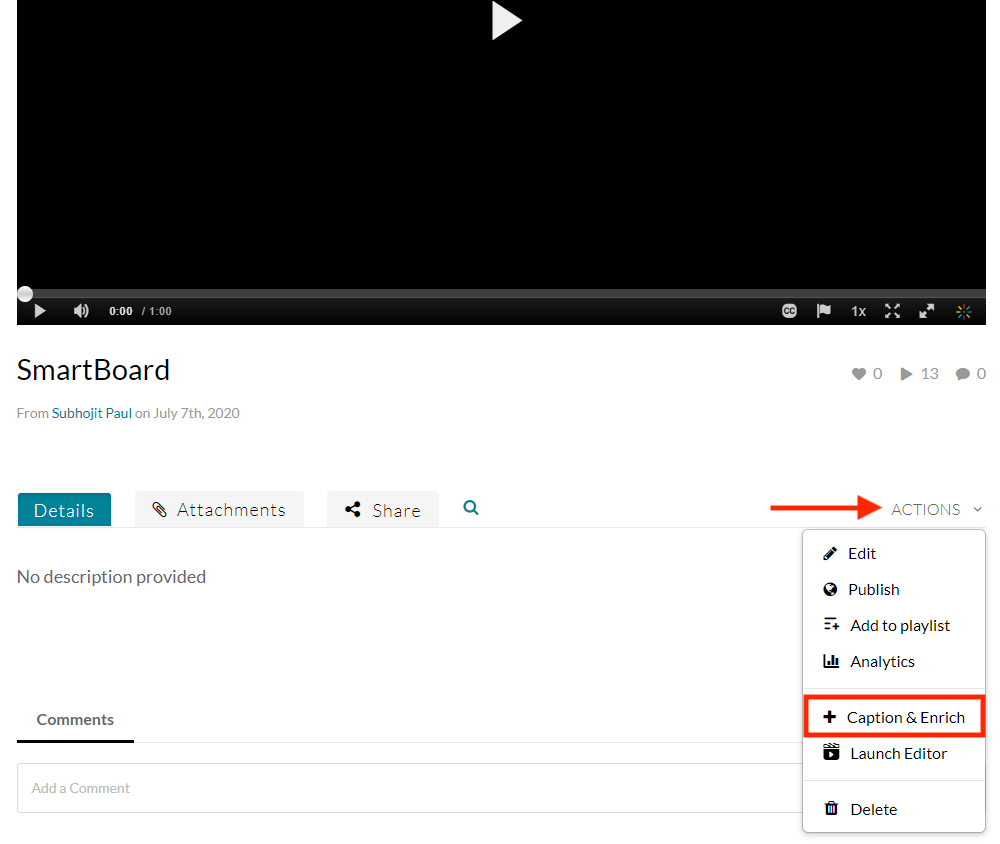
- Open the video that you want to edit the captions
- Click on Actions and select + Captions & Enrich. This will take you the captions request table
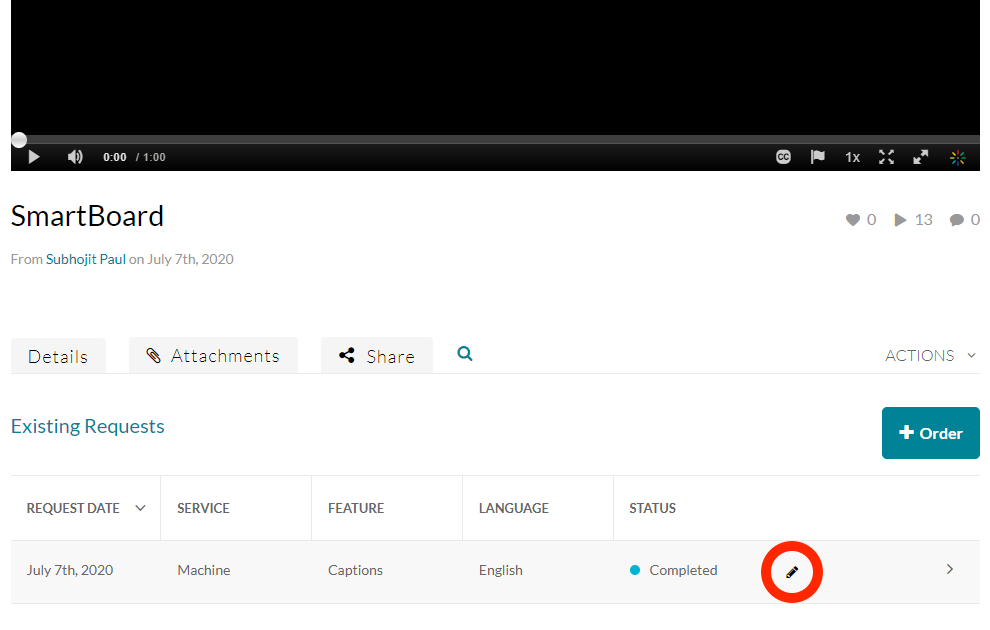
NOTE: You can only edit captions that have been completed.
- Click on the pencil edit icon to open the editor. The captions editor is open automatically alongside the captions that have been selected in the captions requests table
- If you have multiple caption files, you can click on the “Captions” drop down menu and select which file you want to use
- To edit caption text, click on the section you want to change and edit accordingly
- If you are not sure where the text is that you want to change, you can enter that in the “Search Captions” box. That term will be highlighted in each caption line. You can also replace the terms that you search for with a new one by entering the new term in the “Replace with” box and clicking “Replace”.
- When you have completed all of your editing, click on the “Save” button
See also
What is Qualtrics?
Qualtrics is a simple web-based survey tool that provides the opportunity to conduct online survey research, evaluations, and many other data collection activities.
One of the many advantages is the ease of learning to use Qualtrics to:
- Build surveys with multiple question styles
- Distribute the surveys with a website link (there are other ways to distribute as well)
- Analyze data collected
Of great importance, the university currently has a license for all faculty, staff, and students (some caveats with student accounts discussed if you all desire)
Benefits of Qualtrics
- Simple and intuitive formatting of surveys
- Visually appealing for respondents and survey builder
- Computer and smartphone compatible
- Flexibility of survey dissemination
- Multiple data formats (e.g., CSV, TSV, XML, SPSS)
If you need assistance please contact Manish Wadhwa at (201)-692-7074 or Email Manish@fdu.edu
If you are scheduled to attend class using Zoom and you run into technical difficulties, here are some steps you can take.
Common Fixes for Zoom Connection Issues
- Do. Not. Panic. This shift to distance learning is a sudden change. We will do everything we can to support your learning
- Try your best to progress through the steps and troubleshooting resources below. Join when you are able. You can use the chat or hand-raising function once you join the class to let the faculty know if you have questions.
- Try to exit Zoom and open it again
- Try to restart your device and re-open Zoom
- Check that you do not have pop-ups blocked. Also check that you have “allowed” the Zoom browser extension to operate, if needed
- Try on a different device, if you have access to one. If you do not have access to a different device, proceed to step 6
- If you still cannot access Zoom after taking these steps, please contact the SAMI Support Desk with a description of the problem (e.g., error message that you received). Please also bring the issue to the attention of your instructor so they can let you know what you missed in the class session that you were unable to attend
More Resources for Troubleshooting with Zoom
The following troubleshooting guide gives support for all devices that Zoom supports.
See also
FAQ
-
What is Echo360?
Echo360 helps instructors capture and extend those moments to improve student engagement before, during and after class.
Through our technology platform, students have 24/7 access to classroom discussion, presentation materials, and the lecture itself.
-
Who do we contact for assistance with Echo360?
You may call the SAMI Service Desk at (973)-443-8822 for assistance.
-
Who do we contact for assistance with Webcampus?
You may create a SAMI Support ticket at SAMISupport.fdu.edu.
-
How do I provide internet access to our guest that will be presenting at our meeting?
Contact the SAMI Service Desk SAMISupport.fdu.edu.
-
Who do we contact for assistance with web conferencing using WebEx?
Contact the SAMI Service Desk SAMISupport.fdu.edu.
-
Do you provide help and training for software programs such as Word and PowerPoint?
No.
-
Do you provide loaner laptops?
No.
-
Will I be provided with all the necessary cables that I need to use the technology in the room?
Although we can lend some accessories to full time faculty and staff, it is impossible to anticipate all the various configurations that everyone may have so we suggest you purchase your own adapters that will enable you to plug your device into either a standard HDMI port or VGA port.
-
How can I put in a request for equipment use?
Visit FDU’s forms website and locate and fill out the “Academic Technology Equipment (Event) Request” form.
-
How far in advance do I need to put in a request for equipment?
You must submit requests at least 24 business hours prior to the event.
-
Can I call the office directly if I have issues?
Ideally, we recommend contacting the SAMI Service Desk as we are not always at or office and our availability can change at a moment’s notice. If you are having issues with our equipment and need immediate assistance, the service desk can provide assistance via SAMISupport.fdu.edu. The support team will escalate to us as needed.
-
What equipment do you provide for events?
We provide projectors and screens, microphones (where applicable) speakers, and Video cables (HDMI or VGA). Please bring any cables/adapters that you use for your device as it is impossible to meet all possible configurations and we may not have the equipment necessary to display video from your device. We do not provide computers, furniture or power cables/strips of any kind.
-
The classroom technology is not working and I need immediate assistance. What should I do?
Make sure all cables are in the correct ports and all usage instructions are followed. If those steps do not fix your issue you can contact the SAMI Service Desk via SAMISupport.fdu.edu for assistance or call 973-443-8822.
Manish Wadhwa
Academic Technology
Associate Provost for Academic Applications and Technology
 Email
Email
Bernie Yap
Academic Technology
IT Business Relationship Manager
Lauren Elgin
Academic Technology
IT Business Relationship Manager
Subhojit Paul
Academic Technology
Instructional and Technical Support Coordinator


