CrashPlan is a backup agent that will back up all data on a university device under the primary owner’s profile. The backup sets can be used for restoring data to a machine, whether it has been reformatted, replaced, or compromised. This document will outline the steps needed to install, activate, and restore data to a new or existing device.
Index
About CrashPlan
CrashPlan Policy
CrashPlan is required on all University provided desktops and laptops to backup all University Business data to prevent data loss.
Who Can use CrashPlan?
CrashPlan is presently licensed for full-time faculty and full-time staff only. The University mandates CrashPlan for proper data security practices. If a user has personal data that they wish to exclude from being backed up, a folder labeled “Personal Documents” can be found and utilized in your “Documents” folder. This folder and its contents will be ignored by CrashPlan when your system is being backed up.
Personal Documents folder locations:
| Windows PC | C:\users\username\Documents\Personal Documents\ |
| macOS | /users/username/documents/Personal Documents/ |
Tip
If the Personal Documents folder does not exist in your Documents folder, you can manually create it and the folder will be automatically ignored by CrashPlan.
Is My Data Secure?
CrashPlan uses AES-256 encryption is used when storing your backups and can only be accessed by the CrashPlan account owner and administrators.
What is Backed Up?
All data found in a user profile will be backed up by CrashPlan.
Location of User Profile:
| Windows PC | C:\users\UserName\ |
| macOS | /users/username/ |
 Warning
Any data not stored in the user profile will NOT be backed up by CrashPlan. It is highly encouraged to store university business data within your user profile.
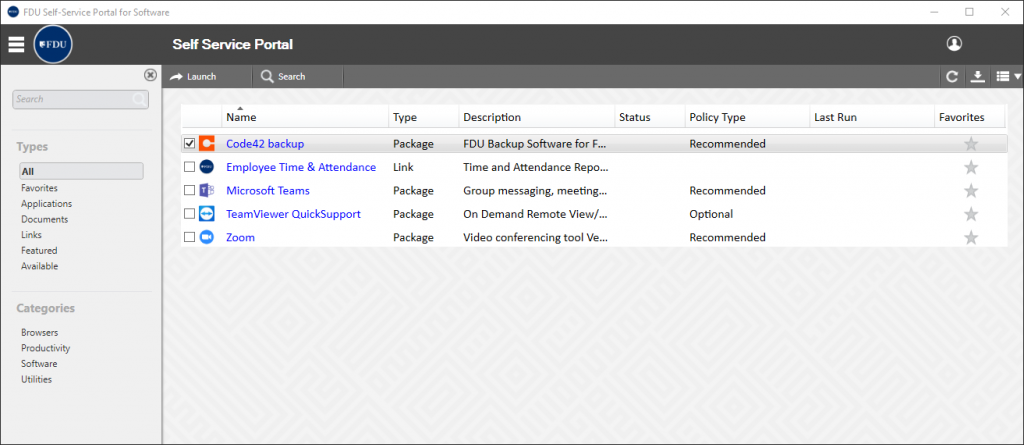
How to Install on a Windows PC
To install CrashPlan on your Windows PC, please follow the instructions below.
Note
CrashPlan is being automatically deployed to all systems owned by Faileigh Dickinson University.
Before Installing CrashPlan, you must be logged in as the owner of the machine using your NetID Credentials.
- Open FDU Self Service Portal for Software on your University PC
- Click on CrashPlan Backup and then click “Install” on the right-hand side
Note
It could take several minutes for the client to make the first connection and start the first backup.
The entire process will take approximately 5-7 minutes, depending on your internet speed. Once CrashPlan is installed, your account is automatically provisioned in the CrashPlan system, and your backup will begin shortly.
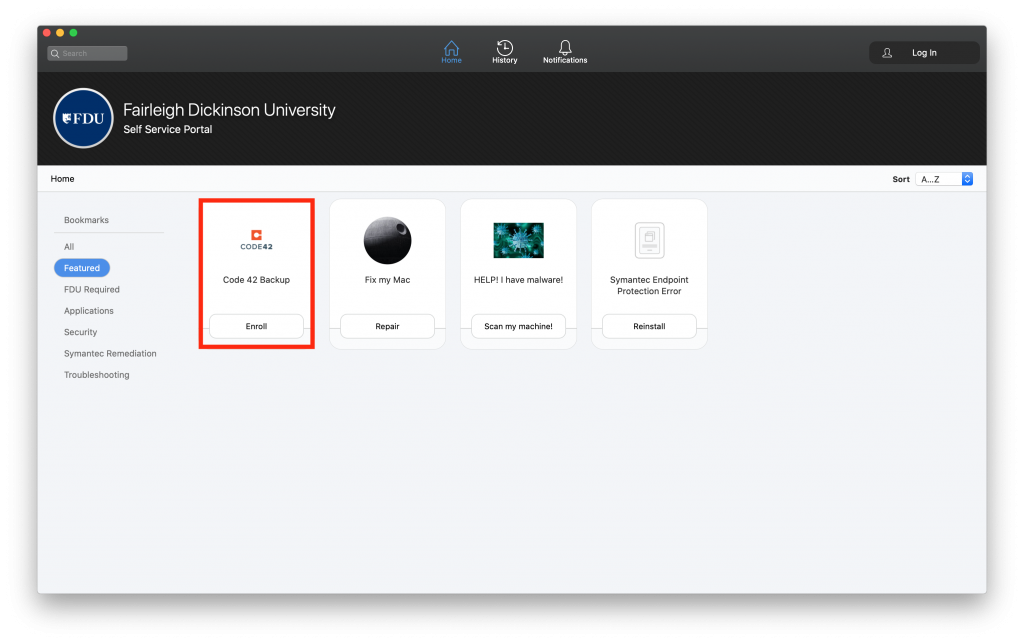
How to Install on macOS
To install CrashPlan on your macOS device, please follow the instructions below.
Note
CrashPlan is being automatically deployed to all systems owned by Faileigh Dickinson University.
- Locate the FDU Self Service Portal in your applications folder or locating the icon on your dock
- Locate CrashPlan Backup and click “Enroll”
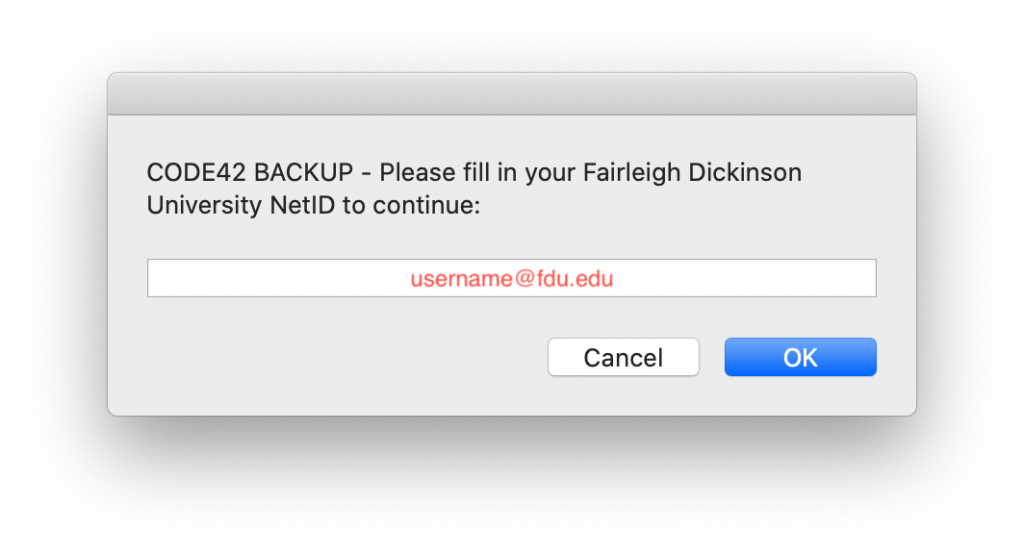
- After the package installs, you will be prompted to enter your FDU email address and then click “OK“
Note
It could take several minutes for the client to make the first connection and start the first backup.
The entire process will take approximately 5-7 minutes, depending on your internet speed. Once CrashPlan is installed, your account is automatically provisioned in the CrashPlan system, and your backup will begin shortly.
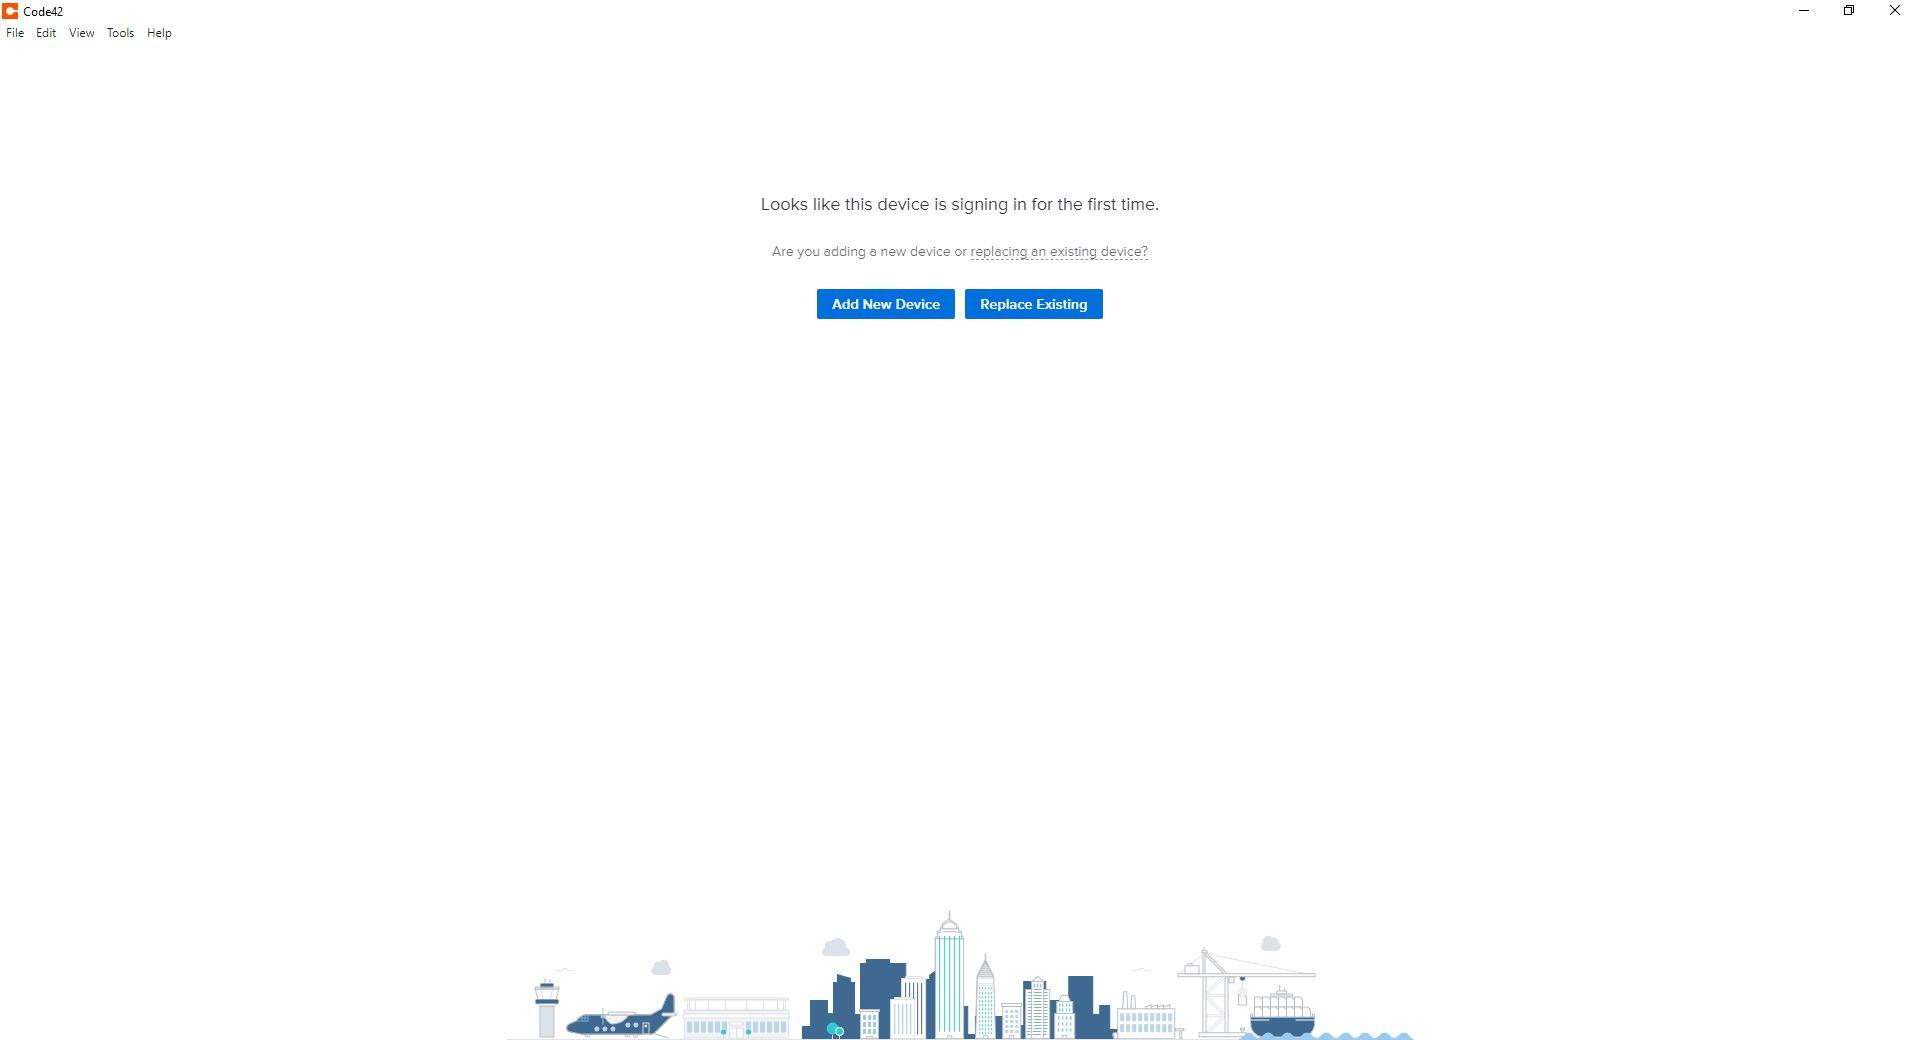
How to Replace or Add a Second Device
This process is used when someone will be assigned a second device and wishes to have it backed up or if the CrashPlan needs to be re-installed on the same device. Because an account already exists, it cannot be provisioned automatically. It must be manually setup either to replace an existing device or create a new backup set on the second computer.
Note
In order to proceed, CrashPlan must be installed prior to continuing, please refer back to the Install instructions for your operating system from the CrashPlan User Guide. A link is found at the bottom of this page.
Tip
A backup set is CrashPlan’s way of describing the backup configuration and what files are being backed up.
- Click on the CrashPlan app in the system tray (PC) or Menu bar (macOS) and then click “Setup Device”
- If prompted, log in to the FDU NetID Portal and proceed through the FDU single sign-on process
- Click “Replace Existing”
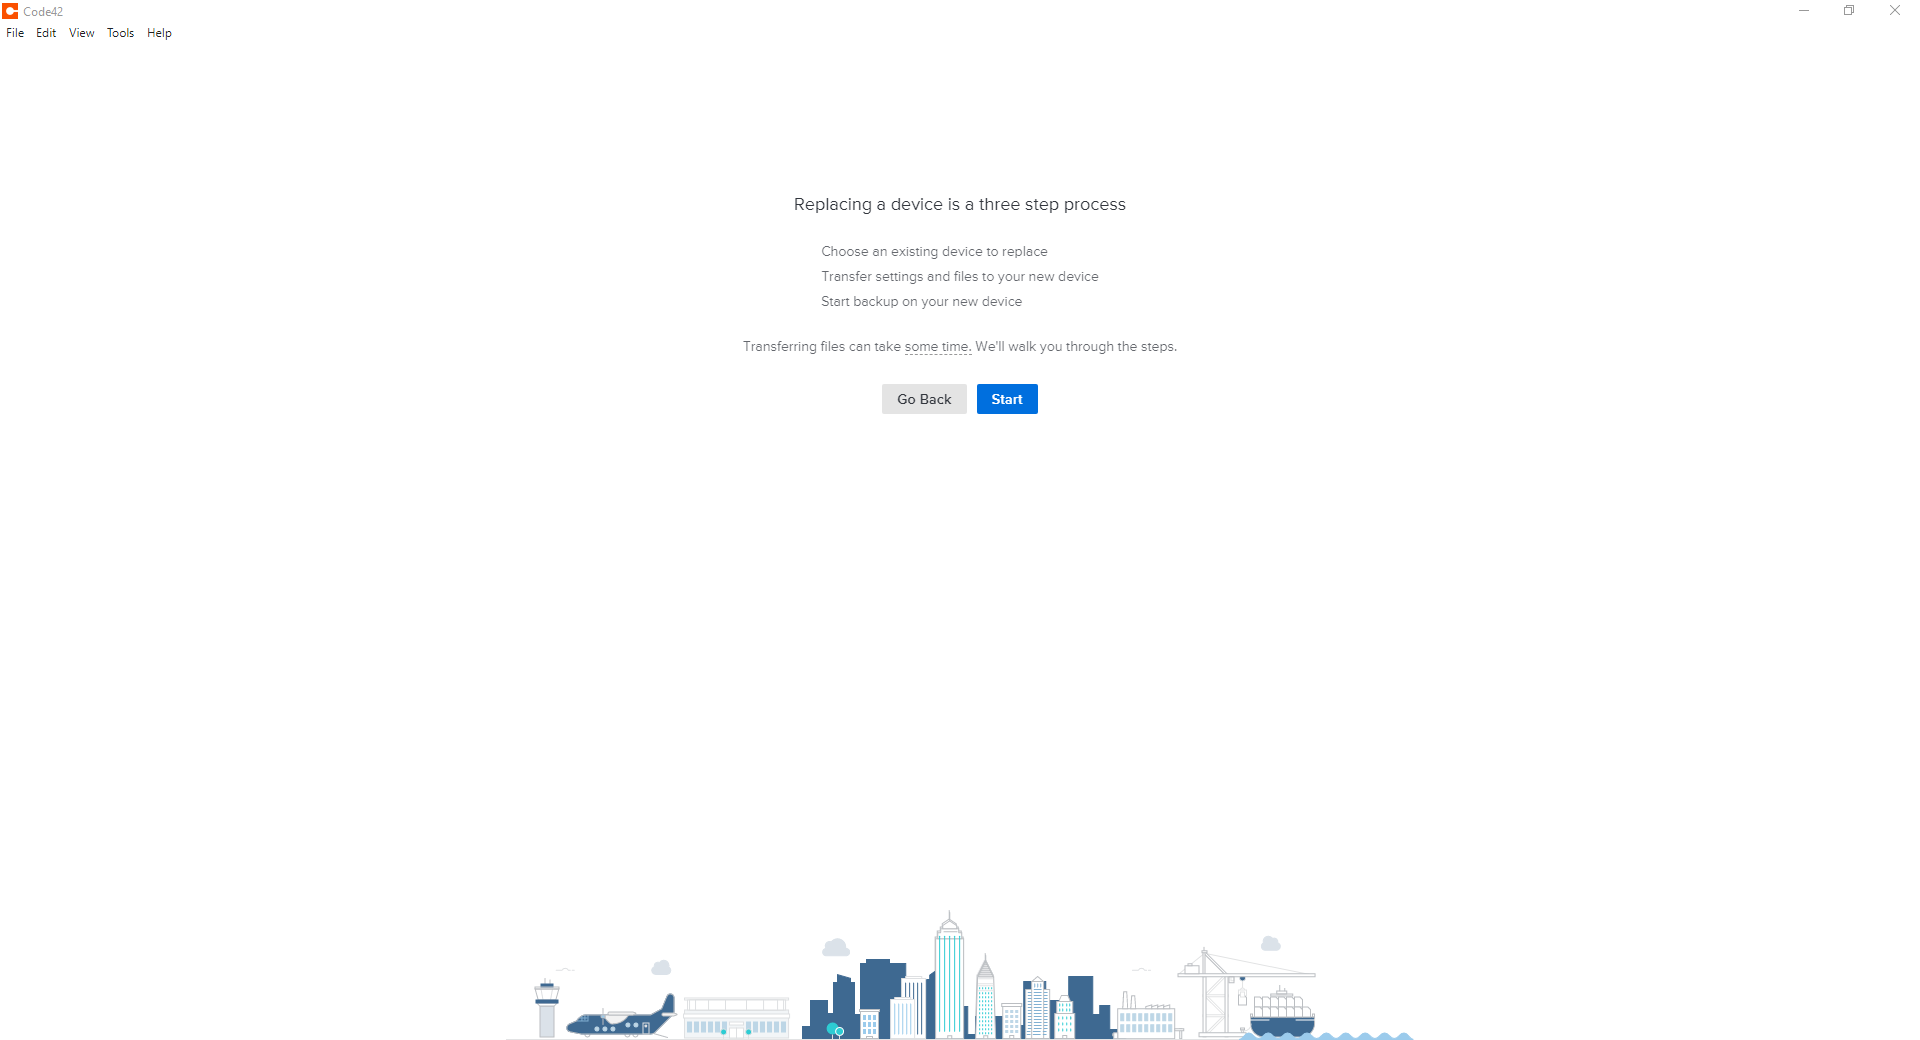
- Click “Start” to continue with the replace existing device process
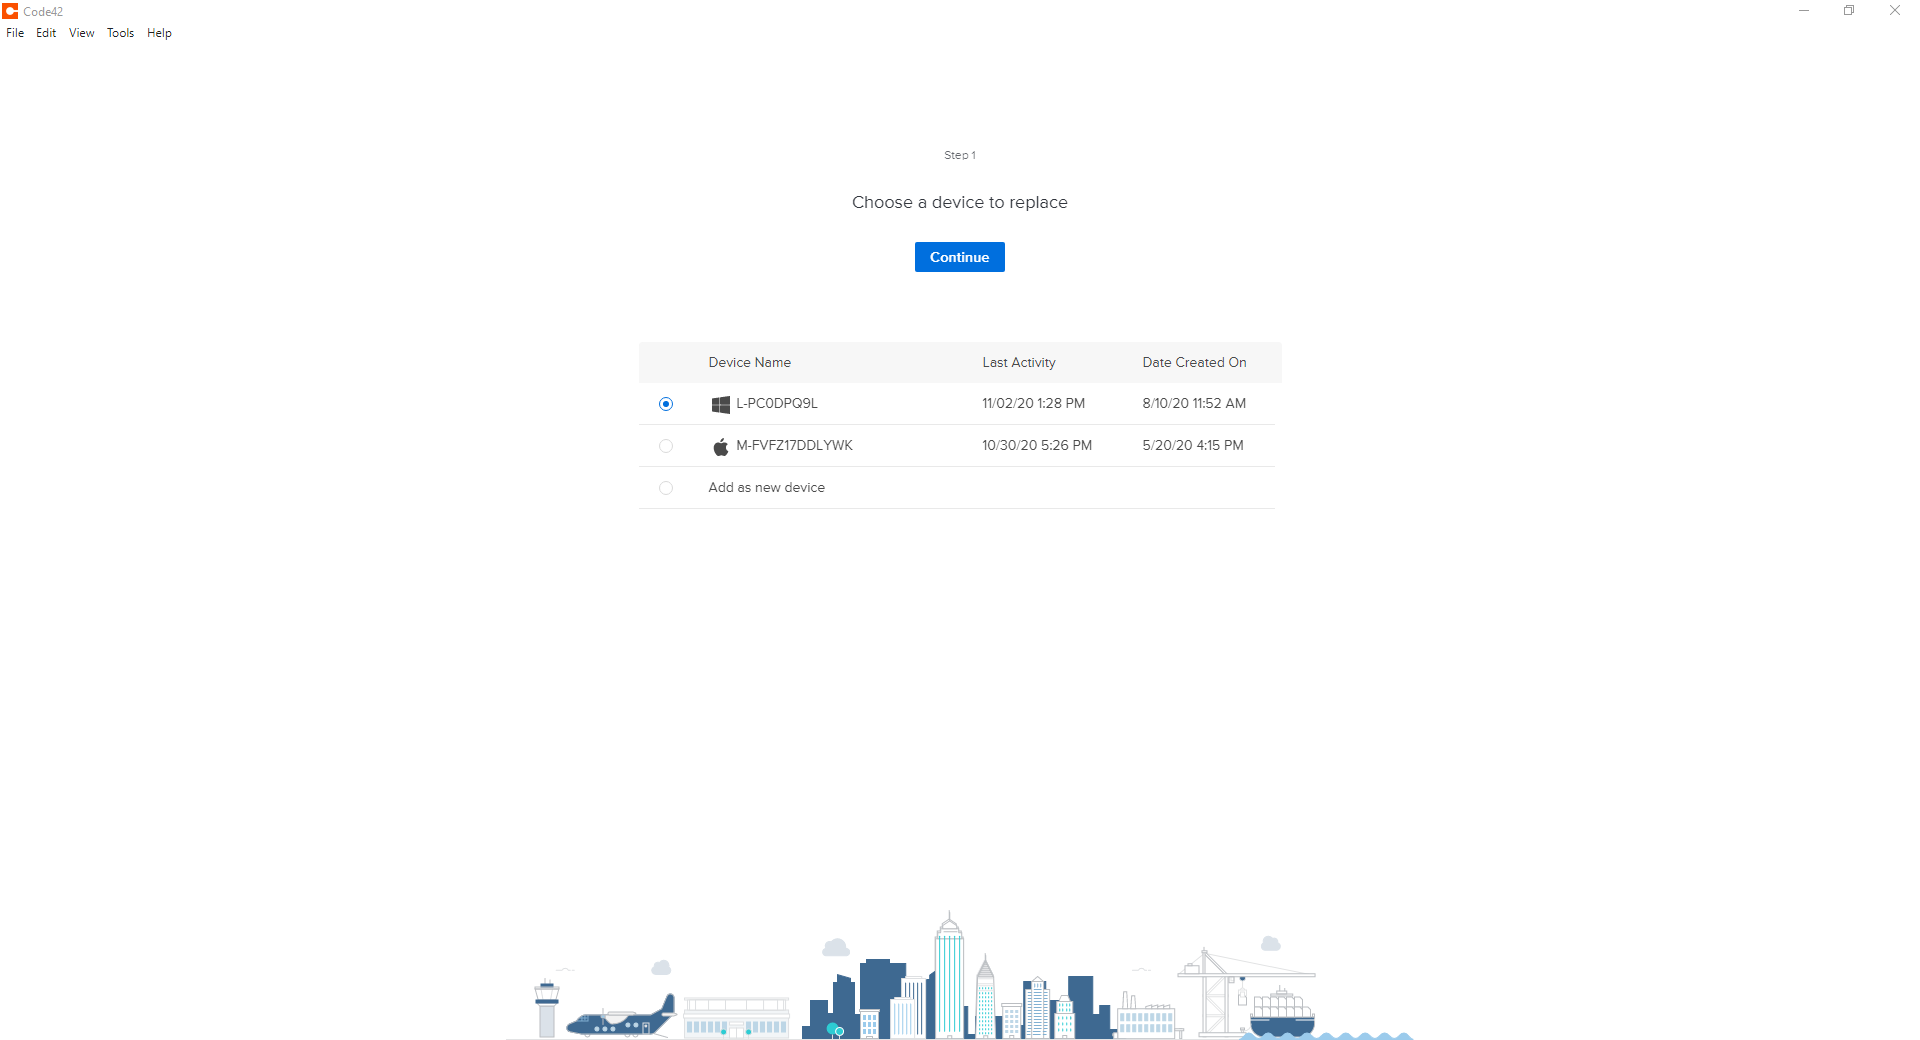
- Select the device from the list you are replacing and click “Continue”
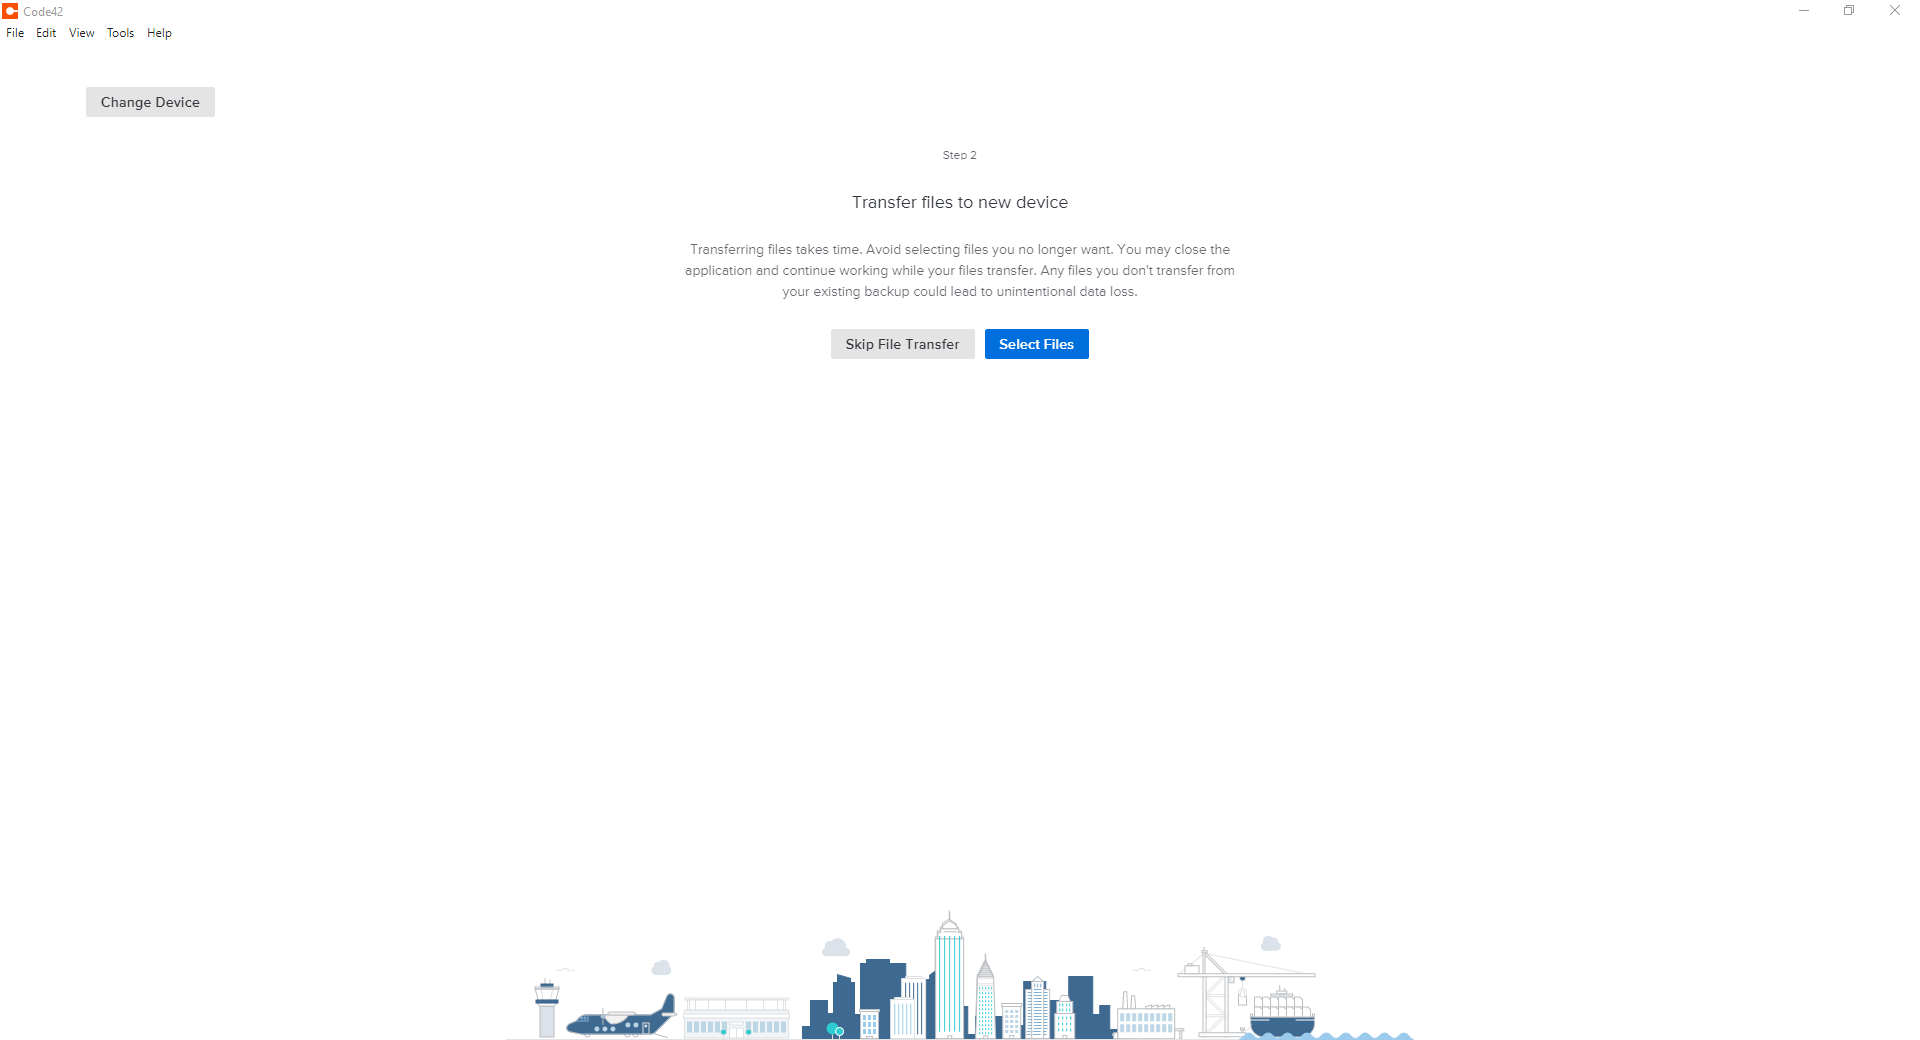
- Click “Select Files” on the following window
- Select and Choose which files you wish to replace by placing a checkmark next to each. When finished, click “Restore Files”
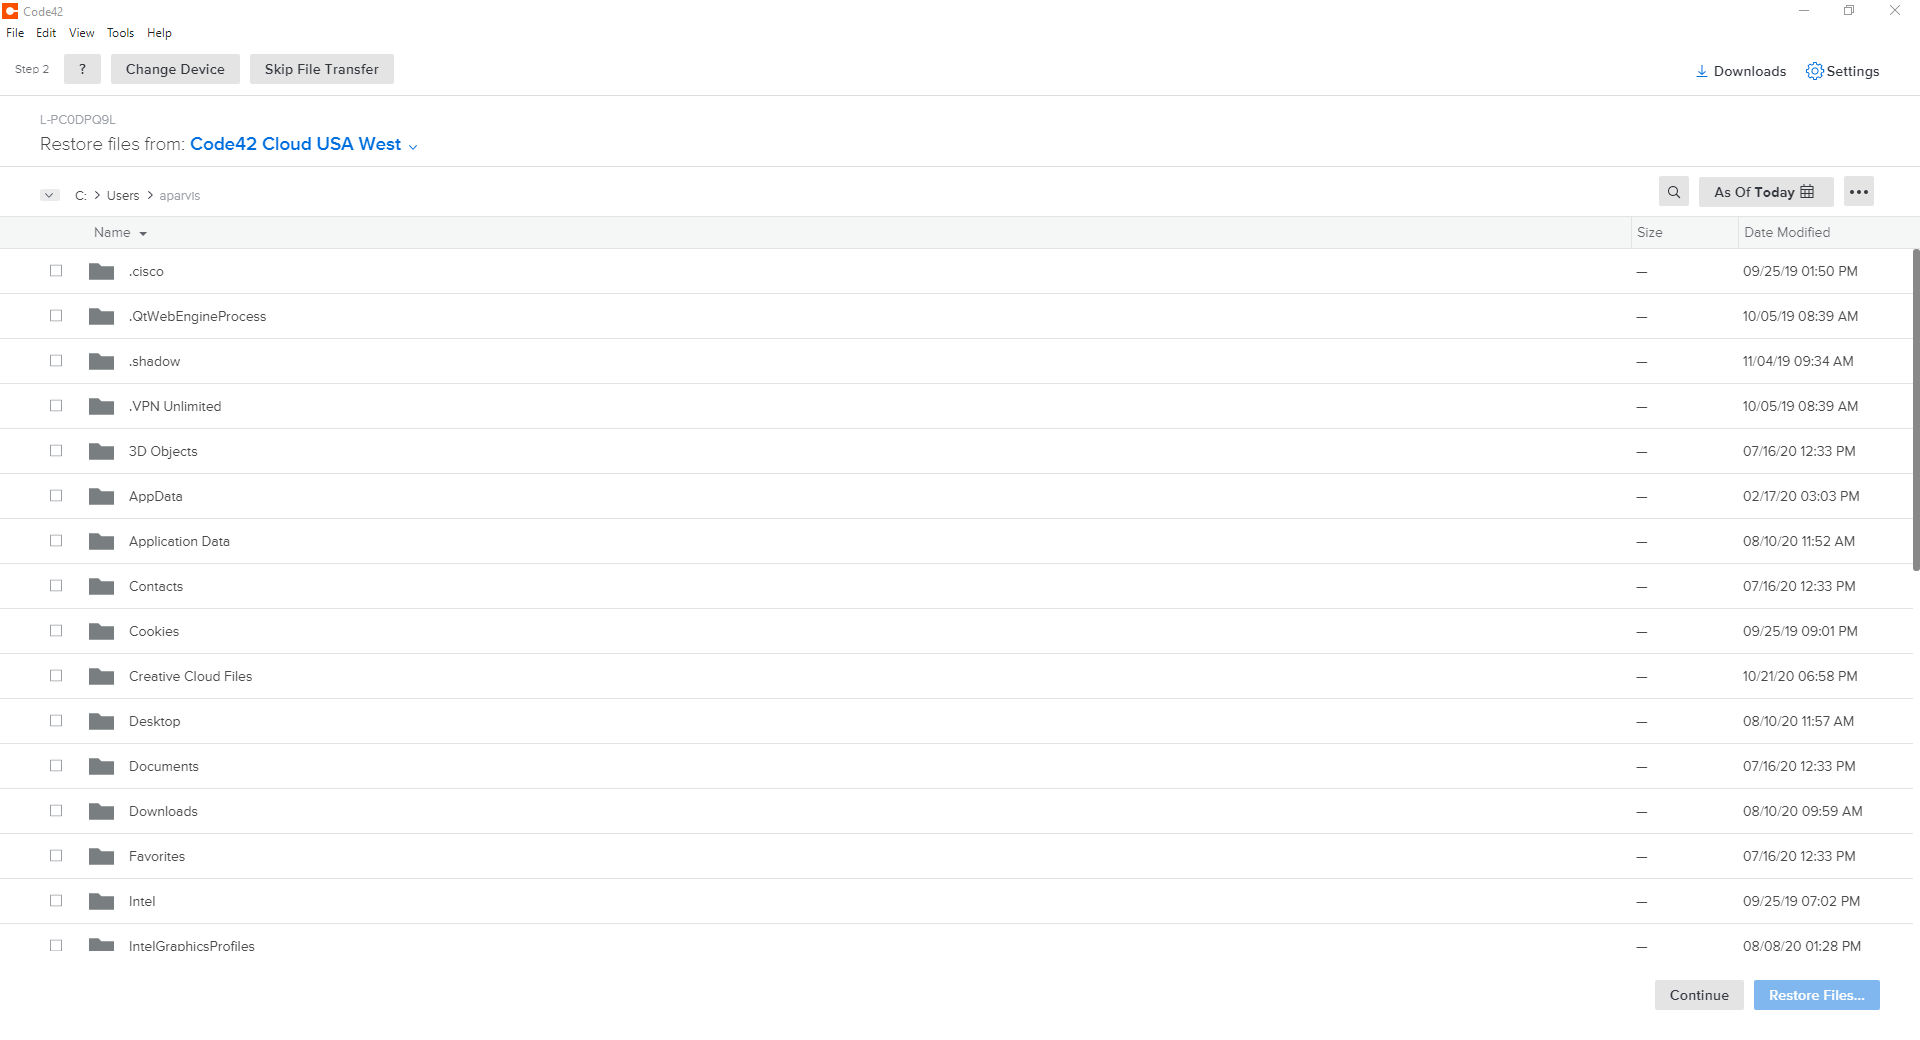
- The next window will allow you to select how you wish to restore your files. Make your selections and click “Go”

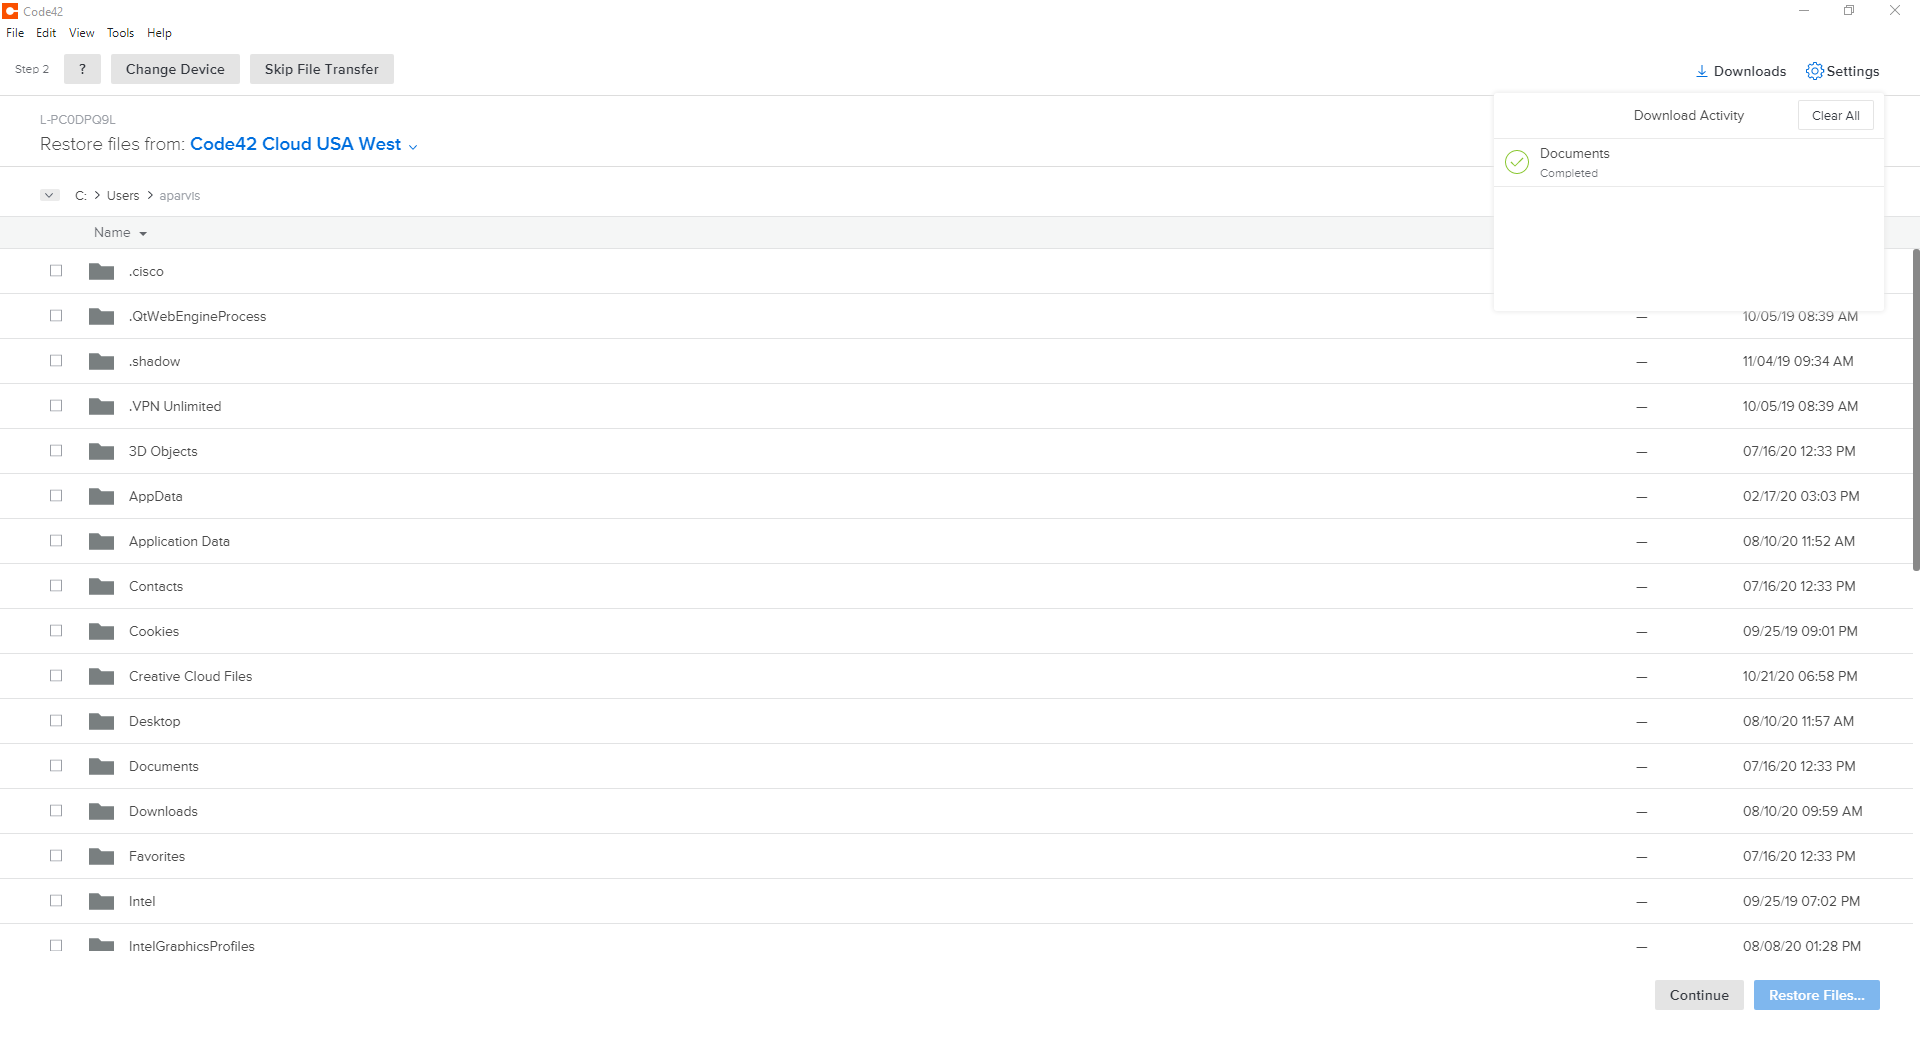
- The next window will display download progress for the restore process. You can continue forward by clicking “Continue” at the bottom
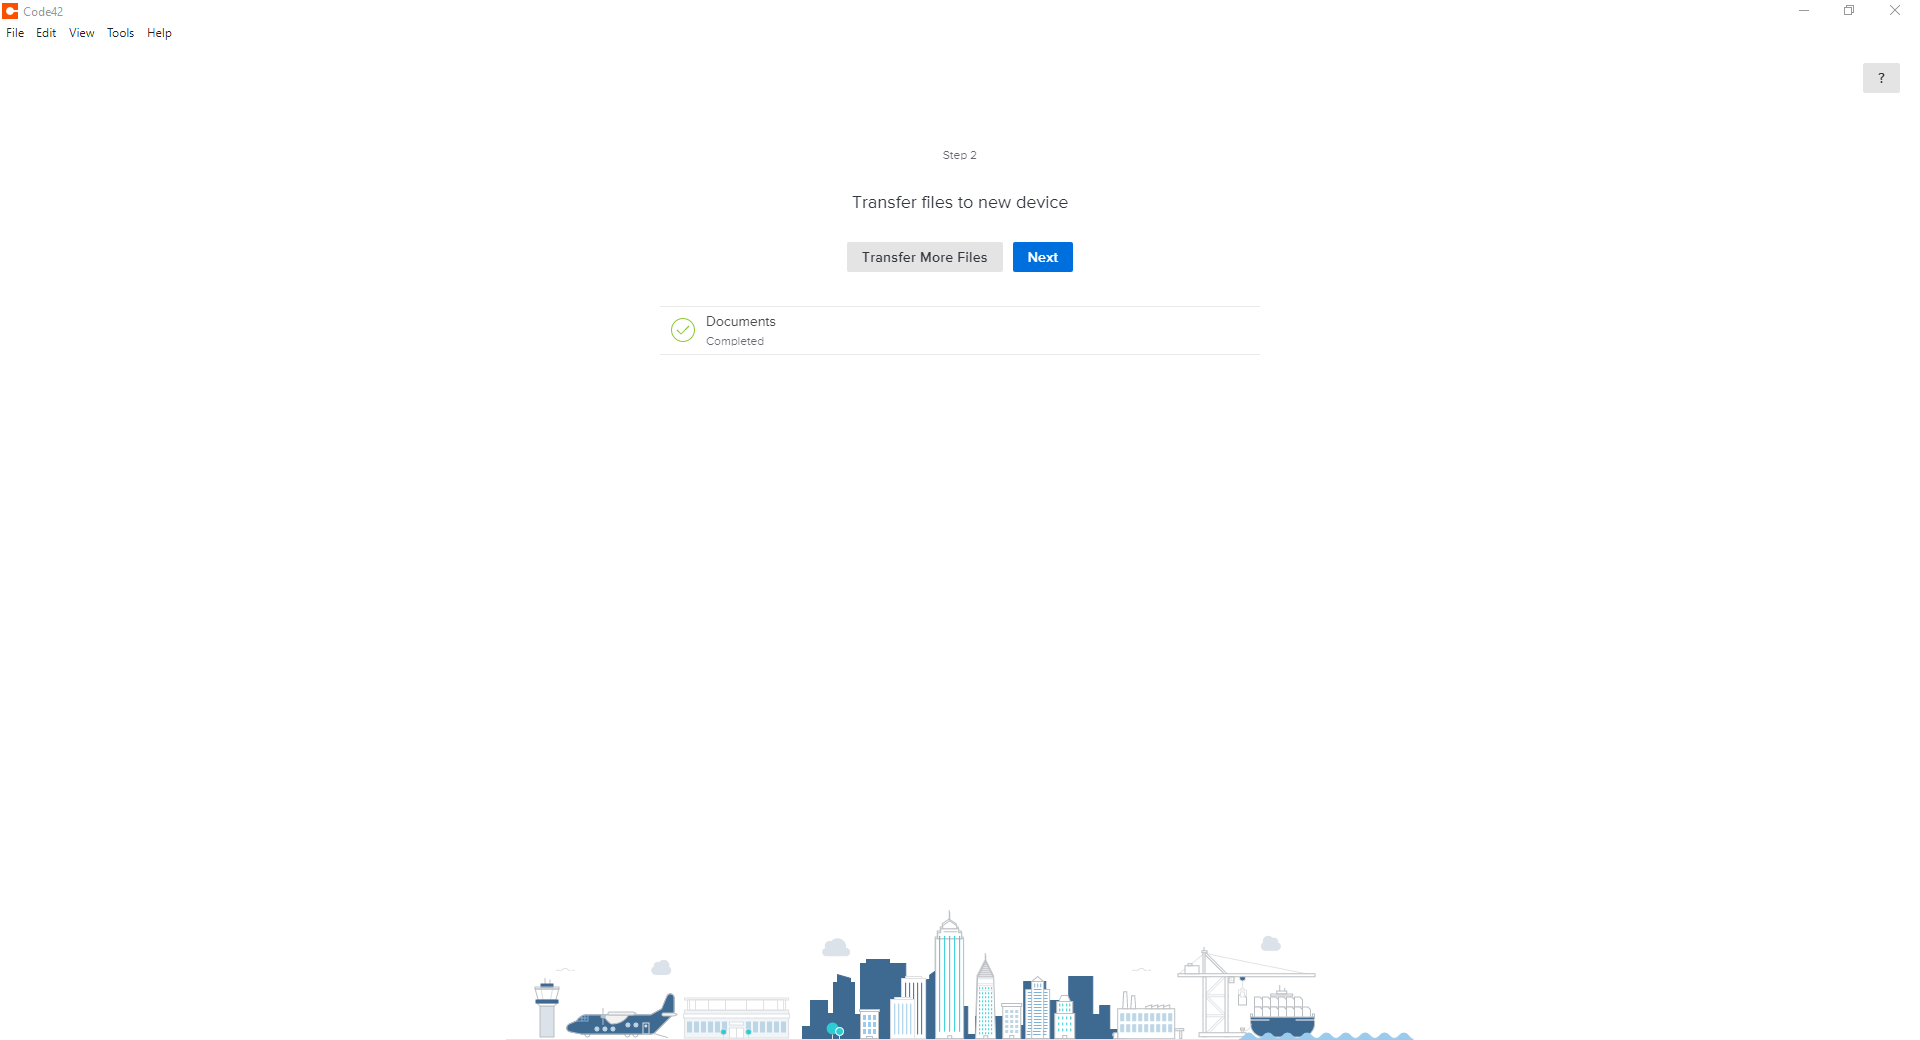
- The next window Downloads the Files to your device. When the transfer is completed, click “Next”
Tip
You can close this window and continue working or you can click transfer more files and repeat the steps for additional files. This will extend the time it needs to restore.
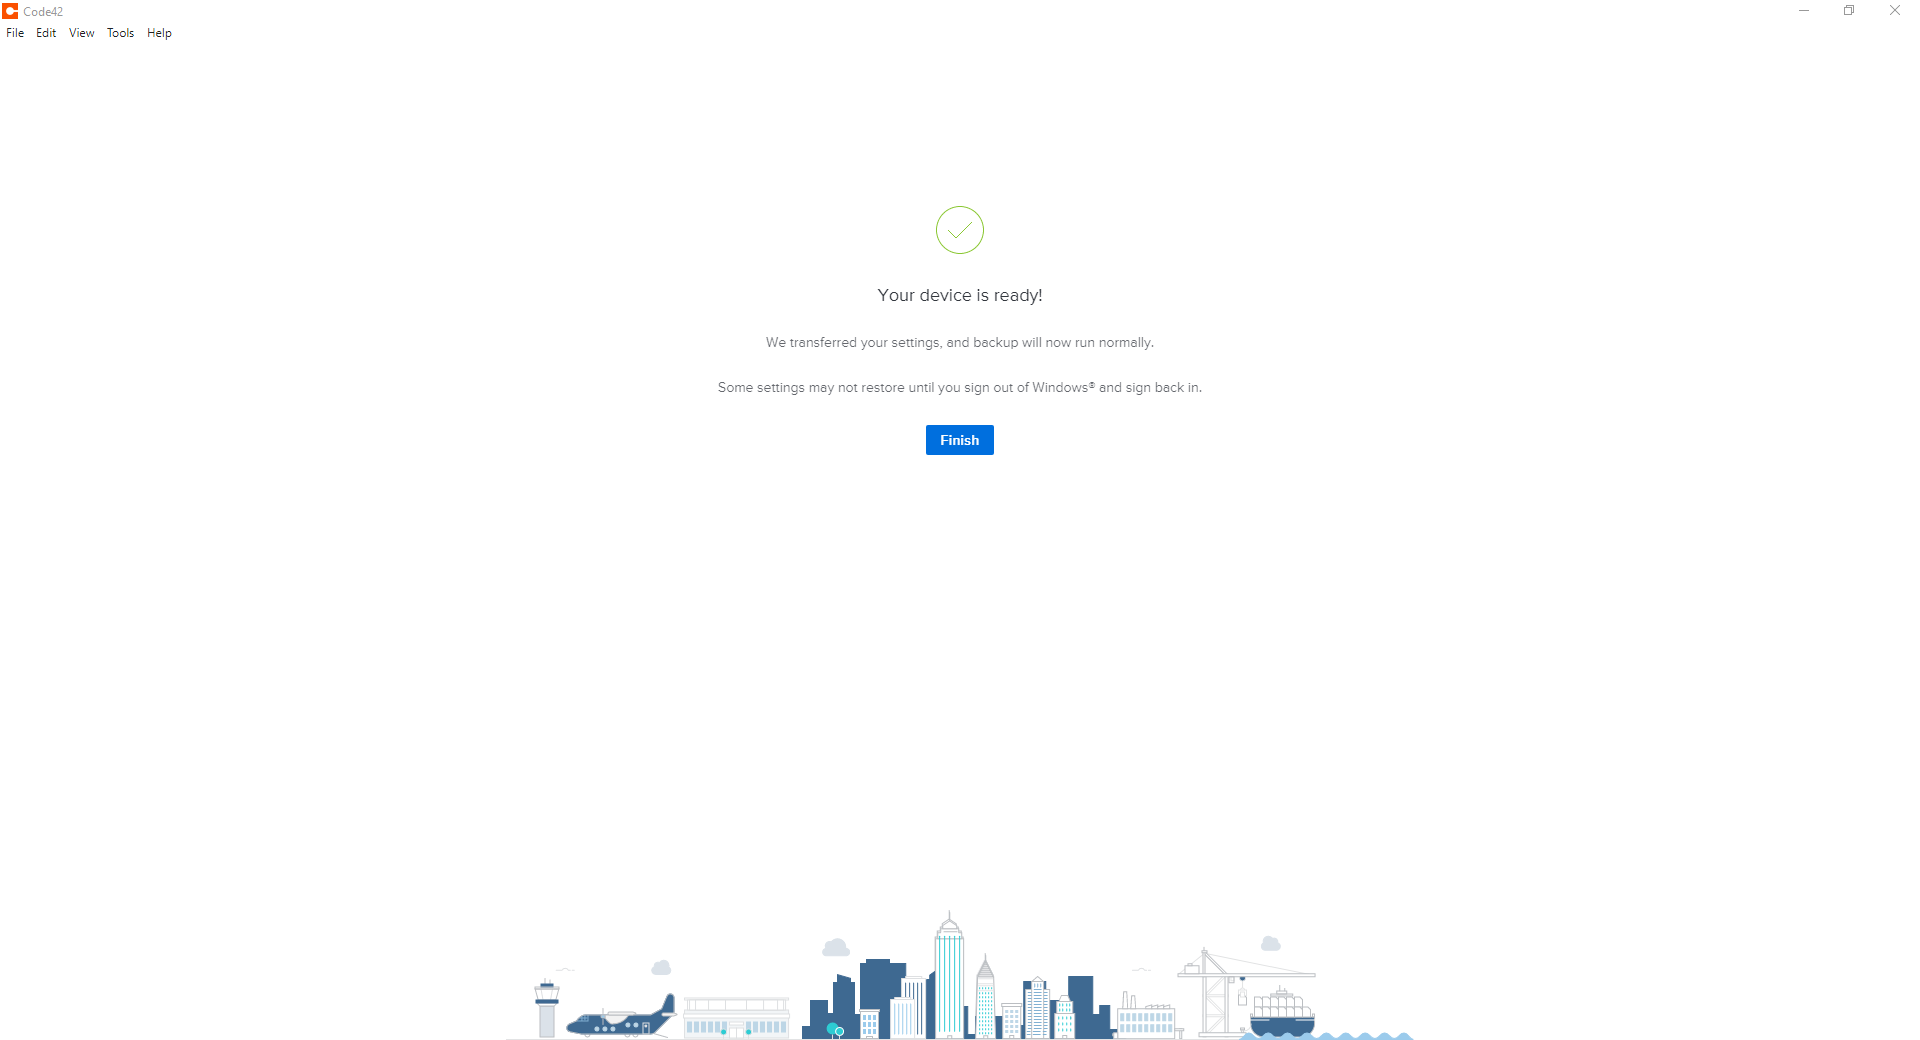
- Your Transfer is now complete, click “Finish“
Verifying a Backup Instructions
If you are unsure if you have CrashPlan installed and backing up your system, this quick guide will help give you some comfort.
- Click on the CrashPlan icon from the system tray on Windows and the menu bar on macOS
CrashPlan Icon
- The Progress will be displayed like in the Figure below

Note
Depending on your backup size, this could take anywhere from a few minutes to a few days. CrashPlan will continue to run and backup in the background. After the first successful backup, incremental backups will occur.
How to Manage Backups
CrashPlan allows you to manage your backup sets. If you want to review your backup set or request assistance, please contact the SAMI Service Desk to initiate a support request.
How to Restore Files
Accidentally deleted or unable to find a file? CrashPlan can help. Please follow the following guidelines in restoring lost or previous versions of files.
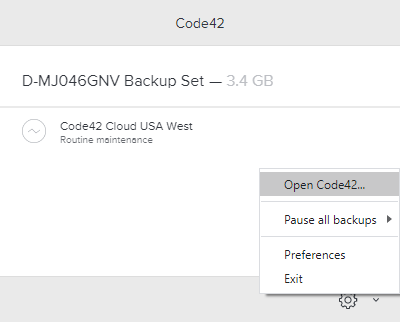
- Click the CrashPlan System Tray or macOS menu bar Icon
CrashPlan Icon
- Left-click on the gear symbol and left-click on “Open CrashPlan….”
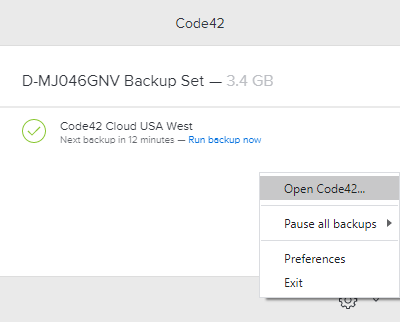
- If prompted, log in to the FDU Single sign-on Portal and proceed through the FDU DUO Multifactor authentication procedures
- Click “Restore Files”
- Select the device you wish to restore from
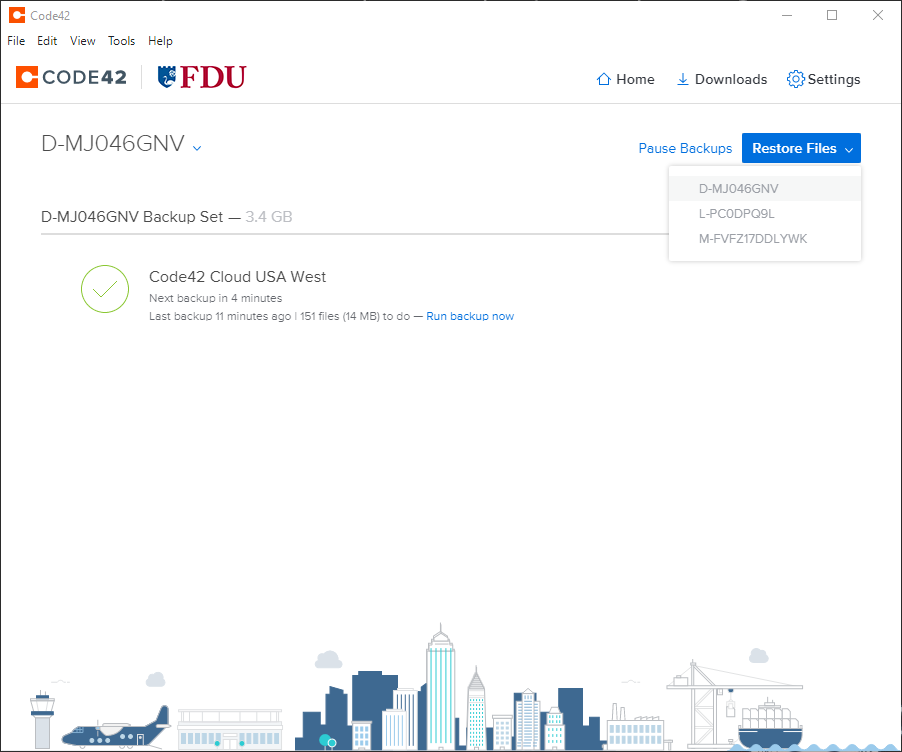
Note
If you have more than one backup device, please select the device from where you want to restore the file from.
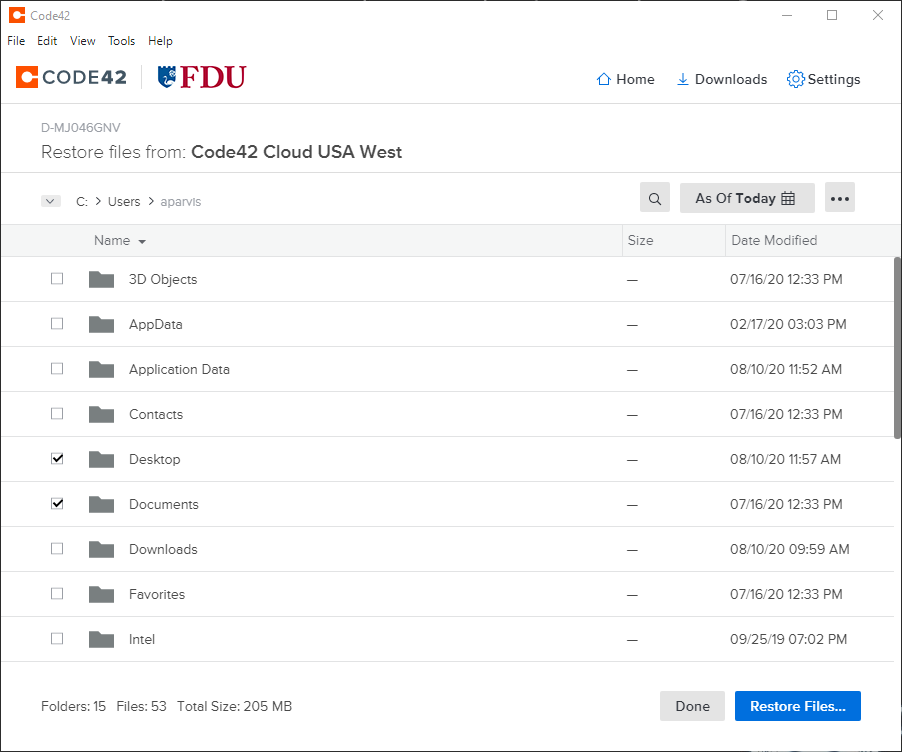
- You can select a date range from when you wish to restore from on the right-hand side
- Navigate to the folder(s) and/or file(s) you wish to restore and place a check next to each one
- Click “Restore Files”
- Select how CrashPlan will restore your files. Click “Go” when finished
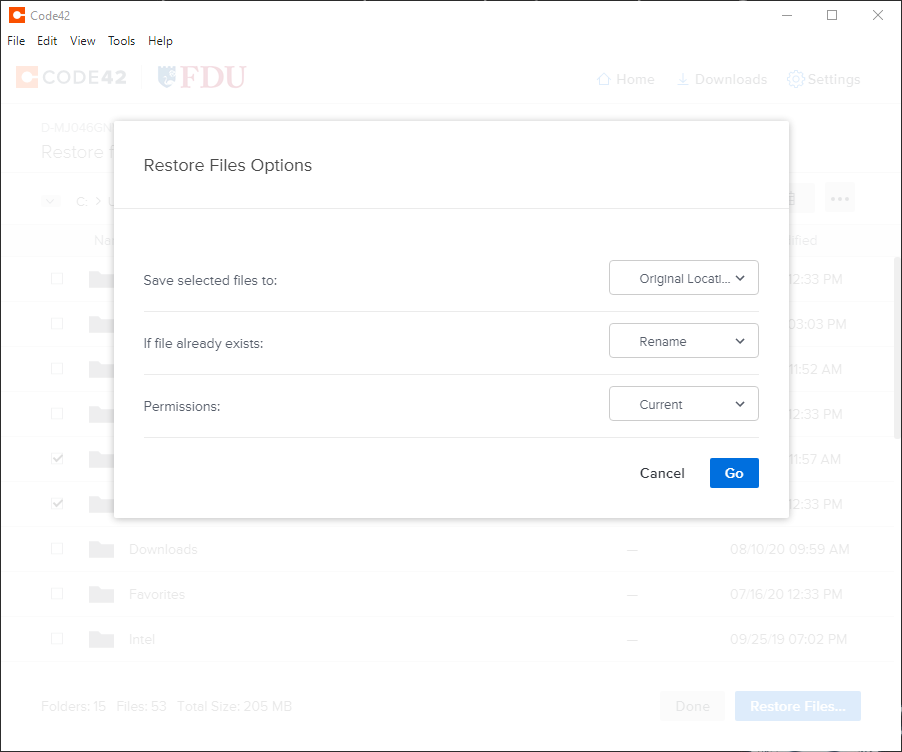
Note
Above are the recommended options for restoring files, this will help you find them more easily.
The time it takes to restore your files will depend on how much data is being restored, available system resources, and available bandwidth.
How to Add Backup Sets
Using CrashPlan you can create backup sets that will back up your data to additional devices utilizing a schedule. This is useful to have immediate access to critical files in the event of data loss.
This guide is only needed if you wish to have a local backup of your data.
Note
If you schedule multiple backup sets to run at specific times and the backup sets go to the same destination, ensure that these times do not overlap. This ensures good backup performance.
- Click the CrashPlan System Tray or macOS menu bar Icon
CrashPlan Icon
- Left-click on the gear symbol and left-click on “Open CrashPlan….”
- If prompted, log in to the FDU Single Sign-on Portal and proceed through the FDU DUO Multi-factor authentication procedures
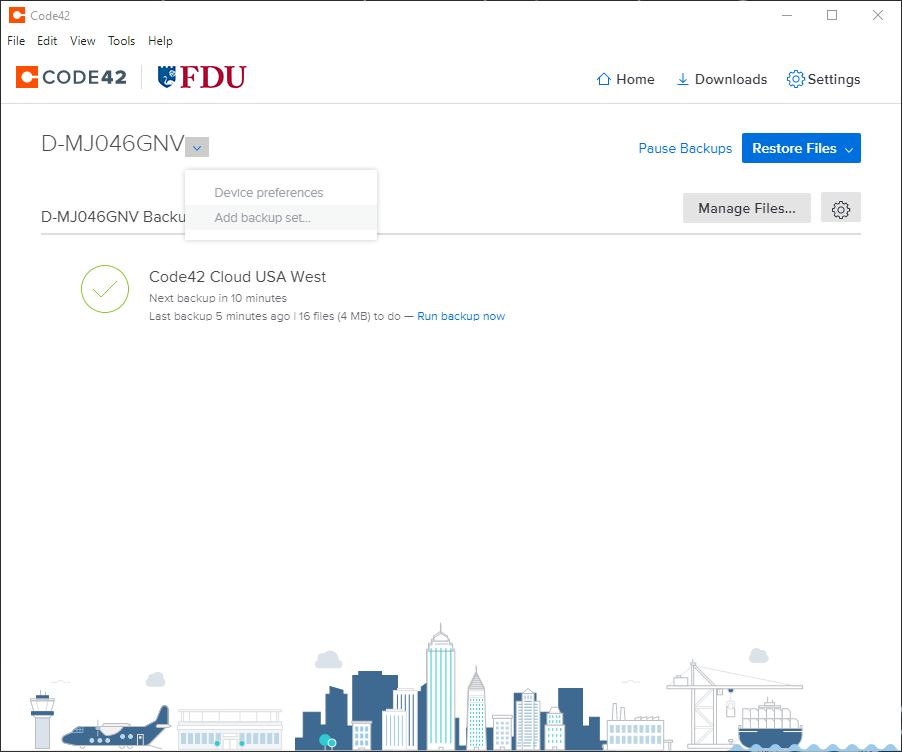
- From the CrashPlan console window, click the “Dropdown Arrow” symbol next to your device name to drop down a menu, then click “Add Backup Set…”
- The next window will be the Add Backup Set configuration window.
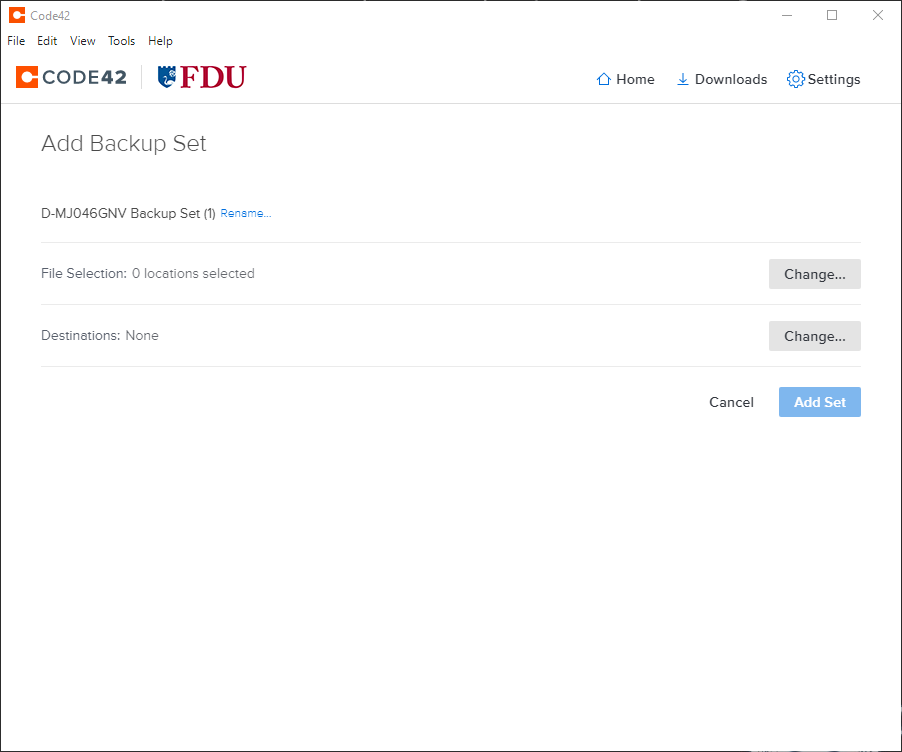
Note
The “Add Set” button will be un-clickable until it is completely configured.
- Click “Rename” to label your backup set
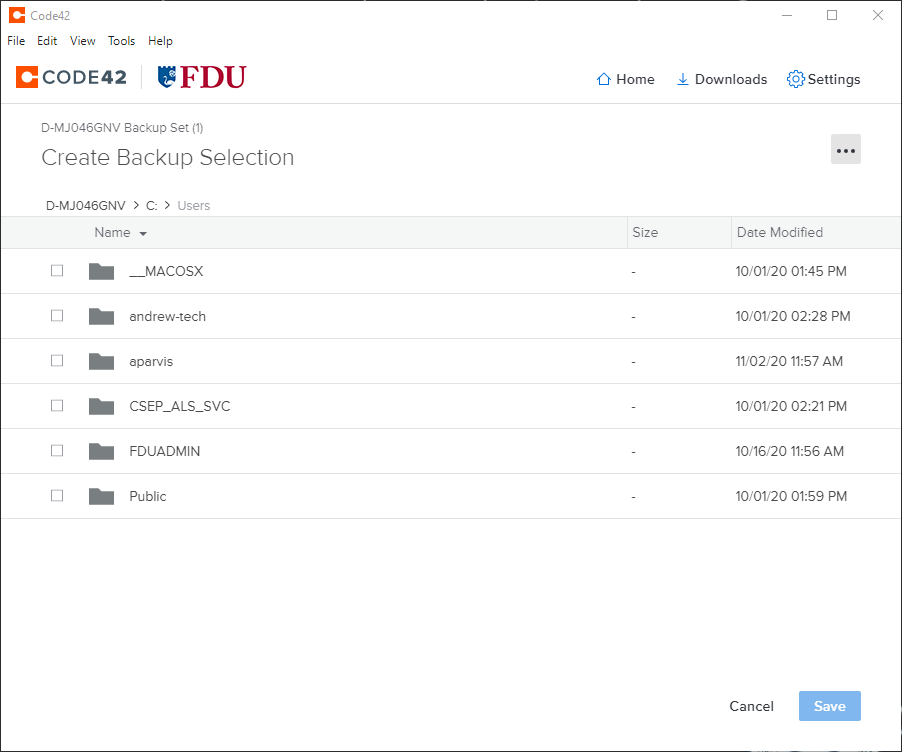
- Changing Selected Files, click “Change”, and select the files and folders you wish to backup to a local destination
- When finished click “Save“
- Click “Change” to set your destination for your backup
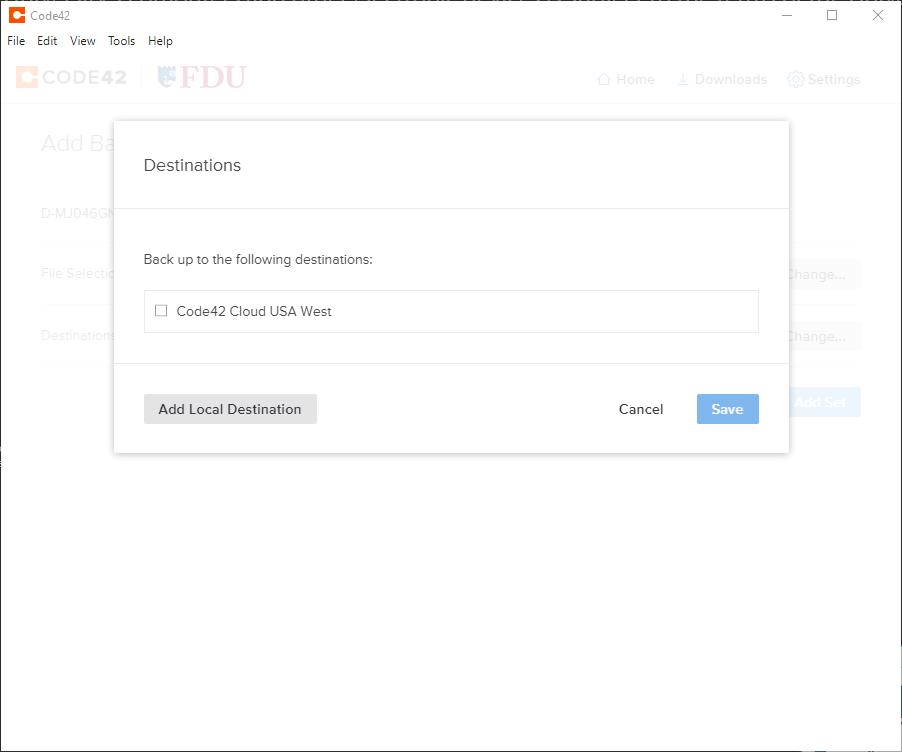
- Select your destination by clicking “Add Local Destination (usually an external hard drive) and click “Save“

- Click “Add Set” to finalize the setup and start backing up to a local location

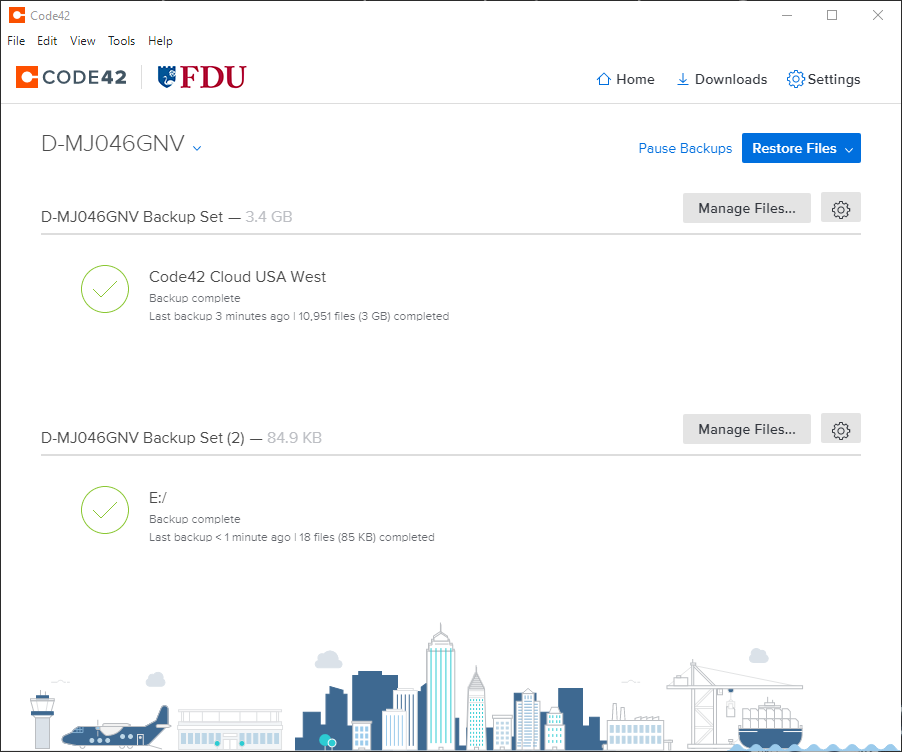
Your new back upset is finished and will begin backing up as configured.
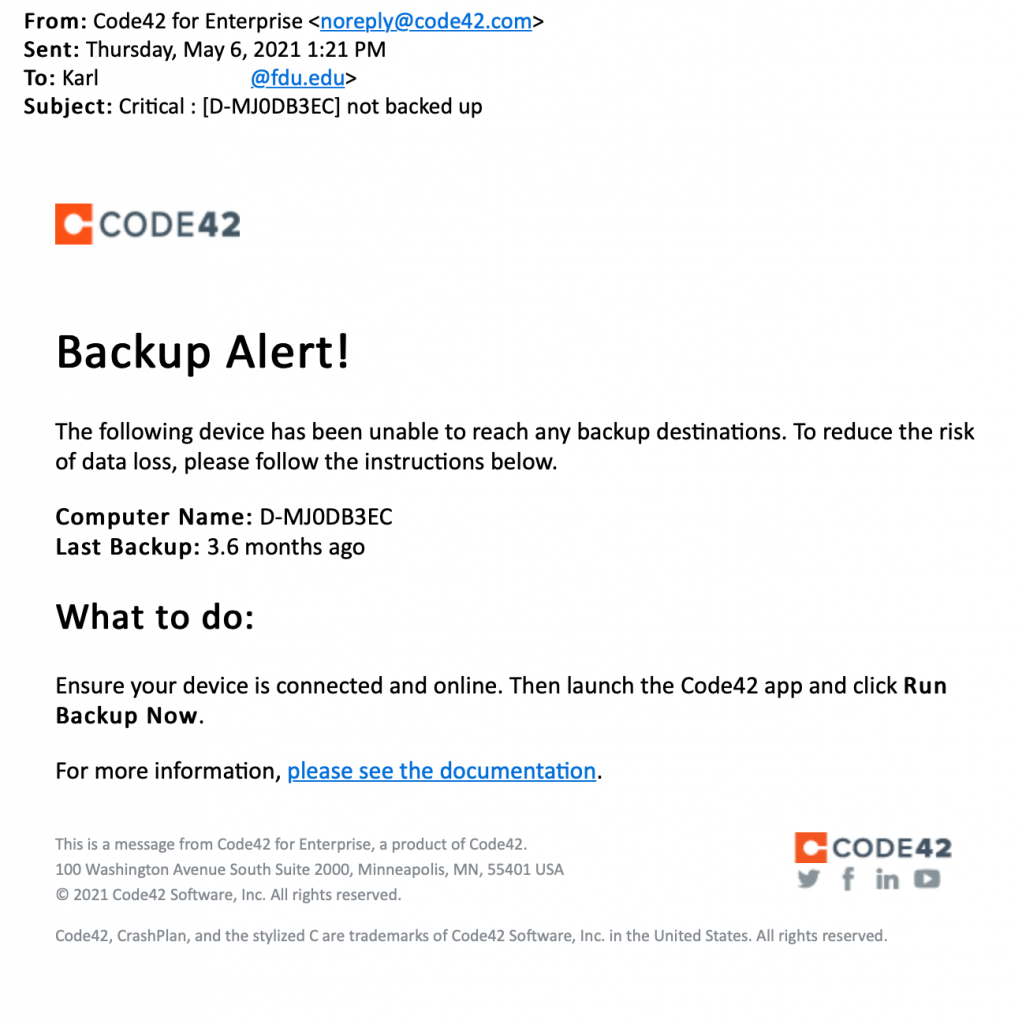
Backup Alert Email Notifications
CrashPlan will send users an email alert notifying of any incomplete backups of their devices.
- The CrashPlan email alert will be sent from CrashPlan for Enterprise <noreply@crashplan.com>
- The Subject line of the email will be labeled with: Critical: [Name of Device] not backed up
Backup Alert
You will receive an alert when your computer hasn’t backed up to CrashPlan for 5 calendar days. The email will look like the example below:
What to do if you get a backup alert
After receiving a CrashPlan backup alert email, you should locate the device the email specifies in need of backup. The CrashPlan device name will be listed in the Subject: line and Computer Name: line of the CrashPlan backup alert email. To locate the name of a CrashPlan device, left-click the CrashPlan “C” symbol icon in the Windows System Tray, also referred to as the notification area.
Tip
The Windows System Tray or notification area is usually located on the bottom right of the Windows taskbar, next to the displayed digital clock.
For macOS users left-click CrashPlan symbol icon on the macOS icon menu bar. The CrashPlan device name will be displayed in the console. Ensure the CrashPlan application displays the same name as the CrashPlan backup alert email you received.
CrashPlan Symbol Icon

CrashPlan Device Name
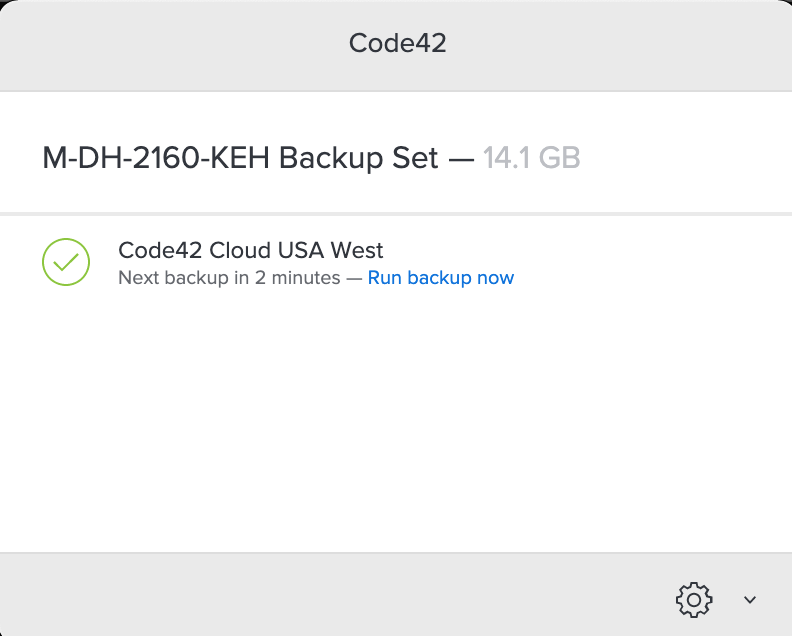
After locating the correct specified device stated in the CrashPlan backup alert email, force a backup of the device by performing the following:
- Left-click the “CrashPlan” System Tray or macOS menu bar Icon
CrashPlan Icon
- Left-click “Run backup now“
Note
The backup may take some time to complete. This depends on the length of time since CrashPlan’s last complete backup and the amount of new data needed to be backed up.
Getting Support
For additional support, contact the SAMI Service Desk to initiate a support request.