office 365

Managing Distribution Groups in Office 365

Resources for:
icon Close

A Distribution group (formerly known as mailing list) in Office 365 is a uniquely named email address that consists of multiple users and is managed by a designated owner. Distribution groups are intended to easily facilitate ongoing communications between a large and relatively fixed group of people.

There are a few important concepts to understand about distribution groups before we get started with group management:

  • Emails sent to a distribution group are distributed to all members of that distribution group.
  • Only users granted permission by the Distribution Group Owner can send emails to a particular distribution group. Permission to post (send emails) to a group is managed by USAN, and Group Owners should open a ticket with the Fairleigh Dickinson University Technical Assistance Center (UTAC) to change members that can post to the group.
  • A distribution group can be configured in such a way that emails sent to it can be held for approval and specific users can be made approvers (also known as moderators).
  • A distribution group has a unique email address attached to it. Users granted permission to send email to this email address can do so from any email client such as Outlook on the Web or Outlook installed in your computer, laptop, tablet or phone, Mozilla Thunderbird, Mac Mail and more.
  • You can request a distribution group by submitting the Distribution List/Shared Mailbox Request form located at FDU Forms Portal.
  • As a Distribution Group owner, you can change the group’s settings via the group’s management page on your Office 365 account (Outlook on the web).
  • As a Distribution Group owner, you can add or remove members (recipients) from your group via your group’s management page. This can be accomplished via Outlook on the web or by using the Outlook application installed on your machine.
Adding and Removing Distribution Group Users in Outlook for Windows
  1. Open “Outlook” on your computer
  1. Open “Address Book

You can open Address Book in two different ways:

  • One way is to click the “Address Book” icon located at the top when “Home” tab is selected:
  • The second way is by composing/creating a new email and clicking the “To” button:
  1. Select “All Distribution Lists” from the drop-down menu located under Address Book:
Graphical user interface, text, application, chat or text message

Description automatically generated
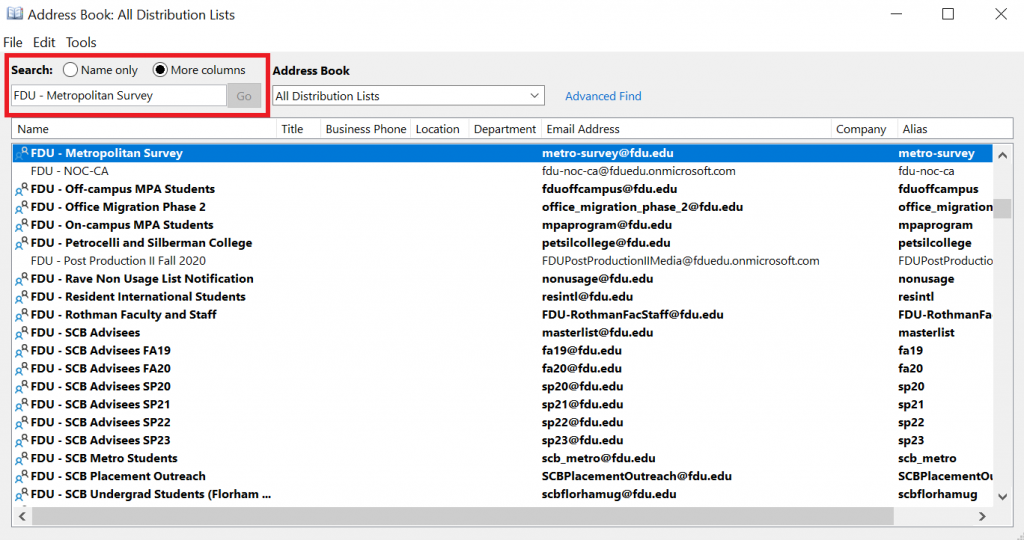
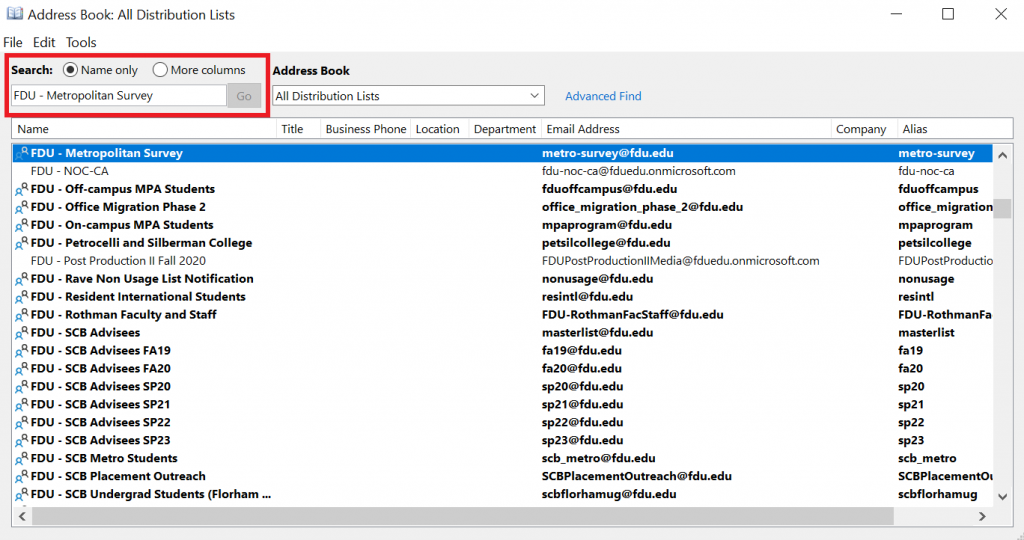
  1. Select “More Columns” and enter the name or email address of your distribution group in the search field as shown in the first screen capture below. If you see your distribution group on the list, highlight it and double click it. If you do not find your list using “More Columns”, then it might be easier to find by using the “Name only
Graphical user interface, text, application

Description automatically generated
  1. Click on “Modify Members…
Graphical user interface, text, application

Description automatically generated
  1. If you want to remove a member, then select the member from the members list, click “Remove” button and then click “OK
  1. If you want to add a member, click “Add” button
  1. Select “More columns” and enter the new member’s name in the search field
  1. You should see the user in the list. Select “Name only” to search again if you are unable to locate the user. Once you have found the user, highlight the record and click “OK
  1. Verify that the new member is in the member’s list and click “OK
Graphical user interface, application

Description automatically generated
  1. Click “Apply” and then click “OK
Graphical user interface, text, application

Description automatically generated
close
Adding and Removing Distribution Group Users in Outlook on the Web
  1. Go to “fdu.edu” in the browser of your choice
  2. Go to “Shortcuts” menu
  3. Click “Office 365 and Email
  4. Sign-in with your NetID and password
  5. Go to online Outlook app by clicking on the “Outlook” icon
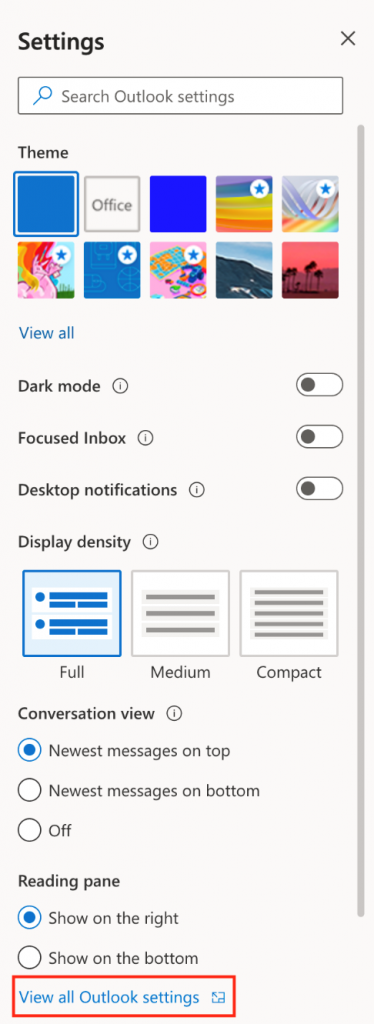
  1. Go to Settings by clicking on the “Settings” icon
  1. Click on “View all Outlook settings
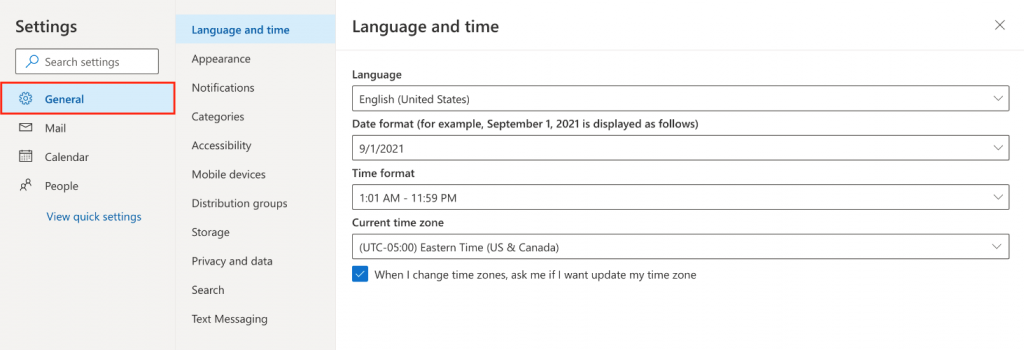
  1. Click “General
  1. Click on “this portal
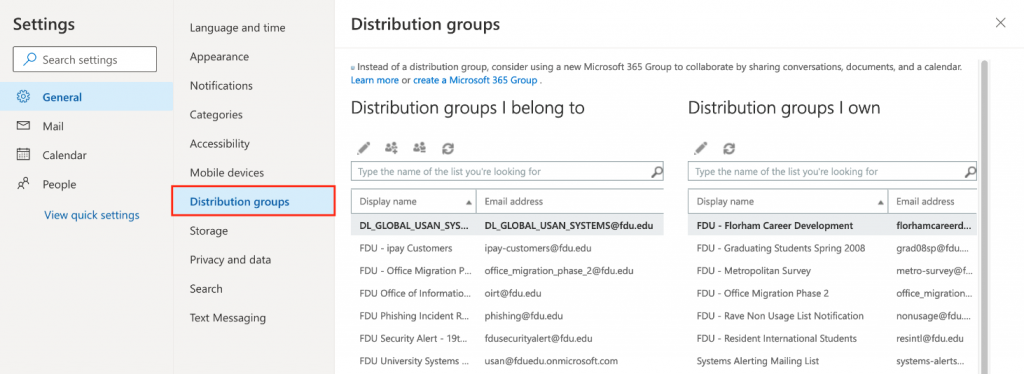
  1. Click on “Distribution groups

Here you see the list of distribution groups that you belong to and the list of distribution groups that you own.

How to open the Configuration page for a particular Distribution Group that you own in Outlook on the Web

  1. Select the distribution group that you would like to make changes to and then click “Edit” (Pencil Icon)
  1. You should see the distribution group configuration page
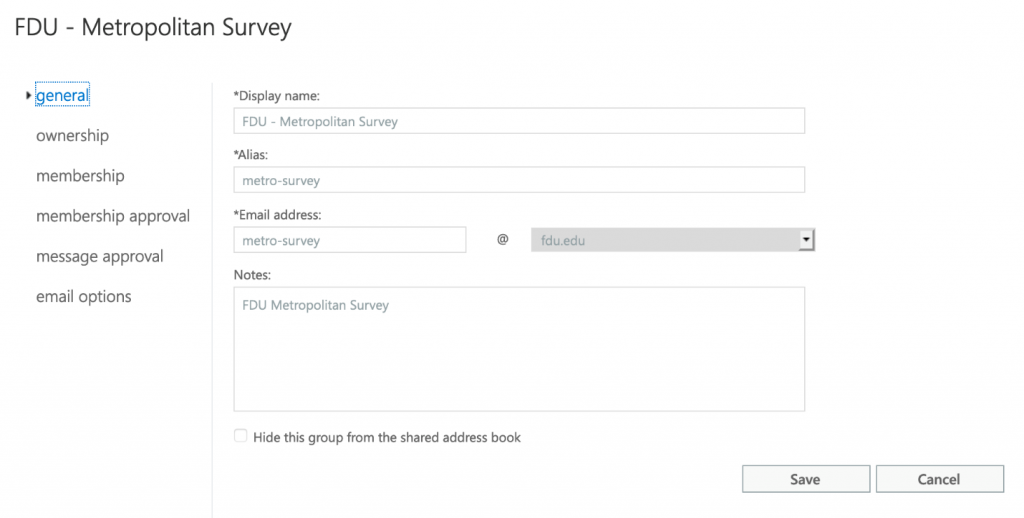
How to see the list of recipients (members) for this Distribution Group in Outlook on the Web

  1. Click on “membership

How to add recipients (members) to this Distribution Group in Outlook on the Web

  1. Click on “+” icon (Plus Icon)
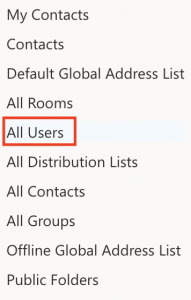
  1. Click “All Users
  1. Please enter the name or NetID of the user that you would like to add to this distribution group in the search text box
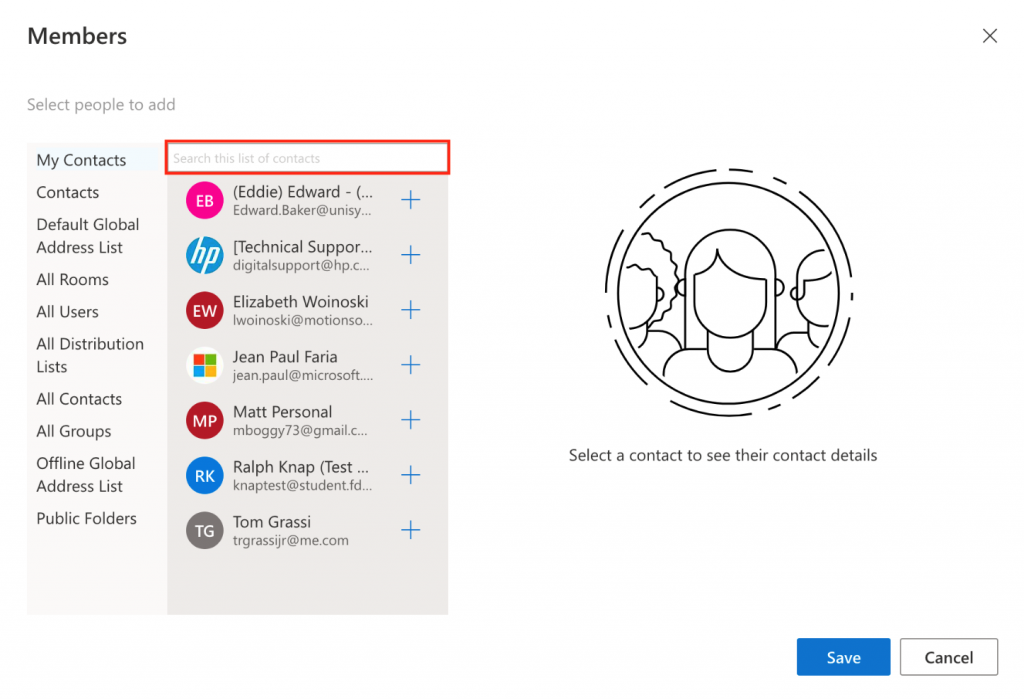
  1. Click “+” button beside the user that you would like to add from the search results (you can search and select more users if you would like)
  1. Click “Save” when you are done

Remove recipients (members) from this Distribution Group in Outlook on the Web

  1. Go to the membership list as shown in Step: 3 How to see the list of recipients (members) for this distribution group
  1. Click on the recipient (member) that you would like to remove

Tip

Press “Control” button while selecting recipient if you would like to select multiple recipients from the list.

  1. To select a range of adjacent recipients on the list, click the first recipient from that part. Now, press the “Shift” key and click last recipient in this part
  1. Click “” button at the top located below the “Members” title
  1. Click “Save” when you are done
close
Enabling Distribution Group Moderation and Adding Group Moderators
  1. Follow Step 1 & 2 in “Adding and Removing Distribution Group Users in Outlook on the Web
  1. Click “Message Approval
  1. Check (select) “Messages sent to this group have to be approved by a moderator”.
  1. Click “+” button under “Group Moderators

Note

By default, emails sent to the distribution group will be sent to the group owner for approval if you enable message approval and do not select any moderators.

  1. Click “All Users
  1. Please enter the name or NetID of the user that you’d like to add to this distribution group in the search text box
  1. Click “+” button beside the user that you’d like to add from the search results (you can search and select more users if you’d like)
  1. Click “Save” when you’re done. You’ll be taken to “Message Approval” screen
  1. You can add users’ emails from who do NOT require any approval by clicking “+” under “Senders who don’t require message approval” and following the same process as above
  1. You can choose who should be notified when an email sent to this distribution group has been held for approval -or- you can choose to disable these notifications as shown:
  1. Click “Save” again on “Message Approval” screen

Note

An email will NOT be held for approval from a group moderator who is allowed to send emails to the distribution group.

close
Last Modified:

Microsoft Office 365 Apps

Resources for:
icon Close

Microsoft Office 365 offers a comprehensive set of software tools that facilitate documentation, collaboration, and communication. These tools are available on the Web or as downloadable desktop Office 365 apps.
Below is a list of articles for each of the available tools in the Microsoft Office 365 environment. Each article contains information on what each application is and training on how to use them.


Outlook

Outlook allows you to connect and stay organized with your email, calendar, and contacts all in one place.


Word

Word allows you to collaboratively view, edit, and create high-quality shared documents.


Excel

Excel is the industry leading spreadsheet program, a powerful data visualization and analysis tool.


PowerPoint

PowerPoint is a slideshow presentation program that’s part of the Microsoft office suite of tools. PowerPoint makes it easy to create, collaborate, and present your ideas in dynamic, visually compelling ways.


Teams

Teams is a unified communication and collaboration platform that combines persistent workplace chat, video meetings, file storage, and application integration. Here you will find documentation on how to install and use Teams and all its features.


OneNote

OneNote is a cross-functional digital notebook. You can organize different notebooks into sections and pages with easy annotation and navigation tools.


OneDrive

OneDrive and Microsoft 365 make it easy to access, share, and collaborate with your classmates or co-workers on files from anywhere within FDU.


Lists

Lists you can Build and share lists to help you track issues, assets, routines, contacts, inventory, and more. You can get started with Microsoft Lists from Microsoft 365, from MS Teams or from within SharePoint.


Power Apps

Power Apps is a suite of apps, services, connectors, and data platform that provides a rapid application development environment to build custom apps. Using Power Apps, you can quickly build custom apps that connect to data stored throughout Microsoft 365.


Power Automate

Power Automate is a service that helps you create automated workflows between apps and services to synchronize files, get notifications, collect data and more.


Power BI

Power BI is a business analytics solution that lets you visualize your data and share insights across your organization or embed them in your app or website. It allows connections to hundreds of data sources and generate live dashboards and reports.


Planner

Planner makes it easy for your team to create new plans, organize and assign tasks, share files, chat about what you are working on, and get updates on progress.


Bookings

Bookings offers a simpler way to organize schedules and manage appointments. Microsoft Bookings includes a web-based booking calendar and integrates with Outlook to optimize your calendar and give your contacts the flexibility to book a time that works best for everyone involved.


Forms

Forms is an app that lets you create surveys, quizzes, and polls to collect real-time responses from students, collaborates and colleagues. It has built-in analytics to evaluate responses, and export results to Excel for additional analysis or grading.

Last Modified:

Microsoft Office 365 Suite for Students

Resources for:
icon Close

The Microsoft productivity suite subscription includes Office for the Web, stand-alone, downloadable Office 365 desktop clients and mobile apps. Included in the Microsoft Office suite of products are

  • Microsoft Word
  • Microsoft Excel
  • Microsoft PowerPoint
  • Microsoft OneNote
  • Microsoft Outlook
  • Microsoft Publisher
  • Microsoft Access

Available Platforms

  • Windows 10 or higher
  • Mac
  • iOS, Android, Other Devices
  • Browsers – Current versions of Safari, Chrome, Firefox, Microsoft Edge, and Internet Explorer

Eligibility

  • Current students that are registered for classes for the current term or a future term.

How to Install Microsoft Office 365 Pro Plus

Current students can download the latest version of Microsoft Office free of charge as part of the Microsoft Campus Agreement. Microsoft Office Suite can be installed on up to five devices.

Note

Students leaving Fairleigh Dickinson University (by graduating or otherwise) will need to purchase Office to continue using it. You will be prompted by Microsoft to purchase Office the next time you launch the software. If you don’t purchase Office, you will still be able to open the documents you created but won’t be able to edit them or create new documents.

  • Office 365 Pro Plus can be installed on Windows 10 or higher
  • Office 365 Pro Plus can be installed on Mac OS 10.13.6 (Sierra) or higher

Steps

  1. Visit the Office Portal

Office Portal

  1. Enter your FDU NetID and then click “Next”. This will re-direct you to the FDU SSO login page
  1. Enter your FDU NetID and Password then click “Sign In“. Follow the prompts on the next screen to authenticate with Duo
  1. In the Software window, click “Office“. Then click the “Install” button
Windows
macOS
  1. The software will be downloaded and installed on your computer. Your copy of Microsoft Office remains active until you leave the University, at which point, you will either need to uninstall it or purchase a license key

Note

Any computer with Office 365 Pro Plus installed on it must connect to the Internet at least once every 30 days so the status of your subscription can be verified. If you do not connect to the Internet every 30 days or less, Office 365 will go into reduced functionality mode. Once the computer reconnects to the Internet and the subscription status is verified, all features will become available again.

Last Modified:

Microsoft Scheduling Poll in Outlook

Resources for:
icon Close

Through Microsoft Outlook’s Scheduling Poll (formerly FindTime), you can select a few possible meeting times and send attendees a link to a poll that allows them to vote for what meeting time works best for them. Once a consensus is reached, you schedule the meeting for the preferred time.

Scheduling Poll Icon
  • Like the Scheduling Assistant, the Scheduling Poll allows you to preview attendees’ FDU Outlook calendars (if available) so that the best possible options can be selected. This particular aspect of the feature will be less useful for attendees who…
    • DO NOT have FDU Outlook calendars
    • Have FDU Outlook calendars, but don’t keep them up-to-date
  • The Scheduling Poll has other convenient features, including email updates, the ability to schedule a meeting automatically, and more.
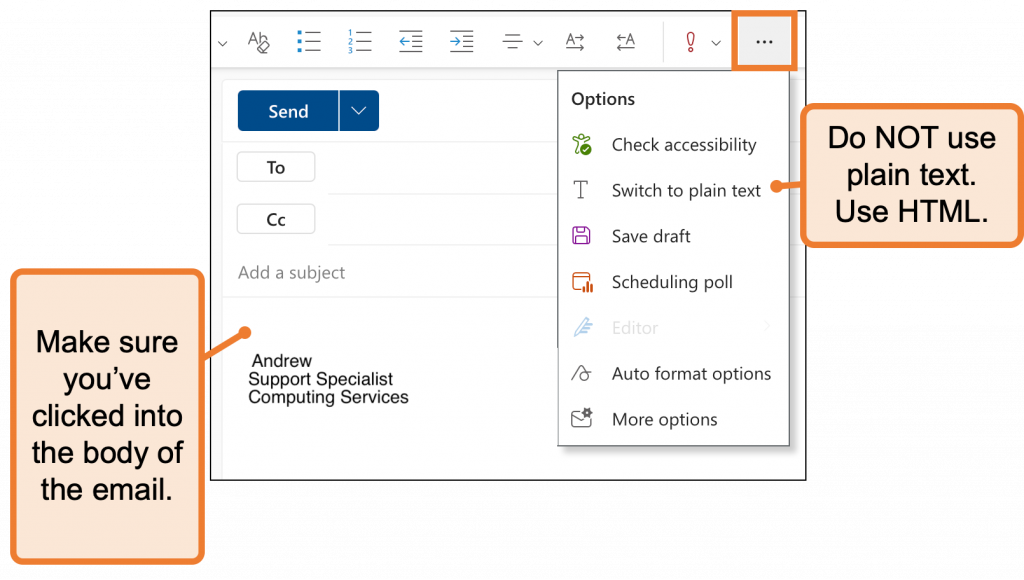
  • When using the Outlook web client, the Scheduling Poll feature is not available for emails composed in plain text. Emails must be composed in HTML.

Note

Doodle, a meeting scheduler add-in for Outlook, is not an approved application for use at FDU. Please use Microsoft Scheduling Poll as your meeting scheduling tool, as detailed in this article.

Where can I access the Scheduling Poll feature?

Windows

You can access the Scheduling Poll via the Mail or Calendar tabs of the Outlook desktop application.

In Mail, you can access the Scheduling Poll as follows:

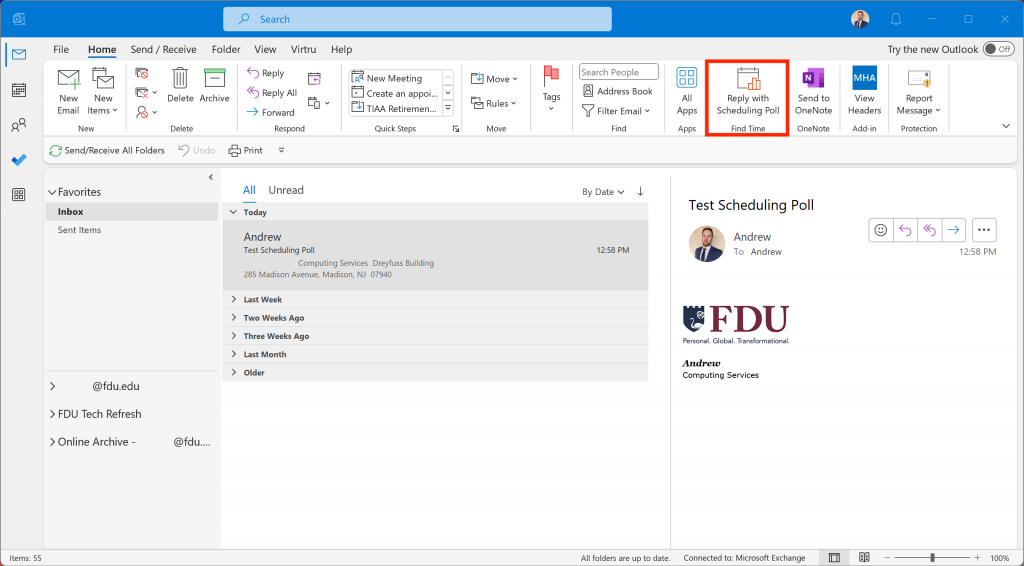
  1. Select “Reply with Scheduling Poll” on the “Home” tab when an email is open in the reading pane
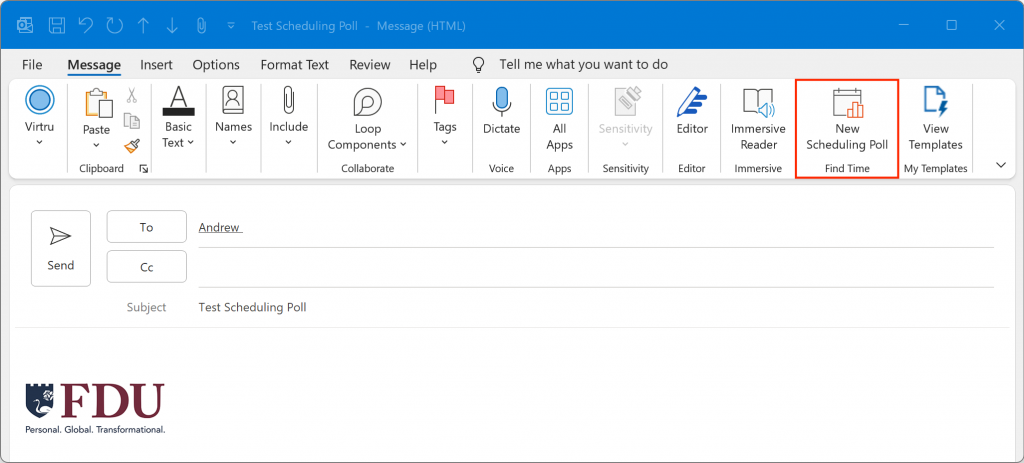
  1. Launch the compose pane by either creating a new message or hitting reply/forward for an existing message. List required recipients in the “To” field and optional recipients in the “CC” field. Then, on the “Message” tab, select “New Scheduling Poll”

In Calendar, you can access the Scheduling Poll as follows:

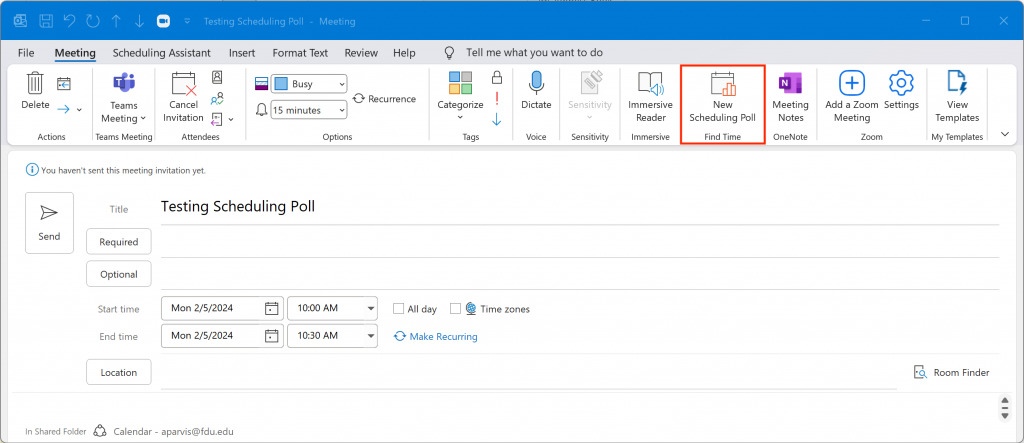
  1. Either by launching the compose form to create a new meeting event or opening an existing event in the edit form. List required attendees in the “Required” field and optional attendees in the “Optional” field. Select “New Scheduling Poll” under the “Meeting” tab
  1. Start a new message or event
  2. In the “Subject/Title” field, type what will eventually become the event’s name.
    • For example, “Team Meeting”
  3. In the “To/Required” or Optional fields, add the people who will be attendees for this meeting. They do not all have to be from FDU. Scheduling Polls can be sent to and completed by non-FDU email addresses
  4. Press into the body of the email and compose a message
  5. Press into the area of the email body where you want the link to the Scheduling Poll to show up
  6. Select the “Scheduling Poll” tab
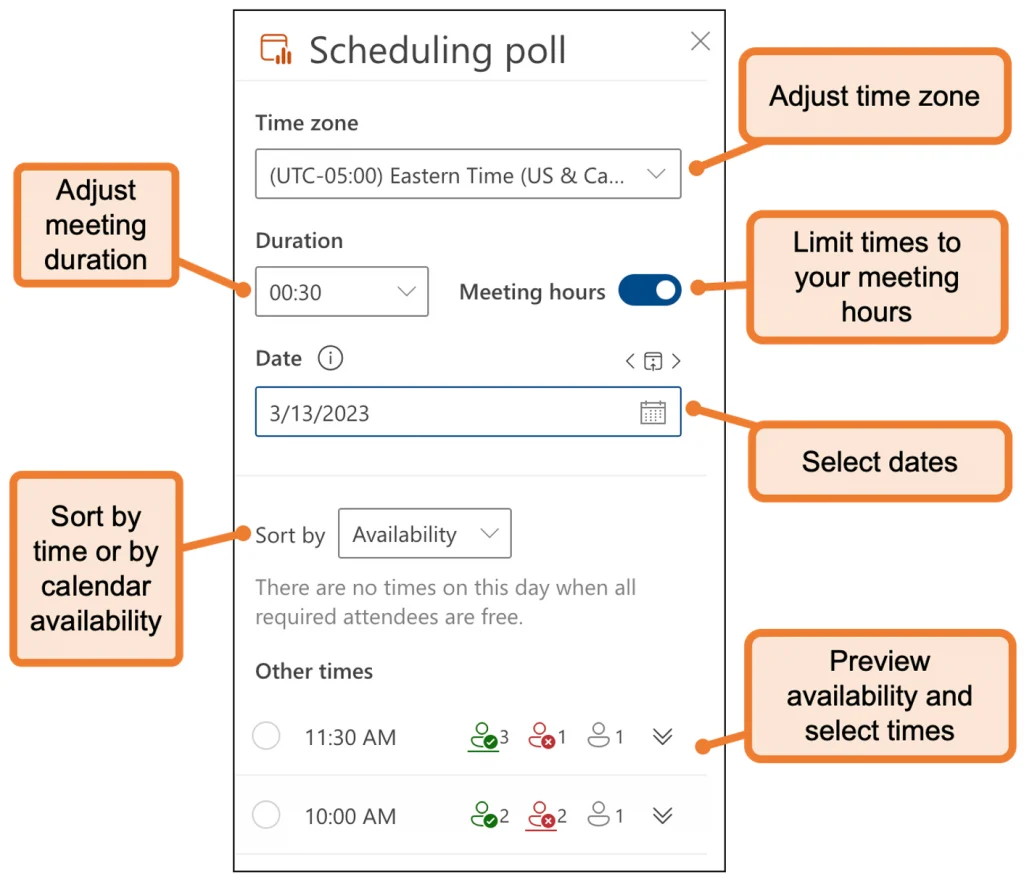
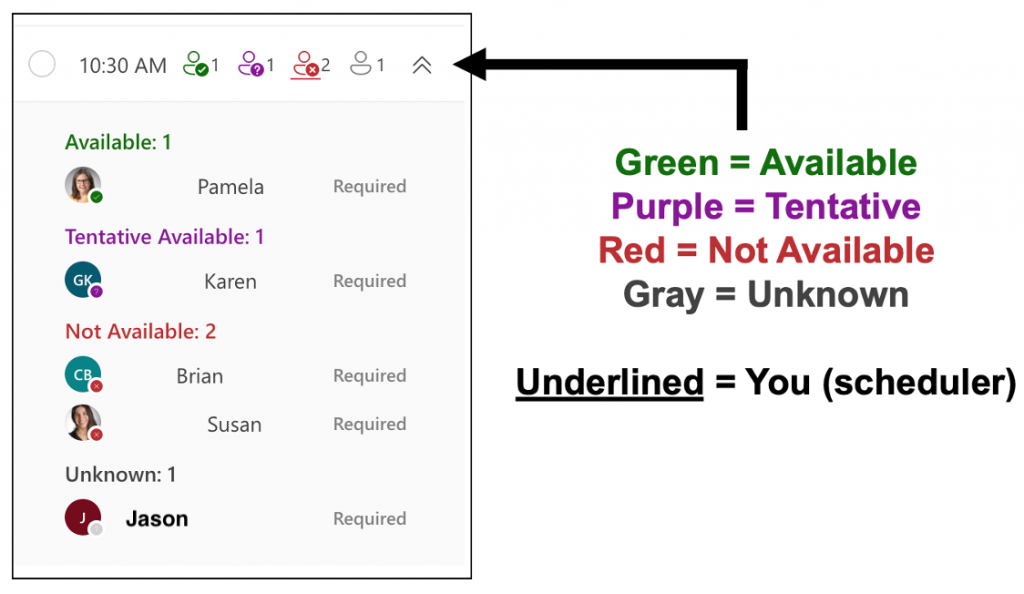
  7. A Scheduling Poll panel will open. From here, you can adjust your meeting duration, move between dates, and preview the availability of your attendees

Note

When selecting times for your poll, you can preview attendees’ FDU Outlook calendars, if available.

  1. Select times that work for as many attendees as possible, paying particular attention to the attendees whose attendance is most critical
  2. Press “Next” to proceed to the next step
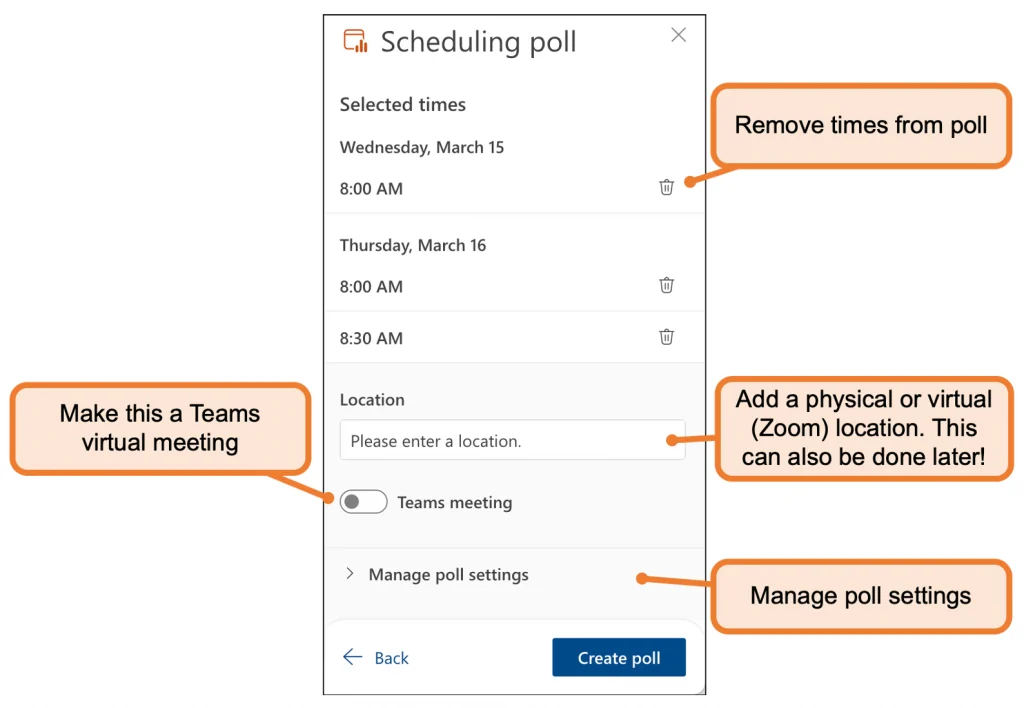
  3. A new panel will open with the ability to delete selected times or adjust the meeting location

Note

You can also turn the Teams meeting feature on if you want Outlook to automatically schedule a Teams virtual meeting for this event.

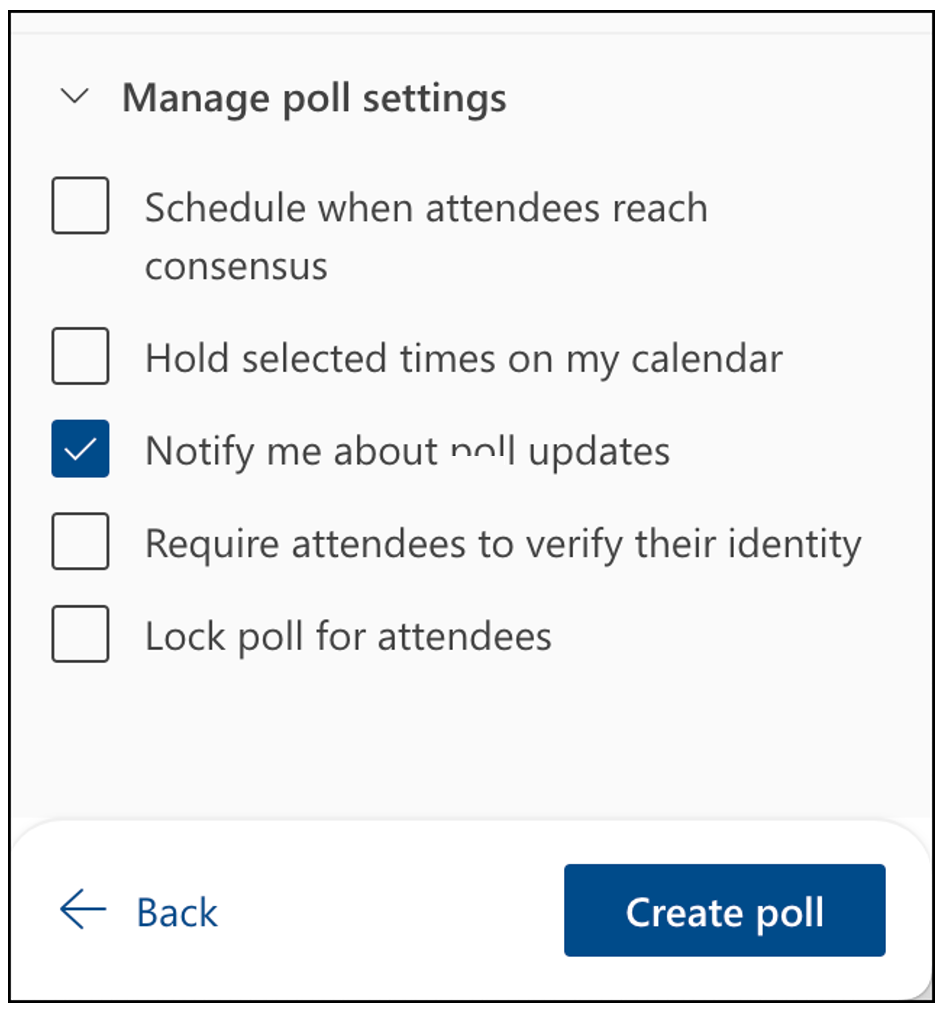
  1. Press “Manage Poll Settings” to expand the menu. Options include:
    • Schedule when attendees reach consensus – Automatically schedules a meeting and sends out an invite to attendees if everyone agrees on a particular time. If multiple times work, the earliest one will be selected.
    • Hold selected times on my calendar – Puts a temporary hold on the scheduler’s calendar for each of the selected times. These holds are removed when the final invite is sent out.
    • Notify me about poll updates – Outlook will send an email update to the scheduler whenever an attendee submits their poll response.
    • Require attendees to verify their identity – Forces respondents to verify their identity either by logging in to their Outlook account or entering a numerical code that Microsoft sends them.
    • Lock poll for attendees – Prevents attendees from adding more people to the meeting or suggesting new meeting times.
  1. When you’re ready, press “Create Poll”
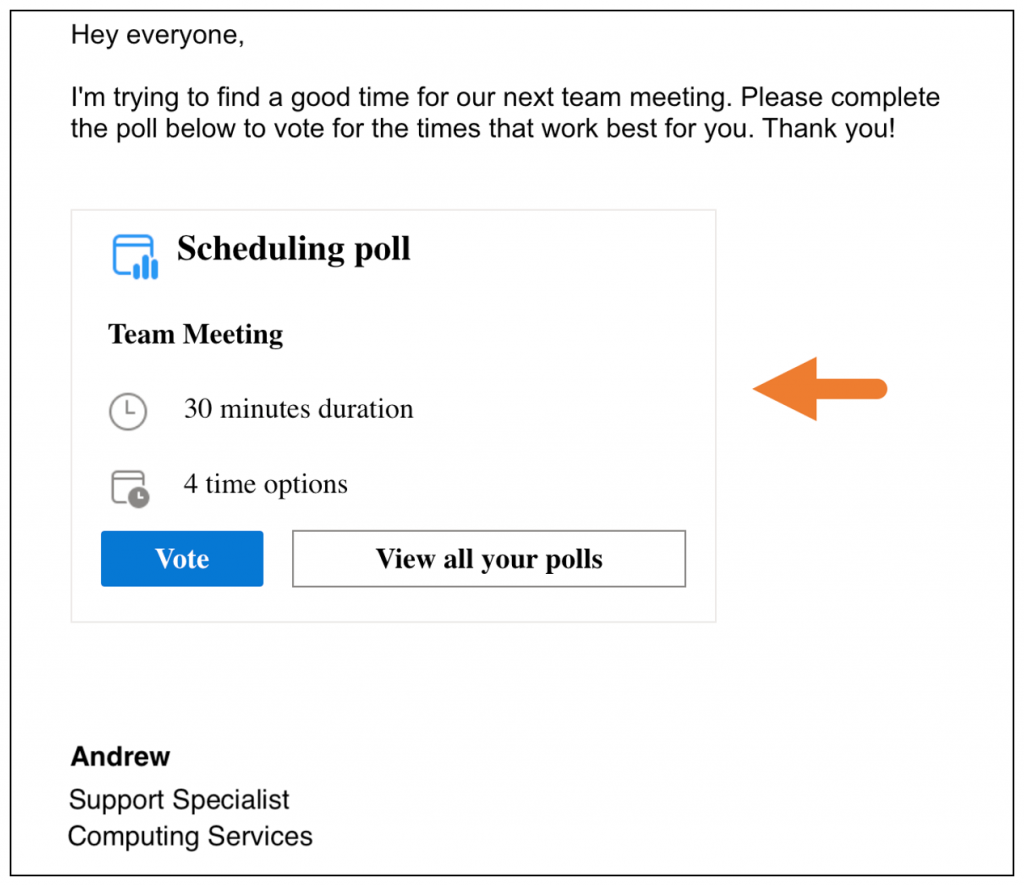
  2. A Scheduling Poll meeting link will be inserted into your email
close
macOS

You can access “Scheduling Poll” via the Mail tab on the Outlook desktop application.

  1. Open the Outlook desktop application on your Mac
  2. Start a new email message
  3. In the “Subject” field, type what will eventually become the name of the event. For example: “Team Meeting”
  4. In the “To” field, add the people who will be attendees for this meeting. They do not all have to be from FDU (Scheduling Polls can be sent to and completed by non-FDU email addresses)
  5. Press into the body of the email and compose a message
  6. Press into the area of the email body where you want the link to the Scheduling Poll to show up
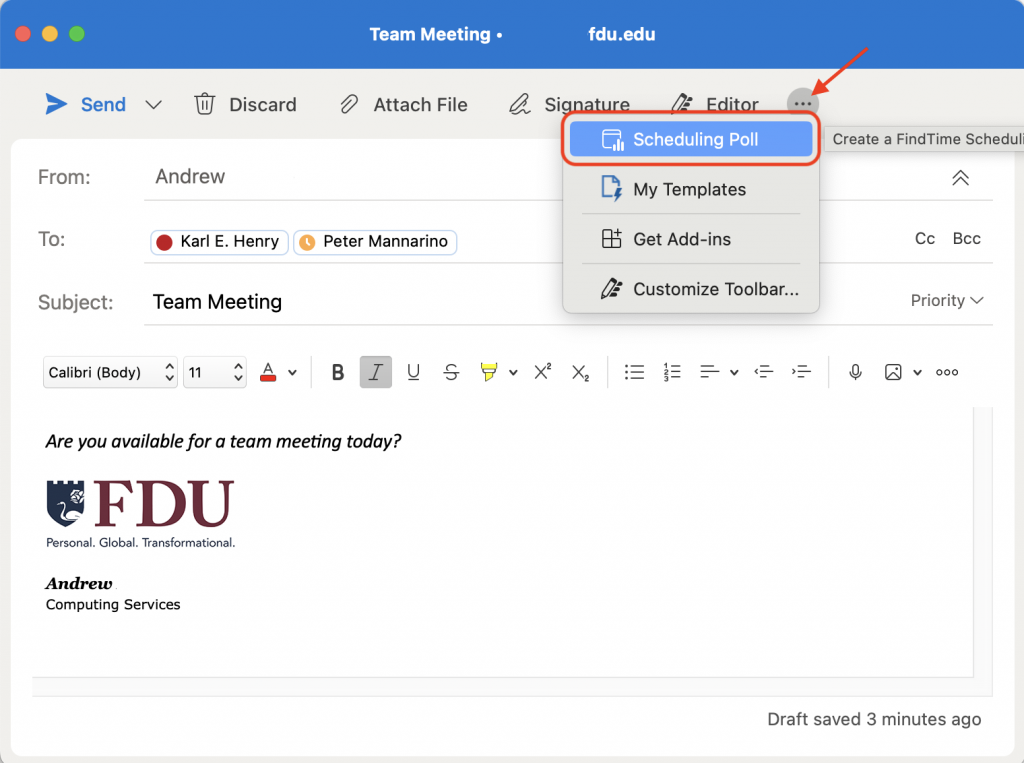
  7. Press on the “More Options” button and select “Scheduling Poll”
  1. A “Scheduling Poll” panel will open. From here, you can adjust your meeting duration, move between dates, and preview your attendees’ availability

Note

When selecting times for your poll, you can preview attendees’ FDU Outlook calendars, if available.

  1. Select times that work for as many attendees as possible, paying particular attention to the attendees whose attendance is most critical
  2. Click “Next” to proceed to the next step
  3. A new panel will open with the ability to delete selected times or adjust the meeting location

Note

You can also turn the Teams meeting feature on if you want Outlook to automatically schedule a Teams virtual meeting for this event.

  1. Press on “Manage Poll Settings” to expand the menu
  1. When you’re ready, press “Create Poll”
  2. A Scheduling Poll meeting link will be inserted into your email
close
Outlook on Web

You can access the “Scheduling Poll” feature via the Mail or Calendar web apps.

  1. Login to the FDU Office 365 Portal

FDU Office 365 Portal

  1. Create a new email or select an email to reply to
  1. In the “Subject” field, type what will eventually become the name of the event. For example, “Team Meeting”
  2. In the “To” field, add the people who will be attendees for this meeting. They do not all have to be from Fairleigh Dickinson University (Scheduling Polls can be sent to and completed by non-FDU email addresses)
  3. Press into the body of the email and compose a message
  4. Press into the area of the email body where you want the link to the Scheduling Poll to show up
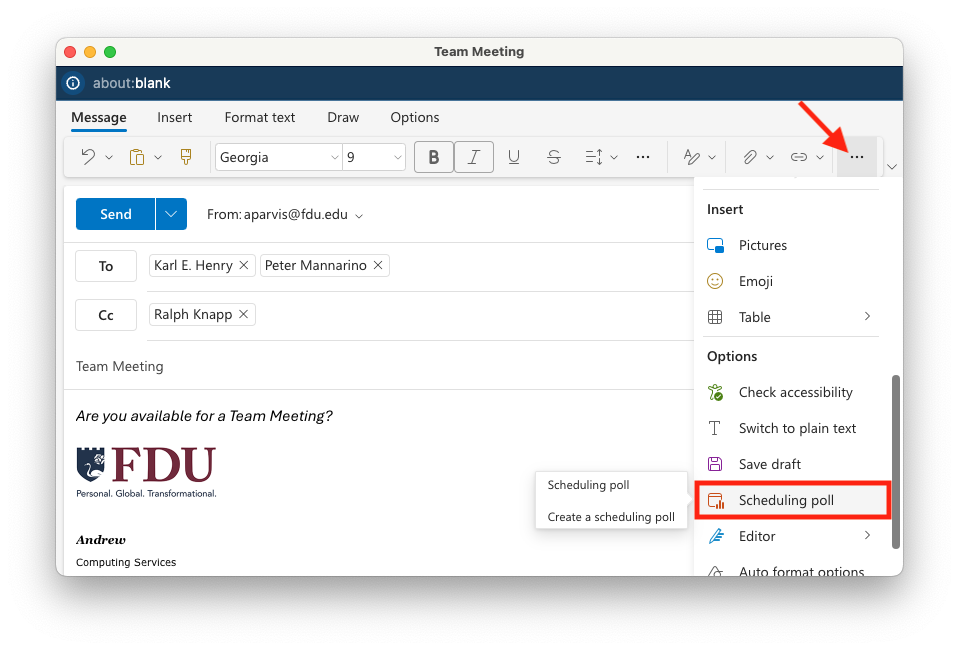
  5. Press on the “More Options” button and select “Scheduling Poll”

Note

If the “Scheduling Poll” option is grayed out, make sure you have clicked into the body of the email and that your email is being composed in HTML and not plain text.

  1. A “Scheduling Poll” panel will open. From here, you can adjust your meeting duration, move between dates, and preview your attendees’ availability

Note

When selecting times for your poll, you can preview attendees’ FDU Outlook calendars, if available.

  1. Select times that work for as many attendees as possible, paying particular attention to the attendees whose attendance is most critical
  2. Press “Next” to proceed to the next step
  3. A new panel will open with the ability to delete selected times or adjust the meeting location

Note

You can also turn the Teams meeting feature on if you want Outlook to automatically schedule a Teams virtual meeting for this event.

  1. Press on “Manage Poll Settings” to expand the menu
    • Schedule when attendees reach consensus – Automatically schedules a meeting and sends out an invite to attendees if everyone agrees on a particular time. If multiple times work, the earliest one will be selected.
    • Hold selected times on my calendar – Puts a temporary hold on the scheduler’s calendar for each of the selected times. These holds are removed when the final invite is sent out.
    • Notify me about poll updates – Outlook will send an email update to the scheduler whenever an attendee submits their poll response.
    • Require attendees to verify their identity – Forces respondents to verify their identity either by logging in to their Outlook account or entering a numerical code that Microsoft sends them.
    • Lock poll for attendees – Prevents attendees from adding more people to the meeting or suggesting new meeting times.
  2. When you’re ready, press “Create Poll”
  3. A Scheduling Poll meeting link will be inserted into your email
close

How do I finalize, vote, and manage a Scheduling Poll?

Sending a finalized Meeting Invite

This section describes how to manually send an invite from scheduling poll results. When setting up your poll, you can also have Outlook automatically send an invite if/when your attendees reach a consensus.

  1. Visit the Scheduling Poll Dashboard on the Web and enter your FDU NetID credentials

Scheduling Poll Web Dashboard

  1. Your scheduling polls will be listed. Press on a “Poll” to view attendees responses
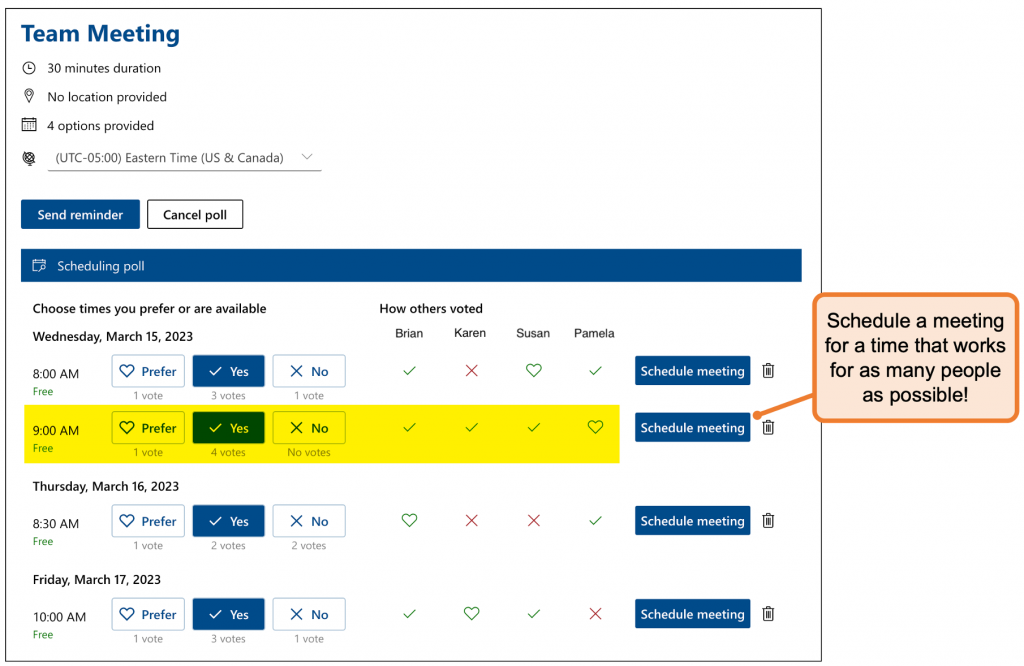
  2. Find a time that works for as many people as possible and press “Schedule Meeting”
  1. A new event invitation will open with all of your attendees listed. Make modifications as necessary, once done, press “Send”
close
Voting on a Scheduling Poll
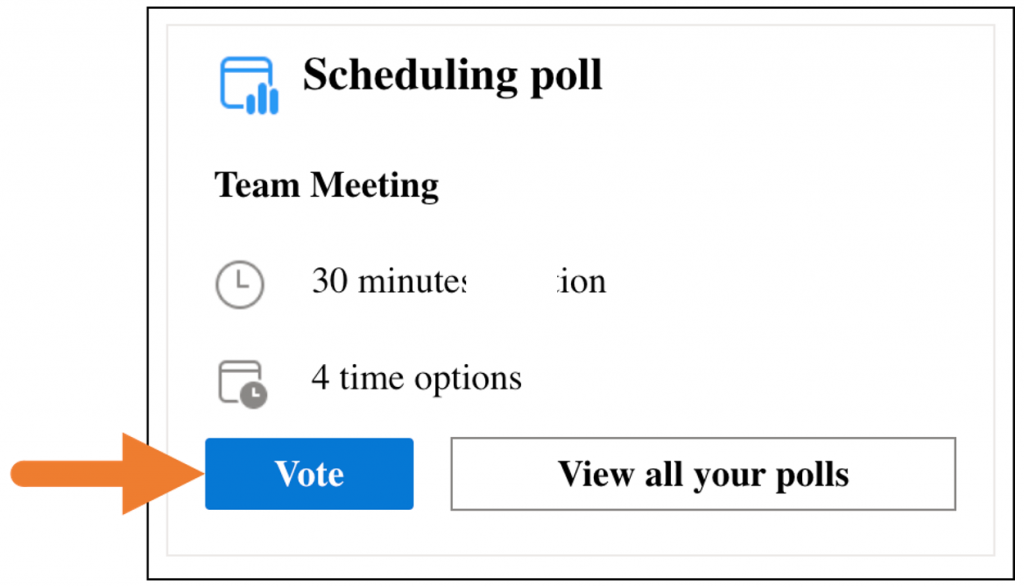
  1. When a scheduling poll is sent to you via email, press “Vote”
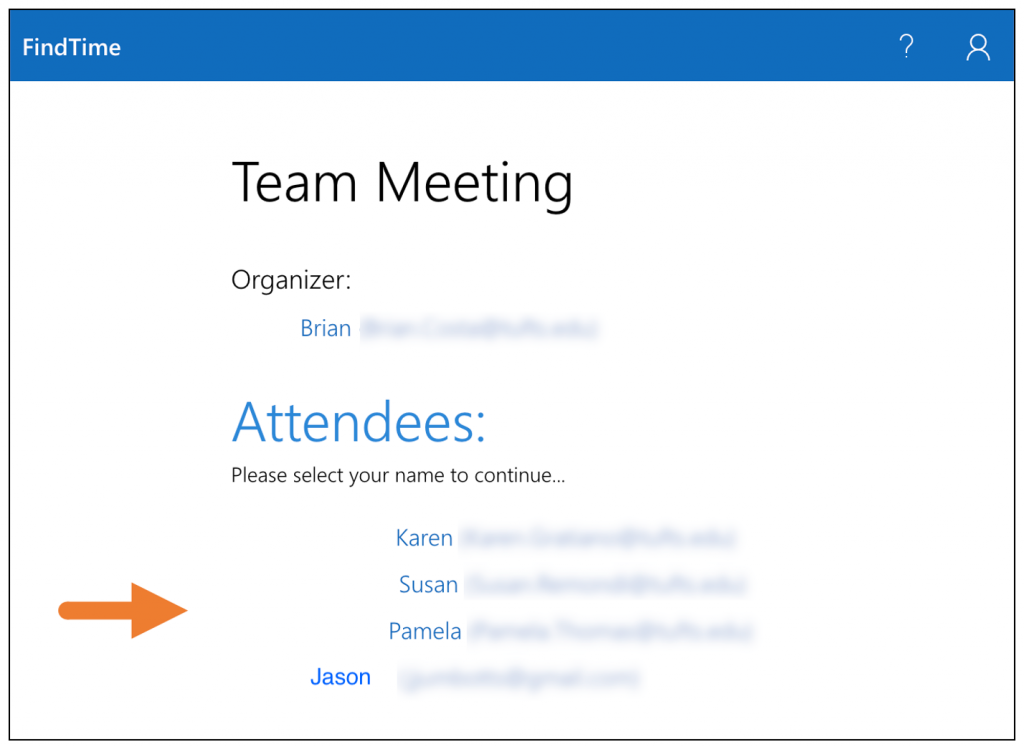
  1. If necessary, select your name from the list of attendees
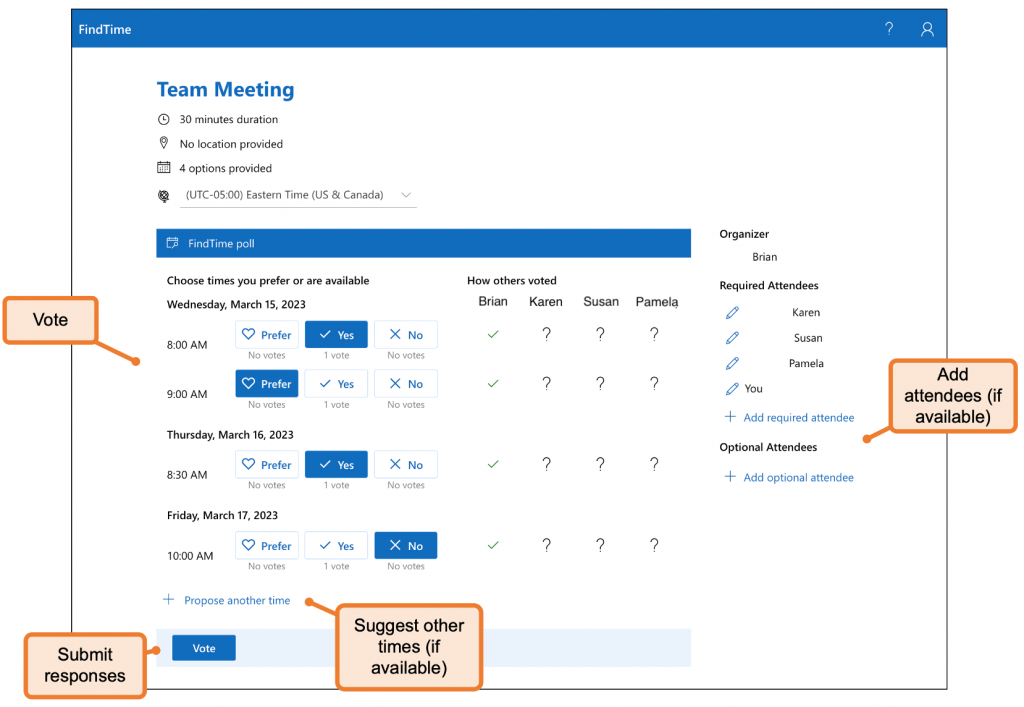
  1. Vote for meeting times by selecting “Preferred, Yes, or No”
  1. Depending on how the poll was set up, you may be able to add more attendees or meeting times to the poll
  2. When you’re ready, press “Vote” to submit your responses

Tip

If you need to change your responses, you can press the “Vote” button again in the original email and repeat the process.

close
Managing my Scheduling Polls

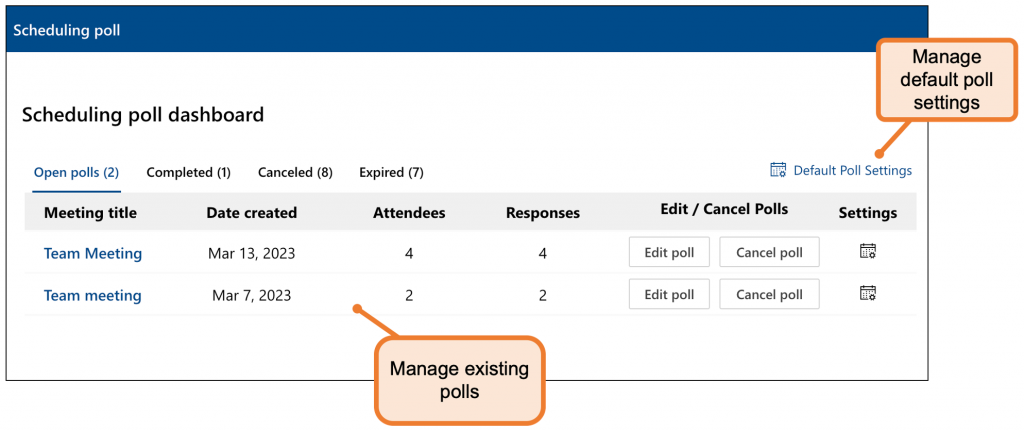
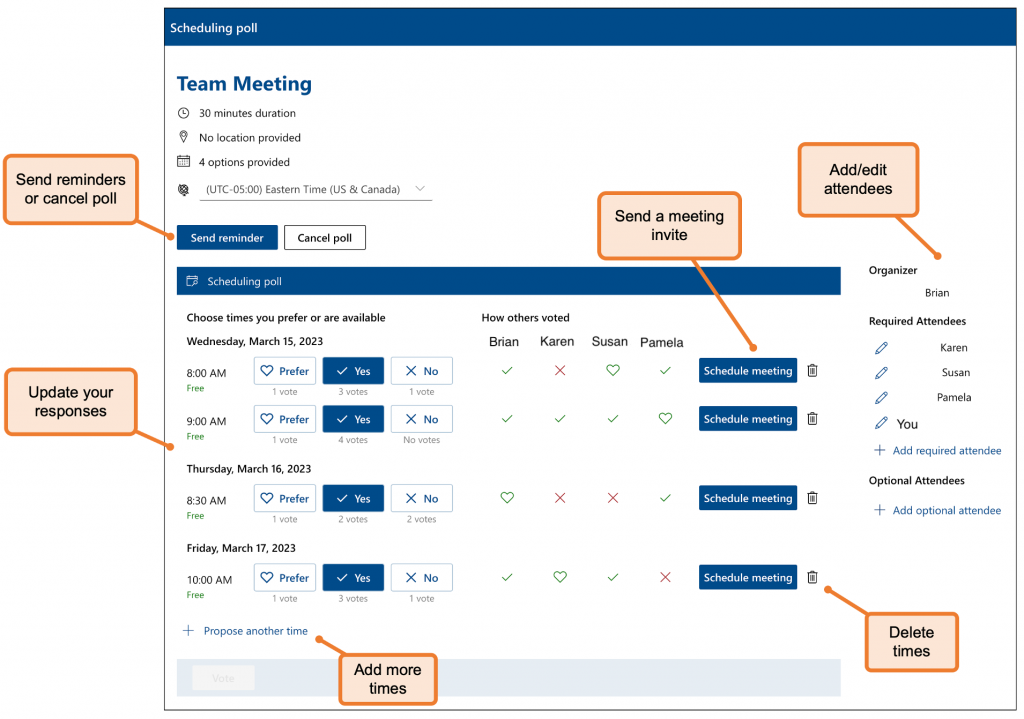
The Scheduling Poll Dashboard allows organizers to view all the polls they have created, manage them, and change default settings for new polls.

  1. Visit the Scheduling Poll Dashboard and enter your FDU NetID credentials

Scheduling Poll Web Dashboard

  1. Your scheduling polls will be listed. From here, you can manage polls and your default poll settings
  1. Press on the name of a poll to view responses
  2. A window will open where you can…
    • Send poll reminders
    • Cancel the poll
    • View attendee responses
    • Adjust your responses
    • Add/edit attendees and times
    • Send a meeting invite
close
Last Modified:

Microsoft Workplace Discount Program

Resources for:
icon Close
What is the Microsoft Workplace Discount Program?

The Microsoft Workplace Discount Program is an employee purchase program with Microsoft for eligible faculty and staff of Fairleigh Dickinson University. The Workplace Discount Program allows eligible employees to buy an annual subscription to Microsoft 365 Family or Microsoft 365 Personal at a discount for use on personal devices.

FDU faculty and staff members with a valid work email address can begin signing up for the Microsoft Workplace Discount Program with their FDU email address. Notification of your Microsoft Workplace Discount Program eligibility is sent to your FDU email address inbox.

To confirm eligibility, visit the link below and enter your FDU email address.

Microsoft Workplace Discount Program Eligibility

close
What is Microsoft 365?

Microsoft 365 is a subscription-based software service. The subscription includes premium Office applications like Word, Excel, PowerPoint, and Outlook. 1TB of OneDrive cloud storage, advanced security features, and support from Microsoft experts are also included with the subscription. 

The Microsoft Workplace Discount Program offers two types of Microsoft 365 subscriptions at a discounted rate:

  1. Microsoft 365 Personal – Includes subscription benefits mentioned above, for 1 person—discounted rate of 30%, $48.99 yearly or $6.99 monthly, usually $69.99 annually
  2. Microsoft 365 Family – Includes subscription benefits mentioned above, for up to 5 people in your family—discounted rate of 30%, $69.99 yearly or $9.99 monthly, usually $99.99 annually
close
What is the difference between Office 2021 (one-time purchase) and Microsoft 365 (subscription)?

Microsoft 365 is a subscription-based software service that comes with premium apps like Word, Excel, PowerPoint, OneNote, Outlook, Publisher, and Access (Publisher and Access available on PC only). The apps can be installed on multiple devices, including PCs, Macs, iPads, iPhones, Android tablets, and Android phones. Microsoft 365 also comes with services like 1 TB of OneDrive storage, and Microsoft chat and phone support. With a subscription, you get the latest versions of the apps and automatically receive updates when they happen.

Office 2021 is sold as a one-time purchase, which means you pay a single, up-front cost to get Microsoft 365 apps for one computer. One-time purchases are available for both PCs and Macs. However, there are no upgrade options, which means if you plan to upgrade to the next major release, you’ll have to buy it at full price.

To learn more about the differences between Microsoft 365 and Office 2021 select the links below:

The Differences Between Microsoft 365 and Office 2021

Office Comparison Chart

close
What are the steps to make a Microsoft Workplace Discount Program purchase?
  1. Sign Up: Visit the Microsoft Workplace Discount Program page. Enter your corporate email address. Click on ‘Get Started’ button

Microsoft Workplace Discount Program

  1. Confirm: If you are eligible, an email will be sent to your corporate email address inbox with a link that will validate your eligibility for the program
  2. Sign In: Once your eligibility is confirmed and you register for the program with your personal Microsoft account that is associated with your personal email address, you can begin the purchase process by viewing the discounts available to you based on your Workplace Discount Program benefit eligibility

Microsoft Account

  1. Shop: Your purchase is processed and completed in the Microsoft Store. You, the eligible employee, can install Microsoft 365 on your personal devices after the purchase is complete. Once you have purchased Microsoft 365 Family, you can share your subscription with up to 5 additional members of your household.
close
Installing your Microsoft 365 subscription software on a Mac or PC

Use your personal Microsoft Account and password when completing the installation and login credentials for your Office software. This is the same personal Microsoft Account used to complete the registration and purchase process of the Microsoft Workplace Discount Program. Your FDU e-mail address and credentials should not be used.

Download for Windows

Download for macOS

close

For commonly asked questions about the Microsoft Workplace Discount Program, visit the link below:

Microsoft Workplace Discount Program FAQs

Last Modified:

Office 365 Training Guide

Resources for:
icon Close

Introduction to Office365

Fairleigh Dickinson University uses Office365, a new E-mail system that greatly expands the quota of data stored per user and features enhanced services such as Word Online, Excel online and PowerPoint online. Office365 service can be accessed via office365.fdu.edu from a web browser, or a configured mail client such as Outlook or Thunderbird.

The manual available for download below is intended to assist users with an FDU email address and non-FDU issued equipment to migrate their e-mail account to Office365.

Last Modified:

Reporting Phishing or Junk Emails

Resources for:
icon Close
Outlook Web Access (Office365.fdu.edu)
  1. Click on the email that you would like to Mark as Junk or Mark as Phishing
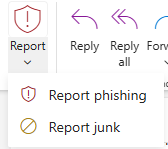
  1. Click the down arrow next to the Junk button
  1. Click on the appropriate button to report the email (Junk, Phishing or Block)
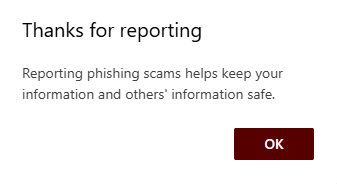
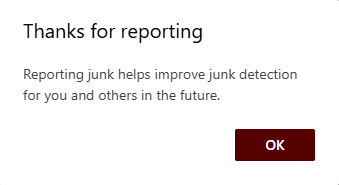
  1. Once you report the email, a copy of the email is automatically sent to the FDU University Systems team and Microsoft for review to improve the spams going forward
close
Microsoft Outlook for Windows or Mac
  1. Click on the email that you would like to Mark as Junk or Mark as Phishing
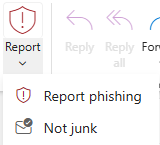
  1. Click on the Report Message button
  1. Click the appropriate option button (Junk or Phishing)
  1. Once you report the email, a copy of the email is automatically sent to the FDU University Systems team and Microsoft for review to improve the spams going forward
close
Last Modified:

Setting up Microsoft Bookings

Resources for:
icon Close
  1. Visit the FDU Office 365 Portal using any web browser
  1. Sign in to the FDU Single-Sign-On (SSO) page using your FDU NetID credentials
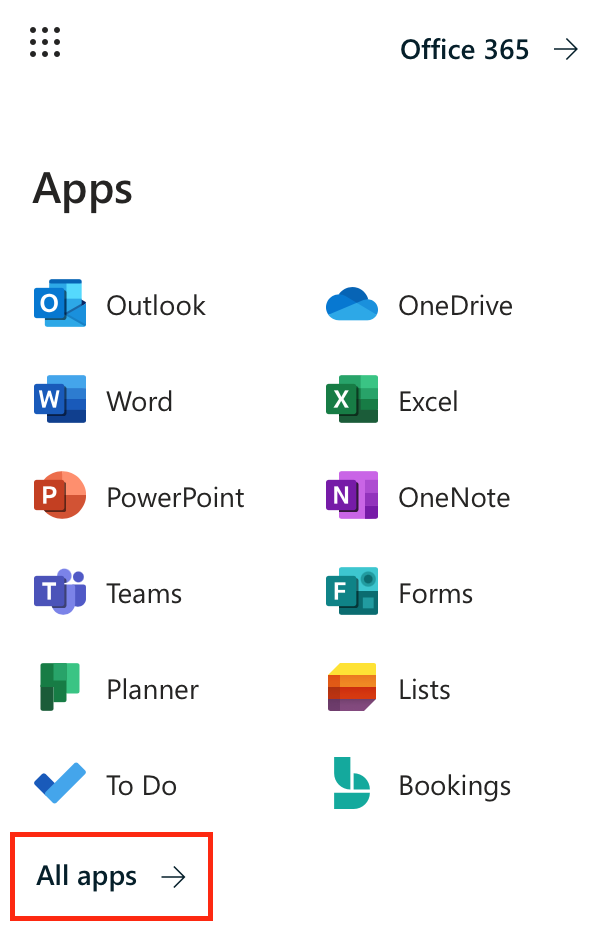
  1. In the upper left corner, click the dotted square and select All Apps
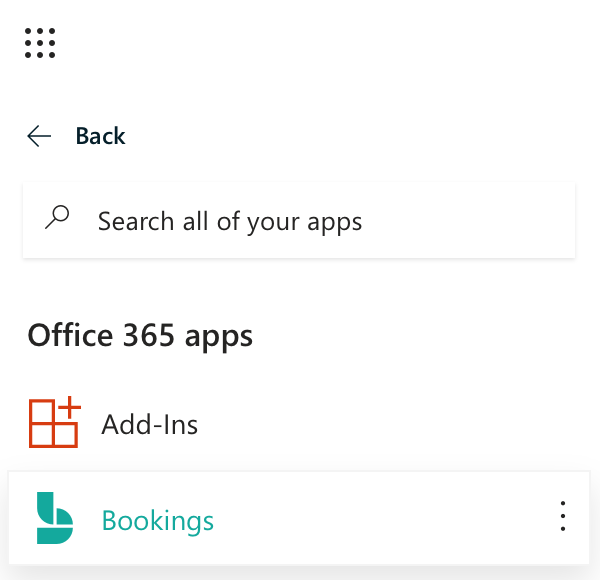
  1. In the All Apps menu, choose Bookings
  1. Microsoft Bookings will open. Click the Get it Now button to begin
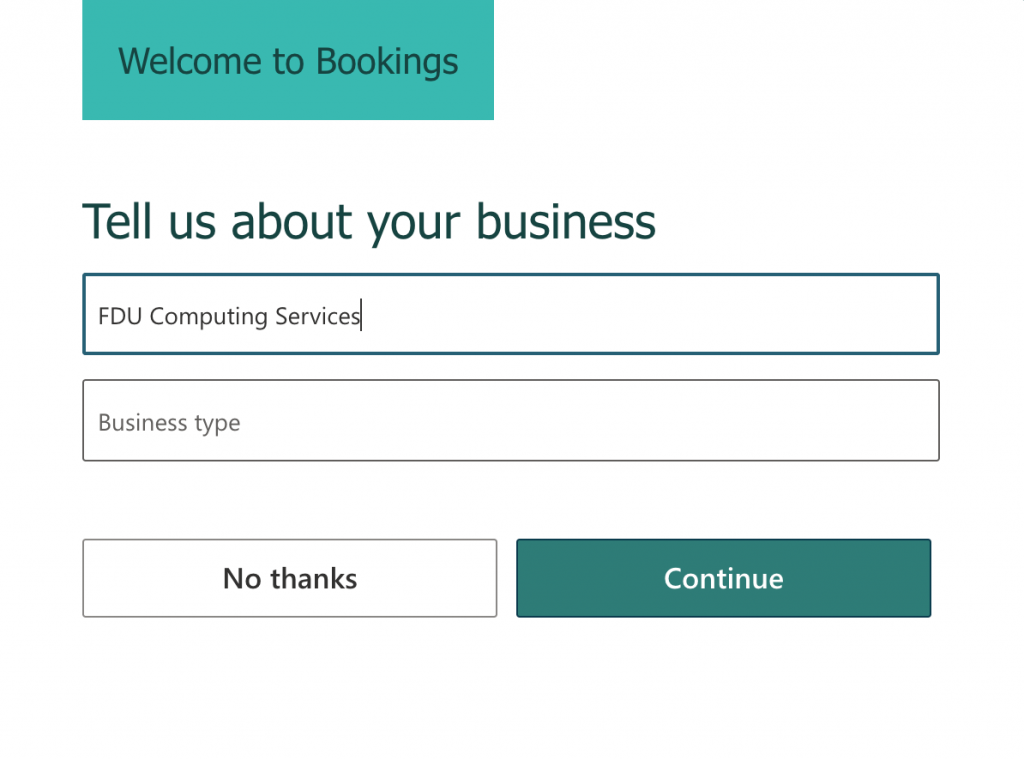
  1. The next page will ask for two pieces of information: Business name and Business type. Enter your Department name or your First and Last Name. Click Continue

Note

Designating a Business Type is not required to be able to Continue.

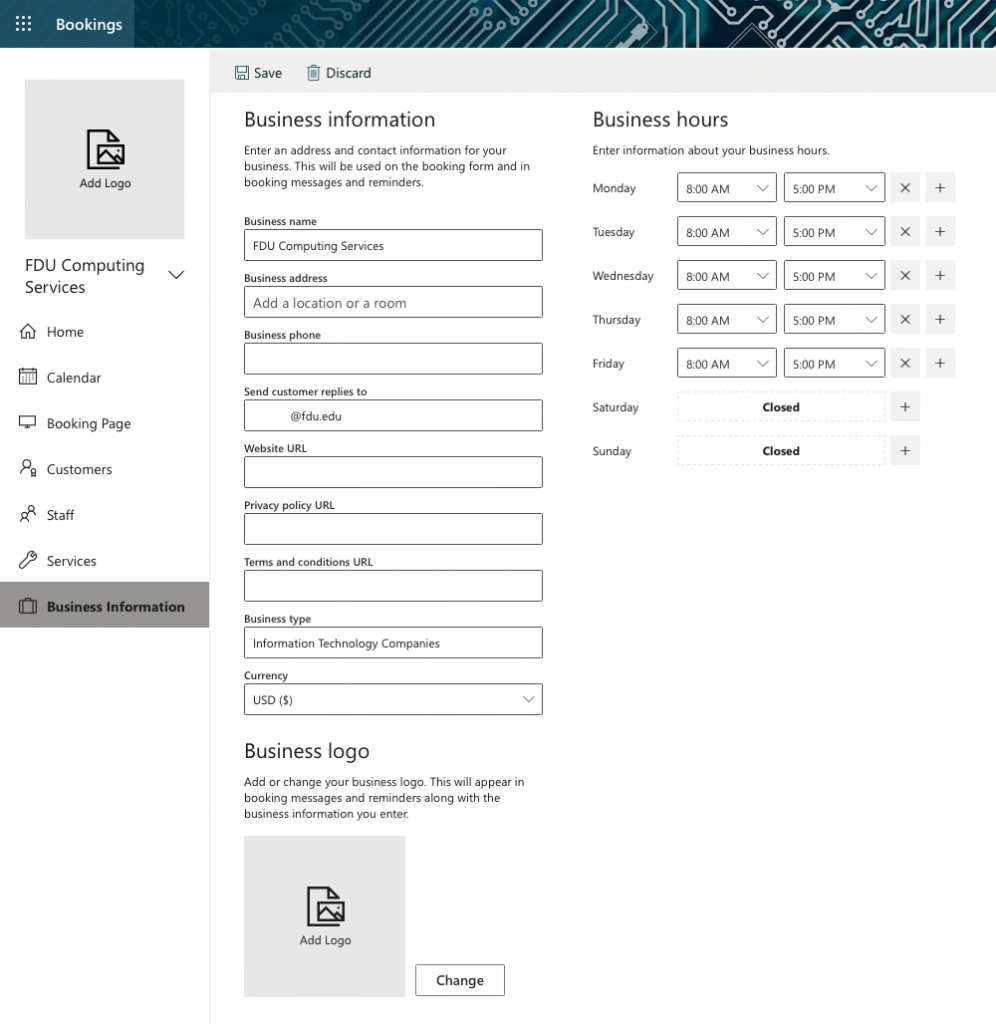
  1. Once your Bookings page loads, the first section you should complete is Business Information. Click  Business Information in the left menu
  1. On the Business Information page, you can enter your business or department address, other contact information, upload a business logo, and set up your business hours
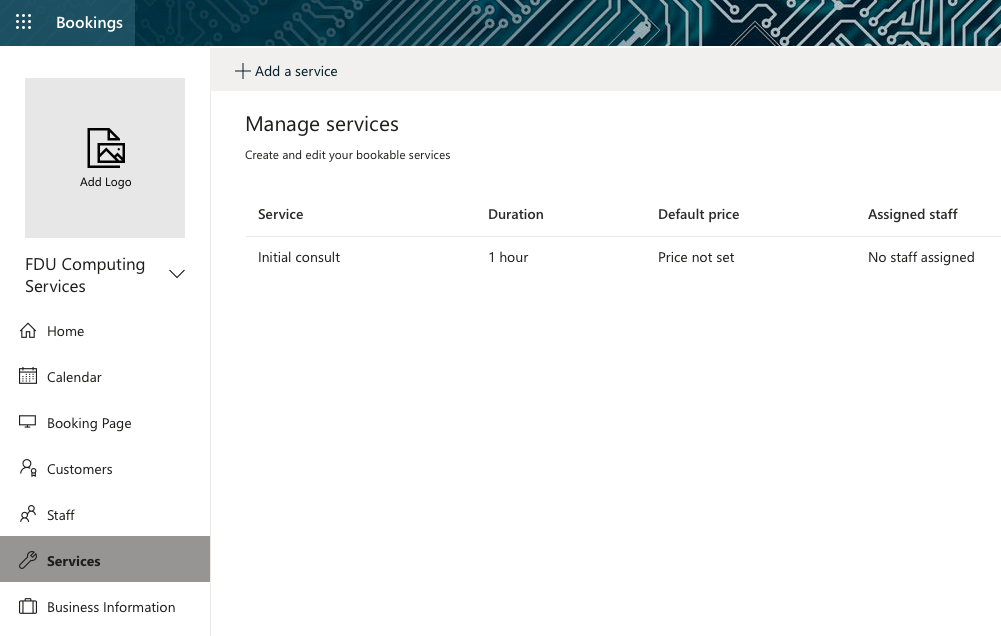
  1. Next, set up your service offerings. Click Services from the left menu

Note

By default, Microsoft Bookings will add a service called “Initial Consult.” You can click the pencil next to this service and make it your own, OR you can add a new service by clicking Add a service at the top of the screen.

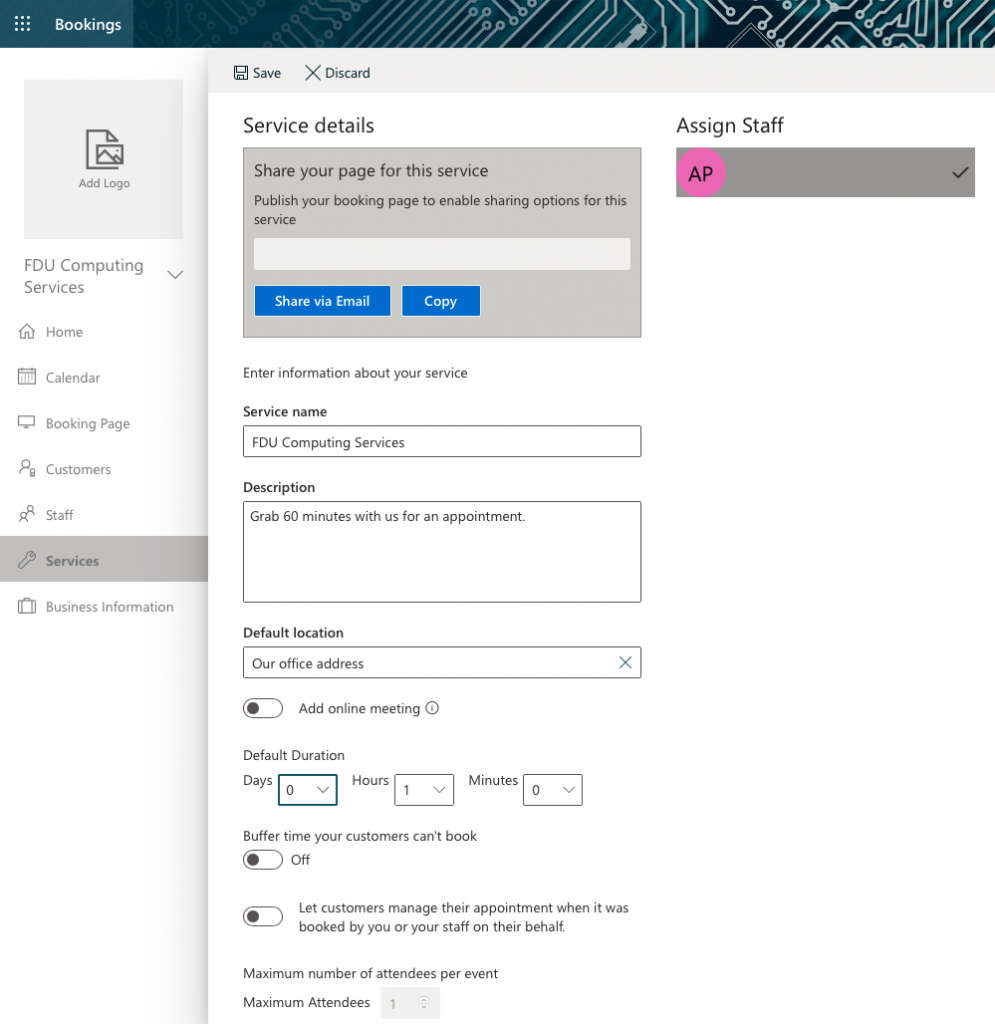
  1. Once you’re on the service-editing page, enter your service details, including name, description, and location. When you start typing an address in the default location, suggested locations will populate. Below are explanations for the other fields on the service-editing screen:
    • Duration: You can enter how long you want the duration to last in days, hours, minutes, and set a buffer time when customers cannot book.
    • Reminders: You can have the system send customers email reminders before their scheduled appointment. Click the pencil to edit the text. 
    • Leave Publishing options checked.
    • Online Scheduling Options: This is where you can manage the settings for when customers can book services.
      • You can choose to use the default scheduling policy by leaving the option checked, OR
      • You can manage the settings for your scheduling policy by unchecking the option.  If you choose this option, we recommend setting the Minimum lead time to 24 and the maximum lead time to 30 days.
    • Don’t forget to click Save at the top of the Service details page
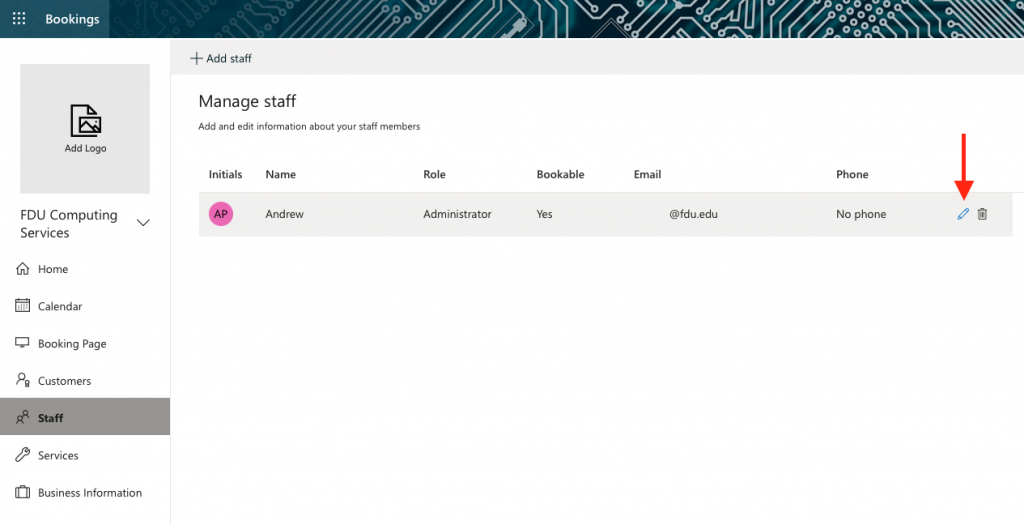
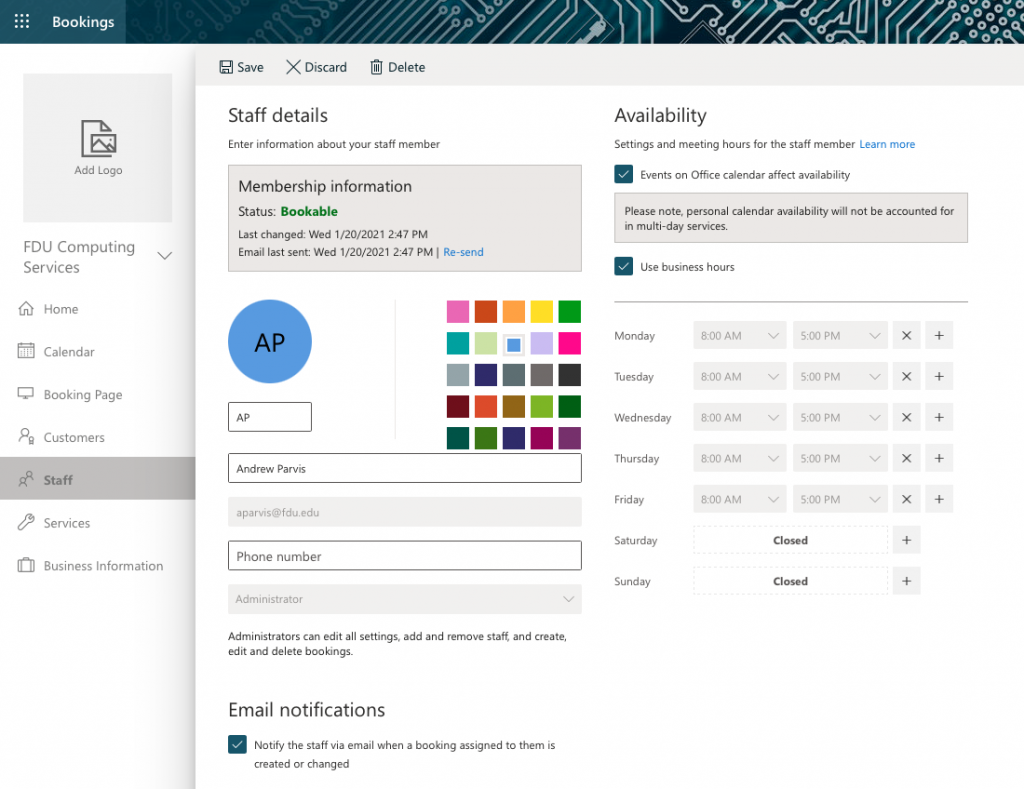
  1. Next, click Staff from the left menu. Click the pencil next to your name to edit your information. Also, you may add any staff or faculty members in your department by clicking the + Add staff button
  1. On this page, you can add information about yourself, including your office or department phone number and whether to receive email notifications (we recommend keeping this option checked).  Click Save when finished
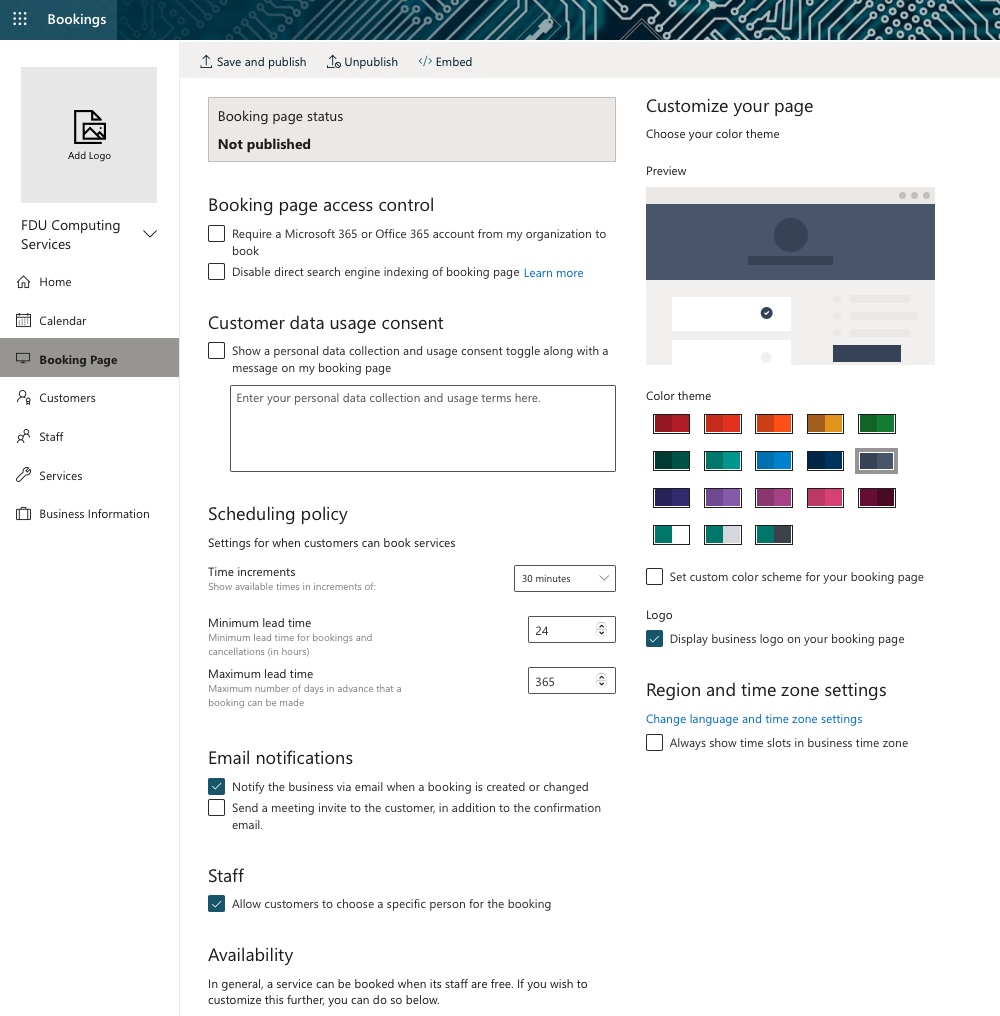
  1. Next, select Booking page from the left navigation pane.
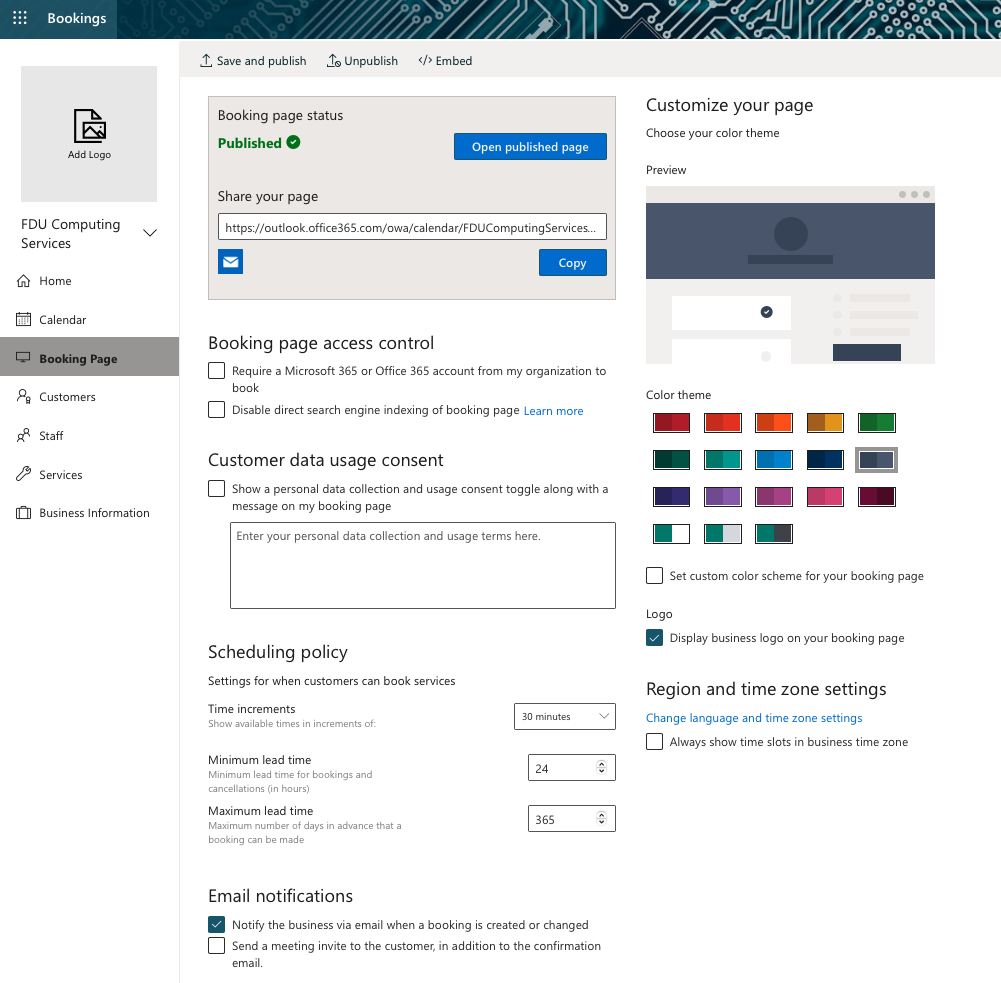
    • Booking page Status: Since this is the first time you are setting up your Bookings page, your status is set to Not published. Once you finish customizing your page and clicking Save, the status will change to Published. 
    • Customer data usage consent (optional):  Where you can customize a message for your visitors to consent to your site collecting their personal data. 
    • Scheduling Policy: Where you can set site-wide scheduling policies. We recommend the following settings:
      • Minimum lead time: 24
      • Maximum lead time: 30
    • Email Notifications: Notifies you when an appointment is made. 
    • Staff: You can allow customers to choose who they want to meet with. However, you can uncheck this option if you do not have any staff.
    • Customize your page: Choose a color theme for your bookings page.
    • Lastly, click Save and Publish
  1. Once you click Save and publish, your Bookings site is now live! You can view your published page by clicking Open published page and share your page with others by copying the link
Last Modified: