request

Computer Lab Reservation Policy

Resources for:
icon Close

Due to the increasing demand of the academic computer facilities, a general document detailing the policies for computer lab reservations has been outlined. The purpose of the computer lab reservation policy is to provide faculty, staff and students with equitable access to campus computing lab resources. Most computer labs are used as classrooms and they are available for open-access use when there are no classes in session.

There are currently four Computing Services computer labs which can be used for classroom instruction on each campus. They are: D206, D207, D208, and D209 located in the Dreyfuss Building on the Florham Campus. The computer labs located on the Metropolitan Campus are: DH2163 and DH2164 in Dickinson Hall and UH Front Lab (UH22) and UH Back Lab (UH28) in University Hall. Also, there are three multimedia labs; two on the Florham campus and one on the Metropolitan campus. The multimedia labs for the Florham Campus are: D211-Animation Lab and ZEN110 – Graphic Design Lab) located in the Dreyfuss and ZEN Buildings. On the Metropolitan campus, the multimedia lab (MML) is located in Becton Hall Room 403. The multimedia labs are primarily used for courses offered by the FDU School of Arts. All labs used for classroom instruction and general use are equipped with a LaserJet printer and data projector. The Animation Lab is equipped with 3-D printers. All multimedia labs are equipped with ZOOM capability to support hybrid instruction.

If you have any questions regarding the lab reservation policy, please contact Denzel James via email at: d.james@fdu.edu

Last Modified:

How to Reserve a Computer Lab

Resources for:
icon Close

Reserving a Computer Lab for an Entire Semester

Before reserving a Computing Services lab please contact Enrollment Services by emailing:

Florham – esmadfdu@fdu.edu

Metropolitan – esfdu@fdu.edu

Lab reservation requests for the entire semester, (i.e. January through May or September through December are processed by the Office of Enrollment Services. To make a lab reservation request for the Summer, Winter, Fall, or Spring semesters, please contact the Scheduling Officers in Enrollment Services for the Florham and Metropolitan campuses. The phone and fax numbers are listed below:

Metropolitan Campus
Ph. (201)-692-2217 / 2517

Florham Campus
Ph. (973)-443-8600

Reserving a Computer Lab for Specific Dates within a Semester

  1. Access the reservation system by visiting
  1. Once logged into the support website, locate ‘Forms for Faculty & Staff’ and click on the “Computing Services – Lab Reservation & Lab Software Request (Faculty & Staff NJ Only)” option.
  2. You will be directed to a reservation request form. Please provide the necessary details, such as the desired date, time, and location of the lab reservation. Additionally, please include any specific requirements or equipment you may need for your session.
  3. After completing the form, you can submit your request by locating and clicking the submit button.
  4. Once your request has been submitted, the Lab & Operations Manager will review and confirm the details of your request. You will receive written confirmation of your request.

Should you require any further assistance, please feel free to reach out to the Lab & Operations Manager, Denzel W. James (d.james@fdu.edu).

Any changes including cancellations to your request should be submitted by using the SAMI support link to locate the ‘My SAMI Support Request’ tile and browse for your lab related request ticket. All updates can be entered directly into the ticket.

Thank you for choosing Computing Services for your lab reservation needs. We look forward to providing you with a seamless and efficient experience.

Last Modified:

SAMI Support Public Request Form

Resources for:
icon Close

The SAMI Support portal requires a valid NetID and password, along with DUO multi-factor authentication, for access. Upon entry, users can create new tickets, review open or closed requests, and explore the IT Knowledgebase for solutions to common issues. Access the support portal using the button below:

SAMI Support Portal

If you need to open a request and cannot access SAMI Support for any of the reasons below, please complete this request form to contact the Fairleigh Dickinson University Technical Assistance Center (UTAC). A member of the IT support team will assist you via phone call or email.

  • I do not have a valid University issued NetID
  • I am not able to authenticate through DUO
  • I have not set up my DUO account
  • I am a vendor without a University issued NetID
  • I am an admitted student
  • I am a newly hired employee or adjunct
  • My FDU account is locked
  • I need my Net ID password reset and have already attempted to do that through identity.fdu.edu

Tip

The form below is not compatible with Dark Mode. For an optimal experience, disable Dark Mode either in your device’s system settings or directly from the FDU IT website menu bar.

SAMI Support Public Request

Last Modified:

Shared Mailbox in Outlook

Resources for:
icon Close

A shared mailbox makes it easy for a group of people to read and send emails from one public email address, like info@fdu.edu. When a person in the group replies to a message sent to the shared mailbox, the email appears to be from the shared address, not from the individual user. Shared mailboxes can also be used to provide a shared calendar, allowing multiple users to schedule and view calendar tasks.

Request Access to an FDU Shared Mailbox

Users can request a new shared mailbox by completing and submitting the “Distribution Group/Shared Mailbox Request” form found below.  Users needing access to a specific FDU shared mailbox account may request access by reaching out to the shared mailbox owner.  To fulfill this request, the shared mailbox owner will open a support case with the Fairleigh Dickinson University Technical Assistance Center (UTAC).

Add a Shared Mailbox to Outlook

Windows
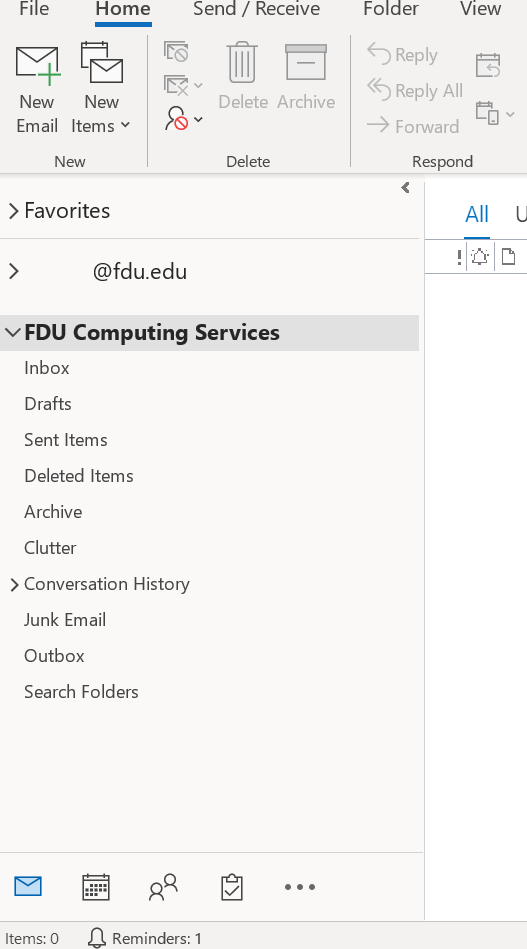
  1. The shared mailbox should automatically display in your folder pane on the left-hand side of your Outlook application within 24 hours of its creation. Closing and restarting the Outlook application maybe necessary if you do not see it after 24 hours

Note

Before you can use a shared mailbox, the Microsoft 365 admin for the university has to add you as a member.

If you cannot open a shared mailbox, please contact the Fairleigh Dickinson University Technical Assistance Center (UTAC) and open a service request.

close
macOS
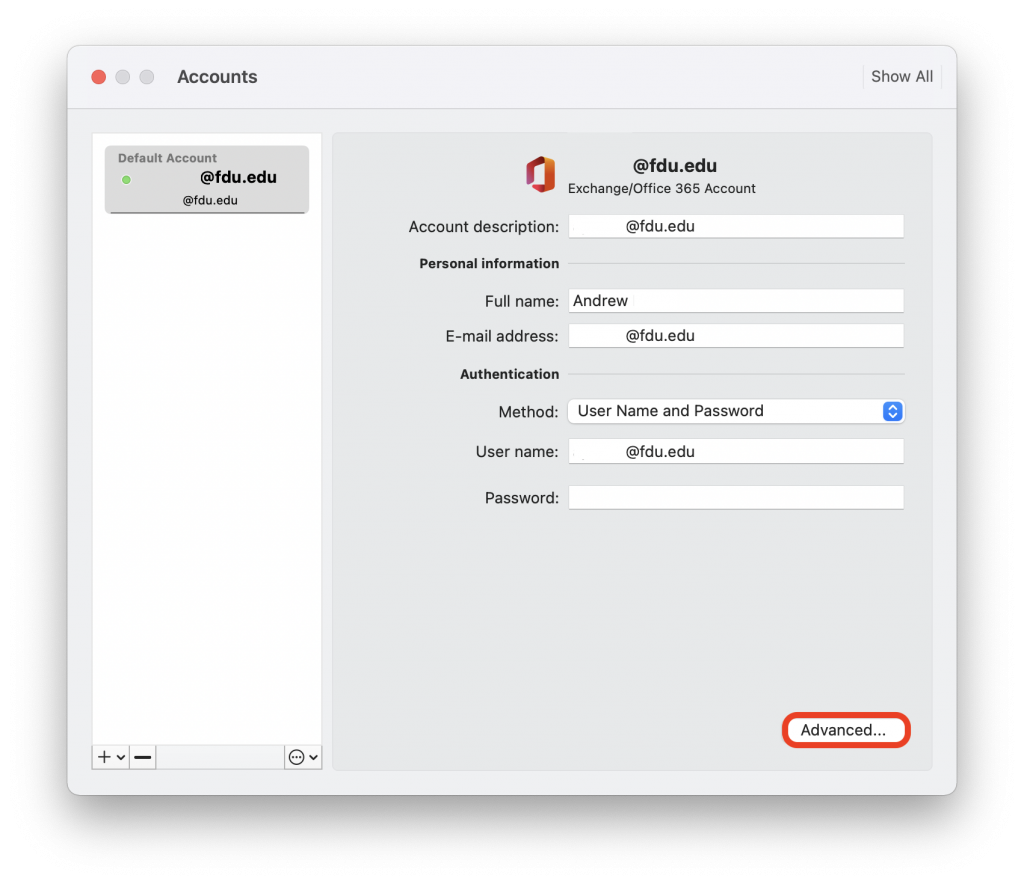
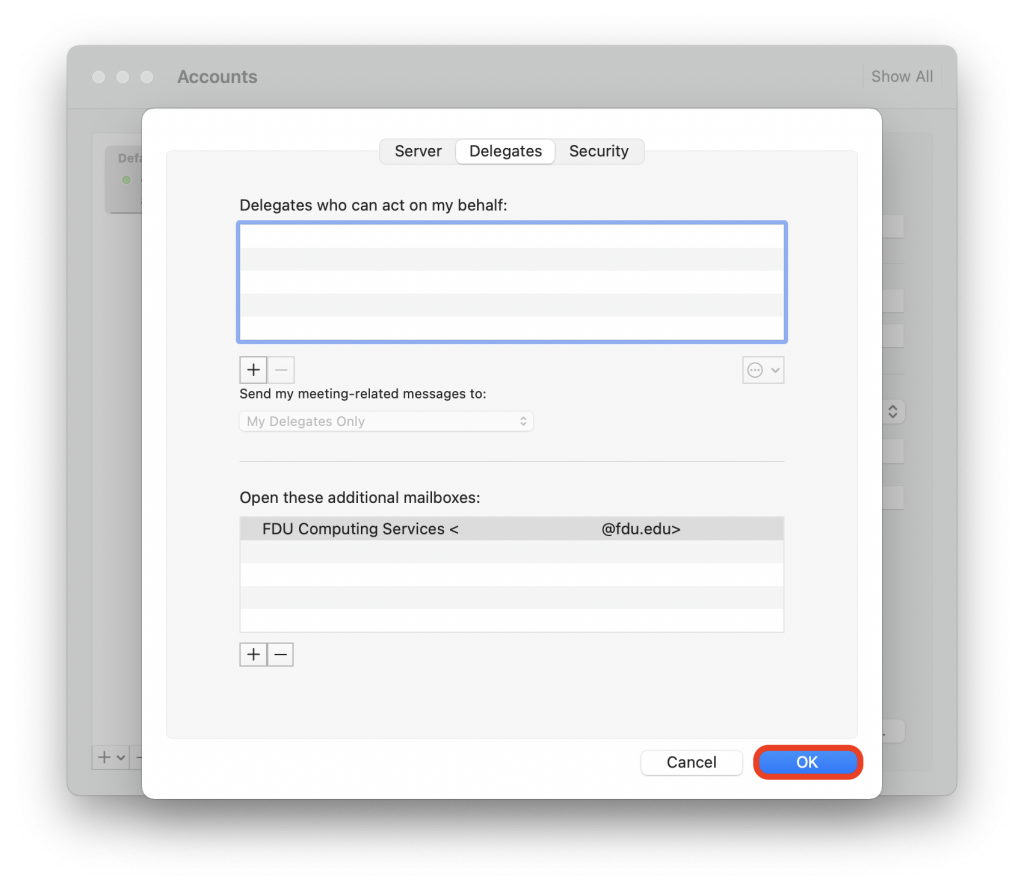
  1. Select Tools from the Outlook menu bar at the top of the screen, then choose Accounts
  1. Select the Advanced… tab
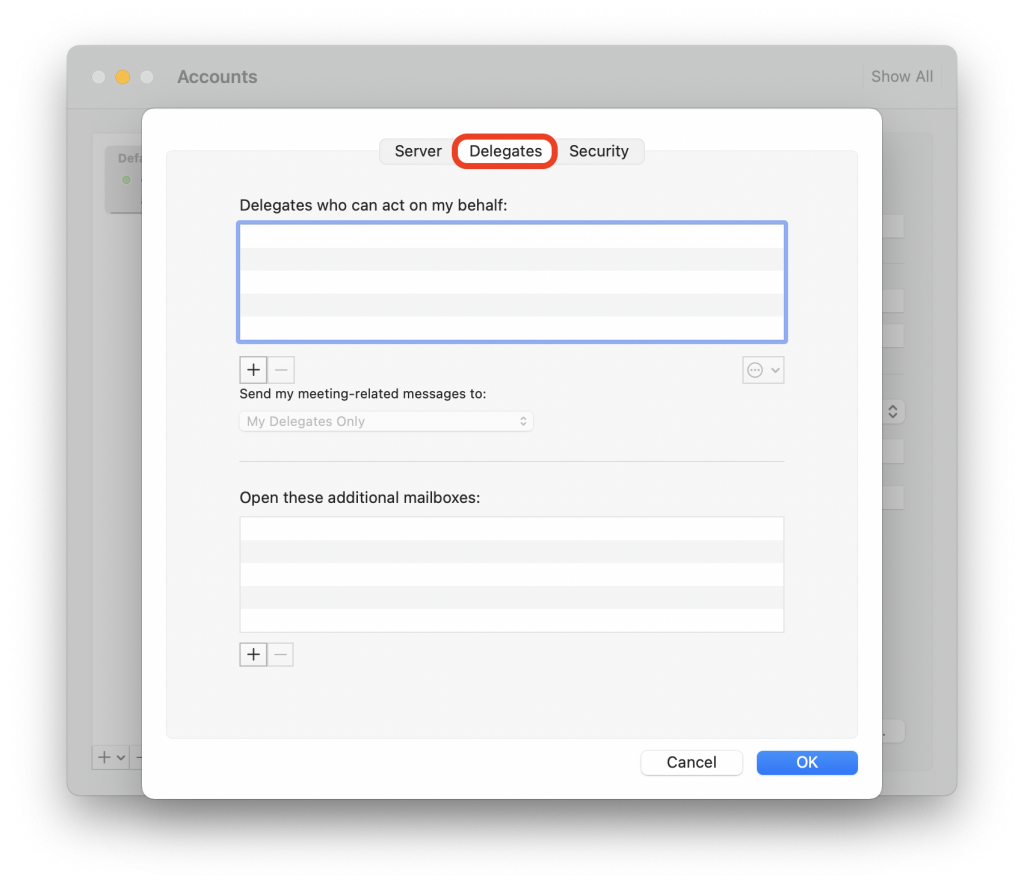
  1. Select the Delegates tab
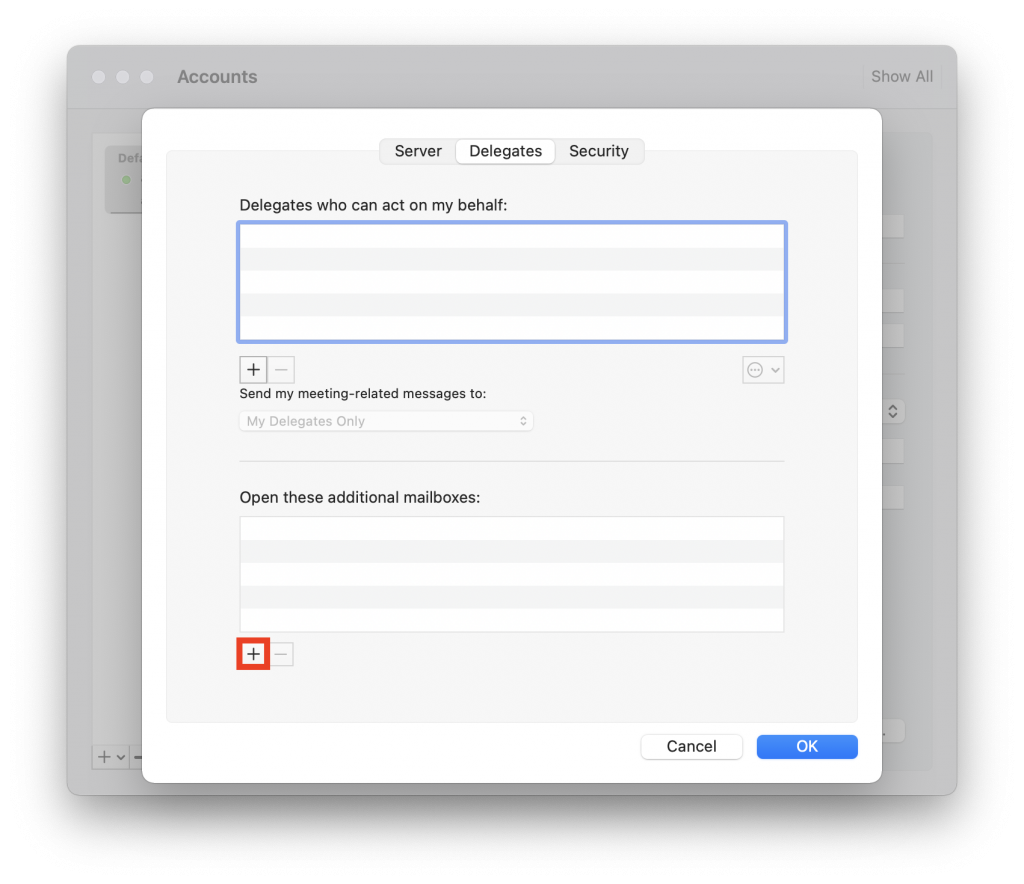
  1. Click the + button, located under Open these additional mailboxes:
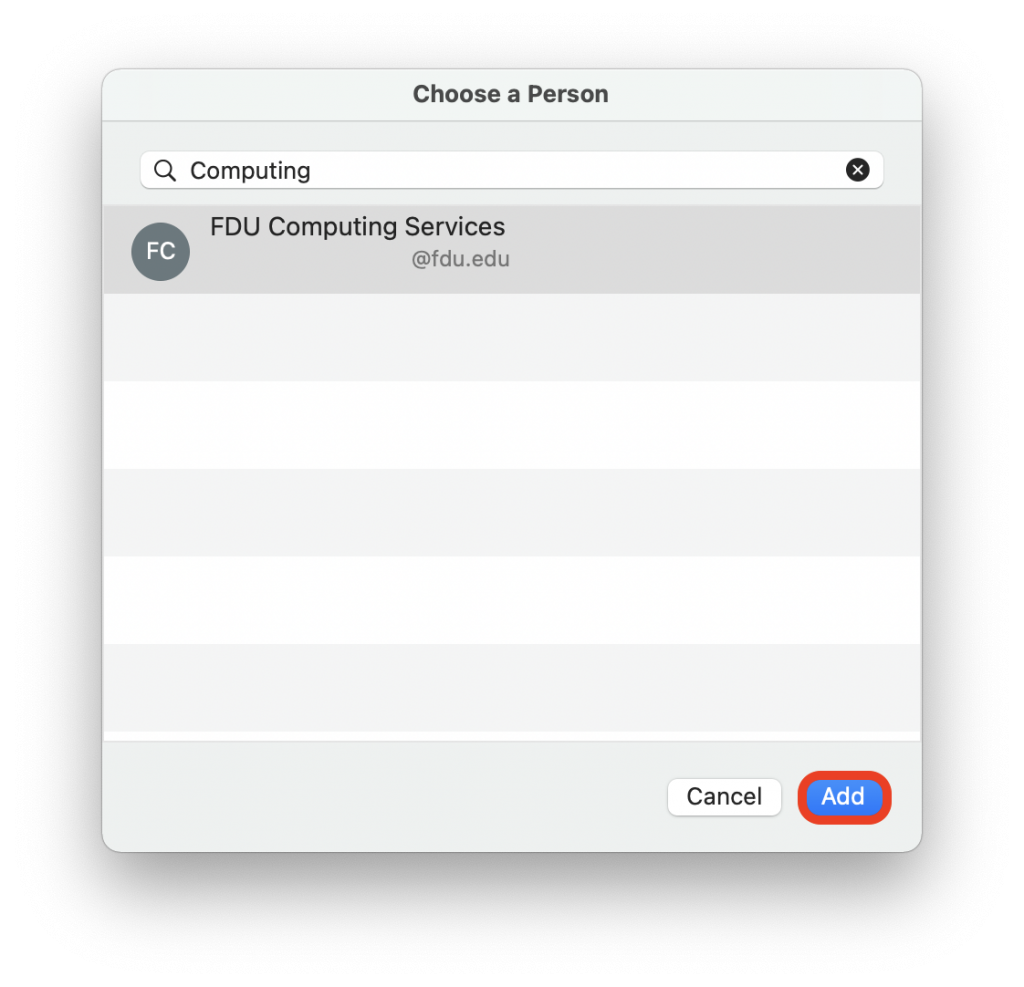
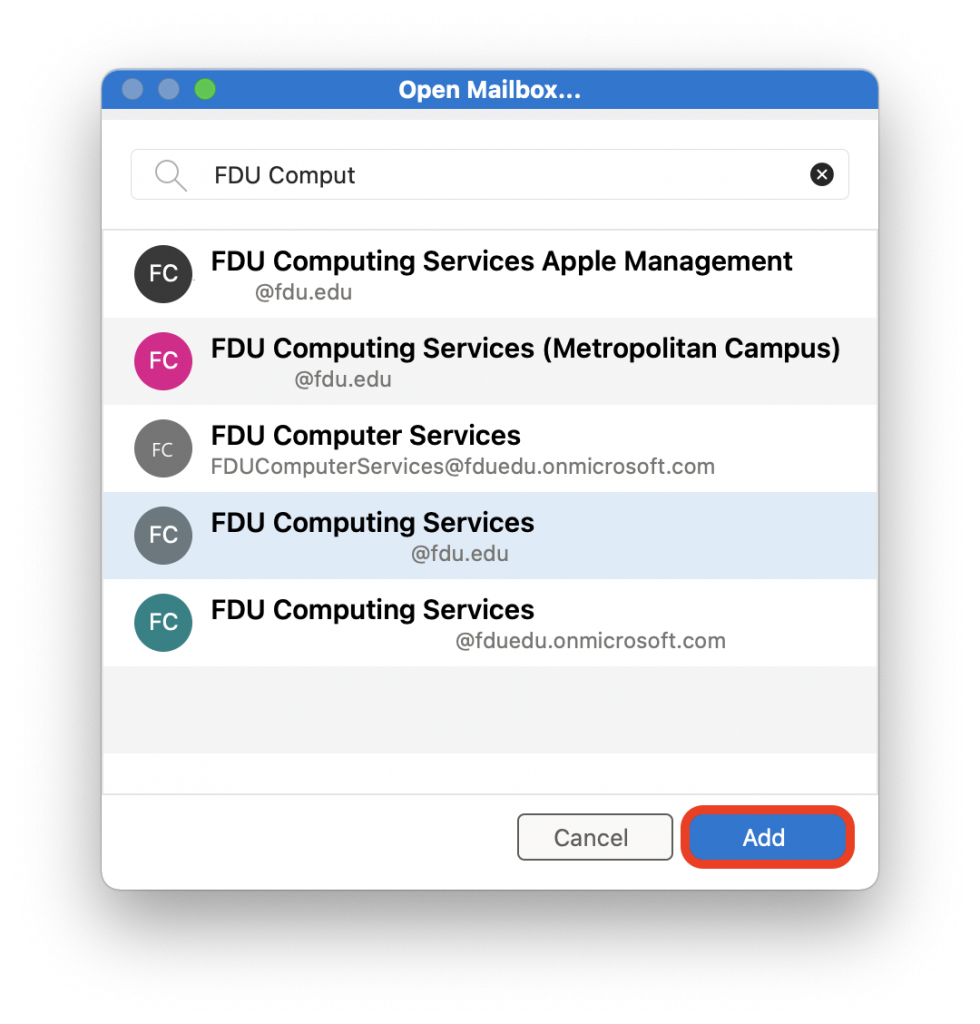
  1. Type or select your correct shared mailbox, and then select Add
  1. Select the OK tab
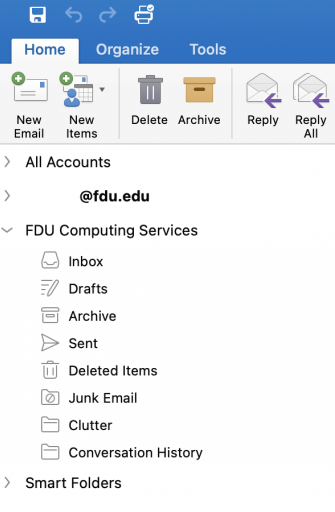
  1. You should now see your shared mailbox listed on the left-hand side of your Outlook email application window

Note

This is a one-time process only. You do not need to follow the above steps to add this to Outlook on your macOS device again.

If you cannot open a shared mailbox, please contact the Fairleigh Dickinson University Technical Assistance Center (UTAC) and open a service request.

New Outlook version on macOS

Some macOS users may take advantage of the “New Outlook” version of the Outlook application. You can identify which Outlook version you are using by locating the “New Outlook” slider tab button on the top right of the application.

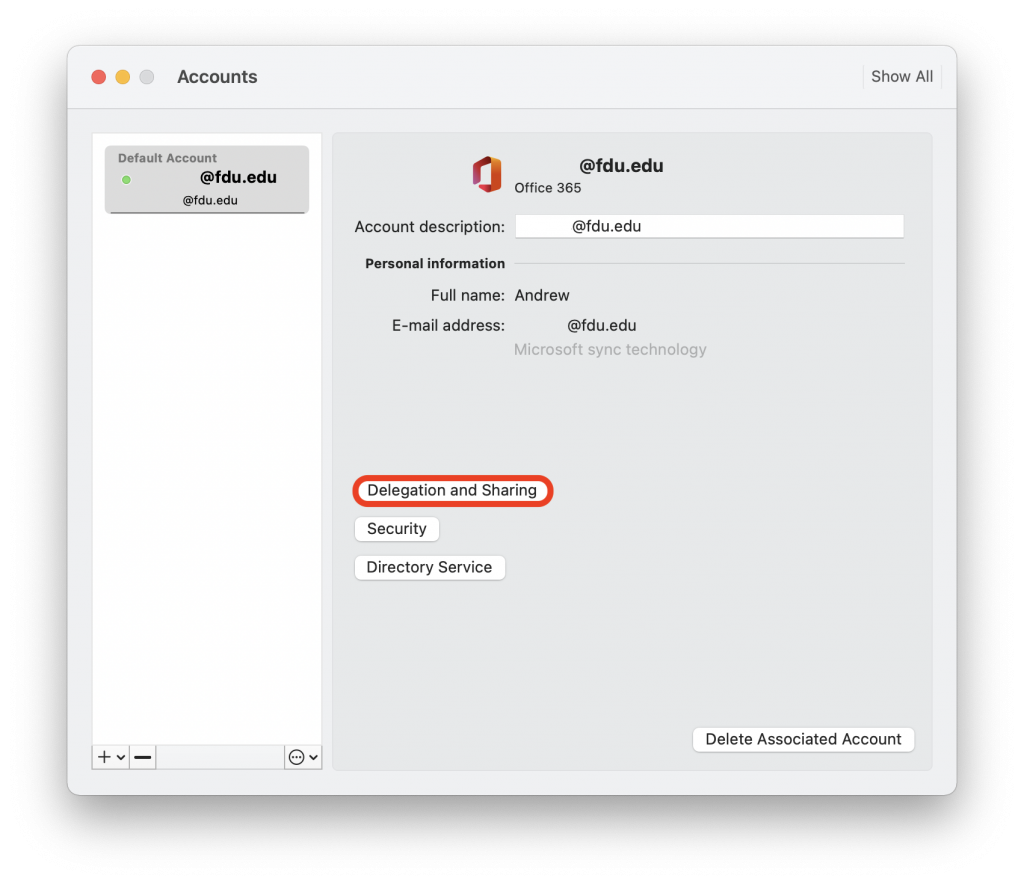
  1. Select Tools from the Outlook menu at the top of the screen, then choose Accounts
  1. Select the Delegation and Sharing tab
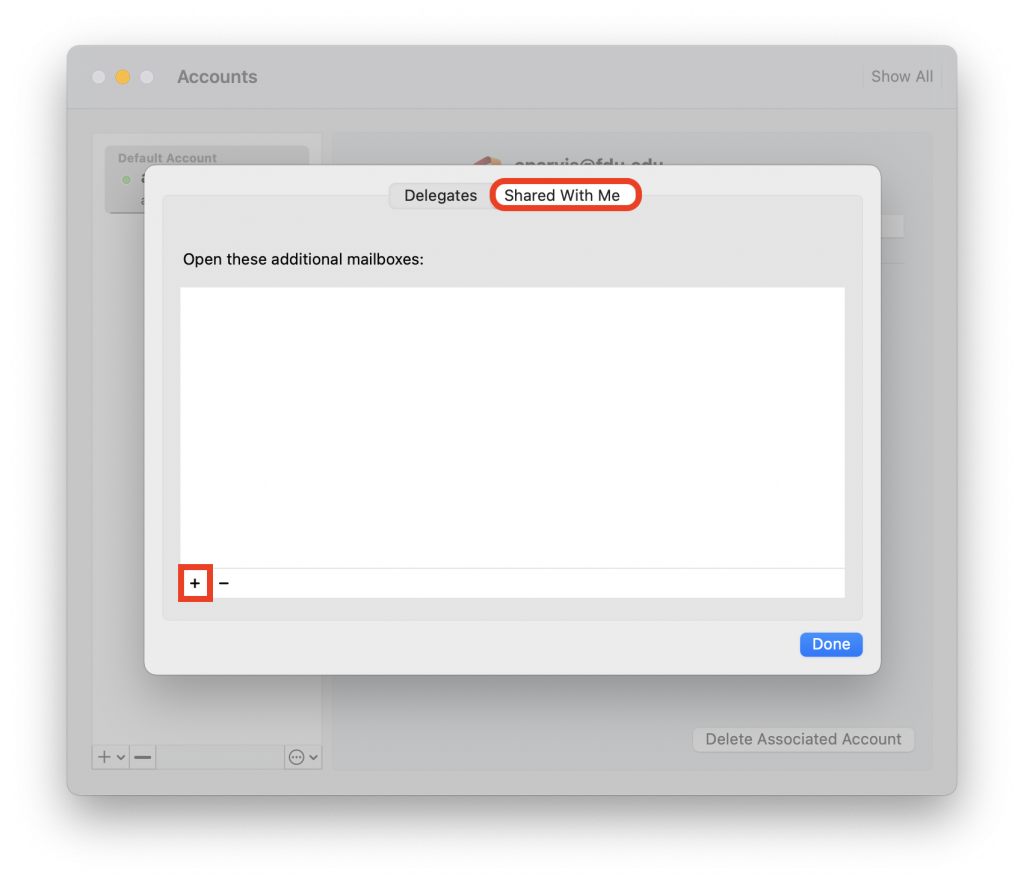
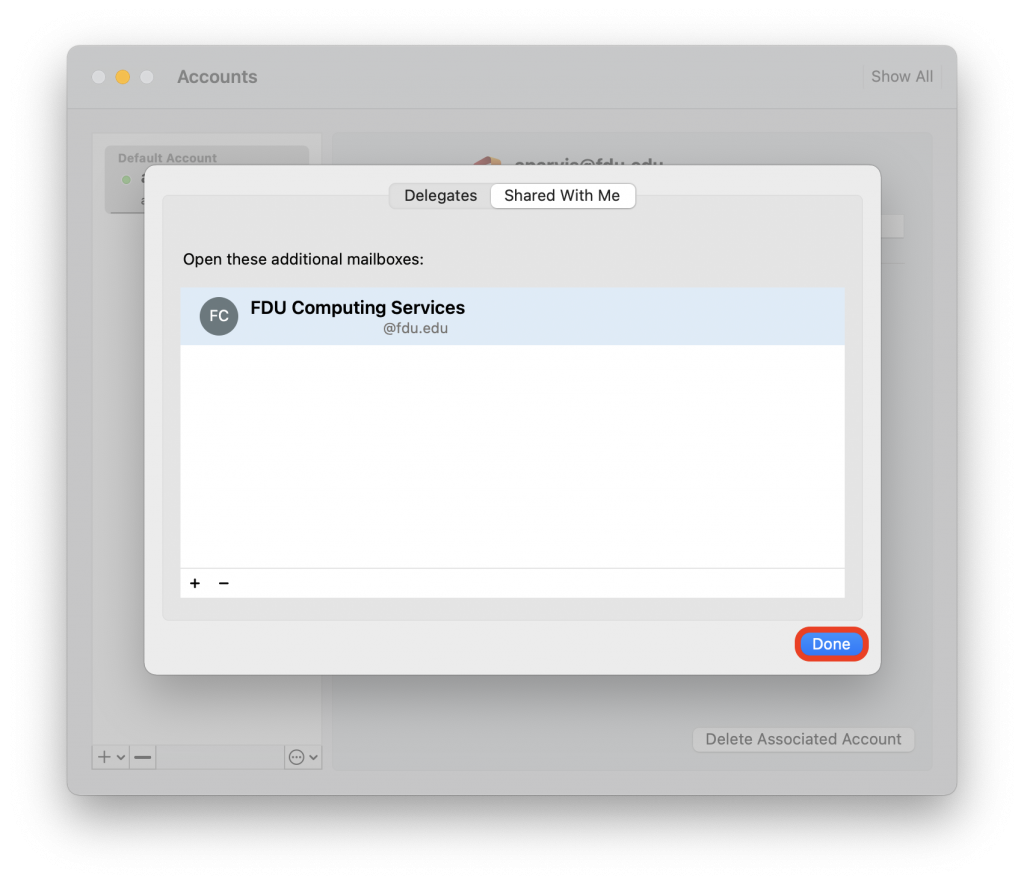
  1. Choose the Shared With Me tab and then select the + button
  1. Begin to type the shared mailbox name or its email address, choose the correct shared mailbox before selecting Add, and finally Done when finished
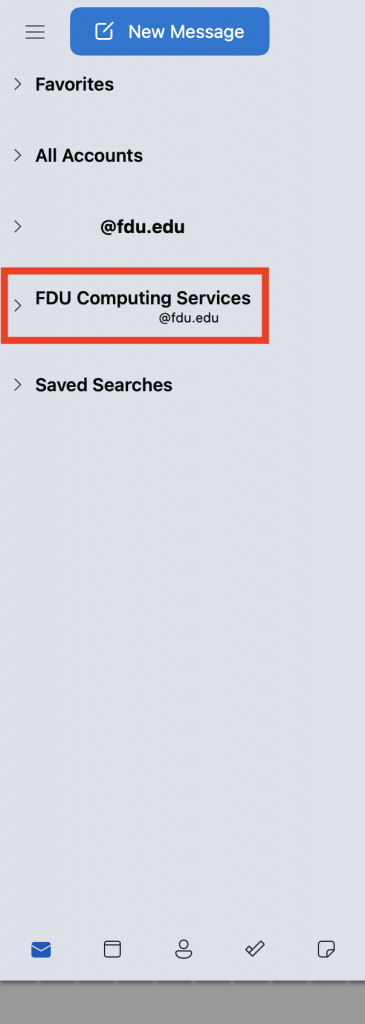
  1. You should now see your shared mailbox, located on the left-hand side of your Outlook application window

Note

This is a one-time process only. You do not need to follow the above steps to add this to Outlook on your macOS device again.

If you cannot open a shared mailbox, please contact the Fairleigh Dickinson University Technical Assistance Center (UTAC) and open a service request.

close
office365.fdu.edu / Outlook Web App
  1. Navigate to the FDU Office 365 Portal webpage
  1. Select the Outlook web app icon, located on the left-hand side of your display
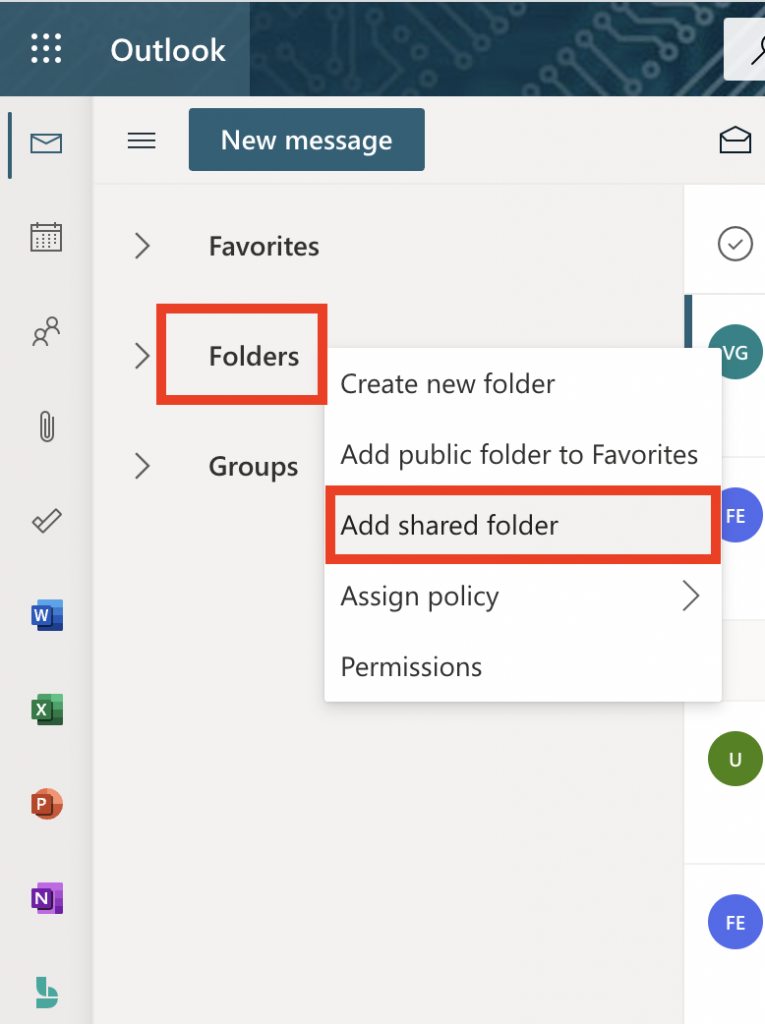
  1. Right-click on the Folders option located on the left side of the menu; a small drop-down menu should display. Select Add shared folder
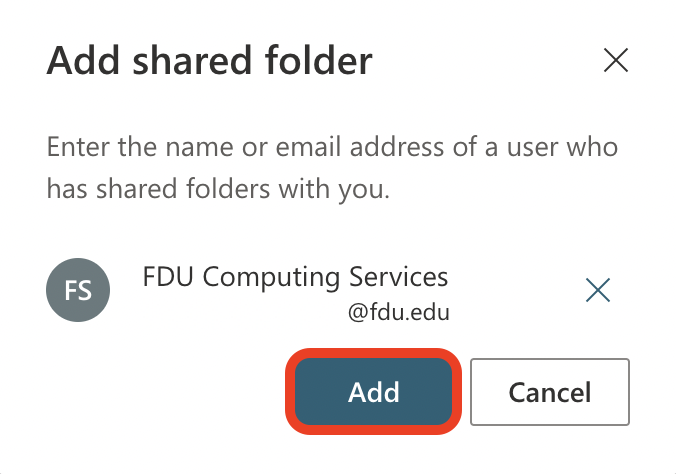
  1. Begin typing the email address for the shared mailbox, auto-populated suggestions will be displayed. Select the correct shared mailbox address and click Add
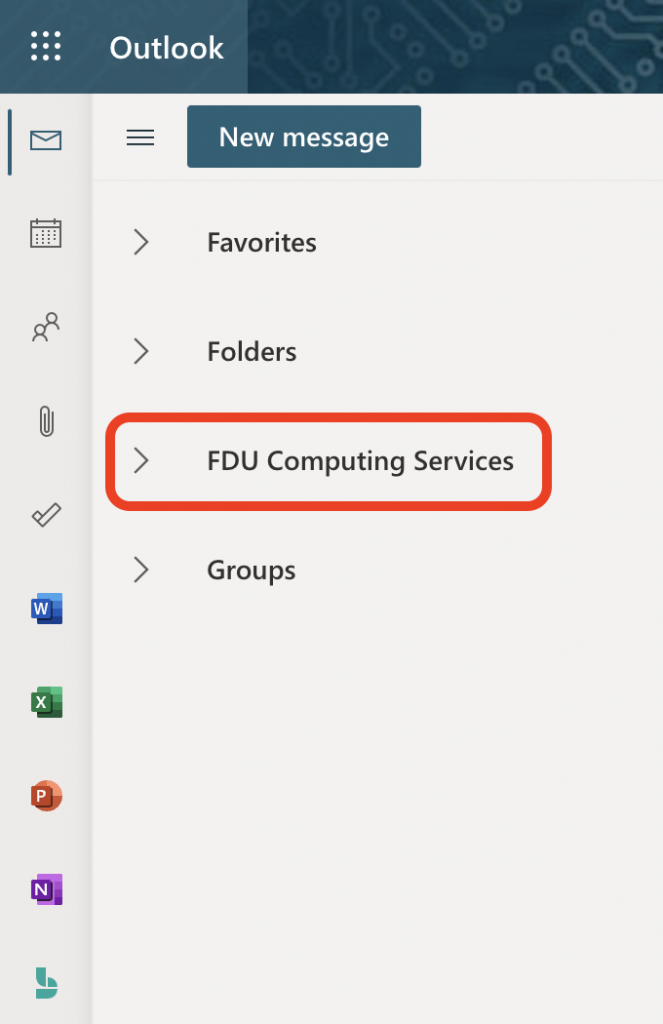
  1. You should now see the added shared mailbox located on left side of your Outlook web email window

Note

This was a one-time process. You do not need to follow the above steps to add this to your account again. You will automatically see the shared mailbox when you sign in to your account next time.

If you cannot open a shared mailbox, please contact the Fairleigh Dickinson University Technical Assistance Center (UTAC) and open a service request.

close
Android and iOS
  1. Sign in to your primary FDU email account in the Microsoft Outlook for Android or iOS app
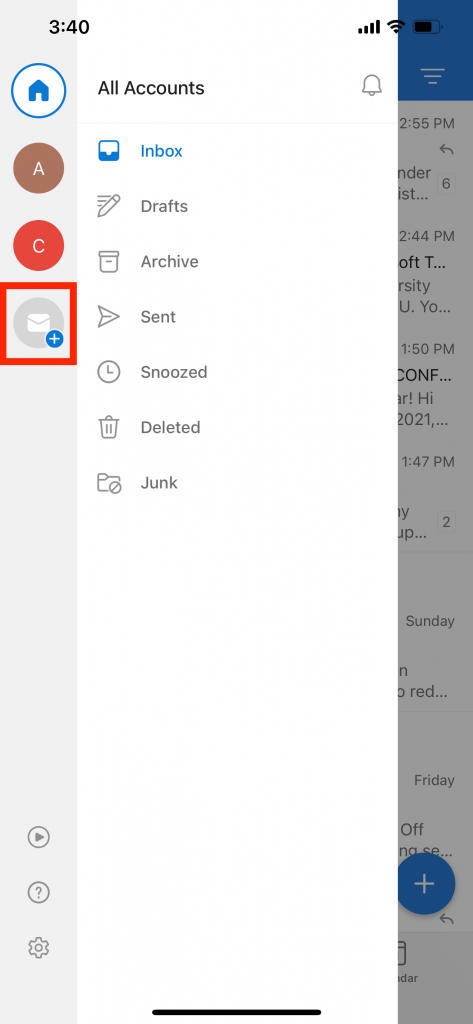
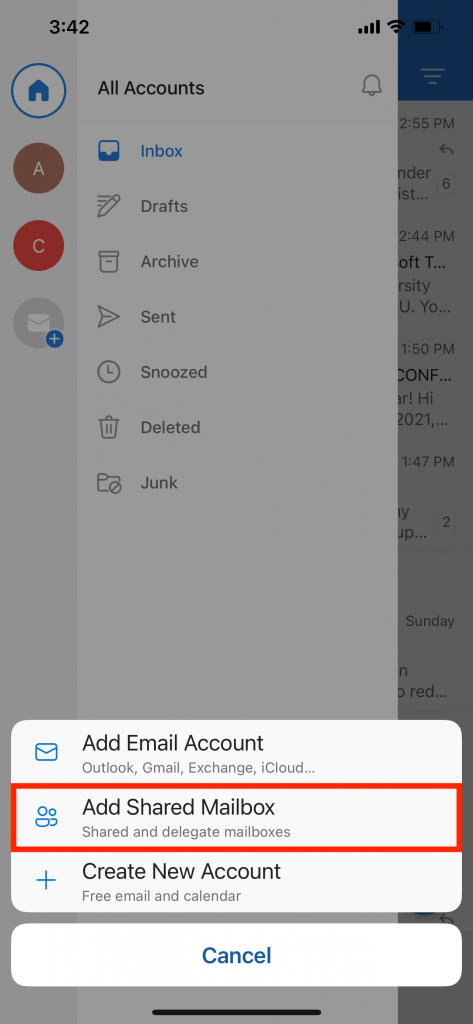
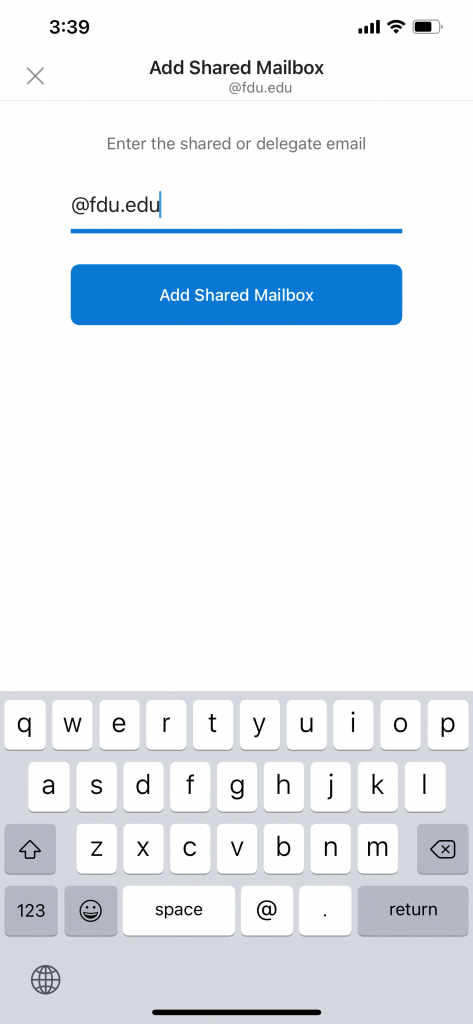
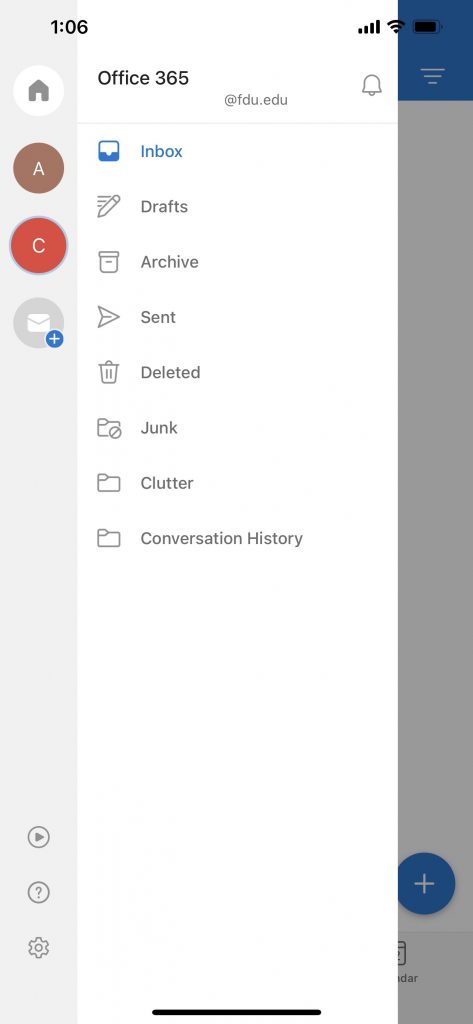
  2. Tap the Add Account button in the left navigation pane, then tap Add Shared Mailbox
  1. Enter the name of the shared mailbox and tap Add Shared Mailbox when finished

Note

If you have multiple accounts in Outlook Mobile, select the account that has permissions to access the shared mailbox.

  1. After the account setup process completes, the shared mailbox will display in your account list within the Outlook for Android or iOS app

Tip

To remove a shared mailbox, go to Settings > Accounts. Then tap on the shared mailbox and select Delete Account.

close

Send Email from a Shared Mailbox

Windows / macOS
  1. Open Outlook
  2. Choose New Email to start a new message
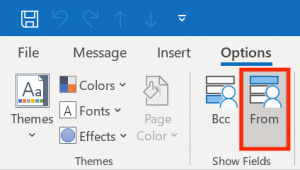
  3. If you don’t see the From field at the top of your message, choose Options, and select the From tab
  1. Click From in the message, and change to the shared email address

Note

If you don’t see your shared email address displayed, choose “Other email address…” Enter the full email address for the shared mailbox in the blank or search for the email address by clicking “From” tab. Click “OK” when finished.

  1. Finish typing your message and then choose Send

Note

From now on when you want to send a message from your shared mailbox, the address will be available in your “From” drop down list.

Whenever you send a message from your shared mailbox, your recipients will only see the shared email address in the message.

close
office365.fdu.edu / Outlook Web App
  1. Choose New Message
  2. Choose From and change to the desired shared email address

Note

If you don’t see your shared email address displayed, choose “Other email address…” Enter the full email address for the shared mailbox, then select the appropriate shared email address from the auto populated list when finished.

  1. Finish typing your message and then choose Send
close
Last Modified:

Software Compliance & Distribution Policy

Resources for:
icon Close

In accordance with FDU’s Acceptable Use Policy for Computer Usage, no employee shall copy or distribute software that violates copyright laws. All employees shall be aware that software and the accompanying documentation is generally owned by the manufacturer and the license only grants the user the right to use the software. Unlicensed software installations, also known as software piracy, are unacceptable at FDU.

The primary user of each computer shall take responsibility of keeping records of licenses for which software is installed. The University’s Computing Services Department shall also track licenses for software installed by the Computing Services Department though the purchase of high volume or site licenses. Users are advised that the software installed on University-owned computers may be audited internally (by the University) or externally (by software manufacturers or other anti-piracy software firms) at any time. Software found not to be in compliance with copyright laws will be removed and replaced with a licensed copy.

Computing Services will provide certain software that is commonly used by the majority of the University’s employees, including but not limited to word processing, spreadsheet, and anti-virus software. Some software manufacturers allow for non-concurrent use of a license on an office computer and an employee’s home computer. Computing Services will not provide non-concurrent licenses at off premise sites due to the inability to track these licenses.

In order to provide the best possible service and support, and to reduce the cost of software site licenses, Computing Services, in conjunction with the Center for Learning and Teaching with Technology, has standardized on Microsoft Office Professional and Symantec Endpoint Protection.

Popular Software Titles and Guidelines for Faculty and Staff to Obtain:

  • Microsoft Office for Windows or Macintosh: Available through standard deployment of leased or owned equipment or by request for any University-owned PC or Mac.
  • Microsoft Visual Studio: Installed in Labs. Available by request for staff and faculty machines.
  • Adobe Acrobat: Available by request for staff and faculty machines.
  • SAS: Installed in Labs. Available by request for staff, faculty and student machines.
  • SPSS (Base): Installed in Labs. Available by request for staff and faculty machines.
  • SPSS Advanced Modules: Available by request for staff and faculty machines.
  • Adobe Products: Faculty and staff may purchase Adobe products at level three pricing with the University’s CLP Membership No. 4400062846.
  • Symantec Endpoint Protection: Available through standard deployment of leased or owned equipment or by request for any University-owned PC or Mac.
  • Other products: Faculty and staff may obtain pricing and submit orders to Purchasing. If assistance is needed, contact Computing Services.

Software Quality Assurance and Compliance Policy for Network Server & Lab Installations

It is no longer possible for individuals to install software on staff or faculty desktops or lab computers. Laptops or Macintosh users have administrative rights and individuals can install additional licensed software to laptops.

Instructors wishing to have a software application installed in a lab for use by 20 or more people simultaneously must provide Computing Services the original installation media, installation guide, and the appropriate proof of license. Note that the licenses for some software may limit our ability to install it on the network. These materials must be provided a minimum of sixty days before the software is needed. Because it is impossible to predict how the software will interact with our network and other software already installed, we cannot guarantee that a program will work on our system.

For programs that will be used by less than 20 people, the instructor may install the application on up to 5 machines in a lab not normally used for classroom instruction, plus an “instructor’s machine” in one of the teaching labs. If fewer licenses are owned, then only that many licenses may be installed. The instructor will be told which machines to install the program on and will be given a password which can be used to disable the security on the machine for the duration of the installation procedure. Software installed in this way will only be available on those designated machines. Computing Services will make a reasonable attempt to keep these designated systems functioning with the additional software, but in the event that the machine needs to have it’s base configuration and software restored from backup, the instructor will be contacted and will need to reinstall the application.

In all cases, software must be owned or licensed by the University, even if the application is only to be used for demonstration purposes. No software owned by an individual will be installed on the systems.

Last Modified:

Software Request Guidelines for University Computers and Computer Labs

Resources for:
icon Close

Departments wishing to obtain software, whether it is for use by the department or to be installed in the FDU computer labs and/or FDU Anywhere, should plan appropriately to provide adequate time to acquire the software and make it available to users.

The following steps should be used as a guide when planning to obtain software for instructional or business use:

Tip

Plan a minimum of 3 weeks for a contract review before a PO can be processed. See contract review requirements and order process by visiting the link at the bottom of the page.

  1. Selection of product
  2. Creation of Purchase Order (PO) and approval by department/dean/chair
  3. Technology review and approval by OIRT
  4. New vendor processing, if necessary
  5. Contract review
  6. Software purchase and delivery to FDU
  7. Software preparation. Plan up to 60 days to allow for items such as:
    • Creating configurations for FDU’s needs and environment
    • Setting up license servers or other required systems
    • Integration with other systems (e.g., Single Sign On)
    • Testing mass deployment (if for the computer labs)
    • Integration with FDU Anywhere (if needed) assuming the software is licensed and approved for VDI enviroment
  8. Testing and confirmation of proper functionality by the requestor (instructor)
  9. Final installation on computers

Note

Even if the software has no cost to FDU, per the Office of the General Counsel and the Contract Review Policy, if the software requires you to agree to terms and conditions, it’s an agreement that must be reviewed

Please begin by completing the Computing Services – Lab Reservation & Lab Software Request (Faculty & Staff NJ Only)

Last Modified: