Index
Install and Launch Options
If you are using a mobile device, or your personally owned computer, you can download Microsoft Team using the link below.
The page will automatically detect your operating system and redirect you to the appropriate desktop client (e.g. Windows, macOS) or mobile client (e.g. Android, Apple iOS).
The Microsoft Teams application is automatically pushed to most university owned computers. To determine if you already have it installed, search for “Teams” using the Windows Search Bar or Spotlight Search on Apple devices. If you are working on a university computer and you cannot locate the Microsoft Teams application, you can install by following the instructions below.
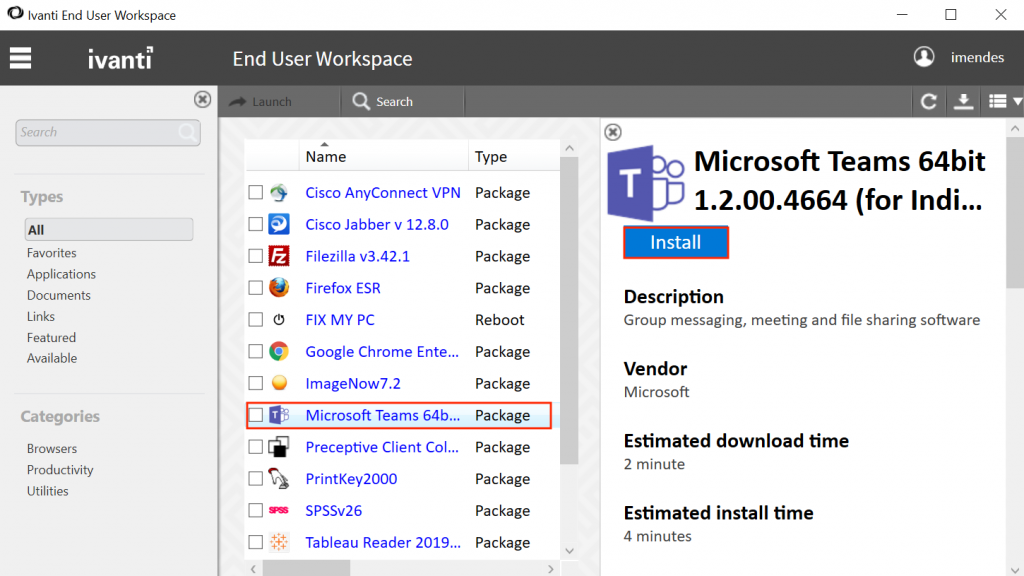
Windows – Portal Manager
- Press the Windows key on your keyboard and type Portal Manager
- Launch Portal Manager from the search results list
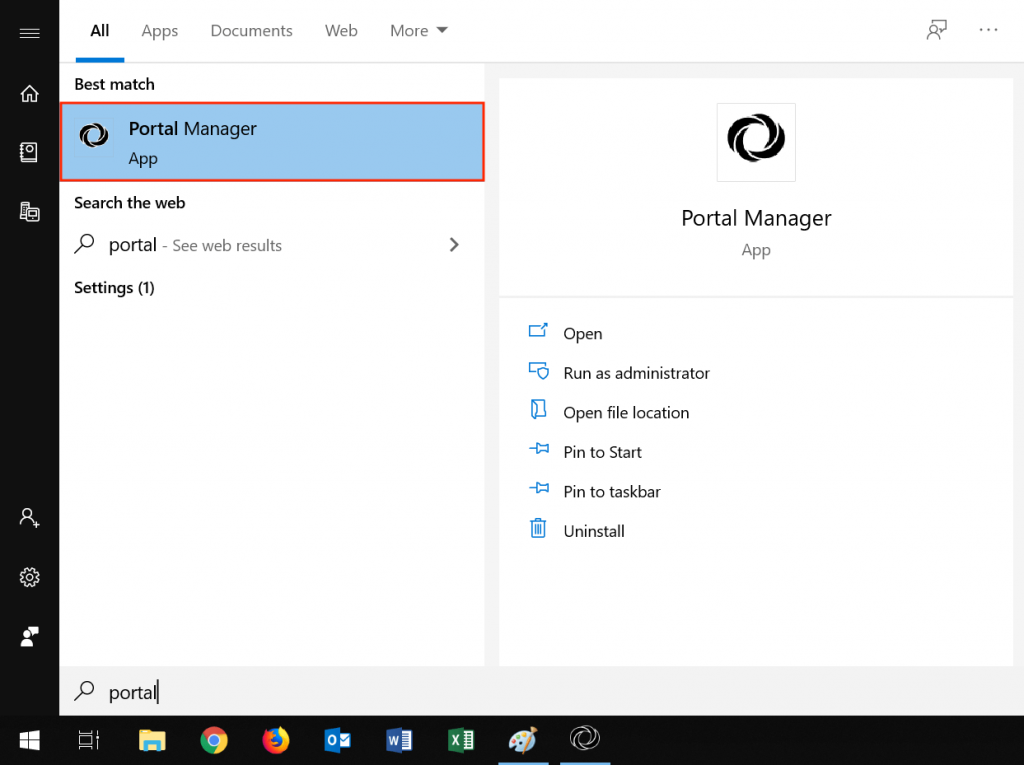
- Select Microsoft Teams from the list and click Install
Mac – FDU Self Help
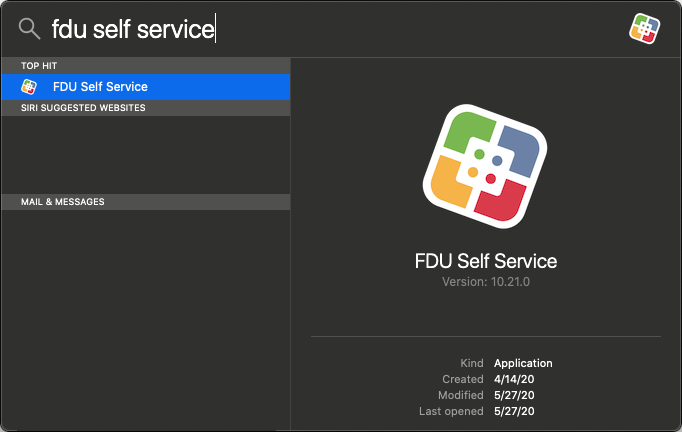
- Press cmd+space on your keyboard and type FDU Self Service

- Launch FDU Self Service from the spotlight search results
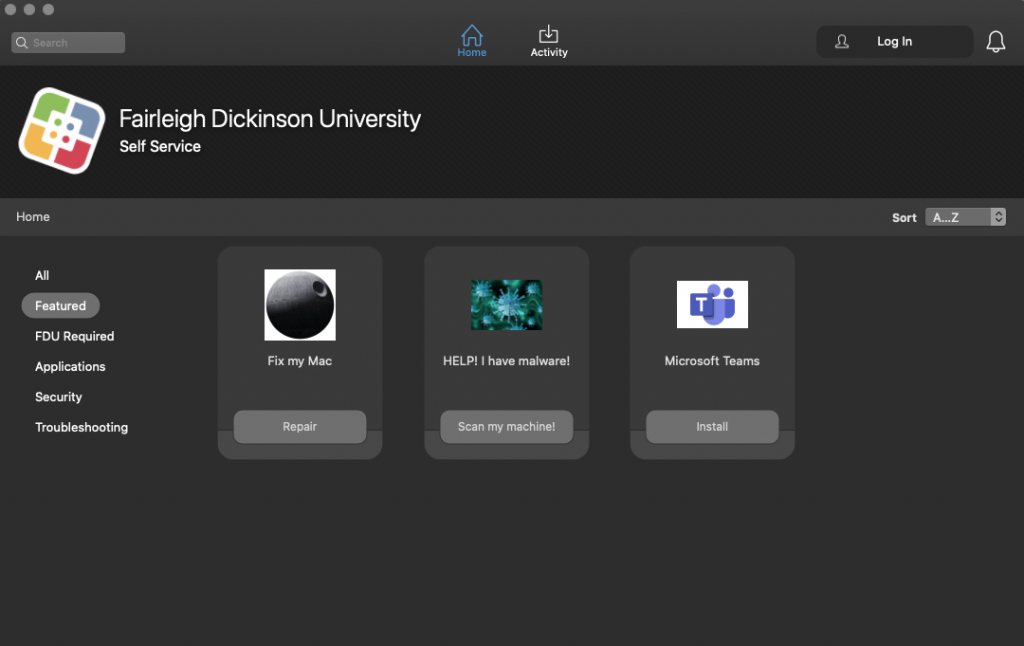
- Locate and double click on Microsoft Teams. If Teams is already installed, it will not show up on the list
Web – Access the Office Web Application
The web client is a full, functional client that can be used from a variety of browsers including Google Chrome, Edge Browser, and Mozilla Firefox. Microsoft Teams will also be available on Safari soon.
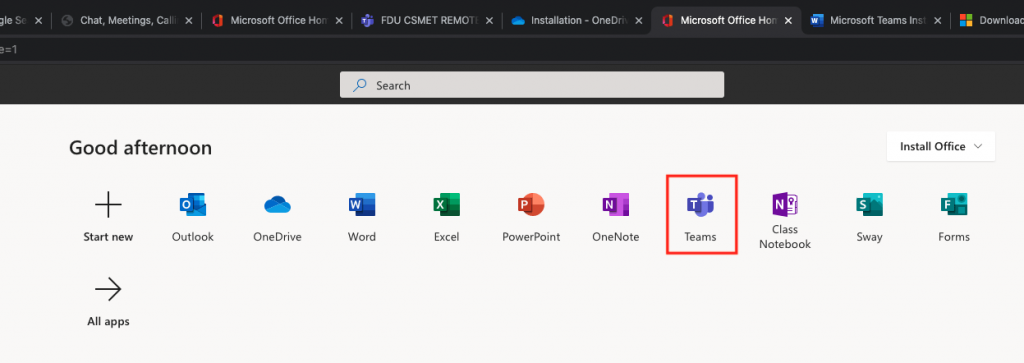
- From an internet browser, go to office365.fdu.edu
- Sign in to your FDU Office 365 account using your NetID and NetID account password
- Select Teams from the list
Starting a Conversation
Teams allows for text-based conversations using the Chat feature. Although it does not replace email in all use cases, it is a great tool for asking quick questions or just saying hello. When using chat, please be mindful and adhere to FDU’s Written Information Security Program.
- Select Chat from the left menu and then click on the top search bar

- Type the name of the person you are attempting to locate and click on their name. Only FDU faculty, staff, and students are accessible in Microsoft Teams

- You will be brought to the chat window and can start your conversation

Navigating the Chat Window
The Chat window has many convenient tabs and shortcuts aimed at improving collaboration. Near the top of the screen, next to the name of the contact that you are chatting with, you will notice the default tabs, followed by a plus sign.
Tabs

- The Chat tab contains the conversation
- The Files tab contains all files shared in during the conversation
- In two person conversations, the Organization tab shows your contact’s organization chart. This information is pulled from Office 365. Datatel remains the authoritative source for this information and the data contained here is not intended to be 100% accurate
- In two person conversations, the Activity tab will list the latest activity of your contact
- You can use the + sign to create a new tab from a file or an app. This can be a quick and convenient way to access a collaborative file that was previously shared in the conversation
To the right of these tabs are a series of shortcut icons which perform the following functions.
Shortcuts
a. The Video call icon starts a new video call
b. The Audio call icon starts a new voice call
c. The Screen sharing icon allows you to share your desktop or an application
d. The Add people icon is used to invite additional people to the chat
e. The Pop out chat icon creates a separate window with your chat
Managing Contacts
The Chat function allows you to have conversations with one person or groups of people. The pane on the left-hand side of the screen is split into Recent and Contacts. Contacts acts like a rolodex that allows you to store and sort a list of the people you contact most frequently. The Recent list will display your most recent conversations with single people or group messages.
By default, the Contacts tab will already have a “Favorites” group. However, creating new groups can be a helpful way to organize your contacts. For example, you may wish to create a group for people that you are working with on a project or for people that you interact with from a department.
- To create a new contact group, click “Create a new contact group” on the bottom of the pane

- Enter a name for your group, and click “Create“

- To add contacts to a group, click the “More options” icon (3 dots) next to the group name and select “Add a contact to this group” from the drop-down menu

- Begin typing the name of your contact. Once you see their name appear, select it and select “Add“

You can add the same contact to as many groups as you would like. The chat with your contact will remain the same regardless of which group you are accessing the conversation from.
Sharing Your Screen
Screen sharing is one of Microsoft Teams’ most powerful collaborative features. You can show your screen to your colleagues and even grant them control to edit Microsoft Office files with you in real time.
Before you get started, make sure that you are using the installed version of Microsoft Teams, as the browser based OWA version does not support this functionality.
- From the chat window or from an ongoing call, click on the “Screen sharing / Share” icon

- You be given a choice to either share your desktop or an application from the Microsoft Office suite, click on the window you want to share

Once you select the screen you wish to share, the members of your chat or call will be able to view your screen and request access to remotely control your desktop or program.
You can only share your screen with a mobile device user if you are engaged in an active voice or video call with them.
Requesting a Team
Creating a team provides remote team members with the ability to work together and share information via a common online space. You can also organize your information by creating channels to help optimize your team’s workflow.
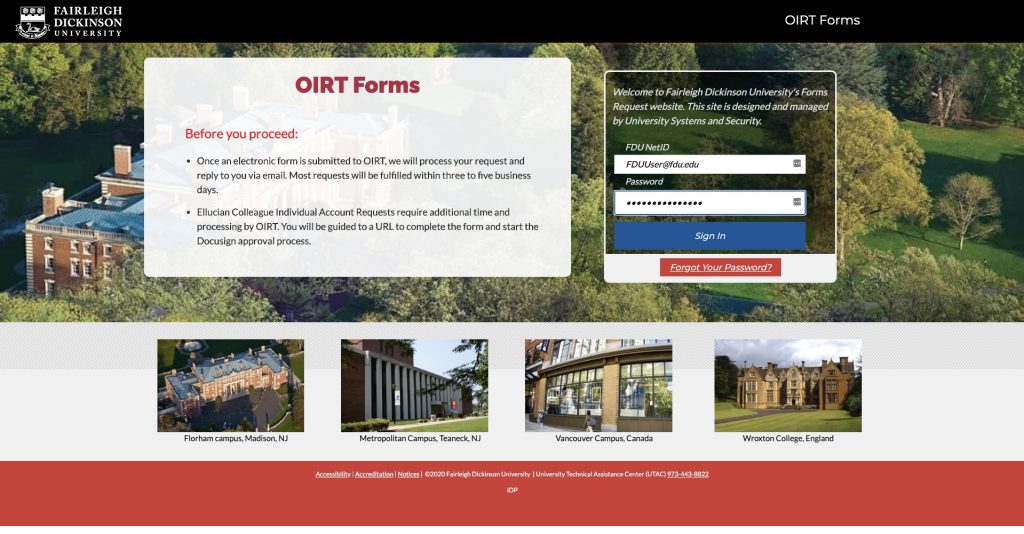
- Navigate to the forms website and log in using you FDU NetID account information
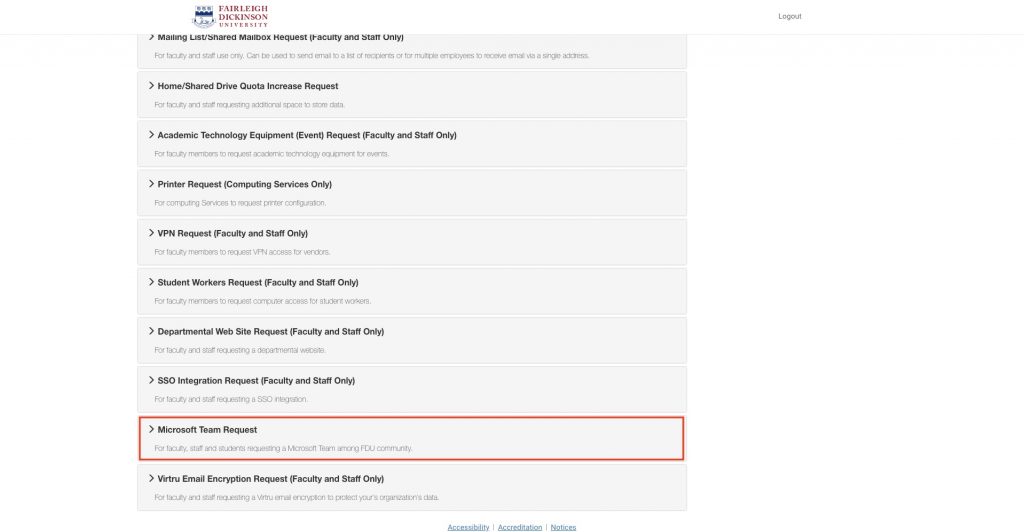
- Scroll down to Microsoft Team Request and click on it to expand the information
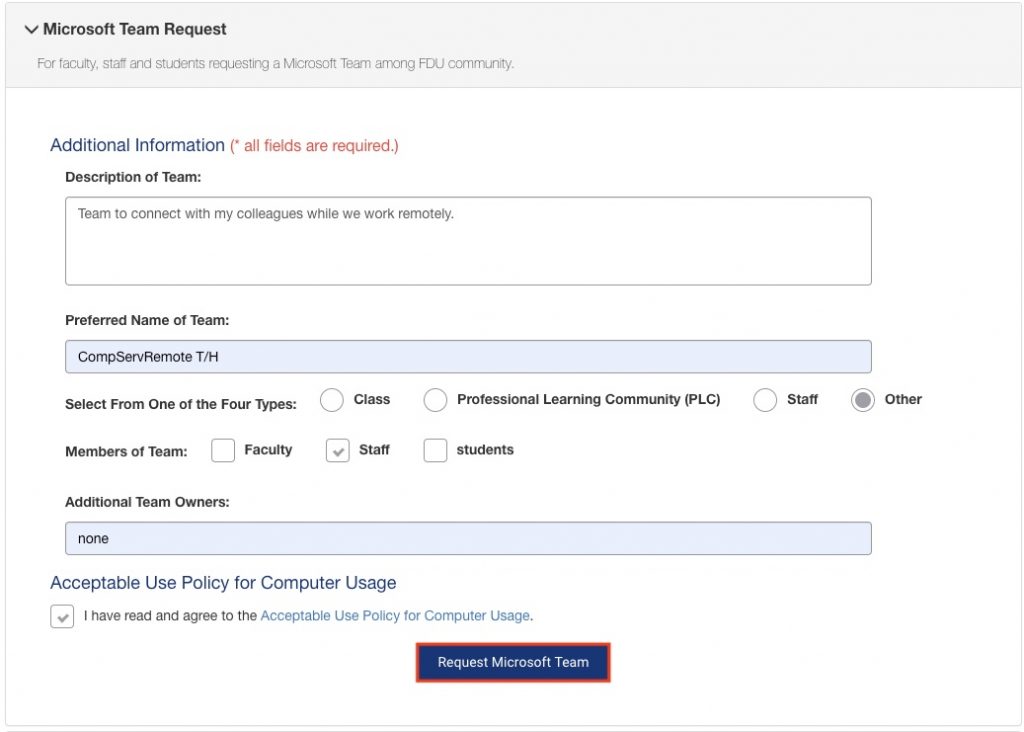
- Fill out all the fields and click on the “Request Microsoft Team” button
Note
You can specify additional team owners. Owners will have rights to invite and make other changes to the team after its creation.
- You should now see a screen informing you that your form was successfully submitted. Please allow 3 to 5 business days for the Team to be created
- You will receive an email once the team is created. The next time you log in to Teams you will see your team listed in the Teams section
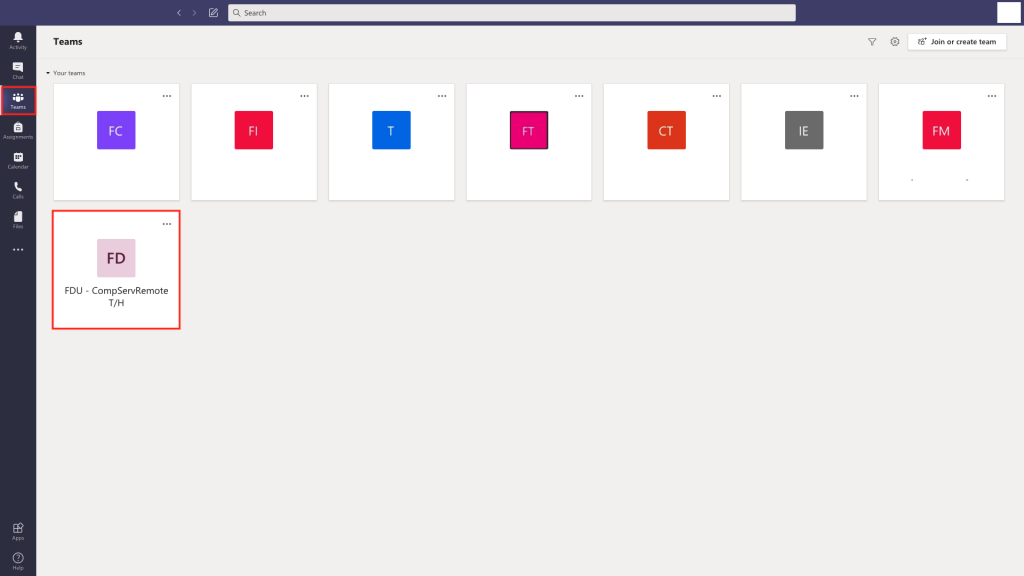
- Click on your team to open the general channel. From here you can create channels, add users, and customize your team. Any team members that you add will receive an email notifying them that they were added to your team. The next time that they log in or open Teams, they will find the team listed in their Teams section
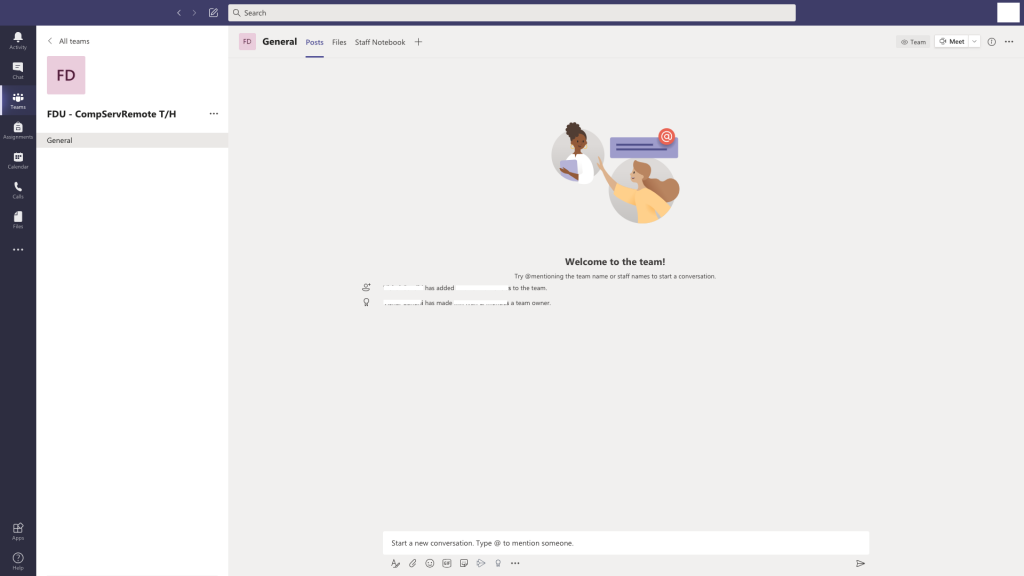
Creating Channels
Channels are dedicated sections within a team. You can keep conversations organized by specific topics, projects, disciplines, or whatever works for your team! Channels are where conversations happen and where the work gets done. There can be public channels which are open to all team members or, if you require a more select audience, private channels can be open to a subset of your team.
- Select Teams from the menu on the left-hand side of the screen. If you have multiple teams, select your team of choice
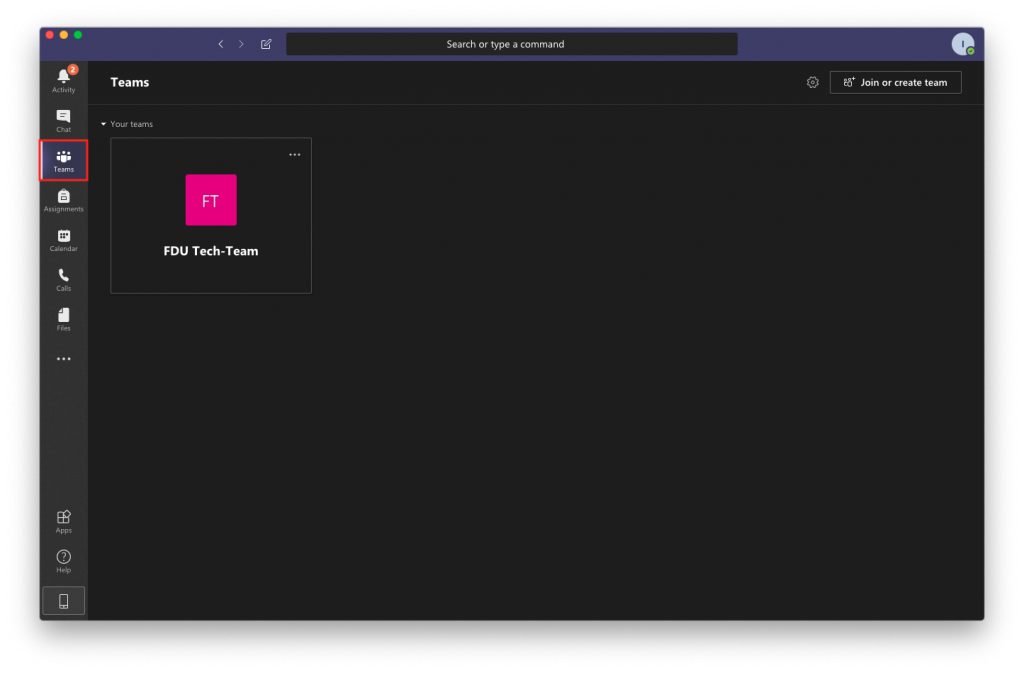
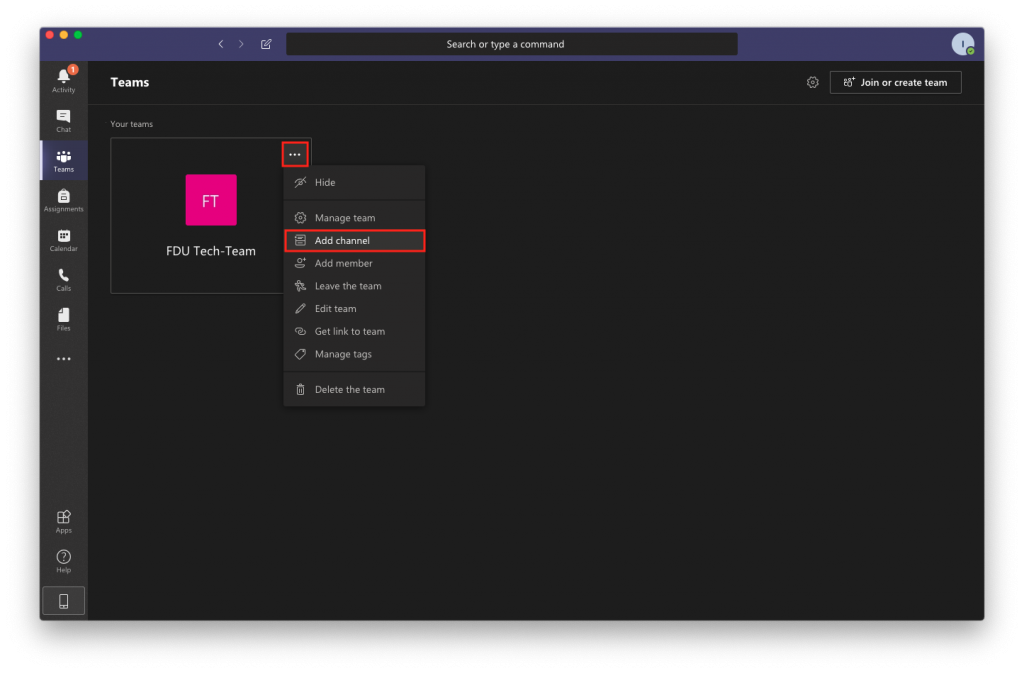
- Click on the “More options” icon (3 dots) next to the team name and select “Add channel“
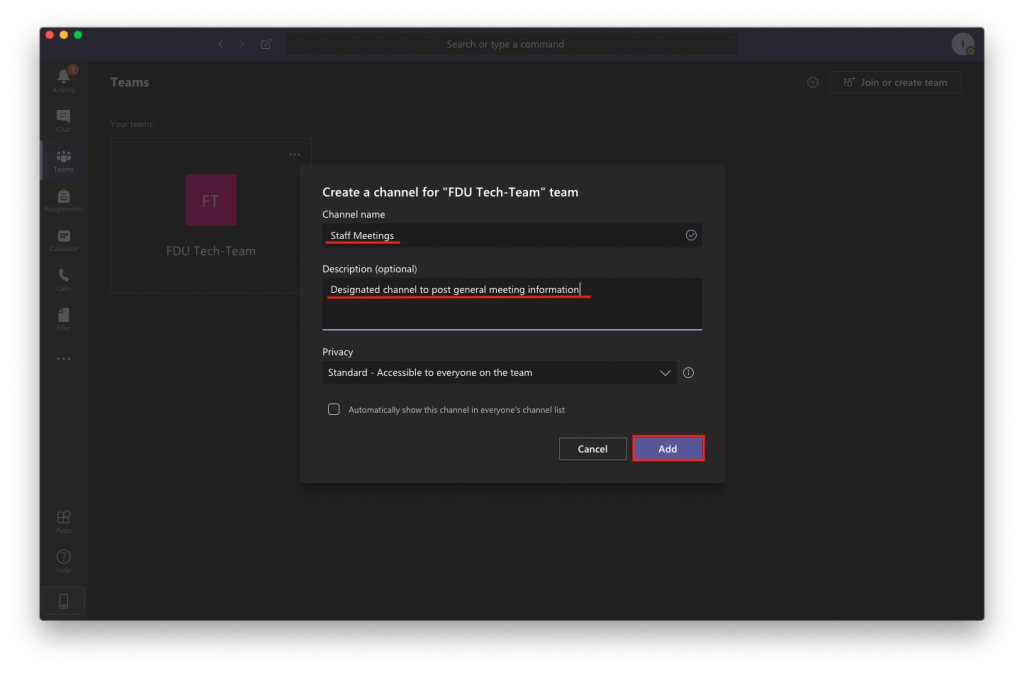
- Give the channel a name. Optionally, you can write in a brief description as well
- Select your channel’s preferred level of privacy and click “Add“
- Standard channels are open for anyone to join.
- Private channels are invitation only.
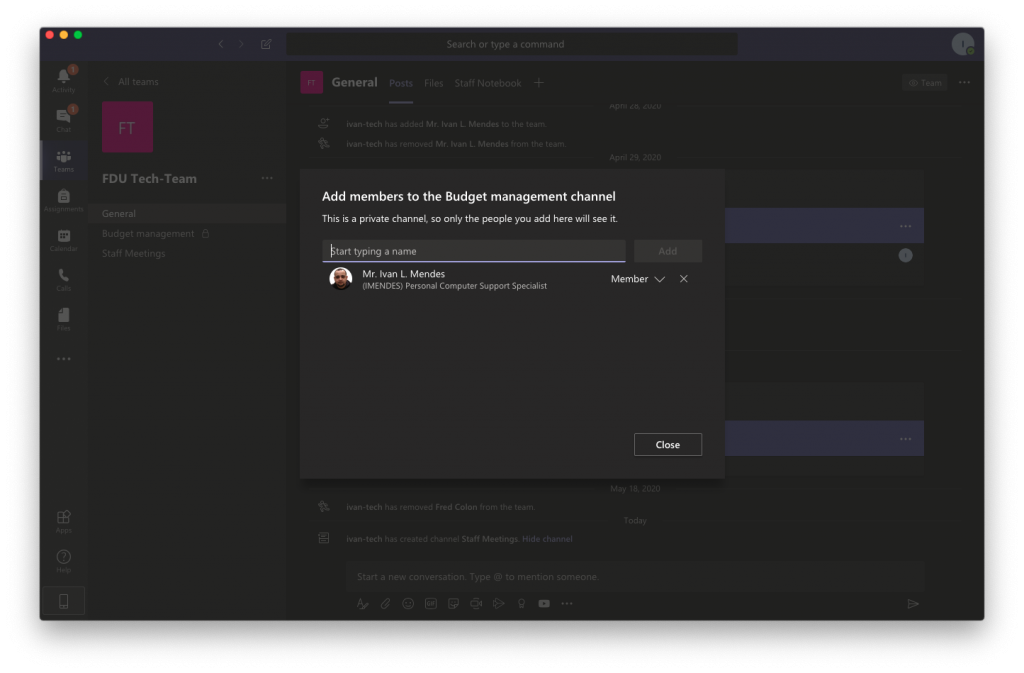
- If you selected “Private” you will see a window that lets you add the team members that should have access to the channel. Once all members are added, click “Close“
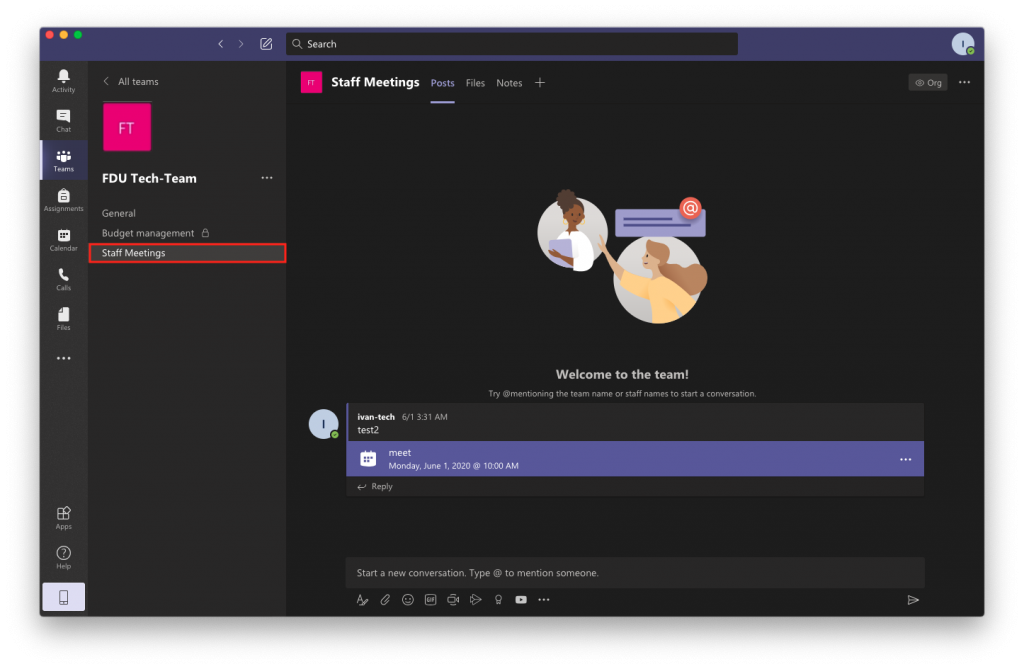
- Once a channel is created it will show up under the General channel in the channels list. If the channel was set to Private, only the members can see it. Anyone who belongs to the channel can click on it to view its contents
Note
Since channels are sections within a team, it is not possible to add members to a channel that are not part of the team.
Managing a Team
Now that your teams and channels are created, you can begin to take advantage of Microsoft Teams’ management features. Team management includes essential functions such as adding and removing members, assigning permissions for individual members, and managing your channels. You can also implement granular customizations such as setting parameters on the use of tags and emojis.
- Select Teams from the left menu. If you have more than one team, click on your team
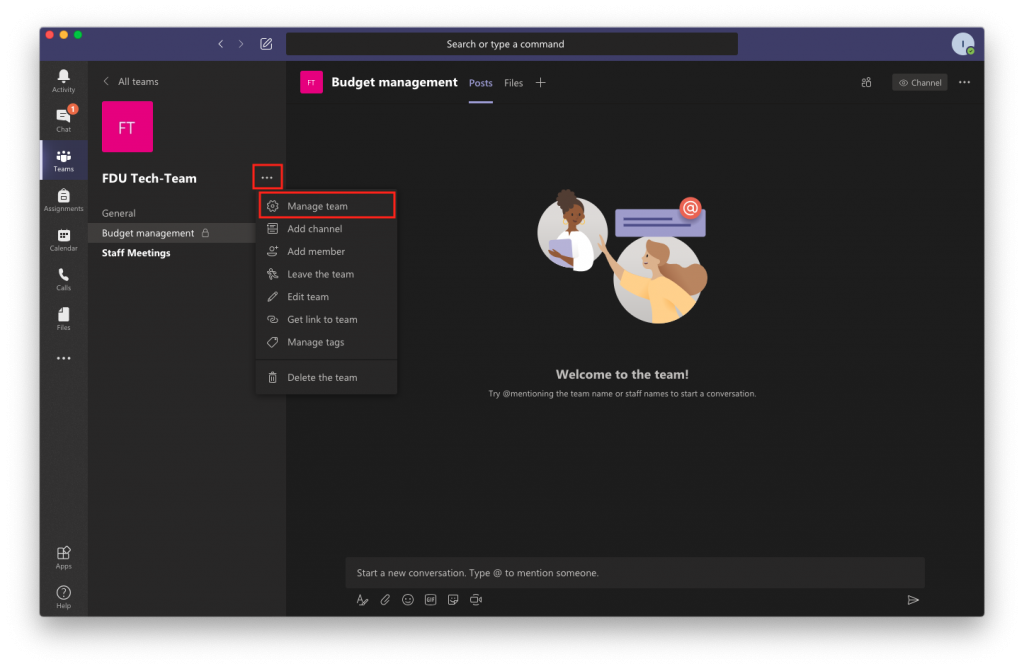
- Click “More Options” icon (3 dots) next to the team name and select “Manage Team“. From here, you can select one of the following tabs
Manage Members Tab
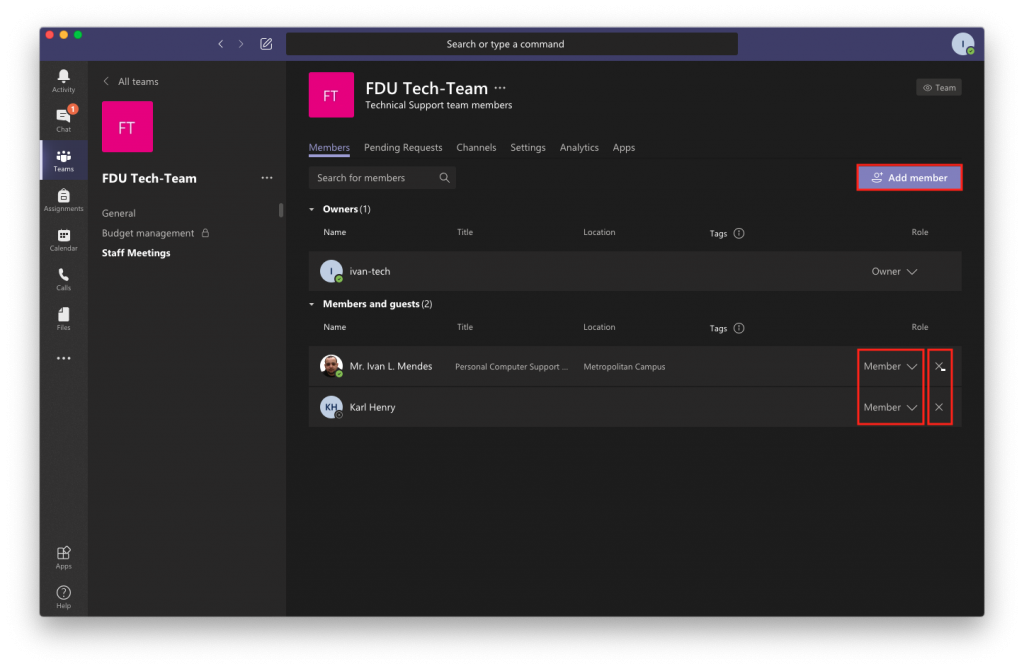
- Add a member by clicking “Add Member” button on the top right of the window
- Remove a member by clicking “X” button on the right of their name
- Use the drop-down menu to change a member’s role to Owner. This allows them full access to change settings
Manage Request Tab
- Use this tab to accept or deny a person’s request to join your team
Manage Channels Tab
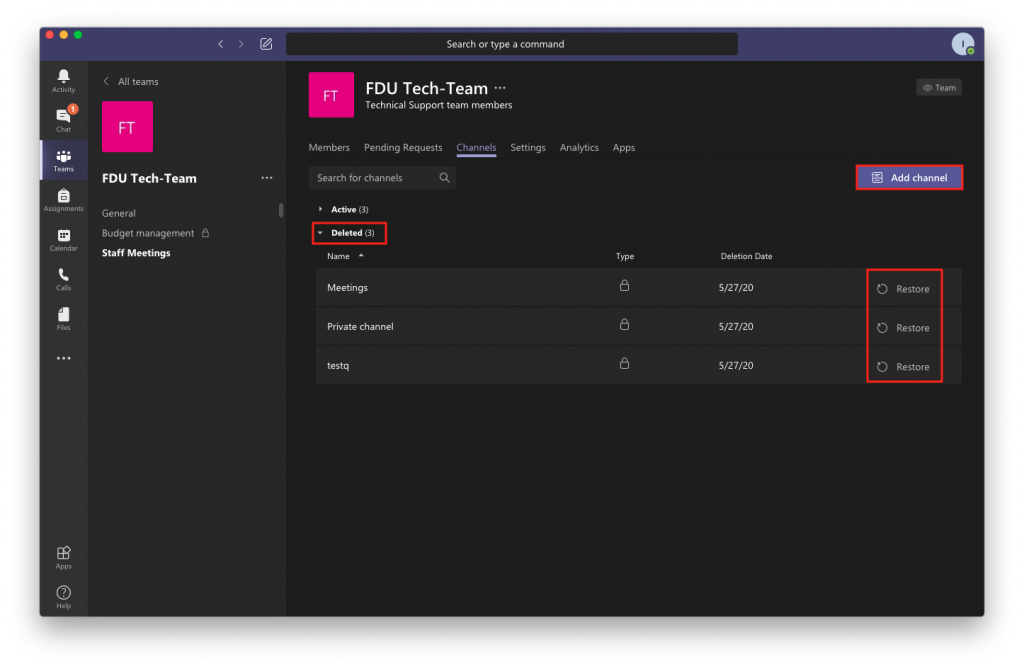
- Create a channel by clicking the Add channel button on the top right of the window
- You can restore deleted channels by expanding the Deleted list and clicking on Restore
Manage Settings Tab
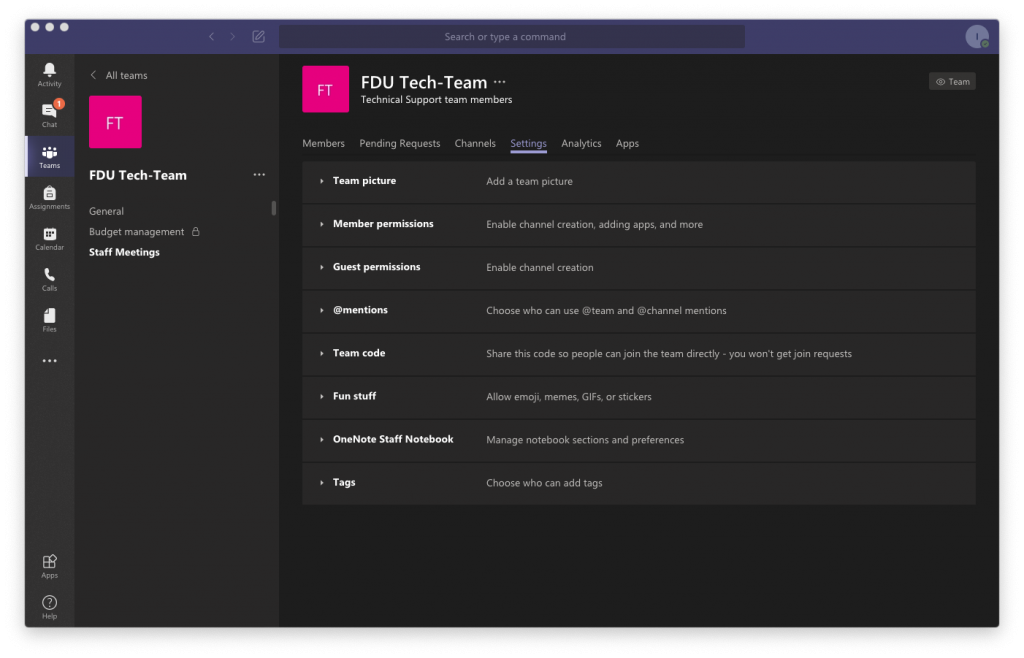
- The Team picture is an optional setting which allows you to set a profile picture for your team. You can upload your own image or use one of the colorful templates provided by Microsoft
- Use Member permissions to set editing permissions for your team members
- With the Guest permissions settings you can allow guests to create, update, and delete channels
- @mentions lets you choose if you allow the @mention function to send notifications to individuals or entire channels
- Team code will provide you with a join code that you can give out to new members. This will allow them to join without being placed in the Pending Requests section
- Fun stuff lets you allow gifs and memes to be displayed on the channel
- Use the Tags setting to decide who can use the tags feature. With tags, your team members can add labels help them better identify other members of the team
Manage Analytics Tab
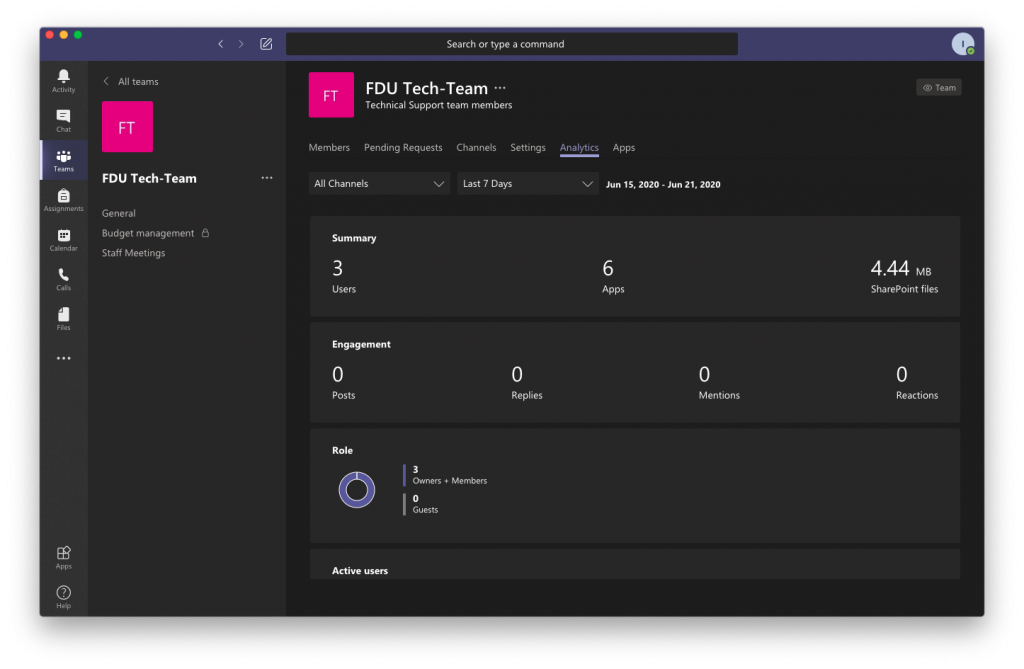
- The Analytics tab displays usage information for your team
Manage Apps Tab
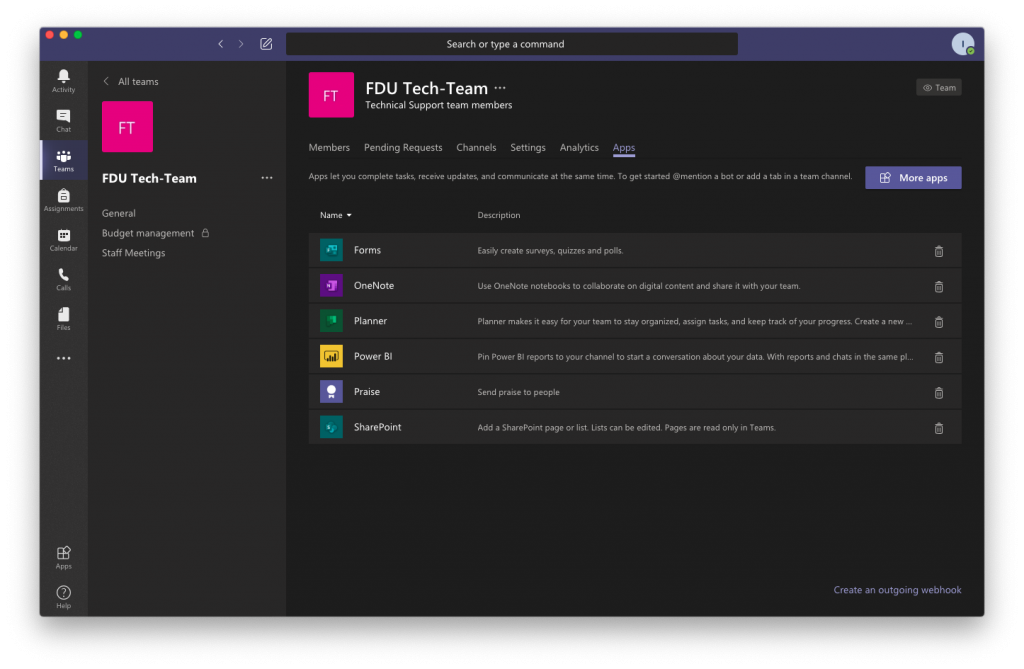
- The Apps tab allows you to add or remove application plug ins for your channels
Choosing a Team Type
When you create a new team in Microsoft Teams, you’ll be asked to select from one of four teams.
Learn more in the table below about which team meets your teaching and learning goals.
| Class | Professional Learning Community (PLC) | Staff | Other | |
|---|---|---|---|---|
| Description | Teachers and students collaborating on group projects, assignments, and more. | Educators collaborating within a professional learning community. Examples: academic department, grade band, or group working on a shared goal. | Staff leaders and staff members collaborating on school administration and development. | Students and school employees collaborating in interest groups and clubs. |
| Team Owners & Team Members | Teachers are team owners and add students as team members. | Educators form the team and other educators join the team. | Staff leaders are team owners and add staff members as team members. | Any combination of students and school staff can form a team and add members. |
| Permissions | Teachers moderate student conversations and who can post where. Students only have write permission in certain areas. | Educators share equal read-write permissions. | Staff leaders control posting settings. Staff members only have write permission in certain areas. | Team members share equal read-write permissions unless the team owner(s) alter the settings. |
| Features | Class Notebook Assignments Conversations Files Video and audio calls Chat (if enabled) Pinning new tabs with documents or sites like Microsoft Forms | OneNote notebook Conversations Files Meetings Video and audio calls Chat (if enabled) Pinning new tabs with documents or sites | Staff Notebook Conversations Files Meetings Video and audio calls Chat (if enabled) Pinning new tabs with documents or sites | OneNote notebook Conversations Files Meetings Video and audio calls Chat (if enabled) Pinning new tabs with documents or sites |
| Educational Goals | Assign, track, and review student work Export grades Collaborate and communicate in the classroom Make announcements Administer quizzes and polls Work in student groups Share and organize rich content Invite virtual experts into the classroom | Collaborate in professional learning communities Communicate Make announcements Share work Organize virtual or face-to-face meetings Work in smaller groups Share and organize content | Oversee professional development, staff, and administrative goals Communicate Make announcements Share content and progress reports Work in smaller groups Organize virtual or face-to-face meetings | Collaborate and communicate with team members Make announcements Share content Organize virtual or face-to-face meetings Work in smaller groups |
Starting an Instant Meeting
Instead of scheduling a meeting for a future date, you can start one right away and invite people in on the fly.
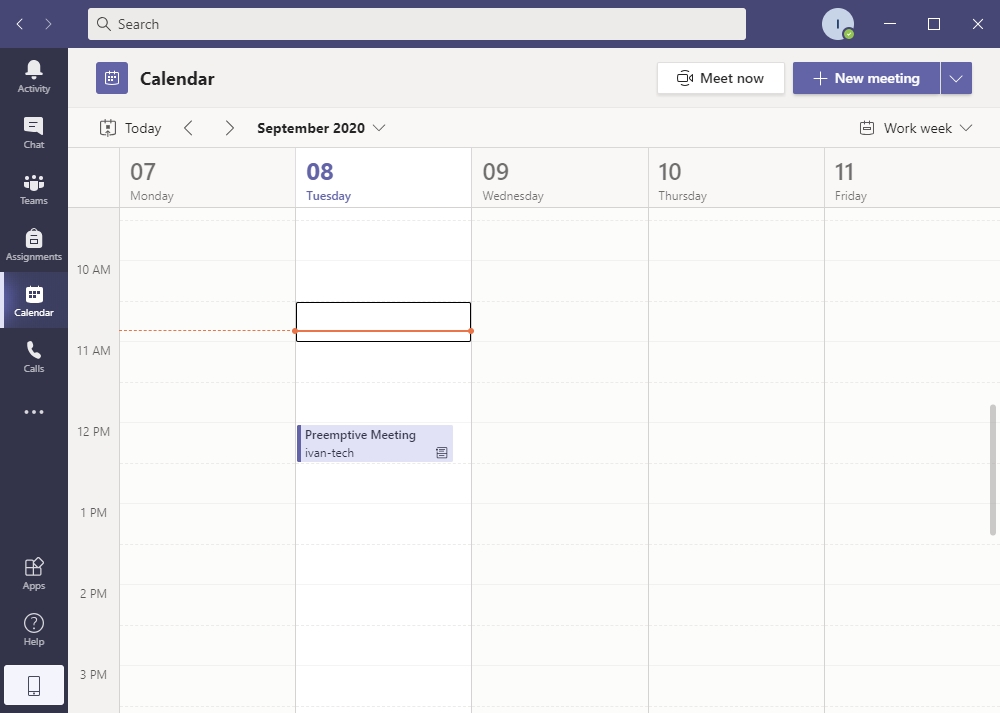
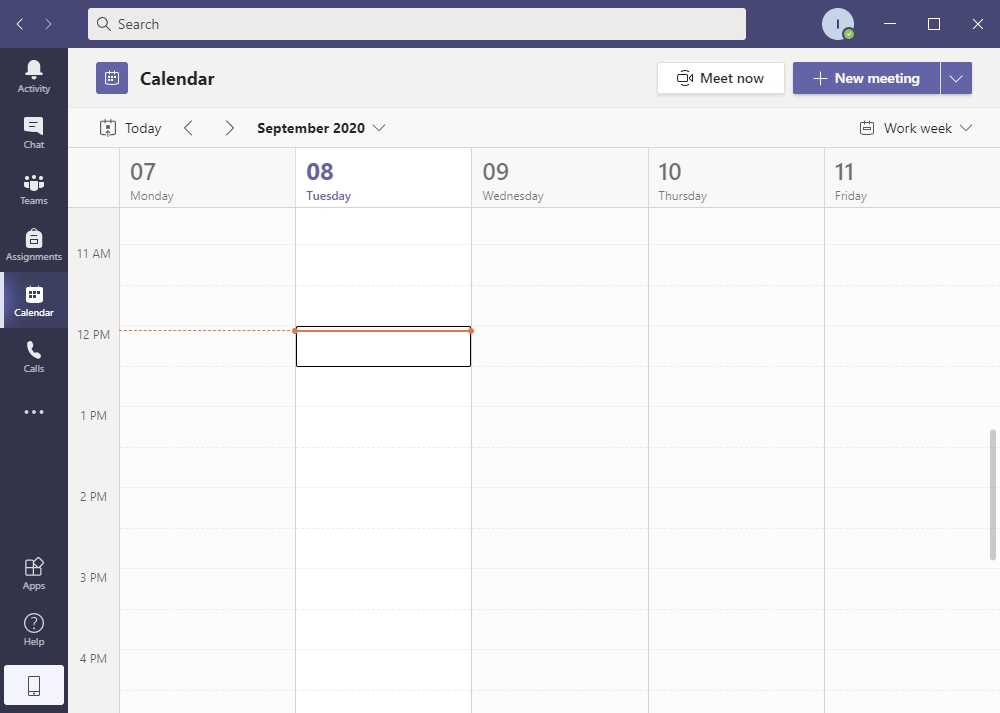
- Select “Calendar” from the left-hand side of the screen and click “Meet Now“
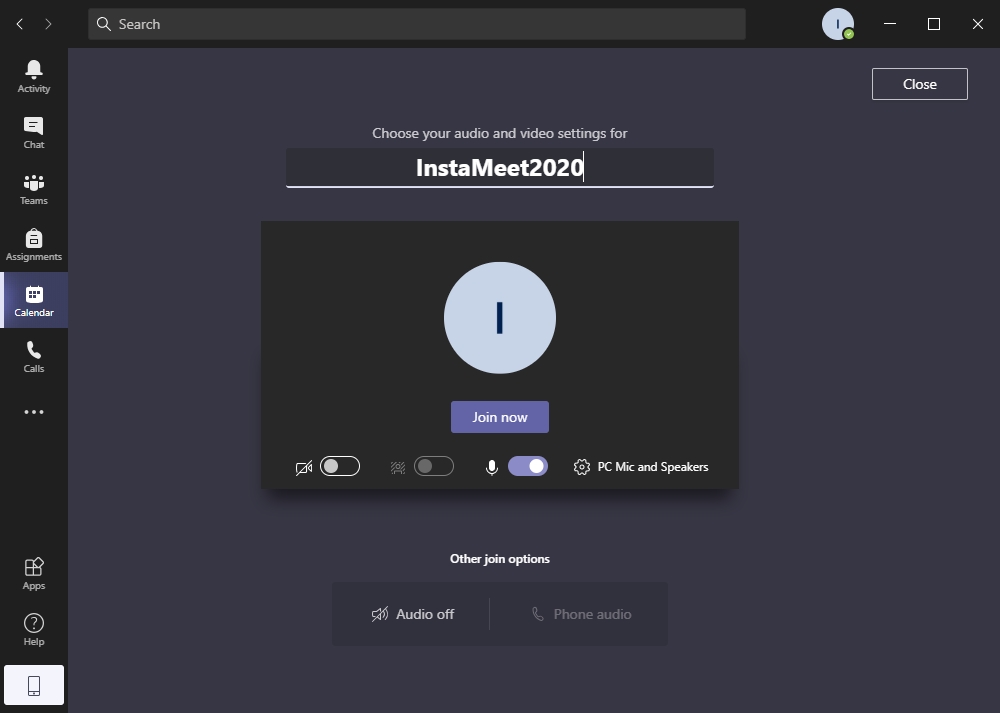
- Give your meeting a name, select audio and video options, and click on “Join Now“
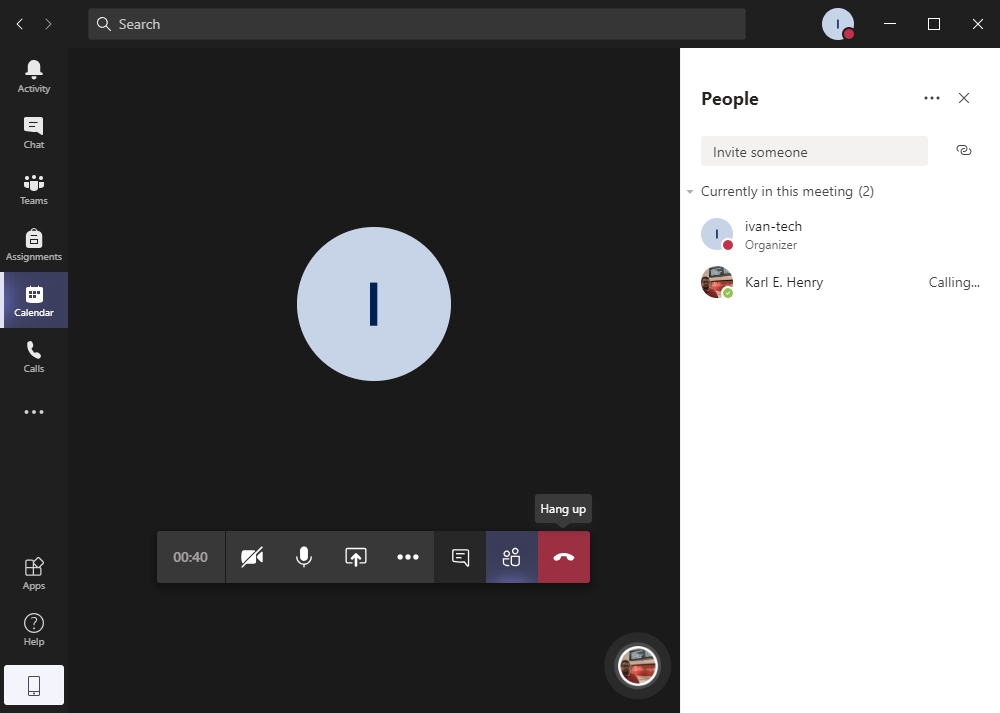
- Your meeting should start with the Participants tab displayed so you can start inviting people right away. As you search for people and add them to your meeting, they will receive a call to be connected
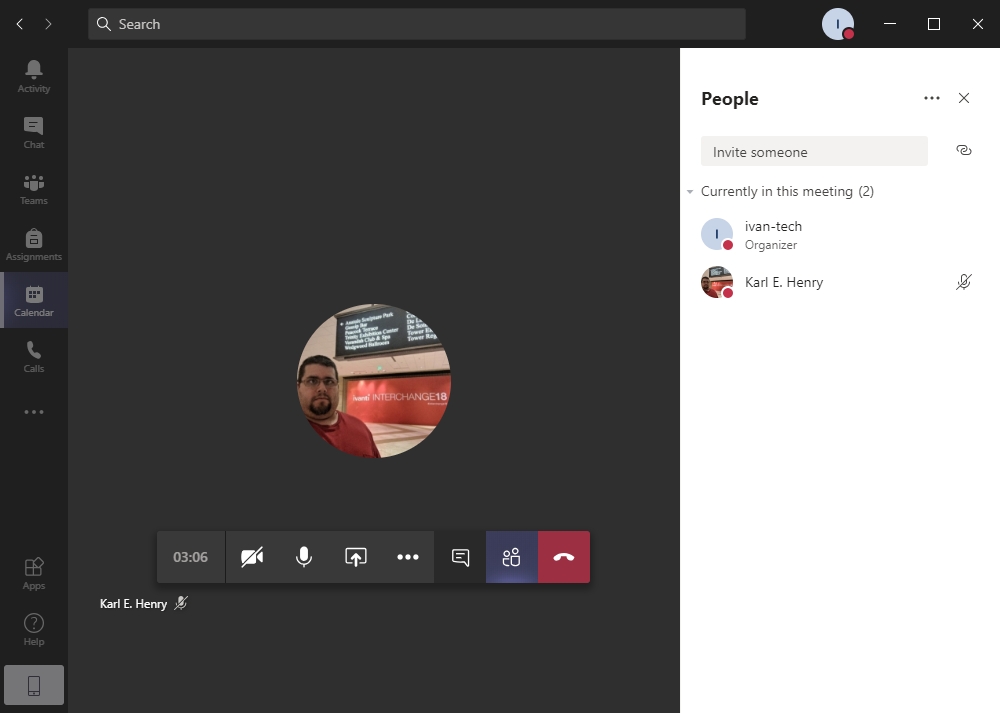
4. As people accept the meeting invitation they will automatically be connected
Joining a Meeting
Meetings in Teams include audio, video, and screen sharing. They’re one of the key ways to collaborate in Teams.
- You can join a scheduled meeting by selecting the “Calendar” tab from the left menu, then finding and left-clicking on your meeting
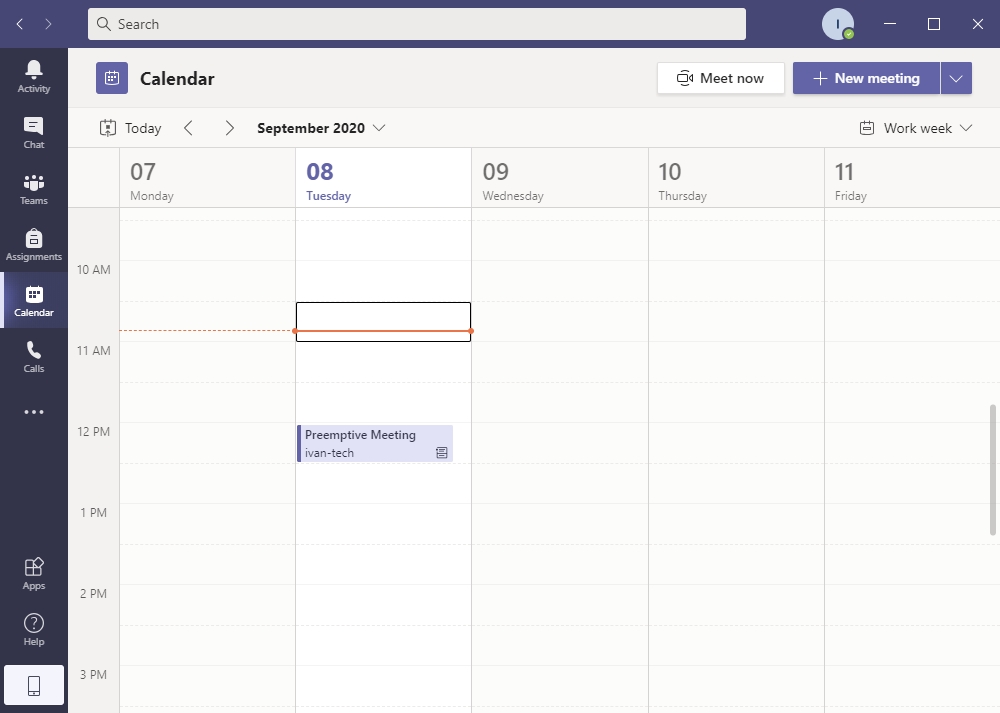
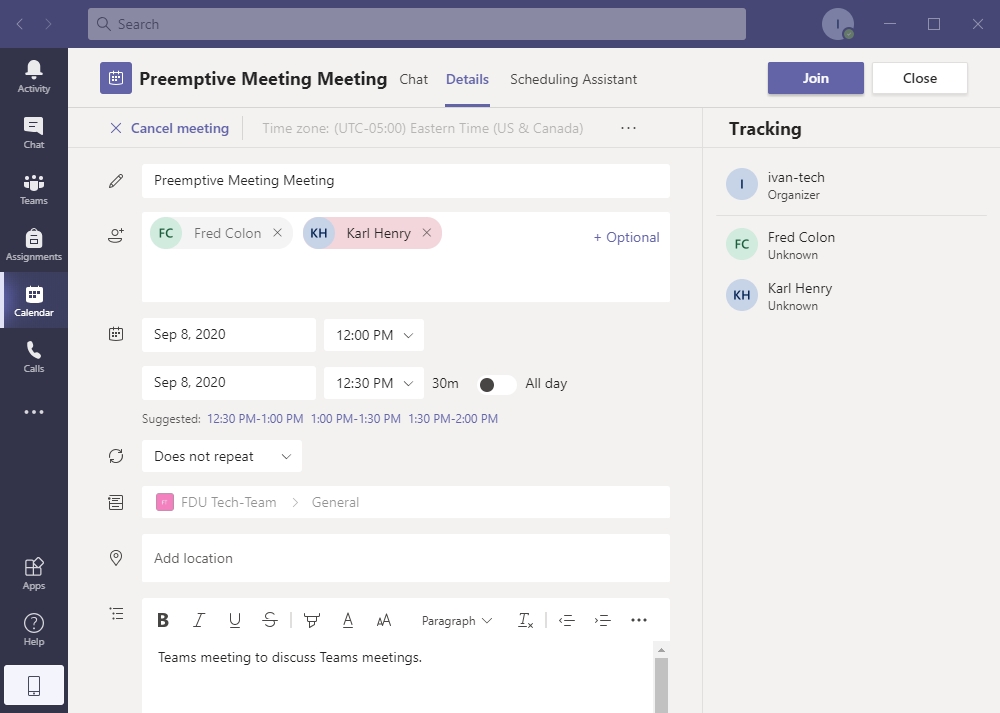
- Click “Join” button on the top of the page
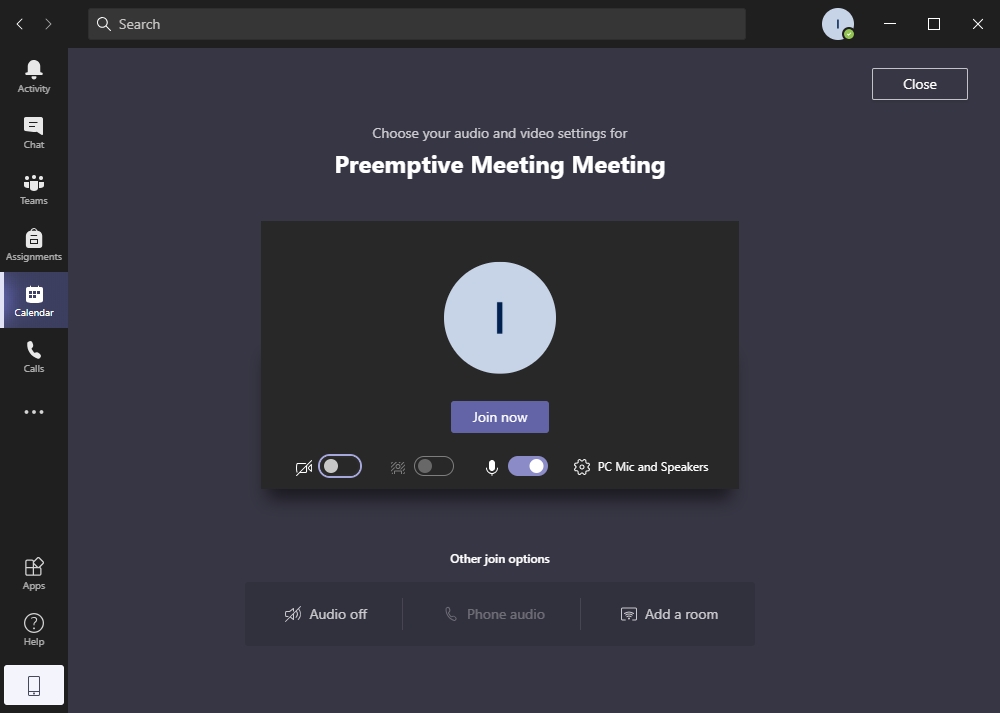
- Select your video and microphone options, then left click “Join Now“
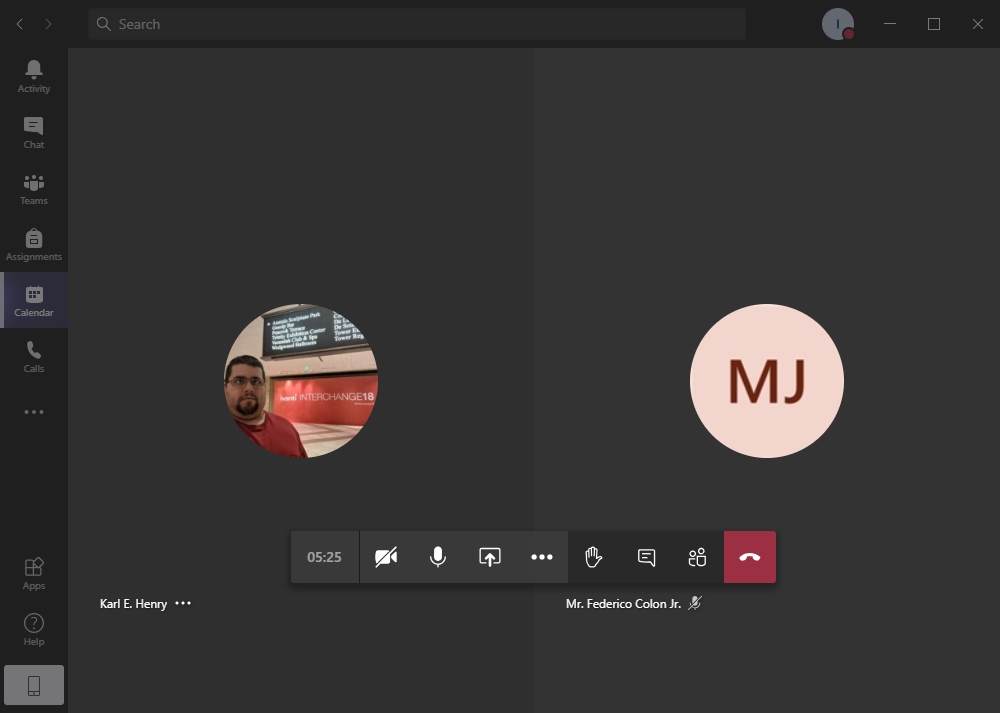
- If you are the first participant that joined the meeting, you will see a black screen informing you that you are waiting for other members to join. As people join the meeting they will show up on the screen.
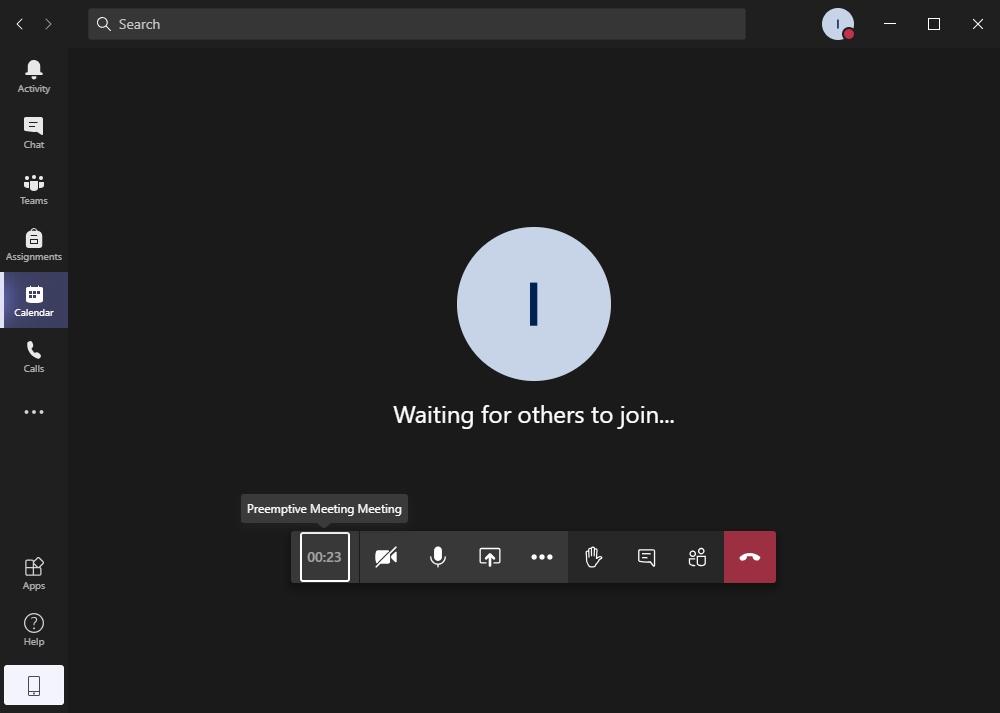
- When you are done with the meeting, close it by clicking the red telephone icon to “Hang up” the call
Scheduling a Meeting
Due to Office 365 calendar integration, scheduling video and voice meetings on Microsoft Teams is simple and convenient.
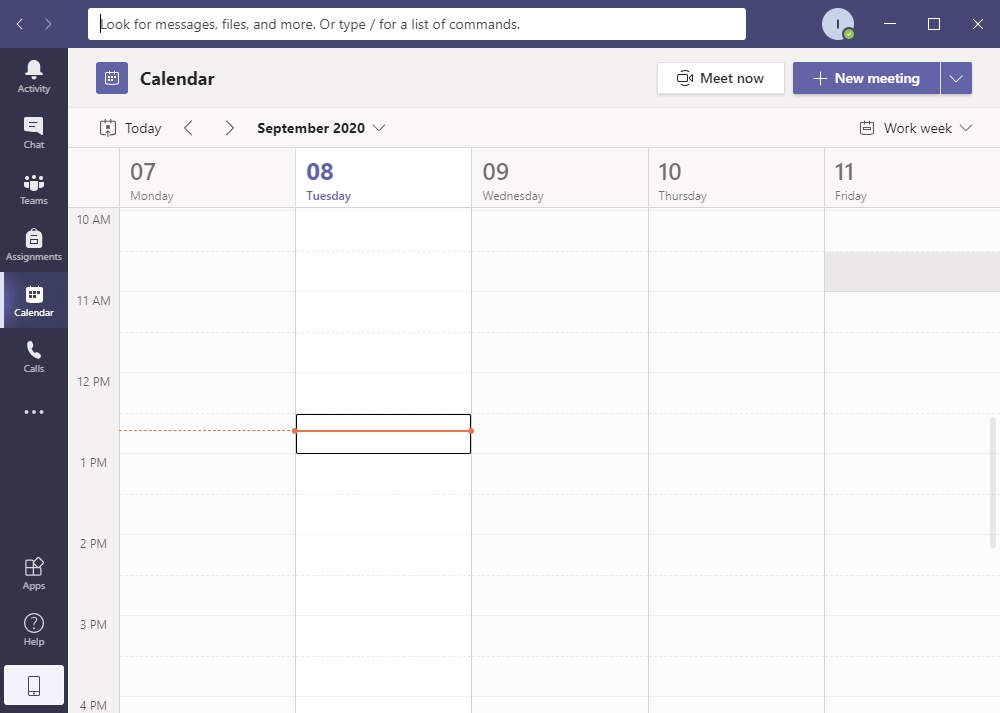
- Select the “Calendar” tab from the left-hand side of the screen. This screen displays your entire FDU Office 365 calendar. Next, click “New Meeting” button on the top right of the window
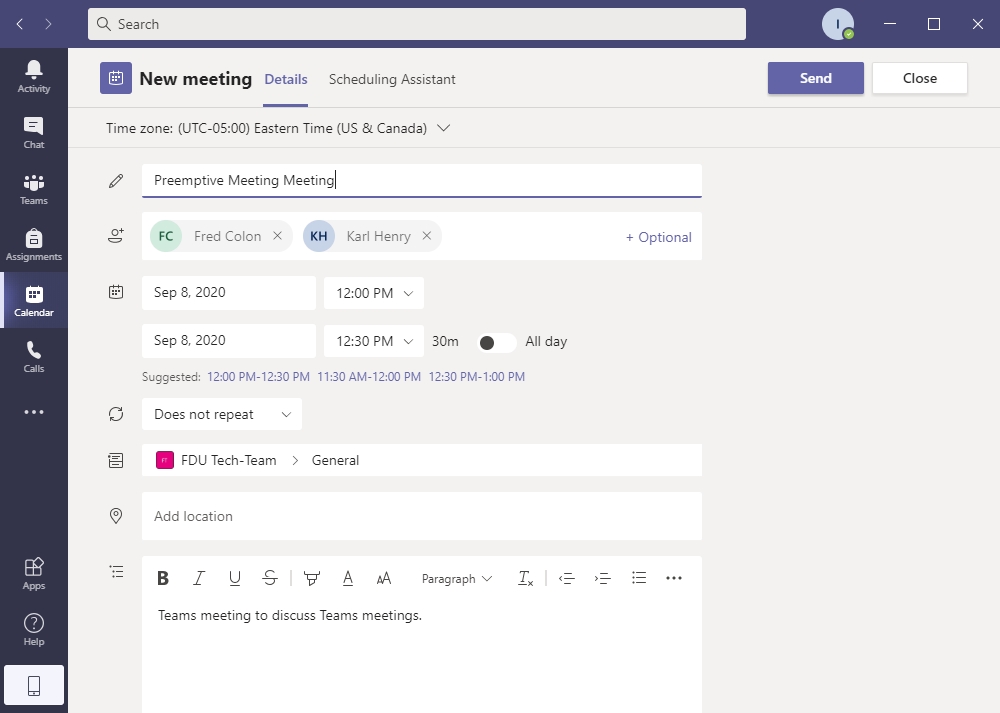
You will notice that the New Meeting window offers 2 tabs, Details and Scheduling Assistant
- From the Details tab, enter the following information about your meeting:
- Title
- Required Attendees
Note
You can also add optional attendees by clicking +optional button
- Time
- Specify whether the meeting reoccurs
- Add Channel is optional and lets you specify an entire Teams channel to receive a meeting notification
- Add location is optional and enables you to select a physical location for members to meet at
- Add details like the topic of discussion, meeting outline, etc
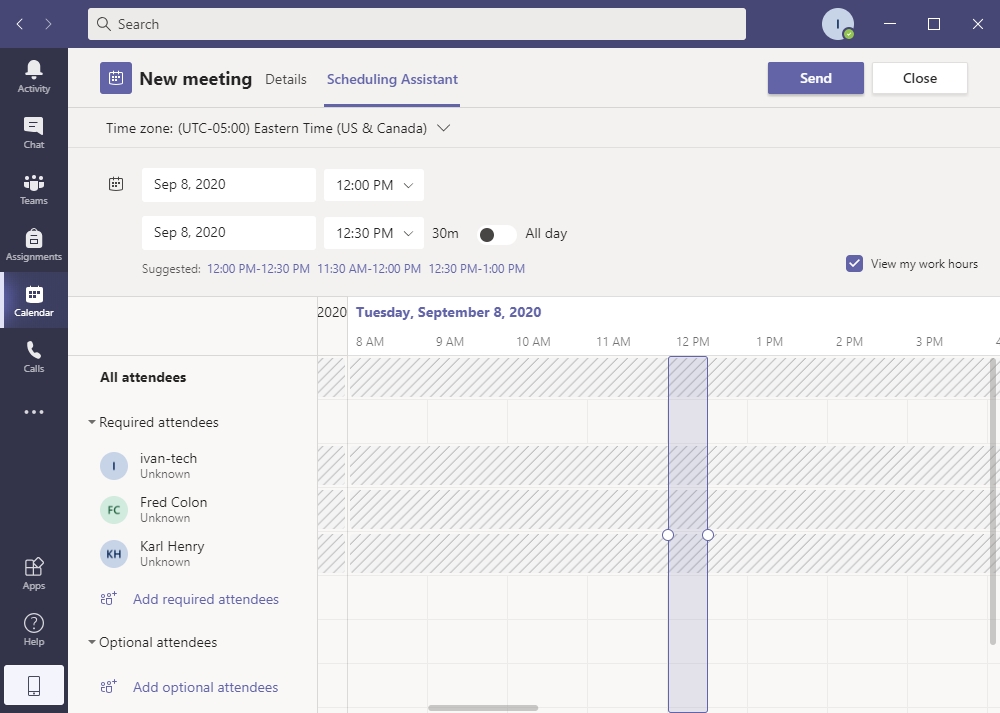
- The Scheduling Assistant tab allows you to view the calendar of all attendees to check for availability. It is possible to adjust the meeting time on this tab
- When finished, click the “Send” button on the top of the page. The meeting will be posted on the channel you selected and invites will be emailed to all requested attendees. The meeting will also show up on the calendar of the people who have accepted the meeting invitation
