MFA

Authorization, Authentication and Access Management Policy

Resources for:
icon Close

Revision Date: New Policy
Effective Date: 11/1/2023

Section A – University Systems and Applications

I. Purpose

The purpose of this policy is to establish information security standards for individuals receiving credentials to Fairleigh Dickinson University (“FDU” or “University”) resources and how those resources are accessed.

II. Scope and Applicability

This policy applies to all university system resources. All Users are responsible for adhering to this policy.

III. Definitions

Capitalized terms shall have the meaning ascribed to them herein and shall have the same meaning when used in the singular or plural form or any appropriate tense.

  1. Account: An established relationship between a User and a computer, network, or Information System which is assigned a credential such as a username and password.
  2. System Administrative Account: An Account with elevated privileges intended to be used only when performing management tasks, such as installing updates and application software, managing user accounts, and modifying operating system and application settings.
  3. Entitled Account: A user who has met the minimum requirement to be granted authorization to access electronic Fairleigh Dickinson University Resources.
  4. Authorized User: A User who has been granted authorization to access electronic Fairleigh Dickinson University Resources and is current and active in their privileges.
  5. Contractor or Vendor: A person or a company that undertakes a contract to provide materials or labor to perform a service.
  6. Employee: University staff faculty and adjunct, including nonexempt, exempt, and overseas staff and collegiate faculty.
  7. Multi-Factor Authentication (MFA): Authentication using two or more different factors to achieve authentication. Factors include something you know (e.g., PIN, password); something you have (e.g., cryptographic identification device, token); or something you are (e.g., biometric).
  8. Privileged Account: An Account that is authorized to perform security-relevant functions that an ordinary Account is not authorized to perform.
  9. Single Sign-On (SSO): An authentication process that allows an Authorized User to access multiple applications with one set of login credentials. SSO is a common procedure in enterprises, where a client accesses multiple resources connected to a local area network (LAN).
  10. User: A member of the University community, including but not limited to Staff and Faculty, and other individuals performing services on behalf of University, including Contractors, volunteers and other individuals who may have a need to access, use or control University Data.

IV. Authentication

  1. Any service, application or Information System, whether on-premise or in the cloud, that contains WISP protected information, especially PI or PHI; OR is accessed by a large group of employees (20 or more), must use Single Sign-on authentication.
    • If the service or application is being provisioned by a business unit, the unit must engage University Systems to work with the provider to enable SSO.
    • If SSO is not supported by the service or application, it will not be approved for use by the university.
    • See Section V for exceptions.
  2. Multi-factor authentication (MFA) must be used to access University resources.
  3. Passwords must be constructed in accordance with the minimum requirements as listed below:
    • Authorized User Account passwords must meet a minimum length of 8 characters.
    • Administrative and Privileged Account passwords must meet a minimum of 10 characters.
    • Passwords must contain a mix of alphanumeric characters. Passwords must not consist of all digits, all special characters, or all alphabetic characters.
    • Automated controls must ensure that passwords are changed at 90-day intervals for both general users and administrative-level accounts.
    • NetIDs associated with a password must be disabled for a period of time after 10 consecutive failed login attempts. A minimum of 30 minutes is required for the reset period.
    • Passwords must not be the same as the NetID.
    • Passwords must not be displayed on screens.
    • Users must not share passwords.
    • Initial passwords and password resets must be issued pre-expired forcing the user to change the password upon first use.
    • Password reuse must be limited by not allowing the last 10 passwords to be reused. In addition, the password must be at least 2 days old in order to be voluntarily changed.
    • Access will be disabled 90 days past the date that a password expired if not changed.
    • Access will be disabled after 30 days of creation if NetID is not claimed.
    • Expired passwords must be changed before any other system activity is allowed.
  4. Server Password Protocol
    • If, at any time, a member of the Community is granted permission to install a server, and access to that server is restricted via Login, and if that process is granted SSO exception through section VII., that system can not hold passwords in clear text. That system must use an approved irreversible cryptographic transform to protect its users’ passwords.

VI. Enforcement

  • This policy will be enforced by technical controls wherever feasible; otherwise, this policy will be enforced by OIRT under the direction of the CIO. All members of FDU’s faculty and staff have a responsibility to promptly report any known instances of noncompliance to AVP of University Systems and Networking or the Director of Systems.
  • Failure to comply with this policy can result in disciplinary action. Any such discipline shall be in accordance with processes and procedures of Human Resources and subject to any protections afforded under the University’s agreement with “Office & Professional Employees International Union”, the “Faculty Handbook”, and similar documents. Third parties who violate this Policy may have their relationship with the University terminated and their access to campus restricted.

VII. Exceptions

  • Exceptions to this policy should be submitted to the AVP, USAN for review. Approval of the Chief Information Officer (CIO) or Data Security Incident Response Team (DSIRT) may be required.

Last Modified:

DUO Device Management Portal Guide

Resources for:
icon Close

This guide is designed to assist you in mastering both the classic and updated versions of the DUO Device Management Portal. It simplifies the process of modifying existing devices and integrating new ones into your multi-factor authentication setup.

Legacy DUO Device Management Portal

Accessing the legacy DUO Management Portal
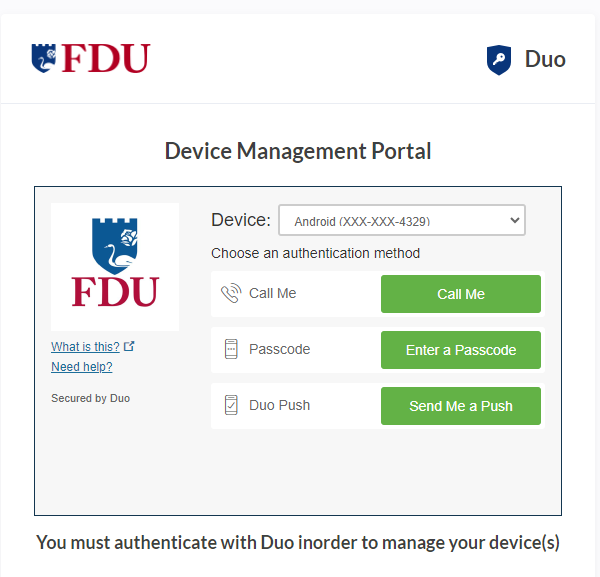
  1. In a Desktop or Laptop browser visit the “DUO Management Portal“. You will be prompted to authenticate through SSO and complete the Multi-factor Authentication process

DUO Management Portal

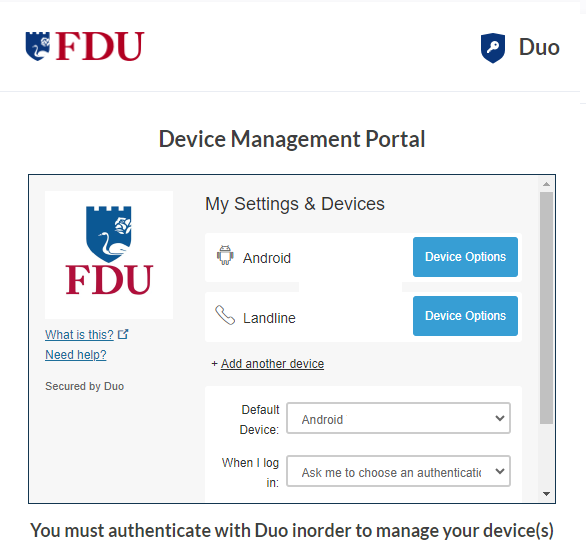
  1. After authenticating you’ll see the DUO Management Portal. This is where you can enroll new devices, reactivate, edit, or delete your existing devices
close
Default Authentication Options

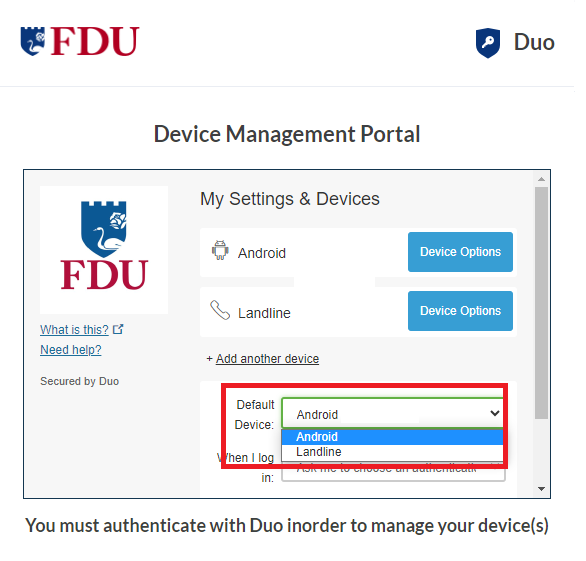
If you authenticate with more than one device, you can specify which you would like to be the default.

  1. Click the “Default Device” drop-down menu and pick your default device for authentication. Click “Save” if you’re done making changes
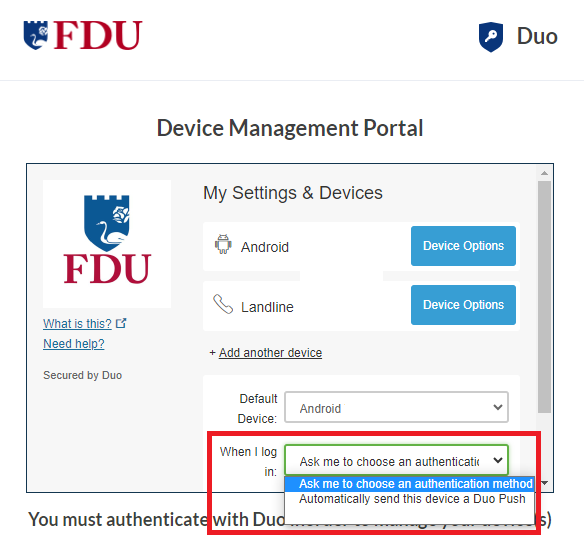
  1. You can choose which authentication method you prefer to use when logging in by clicking on the “When I log in” drop-down menu
    • Ask me to choose an authentication method: it will prompt you to select an option every time you log in
    • Automatically send this device a DUO Push: it will automatically send a DUO Push to your default device
close
Reactivate Duo Mobile
  1. Click on “Reactivate DUO Mobile” if you need to get DUO Push working on your phone, for example, if you replaced your phone with a new model but kept the same phone number.
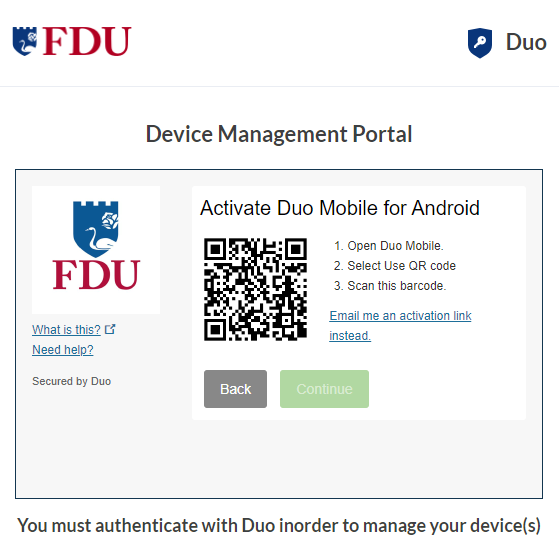
  1. After answering some questions about your device, you’ll receive a new QR code to scan with your phone, which will complete the DUO Mobile activation process
close
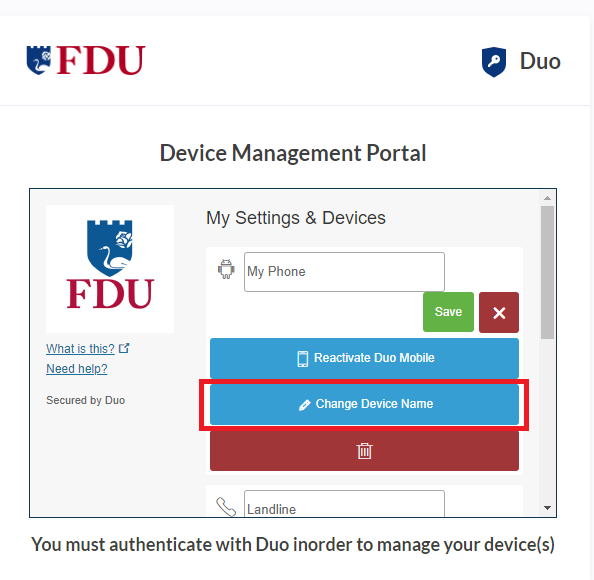
Change Device Name
  1. Click on “Change Device Name” to open up an interface to change the display name of your phone
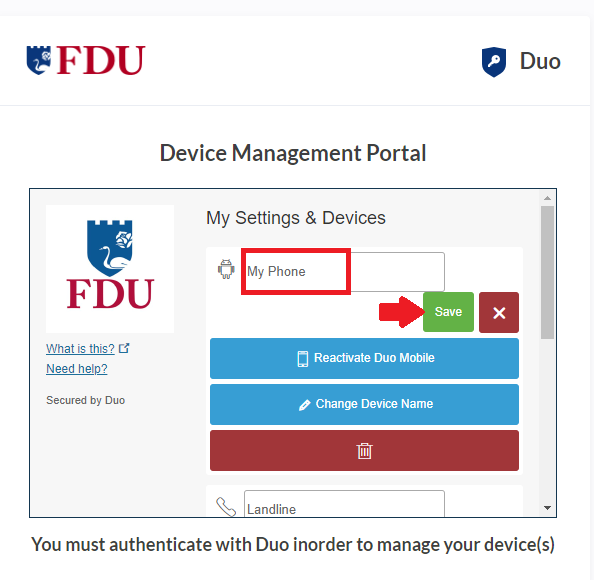
  1. Type in the new name and click “Save
close
Remove Device
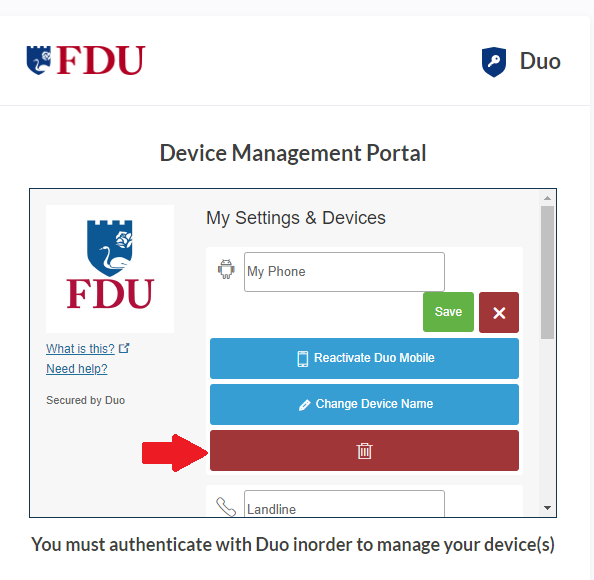
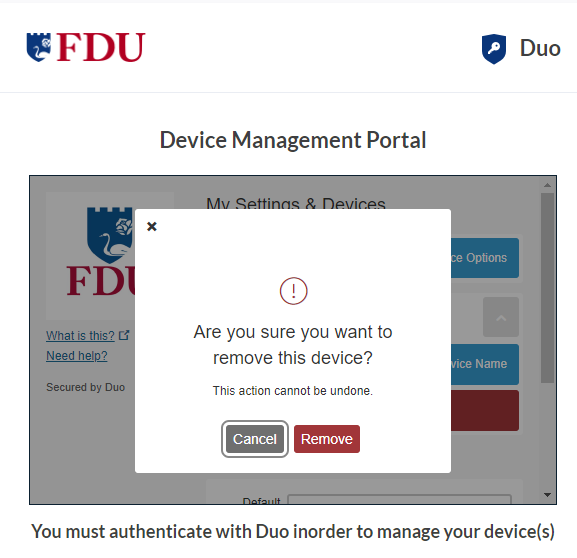
  1. Click the “trash” icon button to delete a device
  1. Confirm that you want to remove the device by clicking on “Remove“. The device will be deleted. It will no longer be able to approve DUO authentication requests.

Note

You may not remove your last device. If you wish to remove it, first add another, then delete the original. If you are unable to delete a device, contact your administrator to have it removed.

close
Add New Device

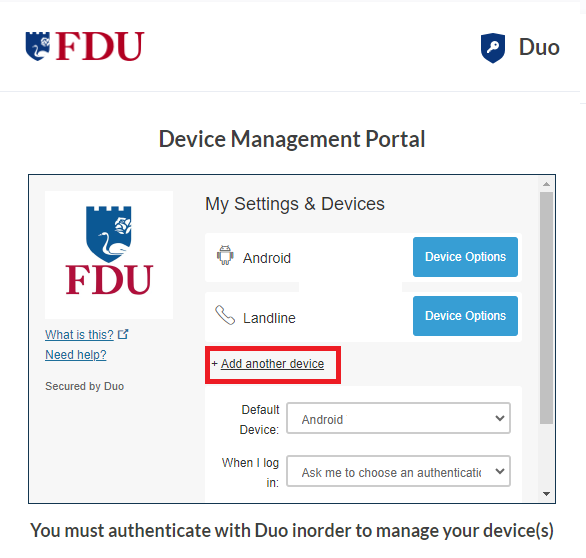
To add a new authentication device, click “Add another device” link on the right side of the DUO Prompt. You’ll be taken to the new device enrollment prompt

You can use the DUO Quick Start Guide for instructions on how to enroll a new device

close

Updated DUO Device Management Portal

Accessing Updated Device Management in the DUO Universal Prompt

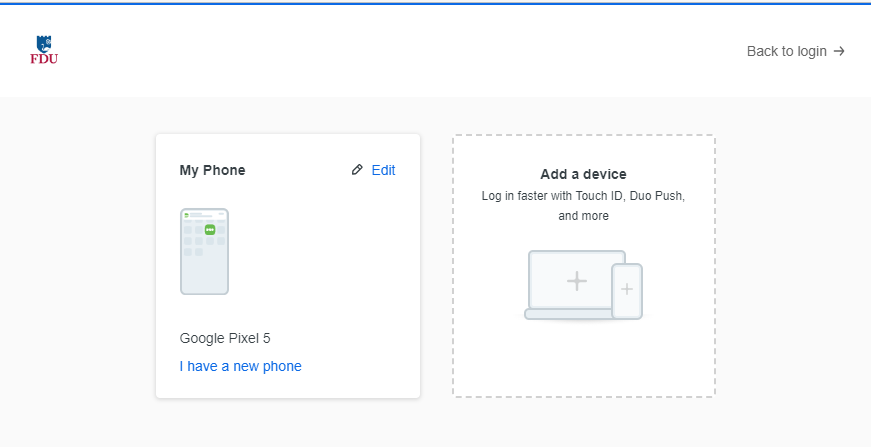
You can add additional verification methods, manage your existing devices, or reactivate DUO Mobile for DUO Push from the DUO Universal Prompt.

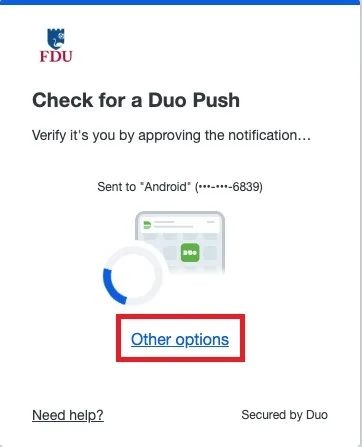
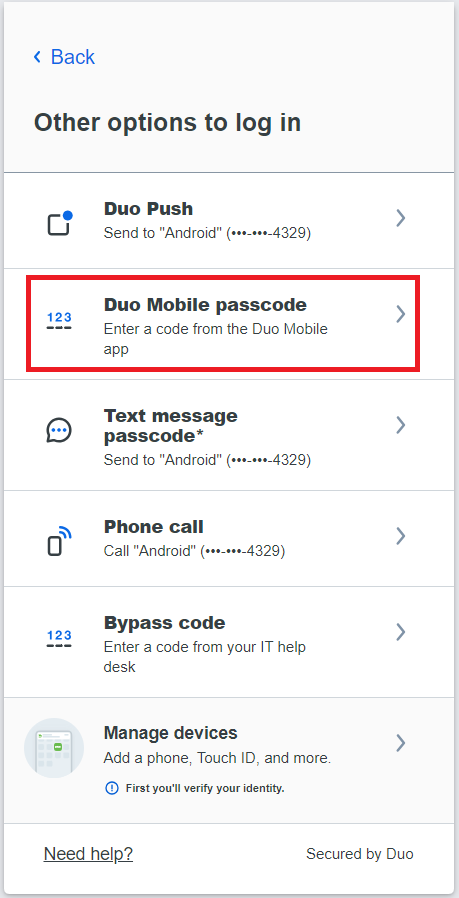
  1. When logging in to an application with the Universal Prompt Click the “Other Options” link on the authentication page to view your list of available methods
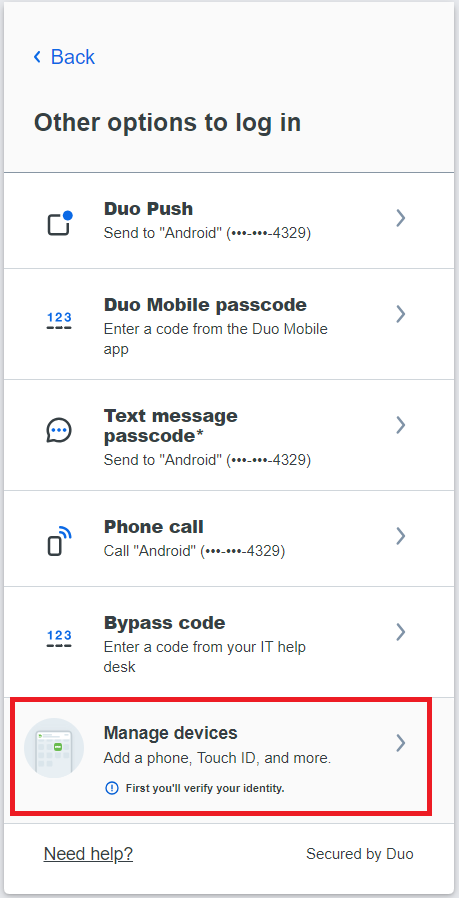
  1. Click on “Manage devices” at the end of the list to enter the device management portal
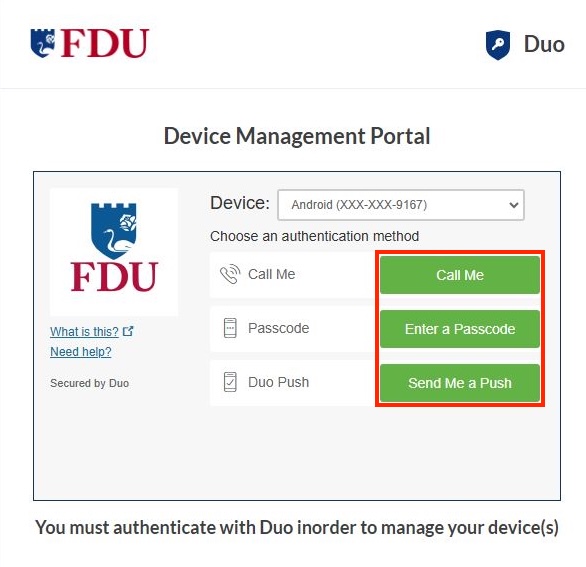
  1. You will be prompted to verify your identity by completing the DUO Multifactor Authentication process. Select your preferred authentication method from the listed options to continue
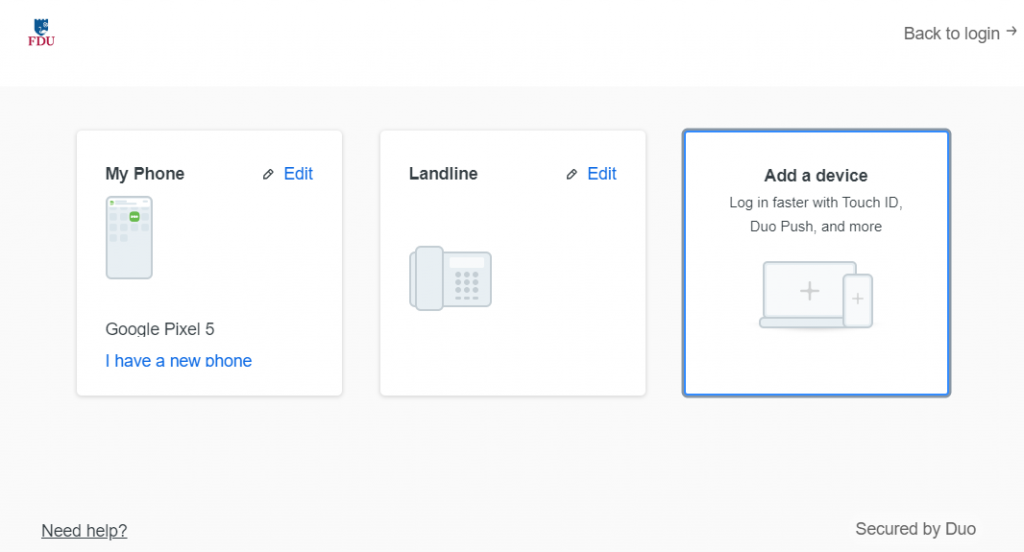
  • After approving a DUO authentication request you can see the Device Management Portal with all your registered devices.
close
Add New Device

To add a new method of verifying your identity in DUO, click “Add a device” and follow the enrollment process described in the DUO Quick Start Guide, starting on Step 3.

The difference between adding a new device from the Device Management Portal and during first-time enrollment is that when you have finished enrolling the new device you return to the Device Management Portal to view all your registered devices, including the new one, instead of continuing to log into an application.

close
Rename or Remove a Device
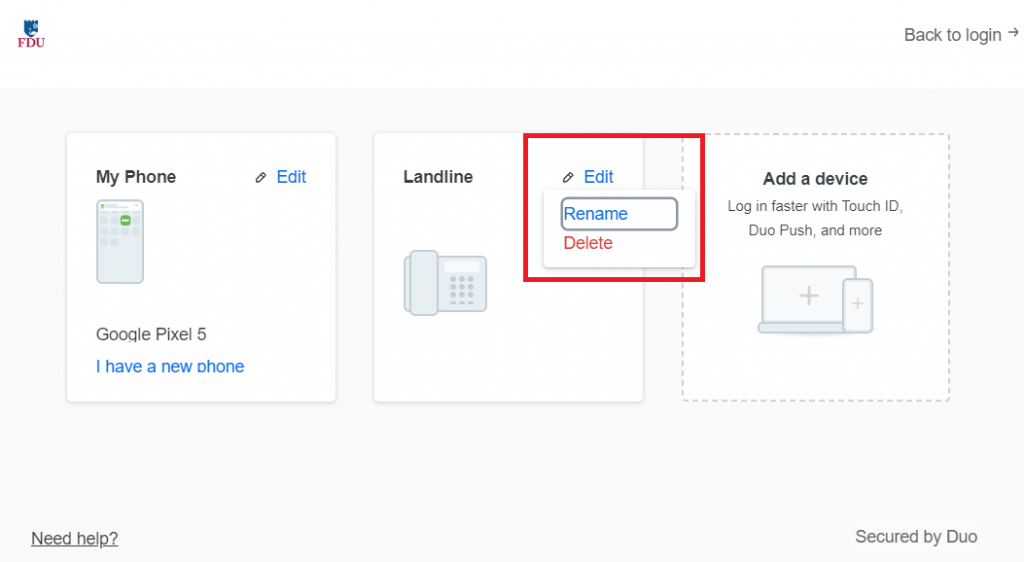
  1. Click the “Edit” button on the device you would like to rename or remove to view the drop down menu
    • Then click either “Rename” or “Delete
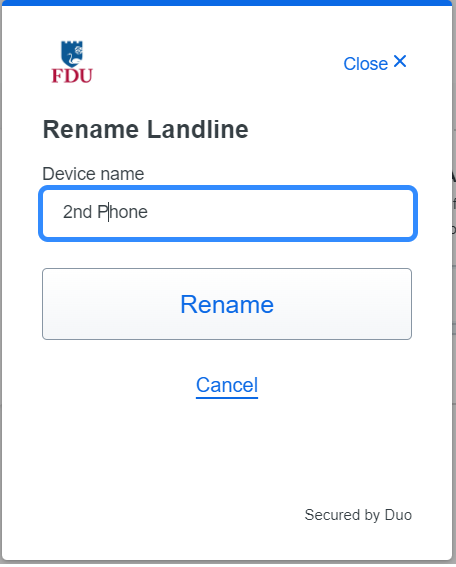
  1. When renaming a device, type the new name for your device, then click on “Rename” to save your changes
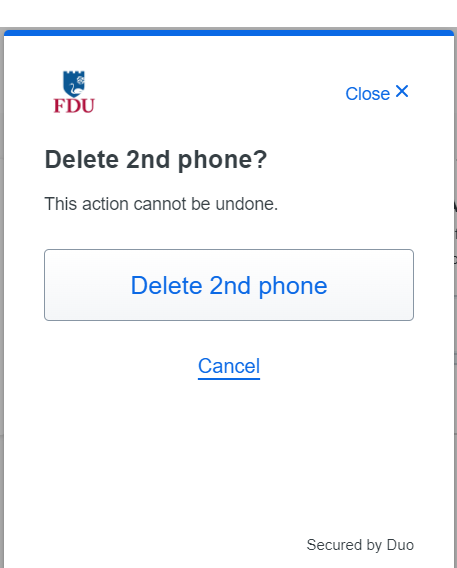
  1. When Deleting a device, confirm your selection to delete
close
Reactivate DUO Mobile for an Existing Device

If you have replaced the phone you activated for DUO Push, you can reactivate DUO Push if you have the same phone number.

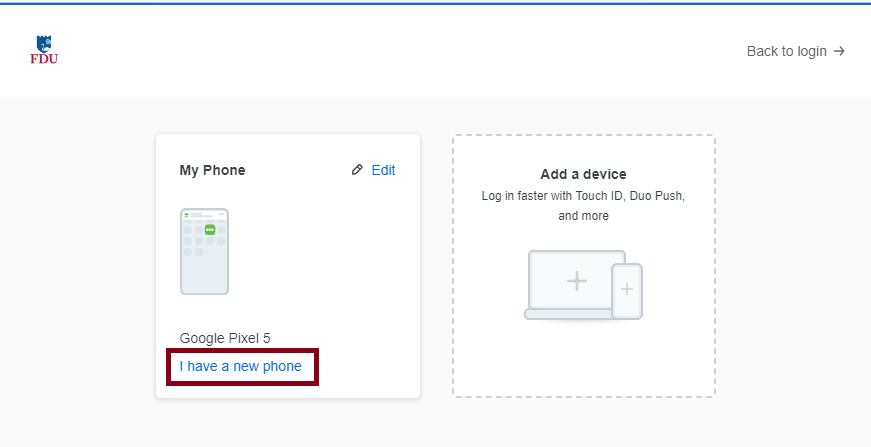
  1. Click on “I have a new phone” for the device you want to reactivate
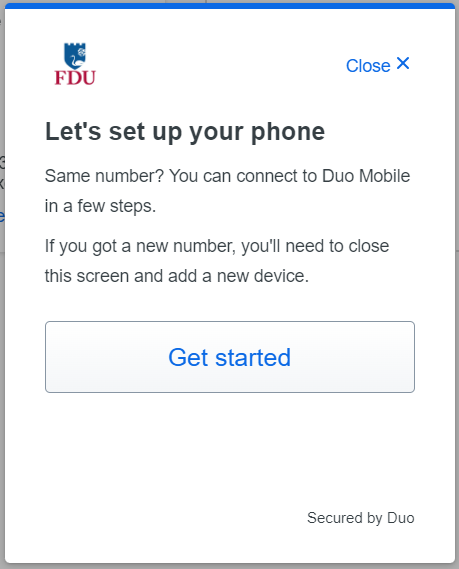
  1. Click “Get Started” to continue
  1. Click on “Send me a passcode” or “Call my phone” then proceed to follow the instructions prompted to complete the reactivation process
close
Reactivate DUO Mobile outside of the Device Management Portal
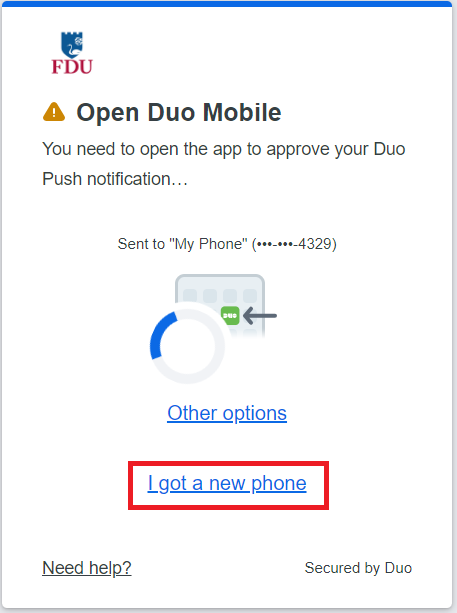
  1. Let the DUO Push authentication time out
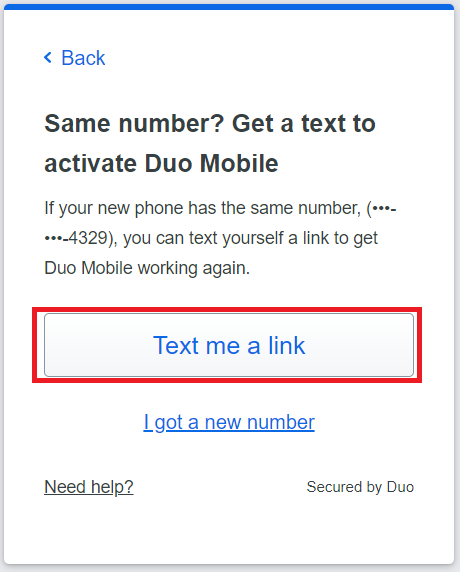
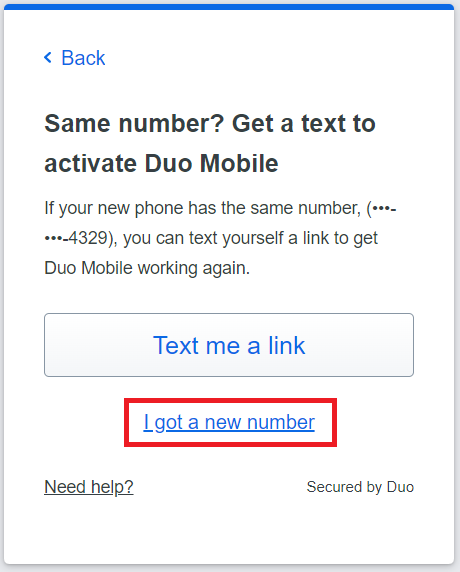
  1. Click on the “I got a new phone” link shown in the Universal Prompt
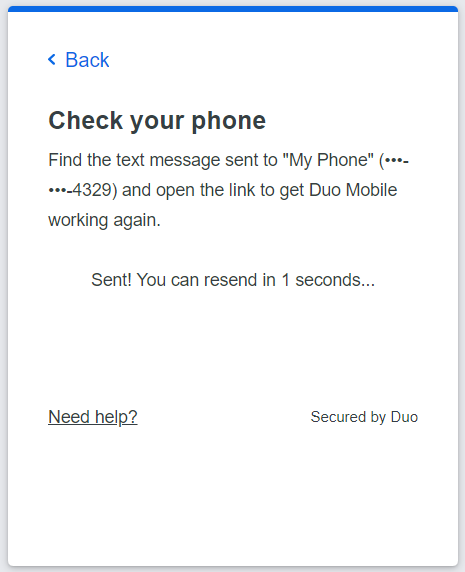
  • If you still use the same phone number as you did when you first set up the phone to use DUO Push, then click or tap the “Text me a link” button
  • When the text message with the link arrives on your phone, tap it to automatically reactivate DUO Mobile on your phone to use DUO Push again. If you don’t have DUO Mobile installed be sure to install it before you try to open the activation link in the text message.
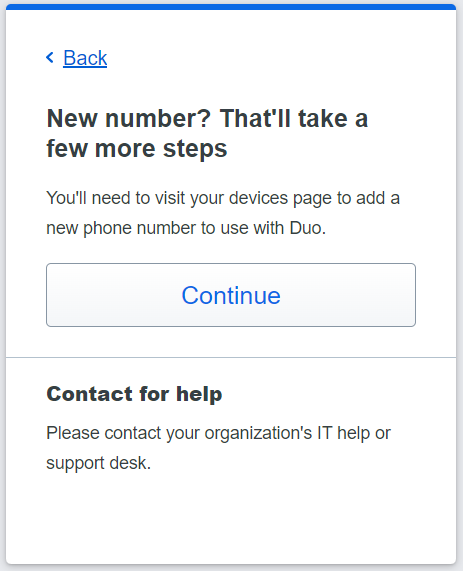
  • If you are using a different phone number than the one you first set up, then press on “I got a new number
  1. Press “Continue” to proceed to the DUO Device Management Portal, where you can complete the steps to “Adding a New Device and set up DUO Push on the new phone

Note

You will need to verify your identity with a different DUO verification method, so if you don’t have one available you will need to contact the Fairleigh Dickinson University Technical Assistance Center for help.

close
Last Modified:

DUO FAQ’s

Resources for:
icon Close

Two-factor Authentication

Two-factor authentication also referred to as multi-factor authentication, provides an additional layer of security when logging in to a website. Two-factor authentication is becoming the standard in cybersecurity. Google, Apple, and other services all have their two-factor authentication methods. In short, passwords are no longer sufficient in protecting our sensitive data; we’ve got to add another layer of security to our accounts.

FAQ’s for DUO Authentication

    • DUO Push – if you have the DUO Mobile App installed on your smartphone or tablet, you can receive a push notification. From the app, you can approve or deny the login attempt.
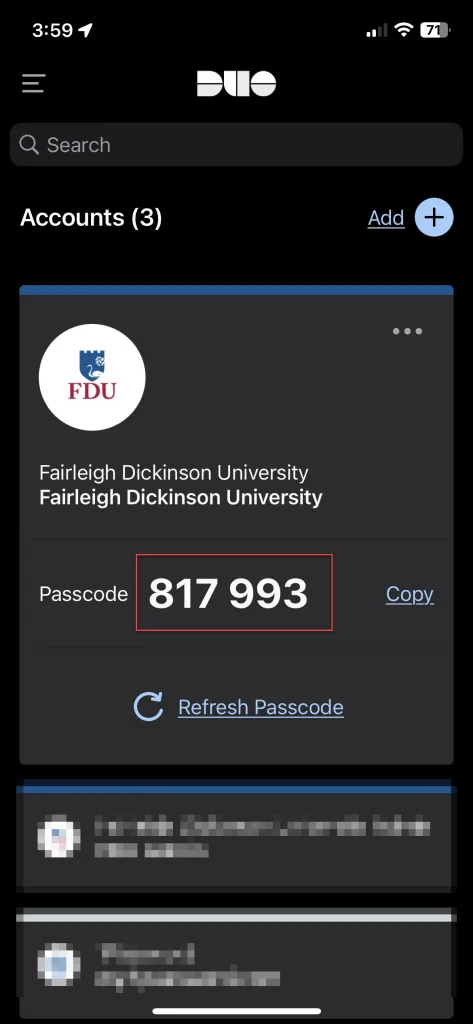
    • Passcodes via DUO Mobile App – If you have the DUO Mobile app installed, you can receive a single passcode by tapping the FDU logo in the mobile app. This code must be used immediately.
    • Passcodes via SMS (Faculty/Staff Only) – users can receive a one-time use code via text message. To get you a one-time code, click Enter Passcode, then click on the blue button “Text me new codes.”  These codes do not expire, and they are valid until used.    You do not have to have a smartphone for this option.
    • Phone Call (Faculty/Staff Only) – you can receive a phone call on your mobile phone or landline phone. The call will give instructions on approving or denying the login attempt.
  • DUO is required for all FDU Staff, Faculty, and Students.

  • If you opt-out of the DUO Mobile Application push notifications, there are a variety of passcode options to utilize as your second verification method.

    • Passcodes via DUO Mobile App – If you have the DUO Mobile app installed, you can receive a single passcode by tapping the FDU logo in the mobile app. This code must be used immediately.


    • Passcodes via SMS (Faculty/Staff Only) – users can receive a one-time use code via text message. To get you one-time code click Enter Passcode, then click on the blue button “Text me new codes.”These codes do not expire, and they are valid until used. You do not have to have a smartphone for this option.


  • Selecting this option will allow you to bypass DUO authentication for the next 60 days. This only works if cookies are enabled, and you are logging in from the same computer and browser. You will still be prompted to verify once – with your username and password. You will not be able to access your settings on that particular browser during the 60 days. Please note that if you have tools or policies running that regularly delete or clean cookies, the remember me feature will not work. If you do need to access your settings (perhaps to add another device), just try another browser or visit the FDU Self-Service Portal. Remember me will not work if your browser is set to private browsing mode.

  • The remember me feature relies on browser cookies. For remember me to work, your Internet browser must allow cookies to be stored. Visit your browser content settings to ensure cookies are being stored. Some departments on campus do not allow cookies to be stored. If the remember me feature does not work on your browser, check with desktop support in your area.

  • If you do not have your device with you, you can obtain a batch of temporary passcodes. To obtain a temporary passcode, call the Fairleigh Dickinson University Technical Assistance Center (UTAC).  Each of the passcodes can only be used once and will expire in 7 days.

    NOTE: If you have lost your device, please report it to the Fairleigh Dickinson University Technical Assistance Center (UTAC).  We want to ensure someone else does not maliciously authenticate your account with your device.

  • DUO is available to all faculty,staff, and Students. At this time, DUO is not available to FDU retirees, past employees, or alumni.

  • Yes, the passcode option on the DUO app does not require WiFi or cellular connectivity, it even works on airplane mode. To use this option, visit the DUO app on your smartphone, and tap the key icon to obtain a passcode. Enter the passcode into the DUO prompt when logging into any website that requires DUO authentication.

  • DUO Authentication is required by any application the utilizes the university Single Sign-On (SSO) service.  Examples of some websites that require DUO authentication are listed below.

    • WebAdvisior
    • WebCampus
    • Office365 (Office365.fdu.edu)
    • Blackboard
    • Zoom
  • You may have trouble receiving push requests if there are network issues between your phone and Duo’s service. Many phones have difficulty determining whether to use the Wi-Fi or cellular data channel when checking for push requests and simply turning the phone to airplane mode and back to normal operating mode again often resolves these types of issues, if there is a reliable internet connection available. Similarly, the issue may be resolved by turning off the Wi-Fi connection on your device and using the cellular data connection.

    Check the time and date on your phone and make sure they are correct. If the date and time on your phone are manually set, try changing your device’s configuration to sync date and time automatically with the network.

    iOS users can run a troubleshooting tool from within Duo Mobile version 3.32.0 or later. To run the tool:

    1. Open the Duo Mobile app on your iOS device and tap the Edit button in the top left of the accounts list screen, then tap the name of the account for you aren’t receiving push requests.
    2. Next, tap the Get Started button in the “Missing Notifications?” section of the “Account Details” screen.
    3. Duo Mobile performs the test. If any step fails, you’ll receive further troubleshooting suggestions. After taking the suggested actions, press “Run test again” to retry.

    The steps that Push Troubleshooting performs automatically are as follows:

    • Check device settings.
    • Check internet connectivity.
    • Check that the device can contact Duo’s cloud service.
    • Attempts to send a test Duo Push notification.

    Should none of these actions help, see the Duo Knowledge Base for additional iOS and Android troubleshooting steps.

    If you can’t get Duo Push working on your own, you can log in with a passcode generated by the Duo Mobile app and send a new activation link to your phone.

    If you’ve tried the suggestions here but can’t get Duo Push working or reactivate your device yourself, please contact the Fairleigh Dickinson University Technical Assistance Center (UTAC).

  • Press the red “X to deny access to your account, then promptly change your FDU NetID password.

  • Yes! Visit the app store on your smartphone to download DUO Mobile.

    DUO for iOS >

    DUO for Android >

    NOTE: Google Play Services are required to receive push notifications on Android. Users without Google Play Services installed will have to “fetch” by swiping down in the DUO Mobile app.

    1. If your phone number has not changed, login to FDU Self-Service Portal then choose the “Call my Phone” option.
    2. Choose your device from the list, and then click “Device Options” next to your phone.
    3. Next click the “Reactivate Duo Mobile” button (you will need to install the Duo app on your phone to proceed). Then follow the instructions to activate DUO Mobile on your new device.

    If you have a new phone number, you will first need to obtain a temporary passcode (see the ‘What are Passcodes?’ section above).

    1. Login to FDU Self-Service Portal and enter the temporary passcode.
    2. Click on “Add a new device.”
    3. Once you complete adding your new device, please delete the device you are replacing.
  • Yes, you can add devices by visiting your DUO settings. When you see the DUO prompt with the three notification options, click “Settings” at the top right.

    NOTE: If you are using the Remember Me for 60 days feature, you will need to visit FDU Self-Service Portal access your settings.)

    After you click Settings, click “Add a New Device“. You can register smartphones, cell phones, tablets, and landline phones.

  • The DUO smartphone application serves only to provide two-factor authentication. It does not access any personal information on your device, nor does it track your location. Learn more about DUO’s commitment to privacy on its website.

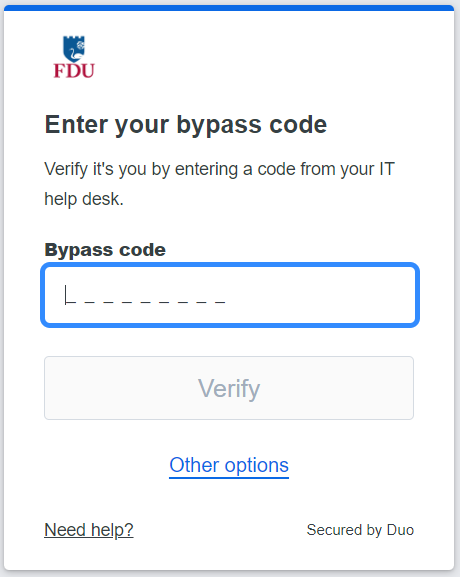
  •  A “bypass code” is a temporary passcode created by an administrator for a specific user to access a Duo-protected application. These are generally, used as “backup codes,” so that enrolled users who are having problems with their mobile devices (e.g., mobile service is disrupted, the device is lost or stolen, etc.) or who temporarily cannot use their enrolled devices (on a plane without mobile data services) can still access their Duo-protected systems.

    A user must have a valid Duo authentication device enrolled (like a phone or iPad) to use a bypass code to authenticate. Bypass codes are not intended as a user’s only 2FA method.

    Bypass codes expire after being used the allowed number of times, or after an administrator-defined amount of time. Once a bypass code is created, the timeout and allowed uses cannot be extended.

    If you need a Bypass code please visit SAMI Support, where you can request additional information from UTAC or search our extensive IT knowledge base. While SAMI Support provides the quickest and easiest access for IT support, you can always contact UTAC by phone at (973) 443-8822 or email at fdutac@fdu.edu.

  • For additional support, please visit the Fairleigh Dickinson University Technical Assistance Center (UTAC).

Last Modified:

DUO Quick Start Guide for Faculty and Staff

Resources for:
icon Close

DUO two-factor authentication adds a second layer of security to your FDU NetID. It requires two factors to verify identity. These factors include something you know – your FDU NetID and password, and something you have – a phone or passcode, to authenticate and gain access to your account on FDU services. Passwords alone no longer provide adequate protection against cyber hacking. DUO is required for all current FDU students.

Install DUO Mobile App

The DUO app is available for mobile phones and tablets. You can directly access the DUO Mobile Security App using these links:

Activate your DUO Account

Self-Service Portal Initiated DUO Activation

Note

This step requires a Desktop or Laptop browser.

  1. In a Desktop or Laptop browser visit the DUO Management Portal to begin the activation process by enrolling your device. Activation requires scanning a QR code with the DUO app’s built-in scanner

DUO Management Portal

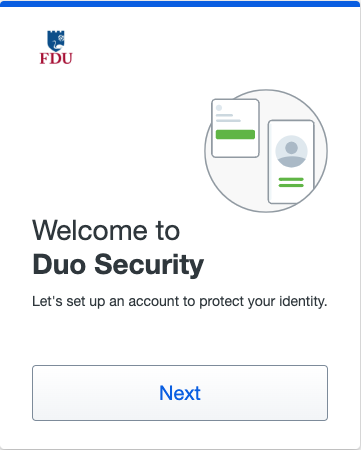
  1. Duo prompts you to enroll the first time you visit the DUO Management Portal using a browser or a client application that shows the interactive Duo web-based prompt

Supported Browsers: Chrome, Firefox, Safari, Edge, Opera, and Internet Explorer 8 or later. Some browsers do not support all of DUO’s authentication devices (for example, Security Keys won’t work with Internet Explorer). For the widest compatibility with DUO’s authentication methods, we recommend recent versions of Chrome and Firefox.

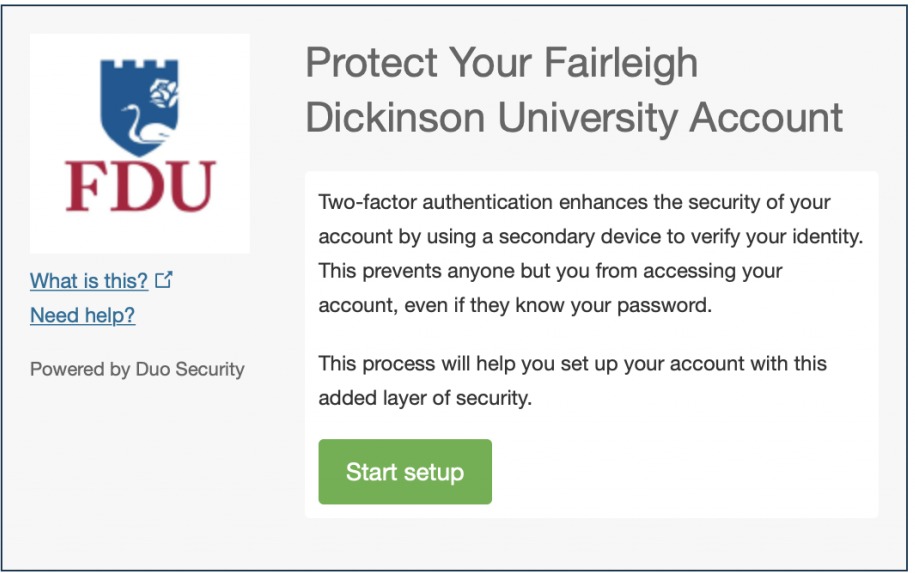
  1. Click “Start setup” to begin enrolling your device
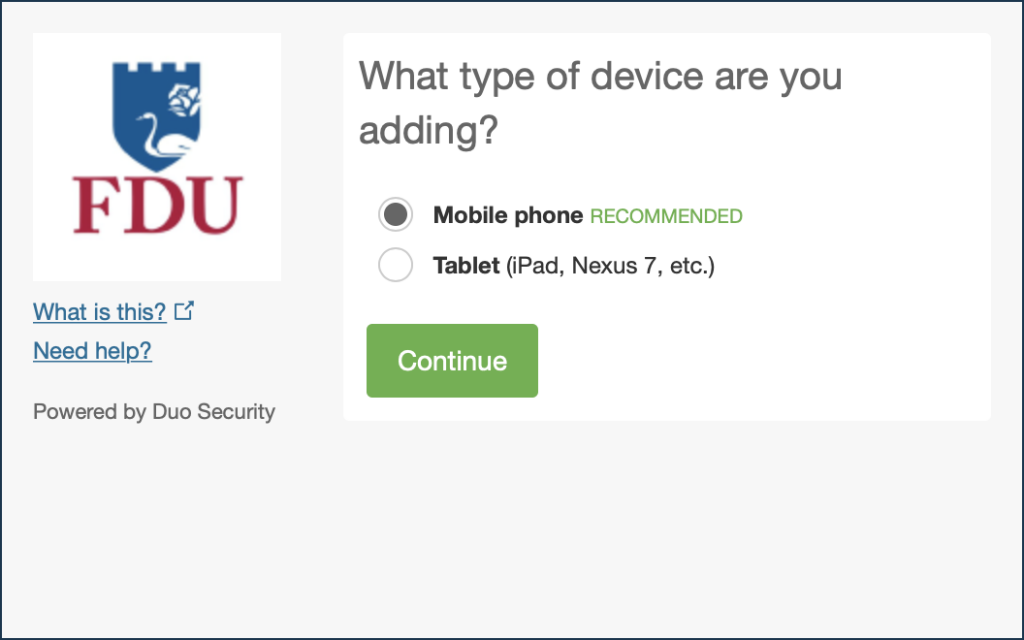
  1. Select the type of device you’d like to enroll and click “Continue“. We recommend using a smartphone for the best experience, but you can also enroll iPadOS and Android tablets
Duo - Choose Your Authentication Device Type
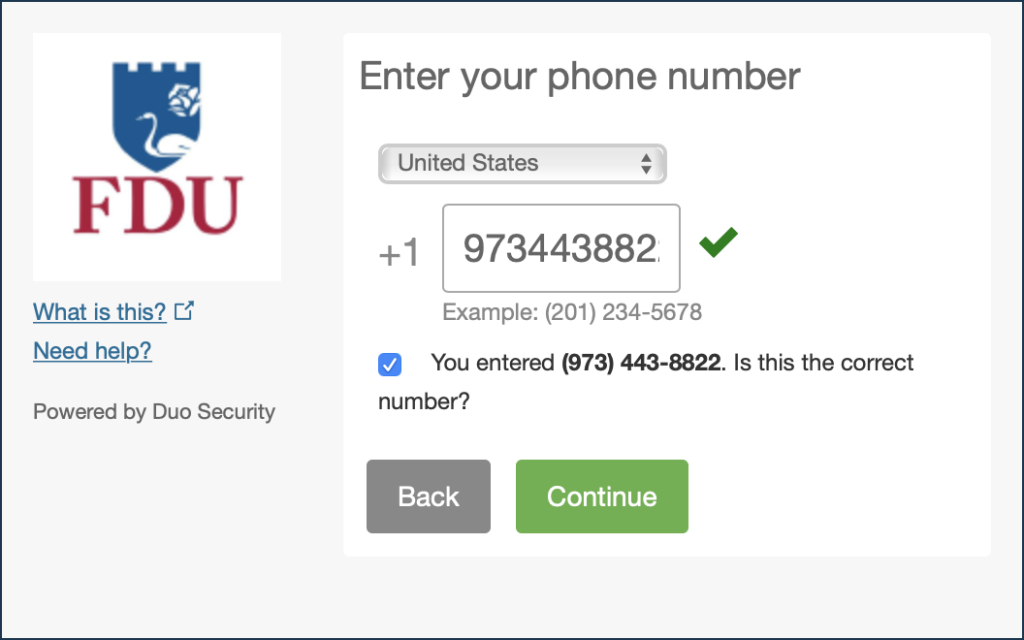
  1. Select your country from the drop-down list and type your phone number. Use the number of your smartphone or cell phone that you installed the DUO Mobile Security App on in the Step 1
  1. Double-check that you entered it correctly, check the box, and click “Continue
Duo - Type Your Phone Number

Note

If you’re enrolling a tablet you aren’t prompted to enter a phone number.

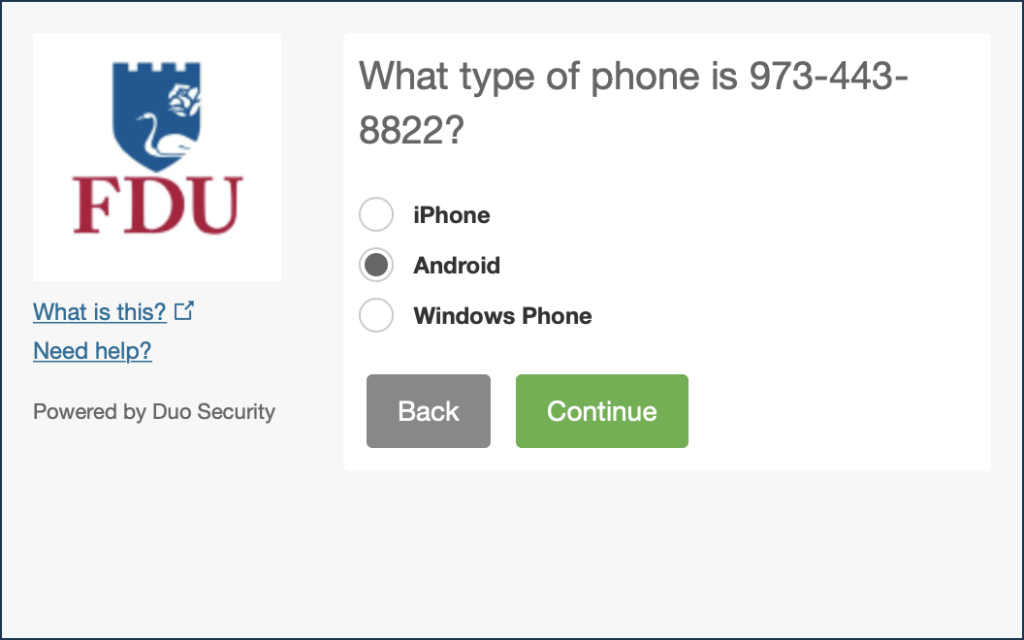
  1. Choose your device’s operating system and click “Continue
Duo - Choose Platform
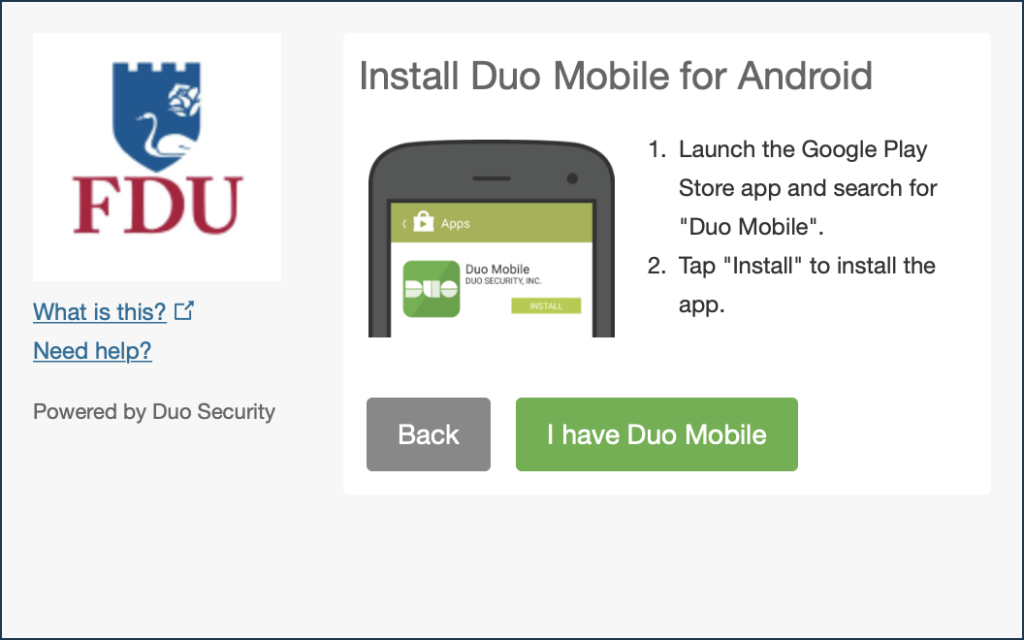
  1. Click “I have DUO Mobile installed”
  • If you have not completed installing the DUO Mobile App in Step 1 please complete now by following the platform-specific instructions on the screen. After installing the app return to the enrollment window
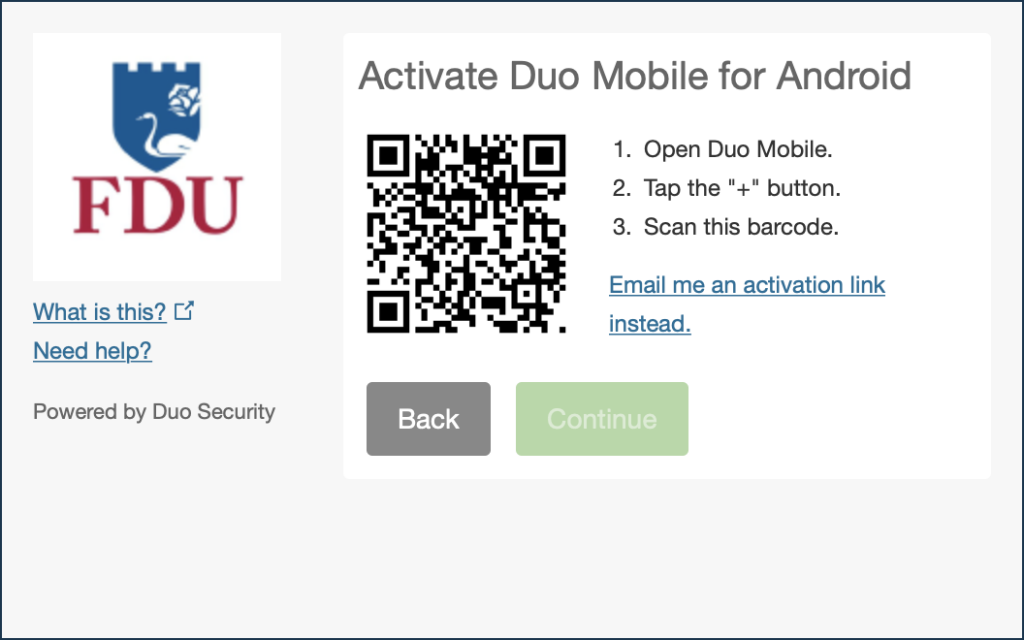
  1. Activating the app links it to your account so you can use it for authentication
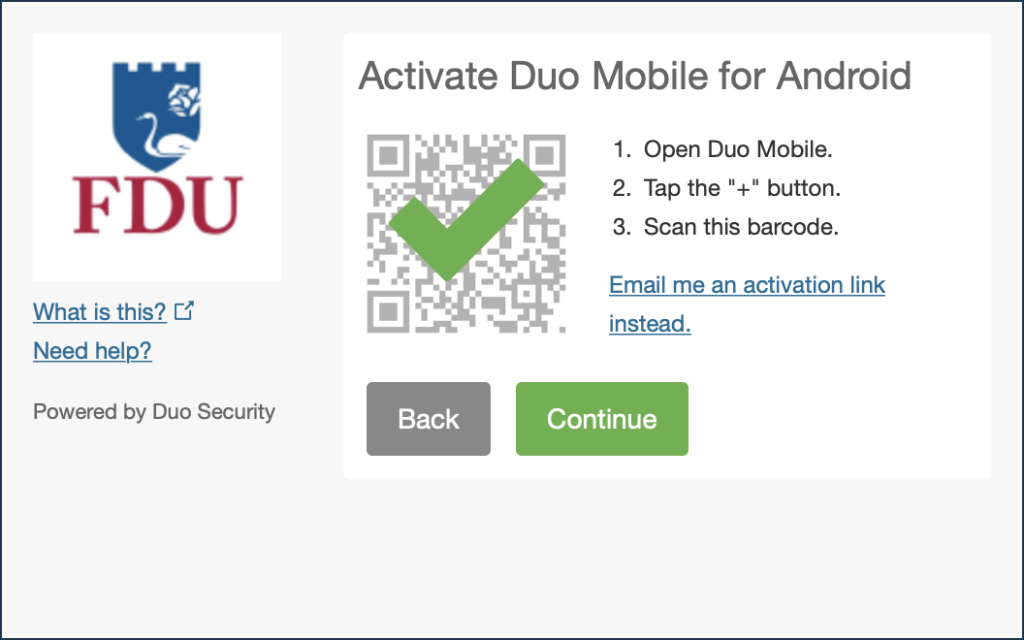
  1. On iPhone or Android, activate DUO Mobile by scanning the barcode with the app’s built-in barcode scanner. Follow the platform specific instructions for your device:
  1. The “Continue” button is clickable after you scan the barcode successfully
  • Can’t scan the barcode? Click “Or, have an activation link emailed to you instead” and follow the instructions
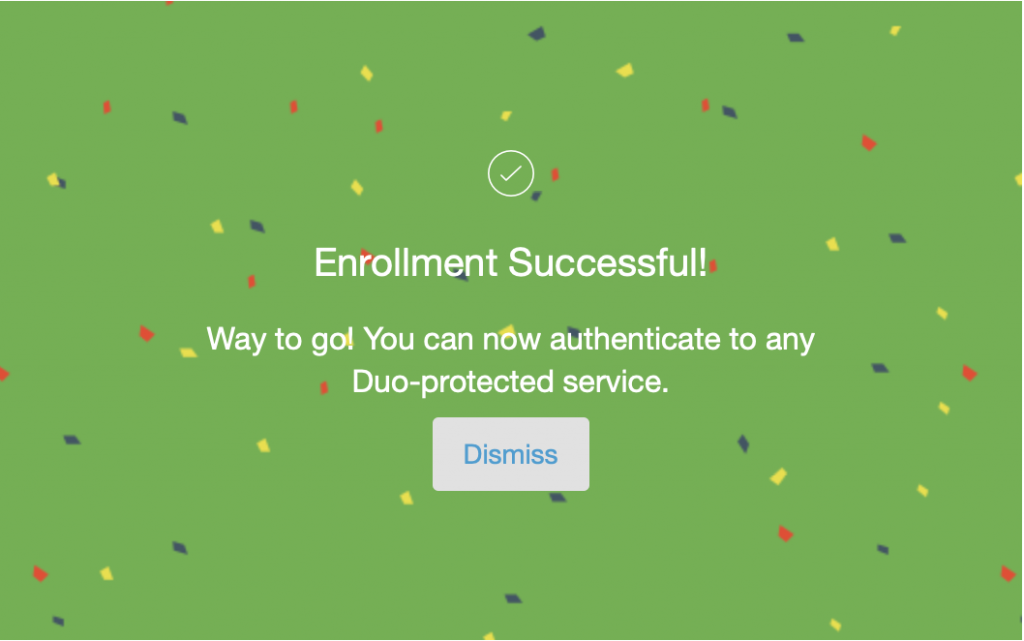
  1. Once activated click “Continue” to complete registration

Configure Device Options (Optional)

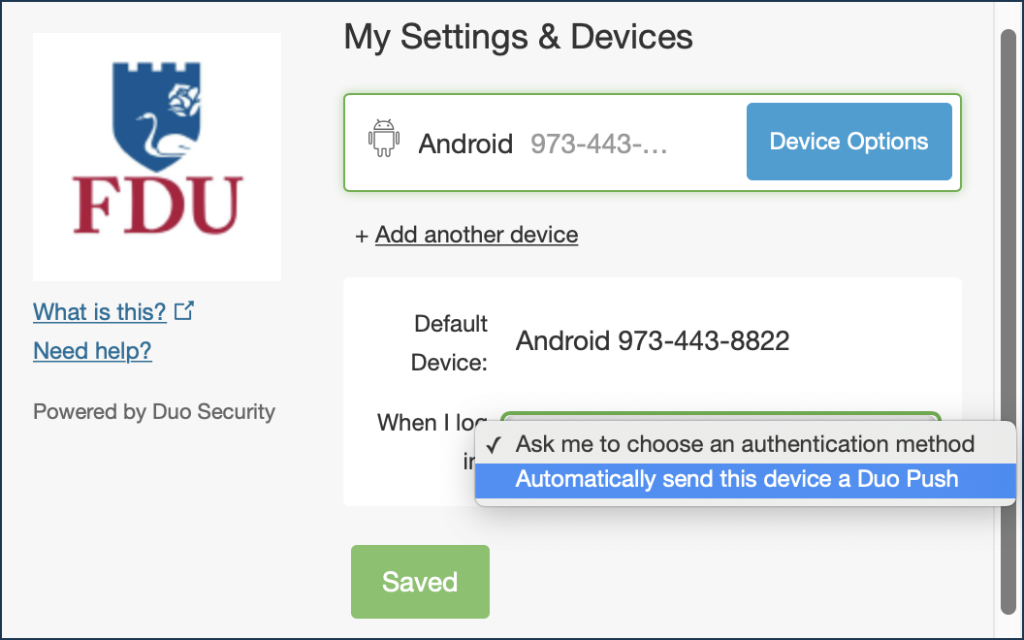
  1. You can use Device Options to give your phone a more descriptive name, or you can click “Add another device” to start the enrollment process again and add a second phone or another authenticator
  • If this is the device you’ll use most often with DUO then you may want to enable automatic push requests by changing the “When I log in:” option and changing the setting from “Ask me to choose an authentication method” to “Automatically send this device a DUO Push” and click “Save“. With one of the automatic options enabled DUO automatically sends an authentication request via push notification to the DUO Mobile app on your smartphone.
  1. Your device is ready to approve DUO push authentication requests. Click “Send me a Push” to give it a try. All you need to do is tap “Approve” on the DUO login request received at your phone

With DUO activated on your account, and with your device enrolled, you are ready to use DUO. When logging in, you will have two authentication options. Review the options below to determine what works best for you.

Tip

We recommend the push notification to your smartphone, it’s the easiest. You can also check the box “Remember Me for 60 Days” to only perform the authentication once every two months on that device.

close
OKTA Initiated DUO Activation

Note

This step requires a Desktop or Laptop browser.

FDU NetID users who are logging into OKTA for the first time will be prompted to enroll using a browser or a client application that shows the interactive Duo web-based prompt.

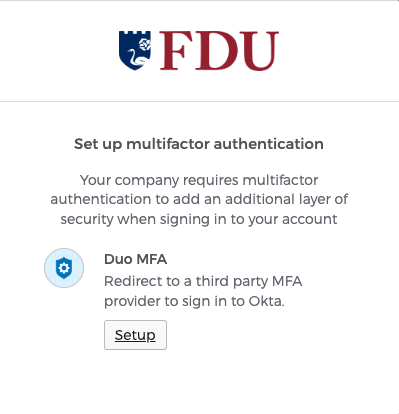
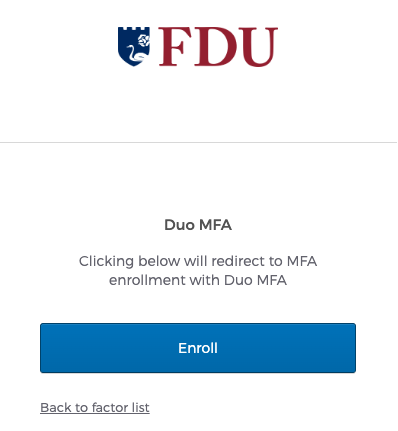
  1. Click on “Enroll” to continue
  1. You will be redirected to verify with DUO MFA. Click on “Set up” then “Next” to continue

Supported Browsers: Chrome, Firefox, Safari, Edge, Opera, and Internet Explorer 8 or later. Some browsers do not support all of DUO’s authentication devices. For the widest compatibility with Duo’s authentication methods, we recommend recent versions of Chrome and Firefox.

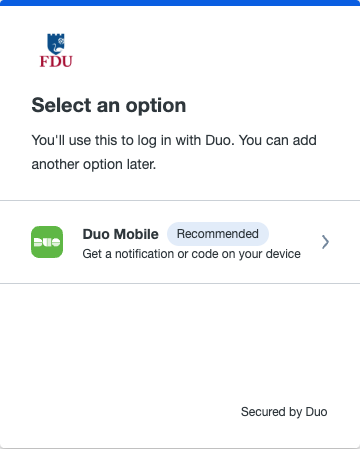
  1. Choose “DUO Mobile” as your verification method
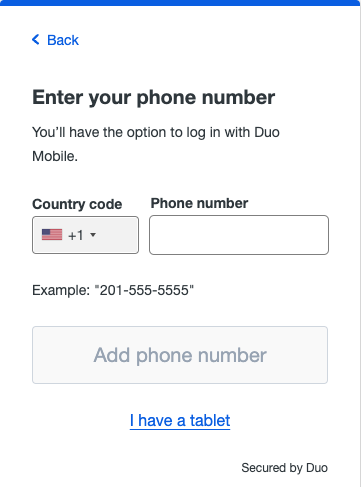
  1. Select your country from the drop-down list and type your mobile phone number. Use the number of your smartphone or cell phone that you installed the DUO Mobile Security App. Click on “Add phone number” to continue

Note

If you’re enrolling a tablet, don’t enter a phone number and click on “I have a tablet” instead

  1. Double-check that you entered your information correctly. Click on “Yes, it’s correct” to continue if the information is correct
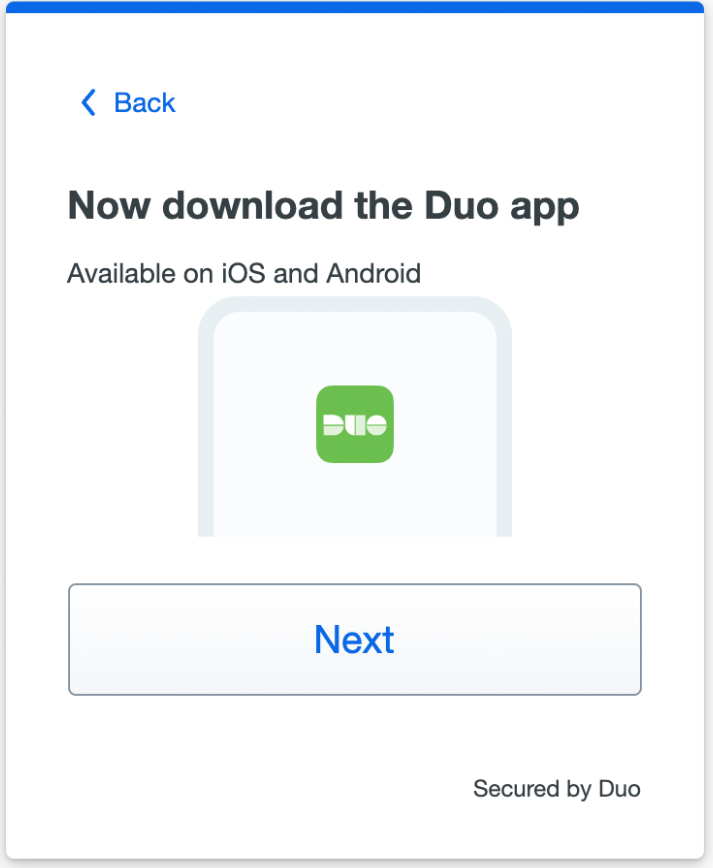
  1. Click “Next” if you downloaded the DUO app as instructed in the first step
  • If you have not completed installing the DUO Mobile App please complete now by following the platform-specific instructions on the screen. After installing the app return to the enrollment window
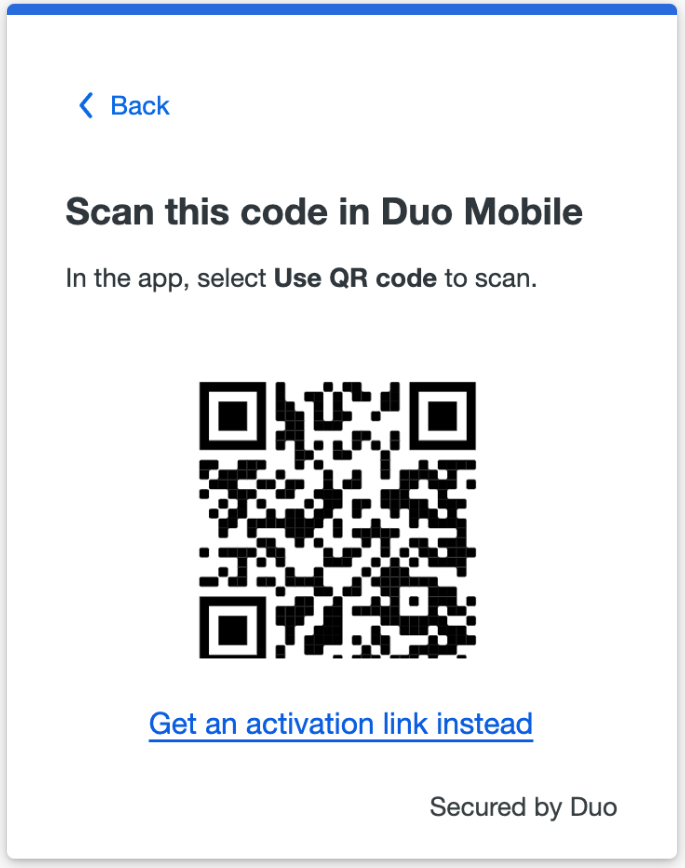
  1. Open the DUO Mobile app on your phone or tablet and add this account by scanning the QR code shown on-screen
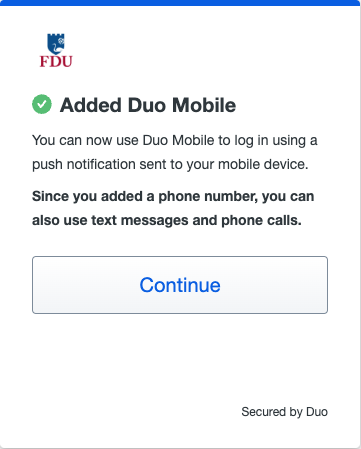
  1. When you receive confirmation that DUO Mobile was added click “Continue

Note

If you aren’t able to scan the QR code, click on “Get an activation link instead” and then enter your email address to send the activation link to yourself. Open your email address on your Mobile device where you installed DUO Mobile. Follow the instructions in the email to activate the new account in DUO Mobile.

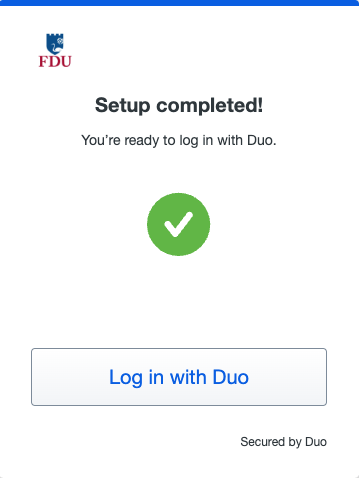
  1. Once the setup is completed, click on “Log in with DUO
close

Authentication Options

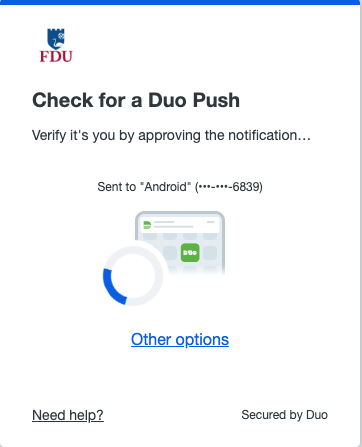
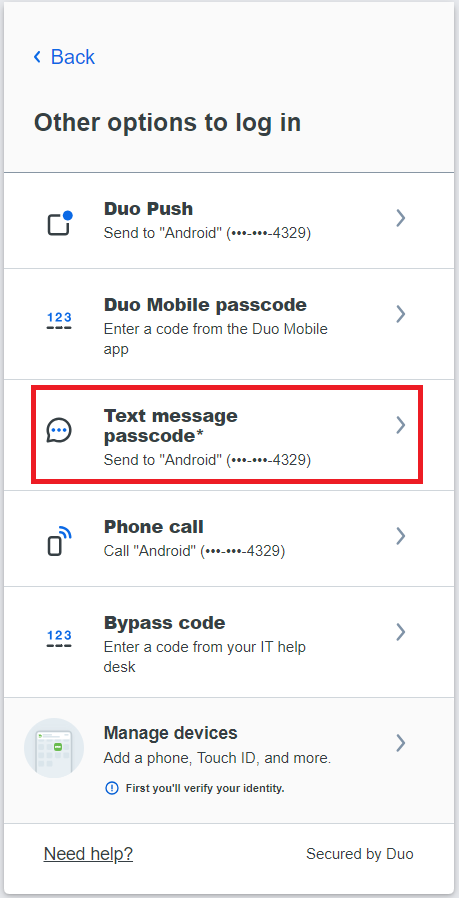
With DUO activated on your account, and with your device enrolled, you are ready to use DUO. When logging in, you will automatically receive a DUO Push but will also have the choice to select from “Other Options“. Review the options below to determine what works best for you.

Tip

We recommend the push notification to your smartphone, it’s the easiest form of authentication.

These are the different ways in which you can use DUO:

Duo Push

Once you have activated DUO Authentication, Duo will automatically send a DUO Push to your registered device. Open the notification on your device, and you’ll see a green checkmark and a Red “x“. Simply tap the “Green Checkmark” to approve the authentication request and gain access to your account.

VPN users select the number corresponding to Push or type “push“. Users with multiple devices will need to include a number indicating desired device i.e. push2.

close
DUO Mobile Passcode

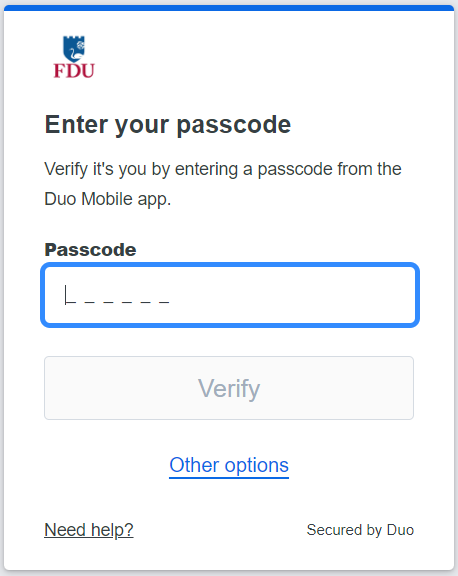
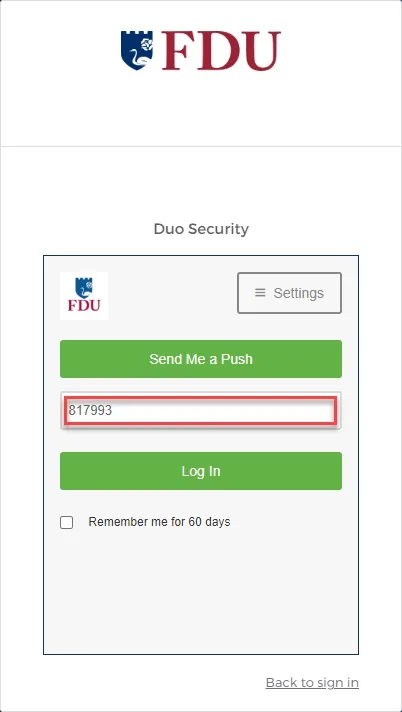
Once you have activated Duo Authentication, you can use the DUO mobile app to generate passcodes. This option does not require wifi or data, so this is a great option if you’re traveling or if you have limited or no cell/Internet service. Open your DUO mobile app, tap the FDU logo and it will reveal a passcode. During login, choose the enter a passcode option, enter the code and you’re in.

close
Text Message Passcode (Faculty/Staff)

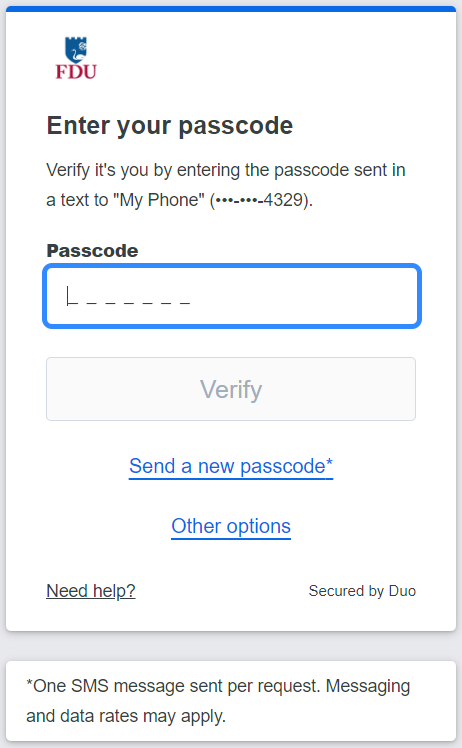
You can receive a one-time use code via text message. To get your one-time code click on “Text message passcode“. When you land on the text message page, it will show that a text message was just sent to you with a passcode.

VPN users select the number corresponding to SMS passcode or type “SMS“. Users with multiple devices will need to include a number indicating desired device i.e. sms2.

Note

These text message passcodes do not expire, and they are valid until used. You do not have to have a smartphone for this option.

close
Phone Call (Faculty/Staff)

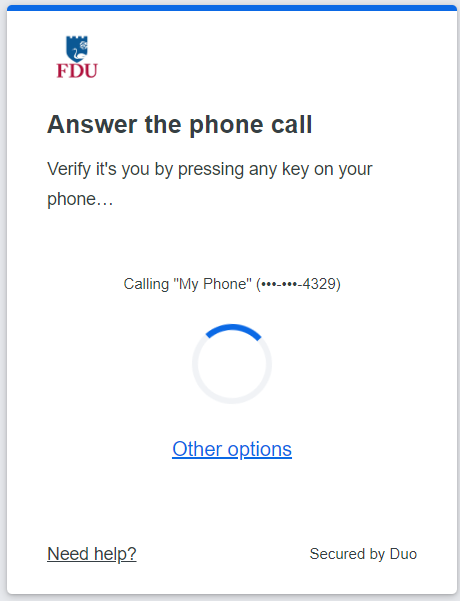
Click the “Phone call” option and DUO will call your phone. Answer the phone call from DUO and follow the voice instructions to log in to the application.

VPN users select the number corresponding to Phone Call or type “phone“. Users with multiple devices will need to include a number indicating desired device i.e. phone2.

close
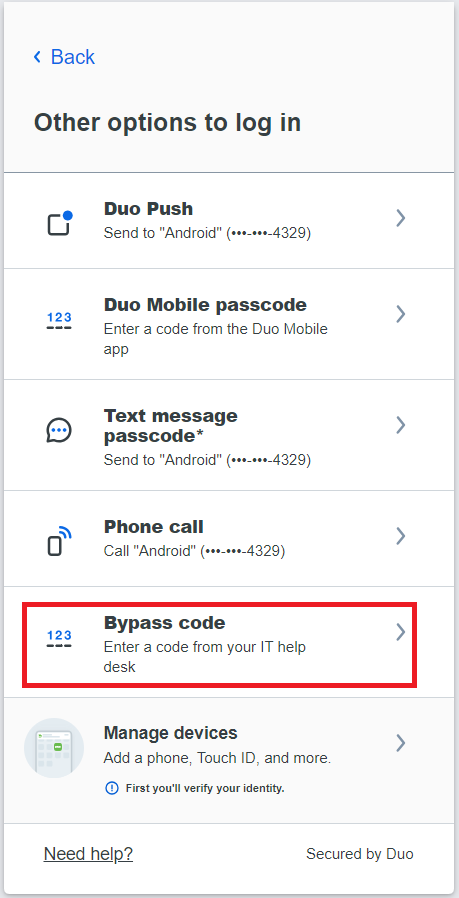
Bypass Code

If you do not have your device with you, don’t worry. You can contact the Fairleigh Dickinson University Technical Assistance Center (UTAC) for a temporary passcode. These passcodes can be entered in the DUO prompt on your computer.

close

How Do I Change Settings or Enroll Another Device?

You can use the DUO Management Portal to easily edit and add new devices. For instructions on how to access the DUO Management Portal, follow the steps using the link below:

Last Modified:

DUO Quick Start Guide for Students

Resources for:
icon Close

DUO two-factor authentication adds a second layer of security to your FDU NetID. It requires two factors to verify identity. These factors include something you know – your FDU NetID and password, and something you have – a phone or passcode, to authenticate and gain access to your account on FDU services. Passwords alone no longer provide adequate protection against cyber hacking. DUO is required for all current FDU students. Please follow the steps below.

Install DUO Mobile App

The DUO app is available for Android, iOS and iPadOS. Use the links below to install DUO on your mobile device.

DUO Mobile App Setup

Activate your DUO Account

Note

This step requires a Desktop or Laptop browser.

  1. In a Desktop or Laptop browser visit the DUO Management Portal to begin the activation process by enrolling your device.  Activation requires scanning a QR code with the DUO app’s built-in scanner

DUO Management Portal

  1. Duo prompts you to enroll the first time you visit the DUO Management Portal using a browser or a client application that shows the interactive DUO web-based prompt

Supported Browsers: Chrome, Firefox, Safari, Edge, Opera, and Internet Explorer 8 or later. Some browsers do not support all of DUO’s authentication devices (for example, Security Keys won’t work with Internet Explorer). For the widest compatibility with DUO’s authentication methods, we recommend recent versions of Chrome and Firefox.

  1. Click “Start setup” to begin enrolling your device
  1. Select the type of device you’d like to enroll and click “Continue“. We recommend using a smartphone for the best experience, but you can also enroll iOS/Android tablets
Duo - Choose Your Authentication Device Type
  1. Select your country from the drop-down list and type your phone number. Use the number of your smartphone or cell phone that you installed the DUO Mobile Security App on in the Step 1
  1. Double-check that you entered it correctly, check the box, and click “Continue
Duo - Type Your Phone Number

Note

If you’re enrolling a tablet you aren’t prompted to enter a phone number.

  1. Choose your device’s operating system and click “Continue“.
Duo - Choose Platform
  1. Click “I have DUO Mobile installed”
  • If you have not completed installing the DUO Mobile App in Step 1 please complete now by following the platform-specific instructions on the screen. After installing the app return to the enrollment window
  1. Activating the app links it to your account so you can use it for authentication
  1. On iPhone, Android, and Windows Phone activate DUO Mobile by scanning the barcode with the app’s built-in barcode scanner. Follow the platform specific instructions for your device:
  1. The “Continue” button is clickable after you scan the barcode successfully
  • Can’t scan the barcode? Click “Or, have an activation link emailed to you instead” and follow the instructions
  1. Once activated click “Continue” to complete registration
close
Configure Device Options (Optional)
  1. You can use Device Options to give your phone a more descriptive name, or you can click “Add another device” to start the enrollment process again and add a second phone or another authenticator
  • If this is the device you’ll use most often with DUO then you may want to enable automatic push requests by changing the “When I log in:” option and changing the setting from “Ask me to choose an authentication method” to “Automatically send this device a DUO Push” and click “Save“. With one of the automatic options enabled DUO automatically sends an authentication request via push notification to the DUO Mobile app on your smartphone.
  1. Your device is ready to approve DUO push authentication requests. Click “Send me a Push” to give it a try. All you need to do is tap “Approve” on the DUO login request received at your phone

With DUO activated on your account, and with your device enrolled, you are ready to use DUO. When logging in, you will have two authentication options. Review the options below to determine what works best for you.

Tip

We recommend the push notification to your smartphone, it’s the easiest. You can also check the box “Remember Me for 60 Days” to only perform the authentication once every two months on that device.

close
Authentication Options

There are two ways you can use DUO:

Push Notification

Once the DUO mobile app is installed, you can select to receive a DUO notification on your smartphone. Open the notification, and you’ll see a green checkmark, and a red X. Simply tap the “Green Checkmark” to gain access.

Passcodes

You can use the DUO mobile app to generate passcodes. This option does not require wifi or data, so this is a great option if you’re traveling or if you have limited or no cell/internet service. Open your DUO mobile app, tap the FDU logo and it will reveal a passcode. During login, choose the enter a passcode option, enter the code and you’re in.

If you do not have your device with you, don’t worry. You can contact the Fairleigh Dickinson University Technical Assistance Center (UTAC) for a temporary passcode. These passcodes can be entered in the DUO prompt on your computer.

close
How Do I Change Settings or Enroll Another Device?

To change settings or enroll another device, visit DUO Management Portal or any DUO-supported application. When you get to the DUO prompt, click the “Settings” button and choose to add a new device or access your settings.

DUO Management Portal

close

For commonly asked questions on using DUO, please visit the link below:

Last Modified:

DUO TLS Support

Resources for:
icon Close

Warning Warning

After June 30, 2023, Transport Layer Security (TLS) 1.0 and 1.1 connection requests to Duo will not receive a response, resulting in blocked multi-factor authentication.

Who will be affected?

This may affect FDU community users using Windows 7, Windows 8.1, Android Devices with Android OS version 9 or lower, and Apple devices with iOS versions that don’t support TLS 1.2.

Check if you are using the supported endpoints by reading the information below:

Windows

Supported Windows operating system (OS) versions will support TLS 1.2 by default. If you are running a supported Windows OS, no action is required.
Unsupported Versions for Windows Operating Systems

Note

If your operating system was manually changed to disable TLS 1.2 for some reason, connection requests will fail. Verify your system is properly configured for TLS 1.2 with the suggested steps below.

Verifying TLS 1.2 on your Operating System

Check OS Version

  • Open the Windows Search box and type “About your PC” and click on “Open
  • Under Windows Specifications, check which edition and version of Windows your device is running

Enabling TLS 1.2 on your Operating System

If your operating system was manually changed to disable TLS 1.2 for some reason, you can verify or configure your system for TLS 1.2.

Before making any changes, create a backup of the registry:

  1. In the Windows Registry Editor, locate and click the “Protocols registry key” or “subkey
    that needs to be backed up
  2. Click “File”, then “Export”
  3. In the Export Registry File dialog box, select the filename and location of where to save the backup
  4. Click “Save”

After creating a backup of the registry, follow the steps below to enable TLS 1.2 on your system:

  1. Click the Start menu, type “regedit” and press the Enter key. The Registry Editor window should be opened.
  2. Navigate to follow the registry path: HKEY_LOCAL_MACHINE\SYSTEM\CurrentControlSet\Control\SecurityProviders\SCHANNEL\Protocols
  3. Check if the subkey of TLS v1.2 is enabled for both the server and the client. Each protocol’s state is controlled by two keys: Enabled and DisabledByDefault
  4. Make sure the Enabled value is 1 and the DisabledByDefault value is 0 or missing, the protocol is enabled.
  5. If the Enabled value is 1 but the DisabledByDefault value is 1, the protocol is disabled by default – it will not be used unless another host explicitly requests it during negotiation.
  6. If the Enabled value is 0, the protocol is disabled
  7. Restart the system to ensure the new settings take effect
close

DUO Mobile

Supported Duo Mobile applications running on supported OS versions will support TLS 1.2+ by default. If you are running a supported Duo Mobile application on a supported OS, no action is required.
  • Supported Android OS versions: Android 10.0 and greater
  • Supported iOS versions: iOS 14.0 and greater

Note

Using a mobile device with unsupported versions can still receive DUO push or generate one-time passcode as before, but it will prevent you from logging in to any systems that are accessed through our FDU Single Sign On Login Page.

Web Browsers

Common web browsers like Google Chrome, Microsoft Edge, Mozilla Firefox, Opera, etc. with their latest version are supporting TLS 1.2.

Note

If your browser was manually changed to disable TLS 1.2 for some reason, connection requests will fail. Please verify your browser is properly configured for TLS 1.2 with the suggested steps below.

Check TLS Support on a Web Browser

Chrome and Microsoft Edge

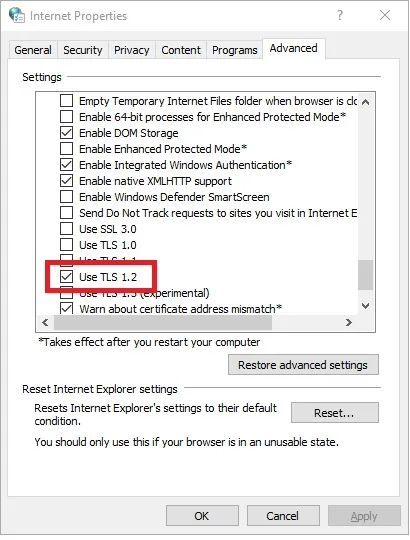
  1. In the Windows menu search box, type “Internet Options”
  2. In the Internet Properties window, on the Advanced tab, scroll down to the Security section
  3. Make sure the “User TLS 1.2” checkbox is checked
  1. Click “OK” and restart the browser

Mozilla Firefox

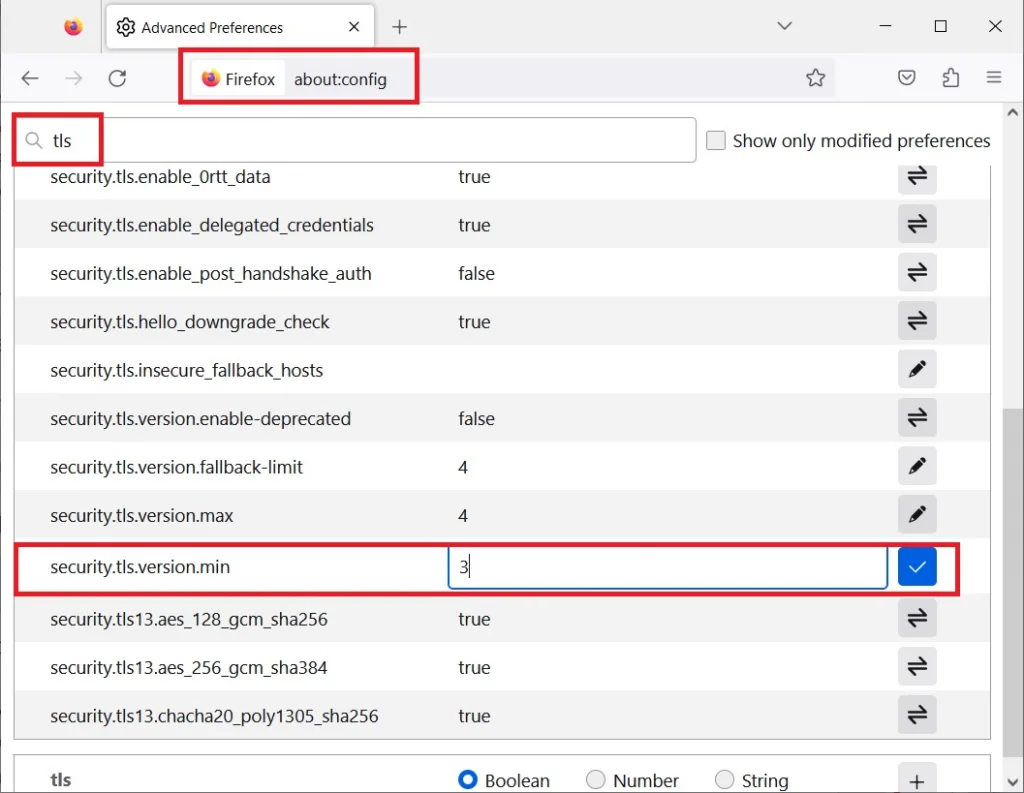
  1. Open the Mozilla Firefox Browser
  2. In the address bar, type “about:config” and press “Enter
  3. In the Search Field type “tls”. Find and double-click the entry for “security.tls. version. min”
  4. Make sure the integer value is 3 to force a minimum protocol of TLS 1.2
  1. Click “OK” and restart the browser
close

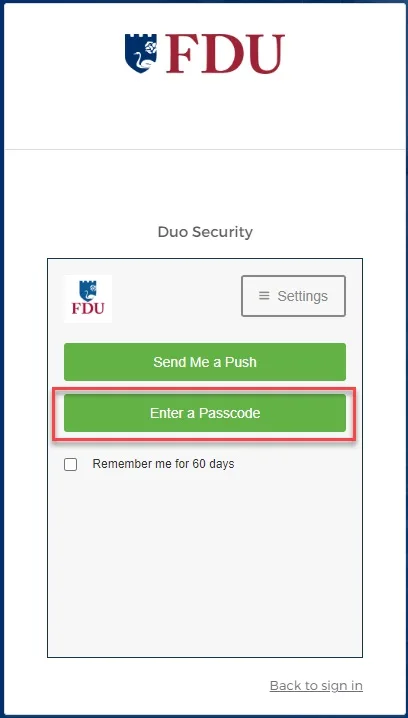
We understand that upgrading your device is not always an option. In these instances, you can still use Duo Passcodes to perform multi-factor authentication.

  1. To use this method, select “Enter a passcode” upon receiving your browser’s Duo security prompt
  1. Next, open the Duo app and click “Show”. This will provide a six-digit passcode which you can enter into the browser prompt
  1. Enter the six-digit passcode from the DUO app and click “Log in”
Last Modified:

FDU SSO Login Guide

Resources for:
icon Close

FDU’s Single Sign-On (SSO) experience has been improved and OKTA is the primary Single Sign-On provider. OKTA will replace our “Legacy” SSO login page for all applications over time.

OKTA SSO Login Page

New and existing FDU NetID users who are logging into OKTA for the first time will need to finish setting up their multifactor authentication with DUO.

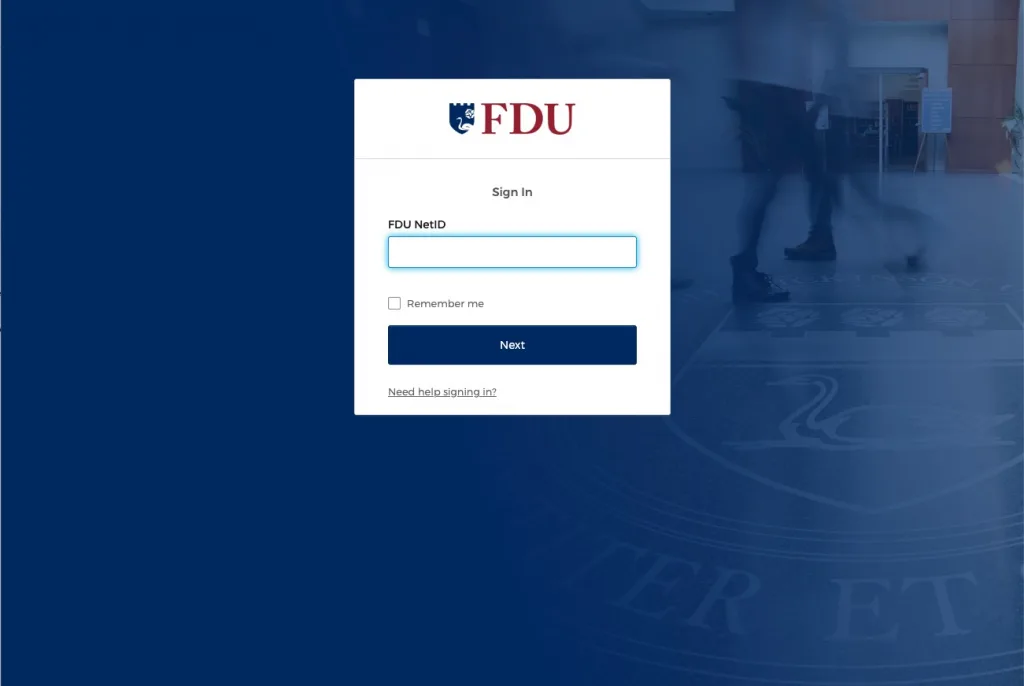
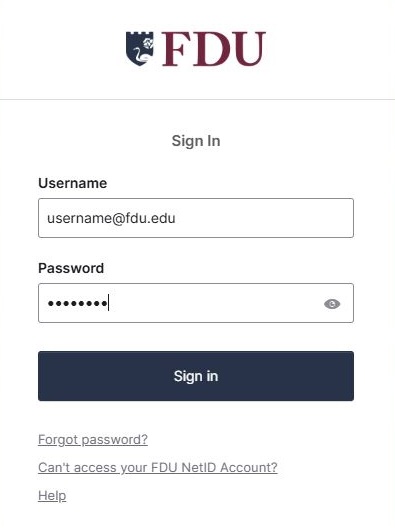
  1. Enter your FDU NetID and click “Next
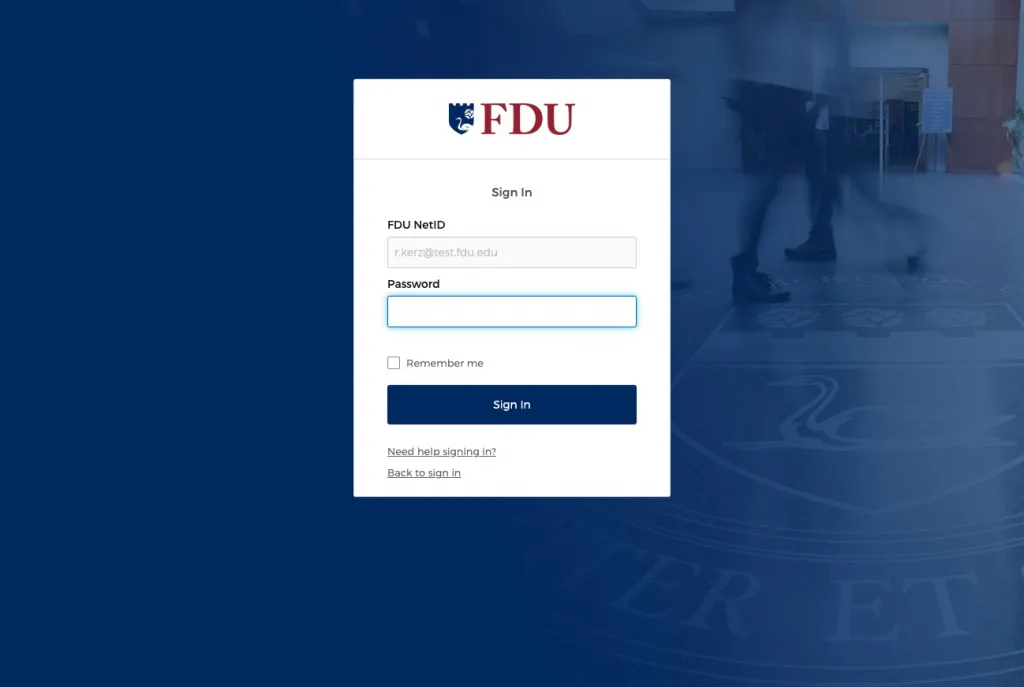
  1. Enter your FDU NetID Password and click “Sign In”
  1. For existing users with DUO configured please skip to step 4. For new users please click “Setup” then “Enroll” to continue the process

For instructions on setting up DUO for the first time, refer to our “Quick Start Guide

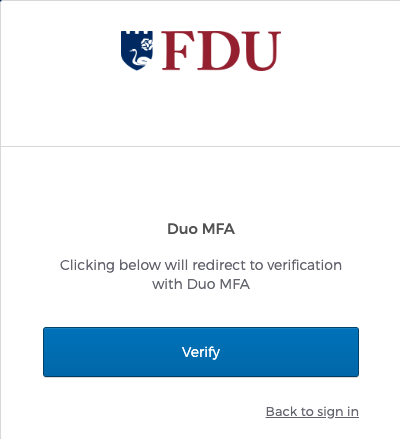
  1. If you are an existing DUO user, a prompt will be shown to redirect you to verification with Duo MFA. Click “Verify” to continue
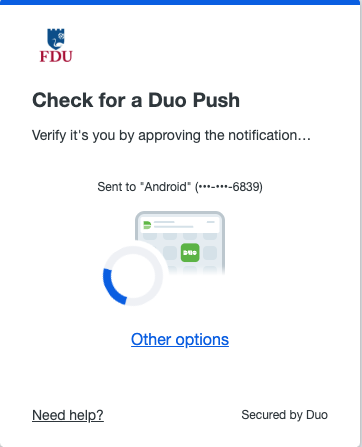
  1. Duo will automatically send a DUO Push to your registered device. Accept the DUO Push on your device to continue the authentication process
  1. If don’t want to use DUO Push to authenticate, select “Other Options” and choose your preferred method from the list

Legacy SSO Login Page

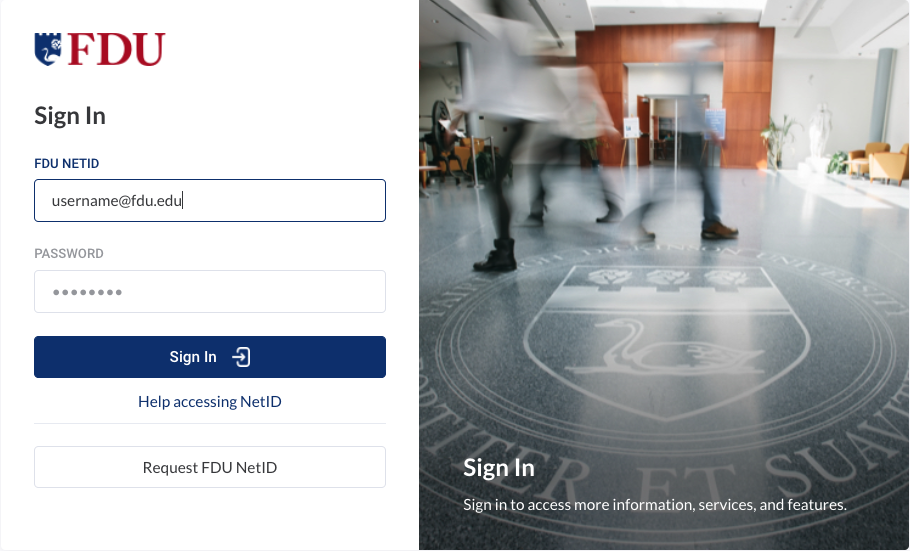
  1. Enter your FDU NetID and Password and click “Sign In
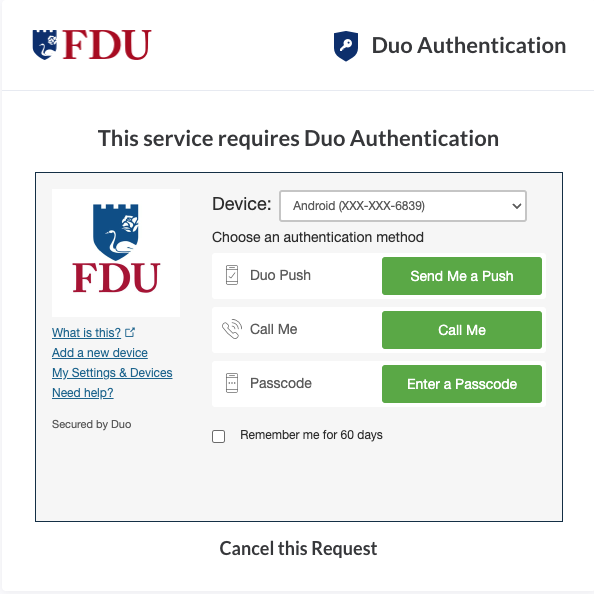
  1. Authenticate using DUO using any of the authentication options shown
Last Modified:

Setting up a Security Key for Duo Authentication

Resources for:
icon Close

Setting up a security key for Duo authentication ensures a higher level of protection for your online accounts. This guide walks you through the process step by step, helping you seamlessly integrate this secure method into your two-factor authentication system.

Compatibility Notice

To ensure compatibility, please use the current version of Google Chrome, Firefox, Safari, or Microsoft Edge. Legacy devices that are incapable of receiving browser updates will be unable to authenticate via security key. To ensure that you can still authenticate to these legacy devices and to other potentially incompatible applications, we ask that you keep Duo Push active as a secondary authentication method.

  1. Visit 2fa.fdu.edu and log in using your NetID username and password
DUO Management Portal

  1. When prompted by Duo authentication, select “Send Me a Push” or select your preferred authentication method and authenticate
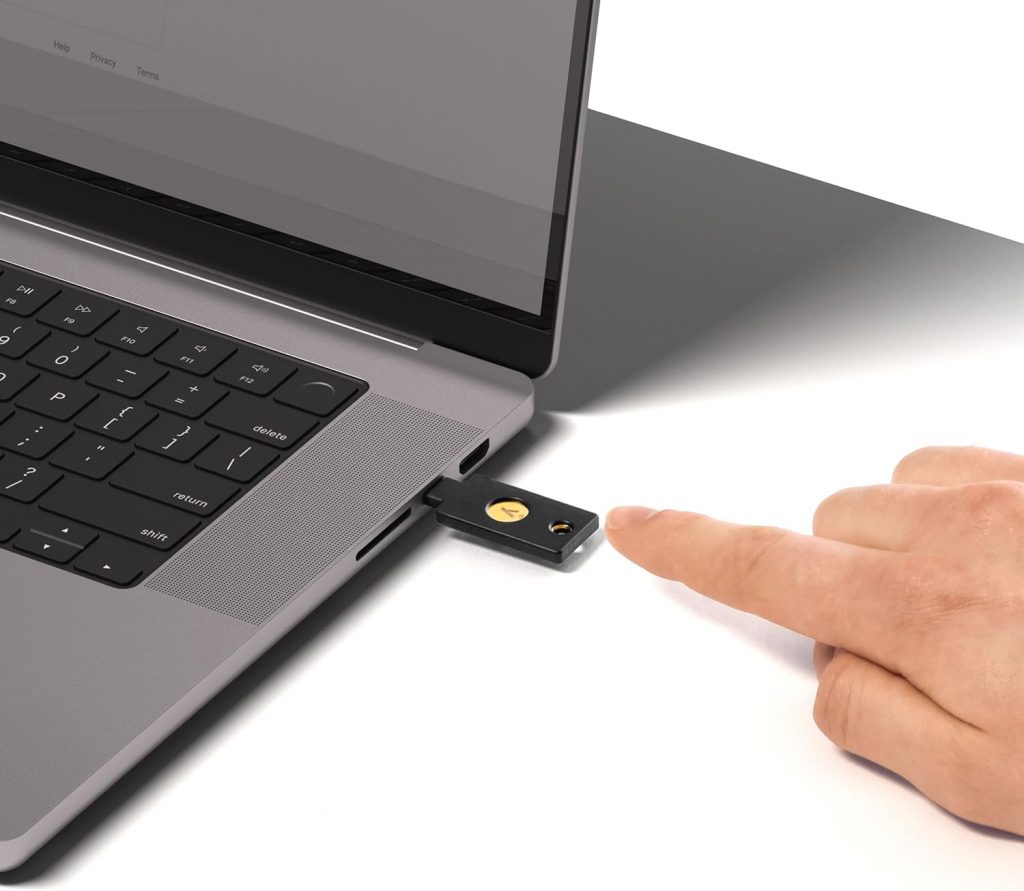
  1. Plug your security key into an available USB-C port on your computer

Tip

All FDU-issued laptops are equipped with USB-C connections. If your device does not have a USB-C port, you can use a USB-C to USB-A adapter to connect the security key.

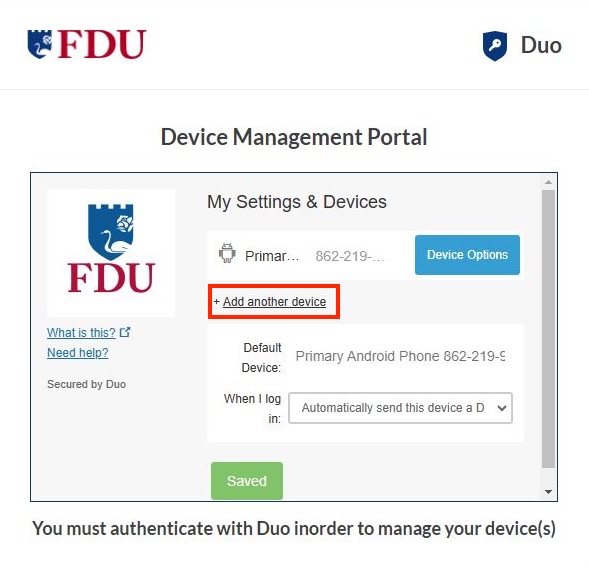
  1. Once the security key is connected, select “Add Another Device”
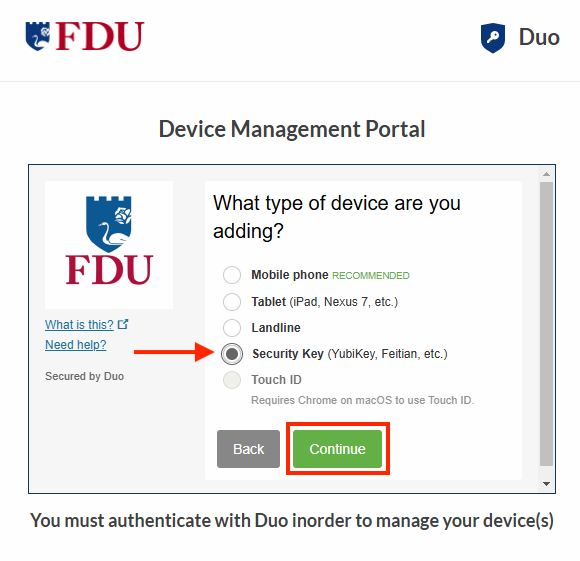
  1. Select “Security Key” and click “Continue”
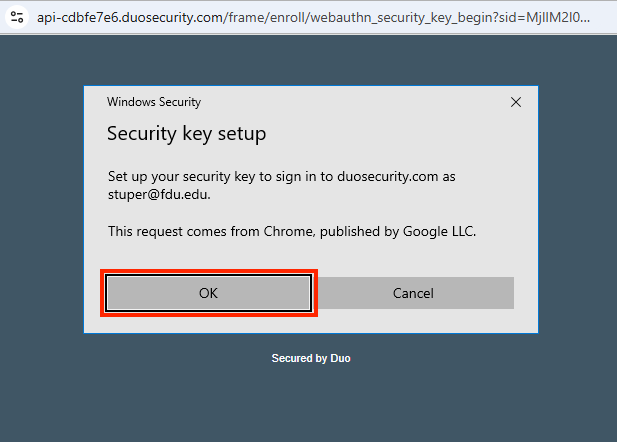
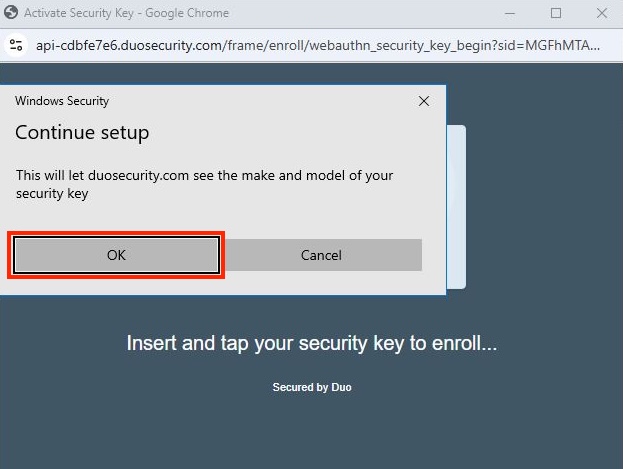
  1. Click “OK” on the security key setup screen
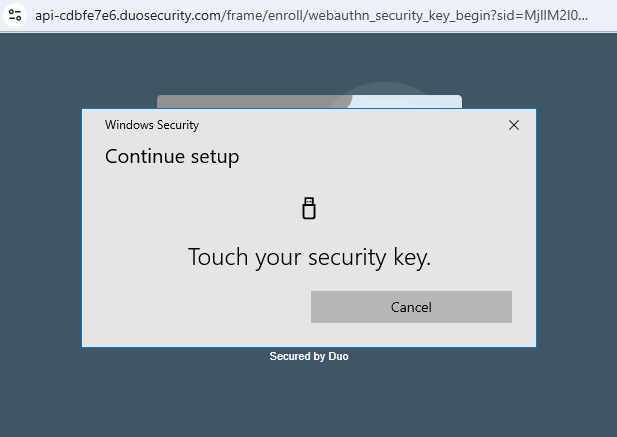
  1. Click “OK” on the Continue Setup screen
  1. Press the button on your security key when prompted
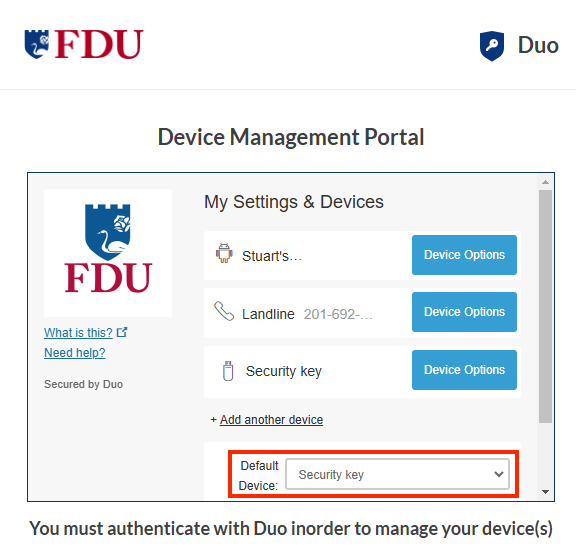
  1. To set the security key as your default device:
    • Select “Security Key” from the Default Device dropdown menu
    • Click “Save”

Recommended Security Keys

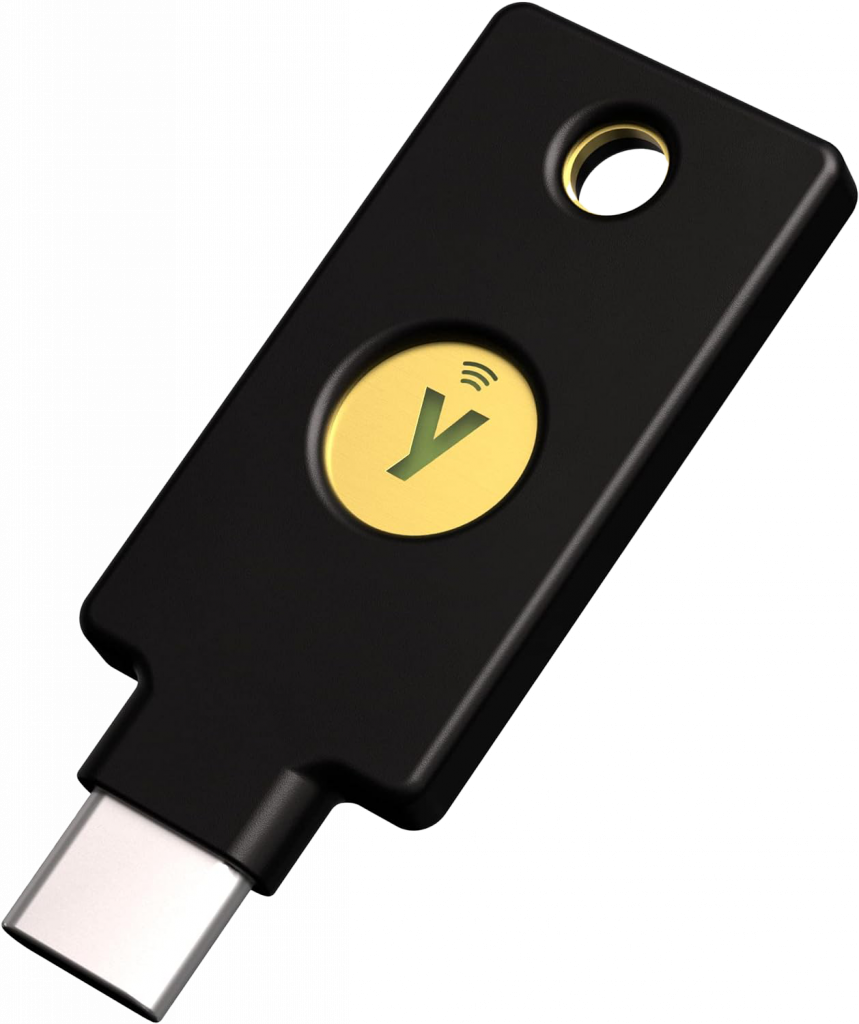
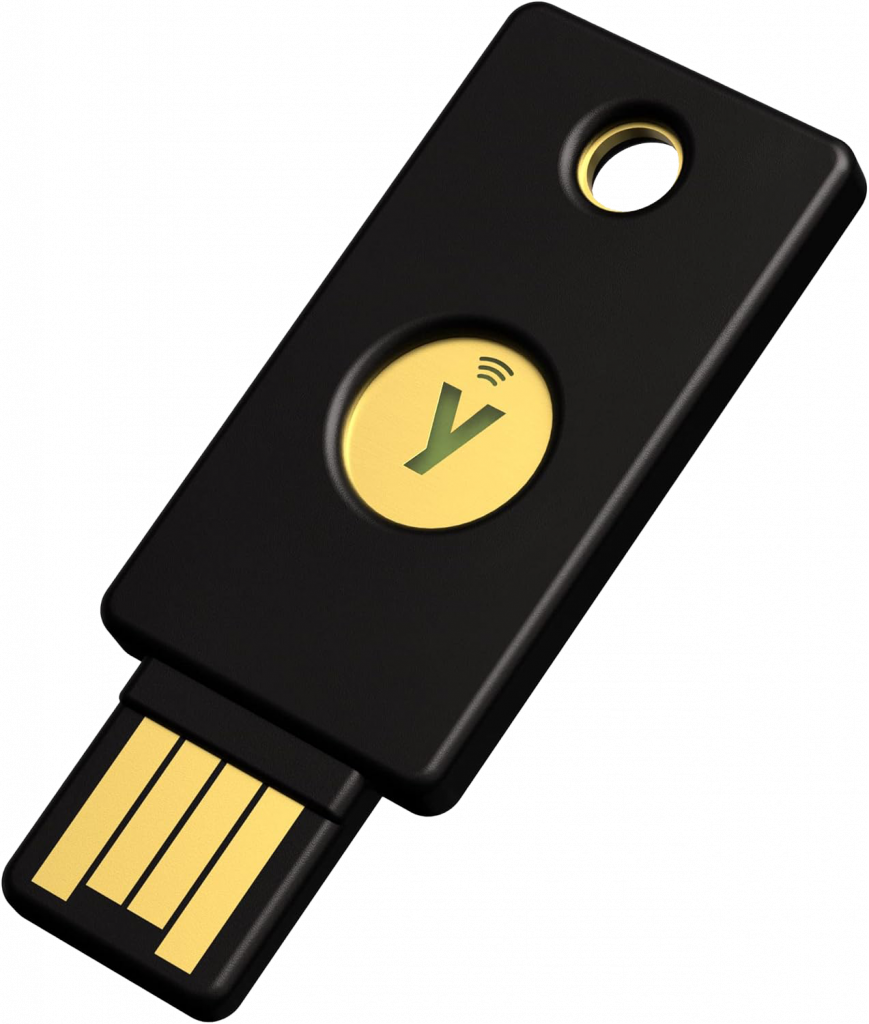
For enhanced security and seamless integration with Duo authentication, we recommend purchasing Yubico NFC security keys. Yubico offers both USB-C and USB-A versions to suit your device’s port compatibility.

Yubikey (USB-C)

Yubikey (USB-A)

Last Modified: