The easiest way to access your FDU email account on your mobile device is to install the Outlook app from either the App Store (Apple) or the Play Store (Android). We support and advise using this method due to the program’s robustness and integration of all Office365 features. Follow the steps below to install and set up the Outlook app on your phone.
Outlook App on Apple iOS and Android Mobile Devices
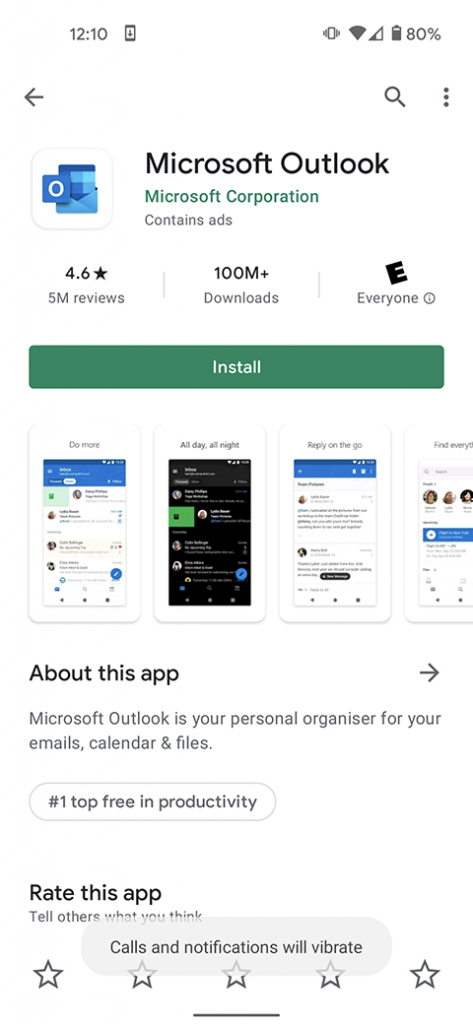
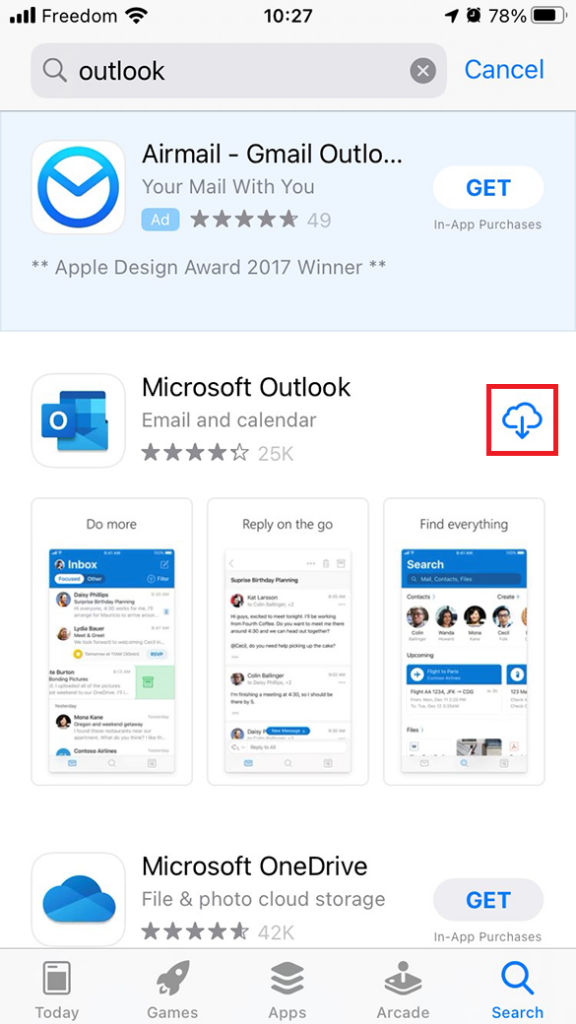
Use the links below to install the Outlook app onto your mobile device.
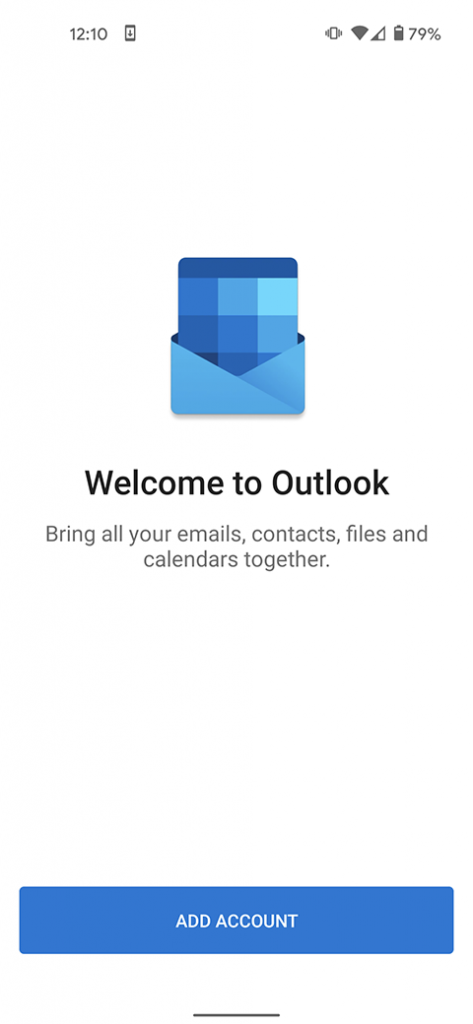
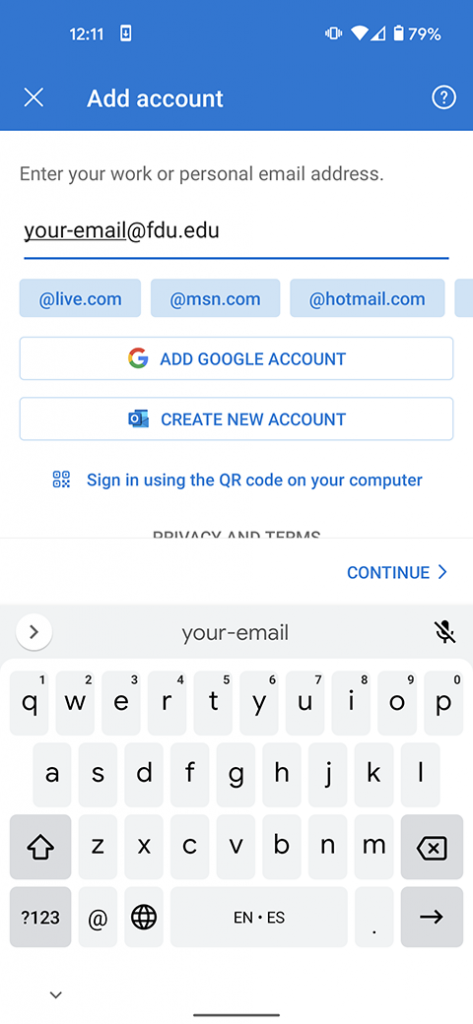
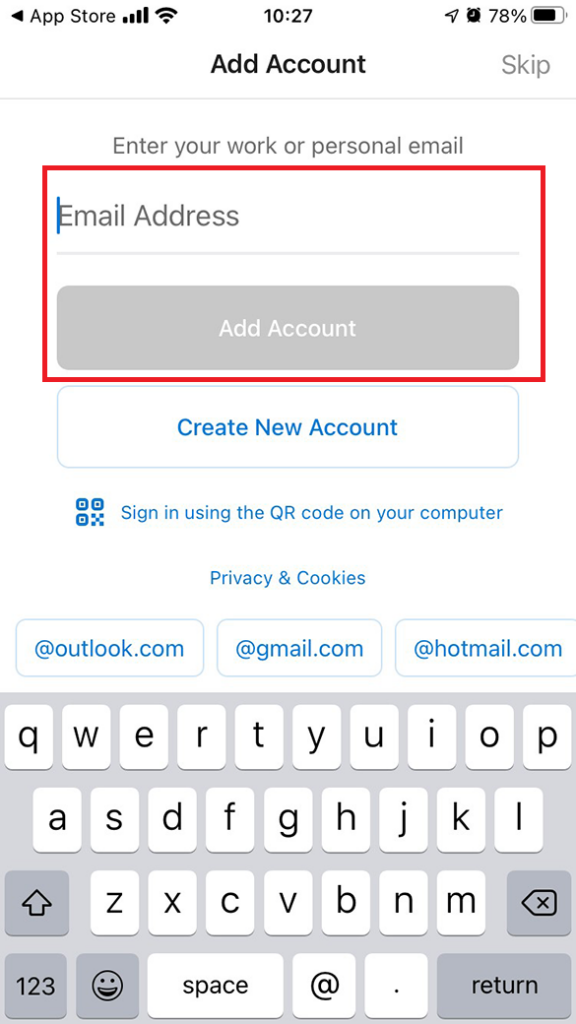
Launch the app and press on “Add Account” if on an Android device. It will then prompt you to input your FDU email address. On iOS, the app will launch and immediately ask you for your FDU email address. Once filled out press “Continue” on Android. On iOS press “Add Account”
Android
Android
iOS
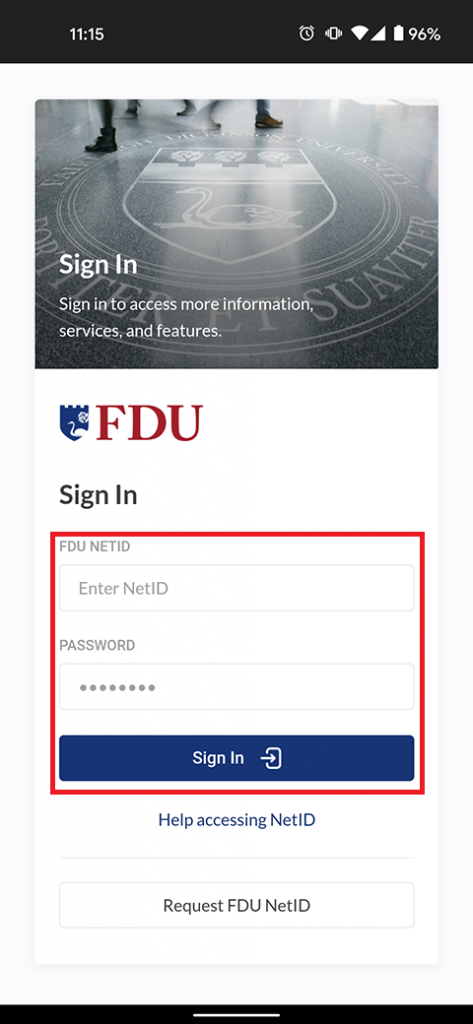
You will be routed to the FDU Single Sign On Page, from here input your FDU email address and password and press “Sign In”
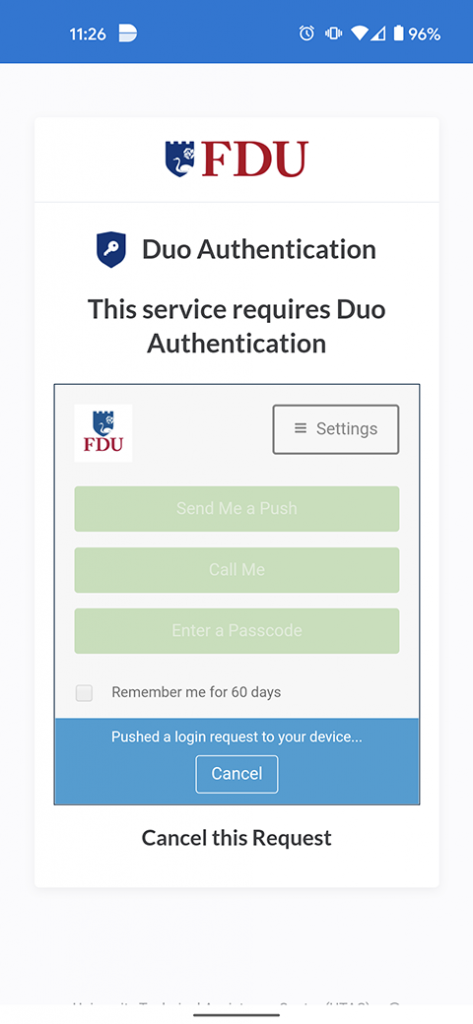
For security purposes, all applications which use FDU’s Single Sign On (NetID) require Duo two-factor authentication. After inputting your FDU NetID login information, Duo requires you to complete a method of second-factor authentication
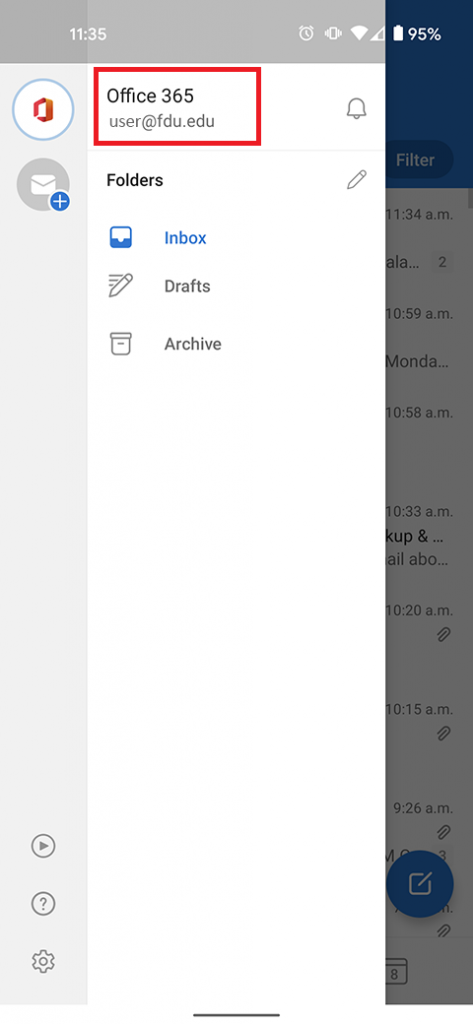
Your FDU email account has now been added to your device successfully. Ensure the email account is listed on your Outlook application.
Microsoft has implemented a new feature to its mail client called Clutter. Clutter acts as a filter that separates e-mails that it Deems low priority. The e-mails are placed in a folder and are out of sight, with no notifications visible to the user. The problem with Clutter is that it is a learning program that tries to guess what emails are important or low priority and might filter out emails that you need.
Disabling Clutter rules in Outlook
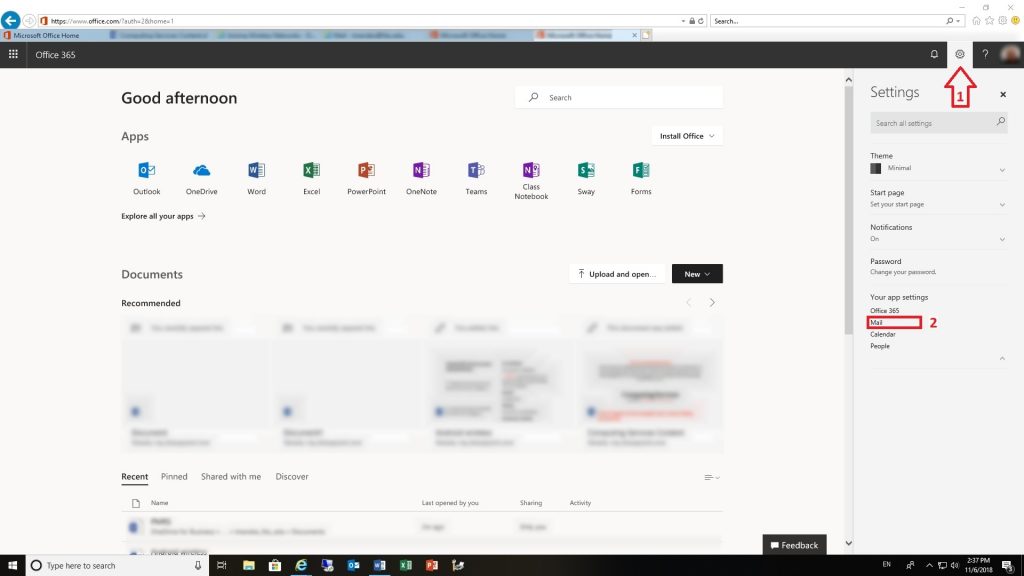
If you wish to disable clutter, log in to Office 365 using our portal office365.fdu.edu with your NetID credentials.
Look for the settings icon on the upper right corner of your window and click on it
Click on the “Mail” option under “Your app settings”
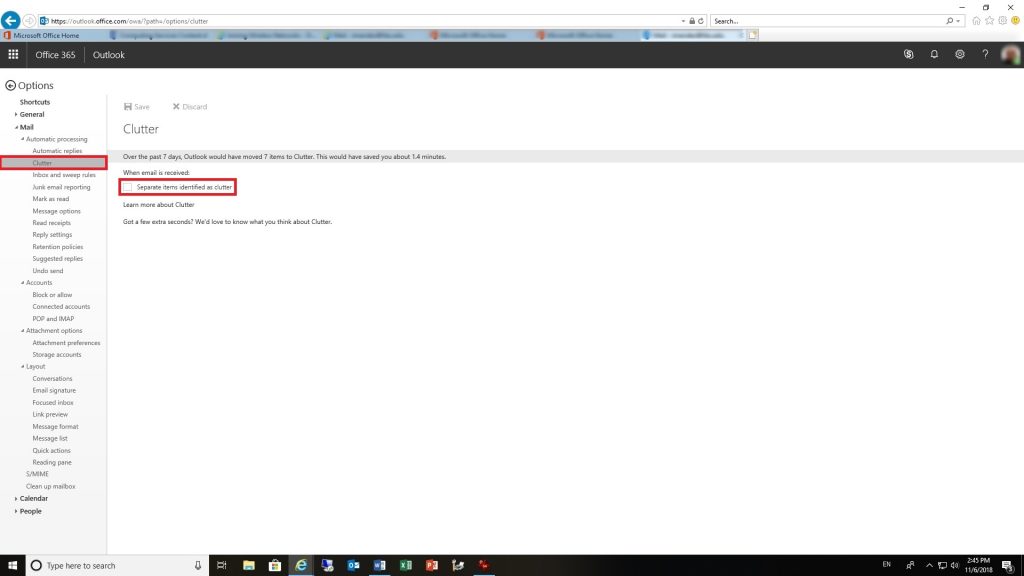
Drill down to “Mail > Automatic processing > Clutter”
Microsoft 365 email has filters to protect users from spam and malicious emails like phishing scams.
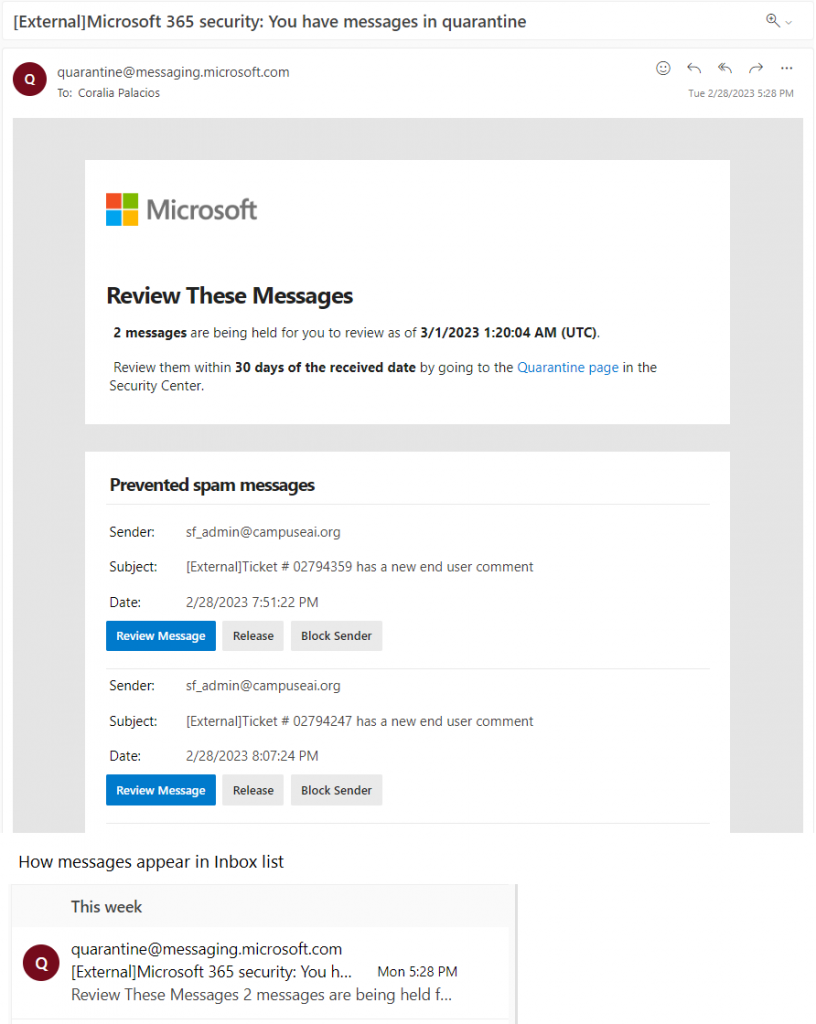
Messages caught by the filters are placed in quarantine for Fairleigh Dickinson University and its users’ protection. Users will receive a Spam Notification message once a day, notifying them of any messages placed in quarantine. Any legitimate mail caught by mistake can be released directly from this message or from the quarantine portal.
Warning
Mail left in quarantine will automatically be deleted after 15 days.
Handling Quarantined Email
Legitimate messages placed in quarantine may be released into your inbox in one of two ways:
From the daily spam notification email message
If you receive mail that has been placed in quarantine, you’ll receive an email message from quarantine@messaging.microsoft.com. The message will look like the one below:
Note
You will only receive an email if you have items in quarantine.
The following options will be available to you by clicking the respective links in the email notification or you can choose to do nothing.
Review Message – go to the Microsoft 365 Security & Compliance Center to review it
Release – the message is removed from quarantine and placed in your inbox
Block Sender – add the sender to the Blocked Senders list in your mailbox
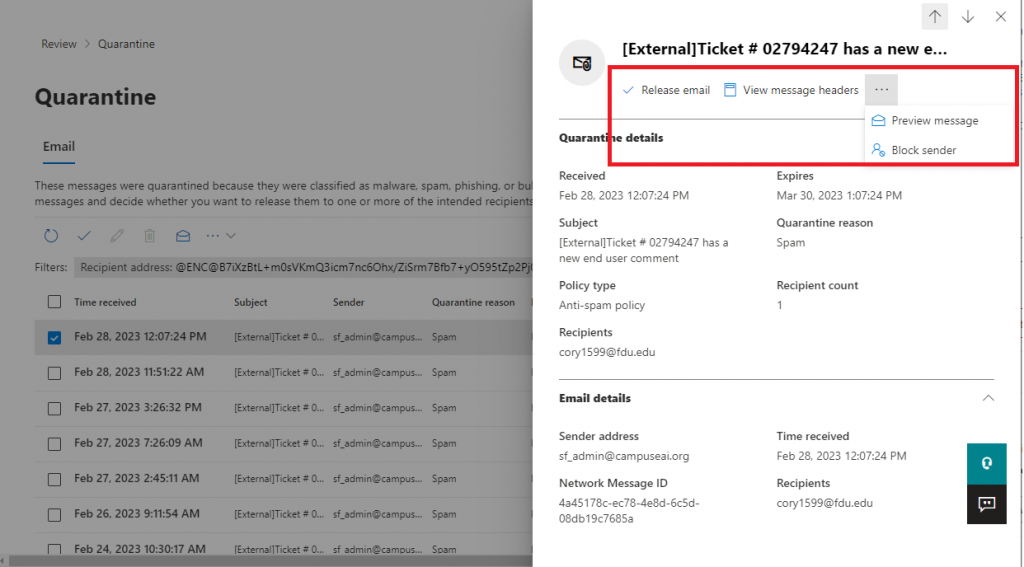
From the Microsoft 365 Security & Compliance Center
Quarantined email can also be handled in the Microsoft 365 Security & Compliance Center.
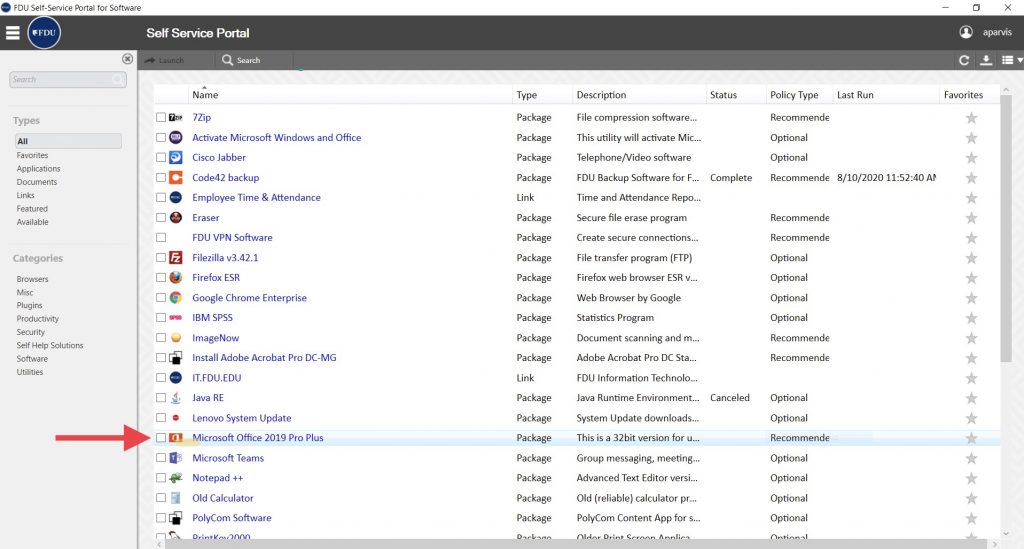
Microsoft Office 2019 Pro Plus is Fairleigh Dickinson University’s standard office productivity software suite used on all FDU-owned laptops and desktops.
Office 2019 Pro Plus is the current version installed on all university computer labs and Microsoft Office 2019 is the current version for all Apple macOS devices.
FDU Faculty and Staff in possession of a university-owned laptop or desktop who has Microsoft Office 2016 Pro Plus installed, may upgrade to the latest version of Office 2019 Pro Plus using the FDU Self Service Portal for Software. Follow the instructions below to upgrade.
Microsoft Office 365 offers a comprehensive set of software tools that facilitate documentation, collaboration, and communication. These tools are available on the Web or as downloadable desktop Office 365 apps.
Below is a list of articles for each of the available tools in the Microsoft Office 365 environment. Each article contains information on what each application is and training on how to use them.
Outlook
Outlook allows you to connect and stay organized with your email, calendar, and contacts all in one place.
PowerPoint is a slideshow presentation program that’s part of the Microsoft office suite of tools. PowerPoint makes it easy to create, collaborate, and present your ideas in dynamic, visually compelling ways.
Teams is a unified communication and collaboration platform that combines persistent workplace chat, video meetings, file storage, and application integration. Here you will find documentation on how to install and use Teams and all its features.
OneNote is a cross-functional digital notebook. You can organize different notebooks into sections and pages with easy annotation and navigation tools.
Lists you can Build and share lists to help you track issues, assets, routines, contacts, inventory, and more. You can get started with Microsoft Lists from Microsoft 365, from MS Teams or from within SharePoint.
Power Apps is a suite of apps, services, connectors, and data platform that provides a rapid application development environment to build custom apps. Using Power Apps, you can quickly build custom apps that connect to data stored throughout Microsoft 365.
Power Automate is a service that helps you create automated workflows between apps and services to synchronize files, get notifications, collect data and more.
Power BI is a business analytics solution that lets you visualize your data and share insights across your organization or embed them in your app or website. It allows connections to hundreds of data sources and generate live dashboards and reports.
Planner makes it easy for your team to create new plans, organize and assign tasks, share files, chat about what you are working on, and get updates on progress.
Bookings offers a simpler way to organize schedules and manage appointments. Microsoft Bookings includes a web-based booking calendar and integrates with Outlook to optimize your calendar and give your contacts the flexibility to book a time that works best for everyone involved.
Forms is an app that lets you create surveys, quizzes, and polls to collect real-time responses from students, collaborates and colleagues. It has built-in analytics to evaluate responses, and export results to Excel for additional analysis or grading.
The Microsoft productivity suite subscription includes Office for the Web, stand-alone, downloadable Office 365 desktop clients and mobile apps. Included in the Microsoft Office suite of products are
Microsoft Word
Microsoft Excel
Microsoft PowerPoint
Microsoft OneNote
Microsoft Outlook
Microsoft Publisher
Microsoft Access
Available Platforms
Windows10or higher
Mac
iOS, Android, Other Devices
Browsers – Current versions of Safari, Chrome, Firefox, Microsoft Edge, and Internet Explorer
Eligibility
Current students that are registered for classes for the current term or a future term.
How to Install Microsoft Office 365 Pro Plus
Current students can download the latest version of Microsoft Office free of charge as part of the Microsoft Campus Agreement. Microsoft Office Suite can be installed on up to five devices.
Note
Students leaving Fairleigh Dickinson University (by graduating or otherwise) will need to purchase Office to continue using it. You will be prompted by Microsoft to purchase Office the next time you launch the software. If you don’t purchase Office, you will still be able to open the documents you created but won’t be able to edit them or create new documents.
Office 365 Pro Plus can be installed on Windows 10 or higher
Office 365 Pro Plus can be installed on Mac OS 10.13.6 (Sierra) or higher
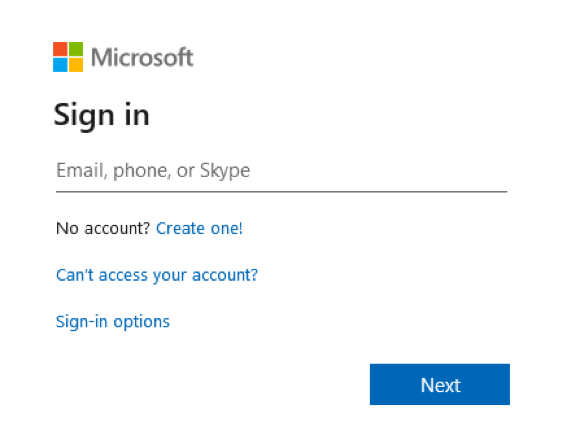
Enter your FDU NetID and then click “Next”. This will re-direct you to the FDU SSO login page
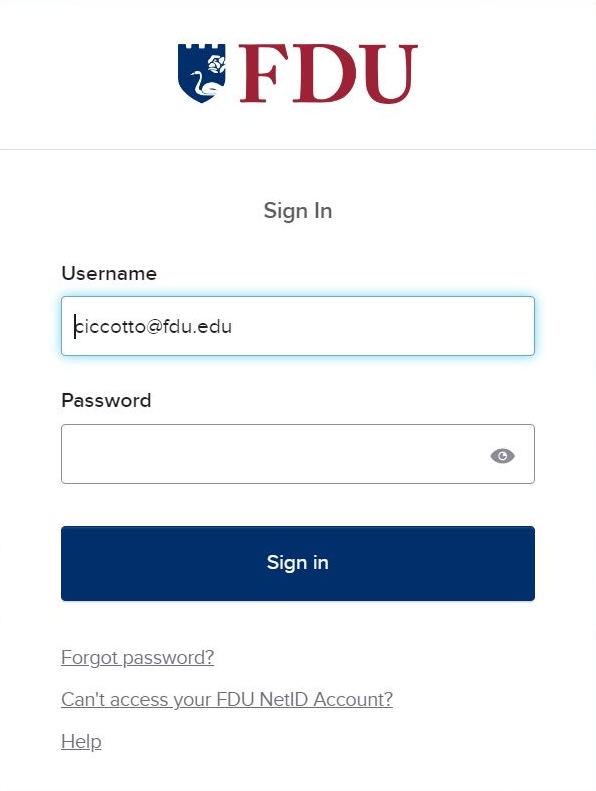
Enter your FDU NetID and Password then click “Sign In“. Follow the prompts on the next screen to authenticate with Duo
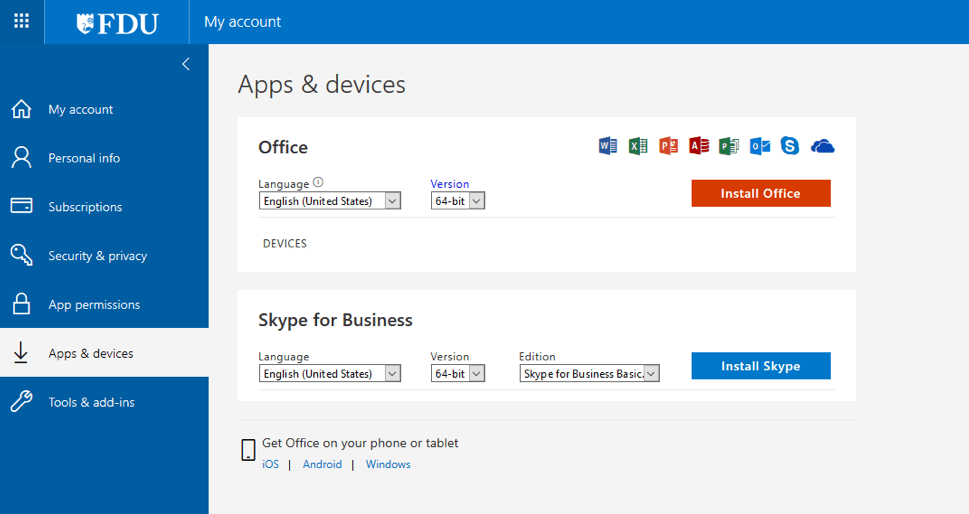
In the Software window, click “Office“. Then click the “Install” button
Windows
macOS
The software will be downloaded and installed on your computer. Your copy of Microsoft Office remains active until you leave the University, at which point, you will either need to uninstall it or purchase a license key
Note
Any computer with Office 365 Pro Plus installed on it must connect to the Internet at least once every 30 days so the status of your subscription can be verified. If you do not connect to the Internet every 30 days or less, Office 365 will go into reduced functionality mode. Once the computer reconnects to the Internet and the subscription status is verified, all features will become available again.
Through Microsoft Outlook’s Scheduling Poll (formerly FindTime), you can select a few possible meeting times and send attendees a link to a poll that allows them to vote for what meeting time works best for them. Once a consensus is reached, you schedule the meeting for the preferred time.
Scheduling Poll Icon
Like the Scheduling Assistant, the Scheduling Poll allows you to preview attendees’ FDU Outlook calendars (if available) so that the best possible options can be selected. This particular aspect of the feature will be less useful for attendees who…
DO NOT have FDU Outlook calendars
Have FDU Outlook calendars, but don’t keep them up-to-date
The Scheduling Poll has other convenient features, including email updates, the ability to schedule a meeting automatically, and more.
When using the Outlook web client, the Scheduling Poll feature is not available for emails composed in plain text. Emails must be composed in HTML.
Note
Doodle, a meeting scheduler add-in for Outlook, is not an approved application for use at FDU. Please use Microsoft Scheduling Poll as your meeting scheduling tool, as detailed in this article.
Where can I access the Scheduling Poll feature?
Windows
You can access the Scheduling Poll via the Mail or Calendar tabs of the Outlook desktop application.
In Mail, you can access the Scheduling Poll as follows:
Select “Reply with Scheduling Poll” on the “Home” tab when an email is open in the reading pane
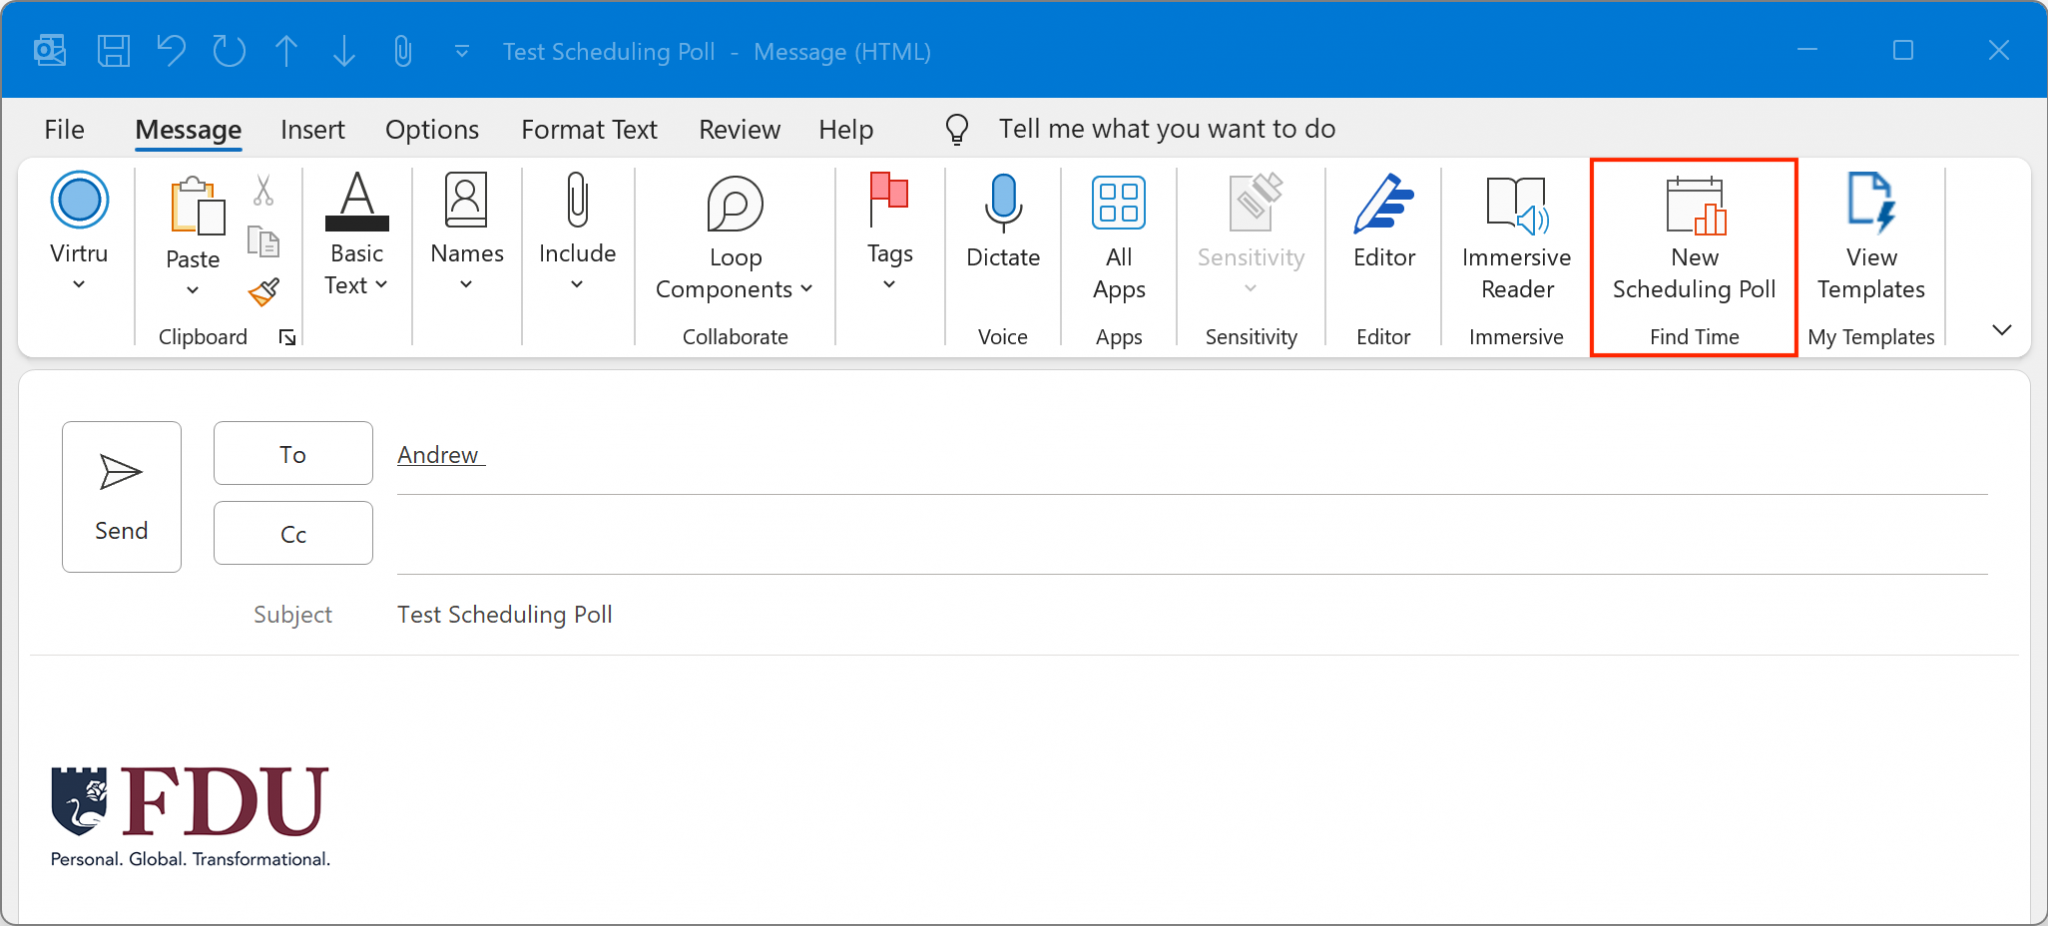
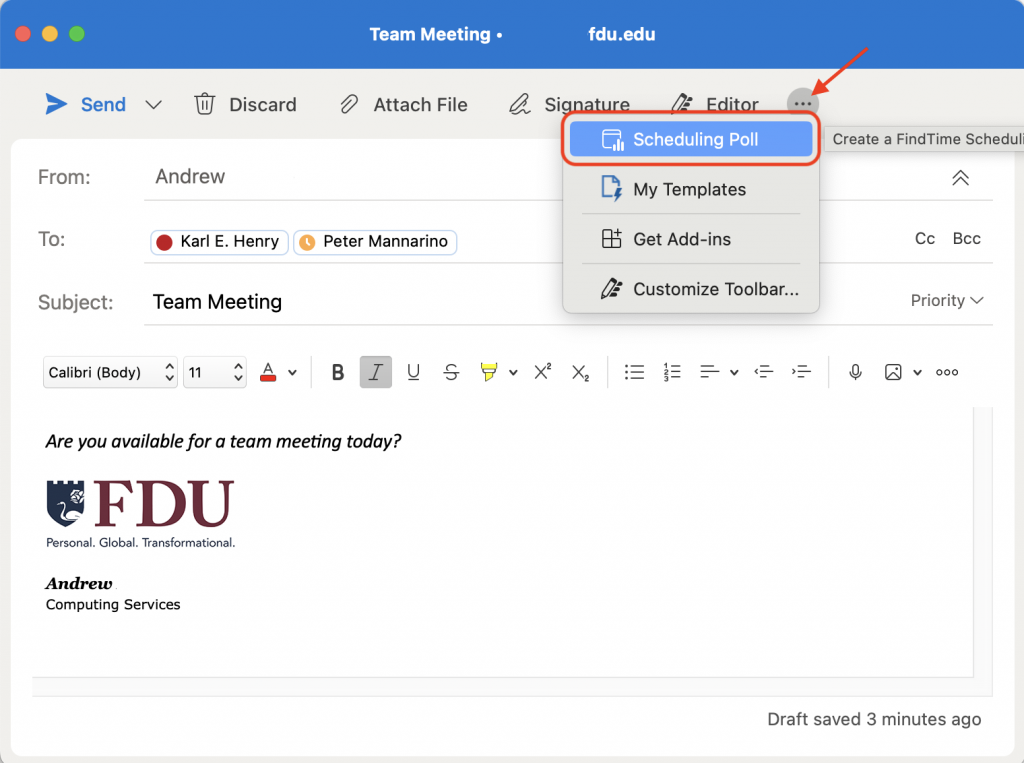
Launch the compose pane by either creating a new message or hitting reply/forward for an existing message. List required recipients in the “To” field and optional recipients in the “CC” field. Then, on the “Message” tab, select “New Scheduling Poll”
In Calendar, you can access the Scheduling Poll as follows:
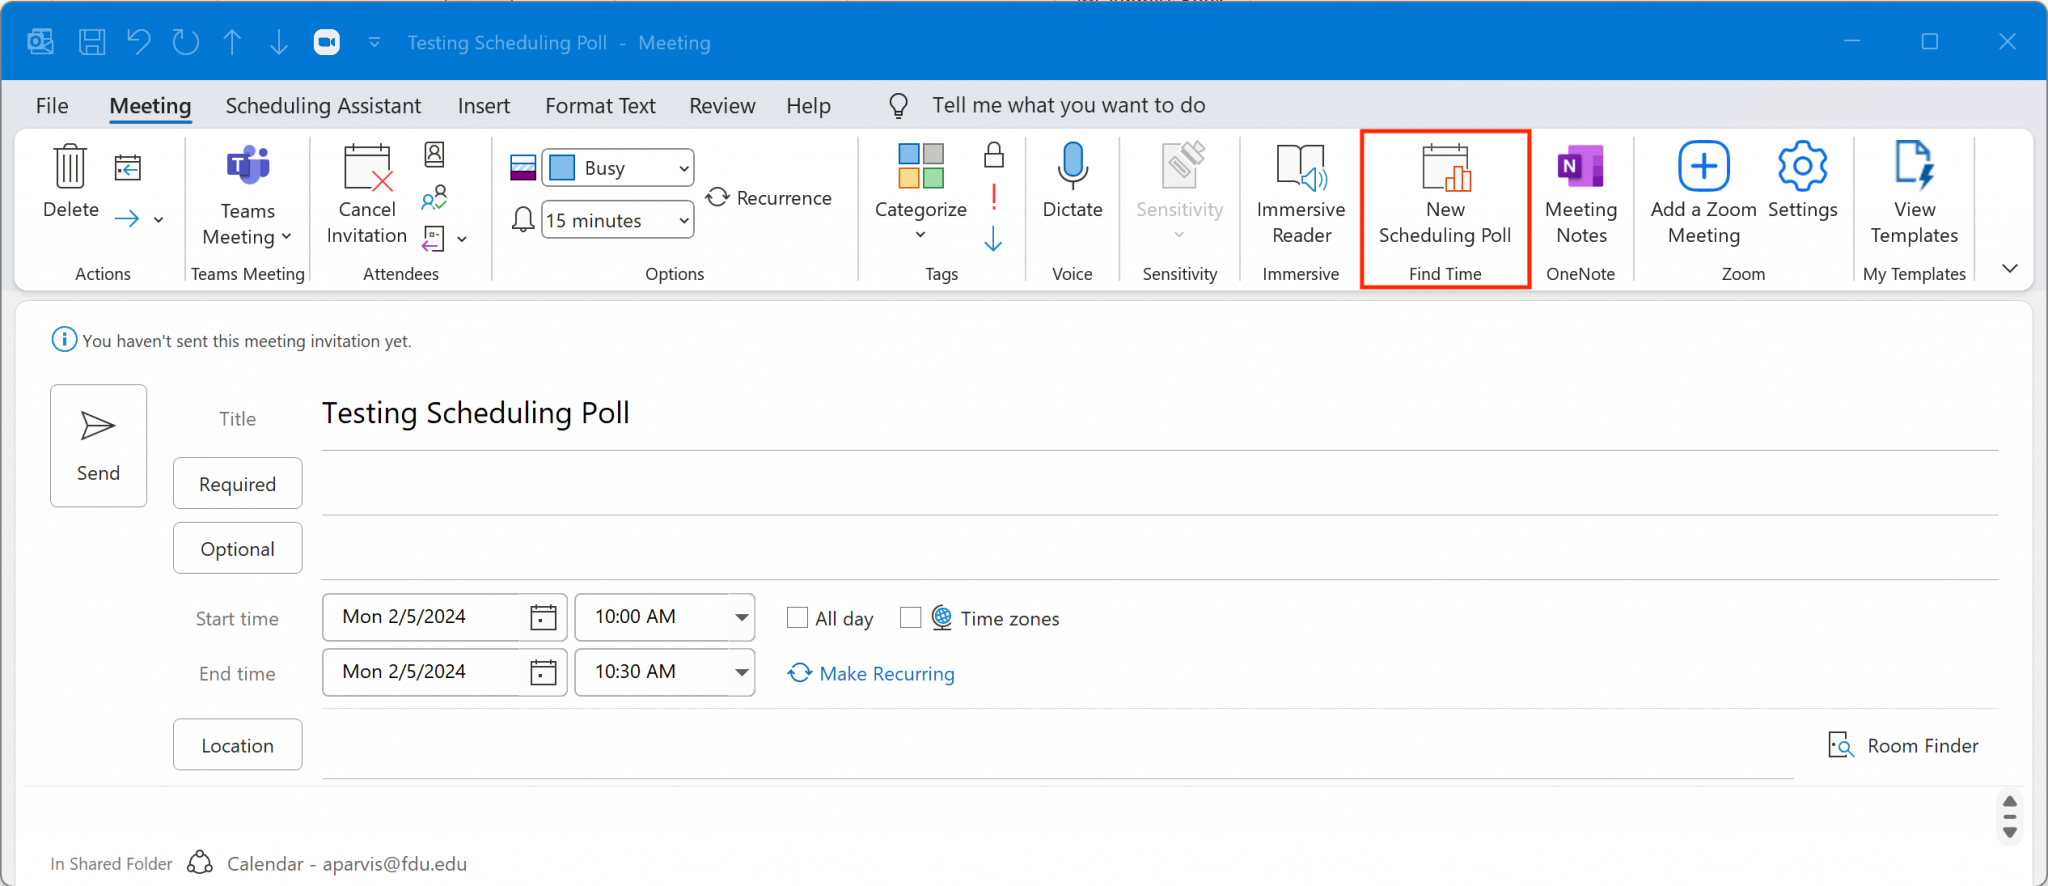
Either by launching the compose form to create a new meeting event or opening an existing event in the edit form. List required attendees in the “Required” field and optional attendees in the “Optional” field. Select “New Scheduling Poll” under the “Meeting” tab
Start a new message or event
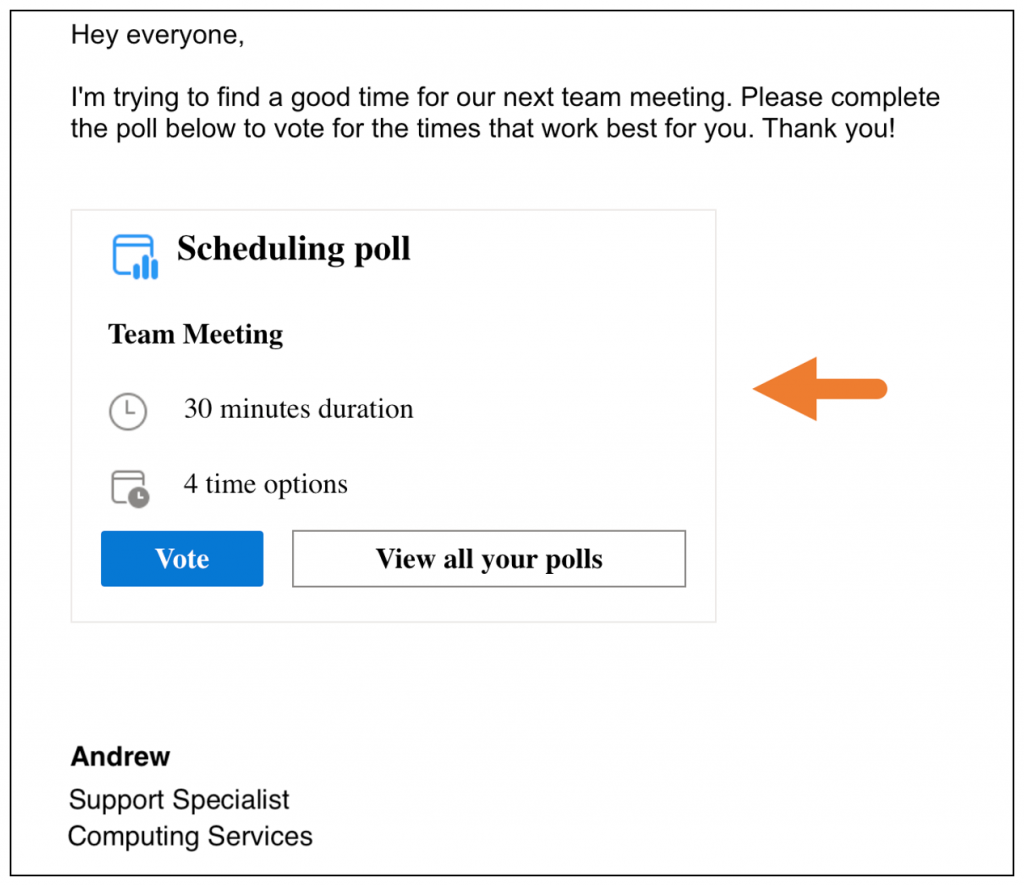
In the “Subject/Title” field, type what will eventually become the event’s name.
For example, “Team Meeting”
In the “To/Required” or Optional fields, add the people who will be attendees for this meeting. They do not all have to be from FDU. Scheduling Polls can be sent to and completed by non-FDU email addresses
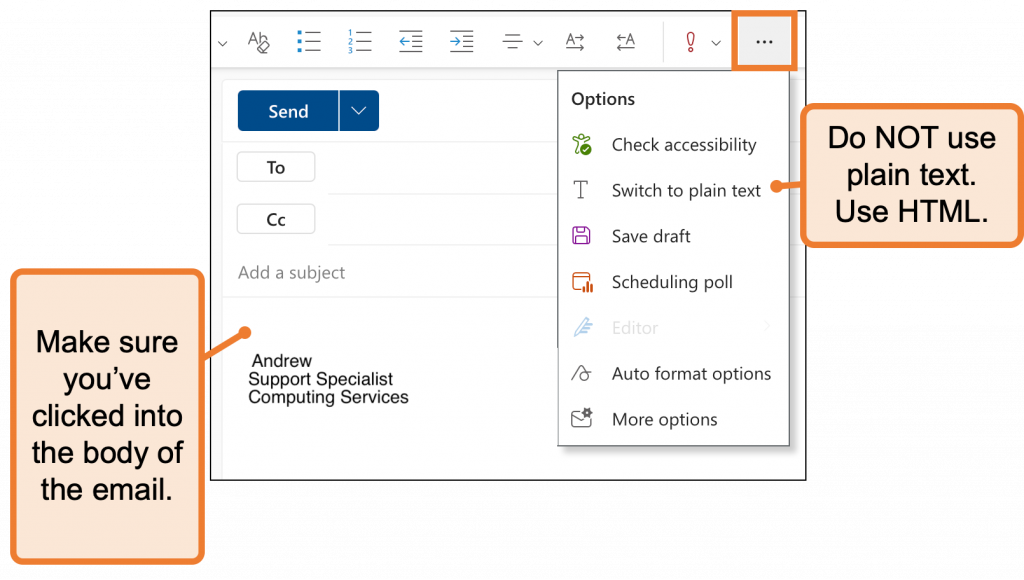
Press into the body of the email and compose a message
Press into the area of the email body where you want the link to the Scheduling Poll to show up
Select the “Scheduling Poll” tab
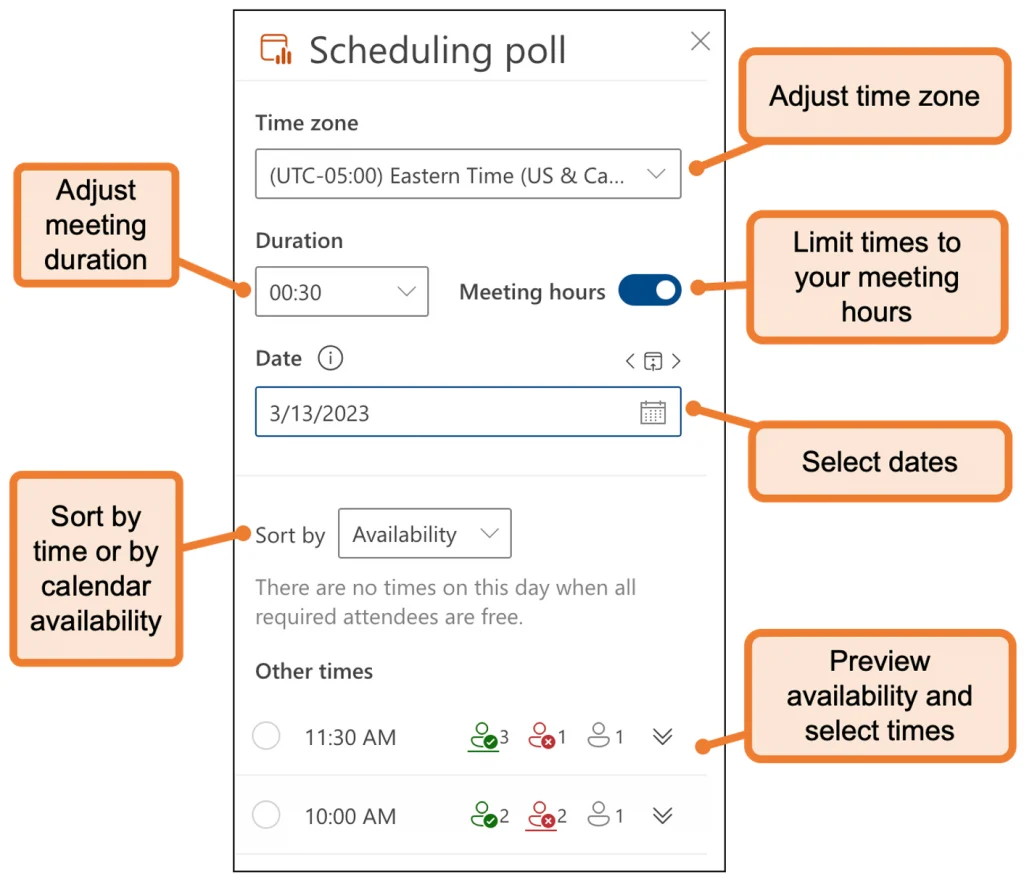
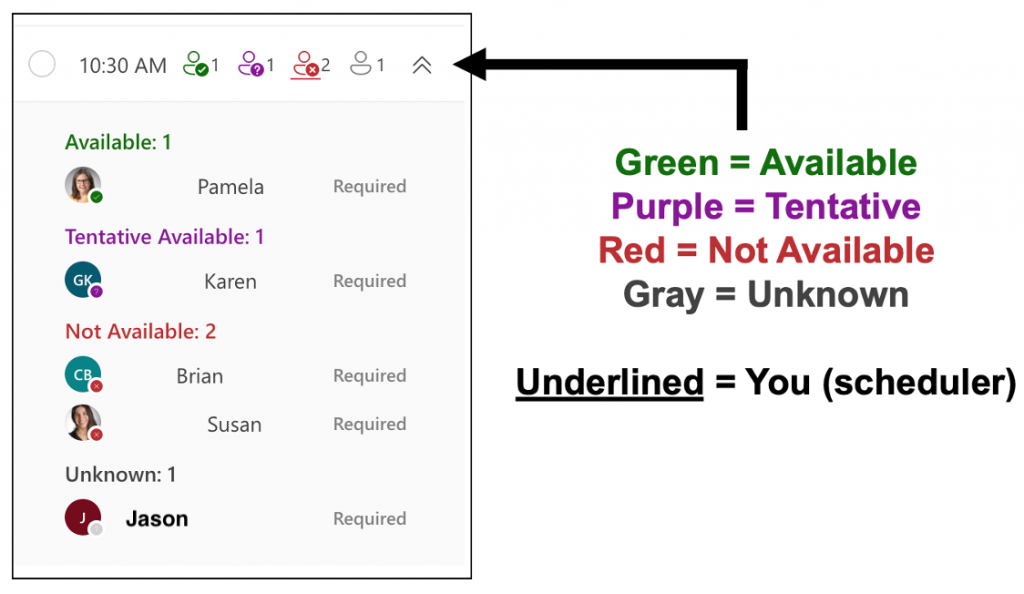
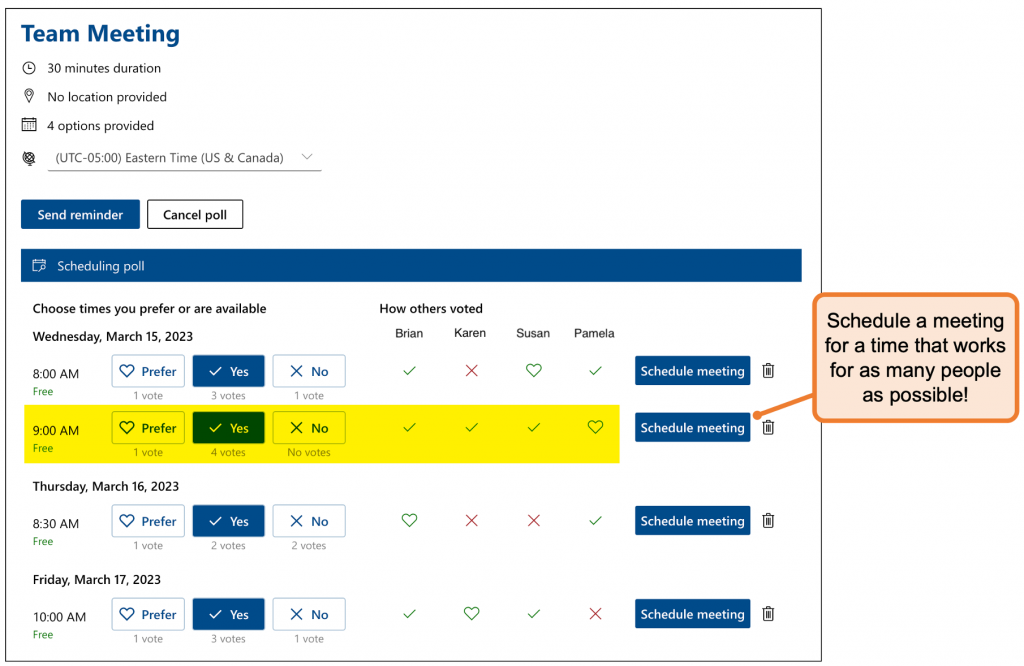
A Scheduling Poll panel will open. From here, you can adjust your meeting duration, move between dates, and preview the availability of your attendees
Note
When selecting times for your poll, you can preview attendees’ FDU Outlook calendars, if available.
Select times that work for as many attendees as possible, paying particular attention to the attendees whose attendance is most critical
Press “Next” to proceed to the next step
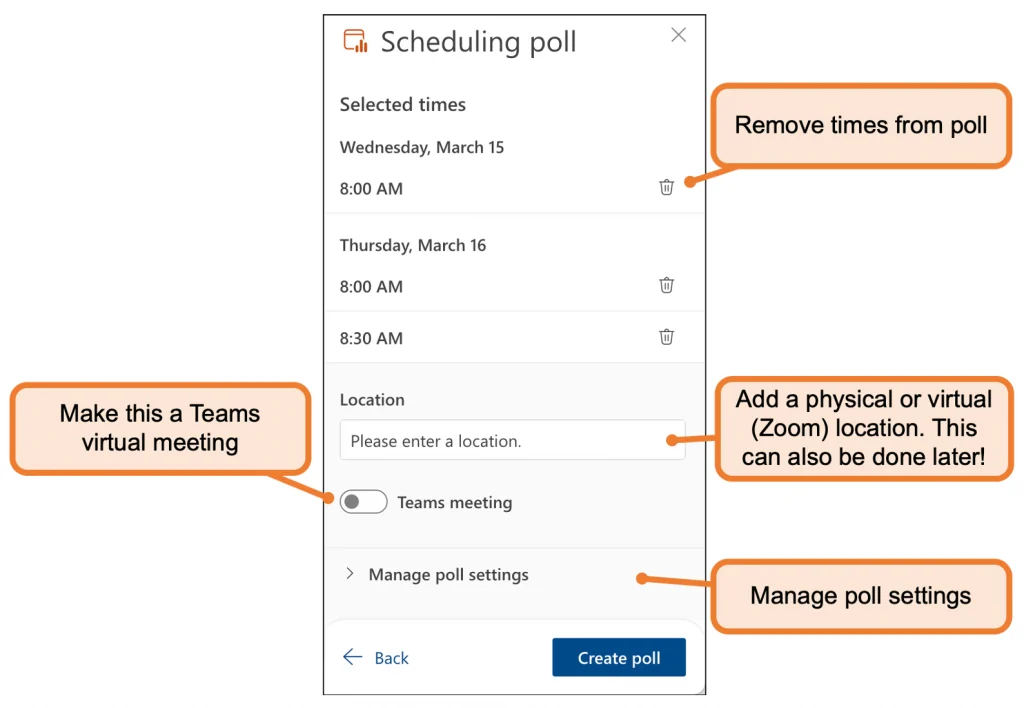
A new panel will open with the ability to delete selected times or adjust the meeting location
Note
You can also turn the Teams meeting feature on if you want Outlook to automatically schedule a Teams virtual meeting for this event.
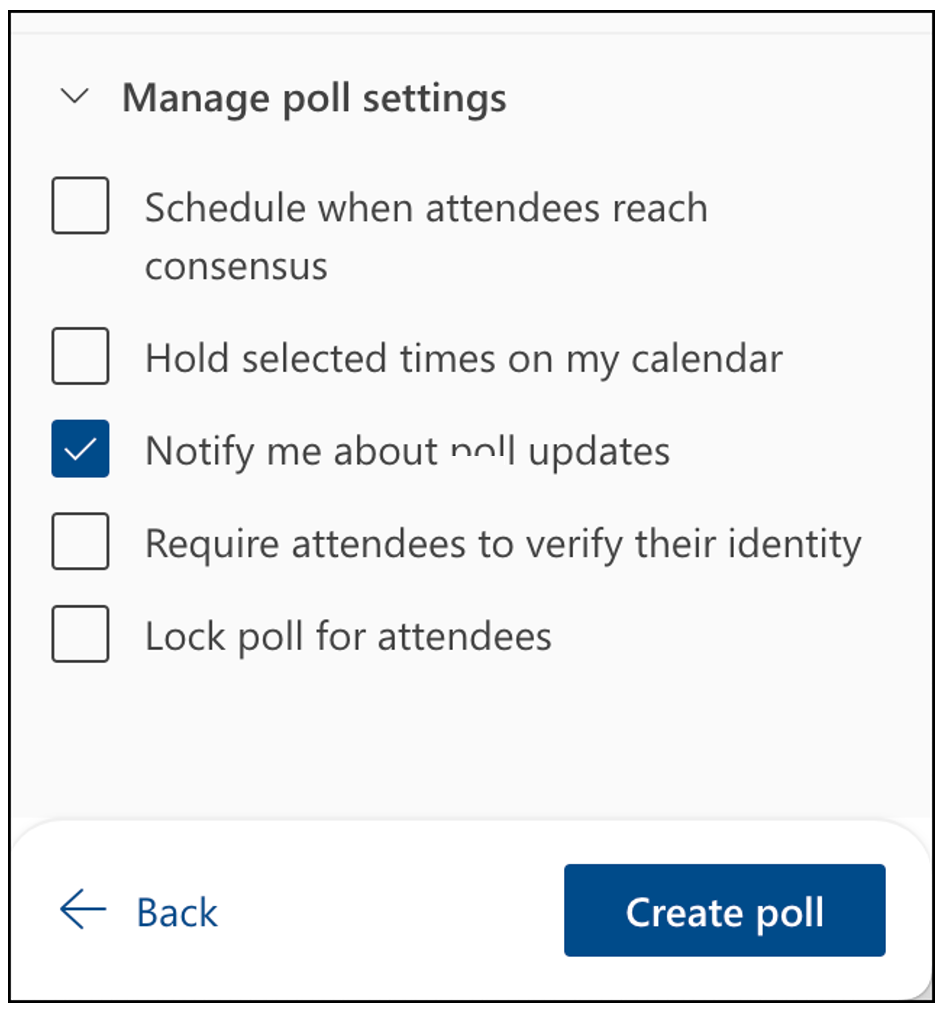
Press “Manage Poll Settings” to expand the menu. Options include:
Schedule when attendees reach consensus – Automatically schedules a meeting and sends out an invite to attendees if everyone agrees on a particular time. If multiple times work, the earliest one will be selected.
Hold selected times on my calendar – Puts a temporary hold on the scheduler’s calendar for each of the selected times. These holds are removed when the final invite is sent out.
Notify me about poll updates – Outlook will send an email update to the scheduler whenever an attendee submits their poll response.
Require attendees to verify their identity – Forces respondents to verify their identity either by logging in to their Outlook account or entering a numerical code that Microsoft sends them.
Lock poll for attendees – Prevents attendees from adding more people to the meeting or suggesting new meeting times.
When you’re ready, press “Create Poll”
A Scheduling Poll meeting link will be inserted into your email
close
macOS
You can access “Scheduling Poll” via the Mail tab on the Outlook desktop application.
Open the Outlook desktop application on your Mac
Start a new email message
In the “Subject” field, type what will eventually become the name of the event. For example: “Team Meeting”
In the “To” field, add the people who will be attendees for this meeting. They do not all have to be from FDU (Scheduling Polls can be sent to and completed by non-FDU email addresses)
Press into the body of the email and compose a message
Press into the area of the email body where you want the link to the Scheduling Poll to show up
Press on the “More Options” button and select “Scheduling Poll”
A “Scheduling Poll” panel will open. From here, you can adjust your meeting duration, move between dates, and preview your attendees’ availability
Note
When selecting times for your poll, you can preview attendees’ FDU Outlook calendars, if available.
Select times that work for as many attendees as possible, paying particular attention to the attendees whose attendance is most critical
Click “Next” to proceed to the next step
A new panel will open with the ability to delete selected times or adjust the meeting location
Note
You can also turn the Teams meeting feature on if you want Outlook to automatically schedule a Teams virtual meeting for this event.
Press on “Manage Poll Settings” to expand the menu
When you’re ready, press “Create Poll”
A Scheduling Poll meeting link will be inserted into your email
close
Outlook on Web
You can access the “Scheduling Poll” feature via the Mail or Calendar web apps.
In the “Subject” field, type what will eventually become the name of the event. For example, “Team Meeting”
In the “To” field, add the people who will be attendees for this meeting. They do not all have to be from Fairleigh Dickinson University (Scheduling Polls can be sent to and completed by non-FDU email addresses)
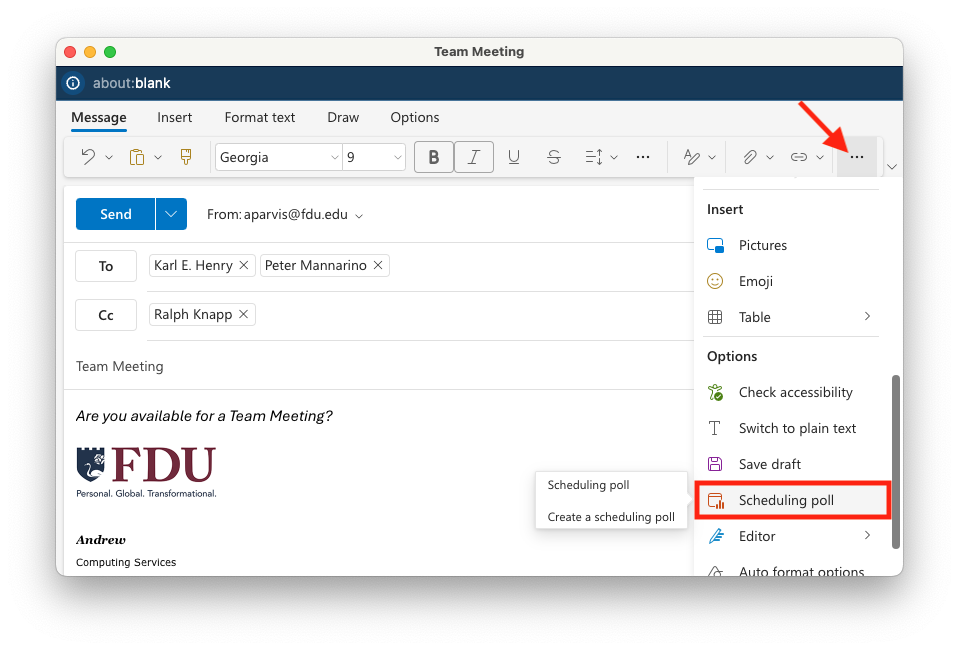
Press into the body of the email and compose a message
Press into the area of the email body where you want the link to the Scheduling Poll to show up
Press on the “More Options” button and select “Scheduling Poll”
Note
If the “Scheduling Poll” option is grayed out, make sure you have clicked into the body of the email and that your email is being composed in HTML and not plain text.
A “Scheduling Poll” panel will open. From here, you can adjust your meeting duration, move between dates, and preview your attendees’ availability
Note
When selecting times for your poll, you can preview attendees’ FDU Outlook calendars, if available.
Select times that work for as many attendees as possible, paying particular attention to the attendees whose attendance is most critical
Press “Next” to proceed to the next step
A new panel will open with the ability to delete selected times or adjust the meeting location
Note
You can also turn the Teams meeting feature on if you want Outlook to automatically schedule a Teams virtual meeting for this event.
Press on “Manage Poll Settings” to expand the menu
Schedule when attendees reach consensus – Automatically schedules a meeting and sends out an invite to attendees if everyone agrees on a particular time. If multiple times work, the earliest one will be selected.
Hold selected times on my calendar – Puts a temporary hold on the scheduler’s calendar for each of the selected times. These holds are removed when the final invite is sent out.
Notify me about poll updates – Outlook will send an email update to the scheduler whenever an attendee submits their poll response.
Require attendees to verify their identity – Forces respondents to verify their identity either by logging in to their Outlook account or entering a numerical code that Microsoft sends them.
Lock poll for attendees – Prevents attendees from adding more people to the meeting or suggesting new meeting times.
When you’re ready, press “Create Poll”
A Scheduling Poll meeting link will be inserted into your email
close
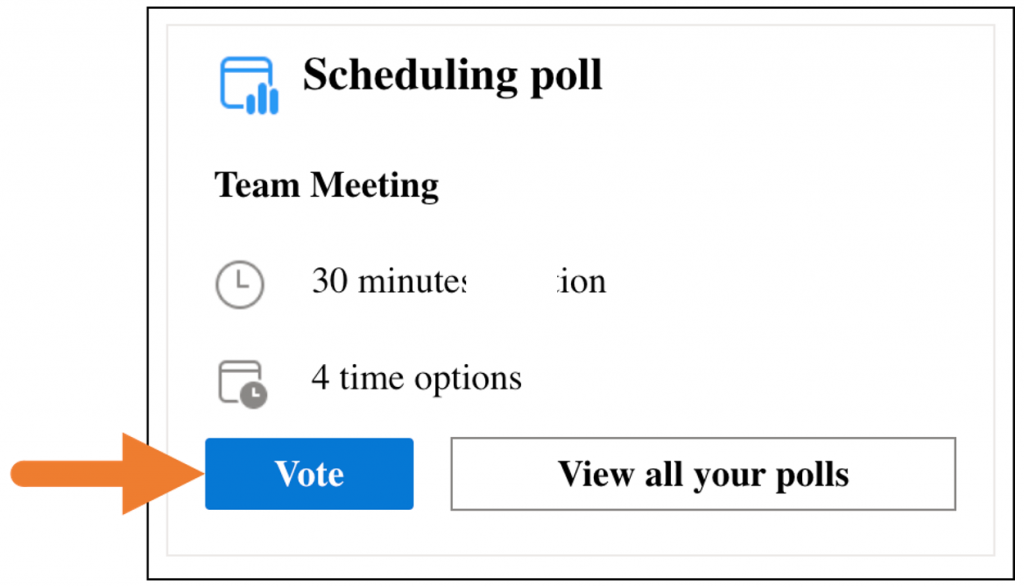
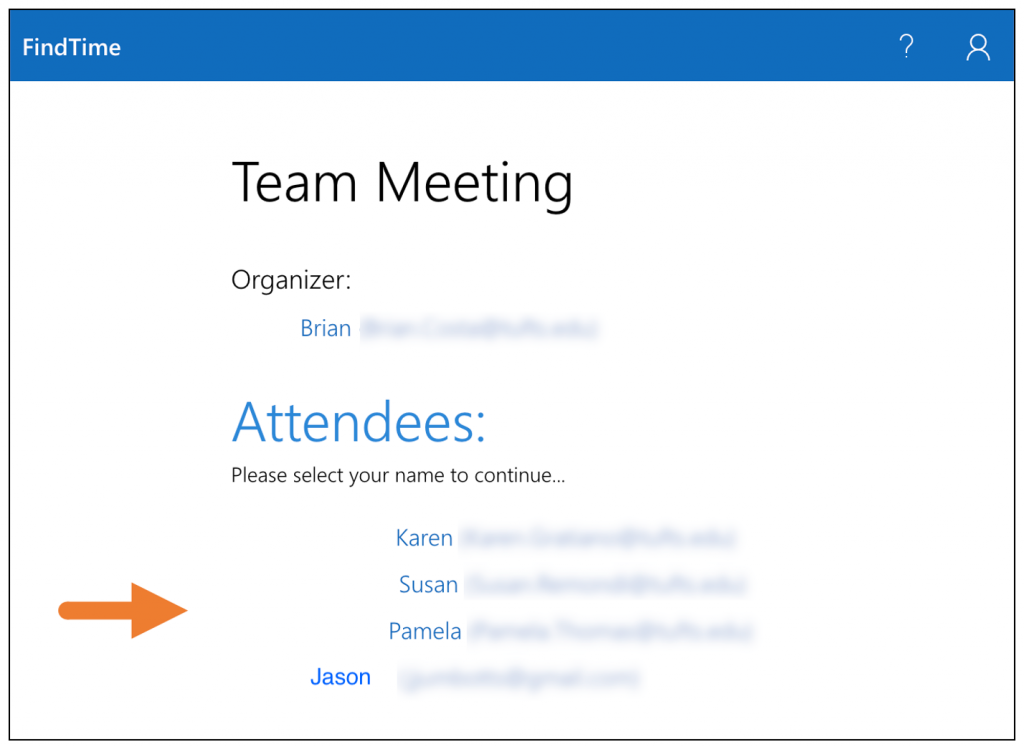
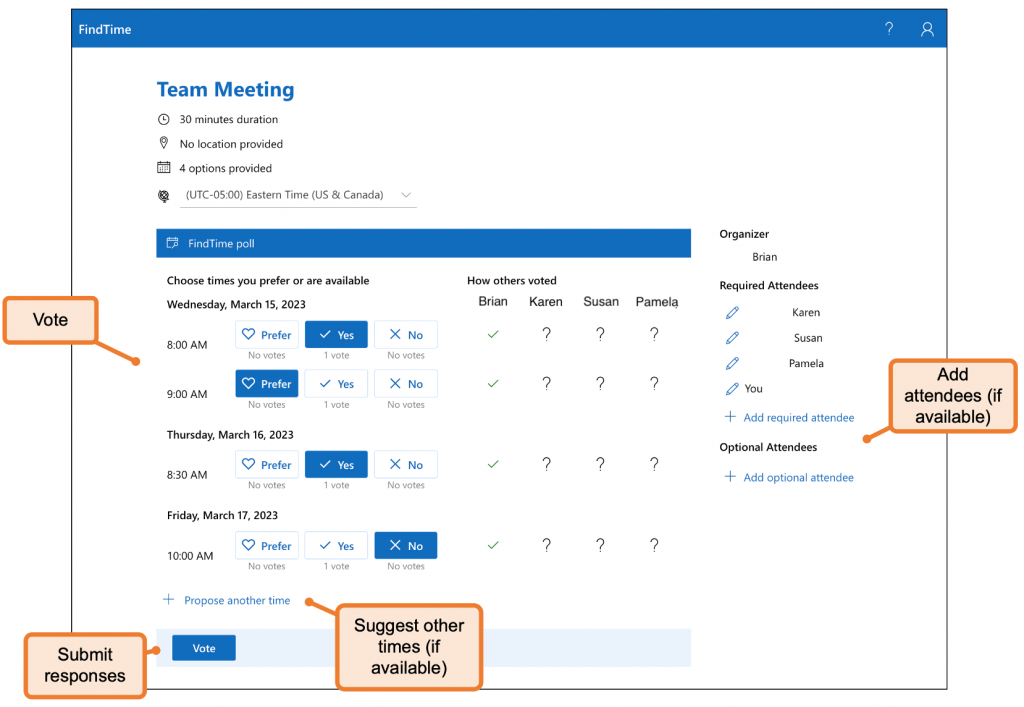
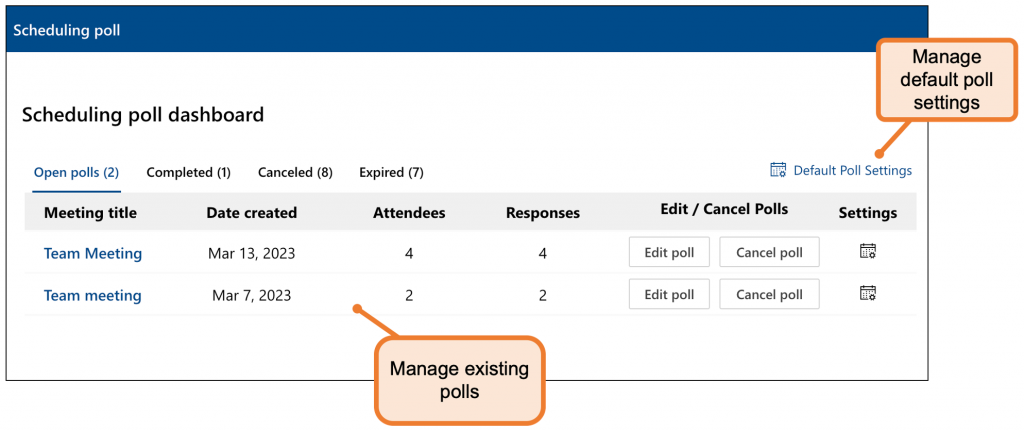
How do I finalize, vote, and manage a Scheduling Poll?
Sending a finalized Meeting Invite
This section describes how to manually send an invite from scheduling poll results. When setting up your poll, you can also have Outlook automatically send an invite if/when your attendees reach a consensus.
Visit the Scheduling Poll Dashboard on the Web and enter your FDU NetID credentials
The Report Message add-in works with Outlook to allow you to report suspicious messages to Microsoft and manage how your Microsoft 365 email account treats these messages.
Messages marked as junk by your Microsoft 365 email account are automatically moved to your Junk Email folder. However, spammers and phishing attempts are continually evolving. If you receive a junk email in your Inbox, you can use the Report Message add-in to send the message to Microsoft, helping improve spam filters. If you find an email in your Junk Email folder that is not spam, you can use the add-in to mark it as legitimate, move it to your Inbox, and report the false positive to help Microsoft enhance the filters.
What is Junk Email?
Junk email, often referred to as spam, consists of messages you do not want to receive. These emails may advertise unwanted products or contain content that is offensive. If you select the Junk option, a copy of the message may be sent to Microsoft to improve spam filters, and the message will be moved to your Junk Email folder.
What is Phishing?
Phishing is a tactic used to trick you into disclosing personal information, such as bank account numbers and passwords. Phishing messages often appear legitimate but contain deceptive links that lead to fake websites. If you select Phishing, a copy of the message may be sent to Microsoft to improve filters, and the message will be moved to your Junk Email folder.
For more information and tips on spotting phishing emails, please refer to the following support article:
Microsoft has recently updated the process for reporting phishing or junk emails in Microsoft 365 Outlook and classic Outlook clients. With this update, a new Report Message button is now available in a dedicated tab within the Outlook client.
Outlook Web and Desktop Client
Classic Outlook
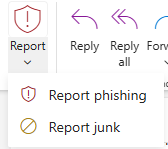
Reporting a Message as Phishing/Junk
By default, the Report button is inactive (grayed out). To activate the button and report a message as phishing or junk, the email must first be highlighted.
To report a message as Phishing or Junk:
Click on the email message you want to report
Click the “Report” button
Select either “Report phishing” or “Report junk” to properly submit the message
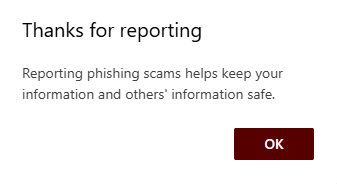
Note
Clicking Report Phishing will delete the email.
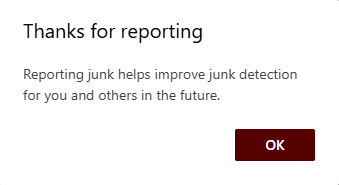
Click “OK” on the confirmation window
A secondary window will appear, explaining that regularly reporting junk emails helps improve junk email filtering in the future.
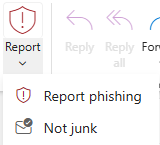
What is a Legitimate Email?
A legitimate email is one that comes from a sender you know, are expecting, or that has been mistakenly marked as junk. If this happens, you can use the Report button to mark the message as Not Junk. This will move the message from your Junk Email folder back to your Inbox.
Reporting Messages as Not Junk:
Click on the “Junk Email” folder in Outlook
Select the email message you want to report as “Not Junk“
Click the “Report” button
Select “Not Junk” to properly report the message
Tip
If a legitimate email has been mistakenly reported as phishing, please open a SAMI Support ticket by clicking the Get Support button below.
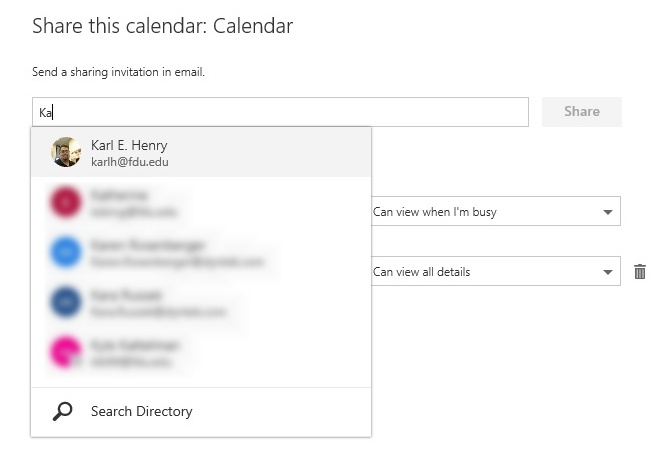
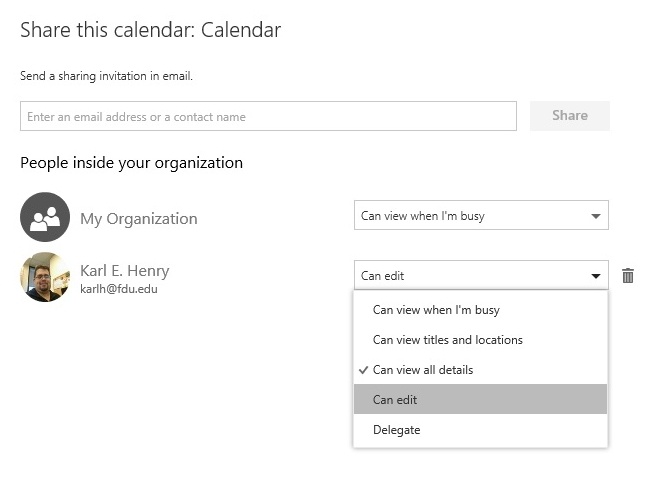
A shared mailbox makes it easy for a group of people to read and send emails from one public email address, like info@fdu.edu. When a person in the group replies to a message sent to the shared mailbox, the email appears to be from the shared address, not from the individual user. Shared mailboxes can also be used to provide a shared calendar, allowing multiple users to schedule and view calendar tasks.
Request Access to an FDU Shared Mailbox
Users can request a new shared mailbox by completing and submitting the “Distribution Group/Shared Mailbox Request” form found below. Users needing access to a specific FDU shared mailbox account may request access by reaching out to the shared mailbox owner. To fulfill this request, the shared mailbox owner will open a support case with the SAMI Service Desk.
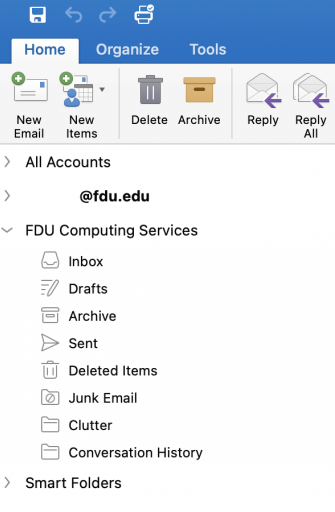
The shared mailbox should automatically display in your folder pane on the left-hand side of your Outlook application within 24 hours of its creation. Closing and restarting the Outlook application maybe necessary if you do not see it after 24 hours
Note
Before you can use a shared mailbox, the Microsoft 365 admin for the university has to add you as a member.
If you cannot open a shared mailbox, please contact the SAMI Service Desk and open a support request.
close
macOS
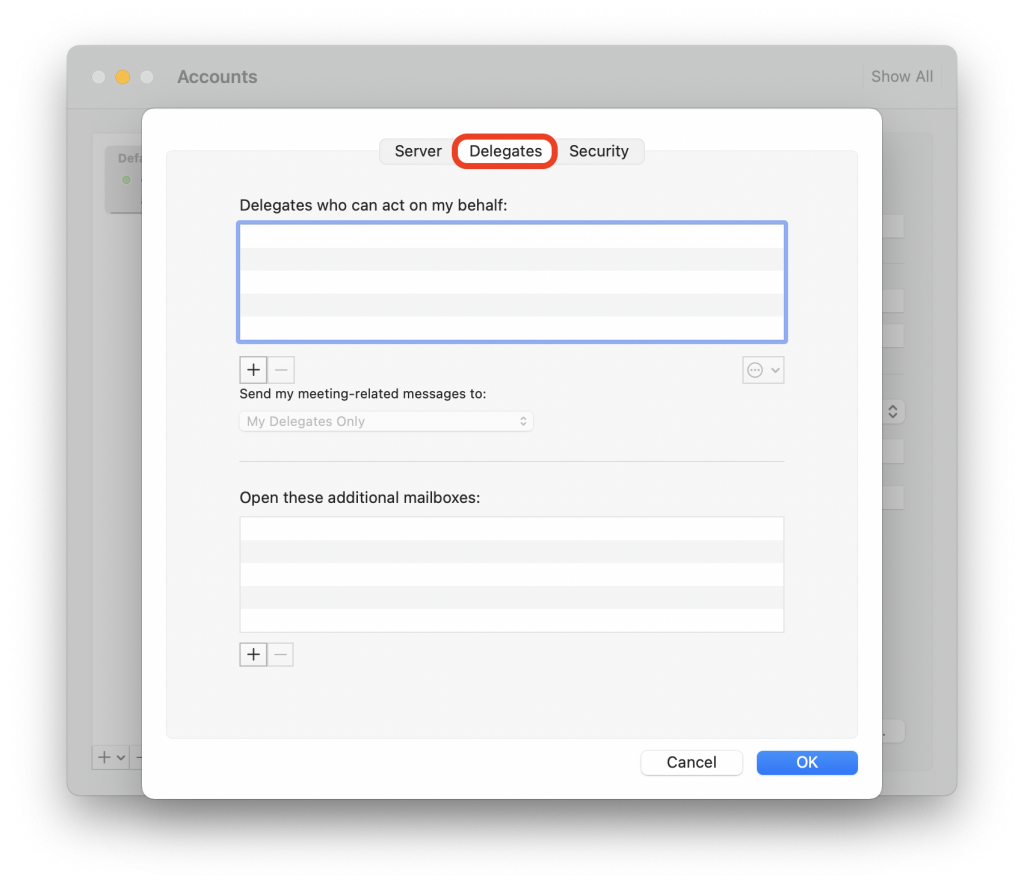
Select Tools from the Outlook menu bar at the top of the screen, then choose Accounts
Select the Advanced… tab
Select the Delegates tab
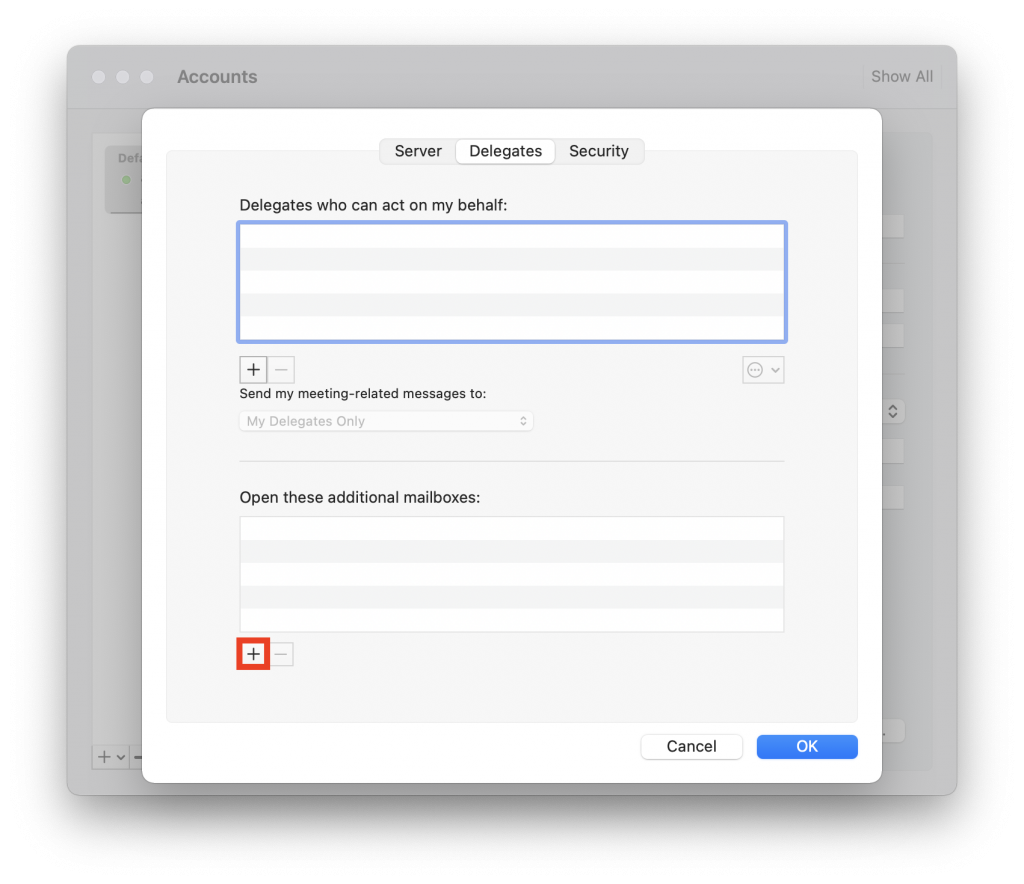
Click the + button, located under Open these additional mailboxes:
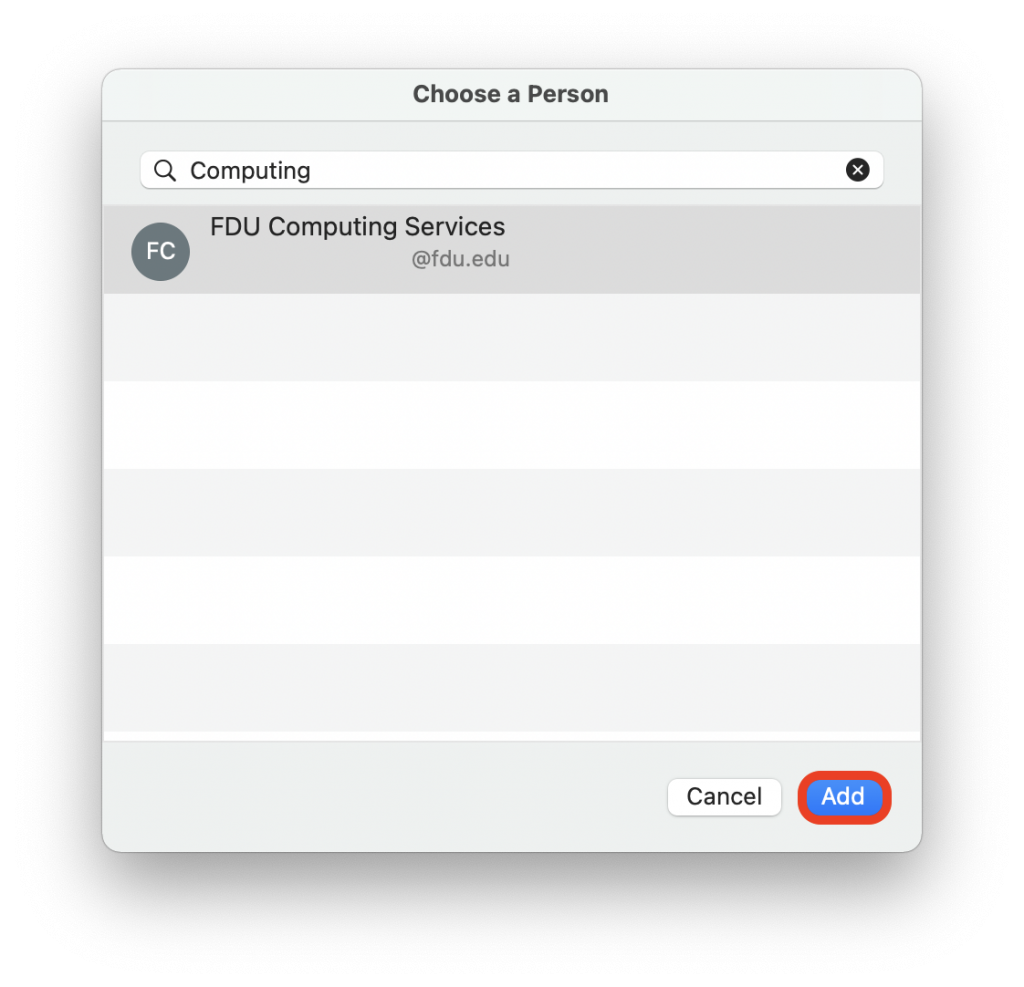
Type or select your correct shared mailbox, and then select Add
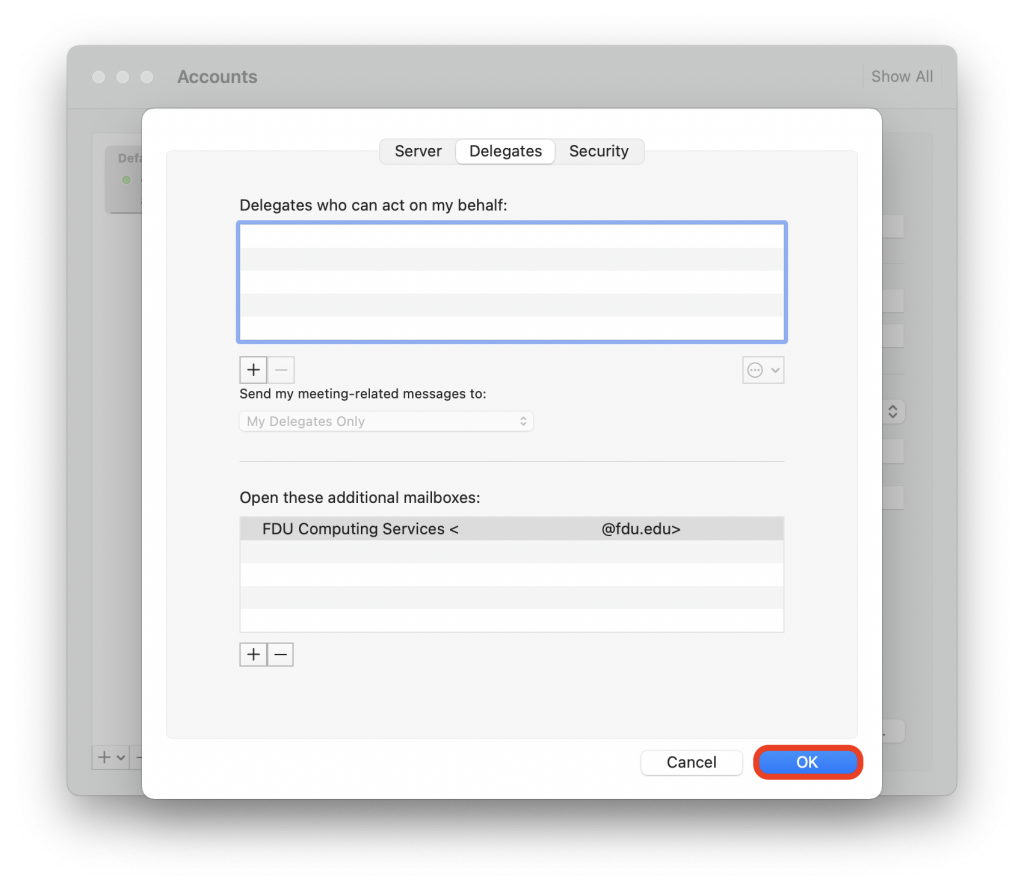
Select the OK tab
You should now see your shared mailbox listed on the left-hand side of your Outlook email application window
Note
This is a one-time process only. You do not need to follow the above steps to add this to Outlook on your macOS device again.
If you cannot open a shared mailbox, please contact the SAMI Service Desk and open a support request.
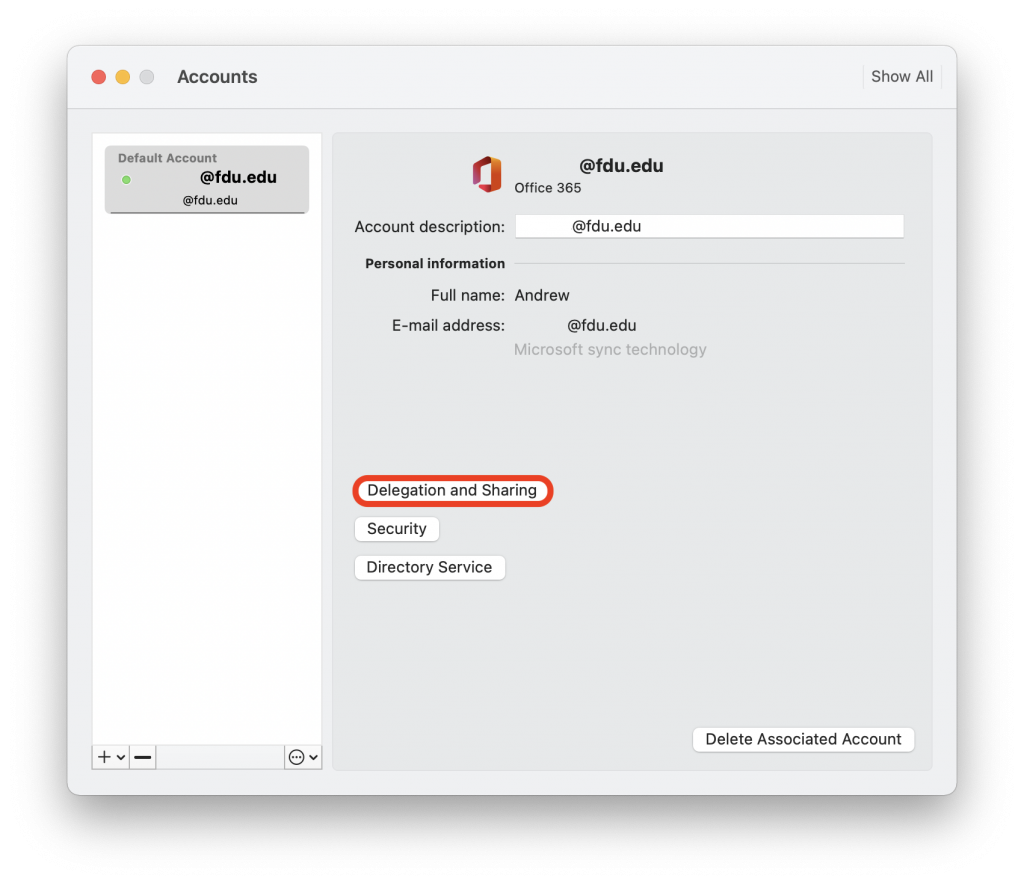
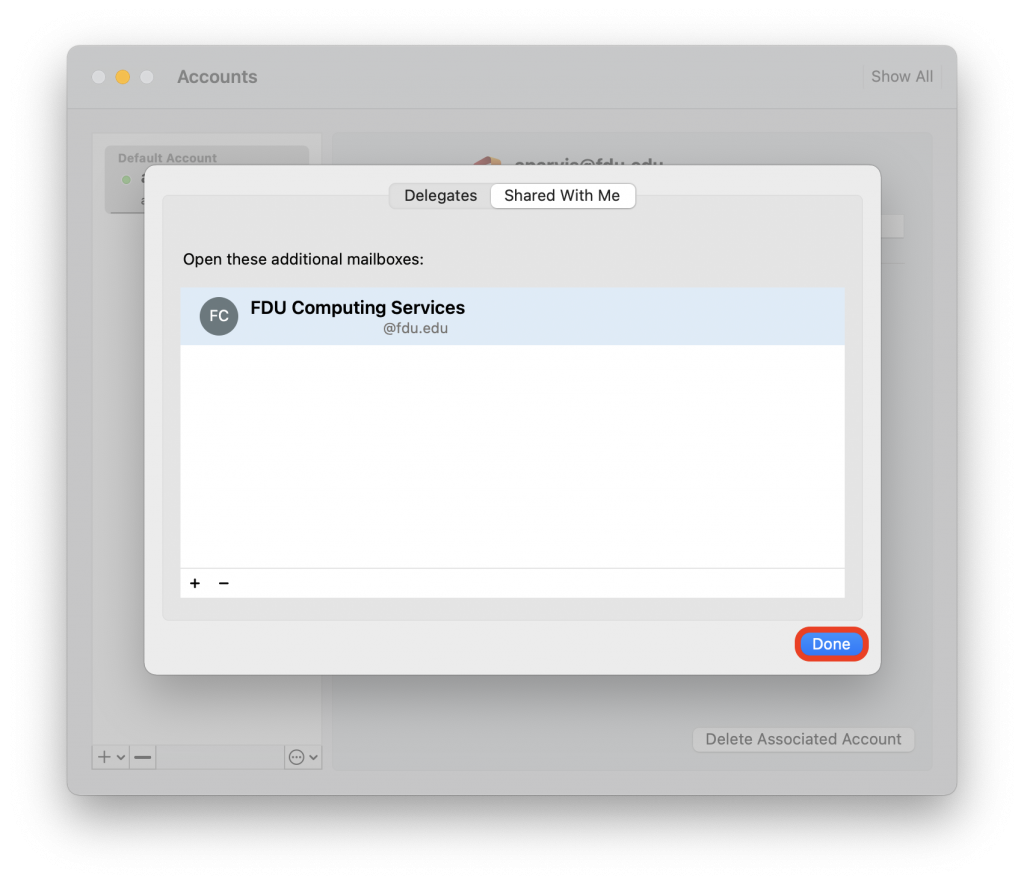
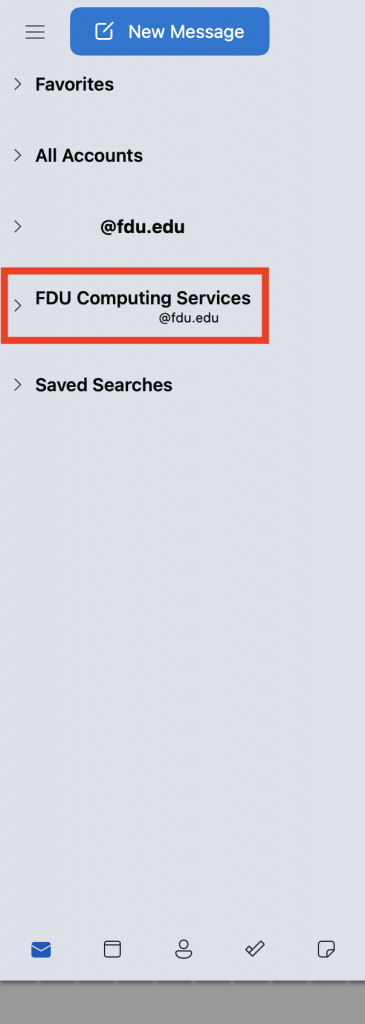
New Outlook version on macOS
Some macOS users may take advantage of the “New Outlook” version of the Outlook application. You can identify which Outlook version you are using by locating the “New Outlook” slider tab button on the top right of the application.
Select Tools from the Outlook menu at the top of the screen, then choose Accounts
Select the Delegation and Sharing tab
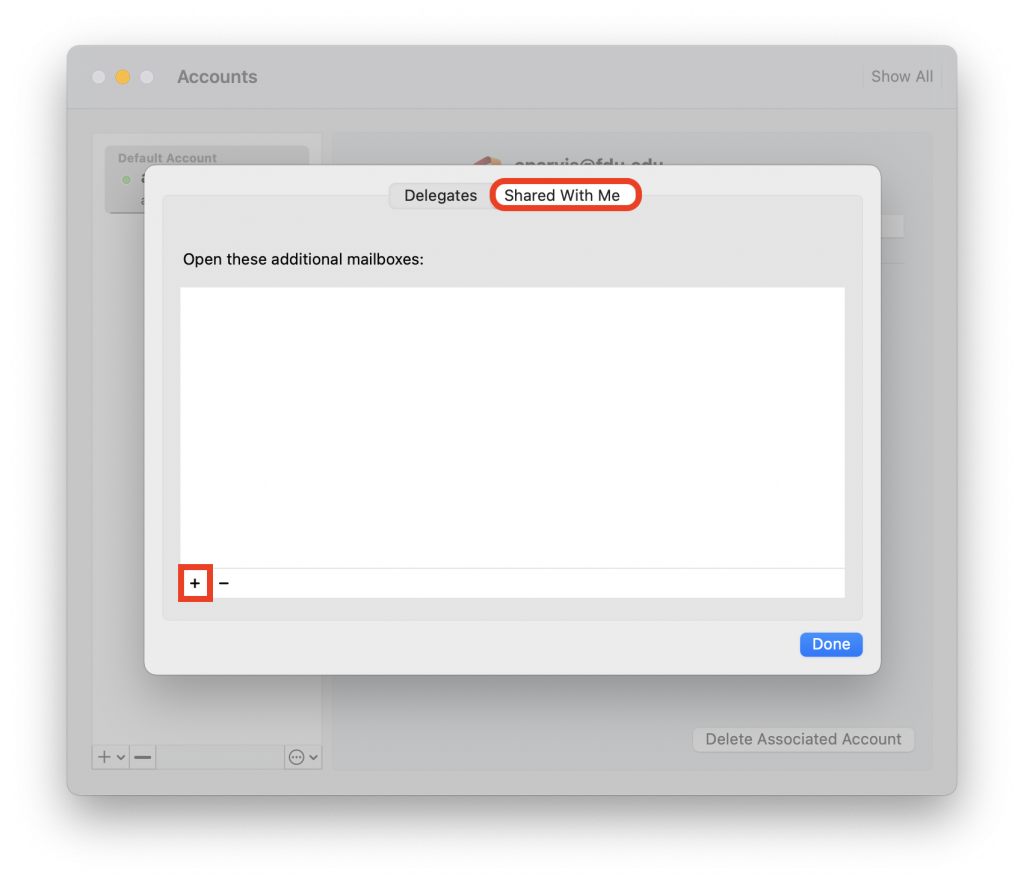
Choose the Shared With Me tab and then select the + button
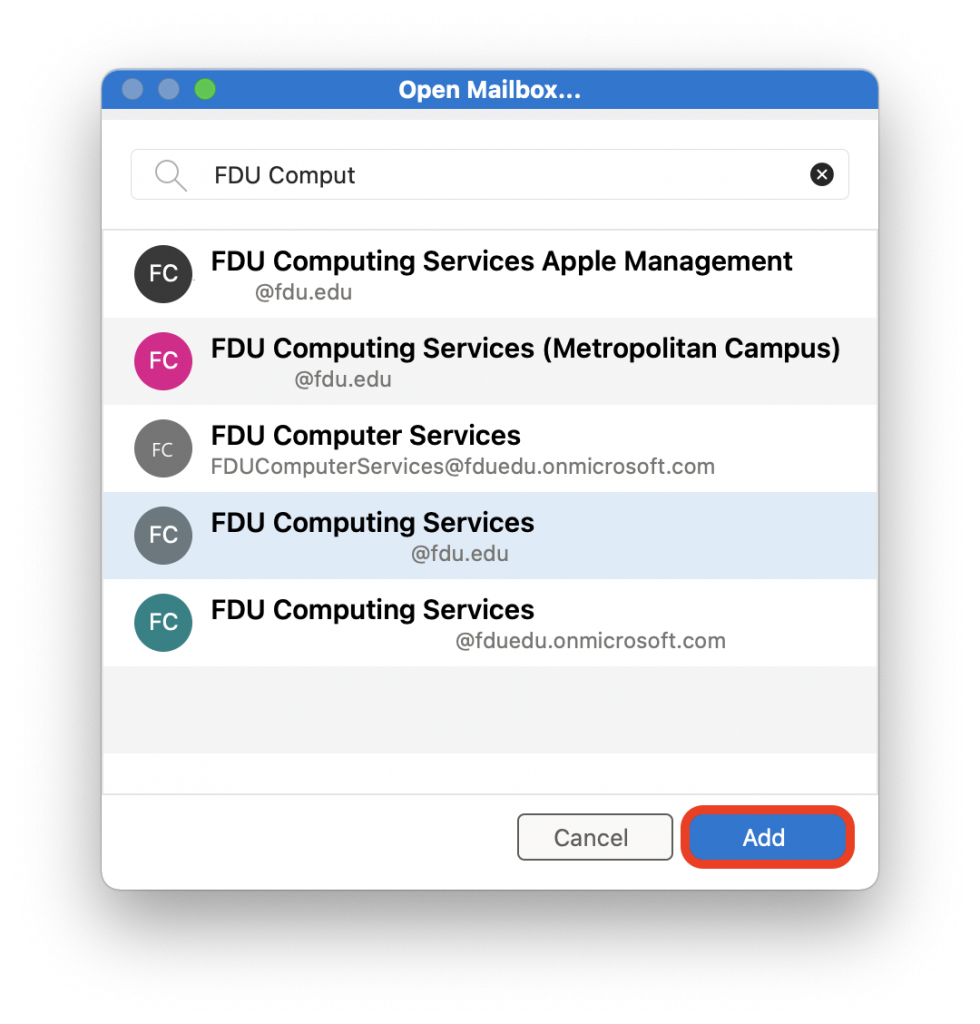
Begin to type the shared mailbox name or its email address, choose the correct shared mailbox before selecting Add, and finally Done when finished
You should now see your shared mailbox, located on the left-hand side of your Outlook application window
Note
This is a one-time process only. You do not need to follow the above steps to add this to Outlook on your macOS device again.
If you cannot open a shared mailbox, please contact the SAMI Service Desk and open a support request.
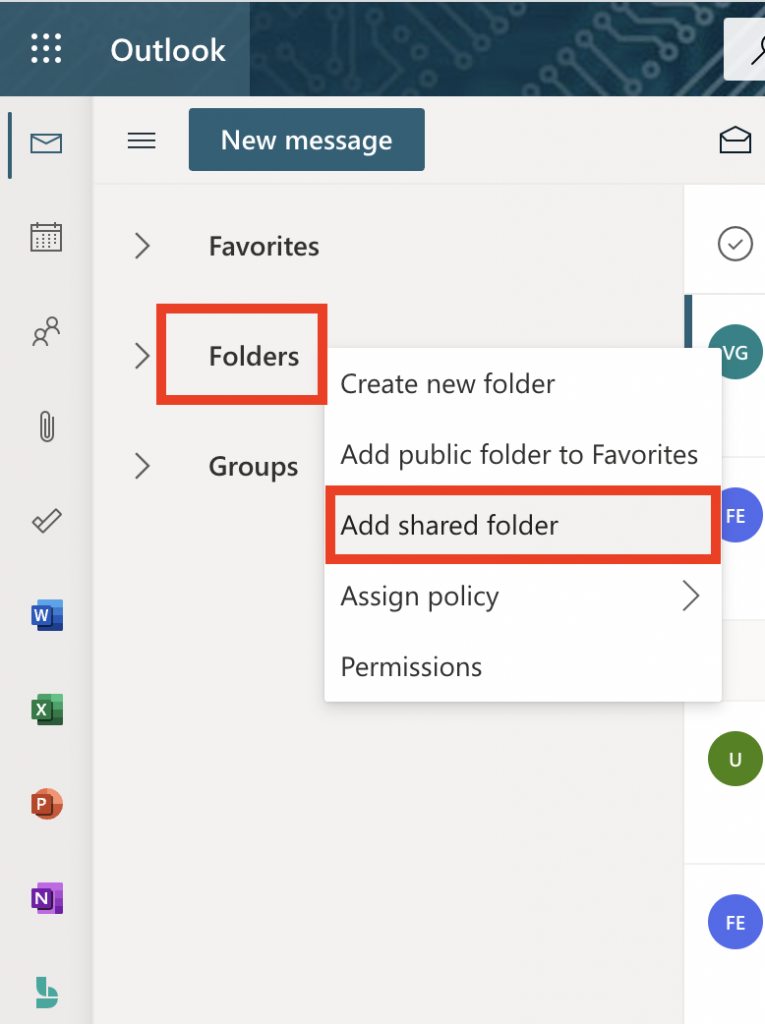
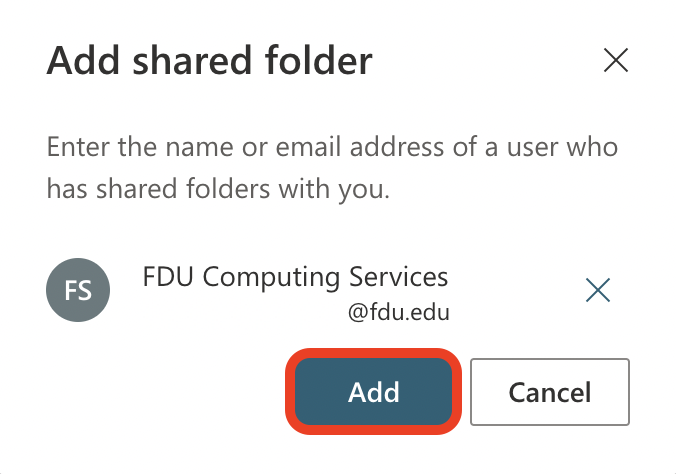
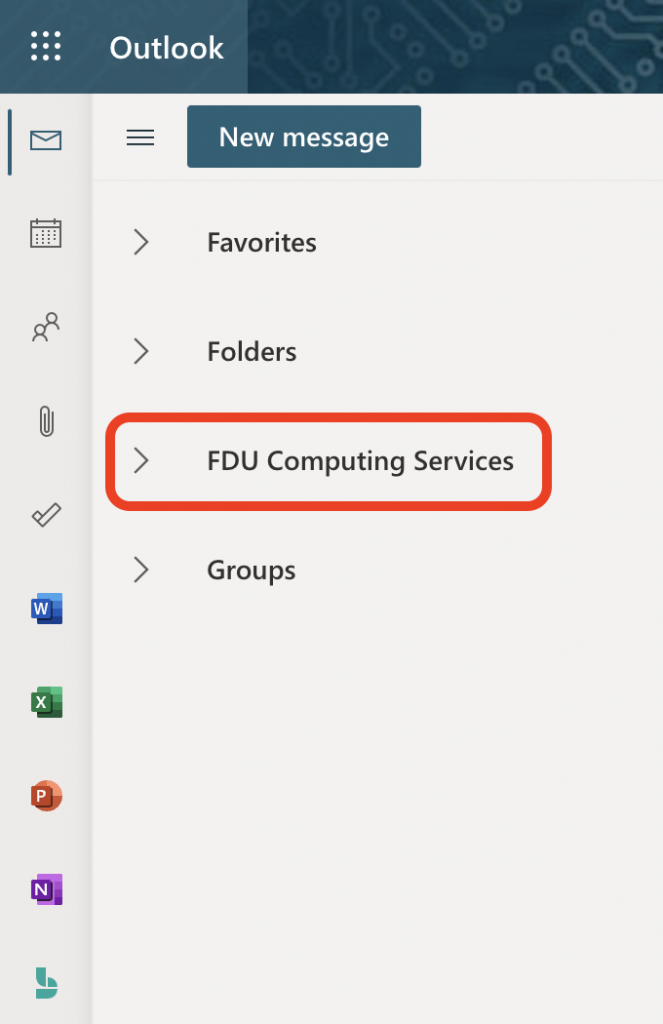
Select the Outlook web app icon, located on the left-hand side of your display
Right-click on the Folders option located on the left side of the menu; a small drop-down menu should display. Select Add shared folder
Begin typing the email address for the shared mailbox, auto-populated suggestions will be displayed. Select the correct shared mailbox address and click Add
You should now see the added shared mailbox located on left side of your Outlook web email window
Note
This was a one-time process. You do not need to follow the above steps to add this to your account again. You will automatically see the shared mailbox when you sign in to your account next time.
If you cannot open a shared mailbox, please contact the SAMI Service Desk and open a support request.
close
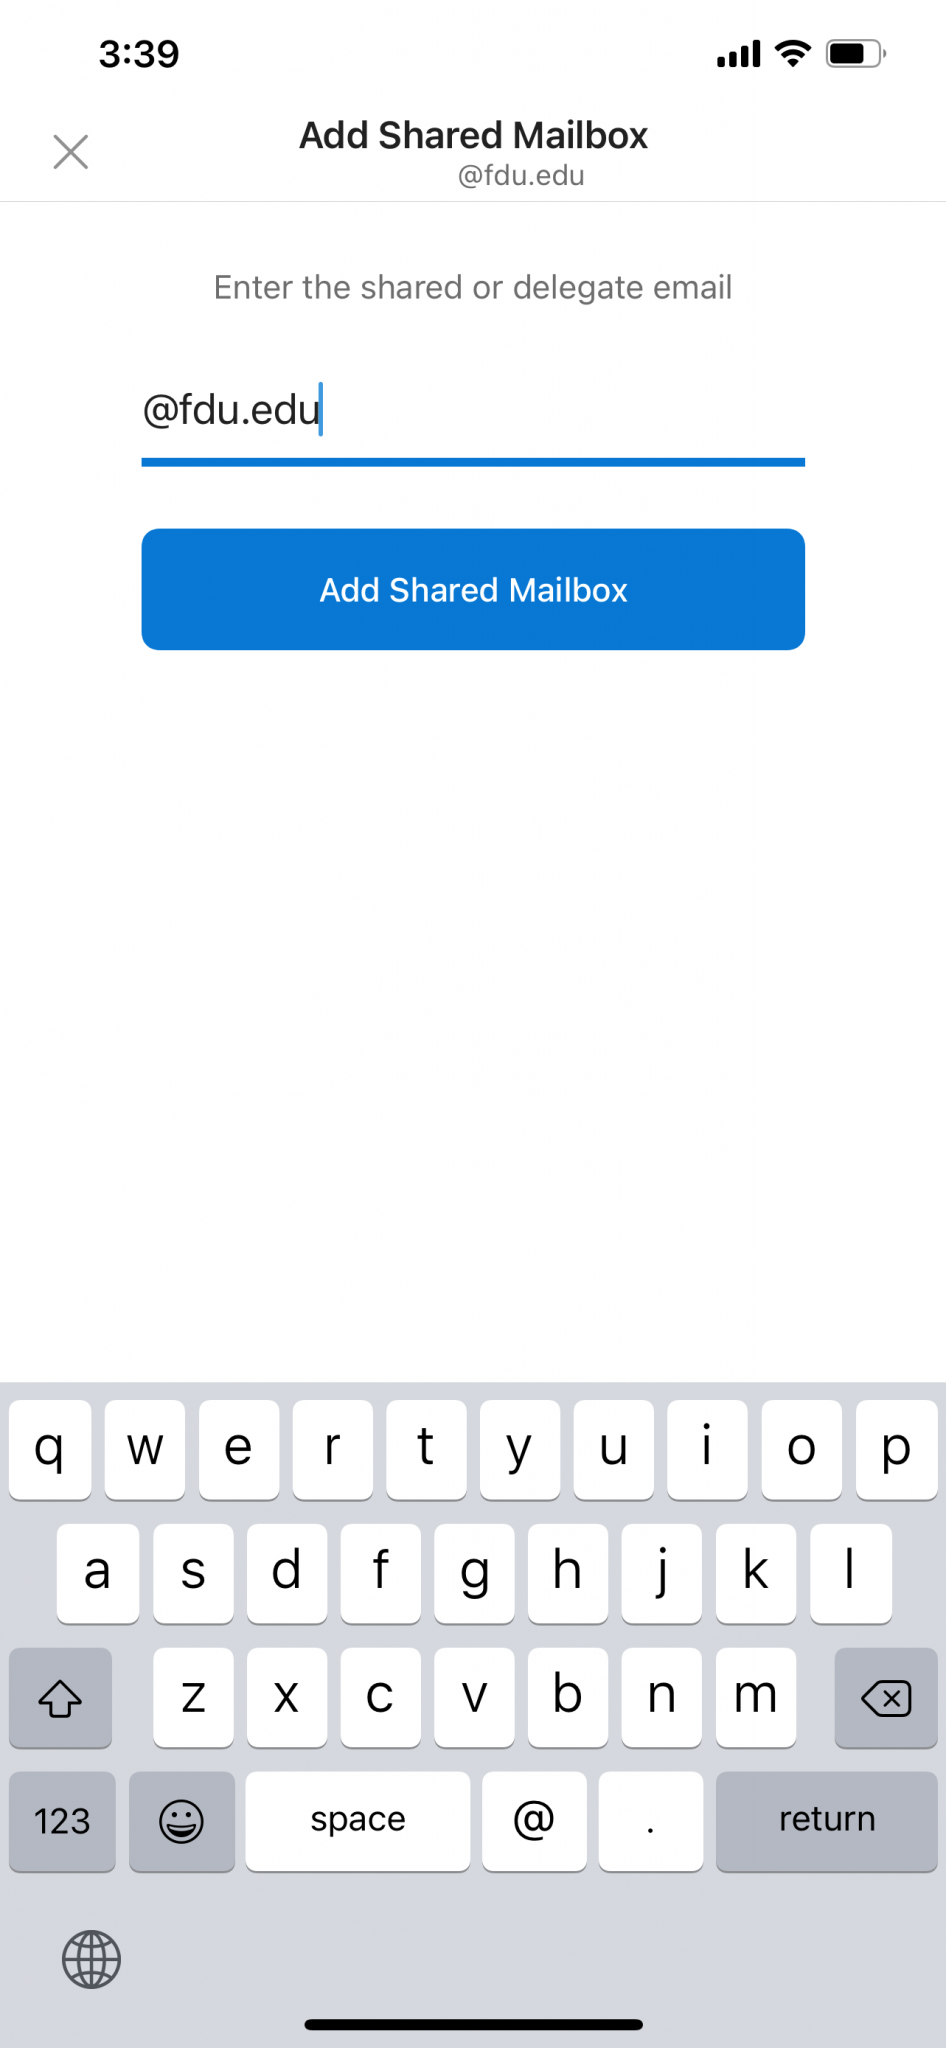
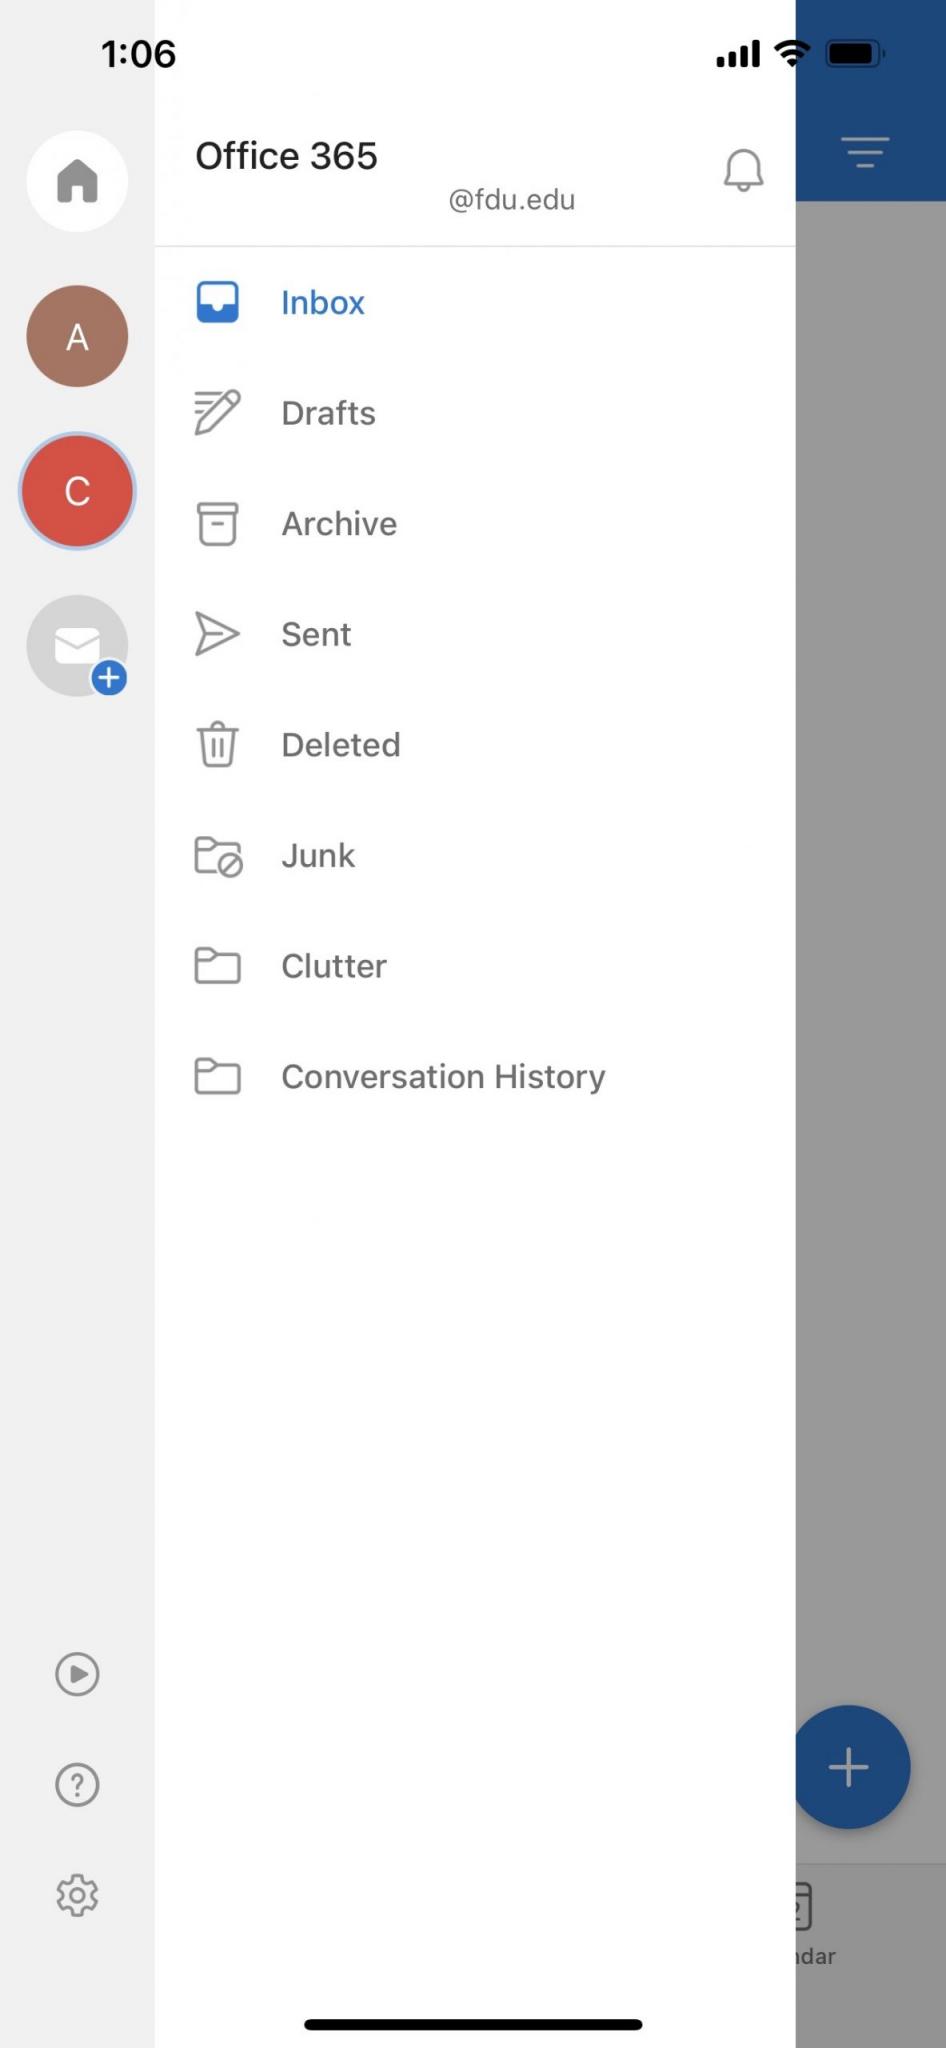
Android and iOS
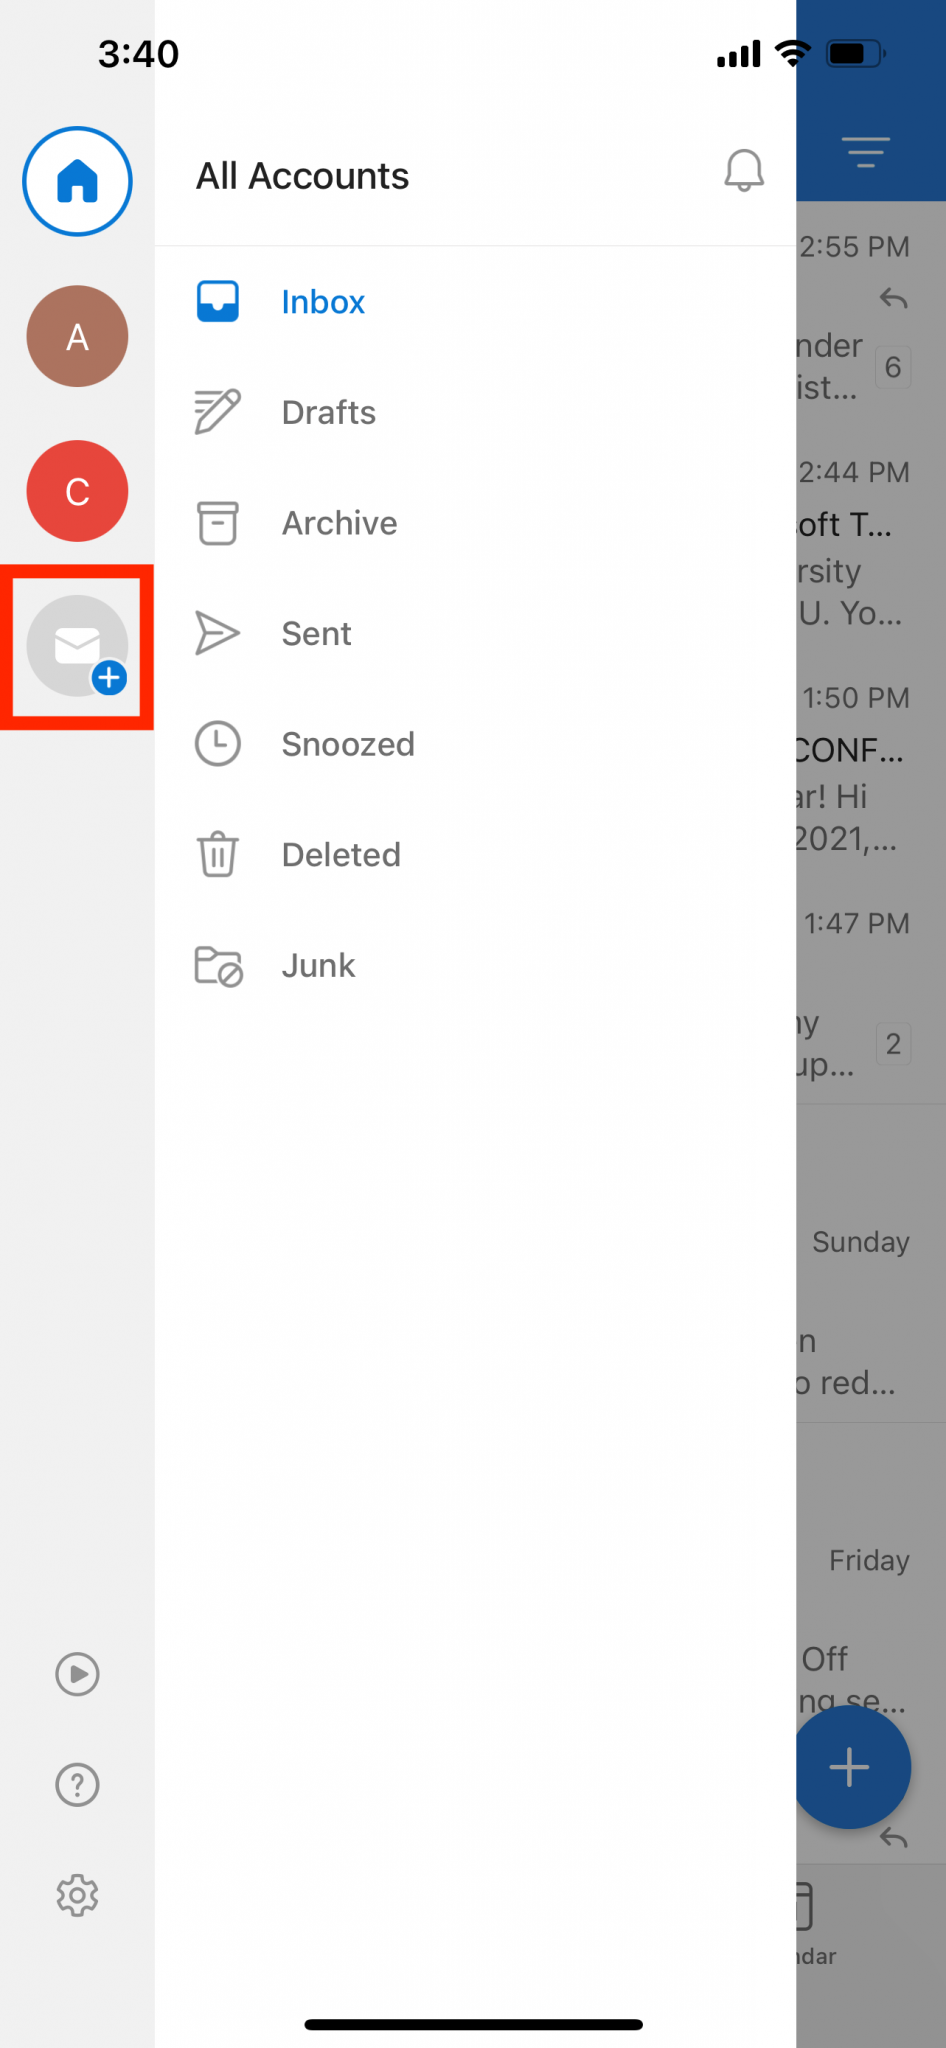
Sign in to your primary FDU email account in the Microsoft Outlook for Android or iOS app
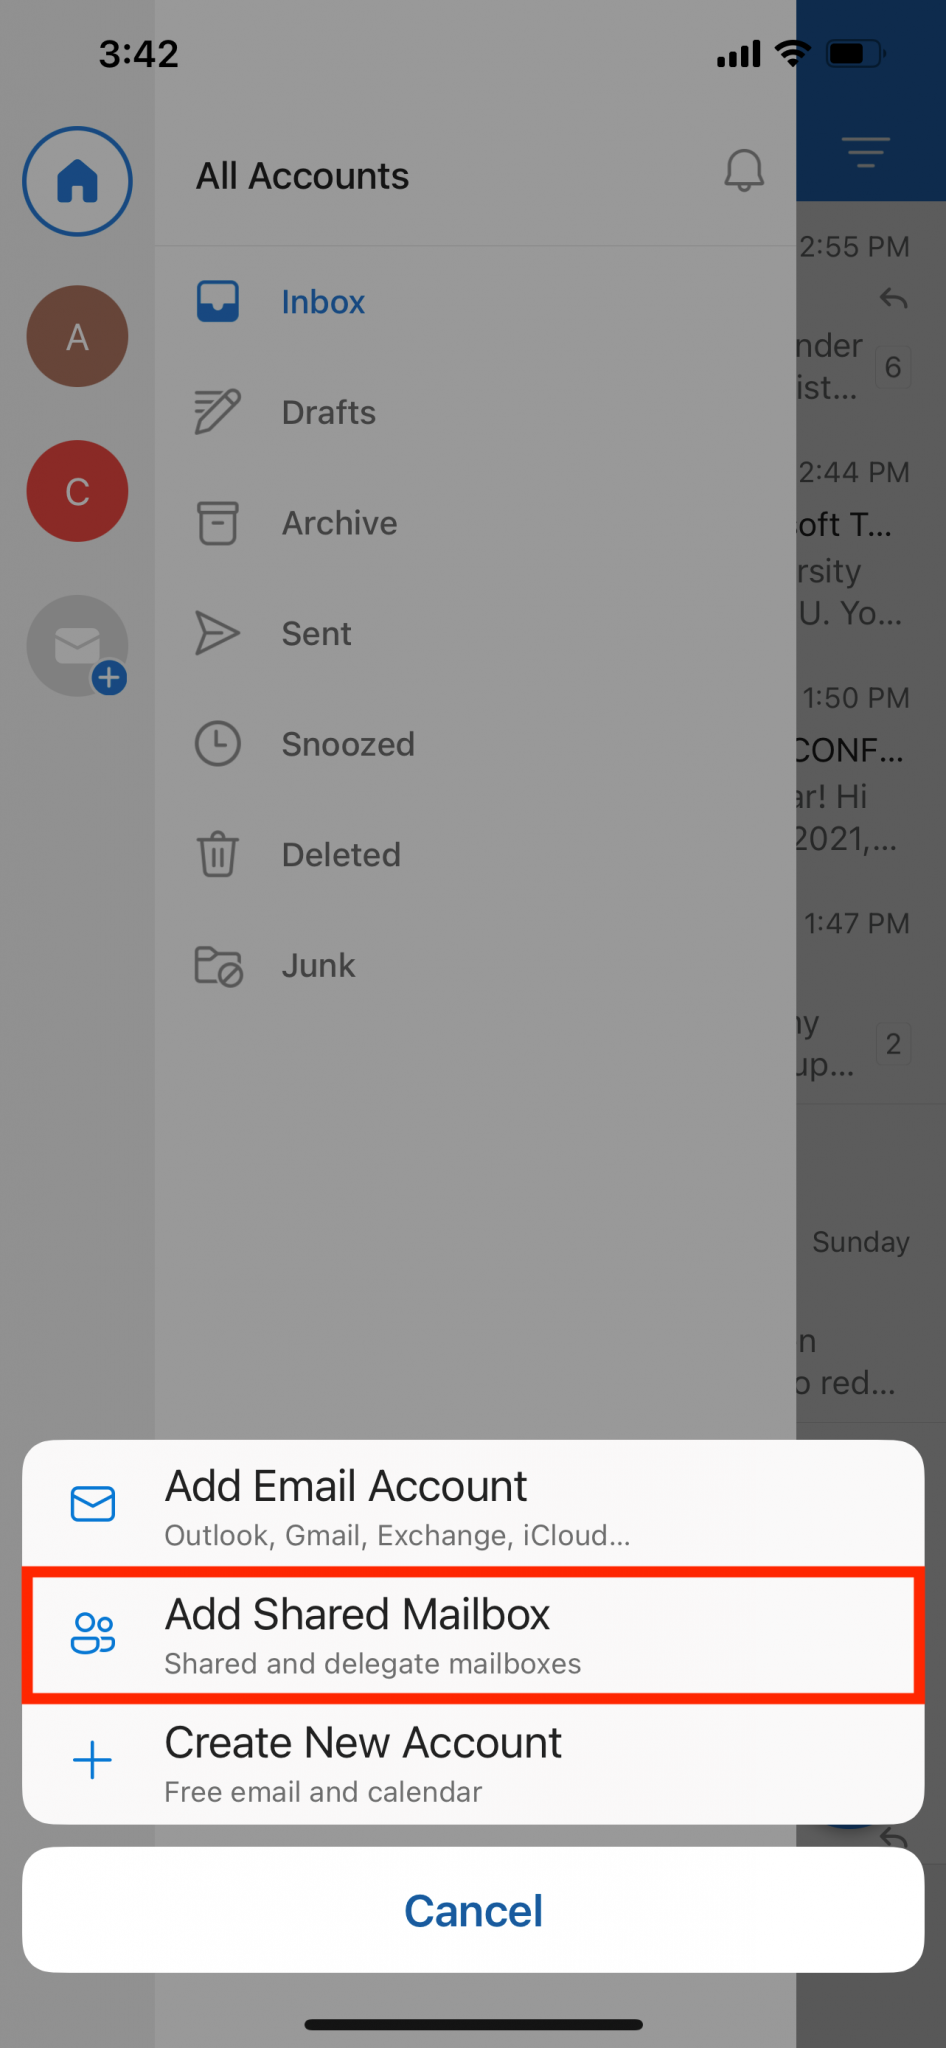
Tap the Add Account button in the left navigation pane, then tap Add Shared Mailbox
Enter the name of the shared mailbox and tap Add Shared Mailbox when finished
Note
If you have multiple accounts in Outlook Mobile, select the account that has permissions to access the shared mailbox.
After the account setup process completes, the shared mailbox will display in your account list within the Outlook for Android or iOS app
Tip
To remove a shared mailbox, go to Settings > Accounts. Then tap on the shared mailbox and select Delete Account.
close
Send Email from a Shared Mailbox
Windows / macOS
Open Outlook
Choose New Email to start a new message
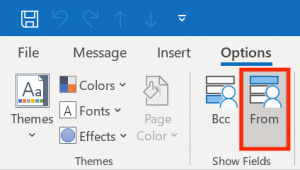
If you don’t see the From field at the top of your message, choose Options, and select the From tab
Click From in the message, and change to the shared email address
Note
If you don’t see your shared email address displayed, choose “Other email address…” Enter the full email address for the shared mailbox in the blank or search for the email address by clicking “From” tab. Click “OK” when finished.
Finish typing your message and then choose Send
Note
From now on when you want to send a message from your shared mailbox, the address will be available in your “From” drop down list.
Whenever you send a message from your shared mailbox, your recipients will only see the shared email address in the message.
close
office365.fdu.edu / Outlook Web App
Choose New Message
Choose From and change to the desired shared email address
Note
If you don’t see your shared email address displayed, choose “Other email address…” Enter the full email address for the shared mailbox, then select the appropriate shared email address from the auto populated list when finished.
To access Forms, you will be directed to our SAMI Support Portal where you will be asked to log in using your NETID and authenticate using Duo. Once you click “Next,” you will be forwarded to samisupport.fdu.edu in a new window or tab.