How-To

Accept a New Certificate for FDU-Secure Wireless Network

Resources for:
icon Close

FDU-Secure uses current encryption standards to connect to the FDU wireless network via secure wireless traffic. This is an evolving technology and occasionally, one of the changes made by FDU IT requires us to issue a new certificate. When this occurs, you will need to accept the certificate using the process below.

Note

Your process may vary slightly based on the version of the Operating System that your device is using.

How to Accept the New Certificate for FDU-Secure Wireless

Windows
  1. Login to your Windows computer
  2. Go to the bottom right taskbar > Click on the “Networks” icon:
    • From the Networks list, select: “FDU-Secure
    • Click “Connect
  3. At the “Continue connection?” prompt, click “Connect
  1. Open your browser and test your Internet connection
close
macOS
  1. Login to your Mac computer
  2. Go to top right menu bar > Click “Wi-Fi” icon:
    • From the Wi-Fi list, select: “FDU-Secure
    • Click “Join
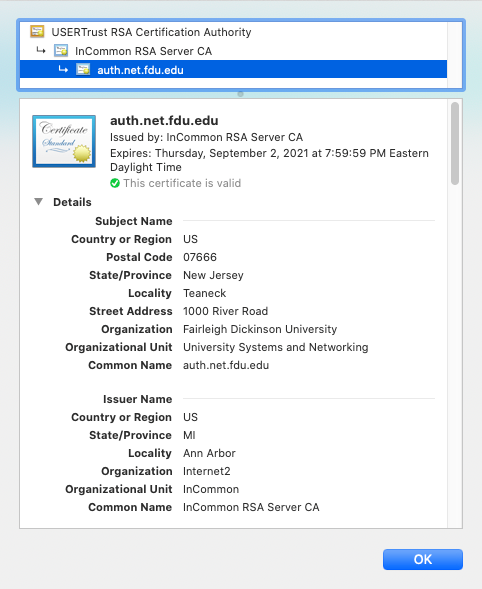
  3. At the “Authenticating to network FDU-Secure” prompt, click “Continue
  1. Click “OK
  2. Open your browser and test your Internet connection
close
iOS
  1. Login your iOS device (eg. iPhone)
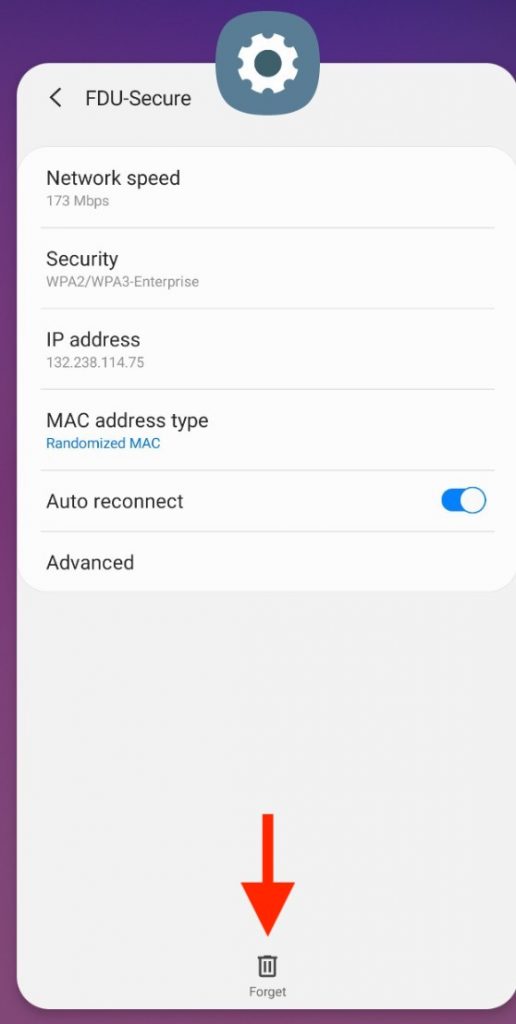
  2. Go to your device’s Settings App > Select “Wi-Fi” > Select “FDU-Secure” > Click “Forget This Network
  3. Tap the “Back” button and select “Wi-Fi “once again to reload the available Wi-Fi networks:
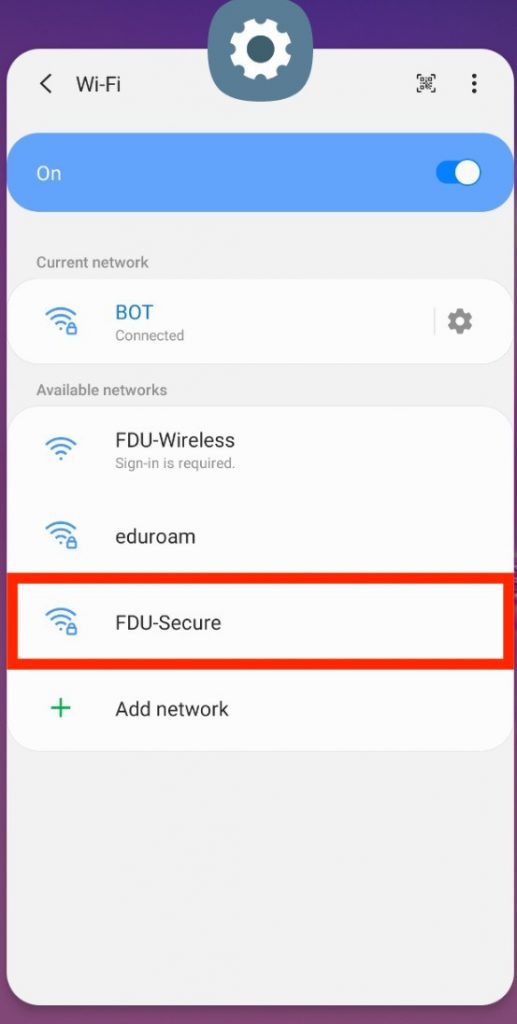
    • From the Wi-Fi list, select: “FDU-Secure
    • Enter your complete FDU NetID as in the examples below: “username@fdu.edu, username@student.fdu.edu, username@alumni.fdu.edu”
    • Enter your FDU NetID Password
    • Click Join
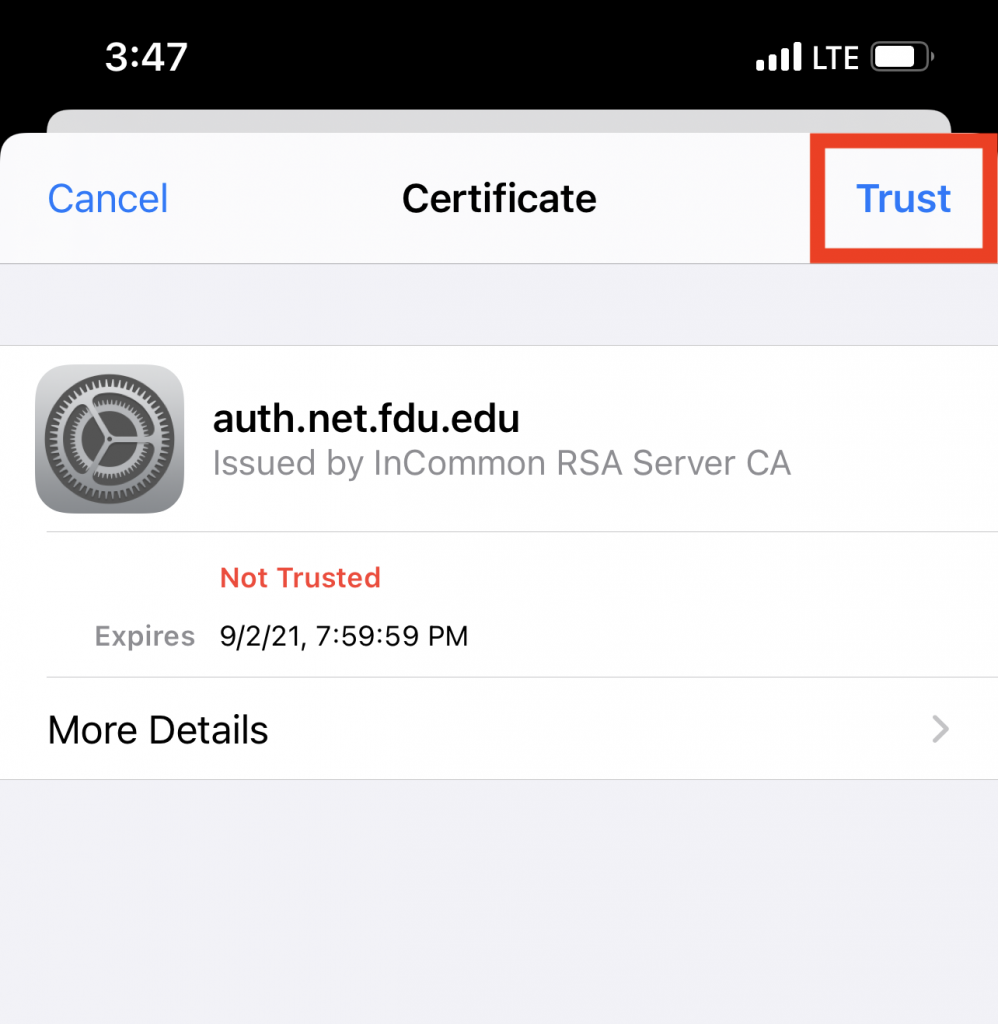
  1. At the “Certificate” prompt, tap “Trust
  1. Open your browser and test your Internet connection
close
Android
  1. Login to your Android Device
  2. Open the “Settings” Application > Select “Wi-Fi” > Select the Gear icon next to FDU-Secure
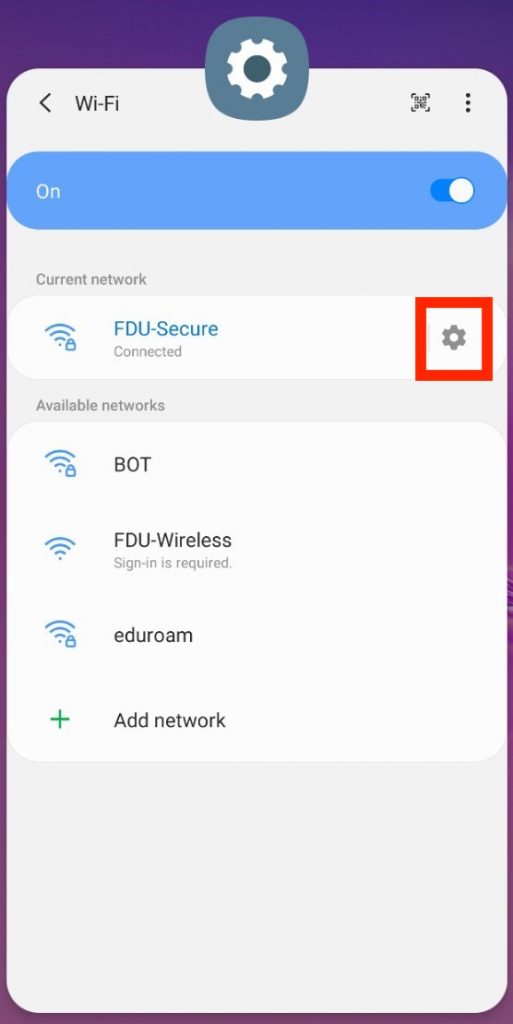
  1. Select “Forget This Network
  1. Select FDU-Secure from the Wi-Fi menu
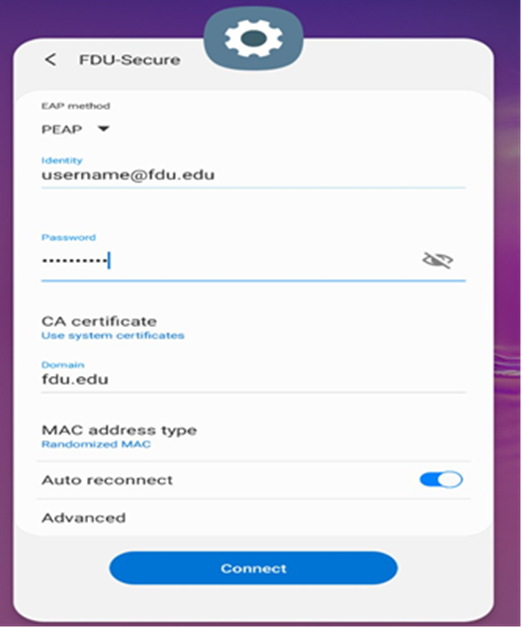
  1. Select “EAP method” and select “PEAP” from the dropdown menu
  2. Enter your complete FDU NetID and password
  3. In the “CA Certificate” field, select “Use System Certificates
  4. In the Domain field, enter fdu.edu
  5. Enable “Auto Reconnect
  6. Tap “Connect
  1. Open your browser and test your Internet connection
close
Last Modified:

Accessing an FDU Email Account on a Mobile Device Using the Outlook App

Resources for:
icon Close

The easiest way to access your FDU email account on your mobile device is to install the Outlook app from either the App Store (Apple) or the Play Store (Android). We support and advise using this method due to the program’s robustness and integration of all Office365 features. Follow the steps below to install and set up the Outlook app on your phone.

Outlook App on Apple iOS and Android Mobile Devices
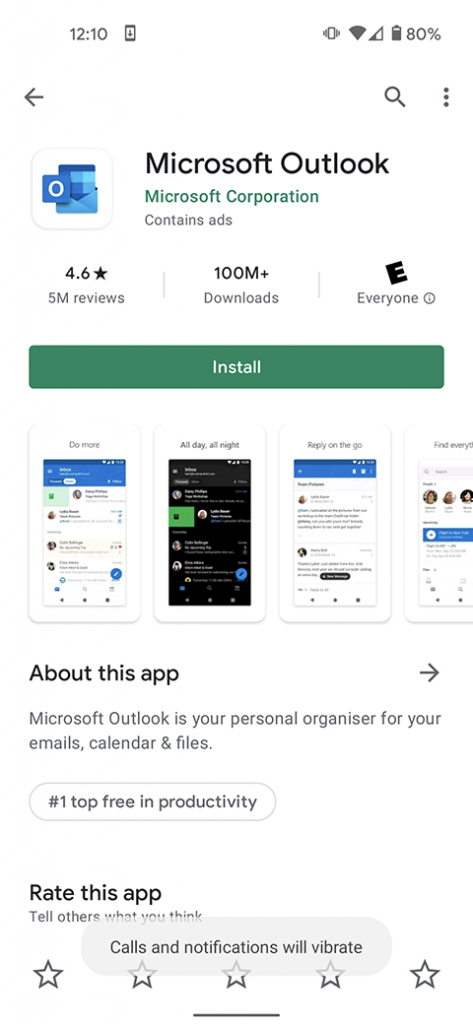
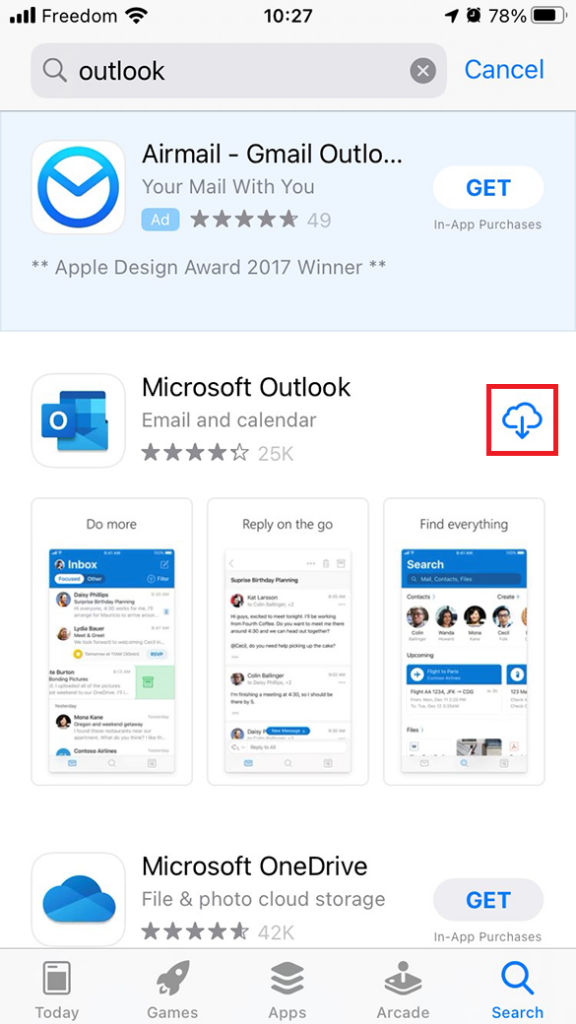
  1. Use the links below to install the Outlook app onto your mobile device.
Android Play Store
Apple App Store
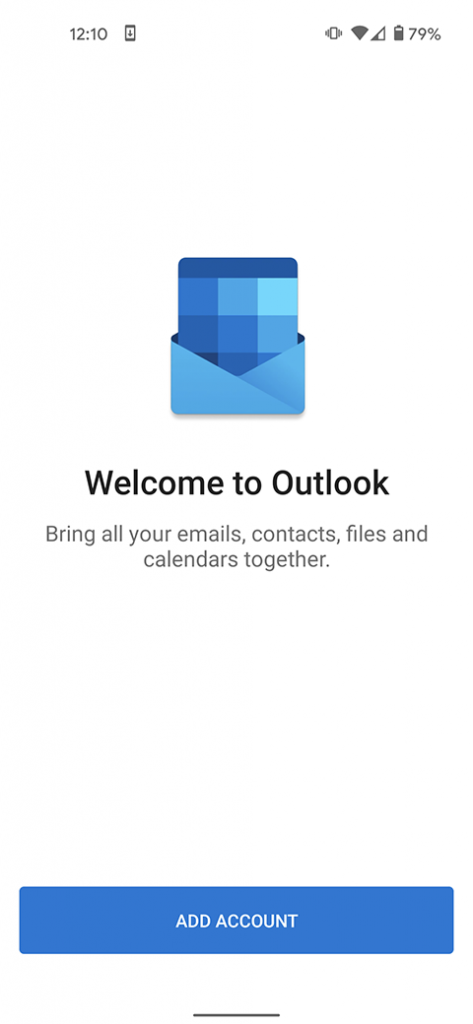
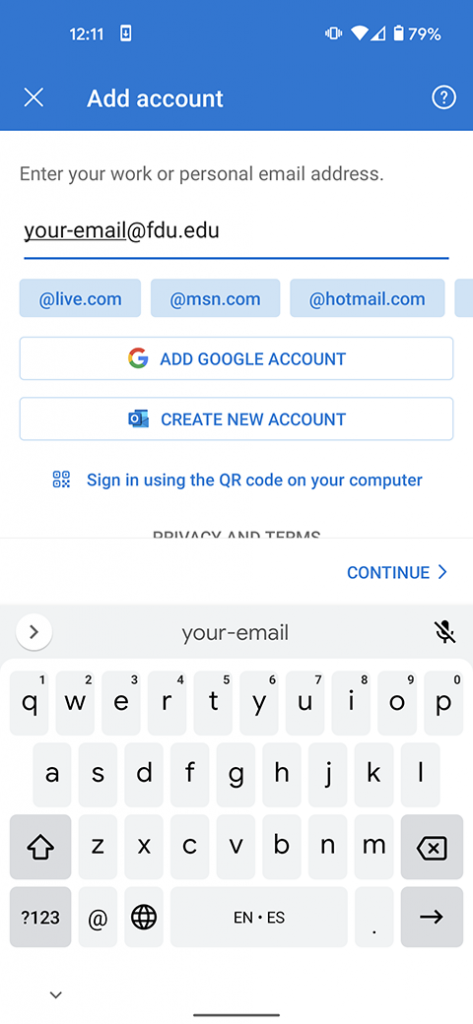
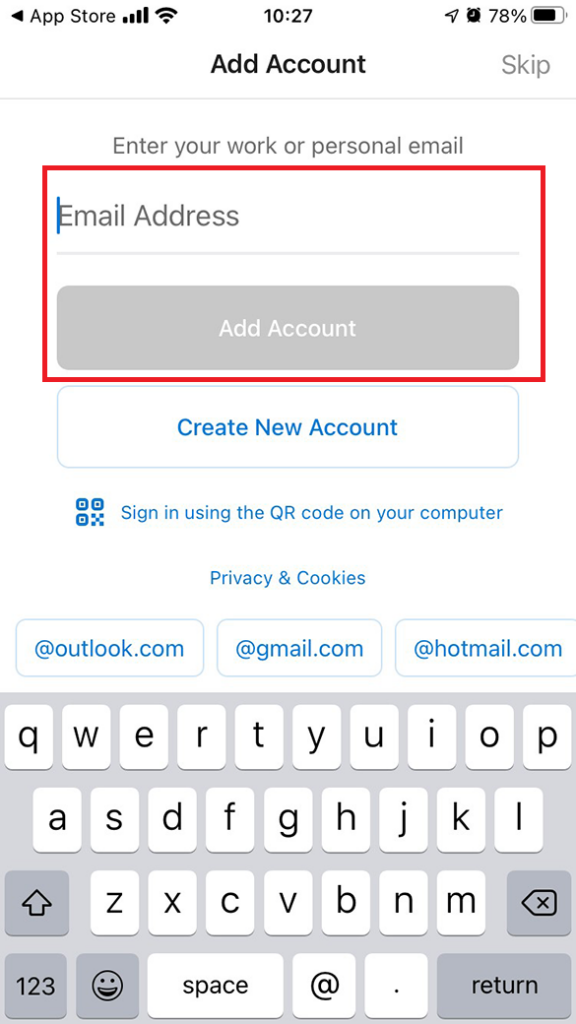
  1. Launch the app and press on “Add Account” if on an Android device. It will then prompt you to input your FDU email address. On iOS, the app will launch and immediately ask you for your FDU email address. Once filled out press “Continue” on Android. On iOS press “Add Account”
Android
Android
iOS
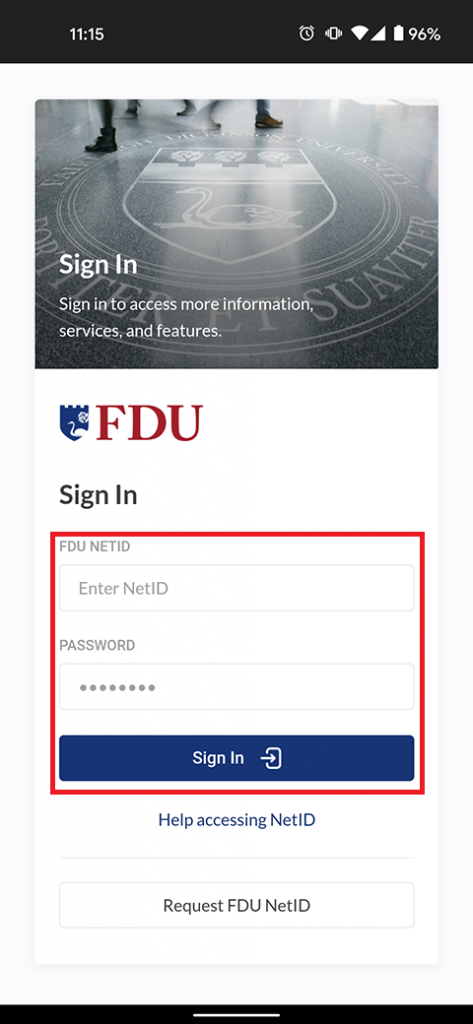
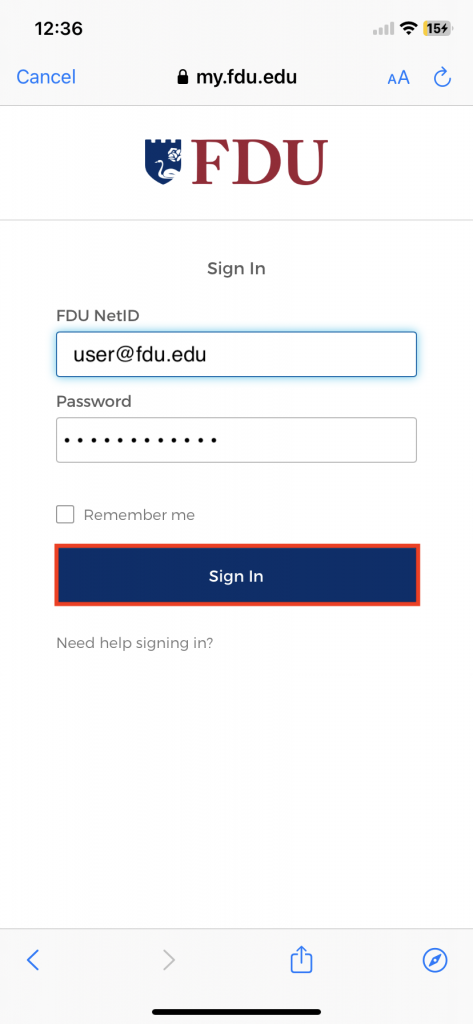
  1. You will be routed to the FDU Single Sign On Page, from here input your FDU email address and password and press “Sign In
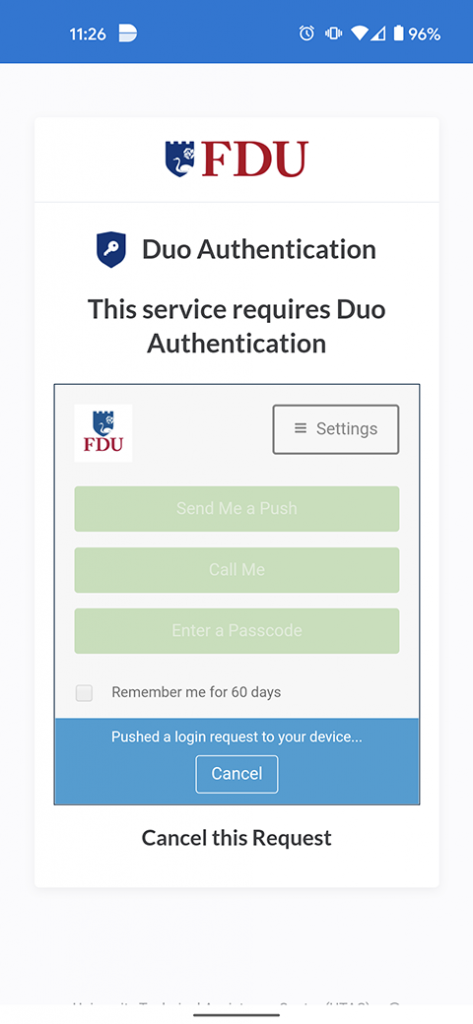
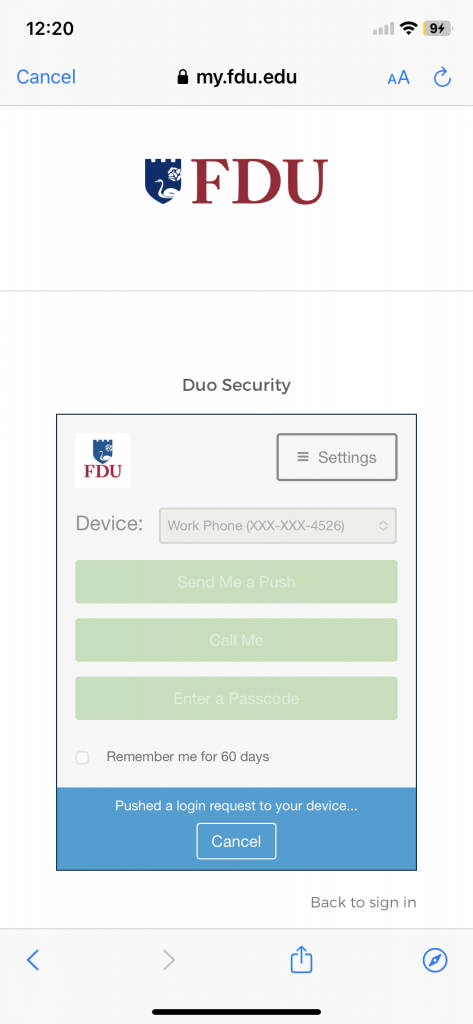
  1. For security purposes, all applications which use FDU’s Single Sign On (NetID) require Duo two-factor authentication. After inputting your FDU NetID login information, Duo requires you to complete a method of second-factor authentication
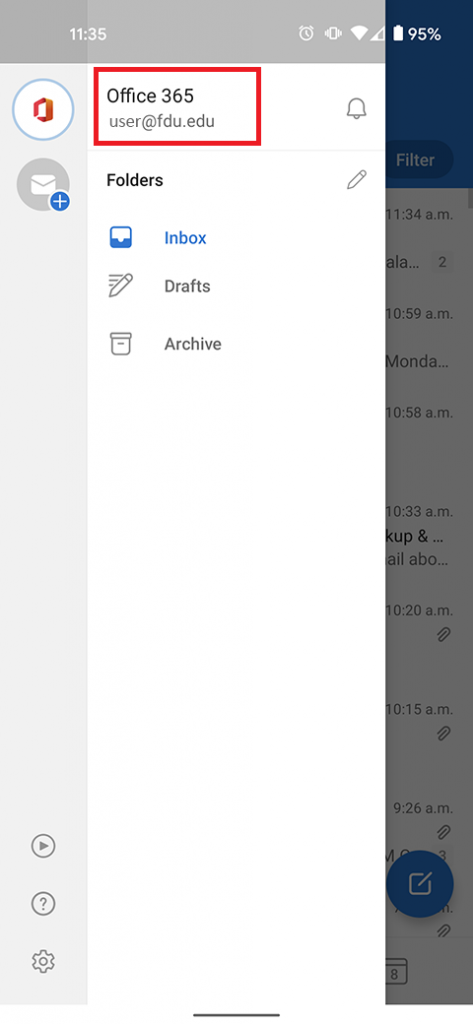
  1. Your FDU email account has now been added to your device successfully. Ensure the email account is listed on your Outlook application.
close
Last Modified:

Adding a FDU Email Account to a Mobile Device’s Native ‘Mail’ App

Resources for:
icon Close

These instructions demonstrate adding an FDU email account to an Apple mobile device’s native Apple “Mail” app. Unfortunately, adding an FDU email account on an Android OS mobile device’s native “Mail” app is currently unsupported by FDU IT support. Information regarding adding an FDU email account to an Android OS mobile device via the Outlook App can be found below for Android OS mobile device users.

Note:

The easiest way to access your FDU email account on your mobile device is to install the Outlook app from either the App Store (Apple) or the Play Store (Android). FDU IT supports and advises using this method due to the program’s robustness and integration of all Microsoft 365 features. A link with instructions for the Outlook app on mobile devices can be found at the bottom of this page.

Setting up your FDU Email Account in the Mail app on iOS
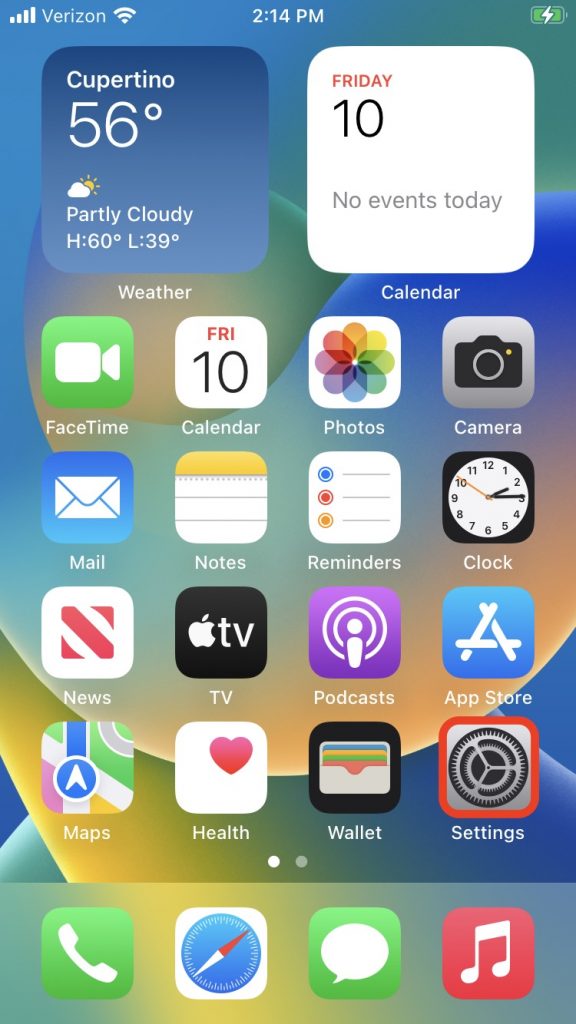
  1. Go to the “Settings” app
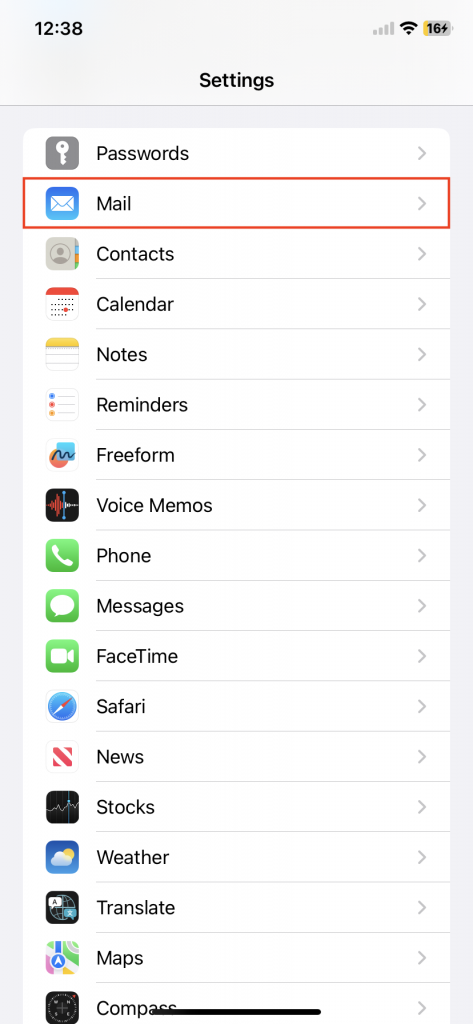
  1. Tap “Mail
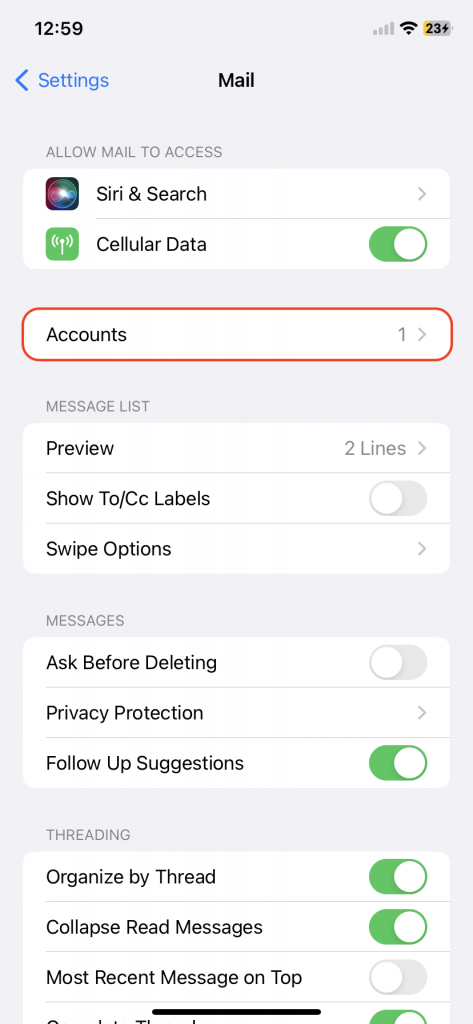
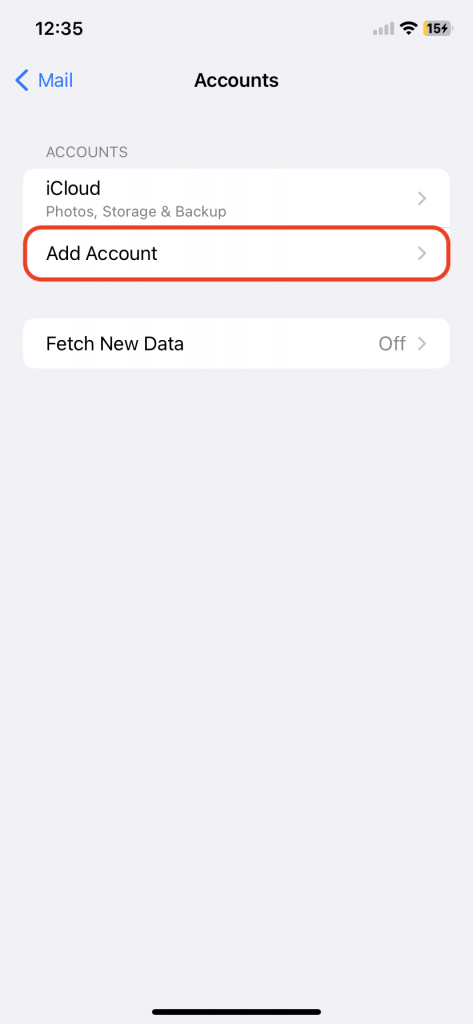
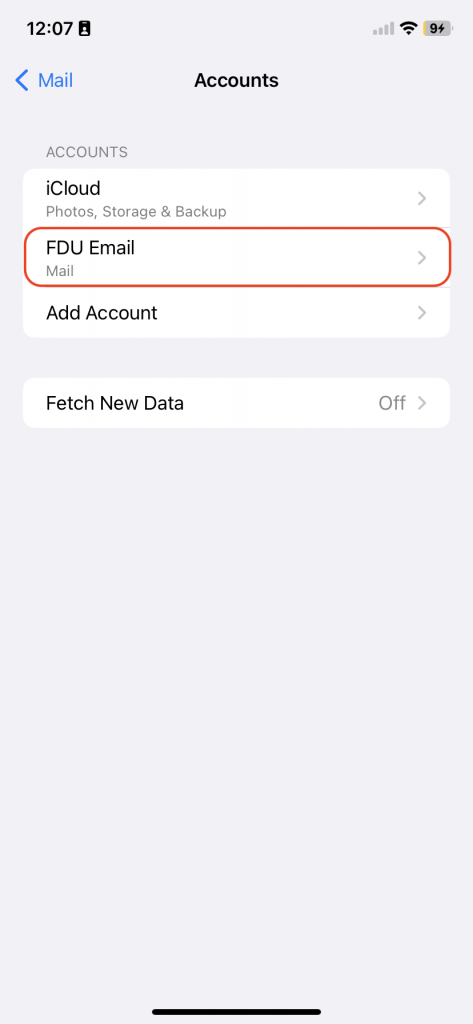
  1. Tap “Accounts
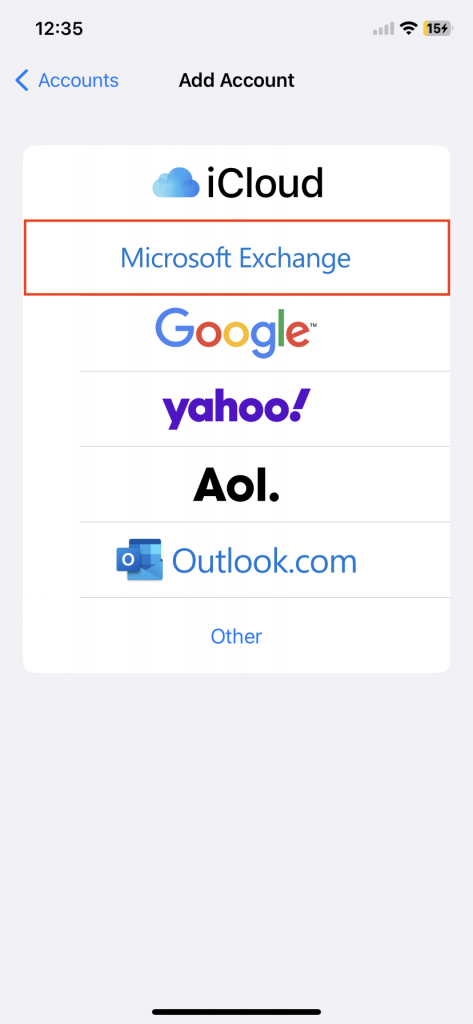
  1. Tap “Add Account” and then select or tap “Microsoft Exchange
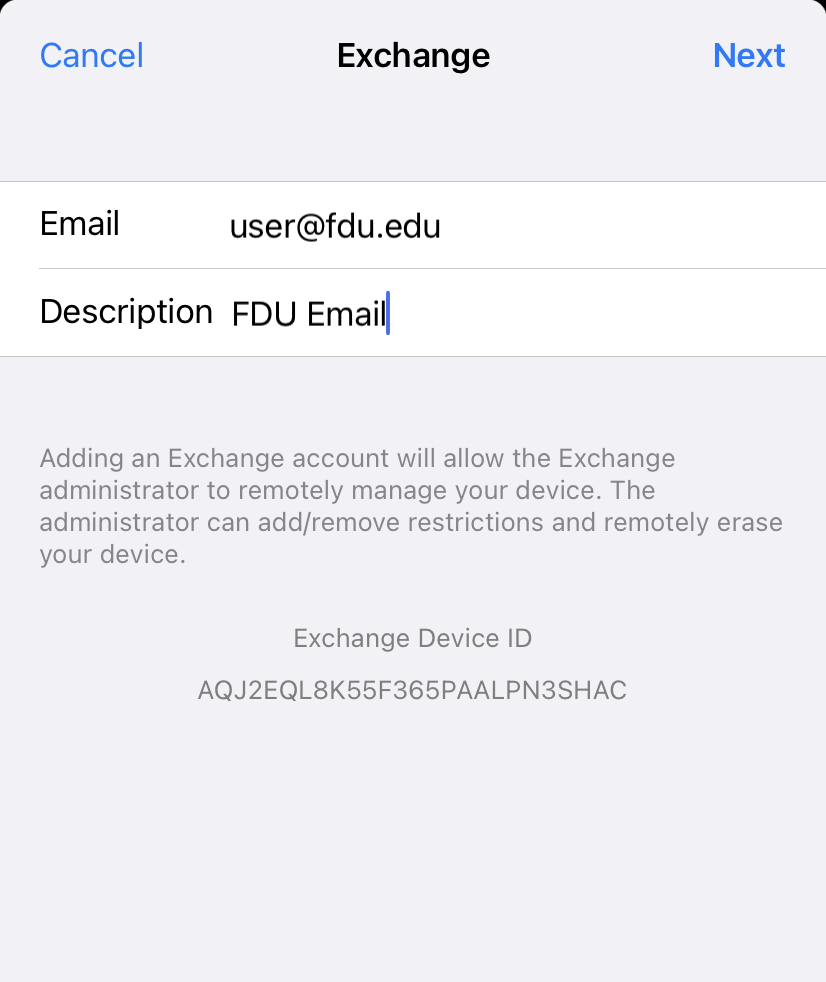
  1. Enter your FDU email address and a description of your email account in the corresponding text boxes. Please note that the default description name for the account will be ‘Exchange’ if left unchanged. Tap “Next” to continue
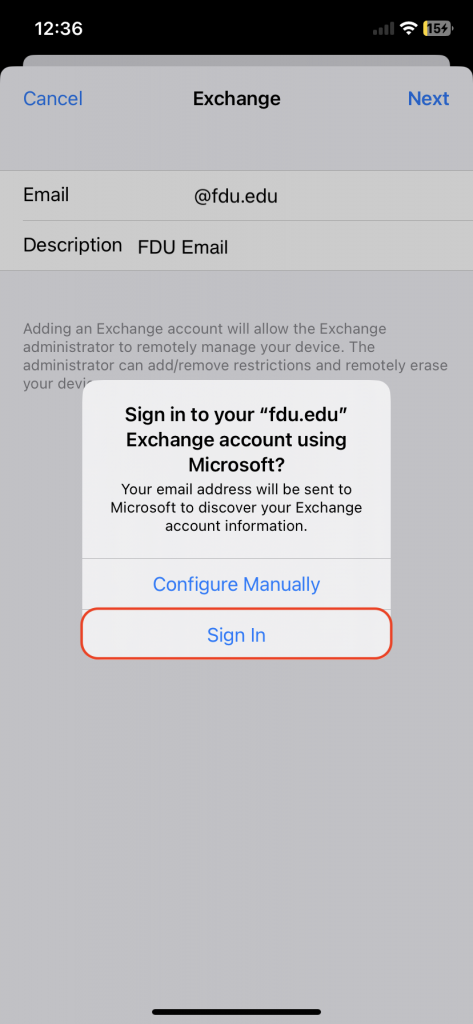
  1. Tap “Sign In
  1. Enter your FDU email address and password. Tap “Sign In” to continue
  1. For security purposes, all applications which use FDU’s Single Sign-On require Duo Two-Factor Authentication (2FA). After entering your FDU NetID login credentials, Duo requires you to complete a method of second-factor authentication
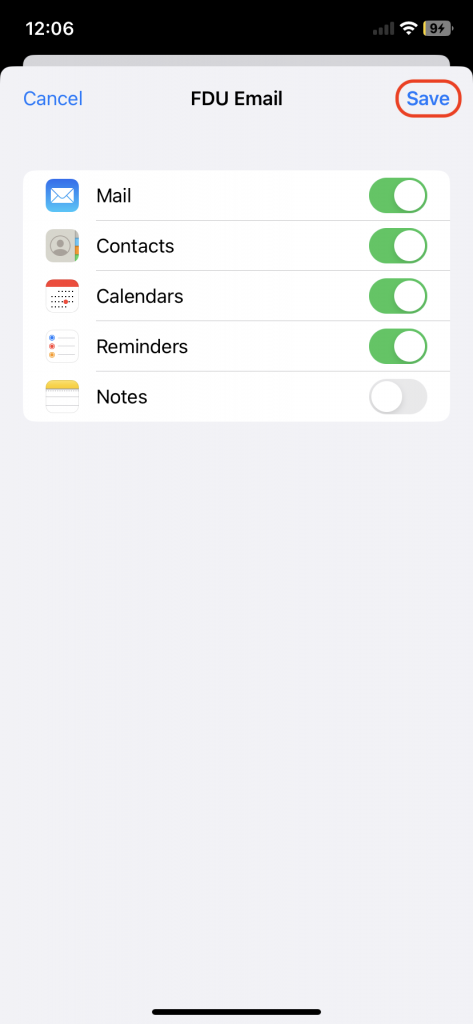
  1. Choose the FDU NetID account information you want to synchronize or access on your iOS mobile device by toggling the choices on/off. Tap “Save” to continue
  1. Your FDU email account has successfully been added to your iOS mobile device
close
Setting up your FDU Email Account on Android OS

Due to the multiple Android OS mobile device manufacturers (Samsung, Google, or LG) each having their own native ‘Mail’ app, email setup and features differ depending on the manufacturer of the Android OS devices. For this reason, it is best practice to use the Microsoft ‘Outlook’ app found in the Google Play Store. Follow the instructions below to set up Outlook on Android OS.

close
Last Modified:

Audio Conferencing

Resources for:
icon Close

Instant Meeting

Verizon Audio Conferencing service allows you to hold a meeting by phone at any time. To Setup an account click on the link below, complete the form, and choose submit. Voice Services will contact you with all the necessary details to begin using the service.

There is no charge to have an account, but charges are incurred when the account is used.

You will be assigned a permanent dial-in number and two passcodes – one for the leader and one for the participants.

To host an Audio Conference Call simply distribute the dial-in number, and the passcode for the participants with the date and time of the meeting.

Last Modified:

Cellular Services

Resources for:
icon Close

FDU offers cellular phones to Faculty and Staff members when approved by a Vice President or Officer of the University.

To place an order for a cellular phone, please fill out the form below:

Mobile Communication Device Request Form

Fairleigh Dickinson University’s Cellular Policy can be reviewed below:

Last Modified:

Change and Sync NETID Password on Mac via Jamf Connect

Resources for:
icon Close

This article offers a detailed, step-by-step guide, on how to change your NETID password directly from your Mac using the Jamf Connect and how to synchronize this updated NETID password with your Mac’s user account password.

Changing and Syncing your NET ID Password on your Mac

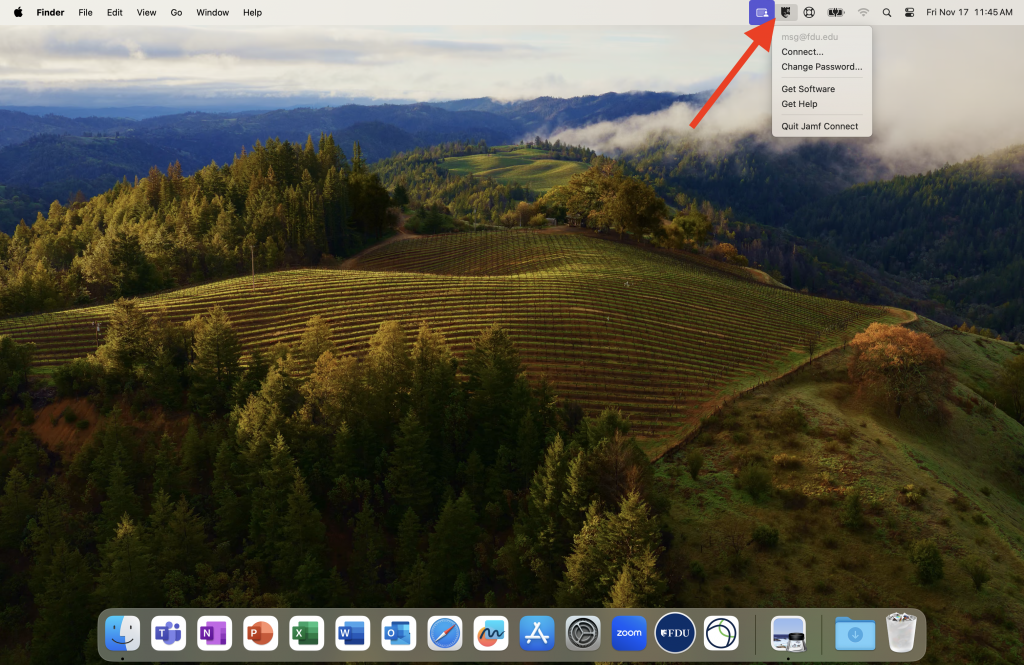
  1. Click on the “FDU shield icon” located in the top right of your screen’s menu bar
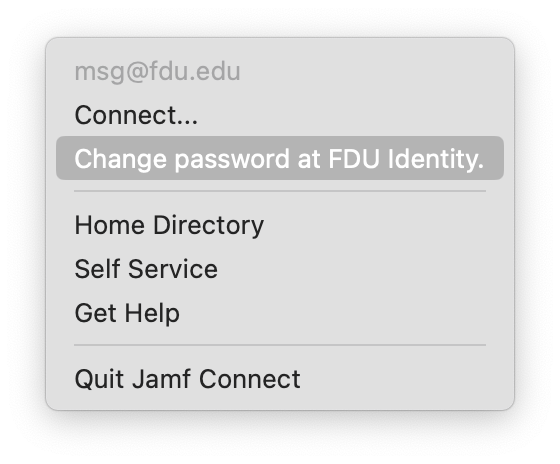
  1. Select “Change Password at FDU Identity
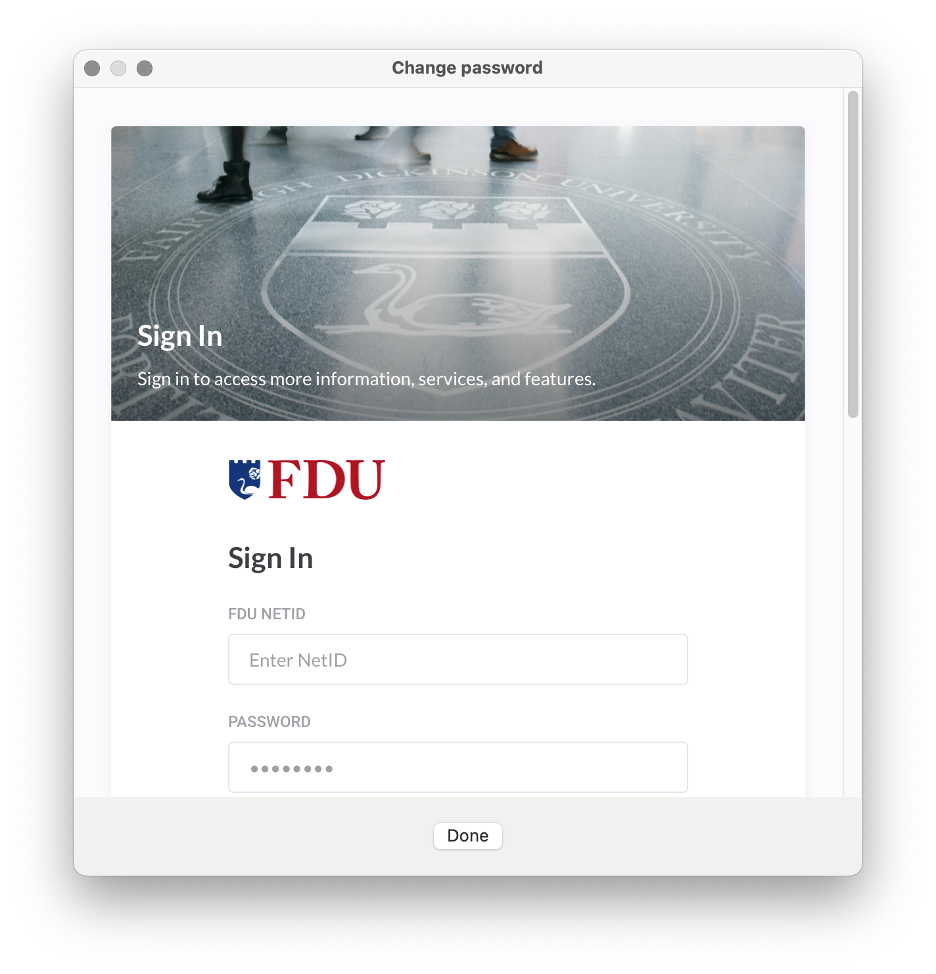
  1. Sign in to the “FDU Identity Portal” that opens up
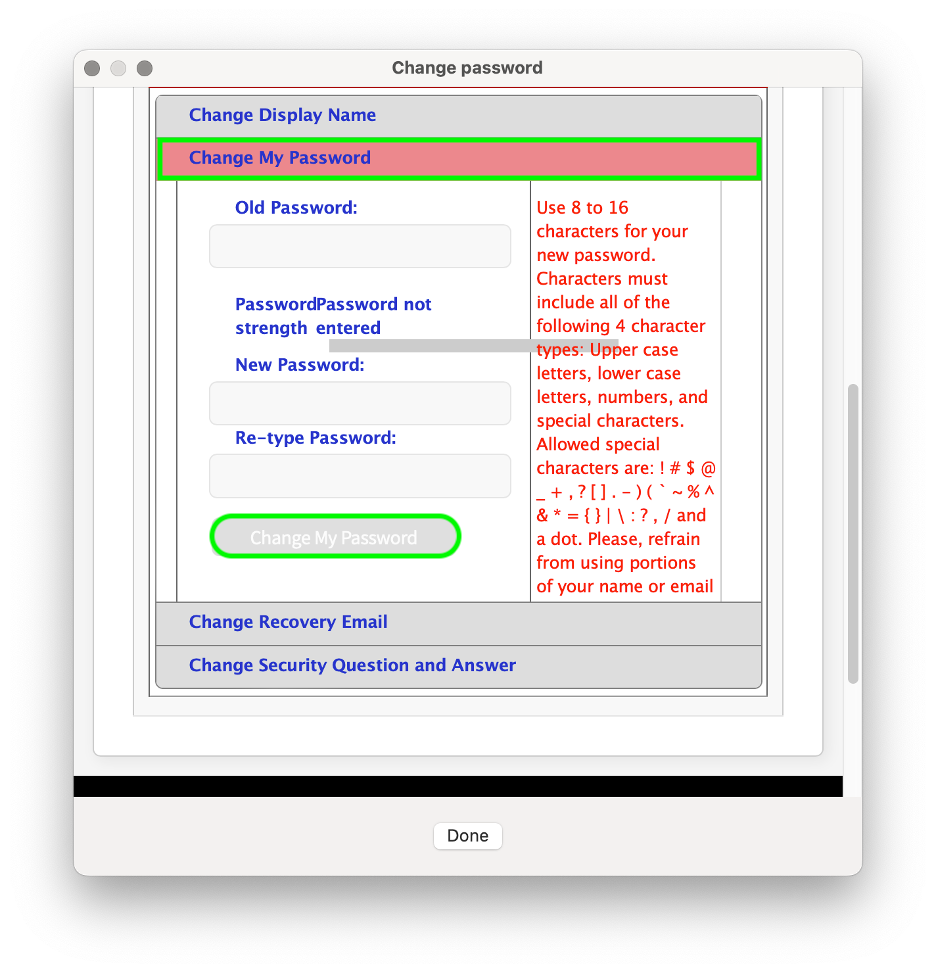
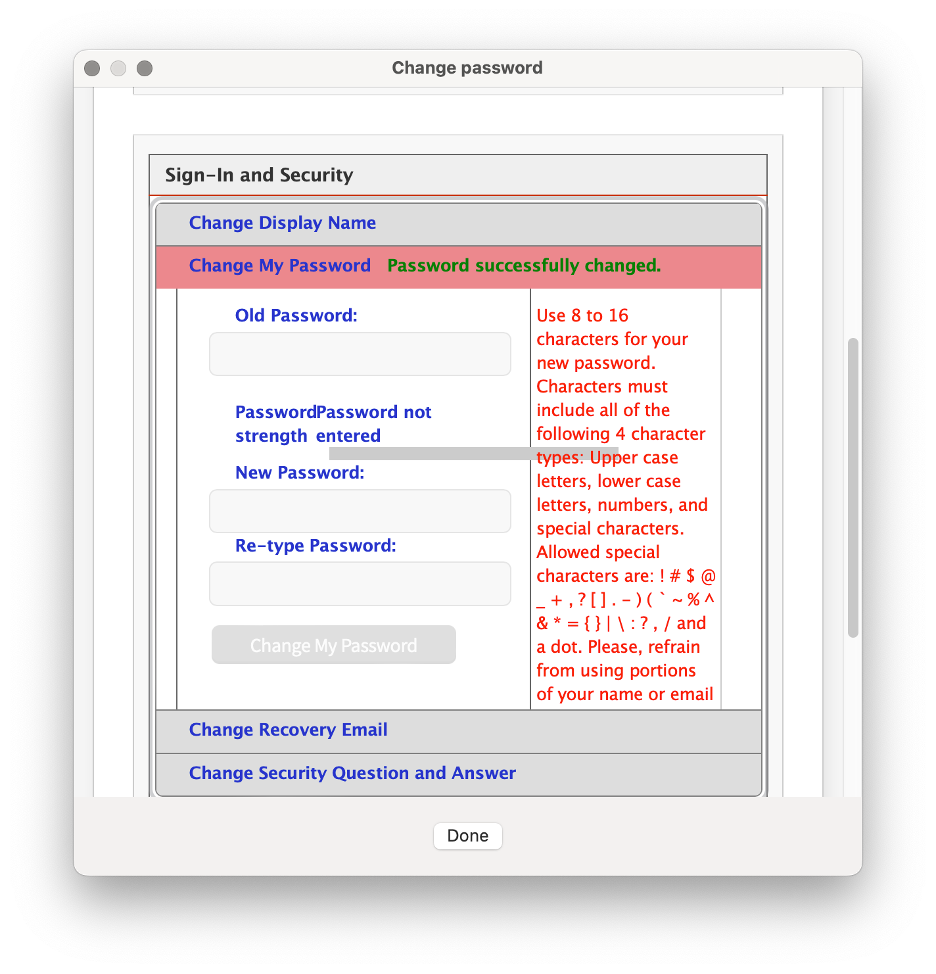
  1. Scroll to “Change My Password” section and enter your old password and new password in the appropriate fields. Then click the “Change My Password” button
  1. You will see the password successfully changed in the red bar when successful. Click “Done
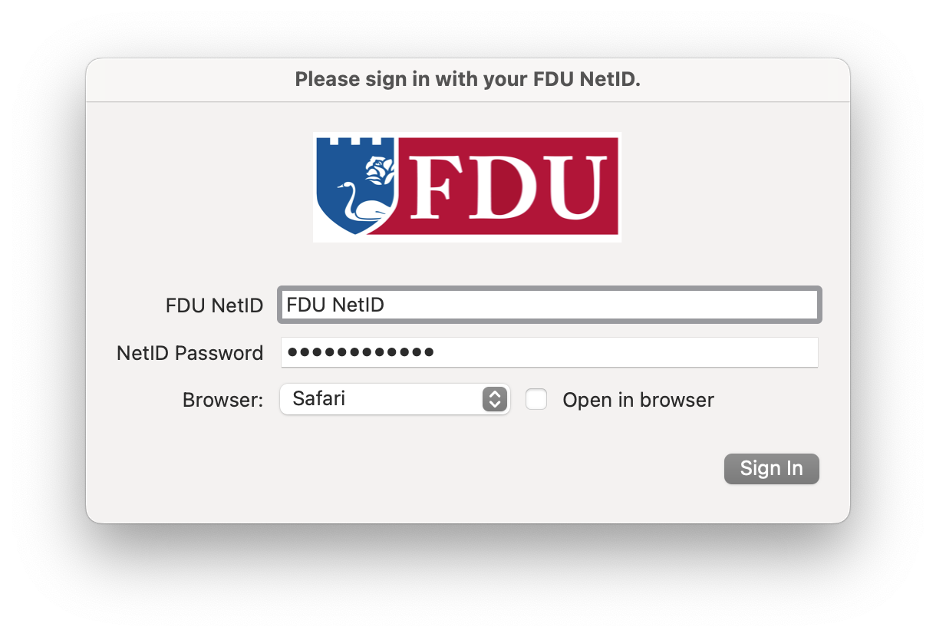
  1. Enter your “FDU NetID” and “Password” in the corresponding fields. Click “Sign In”
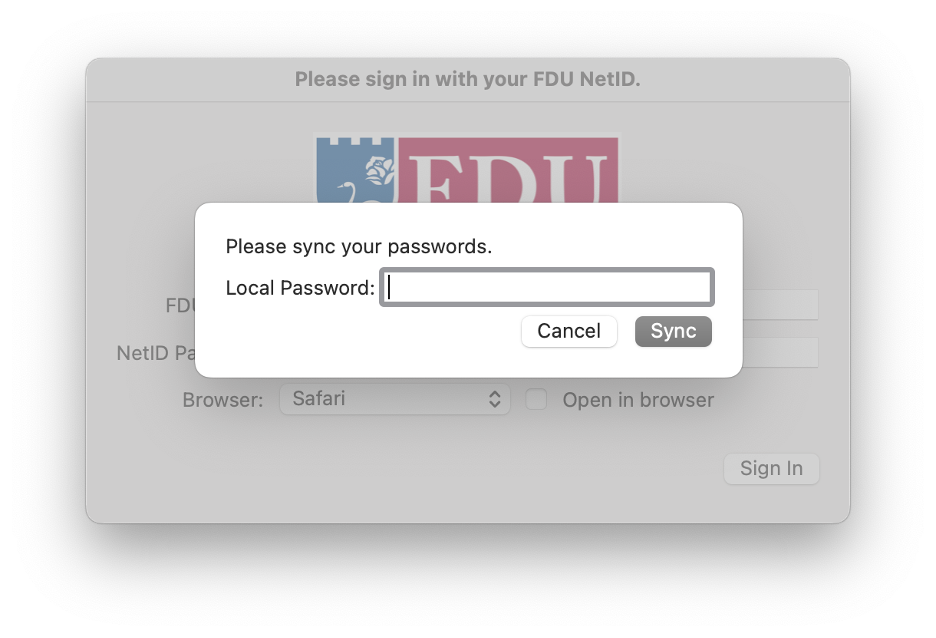
  1. Enter your old password in the “Local Password” prompt and click “Sync” to synchronize the new password with your Mac’s login password

Note

You will need to reauthenticate your Office 365 apps and FDU-Secure.

Synchronizing NETID Password with your Mac Password

If you changed your NETID password outside of your FDU Mac, you will be prompted automatically to sync your password to your Mac’s password the next time you are connected to the internet. You will first need to log in to the machine using your old password and then proceed with the synchronization following the steps below.

  1. The following dialog box will appear once you are connected to the internet automatically. Enter your “FDU NetID” and “Password” and click “Sign In
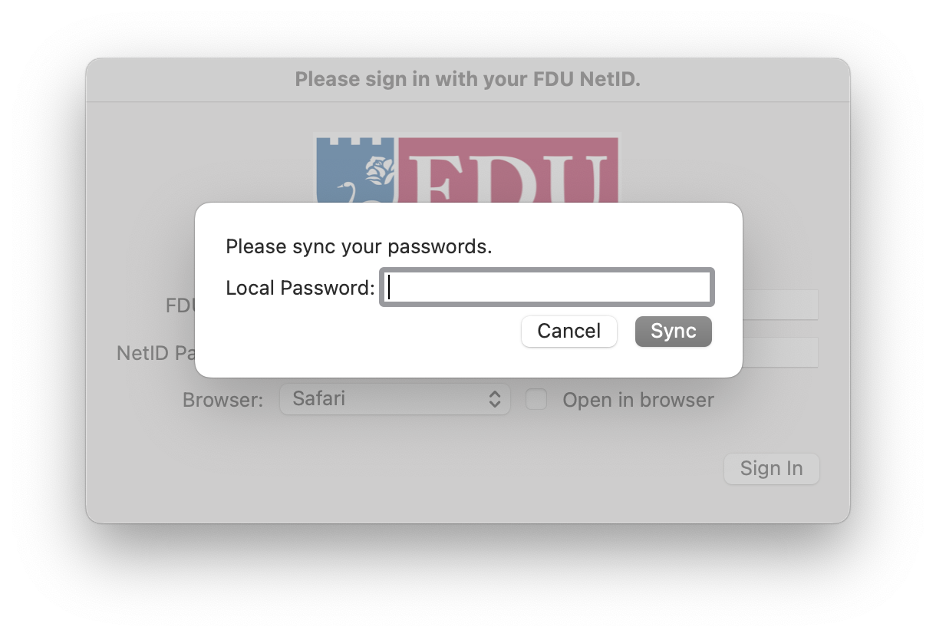
  1. Enter your old password in the “Local Password” prompt and click the “Sync” button to synchronize the new password with your Mac’s login password

Note

You will need to re-authenticate to your Office 365 apps and FDU-Secure.

Last Modified:

Cisco Unified Communications Call Forward

Resources for:
icon Close

With Cisco Unified Communications call forwarding, you have the ability to forward all of your incoming calls to another phone number. This can be useful in the event that you need to work from home or temporarily work from a different office.

Enabling Call Forwarding On-site
  1. To activate call forwarding, press “Forward All” while the phone is still on the hook
  2. To forward off campus, enter 3 then 1 and the 10-digit number.
    Example: (3 1 201 555 1212)
  3. To forward on campus, enter the 4-digit campus extension
    Example: (5555)
  4. A message will briefly appear on your phone’s screen to let you know that calls are now being forwarded
  5. With forwarding enabled, the onscreen “Forward All” button will now read as “Forward Off

Note:

To Disable Call Forwarding simply press this “Forward Off” button when you are ready to deactivate the feature.

The call forwarding process is also explained in your phone’s Quick Reference Guide.

This short and easy to use document explains many essential UC features including conference calls, call transferring and voicemail.

close
Enabling Call Forwarding Offsite

If you are unable to be by your FDU phone, and you need to set up Call Forwarding, you can do this through our Self-Service portal.

  1. You must have an NWN Cloud Self-Service account in order to modify your preferences. If you have one already, proceed to step 3 otherwise continue to step 2
  2. Call the Fairleigh Dickinson University Technical Assistance Center (UTAC) and let them know you are accessing your NWN Cloud Self-Service portal for the first time. UTAC will provide you a temporary password for logging in the first time
  3. Visit the self-service portal at fdu-selfcare.nwncloud.com
  4. Enter your full NETID@fdu.edu in the login field. Example: (SmithR@fdu.edu)
  5. Enter your NWN Cloud account password and click “Enter
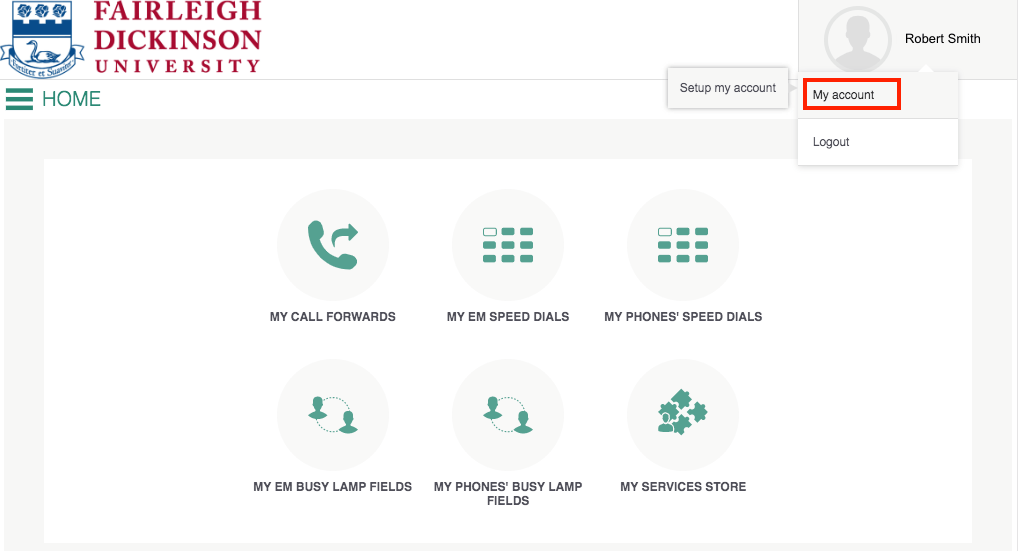
  6. Next click on your Name on the top right of the screen. Hover over the drop-down menu and click “My Account
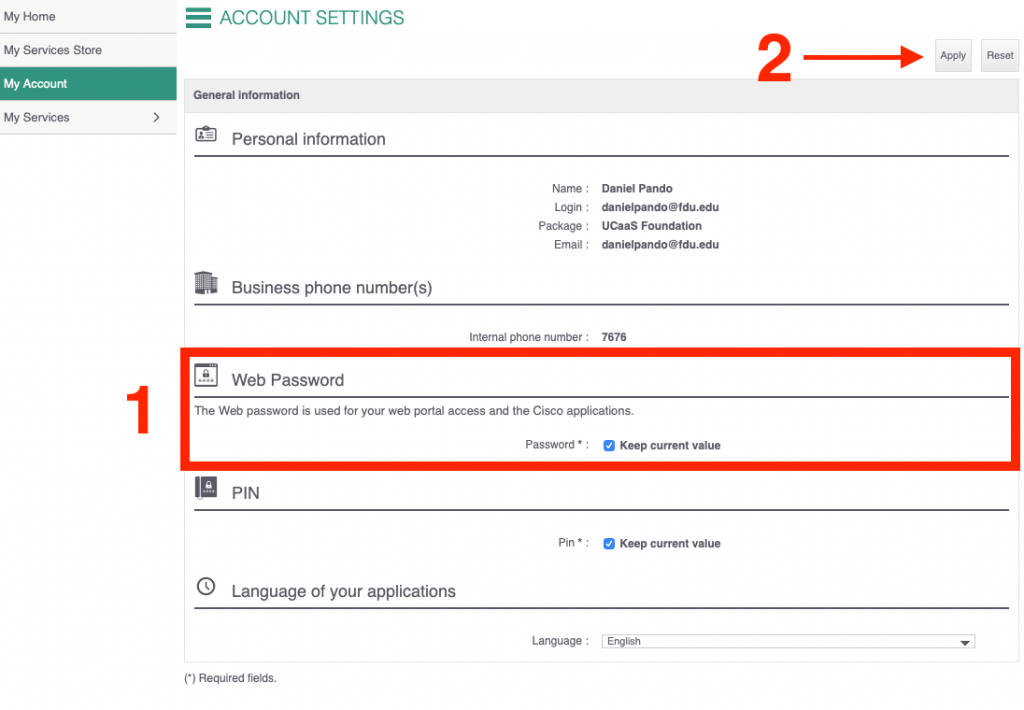
  1. Under “Web Password” un-click the checkbox to set a custom password. When done, click “Apply” in the top right corner
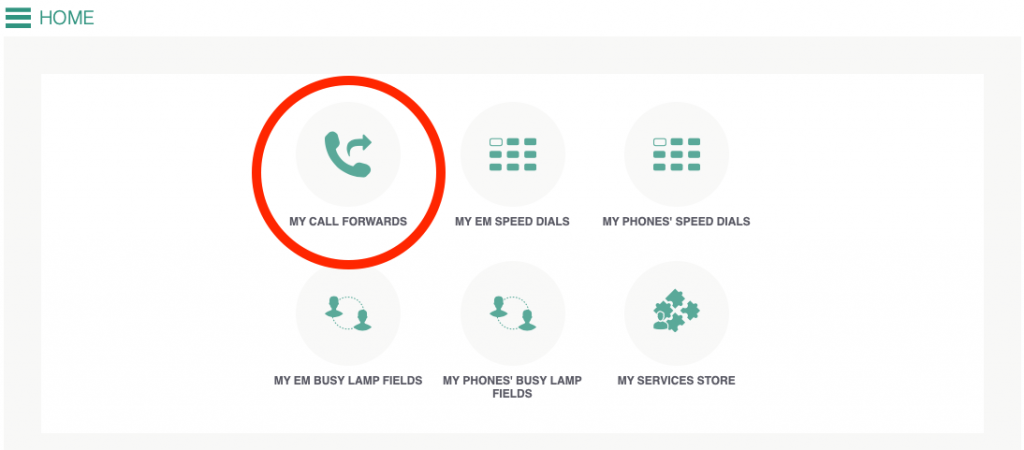
  1. Once logged in, click “My Call Forwards
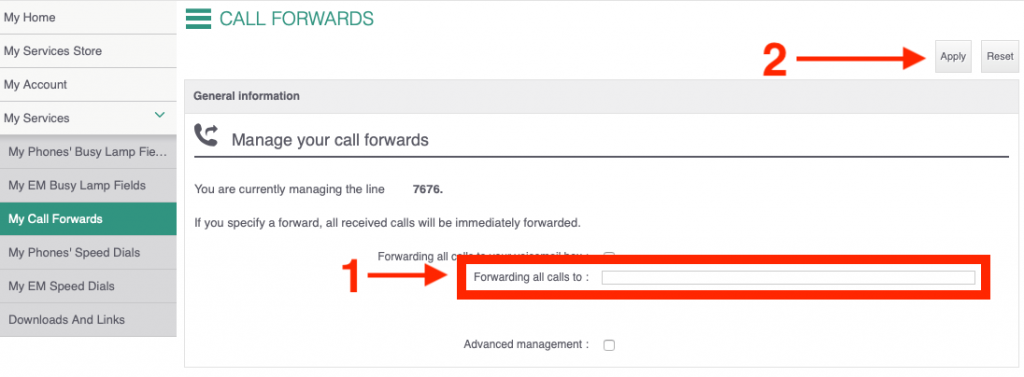
  1. Input the phone number you wish to forward to then click “Apply
    • To forward off campus, enter 3 then 1 and the 10-digit number.
      Example: (3 1 201 555 1212)
    • To forward on campus, enter the 4-digit campus extension
      Example: (5555)

NOTE: If you have more than one internal number, click on the extension you wish to forward.

NOTE: If you need to use your personal cell phone to make a call from a remote site, and you do not wish to reveal your Caller ID, simply prepend the phone number to be dialed with *67.  Example: *672015551212.  Your phone number will not appear to the phone of the person dialed.

close
Last Modified:

Cisco Unified Communications Jabber Softphone Installation

Resources for:
icon Close

Installing Cisco Jabber Softphone

When you are out of the office, a softphone on your computer can be used to make and receive calls from your campus phone number.

  1. You must have an active NWN Cloud Self-Service account in order to use the Cisco Jabber Softphone. If you have one already, proceed to step 3 otherwise continue to step 2
  2. Contact the Fairleigh Dickinson University Technical Assistance Center (UTAC) and let them know you are accessing your NWN Cloud Self-Service portal for the first time. UTAC will provide you a temporary password for logging in the first time
  3. Visit the self-service portal at fdu-selfcare.nwncloud.com
  4. Enter your full NETID@fdu.edu in the login field. Example: (SmithR@fdu.edu)
  5. Enter your NWN Cloud account password and click “Enter
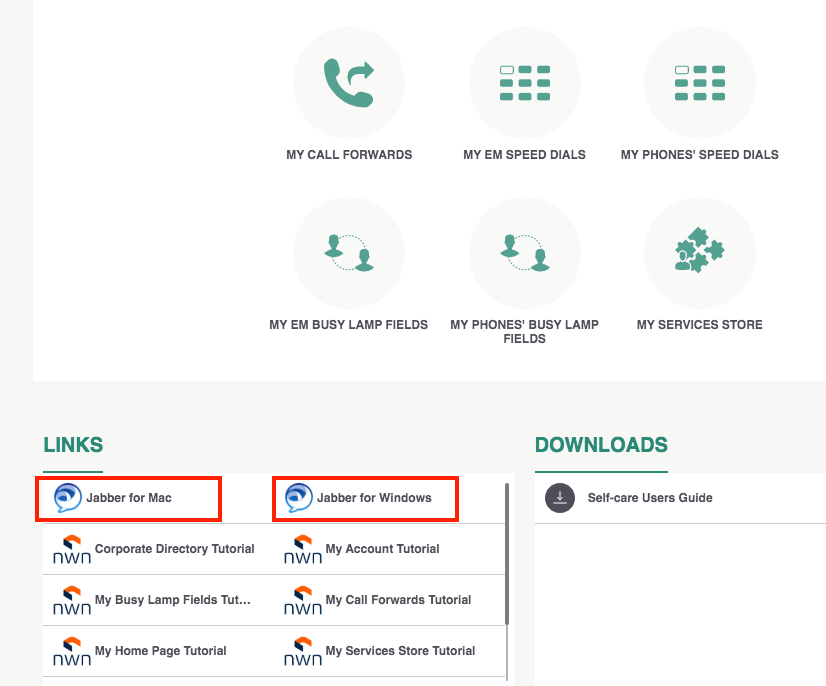
  6. Click and download Jabber for Windows or macOS, located within the links sections.
  1. Each Jabber link will send you to a webpage to download the latest Cisco Jabber software. Choose download at the top right and wait for it to start

Note:

There is no need to login again if you are prompted, the download will begin shortly.

  1. Install the Jabber Software
Windows
  • For Windows, double click the downloaded CiscoJabber.ZIP file and double click on the Setup file to start the installation. Click “Yes” to accept and install the software. Once complete, the Cisco Jabber Software will start and it will have created a shortcut in your Programs Folder

Note:

If you are prompted for an administrative account, and the installation will not proceed, call UTAC and they will be able to assist you through this step.

close
macOS
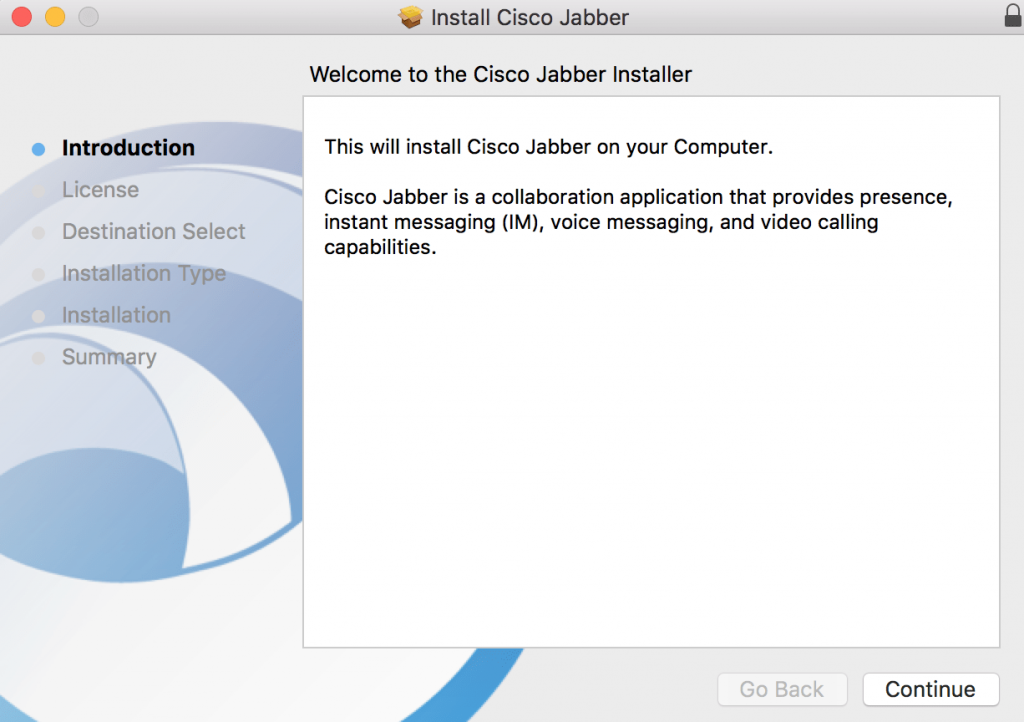
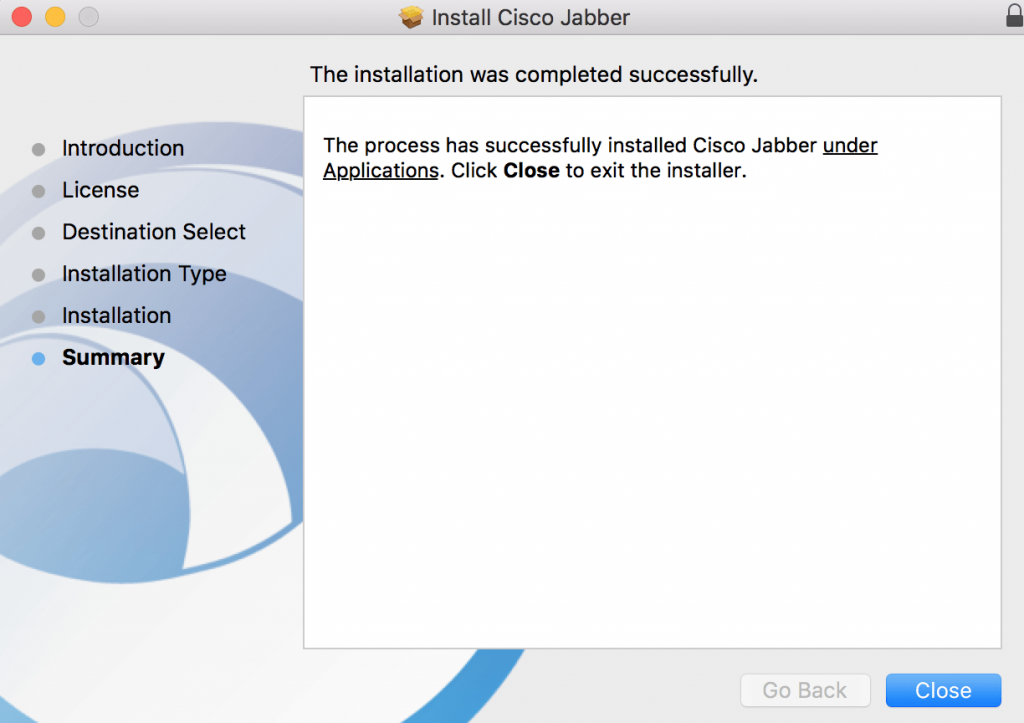
  • For Mac, double click the downloaded CiscoJabber.PKG and proceed through the installation.

The Cisco Jabber Software will be available under your Applications folder.

close
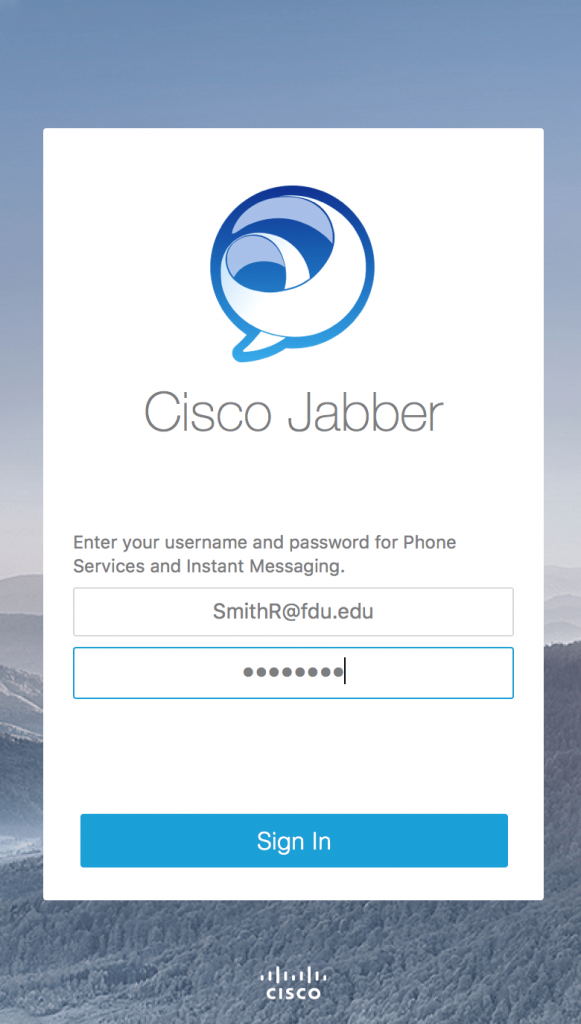
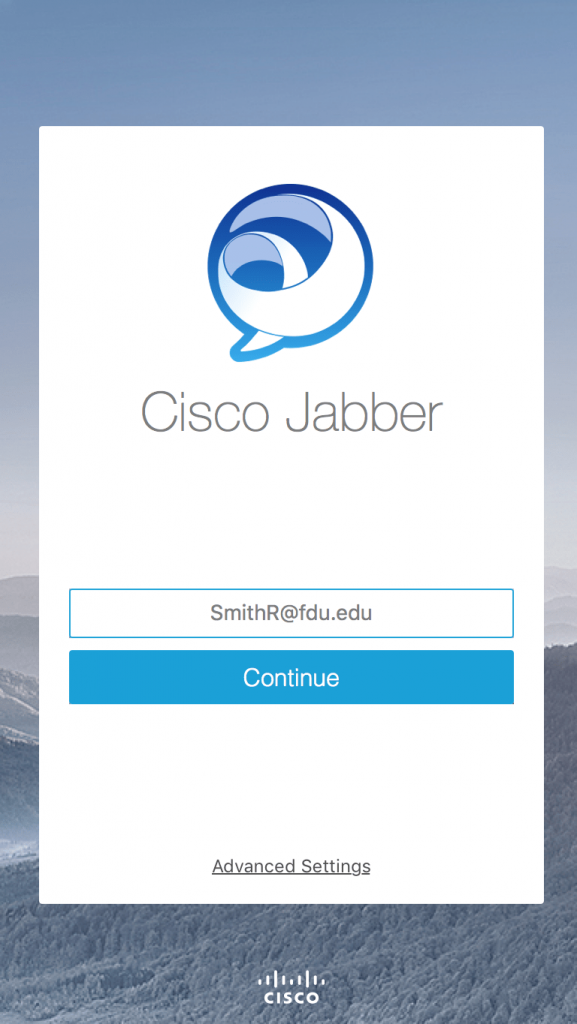
  1. Start Cisco Jabber and enter your username, which is your full NETID@fdu.edu in the login field and click continue. Example: (SmithR@fdu.edu)
  1. Enter your NWN self-service portal password and click Sign In
  1. The Cisco Jabber client installation is now complete.
Last Modified:

Cisco Unified Communications Phone System Manuals

Resources for:
icon Close

Below you can download the manuals for the new FDU Unified Communications Phone Systems from Cisco. The manuals provide information on how to use and access the voicemail features.

Florham and Metro

Vancouver

Last Modified:

Cisco Unified Communications Voice Mail Features

Resources for:
icon Close

Initial Voice Mail Set-Up from Your Own Campus Extension

From your desk phone:

  1. Press the message button on your phone instrument.
  2. Enter your Mailbox ID, this is your 4 digit extension.
  3. Enter the temporary PIN 13579 followed by the # sign.
  4. Listen to the prompts to set-up your voicemail greeting.

Initial Voice Mail Set-Up from Off Campus

When off campus, you can setup your voicemail system by dialing your campus’ assigned voicemail number:

  • Florham Campus: (973)-443-8100
  • Metropolitan Campus: (201)-692-7600
  • Vancouver Campus: (604)-648-4485

Follow these instructions to log into and setup your voicemail:

  1. Press 1 to access the voicemail system.
  2. When prompted enter your ID, this is your 4 digit extension.
  3. Enter the temporary PIN 13579 followed by the # sign.
  4. Listen to the prompts to set-up your voicemail greeting.

Accessing Voicemail On Campus

  • Press the message button on your phone instrument.
  • Enter your Mailbox ID, this is your 4 digit extension.
  • Enter your 5 digit PIN followed by the # sign.

Accessing Voicemail Off Campus

You can access your voicemail when off campus by dialing your campus’ assigned voicemail phone number:

  • Florham Campus: (973)-443-8100
  • Metropolitan Campus: (201)-692-7600
  • Vancouver Campus: (604)-648-4485

Follow these instructions to log into your voicemail:

  1. Press 1 to access the voicemail system.
  2. When prompted enter your ID, this is your 4 digit extension.
  3. Enter your 5 digit PIN followed by the # sign.

Accessing Voicemail from Another Extension That Has Voicemail

Dial the voicemail extension 8100, 7600 or 4485.

  1. Press 1 to access the voicemail system.
  2. When prompted enter your ID, this is your 4 digit extension.
  3. Enter your 5 digit PIN followed by the # sign.

Changing Voicemail Messages & Passcodes

When you first set up your mailbox, you record a greeting, your name and select a passcode. The set-up options allows you to change these at any time. You should update your greeting(s) regularly to let callers know whether you’re in or out of the office. Your voicemail message should always be appropriate, so callers will feel confident in leaving messages. And, of course, boxes should be emptied daily, if not more frequently.

When the University or your department closes you should always redo your voicemail message making the caller aware that the University or your department is closed.

The voicemail system will prompt you as to how to make changes. When you are in doubt about what to do next, you can download the manuals for the new FDU Unified Communications Phone Systems from Cisco. The manuals provide information on how to use and access the voicemail features.

If you are NOT forwarding your office phone, you should create a new voice message similar to the messages below and establish a pattern and practice of checking your voicemail regularly.

Please update your outgoing message to reflect an appropriate out of office message.

Voicemail Forwarding Suggested Message

Below is a recommended Voicemail Message:

“You’ve reached the voicemail of [NAME, TITLE/DEPT]. Fairleigh Dickinson University has moved to virtual business operations as a precaution against the spread of COVID-19. I’ll be checking my voicemail, but would appreciate you also reaching out to me by email at [YOUR EMAIL]@fdu.edu. Thank you.”

Last Modified: