FDU’s Acceptable Use Policy prohibits running software that accepts incoming connections from other computers. Programs such as BitTorrent or other P2P file sharing hosting program all contain server components that allow others to connect to your computer and retrieve files off of your system. In addition to the legal implications of sharing copyrighted materials, file sharing software creates a security concern. Improper use of these programs could result in the compromise of your private files and may leave your system open to attacks from other computers.
To view FDU’s stance on this issue in its entirety, please view the document below.
Effective Date: 11/07/2023 Last Revision: 11/01/2013
Select employees of Fairleigh Dickinson University may be required to engage with confidential University data. The FDU Confidentiality Agreement and Security Policy defines your obligations under Federal and State guidelines to preserve the security and confidentiality of this information.
Confidentiality Agreement and Security Policy
Fairleigh Dickinson University regards the security and confidentiality of data and information to be of utmost importance. Each individual granted access to electronic and/or hard copy data holds a position of trust and must preserve the security and confidentiality of the information to which he/she is granted access to. Therefore, it is the intent of this policy to ensure that University data, in any format, is not divulged outside of Fairleigh Dickinson University without explicit approval to do so by an Associate Vice-President of the University or higher who has responsibility for the data in question. As such, the University requires all users of data to follow the procedures outlined below:
Policy on Confidential Information
Users of University data are required to abide by all applicable Federal and State guidelines and University policies regarding confidentiality of data, including the Family Education Rights and Privacy Act (“FERPA”) and, as applicable, The Health Insurance Portability and Accountability Act of 1996 (“HIPAA”). For more information, see: FDU’s General Confidentiality Policy, FERPA and HIPAA.
Confidential Information shall be defined as:
regarding student, faculty or staff: any personally-identifiable records, financial records (including social security and credit card numbers), health records; contracts, research data; alumni and donor records; personnel records other than an individual’s own personnel record;
regarding the University: University financial data; computer and system passwords, University issued PINS, University proprietary information/data; and
any other information for which access, use, or disclosure is not authorized by: 1) federal, state, or local law; or 2) University policy.
The individual receiving the Confidential Information shall have no obligation under this Policy with respect to Confidential Information which:
is or becomes publicly available without breach of this Policy by the recipient;
is rightfully received by the recipient without obligations of confidentiality; or
is developed by the recipient without breach of this Policy; provided, however, such Confidential Information shall not be disclosed until thirty (30) days after written notice of intent to disclose is given to the University officer who has responsibility for the data in question, along with the asserted grounds for disclosure;
is disclosed in accordance with any “whistle blower” action as provided in the U.S. False Claims Act, the New Jersey Conscientious Employee Protection Act (“NJCEPA”), or similar legislation. (Brief overview of the NJCEPA is available here.
Any individual with authorized access to the Confidential Information is given access solely for the business of the University and must not divulge the Confidential Information outside of the University except for University business requirements approved by the President of the University or the division head responsible for the data in question. Specifically, with respect to Confidential Information, individuals must:
Access Confidential Information solely in order to perform his/her job responsibilities.
Not seek personal benefit or permit others to benefit personally from any Confidential Information that has come to them throughout their work assignments.
Not make or permit unauthorized use of any Confidential Information in the University’s information system or other records.
Not enter, change, delete or add data to any information system or files outside of the scope of their job responsibilities.
Not include or cause to be included in any record or report, a false, inaccurate or misleading entry known to the user as such.
Not alter or delete or cause to be altered or deleted from any records, report or information system, a true and correct entry.
Not release Confidential Information other than what is required in completion of job responsibilities which is consistent with this Policy.
Not exhibit or divulge the contents of any record, file or information system to any person unless it is necessary for the completion of their job responsibilities.
It is the individual’s responsibility to immediately report, as outlined under “Information Security Breach and Violation Reporting” at the end of this Policy, if the individual has violated this Policy. Additionally, given the potential harm that the University may suffer with the release of any Confidential Information, all employees are strongly encouraged to report any suspected violation of this policy or any other action, which violates confidentiality of data, as outlined at the end of this policy.
Security Measures and Procedures
All users of University information systems, including Datatel, MS File shares and FDU Office 365 email accounts, are supplied with an individual user account to access the data or systems necessary for the completion of their job responsibilities. Users of the University information systems are required to follow the procedures outlined below:
All transactions, processed by a user ID and password, or PIN, are the responsibility of the person to whom the user ID was assigned. The user’s ID, password, and PIN must remain confidential and must not be shared with anyone.
Using someone else’s user ID, password or PIN is a violation of policy, no matter how it was obtained.
Your user ID, password or PIN provides access to information that has been granted specifically to you. To reduce the risk of shared passwords – remember not to post your password or PIN on or near your workstation or share your password or PIN with anyone.
It is your responsibility to change your password immediately if you believe someone else has obtained it.
NOTE: If you need your Password or PIN changed, please create a SAMI Support ticket via SAMISupport.fdu.edu. If you are unable to log into SAMI Support via your Net ID username and password, please use the public form.
Access to any student or employee information (in any format) is to be determined based on specific job requirements. The appropriate Department Chair, School Director, Department Director/Manager, Dean, Provost, and/or Vice President is responsible for ensuring that access is granted only to authorized individuals, based on their job responsibilities. Written authorization must be received by the Computer Center prior to granting system access.
You are prohibited from viewing or accessing additional information (in any format) unless you have been authorized to do so. Any access obtained without written authorization is considered unauthorized access.
In order to prevent unauthorized use, the user shall log off of all applications that provide access to confidential information, or lock their computer when leaving their workstation. This is especially important during breaks and lunch. Unless there is a specific business need, all workstations should be shut down at the end of the workday.
NOTE: If you require assistance in establishing your workstation password, please access the screensaver documentation or contact SAMI Support Desk.
If you have any reason to believe your password or PIN has been compromised or revealed inadvertently, you should change your password and immediately notify one of the individuals as outlined under “Information Security Breach and Violation Reporting” at the end of this policy.
NOTE: All University’s computer system will periodically prompt you to change your password.
Upon termination or transfer of an employee, Human Resources will notify University Systems and Security, who in turn will notify the appropriate areas in the Computer Center.
Generally, students, temporary employees and consultants should not have access to the University record system. Written approval by the Department Chair, School Director, Department Director/Manager, Dean, Provost, and/or Vice President in charge of the respective area is required if it is determined that access is required. The student, temporary employee or consultant is to be held to the same standards as all University employees, and must be made aware of their responsibilities to protect student and employee privacy rights and data integrity. Written authorization must be received by the Computer Center prior to granting system access.
You agree to properly secure and dispose of any outputs or files you create in a manner that fully protects the Confidential Information.
Additionally, I understand that if granted access to process transactions via Datatel data entry screens, any information I enter or change will be effective immediately. Accordingly, I understand that I am responsible for any changes made using my ID.
I understand that my access to University data is for the sole purpose of carrying out my job responsibilities and Confidential Information is not to be divulged outside of The University, except as previously stated. Breach of confidentiality, including aiding, abetting, or acting in conspiracy with any other person to violate any part of this policy, may result in sanctions, civil or criminal prosecution and penalties, employment and/or University disciplinary action, and could lead to dismissal, suspension or revocation of all access privileges. I understand that misuse of University data and any violation of this policy or the FERPA, HIPAA or GLB policies are grounds for disciplinary action, up to and including dismissal. This Agreement shall not abridge nor supersede any rights afforded faculty members under the Faculty Handbook.
Information Security Breach and/or Policy Violation Reporting
If you suspect an Information Security Data Breach or a violation of this policy, report such an event to your department chair or staff supervisor and send an immediate email to violation@fdu.edu. If you do not have immediate access to email, contact the SAMI Support Desk; do not provide details but request a ticket be opened with University Systems & Security due to an information security data breach or policy violation requesting an immediate callback. When practical, also send an email to violation@fdu.edu.
CrashPlan is a backup agent that will back up all data on a university device under the primary owner’s profile. The backup sets can be used for restoring data to a machine, whether it has been reformatted, replaced, or compromised. This document will outline the steps needed to install, activate, and restore data to a new or existing device.
CrashPlan is required on all University provided desktops and laptops to backup all University Business data to prevent data loss.
Who Can use CrashPlan?
CrashPlan is presently licensed for full-time faculty and full-time staff only. The University mandates CrashPlan for proper data security practices. If a user has personal data that they wish to exclude from being backed up, a folder labeled “Personal Documents” can be found and utilized in your “Documents” folder. This folder and its contents will be ignored by CrashPlan when your system is being backed up.
Personal Documents folder locations:
Windows PC
C:\users\username\Documents\Personal Documents\
macOS
/users/username/documents/Personal Documents/
Tip
If the Personal Documents folder does not exist in your Documents folder, you can manually create it and the folder will be automatically ignored by CrashPlan.
Is My Data Secure?
CrashPlan uses AES-256 encryption is used when storing your backups and can only be accessed by theCrashPlan account owner and administrators.
What is Backed Up?
All data found in a user profile will be backed up by CrashPlan.
Location of User Profile:
Windows PC
C:\users\UserName\
macOS
/users/username/
Warning
Any data not stored in the user profile will NOT be backed up by CrashPlan. It is highly encouraged to store university business data within your user profile.
To install CrashPlanon your Windows PC, please follow the instructions below.
Note
CrashPlan is being automatically deployed to all systems owned by Faileigh Dickinson University.
Before Installing CrashPlan, you must be logged in as the owner of the machine using your NetID Credentials.
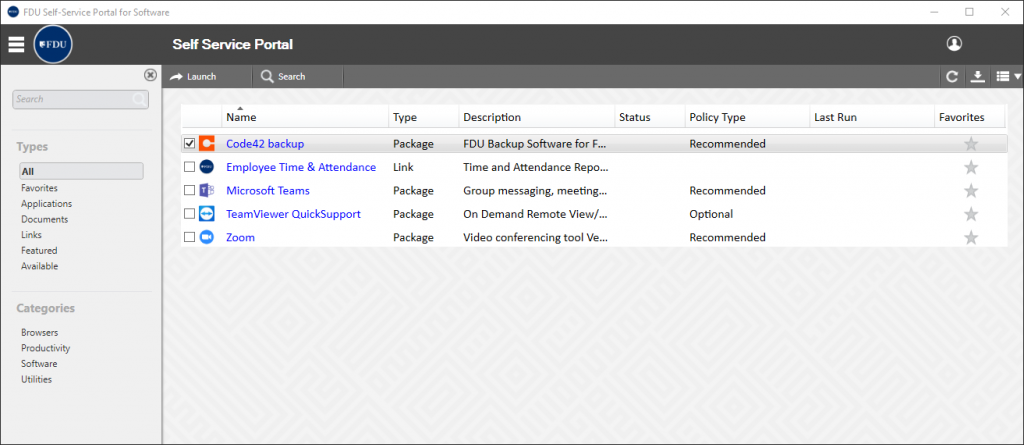
Open FDU Self Service Portal for Software on your University PC
Click on CrashPlan Backupand then click “Install” on the right-hand side
Note
It could take several minutes for the client to make the first connection and start the first backup.
The entire process will take approximately 5-7 minutes, depending on your internet speed. Once CrashPlanis installed, your account is automatically provisioned in the CrashPlansystem, and your backup will begin shortly.
To install CrashPlan on your macOS device, please follow the instructions below.
Note
CrashPlan is being automatically deployed to all systems owned by Faileigh Dickinson University.
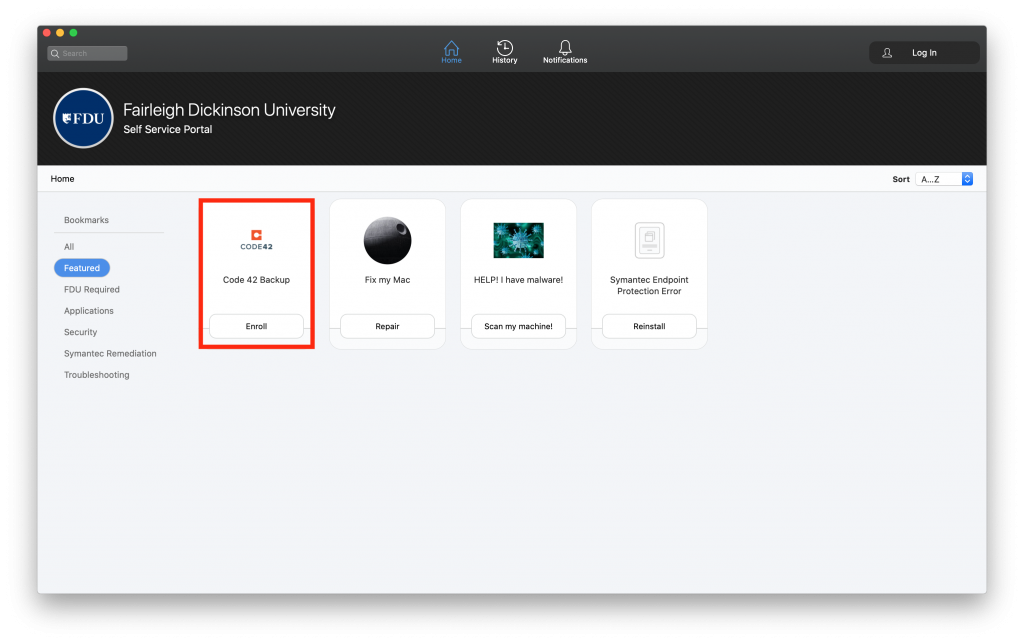
Locate the FDU Self Service Portal in your applications folder or locating the icon on your dock
Locate CrashPlan Backup and click “Enroll”
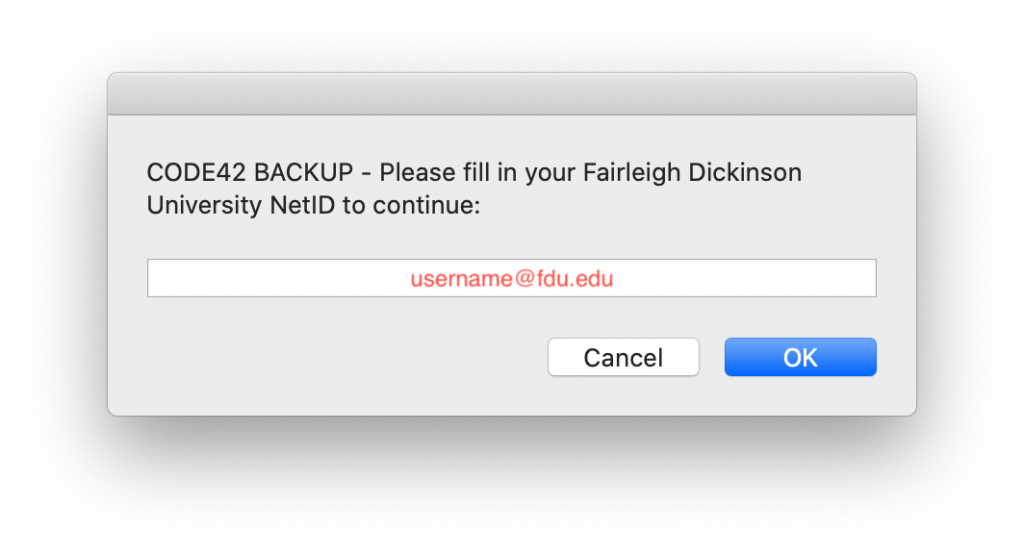
After the package installs, you will be prompted to enter your FDU email address and then click “OK“
Note
It could take several minutes for the client to make the first connection and start the first backup.
The entire process will take approximately 5-7 minutes, depending on your internet speed. Once CrashPlan is installed, your account is automatically provisioned in the CrashPlan system, and your backup will begin shortly.
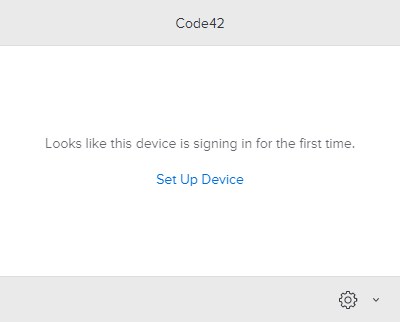
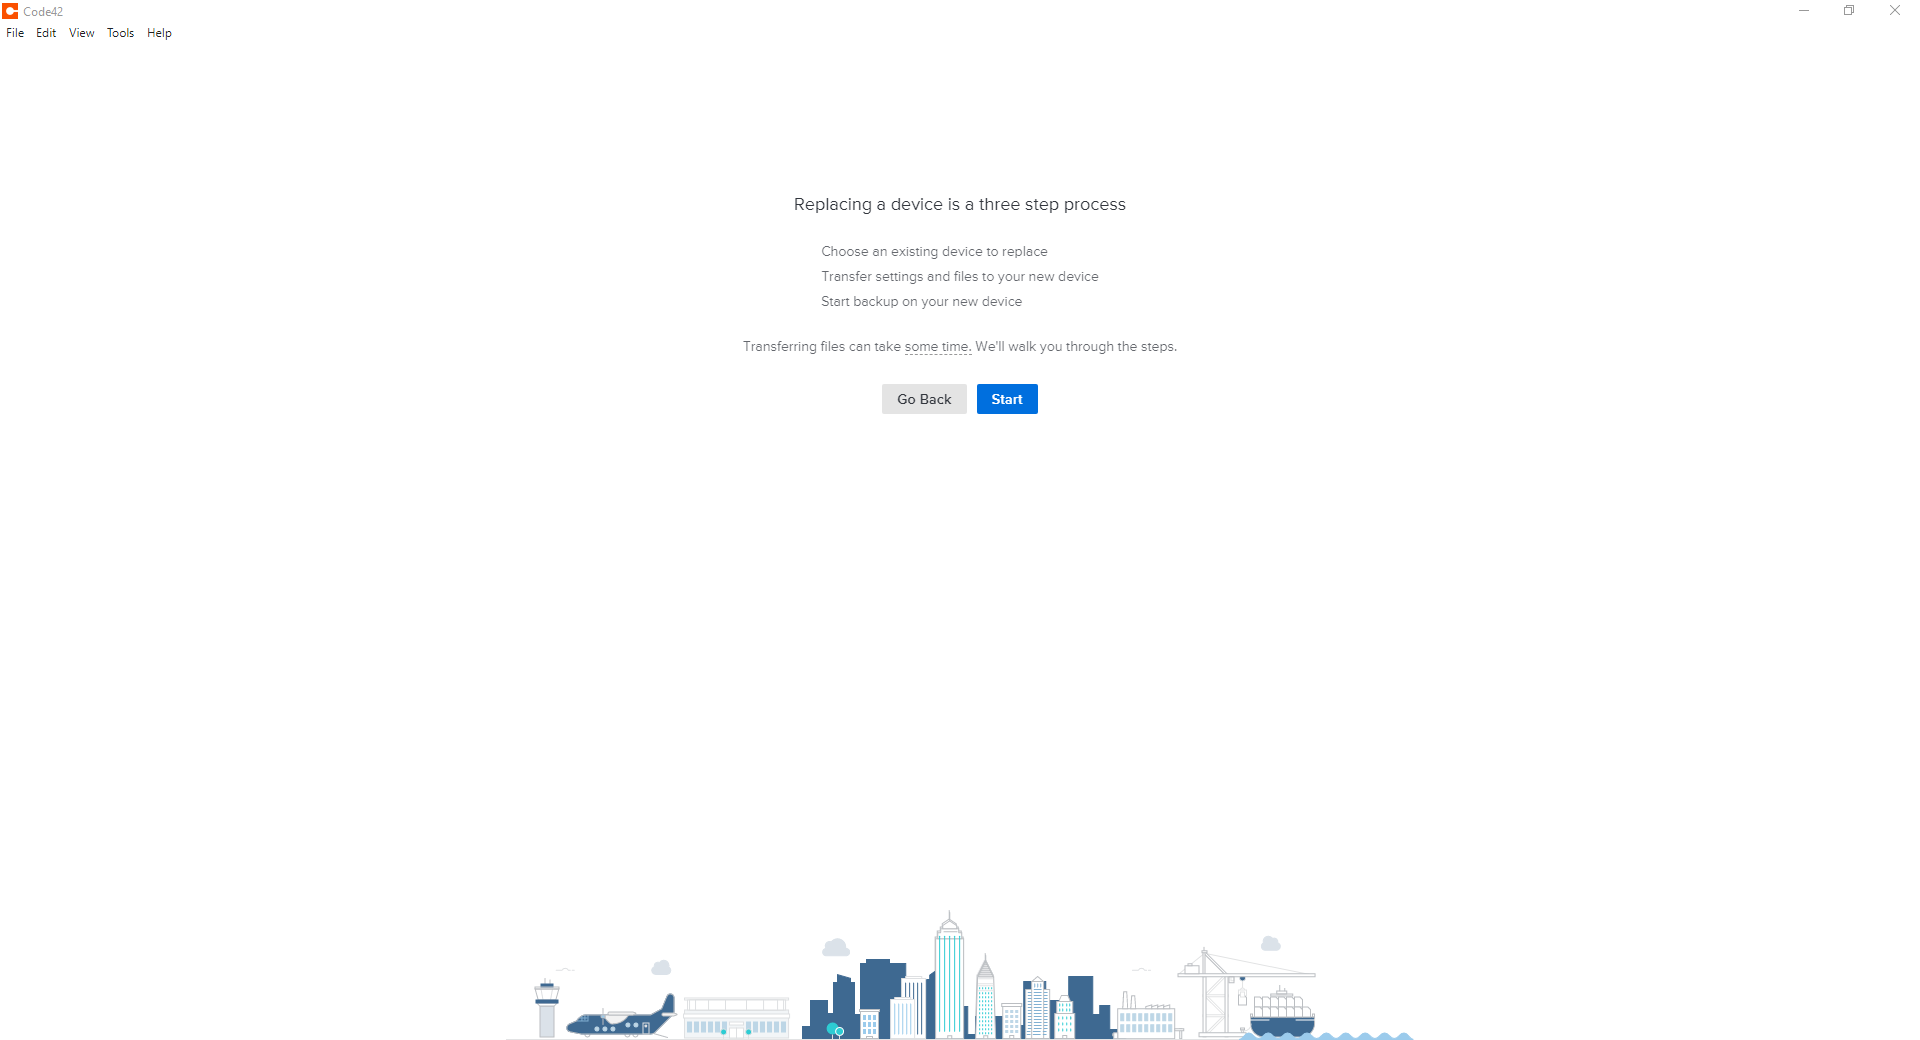
This process is used when someone will be assigned a second device and wishes to have it backed up or if the CrashPlan needs to be re-installed on the same device. Because an account already exists, it cannot be provisioned automatically. It must be manually setup either to replace an existing device or create a new backup set on the second computer.
Note
In order to proceed, CrashPlan must be installed prior to continuing, please refer back to the Install instructions for your operating system from the CrashPlan User Guide. A link is found at the bottom of this page.
Tip
A backup set is CrashPlan’s way of describing the backup configuration and what files are being backed up.
Click on the CrashPlan app in the system tray (PC) or Menu bar (macOS) and then click “Setup Device”
If prompted, log in to the FDU NetID Portal and proceed through the FDU single sign-on process
Click “Replace Existing”
Click “Start” to continue with the replace existing device process
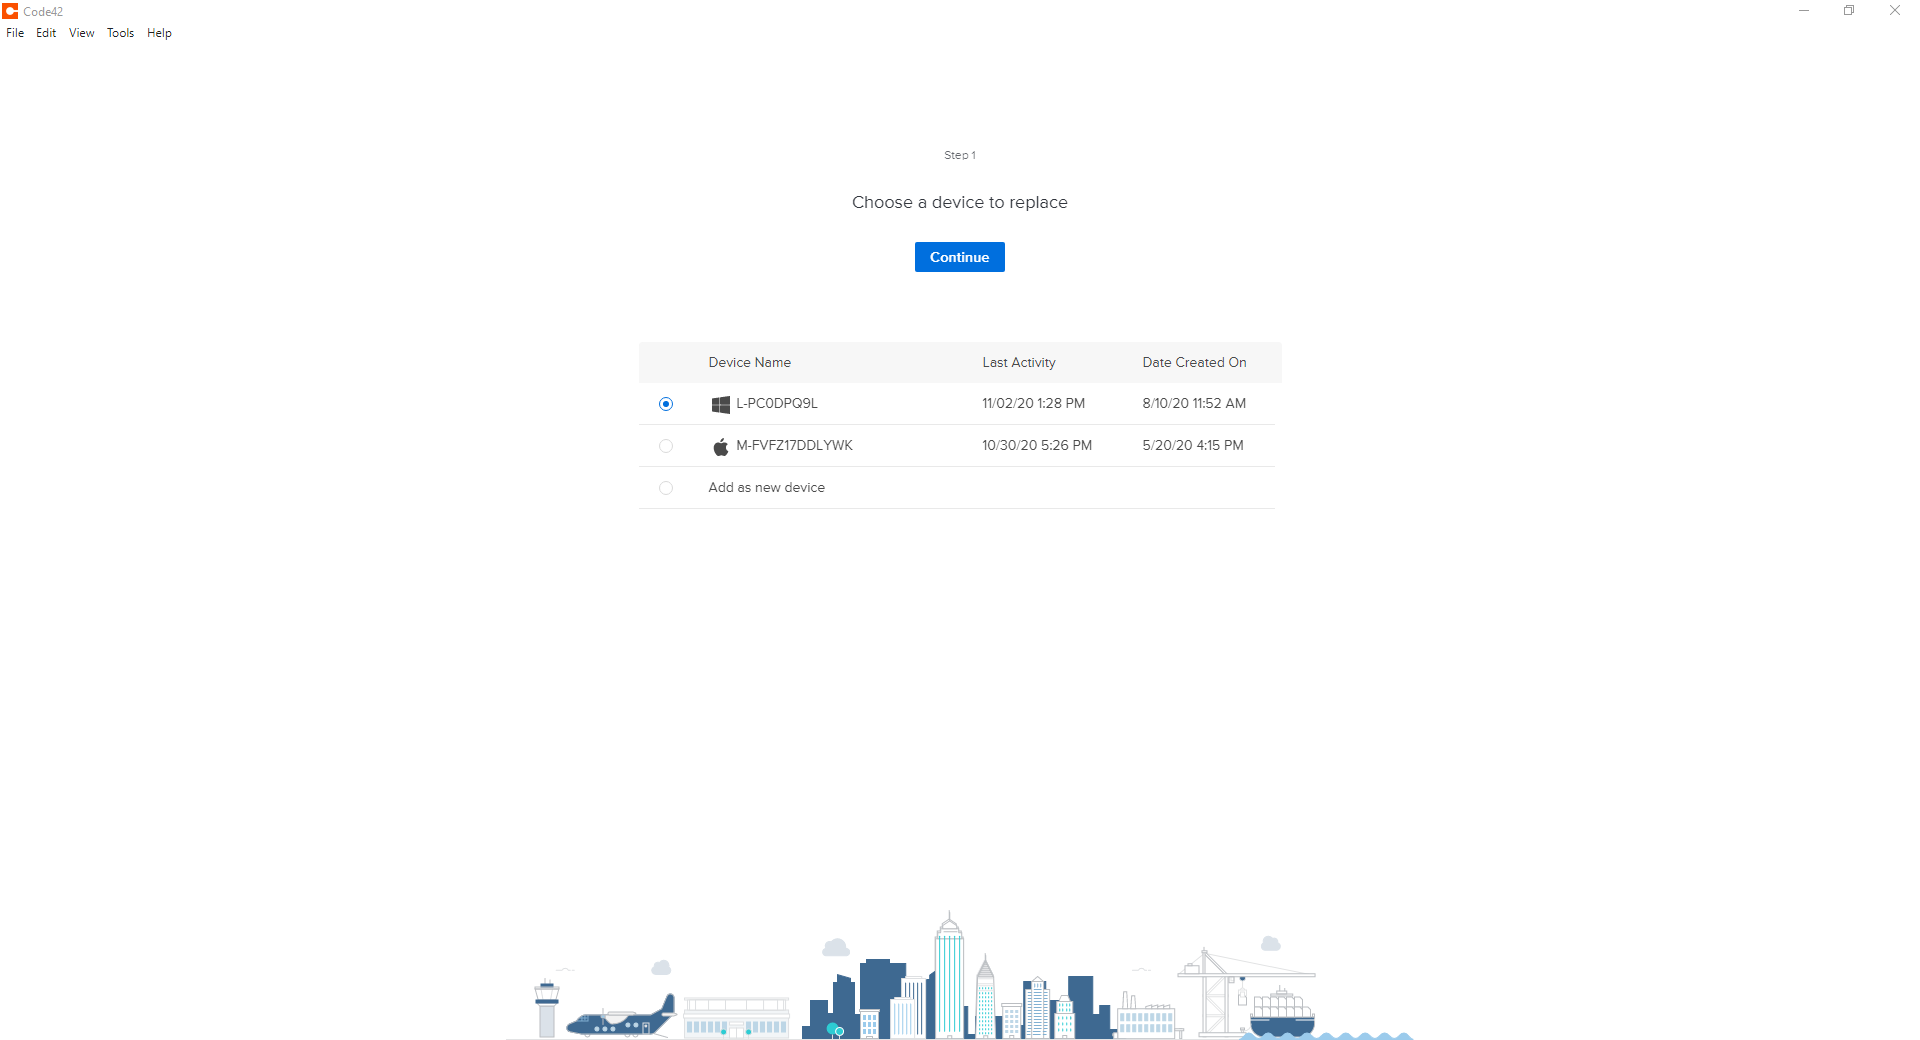
Select the device from the list you are replacing and click “Continue”
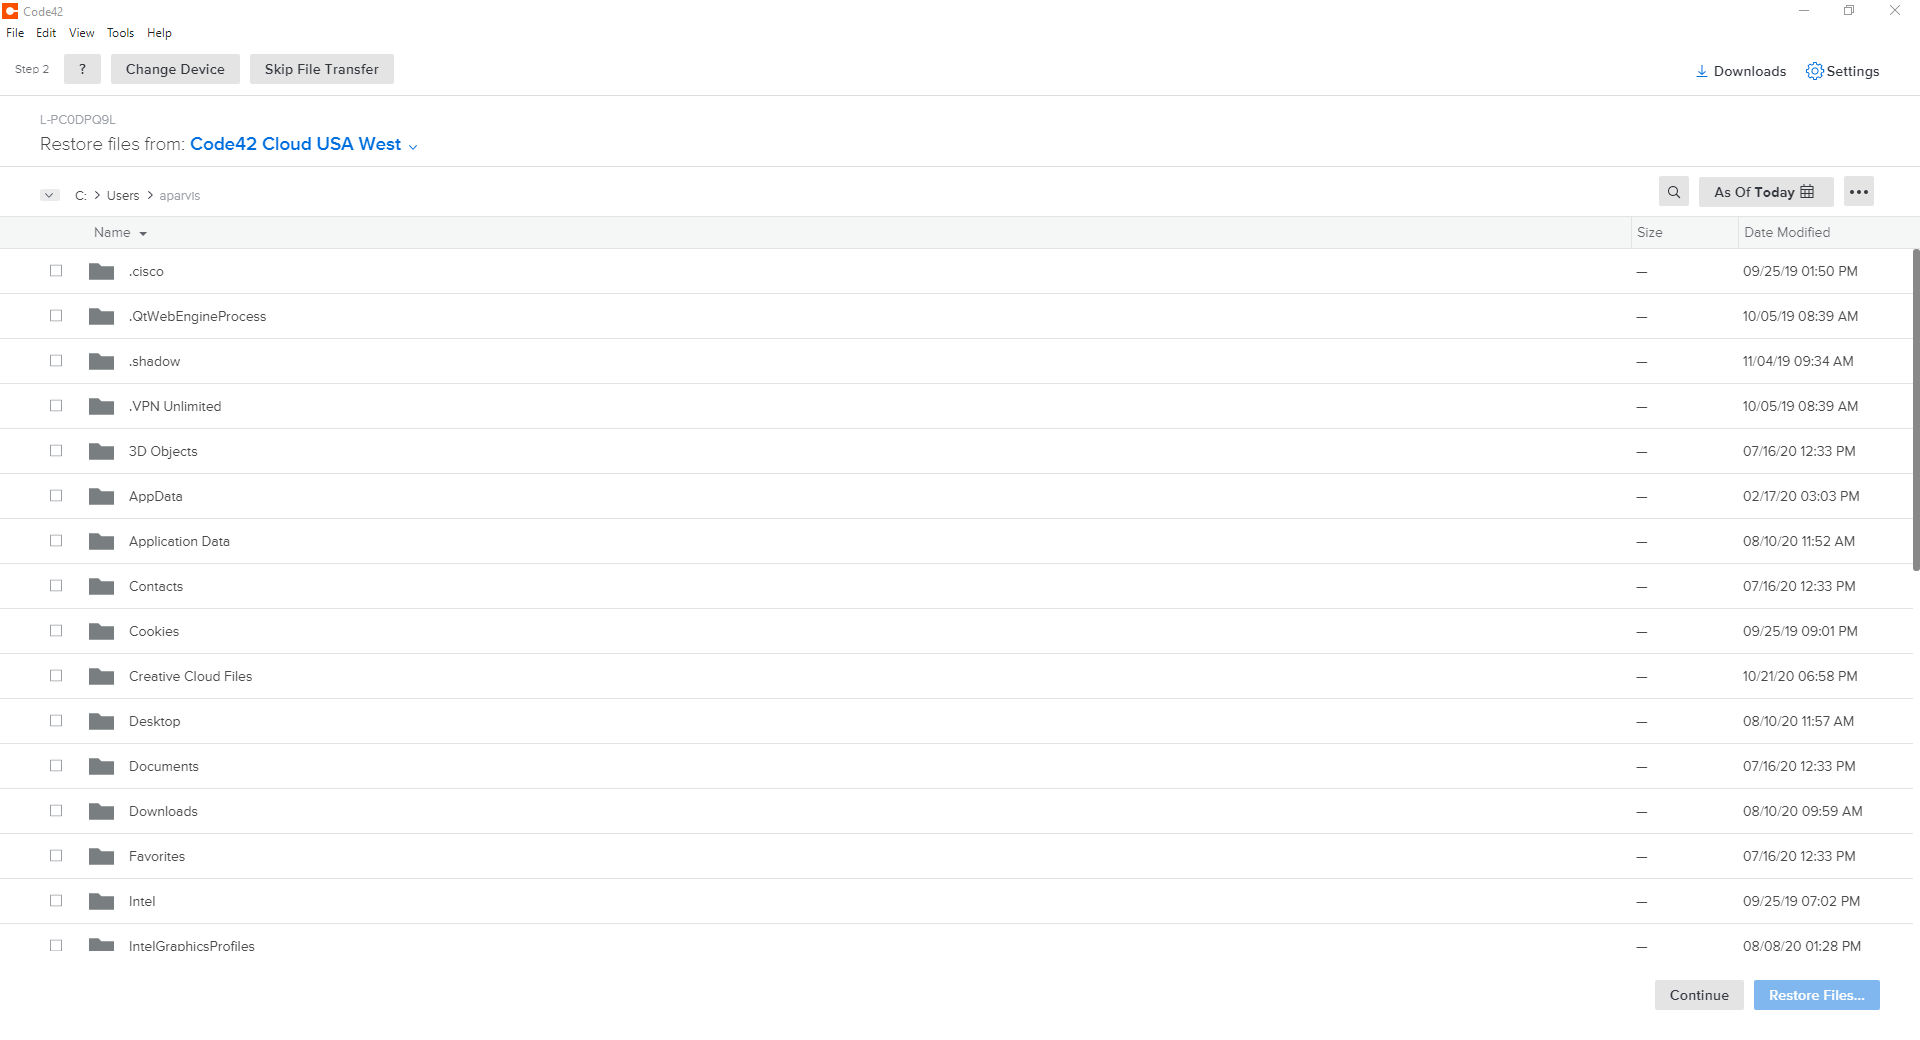
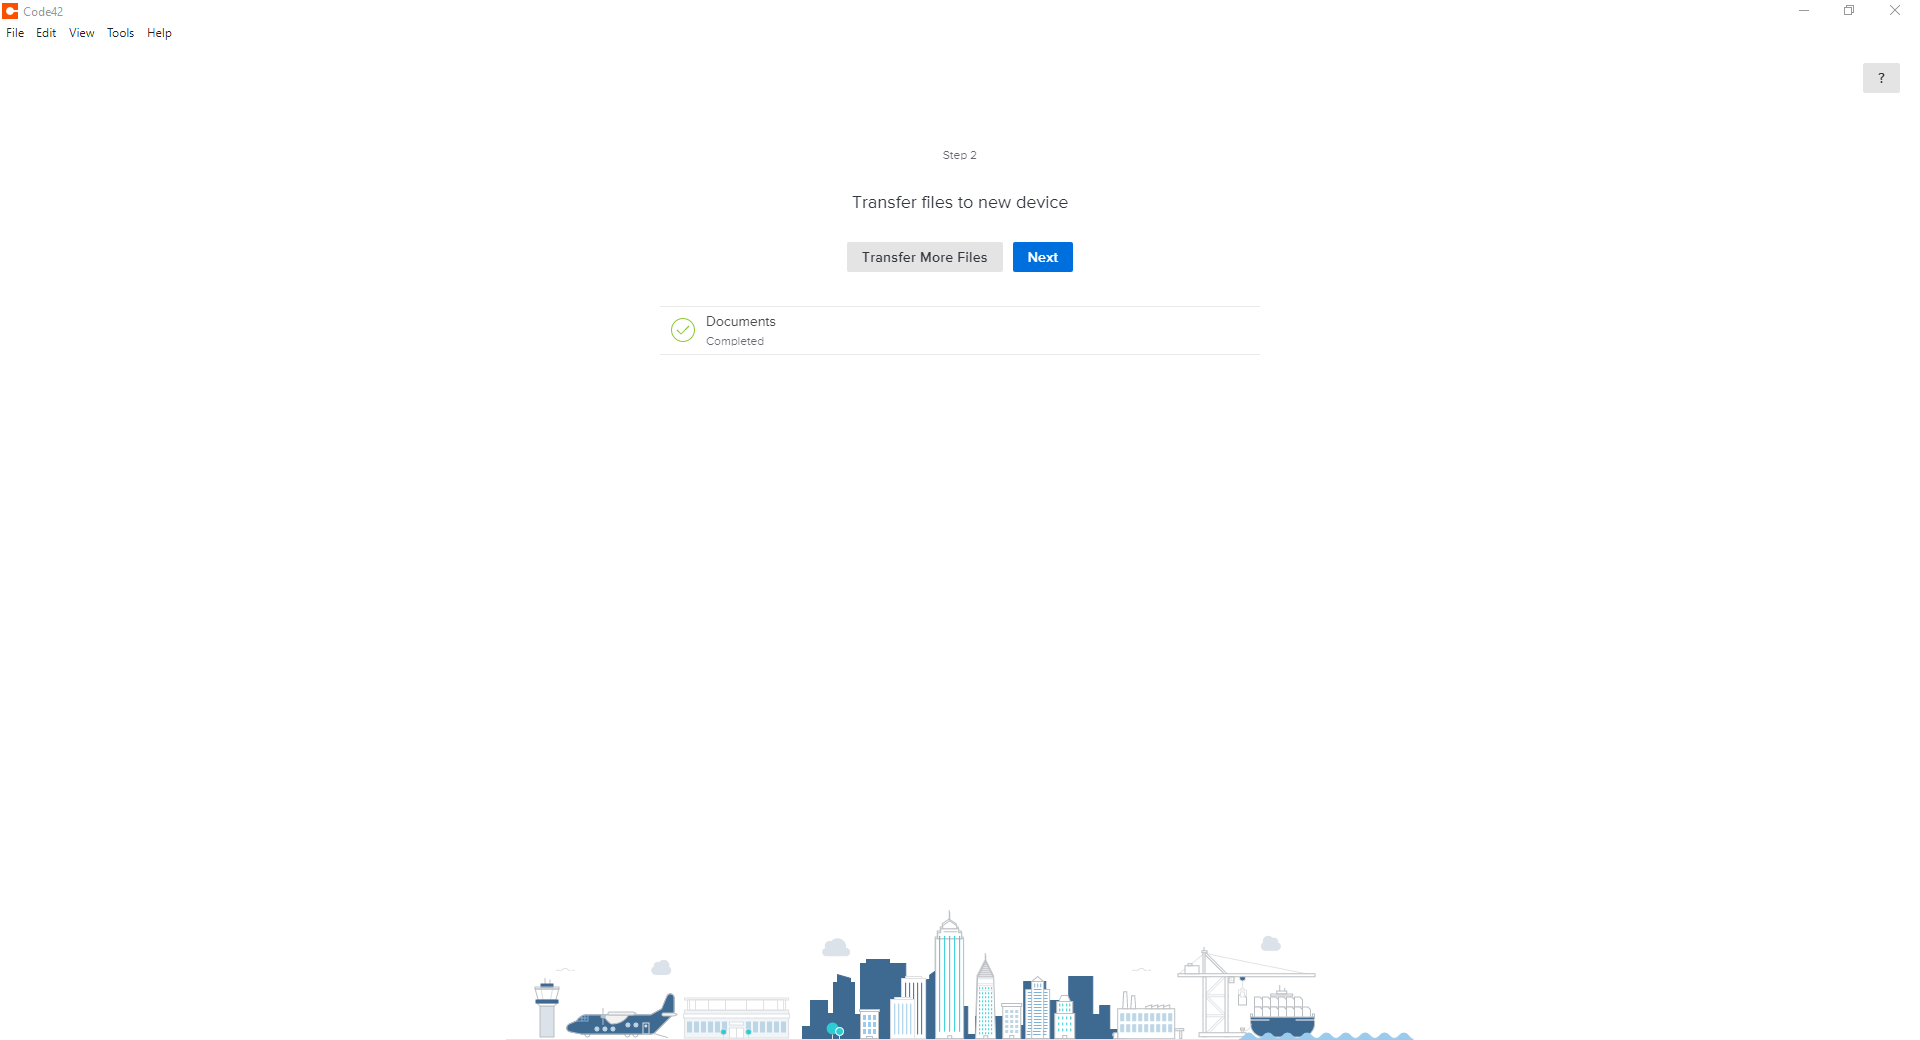
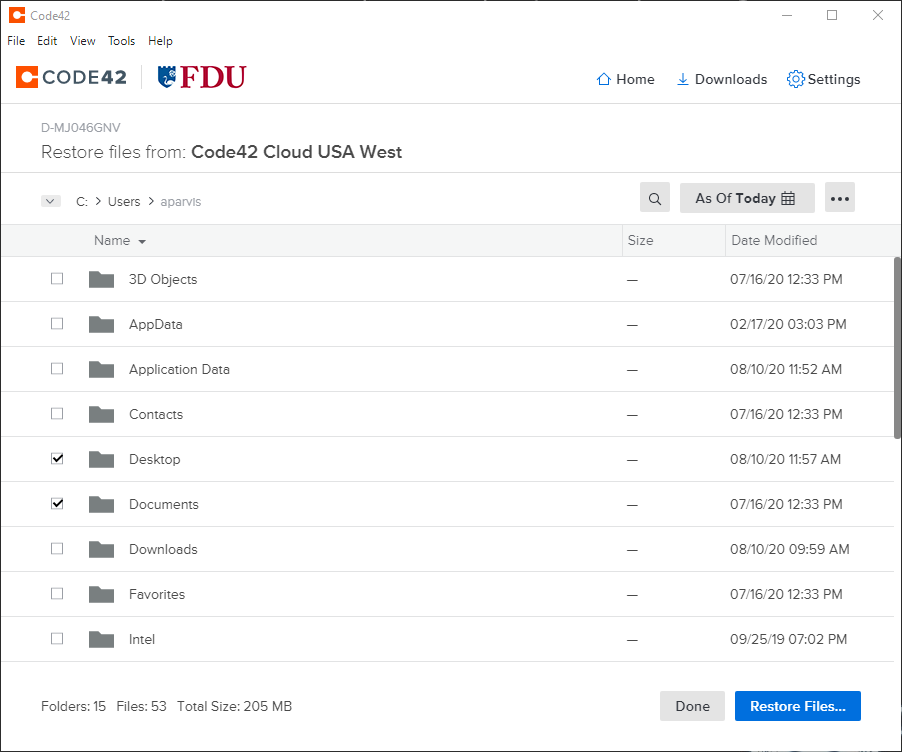
Click “Select Files” on the following window
Select and Choose which files you wish to replace by placing a checkmark next to each. When finished, click “Restore Files”
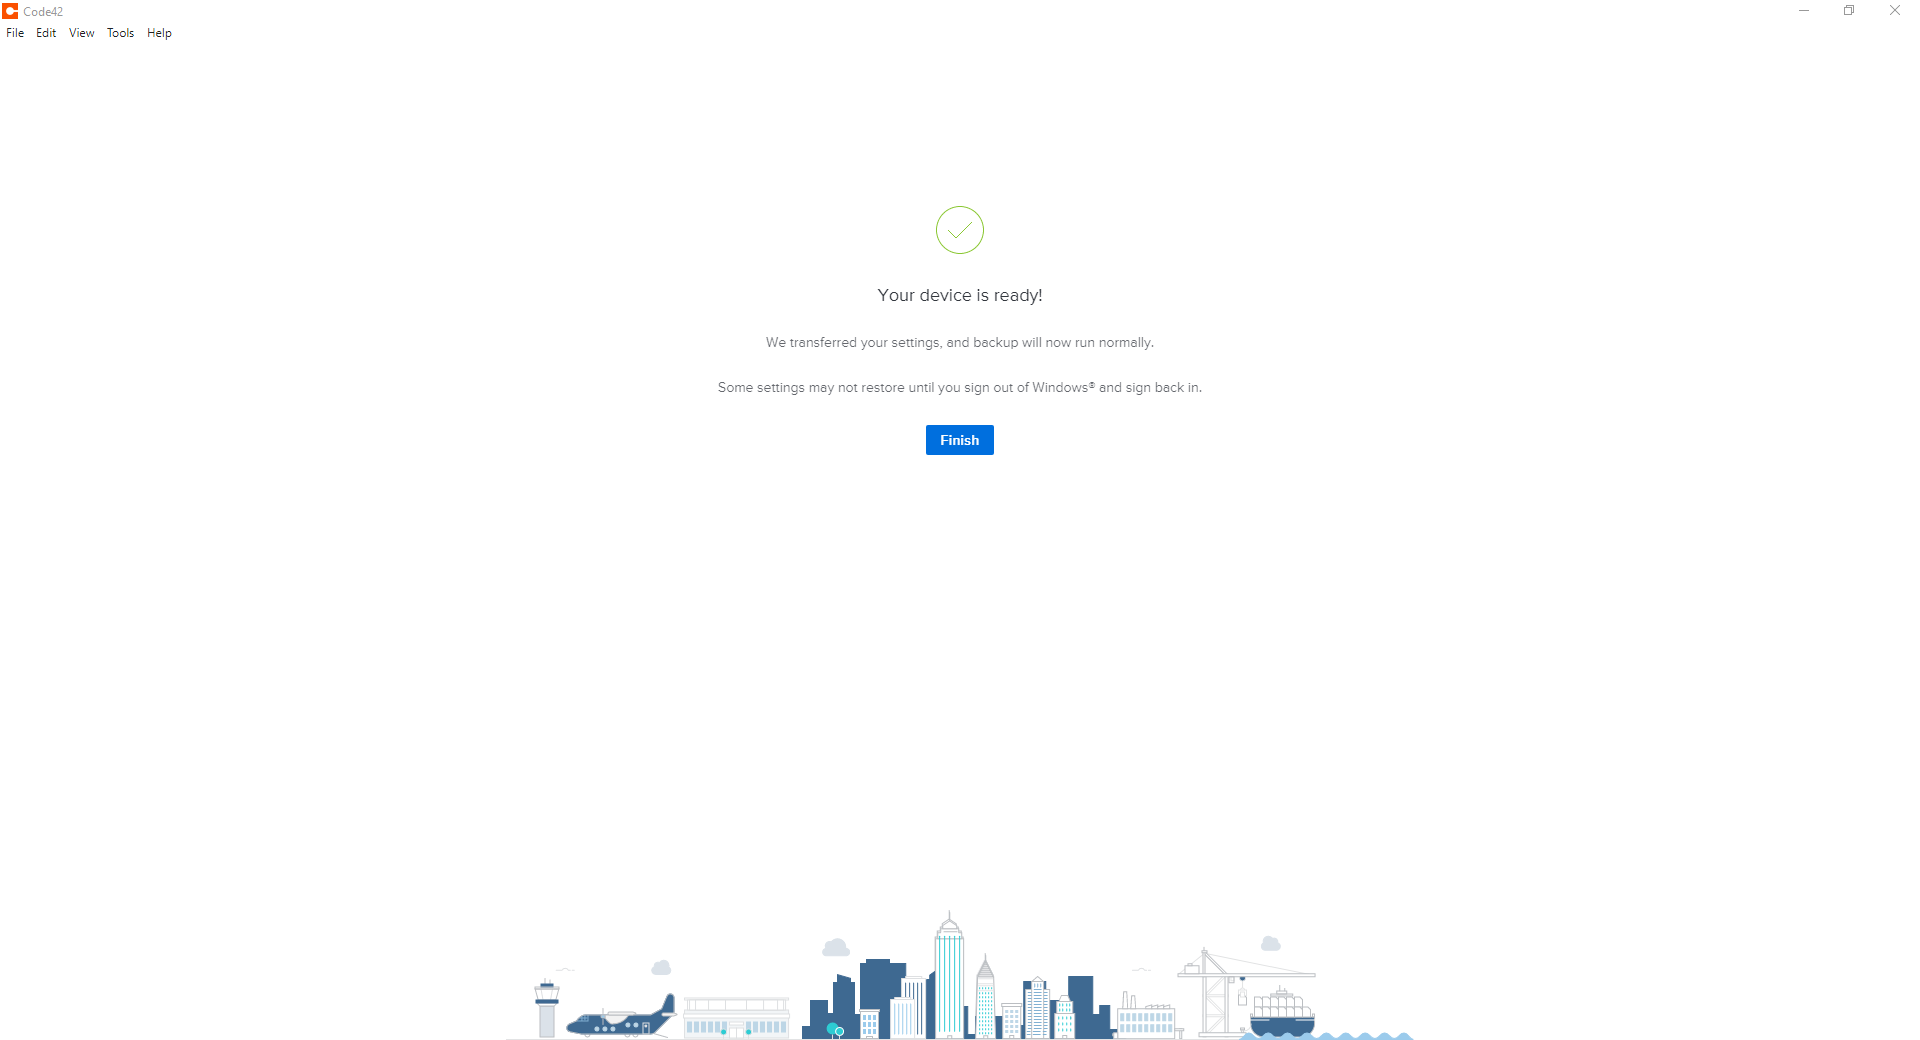
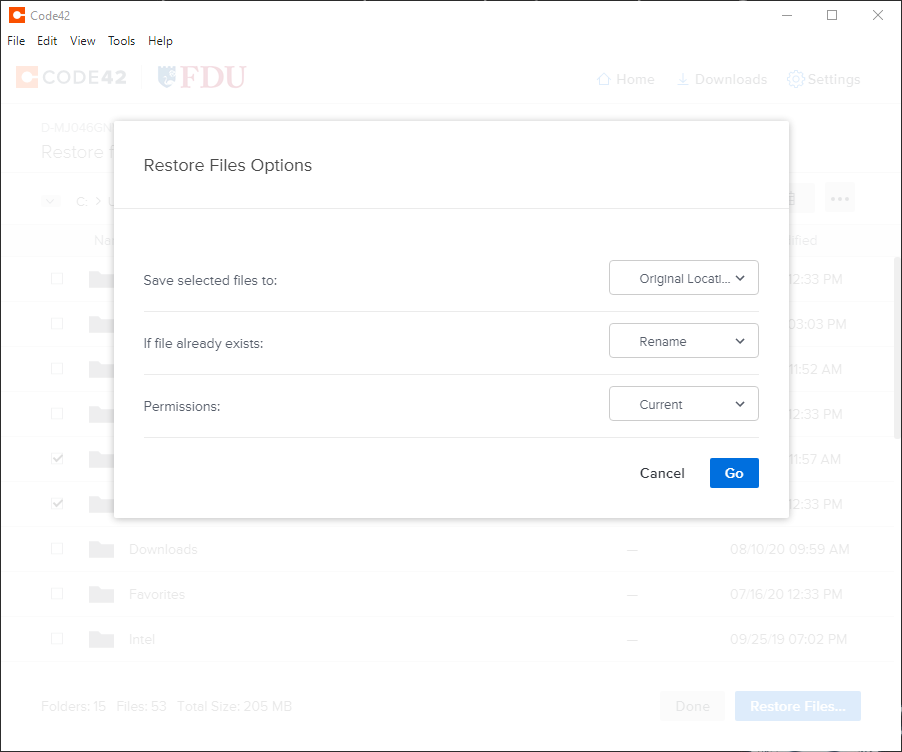
The next window will allow you to select how you wish to restore your files. Make your selections and click “Go”
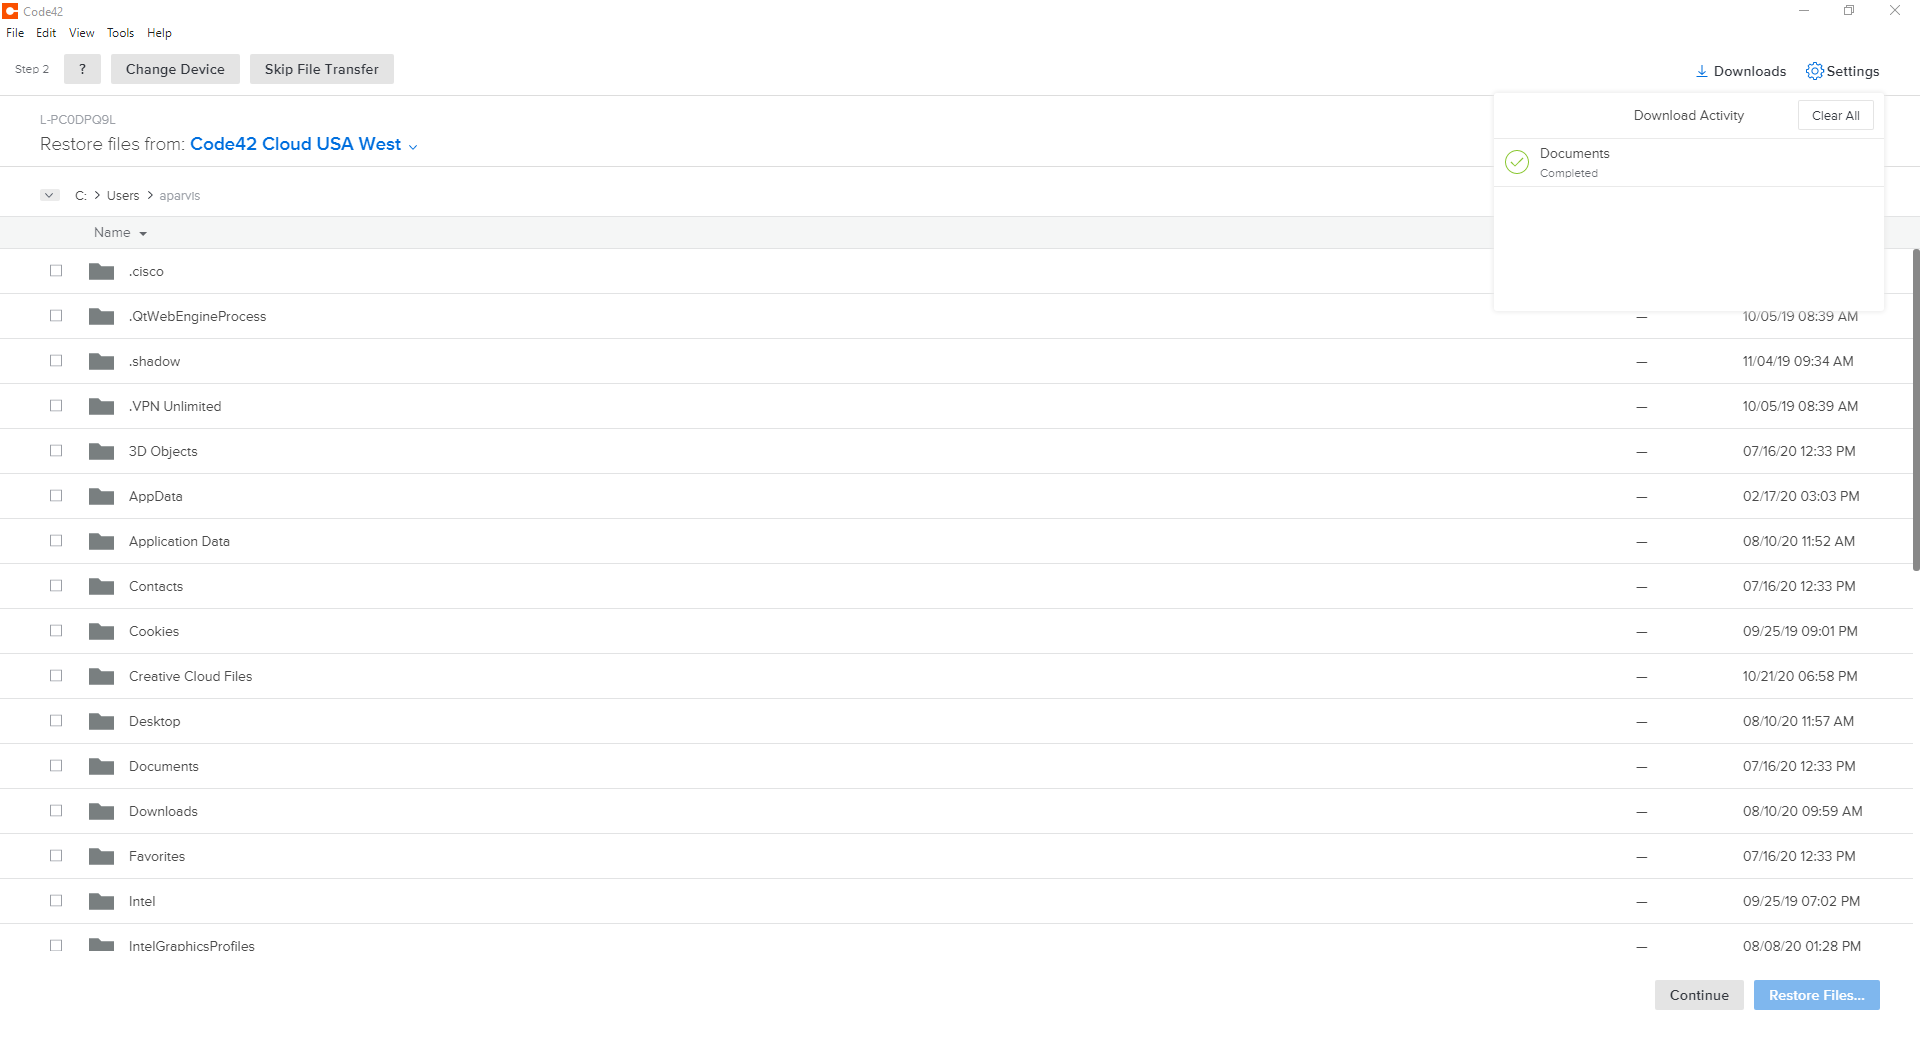
The next window will display download progress for the restore process. You can continue forward by clicking “Continue” at the bottom
The next window Downloads the Files to your device. When the transfer is completed, click “Next”
Tip
You can close this window and continue working or you can click transfer more files and repeat the steps for additional files. This will extend the time it needs to restore.
If you are unsure if you have CrashPlan installed and backing up your system, this quick guide will help give you some comfort.
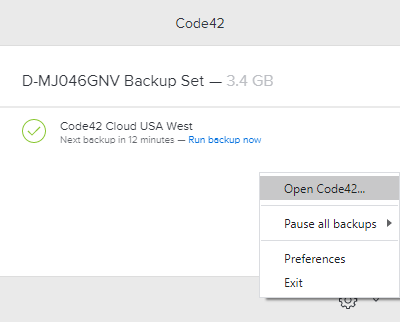
Click on theCrashPlan icon from the system tray on Windows and the menu bar on macOS
CrashPlan Icon
The Progress will be displayed like in the Figure below
Note
Depending on your backup size, this could take anywhere from a few minutes to a few days. CrashPlan will continue to run and backup in the background. After the first successful backup, incremental backups will occur.
CrashPlan allows you to manage your backup sets. If you want to review your backup set or request assistance, please contact the SAMI Service Desk to initiate a support request.
Accidentally deleted or unable to find a file? CrashPlan can help. Please follow the following guidelines in restoring lost or previous versions of files.
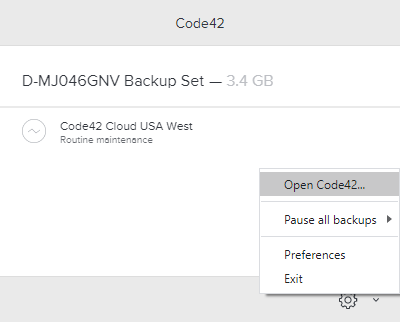
Click the CrashPlan System Tray or macOS menu bar Icon
CrashPlan Icon
Left-click on the gear symbol and left-click on “Open CrashPlan….”
If prompted, log in to the FDU Single sign-on Portal and proceed through the FDU DUO Multifactor authentication procedures
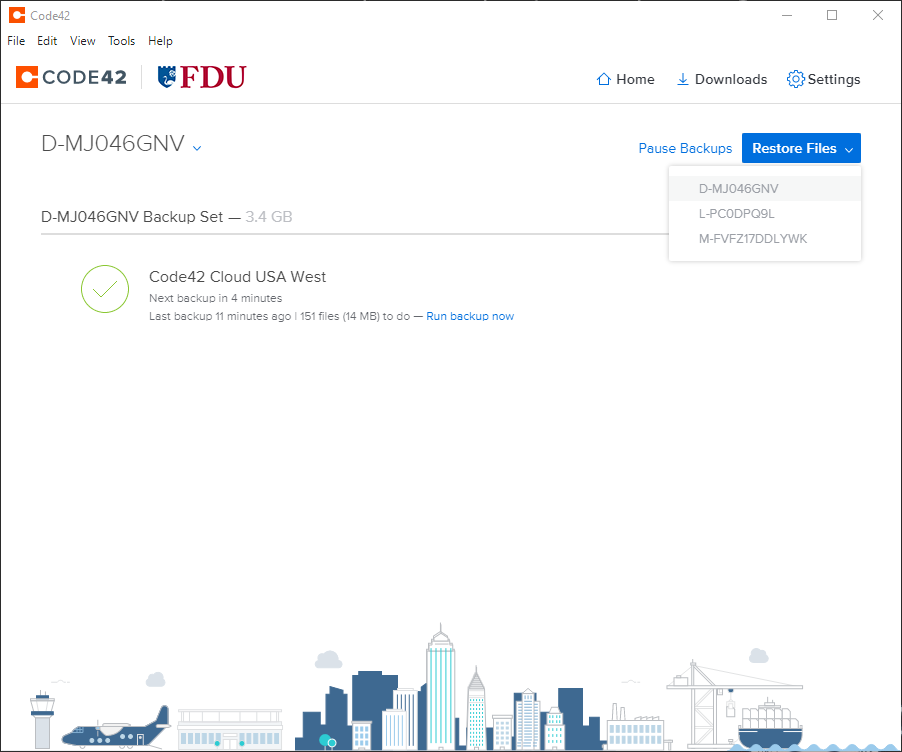
Click “Restore Files”
Select the device you wish to restore from
Note
If you have more than one backup device, please select the device from where you want to restore the file from.
You can select a date range from when you wish to restore from on the right-hand side
Navigate to the folder(s) and/or file(s) you wish to restore and place a check next to each one
Click “Restore Files”
Select how CrashPlan will restore your files. Click “Go” when finished
Note
Above are the recommended options for restoring files, this will help you find them more easily.
The time it takes to restore your files will depend on how much data is being restored, available system resources, and available bandwidth.
Using CrashPlan you can create backup sets that will back up your data to additional devices utilizing a schedule. This is useful to have immediate access to critical files in the event of data loss.
This guide is only needed if you wish to have a local backup of your data.
Note
If you schedule multiple backup sets to run at specific times and the backup sets go to the same destination, ensure that these times do not overlap. This ensures good backup performance.
Click the CrashPlan System Tray or macOS menu bar Icon
CrashPlan Icon
Left-click on the gear symbol and left-click on “Open CrashPlan….”
If prompted, log in to the FDU Single Sign-on Portal and proceed through the FDU DUO Multi-factor authentication procedures
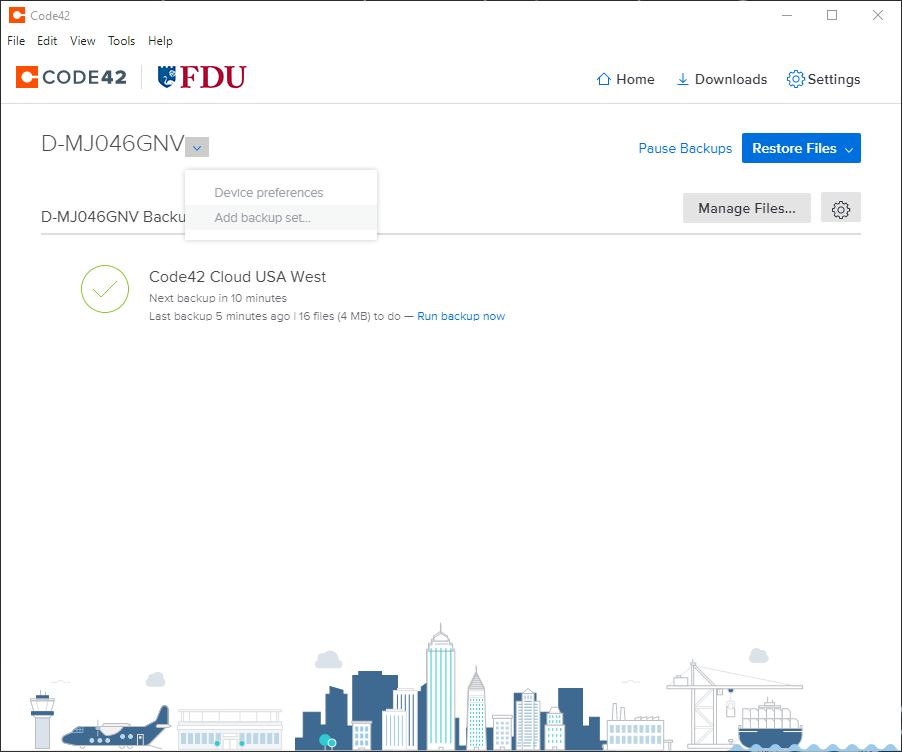
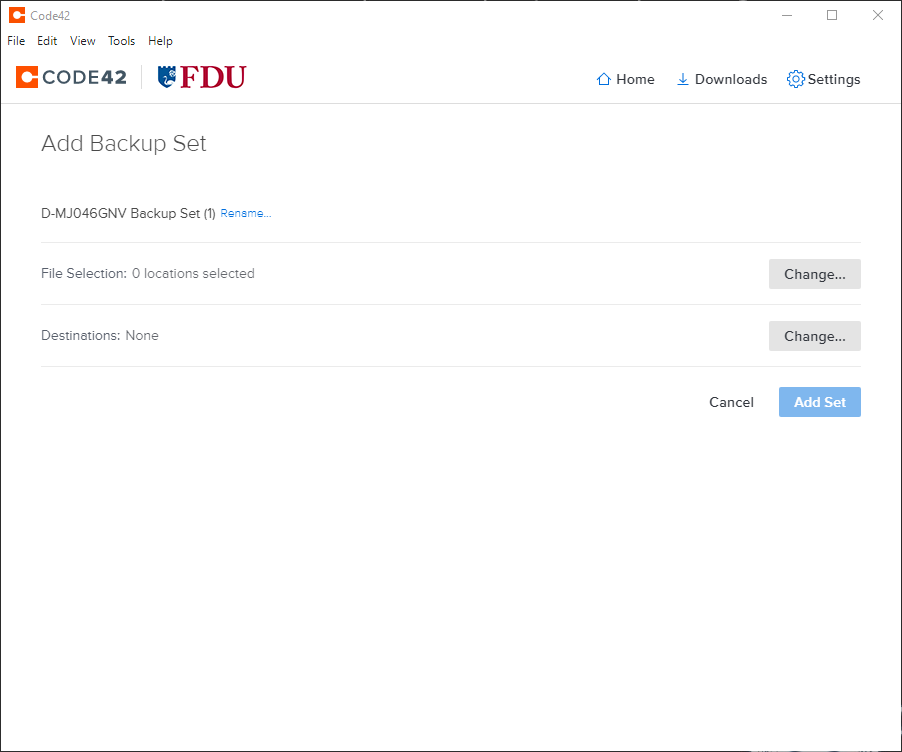
From the CrashPlan console window, click the “Dropdown Arrow” symbol next to your device name to drop down a menu, then click “Add Backup Set…”
The next window will be the Add Backup Set configuration window.
Note
The “Add Set” button will be un-clickable until it is completely configured.
Click “Rename” to label your backup set
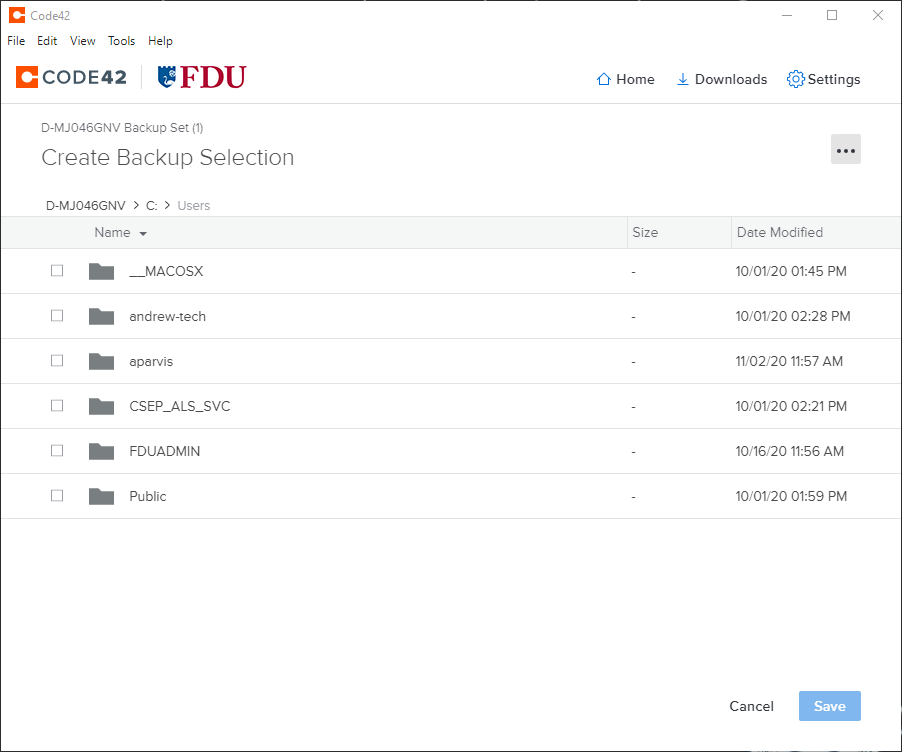
Changing Selected Files, click “Change”, and select the files and folders you wish to backup to a local destination
When finished click “Save“
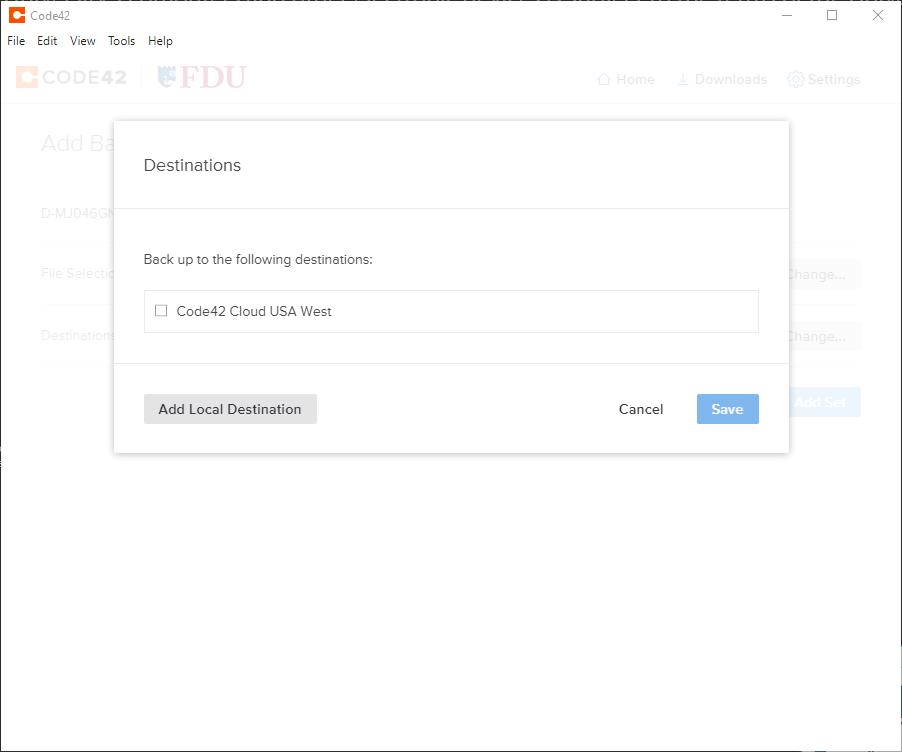
Click “Change” to set your destination for your backup
Select your destination by clicking “Add Local Destination (usually an external hard drive) and click “Save“
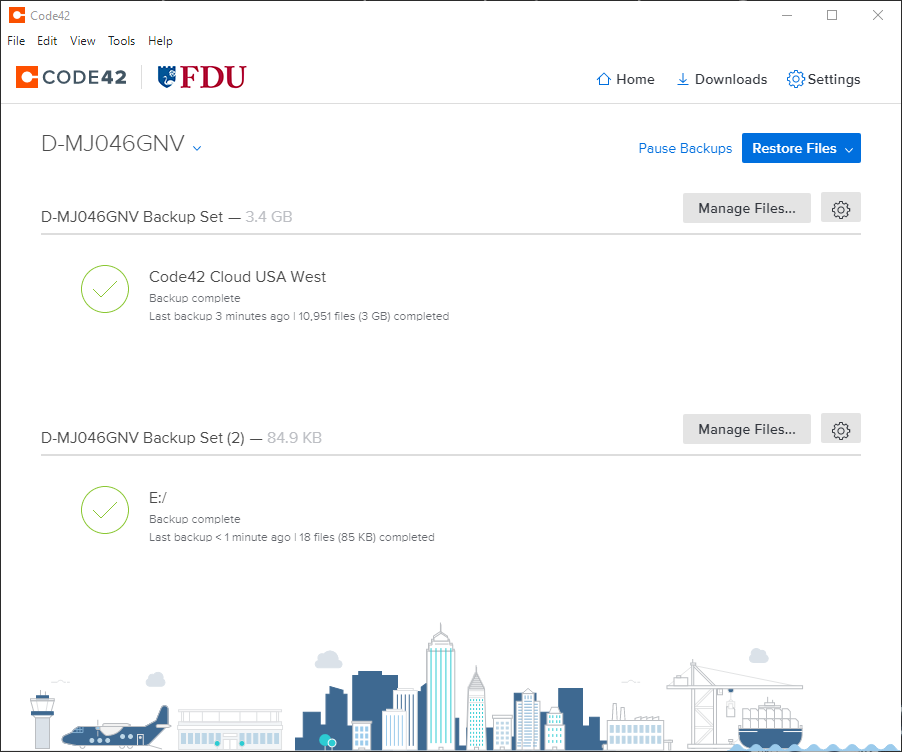
Click “Add Set” to finalize the setup and start backing up to a local location
Your new back upset is finished and will begin backing up as configured.
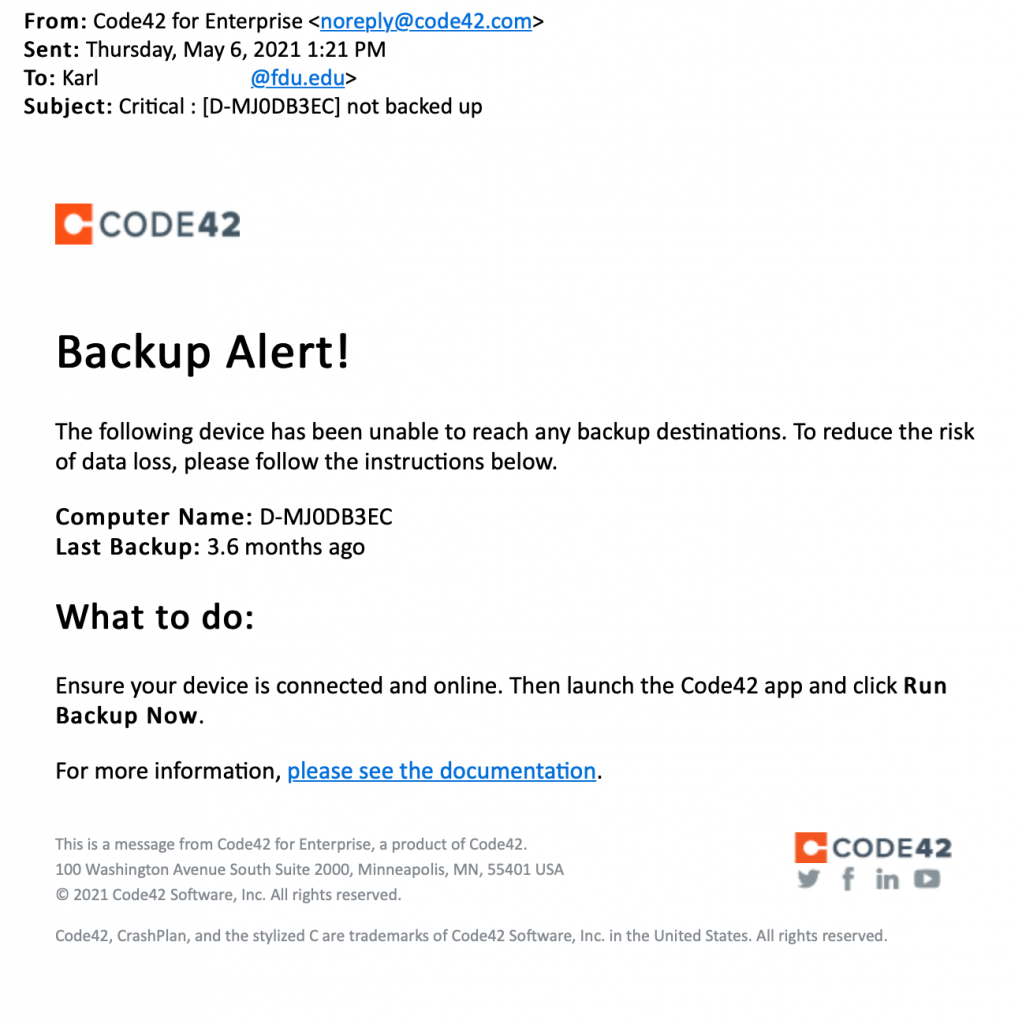
CrashPlan will send users an email alert notifying of any incomplete backups of their devices.
The CrashPlan email alert will be sent from CrashPlan for Enterprise <noreply@crashplan.com>
The Subject line of the email will be labeled with: Critical: [Name of Device] not backed up
Backup Alert
You will receive an alert when your computer hasn’t backed up to CrashPlan for 5 calendar days. The email will look like the example below:
CrashPlan Backup Alert Email Notification
What to do if you get a backup alert
After receiving a CrashPlan backup alert email, you should locate the device the email specifies in need of backup. The CrashPlan device name will be listed in the Subject: line and Computer Name: line of the CrashPlan backup alert email. To locate the name of a CrashPlan device, left-click the CrashPlan “C” symbol icon in the Windows System Tray, also referred to as the notification area.
Tip
The Windows System Tray or notification area is usually located on the bottom right of the Windows taskbar, next to the displayed digital clock.
For macOS users left-click CrashPlan symbol icon on the macOS icon menu bar. The CrashPlan device name will be displayed in the console. Ensure the CrashPlan application displays the same name as the CrashPlan backup alert email you received.
CrashPlan Symbol Icon
CrashPlan Device Name
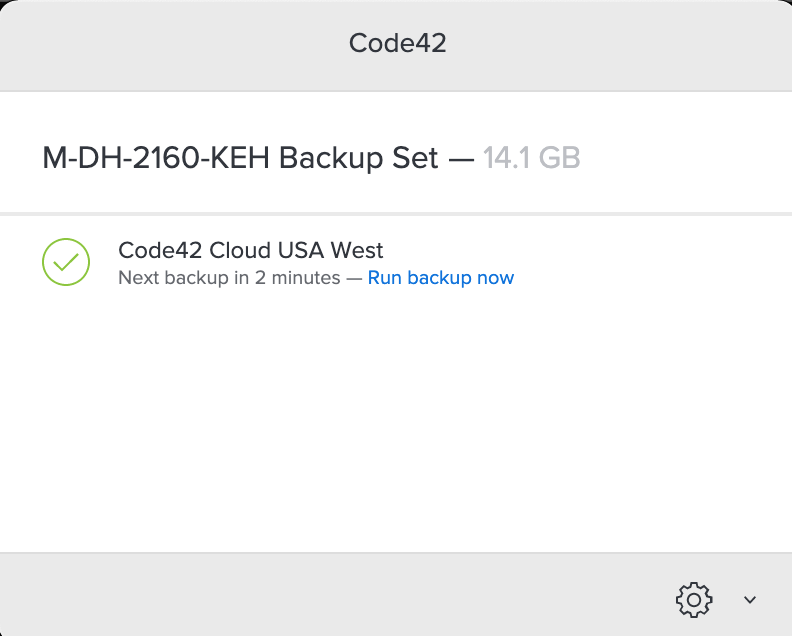
After locating the correct specified device stated in the CrashPlan backup alert email, force a backup of the device by performing the following:
Left-click the “CrashPlan” System Tray or macOS menu bar Icon
CrashPlan Icon
Left-click “Run backup now“
Note
The backup may take some time to complete. This depends on the length of time since CrashPlan’s last complete backup and the amount of new data needed to be backed up.
This guide is designed to assist you in mastering both the classic and updated versions of the DUO Device Management Portal. It simplifies the process of modifying existing devices and integrating new ones into your multi-factor authentication setup.
Legacy DUO Device Management Portal
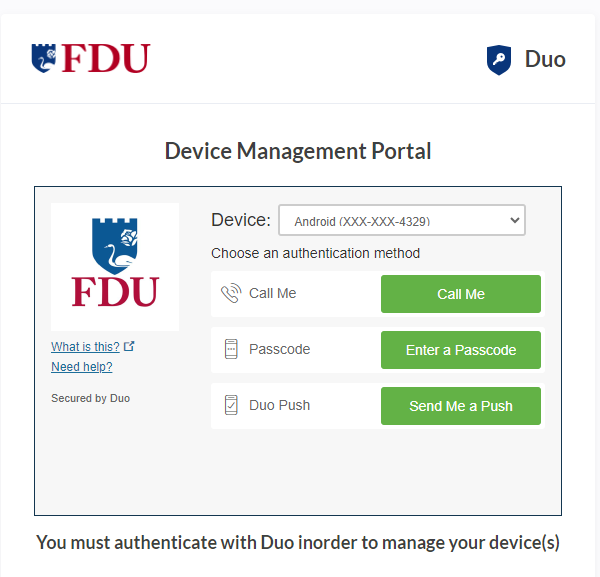
Accessing the legacy DUO Management Portal
In a Desktop or Laptop browser visit the “DUO Management Portal“. You will be prompted to authenticate through SSO and complete the Multi-factor Authentication process
After authenticating you’ll see the DUO Management Portal. This is where you can enroll new devices, reactivate, edit, or delete your existing devices
close
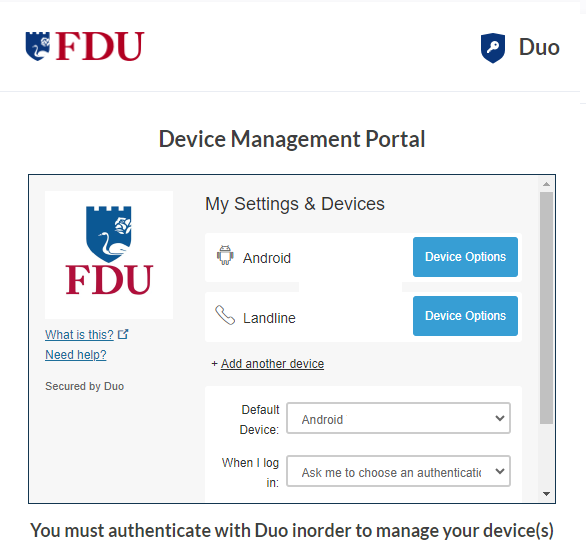
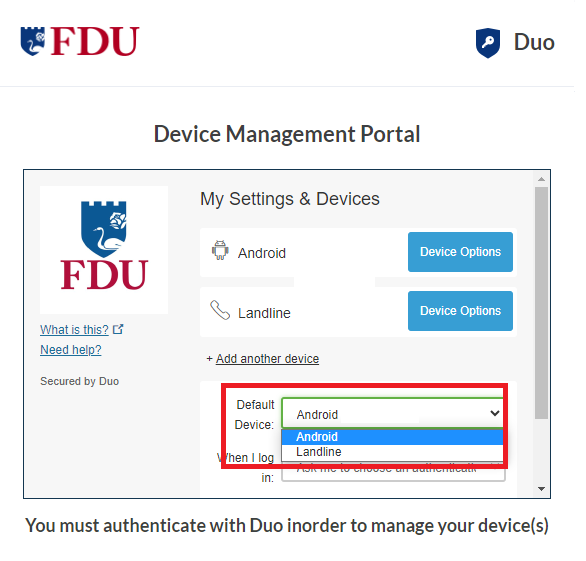
Default Authentication Options
If you authenticate with more than one device, you can specify which you would like to be the default.
Click the “Default Device” drop-down menu and pick your default device for authentication. Click “Save” if you’re done making changes
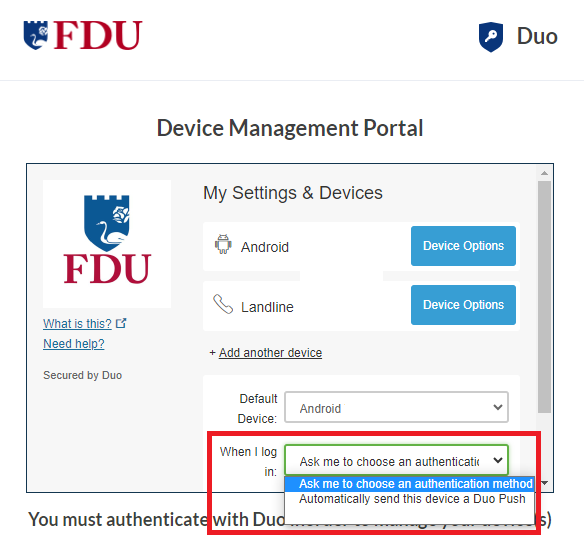
You can choose which authentication method you prefer to use when logging in by clicking on the “When I log in” drop-down menu
Ask me to choose an authentication method: it will prompt you to select an option every time you log in
Automatically send this device a DUO Push: it will automatically send a DUO Push to your default device
close
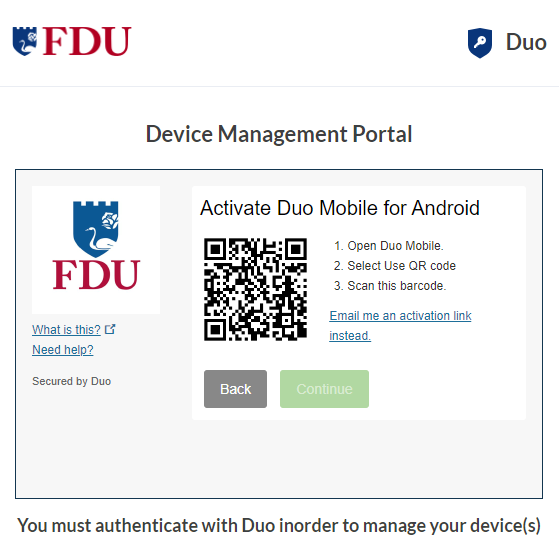
Reactivate Duo Mobile
Click on “Reactivate DUO Mobile” if you need to get DUO Push working on your phone, for example, if you replaced your phone with a new model but kept the same phone number.
After answering some questions about your device, you’ll receive a new QR code to scan with your phone, which will complete the DUO Mobile activation process
close
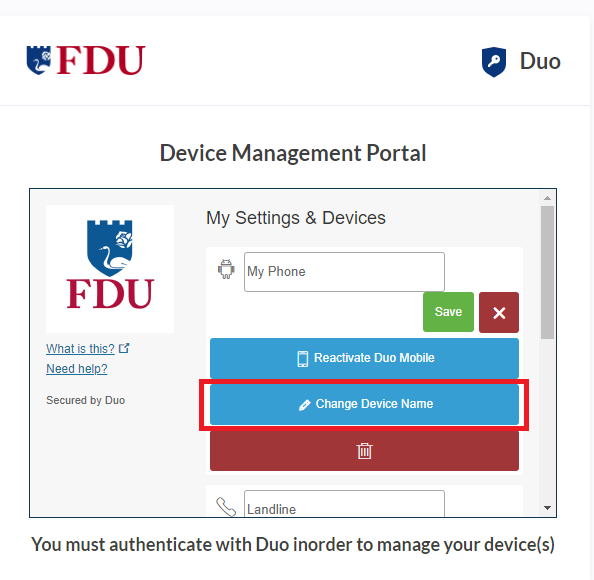
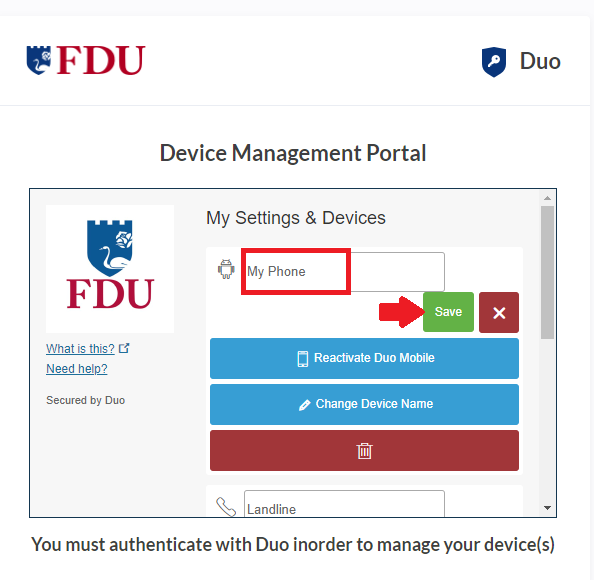
Change Device Name
Click on “Change Device Name” to open up an interface to change the display name of your phone
Type in the new name and click “Save“
close
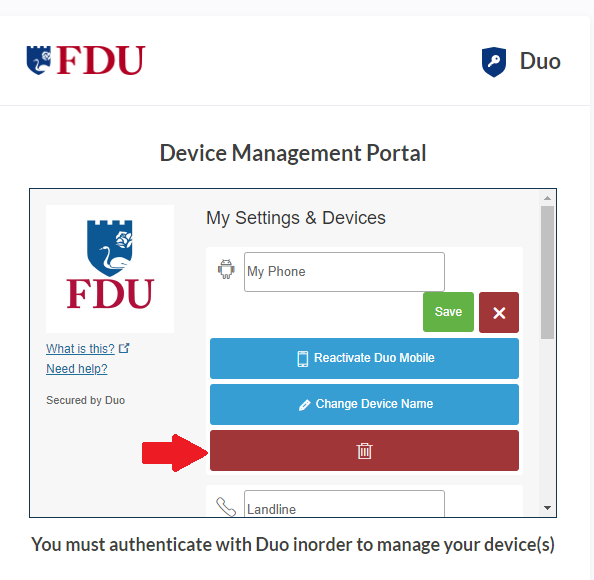
Remove Device
Click the “trash” icon button to delete a device
Confirm that you want to remove the device by clicking on “Remove“. The device will be deleted. It will no longer be able to approve DUO authentication requests.
Note
You may not remove your last device. If you wish to remove it, first add another, then delete the original. If you are unable to delete a device, contact your administrator to have it removed.
close
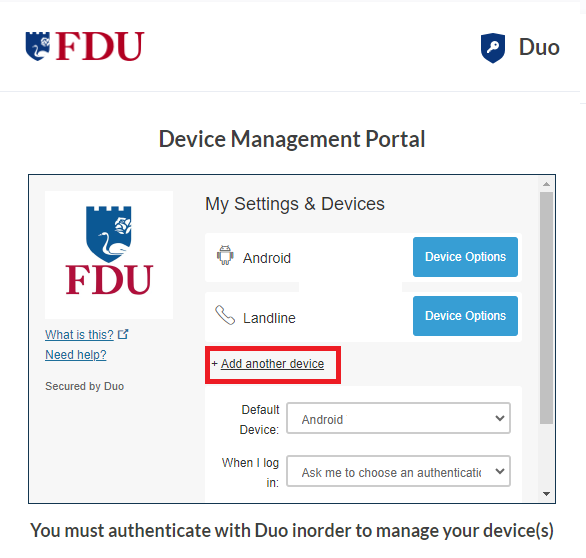
Add New Device
To add a new authentication device, click “Add another device” link on the right side of the DUO Prompt. You’ll be taken to the new device enrollment prompt
You can use the DUO Quick Start Guide for instructions on how to enroll a new device
Accessing Updated Device Management in the DUO Universal Prompt
You can add additional verification methods, manage your existing devices, or reactivate DUO Mobile for DUO Push from the DUO Universal Prompt.
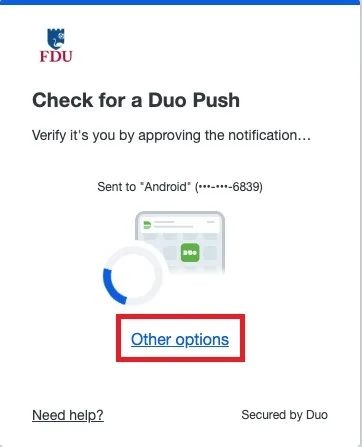
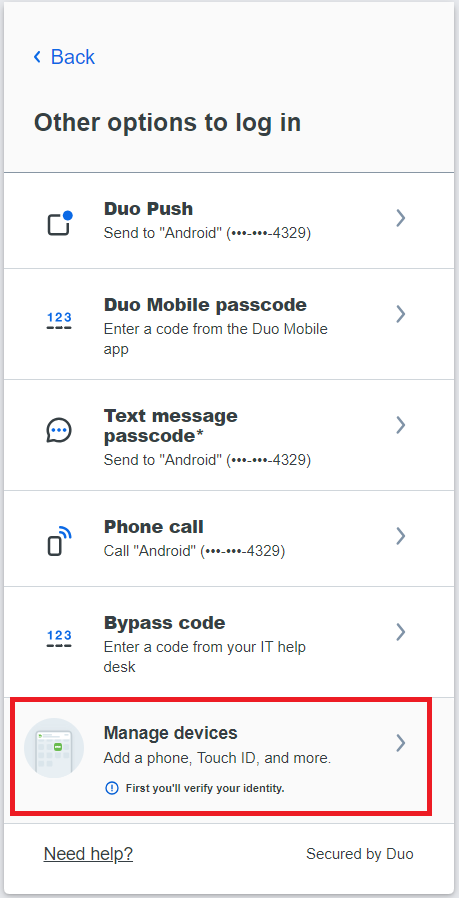
When logging in to an application with the Universal Prompt Click the “Other Options” link on the authentication page to view your list of available methods
Click on “Manage devices” at the end of the list to enter the device management portal
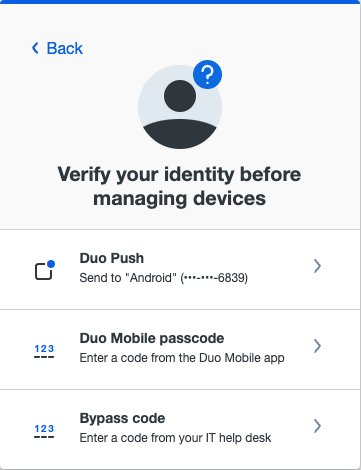
You will be prompted to verify your identity by completing the DUO Multifactor Authentication process. Select your preferred authentication method from the listed options to continue
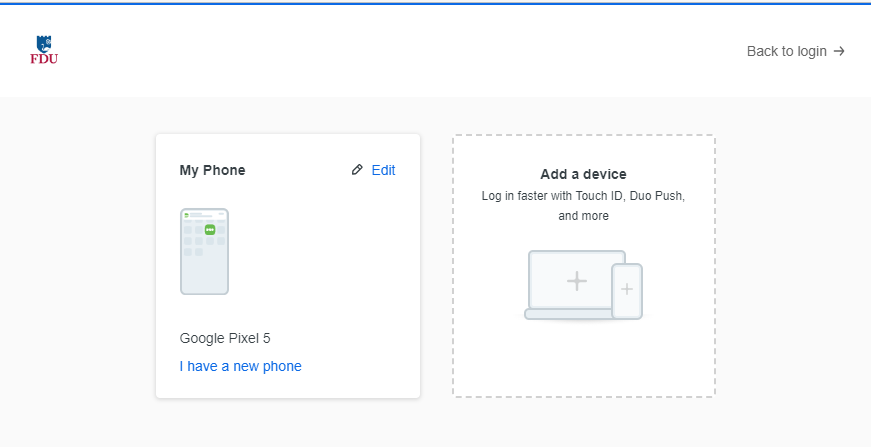
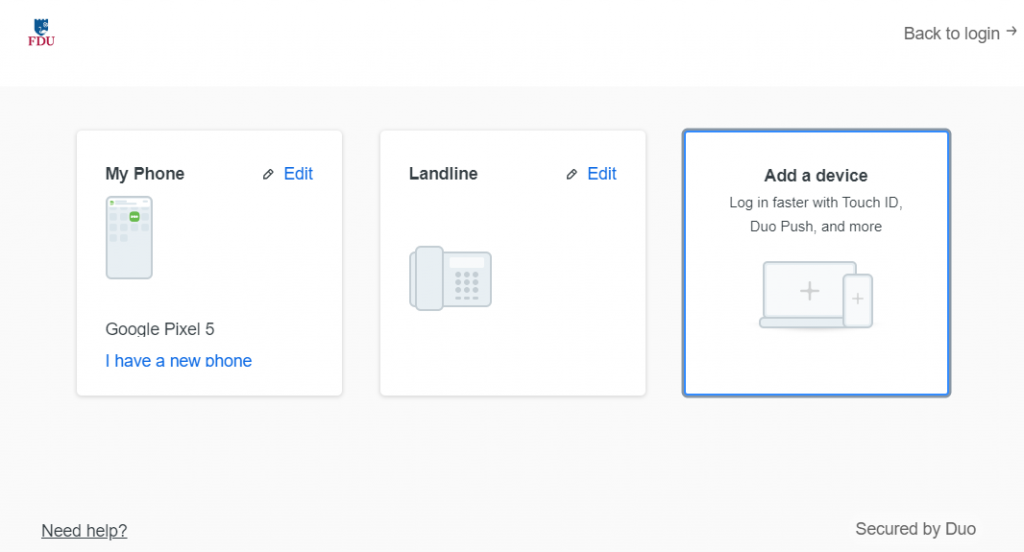
After approving a DUO authentication request you can see the Device Management Portal with all your registered devices.
close
Add New Device
To add a new method of verifying your identity in DUO, click “Add a device” and follow the enrollment process described in the DUO Quick Start Guide, starting on Step 3.
The difference between adding a new device from the Device Management Portal and during first-time enrollment is that when you have finished enrolling the new device you return to the Device Management Portal to view all your registered devices, including the new one, instead of continuing to log into an application.
close
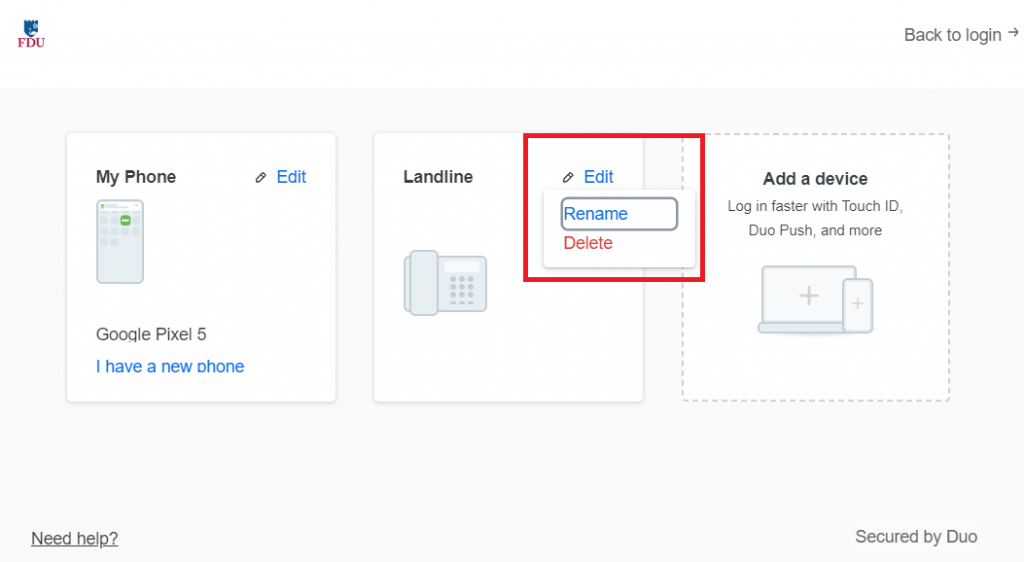
Rename or Remove a Device
Click the “Edit” button on the device you would like to rename or remove to view the drop down menu
Then click either “Rename” or “Delete“
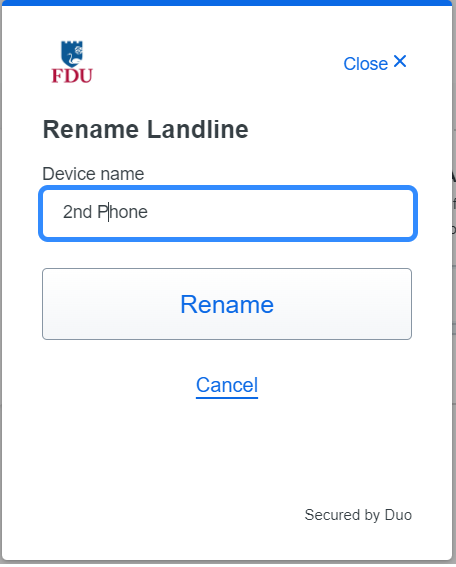
When renaming a device, type the new name for your device, then click on “Rename” to save your changes
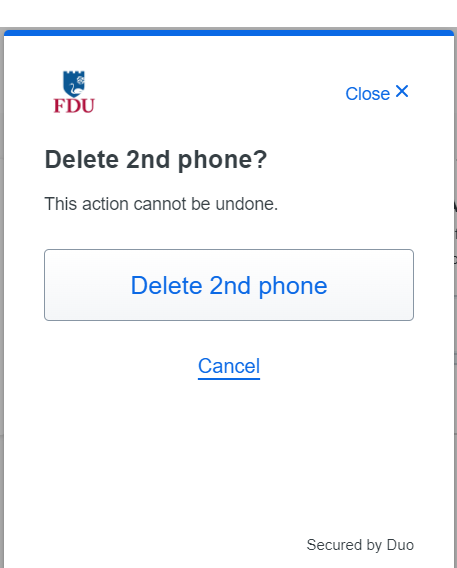
When Deleting a device, confirm your selection to delete
close
Reactivate DUO Mobile for an Existing Device
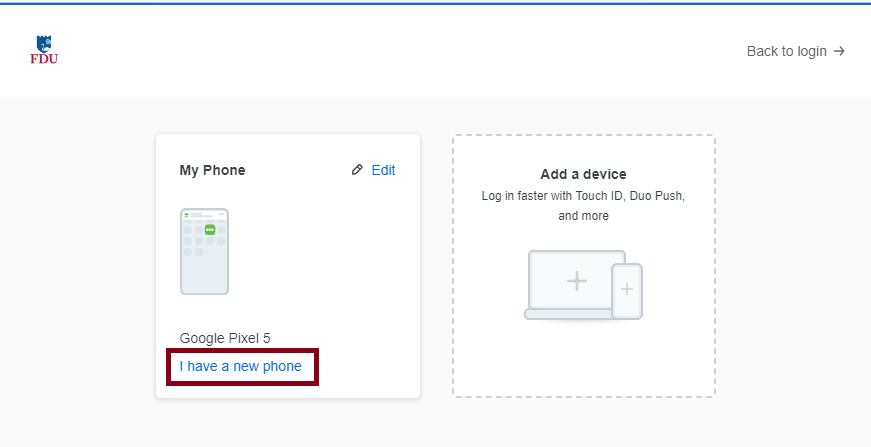
If you have replaced the phone you activated for DUO Push, you can reactivate DUO Push if you have the same phone number.
Click on “I have a new phone” for the device you want to reactivate
Click “Get Started” to continue
Click on “Send me a passcode” or “Call my phone” then proceed to follow the instructions prompted to complete the reactivation process
close
Reactivate DUO Mobile outside of the Device Management Portal
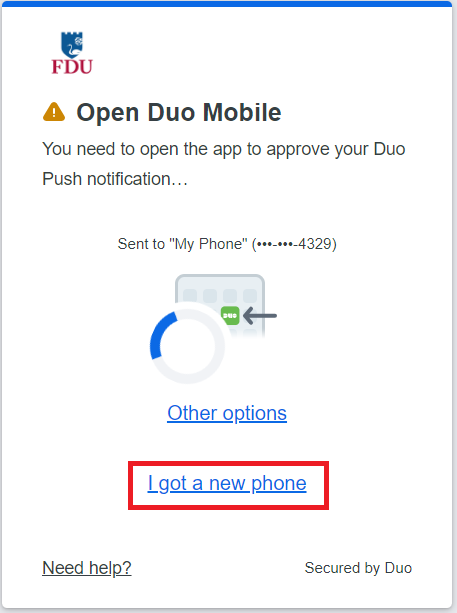
Let the DUO Push authentication time out
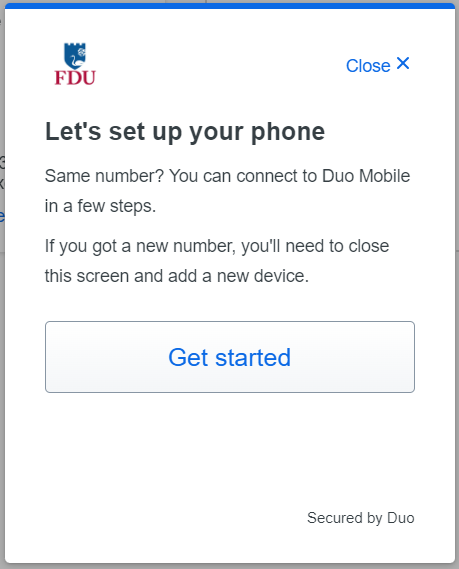
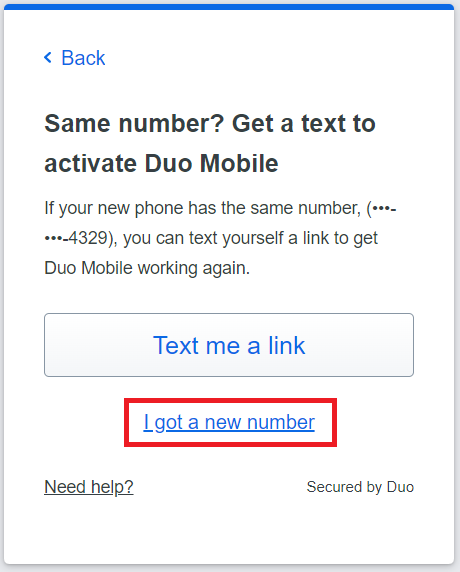
Click on the “I got a new phone” link shown in the Universal Prompt
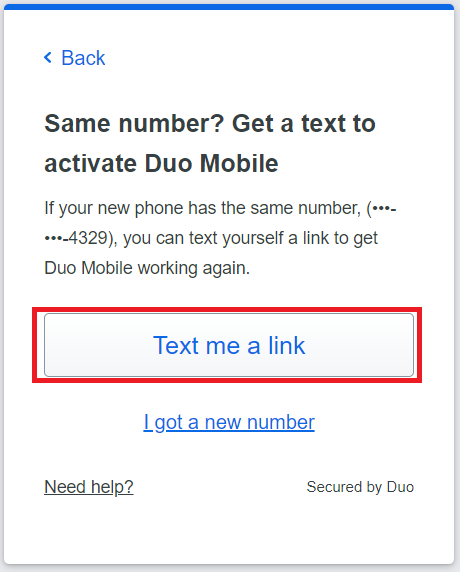
If you still use the same phone number as you did when you first set up the phone to use DUO Push, then click or tap the “Text me a link” button
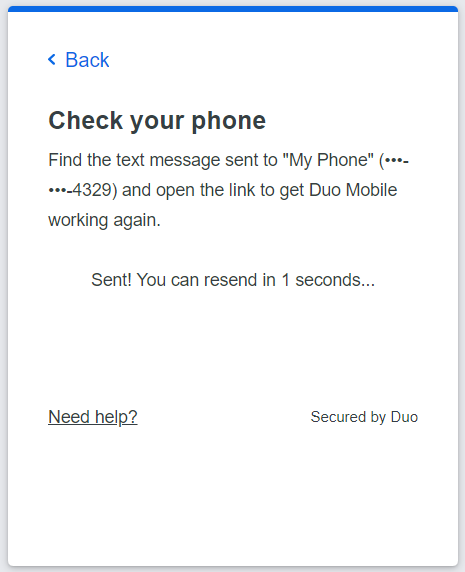
When the text message with the link arrives on your phone, tap it to automatically reactivate DUO Mobile on your phone to use DUO Push again. If you don’t have DUO Mobile installed be sure to install it before you try to open the activation link in the text message.
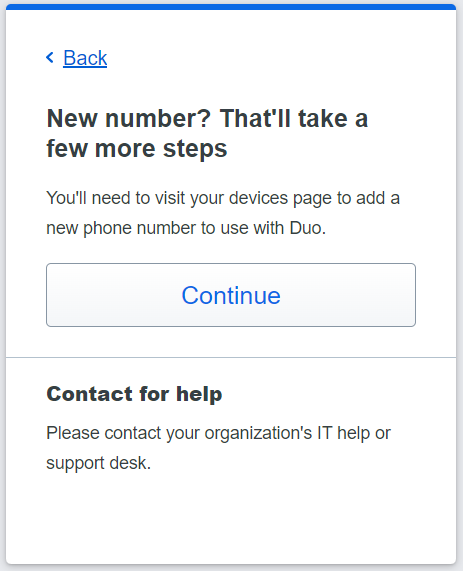
If you are using a different phone number than the one you first set up, then press on “I got a new number“
Press “Continue” to proceed to the DUO Device Management Portal, where you can complete the steps to “Adding a New Device“and set up DUO Push on the new phone
Note
You will need to verify your identity with a different DUO verification method, so if you don’t have one available you will need to contact the SAMI Service Desk for help.
Two-factor authentication also referred to as multi-factor authentication, provides an additional layer of security when logging in to a website. Two-factor authentication is becoming the standard in cybersecurity. Google, Apple, and other services all have their two-factor authentication methods. In short, passwords are no longer sufficient in protecting our sensitive data; we’ve got to add another layer of security to our accounts.
DUO Push – if you have the DUO Mobile App installed on your smartphone or tablet, you can receive a push notification. From the app, you can approve or deny the login attempt.
Passcodes via DUO Mobile App – If you have the DUO Mobile app installed, you can receive a single passcode by tapping the FDU logo in the mobile app. This code must be used immediately.
Passcodes via SMS (Faculty/Staff Only) – users can receive a one-time use code via text message. To get you a one-time code, click Enter Passcode, then click on the blue button “Text me new codes.” These codes do not expire, and they are valid until used. You do not have to have a smartphone for this option.
Phone Call (Faculty/Staff Only) – you can receive a phone call on your mobile phone or landline phone. The call will give instructions on approving or denying the login attempt.
If you opt-out of the DUO Mobile Application push notifications, there are a variety of passcode options to utilize as your second verification method.
Passcodes via DUO Mobile App – If you have the DUO Mobile app installed, you can receive a single passcode by tapping the FDU logo in the mobile app. This code must be used immediately.
Passcodes via SMS(Faculty/Staff Only) – users can receive a one-time use code via text message. To get you one-time code click Enter Passcode, then click on the blue button “Text me new codes.”These codes do not expire, and they are valid until used. You do not have to have a smartphone for this option.
Temporary Passcodes –If you do not have your device with you, you can obtain temporary passcodes by calling the SAMI Service Desk. Each of the passcodes can only be used once, and will expire in 7 days.
Selecting this option will allow you to bypass DUO authentication for the next 60 days. This only works if cookies are enabled, and you are logging in from the same computer and browser. You will still be prompted to verify once – with your username and password. You will not be able to access your settings on that particular browser during the 60 days. Please note that if you have tools or policies running that regularly delete or clean cookies, the remember me feature will not work. If you do need to access your settings (perhaps to add another device), just try another browser or visit the FDU Self-Service Portal. Remember me will not work if your browser is set to private browsing mode.
The remember me feature relies on browser cookies. For remember me to work, your Internet browser must allow cookies to be stored. Visit your browser content settings to ensure cookies are being stored. Some departments on campus do not allow cookies to be stored. If the remember me feature does not work on your browser, check with desktop support in your area.
If you do not have your device with you, you can obtain a batch of temporary passcodes. To obtain a temporary passcode, call the Fairleigh Dickinson University Technical Assistance Center (UTAC). Each of the passcodes can only be used once and will expire in 7 days.
NOTE: If you have lost your device, please report it to the SAMI Service Desk.We want to ensure someone else does not maliciously authenticate your account with your device.
Yes, the passcode option on the DUO app does not require WiFi or cellular connectivity, it even works on airplane mode. To use this option, visit the DUO app on your smartphone, and tap the key icon to obtain a passcode. Enter the passcode into the DUO prompt when logging into any website that requires DUO authentication.
DUO Authentication is required by any application the utilizes the university Single Sign-On (SSO) service. Examples of some websites that require DUO authentication are listed below.
You may have trouble receiving push requests if there are network issues between your phone and Duo’s service. Many phones have difficulty determining whether to use the Wi-Fi or cellular data channel when checking for push requests and simply turning the phone to airplane mode and back to normal operating mode again often resolves these types of issues, if there is a reliable internet connection available. Similarly, the issue may be resolved by turning off the Wi-Fi connection on your device and using the cellular data connection.
Check the time and date on your phone and make sure they are correct. If the date and time on your phone are manually set, try changing your device’s configuration to sync date and time automatically with the network.
iOS users can run a troubleshooting tool from within Duo Mobile version 3.32.0 or later. To run the tool:
Open the Duo Mobile app on your iOS device and tap the Edit button in the top left of the accounts list screen, then tap the name of the account for you aren’t receiving push requests.
Next, tap the Get Started button in the “Missing Notifications?” section of the “Account Details” screen.
Duo Mobile performs the test. If any step fails, you’ll receive further troubleshooting suggestions. After taking the suggested actions, press “Run test again” to retry.
The steps that Push Troubleshooting performs automatically are as follows:
Check device settings.
Check internet connectivity.
Check that the device can contact Duo’s cloud service.
Attempts to send a test Duo Push notification.
Should none of these actions help, see the Duo Knowledge Base for additional iOS and Android troubleshooting steps.
If you can’t get Duo Push working on your own, you can log in with a passcode generated by the Duo Mobile app and send a new activation link to your phone.
If you’ve tried the suggestions here but can’t get Duo Push working or reactivate your device yourself, please contact the SAMI Service Desk.
NOTE: Google Play Services are required to receive push notifications on Android. Users without Google Play Services installed will have to “fetch” by swiping down in the DUO Mobile app.
If your phone number has not changed, login to FDU Self-Service Portal then choose the “Call my Phone” option.
Choose your device from the list, and then click “Device Options” next to your phone.
Next click the “Reactivate Duo Mobile” button (you will need to install the Duo app on your phone to proceed). Then follow the instructions to activate DUO Mobile on your new device.
If you have a new phone number, you will first need to obtain a temporary passcode (see the ‘What are Passcodes?’ section above).
Yes, you can add devices by visiting your DUO settings. When you see the DUO prompt with the three notification options, click “Settings” at the top right.
NOTE: If you are using the Remember Me for 60 days feature, you will need to visit FDU Self-Service Portalaccess your settings.)
After you click Settings, click “Add a New Device“. You can register smartphones, cell phones, tablets, and landline phones.
The DUO smartphone application serves only to provide two-factor authentication. It does not access any personal information on your device, nor does it track your location. Learn more about DUO’s commitment to privacy on its website.
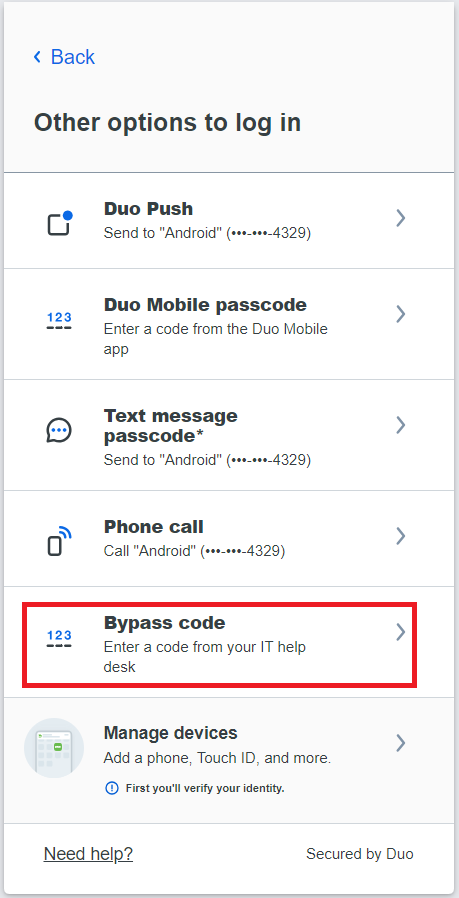
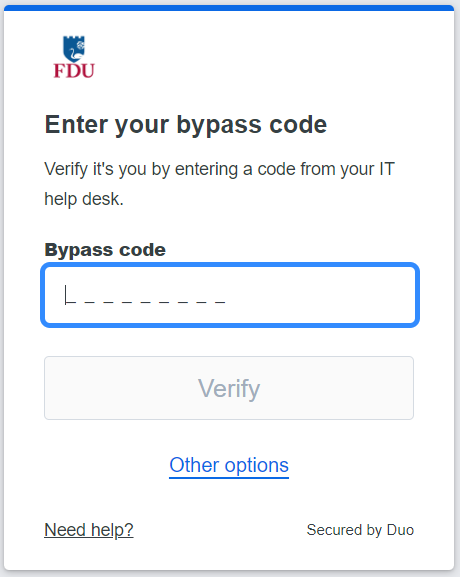
A “bypass code” is a temporary passcode created by an administrator for a specific user to access a Duo-protected application. These are generally, used as “backup codes,” so that enrolled users who are having problems with their mobile devices (e.g., mobile service is disrupted, the device is lost or stolen, etc.) or who temporarily cannot use their enrolled devices (on a plane without mobile data services) can still access their Duo-protected systems.
A user must have a valid Duo authentication device enrolled (like a phone or iPad) to use a bypass code to authenticate. Bypass codes are not intended as a user’s only 2FA method.
Bypass codes expire after being used the allowed number of times, or after an administrator-defined amount of time. Once a bypass code is created, the timeout and allowed uses cannot be extended.
If you need a Bypass code please visit SAMI Service Desk, where you can request additional information or search our extensive IT knowledge base. While SAMI Support provides the quickest and easiest access for IT support, you can always contact the SAMI Service Desk at SAMISupport.fdu.edu.
DUO two-factor authentication adds a second layer of security to your FDU NetID. It requires two factors to verify identity. These factors include something you know – your FDU NetID and password, and something you have – a phone or passcode, to authenticate and gain access to your account on FDU services. Passwords alone no longer provide adequate protection against cyber hacking. DUO is required for all current FDU students.
Install DUO Mobile App
The DUO app is available for mobile phones and tablets. You can directly access the DUO Mobile Security App using these links:
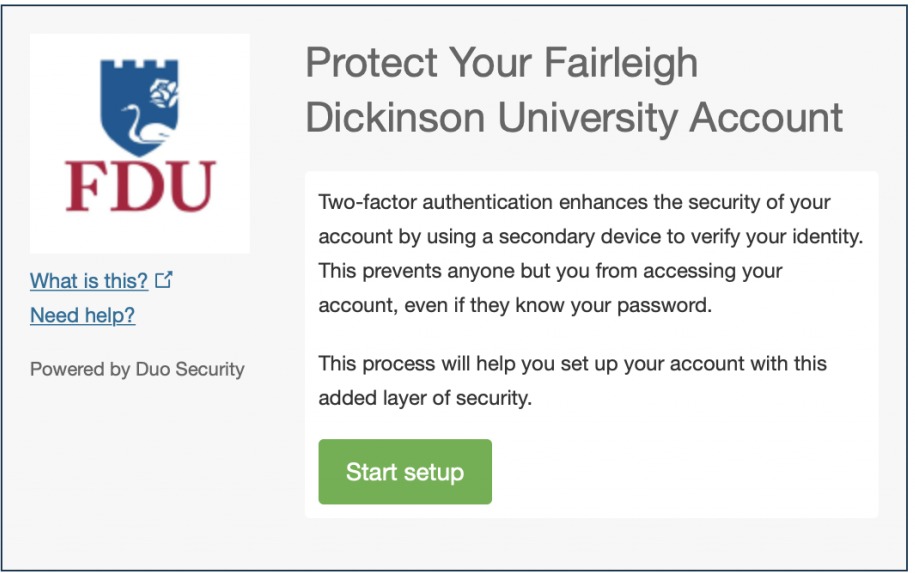
In a Desktop or Laptop browser visit the DUO Management Portal to begin the activation process by enrolling your device. Activation requires scanning a QR code with the DUO app’s built-in scanner
Duo prompts you to enroll the first time you visit the DUO Management Portal using a browser or a client application that shows the interactive Duo web-based prompt
Supported Browsers: Chrome, Firefox, Safari, Edge, Opera, and Internet Explorer 8 or later. Some browsers do not support all of DUO’s authentication devices (for example, Security Keys won’t work with Internet Explorer). For the widest compatibility with DUO’s authentication methods, we recommend recent versions of Chrome and Firefox.
Click “Start setup” to begin enrolling your device
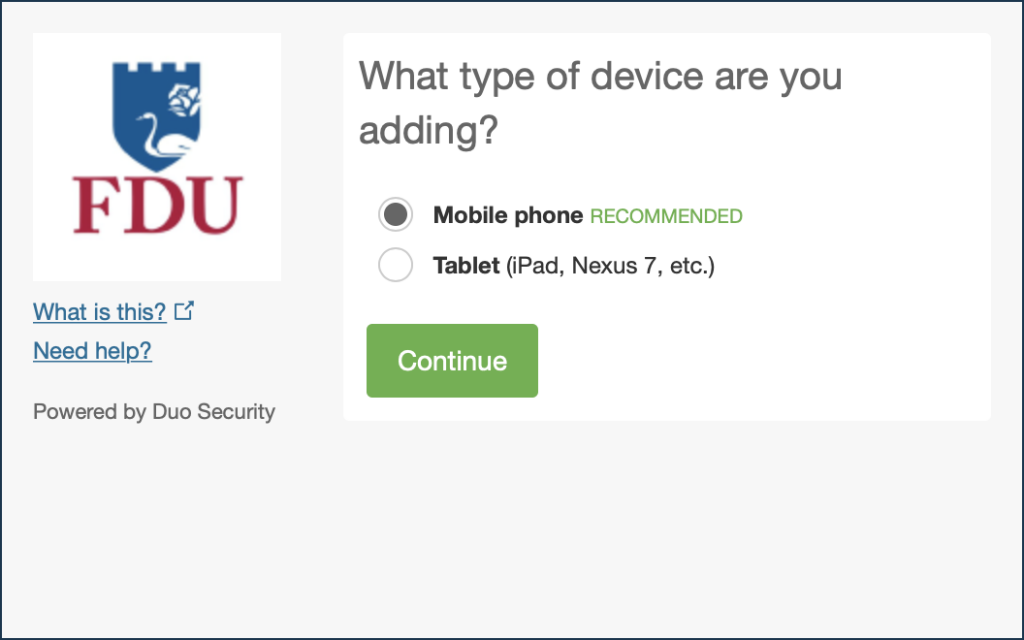
Select the type of device you’d like to enroll and click “Continue“. We recommend using a smartphone for the best experience, but you can also enroll iPadOS and Android tablets
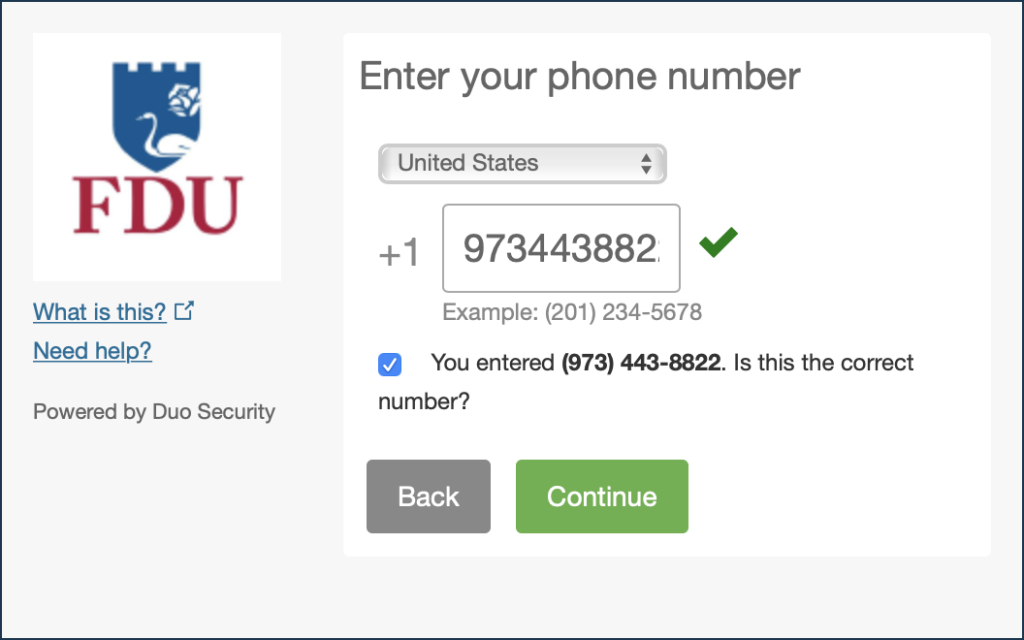
Select your country from the drop-down list and type your phone number. Use the number of your smartphone or cell phone that you installed the DUO Mobile Security App on in the Step 1
Double-check that you entered it correctly, check the box, and click “Continue“
Note
If you’re enrolling a tablet you aren’t prompted to enter a phone number.
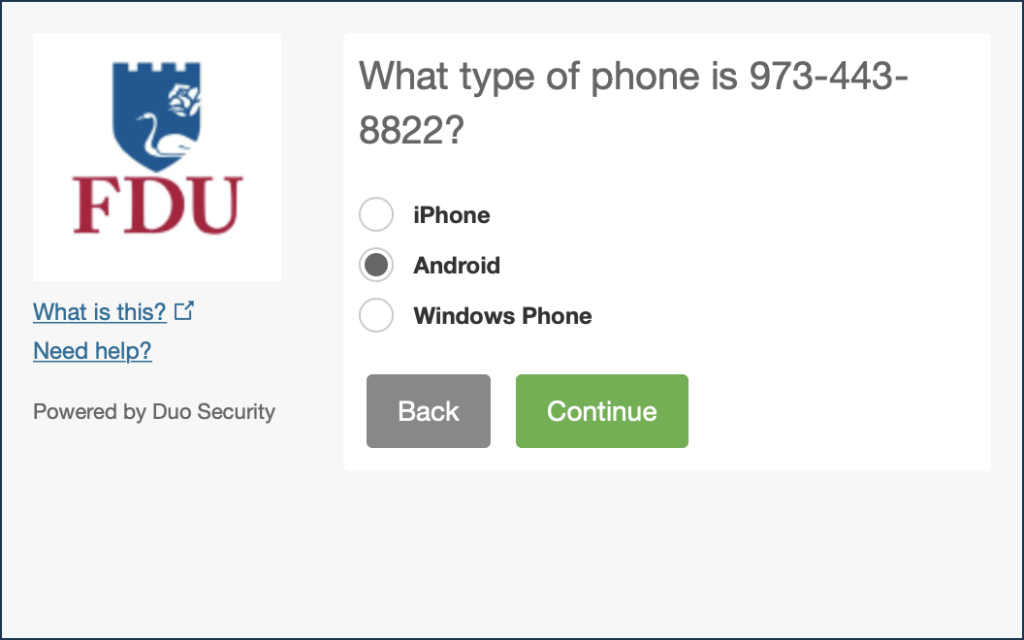
Choose your device’s operating system and click “Continue“
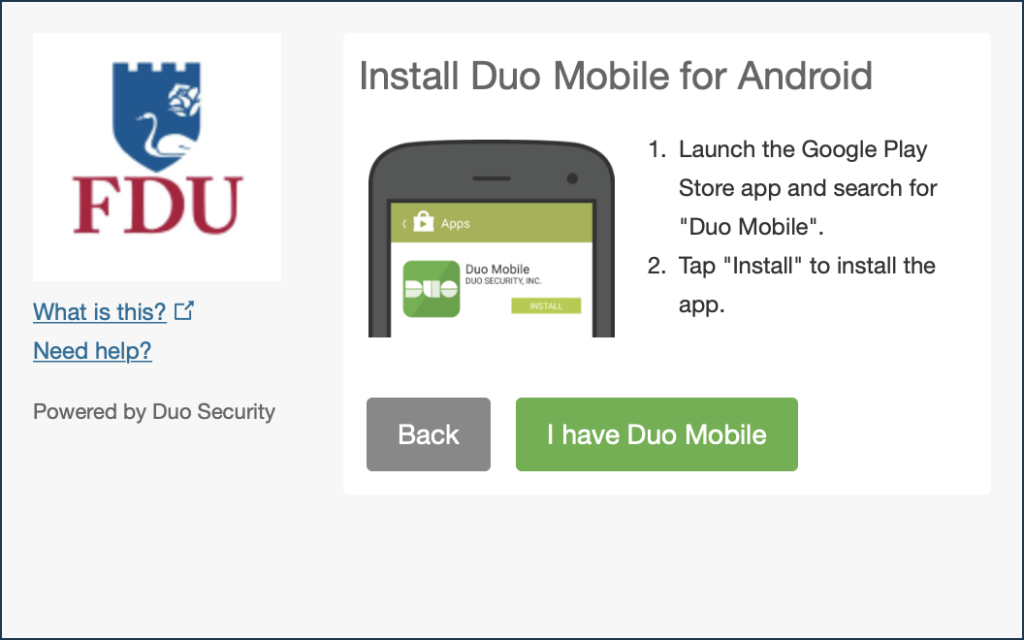
Click “I have DUO Mobile installed”
If you have not completed installing the DUO Mobile App in Step 1 please complete now by following the platform-specific instructions on the screen. After installing the app return to the enrollment window
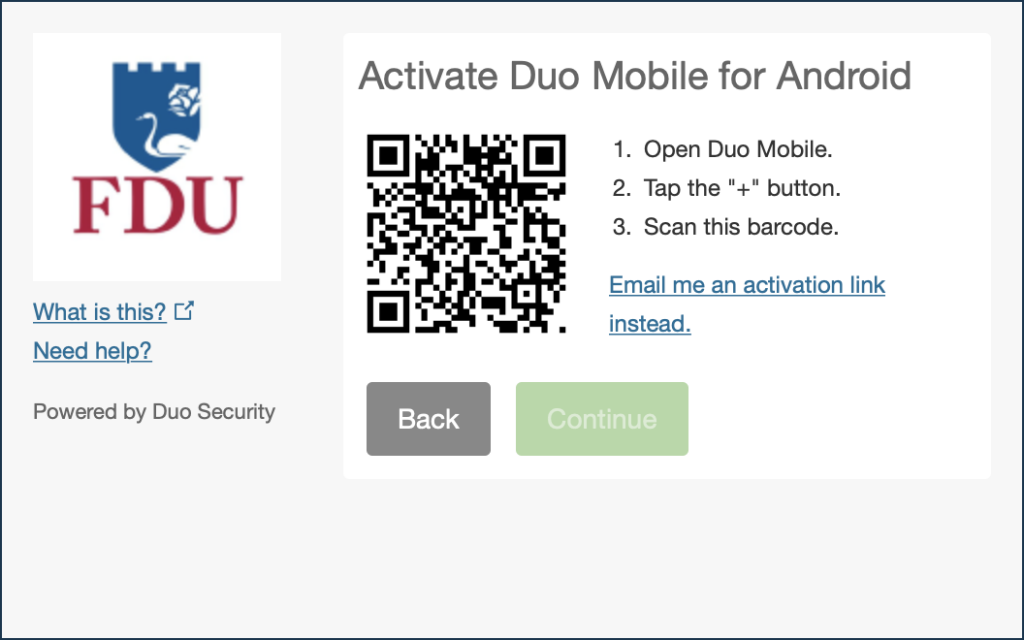
Activating the app links it to your account so you can use it for authentication
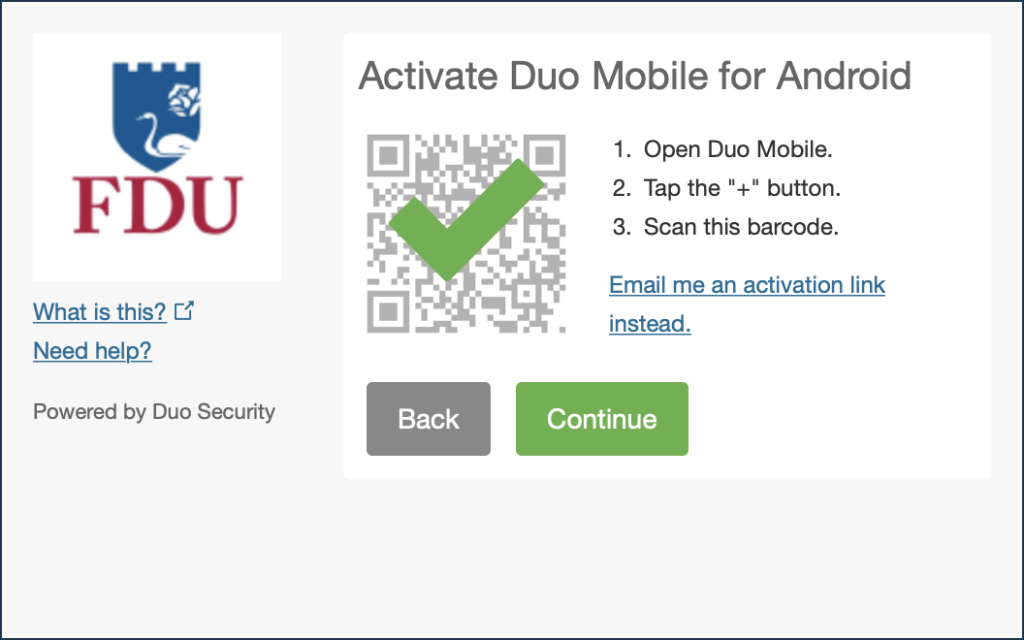
On iPhone or Android, activate DUO Mobile by scanning the barcode with the app’s built-in barcode scanner. Follow the platform specific instructions for your device:
The “Continue” button is clickable after you scan the barcode successfully
Can’t scan the barcode? Click “Or, have an activation link emailed to you instead” and follow the instructions
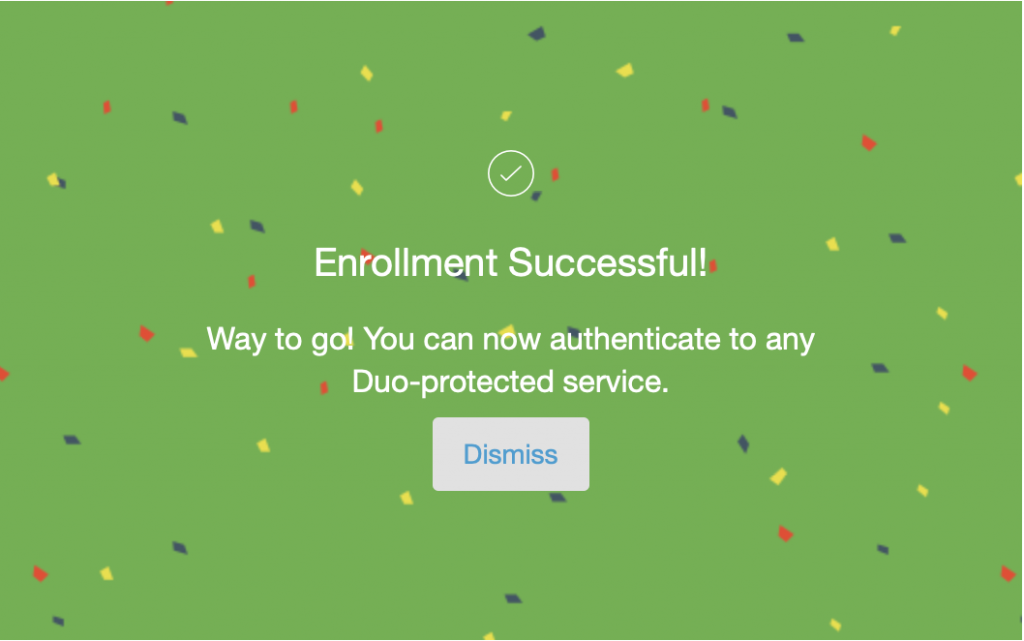
Once activated click “Continue” to complete registration
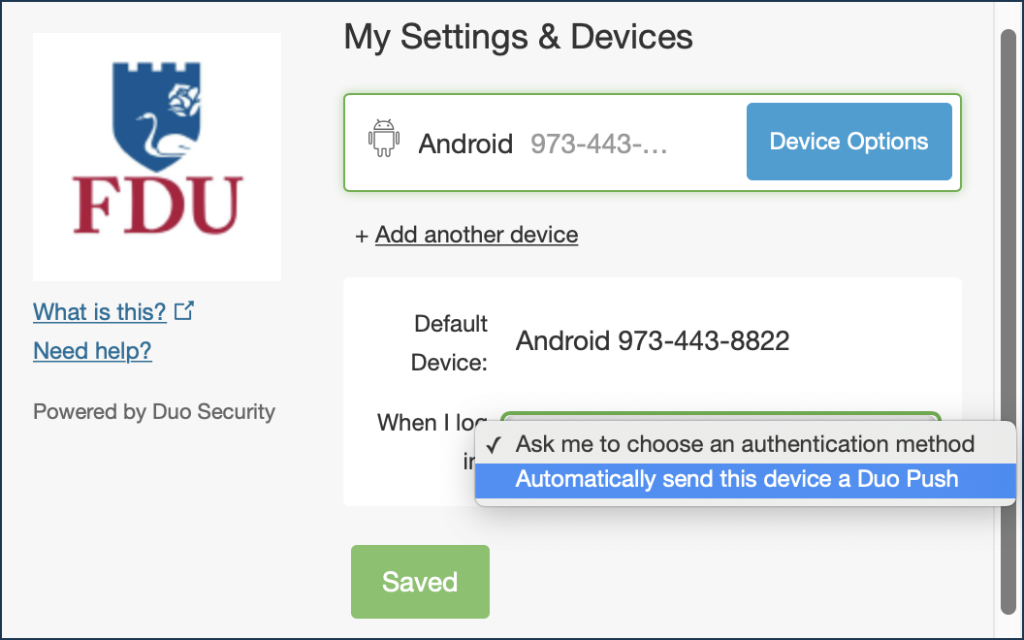
Configure Device Options (Optional)
You can use Device Options to give your phone a more descriptive name, or you can click “Add another device” to start the enrollment process again and add a second phone or another authenticator
If this is the device you’ll use most often with DUO then you may want to enable automatic push requests by changing the “When I log in:” option and changing the setting from “Ask me to choose an authentication method” to “Automatically send this device a DUO Push” and click “Save“. With one of the automatic options enabled DUO automatically sends an authentication request via push notification to the DUO Mobile app on your smartphone.
Your device is ready to approve DUO push authentication requests. Click “Send me a Push” to give it a try. All you need to do is tap “Approve” on the DUO login request received at your phone
With DUO activated on your account, and with your device enrolled, you are ready to use DUO. When logging in, you will have two authentication options. Review the options below to determine what works best for you.
Tip
We recommend the push notification to your smartphone, it’s the easiest. You can also check the box “Remember Me for 60 Days” to only perform the authentication once every two months on that device.
close
OKTA Initiated DUO Activation
Note
This step requires a Desktop or Laptop browser.
FDU NetID users who are logging into OKTA for the first time will be prompted to enroll using a browser or a client application that shows the interactive Duo web-based prompt.
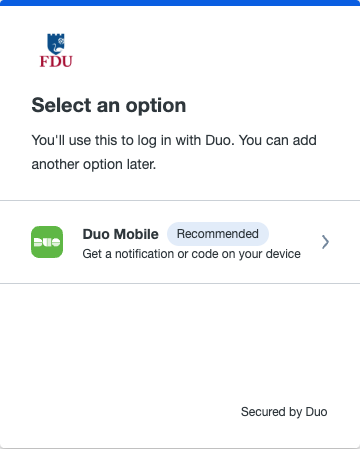
Click on “Enroll” to continue
You will be redirected to verify with DUO MFA. Click on “Set up” then “Next” to continue
Supported Browsers: Chrome, Firefox, Safari, Edge, Opera, and Internet Explorer 8 or later. Some browsers do not support all of DUO’s authentication devices. For the widest compatibility with Duo’s authentication methods, we recommend recent versions of Chrome and Firefox.
Choose “DUO Mobile” as your verification method
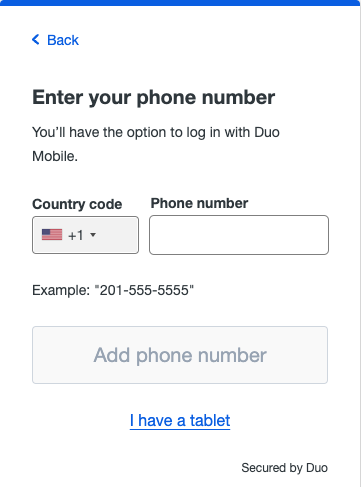
Select your country from the drop-down list and type your mobile phone number. Use the number of your smartphone or cell phone that you installed the DUO Mobile Security App. Click on “Add phone number” to continue
Note
If you’re enrolling a tablet, don’t enter a phone number and click on “I have a tablet” instead
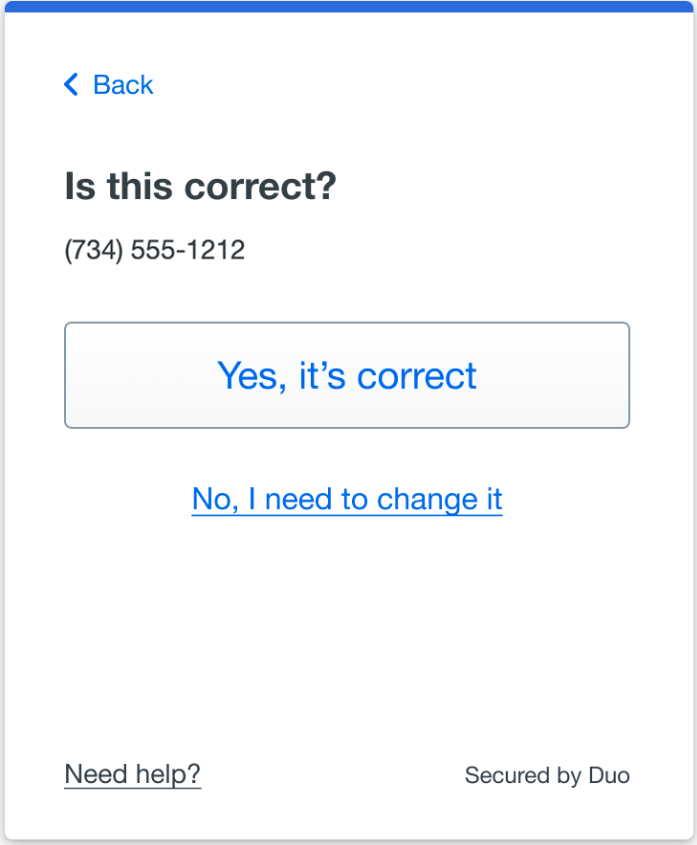
Double-check that you entered your information correctly. Click on “Yes, it’s correct” to continue if the information is correct
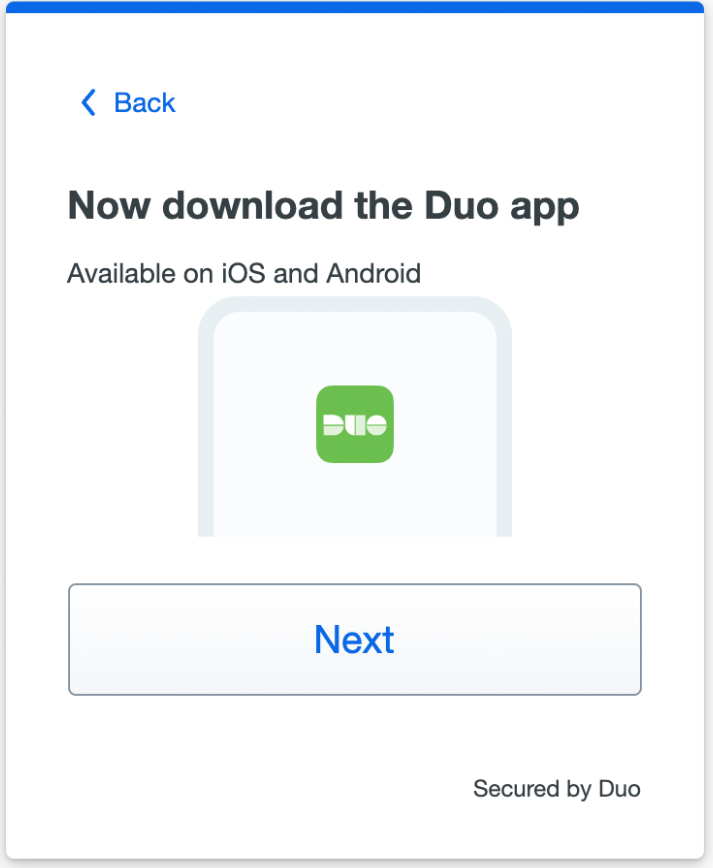
Click “Next” if you downloaded the DUO app as instructed in the first step
If you have not completed installing the DUO Mobile App please complete now by following the platform-specific instructions on the screen. After installing the app return to the enrollment window
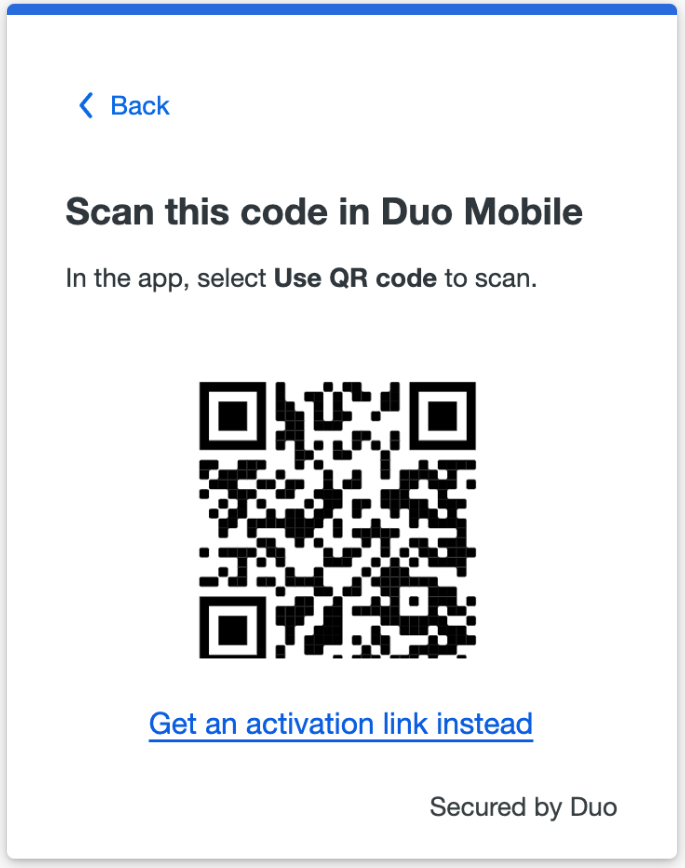
Open the DUO Mobile app on your phone or tablet and add this account by scanning the QR code shown on-screen
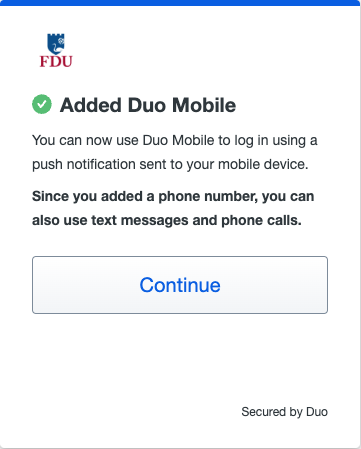
When you receive confirmation that DUO Mobile was added click “Continue“
Note
If you aren’t able to scan the QR code, click on “Get an activation link instead” and then enter your email address to send the activation link to yourself. Open your email address on your Mobile device where you installed DUO Mobile. Follow the instructions in the email to activate the new account in DUO Mobile.
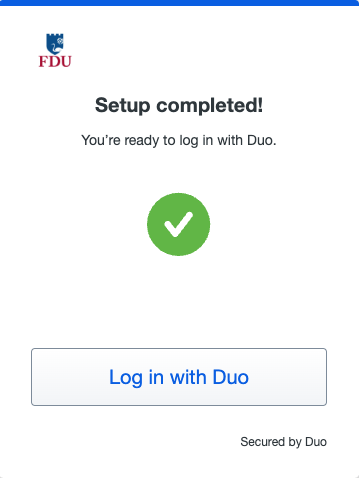
Once the setup is completed, click on “Log in with DUO“
close
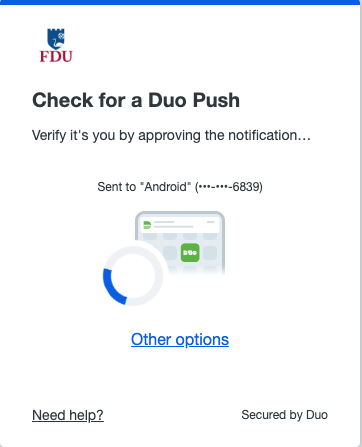
Authentication Options
With DUO activated on your account, and with your device enrolled, you are ready to use DUO. When logging in, you will automatically receive a DUO Push but will also have the choice to select from “Other Options“. Review the options below to determine what works best for you.
Tip
We recommend the push notification to your smartphone, it’s the easiest form of authentication.
These are the different ways in which you can use DUO:
Duo Push
Once you have activated DUO Authentication, Duo will automatically send a DUO Push to your registered device. Open the notification on your device, and you’ll see a green checkmark and a Red “x“. Simply tap the “Green Checkmark” to approve the authentication request and gain access to your account.
VPN users select the number corresponding to Push or type “push“. Users with multiple devices will need to include a number indicating desired device i.e. push2.
close
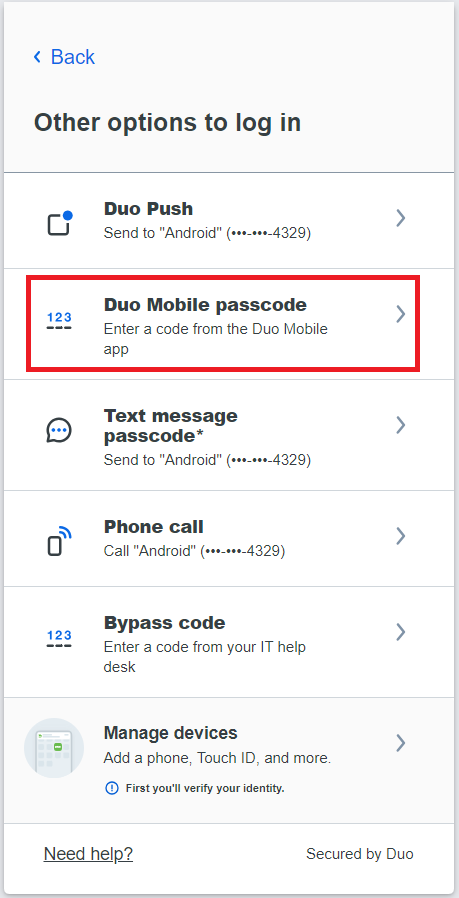
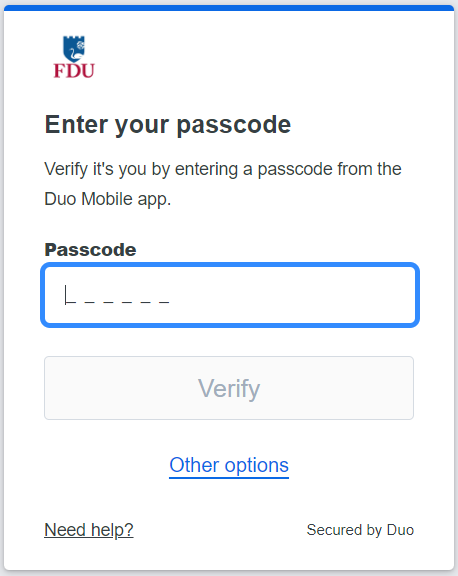
DUO Mobile Passcode
Once you have activated Duo Authentication, you can use the DUO mobile app to generate passcodes. This option does not require wifi or data, so this is a great option if you’re traveling or if you have limited or no cell/Internet service. Open your DUO mobile app, tap the FDU logo and it will reveal a passcode. During login, choose the enter a passcode option, enter the code and you’re in.
close
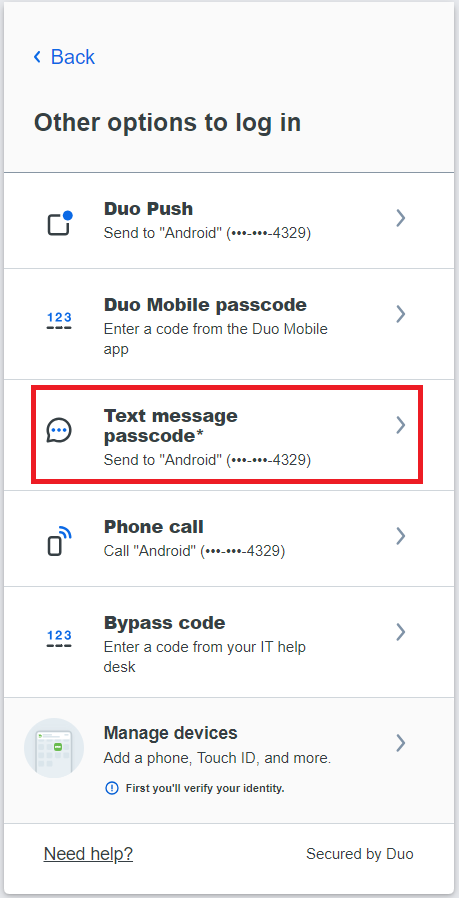
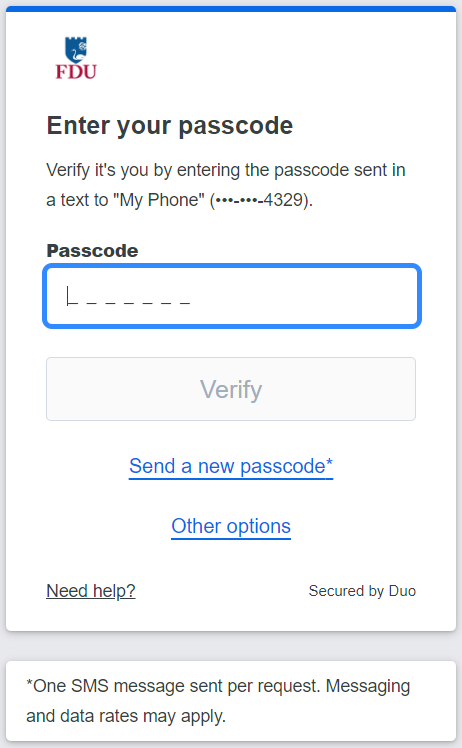
Text Message Passcode (Faculty/Staff)
You can receive a one-time use code via text message. To get your one-time code click on “Text message passcode“. When you land on the text message page, it will show that a text message was just sent to you with a passcode.
VPN users select the number corresponding to SMS passcode or type “SMS“. Users with multiple devices will need to include a number indicating desired device i.e. sms2.
Note
These text message passcodes do not expire, and they are valid until used. You do not have to have a smartphone for this option.
close
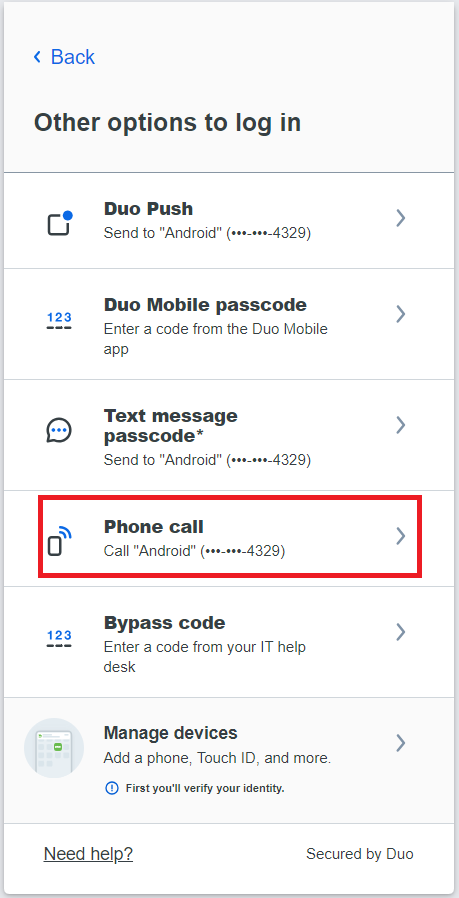
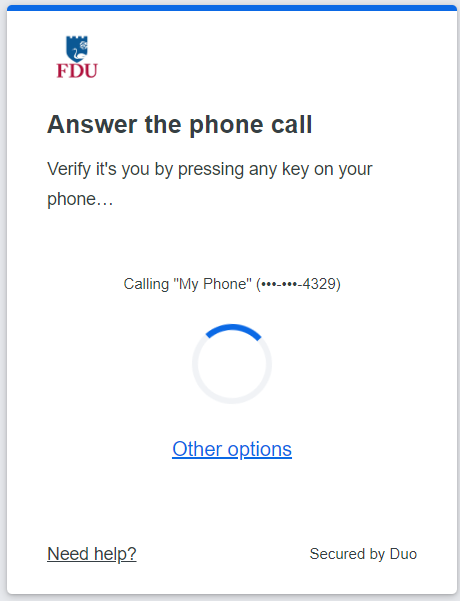
Phone Call (Faculty/Staff)
Click the “Phone call” option and DUO will call your phone. Answer the phone call from DUO and follow the voice instructions to log in to the application.
VPN users select the number corresponding to Phone Call or type “phone“. Users with multiple devices will need to include a number indicating desired device i.e. phone2.
How Do I Change Settings or Enroll Another Device?
You can use the DUO Management Portal to easily edit and add new devices. For instructions on how to access the DUO Management Portal, follow the steps using the link below:
DUO two-factor authentication adds a second layer of security to your FDU NetID. It requires two factors to verify identity. These factors include something you know – your FDU NetID and password, and something you have – a phone or passcode, to authenticate and gain access to your account on FDU services. Passwords alone no longer provide adequate protection against cyber hacking. DUO is required for all current FDU students. Please follow the steps below.
Install DUO Mobile App
The DUO app is available for Android, iOS and iPadOS. Use the links below to install DUO on your mobile device.
In a Desktop or Laptop browser visit the DUO Management Portal to begin the activation process by enrolling your device. Activation requires scanning a QR code with the DUO app’s built-in scanner
Supported Browsers: Chrome, Firefox, Safari, Edge, Opera, and Internet Explorer 8 or later. Some browsers do not support all of DUO’s authentication devices (for example, Security Keys won’t work with Internet Explorer). For the widest compatibility with DUO’s authentication methods, we recommend recent versions of Chrome and Firefox.
Click “Start setup” to begin enrolling your device
Select the type of device you’d like to enroll and click “Continue“. We recommend using a smartphone for the best experience, but you can also enroll iOS/Android tablets
Select your country from the drop-down list and type your phone number. Use the number of your smartphone or cell phone that you installed the DUO Mobile Security App on in the Step 1
Double-check that you entered it correctly, check the box, and click “Continue“
Note
If you’re enrolling a tablet you aren’t prompted to enter a phone number.
Choose your device’s operating system and click “Continue“.
Click “I have DUO Mobile installed”
If you have not completed installing the DUO Mobile App in Step 1 please complete now by following the platform-specific instructions on the screen. After installing the app return to the enrollment window
Activating the app links it to your account so you can use it for authentication
On iPhone, Android, and Windows Phone activate DUO Mobile by scanning the barcode with the app’s built-in barcode scanner. Follow the platform specific instructions for your device:
The “Continue” button is clickable after you scan the barcode successfully
Can’t scan the barcode? Click “Or, have an activation link emailed to you instead” and follow the instructions
Once activated click “Continue” to complete registration
close
Configure Device Options (Optional)
You can use Device Options to give your phone a more descriptive name, or you can click “Add another device” to start the enrollment process again and add a second phone or another authenticator
If this is the device you’ll use most often with DUO then you may want to enable automatic push requests by changing the “When I log in:” option and changing the setting from “Ask me to choose an authentication method” to “Automatically send this device a DUO Push” and click “Save“. With one of the automatic options enabled DUO automatically sends an authentication request via push notification to the DUO Mobile app on your smartphone.
Your device is ready to approve DUO push authentication requests. Click “Send me a Push” to give it a try. All you need to do is tap “Approve” on the DUO login request received at your phone
With DUO activated on your account, and with your device enrolled, you are ready to use DUO. When logging in, you will have two authentication options. Review the options below to determine what works best for you.
Tip
We recommend the push notification to your smartphone, it’s the easiest. You can also check the box “Remember Me for 60 Days” to only perform the authentication once every two months on that device.
close
Authentication Options
There are two ways you can use DUO:
Push Notification
Once the DUO mobile app is installed, you can select to receive a DUO notification on your smartphone. Open the notification, and you’ll see a green checkmark, and a red X. Simply tap the “GreenCheckmark” to gain access.
Passcodes
You can use the DUO mobile app to generate passcodes. This option does not require wifi or data, so this is a great option if you’re traveling or if you have limited or no cell/internet service. Open your DUO mobile app, tap the FDU logo and it will reveal a passcode. During login, choose the enter a passcode option, enter the code and you’re in.
If you do not have your device with you, don’t worry. You can contact the SAMI Service Desk for a temporary passcode. These passcodes can be entered in the DUO prompt on your computer.
close
How Do I Change Settings or Enroll Another Device?
To change settings or enroll another device, visit DUO Management Portal or any DUO-supported application. When you get to the DUO prompt, click the “Settings” button and choose to add a new device or access your settings.
Virtru email encryption is the preferred method to send and view encrypted emails and files with your FDU email address. Available for FDU Faculty and Staff upon request. Click the link below to request access to Virtru Email Encryption.
If you are not approved for Virtru email encryption, the articles below are alternative, FDU OIRT and DSIRT approved methods for encrypting Microsoft Office and Adobe PDF files and comply with the University WISP.
According to FDU’s Written Information Security Program (WISP), in no case should they be sending or storing WISP protected information without the explicit authorization of the Chief Information Security Officer (CISO). If approved, these instructions will provide you with guidance on the methodology.
For more information, visit the link at the bottom of the page.
Follow these easy to use instructions for encrypting Word, Excel, and Acrobat files using built-in features.
Encrypting Word & Excel Documents
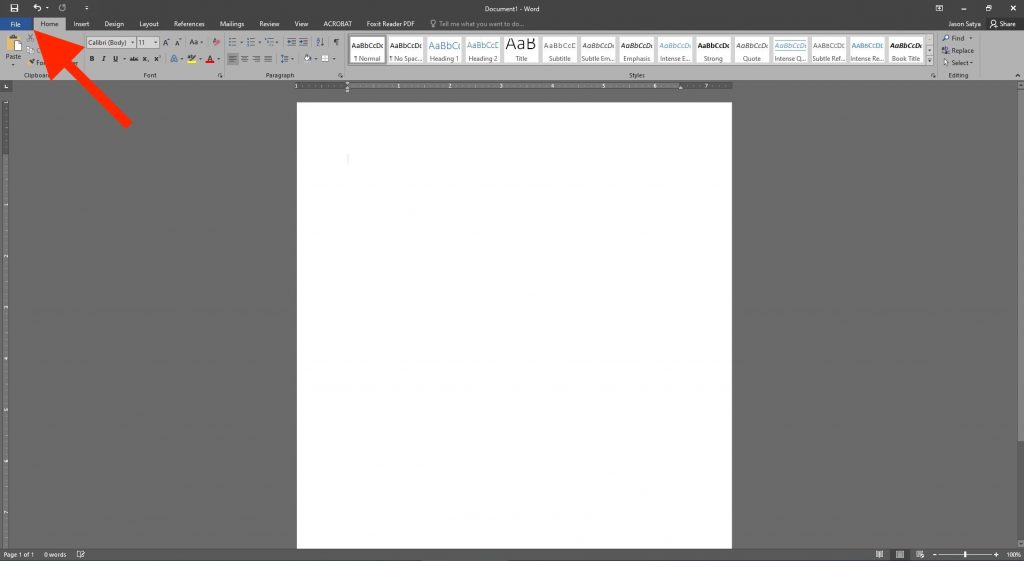
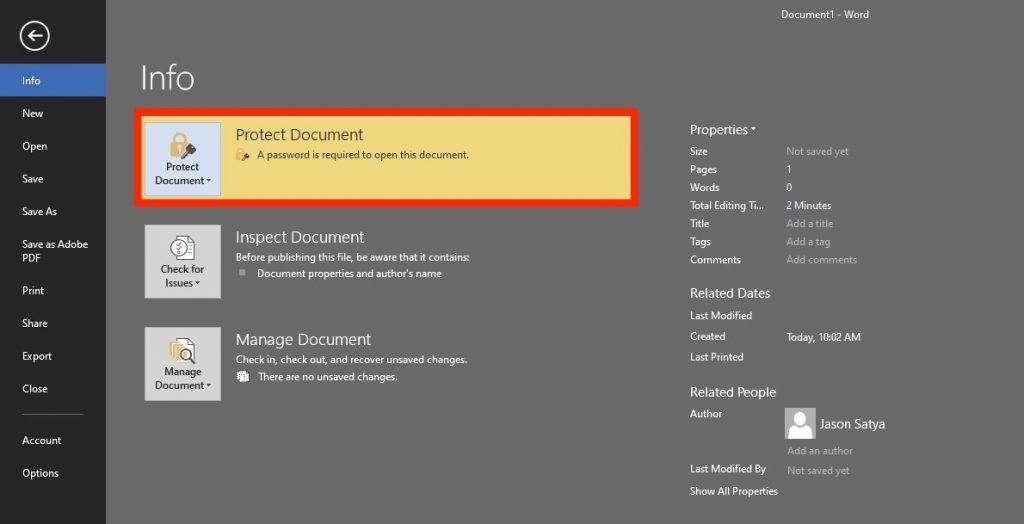
For Word and/or Excel files, first click on File on the upper left-hand corner
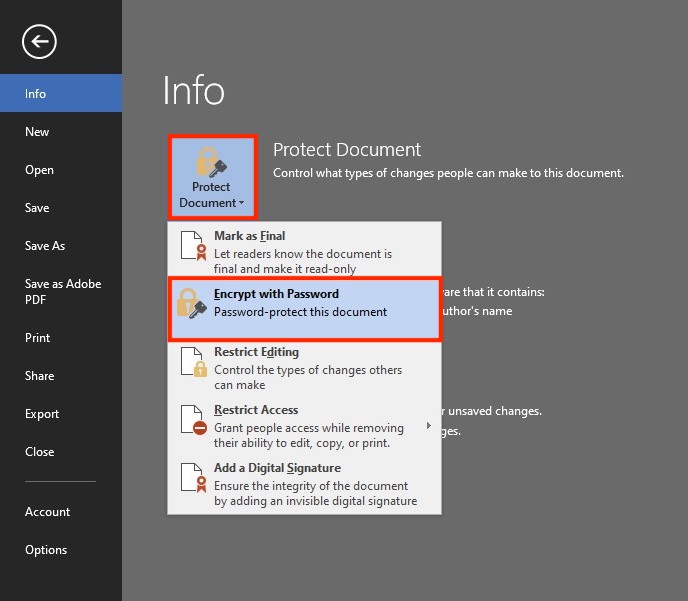
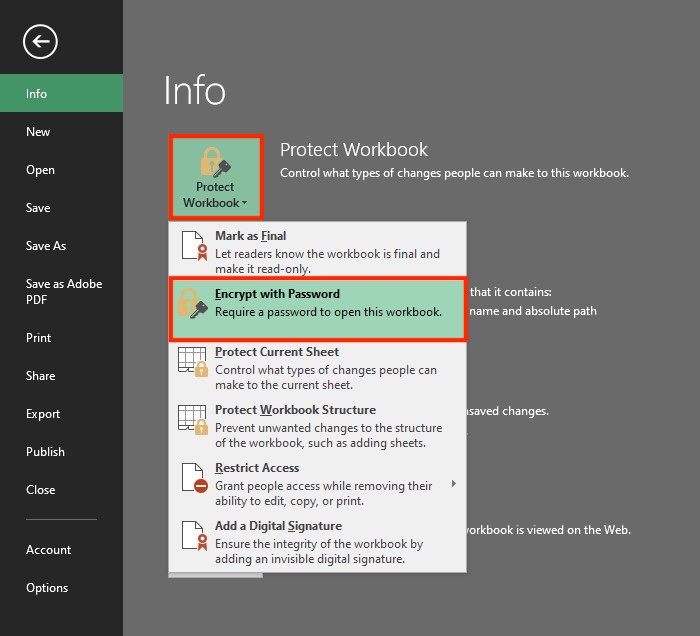
Under the Info tab, click on Protect Document for WordandProtectWorkbook for Excel followed by Encrypt with Password
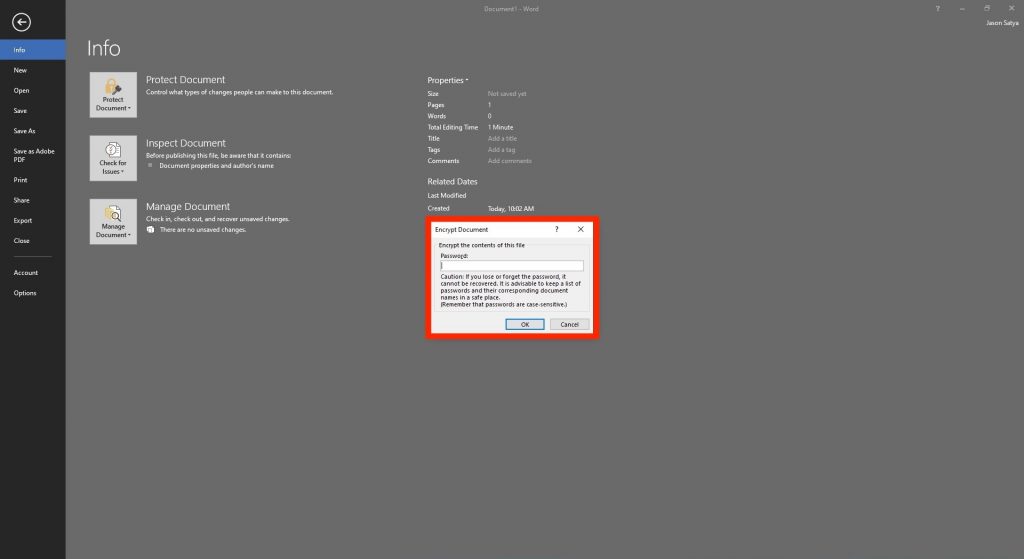
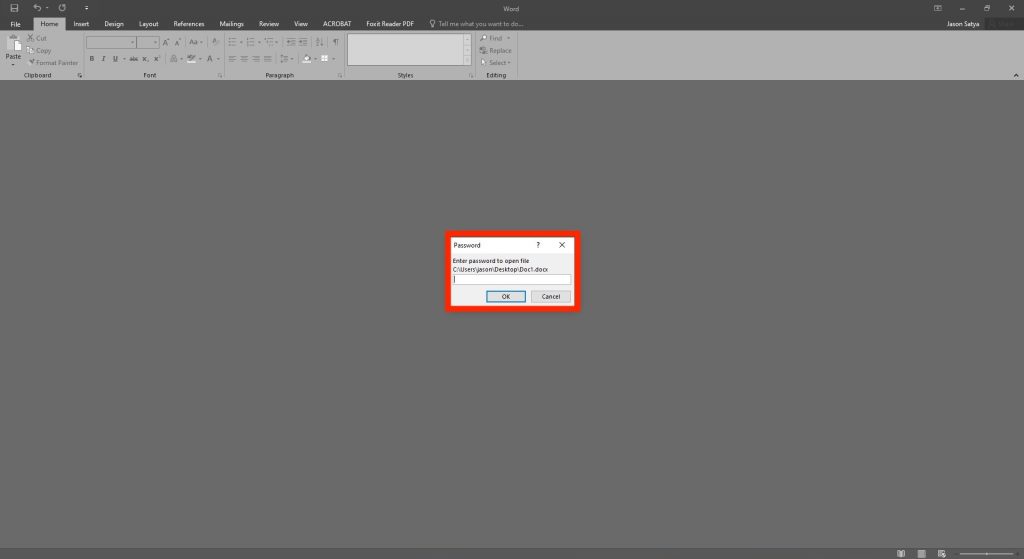
Enter a password in the pop-up window. Re-enter the password in the next window to confirm
The below message will confirm your document has been password-protected
To open a password-protected file, double-click on the file and enter the created password
close
Encrypting PDF Files
NOTE:
Adobe Acrobat Pro DC or Adobe Acrobat for macOS is needed to encrypt PDF files with a password. This feature is not available in the free version of Adobe Acrobat Reader DC.
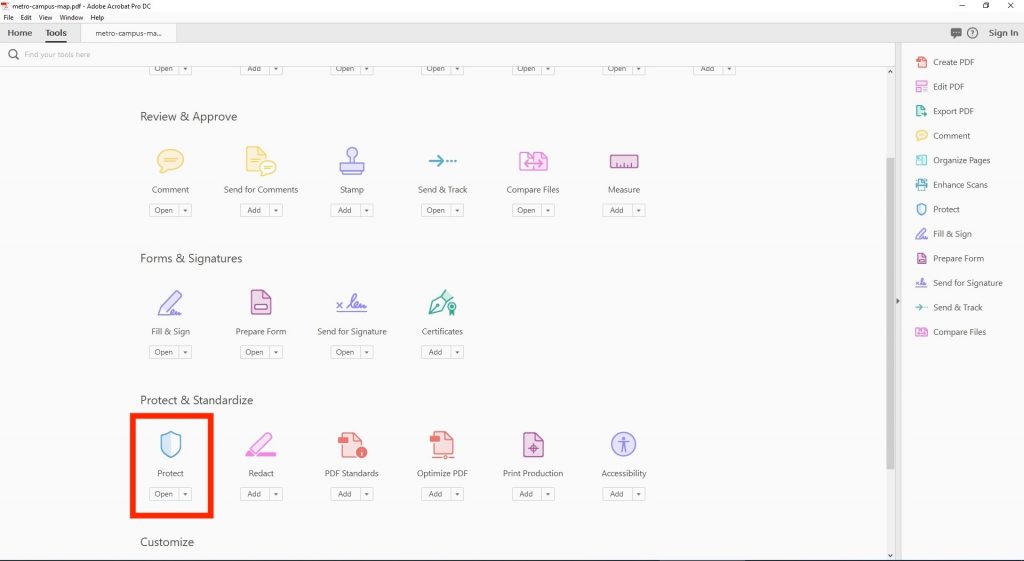
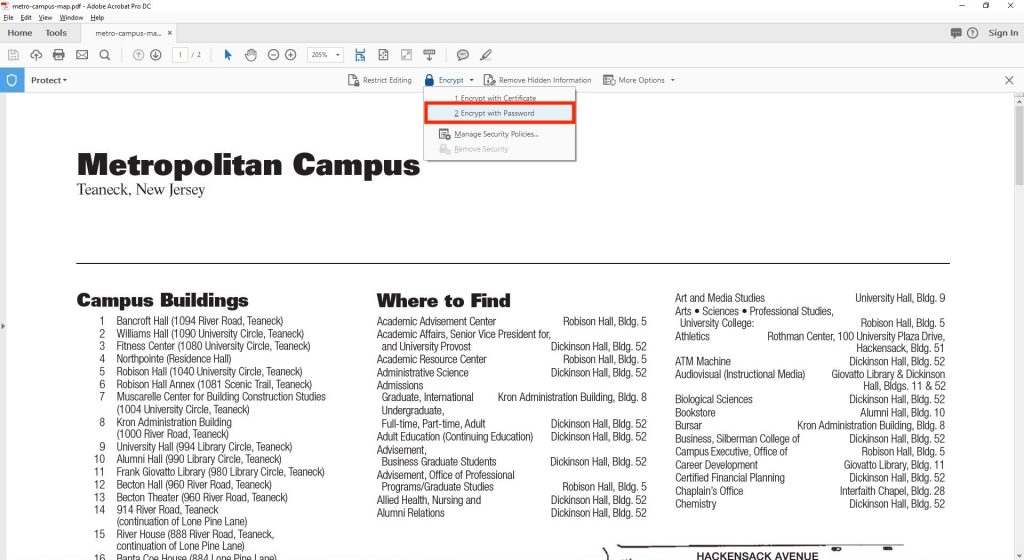
Select Toolson the Navigation Taband then select Protect
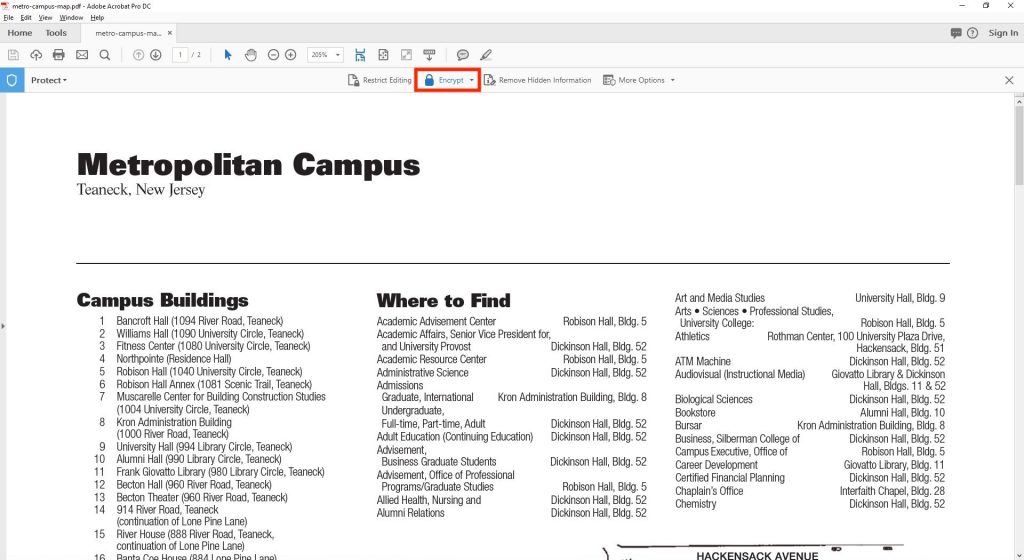
On the Protect Tab select Encrypt
Select Encrypt with Password. Then select Yes on the security pop-up window
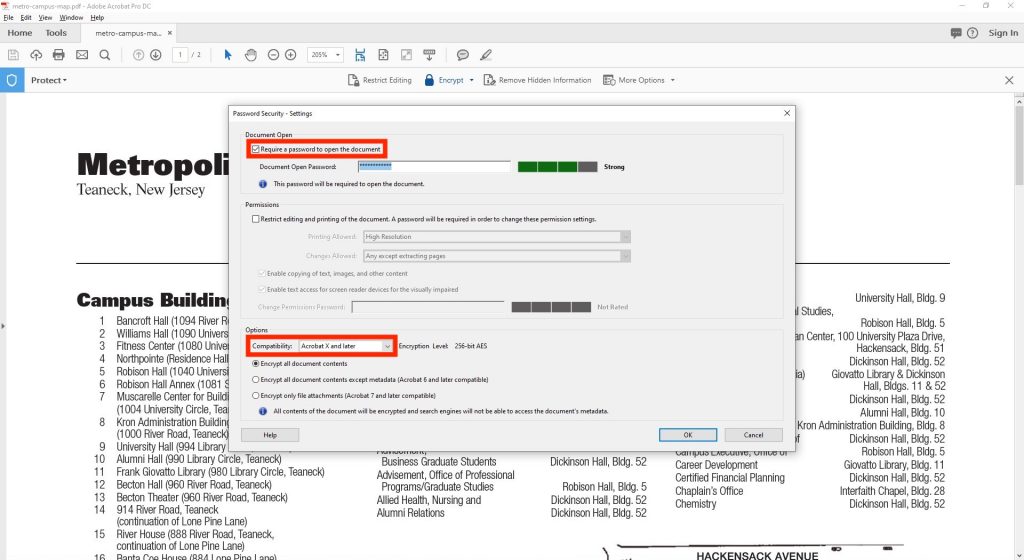
Check Require a Password to Open the Document and then choose a strong password. Under compatibility, choose Acrobat X and laterto change the encryption method to 256-bit.
Confirm the password when requested. Please note that the document WILL NOT be fully encrypted until it is saved
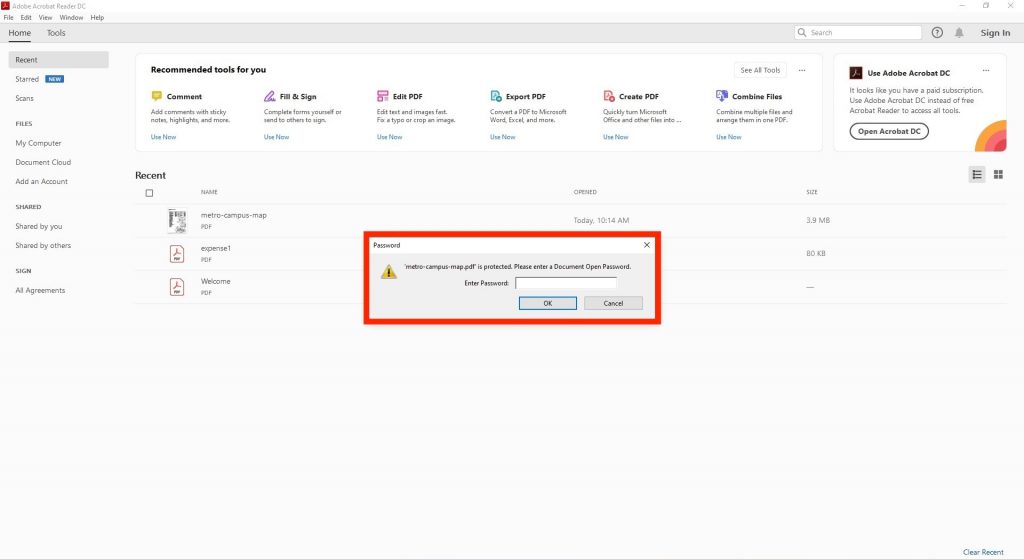
To open the file, double-click the file and enter the created password.
To access Forms, you will be directed to our SAMI Support Portal where you will be asked to log in using your NETID and authenticate using Duo. Once you click “Next,” you will be forwarded to samisupport.fdu.edu in a new window or tab.