Troubleshoot

Accept a New Certificate for FDU-Secure Wireless Network

Resources for:
icon Close

FDU-Secure uses current encryption standards to connect to the FDU wireless network via secure wireless traffic. This is an evolving technology and occasionally, one of the changes made by FDU IT requires us to issue a new certificate. When this occurs, you will need to accept the certificate using the process below.

Note

Your process may vary slightly based on the version of the Operating System that your device is using.

How to Accept the New Certificate for FDU-Secure Wireless

Windows
  1. Login to your Windows computer
  2. Go to the bottom right taskbar > Click on the “Networks” icon:
    • From the Networks list, select: “FDU-Secure
    • Click “Connect
  3. At the “Continue connection?” prompt, click “Connect
  1. Open your browser and test your Internet connection
close
macOS
  1. Login to your Mac computer
  2. Go to top right menu bar > Click “Wi-Fi” icon:
    • From the Wi-Fi list, select: “FDU-Secure
    • Click “Join
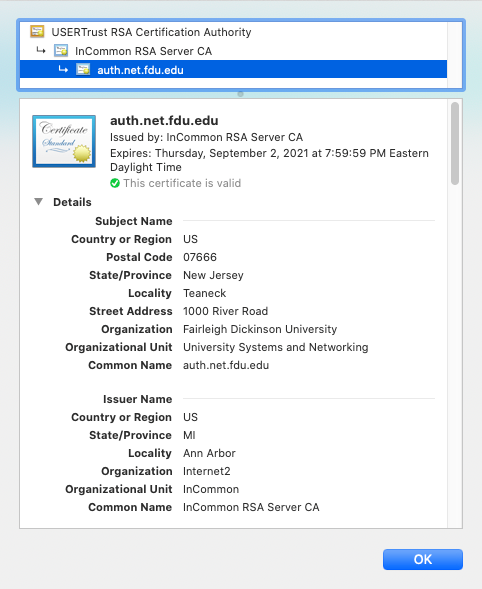
  3. At the “Authenticating to network FDU-Secure” prompt, click “Continue
  1. Click “OK
  2. Open your browser and test your Internet connection
close
iOS
  1. Login your iOS device (eg. iPhone)
  2. Go to your device’s Settings App > Select “Wi-Fi” > Select “FDU-Secure” > Click “Forget This Network
  3. Tap the “Back” button and select “Wi-Fi “once again to reload the available Wi-Fi networks:
    • From the Wi-Fi list, select: “FDU-Secure
    • Enter your complete FDU NetID as in the examples below: “username@fdu.edu, username@student.fdu.edu, username@alumni.fdu.edu”
    • Enter your FDU NetID Password
    • Click Join
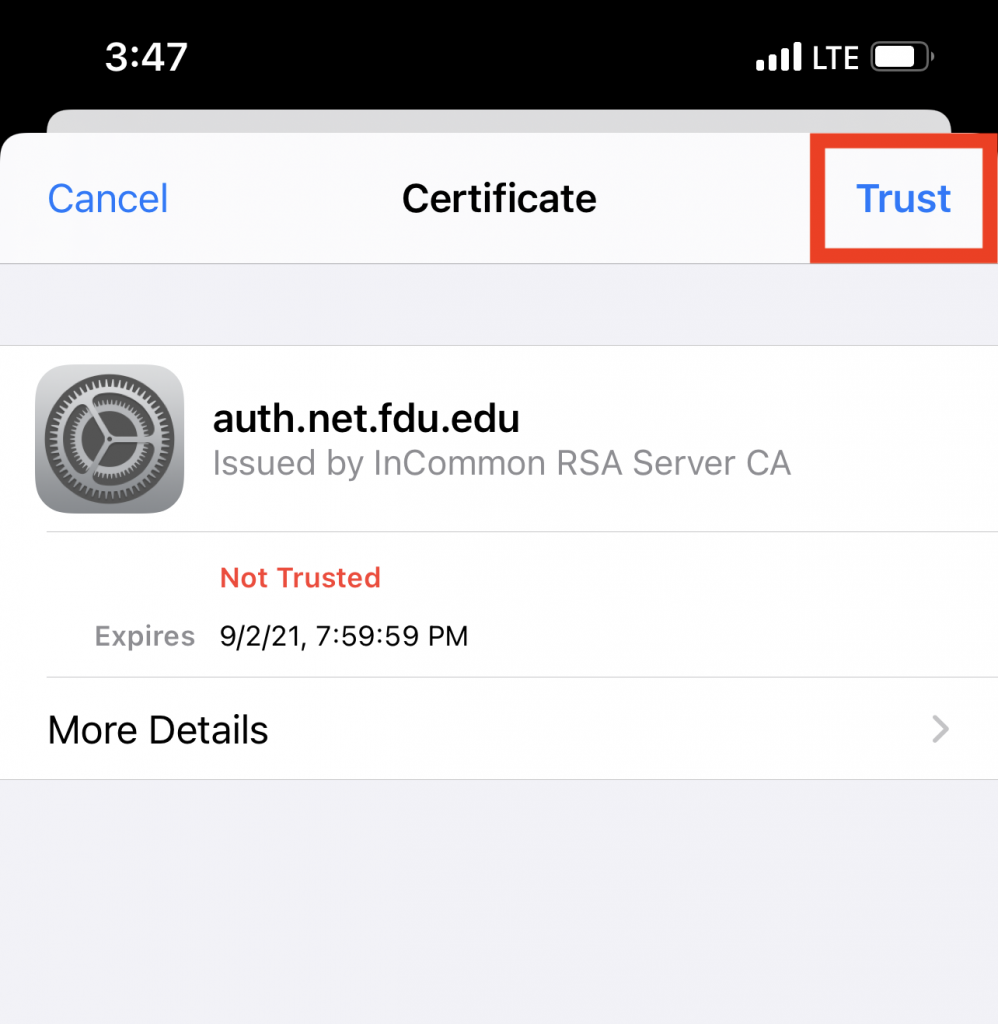
  1. At the “Certificate” prompt, tap “Trust
  1. Open your browser and test your Internet connection
close
Android
  1. Login to your Android Device
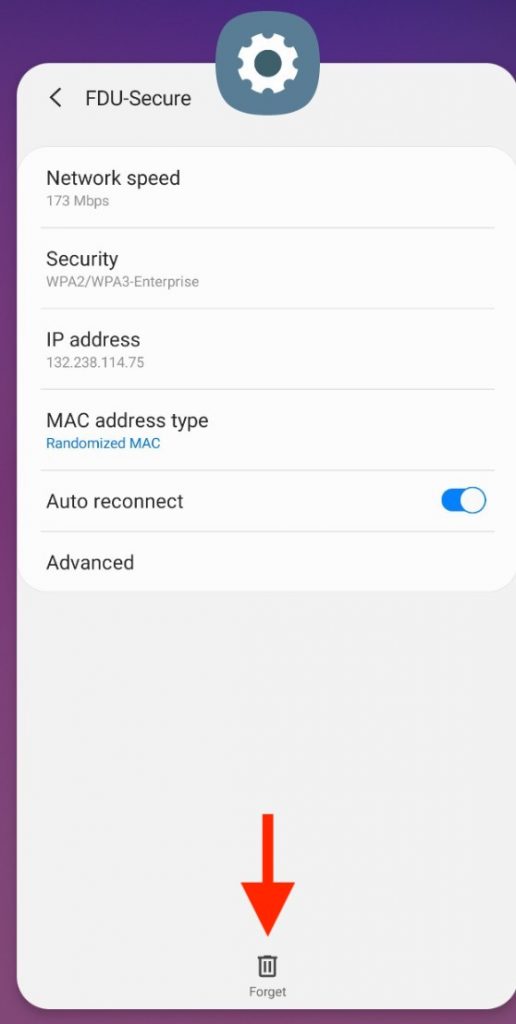
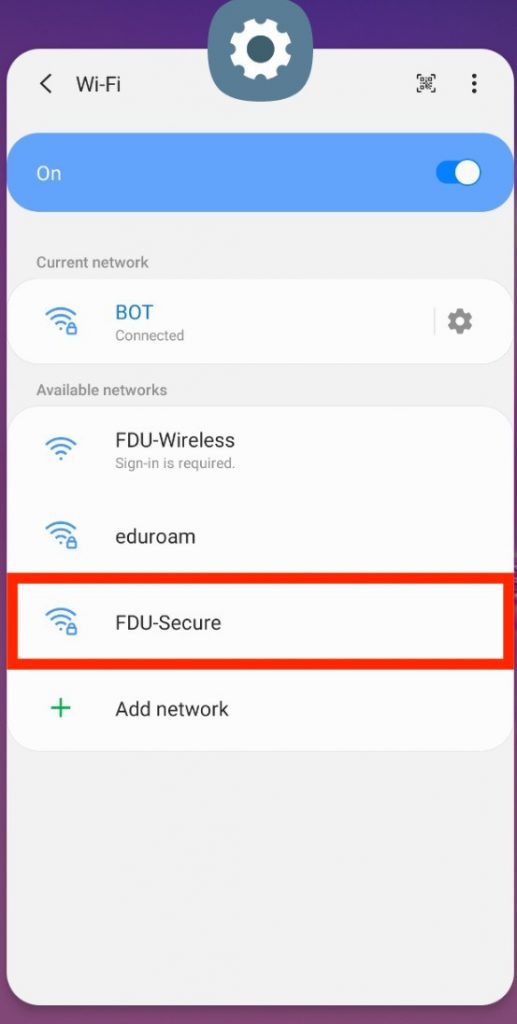
  2. Open the “Settings” Application > Select “Wi-Fi” > Select the Gear icon next to FDU-Secure
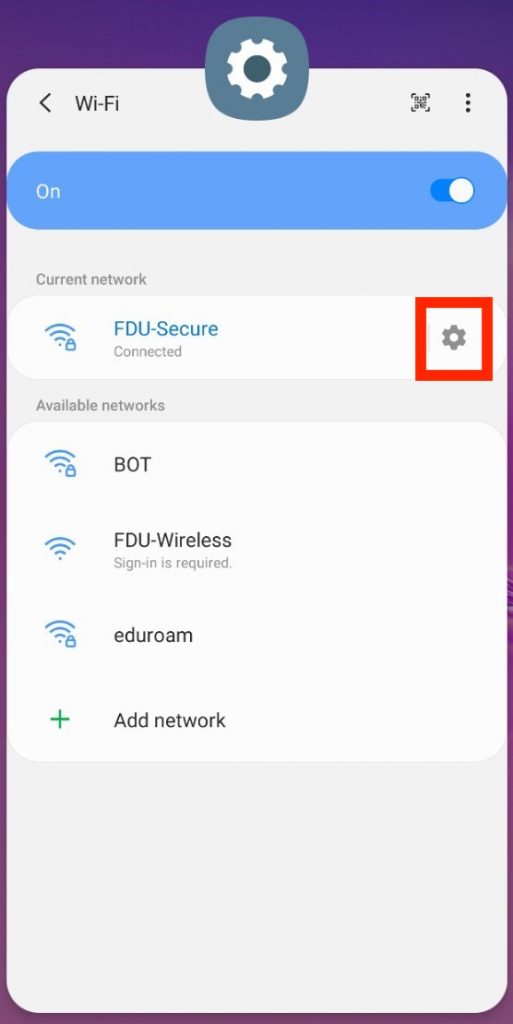
  1. Select “Forget This Network
  1. Select FDU-Secure from the Wi-Fi menu
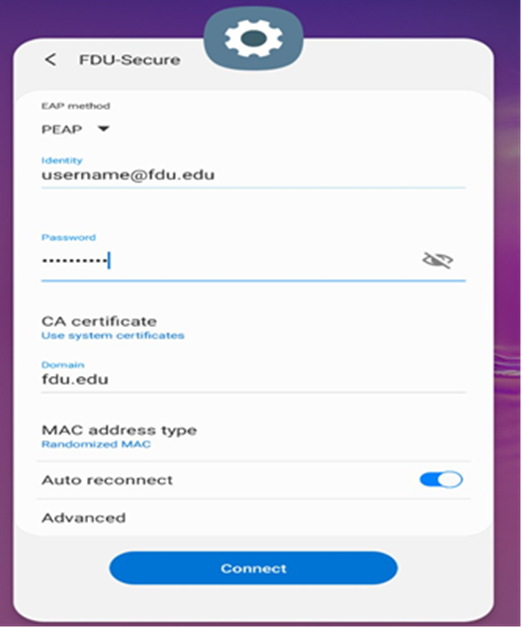
  1. Select “EAP method” and select “PEAP” from the dropdown menu
  2. Enter your complete FDU NetID and password
  3. In the “CA Certificate” field, select “Use System Certificates
  4. In the Domain field, enter fdu.edu
  5. Enable “Auto Reconnect
  6. Tap “Connect
  1. Open your browser and test your Internet connection
close
Last Modified:

Jabber for Windows Audio Setting Method

Resources for:
icon Close

Jabber for Windows has options where you can choose your Speaker, Microphone and Ringer/Alerts devices. The Speaker, Microphone, and Ringer/Alerts device settings are, by default, already chosen though your PC settings. This article describes how to arrange devices on the advanced page.

Setting Method

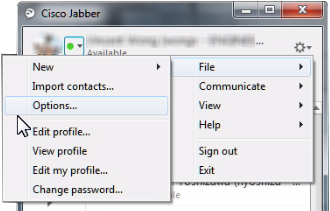
  1. Start Jabber for Windows application and after the sign-in, select the cog’s drop-down menu, File > Options.
1
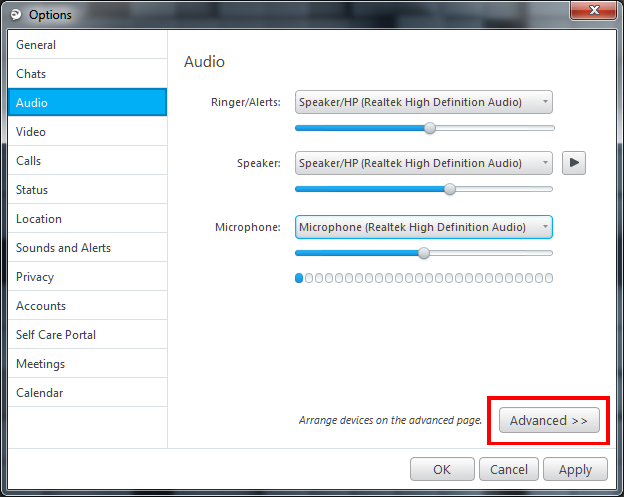
  1. On the left side of the options screen, select the audio and click the Advanced > > button on the bottom right.
Jabber for Windows Audio Setting Method 2
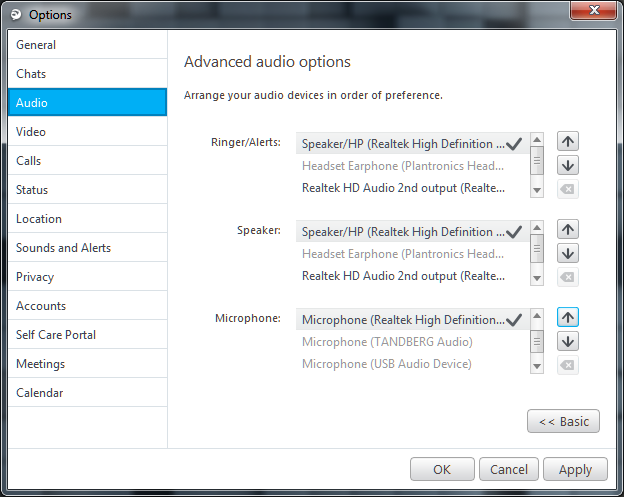
  1. From the Advanced audio options window, PC’s defaulted devices are selected. The check on the right side of the audio devices represents the devices that you are currently using.
Jabber for Windows Audio Setting Method 3
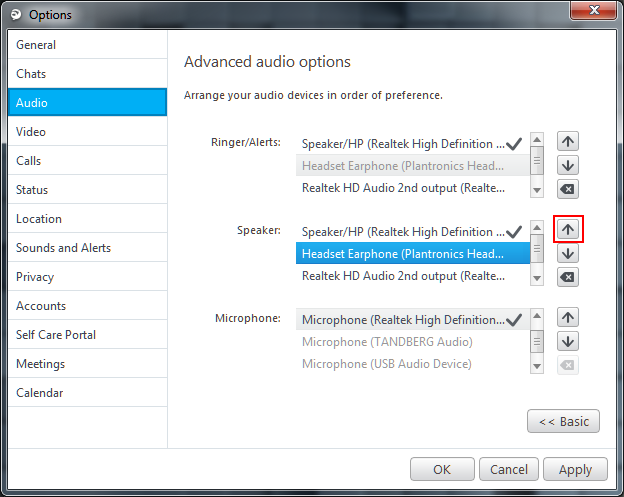
  1. To change the order of preference, select the headset you want to use and click the arrow button on the right-hand side to move your preference.
Jabber for Windows Audio Setting Method 4
Example is that of the Speaker but the Microphone and Ringer/Alerts preferences can also be changed the same way.
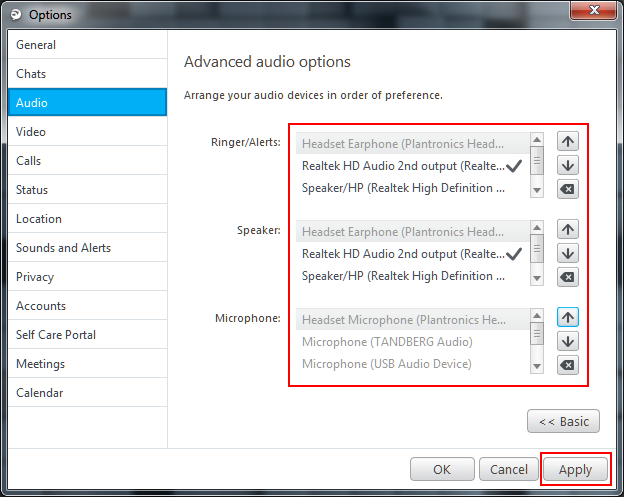
  1. Set your preferred headset to the top, click the Apply button on the bottom right and close with OK. The setup is now complete.
Jabber for Windows Audio Setting Method 5
In this example, the Plantronics headset device is chosen to be the top choice.

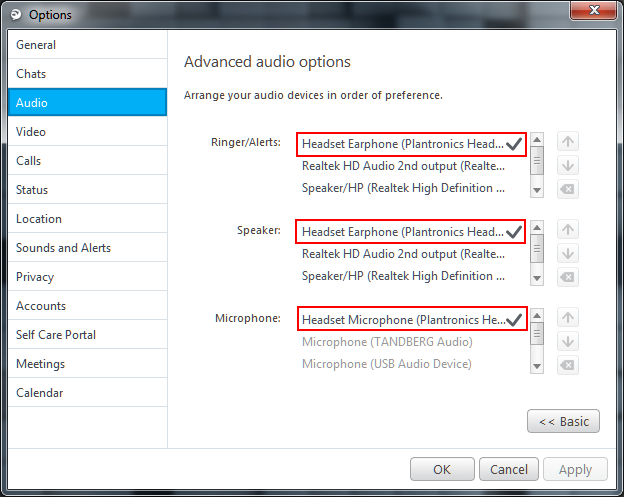
Example of when the Headset is connected to your Computer

For the device that is connected and in use becomes highlighted and will also have an indication of a check.

Jabber for Windows Audio Setting Method 6
Last Modified:

Limited Troubleshooting Support for Personal Devices

Resources for:
icon Close

This document outlines how the help desk should handle issues regarding supporting personal hardware.

All support tickets for personal hardware will need to be created and supported by the help desk. Limited support will be provided by completing basic troubleshooting and diagnostics.

This includes:

  • Laptops and Desktops
  • iMacs and MacBooks
  • Docking Stations, Monitors, and Peripherals
  • Mobile phones and Tablets

Note

The help desk should communicate directly to the users that limited support can be provided for personally owned devices, the Help Desk will assist by providing the below troubleshooting steps. Escalation of the request to Computing Services can be performed. If additional support is needed Computing Services will direct the user to contact their hardware manufacturer for additional support directly if needed.

The following basic troubleshooting steps can and should be performed when any of the above hardware is having issues:

  • The device should be power cycled and/or rebooted to ensure all device resources have been refreshed.
  • If the machine or device is frozen locate and hold the power button for a minimum of 60 seconds until the device has powered down and then have the user power on the device and attempt to use the equipment.
  • The help desk can check and confirm if any updates have recently been loaded on the workstation that may be pending a machine reboot to complete the installation.

The following should not be performed on any personal machines:

  • Upgrading or downgrading of any Microsoft or Apple operating system.
  • Removing and/or reinstalling any licensed software such as but not limited to Microsoft Office, Microsoft Visio, Microsoft Project, Adobe Creative Cloud, etc.
  • Other software such as antivirus, games, or manufacturer-issued diagnostic utilities.

Regarding the troubleshooting of issues related to personal docking stations, monitors, peripherals, mobile phones and tablets. The basic functions of unplugging the power cable and/or power cycling the equipment will be the acceptable troubleshooting necessary.

We do not want to perform any updates for devices operating systems such as mobile phones or tablets. The steps involved in completing these kinds of updates require a more extensive timeframe to be available to successfully be completed.

If you have any questions or require additional information, please contact the FDU Director of Computing Services Peter Mannarino via email p.mannarino@fdu.edu


Vendor Support Contact Links

Apple

Dell

HP

Microsoft

Last Modified:

Printing at Home while Connected to FDU VPN

Resources for:
icon Close

Issue

When I am connected to the FDU VPN or Cisco AnyConnect Adapter, I am unable to print documents while working from home.

Cause

While connected to the FDU VPN network, you are unable to access any local printers or network devices / services to help protect your computer from various threats while working outside of the FDU Campus Network.

Resolution

In order to Print, please disconnect from the VPN client, and once your documents have printed, reconnect.

Tip

Print jobs will continue to queue while you’re connected to the FDU VPN and will print when you disconnect from the VPN.

You can also connect a USB cable from the printer to your laptop, where available, and you can remain on the FDU VPN and print anything you need.

Last Modified:

SAMI Support Public Request Form

Resources for:
icon Close

The SAMI Support portal requires a valid NetID and password, along with DUO multi-factor authentication, for access. Upon entry, users can create new tickets, review open or closed requests, and explore the IT Knowledgebase for solutions to common issues. Access the support portal using the button below:

SAMI Support Portal

If you need to open a request and cannot access SAMI Support for any of the reasons below, please complete this request form to contact the Fairleigh Dickinson University Technical Assistance Center (UTAC). A member of the IT support team will assist you via phone call or email.

  • I do not have a valid University issued NetID
  • I am not able to authenticate through DUO
  • I have not set up my DUO account
  • I am a vendor without a University issued NetID
  • I am an admitted student
  • I am a newly hired employee or adjunct
  • My FDU account is locked
  • I need my Net ID password reset and have already attempted to do that through identity.fdu.edu

Tip

The form below is not compatible with Dark Mode. For an optimal experience, disable Dark Mode either in your device’s system settings or directly from the FDU IT website menu bar.

SAMI Support Public Request

Last Modified:

Trouble Connecting to Zoom

Resources for:
icon Close

If you are scheduled to attend class using Zoom and you run into technical difficulties, here are some steps you can take.

Common Fixes for Zoom Connection Issues

  1. Do. Not. Panic. This shift to distance learning is a sudden change. We will do everything we can to support your learning
    • Try your best to progress through the steps and troubleshooting resources below. Join when you are able. You can use the chat or hand-raising function once you join the class to let the faculty know if you have questions.
  2. Try to exit Zoom and open it again
  3. Try to restart your device and re-open Zoom
  4. Check that you do not have pop-ups blocked. Also check that you have “allowed” the Zoom browser extension to operate, if needed
  5. Try on a different device, if you have access to one. If you do not have access to a different device, proceed to step 6
  6. If you still cannot access Zoom after taking these steps, please contact the University Technical Assistance Center (UTAC) with a description of the problem (e.g., error message that you received). Please also bring the issue to the attention of your instructor so they can let you know what you missed in the class session that you were unable to attend

More Resources for Troubleshooting with Zoom

The following troubleshooting guide gives support for all devices that Zoom supports.

Last Modified: