access


FDU provides remote access to many of the software applications typically found in university computer labs.
index

Index

What is FDU Anywhere?

FDU provides remote access to many of the software applications typically found in university computer labs. This new Virtual Desktop Infrastructure (VDI) gives users access to a Windows desktop environment without requiring downloading and installing programs on a user’s personal equipment. The service, called FDU Anywhere, is powered by Apporto and can be found at anywhere.fdu.edu.

Using FDU Anywhere is like walking into one of FDU’s computer labs. Upon logging in with your FDU NetID and password, you will have access to the virtual platform’s software applications. To find a list of currently available software on FDU Anywhere, use the FDU Software Catalog. A listing of available Free and Open Source software can also be found by visiting the FDU Software Catalog.

The FDU Software Catalog provides an up to date catalog of software available to Faculty, Staff, and Students at the university:

FDU Anywhere App Store

The FDU Anywhere App Store gives you access to FDU Anywhere’s software. Many programs including Microsoft Office, Visual Studio, SPSS, and Matlab are available to everyone. Other programs such as Adobe Creative Cloud and the Autodesk suite are available based on course requirements.

Presently, there are two environments that offer a select set of applications. These environments are:

NJ Lab Desktop

Software available in NJ Desktop Environment

SoftwareAvailable Date
Google Chrome browserAugust 17, 2020
SAS (NJ Campus Only)August 17, 2020
SPSSAugust 17, 2020
Microsoft Office Pro PlusAugust 17, 2020
MatLabAugust 17, 2020
Microsoft Visual Studio CodeAugust 17, 2020
7-Zip File ManagerAugust 17, 2020

Vancouver Lab Desktop

Software Available in Vancouver Lab Desktop Environment

SoftwareAvailable Date
Google Chrome browserAugust 17, 2020
SPSSAugust 17, 2020
Microsoft Office Pro PlusAugust 17, 2020
MatLabAugust 17, 2020
Microsoft Visual Studio CodeAugust 17, 2020
7-Zip File ManagerAugust 17, 2020

Graphics Lab Desktop

Software available in Graphics Lab Desktop Environment

SoftwareAvailable Date
Adobe Creative Cloud (per class assignment)August 17, 2020
Microsoft Office Pro PlusAugust 17, 2020
MapleAugust 17, 2020
Autodesk Suite
• 3DS Max
• Motion
• Mudbox
• Sketchbook
August 17, ,2020
Google Chrome BrowserAugust 17, 2020
Microsoft Visual Studio CodeAugust 17, 2020
7-Zip File ManagerAugust 17, 2020

System & Network Requirements

System Requirements

FDU Anywhere is a powerful resource with a lightweight footprint. In order to utilize FDU Anywhere, you must have the following:

  • Any device that has an HTML 5 supporting browser will do. Nearly all standard and mobile browsers – including Google Chrome, Apple Safari, Microsoft Edge, and Mozilla Firefox support HTML 5
  • An internet connection
  • FDU NetID credentials

Note

Your system hardware specifications may impact the performance of FDU Anywhere, such as systems with less than 8GB of memory.

Network Requirements

For the best experience while using FDU Anywhere, your network should:

  • Have a download speed of at least 5Mb/s or more
  • If your download speed falls below 5Mb/s, the connection could become unstable and cause issues with your stream
  • Have an upload speed of 5Mb/s or higher
  • An upload speed of 5Mb/s is enough to use a basic mouse, keyboard, and controller. More bandwidth-heavy devices such as webcams, microphones, and external storage devices can use up to 100Mb/s
  • Wired network connections are preferred over Wi-Fi network connections whenever possible
  • Wired network connections are more stable and offer more bandwidth over Wi-Fi

For graphics-intensive applications, like Adobe Creative Cloud and Autodesk, we recommend using a wired network connection instead of Wi-Fi, ideally with a bandwidth of 5 Mbp/s.

Wi-Fi networks with 5Ghz rated wireless connections are preferred over 2.4Ghz wireless routers and provide better performance.

VPN Applications and Connections

Warning Warning

The use of any VPN Software within FDU Anywhere is not allowed. Using a VPN client in FDU Anywhere may interrupt your session and disable your access for approximately 15 minutes.

Testing your Connection

Your experience with FDU Anywhere greatly depends on your internet connection. Testing your connection can help you identify and correct most issues.

To test your Internet connection speed, you can use the Google Speed Test:

Note

Fairleigh Dickinson University is not affiliated with Google, Google’s Project Stream, or M-Lab. The link was provided as an aid to help determine your bandwidth.

Using FDU Anywhere

FDU Anywhere is available to all students and accessible by following the instructions below:

Accessing FDU Anywhere

  1. From any web browser, visit anywhere.fdu.edu

Tip

For the best overall experience using FDU Anywhere, Google Chrome is the browser of choice.

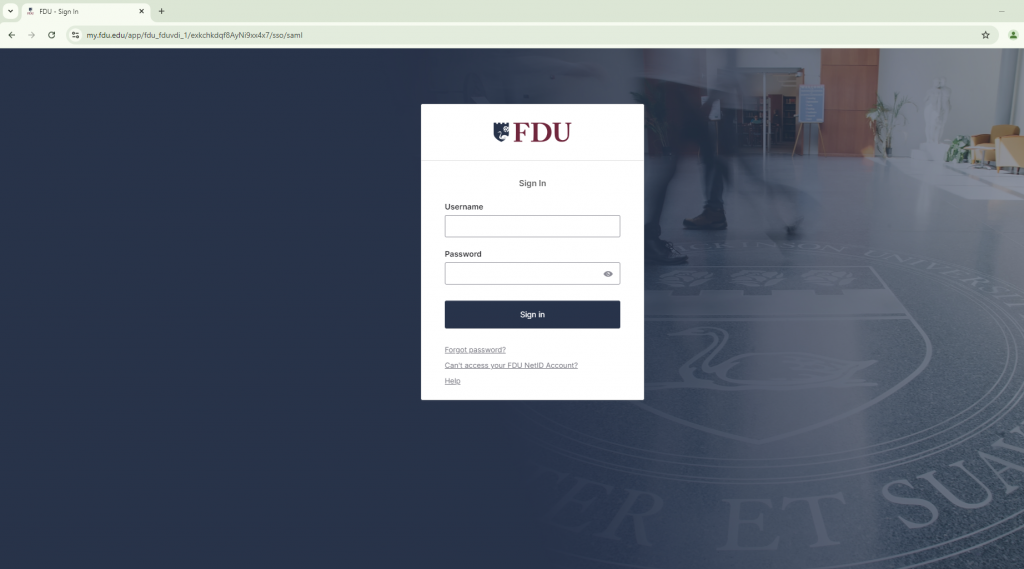
  1. Use your FDU Credentials (NetID and associated password) to complete the login to the FDU Anywhere App Store

NJ Lab Desktop

Vancouver Lab Desktop

Graphics Desktop

Searching and Sorting the FDU Anywhere App Store

Searching FDU Anywhere

When you search for an application, the system will:

  • read the word(s) in your search term as a string of characters (rather than as separate words)
  • search for occurrences of the text string anywhere in the application name or the developer/publisher name

Tip

For example, the search term “ad” would include the results “AutoCAD”, “Notepad”, and Cadence.

  1. Enter the term you wish to search for in the Search box, then press “Enter

The App Store refreshes to display only those applications that contain your search term.

Tip

Click the “X” to clear the Search box and return to the full App Store.

Sorting FDU Anywhere Apps Alphabetically

When you log into FDU Anywhere for the first time, apps are sorted alphabetically by default. For subsequent logins, apps will be sorted by frequency of use.

  1. To sort alphabetically, simply clickSort Alphabetically

Sort Most Used

After your first login, apps are sorted by frequency of use by default. The most-used apps appear first. You may also click “Sort Most Used to sort by frequency.

Launching FDU Anywhere

To launch an app directly from the FDU Anywhere App Store, simply follow the instructions:

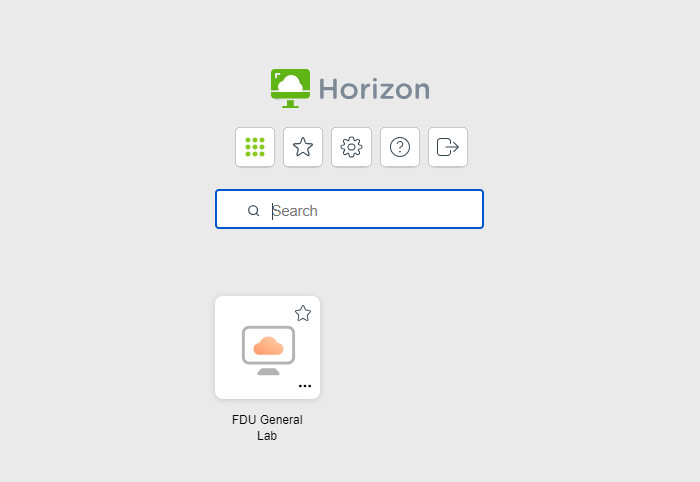
  1. Locate the desired app or desktop and click “Launch”

Note

When you first log in to FDU Anywhere, it may take up to 30 seconds to launch an app. This is because your profile is being created. After this, applications will launch much faster.

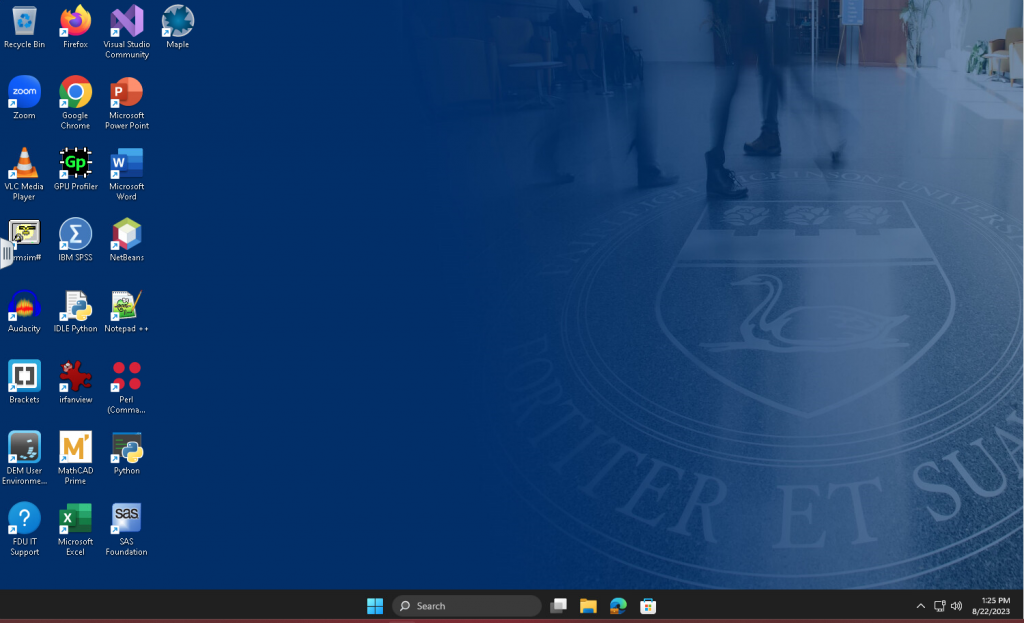
  1. The selected app or desktop opens in a new browser tab
Note

Some applications (Virtual Machines) may take a few minutes to launch because the server needs to start before the app can be launched. In these cases, a popup will notify you when the server is starting.

Log Out of FDU Anywhere

Logging out is a critical step in making sure others continue to be able to easily access FDU Anywhere services. To log out of FDU Anywhere, follow these steps:

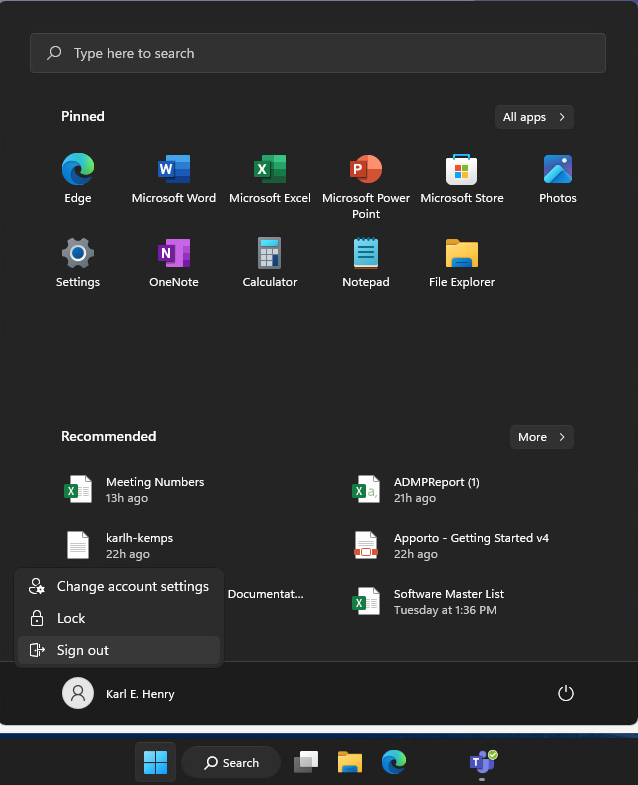
  1. Single left-click the Windows Start Button
  2. Single left-click the power button
  3. Single left-click on “Disconnect
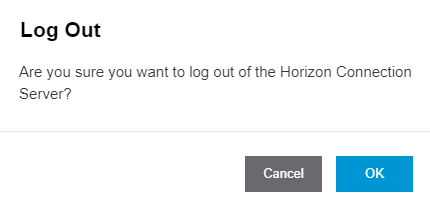
  1. On the upper right-hand side, click your account
  2. Single left-click on “LOGOUT
  1. You have now been logged out of FDU Anywhere

Automatic Session Logout Policy

In order to help make FDU Anywhere as available as possible to all students, accounts that have been inactive (or idle) for 15 minutes will automatically be logged out.
Accessing and Using OneDrive

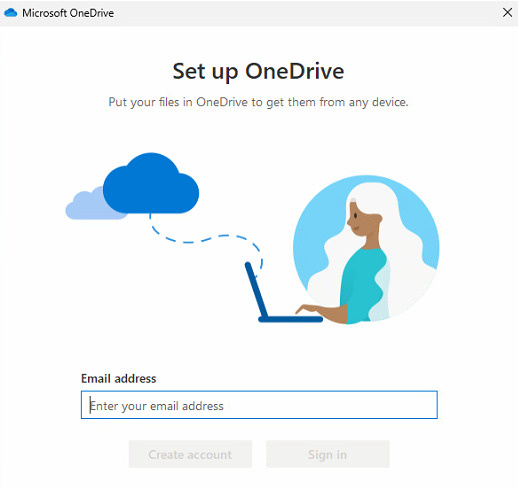
There are many ways in which you can access and save files within FDU Anywhere. Fairleigh Dickinson University highly recommends saving all files on your FDU Microsoft 365 OneDrive which can be mounted within FDU Anywhere.

Accessing and Using Cloud Drives

Accessing your Microsoft 365 OneDrive account is done easily by following these instructions:

  1. From the FDU Anywhere Graphics Lab or NJ Lab desktop, Double click “Cloud Mounter” shortcut
  1. Click the “OneDrive” button, and then click “Connect Now
  1. Enter your FDU NetID and click “Next“. Follow the FDU standard single sign-on prompts to complete the login process
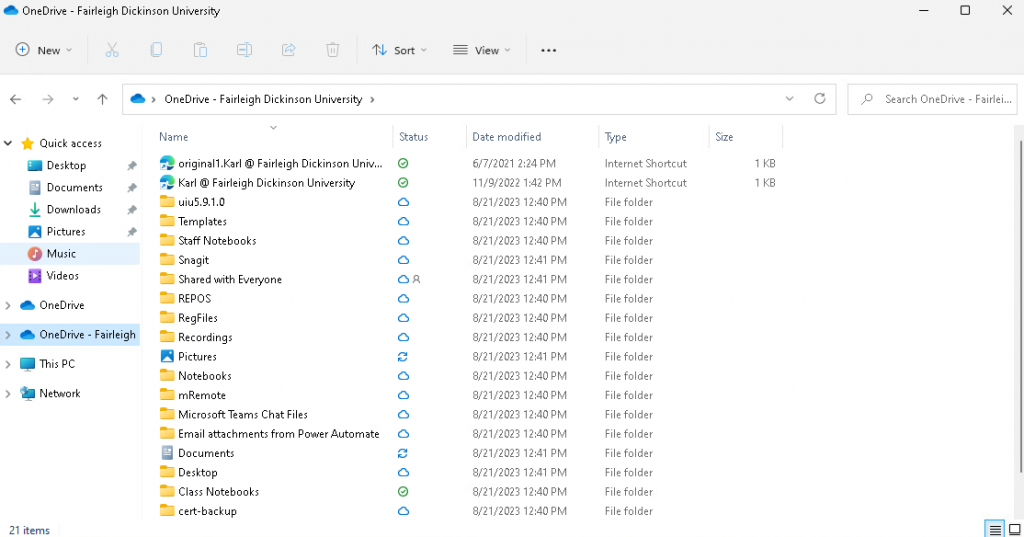
  1. The Mounting process is now complete and your mounted OneDrive folder will now open

Using the Mounted OneDrive Volume

The Mounted Microsoft 365 cloud volume will mount the folder as a network drive. Typically “OneDrive (O:)“. Every folder and file listed will be everything that not only resides in your Microsoft 365 OneDrive folder but everything that has ever been shared with you either through OneDrive, Microsoft Teams, OneNote notebooks, and/or many other Microsoft 365 products.

NOTE: Files and folders can be saved, but not deleted as of a precautionary measure. If you delete a file, it will resync during the next sync interval.

To access or save files directly to and from the mounted volume, simply navigate to the OneDrive volume.

Tip

To help find your class files more easily, it is recommended to first create a folder and give it the name of either the project you are working on or the name of your course.

Working with Files

For most projects, you should be saving and working with files on the Mounted OneDrive volume. For instructions, please refer to the link at the bottom of the page for “FDU Anywhere – Accessing and Using OneDrive“. However, most video editing software (Adobe Premier Pro, Motion Builder for example), will require the user to save those files locally within FDU Anywhere.

The following locations are considered local to FDU Anywhere:

  • Documents
  • Desktop
  • DFS-MyDocuments (U:) Drive

Note

Saving files outside of these locations for specific editing software could result in loss of work.

Moving Files Locally in FDU Anywhere

Some projects require you to move your files locally so they may properly be rendered using the FDU Anywhere hardware. If you need to work on files locally, please follow these instructions.

  1. Find your Project Folder
  2. Copy your folder and save it to a local folder by navigating to the location and pasting it.

Zipping Files

if you need to zip files in order to submit to Webcampus, please follow these instructions:

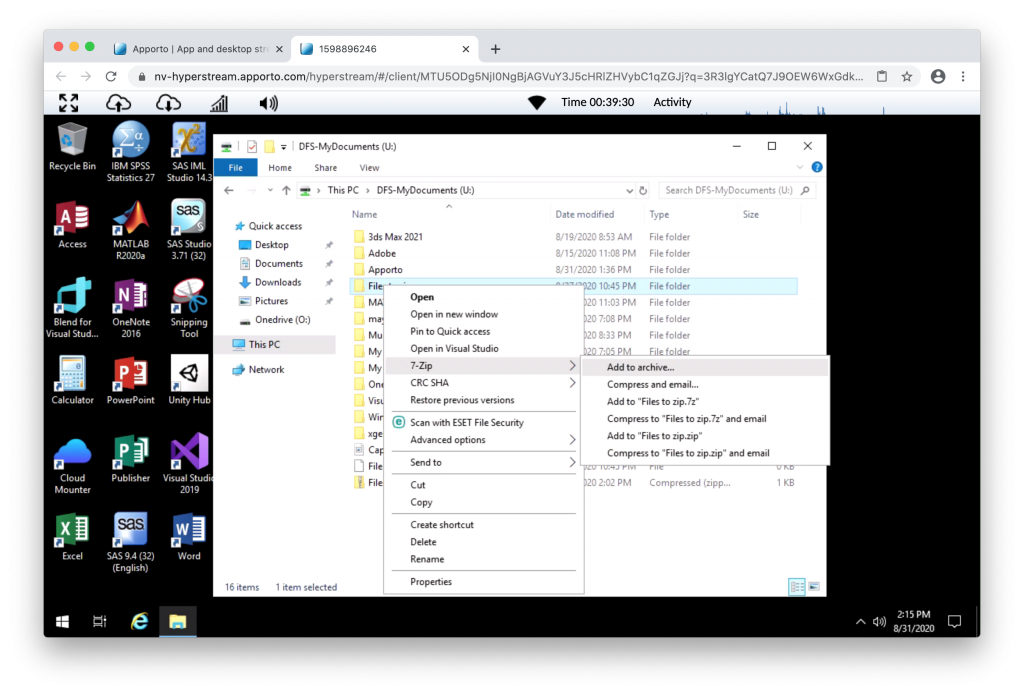
  1. Single right-click the file or folder

Note

For macOS users, you can use the “Two Finger” right-click method on the trackpad in order to initiate the right click. For additional information, please see the link below for “FDU Anywhere – Keyboard Shortcuts”.

  1. right click on 7-zip then click “Add to Archive
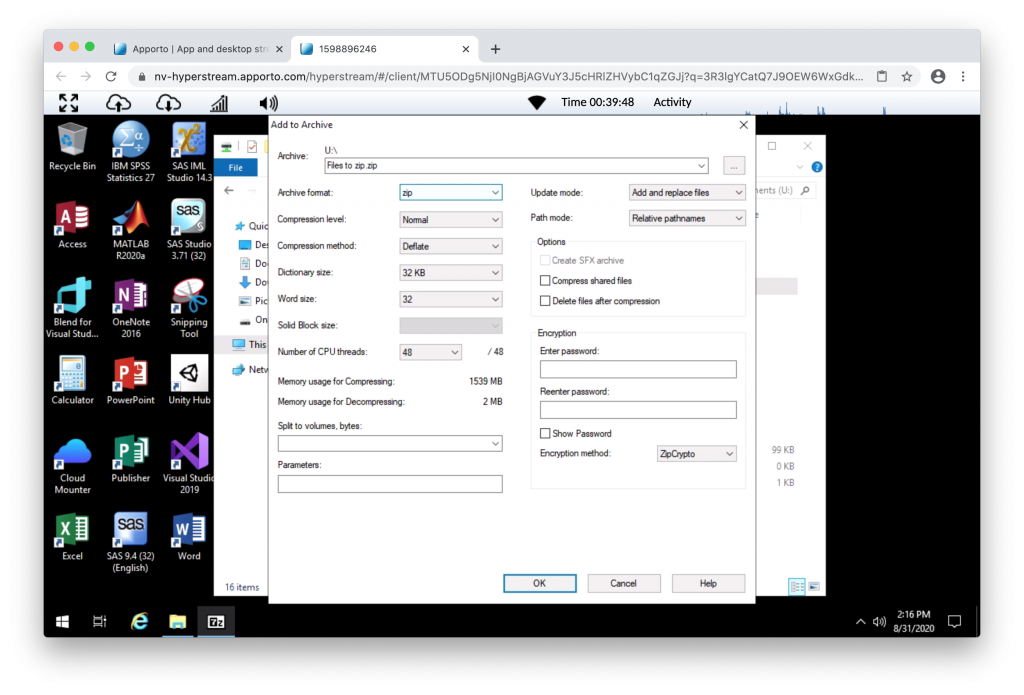
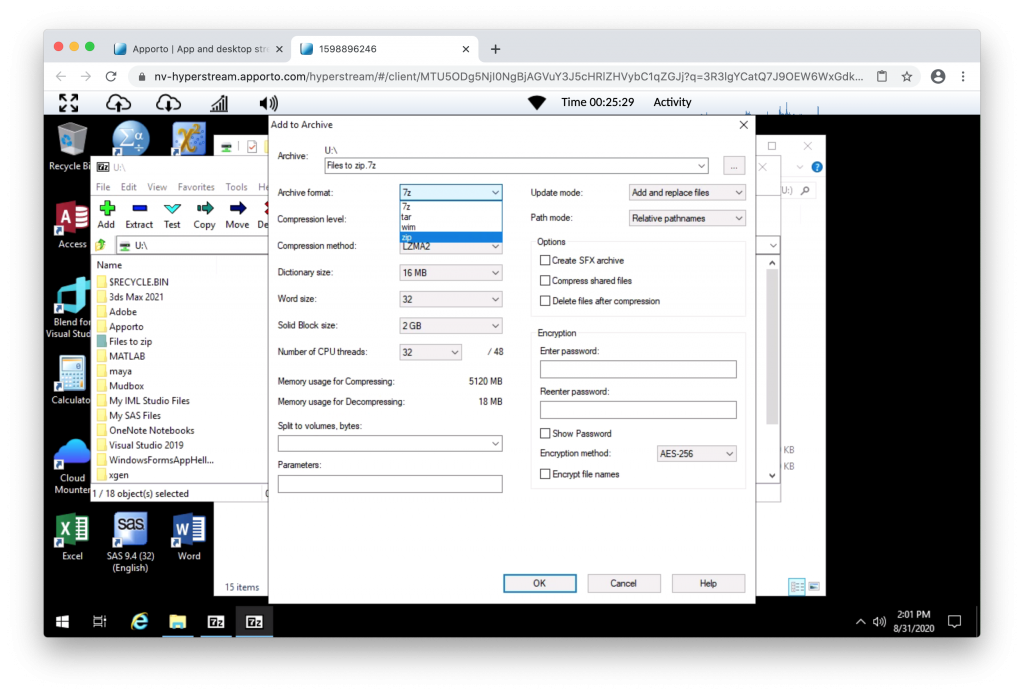
  1. Change Archive Format to “zip” like in the picture below then click “OK” to zip your files

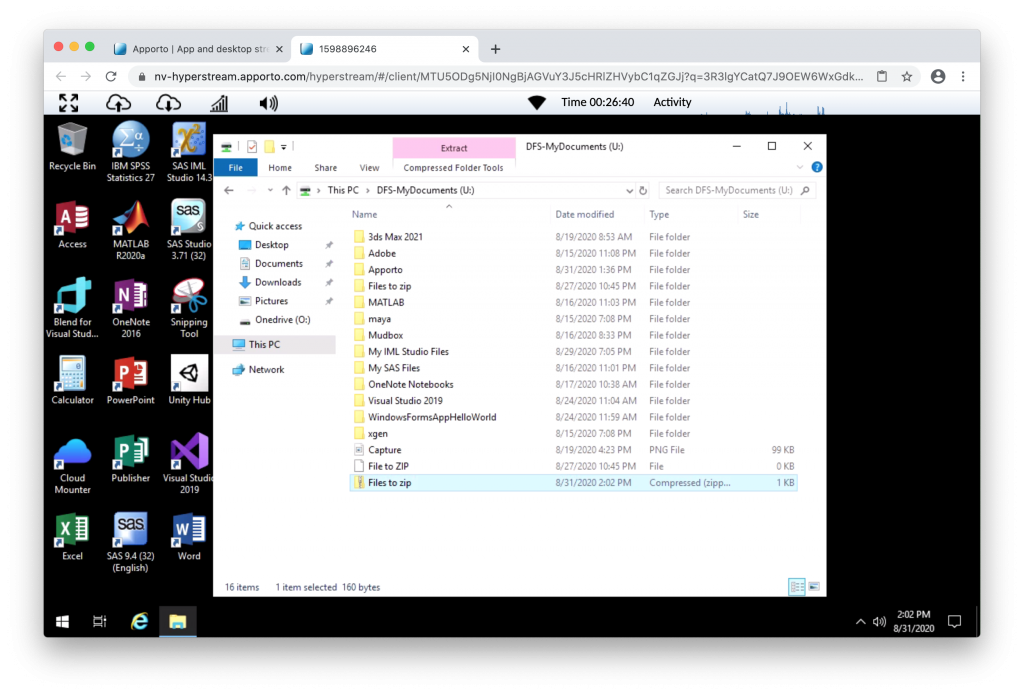
The zip archiving process could take some time depending on the size of the file. Once completed, the file will be in the same location as the folder is. You can then email or upload your file to your professor.

Alternate Way to Zip Files

  1. Click ‘START’ on the taskbar on the left-hand side
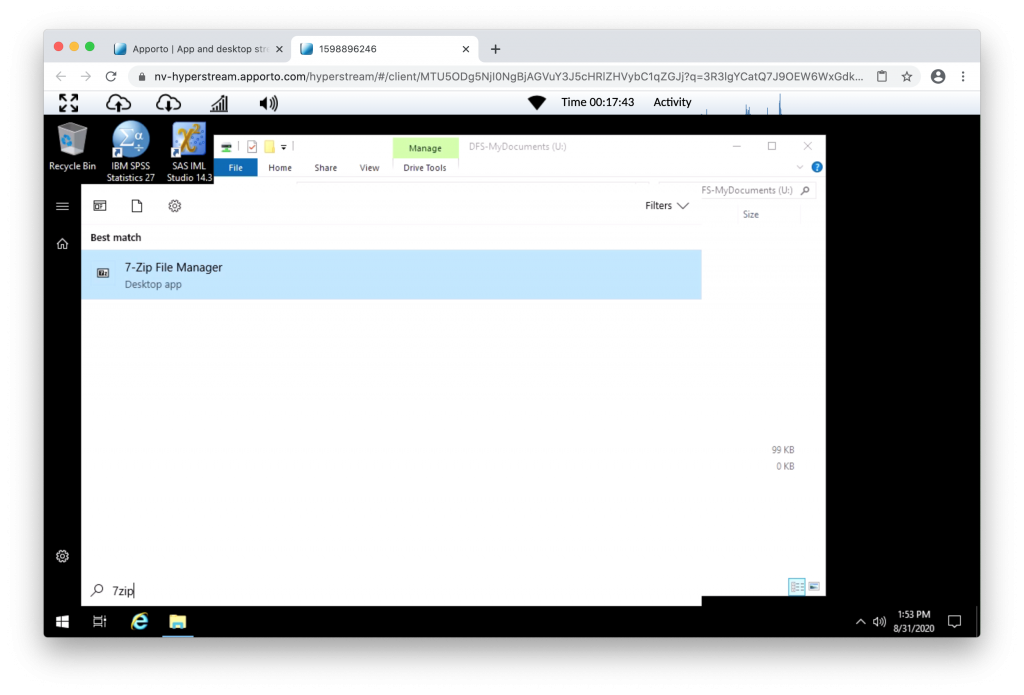
  2. Type “7zip” and 7-zip File Manager will appear, Single Click on “7-zip File Manager
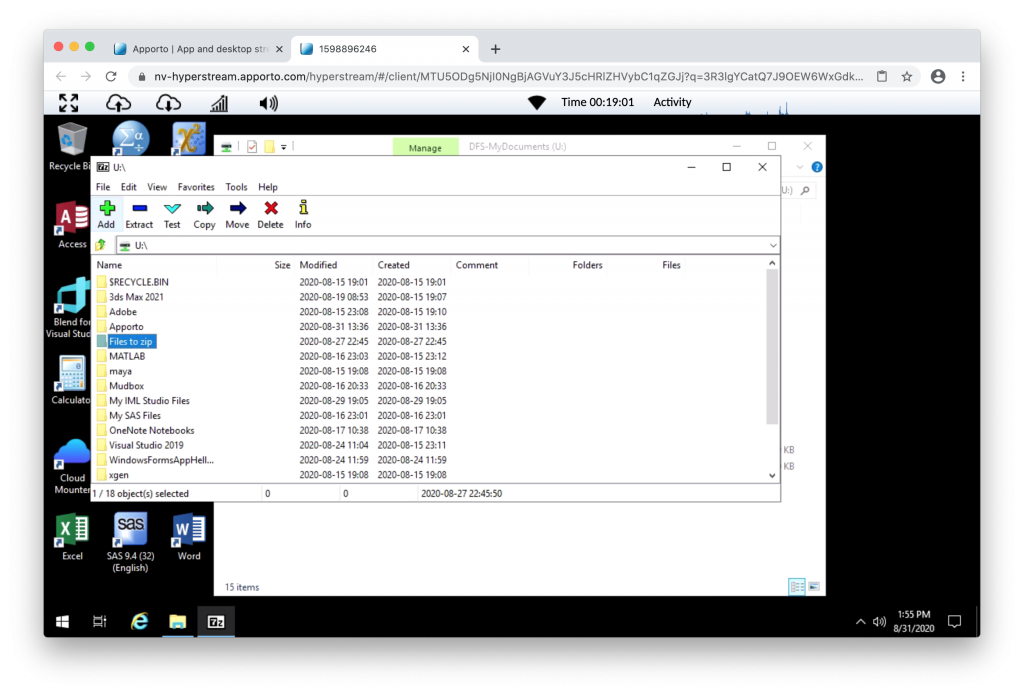
  1. Single click on 7-Zip File Manager
  2. Navigate to the location of your saved file/folder and single click to highlight, then click the Add button at the top
  1. Change Archive Format to zip and then click “Ok” to zip your files

The file will now be zipped and you will find your file in the same folder as the project folder or file you wanted to zip

Note

The zip archive could take some time depending on the size of the file. Once completed, the file will be in the same location as the folder is. You can then email or upload your file to your professor.

Submitting Files to WebCampus

In order to successfully submit your coursework to WebCampus, it is best to use the google chrome browser located on the desktop of FDU Anywhere. Using Internet Explorer may not function properly.

In order to submit your coursework to Webcampus, you can log on from within FDU Anywhere. For more information on Webcampus, please visit:

FDU Anywhere Workshop Video

Screen Sharing

When running a streamed app or desktop, you can share your screen with other users and collaborate in the current session. Screen sharing enables you to collaborate with other users without providing access to your chats, analytics, or other private data. This short guide will show you step-by-step how to:

  1. Share your screen with other users
  2. Stop sharing your screen with others

Share Screen with Others

  1. Click the share screen icon in the top panel in FDU Anywhere
  1. The “Screen Sharing” popup will display the following window:
  1. There are three sharing options, Select the method that you want with the radio buttons, then click Copy Link, and close the Screen Sharing dialog:
    • View only: The viewer can only see what is being worked on in the FDU Anywhere environment
    • View and draw: The viewer can View and Draw or make annotations on the screen by clicking or dragging
    • Full control: The viewer shares control of the FDU Anywhere Environment
  2. Share the copied link to the person you wish to view your FDU Anywhere Streamed session

Stop Sharing your Screen with Others

Once you wish to stop sharing your screen, simply perform the following steps:

  1. To stop sharing your screen with other users, click the Share Screen icon on the top panel
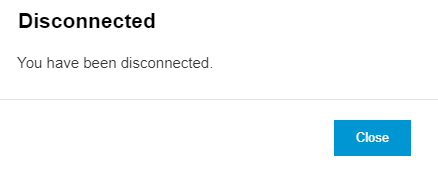
  1. Click the “Stop Sharing” button, then close the ‘Screen Sharing’ dialog box. Other users will see a “Disconnected” popup and will be unable to reconnect
  1. Your Screen Sharing access is no longer active and any connected users are now disconnected

Keyboard Shortcuts

Sometimes you may want to copy and paste content to or from your own computer and an FDU Anywhere cloud desktop or application. You can do this using the copy-and-paste menus or keyboard shortcuts, for example, “Ctrl+C” and “Ctrl+V“.

Note

The copy and paste functions DO NOT work across all applications and browsers, including the copying and pasting of images. This is a limitation inherent in browser clipboards. We recommend the Google Chrome web browser for optimal clipboard capabilities.

If you are unable to copy and paste for any reason, we recommend using our FDU OneDrive service to access any files not found in FDU Anywhere.

Windows OS Copy/Paste Methods

Windows OS to FDU Anywhere

  1. Highlight the text you want to copy from your computer
  2. Press CTRL+C to copy the selected text
  3. Move the cursor to the paste location in FDU Anywhere
  4. Press CTRL+V to paste the text

FDU Anywhere to Windows OS

  1. Highlight the text you want to copy from FDU Anywhere
  2. Press CTRL+C to copy the selected text
  3. Move the cursor to the paste location on your computer.
  4. Press CTRL+V to paste the text

macOS Copy/Paste Methods

Your macOS to FDU Anywhere

  1. Highlight the text you want to copy from your computer
  2. Press COMMAND+C to copy the selected text
  3. macOS also supports CTRL+C

Note

You may find it easier to use CTRL+C when copying content to FDU Anywhere, so you don’t have to switch back and forth between COMMAND and CTRL.

  1. Move the cursor to the paste location in FDU Anywhere
  2. Press CTRL+V to paste the text

FDU Anywhere to macOS

  1. Highlight the text you want to copy from FDU Anywhere
  2. Press CTRL+C to copy the selected text
  3. Move the cursor to the paste location on your macOS
  4. Press COMMAND+V (macOS also supports CTRL+V) to paste the text

Note

Because FDU Anywhere runs on Windows, it is necessary to use Windows keyboard shortcuts (ex. CTRL+C and CTRL+V) in FDU Anywhere Mac OS supports both Mac and Windows keyboard shortcuts.

Getting Support

For additional support, contact the Fairleigh Dickinson University Technical Assistance Center (UTAC).

If you require assistance with Adobe Creative Cloud, Autodesk, or any software application for coursework, it is best to consult with your professor, classmates, and/or course materials.

Network Optimization

If you are experiencing issues while using FDU Anywhere, please use the following tips as guidelines to help improve your experience.

Power-cycle your Modem / Router

Power cycling your modem and router allows them to reset and re-establish a connection to your Internet Service Provider (ISP). Shut down your computer and unplug your modem/router. Plug them back in after 60 seconds and watch the lights on your modem/router. Once the lights are on and steady, start your computer.

Keep all your Local Components Up-to-date

Check that your modem/router and your local computer are totally up to date. This includes the operating system, driver, and browser updates.

Disconnect / Turn off any Devices that are not in use

Some devices could be using bandwidth while on standby. Gaming consoles, for example, might download and install updates. Turn off these devices to keep your bandwidth free.

Use an Ethernet Cable

Using a wired Ethernet connection will make your connection more stable and eliminate additional latency compared to a wireless connection.

Change your Wi-Fi Configuration

If a wired Ethernet connection is not possible or your device requires a wireless connection:

  • Connect to a 5GHz wireless network. Some routers offer both 2.4GHz connections and 5GHz
  • Place your devices (such as a computer or smartphone) and your router closer to each other

Note

You may need to contact your internet service provider for help with rebooting your router and/or to configure your wireless settings correctly.

Last Modified: icon icon Copy Link

Microsoft Office 2019 – University Wide Standard

Resources for: Faculty Staff
icon Close

Microsoft Office 2019 Pro Plus is Fairleigh Dickinson University’s standard office productivity software suite used on All FDU owned laptops and desktops.

Office 2019 Pro Plus is the current version installed on all university computer labs and Microsoft Office 2019 is the current version for all Apple macOS devices.

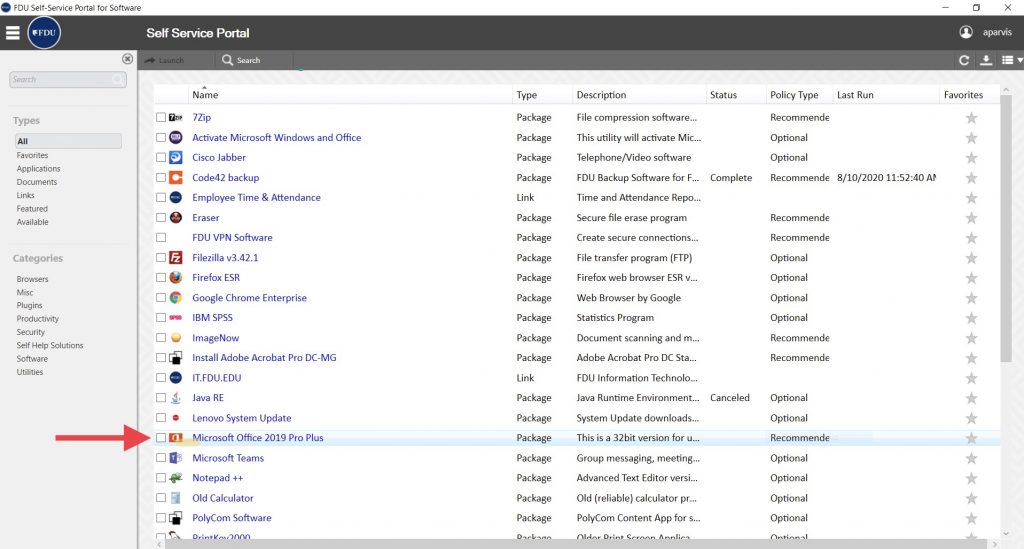
FDU Faculty and Staff in possession of a university owned laptop or desktop who has Microsoft Office 2016 Pro Plus installed, may upgrade to the latest version of Office 2019 Pro Plus using the FDU Self Service Portal for Software. Follow the instructions below to upgrade.

Windows

Launch Microsoft Office 2019 Pro Plus from the FDU Self Service Portal for Software

macOS

Compatible macOS devices will upgrade to the latest version of Office 2019 Pro Plus automatically (minimum version macOS 10.13)

For more information visit:

Last Modified: icon icon Copy Link

Vendor Access Policy for Networking & Computing

Resources for: Faculty Staff
icon Close

As the demand for access by on-site vendors increases, Fairleigh Dickinson University has created a Vendor Access Policy for Networking and Computing. The intent of the policy is to define the categories of non-employees that are on our campuses and provide rules and guidelines around their networking & computing needs. All business units should utilize the Contract Review Process which has been instituted by the Office of the General Counsel prior to initiating any of the below processes. Fully executed contracts that have been reviewed and approved may be requested by members of OIRT prior to providing any access for the non-employees below.

Effective Date: 3/1/2023
Last Revision: 3/1/2023
Last Review: N/A

Contractors/Consultants

The University employs individuals from companies that perform work on behalf of the University and expressly for the University. Examples could be an employee from a staffing agency working within IT to augment the staff in assisting with a series of projects, or an individual hired from an agency to work within Human Resources to assist in processing forms. These individuals are hired under contracts and are held to the terms and conditions of those contracts. In most cases, working as part of the University, these individuals need computing functionality identical to those of University hired staff, as they are acting on behalf of the University & fulfilling a role specific to the University. All work done by these individuals is part of the universities data property, and therefore, careful consideration needs to be given to providing these individuals with University issued devices such as desktop/laptop computers, landline phone extensions, etc.

Individuals hired from companies outside of the University to conduct business on behalf of the University must meet the following guidelines and are provided with the following access:

  1. Contractors/Consultants will be issued a University NetID & email address in the standard Firstinitial.Lastname@fdu.edu format.
  2. All Contractors/Consultants are required to complete the Written Information Security Program (WISP) training immediately after an account is provisioned. Validation of completion is needed within the first 30 days.
    1. WISP training reminder on day 15
    2. WISP training daily reminder every day after day 15
    3. Disable account day 30 with an email sent to the manager
  3. All contractors/consultants must read and accept the following additional policies:
    1. Policy for the acceptable use of email
    2. Acceptable use policy for computer usage
    3. FDU alert policy
    4. Password policy
  4. Contractors/Consultants will be able to sign up for FDU Alert through Colleague Self-service. Instructions can be found here: Self-Service Tutorial >
  5. Contractors/consultants deemed necessary to be issued University managed laptops/desktops will be at the expense of the hiring department.
  6. Upon departmental request, contractors/consultants will be provided access to specific university systems and applications based on overall business needs. These requests will be reviewed by the Director of Systems.
  7. All contractor/consultant accounts will expire at the end of the fiscal year (June 30th) and must be renewed by the FDU manager by completing a Personal Information Notice (PIN) form.
  8. Contractors/consultants must be terminated at the end of their contract using the same methodology utilized for current faculty and staff. It is the unshared responsibility of the managing department to submit termination paperwork per the HR process for any contractor/consultant who had been issued a NetID.

Volunteers

The University utilizes volunteers in non-paying positions during the school year. Examples of these roles include but are not limited to preceptors & chaplains. These individuals do not need access to any University systems with the exception of email. As such, they need access to Internet services & email but they do not require an FDU managed laptop/desktop.

Volunteers must meet the following guidelines and are provided the following access:

  1. Volunteers will be issued a NetID in the format of Firstinitial.Lastname@v.fdu.edu to be able to authenticate to FDU’s wireless network (and wired network in the future).
  2. Volunteers are required to complete the Written Information Security Program (WISP) training immediately after an account is provisioned. Validation of completion is needed within the first 30 days.
    1. WISP training reminder on day 15
    2. WISP training daily reminder every day after day 15
    3. Disable account day 30 with an email sent to the manager
  3. All volunteers must read and accept the following additional policies:
    1. Policy for the acceptable use of email
    2. Acceptable use policy for computer usage
    3. FDU alert policy
    4. Password policy
  4. Volunteers will be able to sign up for FDU Alert through Colleague Self-service. Instructions can be found here: Self-Service Tutorial >
  5. All volunteer accounts will expire at the end of the fiscal year and must be renewed by their FDU manager by completing a PIN form.
  6. Volunteers must be terminated at the end of their contract using the same methodology utilized for current faculty and staff. It is the unshared responsibility of the managing department to submit termination paperwork per the HR process for any contractor/consultant who had been issued a NetID.

On-Campus Vendors

The University outsources various functions to entities (Vendors) that operate independently but work exclusively on our campuses and provide services for our faculty, staff & students. These employees are individually managed by their corporate entities and are largely held accountable by their corporate management.

While on campus, employees of these vendors might need access to the Internet to interact with their corporate websites or communicate with their corporate managers. In many cases today and in most all cases in the future, these employees will need to authenticate through the University’s network in order to conduct their business. The University has established a process whereby the Fairleigh Dickinson University department responsible for that vendor completes the Human Resource forms necessary in order to create a non-employee record within our Colleague system.

Employees of on-campus vendors must meet the following guidelines and are provided the following access:

  1. Vendor employees will be issued a NetID in the format of Firstinitial.Lastname@v.fdu.edu to be able to authenticate to FDU’s wireless network (and wired network in the future).
  1. Vendor employees will be able to add their contact information to FDU Alert by sending an email to fdunotify@fdu.edu
  2. All vendor employee accounts will expire at the end of the fiscal year and must be renewed by their FDU manager by completing a PIN form.
  3. Vendor employees must be terminated through FDU’s systems when they either are removed from their assignment at Fairleigh Dickinson University or are terminated by their employer using the same methodology utilized for current faculty and staff. It is the unshared responsibility of the managing department to submit termination paperwork per the HR process for any contractor/consultant who had been issued a NetID.

Elevated Vendor Privileges

From time to time, the employee of an on-campus vendor might have justification for having access to FDU email or a need to access systems and/or applications that reside behind FDU’s firewalls. If such a case is identified, the FDU department responsible for that vendor would need to contact the Director of Systems with a formal request for additional vendor access. The FDU department must present solid business justification for the elevated access. The Director of Systems will review each request and either approve or reject the request based on business needs and security posture. The Director of Systems might consult with the Data Security & Incident Response Team before providing an answer.

Employees of on-campus vendors approved for elevated access must meet the following guidelines and are provided the following access:

  1. Vendor employees will be issued a NetID in the format of Firstinitial.Lastname@v.fdu.edu to be able to access FDU’s wireless network (and wired network in the future).
  2. All vendor employees are required to complete the Written Information Security Program (WISP) training immediately after an account is provisioned. Validation of completion is needed within the first 30 days.
    1. WISP training reminder on day 15
    2. WISP training daily reminder every day after day 15
    3. Disable account day 30 with an email sent to the manager.
  3. Vendor employees will be able to sign up for FDU Alert through self-service. Instructions can be found here: Self-Service Tutorial >
  4. All vendor employees with elevated access must read the following additional policies:
    1. Policy for the acceptable use of email
    2. Acceptable use policy for computer usage
    3. FDU alert policy
    4. Password policy
  5. If the vendor employee needs to access FDU systems and/or applications, issuance of a University managed laptop/desktop may be required. This would be at the expense of the requesting department.
  6. Upon departmental request, vendor employees will only be provided access to the specific University Systems and applications approved by the Director of Systems.
  7. All vendor employee accounts will expire at the end of the fiscal year and must be renewed by their FDU manager by completing a PIN form.
  8. Vendor employees must be terminated through FDU’s systems when they either are removed from their assignment at Fairleigh Dickinson University or are terminated by their employer using the same methodology utilized for current faculty and staff. It is the unshared responsibility of the managing department to submit termination paperwork per the HR process for any contractor/consultant who had been issued a NetID.

Last Modified: icon icon Copy Link

Fairleigh Dickinson University regularly hosts on-campus visitors requiring access to our wireless network. As a security measure, in order to provide access to our Network, an FDU faculty member, staff member, or student must sponsor the guest(s) that they are providing access to. The sponsor takes responsibility for the Internet usage of their guests and ensures that they adhere to FDU’s Acceptable Use Policy for Computer Usage.

Choosing the Correct Account Type

  • Accounts can be created for up to 8 days
  • The sponsor can manage accounts (extend time, delete, suspend or reset password)
  • Account creation requires a valid FDU NetID to create
  • A single Guest Account (Known Guest) can be created or generic accounts (5 devices per account with the ability to create 10 generic accounts at once) can be created through this function

For events that will have a large audience, a Group Account may be needed. If you are a faculty or staff member and you require this account type, please create a sponsored guest account and then create a UTAC ticket. This can be accomplished by contacting the Fairleigh Dickinson University Technical Assistance Center (UTAC)

Please provide UTAC with the following information:

  • Guest account name
  • The name that you would like to use for your Group account
  • Faculty/staff sponsor name, contact number and e-mail address
  • Location for the event (Building, Room, Classroom, etc.)
  • Time and date of the event

Once the ticket is created, OIRT (Office of Information Resource Technology) will contact you within 3 business days to complete the Group account activation.

EduRoam

Fairleigh Dickinson is a member of Eduroam (education roaming) which provides secure, world-wide roaming access service for the international research and education community. If your guest is coming from another Higher Education institution that is also a member of Eduroam, they will not require an FDU guest account. Instead, they can gain access to our Network simply by logging into the eduroam network with their regular credentials.

(Available on Metro and Florham Campus Only)

Creating and Managing an FDU Wireless Guest Account

Creating a FDU Wireless Guest Account
  1. Log into access.net.fdu.edu using your NetID and password
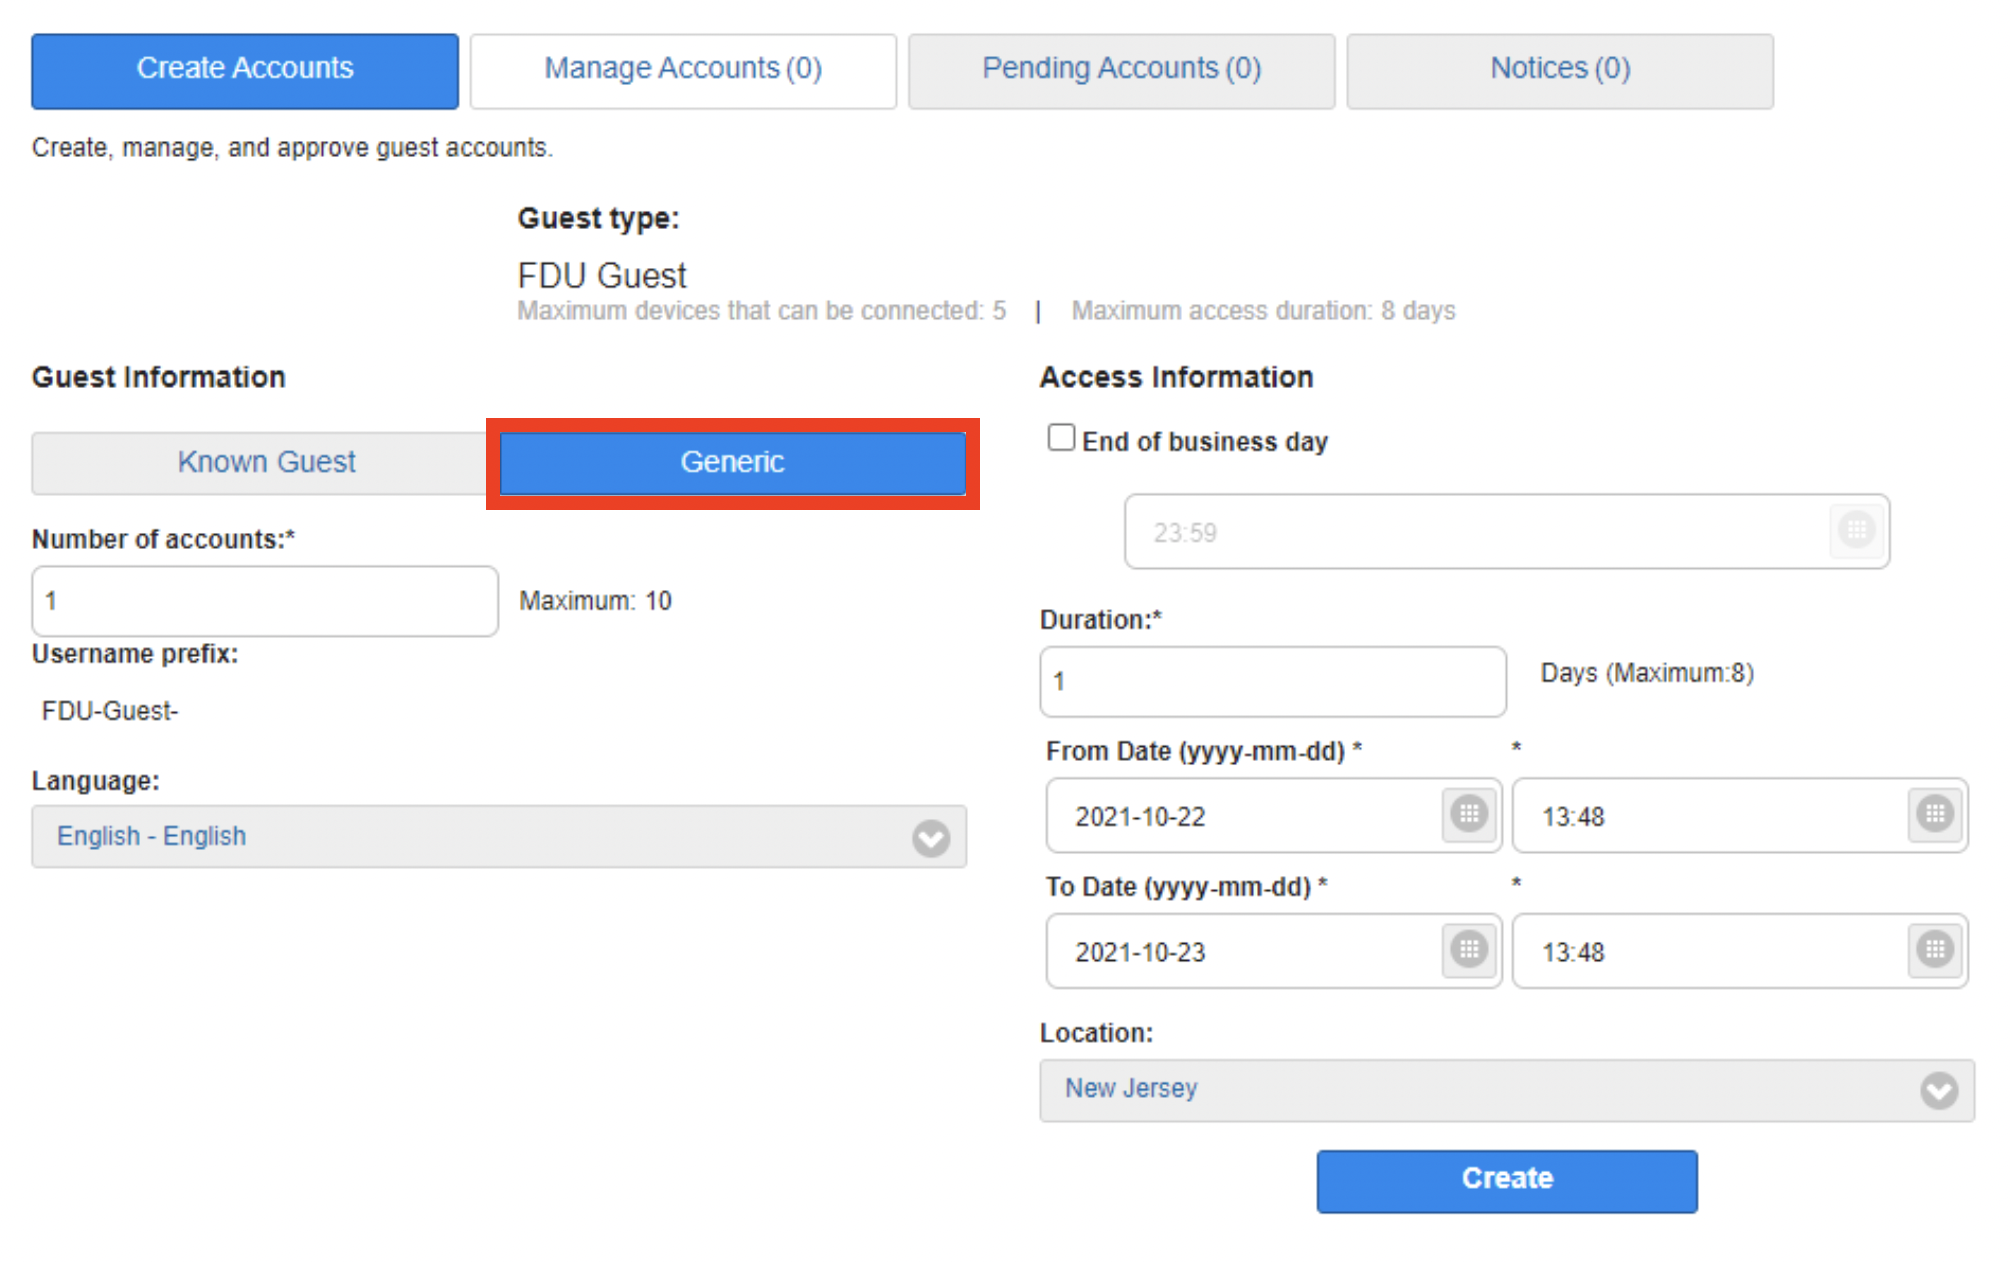
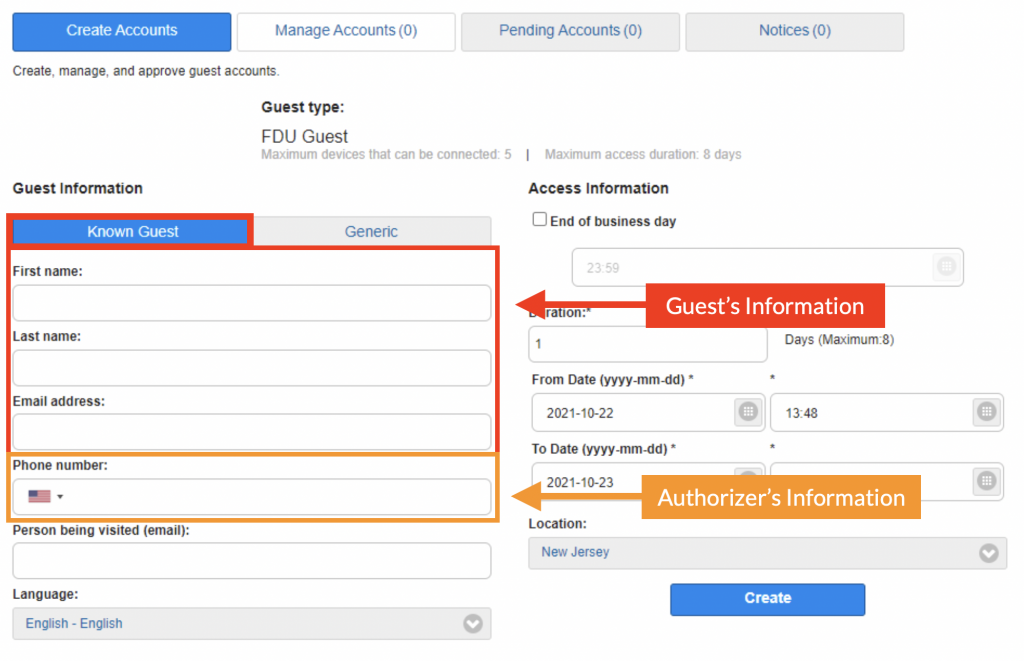
  1. Click the “Generic” or “Known Guest” button
  • Generic – This option allows you to create up to 10 accounts concurrently without entering your guest’s information
  • Known Guest – This option allows you to create an account with guest information. You need to input the guest’s “First name”, “Last name”, “Email address”, and “Phone number”. You also need to enter your own FDU email address
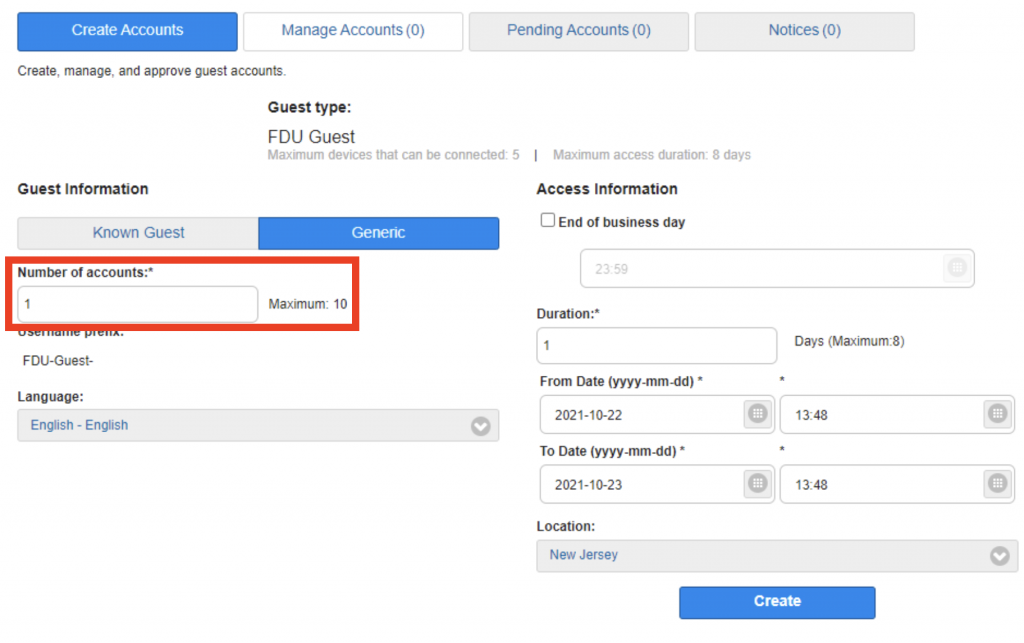
  1. If you have selected “Generic”, enter the number of accounts that you would like to create (maximum of 10)
  1. The remaining instructions are for both known guests and generic accounts. Choose how long you want the guest account to be active
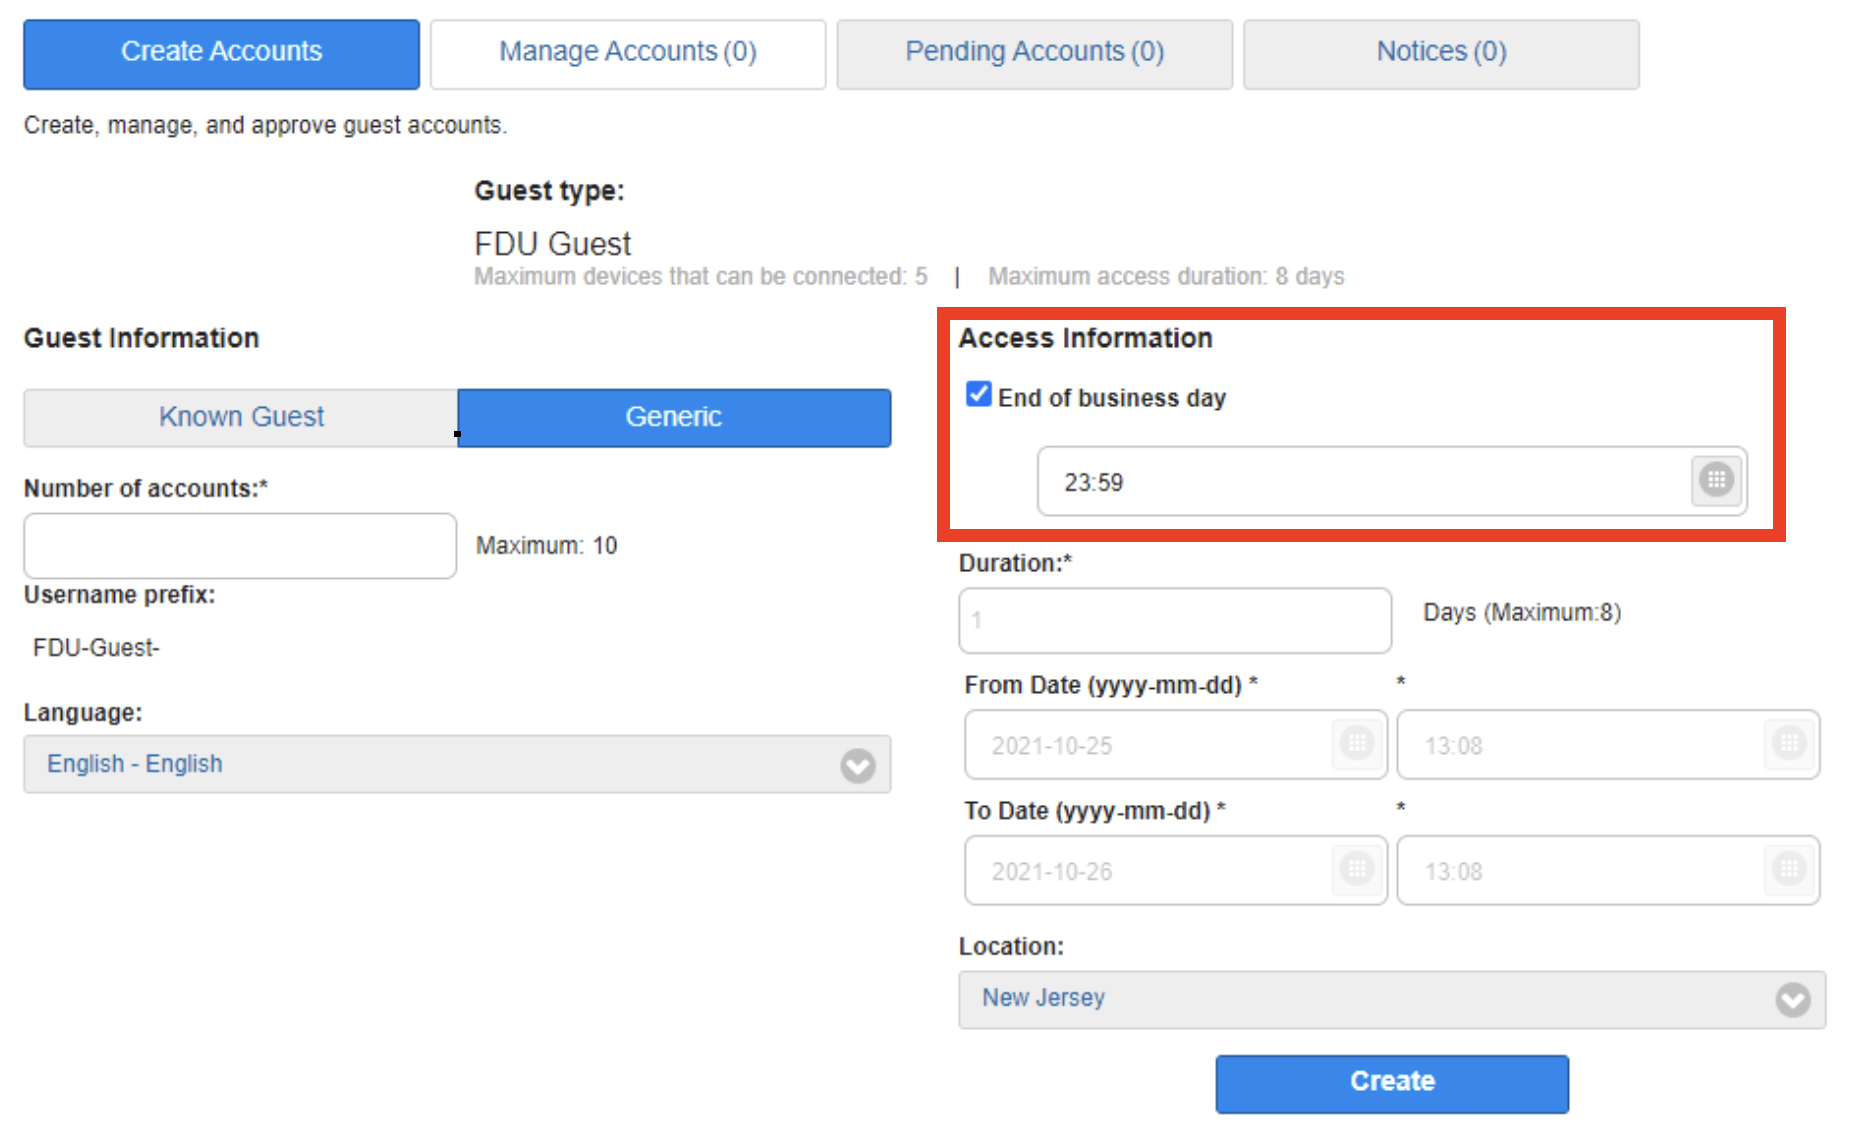
  • First Option – Click the box next to “End of business day” if your guest only requires access through the end of the day
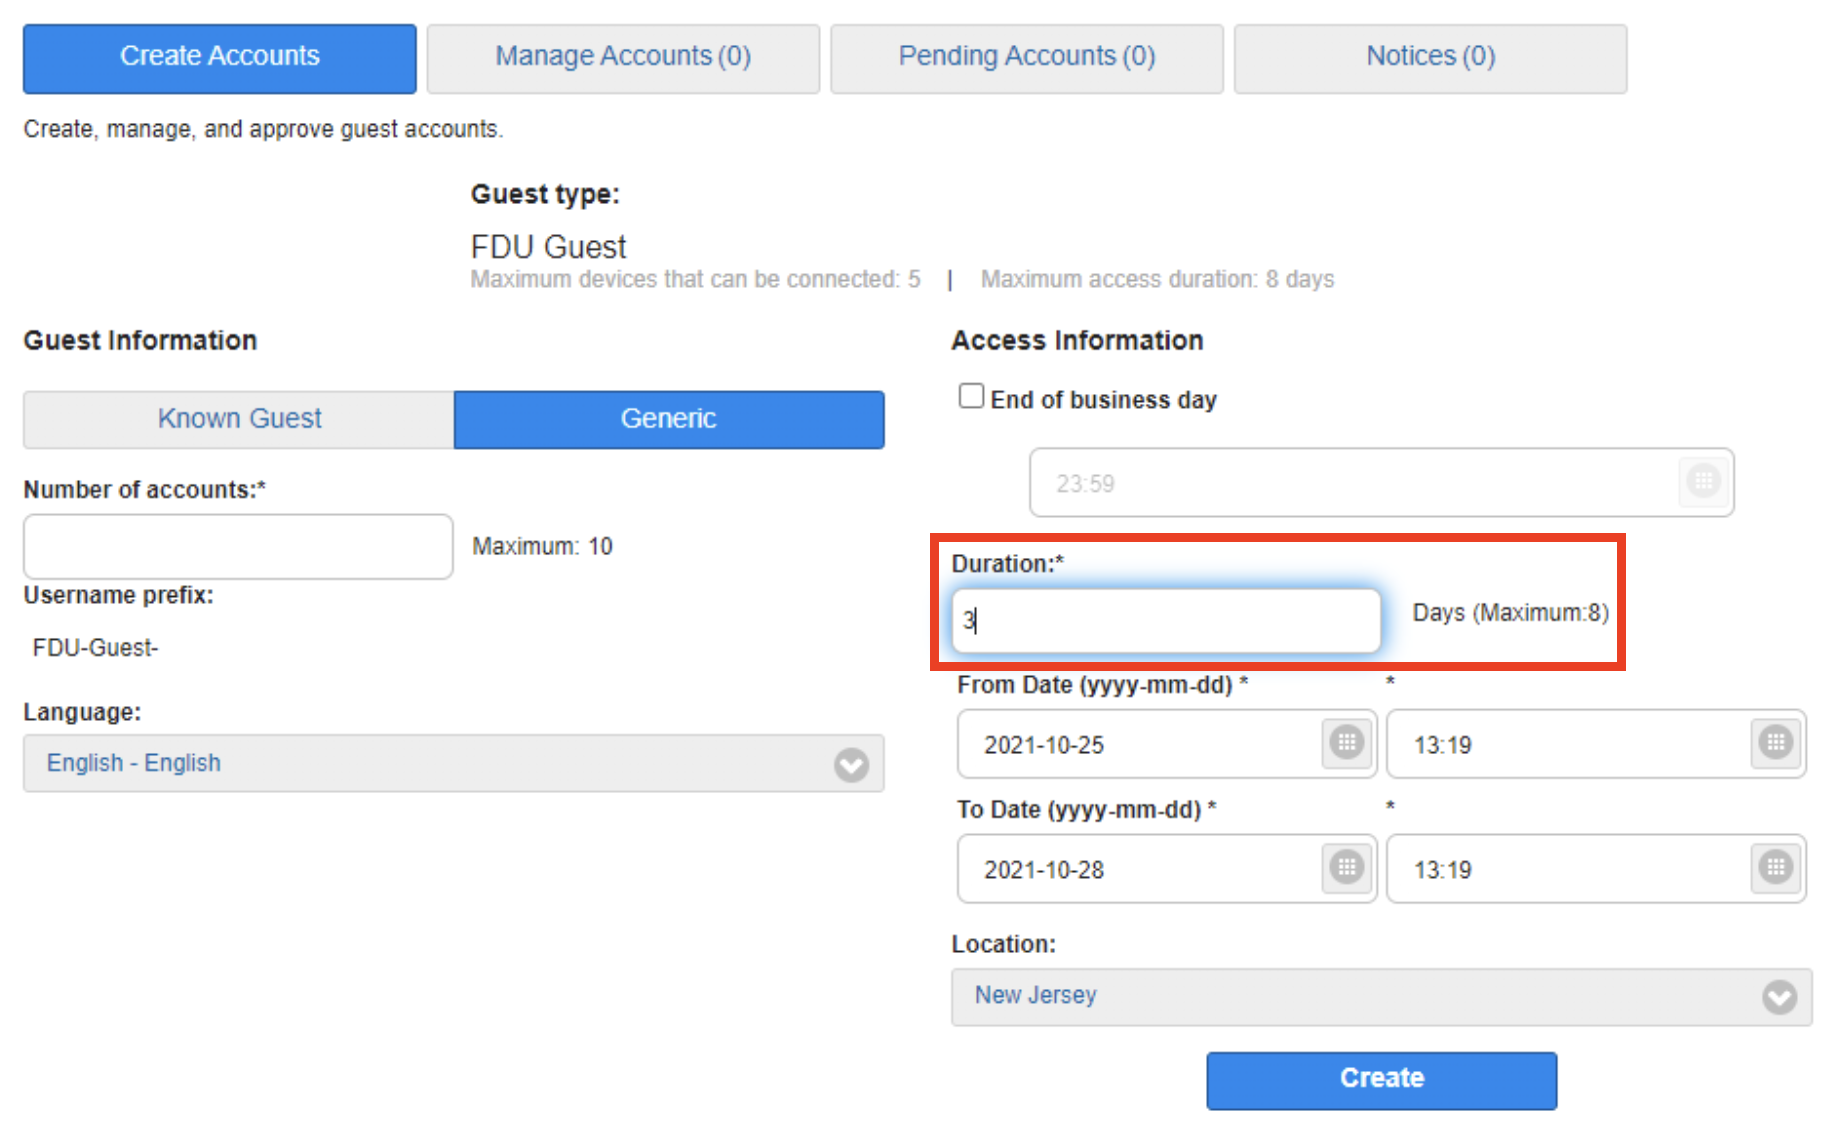
  • Second Option – Type the number of days required in the “Duration” box (maximum of 8). The “From Date” and “To Date” will automatically change based on the requested duration
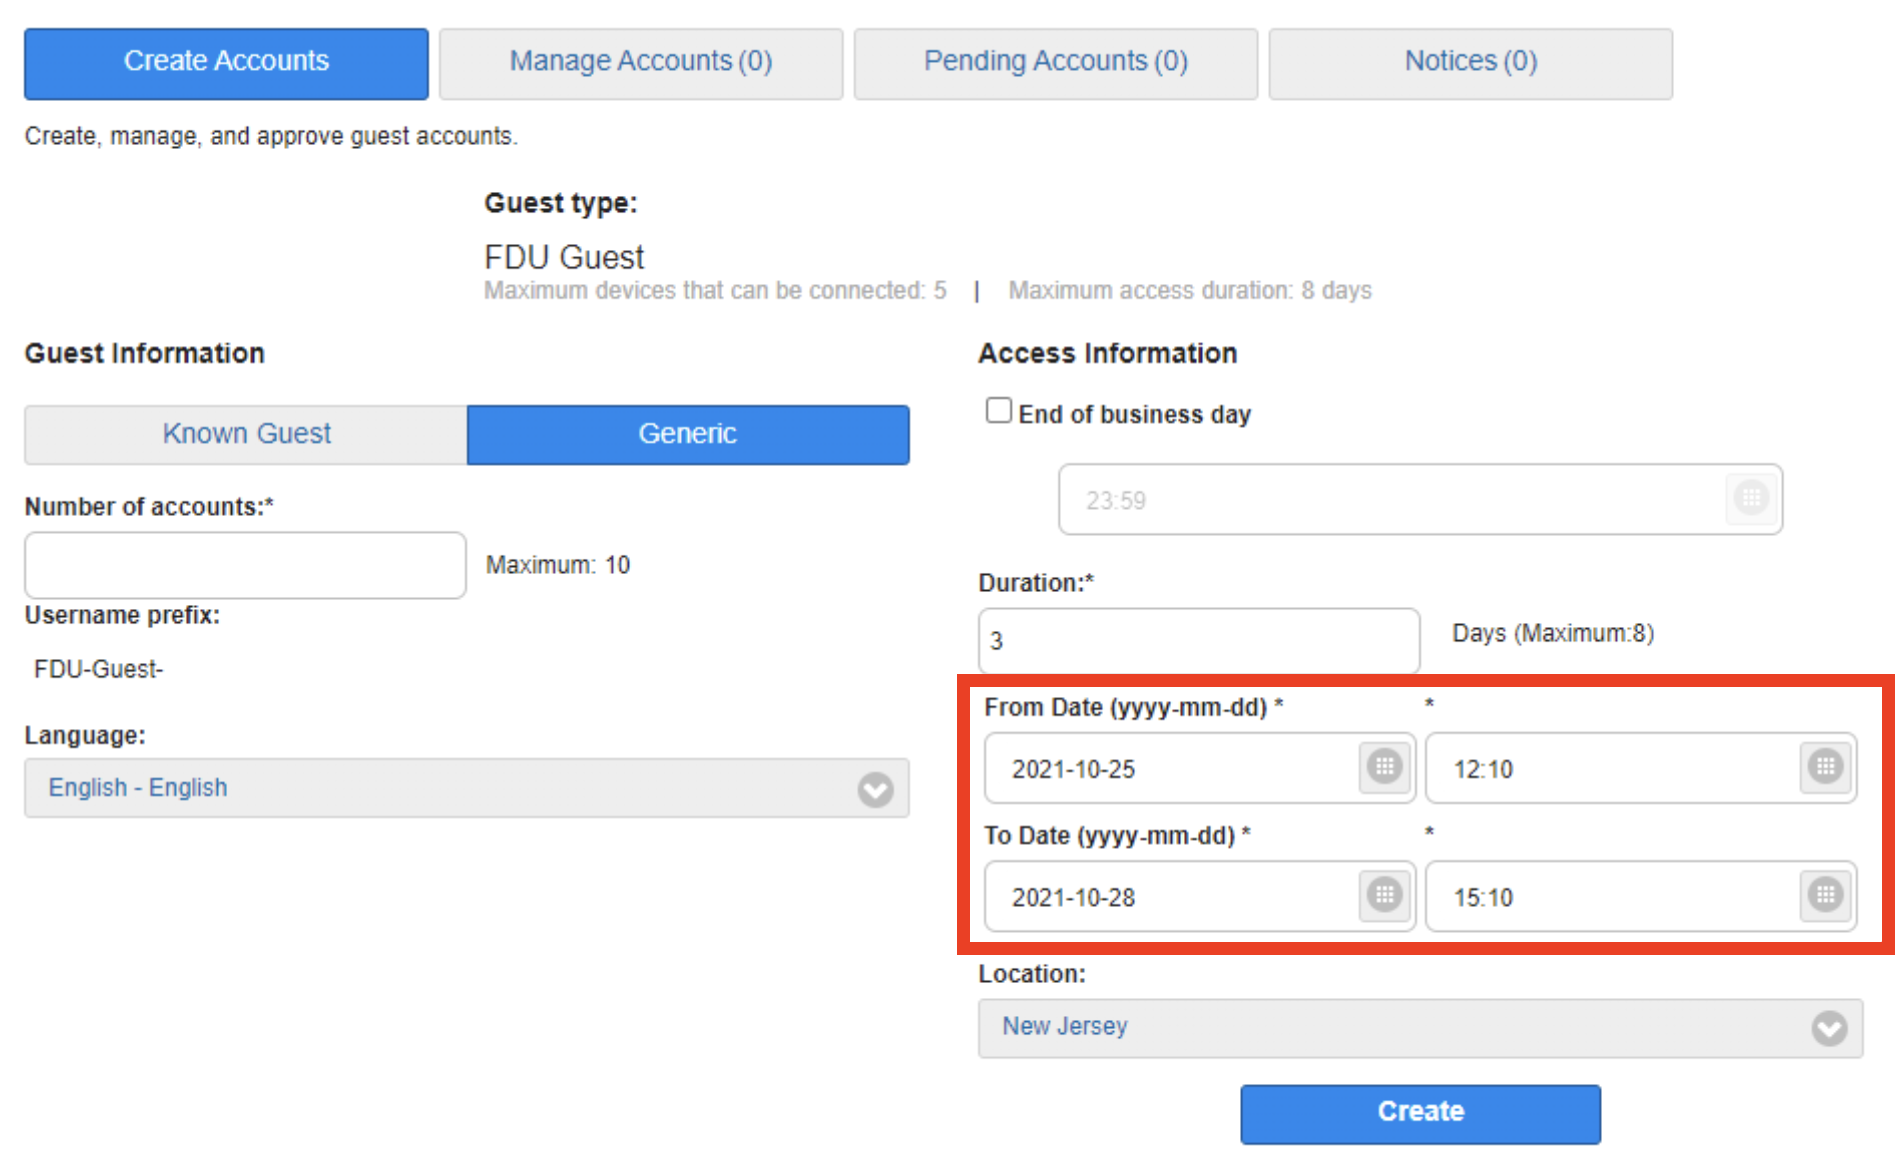
  • Optional – If needed, you can select an exact date and time for the guest account access to begin and end (24:00 format)
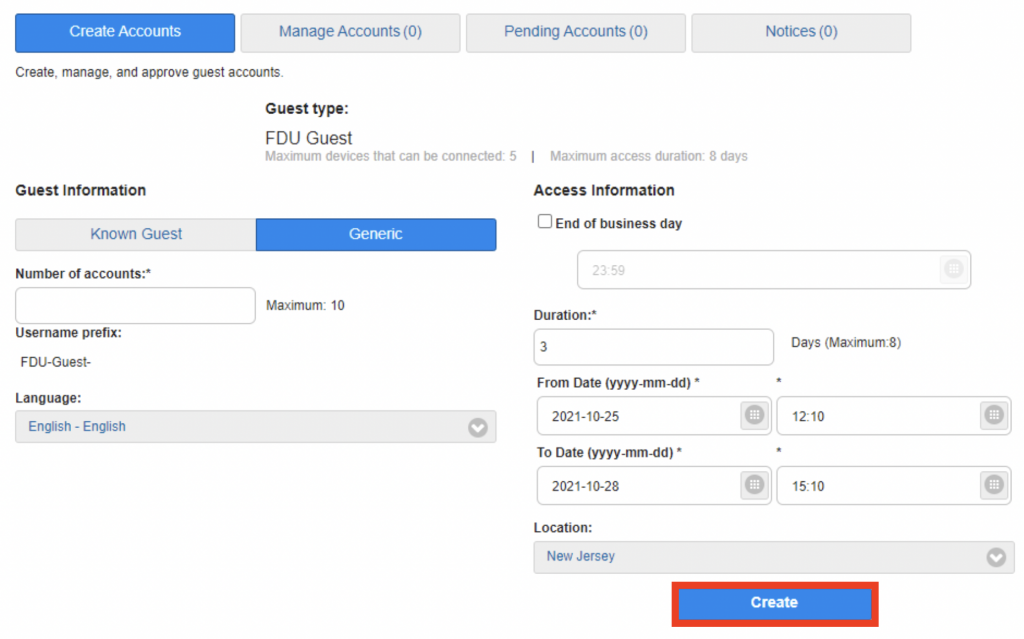
  1. Click the “Create” button
close
Managing a FDU Wireless Guest Account
  1. Log into access.net.fdu.edu using your NetID and password
  1. Click the “Manage Accounts” tab
  1. Check the box next the account that you would like to update. You can now use the following administrative functions
  • Edit: Modify any information entered during account creation
  • Resend: Print or email the account username and password
  • Extend: Add additional time to the account. The maximum total duration of 8 days will still apply
  • Delete: Immediately delete the account
  • Reset Password: This will reset the password and either print or email the new password
close

Support

For additional support, please contact the University Technical Assistance Center (UTAC)

Last Modified: icon icon Copy Link