Microsoft Office 2019 Pro Plus is Fairleigh Dickinson University’s standard office productivity software suite used on all FDU-owned laptops and desktops.
Office 2019 Pro Plus is the current version installed on all university computer labs and Microsoft Office 2019 is the current version for all Apple macOS devices.
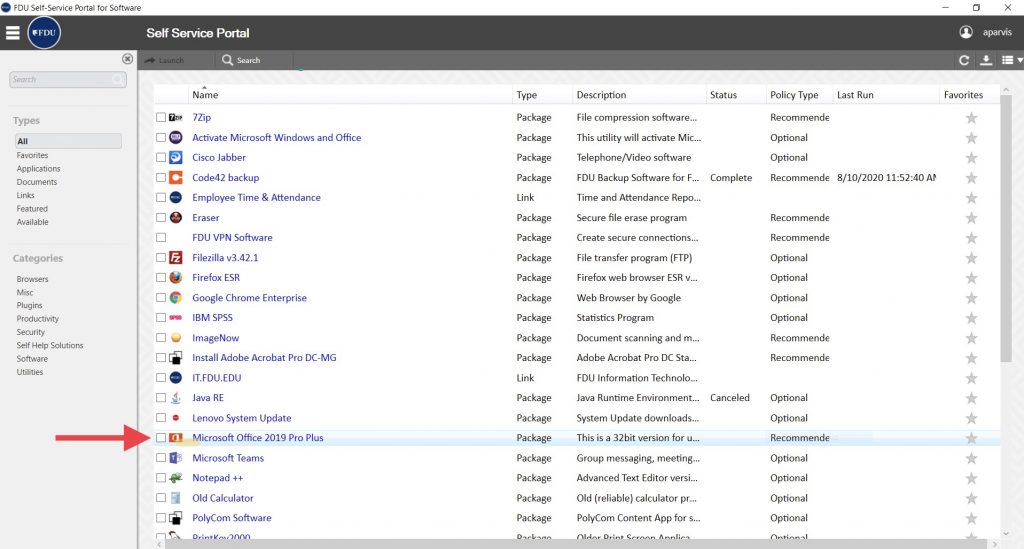
FDU Faculty and Staff in possession of a university-owned laptop or desktop who has Microsoft Office 2016 Pro Plus installed, may upgrade to the latest version of Office 2019 Pro Plus using the FDU Self Service Portal for Software. Follow the instructions below to upgrade.
The Microsoft productivity suite subscription includes Office for the Web, stand-alone, downloadable Office 365 desktop clients and mobile apps. Included in the Microsoft Office suite of products are
Microsoft Word
Microsoft Excel
Microsoft PowerPoint
Microsoft OneNote
Microsoft Outlook
Microsoft Publisher
Microsoft Access
Available Platforms
Windows10or higher
Mac
iOS, Android, Other Devices
Browsers – Current versions of Safari, Chrome, Firefox, Microsoft Edge, and Internet Explorer
Eligibility
Current students that are registered for classes for the current term or a future term.
How to Install Microsoft Office 365 Pro Plus
Current students can download the latest version of Microsoft Office free of charge as part of the Microsoft Campus Agreement. Microsoft Office Suite can be installed on up to five devices.
Note
Students leaving Fairleigh Dickinson University (by graduating or otherwise) will need to purchase Office to continue using it. You will be prompted by Microsoft to purchase Office the next time you launch the software. If you don’t purchase Office, you will still be able to open the documents you created but won’t be able to edit them or create new documents.
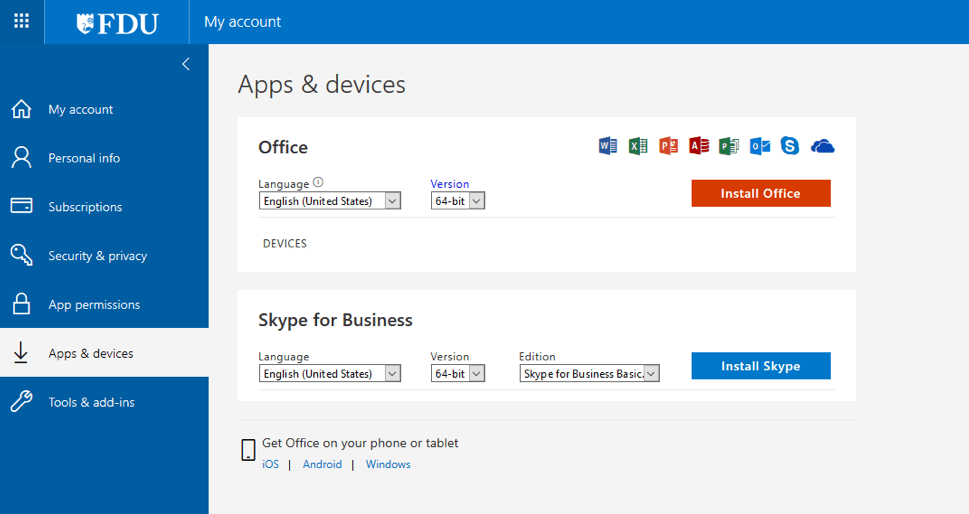
Office 365 Pro Plus can be installed on Windows 10 or higher
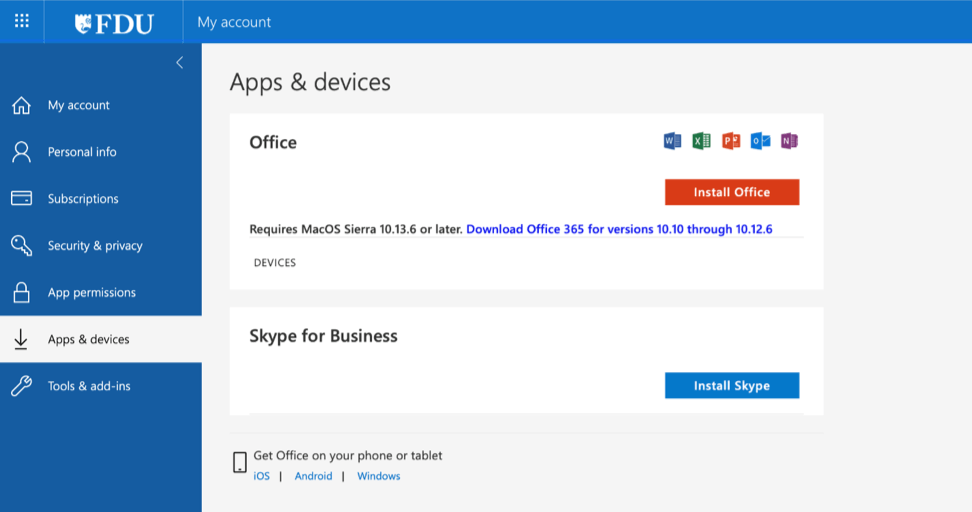
Office 365 Pro Plus can be installed on Mac OS 10.13.6 (Sierra) or higher
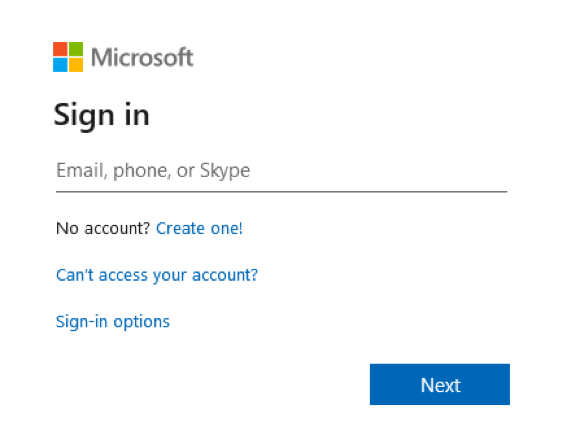
Enter your FDU NetID and then click “Next”. This will re-direct you to the FDU SSO login page
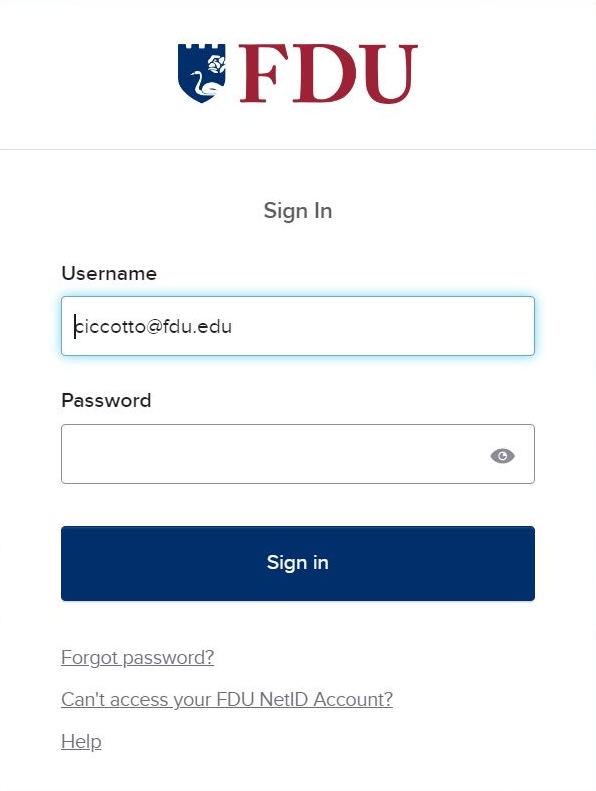
Enter your FDU NetID and Password then click “Sign In“. Follow the prompts on the next screen to authenticate with Duo
In the Software window, click “Office“. Then click the “Install” button
Windows
macOS
The software will be downloaded and installed on your computer. Your copy of Microsoft Office remains active until you leave the University, at which point, you will either need to uninstall it or purchase a license key
Note
Any computer with Office 365 Pro Plus installed on it must connect to the Internet at least once every 30 days so the status of your subscription can be verified. If you do not connect to the Internet every 30 days or less, Office 365 will go into reduced functionality mode. Once the computer reconnects to the Internet and the subscription status is verified, all features will become available again.
The Microsoft Workplace Discount Program is an employee purchase program with Microsoft for eligible faculty and staff of Fairleigh Dickinson University. The Workplace Discount Program allows eligible employees to buy an annual subscription to Microsoft 365 Family or Microsoft 365 Personal at a discount for use on personal devices.
FDU faculty and staff members with a valid work email address can begin signing up for the Microsoft Workplace Discount Program with their FDU email address. Notification of your Microsoft Workplace Discount Program eligibility is sent to your FDU email address inbox.
To confirm eligibility, visit the link below and enter your FDU email address.
Microsoft 365 is a subscription-based software service. The subscription includes premium Office applications like Word, Excel, PowerPoint, and Outlook. 1TB of OneDrive cloud storage, advanced security features, and support from Microsoft experts are also included with the subscription.
The Microsoft Workplace Discount Program offers two types of Microsoft 365 subscriptions at a discounted rate:
Microsoft 365 Personal – Includes subscription benefits mentioned above, for 1 person—discounted rate of 30%, $48.99 yearly or $6.99 monthly, usually $69.99 annually
Microsoft 365 Family – Includes subscription benefits mentioned above, for up to 5 people in your family—discounted rate of 30%, $69.99 yearly or $9.99 monthly, usually $99.99 annually
close
What is the difference between Office 2021 (one-time purchase) and Microsoft 365 (subscription)?
Microsoft 365 is a subscription-based software service that comes with premium apps like Word, Excel, PowerPoint, OneNote, Outlook, Publisher, and Access (Publisher and Access available on PC only). The apps can be installed on multiple devices, including PCs, Macs, iPads, iPhones, Android tablets, and Android phones. Microsoft 365 also comes with services like 1 TB of OneDrive storage, and Microsoft chat and phone support. With a subscription, you get the latest versions of the apps and automatically receive updates when they happen.
Office 2021 is sold as a one-time purchase, which means you pay a single, up-front cost to get Microsoft 365 apps for one computer. One-time purchases are available for both PCs and Macs. However, there are no upgrade options, which means if you plan to upgrade to the next major release, you’ll have to buy it at full price.
To learn more about the differences between Microsoft 365 and Office 2021 select the links below:
Confirm: If you are eligible, an email will be sent to your corporate email address inbox with a link that will validate your eligibility for the program
Sign In: Once your eligibility is confirmed and you register for the program with your personal Microsoft account that is associated with your personal email address, you can begin the purchase process by viewing the discounts available to you based on your Workplace Discount Program benefit eligibility
Shop: Your purchase is processed and completed in the Microsoft Store. You, the eligible employee, can install Microsoft 365 on your personal devices after the purchase is complete. Once you have purchased Microsoft 365 Family, you can share your subscription with up to 5 additional members of your household.
close
Installing your Microsoft 365 subscription software on a Mac or PC
Use your personal Microsoft Account and password when completing the installation and login credentials for your Office software. This is the same personal Microsoft Account used to complete the registration and purchase process of the Microsoft Workplace Discount Program. Your FDU e-mail address and credentials should not be used.
Fairleigh Dickinson University’s Acceptable Use Policy for Computer Usage states, “All computers and mobile devices accessing any FDU resource must run an operating system and configuration that is supported by its vendor with regard to security patches and updates.”
Cisco Duo regularly updates the Duo Mobile app and its mobile platform requirements to maintain secure, reliable authentication and align with modern mobile security standards.
Duo Mobile relies on digital certificates to establish secure communication with Duo’s authentication servers. These certificates are issued by trusted certificate authorities (CAs). Periodically, Duo updates its certificate trust bundle to ensure encrypted connections remain valid and protected.
Older versions of Duo Mobile rely on certificate trust methods that are being retired across the industry. If the app is not updated, this can result in Duo Push failures.
Mobile operating systems evolve to address security vulnerabilities and update encryption standards. Duo aligns its supported operating system versions with Apple and Google security baselines to ensure authentication remains secure and reliable.
To continue using Duo Push authentication without interruption:
Keep Duo Mobile updated
Ensure your device meets Duo’s minimum operating system requirements
Tip
Keeping Duo Mobile and your device’s operating system up to date ensures secure, uninterrupted Duo Push authentication for FDU users.
SAMI Support
If you have any questions or concerns, please visit SAMI Support, where you can request additional information or search our extensive IT knowledge base. While SAMI Support provides the quickest and easiest access for IT support, you can always contact the SAMI Support Desk by phone (973)-443-8822 or email samisupport@fdu.edu.
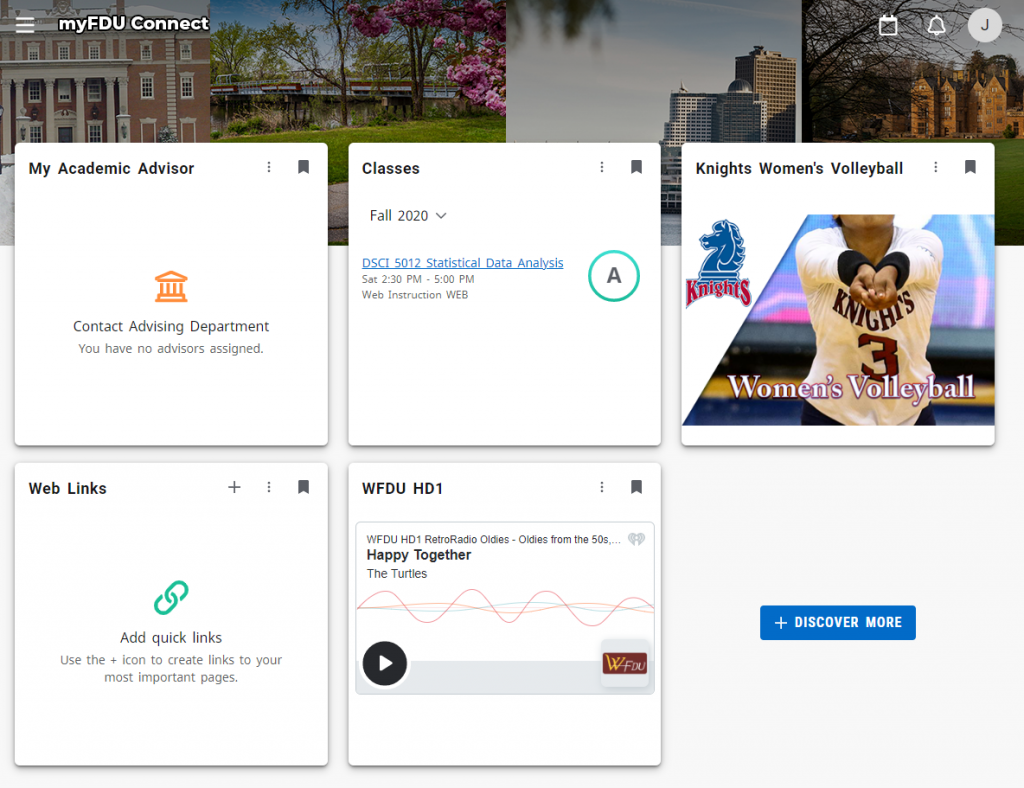
myFDU Connect is a place where Students, Faculty, and Staff can go as their single point of entry for everything FDU. The homepage consists of a dashboard full of “cards” that represent different aspects of FDU. Users can personalize their dashboard to display cards relevant to their life on campus..
How to Navigate myFDU Connect
To log into myFDU Connect, you will need to visit myfduconnect.fdu.edu and login with your FDU NetID. Once logged in, you will land on your customizable homepage
The cards you see can be added to, removed, and rearranged to your liking. To add a new card, click on the “+ Discover More” button
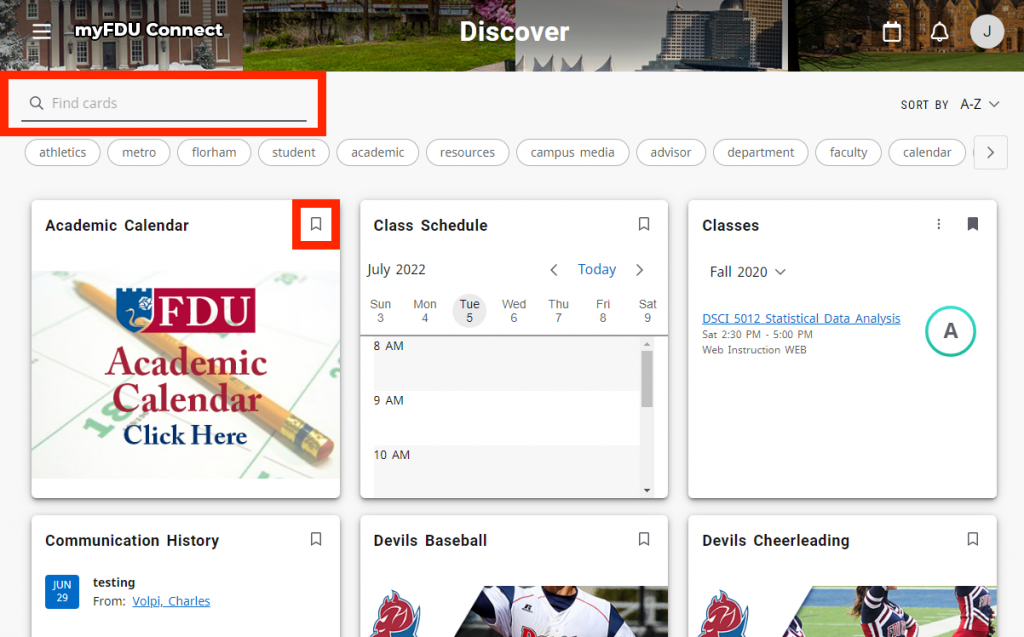
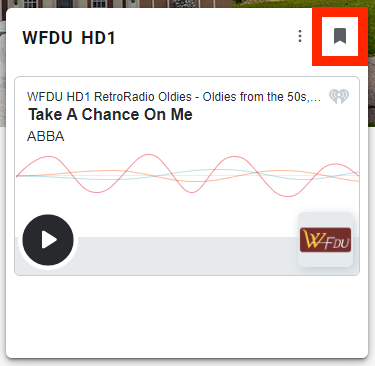
In the top left of the page, you can use the search field to find specific cards. You can also scroll through the page to see everything that is available. When you have found a card you would like to add to your homepage, click on the “save card” ribbon on the top right of the card
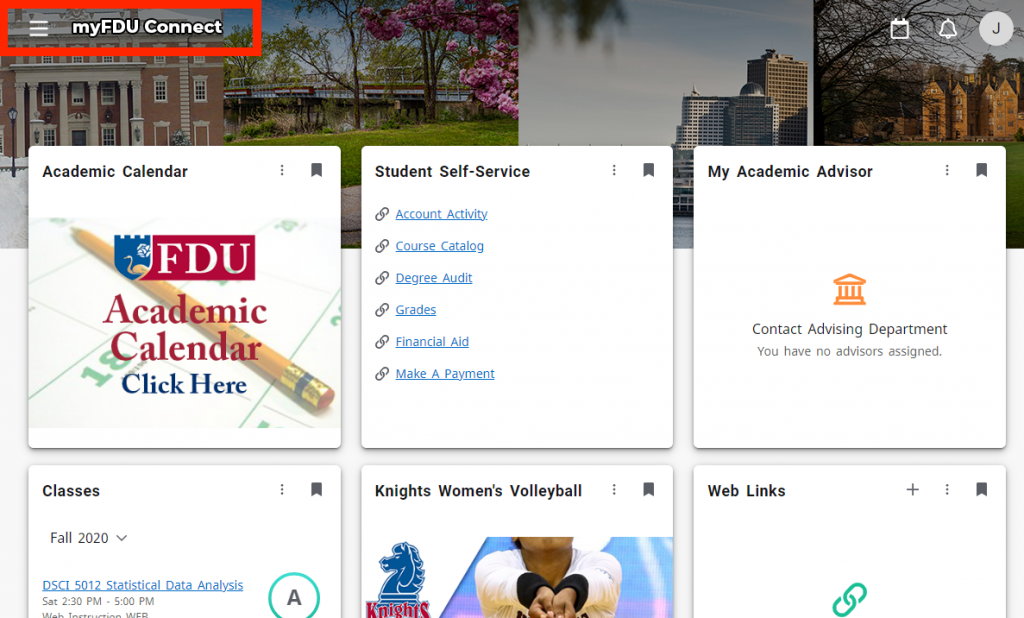
Click on “myFDU Connect” in the top left of the page to return to your homepage. You should see your new card in the first slot
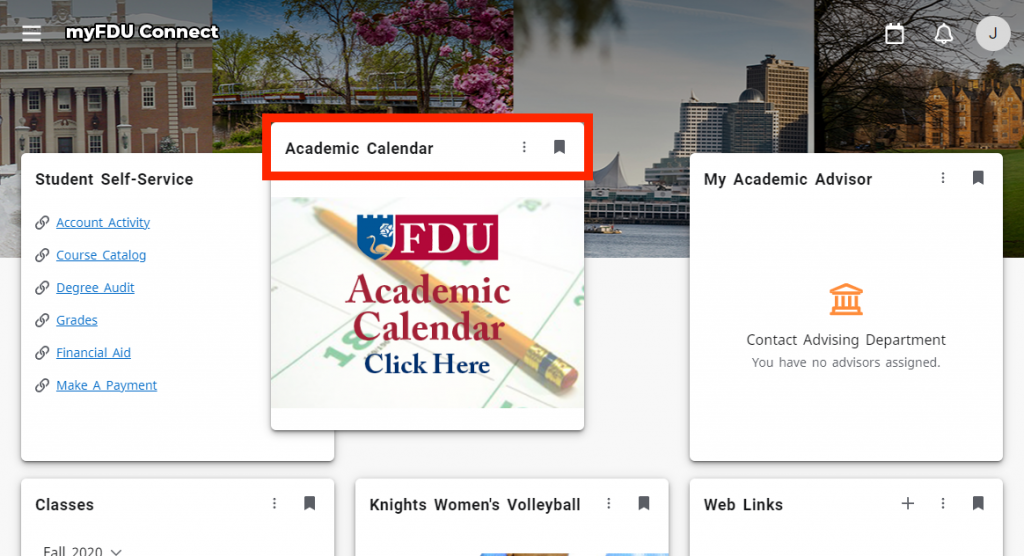
If you would like to change the order of your cards, click and hold on the top of the card and move the card to a new position
If you wish to remove a card from your homepage, click on the “remove card” ribbon on the top right
When new cards are available, you will be notified on the alarm button on the top right of the page
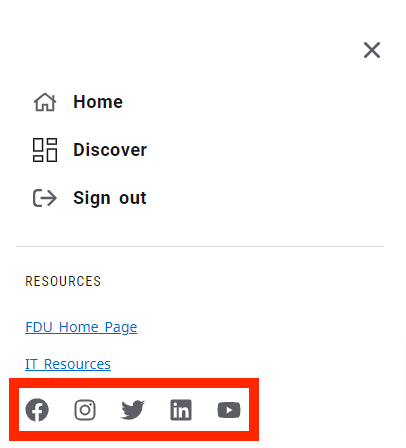
To access FDU’s social media pages, click on the hamburger menu in the top left of the page
The following tutorial will guide you through the process of connecting a printer while on-campus. Faculty and Staff members should review the purchasing process before engaging with the process for connecting a printer.
Note
Wireless printing is not permitted on campus. The information below is for wired connections only.
Connecting a Printer for Students in the Residence Halls
Most new printers are plug and play compatible with Windows 10. When you receive your new printer, you can unbox it and remove any orange tape you see. After plugging in the power and turning the printer on, allow the printer to initialize (most new printers will have a display to show you it’s progress). When the printer finishes initializing, just connect the usb printer cable from the printer to your computer. Windows 10 should automatically install the printer for you.
close
Printer Purchasing Process for Faculty and Staff
All printer purchases for faculty and staff on-campus use must appear on OIRT’s list of approved printer models. For the most up to date list of approved printer models, please contact the Purchasing Department. The purchase of any printer not on the list must be pre-approved by the CIO.
Determining if a Printer will be Directly Connected or On-Network
Faculty and Staff Members have the option of either making a direct or network connection to the printer. A direct connection is when a printer is connected to a single computer and an on-network printer means that multiple parties can print to it. Generally speaking, unless a printer is shared by three or more employees, users should request a direct connect printer.
If you are planning to use a direct connection, simply purchase any printer contained on the Purchasing Department’s list of approved models and follow the instructions for “Installing a Local Printer” in the “Connecting a Printer for Faculty and Staff Members” section below.
If your new printer will be on-network, please ask your department to contact the SAMI Service Desk for USAN to investigate the viability of any data jacks in the vicinity of where the printer will be located. The full workflow for this process is shown in the following diagram.
Most new printers are plug and play compatible with Windows 10. When you receive your new printer, you can Most new printers are plug and play compatible with Windows 10. When you receive your new printer, you can unbox it and remove any orange tape you see. After plugging in the power and turning the printer on, allow the printer to initialize (most new printers will have a display to show you it’s progress). When the printer finishes initializing, you can just connect the usb printer cable from the printer to your computer. Windows 10 should automatically install the printer for you.
Connecting to a Network Printer
Employees are able to add network printers to their own machines.
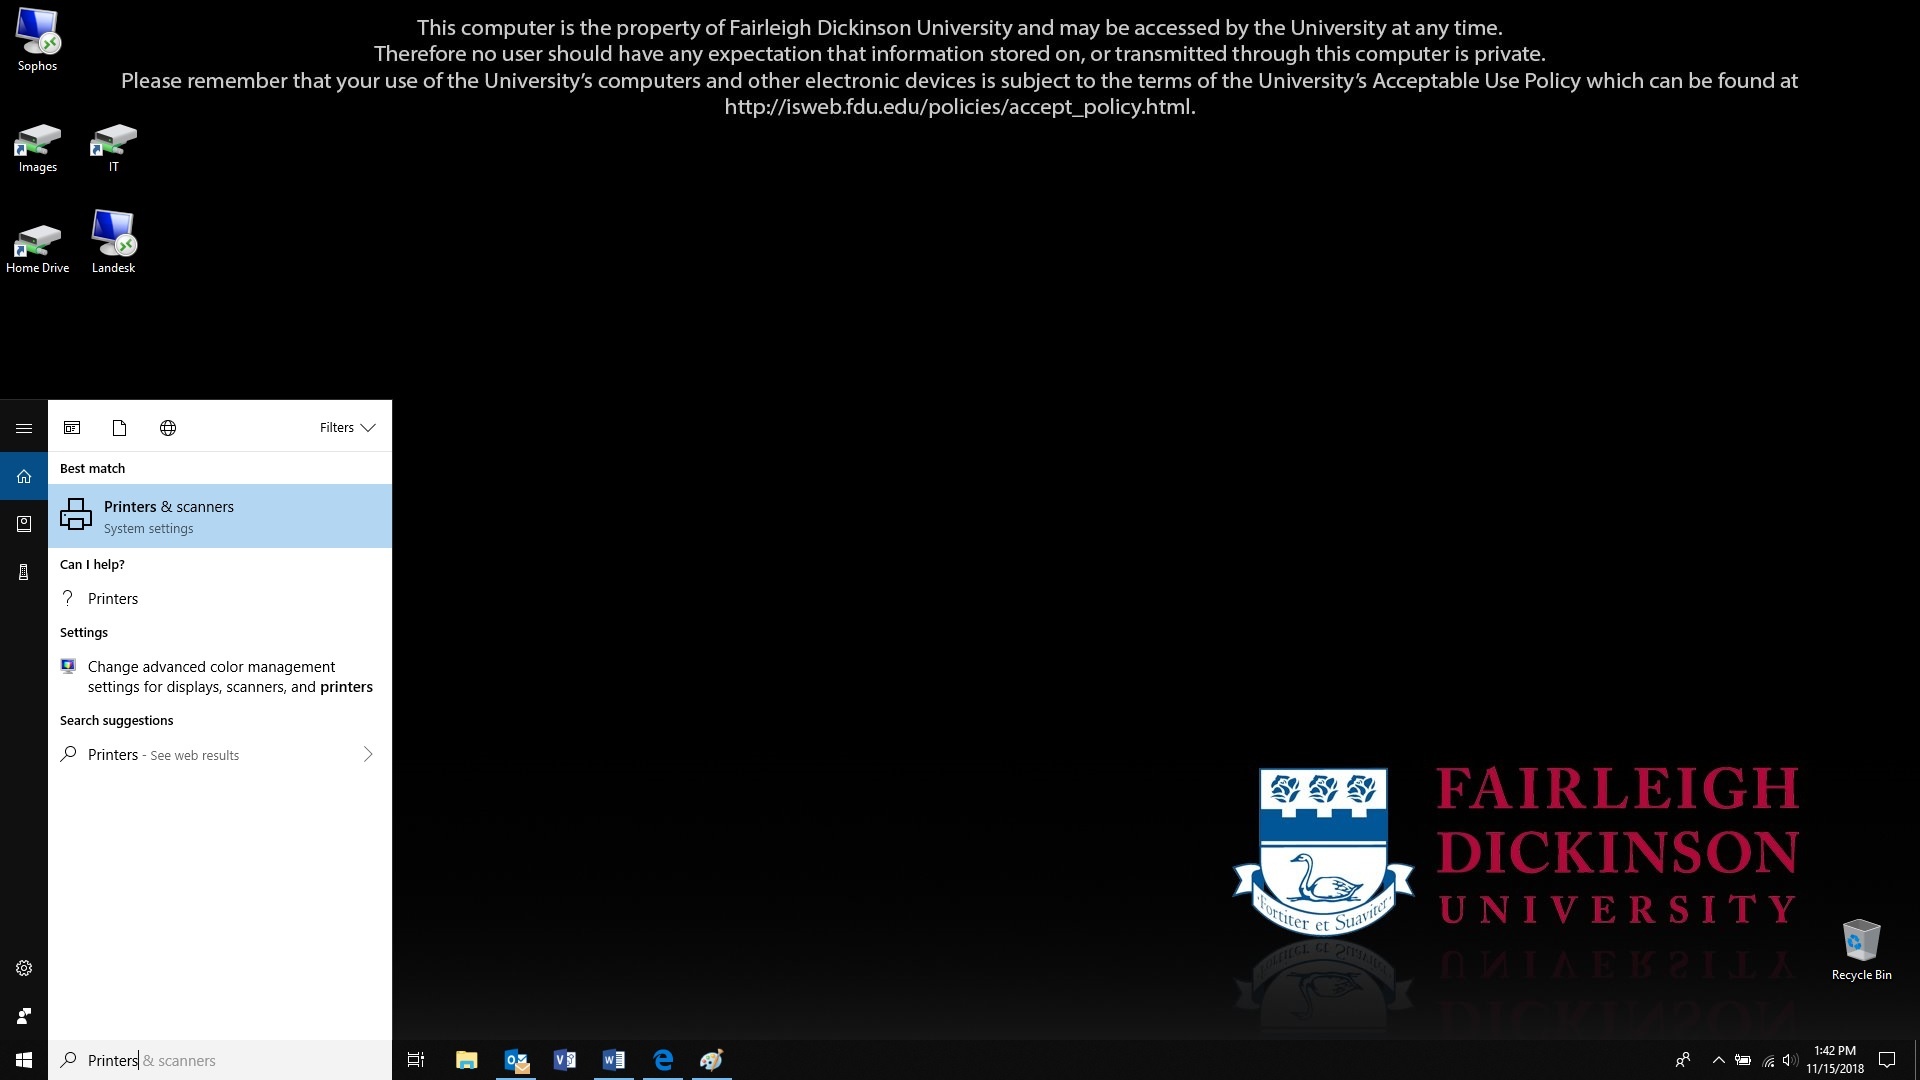
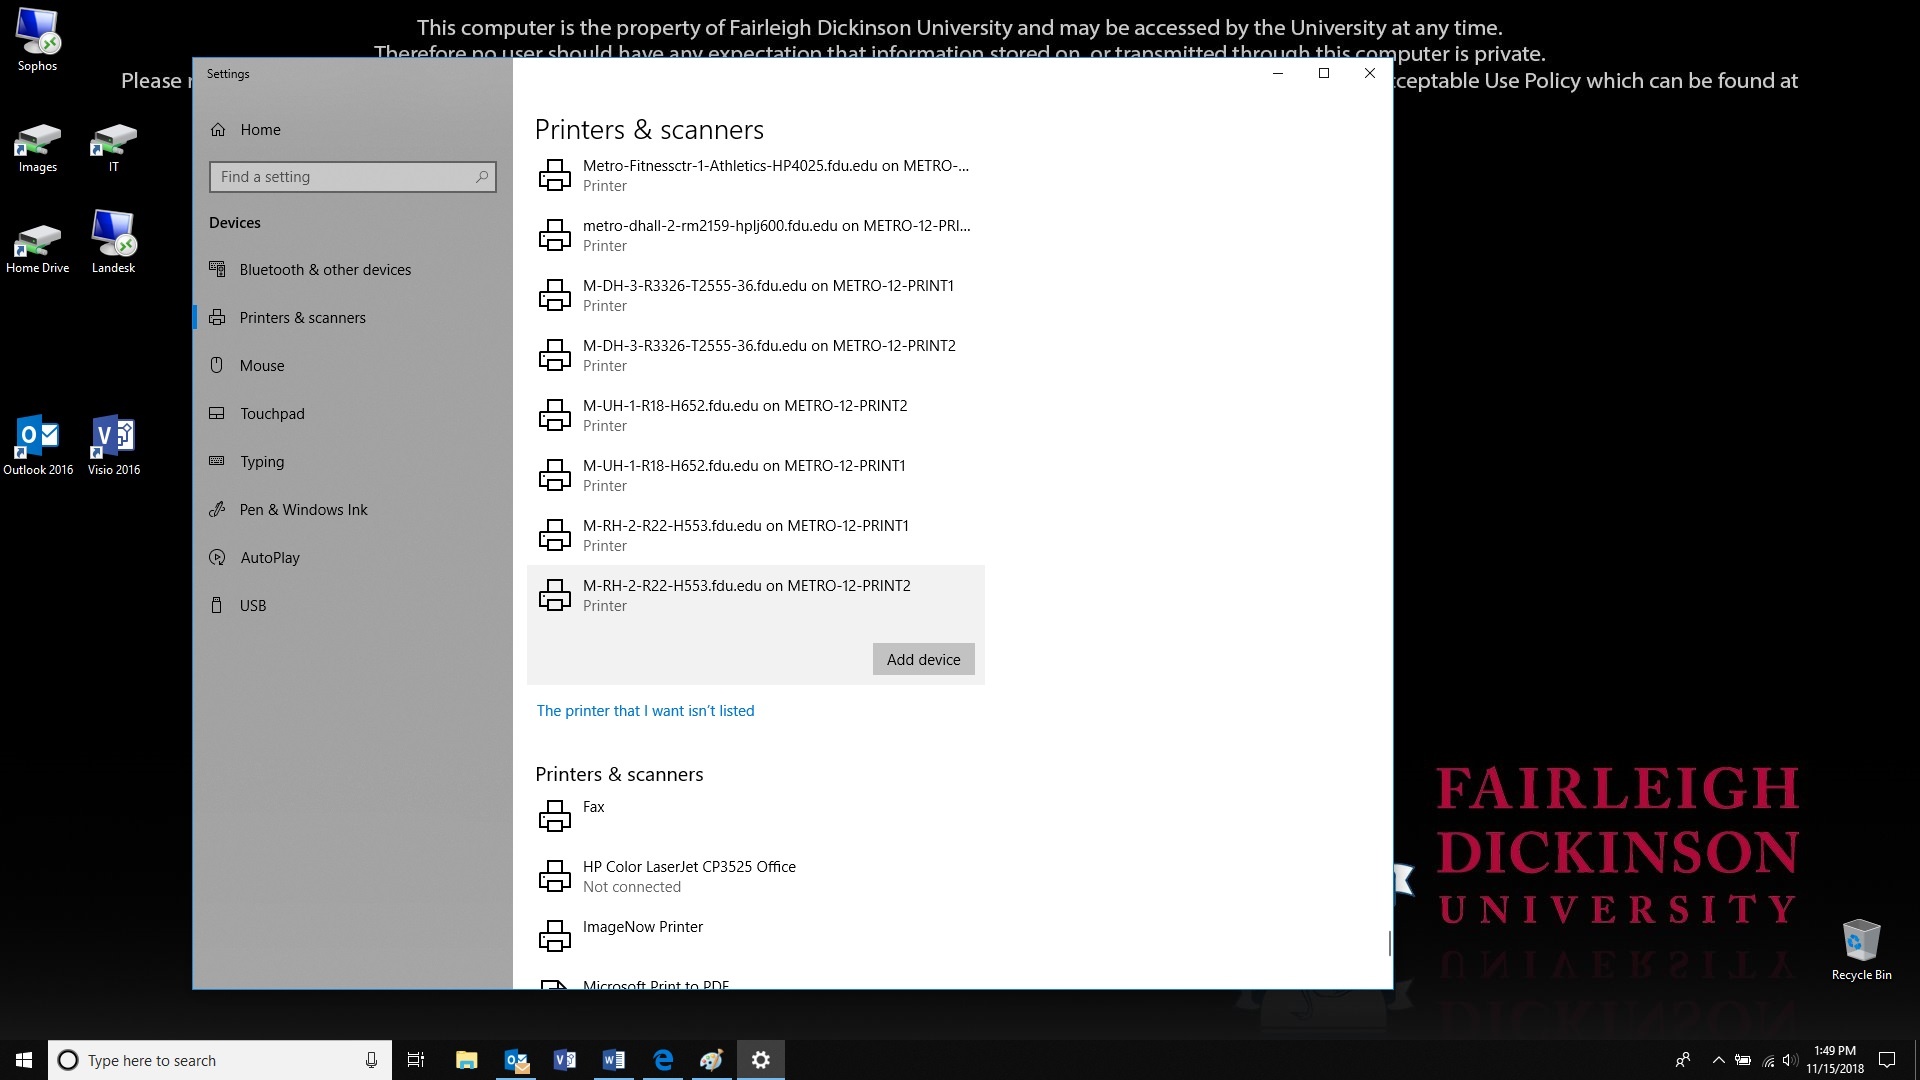
Do a search for printers, and click on “Printers & Scanners”
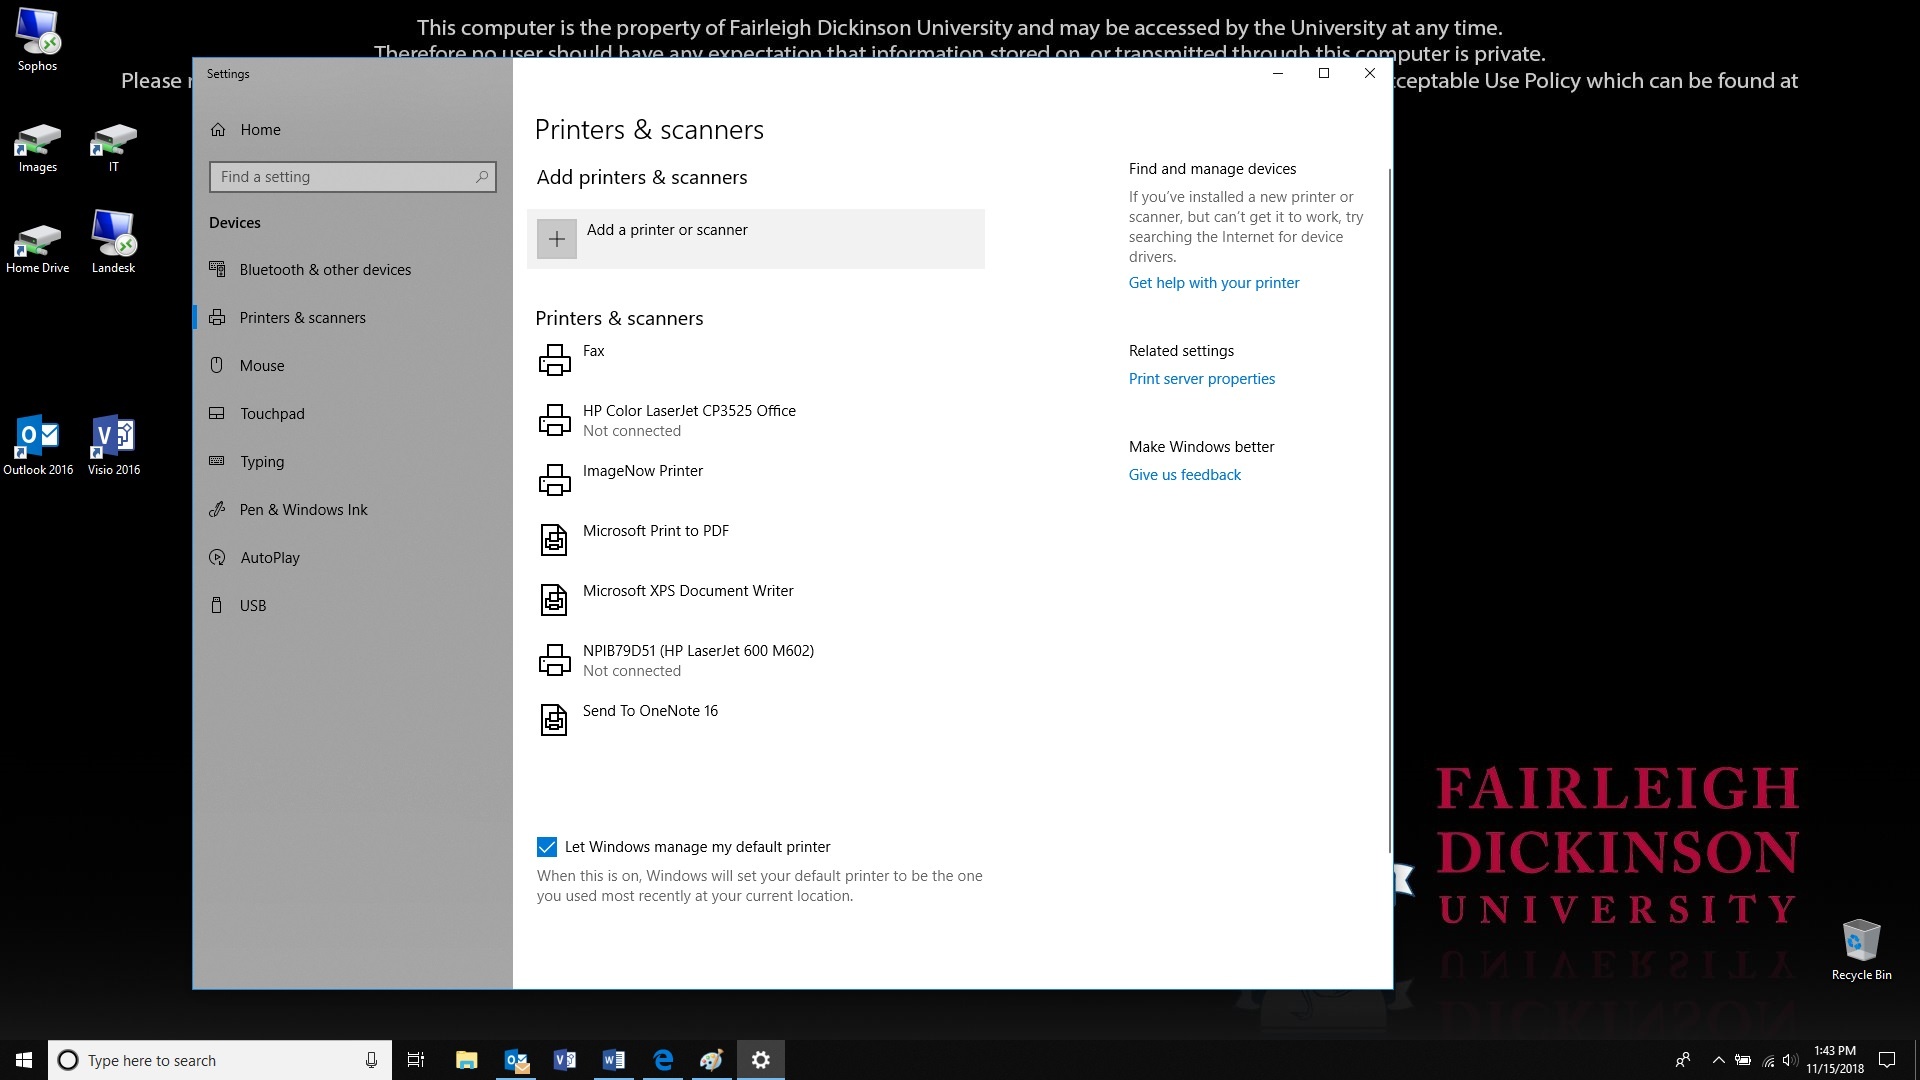
Click on “Add a printer or scanner”
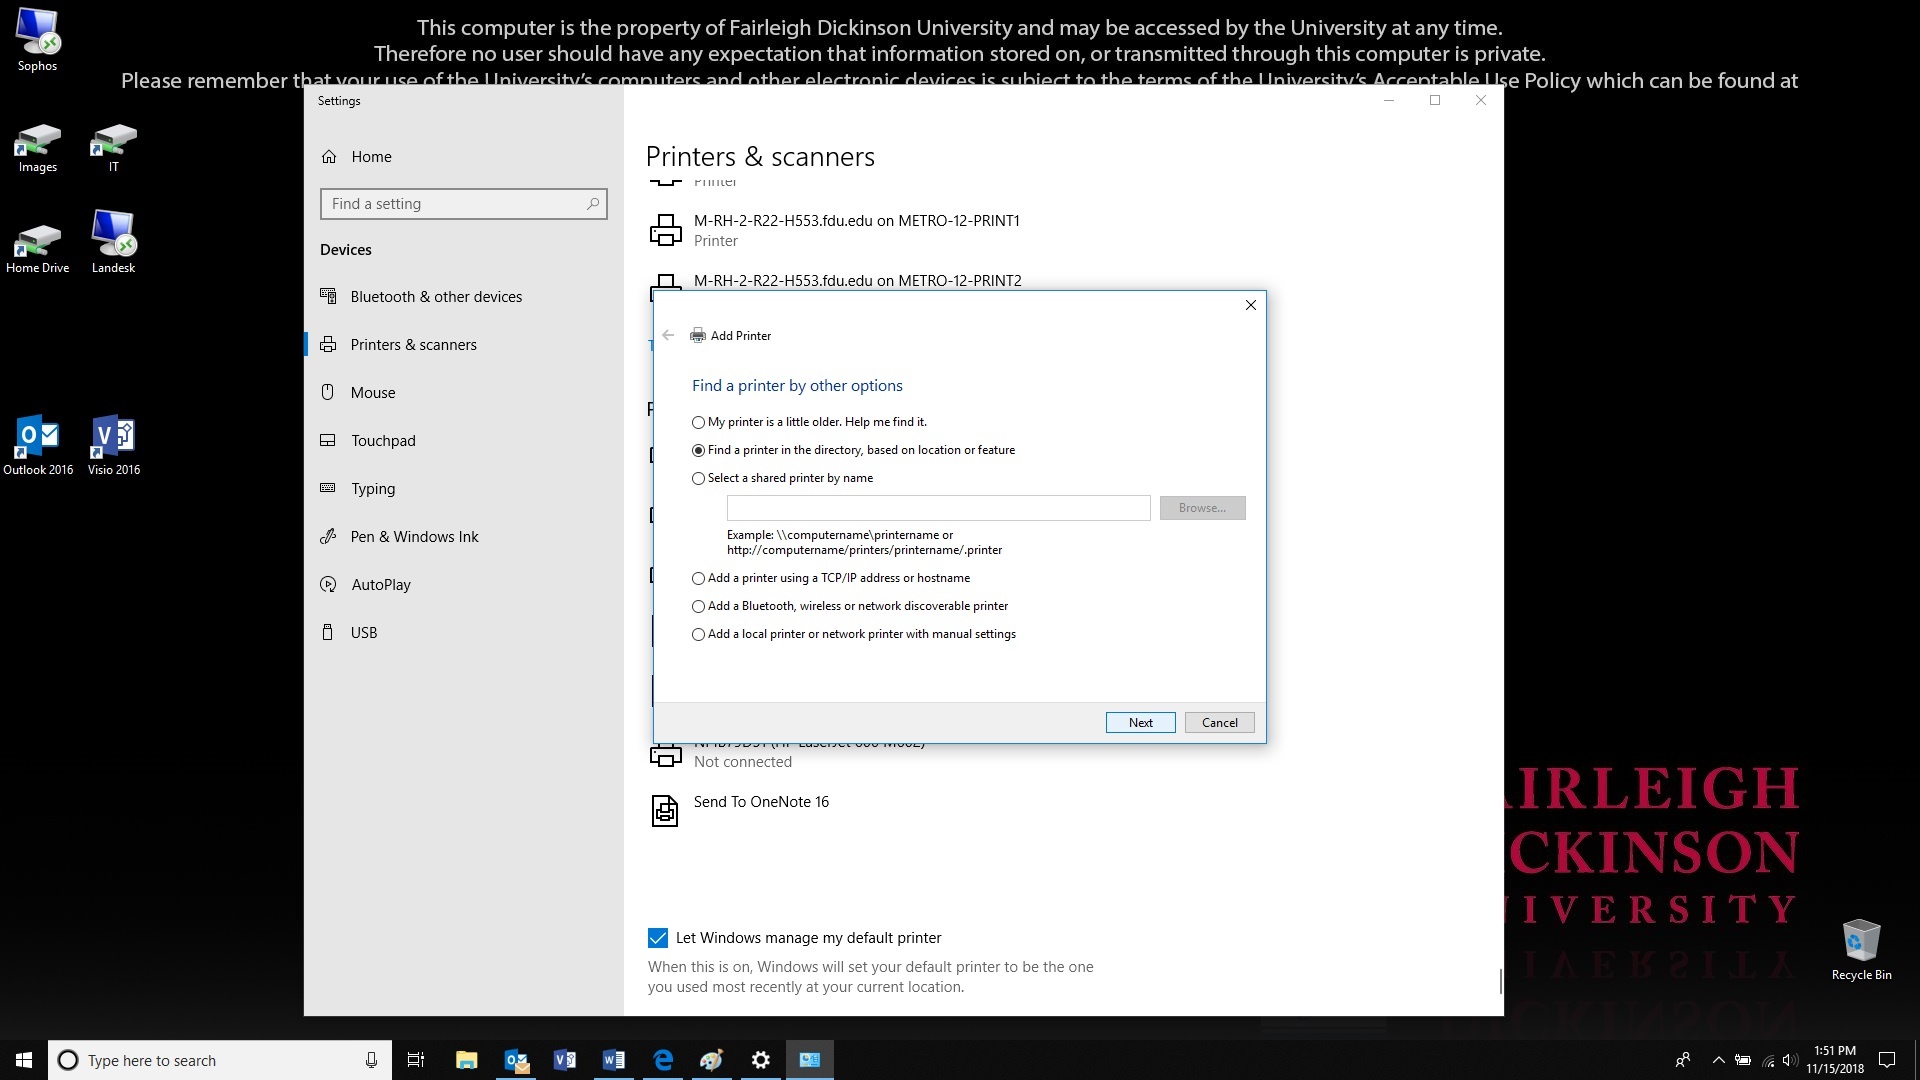
The list will start to populate and if you find your printer you can click on it and then click on “Add device”, otherwise scroll down to the bottom of the list and select “The printer I wanted wasn’t listed”
In the new dialog box, select “Find a printer in the directory” and click “Next”
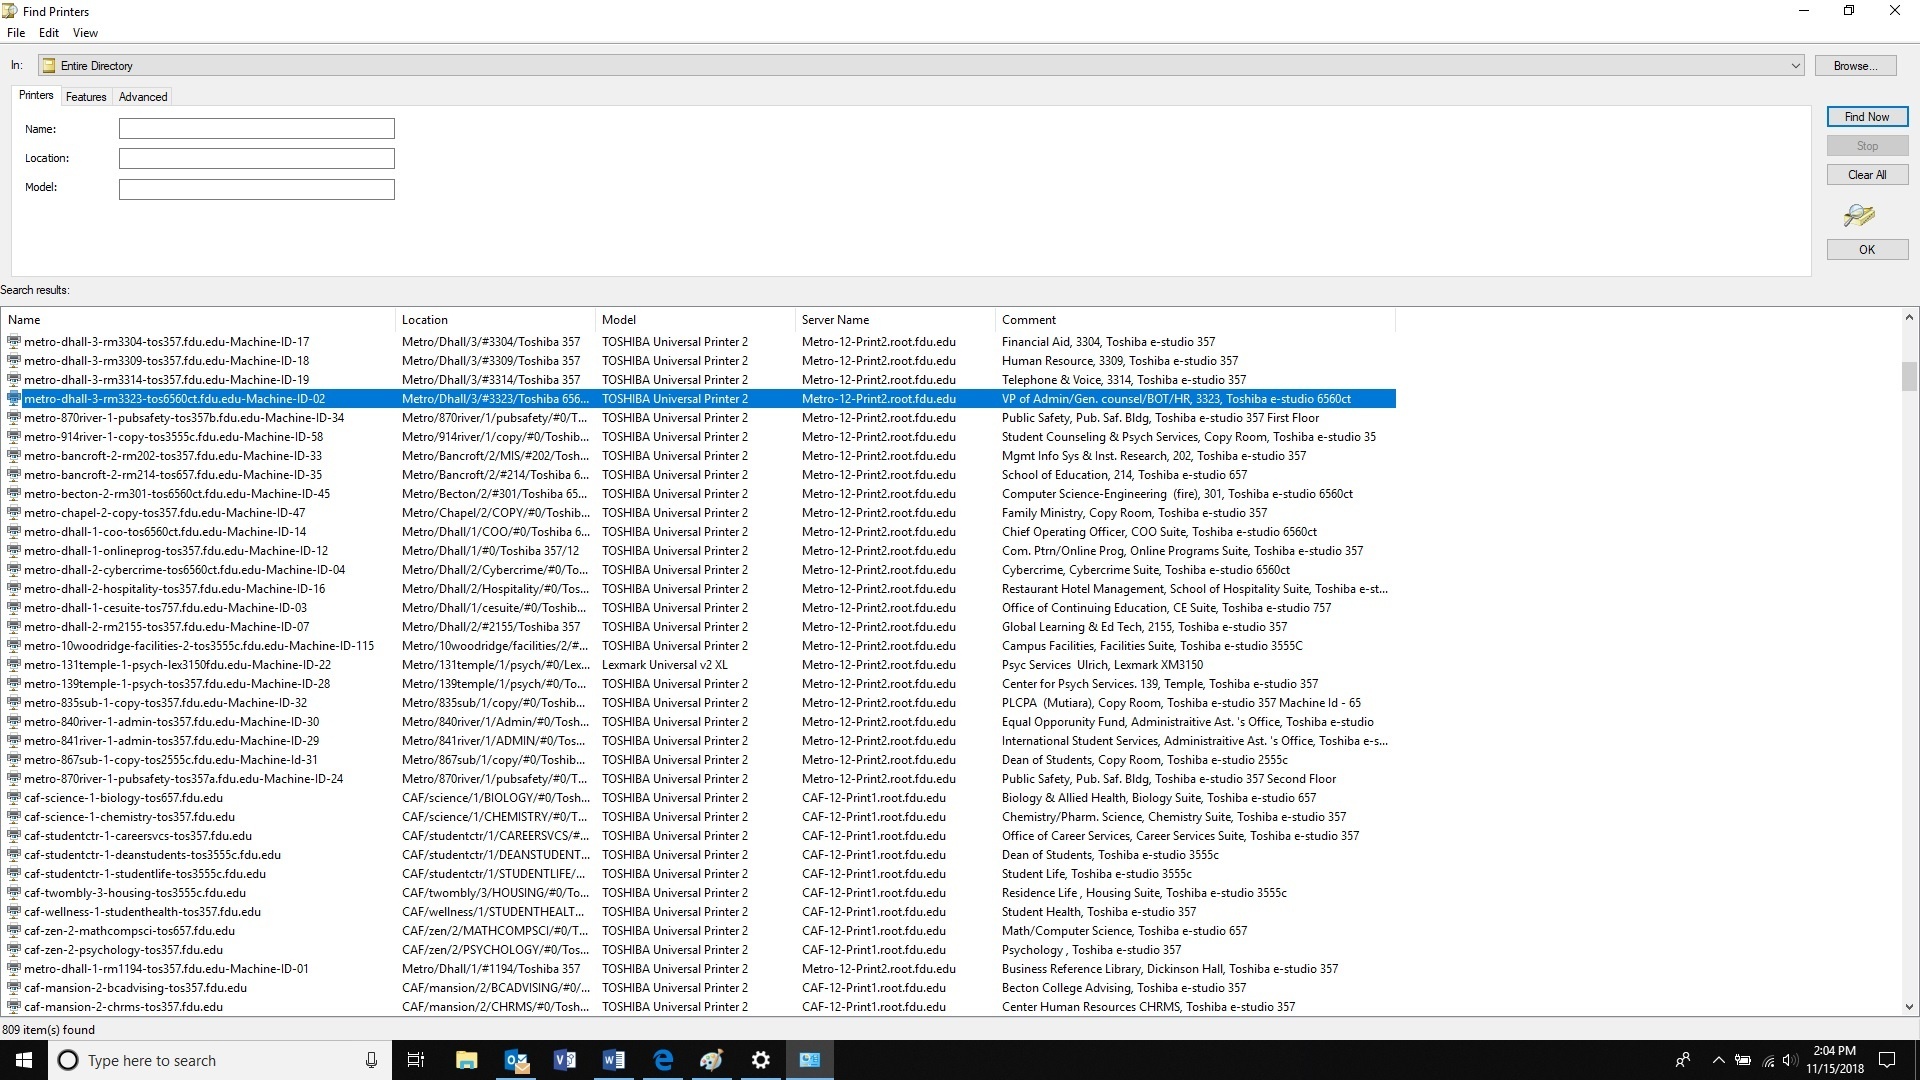
Search for your printer and double click on it when you find it
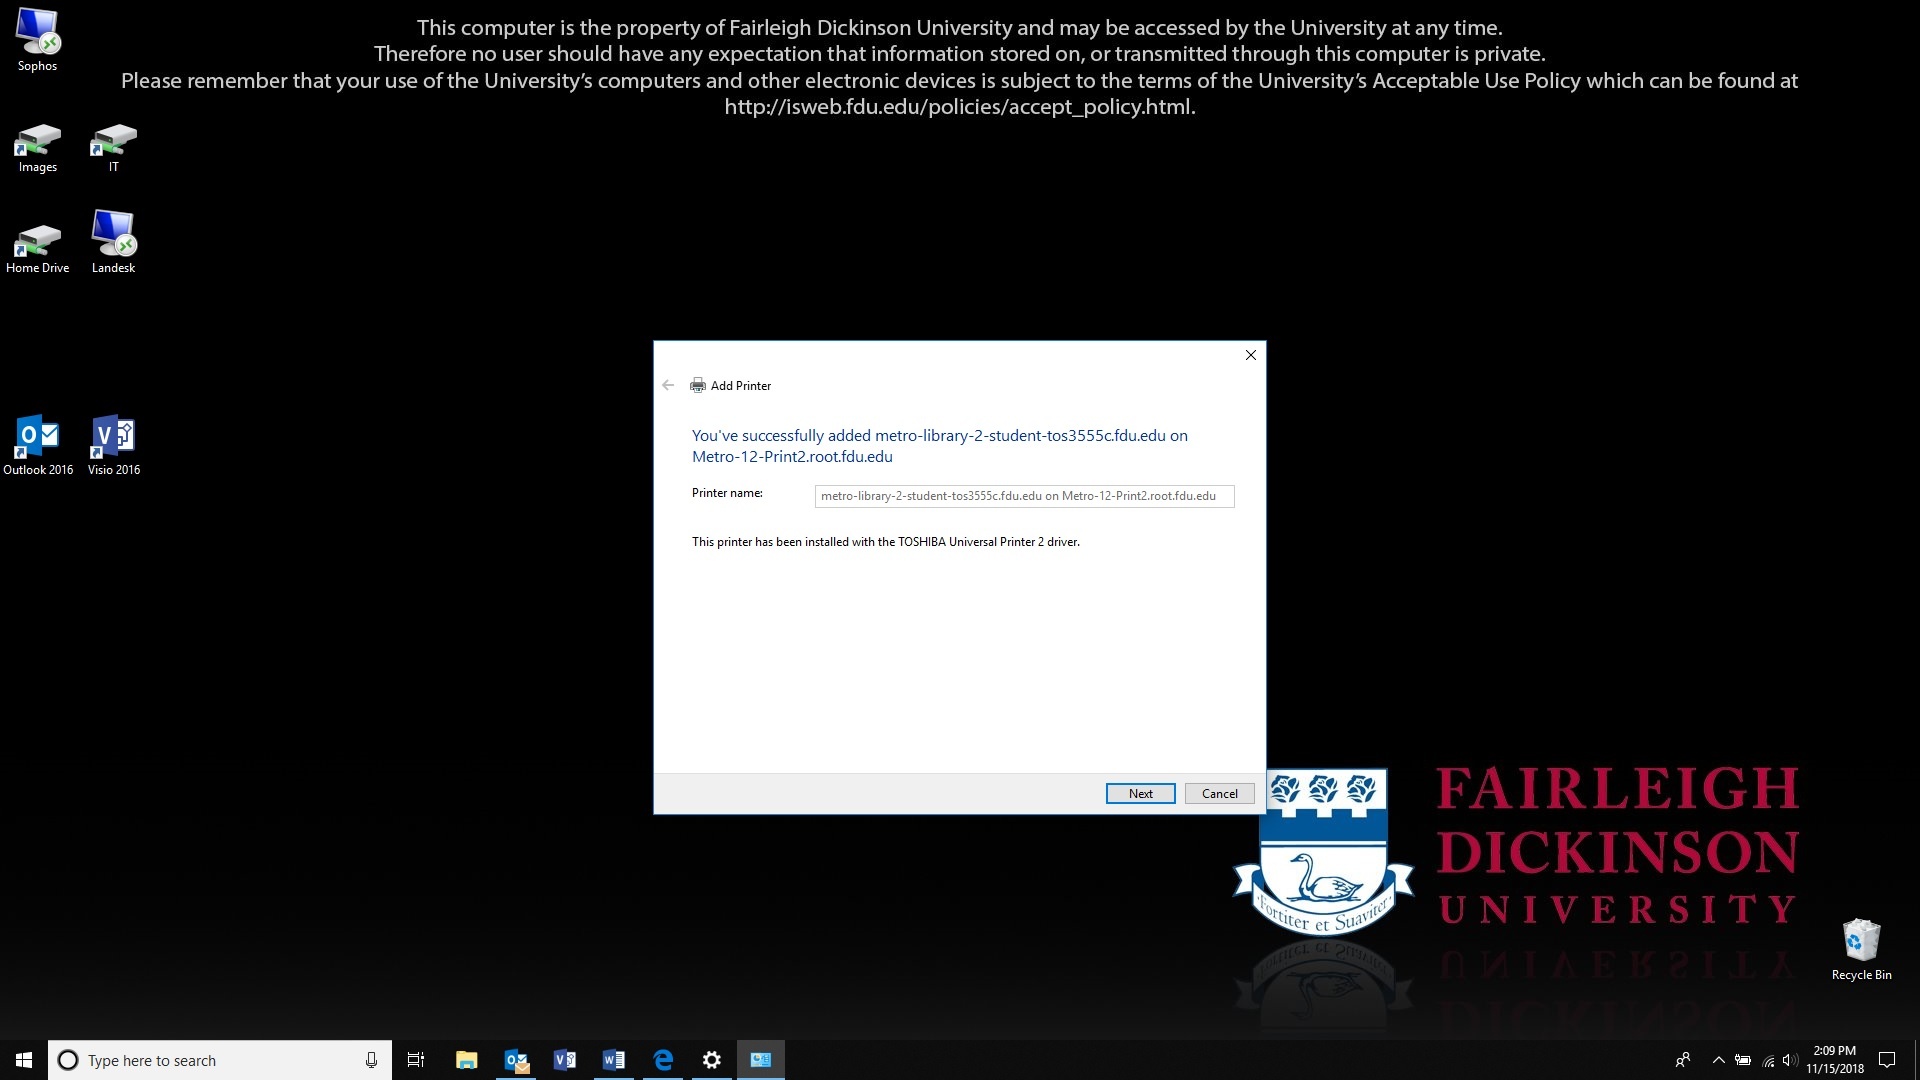
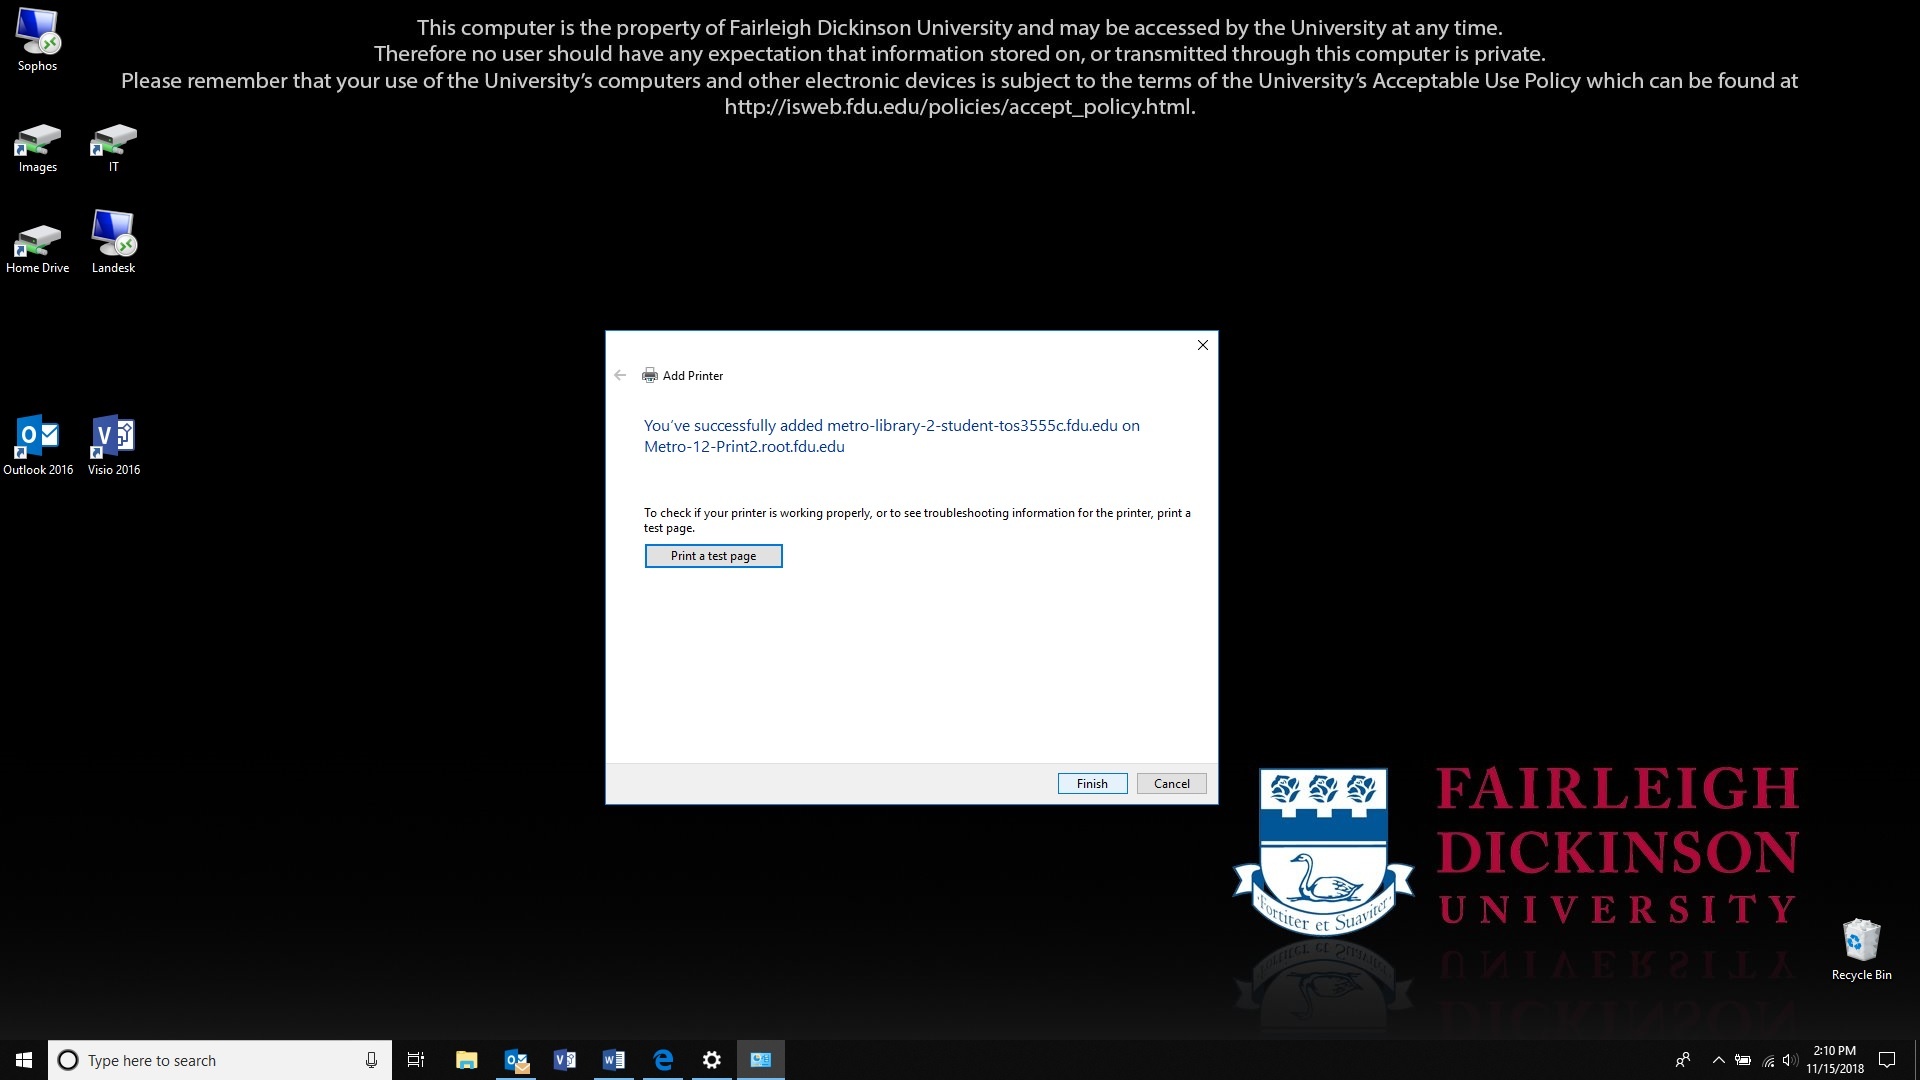
A box will let you know that the printer was successfully installed. Click “Next”
You can click on “Print a Test Page” to verify you are connected to the right printer otherwise click on “Finish”
Fairleigh Dickinson University’s Acceptable Use Policy for Computer Usage states, “All computers and mobile devices accessing any FDU resource must run an operating system and configuration that is supported by its vendor with regard to security patches and updates.”
This guide defines the lifecycle of our support for different operating systems.
Note
Apple does not publish official End of Life dates, but typically provides security updates for the current release of macOS, as well as the previous two releases.
Support Status Descriptions
Active (Default)
This platform is supported by FDU Computer Services & University Systems and Networking and new machines will be built with this platform unless otherwise requested.
Active
This platform is supported by FDU Computer Services & University Systems and Networking and will be installed on request.
Containment
This platform is currently supported by FDU Computer Services & University Systems and Networking but no new machines will be built with this platform. Platforms in containment will receive security updates and patches for the FDU supported software components. FDU Computer Services & University Systems and Networking Facilities will not provide new software or major revisions to existing software for these platforms.
Phasing Out
FDU Computer Services & University Systems and Networking is actively working to migrate assets away from this platform. Platforms go in to this status automatically 6 months before the FDU End of Support Date. Platforms may be placed in this status before that time.
EOL
This platform is no longer supported by FDU Computer Services & University Systems and Networking. Software support will be dropped from any asset running this platform. Other levels of support may be dropped as circumstances warrant. A valid reason is required to maintain an asset running this platform past the End of FDU Support date. All exceptions must be logged and periodically reviewed.
Supported Operating Systems
Desktop
OS Family
Operating System
Latest Release
FDU Support Status
Vendor Release Date
Start of FDU Support
End of FDU Support
Latest Vendor EOL Date
macOS
Tahoe
26
Active (Default)
Sep-2025
Nov-2025
Jun-2028
~2028
Sequoia
15
Active (Default)
Sep-2024
Nov-2024
Jun-2027
~2027
Sonoma
14
Phasing Out
Sep-2023
Nov-2023
Jun-2026
~2026
Windows
Windows 11
25H2
Active (Default)
Sep-2025
Nov-2025
Sep-2028
Oct-2028
24H2
Phasing Out
Oct-2024
Jun-2025
Sep-2027
Oct-2027
23H2
Phasing Out
Oct-2023
Jul-2024
Oct-2026
Nov-2026
Windows 10
22H2
EOL
Oct-2022
Dec-2022
Oct-2025
Oct-2025
Mobile
OS Family
Operating System
Latest Release
FDU Support Status
Vendor Release Date
Start of FDU Support
End of FDU Support
Latest Vendor EOL Date
Apple
iOS
26
Active (Default)
Sep-2025
Nov-2025
Oct-2028
~2028
18
Phasing Out
Sep-2024
Nov-2024
Oct-2027
~2027
17
Containment
Sep-2023
Nov-2023
Oct-2026
~2026
Android
Baklava
16
Active (Default)
Jun-2025
Dec-2025
~2028
~2028
Vanilla Ice Cream
15
Active
Sep-2024
Dec-2024
~2027
~2027
Upside Down Cake
14
Active
Oct-2023
Dec-2023
~2027
~2027
Tiramisu
13
Phasing Out
Aug-2022
Oct-2022
~2026
~2026
Snow Cone V2
12.1
Phasing Out
Mar-2022
Jul-2022
~2026
~2026
Latest Release
The latest release for desktop operating systems includes all minor and incremental updates.
End of Life
Any operating system not listed above is considered EOL (End of Life) and will not be supported. Examples of EOL Operating Systems include:
Windows: 95,98, XP, ME, VISTA, 7, 8, 8.1, & 10
macOS: Yosemite, El Capitan, Sierra, High Sierra, Mojave, Catalina, Big Sur, Monterey, & Ventura
The following PC laptop accessories for university-owned Apple MacBook Pro and Dell laptops may be purchased from our approved vendors. Please use the following PC laptop accessories list and vendor contact information below to help guide you when obtaining optional laptop accessories.
Dell Pro 14 Plus PC Laptop Accessories
A/C Adapters
Only one A/C adapter will be provided with the new Dell laptops. If a user needs a second A/C adaptor, they will need to order the part below.
Accessory
Description
Manufacturer Part Number
CDW Part Number
Cost
Dell 65W USB-C Adapter
Dell AC Power adaptor (USB-C)
492-BDQM
7796926
$34.00
*Prices are noted as of July 2025
close
Docking Stations
Accessory
Description
Manufacturer Part Number
CDW Part Number
Inputs
Cost
Multi-Monitor Docking Station
Dell Pro Smart Dock SD25 – docking station – USB-C – HDMI, 2 x DP, USB-C – 1GbE, 2.5GbE
DELL-SD25
8362105
1 HDMI 2 DisplayPort 1 USB-C
$250.00
Multi-Monitor Docking Station
Dell Pro Thunderbolt 4 Smart Dock SD25TB4 – docking station – Thunderbolt 4 – HDMI, 2 x DP, 2 x Thunderbolt 4, USB-C
DELL-SD25TB4
8362108
1 HDMI 2 DisplayPort 2 Thunderbolt 4 1 USB-C
$355.00
*Prices are noted as of July 2025
close
Keyboards
Keyboards will not need to be replaced for users that already have them. Users that are new to the PC laptop docking station setup may want to buy a wired USB keyboard. There are no IT requirements for purchasing keyboards; however, if users want to go with a basic model, they can order the below part number.
Accessory
Description
Manufacturer Part Number
CDW Part Number
Cost
Wired USB Keyboard
Dell KB216 – keyboard
KB216-BK-US
4306011
$22.93
*Prices are noted as of July 2025
close
Mice
There are no IT requirements for purchasing external wired USB mice; however, if a user wants to go with a basic model, they can order the below part number.
Accessory
Description
Manufacturer Part Number
CDW Part Number
Cost
Wired USB Mouse
Dell Optical Wired Mouse – MS116
MS116-BK
3938481
$22.93
*Prices are noted as of July 2025
close
Monitors
For users who already have a monitor and wish to use it with one of the new docking stations, your existing monitor must have either an HDMI or DisplayPort (DP) input connection. If your monitor only has a DisplayPort (DP) connection, you will need an HDMI to DisplayPort (DP) adapter. Users should check their current monitor connections for compatibility; if new monitors are required or desired, please choose from the list below.
Accessory
Description
Manufacturer Part Number
CDW Part Number
Inputs
Features
Cost
24″ External Monitor
Dell P2425H 24-inch Full HD LED Monitor
DELL-P2425H
7878797
1 HDMI 1 DisplayPort 1 VGA
Built-in Camera: No
Built-in USB Hub: Yes
$182.00
27″ External Monitor
Dell P2725H – LED monitor – Full HD (1080p) – 27″
DELL-P2725H
7878801
1 HDMI 1 DisplayPort 1 VGA
Built-in Camera: No
Built-in USB Hub: Yes
$234.99
34″ External Monitor
Dell Pro 34 Plus USB-C Hub Monitor P3425WE – LED monitor – curved – 34.1″
There are no IT requirements for purchasing an external wireless keyboard and mouse combo set; however, if a user would like to go with a basic model, they can order the below part number.
Accessory
Description
Manufacturer Part Number
CDW Part Number
Cost
Wireless Keyboard & Wireless Mouse
Logitech MK850 Performance Keyboard and Mouse (wireless)
920-008219
4540578
$67.07 from CDW-G
*Prices are noted as of July 2025
close
Lenovo Desktop PC Accessories
Keyboards
Keyboards will not need to be replaced for users that already have them. Users that are new to the PC laptop docking station setup may want to buy a wired USB keyboard. There are no IT requirements for purchasing keyboards; however, if users want to go with a basic model, they can order the below part number.
Accessory
Description
Part Number
Cost
Wired USB Keyboard
Lenovo Preferred Pro II USB Keyboard – US English
4X30M86879
$26.17 from CDW-G
close
Mice
There are no IT requirements for purchasing external wired USB mice; however, if a user wants to go with a basic model, they can order the below part number.
Accessory
Description
Part Number
Cost
USB Mouse
Lenovo Essential USB Mouse
4Y50R20863
$18.80 from CDW-G
close
Monitors
Accessory
Description
Part Number
Inputs
Features
Cost
24″ External Monitor
Lenovo ThinkVision T24v-30 – LED monitor – Full HD (1080p) – 23.8″
63D8MAR3US
HDMI, DisplayPort, VGA
Built-in Camera: Yes
Built-in USB Hub: Yes
$324.38 from CDW-G. This monitor is the preferred 24″ model to purchase if the the user requires a built-in web camera.
27″ External Monitor
Lenovo ThinkVision T27hv-30 – LED monitor – QHD – 27″
63D6UAR3US
HDMI, DisplayPort, USB-C
Built-in Camera: Yes
Built-in USB Hub: Yes
$628.58 from CDW-G. This monitor is the preferred 27″ model to purchase if the the user requires a built-in web camera.
close
Wireless Keyboard and Mouse Combo
There are no IT requirements for purchasing an external wireless keyboard and mouse combo set; however, if a user would like to go with a basic model, they can order the below part number.
Accessory
Description
Part Number
Cost
Wireless Keyboard
Logitech MK850 Performance Keyboard and Mouse (wireless)
920-008219
$67.07 from CDW-G
close
Apple MacBook Pro Laptop Accessories
A/C Power Adapters for 14-inch & 16-inch MacBook Pro
Accessory
Description
Part Number
Cost
A/C Power Adapter
Apple USB-C – Power Adapter – 96 Watt
MX0J2AM/A
$63.19 from CDW-G
A/C Power Adapter
Apple Power Cable – 24 pin USB-C to MagSafe 3 – 6.6 ft
MLYV3AM/A
$41.65 from CDW-G
close
Docking Stations
Accessory
Description
Part Number
Inputs
Cost
Single Monitor Docking Station or Hub
HyperDrive Ultimate USB-C Hub – This model supports a single external monitor setup. One HDMI port supports video resolutions up to 4K at 30 Hz. Featuring three USB 3.1 Gen 1 Type-A ports, 1 USB Type-C Power Delivery port, one ethernet port, and one 3.5mm audio jack, plus SD and microSD card readers.
HD30FGRAY
1 HDMI, 1 Mini DisplayPort, 1 VGA
$89.99 from B&H.com. This model is the preferred single monitor hub to purchase
Dual-Monitor Docking Station or Hub
HYPER HyperDrive Viper 10-in-2 USB Type-C Hub (Space Gray) – This model is essential for connecting up to two external monitors. This hub provides two HDMI and three USB 3.1 Gen 1 Type-A ports, as well as ports for Gigabit Ethernet, 3.5mm audio, and USB Type-C with 60W of power delivery. UHS-1 SD and microSD card readers are also present.
HD392-GRAY
2 HDMI
$129.99 from CDW-G. $129.99 from B&H.com. This model is the preferred dual-monitor hub to purchase
Single Monitor Docking Station or Hub
HYPER Hyperdrive 4-In-1 USB Type-C Hub – This model supports a single external monitor setup. Supports a single 4K display at 60 Hz via the one HDMI port. Featuring two USB 3.2 Gen 1 Type-A ports and one USB Type-C port to deliver up to 100W of pass-through power to your laptop or tablet.
HD41
1 HDMI
$59.99 from B&H.com. This model does not contain an ethernet port
Single Monitor Docking Station or Hub
HyperDrive 5-Port USB Type-C Hub – This model supports a single external monitor setup. Supports a single 4K monitor at 60 Hz via the one HDMI port. Features two USB Type-A ports, one ethernet port, and one USB Type-C port to deliver up to 86W of power to your laptop or tablet.
HDMB2
1 HDMI
$84.59 from CDW-G
Single Monitor Travel Hub or Docking Station
Lenovo Powered USB-C Travel Hub – This model supports a single external monitor setup. Features one ethernet port, one USB Type-A port, one USB 3.1 Gen 1 Type-A port, and one USB-C power port.
4X90S92381
1 HDMI, 1 VGA
$82.28 from CDW-G
close
Monitors
Accessory
Description
Part Number
Inputs
Features
Cost
24″ External Monitor
ASUS ProArt PA247CV – LED monitor – Full HD (1080p) – 23.8″
PA247CV
HDMI, DisplayPort, USB-C
Built-in Camera: No Built-in USB Hub: Yes
$201.69 from CDW-G
You may also refer to the Lenovo Desktop PC Accessories – Monitors section above to select an external monitor for the Apple MacBook Pro.
close
Accessories
USB Flash Drives
There are no IT requirements for purchasing USB flash drives. USB 3.0 is recommended. Users are reminded about adhering to the Written Information Security Program (WISP). No WISP-protected data may be placed on external devices without specific authorization, as indicated in the policy.
close
External Hard Drives
There are no IT requirements for purchasing external hard drives. USB 3.0 is recommended. Users are reminded about the Written Information Security Program (WISP). No WISP-protected data may be placed on external devices without specific authorization as indicated in the policy.
close
Printers / Scanners
For a current list of approved printers and scanners, please reach out to the Purchasing Department. Please remember that most printers don’t have USB printer cables included upon purchase.
Note
While most modern printers support wireless connectivity, wireless printing capabilities may not be enabled on any printer without the explicit authorization of the Director of Networking.
close
Purchasing
FDU Purchasing
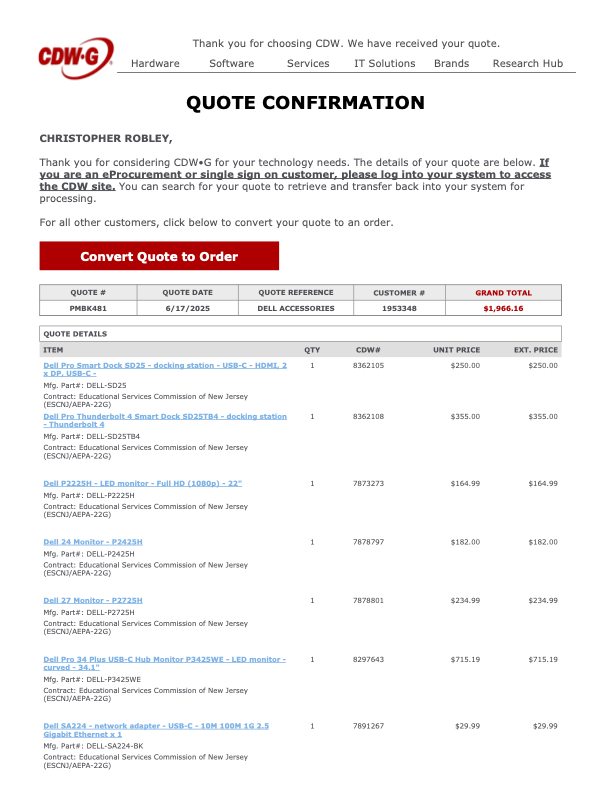
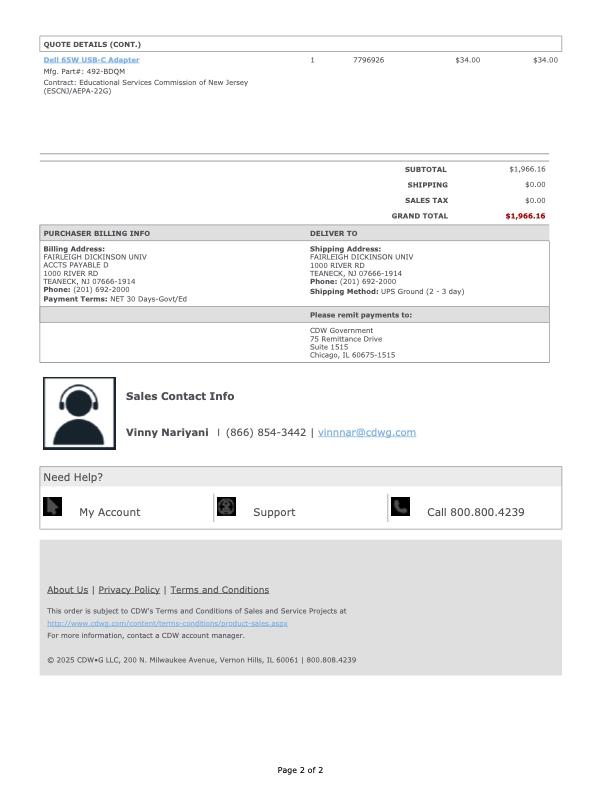
To purchase any of the laptop accessories listed above, please submit a PO to the Purchasing Department. Users need to get a quote from either vendor through the contact information below. Please reference the item numbers from the attached quotes. Unless stated otherwise, the products listed are currently available. Prices may vary. Other University approved vendor reseller information and common products that departments may be interested in purchasing can be found by visiting:
Departments should consolidate orders as much as possible. There is no additional discount for quantity. Departments should designate the ‘ship to’ to their respective department. Vendors’ contact information is listed below.
close
Sample Purchase Order (PO) Quotes
Tip
View the Sample PO quotes to help guide you when obtaining your own quote prior to submitting to the Purchasing Department.
The instructions below pertain to any Vancouver user that will use the Secure Print, Scan to email, and Copy functions of the Xerox printers.
Account Balances
Vancouver users have the following account balances listed below:
Free Quota, is a designated account balance that is applied to all the students and is auto-replenished on schedule – before the start of the semester. This is the first balance that gets deducted after which the secondary “Paid_Balance” goes into effect.
Paid Balance is the amount credited onto a student’s account when they pay for extra printing credits.
Each user listed below has a specified amount of Free Quota replenished according to a schedule:
Adjuncts: $1000.00 replenished at the start of the school year
Student IT Assistants And Student Workers: $200.00 replenished at the start of every school term
Staff and Faculty: $1000.00 replenished at the start of every school term
Students: $10.00 replenished at the start of every school term
Paid Balance Reload / Replenishment
The instructions below are for Students on how to reload/replenish their Paid Balances:
Go to Enrollment Services to pay for the amount they wish to recharge
Bring the receipt to IT Office to request the reload for their Paid Balance
Logging In
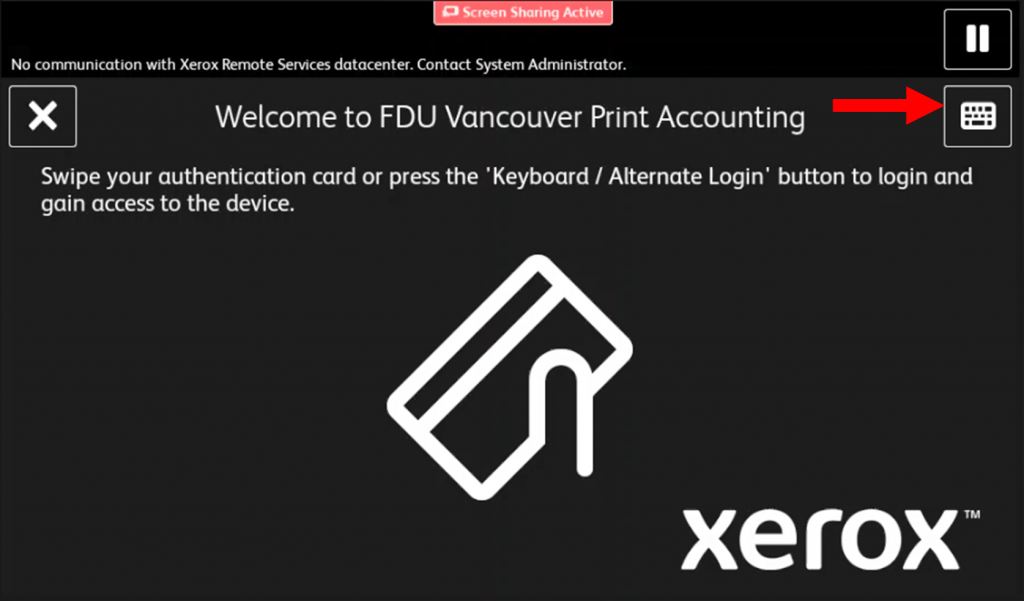
Users can either swipe their badge or use their FDU NetID and password to log in. To use your credentials press the “Keyboard” button on the top right of the screen
If upon swiping your badge the following screen appears on the Xerox printer screen. Enter your credentials to associate them with your account. For a detailed walkthrough, play the video below:
close
Checking Account Balance on Printer
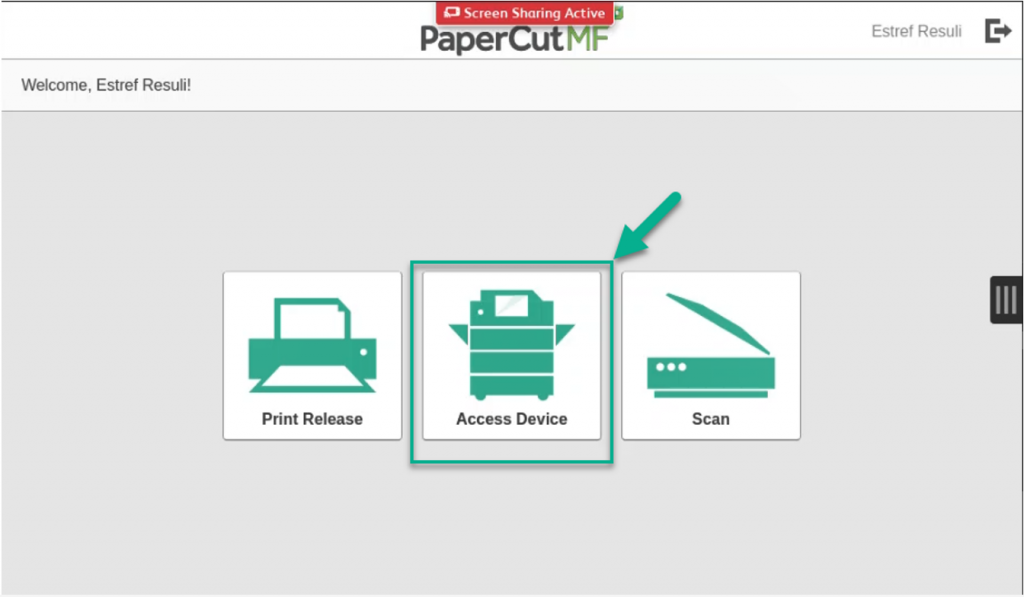
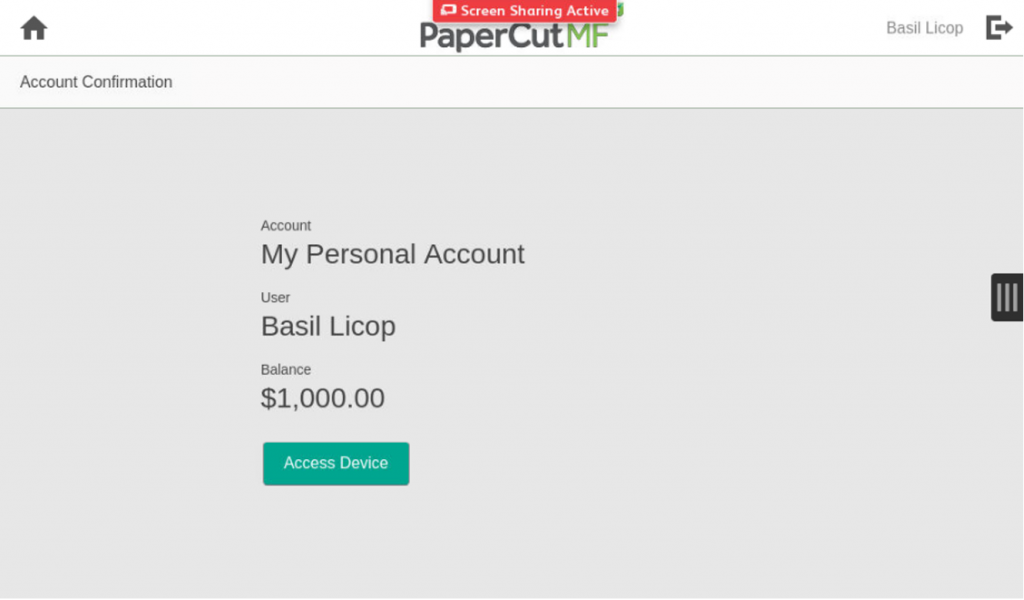
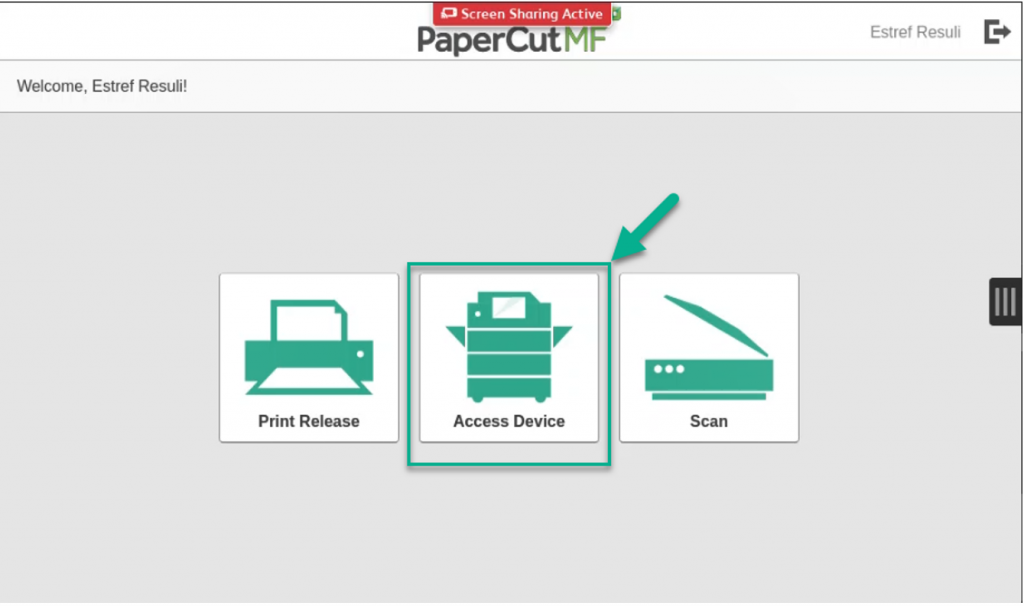
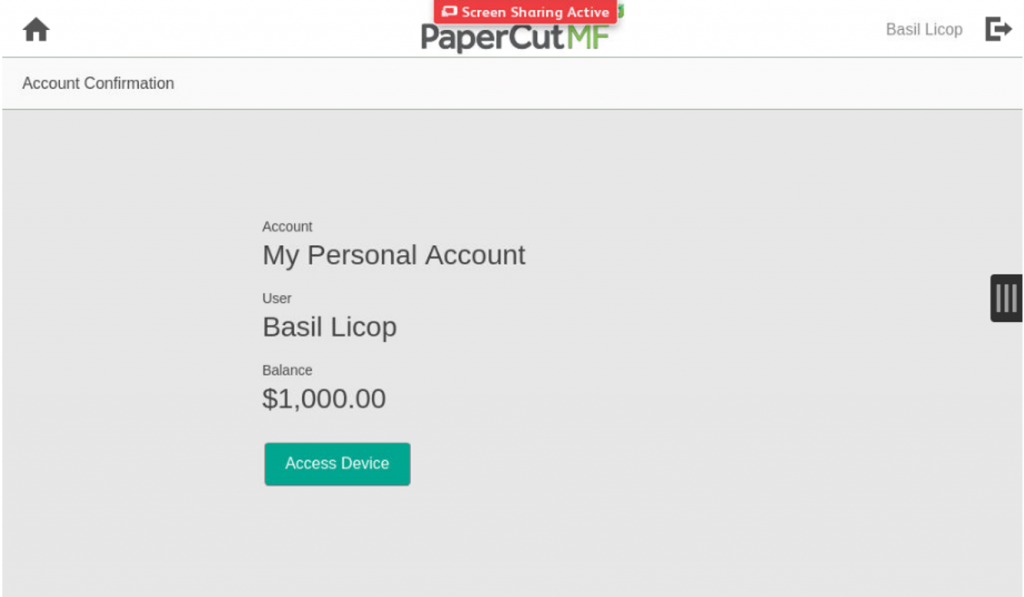
To check your total balance from the printer, log into that printer and press the “Access Device” button. The balance will be displayed on the screen.
close
Secure Print
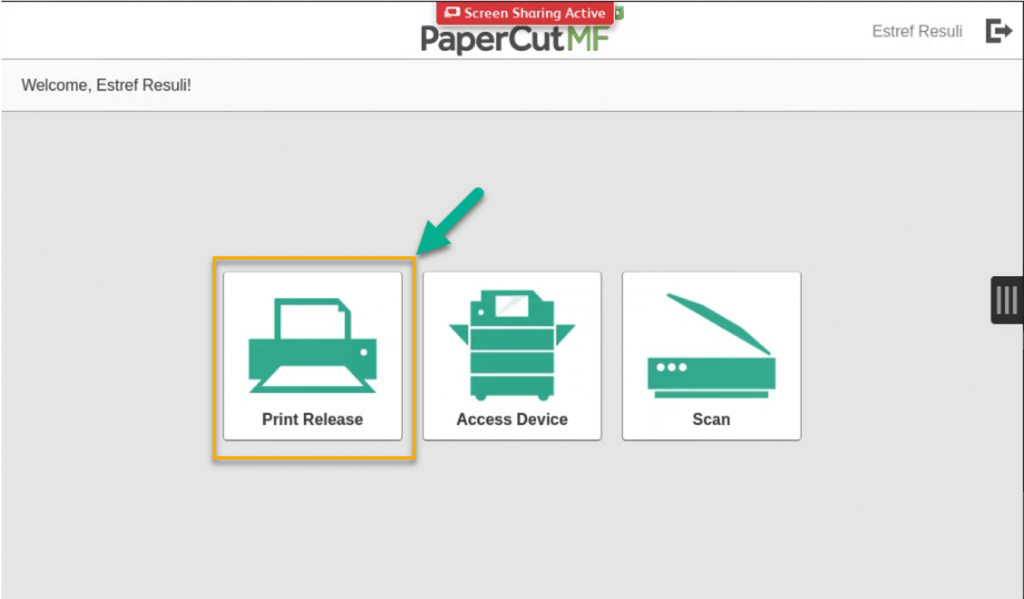
To release a print job after you have sent a print job to the appropriate printer and logged into that printer. Press the “Print Release” button
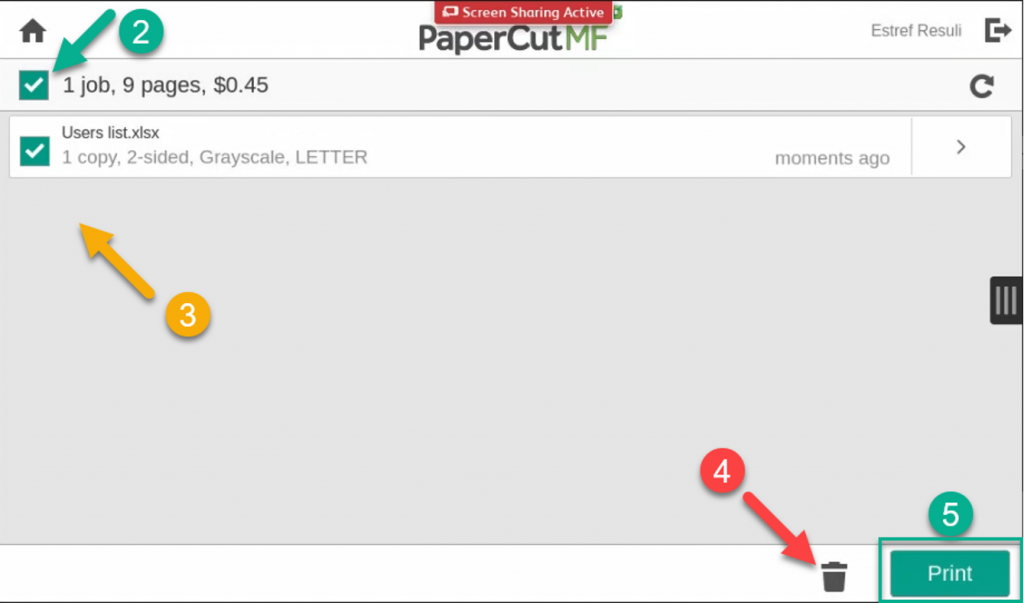
To print all jobs under the queue press the checkbox above all the jobs (2) then press the “Print” button (5)
To print a selection of the jobs, select the appropriate checkbox beside the jobs you want to print (3), then press the “Print” button (5)
To delete jobs from the printer’s queue, select the appropriate checkbox beside the jobs you want to delete (3), then press the “Trashcan” button (4)
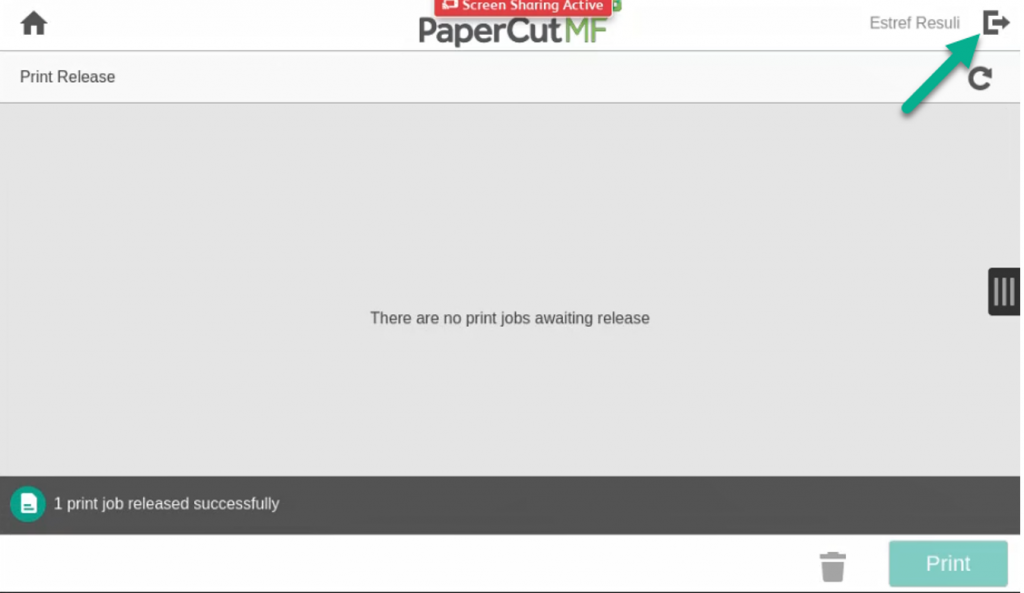
To log off of the printer, press the “Log Out” icon on the top right next to your name
close
Scan to Email
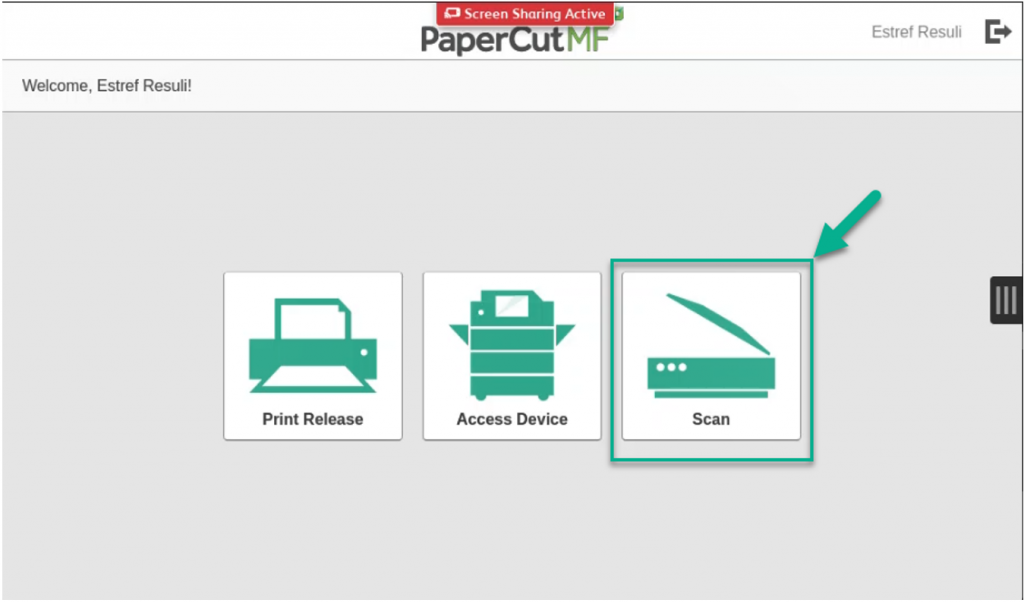
To start a scan-to-email job, log into a printer and press the “Scan” button
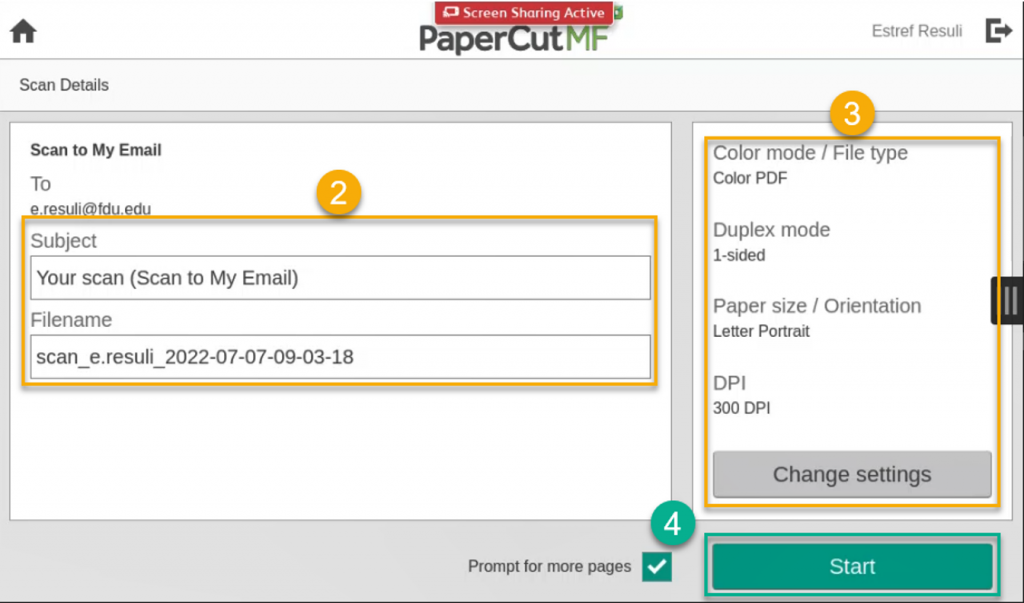
You can press the “Star“’ button (4) immediately to start scanning
Optionally you can edit the Subject and Filename entries (2) and the scan settings (3)
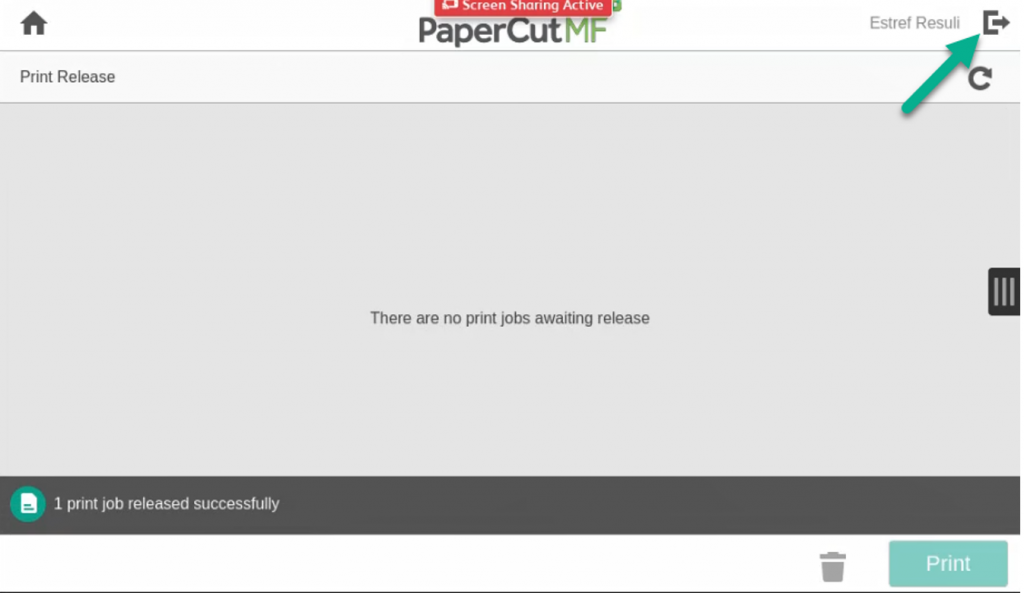
To log off of the printer, press the “Log Out” icon on the top right next to your name
close
Copying
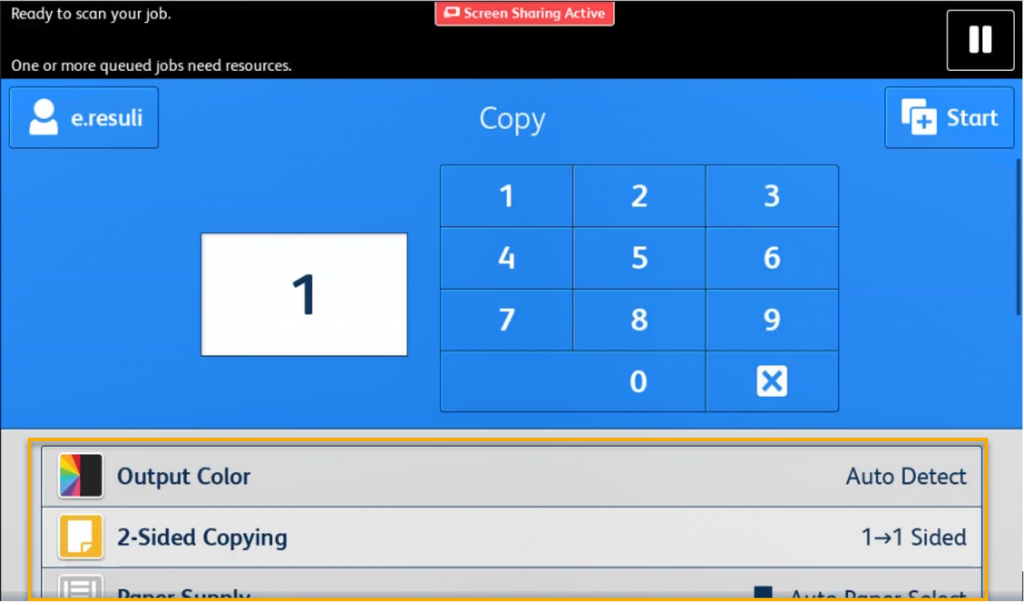
To start a copy job, log into a printer and press the “Access Device” button
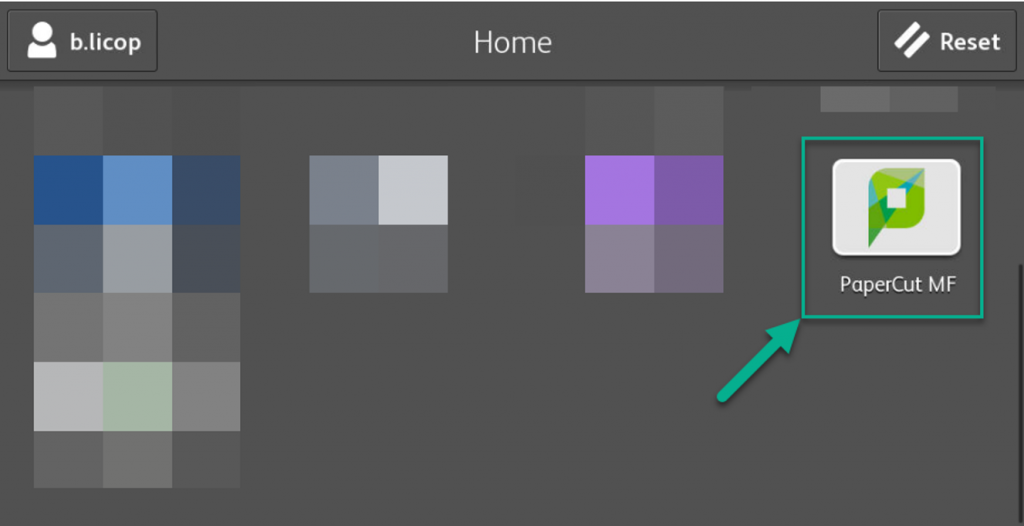
Press “Access Device“
To return to the PaperCut MF main screen, press the “PaperCut MF” button
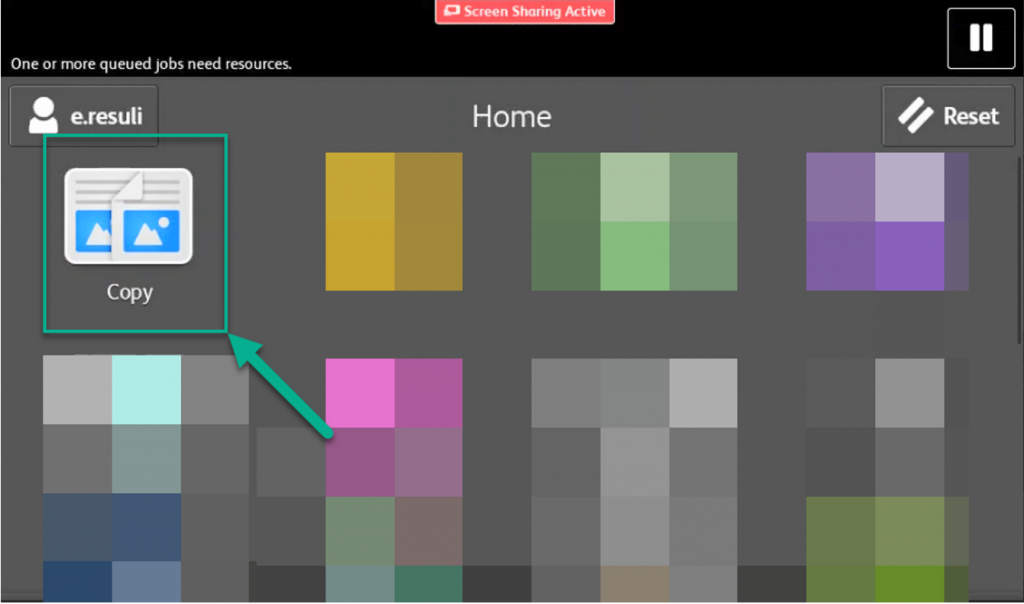
To copy, press the “Copy” button
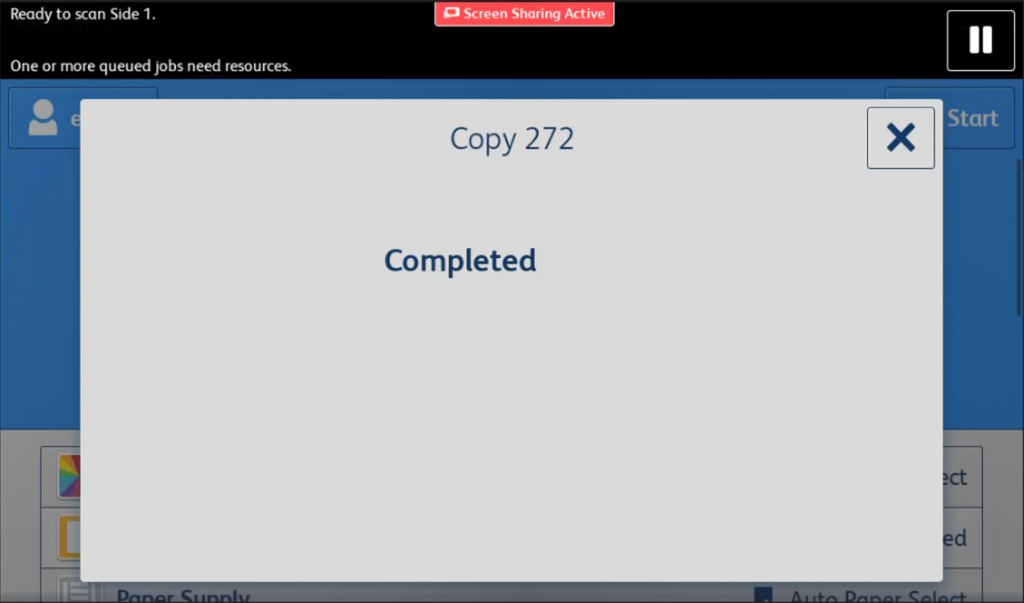
Enter the number of copies and then press the “Star“’ button for the default selection (Auto Detect Color, 1-1 Sided copies). Optionally you can change the settings shown in the yellow box below, then press the “Star” button
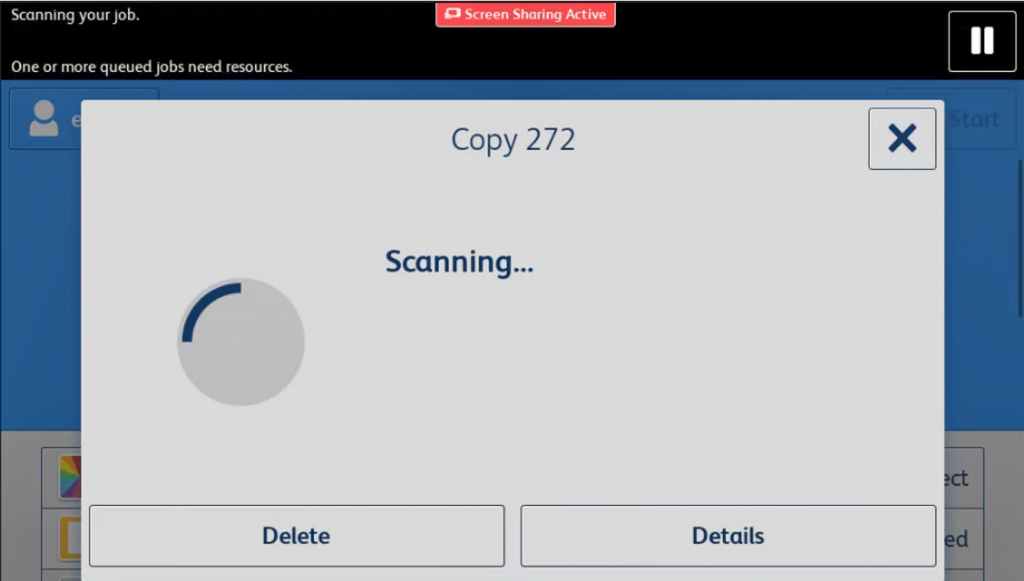
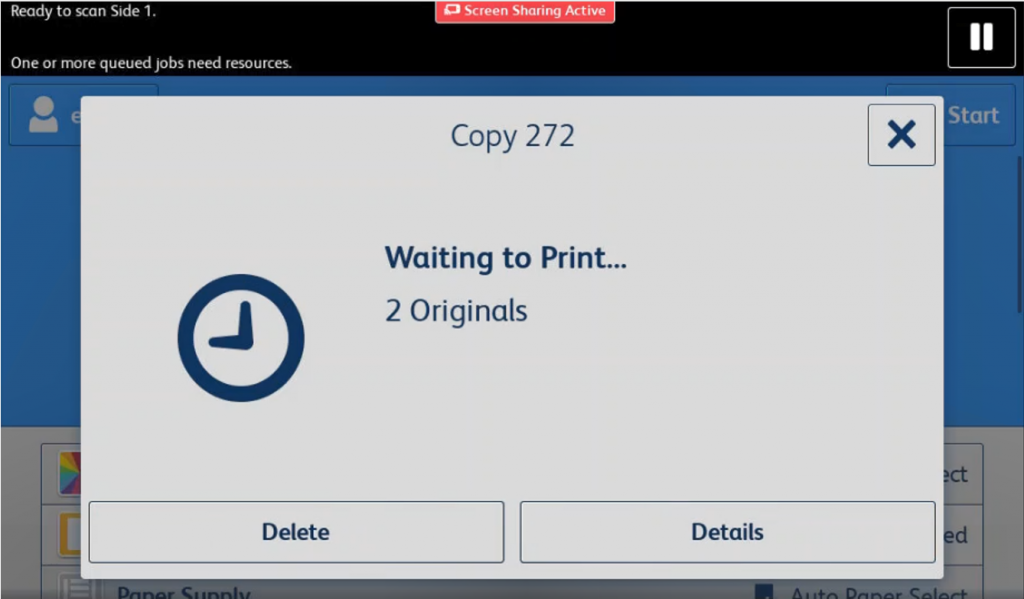
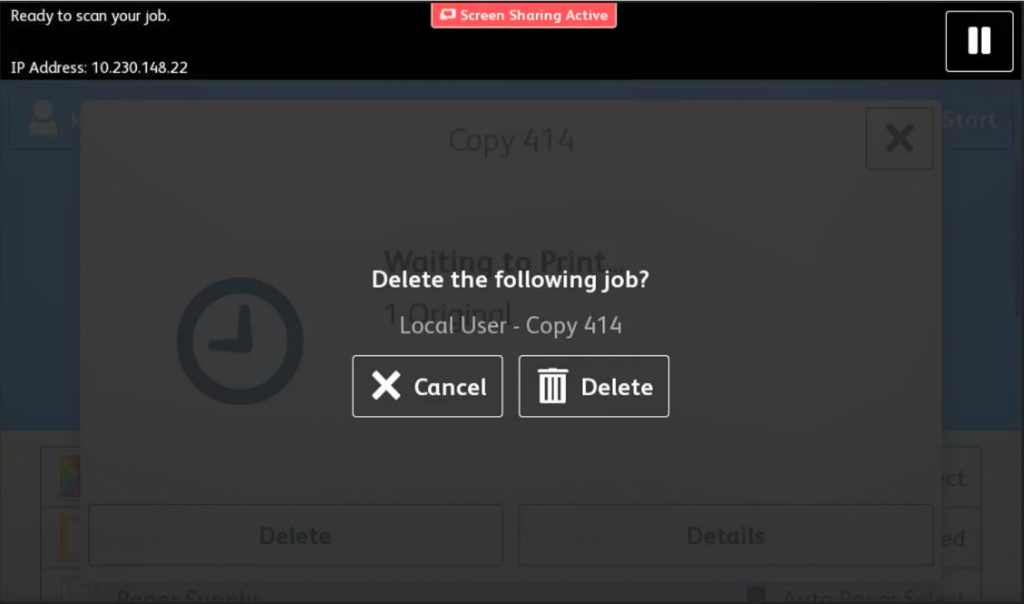
You can delete the job at any point in the previous screens by pressing the “Delete” button. If only N number of pages have been printed, you will only be charged N times
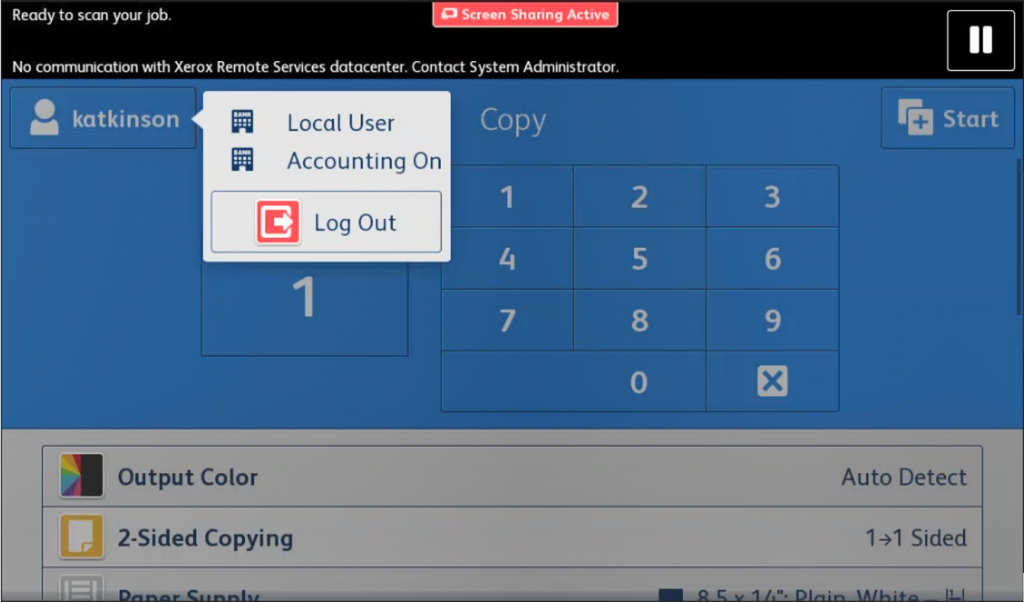
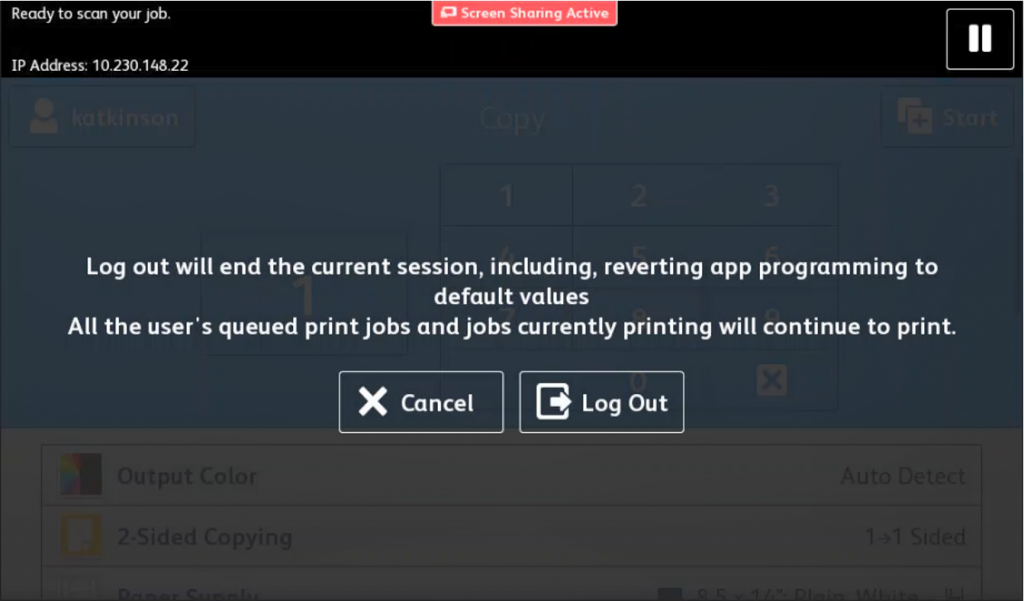
To log off of the printer, press your username on the top left and then press the “Log Out” button.
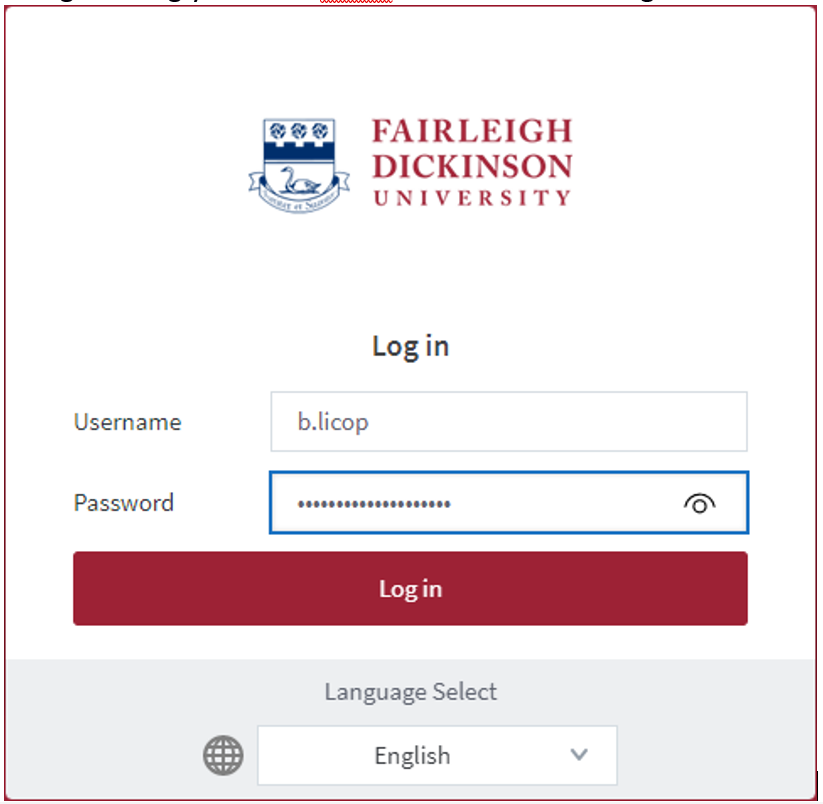
Log in using your FDU netID then select the “Login” button
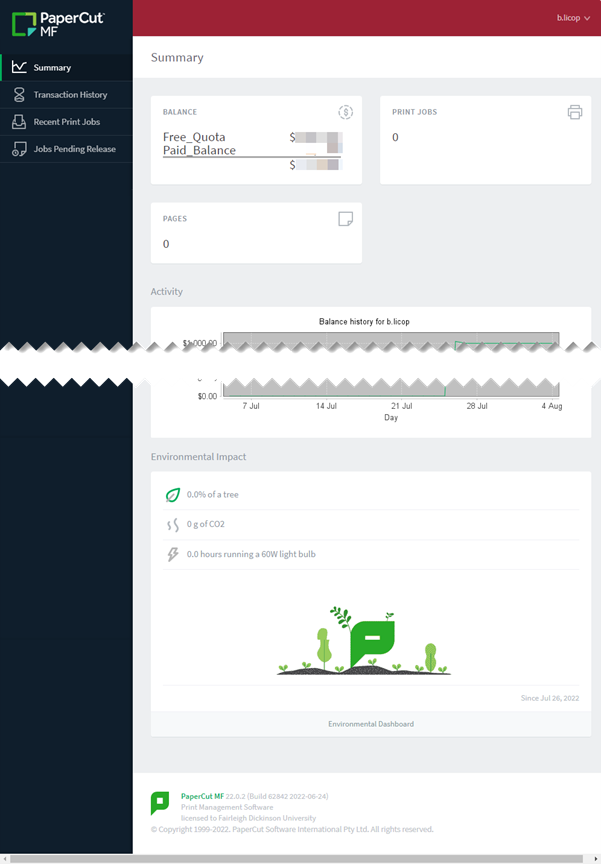
You can review your Transaction History, Balances, Recent Print Jobs & Jobs Pending Release by selecting the appropriate tab on the left-hand side. You can also see your environmental impact according to your print, scan & copy activities
Creating strong, secure passwords is essential to protecting your personal information and maintaining the safety of your FDU NetID account. This article provides clear guidelines for password creation, including complexity requirements, helpful tips, and best practices to ensure your account remains secure. By following these guidelines, you can create passwords that are not only compliant with university policies but also resilient against potential threats.
Guidelines for Passwords
Passwords must be between 8-16 characters
Pass a basic complexity check
Password Requirements:
At least one uppercase letter
At least one lowercase letter
At least one number
At least one special character
Passwords must not:
Contain your first or last name
Be the same as any prior passwords
Helpful Tips:
Longer passwords (or “passphrases”) can be created using a phrase or sentence. These are easy to remember but difficult for others to guess.
A short, meaningful phrase or sentence is often easier to recall.
Other Important Password-Related Guidelines:
Your account is your responsibility. Do not share your password with others, including technicians. FDU IT staff will never ask for your password.
Avoid choosing a password based on personal information that someone who knows you could guess.
Do not use your FDU NetID or your name/department name as your password.
Refrain from using your FDU NetID and password to access third-party systems (e.g., online shopping, newspapers, travel websites).
Avoid letting software save or store your passwords. This increases the risk of unauthorized access and makes it harder to remember your password if you don’t type it in regularly.
Always log out of programs or websites and close your browser (e.g., Internet Explorer, Firefox, Chrome) when done, especially on public computers.
Treat your passwords as valuable and protect them accordingly.
Passwords must be changed every 90 days.
To learn how to change your NETID password, follow the steps in this article:
To access Forms, you will be directed to our SAMI Support Portal where you will be asked to log in using your NETID and authenticate using Duo. Once you click “Next,” you will be forwarded to samisupport.fdu.edu in a new window or tab.



 Feedback
 Copy Link