Explore our comprehensive IT resource library to discover a wealth of helpful information tailored to your needs. Utilize our filters to refine your search by role at FDU, department, or specific service for a more personalized experience.
B-ROLL is supplemental footage inserted as a cutaway under narration or interview that helps tell the story. It can be used to introduce a segment or to cover a speaker’s audio or video miscues.
Acquiring B-ROLL
Multimedia Services has a significant amount of B-ROLL, however, there are projects that are so specific that we will not have the exact material required. In these situations, the producer will need to schedule a day(s) to acquire the footage. In some cases, scenarios may need to be created. If B-ROLL needs to be recorded off campus, permits may be required.
Requesting Access to B-ROLL Previously Captured
We currently grant access to existing B-ROLL via direct request. Our B-ROLL catalog is currently hosted on Sony CI and can be shared with anyone in and outside of FDU upon request. For access to our B-ROLL, please email danielpando@fdu.edu.
Note
Multimedia Services is diligently organizing and labeling our extensive collection of B-ROLL footage in preparation for the launch of a new cloud-based video library, set to become available in Summer 2024. This initiative aims to enhance accessibility and search-ability, ensuring efficient use of our valuable video resources.
Zoom comes equipped with numerous security features to help control online classrooms, prevent disruptions, and support educators in teaching remotely. Below are best practices for securing your virtual classroom using Zoom.
Blackboard Ultra gives students a modern, streamlined way to access course materials, keep track of due dates, submit assignments, take assessments, review grades and feedback, and communicate with instructors and classmates. This guide brings together essential student tutorials to help you navigate Blackboard confidently and stay on top of your course work.
Getting Started & Navigation
Welcome to Blackboard
Get an introduction to Blackboard Ultra and the main tools you will use to access course materials, activities, and updates.
close
Customize Your Profile
Review and update the profile information and settings available through your Blackboard account.
close
Find Your Courses
Locate current, upcoming, and previous courses from the Courses page in Blackboard.
close
Navigate Inside a Course
Use the course navigation to find content, discussions, grades, messages, and other course-specific tools.
close
Activity Page
Review recent course activity, new content, grades, and upcoming work from the Activity page.
close
Calendar
Use the Blackboard calendar to review due dates and course events and stay organized across your courses.
close
Notification Settings
Choose how and when Blackboard notifies you about course announcements, due dates, grades, and other activity.
close
Check Your Browser
Use the browser checker and Blackboard Help resources to confirm that your browser is ready for course work.
close
Course Content & Tools
Types of Course Content
Learn how common Blackboard content types are presented so you can find files, learning modules, links, and activities.
close
Use the Content Editor
Use the Blackboard content editor to format text and add links or media when completing course activities.
close
Assignments & Assessments
Assignments Overview
Learn how to open assignments, review instructions and due dates, and understand submission status.
close
Submit an Assignment
Upload your work, review the attached files, and submit an assignment in Blackboard.
close
Review Assignment Feedback
Find instructor comments, grades, and other feedback after an assignment has been reviewed.
close
Assignments in SafeAssign
Learn how SafeAssign works within the Blackboard assignment submission process.
close
Prepare for an Assessment
Review assessment details and complete the recommended checks before beginning a Blackboard test.
close
Take and Submit a Test
Navigate test questions, enter your responses, and submit a completed assessment in Blackboard.
close
Review Test Feedback
Review your test results, submitted responses, scores, and instructor feedback when they are available.
close
Hotspot Questions
Learn how to answer hotspot questions by selecting the requested area within an image.
close
Grades & Progress
Check Grades
Use the Gradebook to review scores, submission status, and feedback across your course work.
close
How Am I Doing? Report
Use the How Am I Doing? report to understand your activity and progress within a course.
close
Grades in the Blackboard App
Find and review course grades from the Blackboard mobile app.
close
Discussions & Collaboration
Participate in Discussions
Open course discussions, create a response, and reply to classmates or your instructor.
close
Messages
Read and send course messages to communicate with instructors and classmates within Blackboard.
close
Journals
Create and manage journal entries for reflective or instructor-guided course activities.
close
Work in Groups
Use Blackboard group spaces and tools to collaborate with classmates on shared course work.
Blackboard Ultra gives instructors a modern, streamlined way to manage courses, communicate with students, deliver engaging content, and assess learning in one centralized platform. This guide brings together essential instructor resources—covering navigation, announcements, discussions, grading, assessments, course content, and student management—to help you work more efficiently and get the most out of Blackboard Ultra, whether you’re setting up a course for the first time or refining an existing one.
Navigation & Getting Started
How to Add a Zoom Meeting
close
Find Your Courses
Locate your course list immediately after logging in. You can view current, past, and upcoming courses from the “Courses” page in the global navigation menu.
Access global tools such as your Profile, Activity Stream, Calendar, Messages, and Grades from the main menu on the left side of the screen, outside of any specific course context.
This page (often the “Activity Stream”) highlights important updates such as new content, grades, and due dates, featuring institutional announcements at the top.
View your course exactly as students will see it before making it available. Use this feature to verify content visibility, layout, and the overall student-facing experience without publishing live changes.
close
Student Preview
Enter a temporary student account within your course to experience it as a student would. You can submit test submissions and review results to confirm that content and assessments behave as intended.
close
Notification Settings
Customize how and when you receive alerts about student activity, discussion posts, assignment submissions, and course updates. Proper configuration helps you stay informed without being overwhelmed by notifications.
close
Accessibility Overview
Learn how Blackboard Ultra supports an inclusive learning environment through built-in accessibility features, including screen reader compatibility, keyboard navigation, and tools for creating accessible course content.
close
Discussions & Communication
Create Discussions
Facilitate class-wide conversations to encourage peer interaction and critical thinking. You can set up graded or ungraded forums.
Set up private or shared student journals to support individual reflection, formative writing, and ongoing communication between you and each student throughout the course.
close
Feedback Recording
Record audio or video feedback directly within the gradebook to provide students with richer, more personal responses to their work—an effective alternative to written-only comments.
close
Attendance Tracking
Monitor and record student attendance directly within your course. You can manually update attendance records or configure automatic tracking tied to participation or login activity.
close
Grading & Assessments
Gradebook
Use the Gradebook to review student submissions, manage grades, track progress, and keep assessment information organized within your course.
close
Gradebook Navigation and Layout
Learn how to navigate the Blackboard Ultra Gradebook and understand the layout of its key areas, controls, and assessment views.
close
Gradebook Student Display and Name Options
Review the Gradebook display options that help instructors organize student information and choose how names and student details appear.
close
Gradebook Column Header and Assessment Details Panel
Explore the Gradebook column header and Assessment Details panel to manage assessment information and access related grading options.
close
Gradebook Filter
Use Gradebook filters to narrow the view and quickly focus on the students, assessments, or grading information you need.
close
Gradebook Grade Details Panel
Learn how to use the Grade Details panel to review individual grades, feedback, submission information, and related grading actions.
close
Gradebook Manual Grade Entry and Posting Grades
See how to enter grades manually and post them to students from the Blackboard Ultra Gradebook.
close
Gradebook Accommodations, Exceptions, and Exemptions
Learn how to apply accommodations, exceptions, and exemptions in the Gradebook when student circumstances require adjusted assessment handling.
close
Grading Assignments
Review assignment submissions, enter grades, and provide feedback so students can understand their performance and next steps.
close
Flexible Grading Tests
Use flexible grading tools to review test submissions efficiently, move between students and questions, and focus on the grading workflow that works best for the assessment.
close
How to Grade Discussions
Grade student discussion participation, review responses, and provide feedback from the discussion grading workflow.
close
Rubrics
Create and manage rubrics to define grading criteria, communicate expectations, and support more consistent evaluation of student work.
close
Grade Using Rubrics
Apply rubric criteria while grading submissions to provide structured feedback and align scores with the expectations shared with students.
close
Timed Assessments
Set time limits for tests and other assessments to manage availability, pacing, and completion expectations for students.
close
Display One Question at a Time
Configure tests to show one question at a time when you want students to move through an assessment in a more controlled sequence.
close
Content Management
Add Content
The primary action to build your course. You can create new items, upload files, or import content from other sources using the plus (+) sign in the Course Content area.
Create shortcuts within your course content that link students directly to other tools or materials (e.g., a link in Week 1 content that leads to a Test).
Build structured, step-by-step learning paths that guide students through course materials in a set sequence. Learning Modules support conditional release to help you control the pace of student progress.
close
Release Conditions
Set rules that control when content, assessments, or activities become accessible to students based on criteria such as specific dates, prior completions, or group membership.
close
Copy Content From Other Courses
Reuse materials by copying content items, folders, or entire banks from your previous courses into the current one.
FDU faculty can access these recorded Zoom training sessions to learn the essentials of teaching with Blackboard Ultra. The three-part series covers key areas of course setup and management, including Getting Started with Blackboard Ultra, creating and managing Assignments and Tests, and using the Gradebook to track student performance. These recordings are designed to help instructors become more comfortable navigating Blackboard Ultra and preparing their courses for students.
FDU’s Acceptable Use Policy prohibits running software that accepts incoming connections from other computers. Programs such as BitTorrent or other P2P file sharing hosting program all contain server components that allow others to connect to your computer and retrieve files off of your system. In addition to the legal implications of sharing copyrighted materials, file sharing software creates a security concern. Improper use of these programs could result in the compromise of your private files and may leave your system open to attacks from other computers.
To view FDU’s stance on this issue in its entirety, please view the document below.
Fairleigh Dickinson University’s implementation of Box.com is designed to enable secure, scalable, and collaborative file sharing and content management between members of the FDU community and parties external to the institution.
The platform offers:
Unlimited cloud storage for academic, administrative, and research content
Secure access and sharing with encryption and granular permission controls
Seamless collaboration with internal and external users via shared folders and links
Integration with tools such as Microsoft 365, Zoom, and Adobe Sign
Version control and file recovery, minimizing data loss and ensuring continuity
Mobile and remote access for flexible work from any device
Fairleigh Dickinson University has a limited number of licenses available for qualified faculty and staff to use Box.com. Qualified in this case is defined as FDU faculty and staff members who have an approved business need to share confidential information with parties external to the University.
To acquire a license for Box.com, a user must complete a request form located on samisupport.fdu.edu using the link below:
Once a license is provided and a folder built, the licensee has complete accountability of the data and any access provided to others. As with any sensitive information, the licensee is reminded to pay careful attention to following WISP guidelines and when in doubt, ask before sharing content.
Click “Continue” to proceed to the FDU network login
Complete the FDU Single Sign-On process
Creating Your Workspace
Learn how to create a new subfolder in your Box account, upload content, and share it with your colleagues.
Creating a New Subfolder
Click “New” in the upper-right corner
Click “Folder”
In the pop-up window, enter a name for your folder. You can also invite collaborators at this step. If you don’t invite anyone, the folder will remain private
Click “Create”
Uploading a File or Folder
In the All Files section, click “New” in the upper-right corner
Select “File Upload” or “Folder Upload”, depending on your needs
Choose the file(s) or folder to upload
Use Command (macOS) or Control (Windows) to select multiple files.
Note
Only one folder can be selected at a time.
Click “Open” or “Upload”
close
Sharing Content with Others
You can share Box content in two primary ways:
Inviting collaborators to files or folders
Sending shared links
Adding Collaborators
A collaborator is someone you invite into a file or folder. The shared item will appear in their All Files view.
Hover over the row of the file or folder you want to share
Click “Share” on the right to open the Share window
Under “Invite People”, click “Add names or email addresses” and enter the collaborator’s details
Use the “Invite as” drop-down to assign a role
Type a message in the “Message” field (this step is optional and has a character limit of 750)
Click “Send”
Sending a Shared Link
Shared links allow quick access to content for both internal and external users.
Hover over the file or folder you want to share
Click “Copy Shared Link” on the right. The Shared Link window will open
Choose one of the following access levels:
People with the link: Anyone with the link can access. Add password protection, expiration, or restrict downloads if needed
People in your company: Only Box users with your organization’s email domain can access
Invited people only: Only invited collaborators can access the content
Choose allowed actions for recipients:
Can edit: Edit, comment, annotate, and download
Can view and download: View and download only
Can view only: View within Box but cannot download or edit
Copy and paste the link into your preferred app (email, messaging, etc.)
close
Managing Collaborators
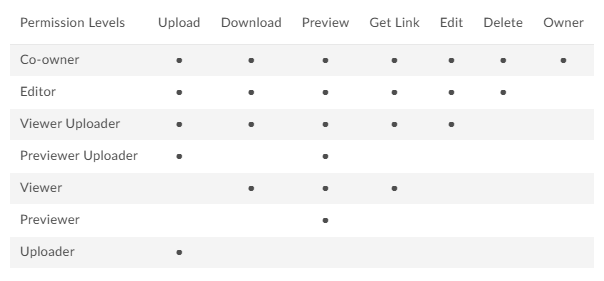
When allowing other to access a folder, here is breakdown of permission levels:
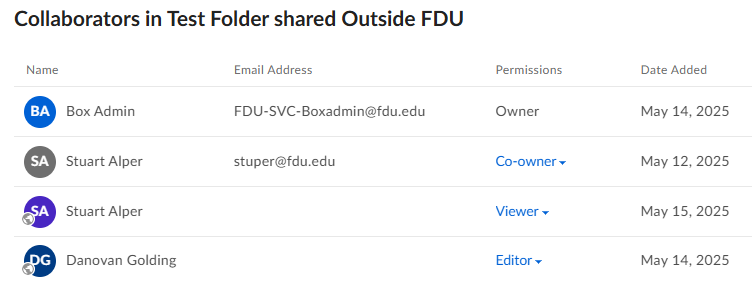
To manage existing collaborators:
Click the three dots to the right of the folder
Hover over “More Actions”, then click “Manage Collaborators”
Note
When inviting a collaborator outside of FDU, the invitee will receive an email notification with access details. Permissions may vary depending on folder settings and account restrictions.
Upon request, we are able to provide an initial quote for your video project, giving you an estimated cost. For a more accurate estimate, please provide as many details as possible about the project. To initiate your video project and request a quote, please email danielpando@fdu.edu.
Note
Quoted prices serves as an estimate and the final price may exceed the initially quoted amount, depending on the actual hours worked to complete the project.
Invoicing After Project Completion
Once a project is completed, an invoice will be generated that accurately reflects the predetermined cost associated with the production. An e-mail will be sent to the initial contractor of the production, and a GL account number will be requested to be added to the invoice and sent to Finance to complete the transfer.
Note
Prior to the processing of any budget transfers, it’s mandatory for the invoice to receive written approval from the either the supervisor in charge of the GL budget code, or the project leader. This step ensures proper authorization and accountability.
Approved accessories, such as a case, screen protector, charging cable and plug, will be provided with the purchase of a new phone.
Tip
The form can be used to request a replacement for these accessories. Additionally, the form can be used to request the addition of an international plan, process the return of a cellular device, or report a lost or stolen cellular device.
Fairleigh Dickinson University’s Cellular Policy can be reviewed below:
To access Forms, you will be directed to our SAMI Support Portal where you will be asked to log in using your NETID and authenticate using Duo. Once you click “Next,” you will be forwarded to samisupport.fdu.edu in a new window or tab.





 Feedback
 Copy Link