The easiest way to access your FDU email account on your mobile device is to install the Outlook app from either the App Store (Apple) or the Play Store (Android). We support and advise using this method due to the program’s robustness and integration of all Office365 features. Follow the steps below to install and set up the Outlook app on your phone.
Outlook App on Apple iOS and Android Mobile Devices
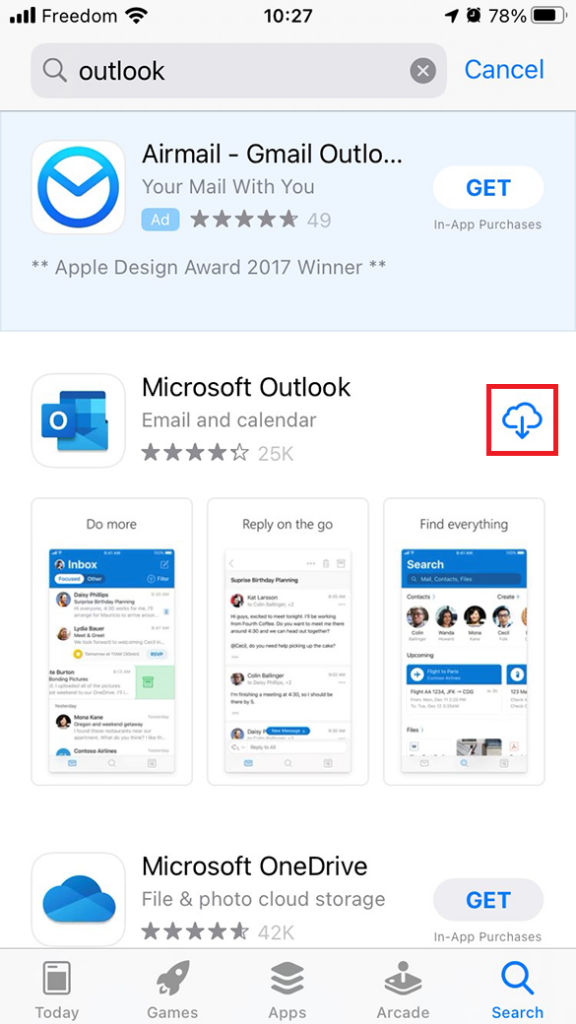
Use the links below to install the Outlook app onto your mobile device.
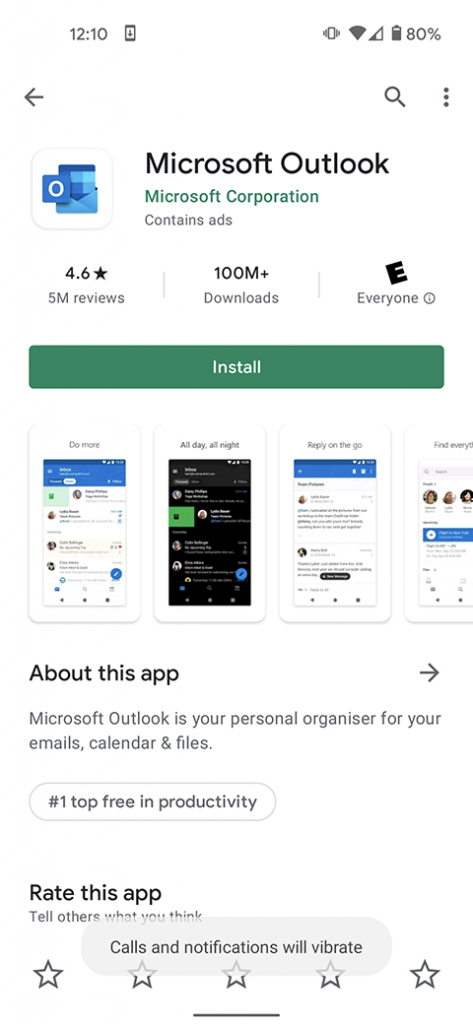
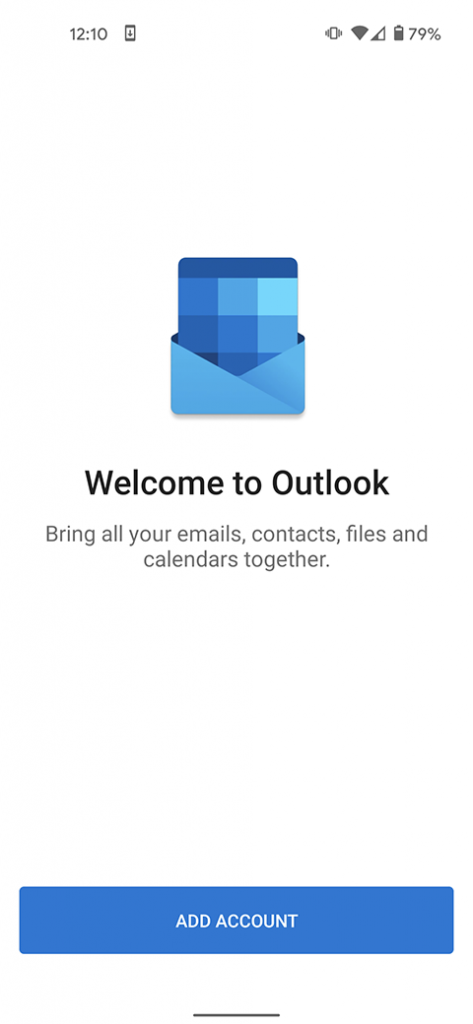
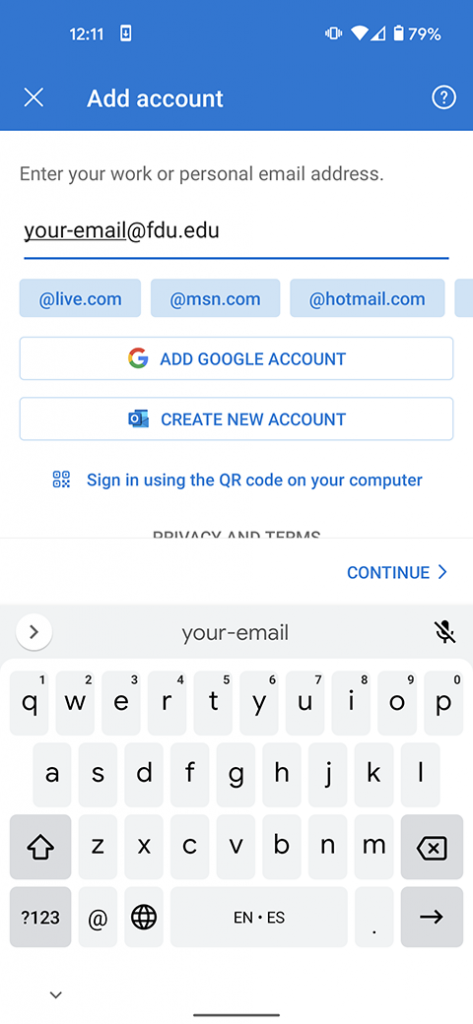
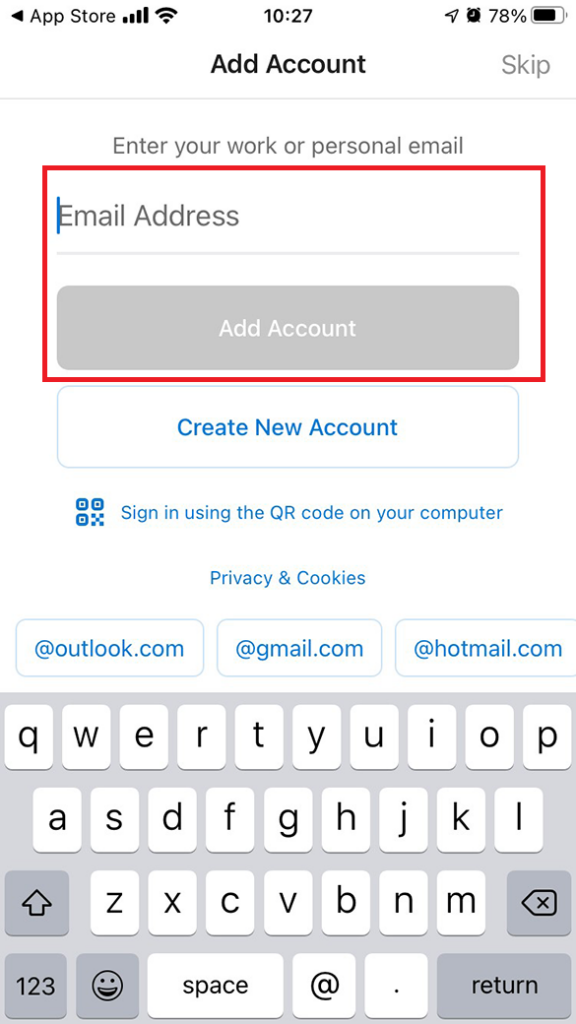
Launch the app and press on “Add Account” if on an Android device. It will then prompt you to input your FDU email address. On iOS, the app will launch and immediately ask you for your FDU email address. Once filled out press “Continue” on Android. On iOS press “Add Account”
Android
Android
iOS
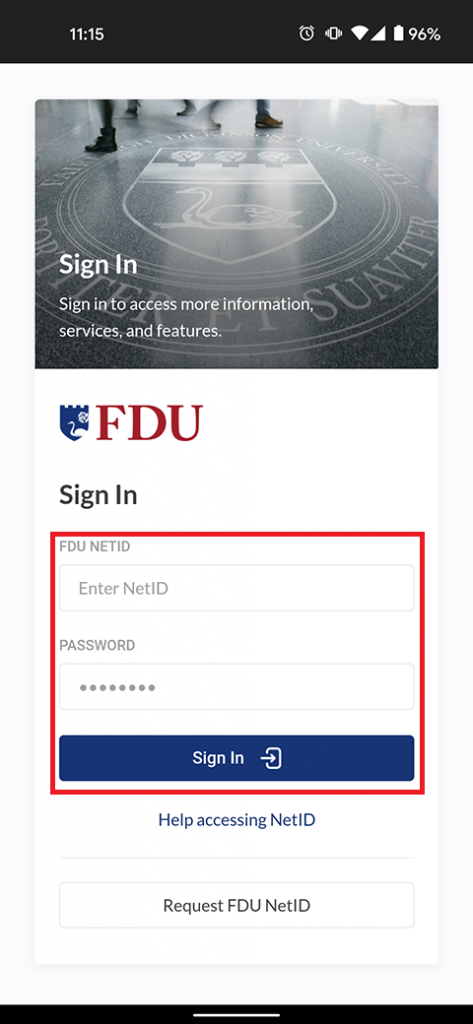
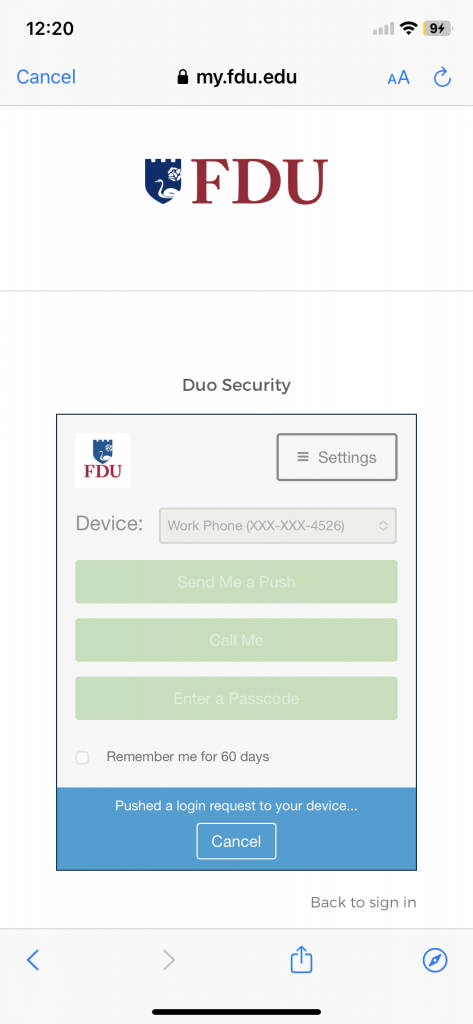
You will be routed to the FDU Single Sign On Page, from here input your FDU email address and password and press “Sign In”
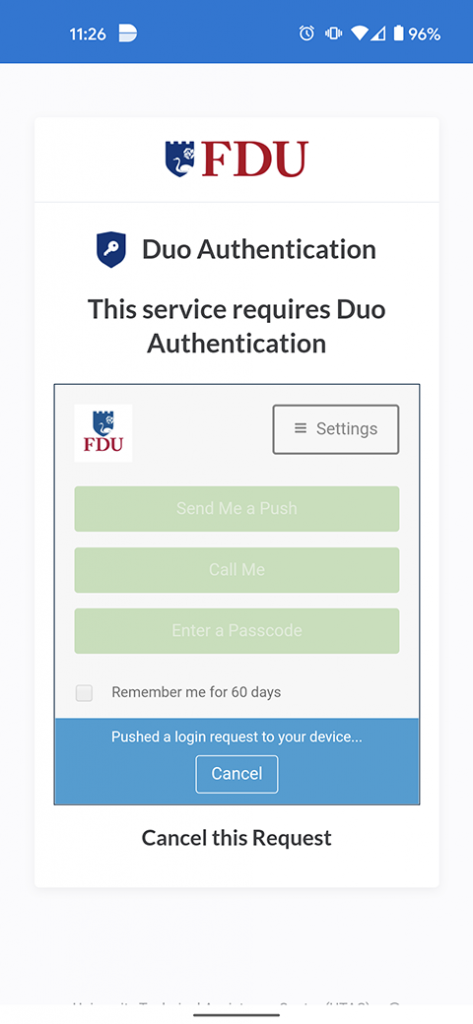
For security purposes, all applications which use FDU’s Single Sign On (NetID) require Duo two-factor authentication. After inputting your FDU NetID login information, Duo requires you to complete a method of second-factor authentication
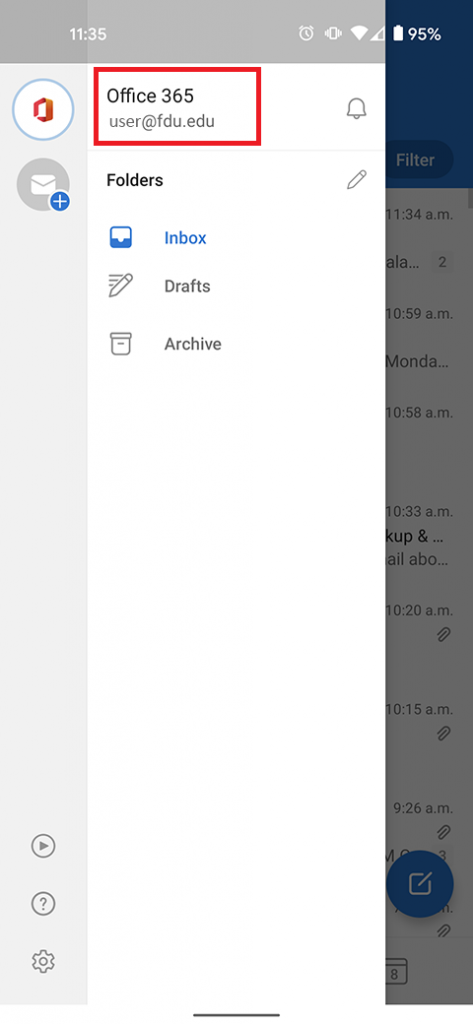
Your FDU email account has now been added to your device successfully. Ensure the email account is listed on your Outlook application.
These instructions demonstrate adding an FDU email account to an Apple mobile device’s native Apple “Mail” app. Unfortunately, adding an FDU email account on an Android OS mobile device’s native “Mail” app is currently unsupported by FDU IT support. Information regarding adding an FDU email account to an Android OS mobile device via the Outlook App can be found below for Android OS mobile device users.
Note:
The easiest way to access your FDU email account on your mobile device is to install the Outlook app from either the App Store (Apple) or the Play Store (Android). FDU IT supports and advises using this method due to the program’s robustness and integration of all Microsoft 365 features. A link with instructions for the Outlook app on mobile devices can be found at the bottom of this page.
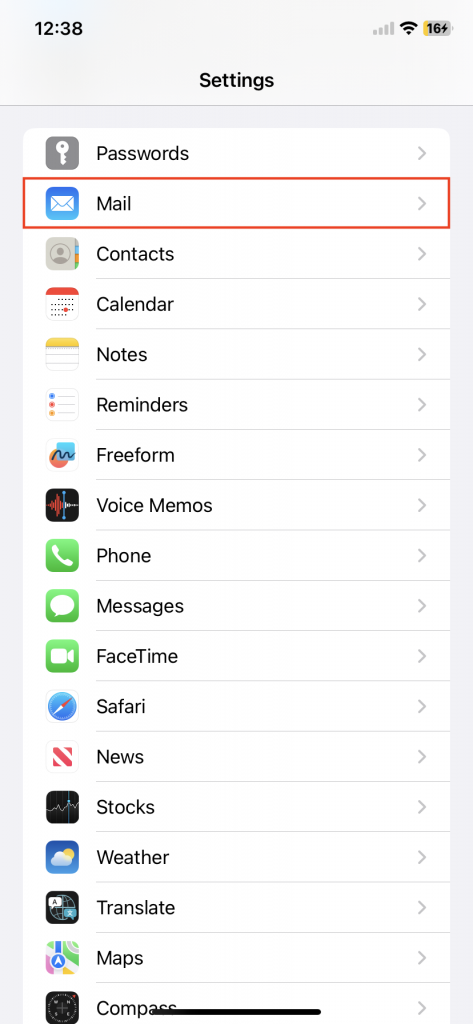
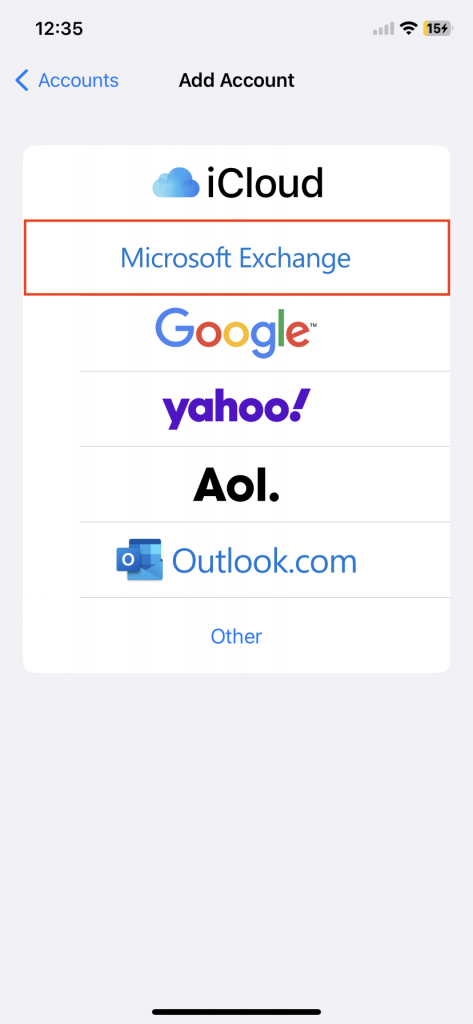
Setting up your FDU Email Account in the Mail app on iOS
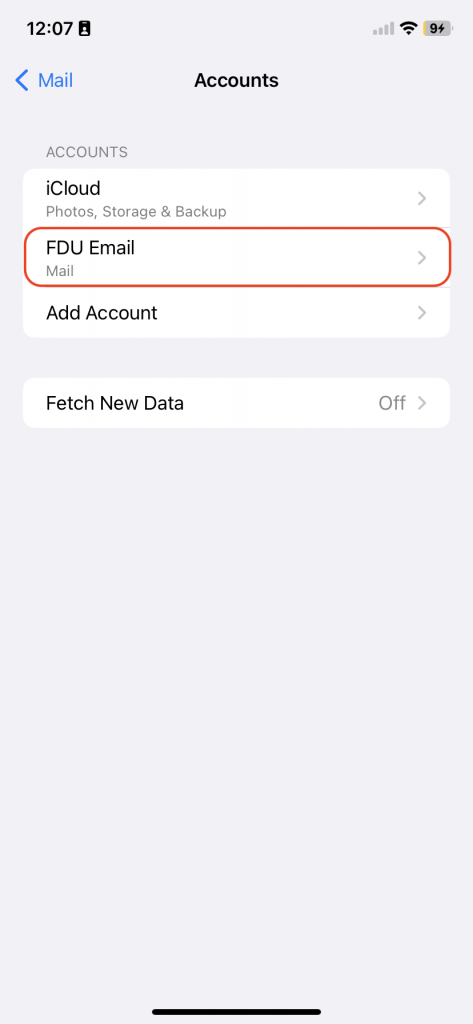
Go to the “Settings” app
Tap “Mail”
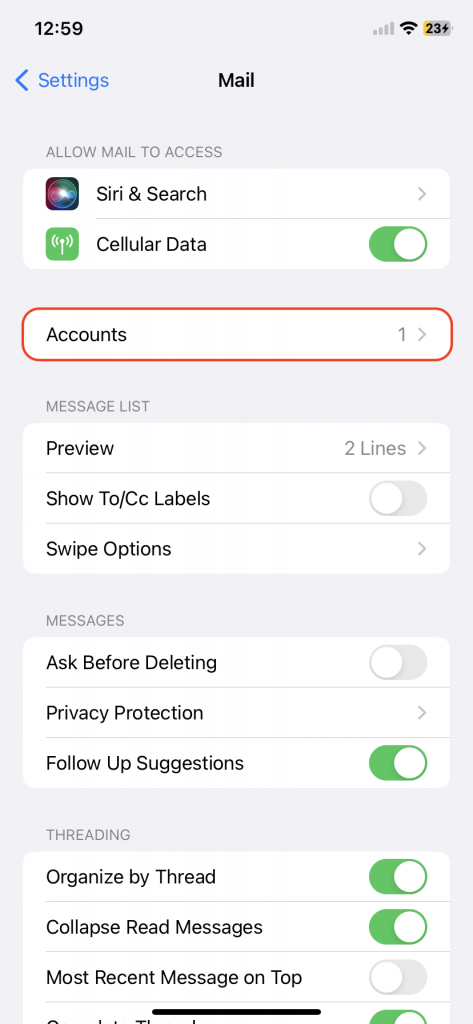
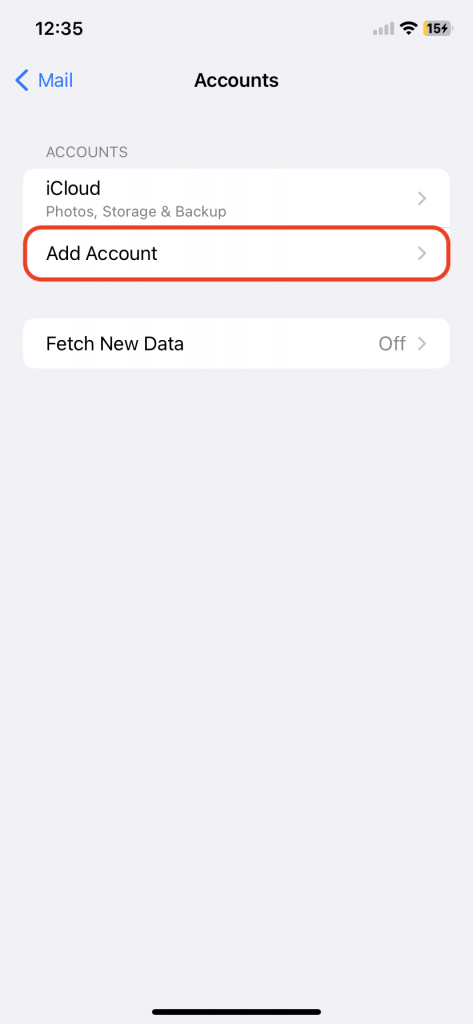
Tap “Accounts”
Tap “Add Account” and then select or tap “Microsoft Exchange”
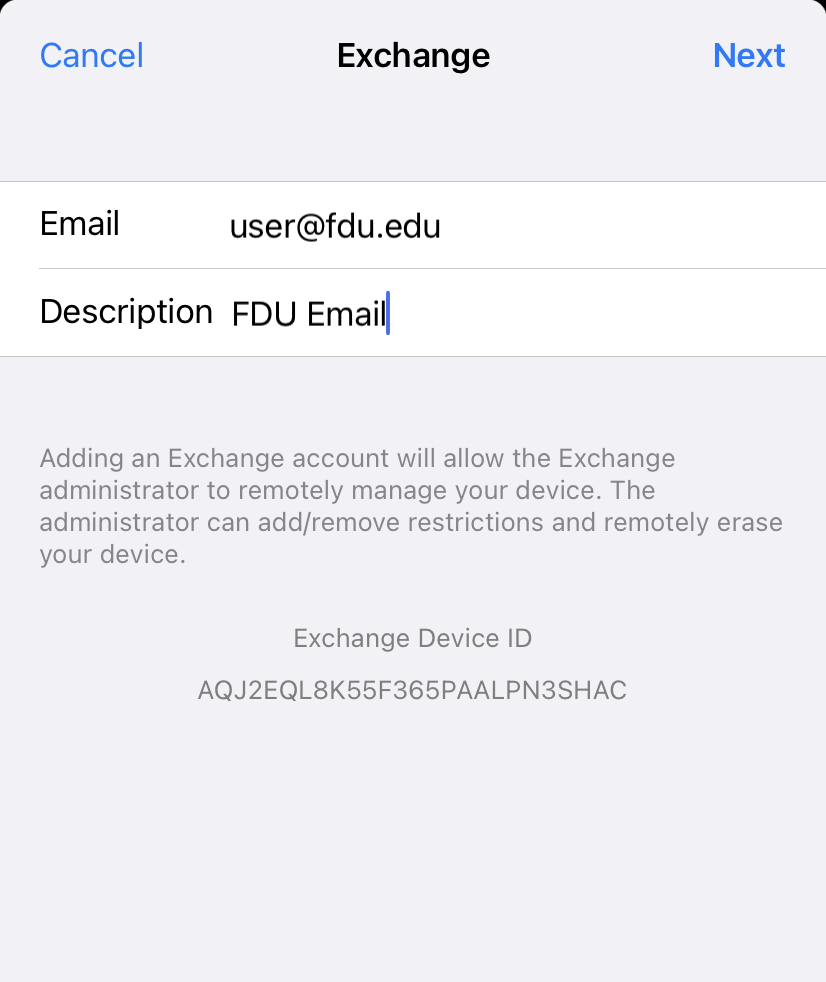
Enter your FDU email address and a description of your email account in the corresponding text boxes. Please note that the default description name for the account will be ‘Exchange’ if left unchanged. Tap “Next” to continue
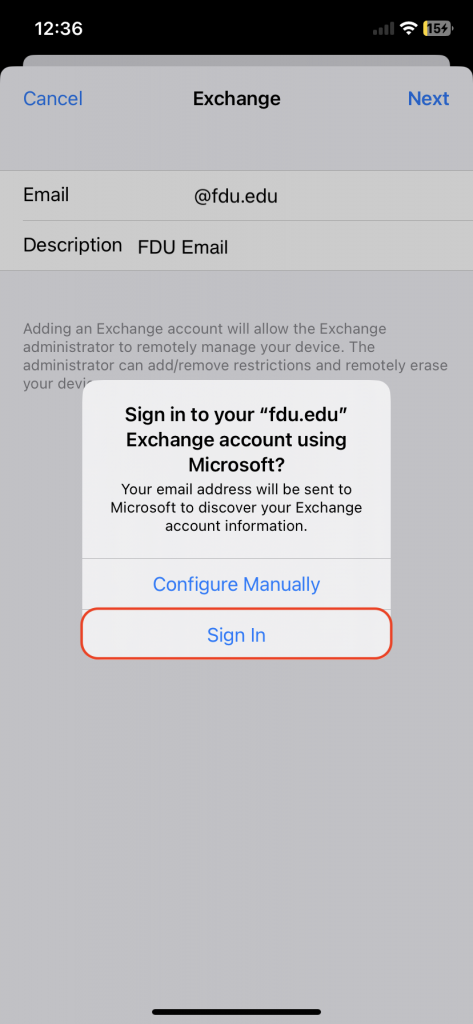
Tap “Sign In”
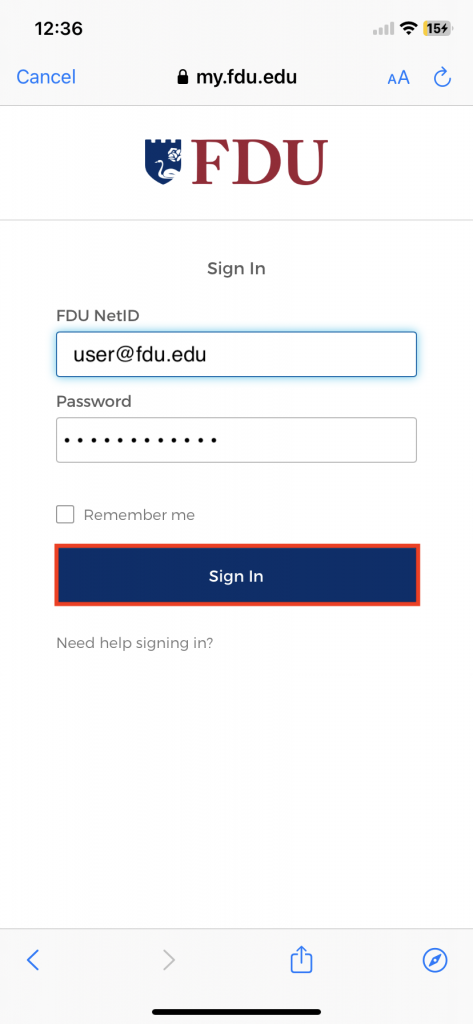
Enter your FDU email address and password. Tap “Sign In” to continue
For security purposes, all applications which use FDU’s Single Sign-On require DuoTwo-Factor Authentication (2FA). After entering your FDU NetID login credentials, Duo requires you to complete a method of second-factor authentication
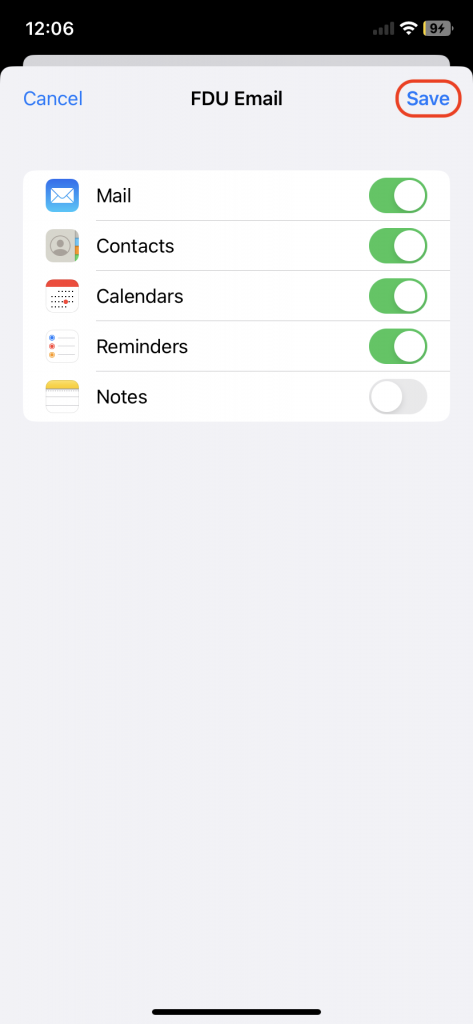
Choose the FDU NetID account information you want to synchronize or access on your iOS mobile device by toggling the choices on/off. Tap “Save” to continue
Your FDU email account has successfully been added to your iOS mobile device
close
Setting up your FDU Email Account on Android OS
Due to the multiple Android OS mobile device manufacturers (Samsung, Google, or LG) each having their own native ‘Mail’ app, email setup and features differ depending on the manufacturer of the Android OS devices. For this reason, it is best practice to use the Microsoft ‘Outlook’ app found in the Google Play Store. Follow the instructions below to set up Outlook on Android OS.
Visitors can get online in just three quick steps using a browser-based portal with a single click to accept the guest policy on New Jersey Campuses.
The FDU-Guest network provides fast, on-campus public internet access for users who do not require access to internal FDU resources.
How to Connect to FDU-Guest WiFi
Navigate to your devices WiFi settings and select the SSID Network: “FDU-Guest”
A Captive Portal will open automatically
Note
If your web browser is already open, it will be redirected automatically to the Captive Portal.
On the Captive Portal page, review and accept the User Acceptable Policy to complete your connection
Once the policy is accepted, your device will be connected to the FDU-Guest network.
Network Access Limitations
Note
The FDU-Guest network provides public internet access only. It does not allow access to FDU internal systems, file servers, or other restricted university resources.
For access to FDU network resources, use our secure connection methods or contact SAMI Support for assistance.
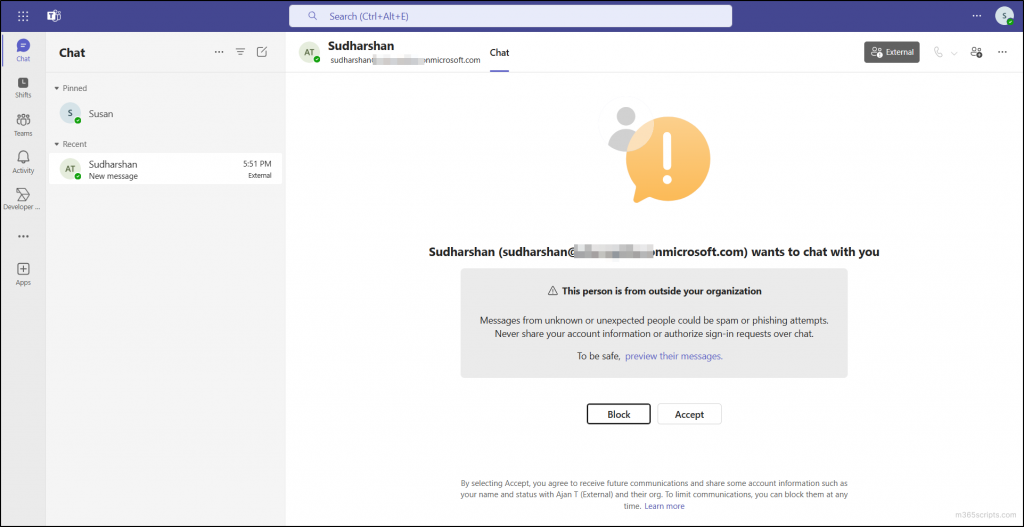
To maintain a secure and productive Microsoft Teams experience at Fairleigh Dickinson University, it’s important to understand how to manage external communication requests, recognize brand impersonation attempts, and report suspicious content. This guide offers clear, step-by-step instructions to help you stay secure while using Teams.
Managing Incoming Requests from External Users
To ensure your Teams environment remains secure, review and manage requests from individuals outside of FDU before accepting any communication.
Steps to Manage External User Requests:
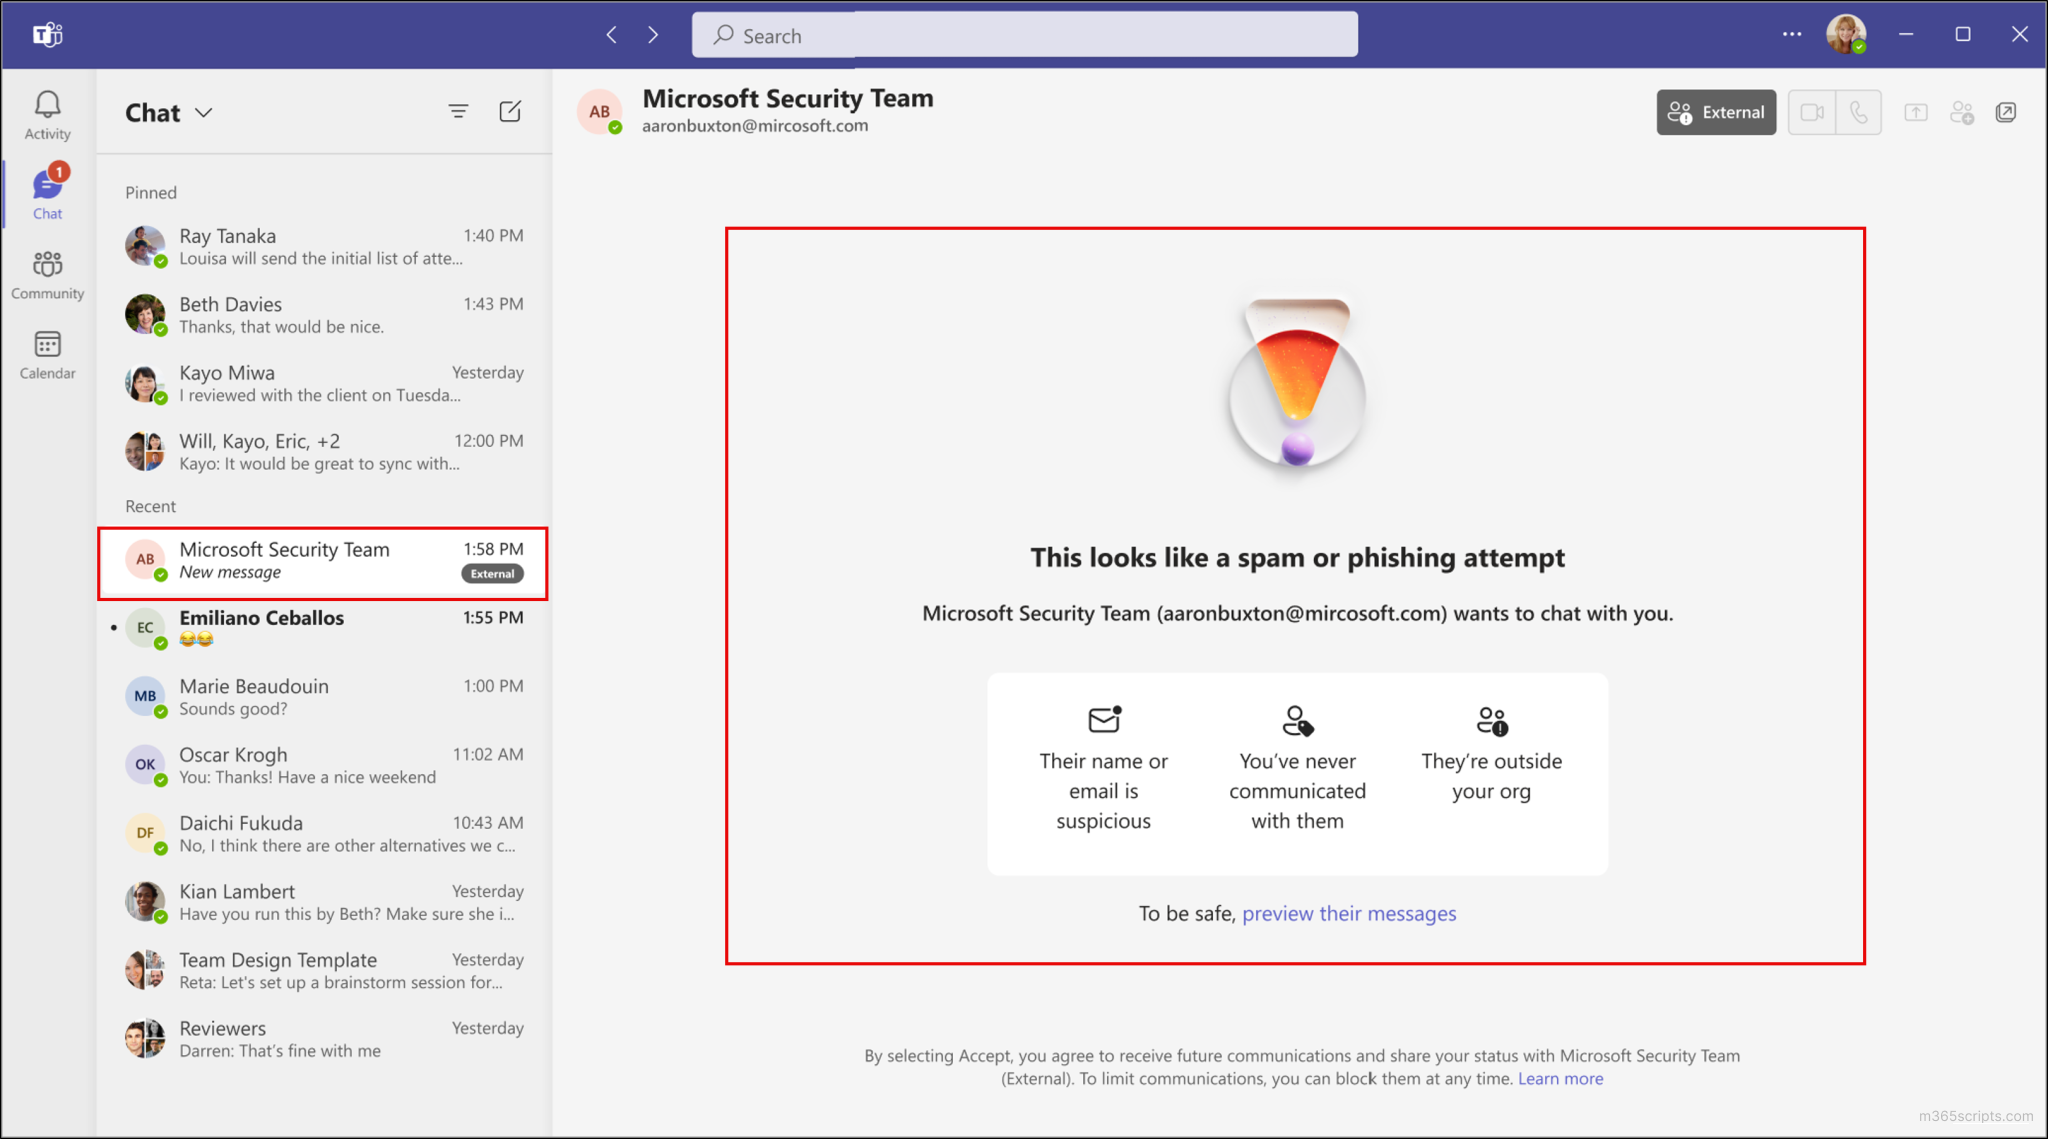
Initial Notification: When someone outside FDU tries to initiate a chat, you will receive a notification indicating they are external to your organization
Review the Request: Examine the name and any provided details. Be cautious of unfamiliar or suspicious names
Choose an Action:
Click “Accept” if you recognize the individual and have a valid reason to communicate
Click “Block” if the person is unfamiliar or seems suspicious. Blocking prevents further contact
Protecting Against Brand Impersonation in Teams Chat
Microsoft Teams now detects potential brand impersonation attempts automatically. This feature alerts you if an external user’s message seems suspicious.
Steps to Protect Yourself:
First Message Analysis: Teams evaluates the external user’s name and email for impersonation risks
High-Risk Alert: If a potential threat is detected, Teams will display a prominent warning with one or more of the following:
The sender’s name or email resembles a known FDU entity
No previous communication history with the sender
The sender is outside your organization
Review the Message Content: Click “Preview their messages” and read the message carefully. Watch for urgent requests or unusual links/attachments
Second Warning (If Applicable): If you proceed to accept, Teams may display another warning about the associated risks
Make Your Decision: Use the alerts and message content to decide whether to continue the conversation
Reporting Suspicious Content
Reporting suspicious messages, calls, or users within Teams helps FDU’s security team manage potential threats effectively.
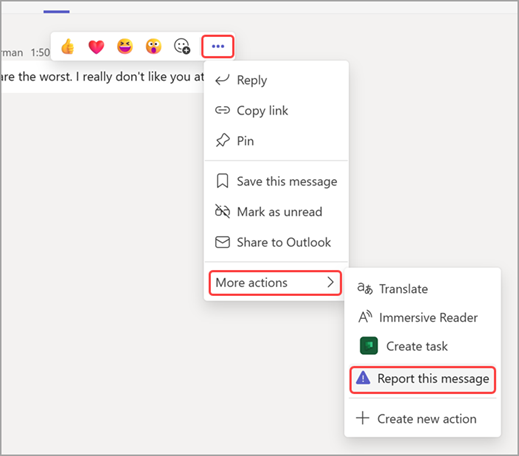
Reporting Messages from Internal User:
Hover Over the Message: Place your cursor over the suspicious message.
Click the “More options” (…) icon > More actions > Report this message.
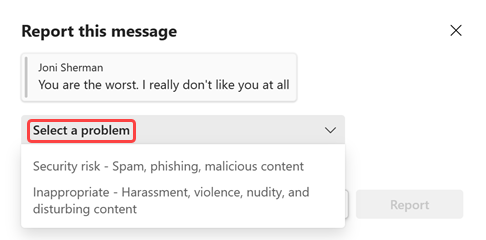
In the dialog that opens, verify Security risk – Spam, phishing, malicious content is selected, then click “Report”
In the confirmation dialog, click “Close”
Reporting Messages from External Sender:
If you receive a suspicious message from an external sender (e.g., @outlook.com, @live.com), the “Report this message”option in Teams will not be available.
To report a suspicious message from an external source, you must create a SAMI support ticket:
Click “Get Support” button located at the bottom of this article
Create a support ticket and include all relevant details about the suspicious message
FDU provides remote access to many software applications typically found in university computer labs. This new Virtual Desktop Infrastructure (VDI) gives users access to a Windows desktop environment along with many General Lab Software, without requiring downloading and installing programs on a user’s personal equipment. The service, called FDU Anywhere, is powered by University Systems and Networking (USAN) and can be found at anywhere.fdu.edu.
Using FDU Anywhere is like walking into one of FDU’s computer labs. Upon logging in with your FDU NetID and password, you will have access to the virtual platform. To find a list of currently available software on FDU Anywhere, use the FDU Software Catalog. A listing of available Free and Open Source software can also be found by visiting the FDU Software Catalog.
The FDU Software Catalog provides an up-to-date catalog of software available to Faculty, Staff, and Students at the university:
FDU Anywhere is a powerful resource with a lightweight footprint. In order to utilize FDU Anywhere, you must have the following:
Any device with a browser that supports HTML 5 will work. HTML 5 is supported by almost all desktop and mobile browsers including Google Chrome, Apple Safari, Microsoft Edge, and Mozilla Firefox
An internet connection
FDU NetID credentials
Tip
Your system hardware specifications may impact the performance of FDU Anywhere, such as systems with less than 8GB of memory.
Network Requirements
For the best experience, while using FDU Anywhere, your network should:
Have a download speed of at least 5Mb/s or more
If your download speed falls below 5Mb/s, the connection could become unstable and cause issues with your stream
Have an upload speed of 5Mb/s or higher
An upload speed of 5Mb/s is enough to use a basic mouse, keyboard, and controller. More bandwidth-heavy devices such as webcams, microphones, and external storage devices can use up to 100Mb/s
Wired network connections are preferred over Wi-Fi network connections whenever possible
Wired network connections are more stable and offer more bandwidth over Wi-Fi
For graphics-intensive applications, like Adobe Creative Cloud and Autodesk, we recommend using a wired network connection instead of Wi-Fi, ideally with a bandwidth of 5 Mbp/s.
Wi-Fi networks with 5Ghz rated wireless connections are preferred over 2.4Ghz wireless routers and provide better performance.
VPN Applications and Connections
Warning
The use of any VPN Software within FDU Anywhere is not allowed. Using a VPN client in FDU Anywhere may interrupt your session and disable your access for approximately 15 minutes.
Testing your Connection
Your experience with FDU Anywhere greatly depends on your internet connection. Testing your connection can help you identify and correct most issues.
To test your Internet connection speed, click the link below:
For the best overall experience using FDU Anywhere, Google Chrome is the browser of choice.
Use your FDU Credentials (NetID and associated password) to complete the login to the FDU Anywhere
General Lab
Note
When you login to the General Lab experience, it may take about 60 seconds to get to the desktop. This is because your profile is being created or loaded.
The selected app or desktop opens in a new browser tab
Note
Depending on your screen resolution, your desktop experience view may differ from the picture above.
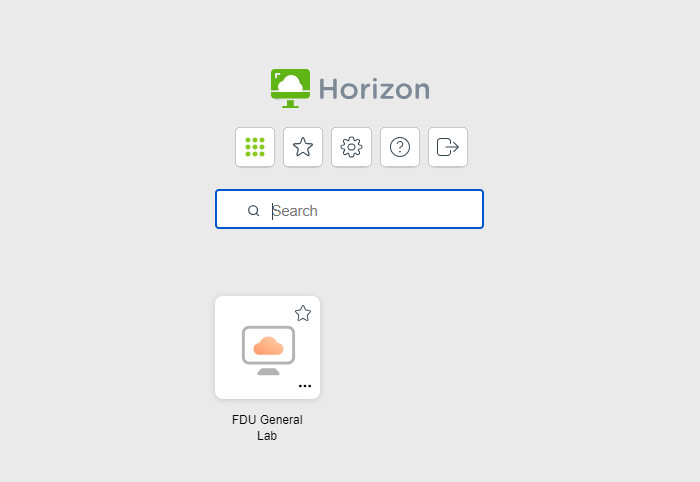
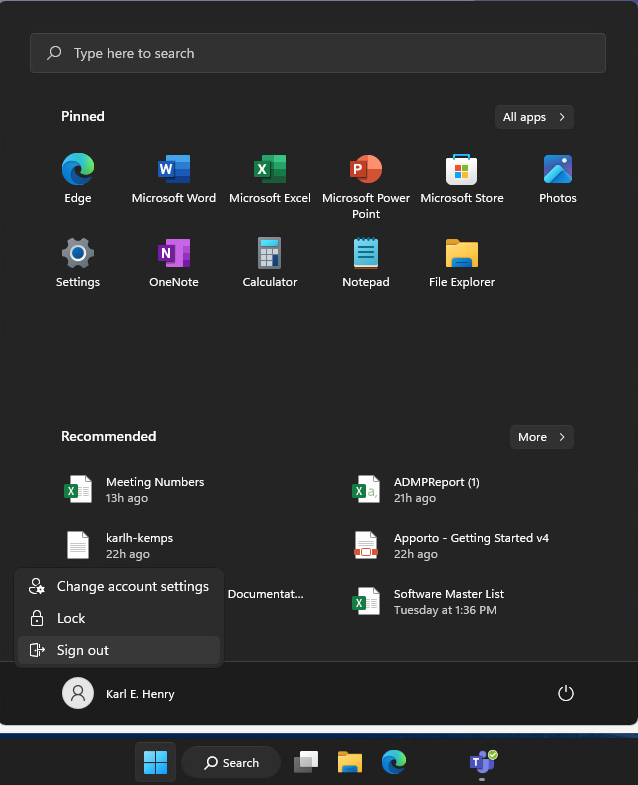
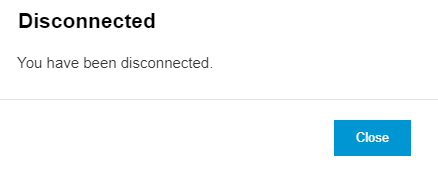
Log Out of FDU Anywhere
Logging out is a critical step in making sure others continue to be able to easily accessFDU Anywhere services. To log out of FDU Anywhere, follow these steps:
Click the Windows “Start” button
Click your “Name“
Click “Sign Out“
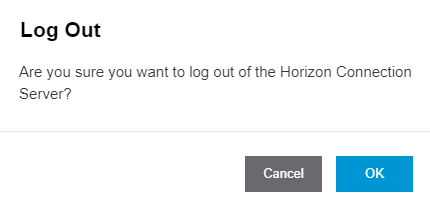
On the upper left-hand side, click the “Hamburger” menu icon
Click “Log Out“
Click “OK” to confirm Logout
Automatic Session Logout Policy
To help make FDU Anywhere as available as possible to all students, accounts that have been inactive (or idle) for 15 minutes will automatically be logged out.
There are many ways in which you can access and save files within FDU Anywhere. Fairleigh Dickinson University highly recommends saving all files on your FDU Microsoft 365 OneDrive which is accessible within FDU Anywhere. There will be a first-time setup and initialization process required to use OneDrive within FDU Anywhere.
Setup and Initialization Process
Accessing your Microsoft 365 OneDrive account is done easily by following these instructions:
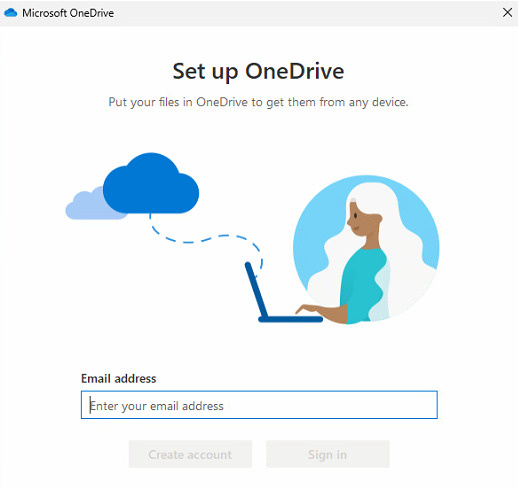
From the FDU Anywhere General Lab, single click on the “OneDrive” icon found on the Windows desktop
Enter your FDU NetID and click “Next”
Follow the FDU standard single sign-on prompts to complete the login process
Note
Your FDU NetID may already be filled in, just click Sign in.
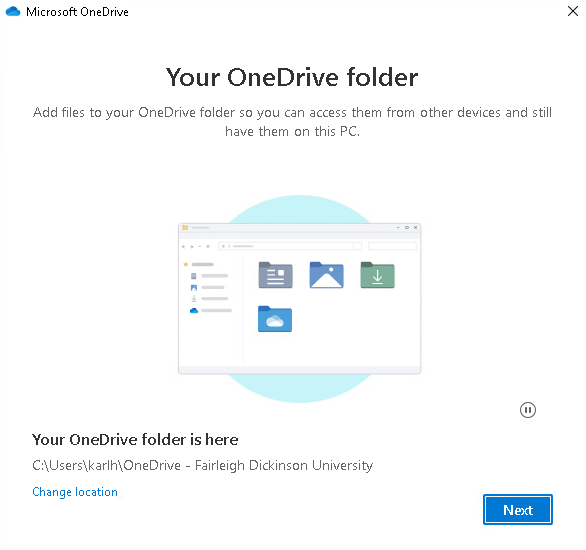
You have successfully logged into OneDrive, click “Next“
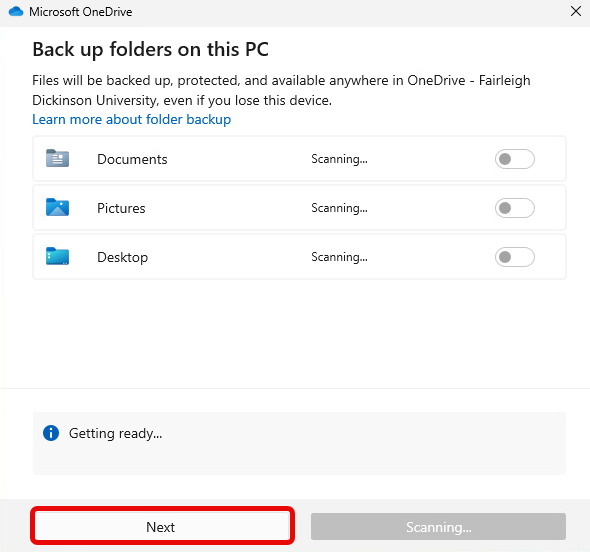
Microsoft OneDrive may prompt you to backup your folders, click “Next” to skip this step
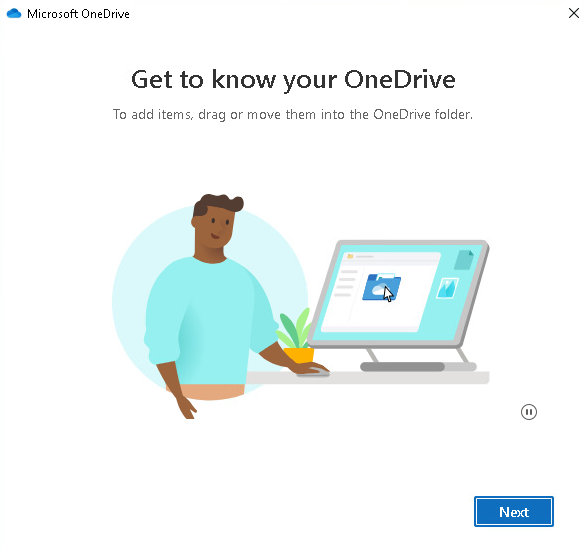
A brief overview will be given on OneDrive, to begin, click “Next“
When the tutorial is finished, click “Later“
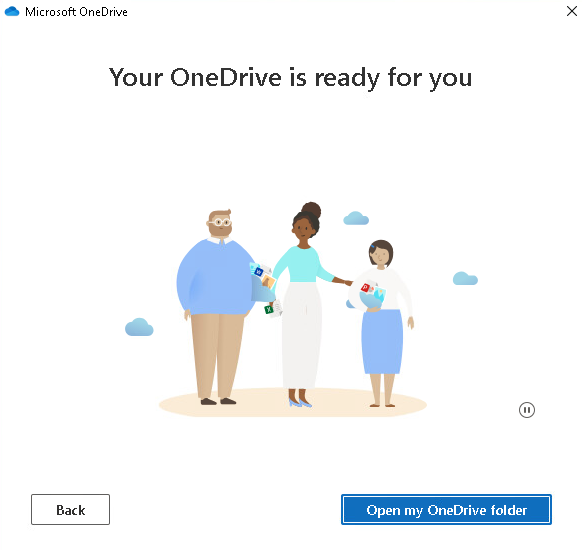
OneDrive setup is complete and ready to use. Click the “X” to close the window or “Open My OneDrive Folder” to access files
Using OneDrive
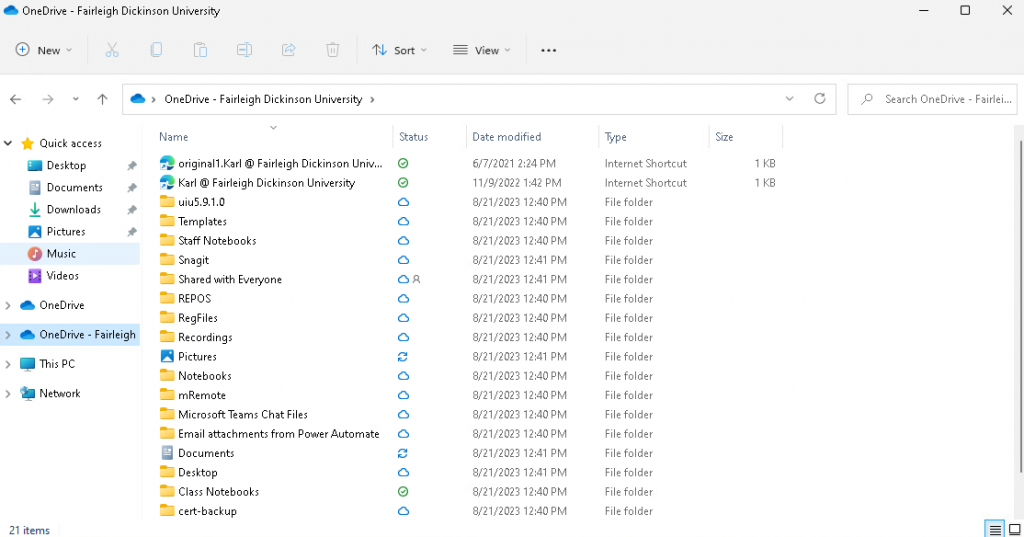
Using Microsoft OneDrive within FDU Anywhere is very similar to accessing, saving, and opening files on a computer. Just open up File Explorer and look for OneDrive – Fairleigh Dickinson University.
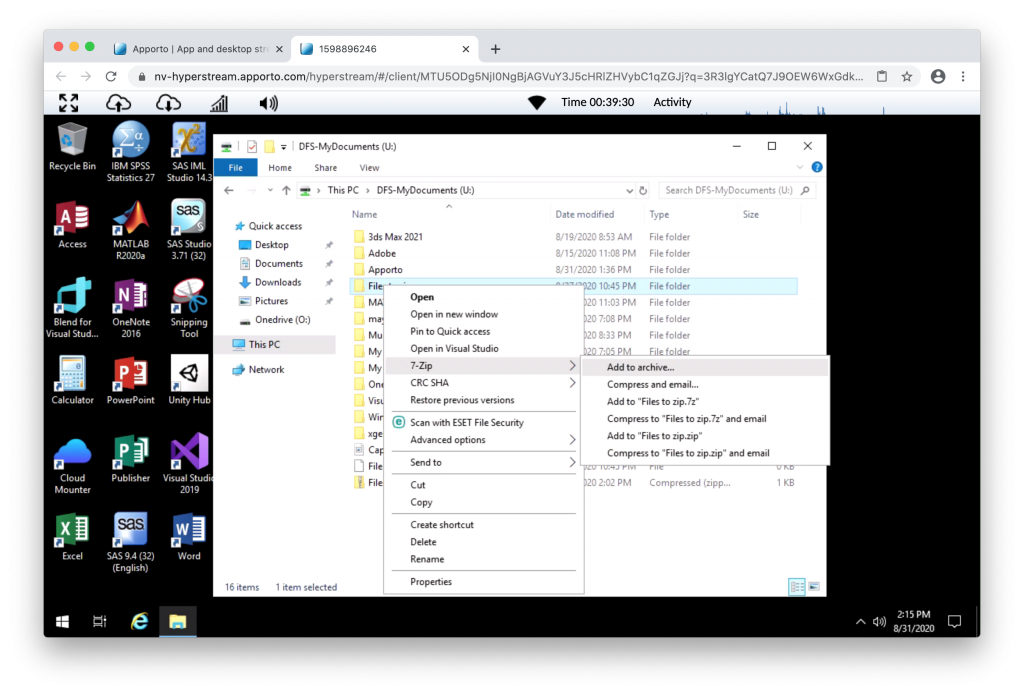
if you need to zip files to submit them to Webcampus, please follow these instructions:
Click the file or folder
Note
For macOS users, you can use the “Two Finger” click method on the trackpad in order to initiate the right click. For additional information, please see the link below for “FDU Anywhere – Keyboard Shortcuts”.
Click on 7-zip then click “Add to Archive“
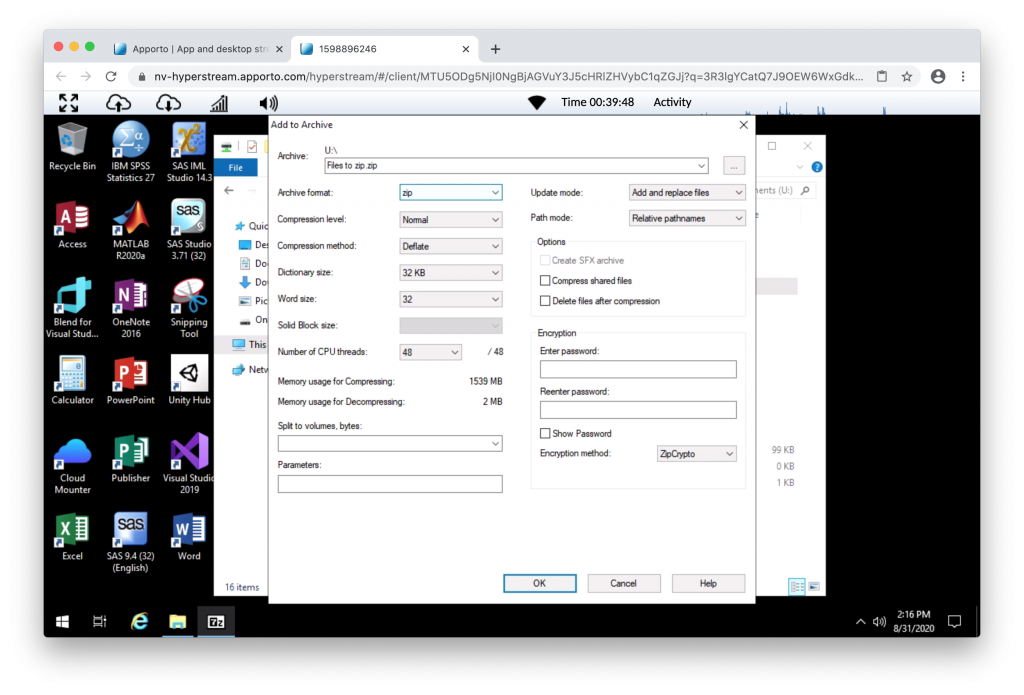
Change Archive Format to “zip” like in the picture below, then click “OK” to zip your files
The zip archiving process could take some time depending on the size of the file. Once completed, the file will be in the same location as the folder. You can then email or upload your file to your professor.
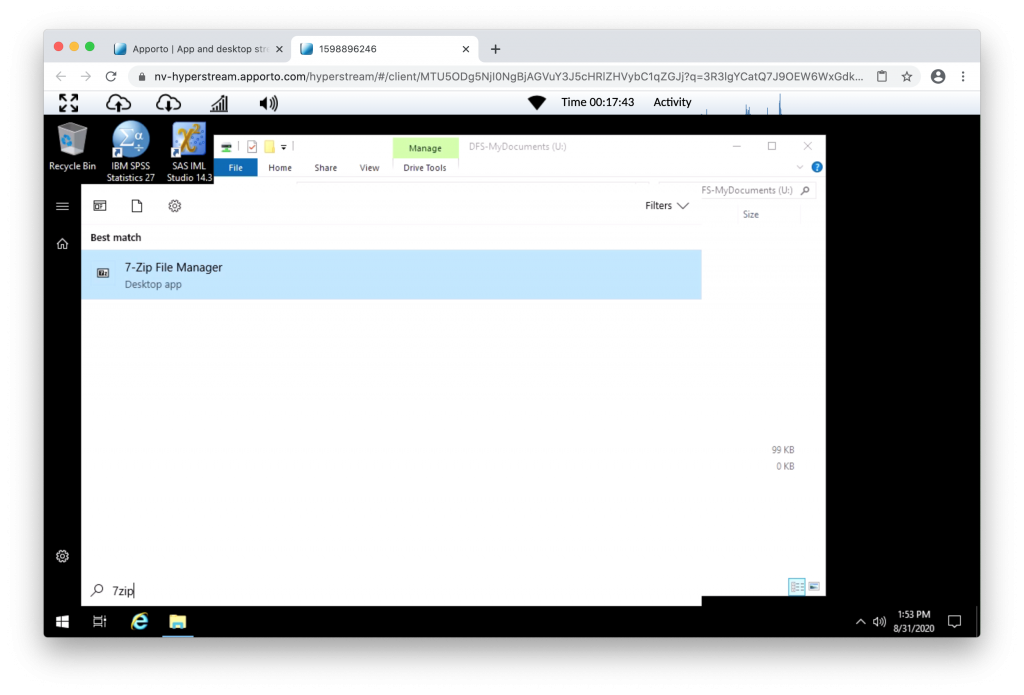
Alternate Way to Zip Files
Click “Start” on the taskbar on the left-hand side
Type “7zip” and click on 7-zip File Manager that appears
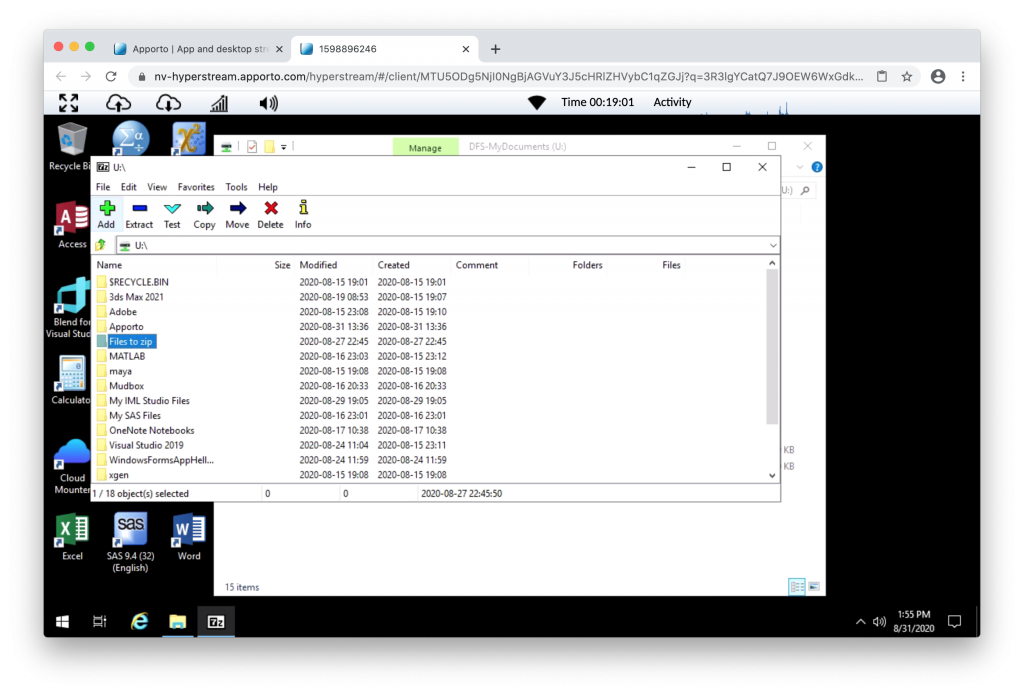
Navigate to the location of your saved file/folder and click to highlight, then click the “Add” button at the top
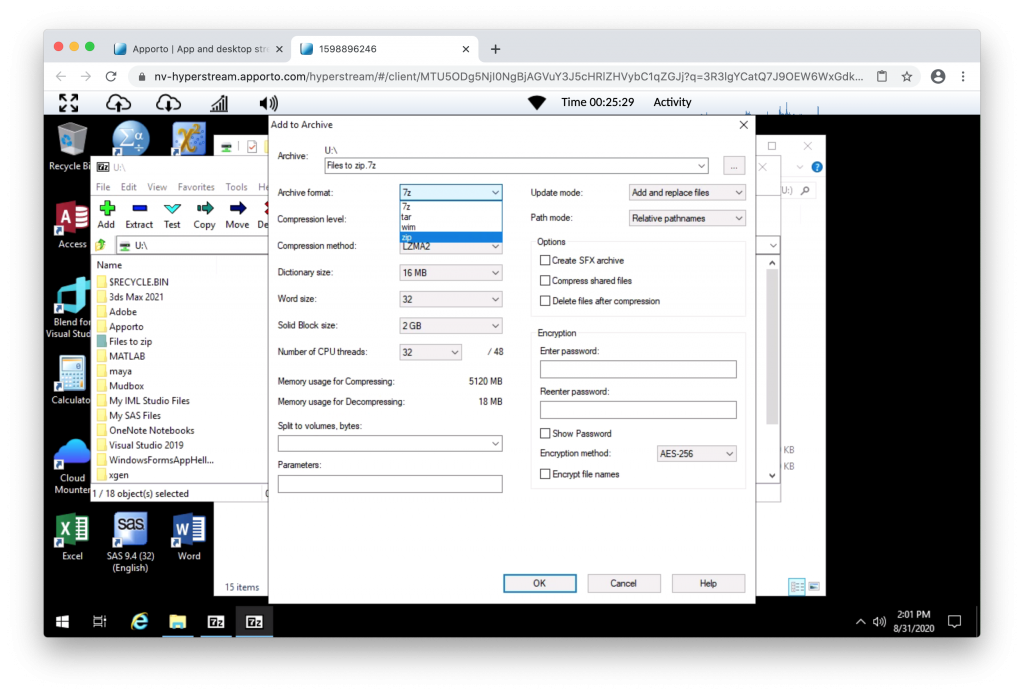
Change “Archive Format” to “zip” and then click “OK” to zip your files
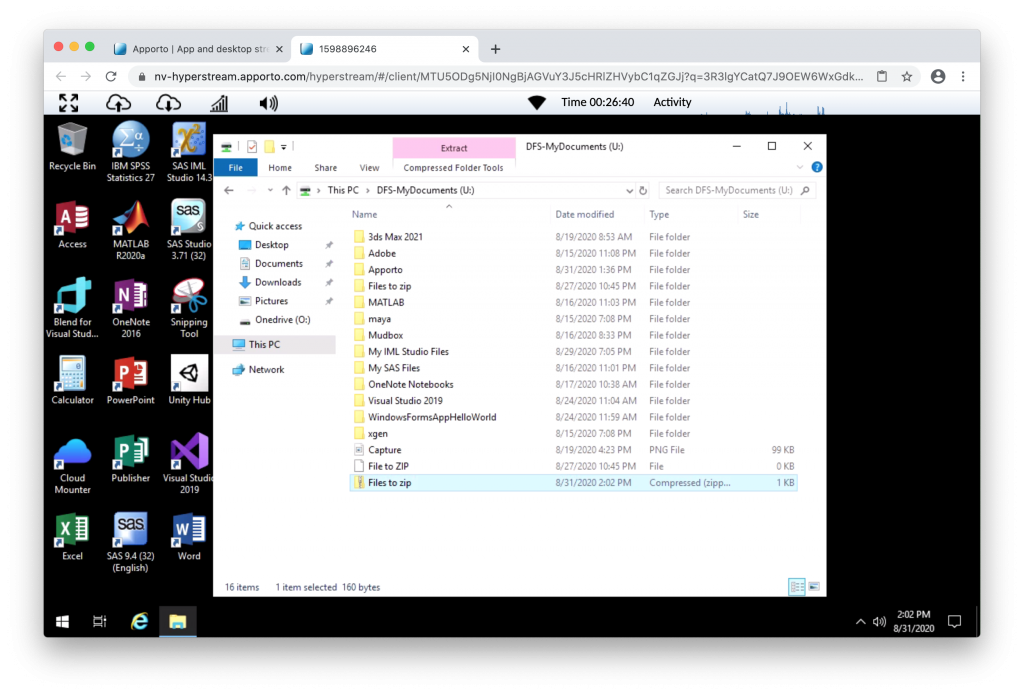
The file will now be zipped and you will find your file in the same folder as the project folder or file you wanted to zip.
Note
The zip archive could take some time depending on the size of the file. Once completed, the file will be in the same location as the folder is. You can then email or upload your file to your professor.
Submitting Files to WebCampus
To successfully submit your coursework to WebCampus, it is best to use the Google Chrome, Mozilla Firefox, or Microsoft Edge web browser located on the desktop of FDU Anywhere.
To submit your coursework to Webcampus, you can log on from within FDU Anywhere. For more information on Webcampus visit:
Sometimes you may want to copy and paste content from your own computer to an FDU Anywhere desktop or application. You can do this using the copy-and-paste menus or keyboard shortcuts, for example, “Ctrl+C” and “Ctrl+V“.
Note
FDU Anywhere only allows copying from your personal computer into the FDU Anywhere desktop.
If you cannot copy and paste for any reason, we recommend using our FDU OneDrive service to access any files not found in FDU Anywhere.
Copy files from Windows OS Devices
Windows OS to FDU Anywhere
Highlight the text you want to copy from your computer
Press “CTRL+C” to copy the selected text
Move the cursor to the paste location in FDU Anywhere
Press “CTRL+V” to paste the text
close
Copy Files from Apple OS Devices
Your macOS to FDU Anywhere
Highlight the text you want to copy from your computer
Press “COMMAND+C “to copy the selected text
macOS also supports “CTRL+C“
Tip
You may find it easier to use CTRL + C when copying content to FDU Anywhere, so you don’t have to switch back and forth between COMMAND + CTRL.
Move the cursor to the paste location in “FDU Anywhere“
Press “CTRL+V” to paste the text
close
Note
The copy and paste functions DO NOT work across all applications and browsers, including the copying and pasting of images. This is a limitation inherent in browser clipboards. We recommend the Google Chrome web browser for optimal clipboard capabilities.
If you are experiencing issues while using FDU Anywhere, please use the following tips as guidelines to help improve your experience.
Power-cycle your Modem/Router
Power cycling your modem and router allows them to reset and re-establish a connection to your Internet Service Provider (ISP). Shut down your computer and unplug your modem/router. Plug them back in after 60 seconds and watch the lights on your modem/router. Once the lights are on and steady, start your computer.
Keep all your Local Components Up-to-date
Check that your modem/router and your local computer are totally up to date. This includes the operating system, driver, and browser updates.
Disconnect/Turn off any Devices that are not in use
Some devices could be using bandwidth while on standby. Gaming consoles, for example, might download and install updates. Turn off these devices to keep your bandwidth free.
Use an Ethernet Cable
Using a wired Ethernet connection will make your connection more stable and eliminate additional latency compared to a wireless connection.
Change your Wi-Fi Configuration
If a wired Ethernet connection is not possible or your device requires a wireless connection:
Connect to a 5GHz wireless network. Some routers offer both 2.4GHz connections and 5GHz
Place your devices (such as a computer or smartphone) and your router closer to each other
Note
You may need to contact your internet service provider for help with rebooting your router and/or to configure your wireless settings correctly.
To help protect the University’s computers and networks from cyber threats, FDU OIRT is implementing Application Control with privilege management. This feature provides all users with privileged rights to install applications as needed while continuing to protect resources from unknown and malicious risks.
All software is typically installed from a setup file. Any setup file for an application should only be downloaded from the developer’s official site. For example, to install Google Chrome, the setup file should only be downloaded from Google’s official site.
Any setup file on a USB drive, CD drive, or other removable media should only be installed if provided directly by the developer or other credible source.
Windows
By default, the setup file will be located within theDownloads folder:
C:\users\yourusername\downloads\
To install software on a university laptop with Windows, follow the process defined below:
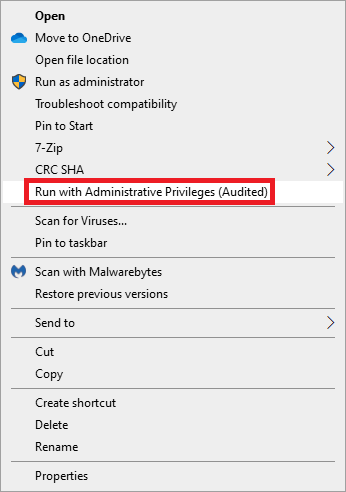
Right-click the setup file for the application to be installed
Click “Run with Administrative Privileges (Audited)” on the setup file
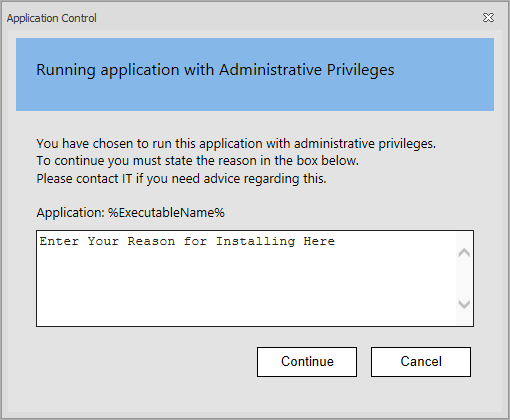
Provide a valid reason for installation and use of the application in the space provided and press “Continue”
The application will now be installed with administrative privileges.
Note
While off-campus, the option to “Run with Administrative Privileges (Audited)” may not be present. Please connect to FDU VPN, lock the machine by pressing “Window Key” + L and re-login. The feature should then be available. If this feature is not available while on-campus, please click the “Support” button above for further assistance.
close
macOS
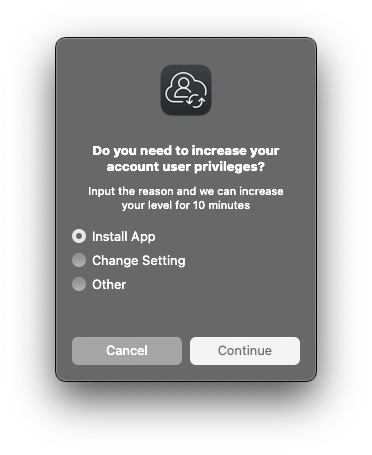
Click on “Jamf Connect” located on the top right menu bar app (where you log in to sync your password) and click “Request Admin Privileges“
Select the reason from the dialog box: Install App, Change Setting, or Other for the elevation, and click “Continue“
You will be notified when you are elevated and can begin installing a new application or making changes to your settings
A countdown will appear in your menu bar, showing how much time remains for your administrator access. Complete the installation before the countdown ends
You will return to your normal permissions when the countdown reaches zero
Special-use elevations will still be handled through the existing workflow.
Fairleigh Dickinson University regularly hosts on-campus visitors requiring access to our wireless network. As a security measure, in order to provide access to our Network, an FDU faculty member, staff member, or student must sponsor the guest(s) that they are providing access to. The sponsor takes responsibility for the Internet usage of their guests and ensures that they adhere to FDU’s Acceptable Use Policy for Computer Usage.
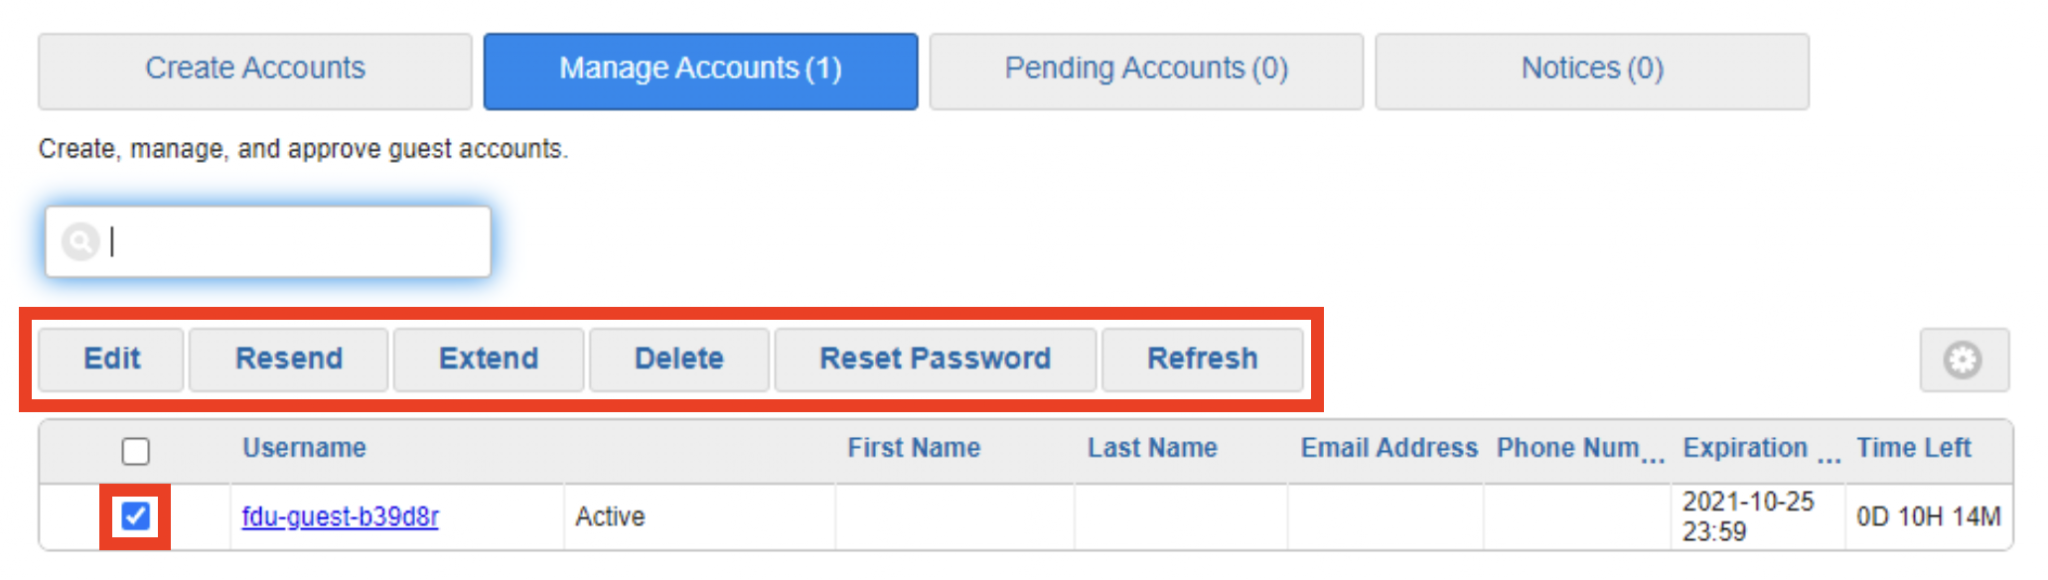
The sponsor can manage accounts (extend time, delete, suspend or reset password)
Account creation requires a valid FDU NetID to create
A single Guest Account (Known Guest) can be created or generic accounts (5 devices per account with the ability to create 10 generic accounts at once) can be created through this function
For events that will have a large audience, a Group Account may be needed. If you are a faculty or staff member and you require this account type, please create a sponsored guest account and then create a SAMI Support ticket. This can be accomplished by visiting SAMISupport.fdu.edu.
Please provide the support desk with the following information:
Please provide support desk with the following information:
Guest account name
The name that you would like to use for your Group account
Faculty/staff sponsor name, contact number and e-mail address
Location for the event (Building, Room, Classroom, etc.)
Time and date of the event
Once the ticket is created, OIRT (Office of Information Resource Technology) will contact you within 3 business days to complete the Group account activation.
EduRoam
Fairleigh Dickinson is a member of Eduroam (education roaming) which provides secure, world-wide roaming access service for the international research and education community. If your guest is coming from another Higher Education institution that is also a member of Eduroam, they will not require an FDU guest account. Instead, they can gain access to our Network simply by logging into the eduroam network with their regular credentials.
(Available on Metro and Florham Campus Only)
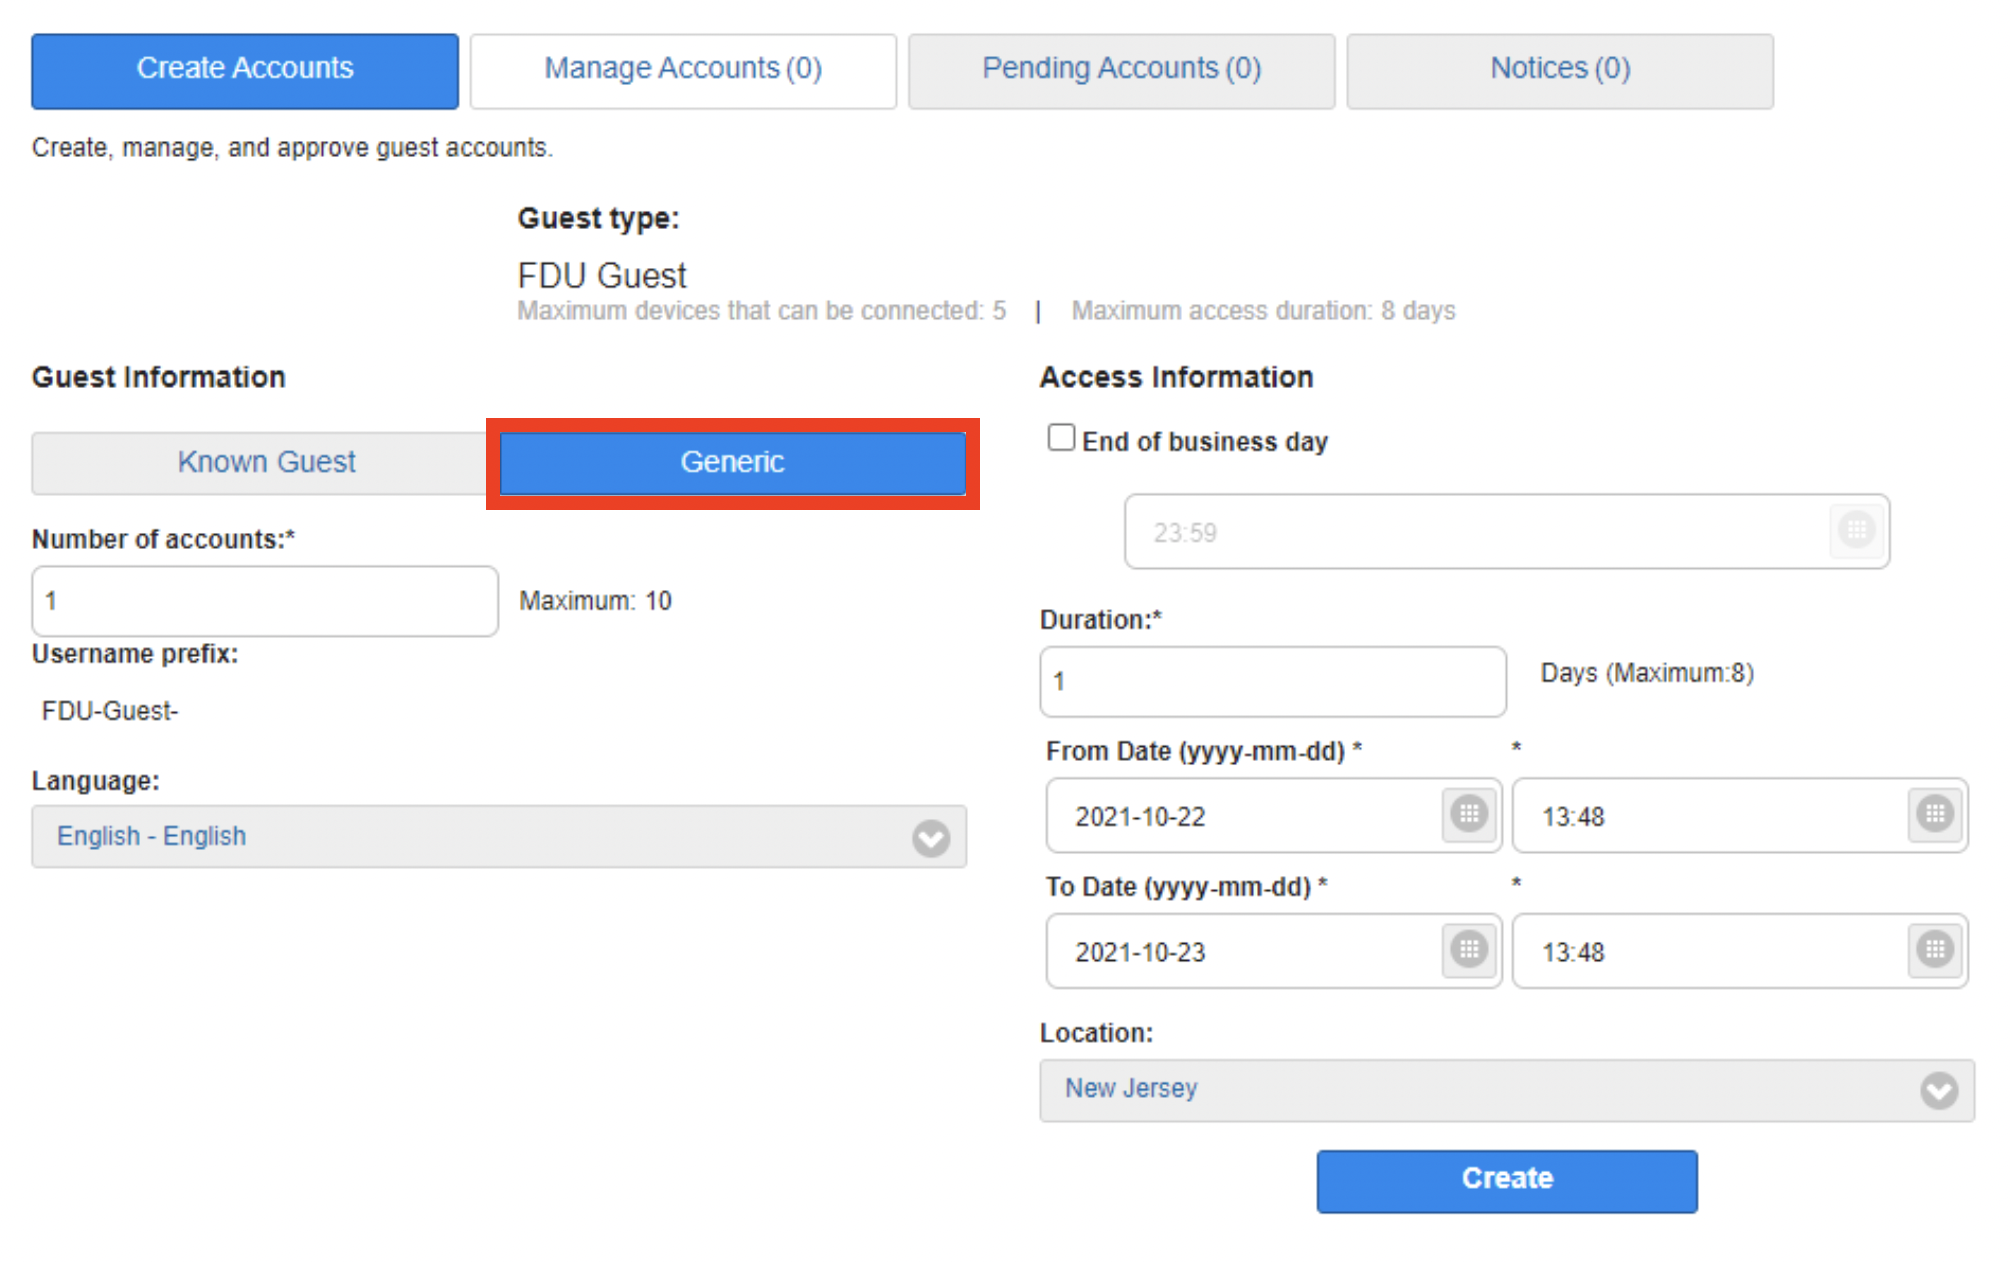
Creating and Managing an FDU Wireless Guest Account
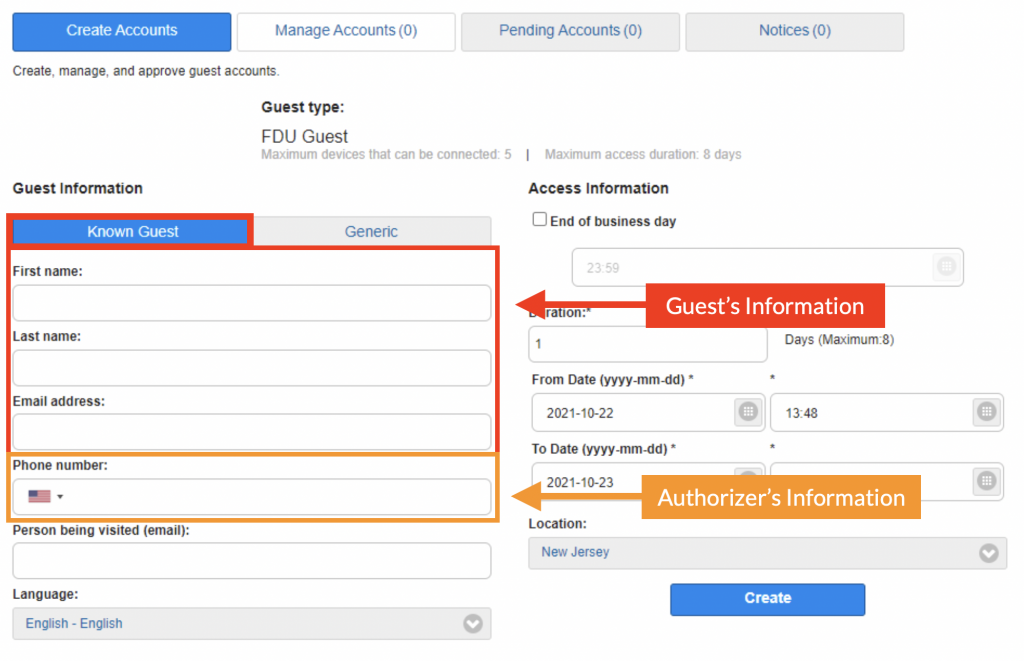
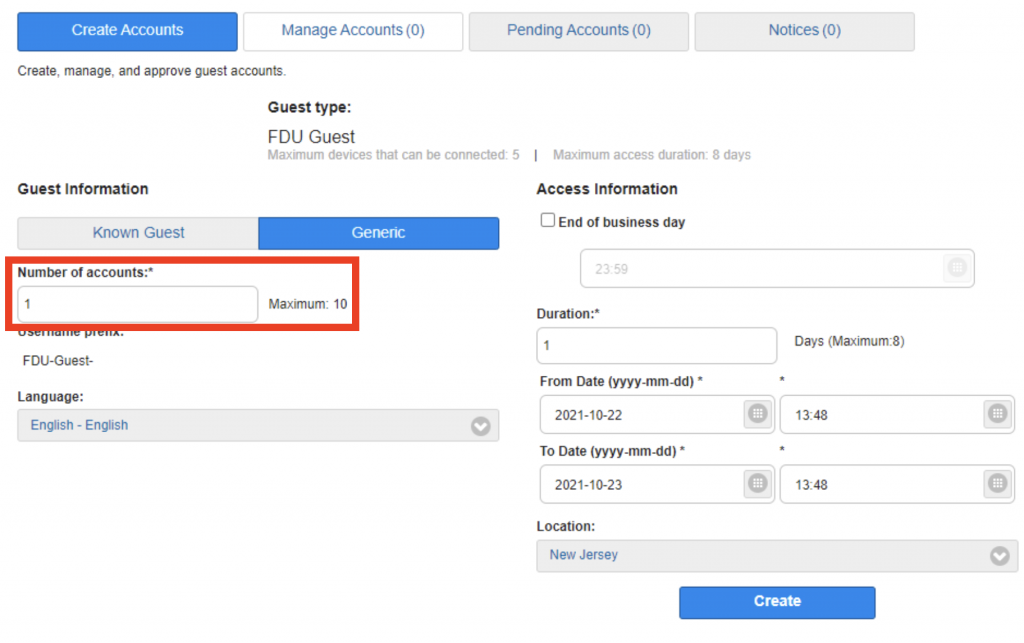
Generic – This option allows you to create up to 10 accounts concurrently without entering your guest’s information
Known Guest – This option allows you to create an account with guest information. You need to input the guest’s “First name”, “Last name”, “Email address”, and “Phone number”. You also need to enter your own FDU email address
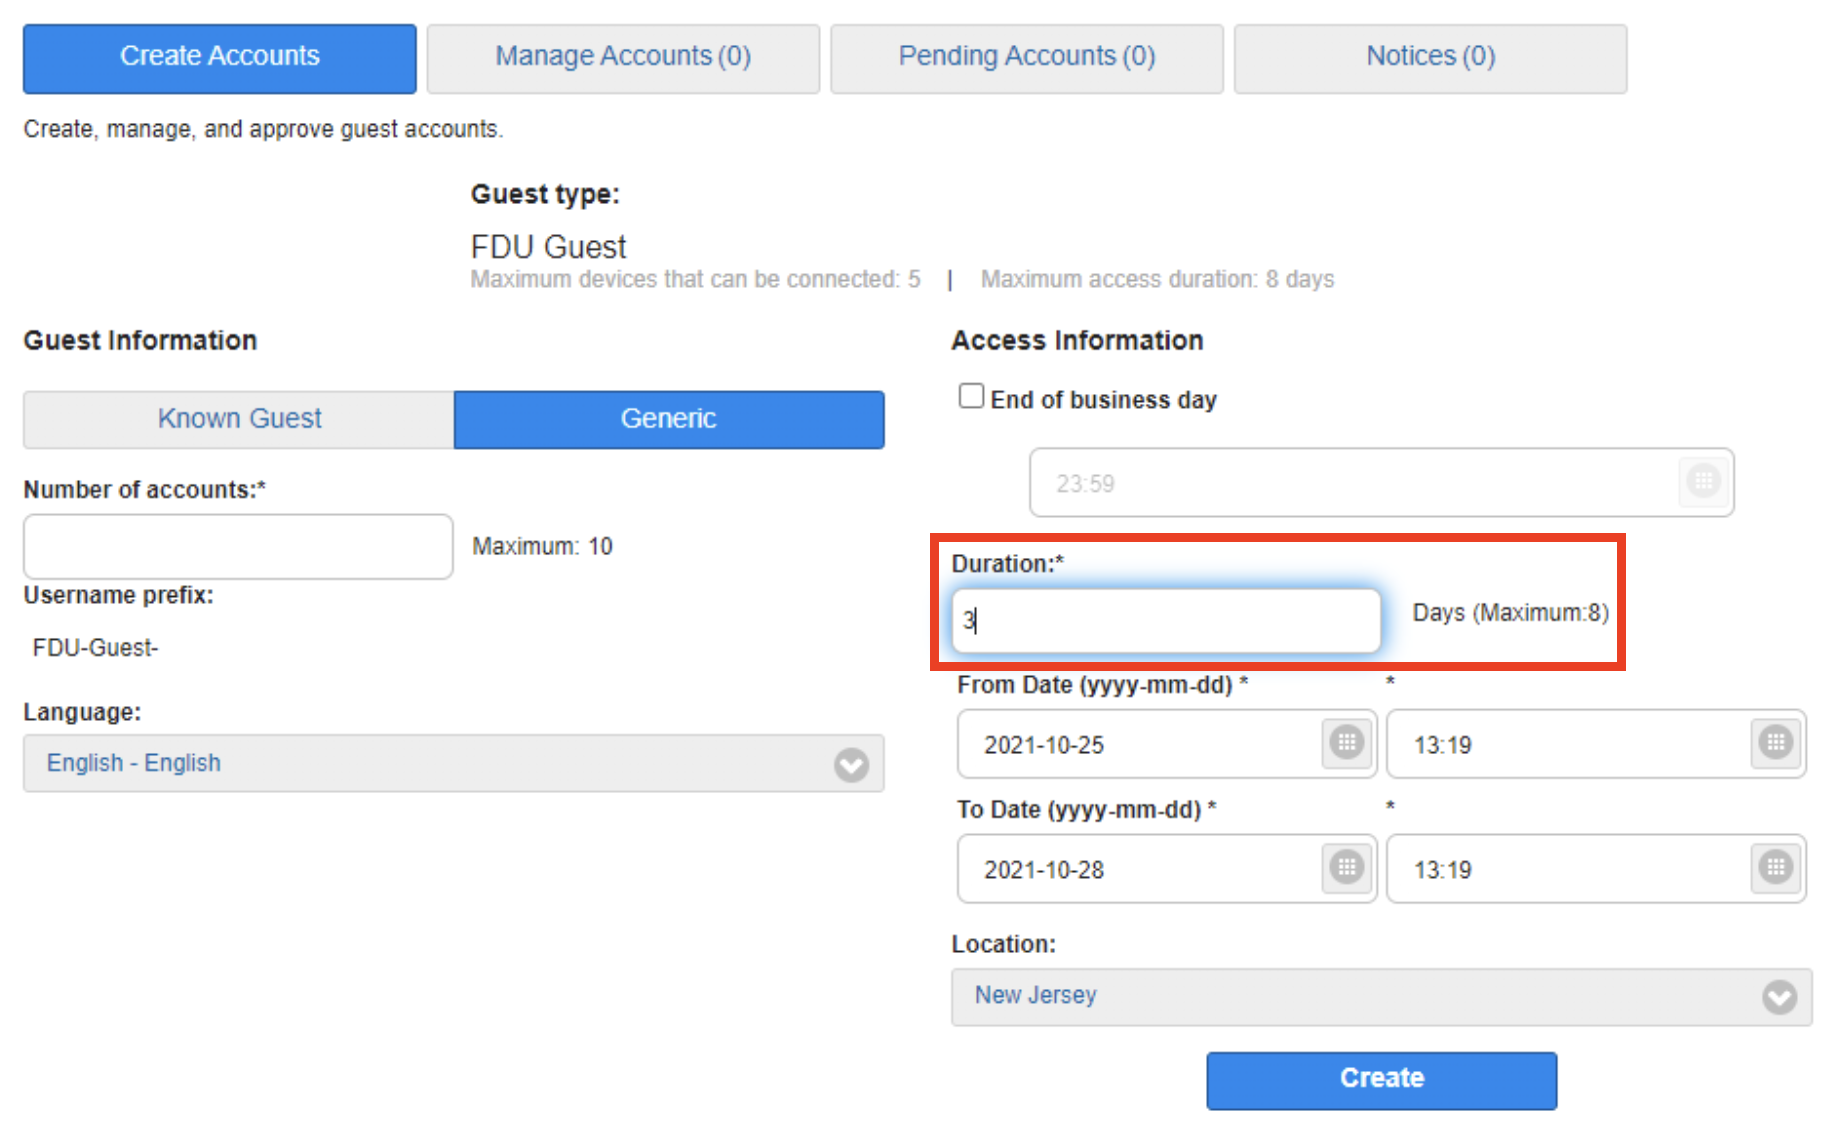
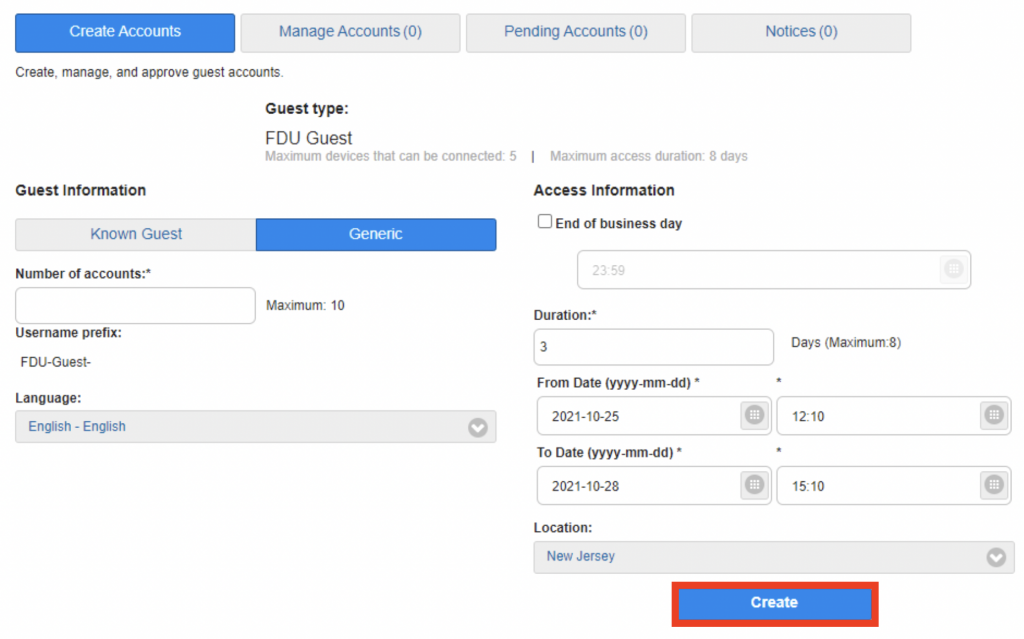
If you have selected “Generic”, enter the number of accounts that you would like to create (maximum of 10)
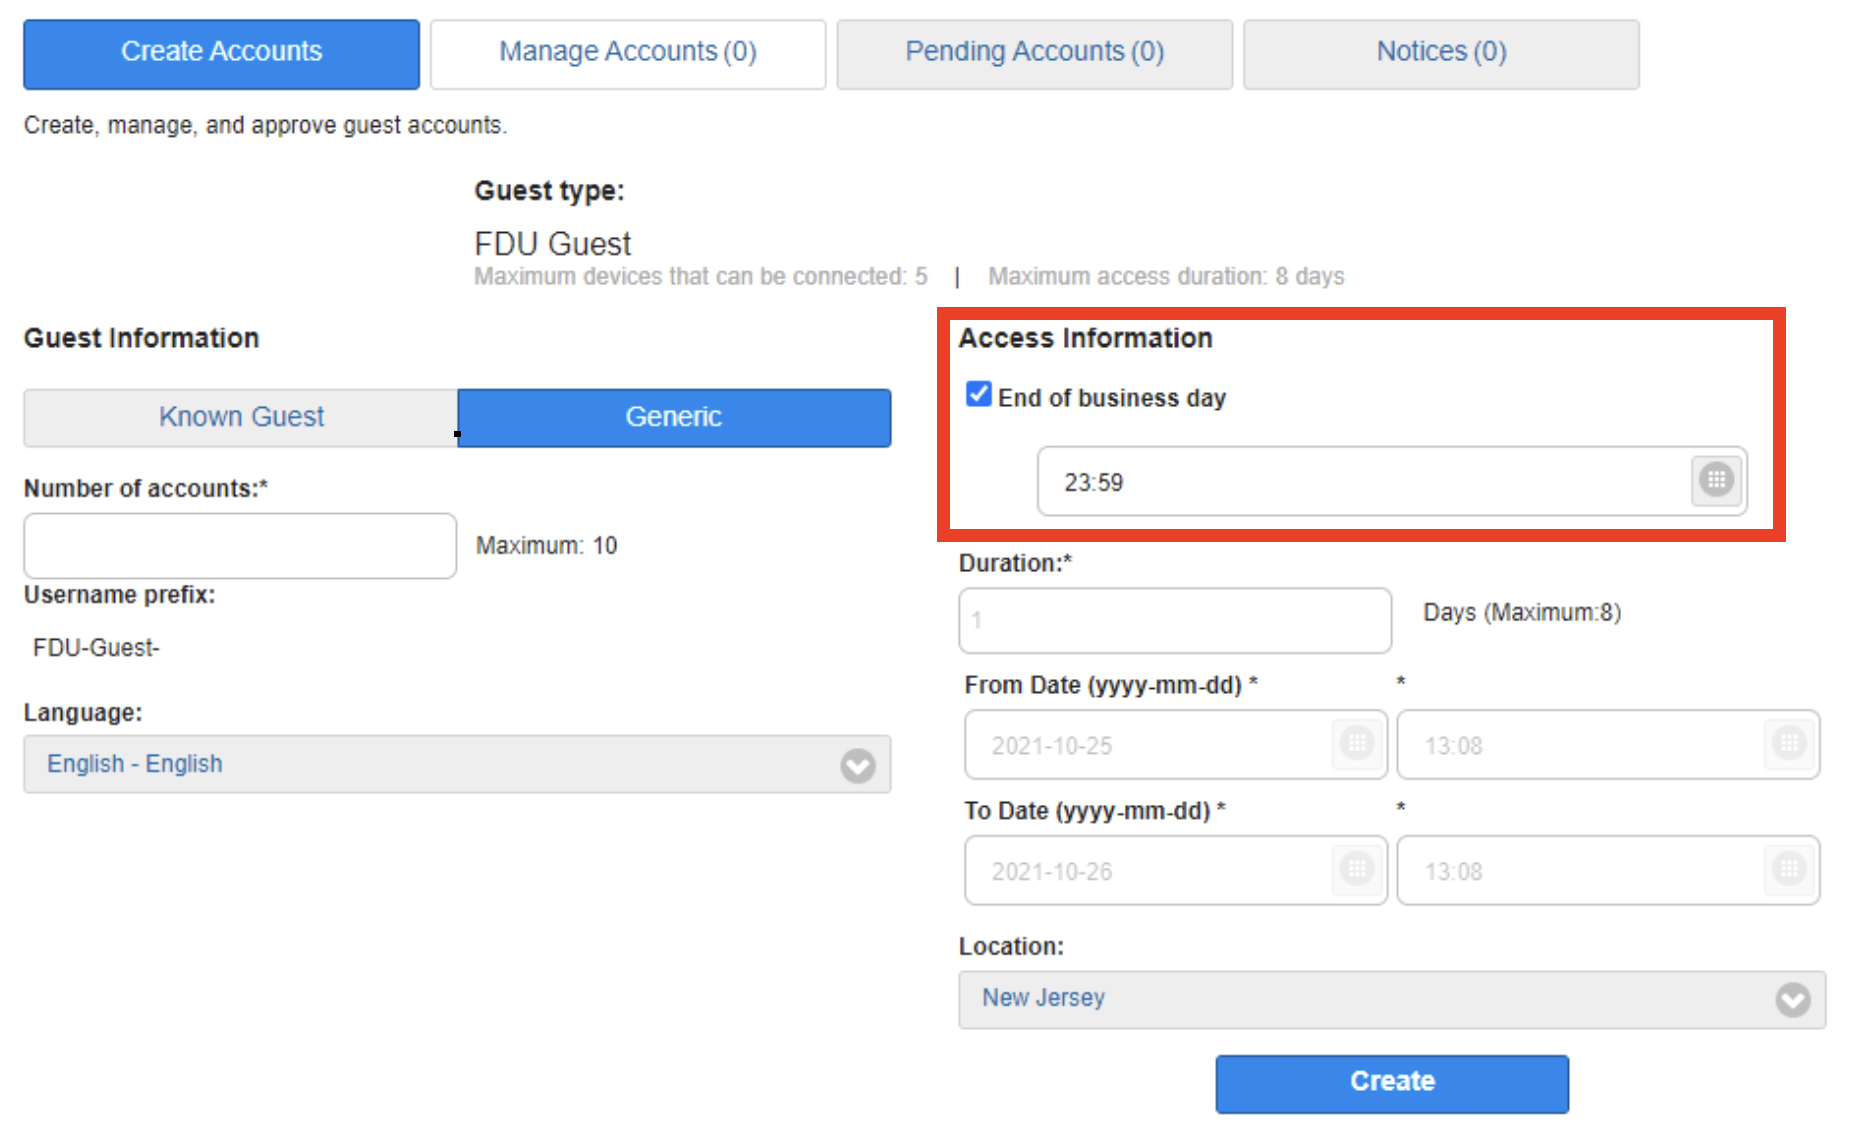
The remaining instructions are for both known guests and generic accounts. Choose how long you want the guest account to be active
First Option – Click the box next to “End of business day” if your guest only requires access through the end of the day
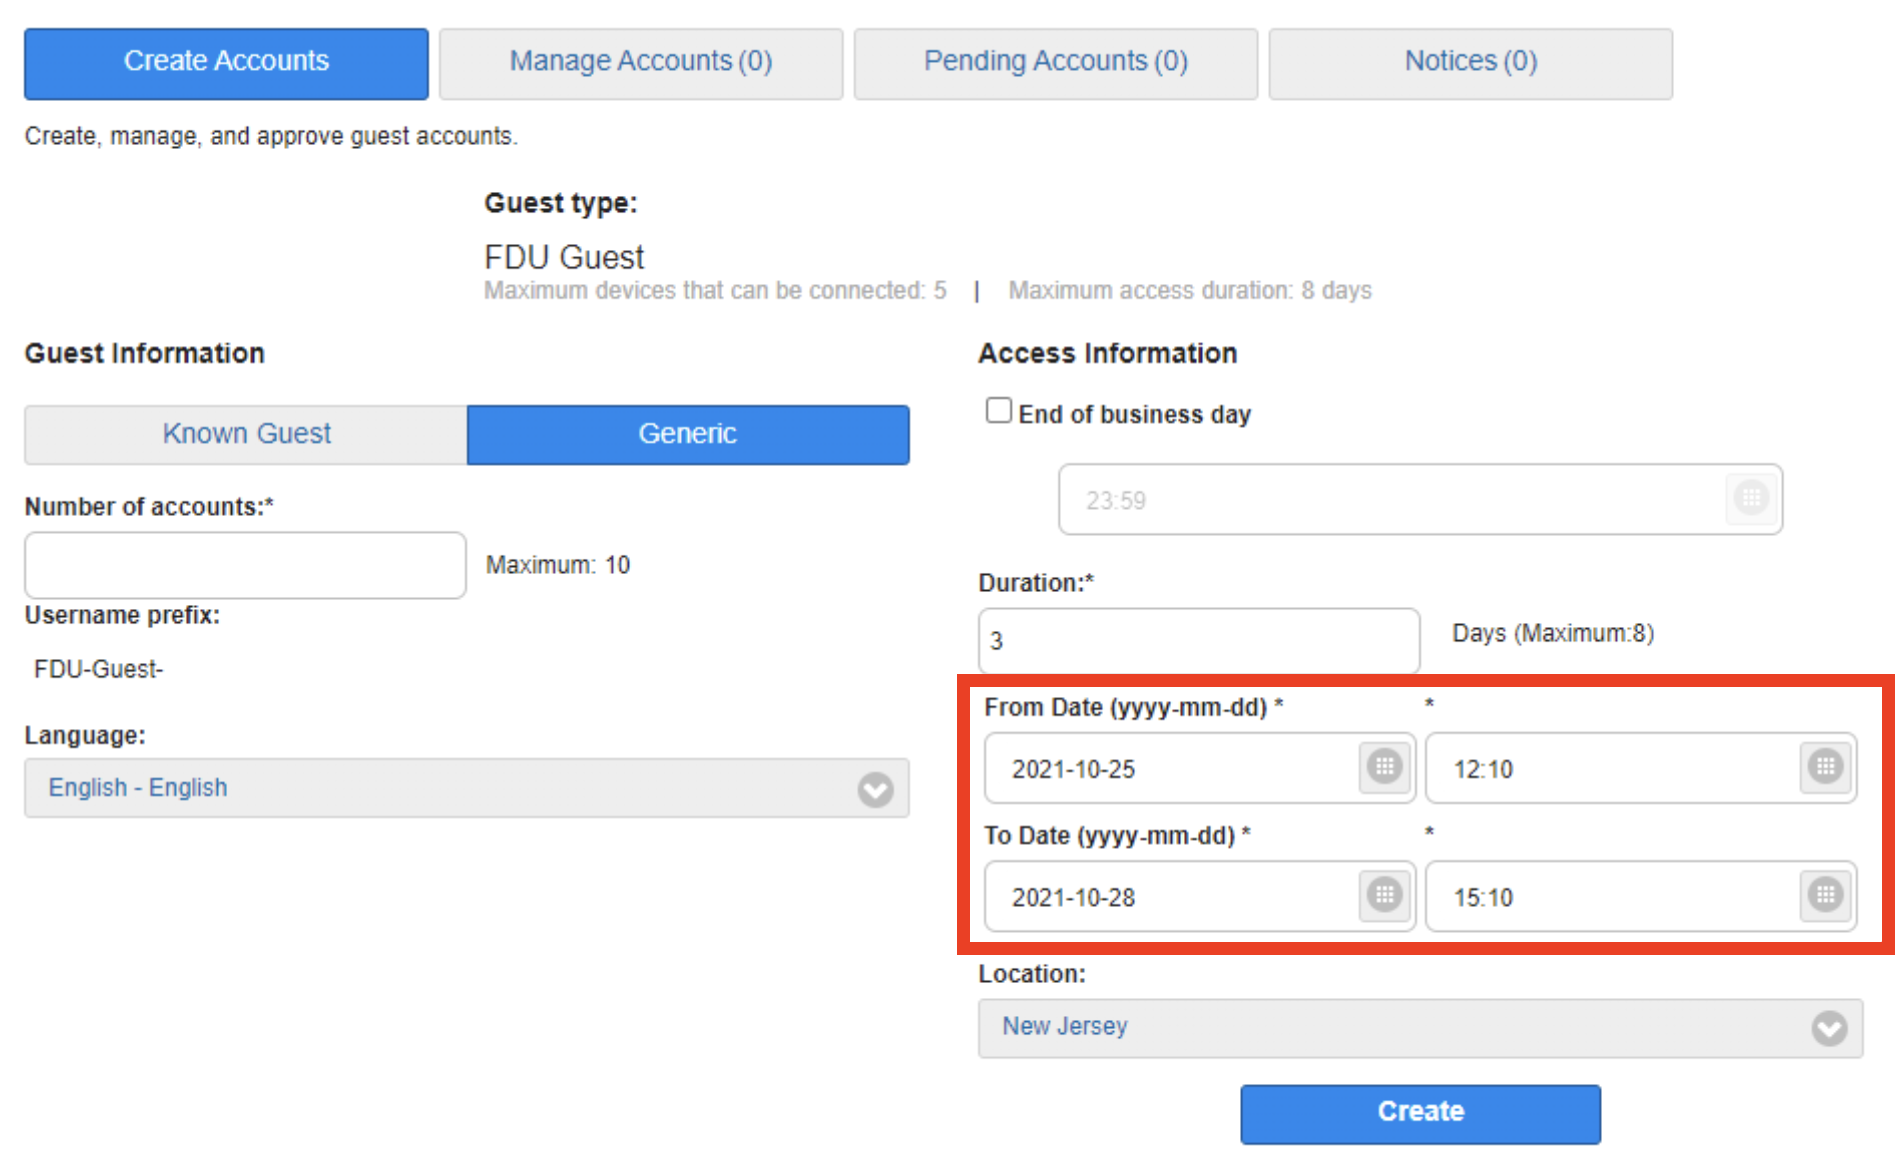
Second Option – Type the number of days required in the “Duration” box (maximum of 8). The “From Date” and “To Date” will automatically change based on the requested duration
Optional – If needed, you can select an exact date and time for the guest account access to begin and end (24:00 format)
To access Forms, you will be directed to our SAMI Support Portal where you will be asked to log in using your NETID and authenticate using Duo. Once you click “Next,” you will be forwarded to samisupport.fdu.edu in a new window or tab.