Explore our comprehensive IT resource library to discover a wealth of helpful information tailored to your needs. Utilize our filters to refine your search by role at FDU, department, or specific service for a more personalized experience.
This document outlines how the help desk should handle issues regarding supporting personal hardware.
All support tickets for personal hardware will need to be created and supported by the help desk. Limited support will be provided by completing basic troubleshooting and diagnostics.
This includes:
Laptops and Desktops
iMacs and MacBooks
Docking Stations, Monitors, and Peripherals
Mobile phones and Tablets
Note
The SAMI Service Desk should communicate directly to the users that limited support can be provided for personally owned devices, the service desk will assist by providing the below troubleshooting steps. Escalation of the request to Computing Services can be performed. If additional support is needed Computing Services will direct the user to contact their hardware manufacturer for additional support directly if needed.
The following basic troubleshooting steps can and should be performed when any of the above hardware is having issues:
The device should be power cycled and/or rebooted to ensure all device resources have been refreshed.
If the machine or device is frozen locate and hold the power button for a minimum of 60 seconds until the device has powered down and then have the user power on the device and attempt to use the equipment.
The help desk can check and confirm if any updates have recently been loaded on the workstation that may be pending a machine reboot to complete the installation.
The following should not be performed on any personal machines:
Upgrading or downgrading of any Microsoft or Apple operating system.
Removing and/or reinstalling any licensed software such as but not limited to Microsoft Office, Microsoft Visio, Microsoft Project, Adobe Creative Cloud, etc.
Other software such as antivirus, games, or manufacturer-issued diagnostic utilities.
Regarding the troubleshooting of issues related to personal docking stations, monitors, peripherals, mobile phones and tablets. The basic functions of unplugging the power cable and/or power cycling the equipment will be the acceptable troubleshooting necessary.
We do not want to perform any updates for devices operating systems such as mobile phones or tablets. The steps involved in completing these kinds of updates require a more extensive timeframe to be available to successfully be completed.
If you have any questions or require additional information, please contact the FDU Director of Computing Services Peter Mannarino via email p.mannarino@fdu.edu
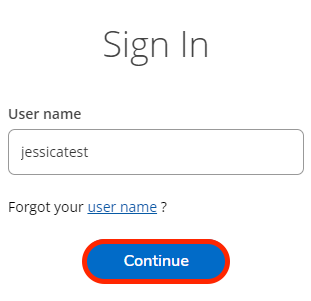
If you do not know your username, you can click on “Forgot your username” and follow the prompts to retrieve it.
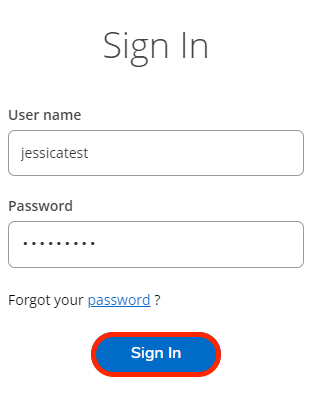
Type in your password and click “Sign In”
Tip
If you do not know your password, you can click on “Forgot your password” and follow the prompts to reset it.
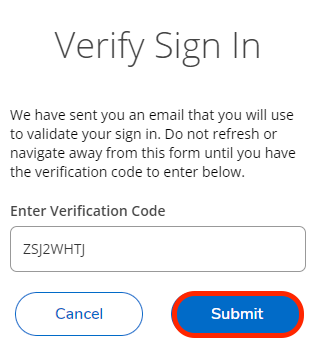
After successfully logging in, you will automatically receive an email containing a multi-factor authentication code. Copy and paste the code into the sign in page and click “Submit”
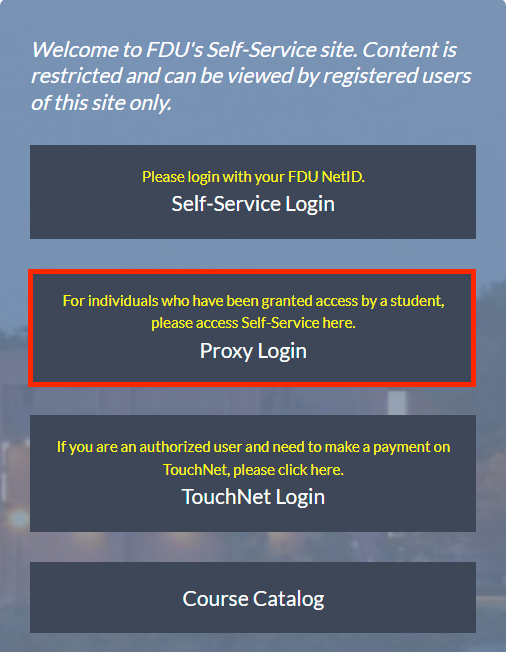
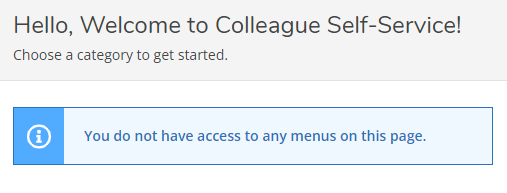
Once you have successfully signed into Self-Service, you may see a page that says, “You do not have access to any menus on this page.” This means you need to switch the profile you are viewing to the student’s profile
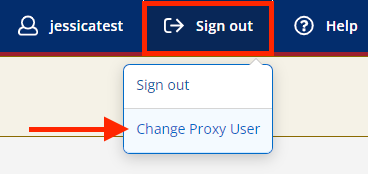
You can switch profiles by clicking on the “Sign Out” button at the top of the page and selecting “Change Proxy User”
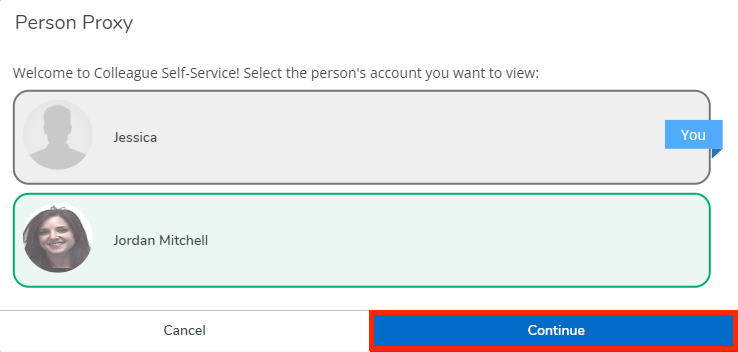
Select the student’s profile in the pop-up window and click “Continue”
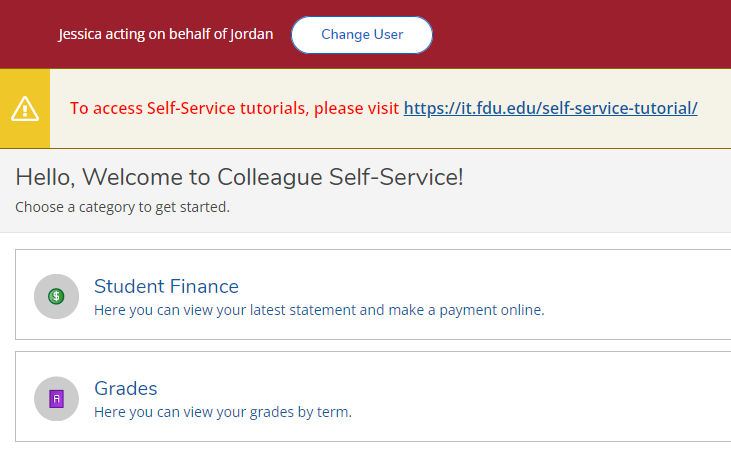
Once viewing the student’s profile, you will have access to the menus they granted you permission to. You can navigate by using the menus on the left-hand side of the page or the tiles on the homepage
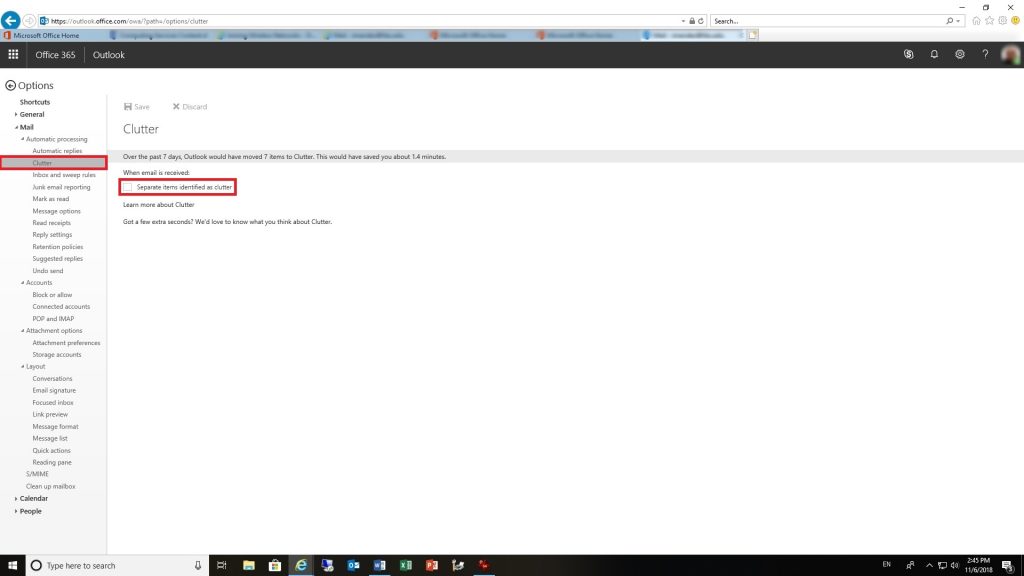
Microsoft has implemented a new feature to its mail client called Clutter. Clutter acts as a filter that separates e-mails that it Deems low priority. The e-mails are placed in a folder and are out of sight, with no notifications visible to the user. The problem with Clutter is that it is a learning program that tries to guess what emails are important or low priority and might filter out emails that you need.
Disabling Clutter rules in Outlook
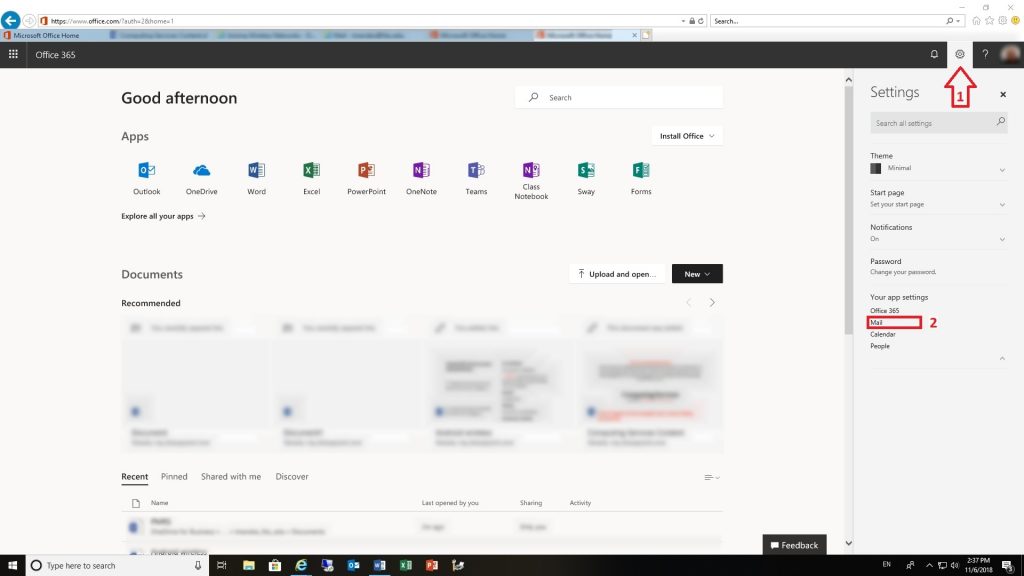
If you wish to disable clutter, log in to Office 365 using our portal office365.fdu.edu with your NetID credentials.
Look for the settings icon on the upper right corner of your window and click on it
Click on the “Mail” option under “Your app settings”
Drill down to “Mail > Automatic processing > Clutter”
A Distribution group (formerly known as mailing list) in Office 365 is a uniquely named email address that consists of multiple users and is managed by a designated owner. Distribution groups are intended to easily facilitate ongoing communications between a large and relatively fixed group of people.
There are a few important concepts to understand about distribution groups before we get started with group management:
Emails sent to a distribution group are distributed to all members of that distribution group.
OOnly users granted permission by the Distribution Group Owner can send emails to a particular distribution group. Permission to post (send emails) to a group is managed by USAN, and Group Owners should open a ticket with the SAMI Service Desk to change members that can post to the group.
A distribution group can be configured in such a way that emails sent to it can be held for approval and specific users can be made approvers (also known as moderators).
A distribution group has a unique email address attached to it. Users granted permission to send email to this email address can do so from any email client such as Outlook on the Web or Outlook installed in your computer, laptop, tablet or phone, Mozilla Thunderbird, Mac Mail and more.
You can request a distribution group by submitting the Distribution List/Shared Mailbox Request form located at FDU Forms Portal.
As a Distribution Group owner, you can change the group’s settings via the group’s management page on your Office 365 account (Outlook on the web).
As a Distribution Group owner, you can add or remove members (recipients) from your group via your group’s management page. This can be accomplished via Outlook on the web or by using the Outlook application installed on your machine.
Adding and Removing Distribution Group Users in Outlook for Windows
Open “Outlook” on your computer
Open “Address Book”
You can open Address Book in two different ways:
One way is to click the “Address Book” icon located at the top when “Home” tab is selected:
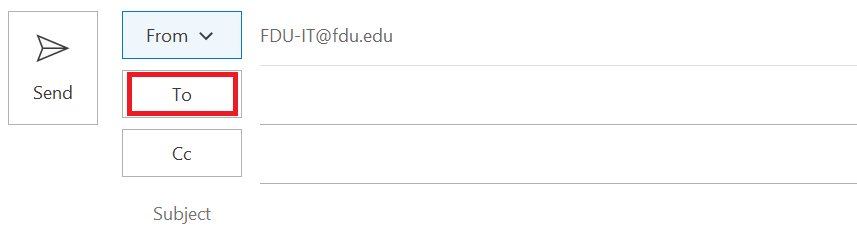
The second way is by composing/creating a new email and clicking the “To” button:
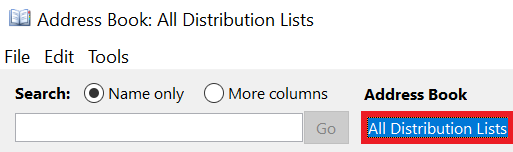
Select “All Distribution Lists” from the drop-down menu located under Address Book:
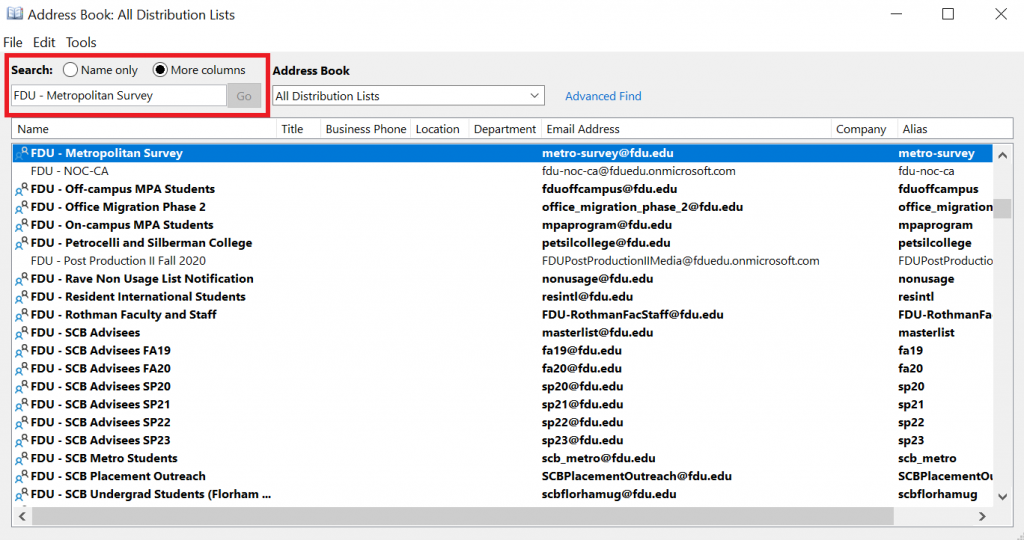
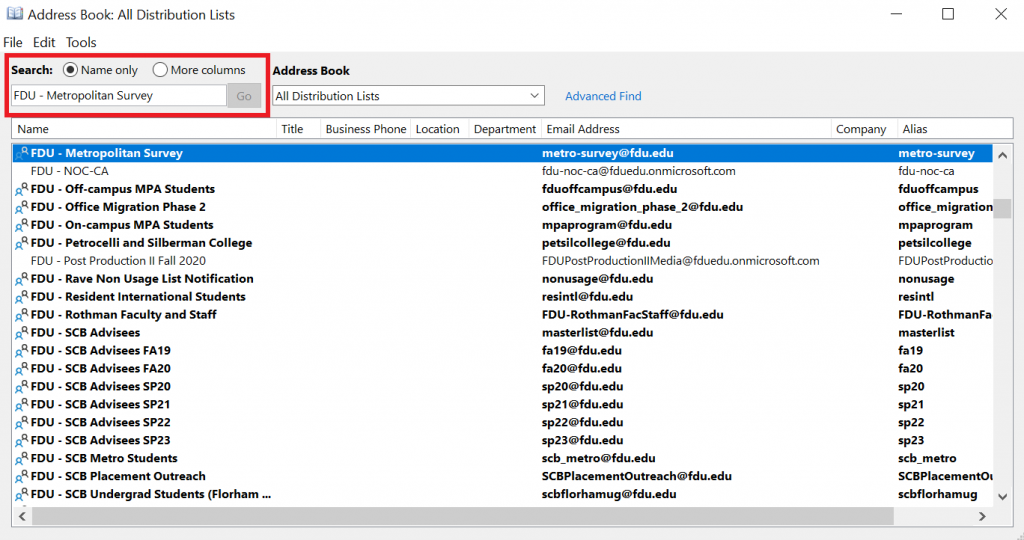
Select “More Columns” and enter the name or email address of your distribution group in the search field as shown in the first screen capture below. If you see your distribution group on the list, highlight it and double click it. If you do not find your list using “More Columns”, then it might be easier to find by using the “Name only”
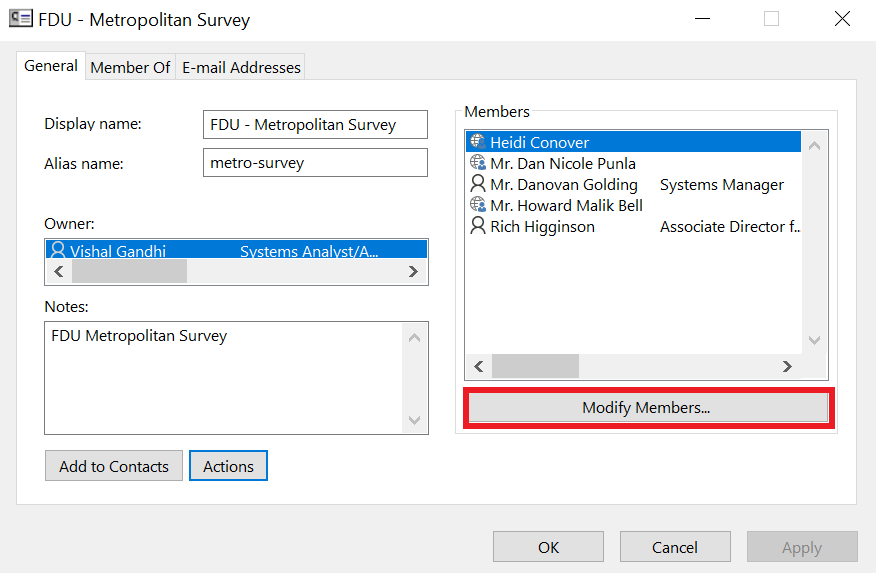
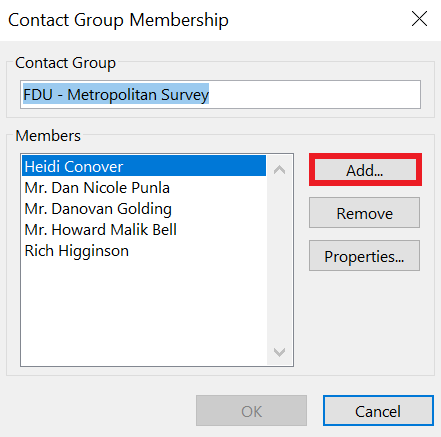
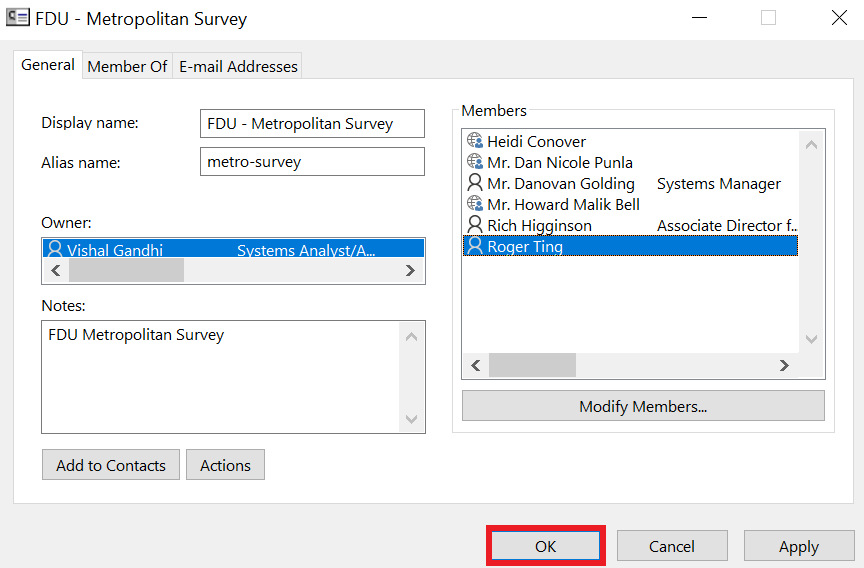
Click on “Modify Members…”
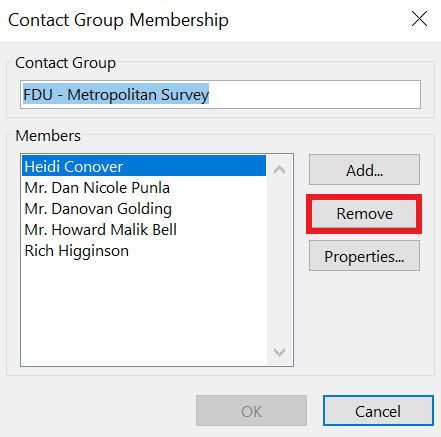
If you want to remove a member, then select the member from the members list, click “Remove” button and then click “OK”
If you want to add a member, click “Add” button
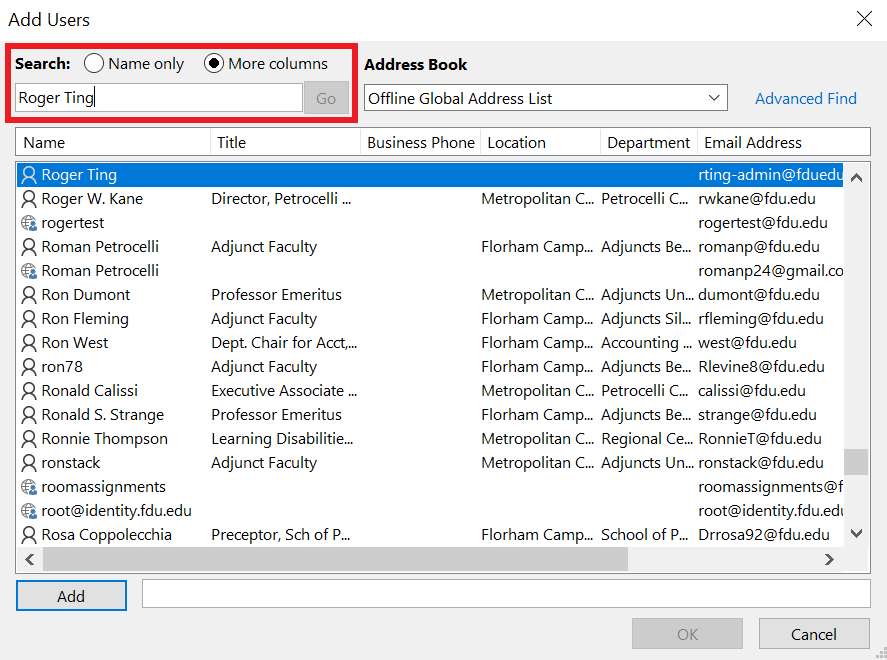
Select “More columns” and enter the new member’s name in the search field
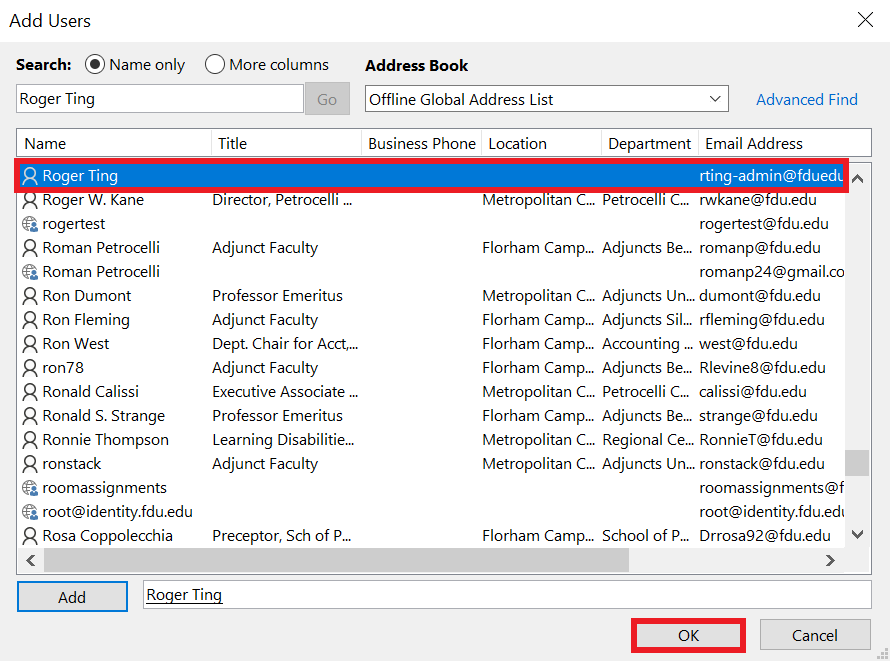
You should see the user in the list. Select “Name only” to search again if you are unable to locate the user. Once you have found the user, highlight the record and click “OK”
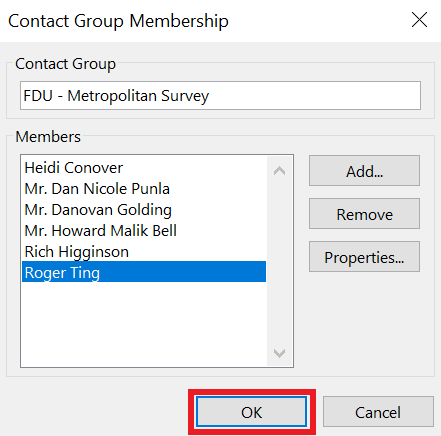
Verify that the new member is in the member’s list and click “OK”
Click “Apply” and then click “OK”
close
Adding and Removing Distribution Group Users in Outlook on the Web
Go to “fdu.edu” in the browser of your choice
Go to “Shortcuts” menu
Click “Office 365 and Email“
Sign-in with your NetID and password
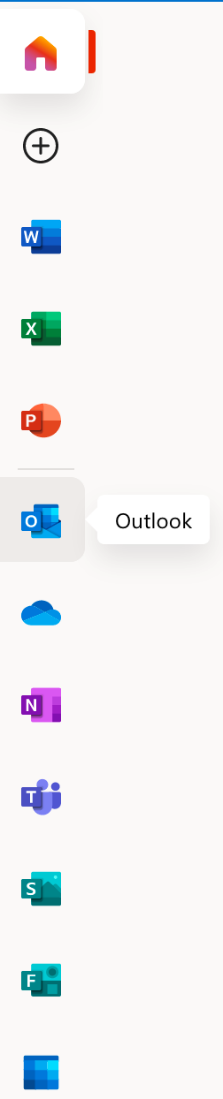
Go to online Outlook app by clicking on the “Outlook” icon
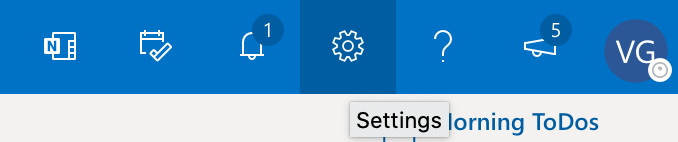
Go to Settings by clicking on the “Settings” icon
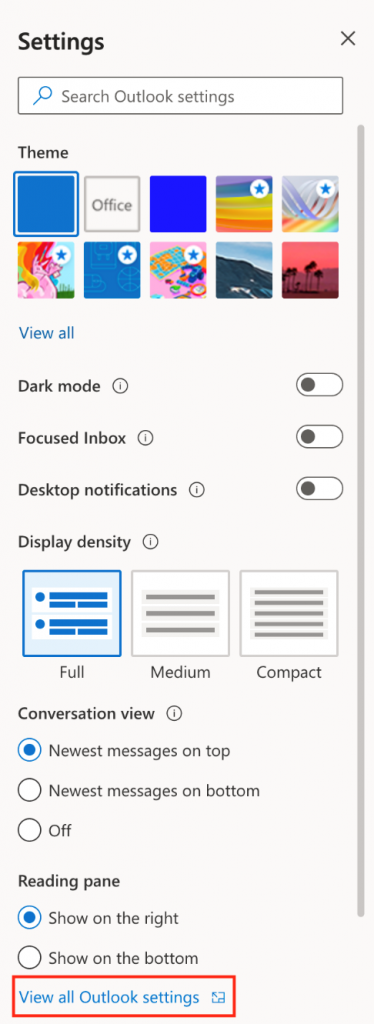
Click on “View all Outlook settings”
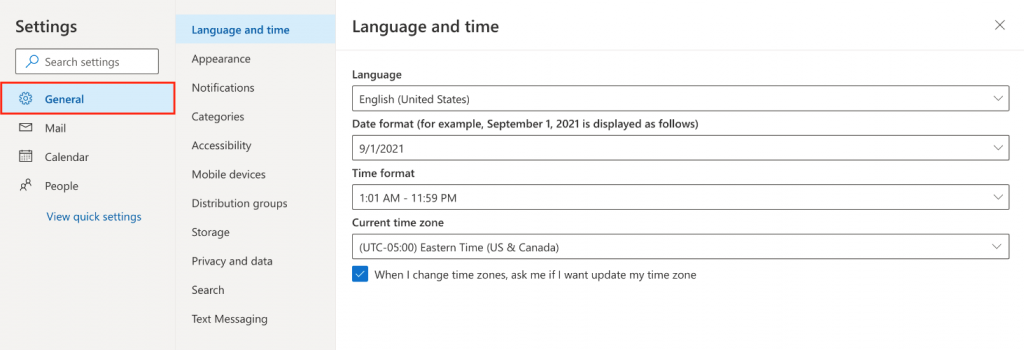
Click “General”
Click on “this portal“
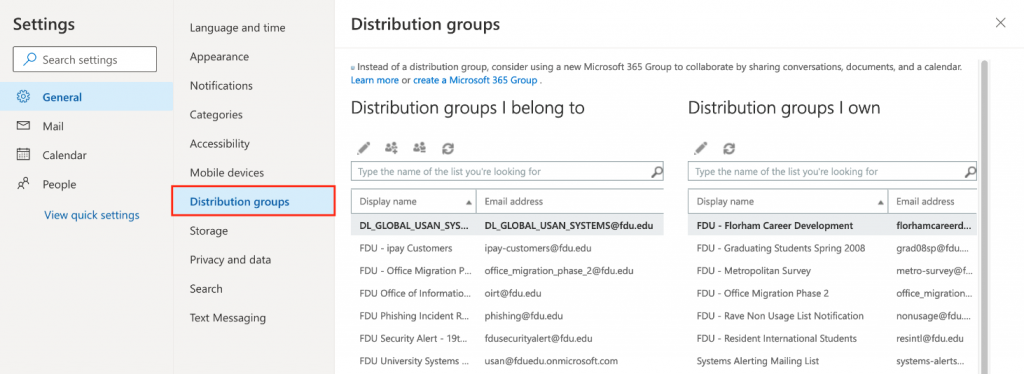
Click on “Distribution groups”
Here you see the list of distribution groups that you belong to and the list of distribution groups that you own.
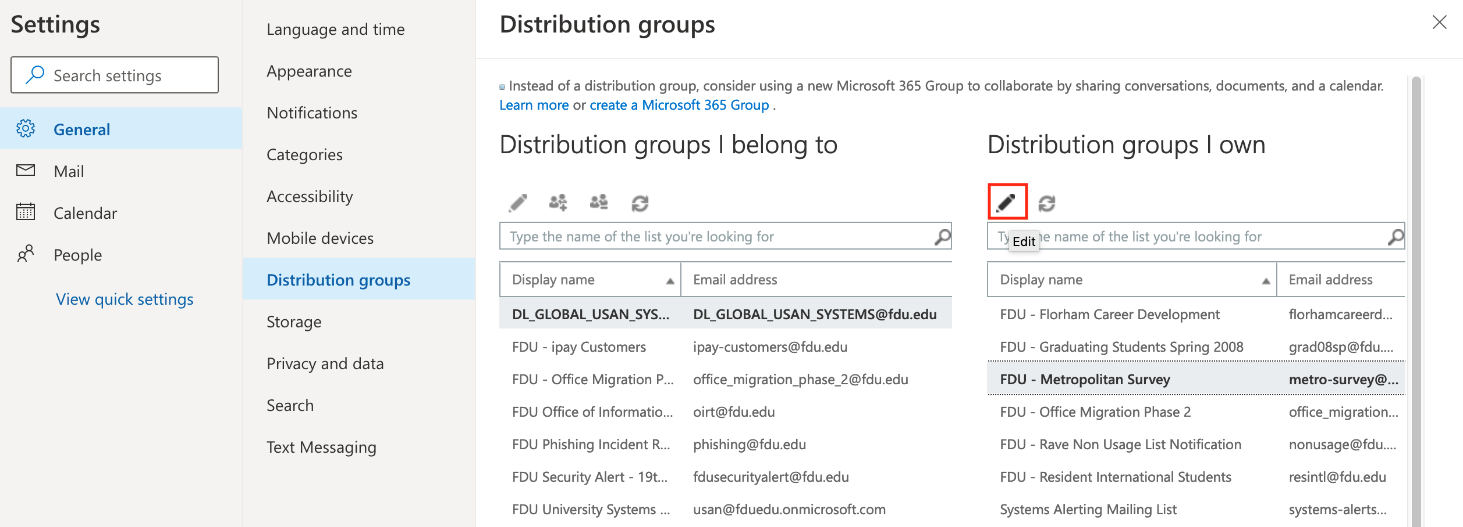
How to open the Configuration page for a particular Distribution Group that you own in Outlook on the Web
Select the distribution group that you would like to make changes to and then click “Edit” (Pencil Icon)
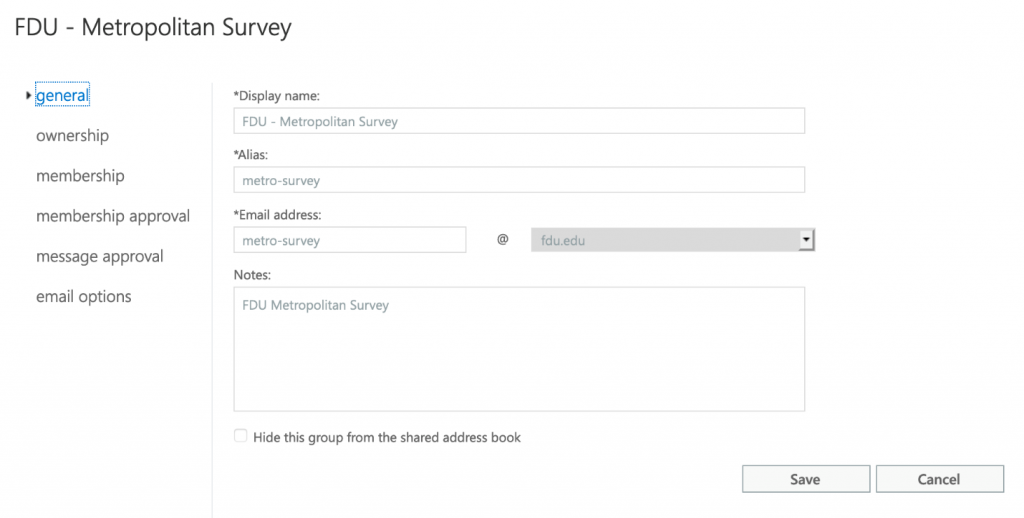
You should see the distribution group configuration page
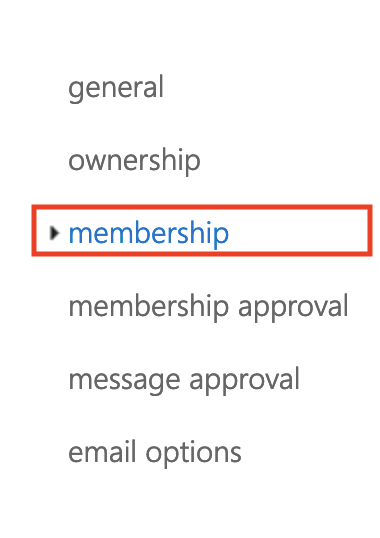
How to see the list of recipients (members) for this Distribution Group in Outlook on the Web
Click on “membership”
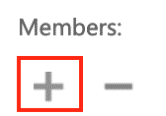
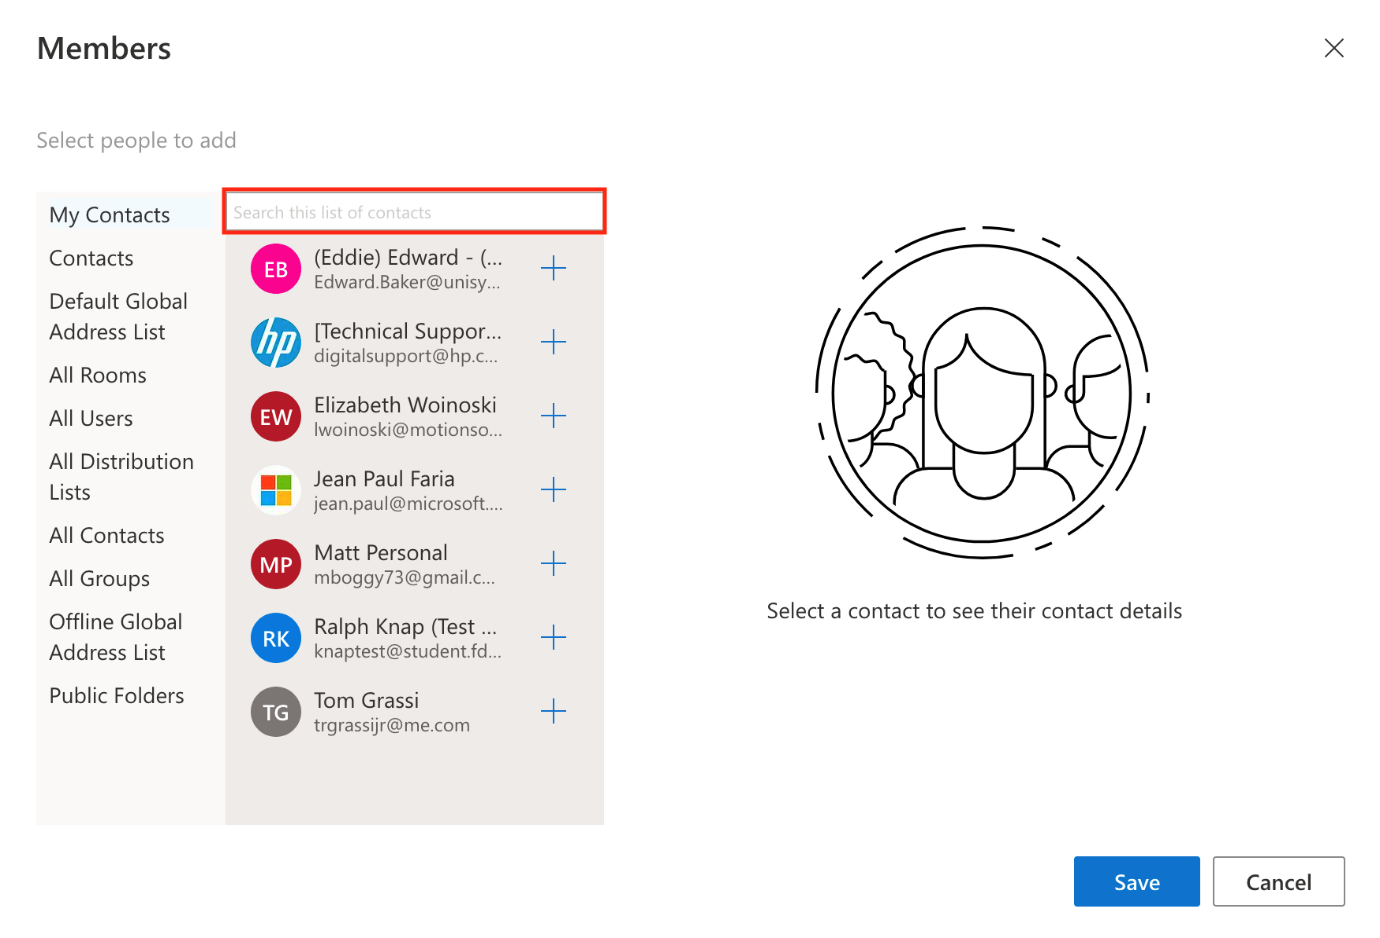
How to add recipients (members) to this Distribution Group in Outlook on the Web
Click on “+” icon (Plus Icon)
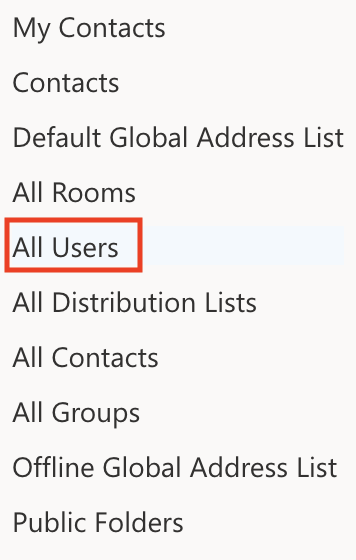
Click “All Users”
Please enter the name or NetID of the user that you would like to add to this distribution group in the search text box
Click “+” button beside the user that you would like to add from the search results (you can search and select more users if you would like)
Click “Save” when you are done
Remove recipients (members) from this Distribution Group in Outlook on the Web
Go to the membership list as shown in Step: 3 How to see the list of recipients (members) for this distribution group
Click on the recipient (member) that you would like to remove
Tip
Press “Control” button while selecting recipient if you would like to select multiple recipients from the list.
To select a range of adjacent recipients on the list, click the first recipient from that part. Now, press the “Shift” key and click last recipient in this part
Click “–” button at the top located below the “Members” title
Click “Save” when you are done
close
Enabling Distribution Group Moderation and Adding Group Moderators
Follow Step 1 & 2 in “Adding and Removing Distribution Group Users in Outlook on the Web”
Click “Message Approval”
Check (select) “Messages sent to this group have to be approved by a moderator”.
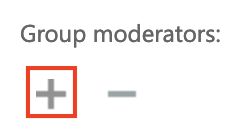
Click “+” button under “Group Moderators”
Note
By default, emails sent to the distribution group will be sent to the group owner for approval if you enable message approval and do not select any moderators.
Click “All Users“
Please enter the name or NetID of the user that you’d like to add to this distribution group in the search text box
Click “+” button beside the user that you’d like to add from the search results (you can search and select more users if you’d like)
Click “Save” when you’re done. You’ll be taken to “Message Approval” screen
You can add users’ emails from who do NOT require any approval by clicking “+” under “Senders who don’t require message approval” and following the same process as above
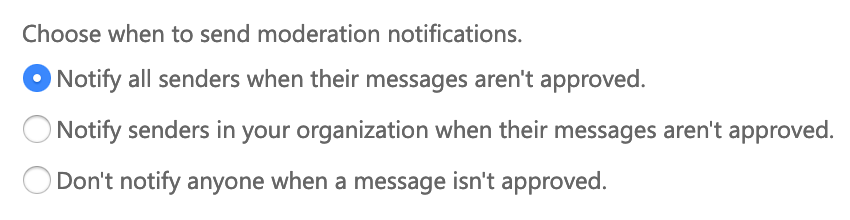
You can choose who should be notified when an email sent to this distribution group has been held for approval -or- you can choose to disable these notifications as shown:
Click “Save” again on “Message Approval” screen
Note
An email will NOT be held for approval from a group moderator who is allowed to send emails to the distribution group.
Unused Teams and Groups can accumulate and become a burden to resources over time. To prevent this from happening, Fairleigh Dickinson University has implemented an expiration policy for Teams and Groups. This article will explain the expiration policy and provide you with information regarding renewal.
What is the FDU expiration policy for Teams and Groups
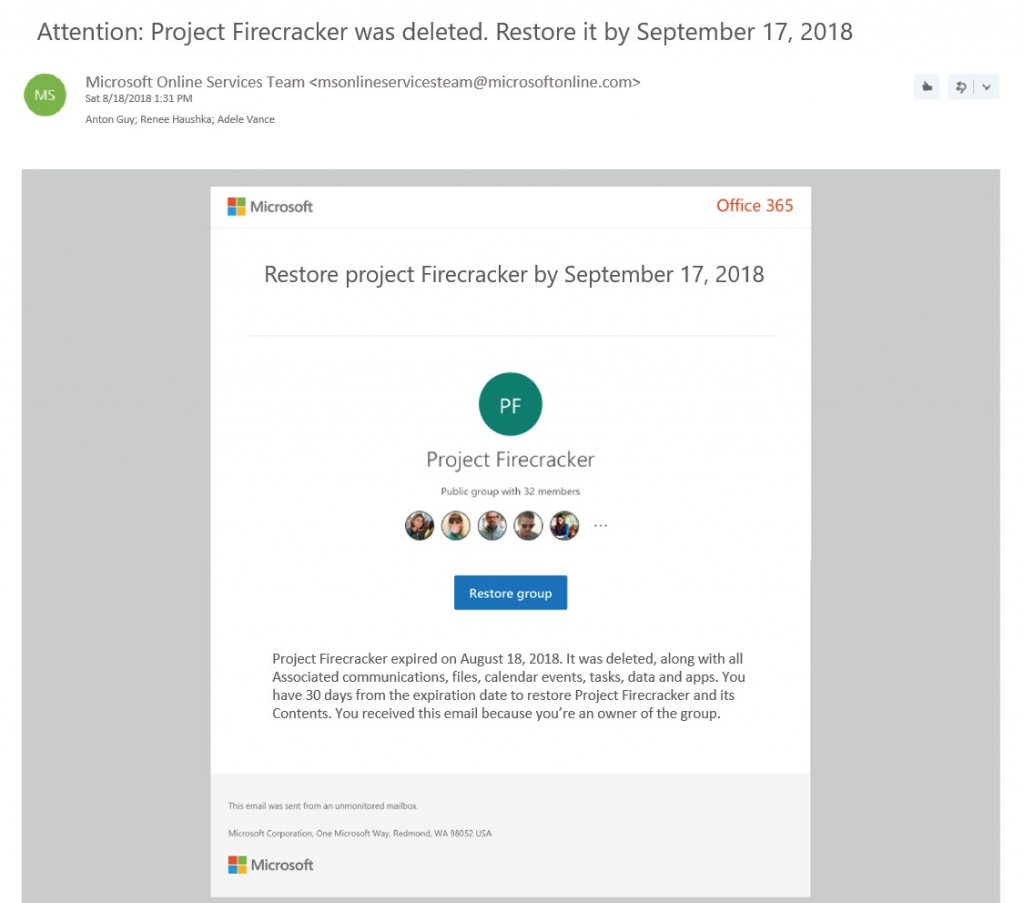
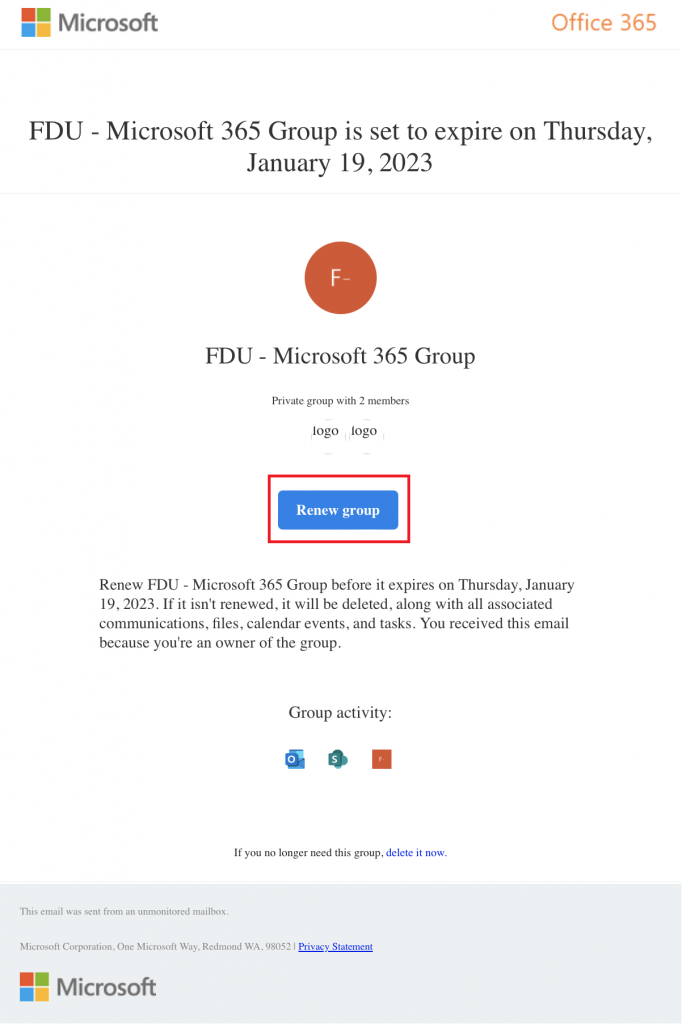
Any Team or Group inactive for 365 days or more will expire
Team and Group owners will be notified 30 days, 15 days, and 1 day before the team’s expiration date. If the Team or Group is not renewed before expiration, it will be deleted.
Note
Expiration notices for groups used in Teams appear in the Teams Owners feed.
The expiration period of 365 days begins at the creation of the Team or Group, or the date it was last renewed
Note
When the policy goes into effect, all groups that have already passed the 365 days period will expire. Affected group owners will be notified to renew.
How to renew a Team or Group
There are two methods to prevent the Microsoft 365 group from being deleted.
The group owner can manually renew the group by clicking the button in the warning message
A member of the group can perform a monitored user activity:
SharePoint: view, edit, download, move, share, or upload files (viewing a SharePoint page does not count as an action for automatic renewal)
Outlook: join or edit group, read or write group messages from the group, and like a message (Outlook on the web)
Teams: visit a teams channel
Yammer: view a post within a Yammer community or an interactive email in Outlook
Forms: view, create, or edit forms, or submit a response to a form
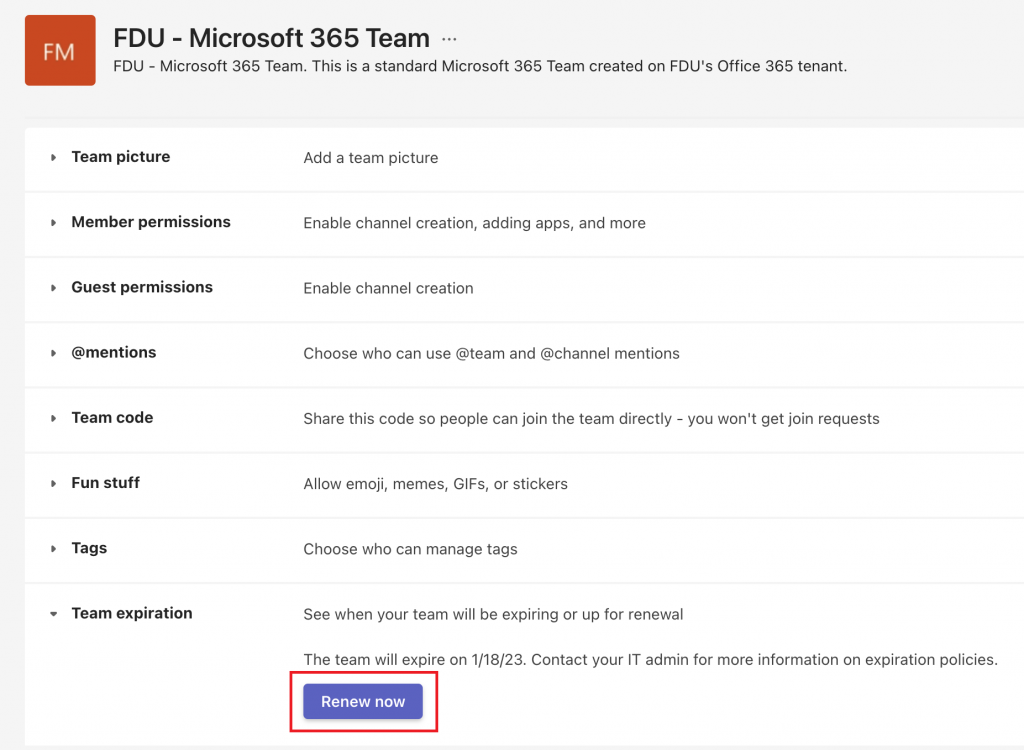
When the team owner receives the expiration notification, go to the Team’s group “Manage team” option and click on Renew now as shown below
Whenever the Microsoft 365 group is renewed by any of the methods mentioned, the group’s lifetime will be extended for another period of 365 days.
What are Microsoft 365 Groups
Microsoft 365 groups are created from a variety of tools including Outlook, SharePoint, Planner, and Teams. Microsoft 365 groups allow you to choose a set of people to collaborate with. You can use Microsoft 365 groups to communicate with others, share files, and apply permissions to shared resources.
Who are Group Owners
When a Microsoft 365 group is created, the person creating the group is designated as the owner. After adding members to the group, the primary owner can also promote other members to owner status. We suggest that when practical, Microsoft 365 groups have at least 2 owners. This can be important as only the group owner will receive the warning messages. In some cases, the group owner may have removed themselves from the group or left the university entirely. If you find yourself a member of a Microsoft 365 group without an owner, please contact support by creating a SAMI Support Request.
Groups without Owners
Ownerless or orphaned Groups may be deleted by USAN. USAN will notify Group members prior to deletion, but if they receive no response, the Group will be deleted. If USAN deletes a Group, all the records associated with the Group’s shared space will be deleted as well
Automatic Renewal
Groups that are actively in use are renewed automatically setting the days to zero. Any of the following actions will auto-renew a group:
SharePoint – view, edit, download, move, share, or upload files. (Viewing a SharePoint page does not count as an action for automatic renewal.)
Outlook – join the group, read or write group messages from the group, and like a message (Outlook on the web).
Teams – visiting the Teams channel.
Recover Deleted Teams or Groups
When the 365 days limit hits, the Microsoft 365 group will expire and be put into a “Soft-deleted” state. Which means it can still be recovered for up to 30 days. To have the Microsoft 365 group recovered please contact support by creating a SAMI Support Request and include the Microsoft 365 group or Team name to be recovered.
Where to Get Help
For assistance with Microsoft 365 groups, please contact support by creating a SAMI Support Request. We can answer questions about the expiration policy, renewing groups, and updating group owners.
Microsoft 365 email has filters to protect users from spam and malicious emails like phishing scams.
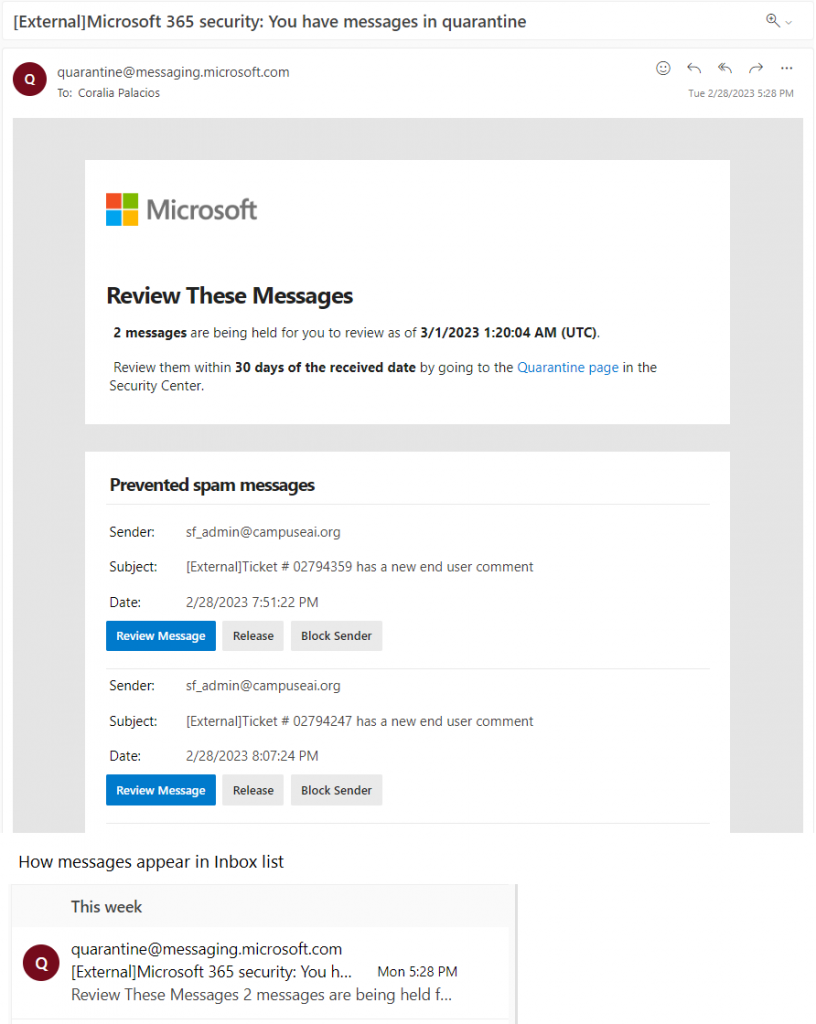
Messages caught by the filters are placed in quarantine for Fairleigh Dickinson University and its users’ protection. Users will receive a Spam Notification message once a day, notifying them of any messages placed in quarantine. Any legitimate mail caught by mistake can be released directly from this message or from the quarantine portal.
Warning
Mail left in quarantine will automatically be deleted after 15 days.
Handling Quarantined Email
Legitimate messages placed in quarantine may be released into your inbox in one of two ways:
From the daily spam notification email message
If you receive mail that has been placed in quarantine, you’ll receive an email message from quarantine@messaging.microsoft.com. The message will look like the one below:
Note
You will only receive an email if you have items in quarantine.
The following options will be available to you by clicking the respective links in the email notification or you can choose to do nothing.
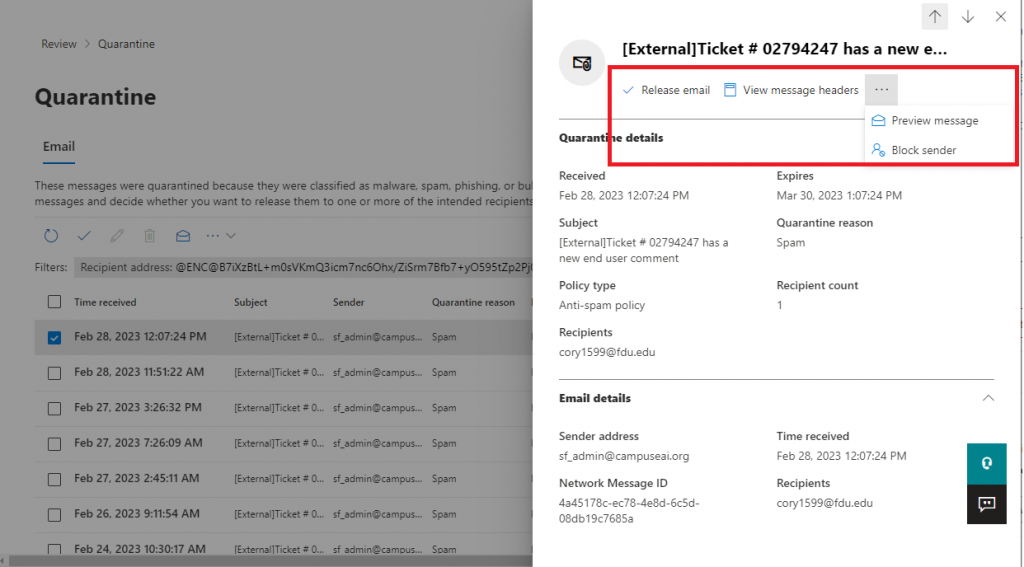
Review Message – go to the Microsoft 365 Security & Compliance Center to review it
Release – the message is removed from quarantine and placed in your inbox
Block Sender – add the sender to the Blocked Senders list in your mailbox
From the Microsoft 365 Security & Compliance Center
Quarantined email can also be handled in the Microsoft 365 Security & Compliance Center.
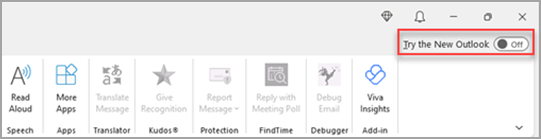
Microsoft has released a new version of Outlook that will eventually replace the classic version. The new Outlook for Windows brings the latest features, intelligent assisted capabilities, and a new modern and simplified design to your Outlook app. The New Outlook has many features and is vastly different visually from the classic version of outlook presently installed on all university owned computers.
The New Outlook is compatible fully with all Office365 functions but because there are some features missing that presently exist in the classic Outlook, FDU IT highly recommends NOT switching to the new Outlook currently, especially since not all features are present and Microsoft is still developing the new Outlook.
Some of the features not available in the New Outlook are:
Existing Offline Outlook files called PST files stored locally on your computer
Virtru Email Encryption Client: While the Add-on is not supported, you can still send and receive encrypted email using the “#secure# tag in the subject line of the email
Adobe Acrobat and/or Foxit PDF Professional Outlook using the COM-Add-ins platform
Zoom Outlook Plugin or any other Meeting platform using the COM-Add-ins platform
Any other third-party COM-Add-in
Custom Macros or Custom Visual Basic functions manually added
Many Rule templates and options are not available
Note
The New Outlook has already been deployed to university owned macOS devices, due to the number of enhancements it provides, and that COM-Add-in platform was a Windows only feature.
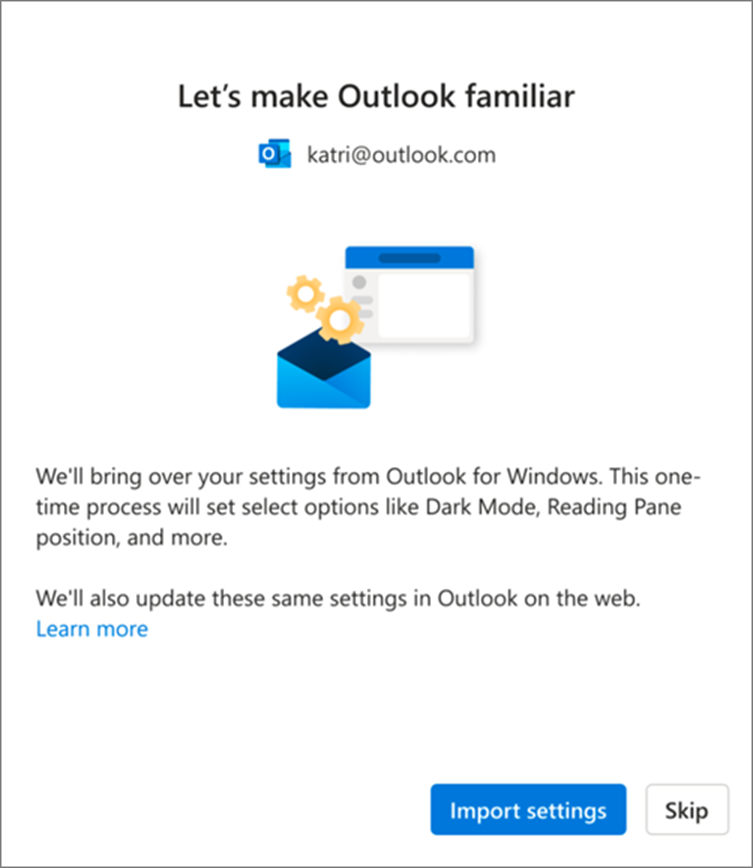
Turn on the toggle “Try the new Outlook” which will begin downloading the New Outlook
From the Success window, select “Switch”. This will close the current version of Outlook and New Outlook will sign you in automatically. Select “Next” to accept the privacy settings
Select an option about sending optional data, and then select “Accept”. Review the privacy information about connected experiences, and then select “Continue”
Select “Import Settings” to bring over your settings from classic Outlook. New Outlook will begin adding your accounts
The new Outlook for Windows will open once the setup is complete, and you can start reading and sending emails immediately.
New Look
This is the new Outlook mail icon. It might also include the word NEW.
When you open new Outlook, you’ll see the following tabs on the ribbon: Home, View, and Help. This version includes Settings which is available in the navigation header. Settings is where you can customize your Outlook experience.
Note
If you are using the new outlook and never created an account using the Classic Outlook, you will have to create a ticket using FDU SAMI Support by clicking the Support button at the bottom of this page.
If you switched from the classic Outlook for Windows, you’ll have the option to migrate some of your settings, which you can learn more about on following the link below:
The top bar of the app should be familiar if you’ve used any apps like Word or Excel before, including the classic Outlook for Windows.
Known as the ribbon, it is the place to find the commands you need to manage your inbox or format emails. You can make the ribbon larger (the classic experience) or smaller (the simplified experience) using the dropdown arrow on the right side of the bar. If you want to personalize the commands you see in the simplified ribbon, select Customize.
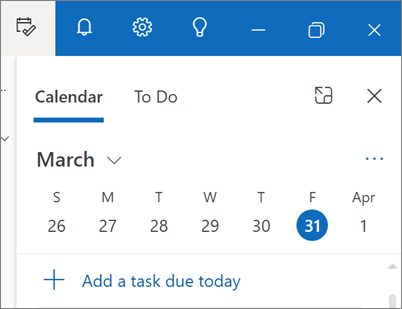
On the left side you’ll see the navigation bar, which makes it simple to switch to Calendar, Contacts, or any other app you frequently use. For quick access to your calendar or tasks without leaving the inbox, you can use My Day by selecting the icon in the upper right.
Do you ever have trouble tracking down that key email thread you’re actively responding to? Or is there an email with key information you frequently refer to? Now, simply right-click any message and choose. Pin and that email will appear at the top of your inbox, saving you time from having to go back and search for it.
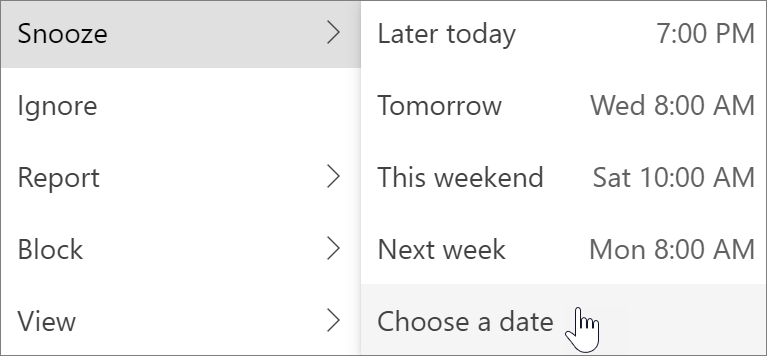
Snooze an Email
Sometimes email is very important, but not yet. With the Snooze feature, you can schedule a time for the email to be re-delivered to your inbox, appearing at the time you want it to, so you can handle it when it’s the right time for you. Just right-click any message and choose Snooze, or select Snooze from the ribbon. Then choose the time you want it to be delivered.
Scheduling Poll (Formerly Find Time)
Schedule an Email
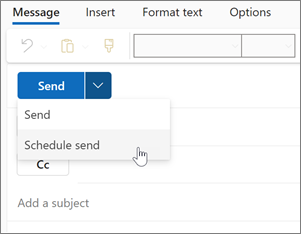
In today’s hybrid work world, your day might be someone else’s night, so you don’t want to send an email to someone in the middle of the night. With the new Outlook, it’s simple to send an email when you want to. Just select the dropdown arrow next to Send and choose Schedule send.
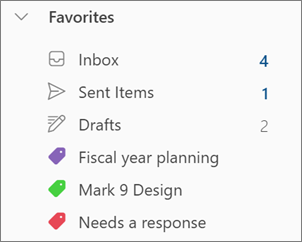
You might be familiar with categories, but they’ve been significantly upgraded. See the category names and colors directly on your messages in your inbox. Want to see everything you’ve tagged with that category? Just click it right on your message. You can even add a category to your Favorites.
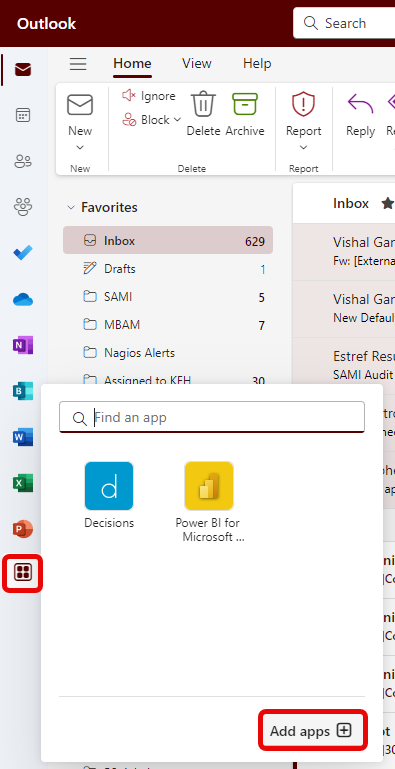
In Outlook, go to the navigation bar and select “More Apps > Add apps”
Tip
You can also access the Store from the Apps button to install an add-in directly from a message or appointment.
Note
Only Approved Addons will be allowed to be installed. To request an Addon, Open a Sami Support Ticket.
For guidance on how to locate the Apps button to access add-ins while reading or composing a mail item, see Use an add-in in Outlook following the link below:
In the “Apps” page, search for the add-in you want from the available list. Alternatively, if you’re after a specific add-in, enter its name in the search box. When you find the add-in you want to install, select it to learn more about the add-in and review its privacy policy
When you’re ready to install the add-in, select “Add”
Add-ins Installed by your IT Admin
If you’re part of an organization and a new add-in is installed for you by your IT admin, the add-in will be available on the read or compose surface where it’s designed to work. For guidance on how to access an add-in, follow the link below:
The location of where an Add-in is installed depends on whether you’re reading or composing a mail item.
Tip
If you moved from classic Outlook for Windows to the new Outlook for Windows, note that the location of add-ins is different. While add-ins are accessed from the ribbon or app bar in classic Outlook, access to add-ins in new Outlook for Windows depends on whether you’re reading or composing a mail item.
For guidance on how to use Add-ins in classic Outlook, visit the link below:
Select a message in the Reading Pane or open a message in a separate window
From the action bar of the message, select “Apps”
Select the “Add-in” you want to use
Tip
Customize your action bar to quickly access your add-ins. In the message action bar, select the ellipsis button (•••), then choose Customize actions. In the Addins section, check the boxes for the add-ins you want to see in the action bar.
Use an Add-in While Composing a Message
Create a new message or reply to an existing one
From the ribbon, select the “Message” tab, then choose the Add-in you want to use. If the Add-in doesn’t appear in the ribbon, select “Apps” to view your installed add-ins
Use an Add-in While Viewing or Scheduling a Meeting or Appointment
Open an existing appointment or create a new one
Tip
If you want to use an add-in on an existing meeting or appointment, you must open the meeting or appointment in a pop-up window to view the ribbon.
From the ribbon, select the “Add-in” you want to use
Delete an Add-in
Go to the navigation bar and select “More Apps” then “Add Apps”
On the “Apps” page select “Manage your Apps”
Under “Manage your Apps” find the app you want to delete and select “More options” then “Remove”
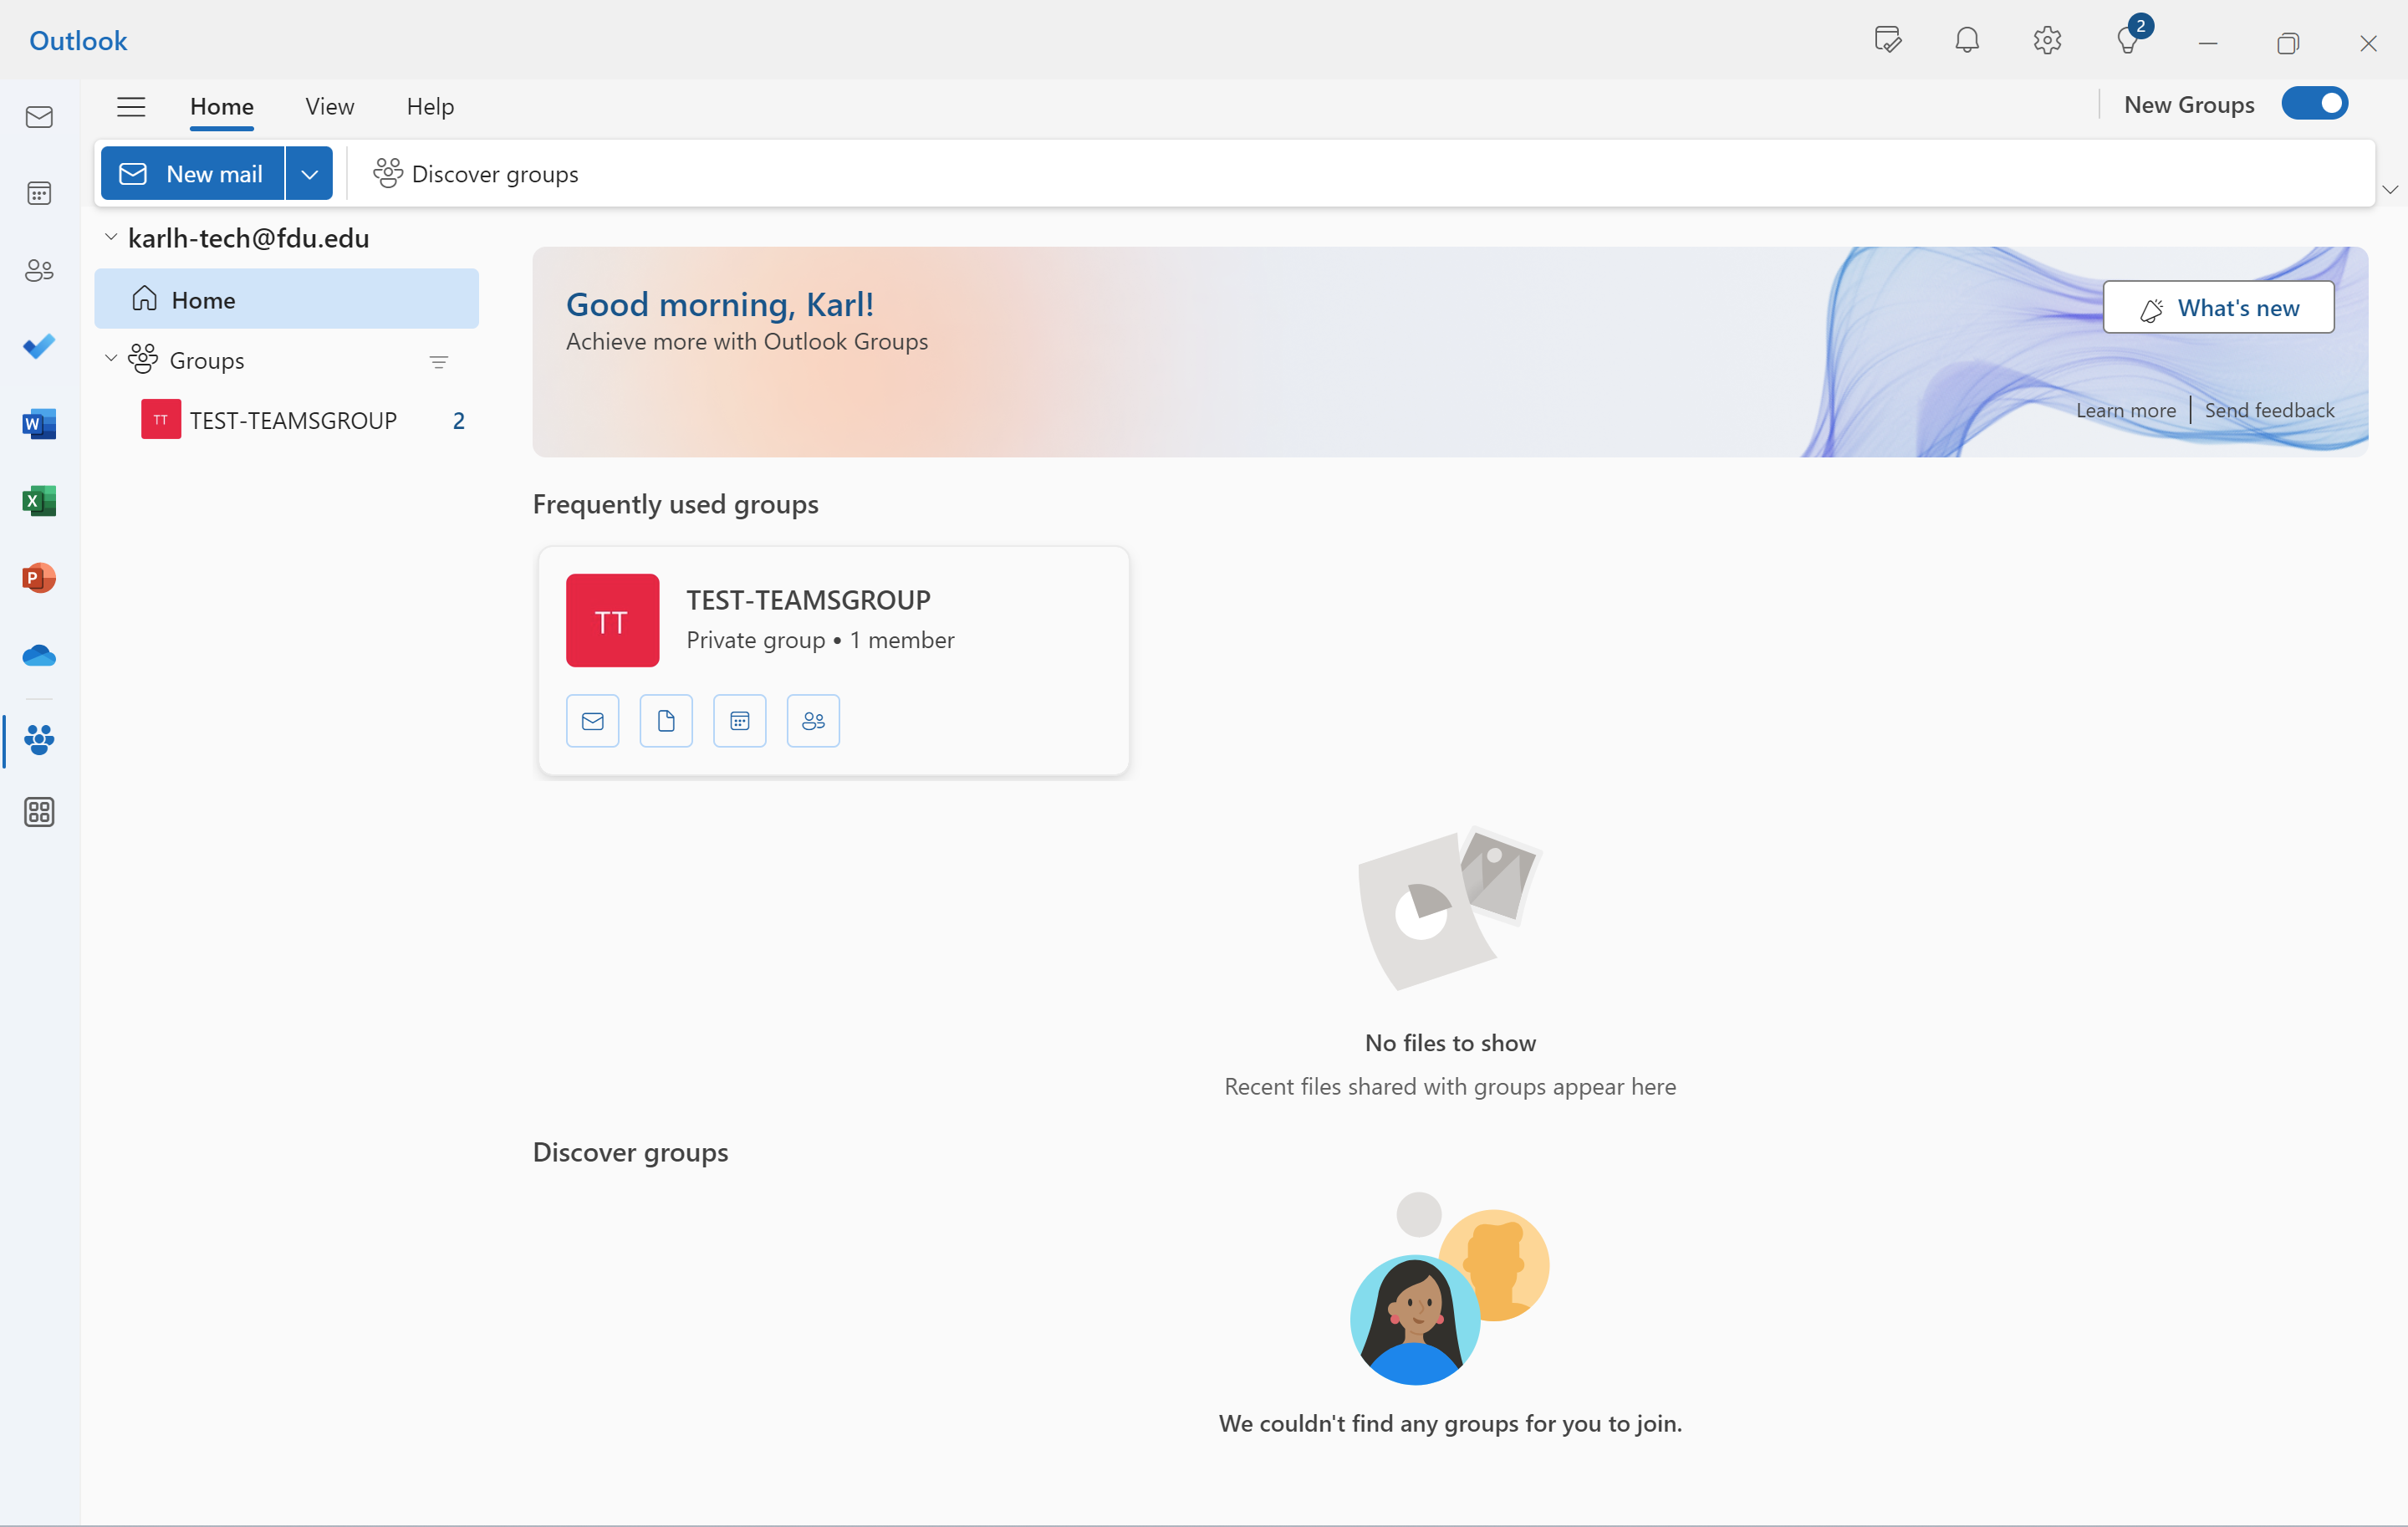
As of November 2023, the Microsoft 365 Groups experience in Outlook is generally available for Outlook on the web and new Outlook for Windows. Access new Groups by selecting Groups on the navigation bar.
Tip
New Groups in classic Outlook is available in Build Version 16.0.16714.10000 or later. To access new Groups in classic Outlook, from the navigation bar select More Apps > Groups.
New Outlook Groups
Groups in Microsoft 365 let you choose a set of people that you wish to collaborate with and easily set up a collection of resources for those people to share. Resources such as a shared Outlook inbox, shared calendar or a document library for collaborating on files.
Outlook now has a new home for Microsoft 365 Groups - one place to connect, communicate, and collaborate with your team. Groups Home provides a central destination to get critical information from all the different groups you may be part of.
Benefits of the new Groups experience include:
Group Home landing page – Stay updated on your groups, including recent files across all your groups. From Home, you can access frequently used groups and find new ones based on your interests.
Recent groups and Recent files – Find recent active groups and quick links to get to files, emails, events, and member management from the Groups Home landing page.
Revamped individual Groups experience – Create, consume, and share information related to a particular group, as well as manage events and members efficiently in fewer clicks.
Accessing New Groups
In the New Outlook, from the navigation bar select “Groups”. This takes you to Groups Home.
In the Classic Outlook, from the navigation bar select “More apps” then “Groups”.
Tip
To pin, right-click Groups and select Pin.
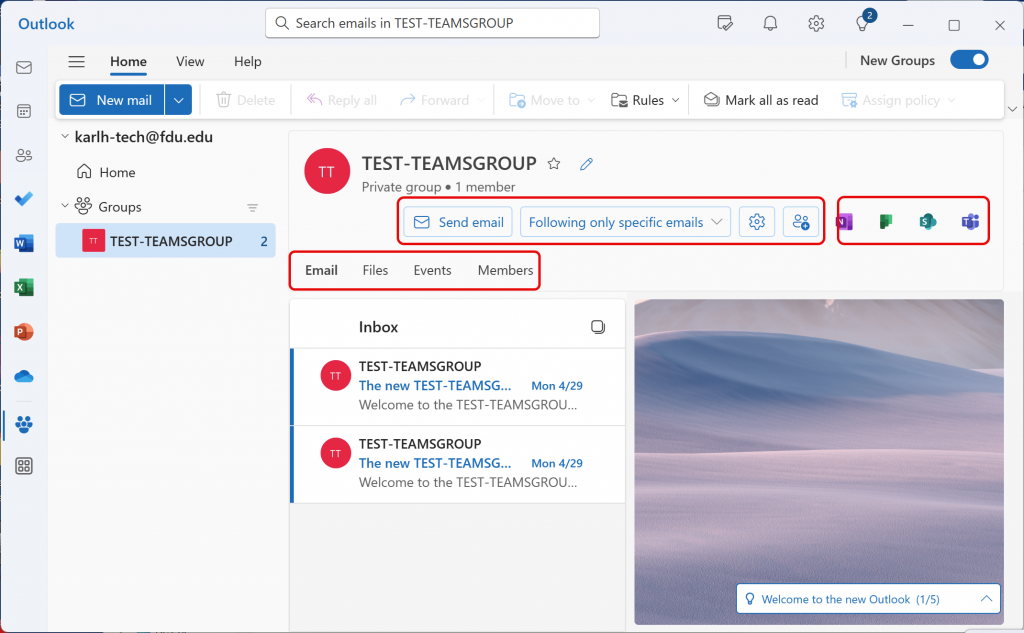
From Groups Home you can see all your groups at once. Or, when you select an individual group, you can:
Send an email to the group, access and edit your group settings and preferences, and manage group membership as needed.
Access the group email, files, events, and members by selecting the respective tab.
Access connected apps like Teams, SharePoint, OneNote, and Planner.
Talk
Conversations in Microsoft 365 Groups in Outlook happen in the shared inbox for the group. Users can read and reply to messages, and members can easily search or scroll back through the message history to get caught up on what’s been discussed before. The shared inbox looks a lot like the personal inbox that Outlook users are familiar with. Each conversation appears separately in the message list at the left and clicking on one will open it in the reading pane. If a user marks a message, or conversation, as read it doesn’t affect how the messages appear for other members of the group so you don’t have to worry that other members may miss an important message.
The shared inbox for your Office 365 group is where conversations occur.
Tip
A recent change in the way messages are displayed, and counted, in Outlook may have reset the number you see next to your group name in the Outlook navigation pane. If you want to reset that number to zero you can right-click the group and select Mark all as read.
Now that you’ve got your group created, let’s start a new conversation. You can post a new message by opening the shared inbox for the group and clicking New Conversation on the Ribbon. Or you can simply send an email to the group’s alias. All members of the group will be able to read the new message you’ve posted and any members who follow the group will get a copy of your message in their personal inbox.
Share Files
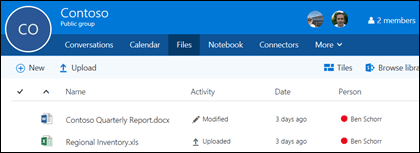
Each Microsoft 365 Group gets a shared files library where you can store, share, and collaborate on documents, workbooks, presentations, or just about any kind of file.
Access the files library by going to your group in Outlook (on the left navigation pane) and click Files on the Ribbon. The files library will open in a browser and from here you can create new files, upload files from your computer and do just about anything else a SharePoint document library can do. Think about what kind of files would be useful to share with your group, and don’t feel limited to Microsoft Office files. You can also share PDFs, photos or just about any other kind of file that your group would find useful.
To download or delete a file just select it and those options will appear on the toolbar at the top.
Collaborate
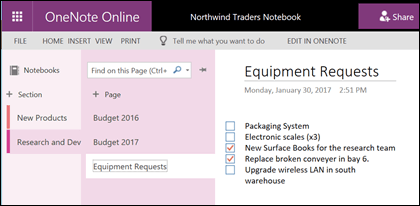
Each Microsoft 365 Group gets its own shared OneNote notebook where they can gather ideas, collaborate and store research.
Go to your group in Outlook by finding it on the left navigation pane, or in Outlook on the web by going to the People tile. Once you’re there click Notebook on the Ribbon to open the group’s shared notebook.
The first time you open the group’s shared notebook it will open in the browser in OneNote for the web. You can make edits there, or if you have OneNote 2016 and you’d prefer to use that just click Edit in OneNote from the Ribbon. Once you’ve opened it in OneNote the notebook will sync to your list of open notebooks and you can access it directly from within OneNote without having to go to the group first.
Try going to your group’s OneNote notebook and think about what might be useful for the group to collect ideas and collaborate on. For example you might have a section that you use to gather and comment on web content that is relevant to your team.
Plan Events
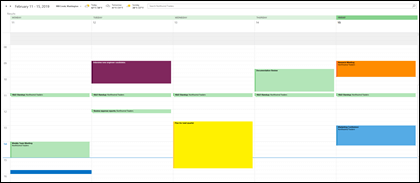
Chances are good that your group has events, meetings, milestones or other items that would benefit from a shared calendar. Each Microsoft 365 Group has a shared calendar that all members can see and contribute to.
Working with the calendar of your group is no different than working with your personal calendar. If you select the calendar button on the navigation pane, you’ll see your personal calendar, plus the shared calendars of any groups you’re a member of. You can check the boxes next to each calendar you want to see and view them side by side or overlapped.
Adding an item to the shared calendar works just as it does on your personal calendar. Any meeting you add to the shared calendar will invite the other members of the group to that event as well, so they can have it on their own calendars. Appointments added to the shared Group calendar do not appear on the personal calendars of other members.
Now that you’ve got your shared calendar try adding any upcoming meetings or events that your group might be participating in.
Microsoft Teams is a unified communication and collaboration platform that combines persistent workplace chat, video meetings, file storage, and application integration. Continue reading to find more information about the new Teams app, common features and settings most commonly used.
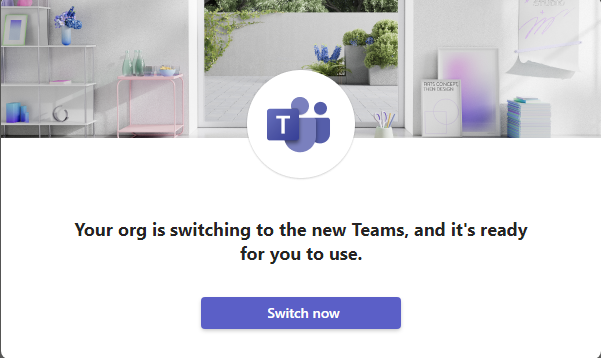
A New Teams client is rolling out! Though it looks nearly identical to classic Teams, it has been redesigned from the ground up to take advantage of future developments. Microsoft has discontinued the use of classic teams in July of 2024.
For a comprehensive list of all the new features of Microsoft Teams, click the link below:
Looking for the new Teams experience? The upgrade process itself is quick and silent, where Microsoft 365 will install the new Teams client in the background.
For all university owned computers, the new Teams app has been silently rolling out in the background and may be presented with as the following options to switch over
New Teams experience has been delivered to the device
You may be presented with an option to Upgrade your device with the New Teams experience
A notification prompt to switch your device to the new Teams experience
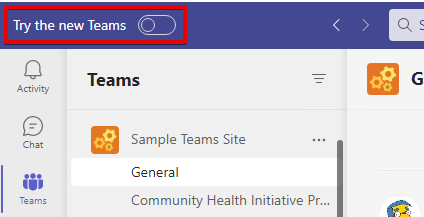
A “Try the new Teams” toggle switch will present itself if the new Teams app upgrade has completed but continue to use the classic Teams experience.
During the transition phase, which will end in June of 2024, you might see two icons. The old Teams is labelled Microsoft Teams classic (work or school), and the new Teams will be labeled Microsoft Teams (work or school). The new Teams will also have a cyan “New” label on the icon as well.
Windows 10 Search for Microsoft Teams
Windows 11 Search for Microsoft Teams
macOS spotlight search for Microsoft Teams
Note
The new Teams app should be used unless there is a specific reason not to (like troubleshooting a Teams Application issue).
For a complete list of all changes in the New Microsoft Teams, visit:
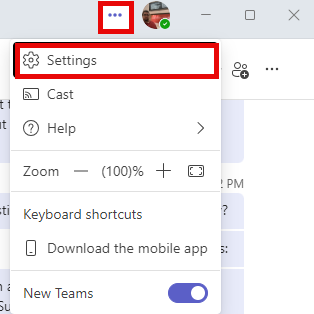
When you’re upgraded to the new Teams, your display settings will reset. Here’s how to change the most commonly accessed display settings.
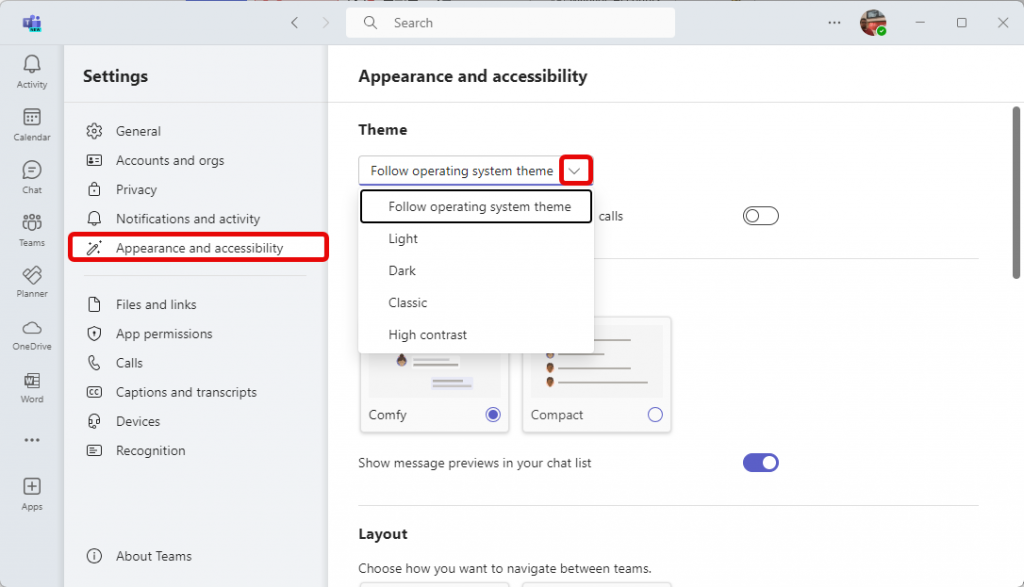
Click on the “Ellipses” in upper right-hand corner, and then “Settings”
The default theme for new Teams is Light, which appears grey. Dark will color the window black. Classic will bring back the purple/gray theme from classic Teams
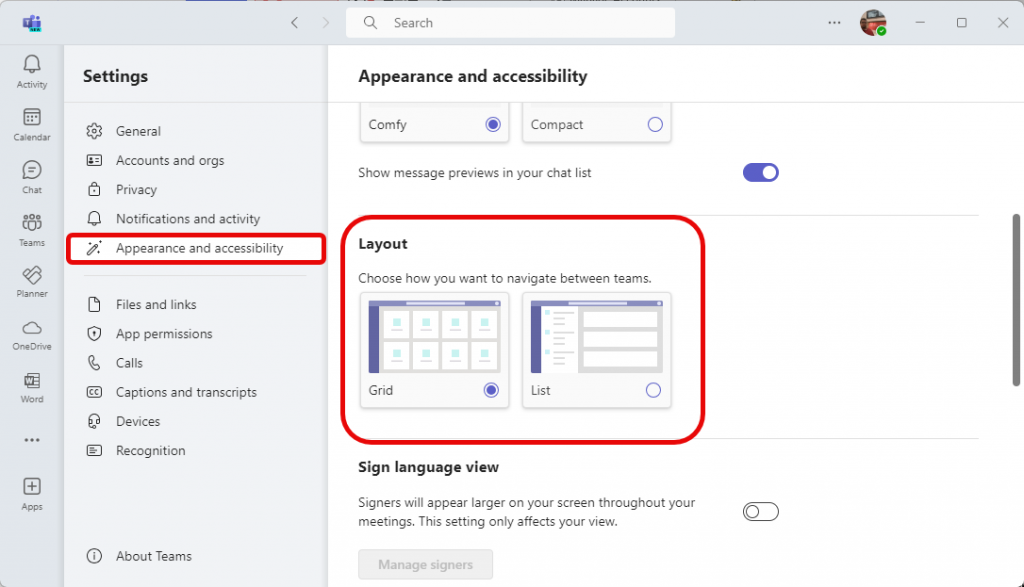
Another commonly changed display setting is Layout. You can choose your Teams to display in a Grid view, which is the new Teams default, or a List view, which will show all your Teams in a list on the left, similar to how Outlook displays folders.
There are many other settings in Teams, and we encourage you to review your device settings and video effects (blurred and custom backgrounds) prior to joining your next meeting. Custom backgrounds may need to be re-added.
What happened to my Contacts list on the Chat tab?
Microsoft has moved the Contacts list to the People app. You can find People by clicking the “…” tab in the left navigation bar and typing “People” in the search.
To pin it to your sidebar, right click “People” then select “Pin”
Note
If People is not able to be found when searching, this means that the People App is already Pinned.
close
Where are my Saved Items?
Saved Items are not currently available in new Teams. Microsoft plans to release a new functionality that will replace it and offer you a method for exporting Saved Items from Teams Classic in the near future. For now, Microsoft recommends using Classic Teams to access Saved Items.
close
Why are my Office documents opening in my browser or Teams app unexpectedly?
We have observed some cases where upgrading to new Teams will reset your file open preference. You can change it by going to “Settings > Files and Links” from the (•••) menu at the upper right.
close
Why can’t I tag some private channels?
We have observed that you cannot @ mention or tag some private channels in the new Teams experience. This issue appears most likely to affect older private channels and has been reported to Microsoft.
close
What happened to Groups?
Groups are now called Categories and how to create and manage categories will be discussed in the Section for Teams Chat.
close
What happened to Contacts?
Contacts have been moved to the People App. How to manage and use People will be discussed in the Teams Chat Section.
The page will automatically detect your operating system and redirect you to the appropriate desktop client (e.g. Windows, macOS) or mobile client (e.g. Android, Apple iOS).
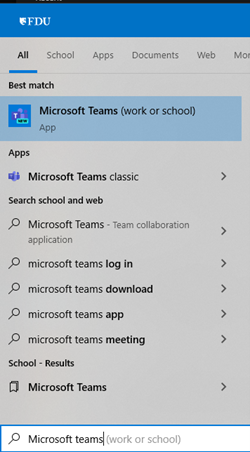
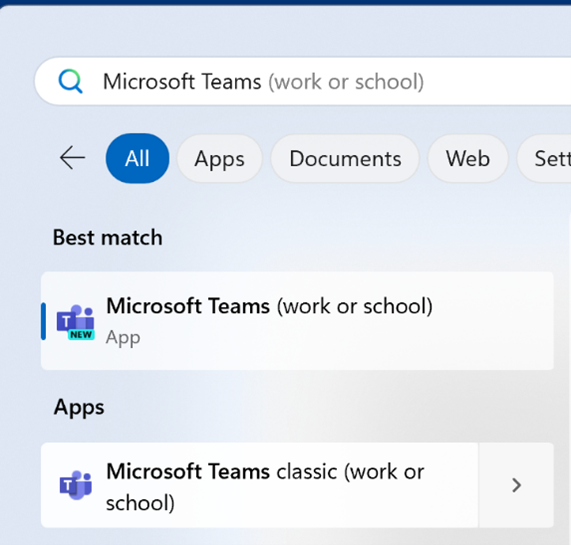
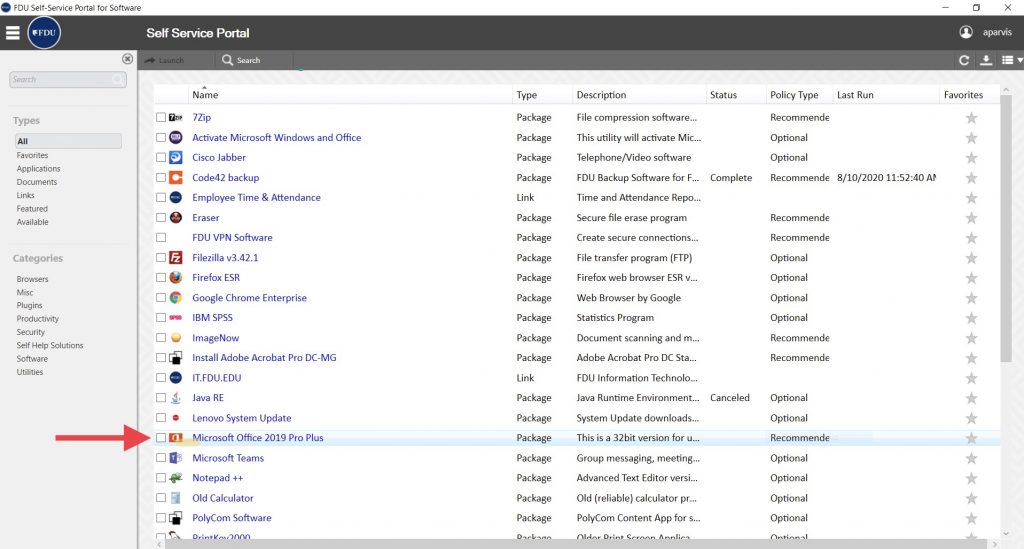
The Microsoft Teams application is automatically pushed to all university owned computers. To determine if you already have it installed, search for “Teams” using the Windows Search Bar or Spotlight Search on Apple devices. If you are working on a university computer and you cannot locate the Microsoft Teams application, you can install by following the instructions below.
Windows – FDU Self Service Portal for Software
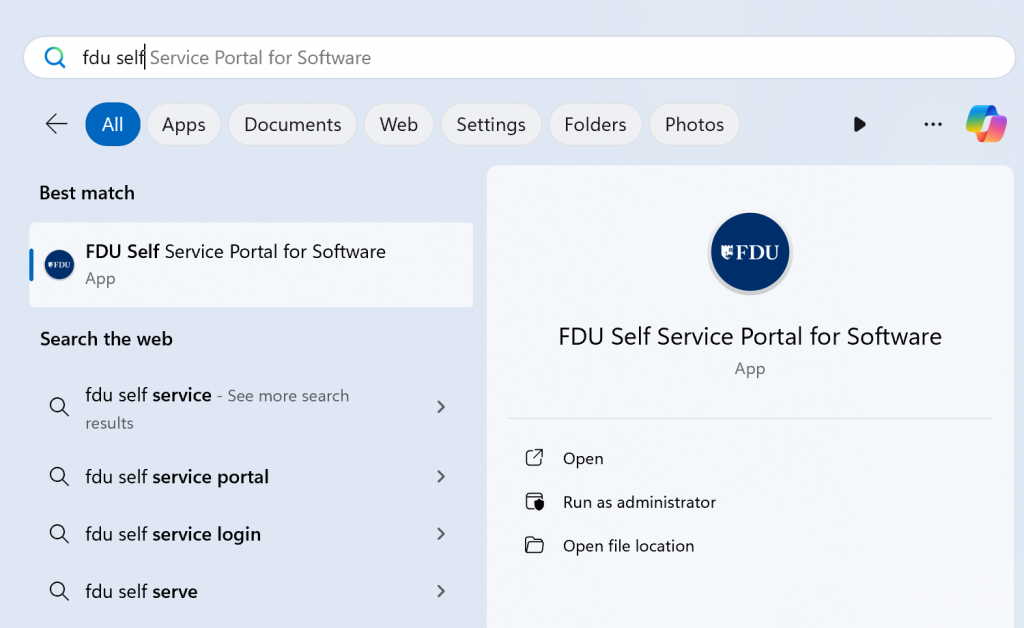
Press the “Windows key” on your keyboard and type “FDU Self”
Launch “FDU Self Service Portal for Software” from the search results list
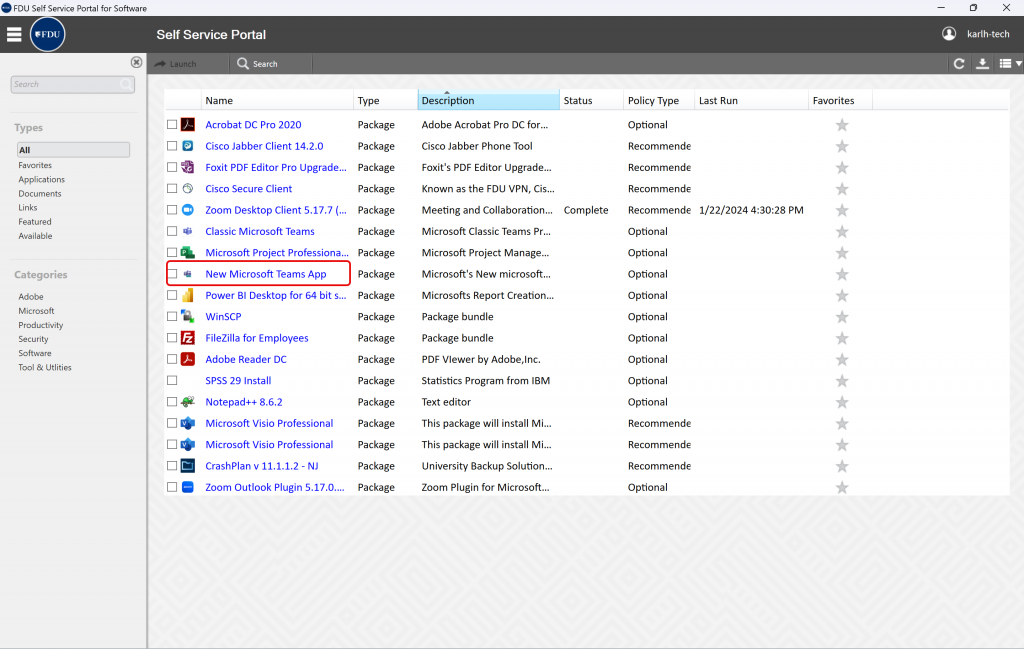
Select the “Microsoft Teams” experience from the list and click “Install”
The classic Teams experience will be available until the end of June of 2024.
Web – Access the Office Web Application
The web client is a full, functional client that can be used from a variety of browsers including Google Chrome, Edge Browser, and Mozilla Firefox. Microsoft Teams will also be available on Safari soon.
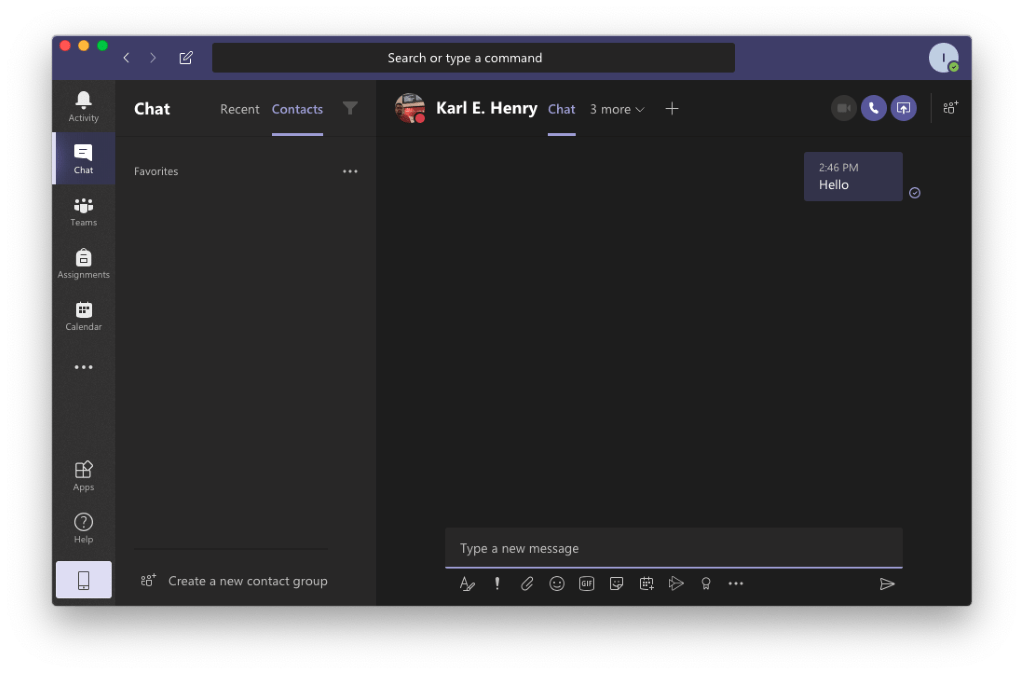
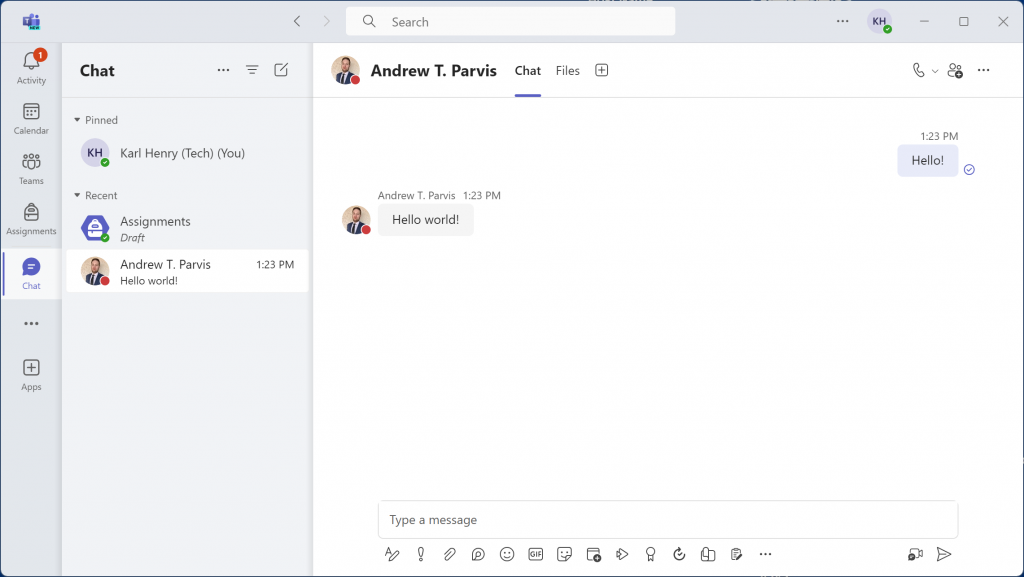
Teams allow’s for text-based conversations using the Chat feature. Although it does not replace email in all use cases, it is a great tool for asking quick questions or just saying hello. When using chat, be mindful and adhere to FDU’s Written Information Security Program.
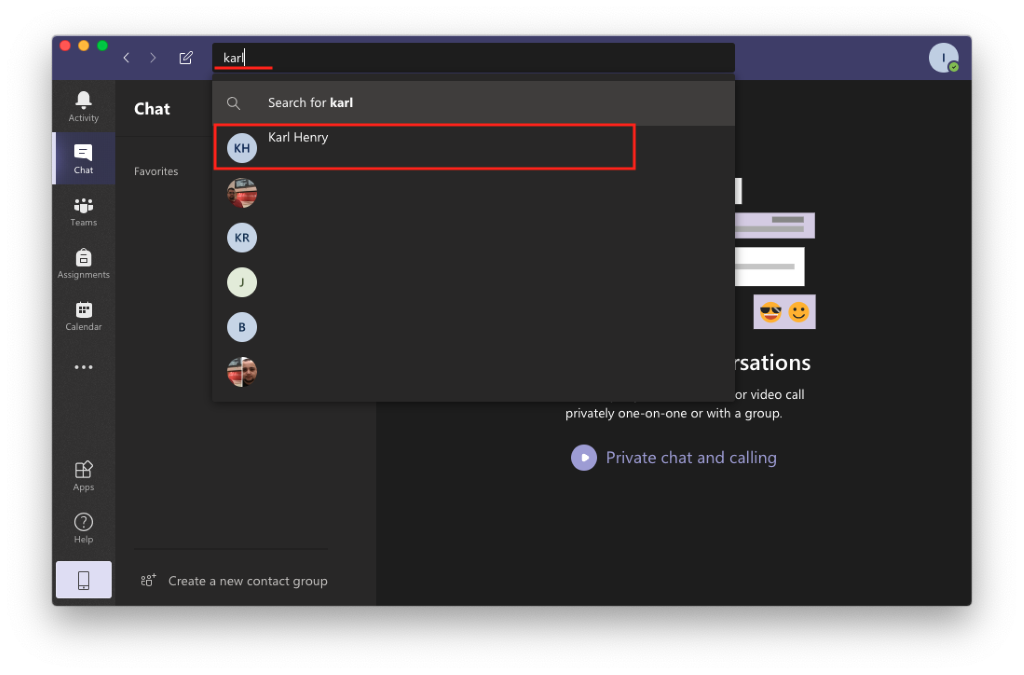
Select “Chat” from the left menu and then click on the top search bar
Classic Teams
New Teams
Type the name of the person you are attempting to locate and click on their name. Only FDU faculty, staff, and students are accessible in Microsoft Teams
Classic Teams
New Teams
You will be brought to the chat window and can start your conversation
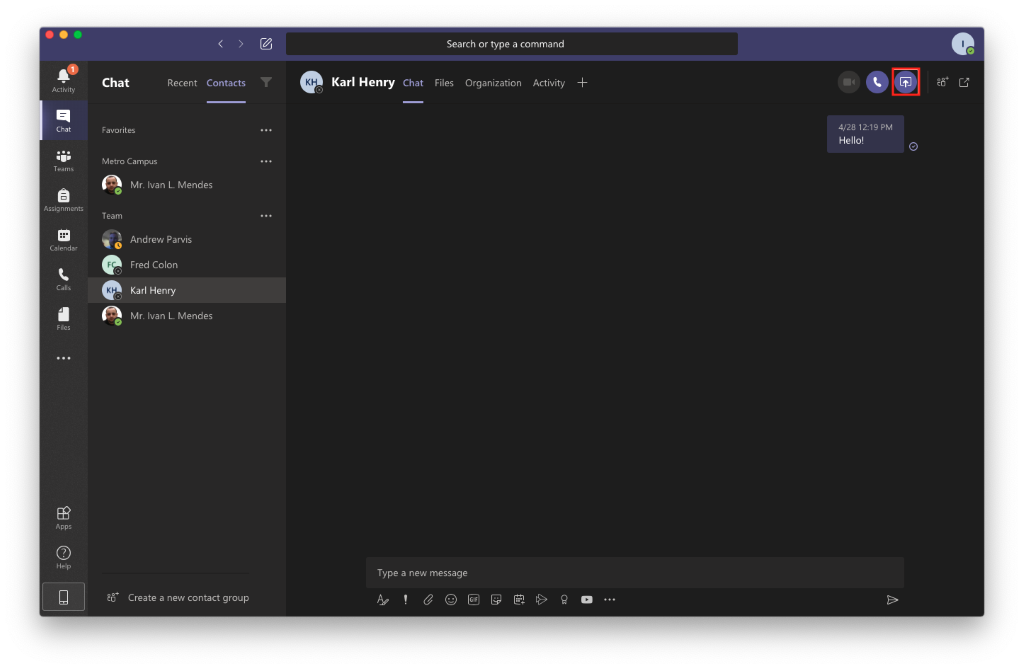
The Chat window has many convenient tabs and shortcuts aimed at improving collaboration. Near the top of the screen, next to the name of the contact that you are chatting with, you will notice the default tabs, followed by a plus sign.
Classic Teams – Tabs
Chat: tab contains the conversation
Files: tab contains all files shared in during the conversation
Organization: Two person conversations, the Organizationtab shows your contact’s organization chart. This information is pulled from Office 365
Note
Datatel remains the authoritative source for this information and the data contained here is not intended to be 100% accurate.
In two person conversations, the “Activity” tab will list the latest activity of your contact
You can use the “+ sign” to create a new tab from a file or an app. This can be a quick and convenient way to access a collaborative file that was previously shared in the conversation
To the right of these tabs are a series of shortcut icons which perform the following functions:
Classic Teams – Shortcuts
Video call: icon starts a new video call
Audio call: icon starts a new voice call
Screen sharing: icon allows you to share your desktop or an application
Add people: icon is used to invite additional people to the chat
Pop out chat: icon creates a separate window with your chat
close
New Teams – Tabs
Chat: contains the conversation
Files: Contains all files shared in during the conversation
Add a Tab: Add an App to the tab list for all users
To the right of these tabs are a series of shortcut icons which perform the following functions.
Shortcuts – New Team
Audio Call icon starts a new voice call
Add people icon is used to invite additional people to the chat
Ellipses is used for additional features:
Open Chat in New Window: Pops chat in separate window
Schedule Meeting: schedules a meeting with individual
Screen Sharing: initiates a screen sharing session and calls individual
Pin: Pins person to pinned section in teams
Note
Depending on your screen resolution and application window size, your view may differ from the picture above, but all options outlined will be available.
The Chat function allows you to have conversations with one person or groups of people. In classic Teams, this is known as Contacts and in the New teams, this is called People.
The pane on the left-hand side of the screen is split into Recent and Contacts. Contacts acts like a rolodex that allows you to store and sort a list of the people you contact most frequently. The Recent list will display your most recent conversations with single people or group messages.
Types of Contacts
There are two types of contacts, directory contacts which come from your organization, and local contacts which you can add from scratch to your copy of Teams.
Directory contacts have some fields set by your organization, and additional fields which can be edited by you.
Local contacts are stored within your local copy of Teams, and do not synch with an organization’s directory.
Note
For contacts you create based on the company directory, the admin may control some of the fields, like the name and email. They will appear grayed out and you will not be able to modify them.
Classic Teams – Contacts
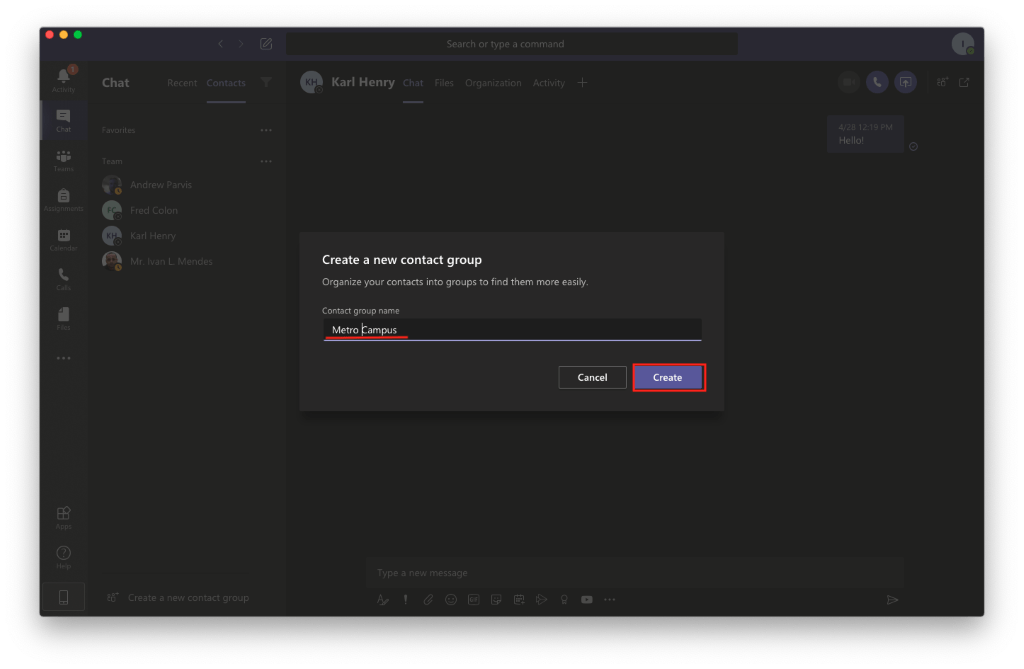
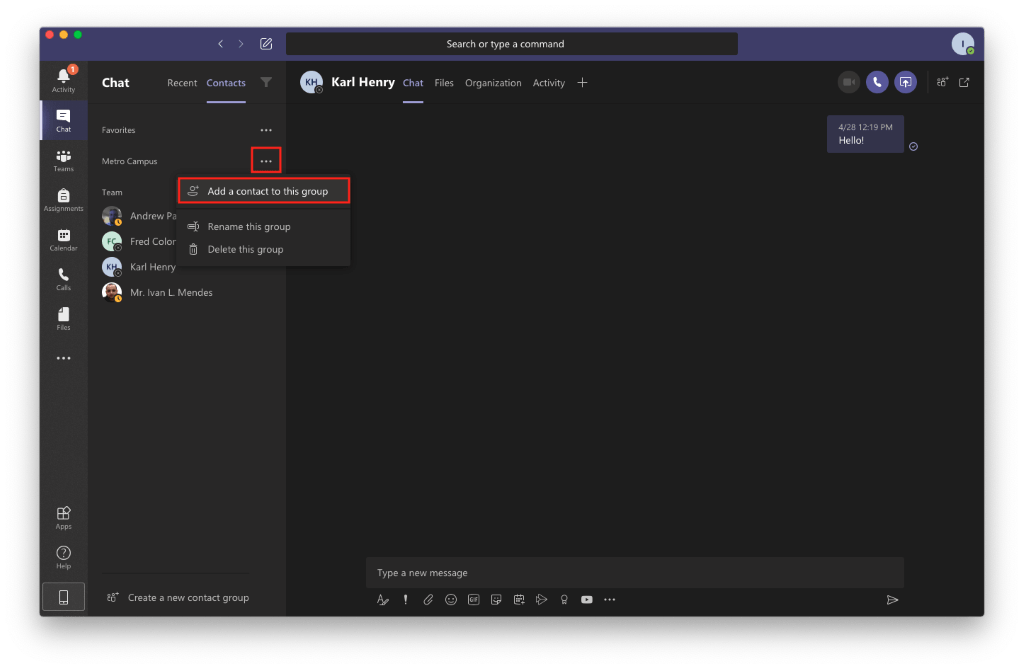
By default, the Contacts tab will already have a “Favorites” group. However, creating new groups can be a helpful way to organize your contacts. For example, you may wish to create a group for people that you are working with on a project or for people that you interact with from a department.
To create a new contact group, click “Create a new contact group” on the bottom of the pane
Enter a name for your group, and click “Create”
To add contacts to a group, click the “More options” icon (•••) next to the group name and select “Add a contact to this group” from the drop-down menu
Begin typing the name of your contact. Once you see their name appear, select it and select “Add”
You can add the same contact to as many groups as you would like. The chat with your contact will remain the same regardless of which group you are accessing the conversation from.
close
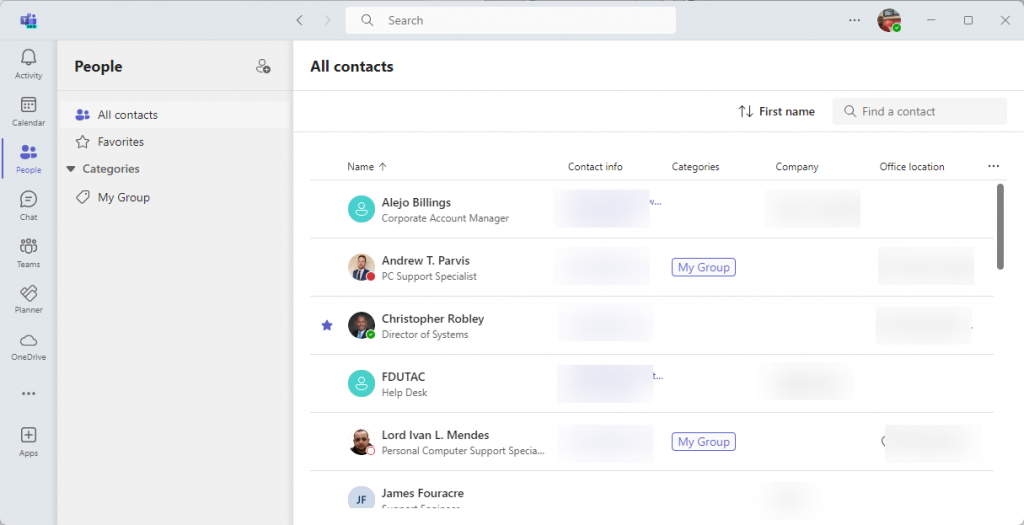
New Teams – People
Microsoft has moved the Contacts into the People App. By default, the People tab will already have a “Favorites” group and a “My Group” category. However, creating new categoriess can be a helpful way to organize your contacts.
For example, you may wish to create a category for people that you are working with on a project or for people that you interact with from a department.
Add People to Favorites
Find the contact you wish to be added to favorite and click the star in front of their name
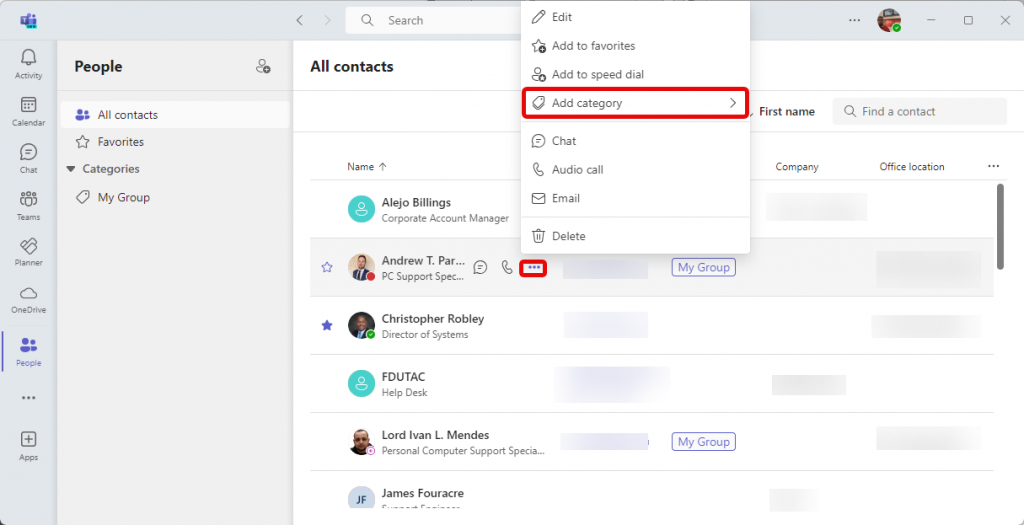
Add People to Category
Next to the contact, click the ellipses button and then click “Add Category”
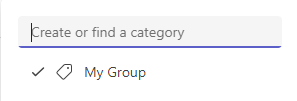
Type in the name of the new Category, search for an existing category, or select from the provided list
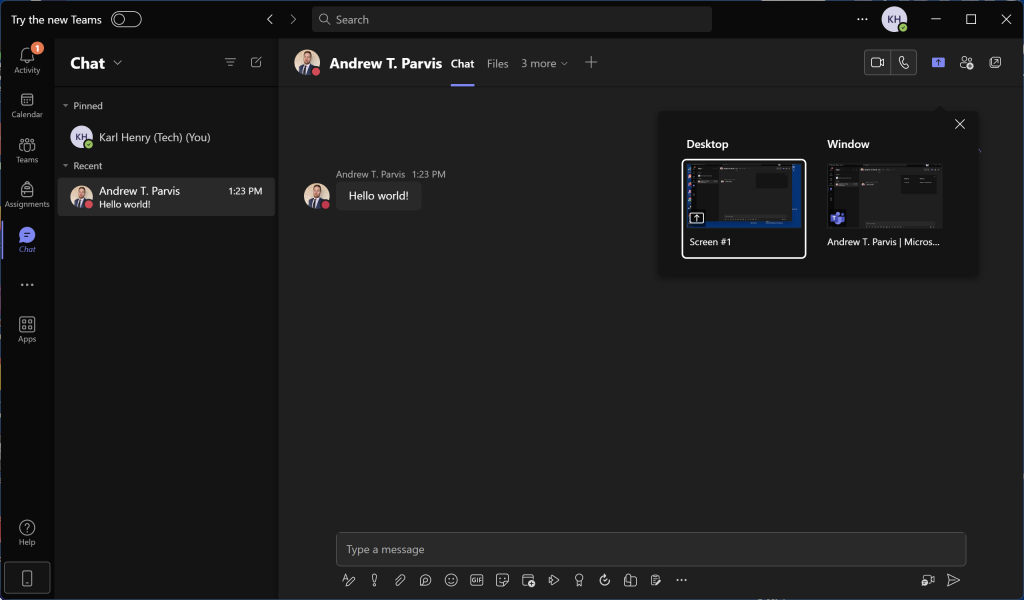
Screen sharing is one of Microsoft Teams’ most powerful collaborative features. You can show your screen to your colleagues and even grant them control to edit Microsoft Office files with you in real time.
Note
Before you get started, make sure that you are using the installed version of Microsoft Teams, as the browser-based Teams version does not support this functionality.
From the chat window or from an ongoing call, click on the “Screen Sharing / Share” icon
Classic Teams
New Teams
You be given a choice to either share your desktop or an application from the Microsoft Office suite, click on the window you want to share
Classic Teams
New Teams
Once you select the screen you wish to share, the members of your chat or call will be able to view your screen and request access to remotely control your desktop or program.
You can only share your screen with a mobile device user if you are engaged in an active voice or video call with them.
Creating a team provides remote team members with the ability to work together and share information via a common online space. You can also organize your information by creating channels to help optimize your team’s workflow.
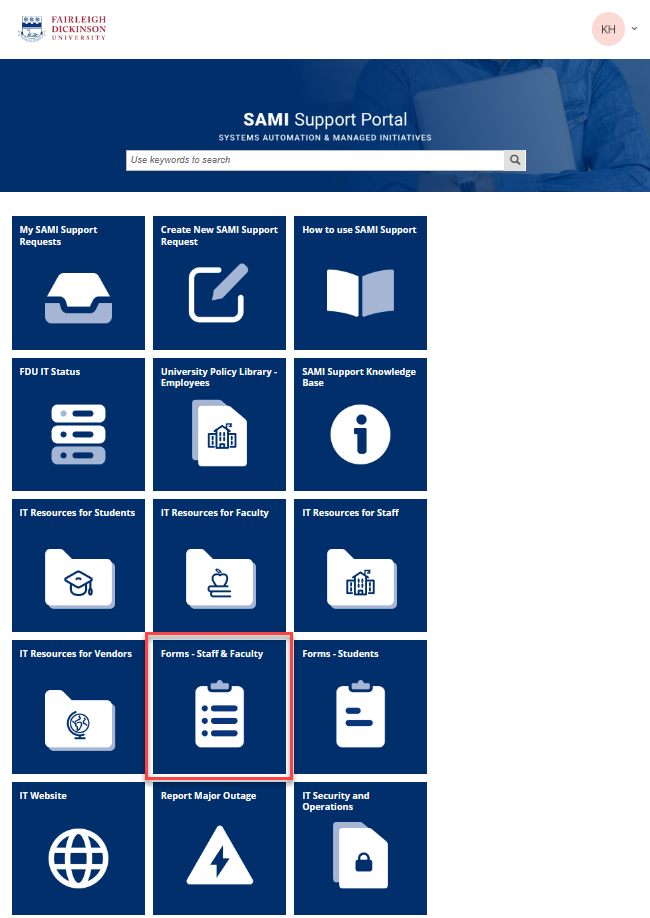
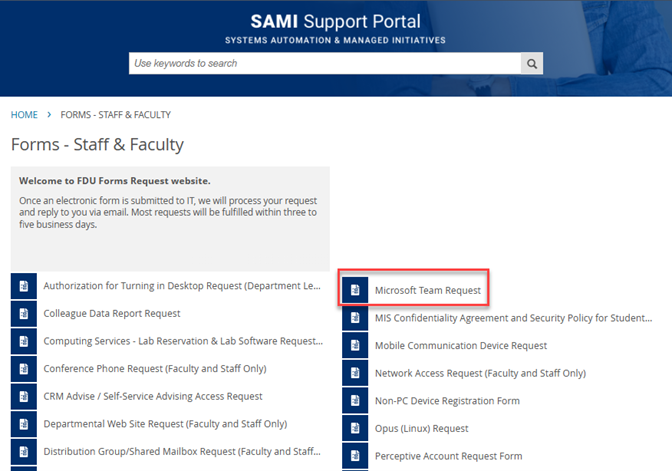
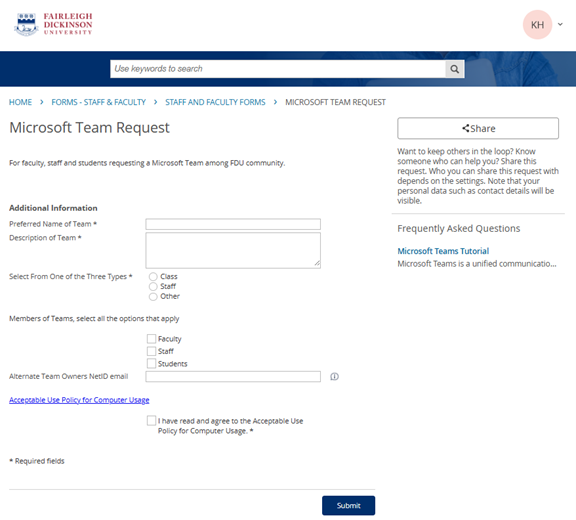
To create a Microsoft Team, you must request one using an online form on SAMI Support. To request a team, follow these instructions:
Navigate to the SAMI Support using the link below, logging in with your FDU NetID account
Scroll down to “Microsoft Team Request” and click on it to expand the information
Fill out all the fields and click on the “Submit” button
Note
You can specify additional team owners. Owners will have rights to invite and make other changes to the team after its creation.
You should now see a screen informing you that your form was successfully submitted
Note
Please allow 3 to 5 business days for the Team to be created.
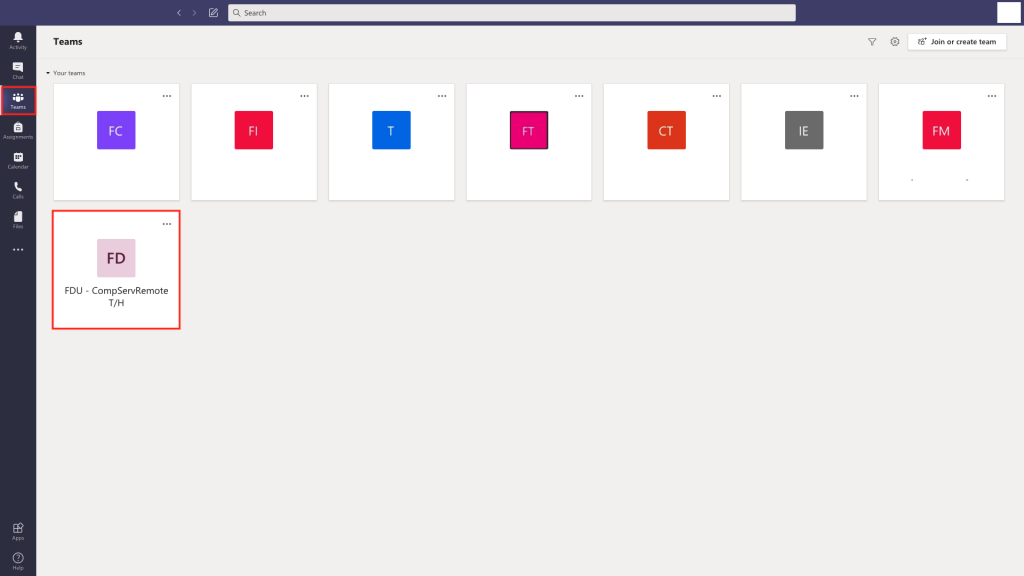
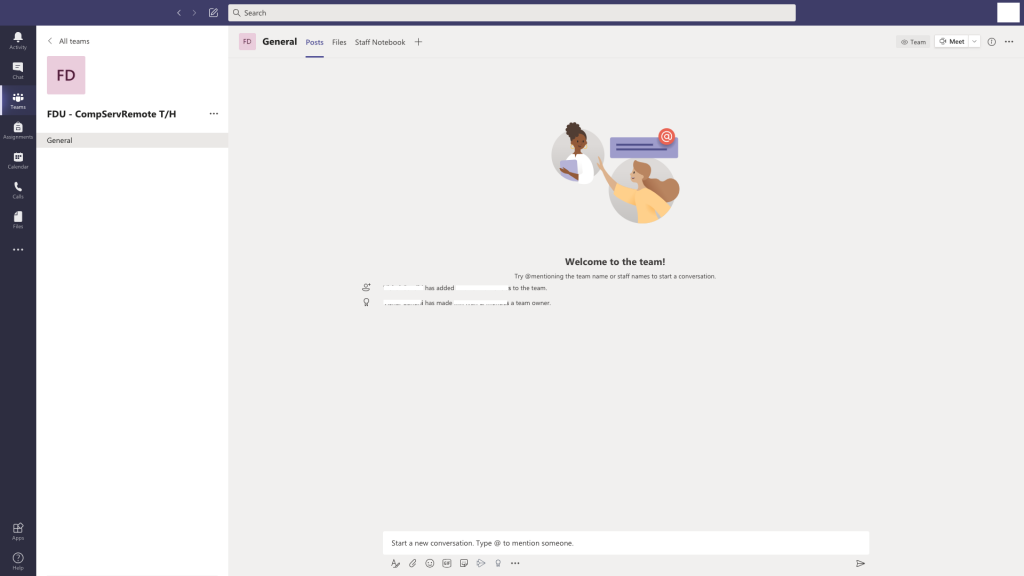
You will receive an email once the team is created. The next time you log in to Teams you will see your team listed in the Teams section
Click on your team to open the general channel. From here you can create channels, add users, and customize your team. Any team members that you add will receive an email notifying them that they were added to your team. The next time that they log in or open Teams, they will find the team listed in their Teams section
Channels are dedicated sections within a team. You can keep conversations organized by specific topics, projects, disciplines, or whatever works for your team! Channels are where conversations happen and where the work gets done. There can be public channels which are open to all team members or, if you require a more select audience, private channels can be open to a subset of your team.
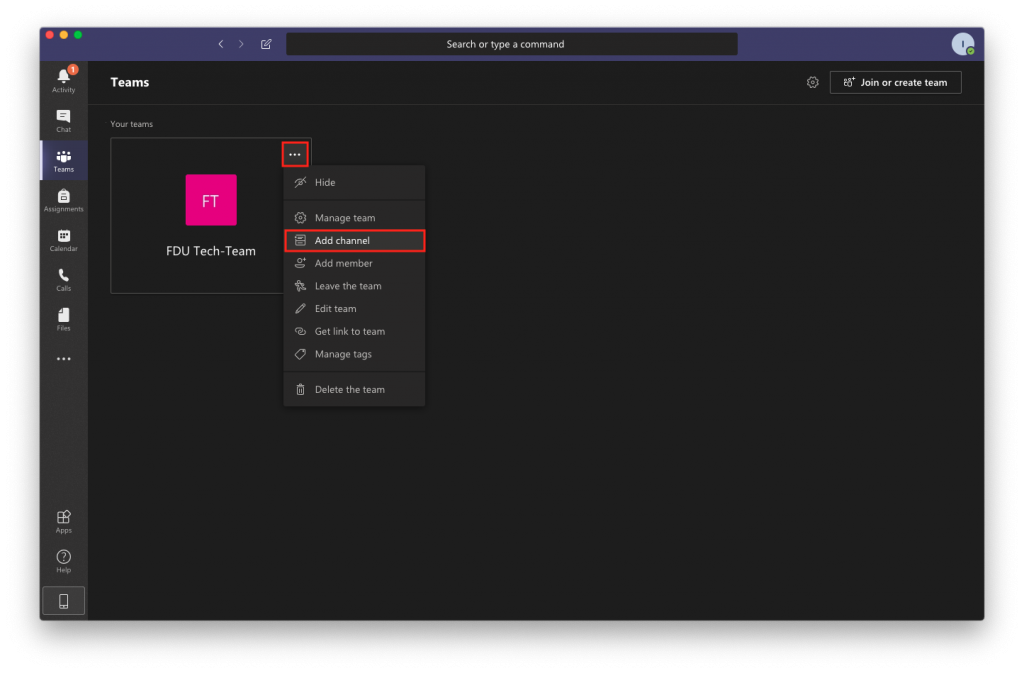
Select Teams from the menu on the left-hand side of the screen. If you have multiple teams, select your team of choice
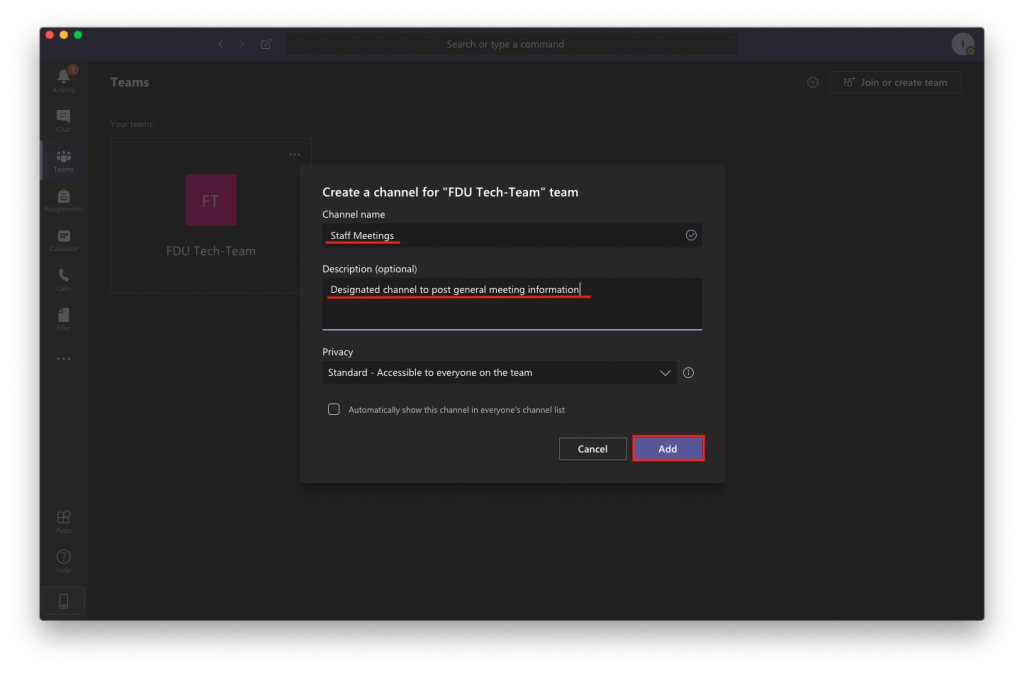
Click on the “More options” icon (•••) next to the team name and select “Add channel”
Give the channel a name, and a brief description as if would would like
Select your channel’s preferred level of privacy and press “Add”
Standard channels are open for anyone to join Private channels are invitation only
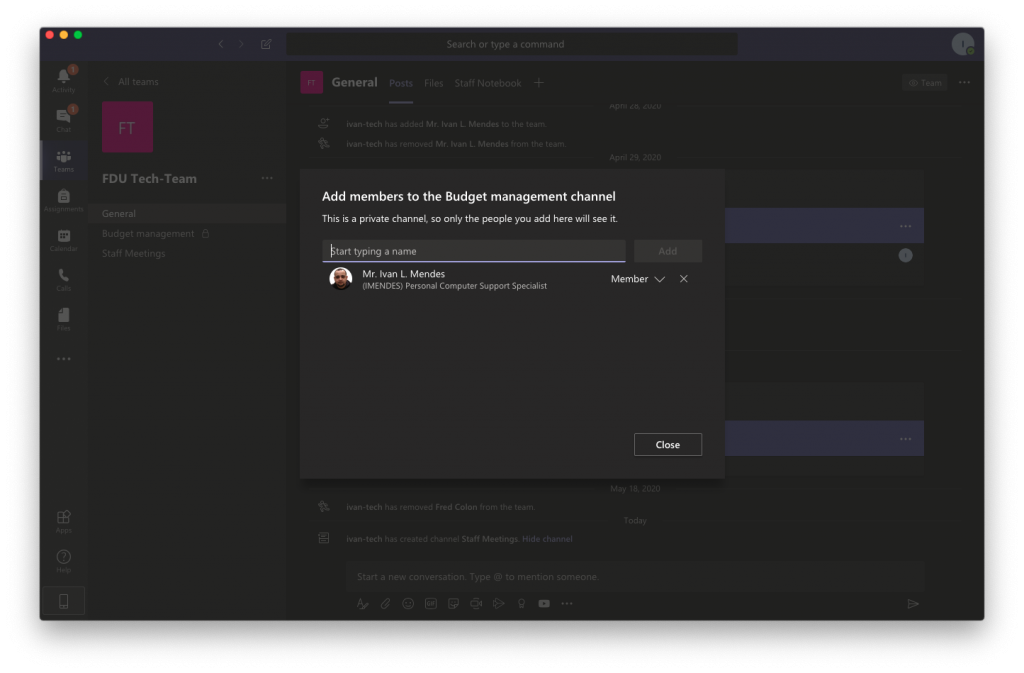
If you selected “Private” you will see a window that lets you add the team members that should have access to the channel. Once all members are added, press “Close”
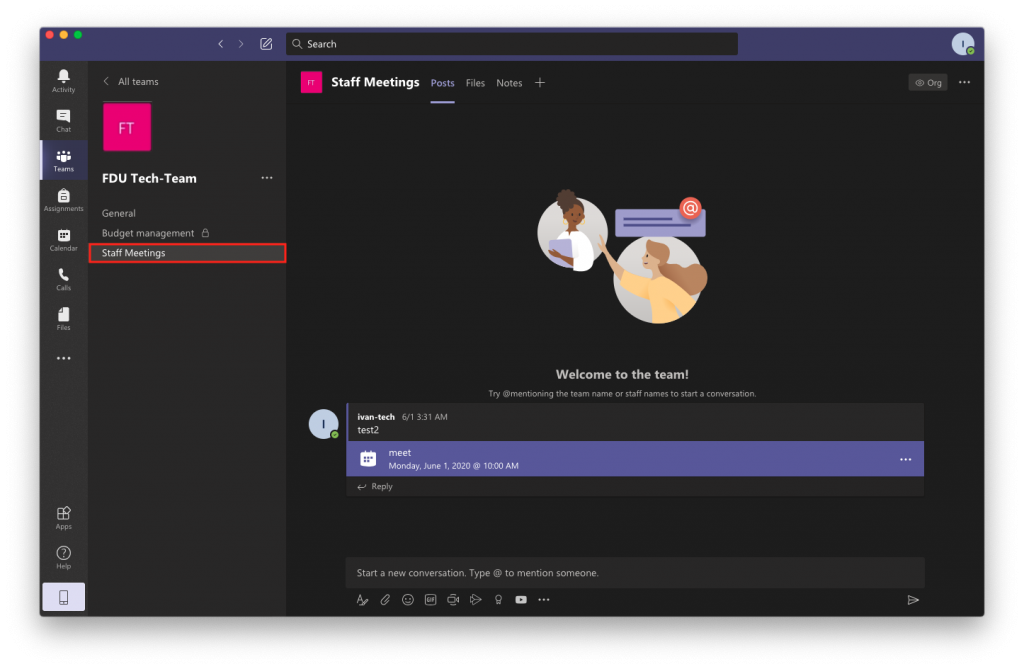
Once a channel is created it will show up under the General channel in the channels list. If the channel was set to Private, only the members can see it. Anyone who belongs to the channel can click on it to view its contents
Note
Since channels are sections within a team, it is not possible to add members to a channel that are not part of the team.
Now that your teams and channels are created, you can begin to take advantage of Microsoft Teams’ management features. Team management includes essential functions such as adding and removing members, assigning permissions for individual members, and managing your channels. You can also implement granular customizations such as setting parameters on the use of tags and emojis.
Select Teams from the left menu. If you have more than one team, click on your team
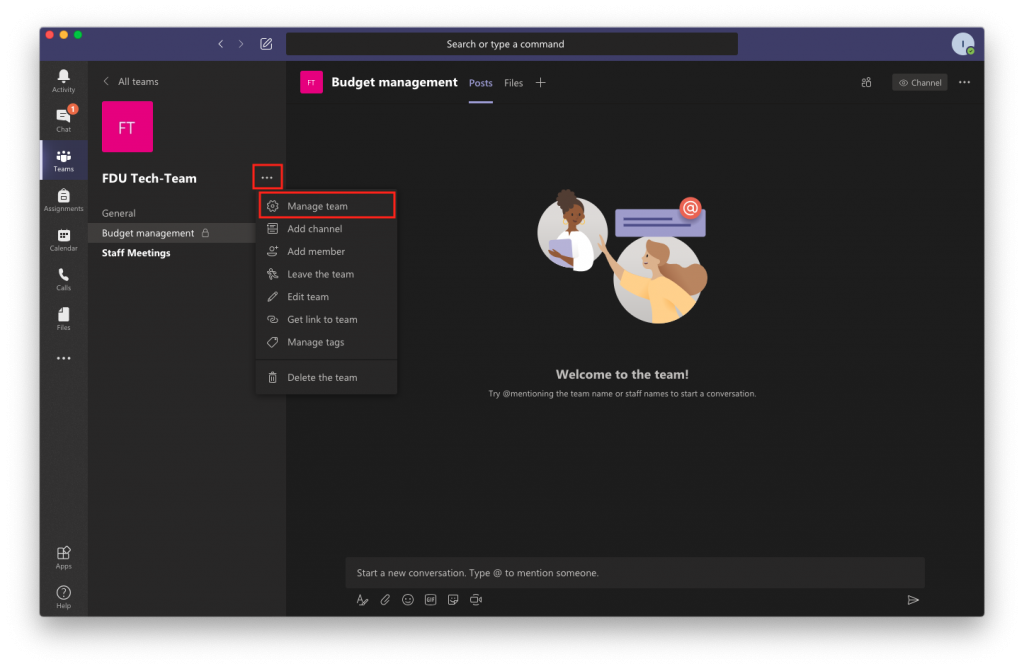
Click “More Options” icon (•••) next to the team name and select “Manage Team”. From here, you can select one of the following tabs
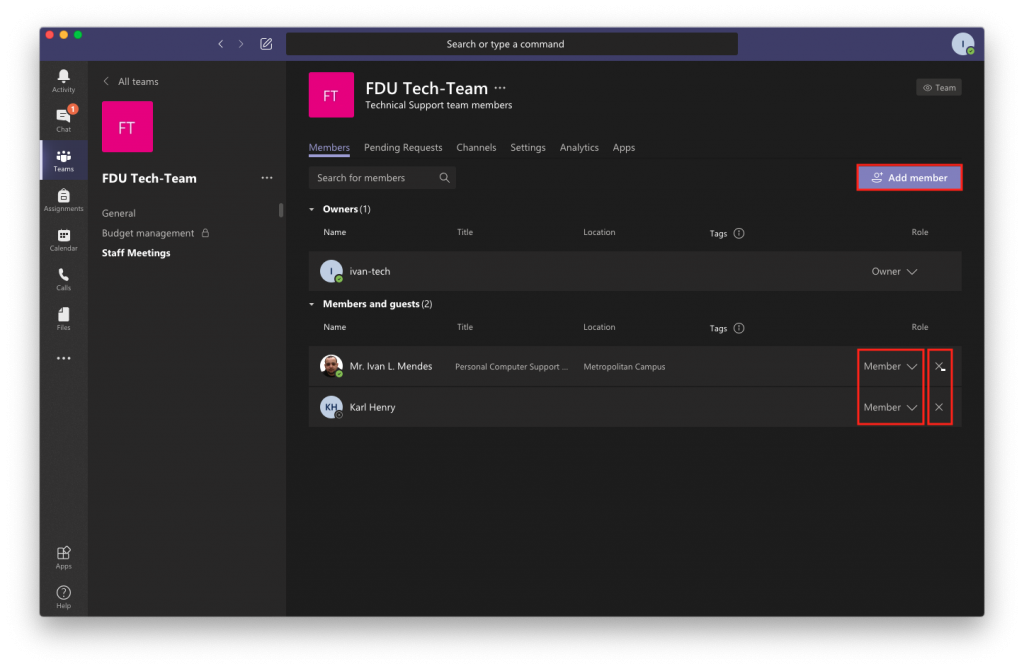
Manage Members Tab
Add a member by clicking “Add Member” button on the top right of the window
Remove a member by pressing “X” button on the right of their name
Use the drop-down menu to change a member’s role to Owner. This allows them full access to change settings
Manage Request Tab
Use this tab to accept or deny a person’s request to join your team
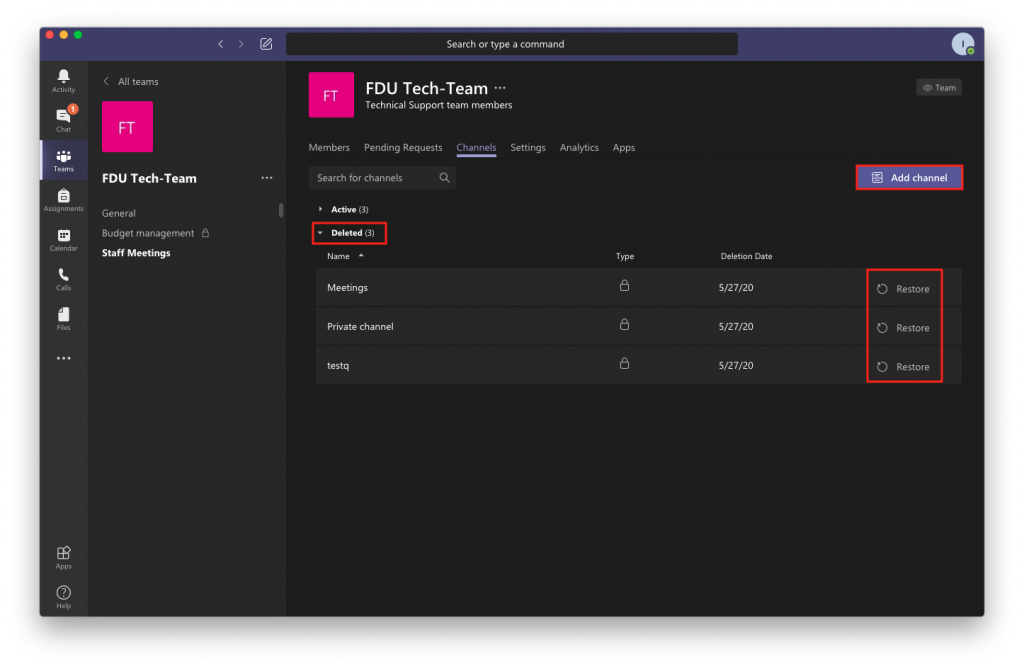
Manage Channels Tab
Create a channel by pressing the “Add channel” button on the top right of the window
You can restore deleted channels by expanding the “Deleted” list and pressing on “Restore”
The experience for managing a team setting varies between both the classic and new Teams.
Classic Teams – Manage Settings Tab
Team picture: is an optional setting which allows you to set a profile picture for your team. You can upload your own image or use one of the colorful templates provided by Microsoft
Member permissions: to set editing permissions for your team members
Guest permissions: settings you can allow guests to create, update, and delete channels
@mentions: lets you choose if you allow the @mention function to send notifications to individuals or entire channels
Team code: will provide you with a join code that you can give out to new members. This will allow them to join without being placed in the Pending Requests section
Fun stuff: lets you allow gifs and memes to be displayed on the channel
Tags: setting todecide who can use the tags feature. With tags, your team members can add labels help them better identify other members of the team
close
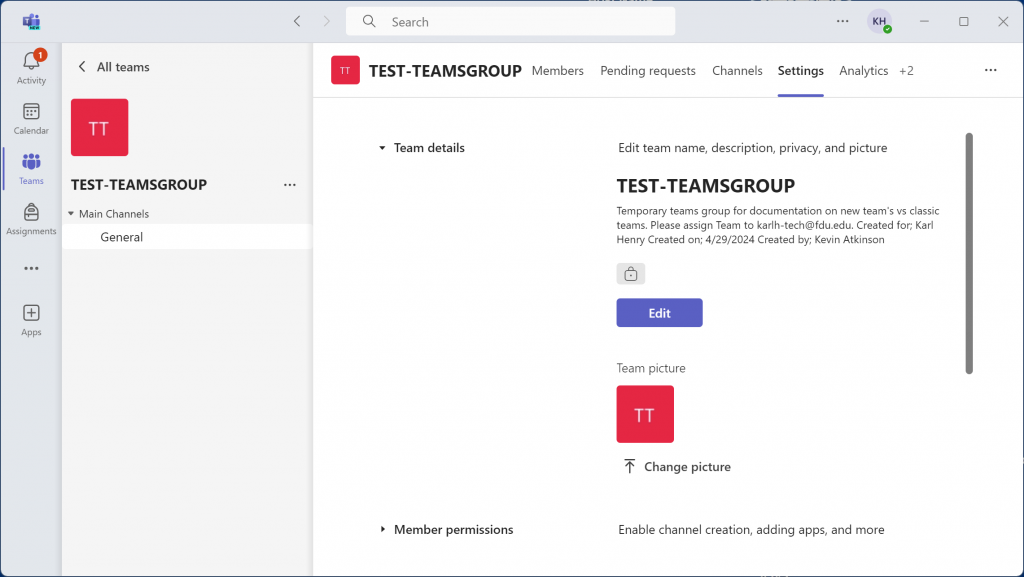
New Teams – Manage Settings Tab
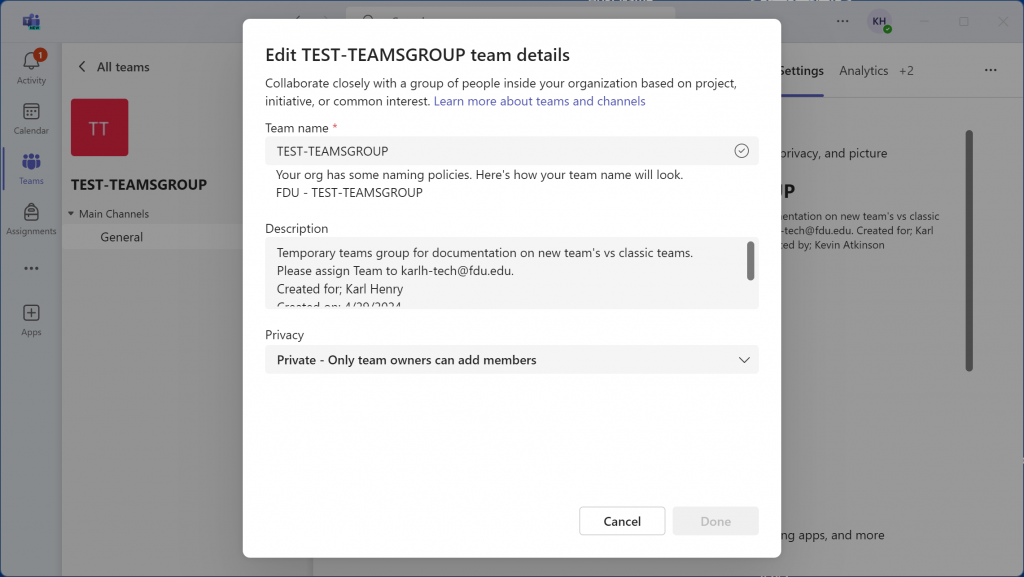
Team Details: is an optional setting which allows you to set a profile picture, description and set privacy options for your team. You can upload your own image or use one of the colorful templates provided by Microsoft
Member permissions: to set editing permissions for your team members
Guest permissions: settings you can allow guests to create, update, and delete channels
@mentions: lets you choose if you allow the @mention function to send notifications to individuals or entire channels
Team code: will provide you with a join code that you can give out to new members. This will allow them to join without being placed in the Pending Requests section
Fun stuff: lets you allow gifs and memes to be displayed on the channel
Tags: setting todecide who can use the tags feature. With tags, your team members can add labels help them better identify other members of the team
Team Expiration: Specifies when the Team will expire. By policy no user can change the expiration policy and can visit SAMI Support to extend the expiration when nearing the expiration date.
New Teams – Team Settings Page
New Teams – Team Details Page
New Teams – Team Image Page
close
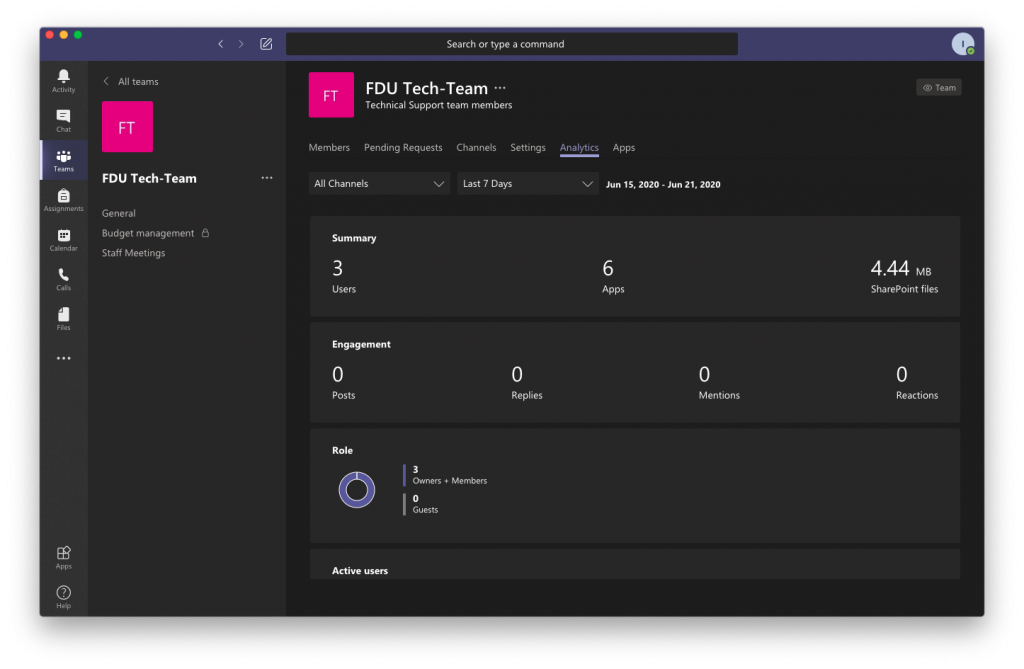
Manage Analytics Tab
The Analytics tab displays usage information for your team
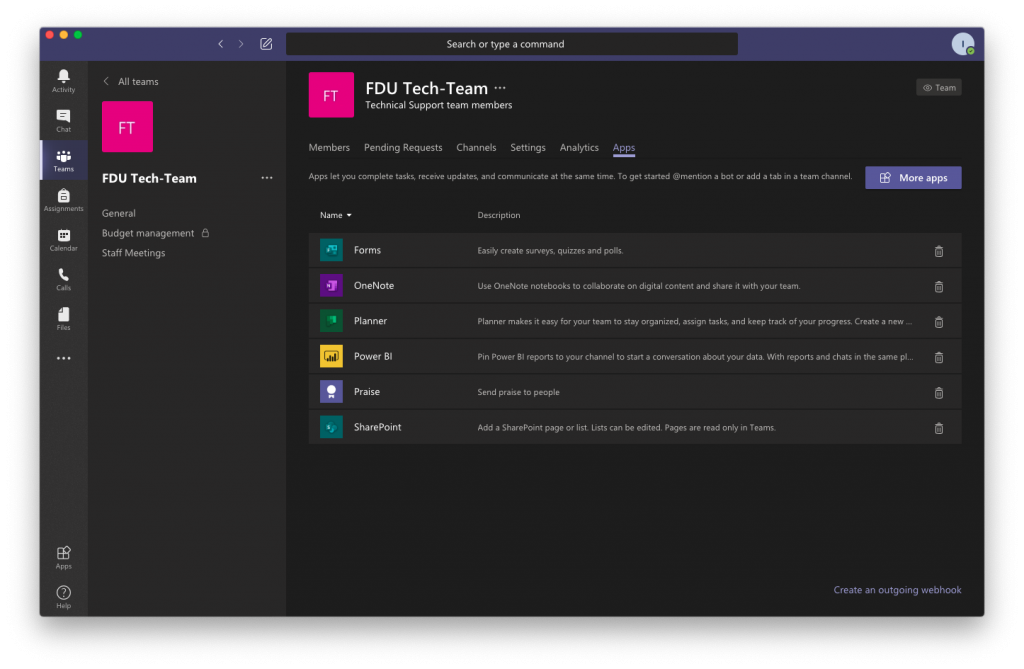
Manage Apps Tab
The Apps tab allows you to add or remove application plug ins for your channels
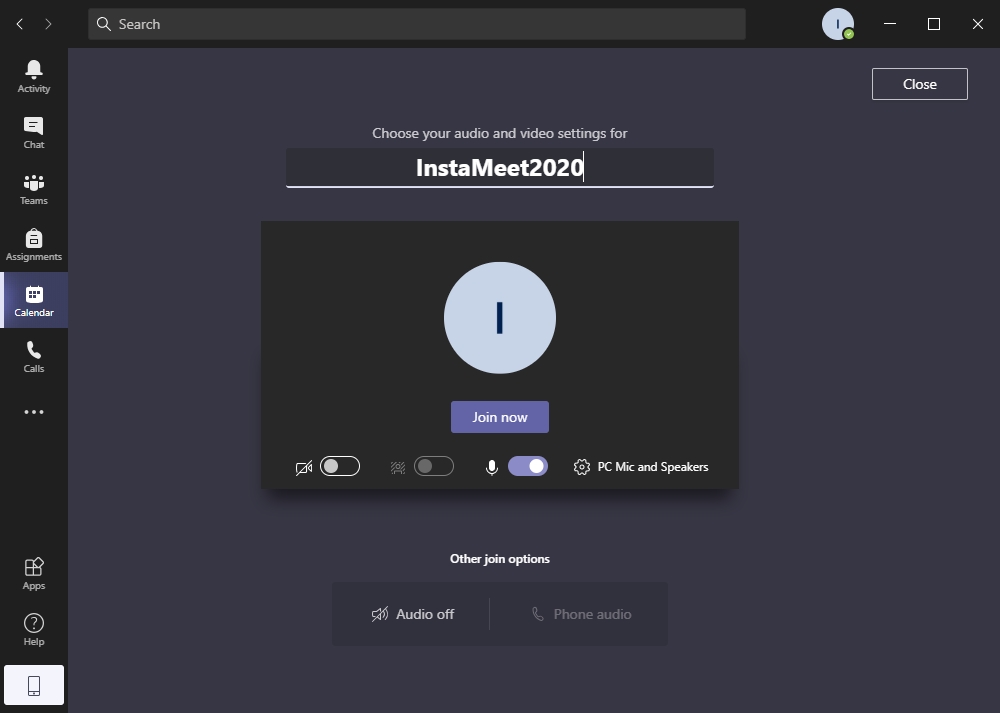
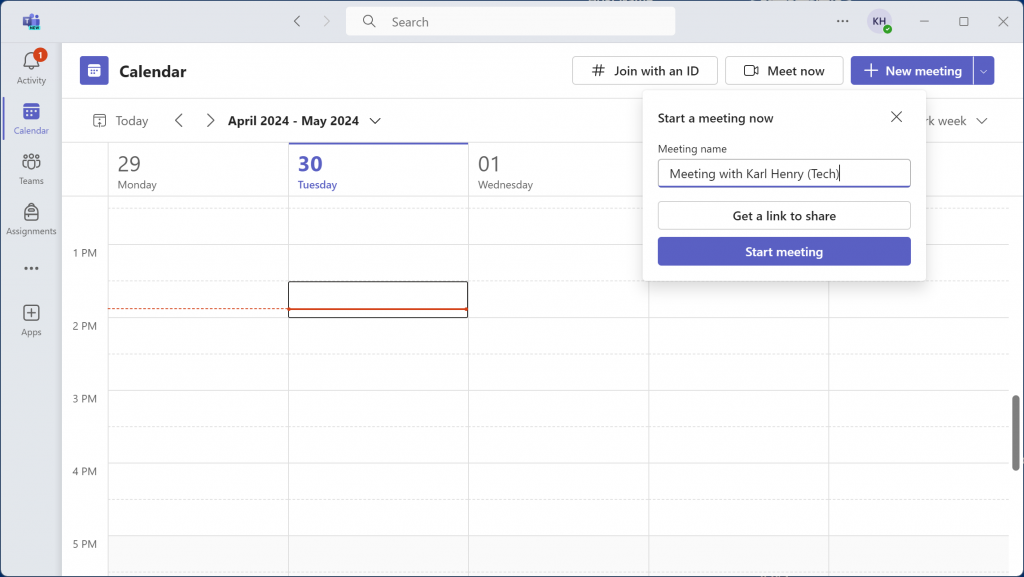
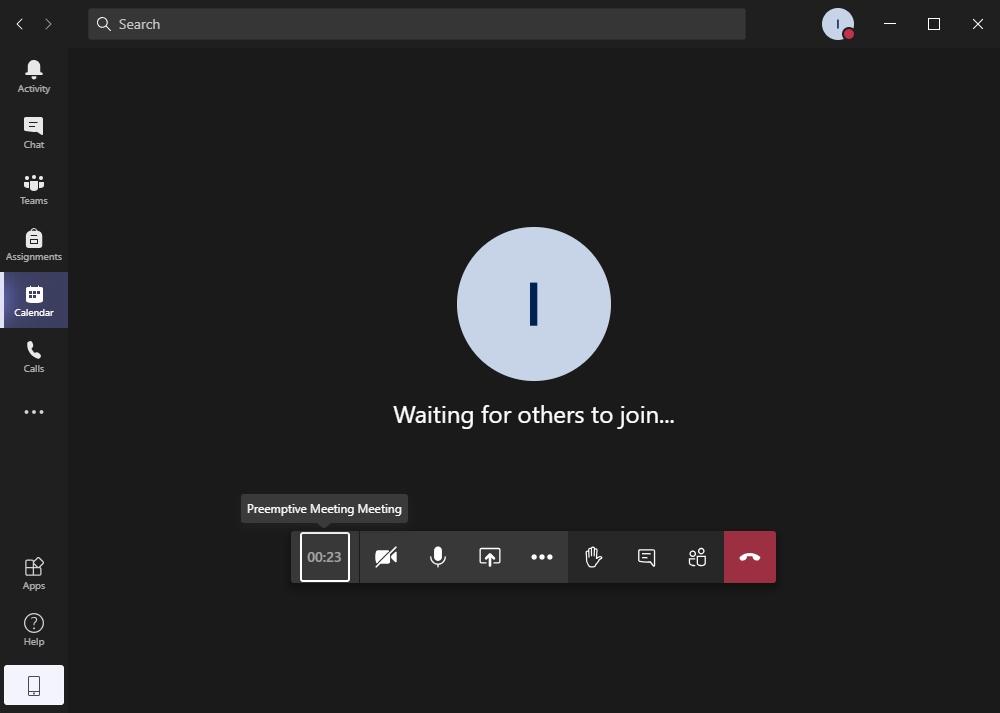
Instead of scheduling a meeting for a future date, you can start one right away and invite people in on the fly.
Select “Calendar” from the left-hand side of the screen and press “Meet Now”
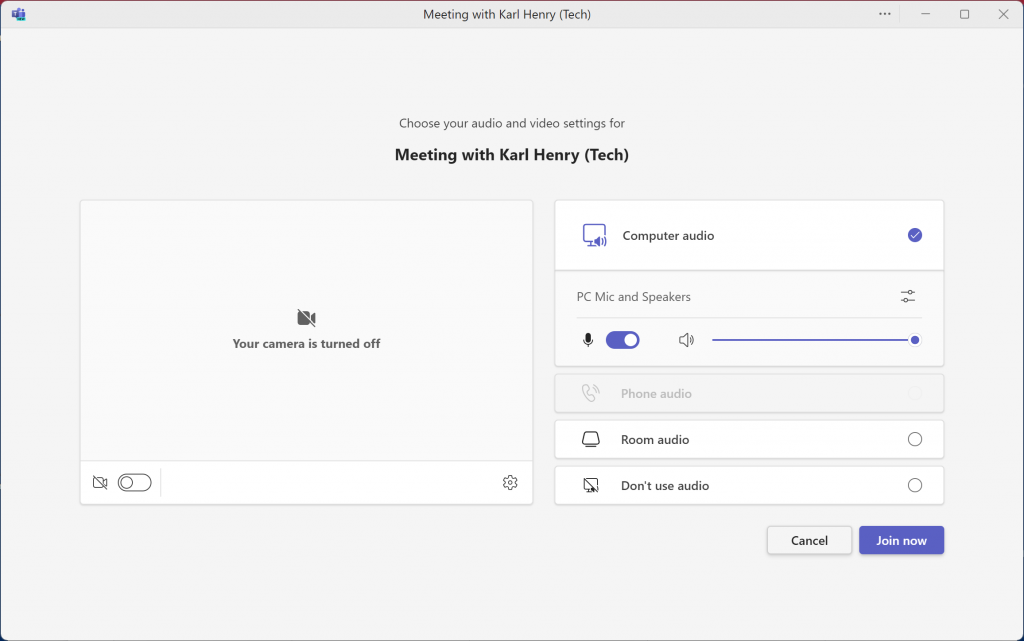
Give your meeting a name, select audio and video options, and press on “Join Now”
Classic Teams – Meet Now Options
New Teams – Meet Now Options
New Teams – Meet Now Audio Options
New Teams – Meet Now Invite Prompt
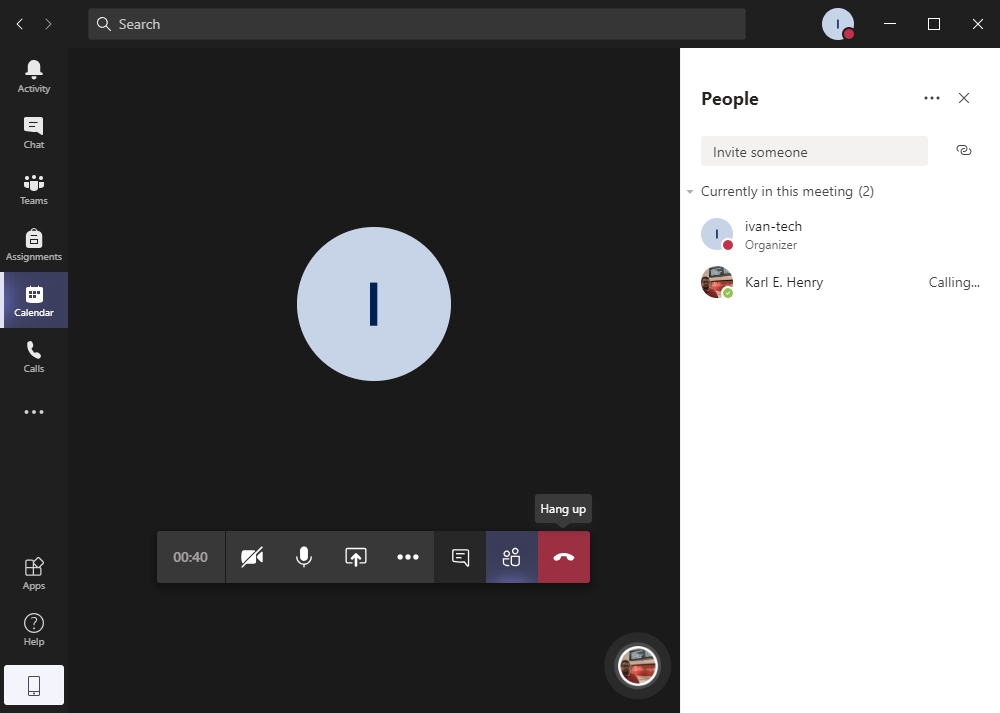
Your meeting should start with the “Participants” tab displayed so you can start inviting people right away. As you search for people and add them to your meeting, they will receive a call to be connected
As people accept the meeting invitation they will automatically be connected
Meetings in Teams include audio, video, and screen sharing. They’re one of the key ways to collaborate in Teams.
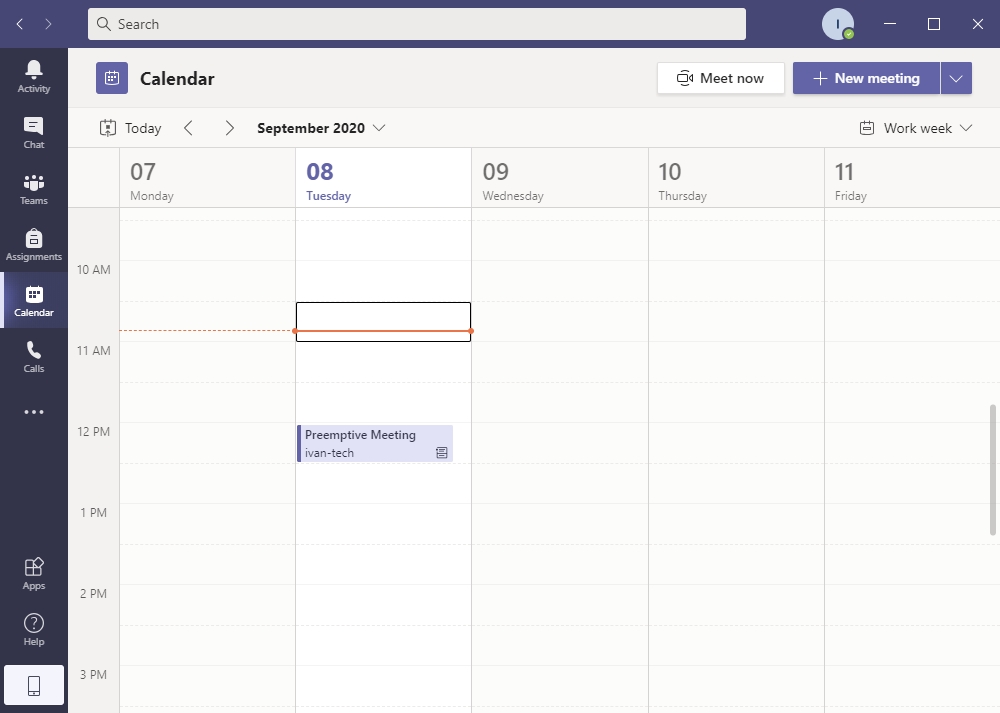
The Teams Calendar can be found by clicking Calendar in the left pane
Classing Teams – Scheduled Meeting
New Teams – Scheduled Meeting
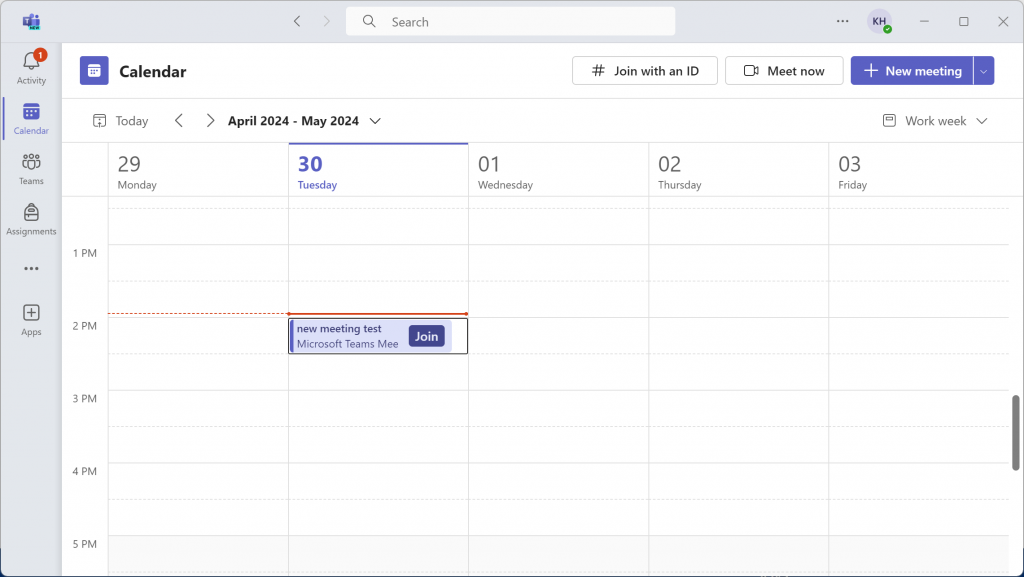
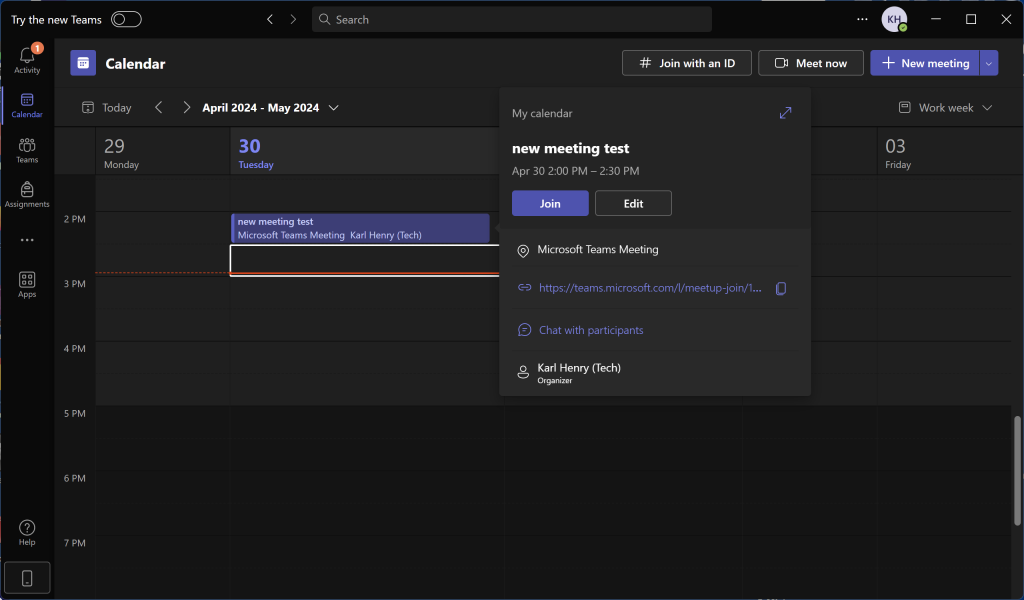
You can join a scheduled meeting by selecting the “Calendar” tab from the left menu, then finding and left clicking on your meeting and clicking join for the Classic Teams Experience, or simply press “Join” on the New Teams experience
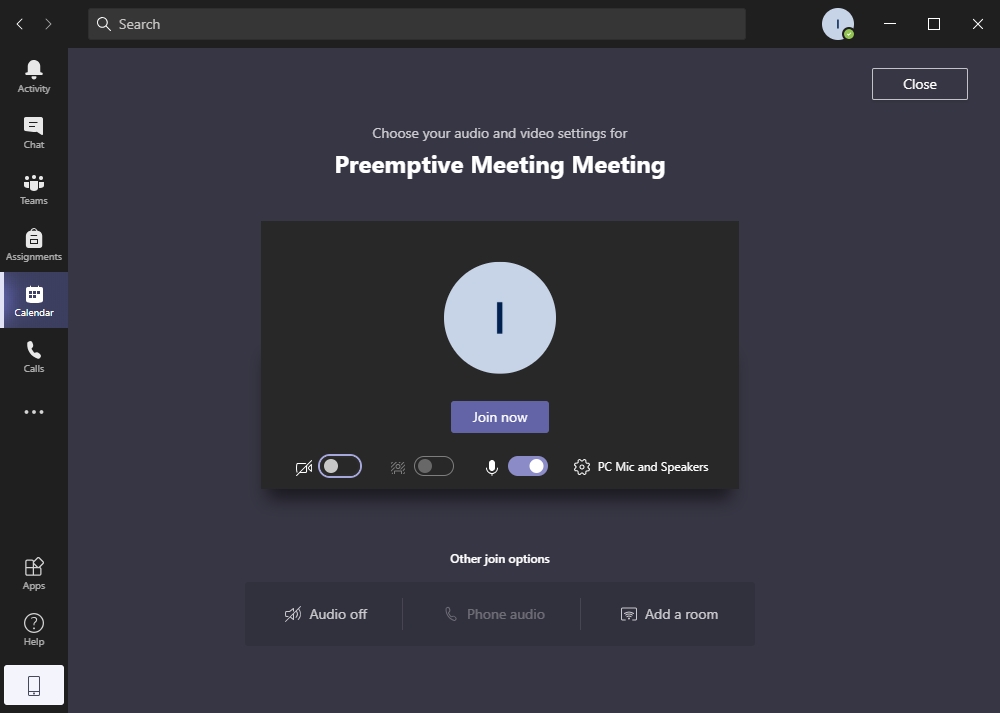
Select your video and microphone options, then left click “Join Now”
Classing Teams – Join Meeting Options
New Teams – Join Metting Options
Join
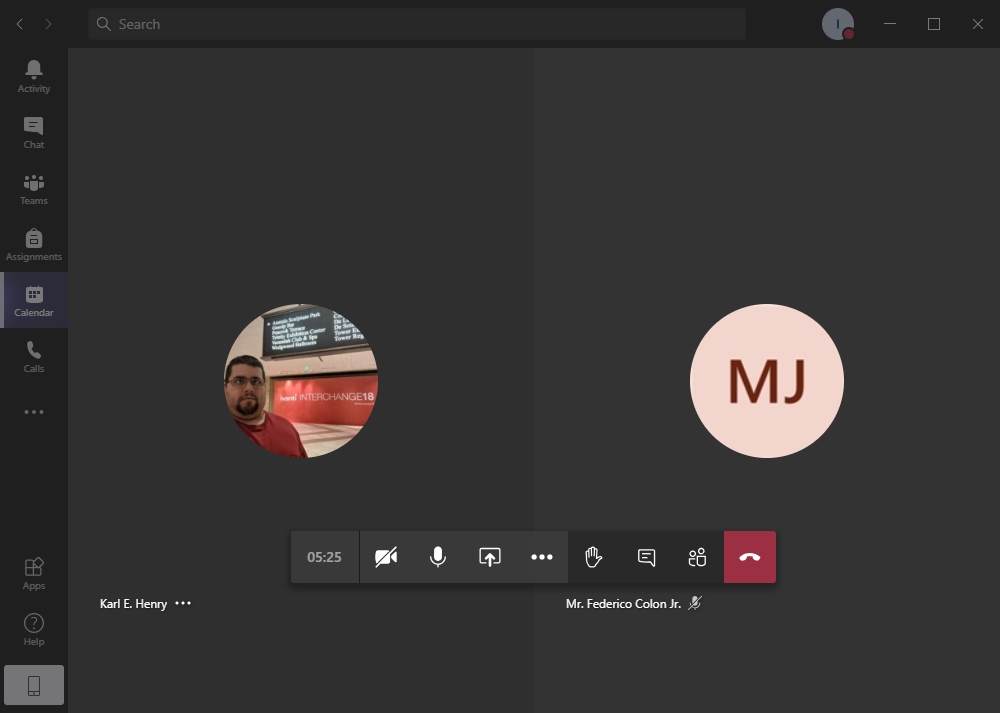
Depending on the Metting owner’s settings, you may receive a message that you are waiting for the host to let you into the meeting. You will remain on the Join Meeting Options Screen until you are admitted into the meeting.
If you are the first participant that joined the meeting, you will see a black screen informing you that you are waiting for other members to join. As people join the meeting they will show up on the screen. If you are the host and your meeting has the lobby opened, you will have to admit everyone who joins the meeting
Classic Teams – Waiting in Meeting
New Teams – Person in Lobby Prompt
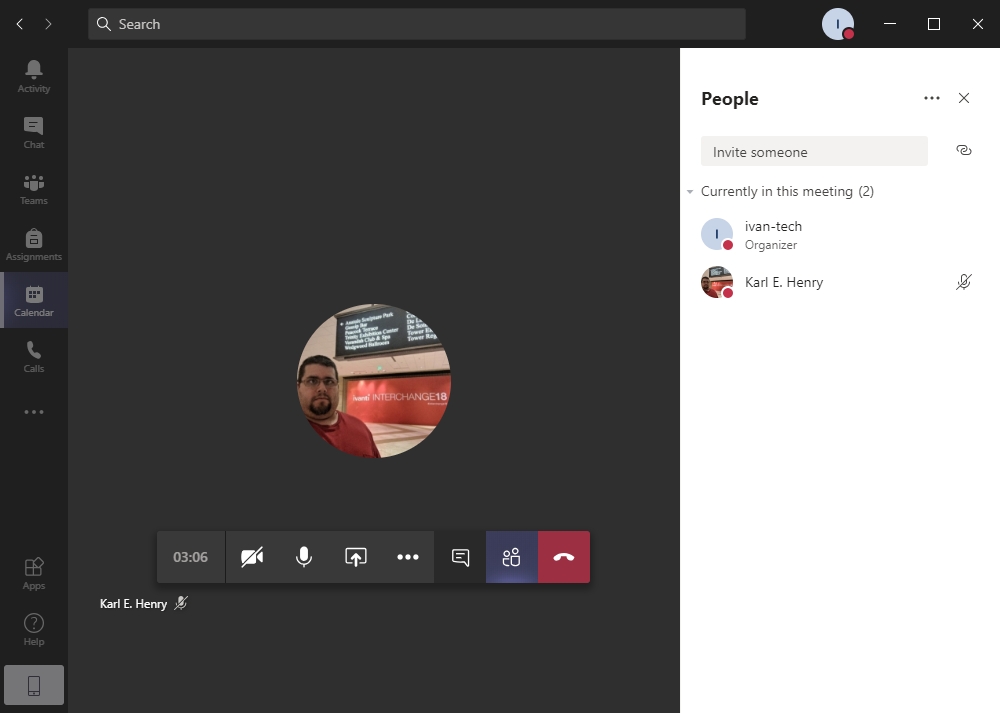
When you are done with the meeting, close it by pressing the red telephone icon to “Hang up” the call
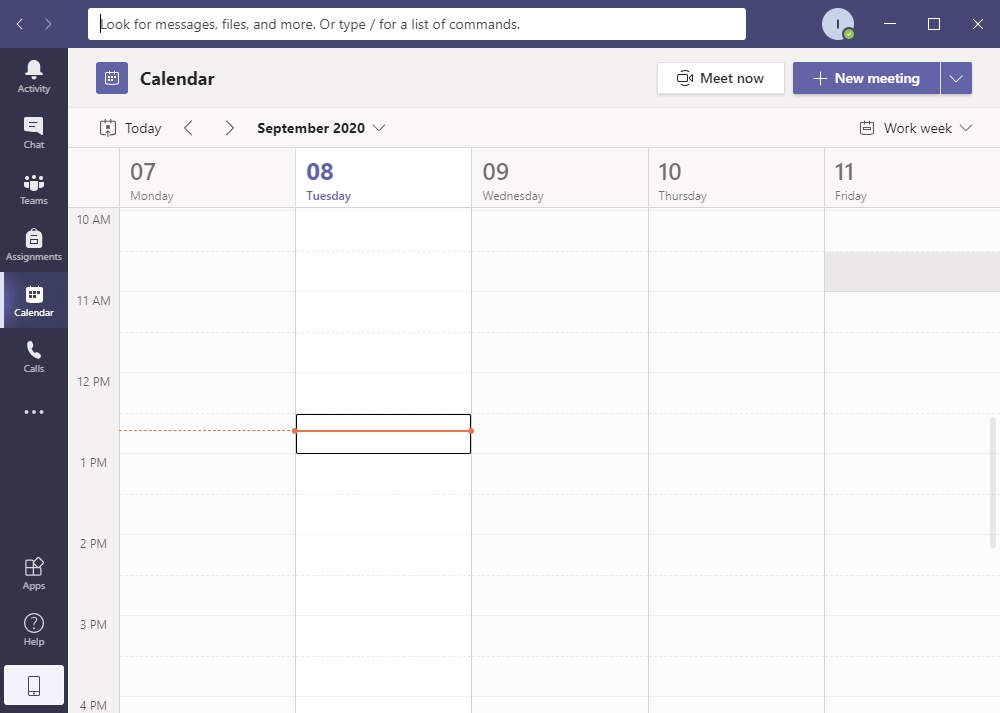
Due to Office 365 calendar integration, scheduling video and voice meetings on Microsoft Teams is simple and convenient.
Select the “Calendar” tab from the left-hand side of the screen. This screen displays your entire FDU Office 365 calendar. Next, press “New Meeting” button on the top right of the window
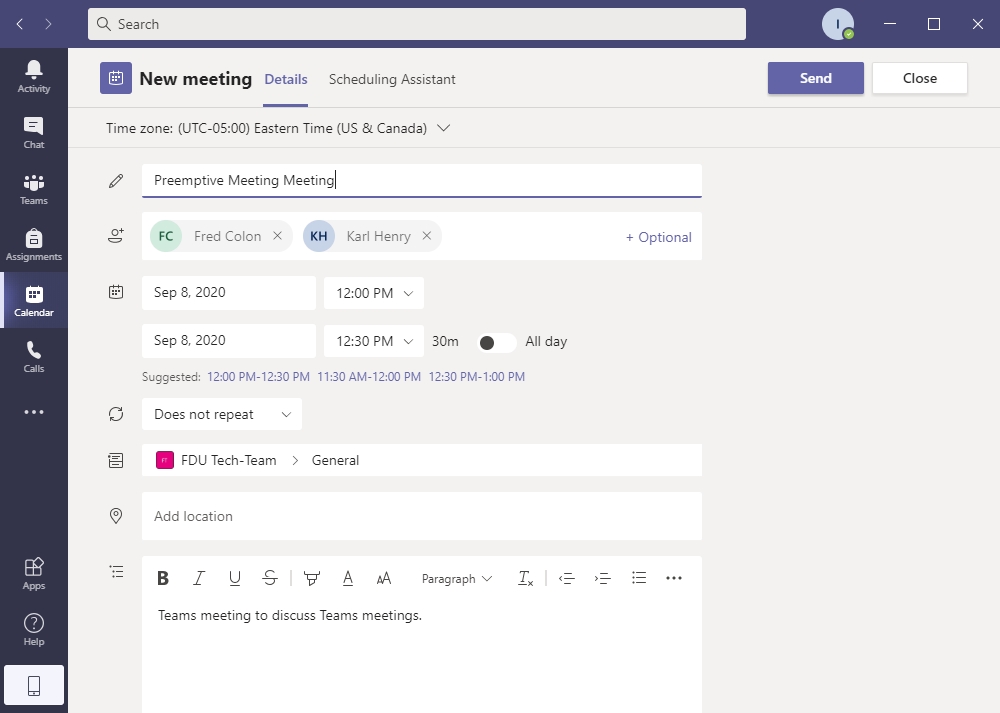
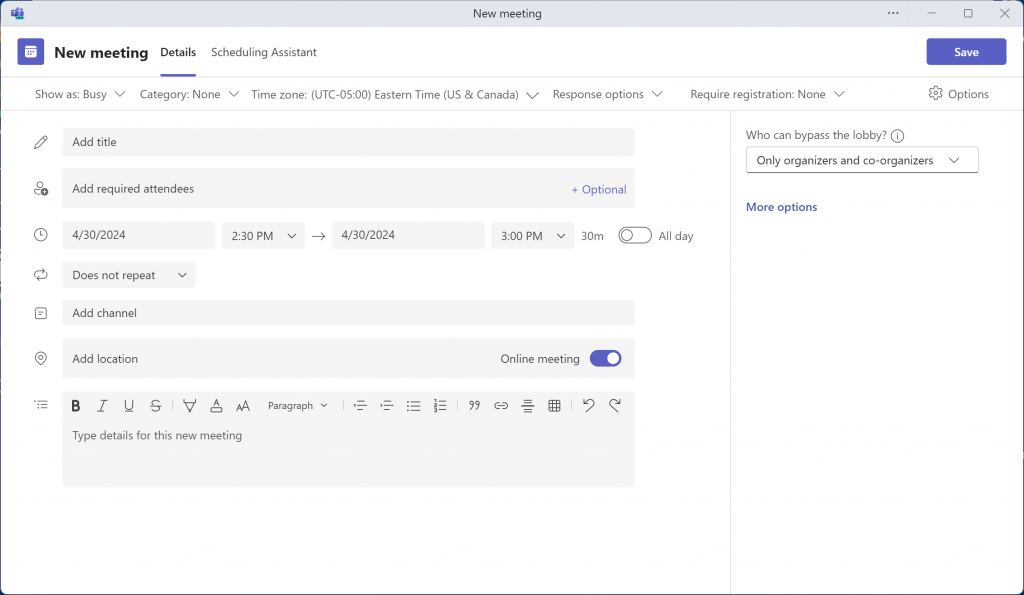
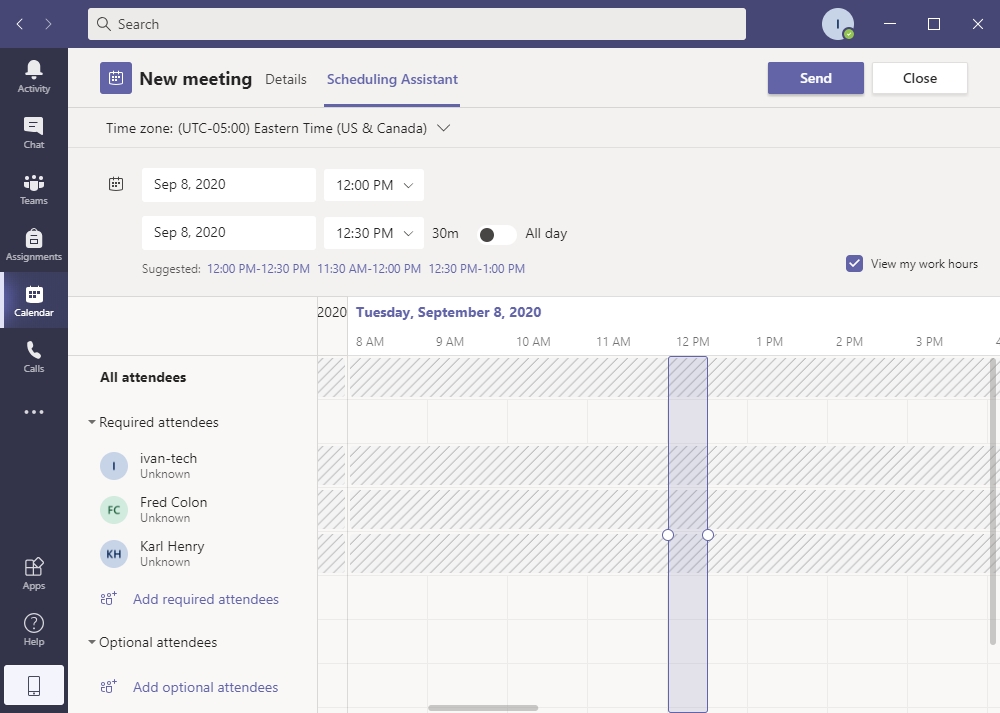
You will notice that the New Meeting window offers 2 tabs: “Details & Scheduling Assistant”
From the “Details” tab, enter the following information about your meeting:
Title
Required Attendees
Note
You can also add optional attendees by pressing + optional button
Time
Specify whether the meeting reoccurs
Add Channel is optional and lets you specify an entire Teams channel to receive a meeting notification
Add location is optional and enables you to select a physical location for members to meet at
Add details like the topic of discussion, meeting outline, etc
Classic Teams – Meeting Invitation Request
New Teams – Meeting Invitation Request
The “Scheduling Assistant” tab allows you to view the calendar of all attendees to check for availability. It is possible to adjust the meeting time on this tab
When finished, press the “Send” button on the top of the page. The meeting will be posted on the channel you selected, and invites will be emailed to all requested attendees. The meeting will also show up on the calendar of the people who have accepted the meeting invitation
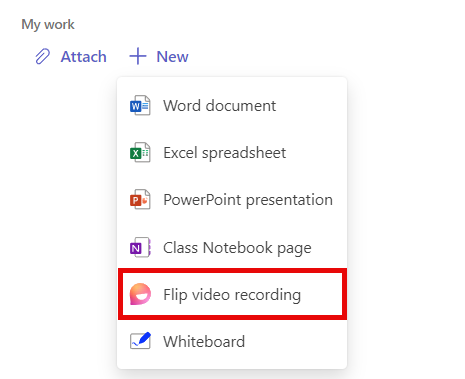
Microsoft has acquired Flipgrid for video submissions for Classroom Assignments. This feature is only available from within a Classroom Team for assignment posting and submission.
Faculty can request a classroom team by using the following SAMI Support form:
The description must state that a classroom team is required.
After the new classroom team is created, the requesting faculty member can assign students to the classroom team. Students can only access the Flipgrid video submission button within the classroom team.
After you have created assignments or posted to an assignment, A new app tab will be displayed within your Teams app list labeled Assignments.
Microsoft Office 2019 Pro Plus is Fairleigh Dickinson University’s standard office productivity software suite used on all FDU-owned laptops and desktops.
Office 2019 Pro Plus is the current version installed on all university computer labs and Microsoft Office 2019 is the current version for all Apple macOS devices.
FDU Faculty and Staff in possession of a university-owned laptop or desktop who has Microsoft Office 2016 Pro Plus installed, may upgrade to the latest version of Office 2019 Pro Plus using the FDU Self Service Portal for Software. Follow the instructions below to upgrade.
Microsoft Office 365 offers a comprehensive set of software tools that facilitate documentation, collaboration, and communication. These tools are available on the Web or as downloadable desktop Office 365 apps.
Below is a list of articles for each of the available tools in the Microsoft Office 365 environment. Each article contains information on what each application is and training on how to use them.
Outlook
Outlook allows you to connect and stay organized with your email, calendar, and contacts all in one place.
PowerPoint is a slideshow presentation program that’s part of the Microsoft office suite of tools. PowerPoint makes it easy to create, collaborate, and present your ideas in dynamic, visually compelling ways.
Teams is a unified communication and collaboration platform that combines persistent workplace chat, video meetings, file storage, and application integration. Here you will find documentation on how to install and use Teams and all its features.
OneNote is a cross-functional digital notebook. You can organize different notebooks into sections and pages with easy annotation and navigation tools.
Lists you can Build and share lists to help you track issues, assets, routines, contacts, inventory, and more. You can get started with Microsoft Lists from Microsoft 365, from MS Teams or from within SharePoint.
Power Apps is a suite of apps, services, connectors, and data platform that provides a rapid application development environment to build custom apps. Using Power Apps, you can quickly build custom apps that connect to data stored throughout Microsoft 365.
Power Automate is a service that helps you create automated workflows between apps and services to synchronize files, get notifications, collect data and more.
Power BI is a business analytics solution that lets you visualize your data and share insights across your organization or embed them in your app or website. It allows connections to hundreds of data sources and generate live dashboards and reports.
Planner makes it easy for your team to create new plans, organize and assign tasks, share files, chat about what you are working on, and get updates on progress.
Bookings offers a simpler way to organize schedules and manage appointments. Microsoft Bookings includes a web-based booking calendar and integrates with Outlook to optimize your calendar and give your contacts the flexibility to book a time that works best for everyone involved.
Forms is an app that lets you create surveys, quizzes, and polls to collect real-time responses from students, collaborates and colleagues. It has built-in analytics to evaluate responses, and export results to Excel for additional analysis or grading.
To access Forms, you will be directed to our SAMI Support Portal where you will be asked to log in using your NETID and authenticate using Duo. Once you click “Next,” you will be forwarded to samisupport.fdu.edu in a new window or tab.