How-To

Microsoft Scheduling Poll in Outlook

Resources for:
icon Close

Through Microsoft Outlook’s Scheduling Poll (formerly FindTime), you can select a few possible meeting times and send attendees a link to a poll that allows them to vote for what meeting time works best for them. Once a consensus is reached, you schedule the meeting for the preferred time.

Scheduling Poll Icon
  • Like the Scheduling Assistant, the Scheduling Poll allows you to preview attendees’ FDU Outlook calendars (if available) so that the best possible options can be selected. This particular aspect of the feature will be less useful for attendees who…
    • DO NOT have FDU Outlook calendars
    • Have FDU Outlook calendars, but don’t keep them up-to-date
  • The Scheduling Poll has other convenient features, including email updates, the ability to schedule a meeting automatically, and more.
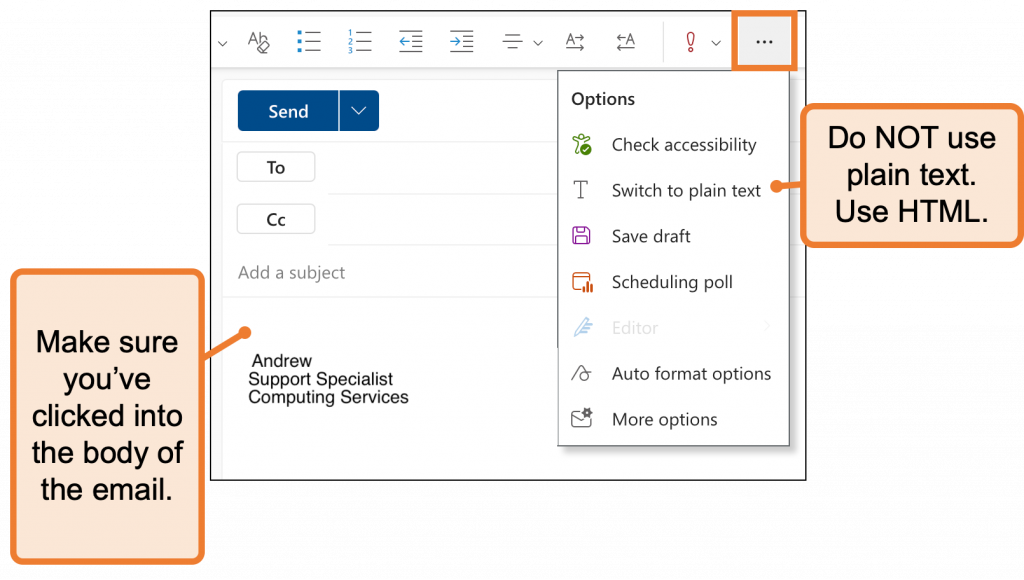
  • When using the Outlook web client, the Scheduling Poll feature is not available for emails composed in plain text. Emails must be composed in HTML.

Note

Doodle, a meeting scheduler add-in for Outlook, is not an approved application for use at FDU. Please use Microsoft Scheduling Poll as your meeting scheduling tool, as detailed in this article.

Where can I access the Scheduling Poll feature?

Windows

You can access the Scheduling Poll via the Mail or Calendar tabs of the Outlook desktop application.

In Mail, you can access the Scheduling Poll as follows:

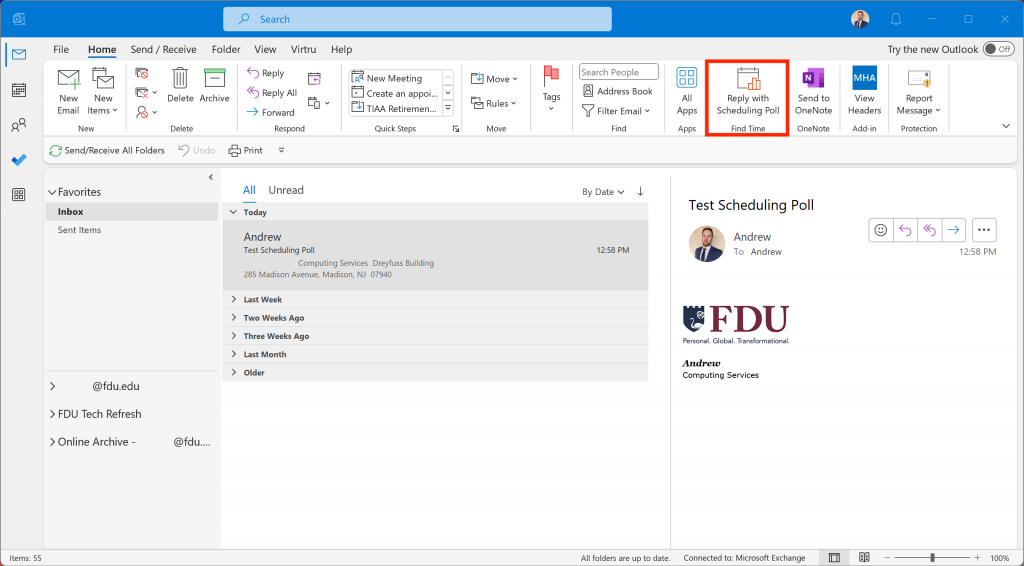
  1. Select “Reply with Scheduling Poll” on the “Home” tab when an email is open in the reading pane
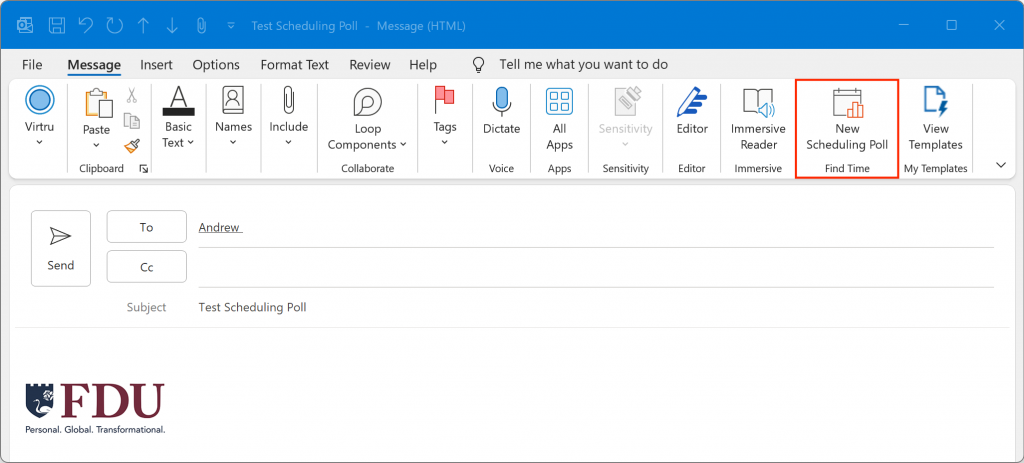
  1. Launch the compose pane by either creating a new message or hitting reply/forward for an existing message. List required recipients in the “To” field and optional recipients in the “CC” field. Then, on the “Message” tab, select “New Scheduling Poll”

In Calendar, you can access the Scheduling Poll as follows:

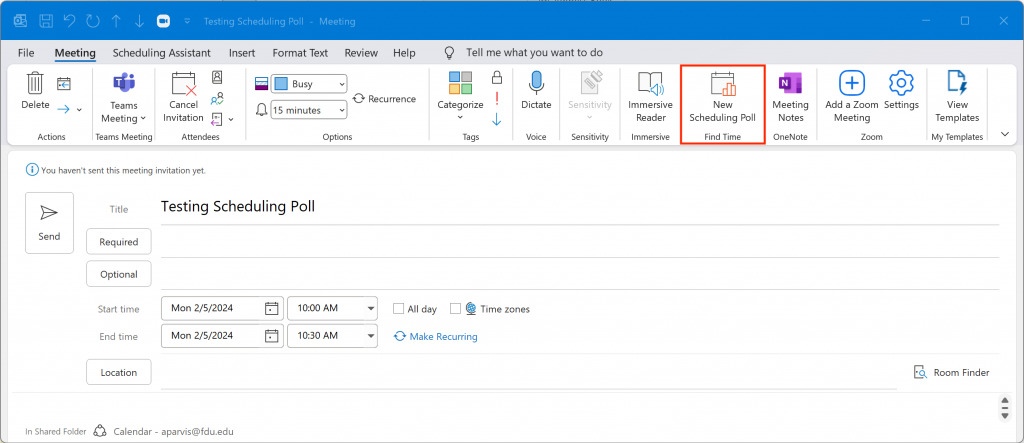
  1. Either by launching the compose form to create a new meeting event or opening an existing event in the edit form. List required attendees in the “Required” field and optional attendees in the “Optional” field. Select “New Scheduling Poll” under the “Meeting” tab
  1. Start a new message or event
  2. In the “Subject/Title” field, type what will eventually become the event’s name.
    • For example, “Team Meeting”
  3. In the “To/Required” or Optional fields, add the people who will be attendees for this meeting. They do not all have to be from FDU. Scheduling Polls can be sent to and completed by non-FDU email addresses
  4. Press into the body of the email and compose a message
  5. Press into the area of the email body where you want the link to the Scheduling Poll to show up
  6. Select the “Scheduling Poll” tab
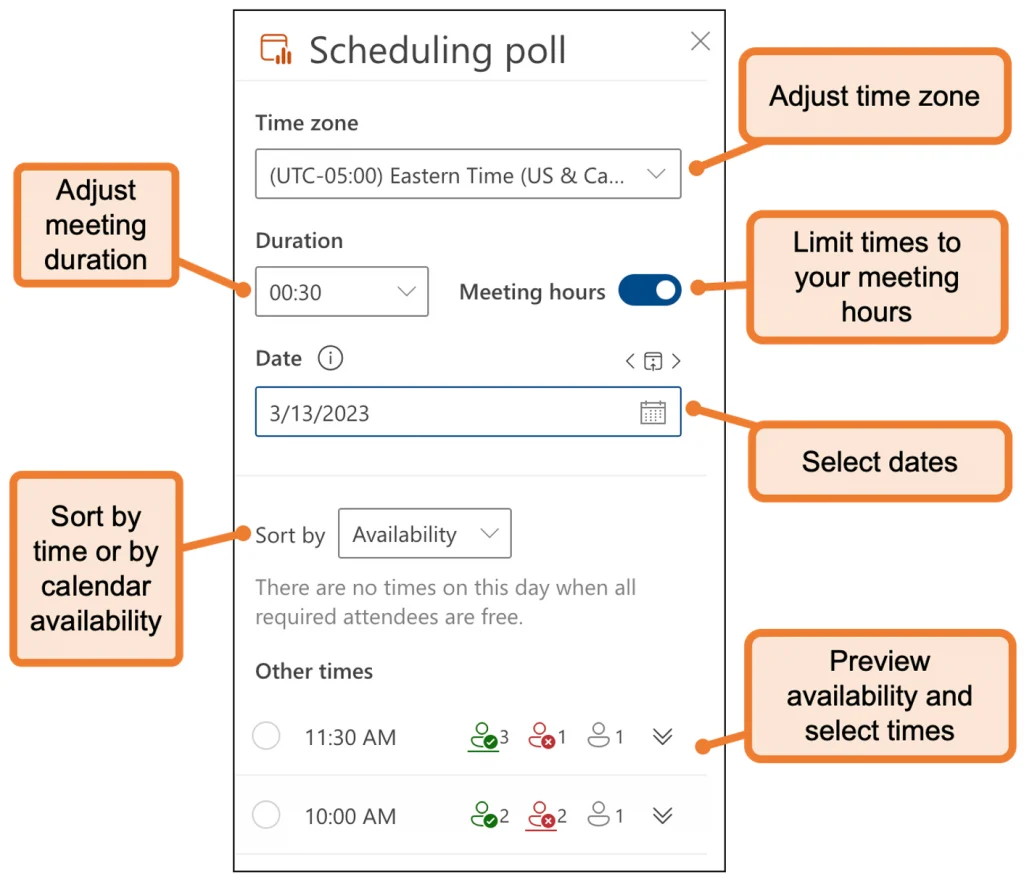
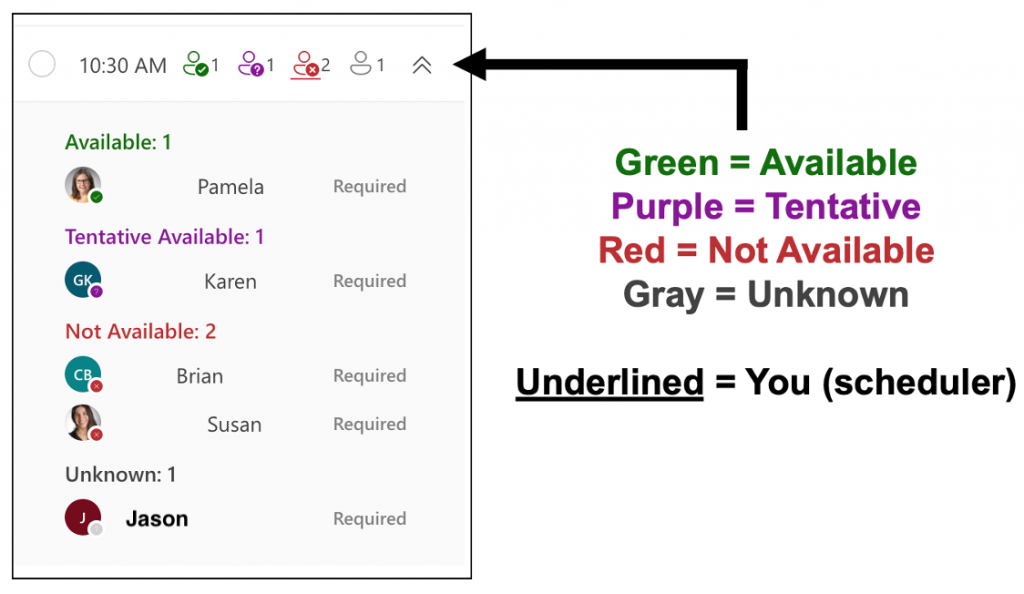
  7. A Scheduling Poll panel will open. From here, you can adjust your meeting duration, move between dates, and preview the availability of your attendees

Note

When selecting times for your poll, you can preview attendees’ FDU Outlook calendars, if available.

  1. Select times that work for as many attendees as possible, paying particular attention to the attendees whose attendance is most critical
  2. Press “Next” to proceed to the next step
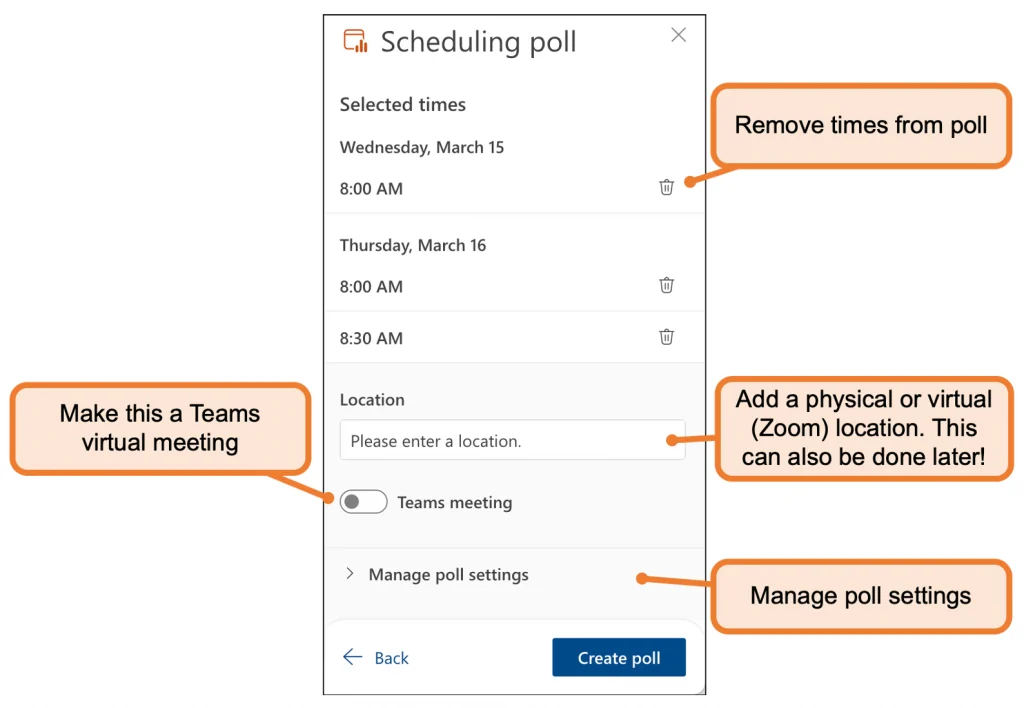
  3. A new panel will open with the ability to delete selected times or adjust the meeting location

Note

You can also turn the Teams meeting feature on if you want Outlook to automatically schedule a Teams virtual meeting for this event.

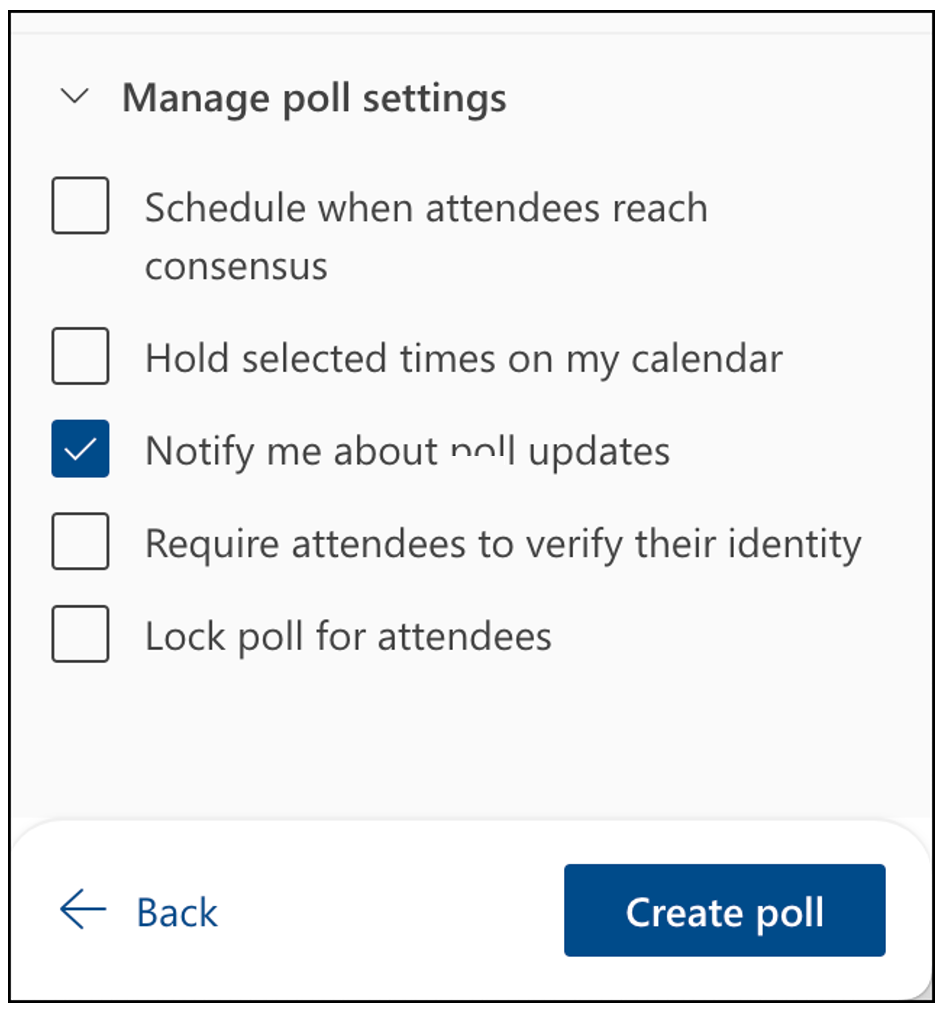
  1. Press “Manage Poll Settings” to expand the menu. Options include:
    • Schedule when attendees reach consensus – Automatically schedules a meeting and sends out an invite to attendees if everyone agrees on a particular time. If multiple times work, the earliest one will be selected.
    • Hold selected times on my calendar – Puts a temporary hold on the scheduler’s calendar for each of the selected times. These holds are removed when the final invite is sent out.
    • Notify me about poll updates – Outlook will send an email update to the scheduler whenever an attendee submits their poll response.
    • Require attendees to verify their identity – Forces respondents to verify their identity either by logging in to their Outlook account or entering a numerical code that Microsoft sends them.
    • Lock poll for attendees – Prevents attendees from adding more people to the meeting or suggesting new meeting times.
  1. When you’re ready, press “Create Poll”
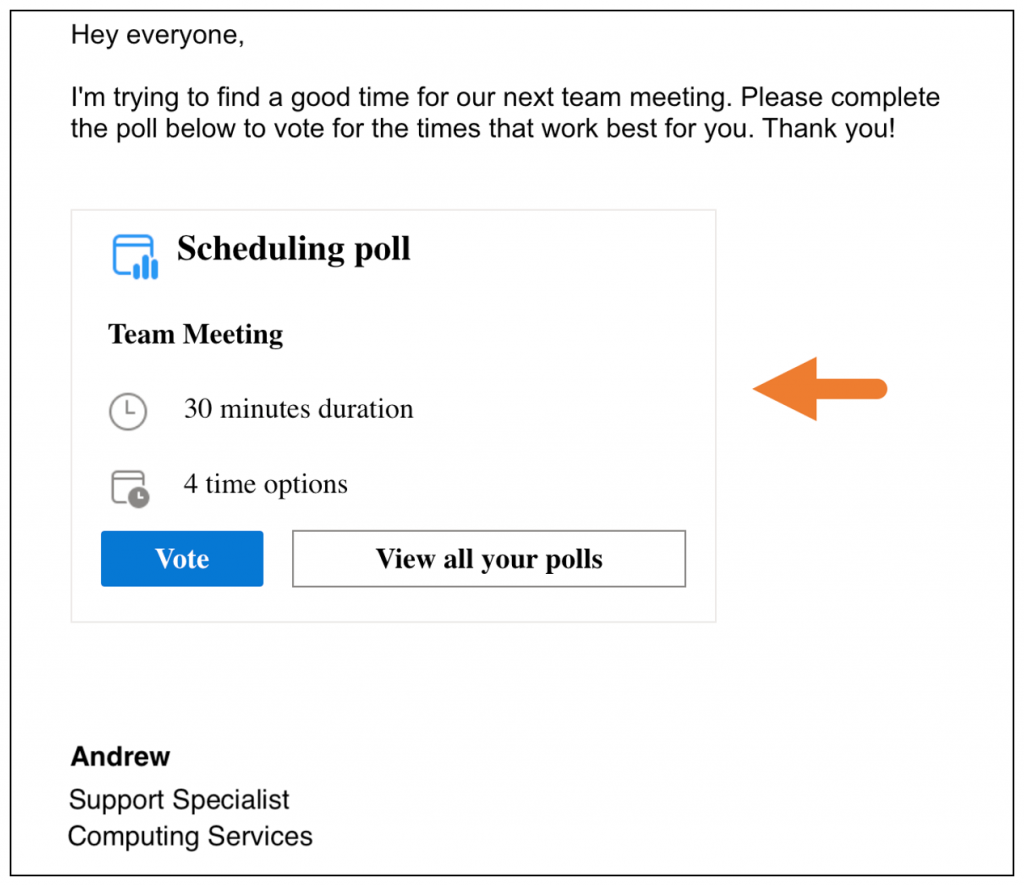
  2. A Scheduling Poll meeting link will be inserted into your email
close
macOS

You can access “Scheduling Poll” via the Mail tab on the Outlook desktop application.

  1. Open the Outlook desktop application on your Mac
  2. Start a new email message
  3. In the “Subject” field, type what will eventually become the name of the event. For example: “Team Meeting”
  4. In the “To” field, add the people who will be attendees for this meeting. They do not all have to be from FDU (Scheduling Polls can be sent to and completed by non-FDU email addresses)
  5. Press into the body of the email and compose a message
  6. Press into the area of the email body where you want the link to the Scheduling Poll to show up
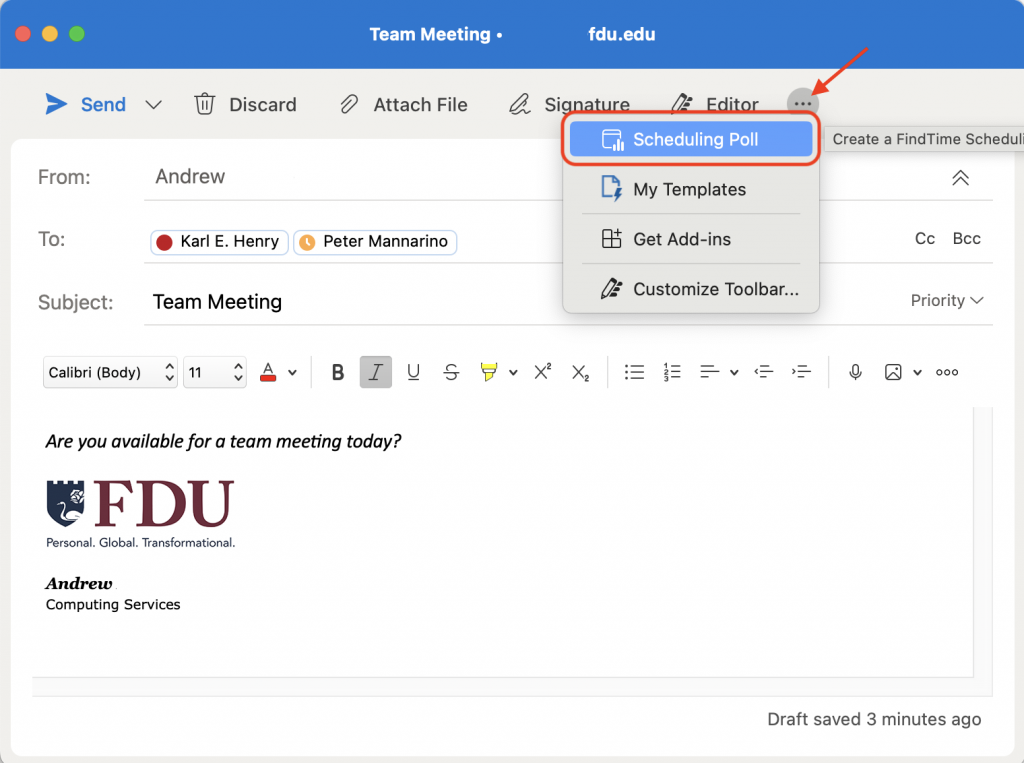
  7. Press on the “More Options” button and select “Scheduling Poll”
  1. A “Scheduling Poll” panel will open. From here, you can adjust your meeting duration, move between dates, and preview your attendees’ availability

Note

When selecting times for your poll, you can preview attendees’ FDU Outlook calendars, if available.

  1. Select times that work for as many attendees as possible, paying particular attention to the attendees whose attendance is most critical
  2. Click “Next” to proceed to the next step
  3. A new panel will open with the ability to delete selected times or adjust the meeting location

Note

You can also turn the Teams meeting feature on if you want Outlook to automatically schedule a Teams virtual meeting for this event.

  1. Press on “Manage Poll Settings” to expand the menu
  1. When you’re ready, press “Create Poll”
  2. A Scheduling Poll meeting link will be inserted into your email
close
Outlook on Web

You can access the “Scheduling Poll” feature via the Mail or Calendar web apps.

  1. Login to the FDU Office 365 Portal

FDU Office 365 Portal

  1. Create a new email or select an email to reply to
  1. In the “Subject” field, type what will eventually become the name of the event. For example, “Team Meeting”
  2. In the “To” field, add the people who will be attendees for this meeting. They do not all have to be from Fairleigh Dickinson University (Scheduling Polls can be sent to and completed by non-FDU email addresses)
  3. Press into the body of the email and compose a message
  4. Press into the area of the email body where you want the link to the Scheduling Poll to show up
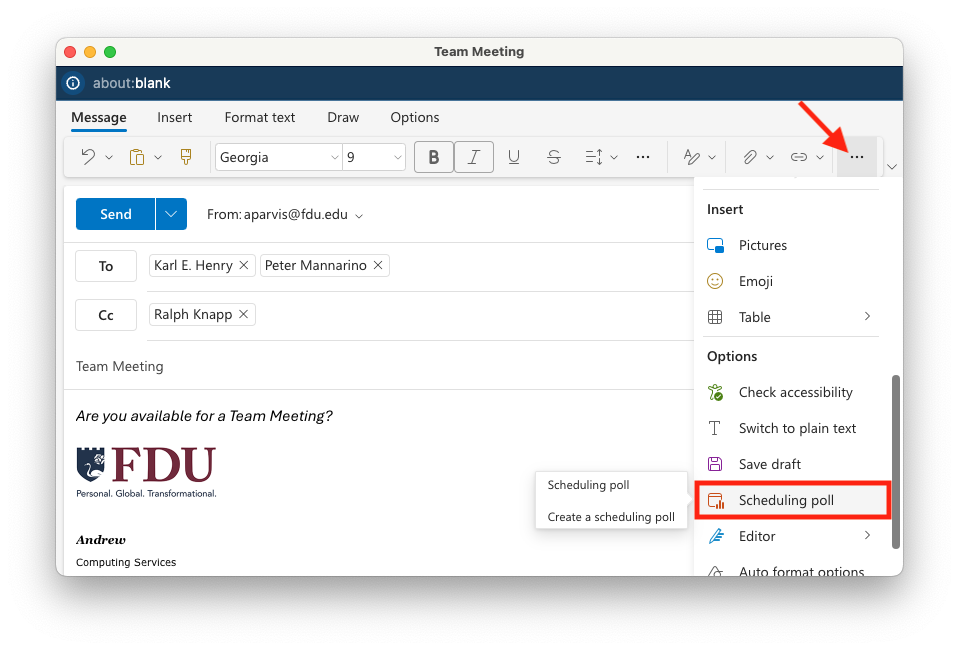
  5. Press on the “More Options” button and select “Scheduling Poll”

Note

If the “Scheduling Poll” option is grayed out, make sure you have clicked into the body of the email and that your email is being composed in HTML and not plain text.

  1. A “Scheduling Poll” panel will open. From here, you can adjust your meeting duration, move between dates, and preview your attendees’ availability

Note

When selecting times for your poll, you can preview attendees’ FDU Outlook calendars, if available.

  1. Select times that work for as many attendees as possible, paying particular attention to the attendees whose attendance is most critical
  2. Press “Next” to proceed to the next step
  3. A new panel will open with the ability to delete selected times or adjust the meeting location

Note

You can also turn the Teams meeting feature on if you want Outlook to automatically schedule a Teams virtual meeting for this event.

  1. Press on “Manage Poll Settings” to expand the menu
    • Schedule when attendees reach consensus – Automatically schedules a meeting and sends out an invite to attendees if everyone agrees on a particular time. If multiple times work, the earliest one will be selected.
    • Hold selected times on my calendar – Puts a temporary hold on the scheduler’s calendar for each of the selected times. These holds are removed when the final invite is sent out.
    • Notify me about poll updates – Outlook will send an email update to the scheduler whenever an attendee submits their poll response.
    • Require attendees to verify their identity – Forces respondents to verify their identity either by logging in to their Outlook account or entering a numerical code that Microsoft sends them.
    • Lock poll for attendees – Prevents attendees from adding more people to the meeting or suggesting new meeting times.
  2. When you’re ready, press “Create Poll”
  3. A Scheduling Poll meeting link will be inserted into your email
close

How do I finalize, vote, and manage a Scheduling Poll?

Sending a finalized Meeting Invite

This section describes how to manually send an invite from scheduling poll results. When setting up your poll, you can also have Outlook automatically send an invite if/when your attendees reach a consensus.

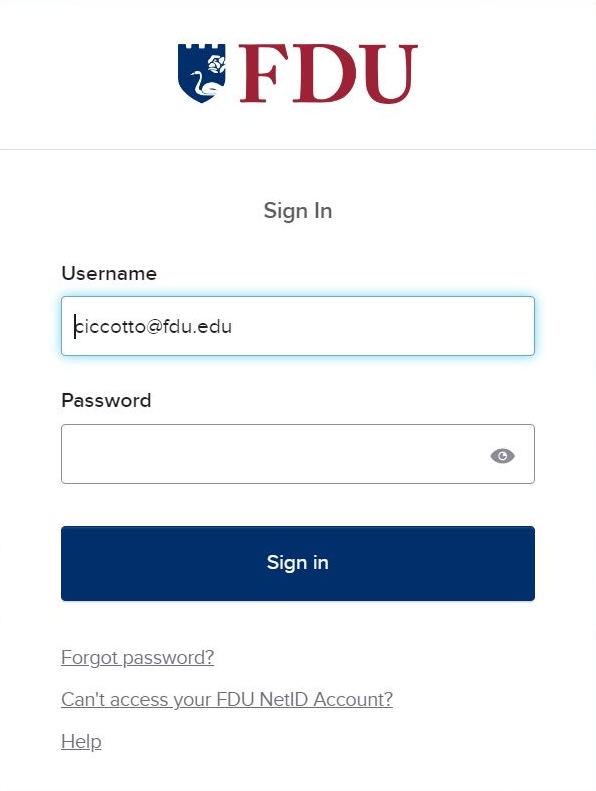
  1. Visit the Scheduling Poll Dashboard on the Web and enter your FDU NetID credentials

Scheduling Poll Web Dashboard

  1. Your scheduling polls will be listed. Press on a “Poll” to view attendees responses
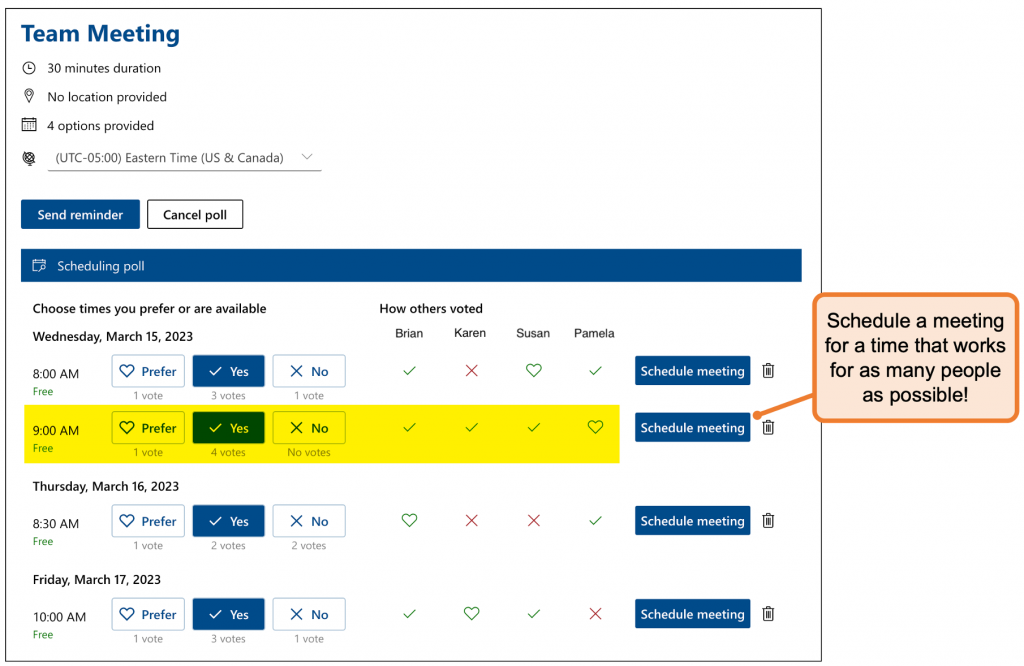
  2. Find a time that works for as many people as possible and press “Schedule Meeting”
  1. A new event invitation will open with all of your attendees listed. Make modifications as necessary, once done, press “Send”
close
Voting on a Scheduling Poll
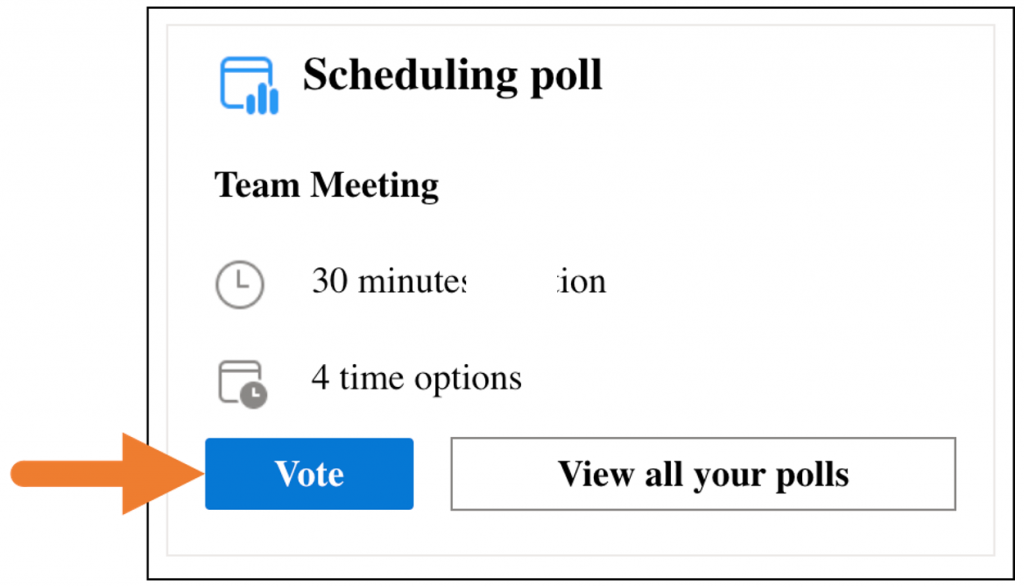
  1. When a scheduling poll is sent to you via email, press “Vote”
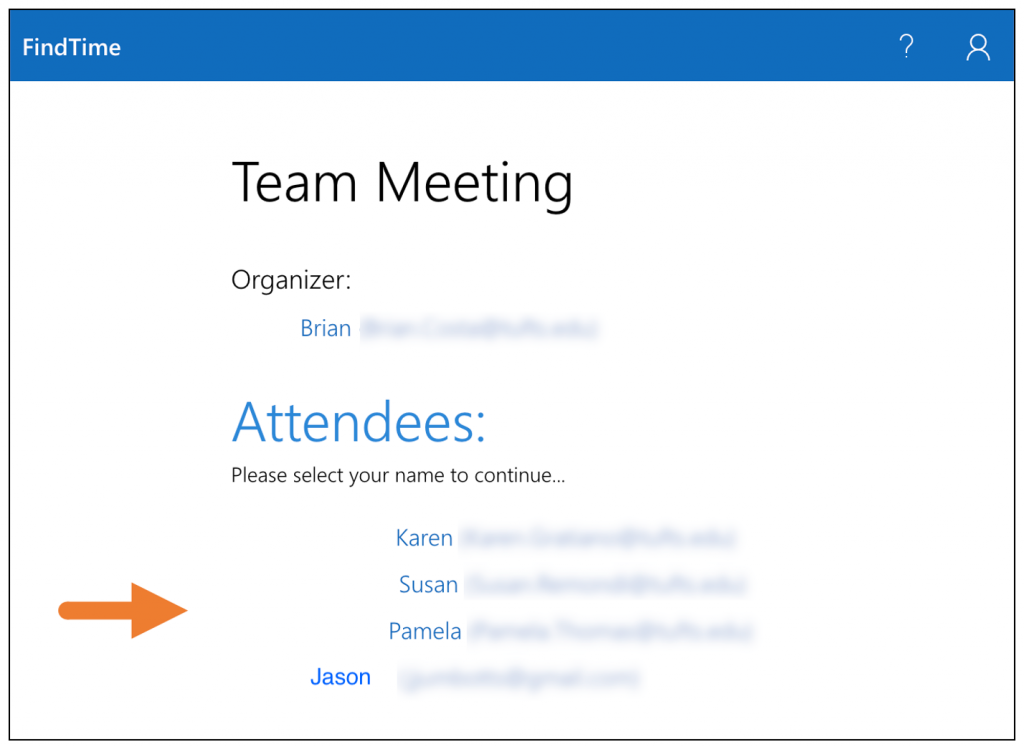
  1. If necessary, select your name from the list of attendees
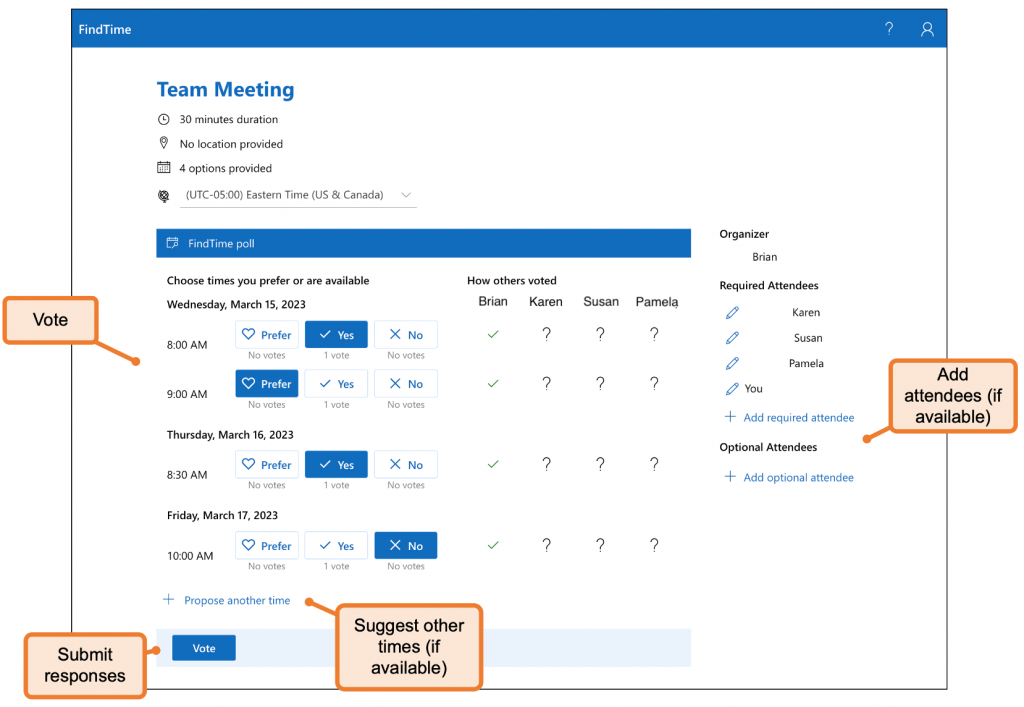
  1. Vote for meeting times by selecting “Preferred, Yes, or No”
  1. Depending on how the poll was set up, you may be able to add more attendees or meeting times to the poll
  2. When you’re ready, press “Vote” to submit your responses

Tip

If you need to change your responses, you can press the “Vote” button again in the original email and repeat the process.

close
Managing my Scheduling Polls

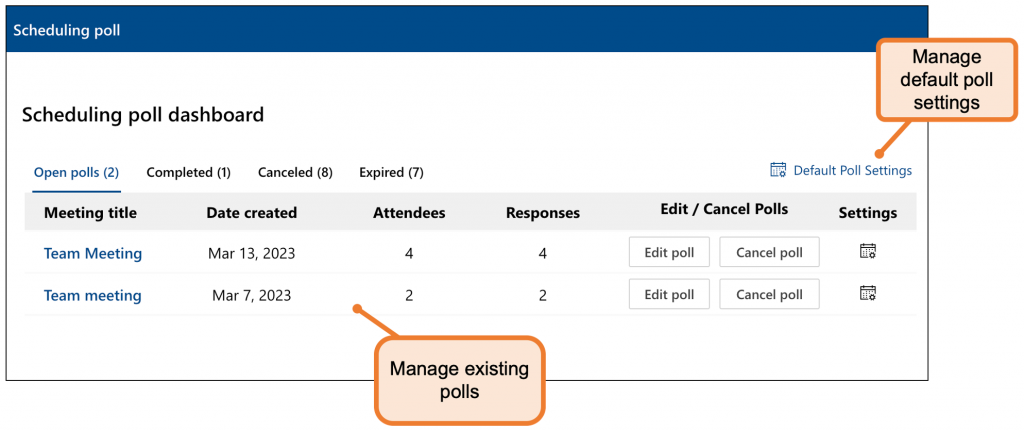
The Scheduling Poll Dashboard allows organizers to view all the polls they have created, manage them, and change default settings for new polls.

  1. Visit the Scheduling Poll Dashboard and enter your FDU NetID credentials

Scheduling Poll Web Dashboard

  1. Your scheduling polls will be listed. From here, you can manage polls and your default poll settings
  1. Press on the name of a poll to view responses
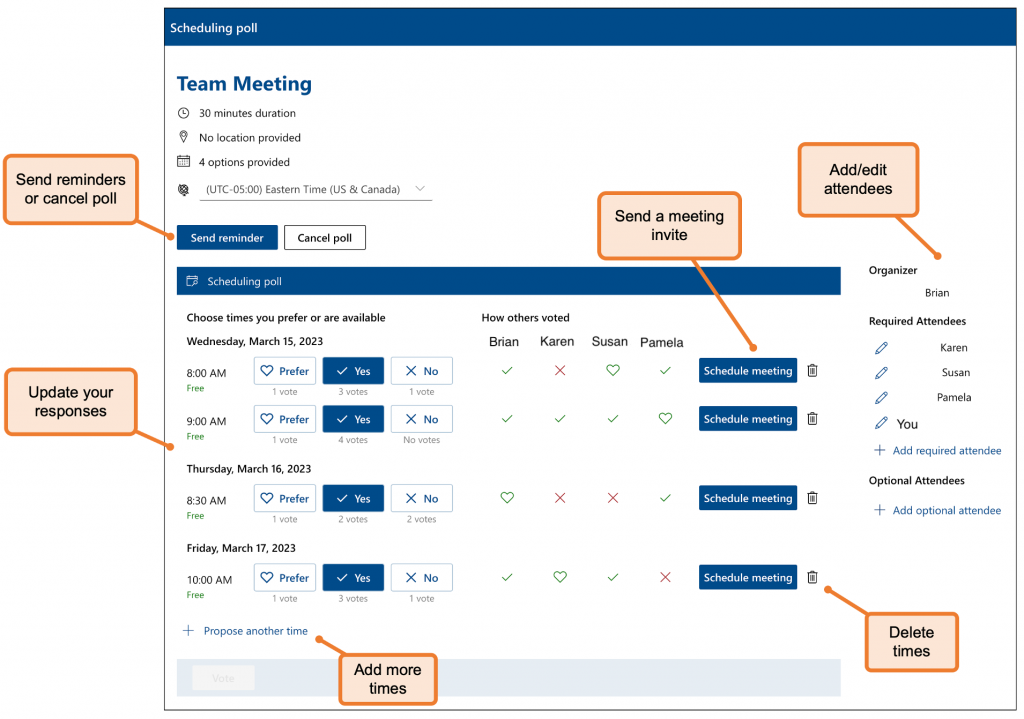
  2. A window will open where you can…
    • Send poll reminders
    • Cancel the poll
    • View attendee responses
    • Adjust your responses
    • Add/edit attendees and times
    • Send a meeting invite
close
Last Modified:

Microsoft Teams Tutorial

Resources for:
icon Close
Microsoft Teams is a unified communication and collaboration platform that combines persistent workplace chat, video meetings, file storage, and application integration. Here you will find documentation on how to install and use Teams and all of its features.
index

Index

Install and Launch Options

If you are using a mobile device, or your personally owned computer, you can download Microsoft Team using the link below.

The page will automatically detect your operating system and redirect you to the appropriate desktop client (e.g. Windows, macOS) or mobile client (e.g. Android, Apple iOS).

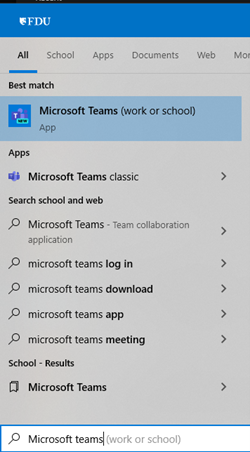
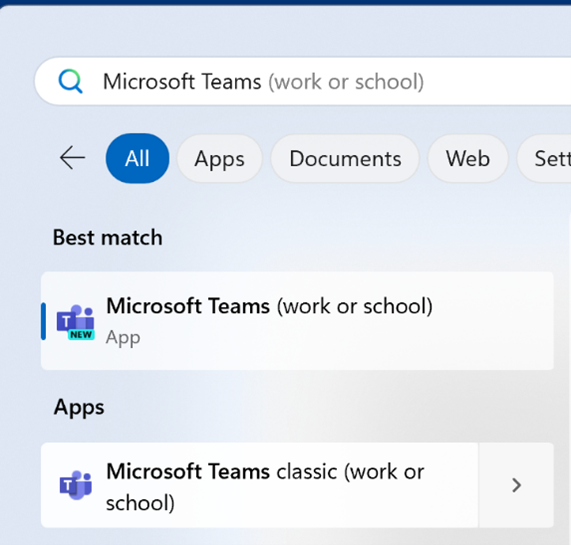
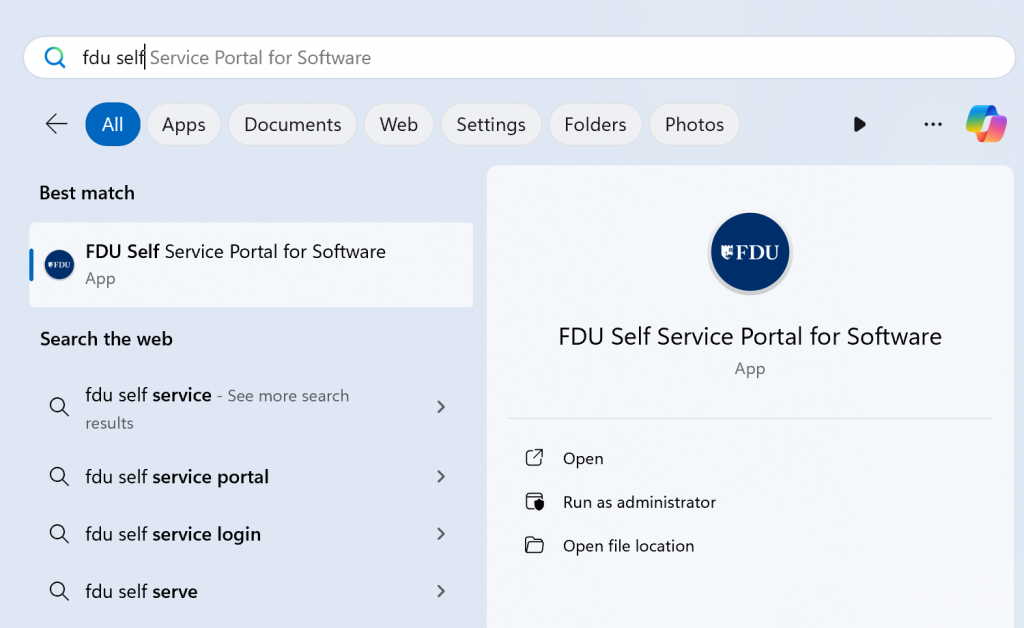
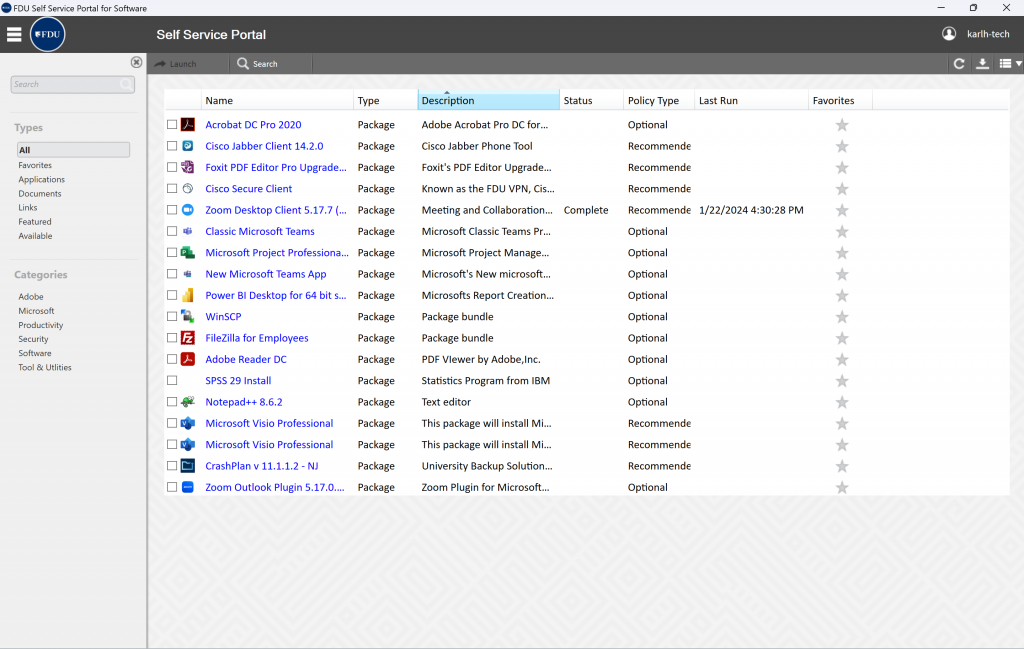
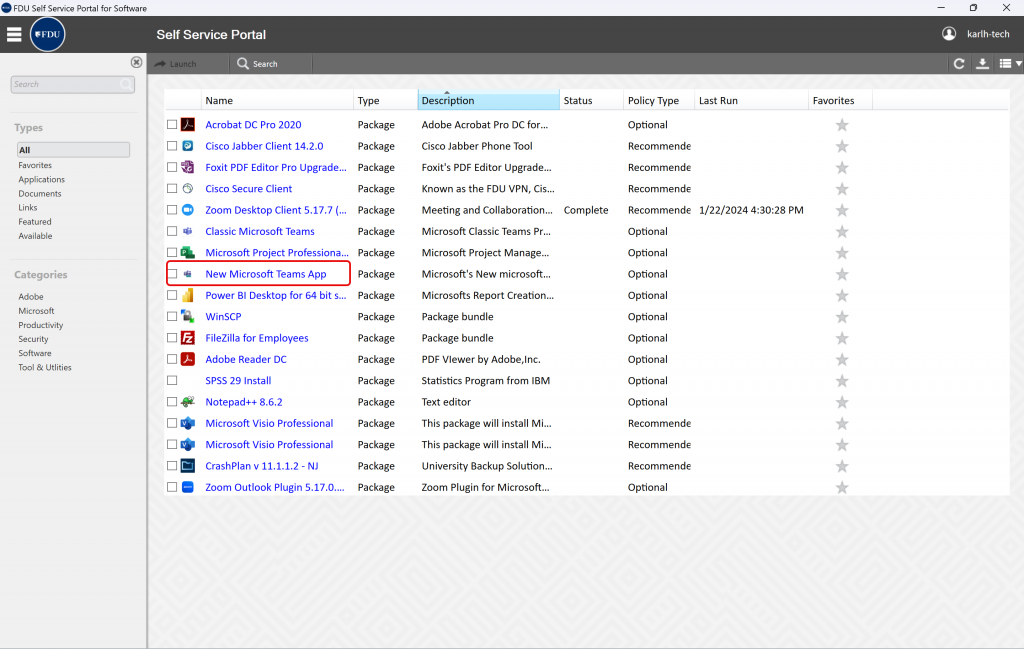
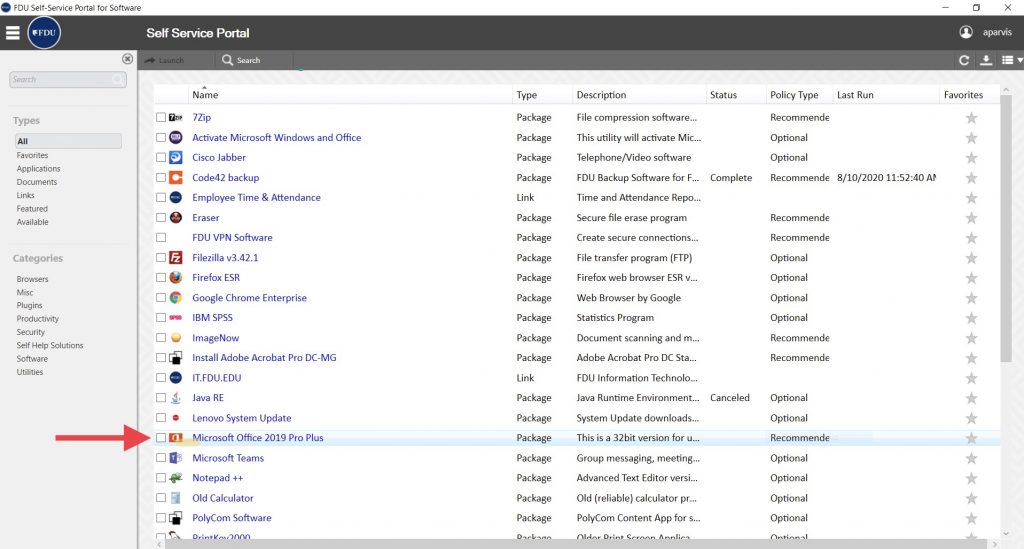
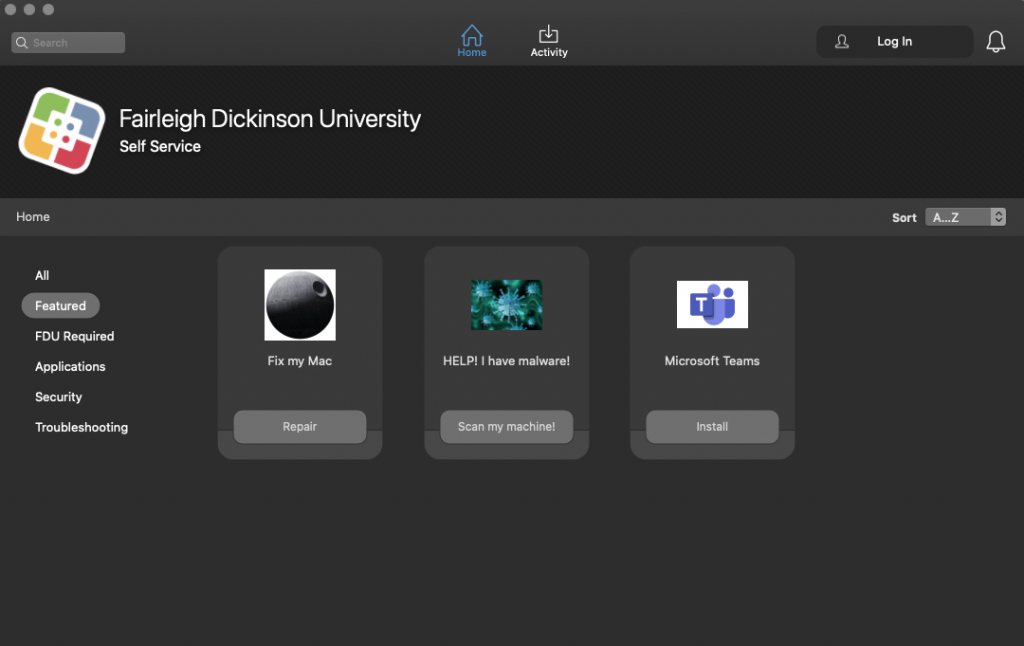
The Microsoft Teams application is automatically pushed to most university owned computers. To determine if you already have it installed, search for “Teams” using the Windows Search Bar or Spotlight Search on Apple devices. If you are working on a university computer and you cannot locate the Microsoft Teams application, you can install by following the instructions below.

Windows – Portal Manager

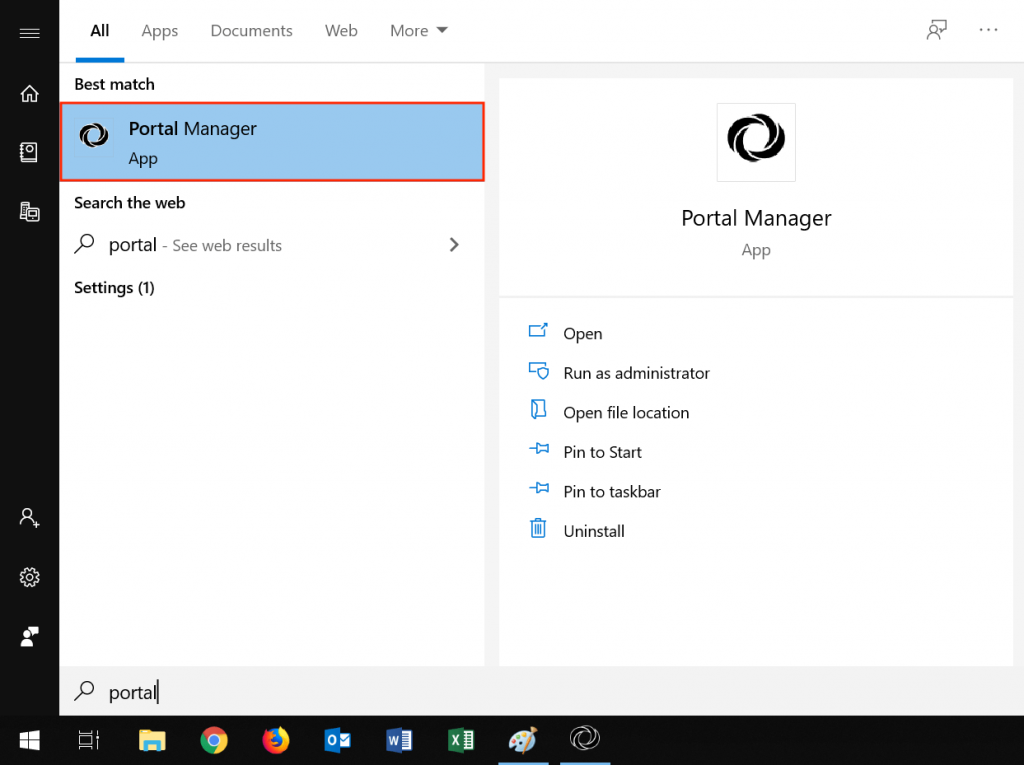
  1. Press the Windows key on your keyboard and type Portal Manager
  2. Launch Portal Manager from the search results list
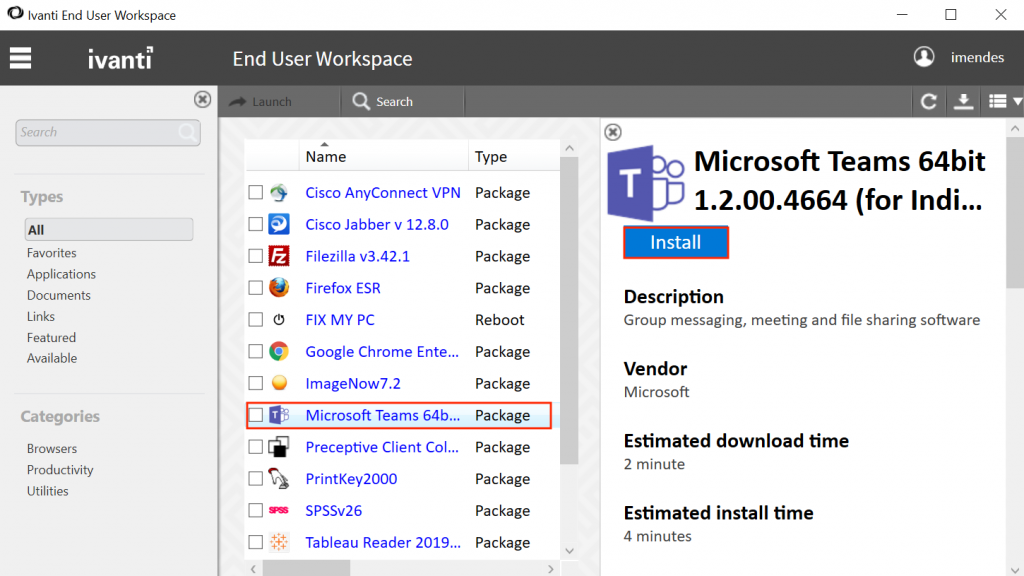
  1. Select Microsoft Teams from the list and click Install

Mac – FDU Self Help

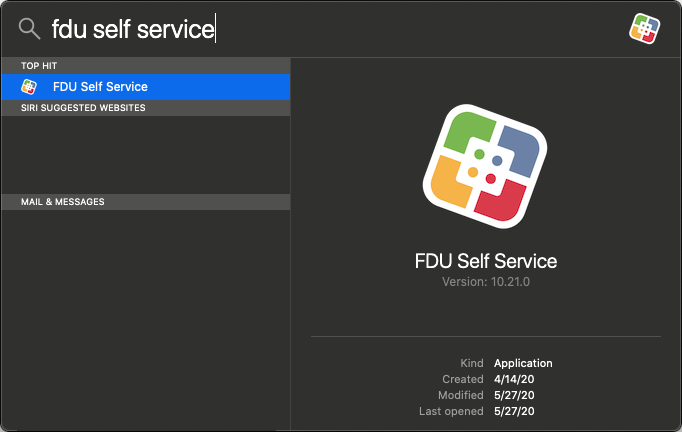
  1. Press cmd+space on your keyboard and type FDU Self Service
  1. Launch FDU Self Service from the spotlight search results
  1. Locate and double click on Microsoft Teams. If Teams is already installed, it will not show up on the list

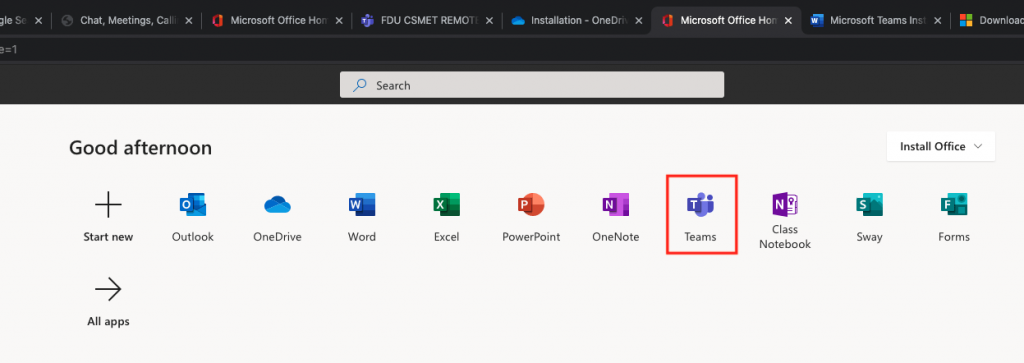
Web – Access the Office Web Application

The web client is a full, functional client that can be used from a variety of browsers including Google Chrome, Edge Browser, and Mozilla Firefox. Microsoft Teams will also be available on Safari soon. 

  1. From an internet browser, go to  office365.fdu.edu
  2. Sign in to your FDU Office 365 account using your NetID and NetID account password
  3. Select  Teams from the list

Starting a Conversation

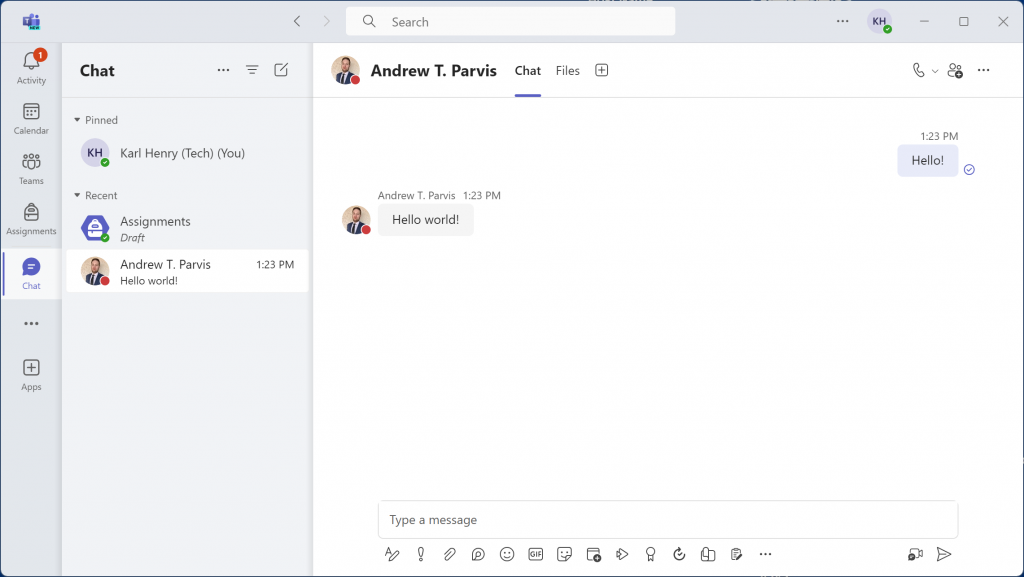
Teams allows for text-based conversations using the Chat feature. Although it does not replace email in all use cases, it is a great tool for asking quick questions or just saying hello. When using chat, please be mindful and adhere to FDU’s Written Information Security Program.

  1. Select Chat from the left menu and then click on the top search bar
  1. Type the name of the person you are attempting to locate and click on their name. Only FDU faculty, staff, and students are accessible in Microsoft Teams
  1. You will be brought to the chat window and can start your conversation

Navigating the Chat Window

The Chat window has many convenient tabs and shortcuts aimed at improving collaboration. Near the top of the screen, next to the name of the contact that you are chatting with, you will notice the default tabs, followed by a plus sign.

Tabs

  1. The Chat tab contains the conversation
  2. The Files tab contains all files shared in during the conversation
  3. In two person conversations, the Organization tab shows your contact’s organization chart. This information is pulled from Office 365. Datatel remains the authoritative source for this information and the data contained here is not intended to be 100% accurate
  4. In two person conversations, the Activity tab will list the latest activity of your contact
  5. You can use the + sign to create a new tab from a file or an app. This can be a quick and convenient way to access a collaborative file that was previously shared in the conversation

To the right of these tabs are a series of shortcut icons which perform the following functions.

Shortcuts

a. The Video call icon starts a new video call
b. The Audio call icon starts a new voice call
c. The Screen sharing icon allows you to share your desktop or an application
d. The Add people icon is used to invite additional people to the chat
e. The Pop out chat icon creates a separate window with your chat

Managing Contacts

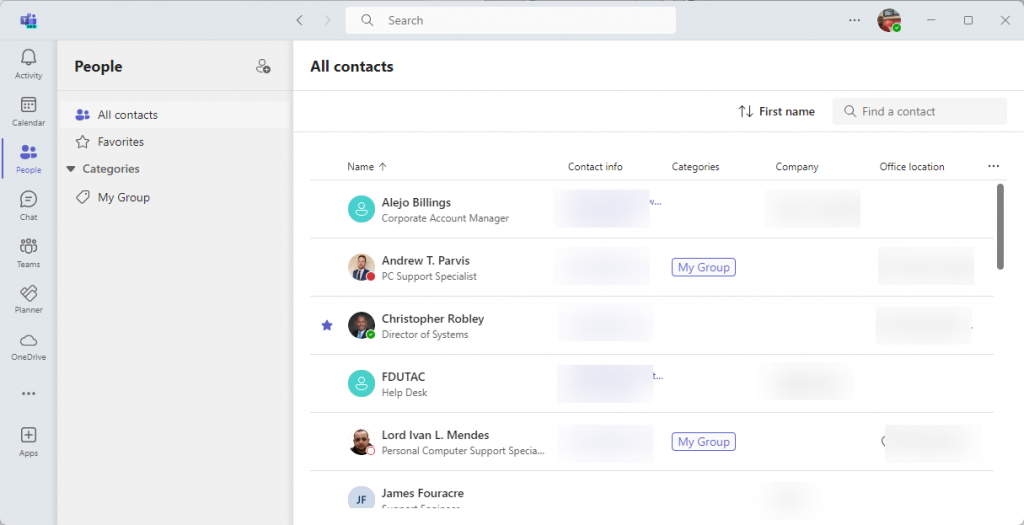
The Chat function allows you to have conversations with one person or groups of people. The pane on the left-hand side of the screen is split into Recent and Contacts. Contacts acts like a rolodex that allows you to store and sort a list of the people you contact most frequently. The Recent list will display your most recent conversations with single people or group messages.

By default, the Contacts tab will already have a “Favorites” group. However, creating new groups can be a helpful way to organize your contacts. For example, you may wish to create a group for people that you are working with on a project or for people that you interact with from a department.

  1. To create a new contact group, click “Create a new contact group” on the bottom of the pane
  1. Enter a name for your group, and click “Create
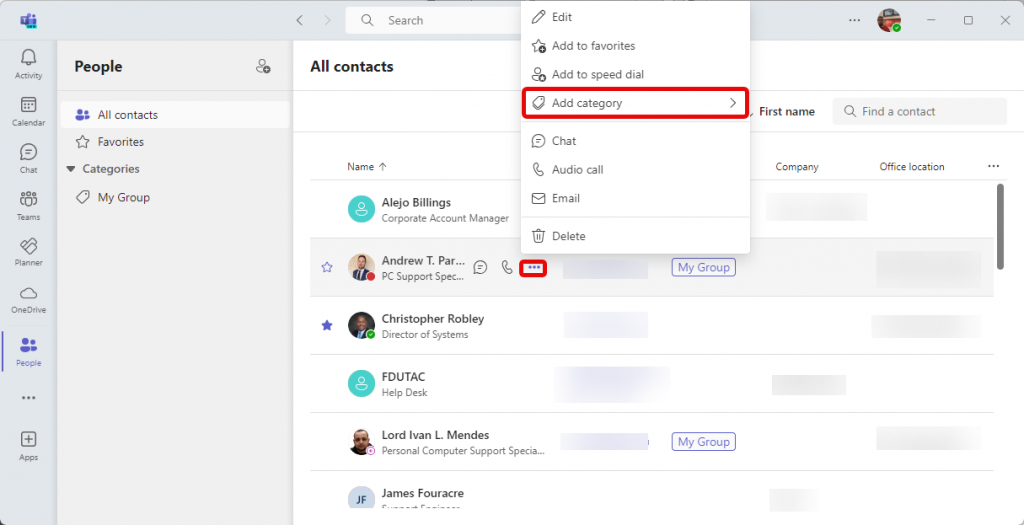
  1. To add contacts to a group, click the “More options” icon (3 dots) next to the group name and select “Add a contact to this group” from the drop-down menu
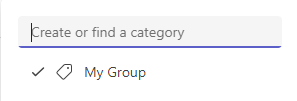
  1. Begin typing the name of your contact. Once you see their name appear, select it and select “Add

You can add the same contact to as many groups as you would like. The chat with your contact will remain the same regardless of which group you are accessing the conversation from.

Sharing Your Screen

Screen sharing is one of Microsoft Teams’ most powerful collaborative features. You can show your screen to your colleagues and even grant them control to edit Microsoft Office files with you in real time.

Before you get started, make sure that you are using the installed version of Microsoft Teams, as the browser based OWA version does not support this functionality.

  1. From the chat window or from an ongoing call, click on the “Screen sharing / Share” icon
  1. You be given a choice to either share your desktop or an application from the Microsoft Office suite, click on the window you want to share
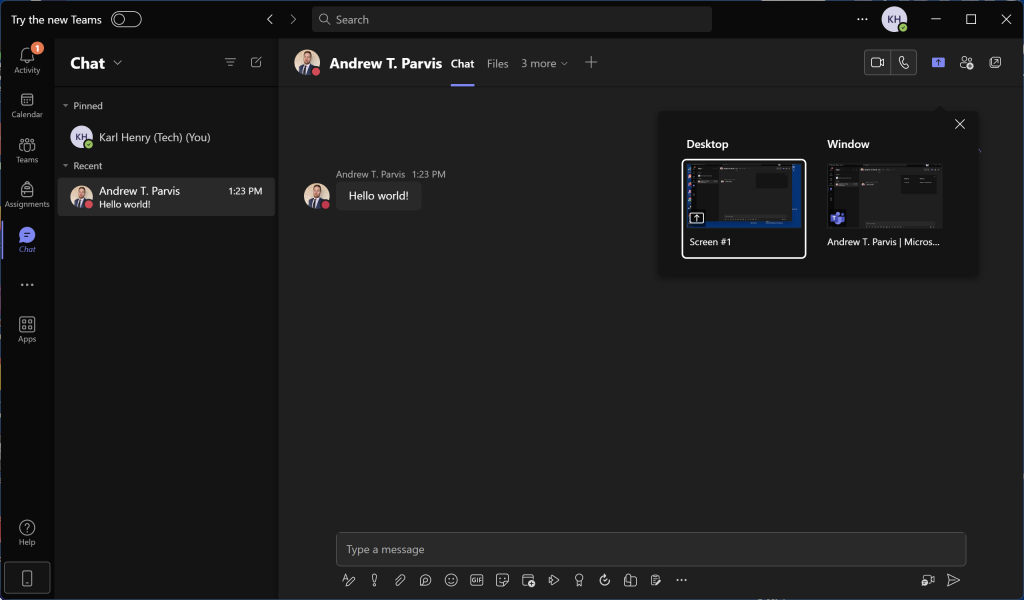
Once you select the screen you wish to share, the members of your chat or call will be able to view your screen and request access to remotely control your desktop or program.

You can only share your screen with a mobile device user if you are engaged in an active voice or video call with them.

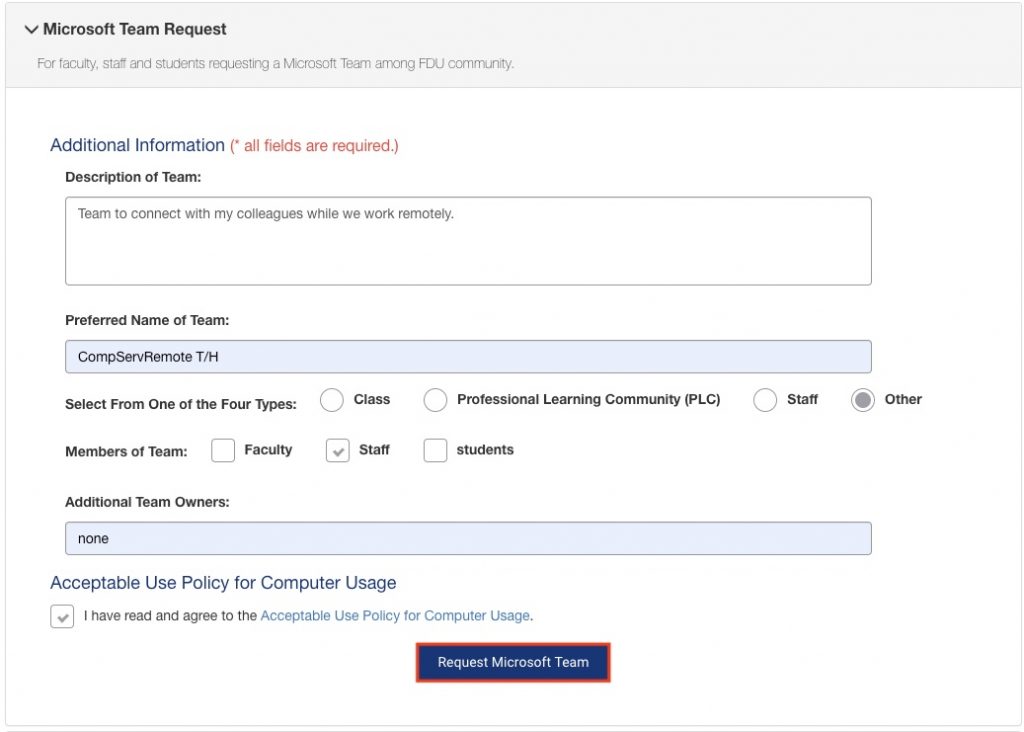
Requesting a Team

Creating a team provides remote team members with the ability to work together and share information via a common online space. You can also organize your information by creating channels to help optimize your team’s workflow.

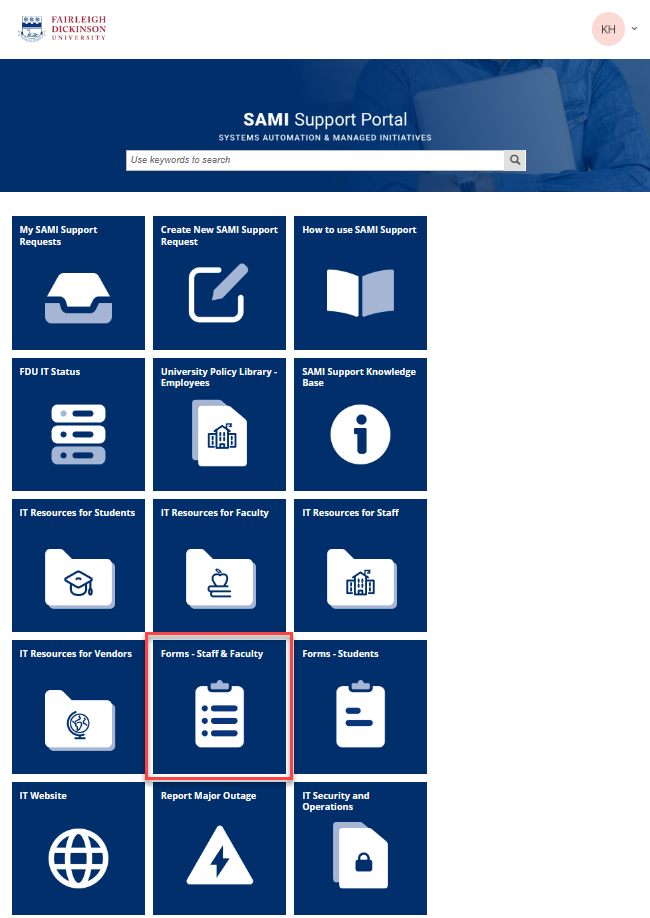
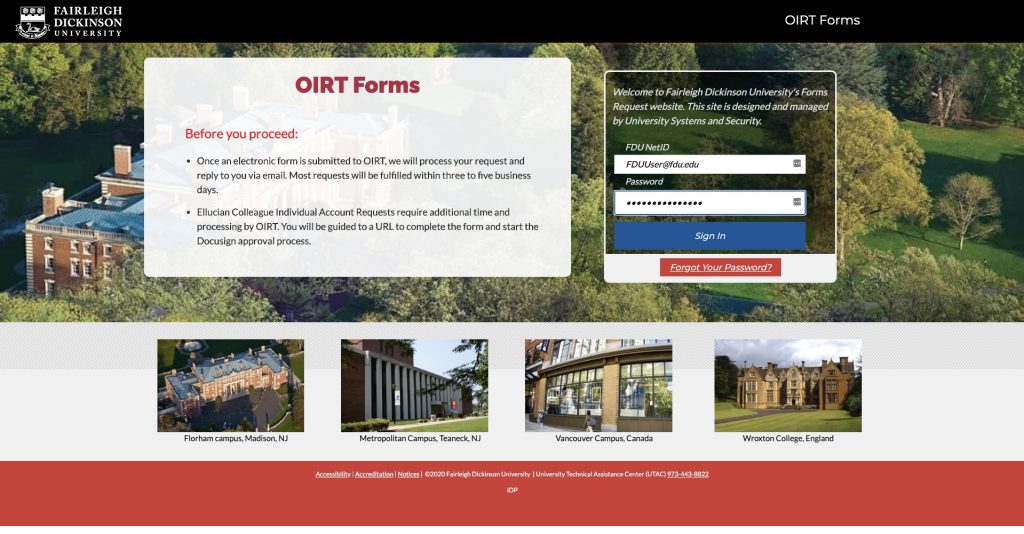
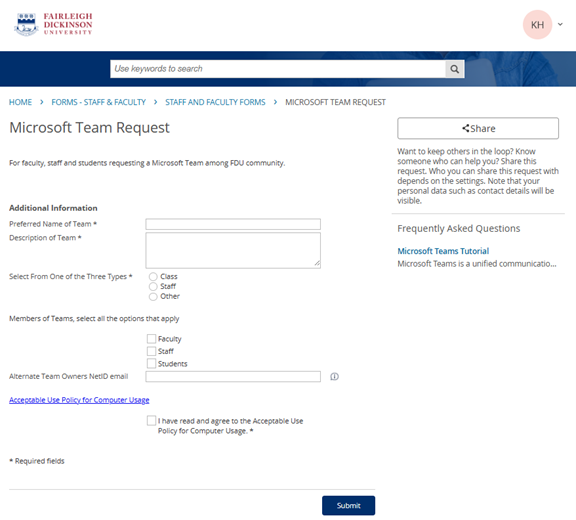
  1. Navigate to the forms website and log in using you FDU NetID account information
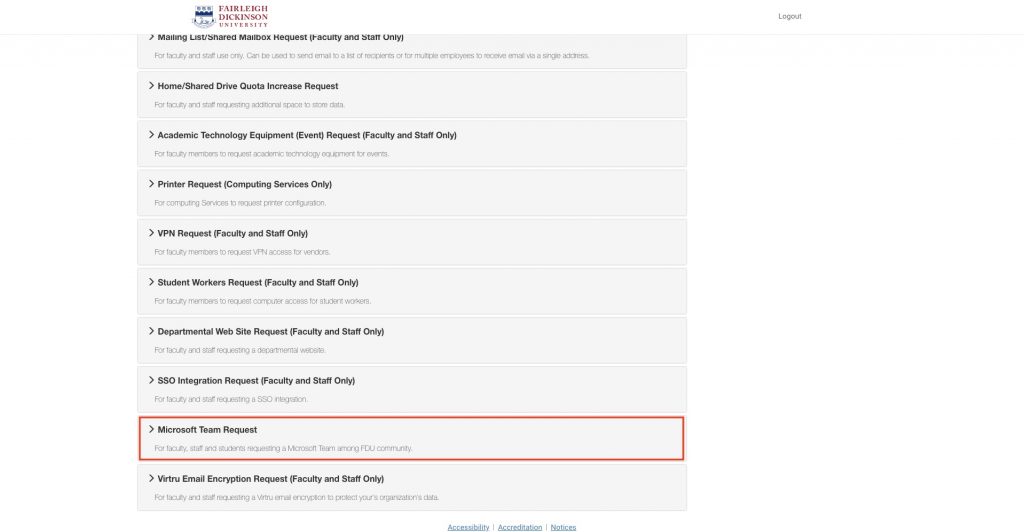
  1. Scroll down to Microsoft Team Request and click on it to expand the information
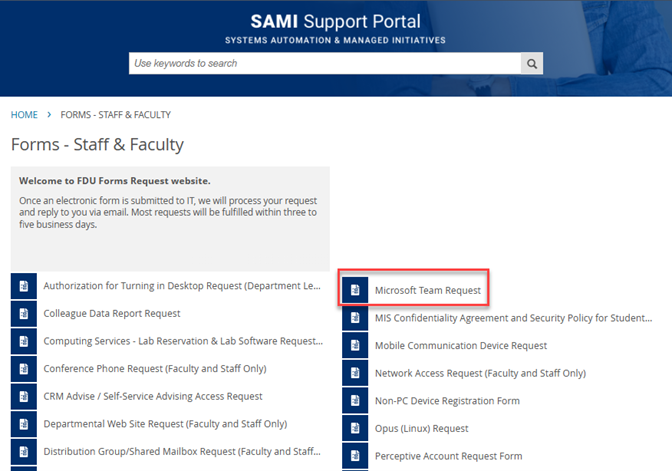
  1. Fill out all the fields and click on the “Request Microsoft Team” button

Note

You can specify additional team owners. Owners will have rights to invite and make other changes to the team after its creation.
  1. You should now see a screen informing you that your form was successfully submitted. Please allow 3 to 5 business days for the Team to be created
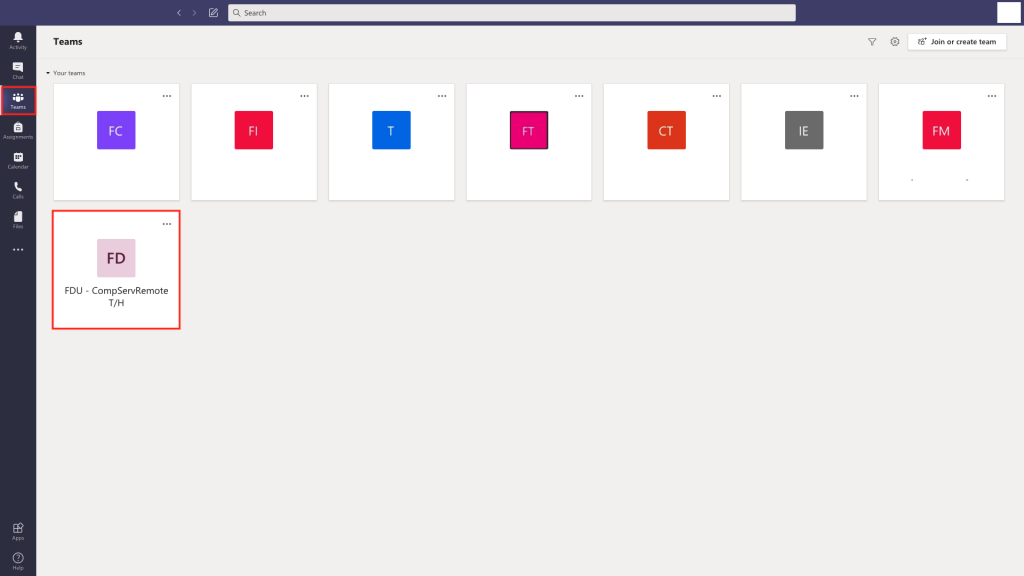
  2. You will receive an email once the team is created. The next time you log in to Teams you will see your team listed in the Teams section
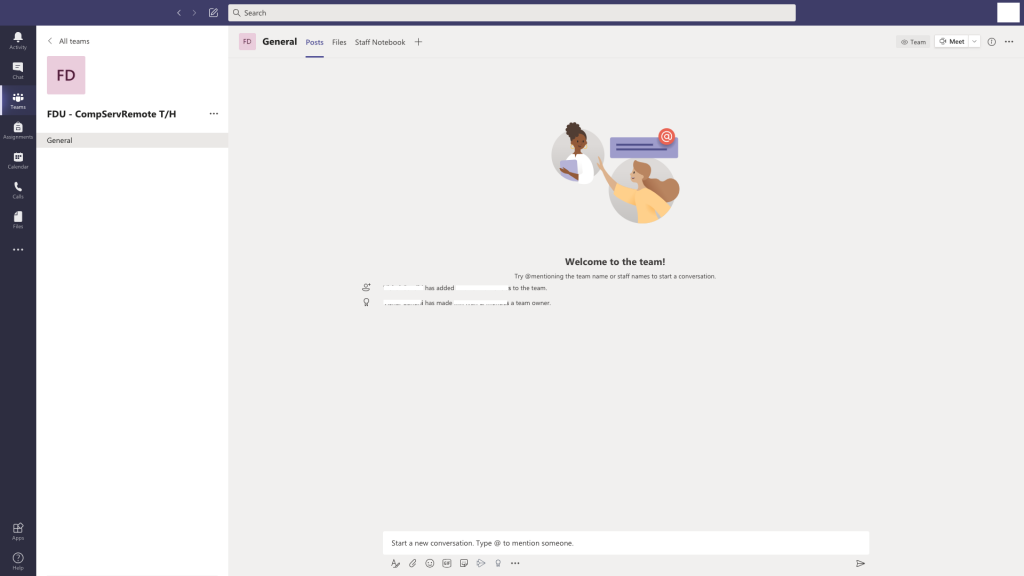
  1. Click on your team to open the general channel. From here you can create channels, add users, and customize your team. Any team members that you add will receive an email notifying them that they were added to your team. The next time that they log in or open Teams, they will find the team listed in their Teams section
Creating Channels

Channels are dedicated sections within a team. You can keep conversations organized by specific topics, projects, disciplines, or whatever works for your team! Channels are where conversations happen and where the work gets done. There can be public channels which are open to all team members or, if you require a more select audience, private channels can be open to a subset of your team.

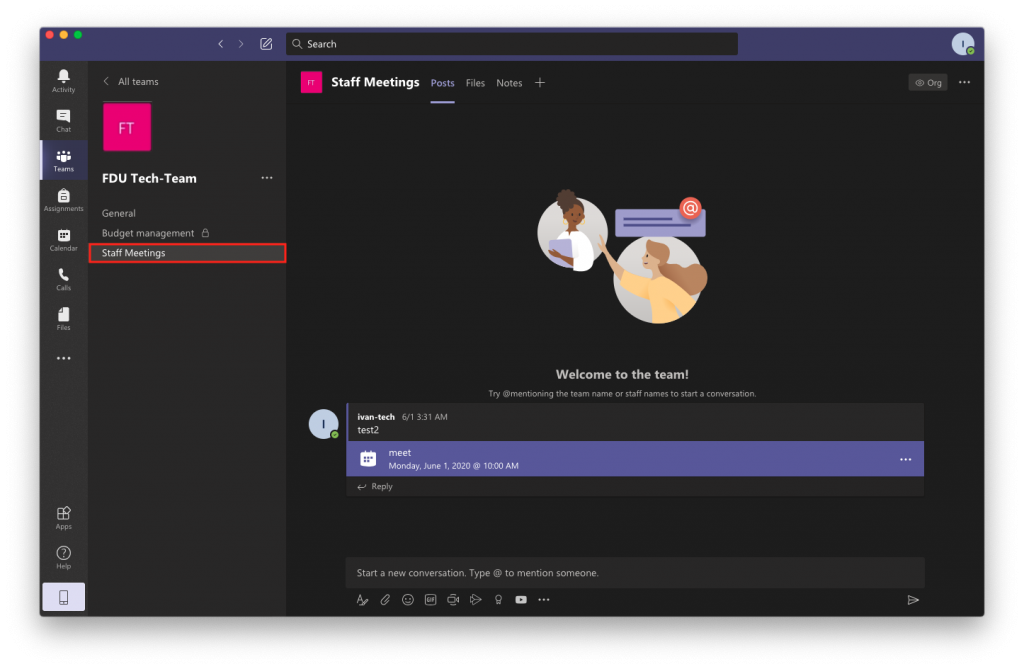
  1. Select Teams from the menu on the left-hand side of the screen. If you have multiple teams, select your team of choice
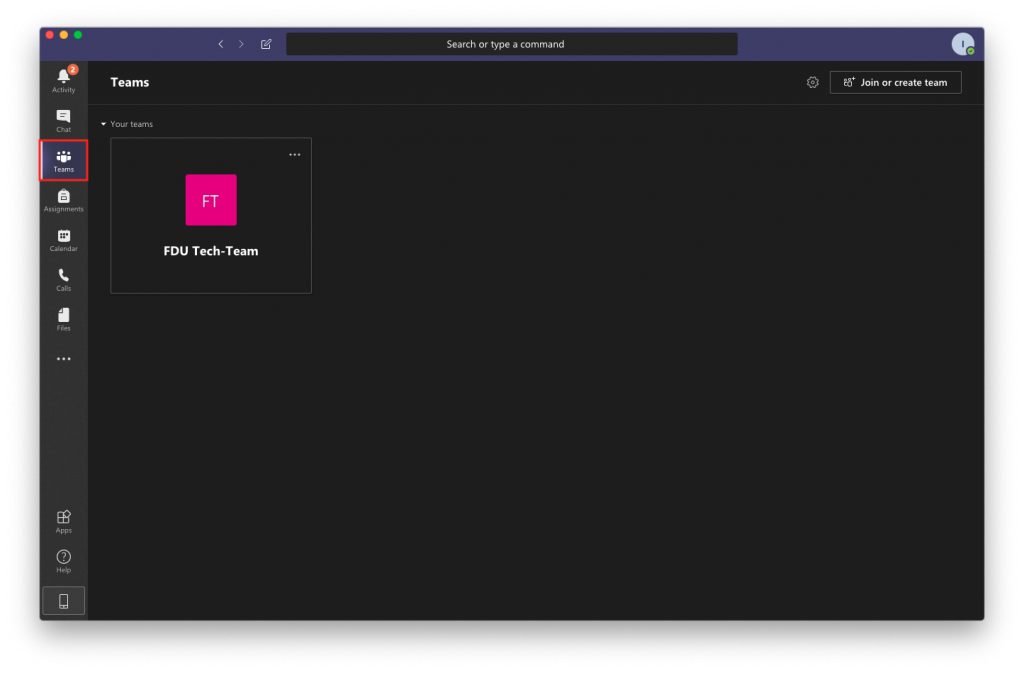
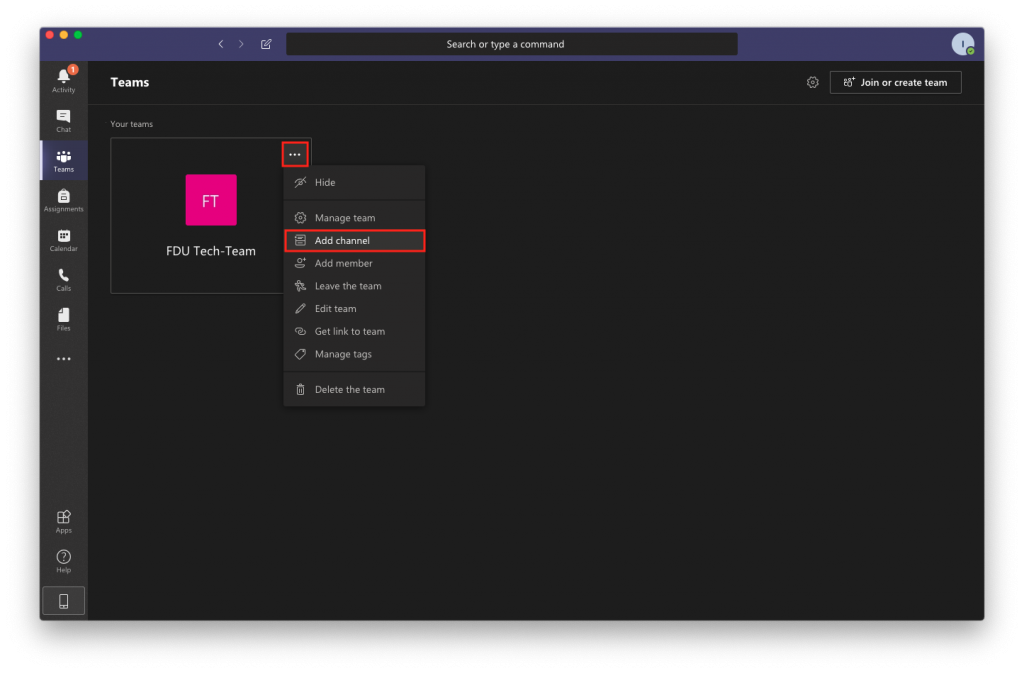
  1. Click on the “More options” icon (3 dots) next to the team name and select “Add channel
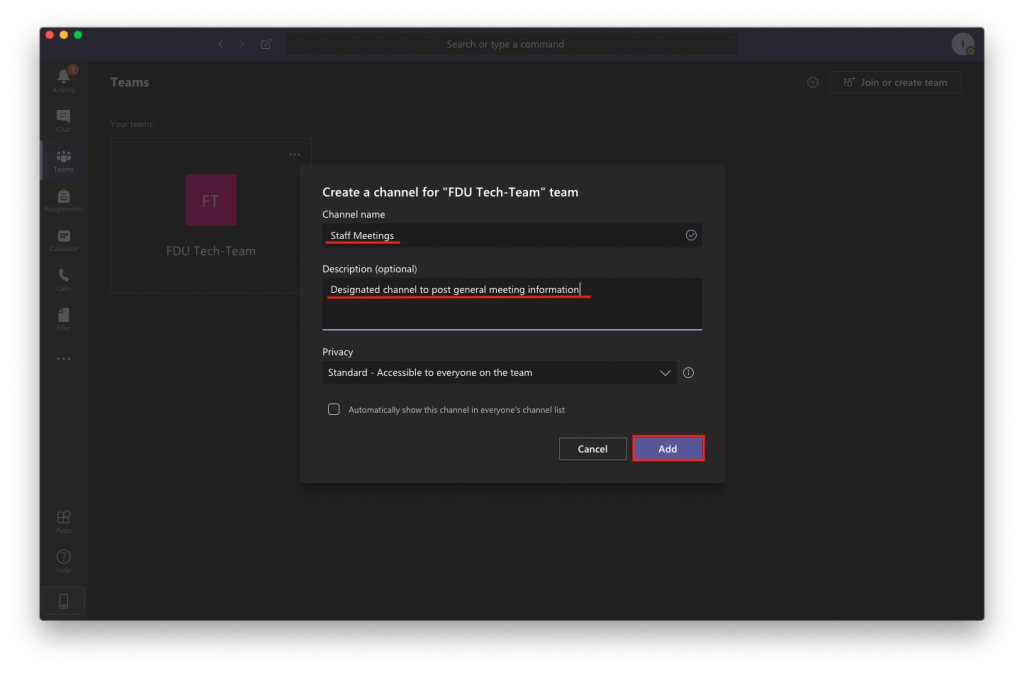
  1. Give the channel a name. Optionally, you can write in a brief description as well
  2. Select your channel’s preferred level of privacy and click “Add
  • Standard channels are open for anyone to join.
  • Private channels are invitation only.
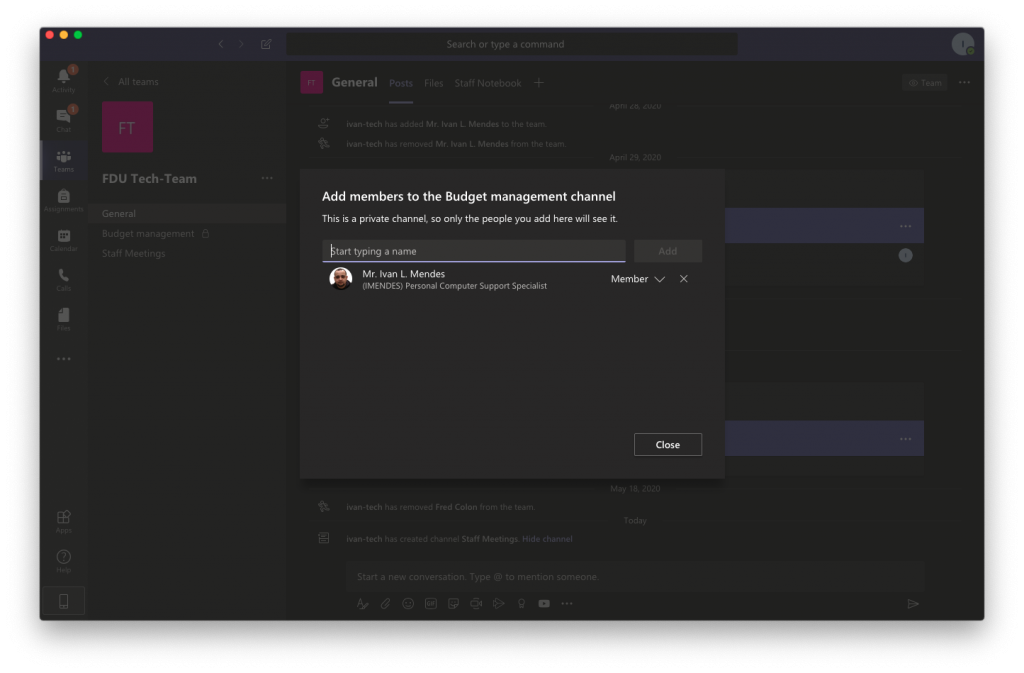
  1. If you selected “Private” you will see a window that lets you add the team members that should have access to the channel. Once all members are added, click “Close
  1. Once a channel is created it will show up under the General channel in the channels list. If the channel was set to Private, only the members can see it. Anyone who belongs to the channel can click on it to view its contents
Note

Since channels are sections within a team, it is not possible to add members to a channel that are not part of the team.

Managing a Team

Now that your teams and channels are created, you can begin to take advantage of Microsoft Teams’ management features. Team management includes essential functions such as adding and removing members, assigning permissions for individual members, and managing your channels. You can also implement granular customizations such as setting parameters on the use of tags and emojis.

  1. Select Teams from the left menu. If you have more than one team, click on your team
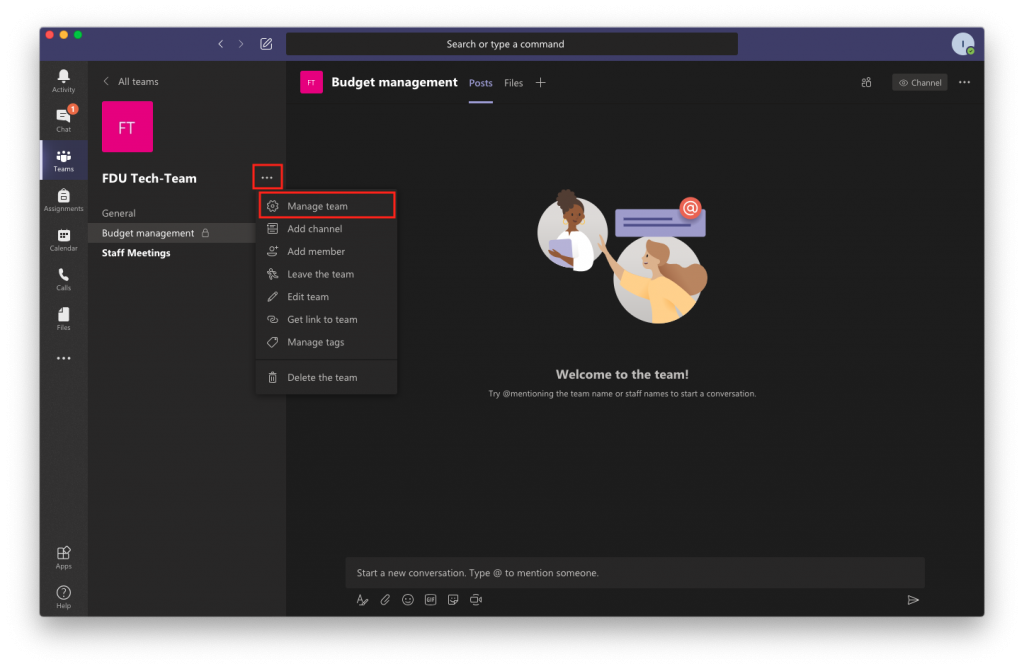
  2. Click “More Options” icon (3 dots) next to the team name and select “Manage Team“. From here, you can select one of the following tabs
Manage Members Tab

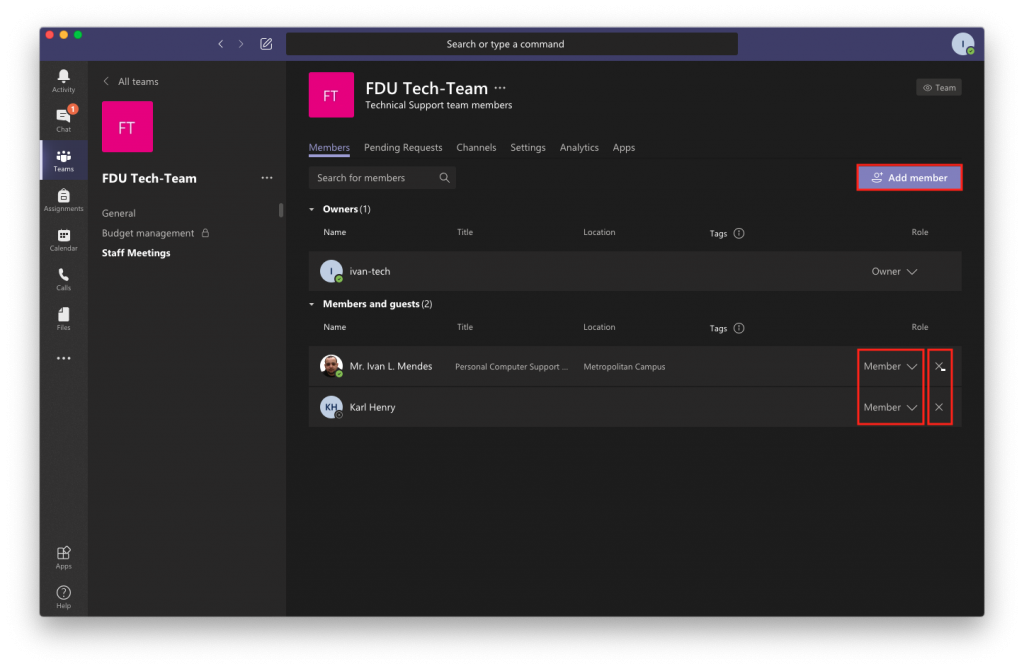
  • Add a member by clicking “Add Member” button on the top right of the window
  • Remove a member by clicking “X” button on the right of their name
  • Use the drop-down menu to change a member’s role to Owner. This allows them full access to change settings
Manage Request Tab

  • Use this tab to accept or deny a person’s request to join your team

Manage Channels Tab

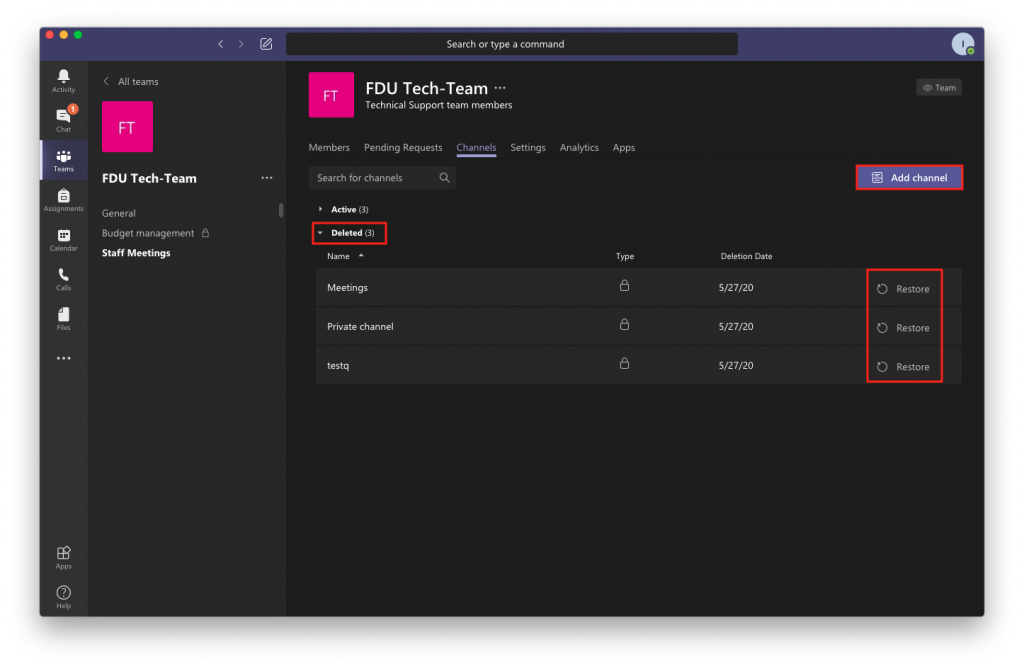
  • Create a channel by clicking the Add channel button on the top right of the window
  • You can restore deleted channels by expanding the Deleted list and clicking on Restore

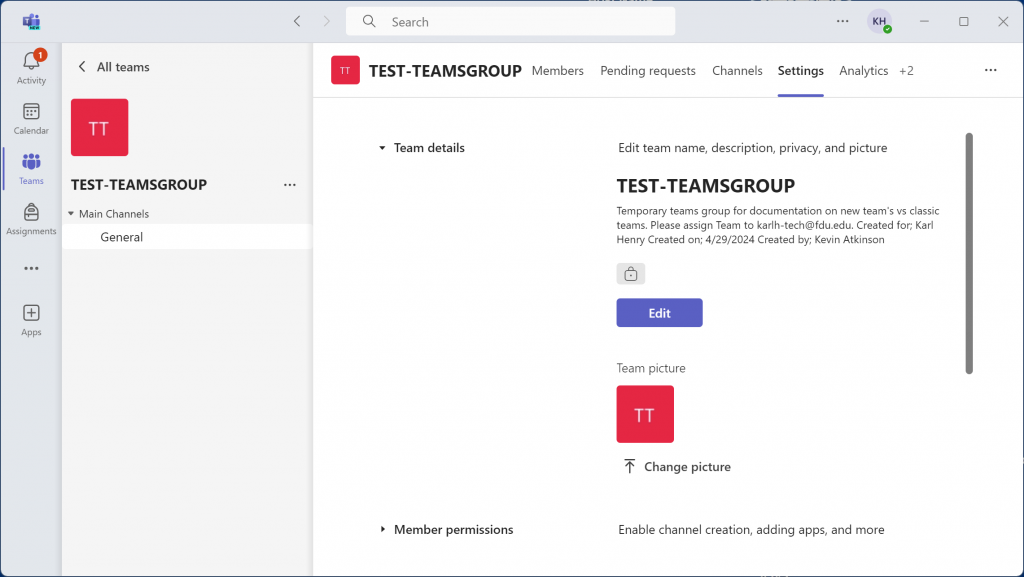
Manage Settings Tab

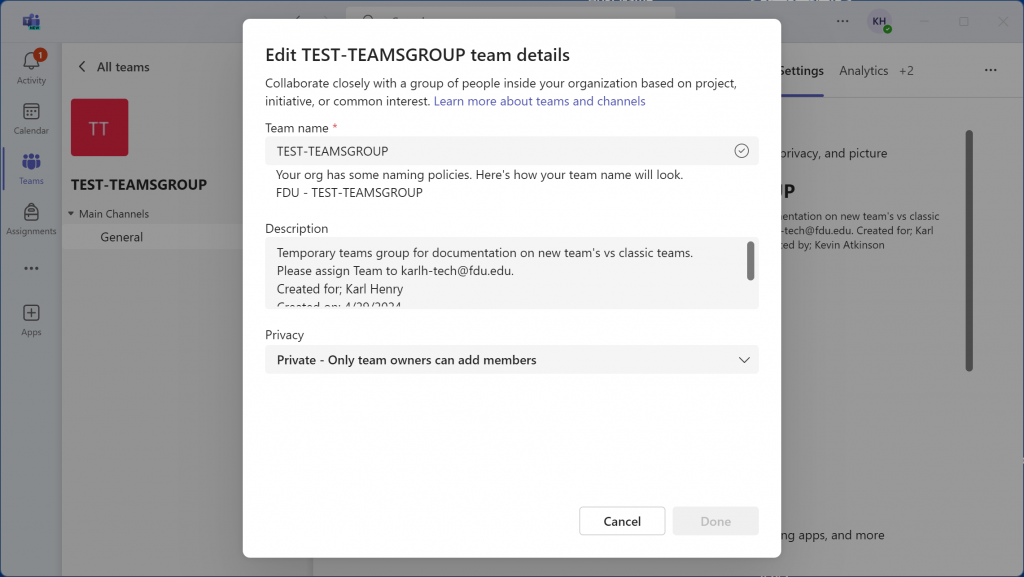
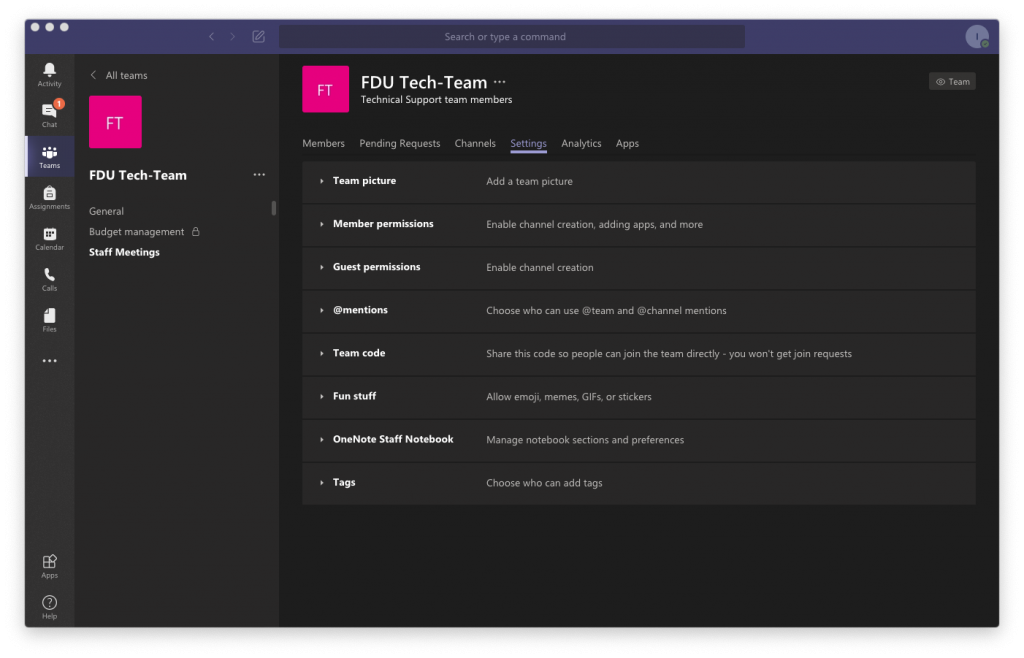
  • The Team picture is an optional setting which allows you to set a profile picture for your team. You can upload your own image or use one of the colorful templates provided by Microsoft
  • Use Member permissions to set editing permissions for your team members
  • With the Guest permissions settings you can allow guests to create, update, and delete channels
  • @mentions lets you choose if you allow the @mention function to send notifications to individuals or entire channels
  • Team code will provide you with a join code that you can give out to new members. This will allow them to join without being placed in the Pending Requests section
  • Fun stuff lets you allow gifs and memes to be displayed on the channel
  • Use the Tags setting to decide who can use the tags feature. With tags, your team members can add labels help them better identify other members of the team
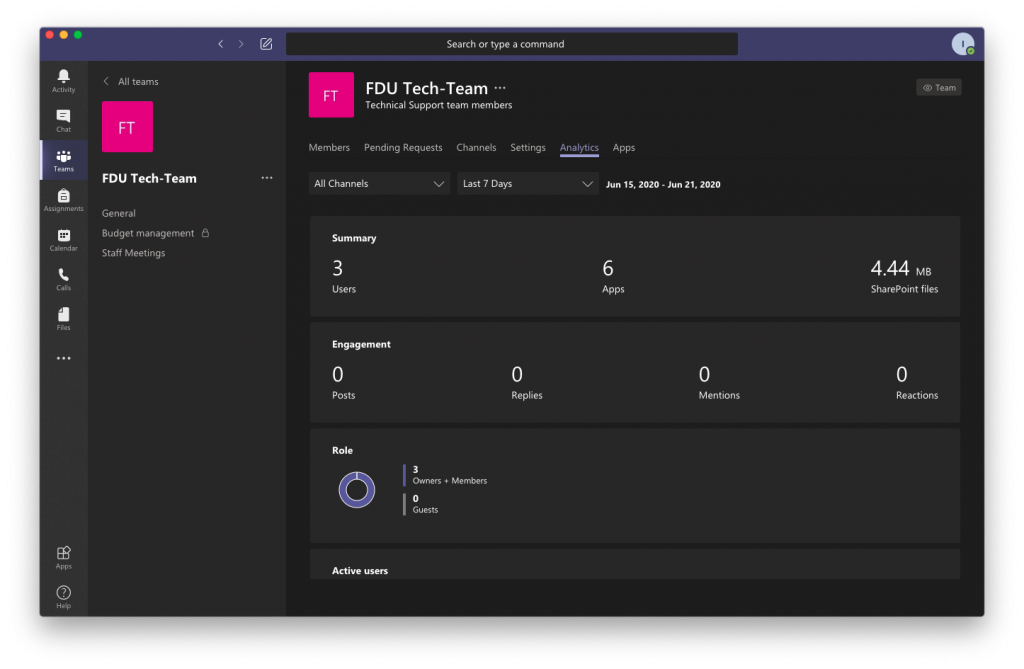
Manage Analytics Tab

  • The Analytics tab displays usage information for your team
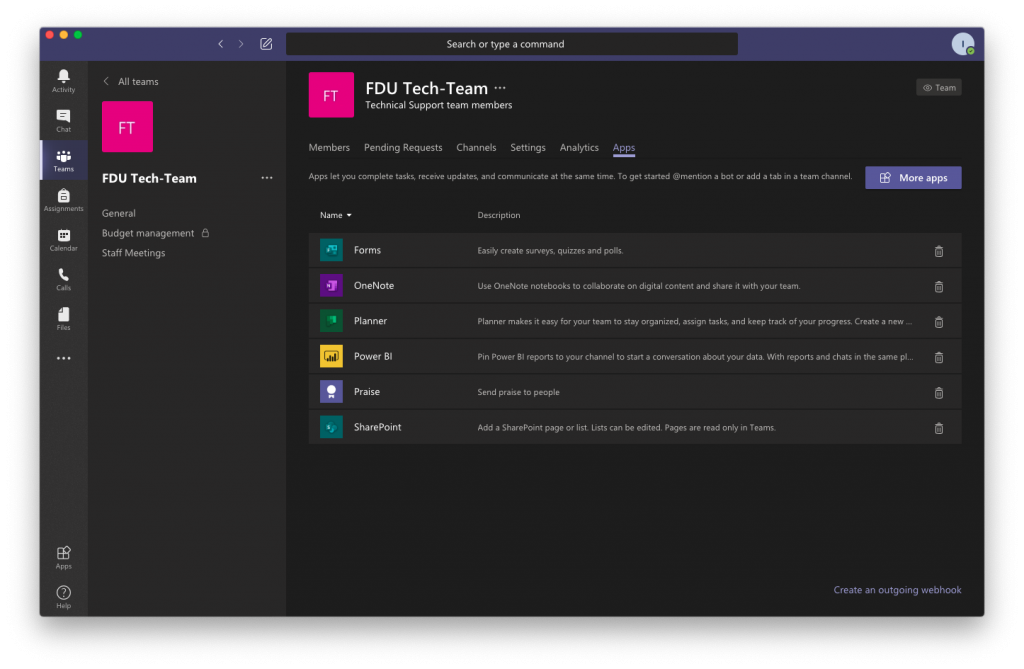
Manage Apps Tab

  • The Apps tab allows you to add or remove application plug ins for your channels
Choosing a Team Type

When you create a new team in Microsoft Teams, you’ll be asked to select from one of four teams.

Learn more in the table below about which team meets your teaching and learning goals.

Class Professional Learning Community (PLC) Staff Other
Description Teachers and students collaborating on group projects, assignments, and more. Educators collaborating within a professional learning community. Examples: academic department, grade band, or group working on a shared goal. Staff leaders and staff members collaborating on school administration and development. Students and school employees collaborating in interest groups and clubs.
Team Owners & Team Members Teachers are team owners and add students as team members. Educators form the team and other educators join the team. Staff leaders are team owners and add staff members as team members. Any combination of students and school staff can form a team and add members.
Permissions Teachers moderate student conversations and who can post where. Students only have write permission in certain areas. Educators share equal read-write permissions. Staff leaders control posting settings. Staff members only have write permission in certain areas. Team members share equal read-write permissions unless the team owner(s) alter the settings.
Features Class Notebook Assignments Conversations Files Video and audio calls Chat (if enabled) Pinning new tabs with documents or sites like Microsoft Forms OneNote notebook Conversations Files Meetings Video and audio calls Chat (if enabled) Pinning new tabs with documents or sites Staff Notebook Conversations Files Meetings Video and audio calls Chat (if enabled) Pinning new tabs with documents or sites OneNote notebook Conversations Files Meetings Video and audio calls Chat (if enabled) Pinning new tabs with documents or sites
Educational Goals Assign, track, and review student work Export grades Collaborate and communicate in the classroom Make announcements Administer quizzes and polls Work in student groups Share and organize rich content Invite virtual experts into the classroom Collaborate in professional learning communities Communicate Make announcements Share work Organize virtual or face-to-face meetings Work in smaller groups Share and organize content Oversee professional development, staff, and administrative goals Communicate Make announcements Share content and progress reports Work in smaller groups Organize virtual or face-to-face meetings Collaborate and communicate with team members Make announcements Share content Organize virtual or face-to-face meetings Work in smaller groups

Starting an Instant Meeting

Instead of scheduling a meeting for a future date, you can start one right away and invite people in on the fly.

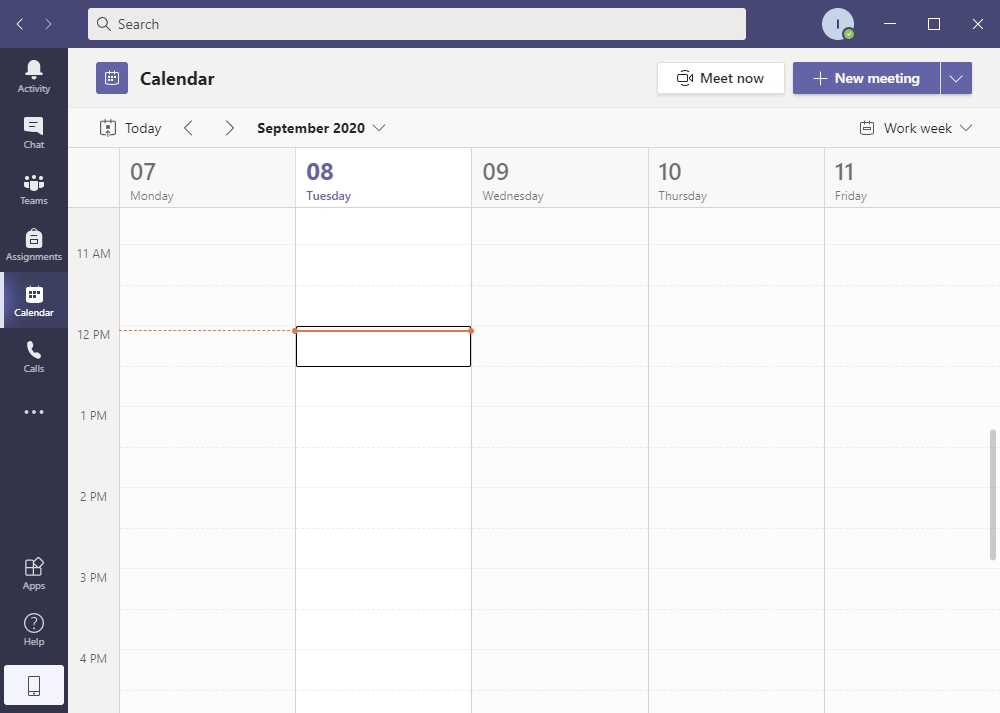
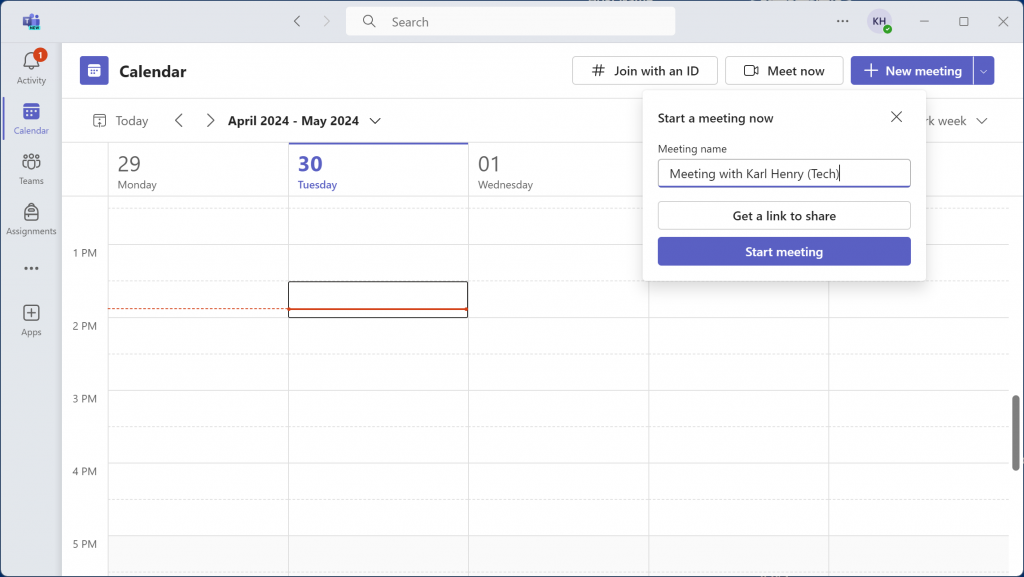
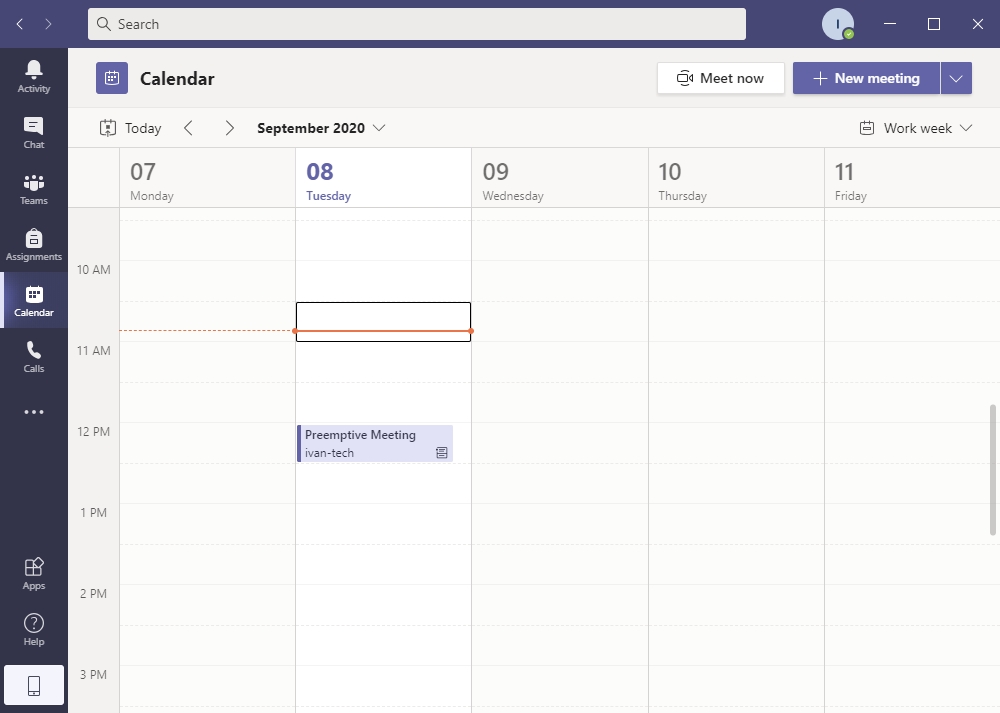
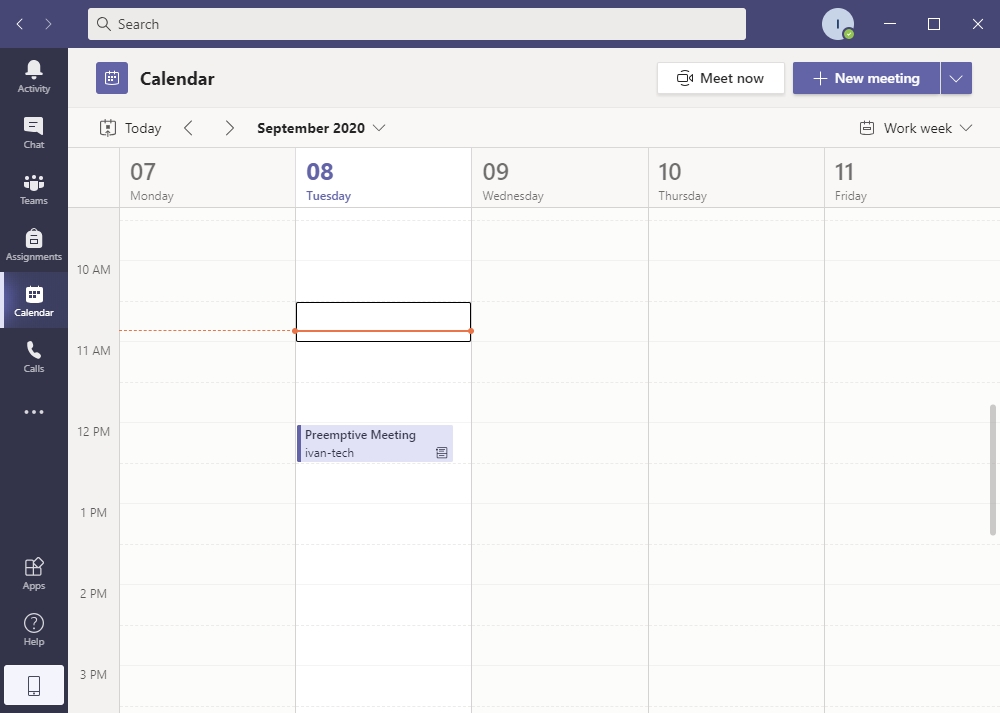
  1. Select “Calendar” from the left-hand side of the screen and click “Meet Now
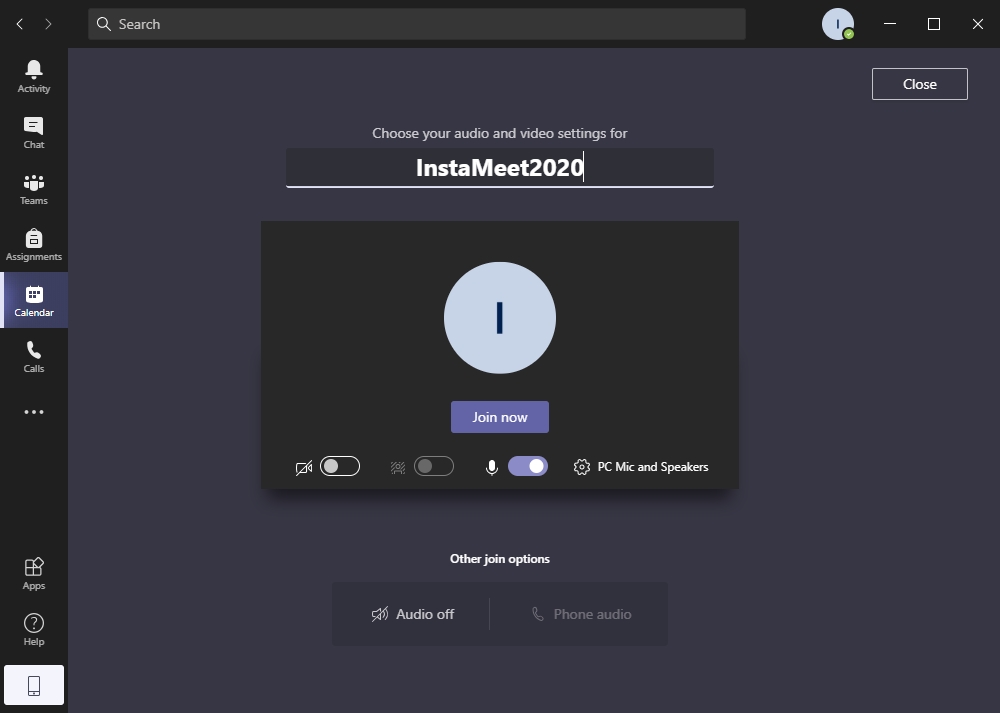
  1. Give your meeting a name, select audio and video options, and click on “Join Now
  1. Your meeting should start with the Participants tab displayed so you can start inviting people right away. As you search for people and add them to your meeting, they will receive a call to be connected
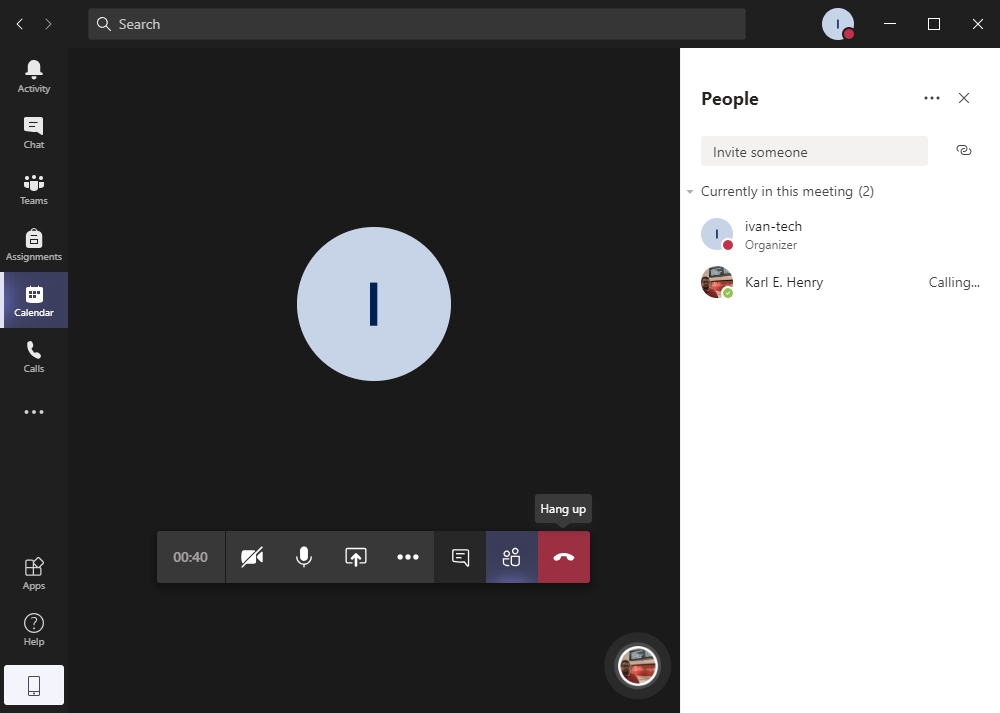
4. As people accept the meeting invitation they will automatically be connected
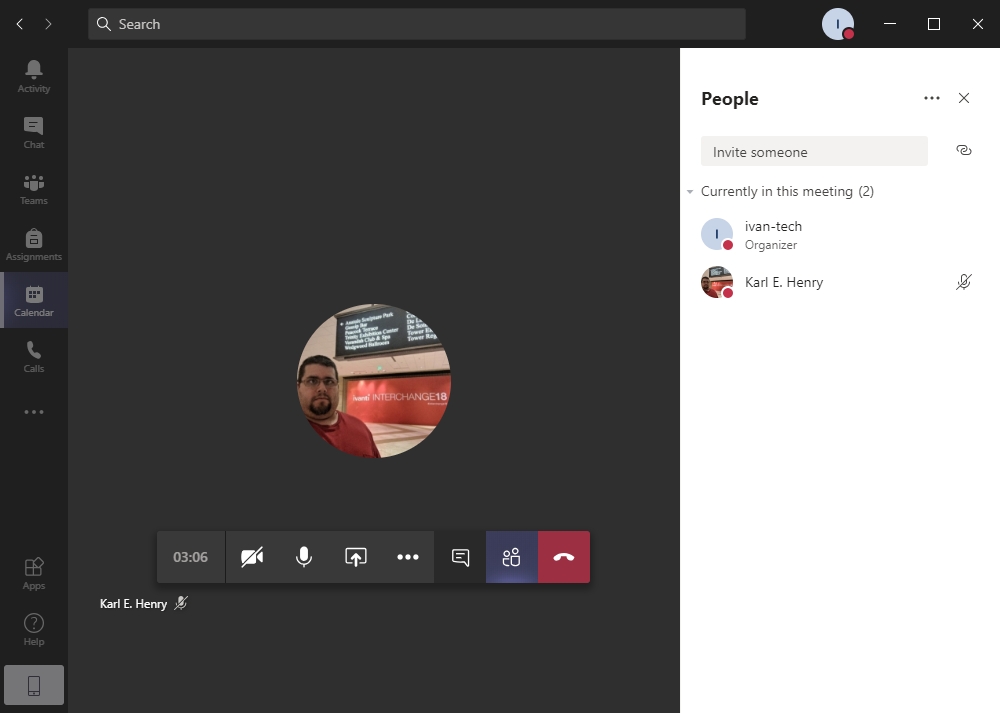
Joining a Meeting

Meetings in Teams include audio, video, and screen sharing. They’re one of the key ways to collaborate in Teams.

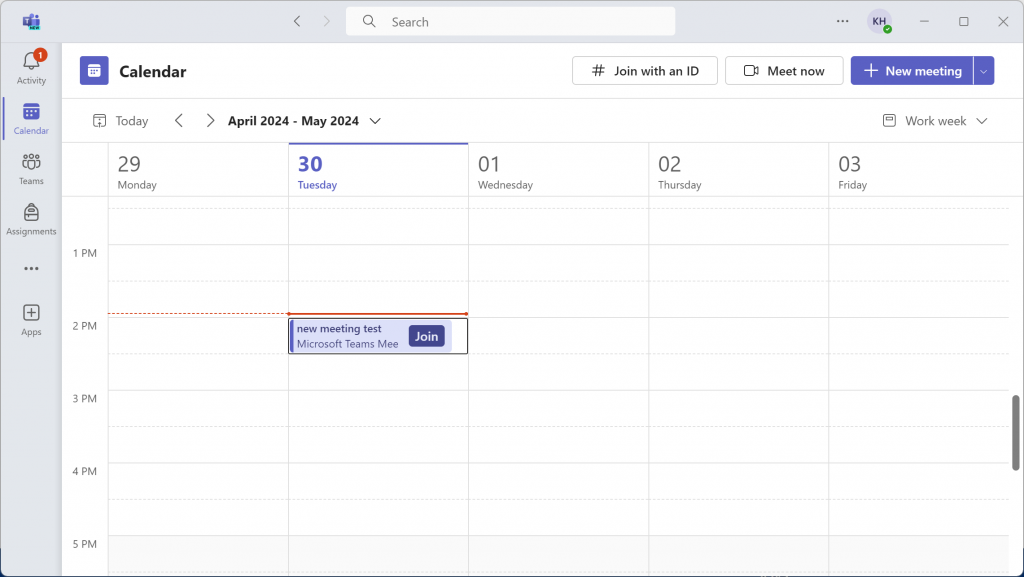
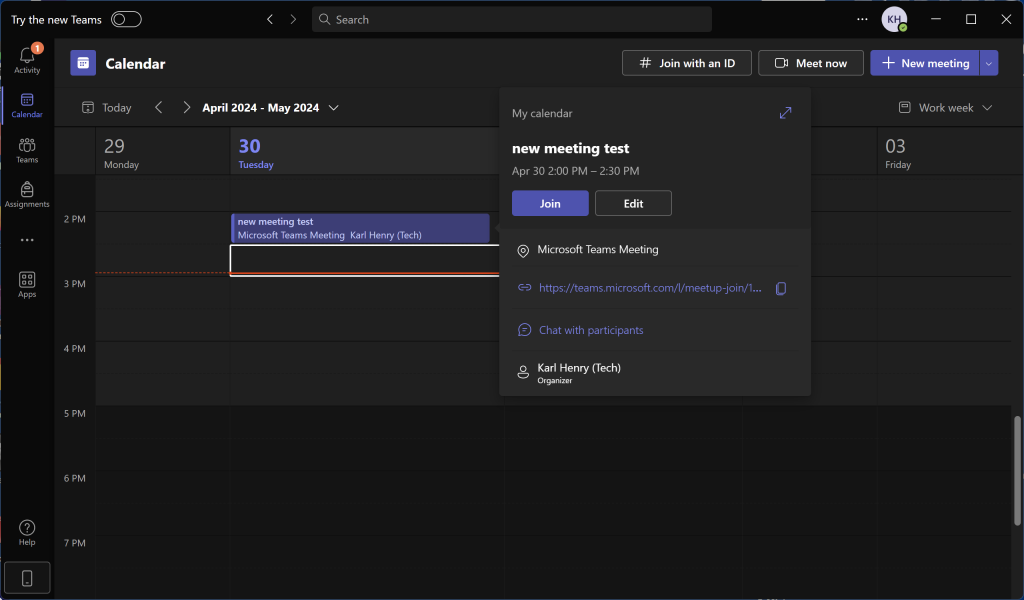
  1. You can join a scheduled meeting by selecting the “Calendar” tab from the left menu, then finding and left-clicking on your meeting
  1. Click “Join” button on the top of the page
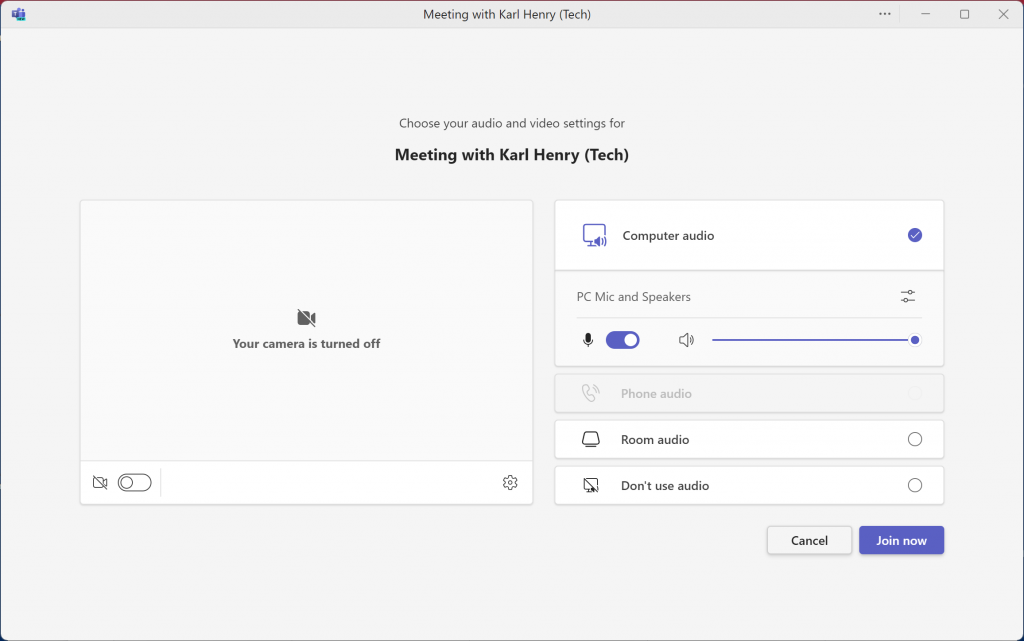
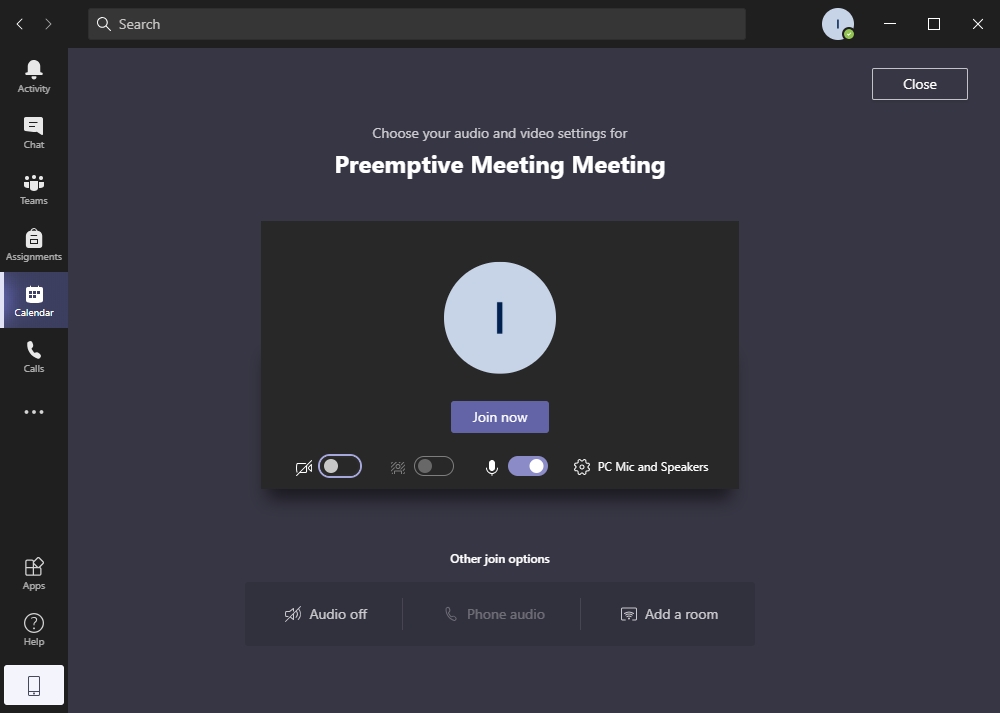
  1. Select your video and microphone options, then left click “Join Now
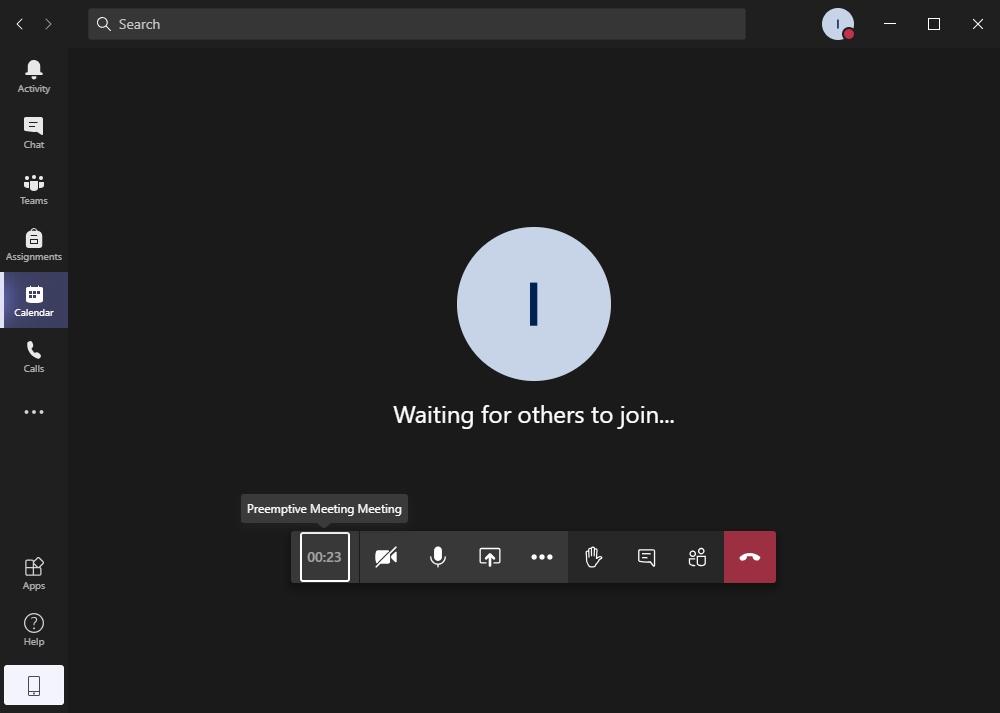
  1. If you are the first participant that joined the meeting, you will see a black screen informing you that you are waiting for other members to join. As people join the meeting they will show up on the screen.
  1. When you are done with the meeting, close it by clicking the red telephone icon to “Hang up” the call
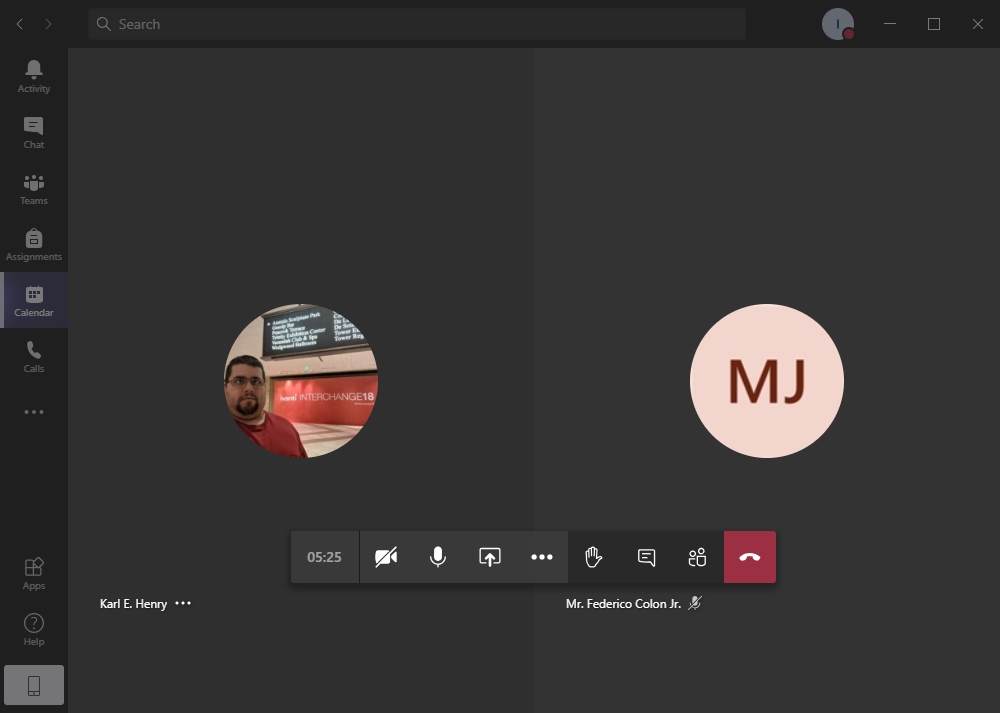
Scheduling a Meeting

Due to Office 365 calendar integration, scheduling video and voice meetings on Microsoft Teams is simple and convenient.

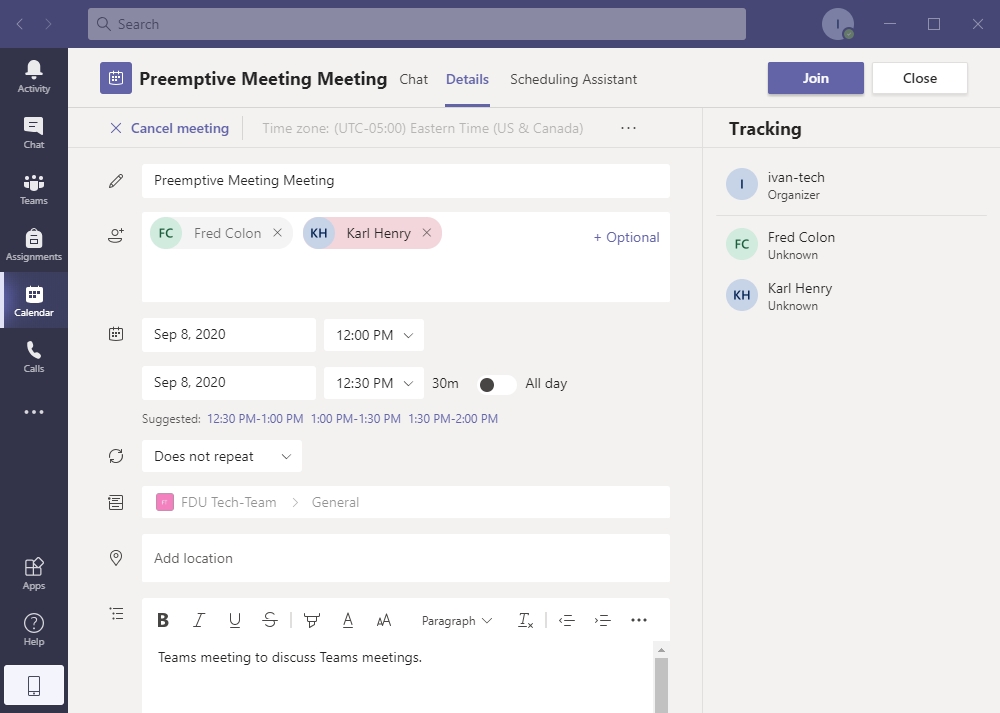
  1. Select the “Calendar” tab from the left-hand side of the screen. This screen displays your entire FDU Office 365 calendar. Next, click “New Meeting” button on the top right of the window
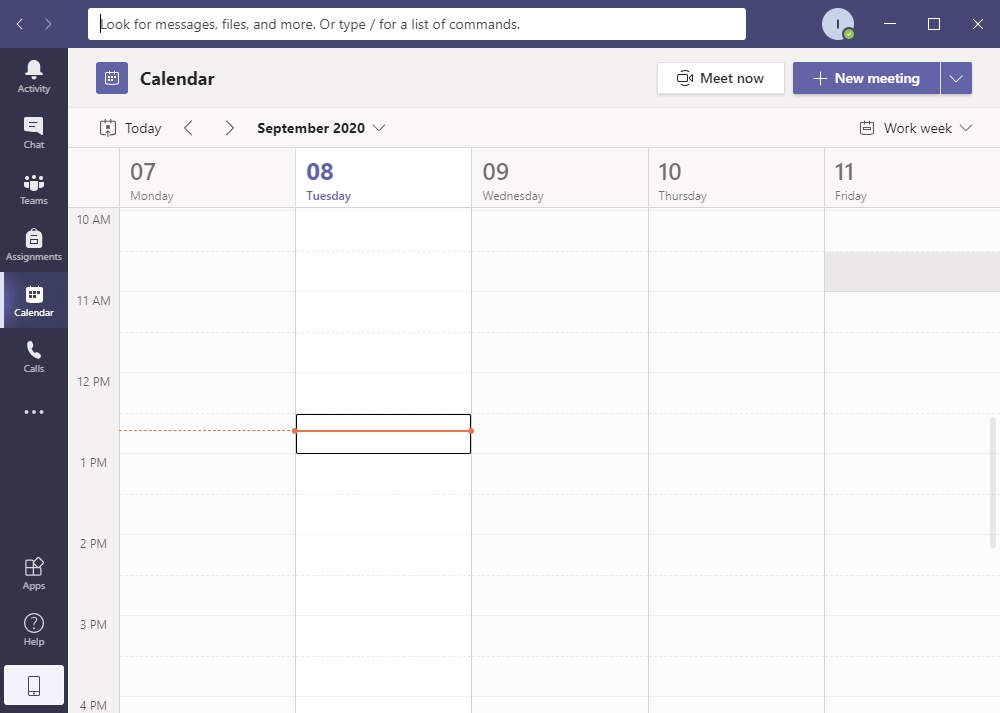
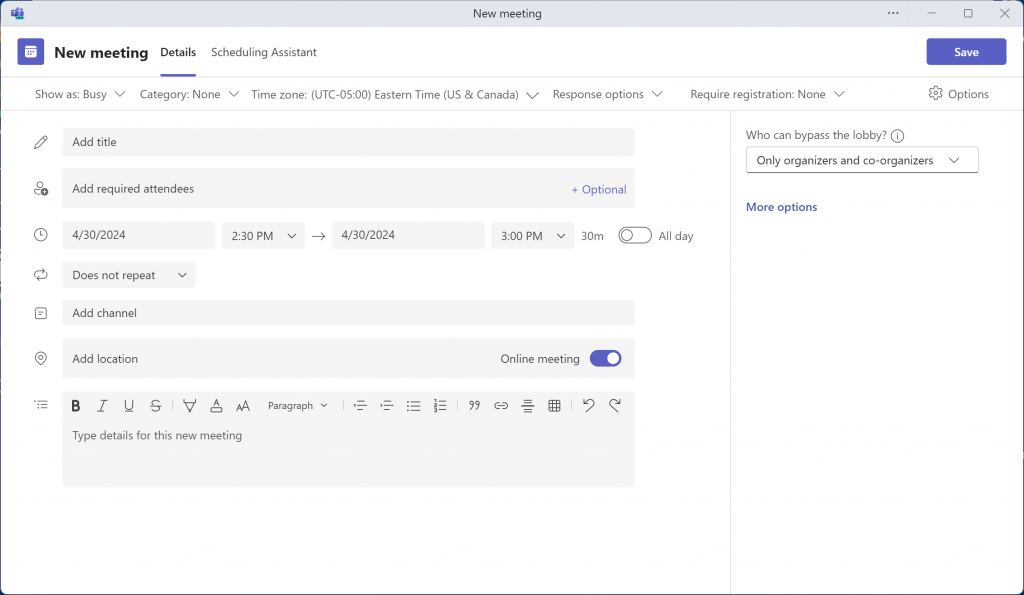
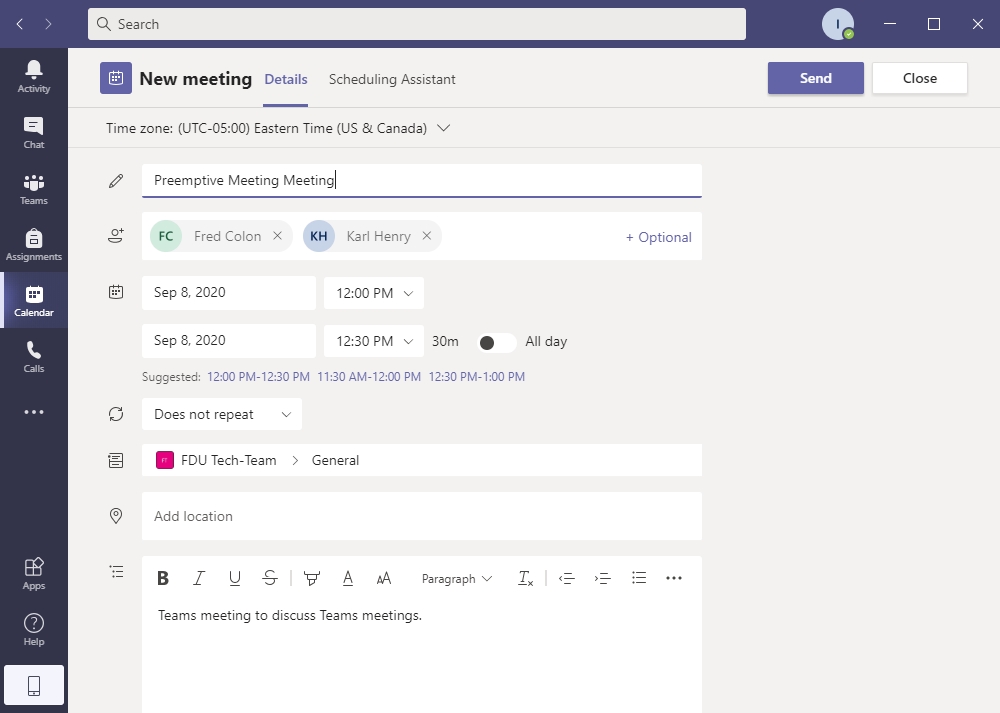
You will notice that the New Meeting window offers 2 tabs, Details and Scheduling Assistant

  1. From the Details tab, enter the following information about your meeting:
  • Title
  • Required Attendees

Note

You can also add optional attendees by clicking +optional button

  • Time
  • Specify whether the meeting reoccurs
  • Add Channel is optional and lets you specify an entire Teams channel to receive a meeting notification
  • Add location is optional and enables you to select a physical location for members to meet at
  • Add details like the topic of discussion, meeting outline, etc
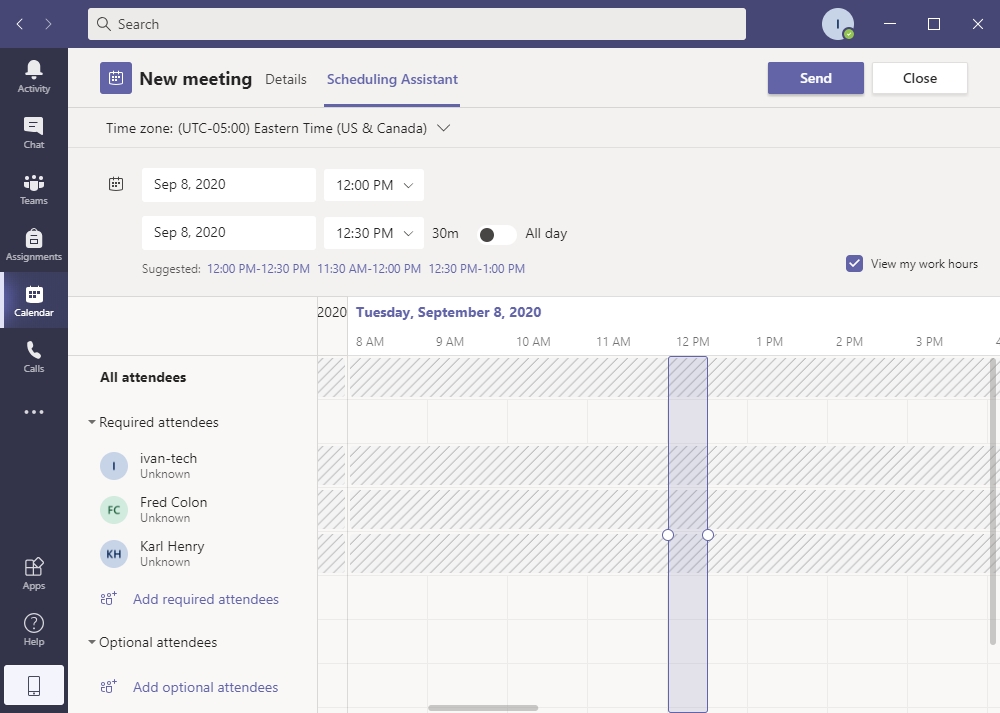
  1. The Scheduling Assistant tab allows you to view the calendar of all attendees to check for availability. It is possible to adjust the meeting time on this tab
  1. When finished, click the “Send” button on the top of the page. The meeting will be posted on the channel you selected and invites will be emailed to all requested attendees. The meeting will also show up on the calendar of the people who have accepted the meeting invitation
Last Modified:
Navigating myFDU Connect 

Resources for:
icon Close

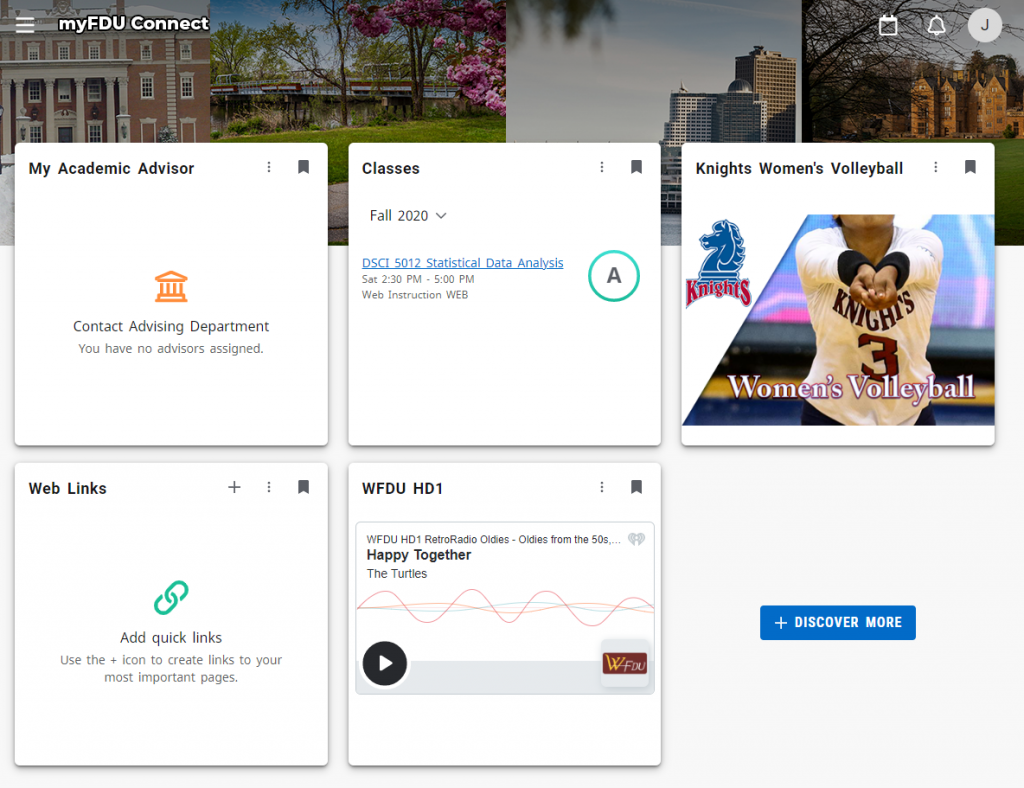
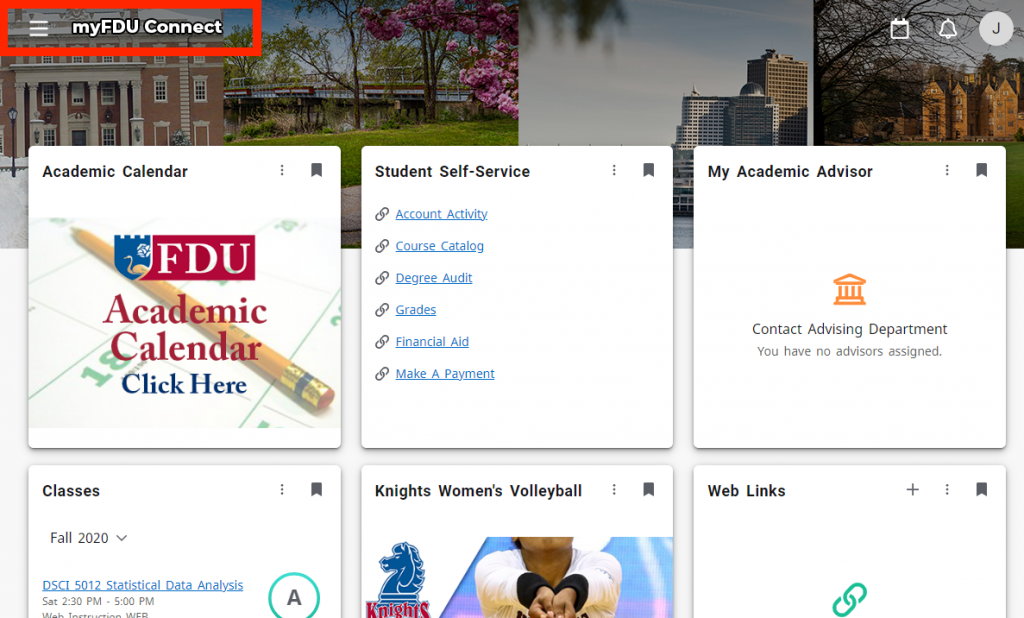
myFDU Connect is a place where Students, Faculty, and Staff can go as their single point of entry for everything FDU. The homepage consists of a dashboard full of “cards” that represent different aspects of FDU. Users can personalize their dashboard to display cards relevant to their life on campus..

How to Navigate myFDU Connect

  1. To log into myFDU Connect, you will need to visit myfduconnect.fdu.edu and login with your FDU NetID. Once logged in, you will land on your customizable homepage
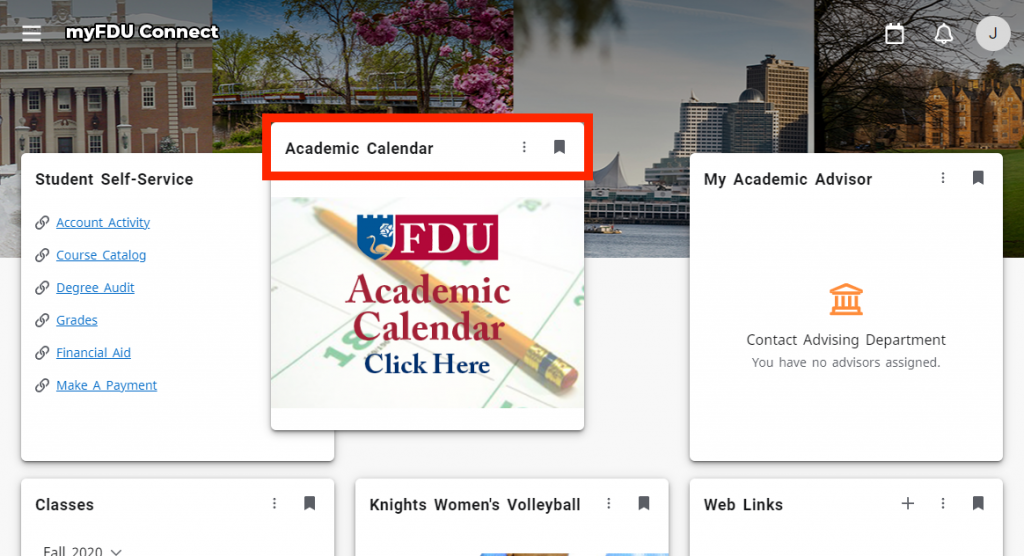
  1. The cards you see can be added to, removed, and rearranged to your liking. To add a new card, click on the “+ Discover More” button
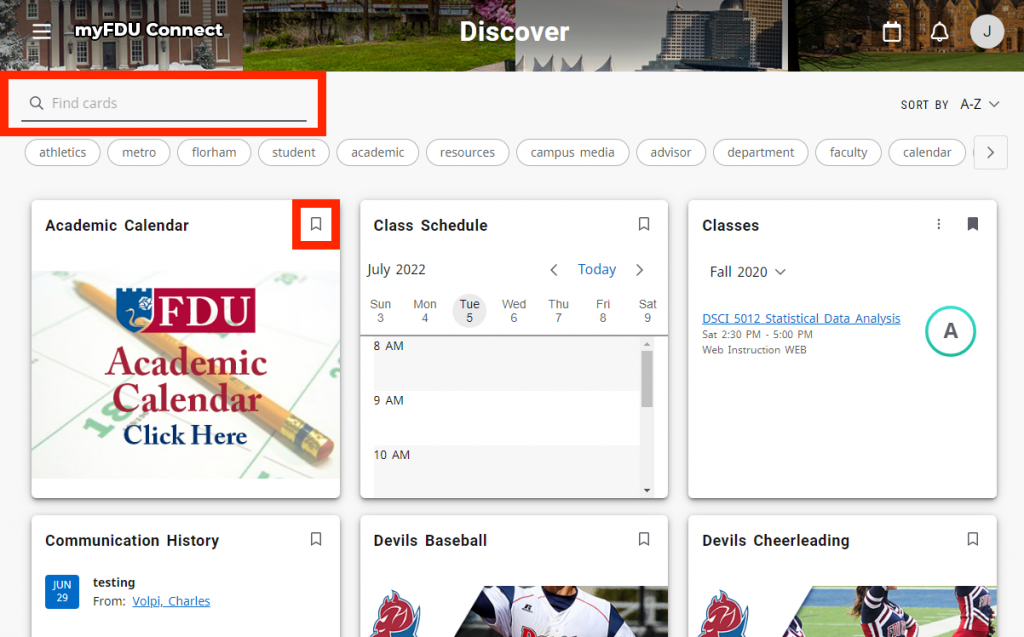
  1. In the top left of the page, you can use the search field to find specific cards. You can also scroll through the page to see everything that is available. When you have found a card you would like to add to your homepage, click on the “save card” ribbon on the top right of the card
  1. Click on “myFDU Connect” in the top left of the page to return to your homepage. You should see your new card in the first slot
  1. If you would like to change the order of your cards, click and hold on the top of the card and move the card to a new position
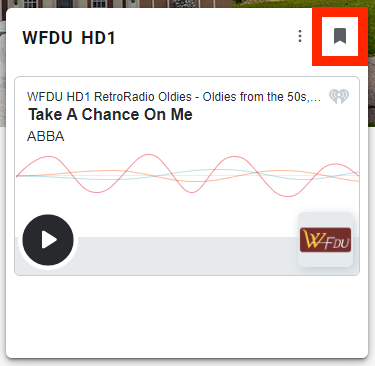
  1. If you wish to remove a card from your homepage, click on the “remove card” ribbon on the top right
  1. When new cards are available, you will be notified on the alarm button on the top right of the page
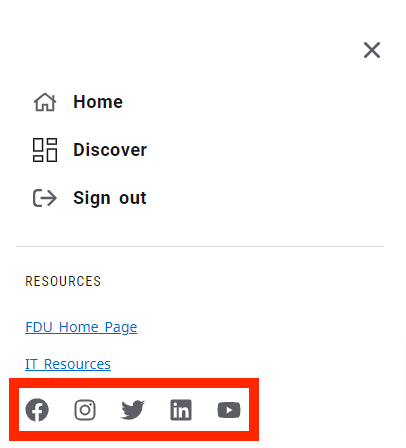
  1. To access FDU’s social media pages, click on the hamburger menu in the top left of the page
Last Modified:

NWN Cloud Self-Service Portal Account Setup

Resources for:
icon Close

The NWN Cloud Self-Service portal allows you to manage and view your phone settings.

  1. Visit SAMI Support to open a ticket and gain access to your NWN Cloud Self-Service Portal for the first time.
    • While SAMI Support offers the fastest and easiest way to get IT assistance, you can also reach out to UTAC by phone at (973)-443-8822 or via email at fdutac@fdu.edu. The Voice Services team will manage your request, and once it’s processed, you can proceed to the next step.
  2. Visit the self-service portal at fdu-selfcare.nwncloud.com
  3. Enter your full NETID@fdu.edu in the login field. Example: (SmithR@fdu.edu)
  4. Enter your NWN Cloud account password and click “Enter
  5. Next click on your Name on the top right of the screen. Hover over the drop-down menu and click “My Account
  1. Under “Web Password” un-check the checkbox, next to keep current value, and input set a custom password. When done, click “Apply” in the top right corner
  1. Your account is now active
Last Modified:

Office 365 Training Guide

Resources for:
icon Close

Introduction to Office365

Fairleigh Dickinson University uses Office365, a new E-mail system that greatly expands the quota of data stored per user and features enhanced services such as Word Online, Excel online and PowerPoint online. Office365 service can be accessed via office365.fdu.edu from a web browser, or a configured mail client such as Outlook or Thunderbird.

The manual available for download below is intended to assist users with an FDU email address and non-FDU issued equipment to migrate their e-mail account to Office365.

Last Modified:

On-Campus Printing

Resources for:
icon Close

The following tutorial will guide you through the process of connecting a printer while on-campus. Faculty and Staff members should review the purchasing process before engaging with the process for connecting a printer.

Note

Wireless printing is not permitted on campus. The information below is for wired connections only.

Connecting a Printer for Students in the Residence Halls

Most new printers are plug and play compatible with Windows 10. When you receive your new printer, you can unbox it and remove any orange tape you see. After plugging in the power and turning the printer on, allow the printer to initialize (most new printers will have a display to show you it’s progress). When the printer finishes initializing, just connect the usb printer cable from the printer to your computer. Windows 10 should automatically install the printer for you.

close
Printer Purchasing Process for Faculty and Staff

All printer purchases for faculty and staff on-campus use must appear on OIRT’s list of approved printer models. For the most up to date list of approved printer models, please contact the Purchasing Department. The purchase of any printer not on the list must be pre-approved by the CIO.

Determining if a Printer will be Directly Connected or On-Network

Faculty and Staff Members have the option of either making a direct or network connection to the printer. A direct connection is when a printer is connected to a single computer and an on-network printer means that multiple parties can print to it. Generally speaking, unless a printer is shared by three or more employees, users should request a direct connect printer.

If you are planning to use a direct connection, simply purchase any printer contained on the Purchasing Department’s list of approved models and follow the instructions for “Installing a Local Printer” in the “Connecting a Printer for Faculty and Staff Members” section below.

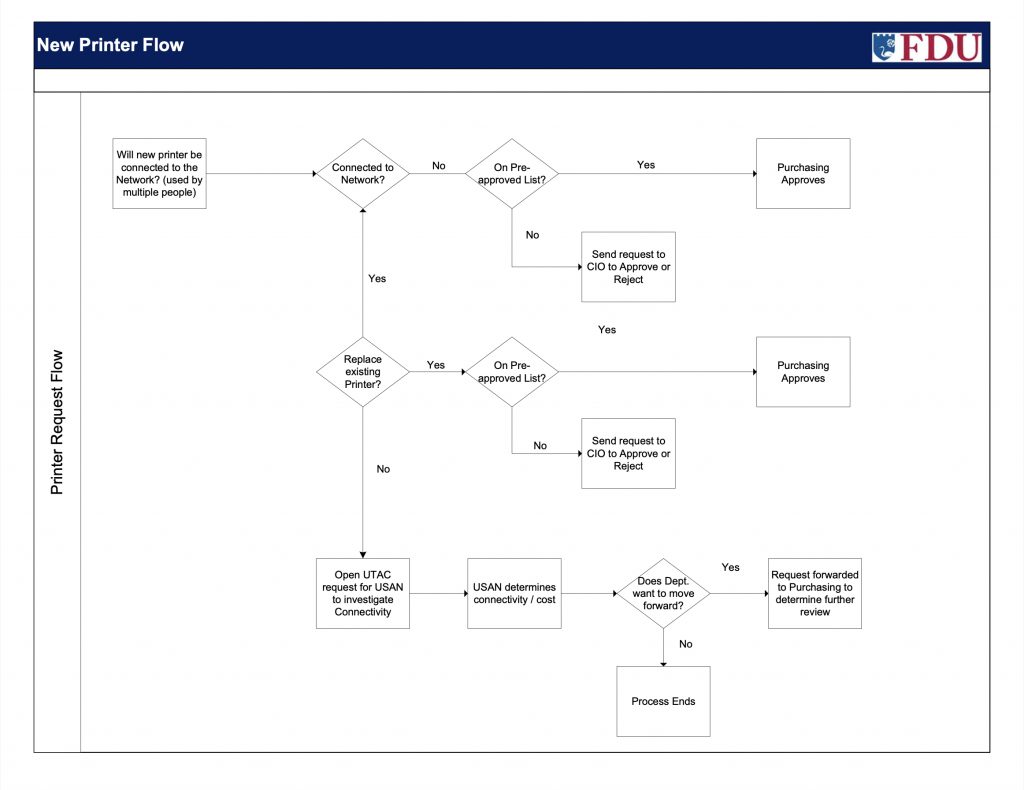
If your new printer will be on-network, please ask your department to contact the Fairleigh Dickinson University Technical Assistance Center (UTAC) for USAN to investigate the viability of any data jacks in the vicinity of where the printer will be located. The full workflow for this process is shown in the following diagram.

close
Connecting a Printer for Faculty and Staff

Installing a Local Printer

Most new printers are plug and play compatible with Windows 10. When you receive your new printer, you can Most new printers are plug and play compatible with Windows 10. When you receive your new printer, you can unbox it and remove any orange tape you see. After plugging in the power and turning the printer on, allow the printer to initialize (most new printers will have a display to show you it’s progress). When the printer finishes initializing, you can just connect the usb printer cable from the printer to your computer. Windows 10 should automatically install the printer for you.

Connecting to a Network Printer

Employees are able to add network printers to their own machines.

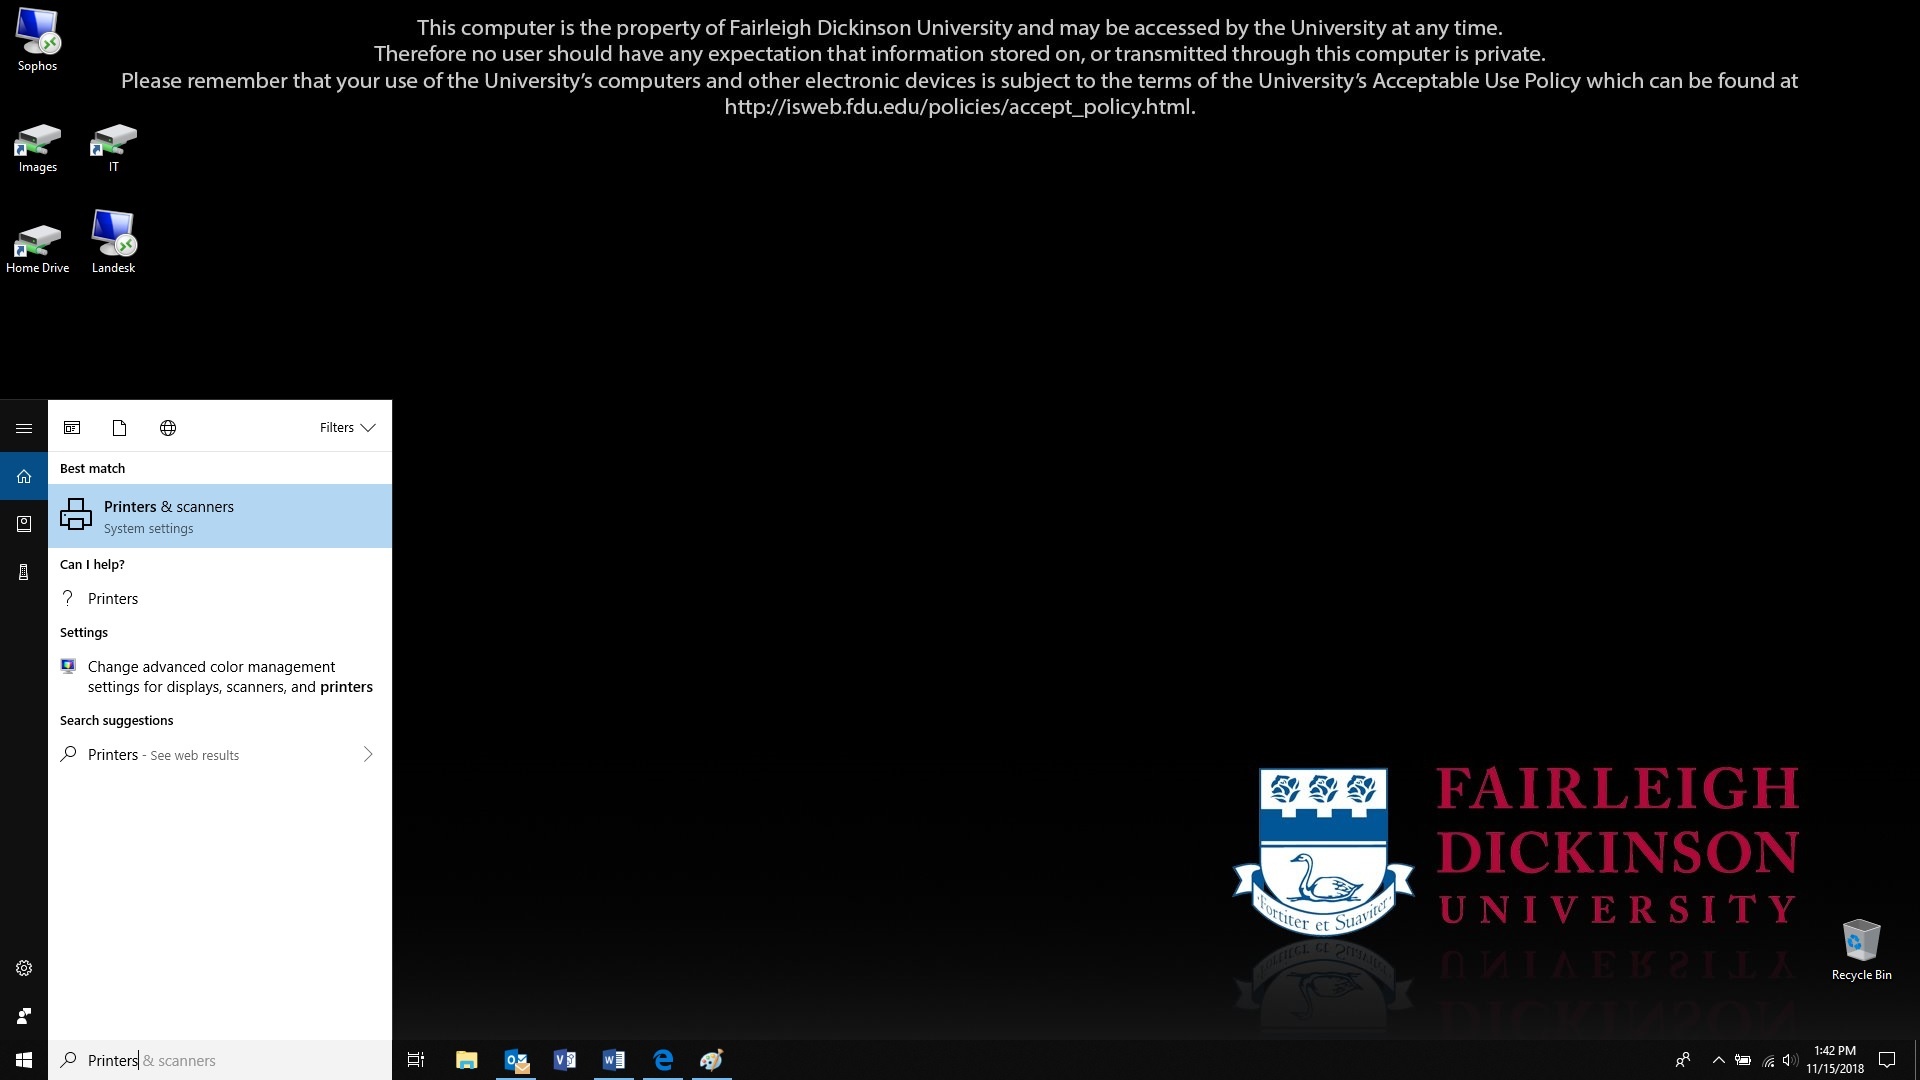
  1. Do a search for printers, and click on “Printers & Scanners

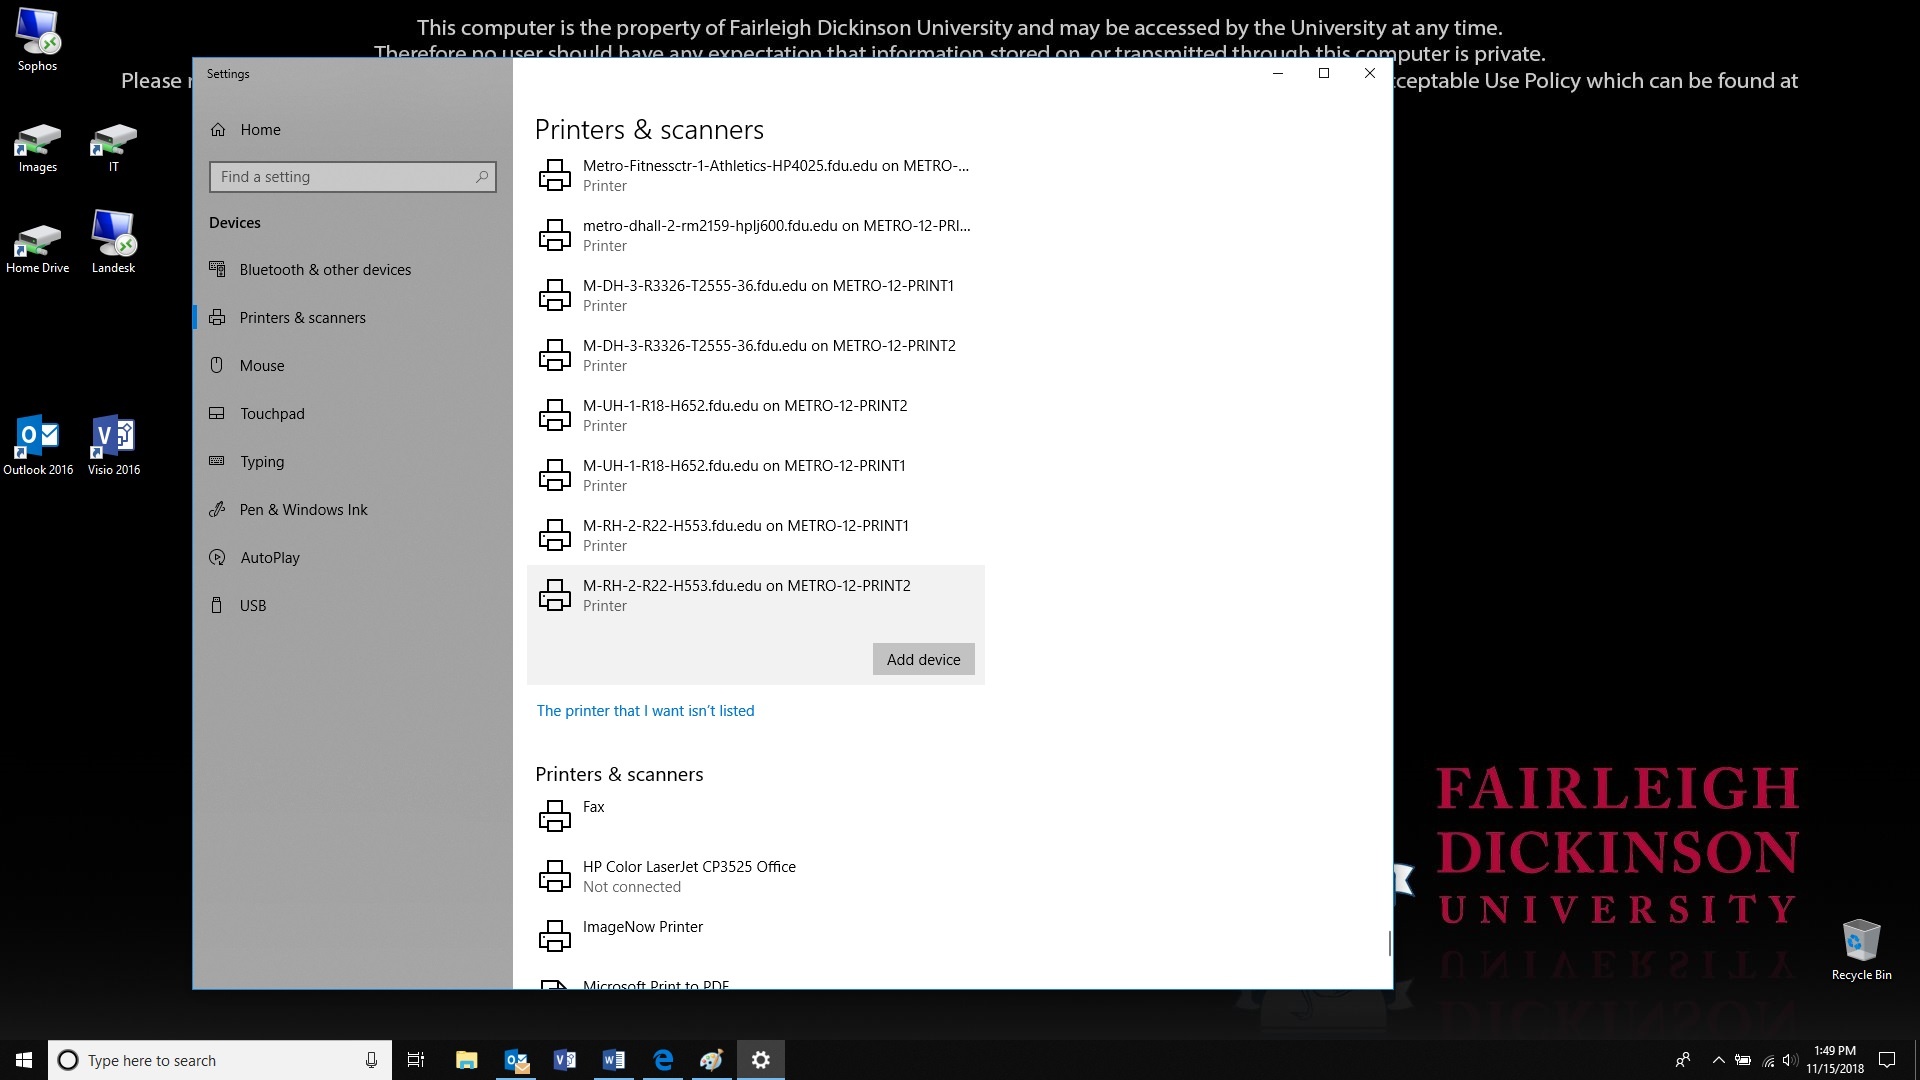
  2. Click on “Add a printer or scanner

  3. The list will start to populate and if you find your printer you can click on it and then click on “Add device”, otherwise scroll down to the bottom of the list and select “The printer I wanted wasn’t listed

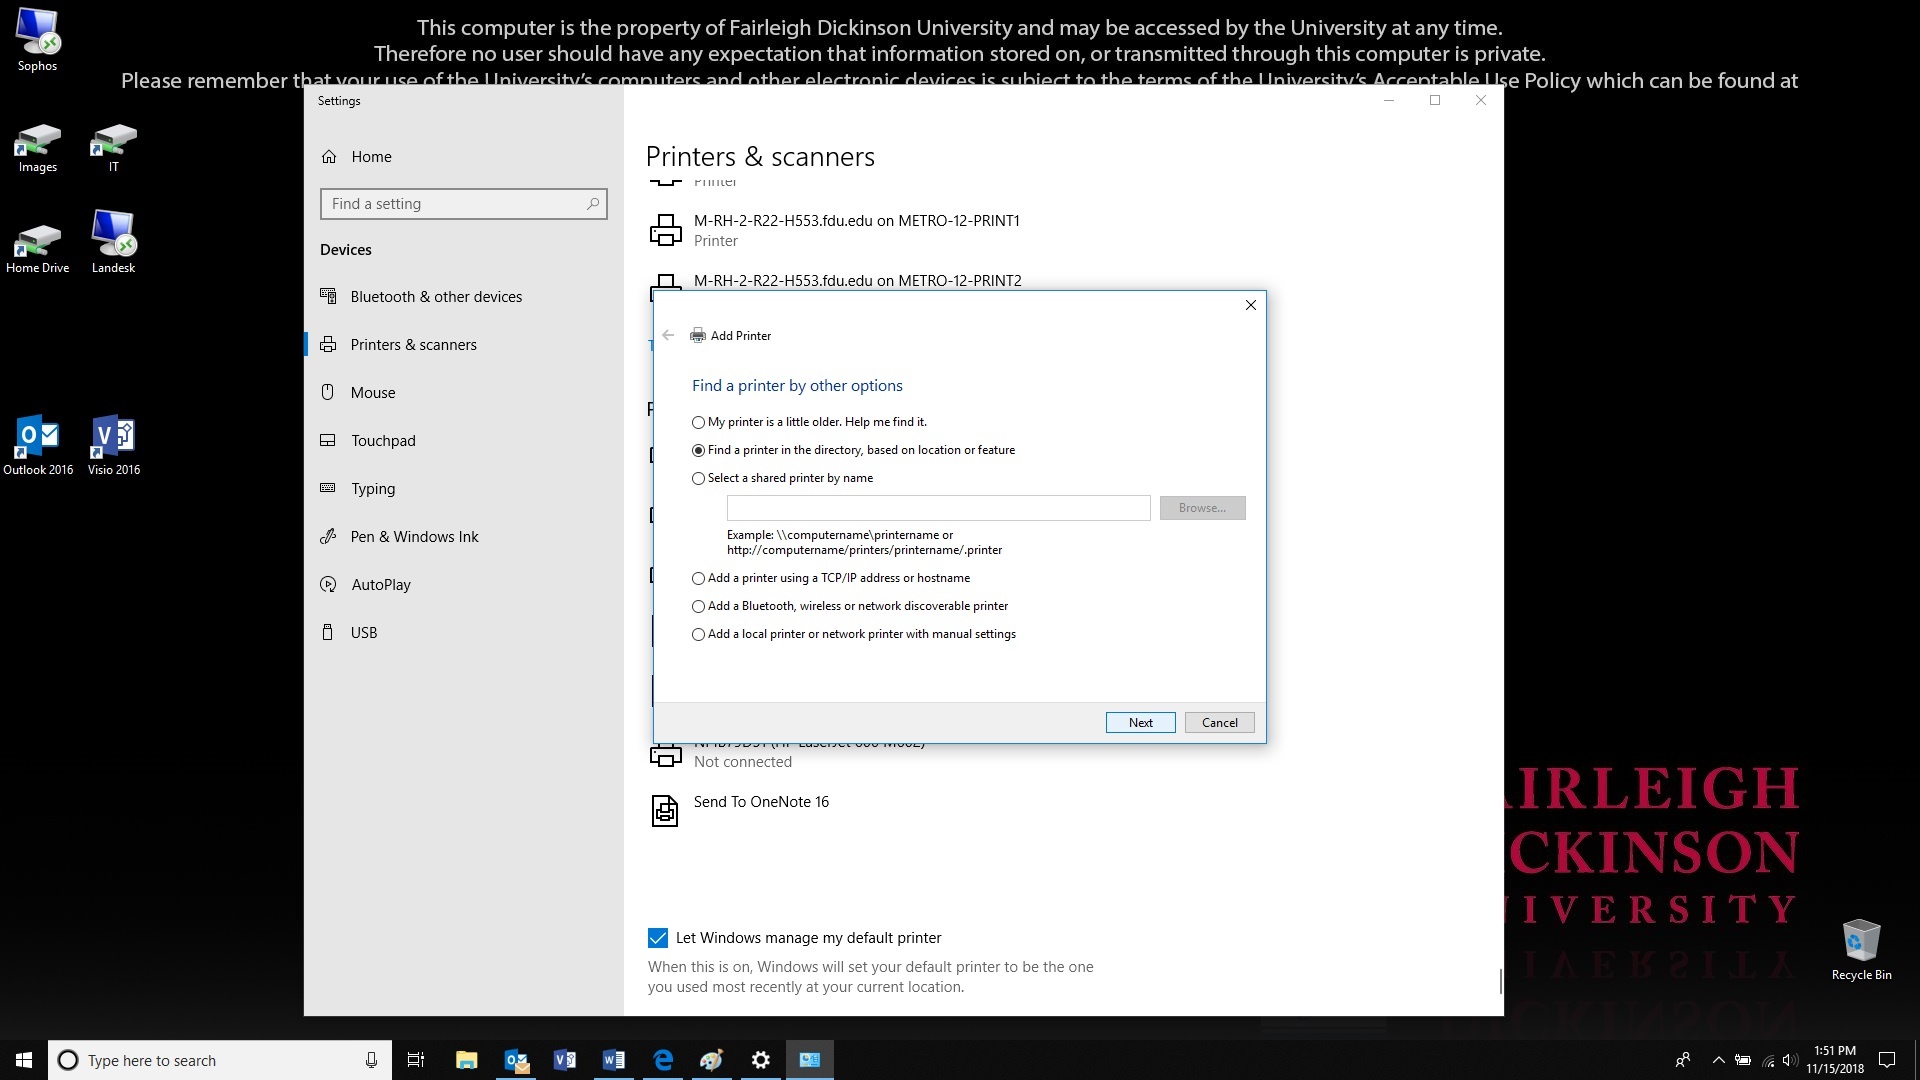
  4. In the new dialog box, select “Find a printer in the directory” and click “Next

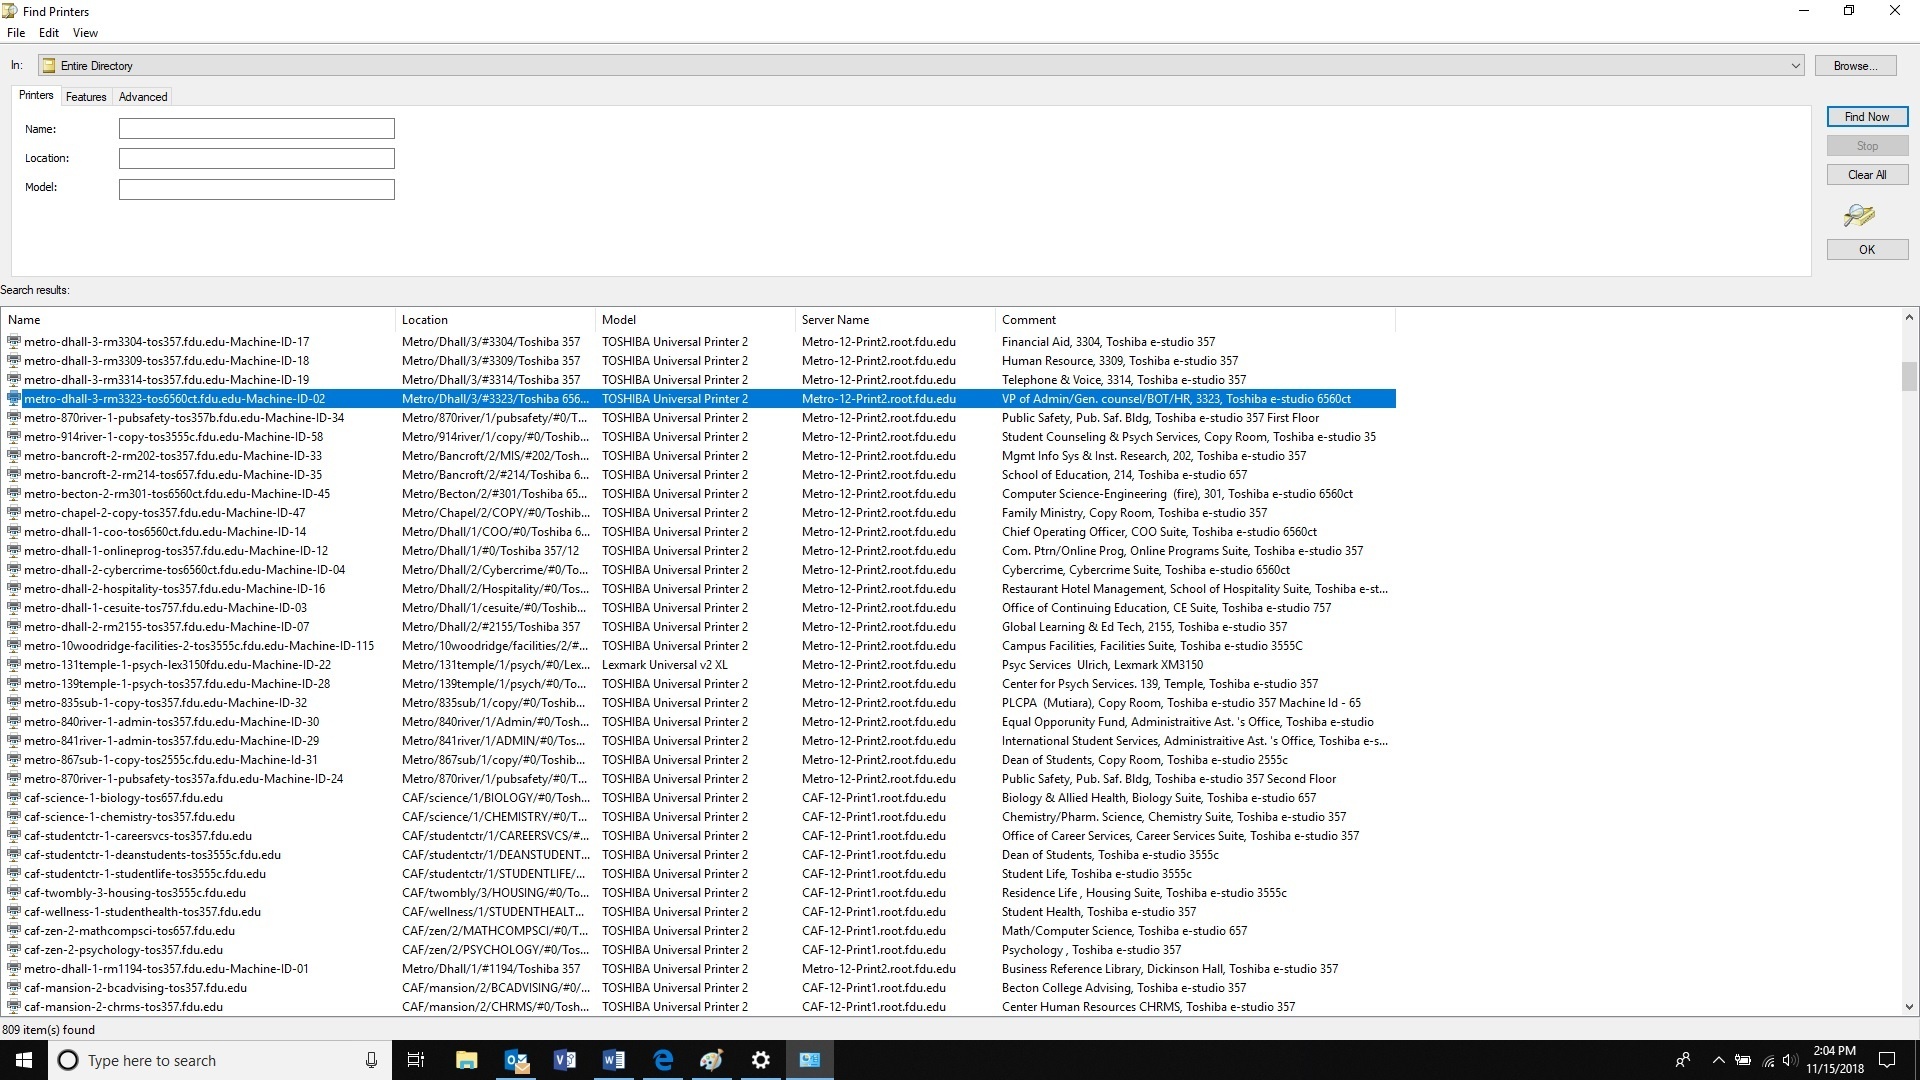
  5. Search for your printer and double click on it when you find it

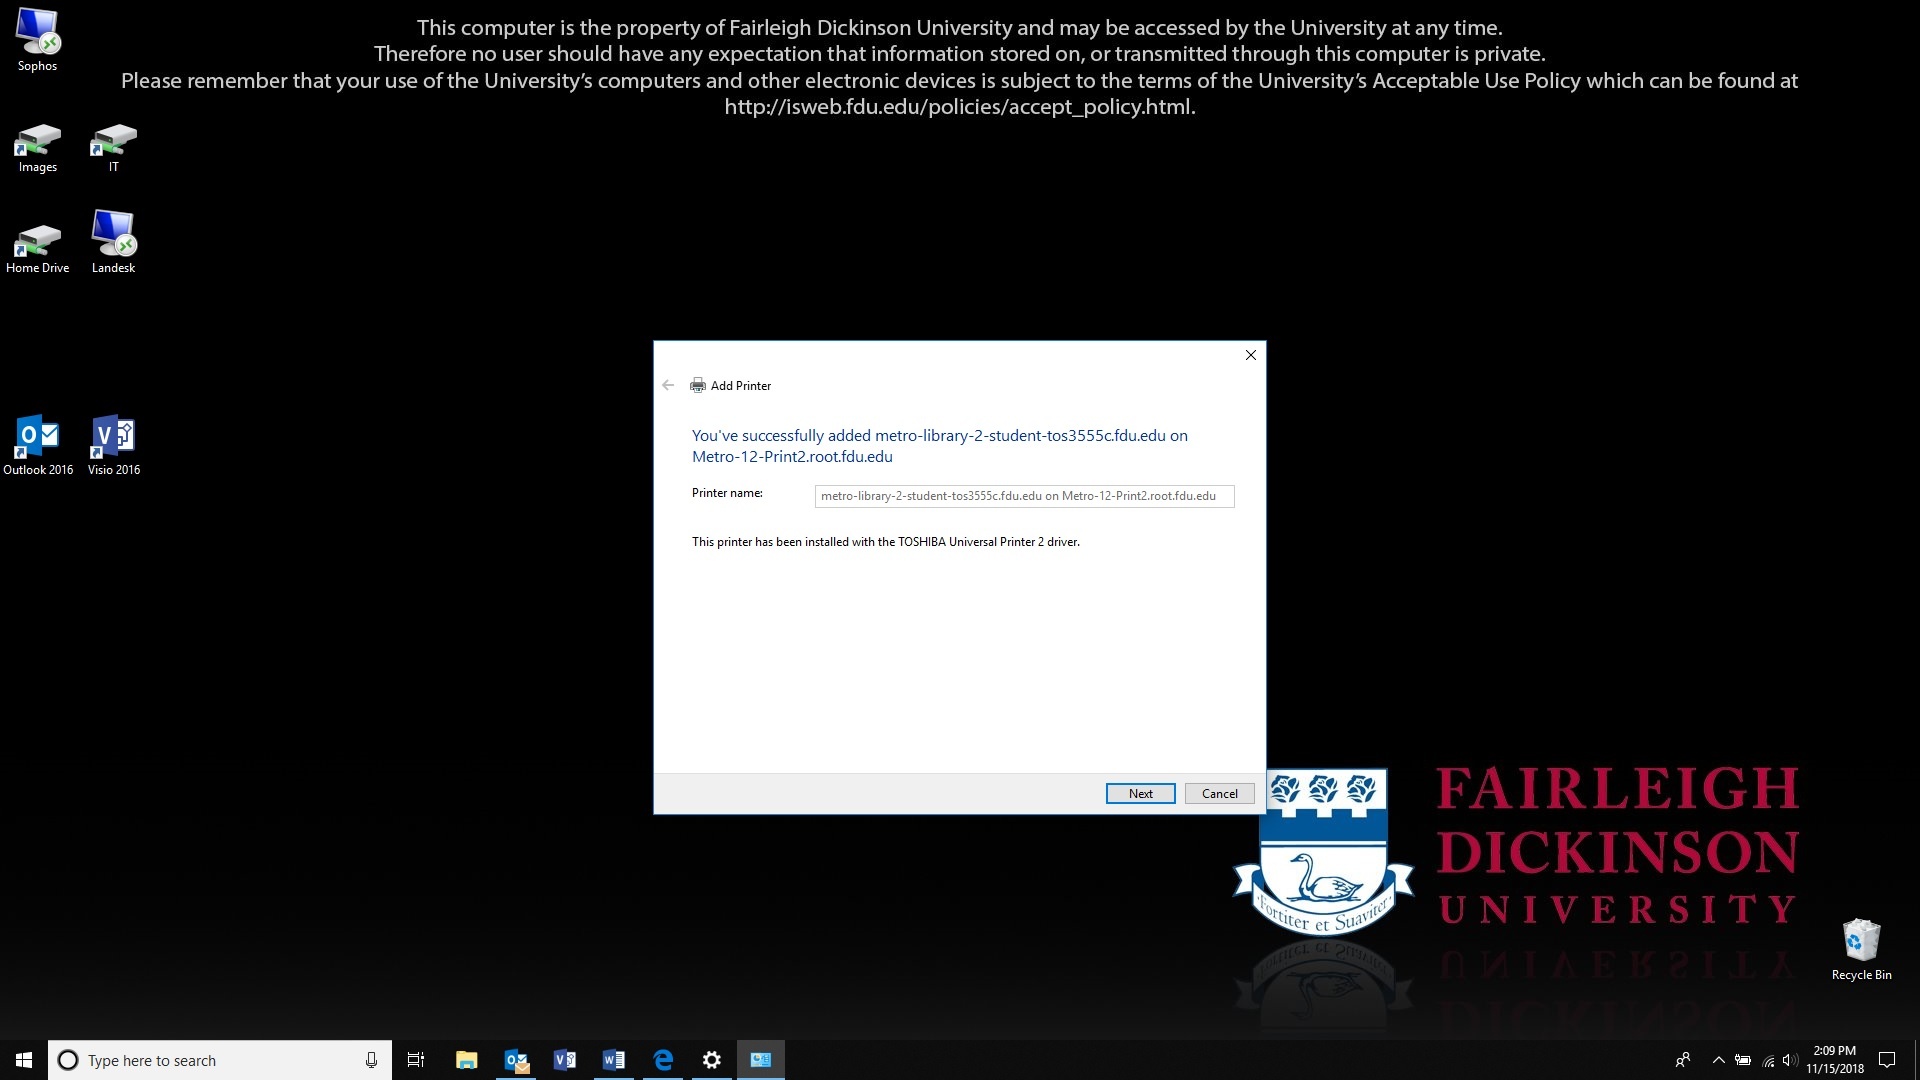
  6. A box will let you know that the printer was successfully installed. Click “Next

  7. You can click on “Print a Test Page” to verify you are connected to the right printer otherwise click on “Finish

close
Last Modified:

Papercut Printing User Instructions

Resources for:
icon Close

The instructions below pertain to any Vancouver user that will use the Secure Print, Scan to email, and Copy functions of the Xerox printers.

Account Balances

Vancouver users have the following account balances listed below:

  1. Free Quota, is a designated account balance that is applied to all the students and is auto-replenished on schedule – before the start of the semester. This is the first balance that gets deducted after which the secondary “Paid_Balance” goes into effect.
  2. Paid Balance is the amount credited onto a student’s account when they pay for extra printing credits.

Free Quota Account Balance Automated Replenishment

Each user listed below has a specified amount of Free Quota replenished according to a schedule:

  • Adjuncts: $1000.00 replenished at the start of the school year
  • Student IT Assistants And Student Workers: $200.00 replenished at the start of every school term
  • Staff and Faculty: $1000.00 replenished at the start of every school term
  • Students: $10.00 replenished at the start of every school term

Paid Balance Reload / Replenishment

The instructions below are for Students on how to reload/replenish their Paid Balances:

  1. Go to Enrollment Services to pay for the amount they wish to recharge
  2. Bring the receipt to IT Office to request the reload for their Paid Balance
Logging In
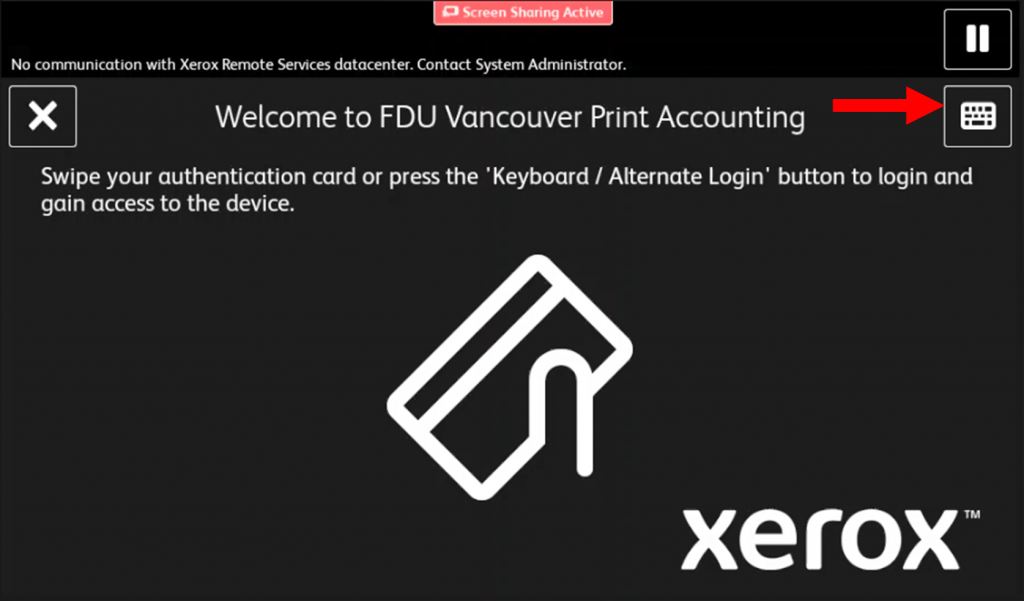
  1. Users can either swipe their badge or use their FDU NetID and password to log in. To use your credentials press the “Keyboard” button on the top right of the screen
Papercut Log in using credentials
  • If upon swiping your badge the following screen appears on the Xerox printer screen. Enter your credentials to associate them with your account. For a detailed walkthrough, play the video below:
close
Checking Account Balance on Printer

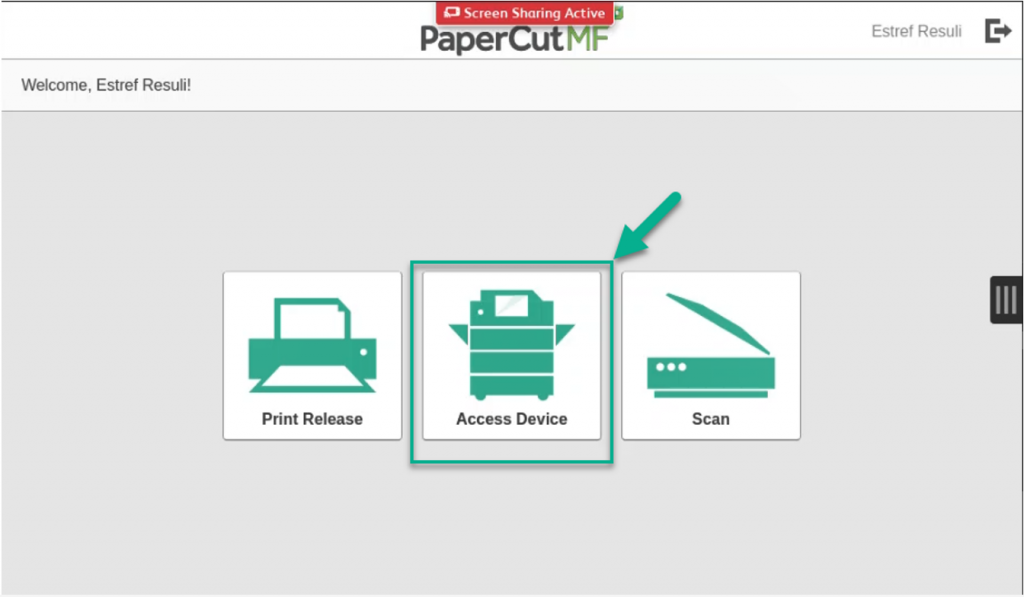
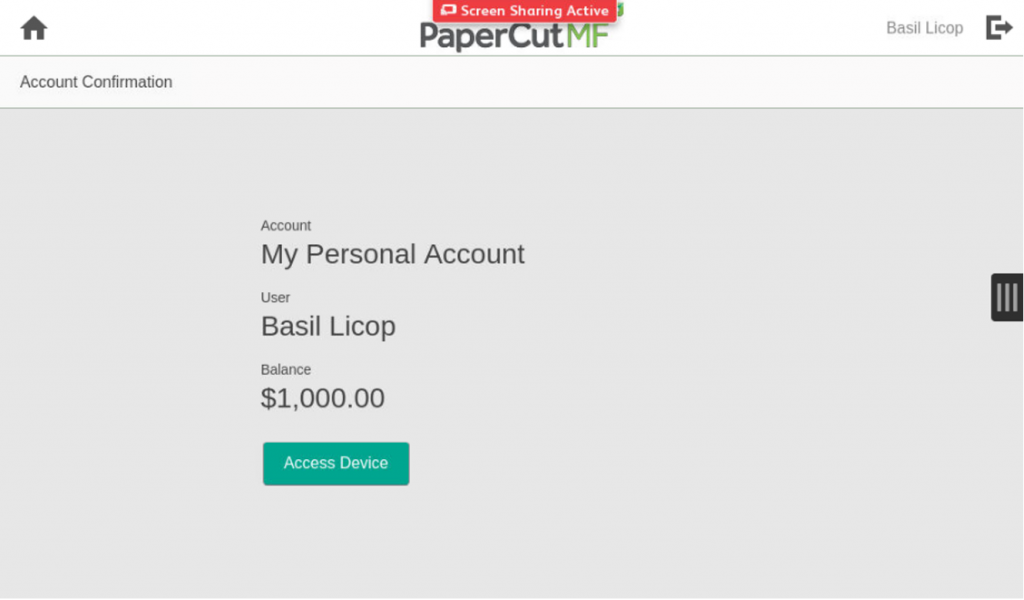
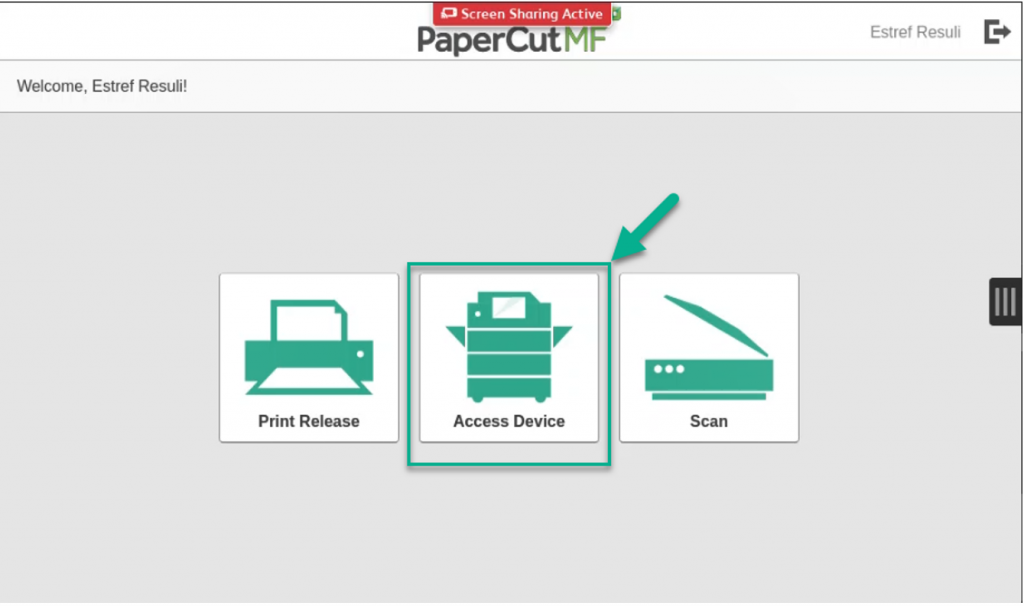
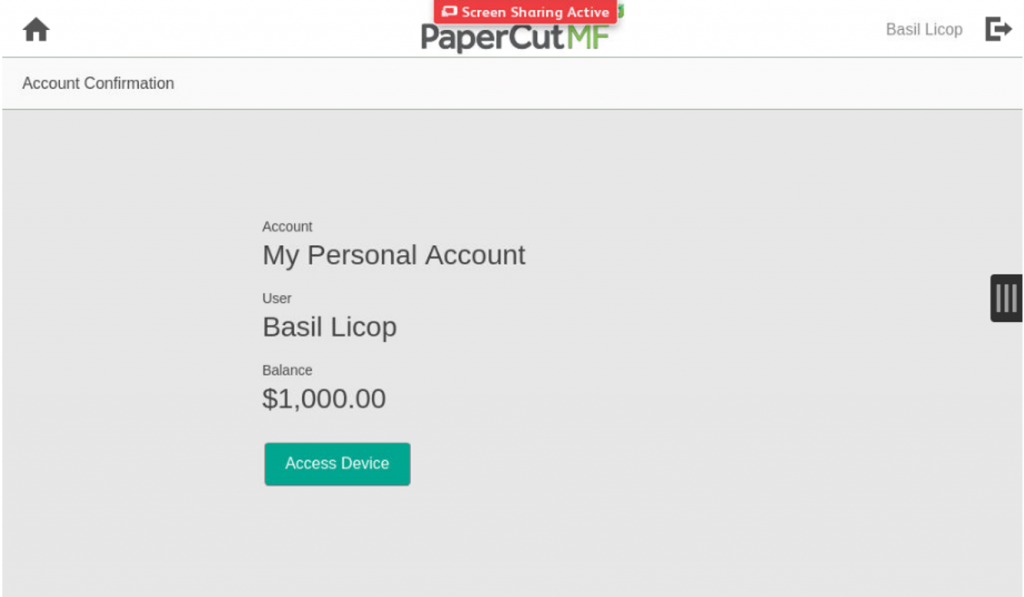
To check your total balance from the printer, log into that printer and press the “Access Device” button. The balance will be displayed on the screen.

close
Secure Print
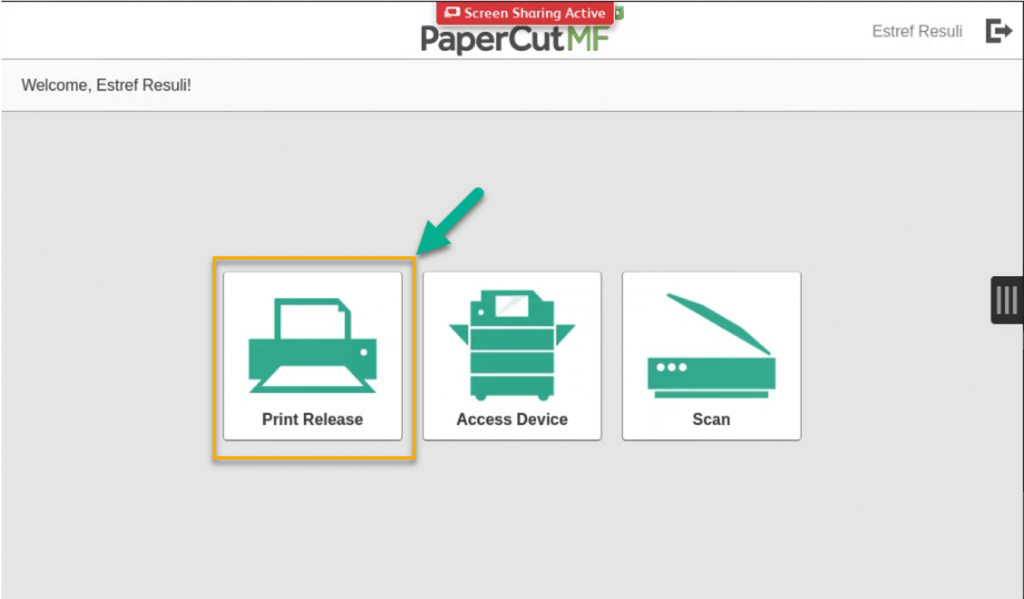
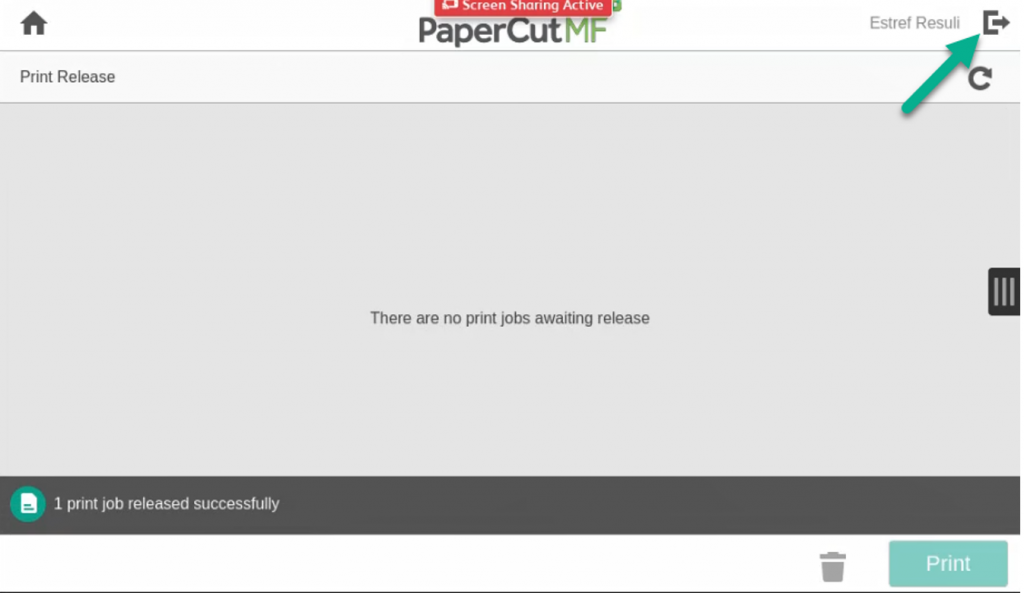
  1. To release a print job after you have sent a print job to the appropriate printer and logged into that printer. Press the “Print Release” button
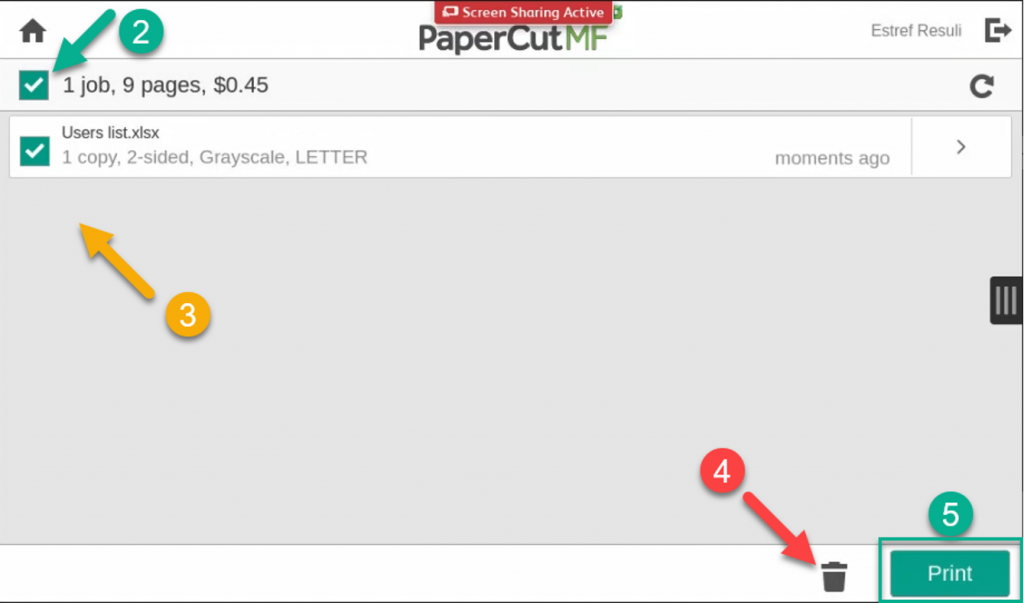
  • To print all jobs under the queue press the checkbox above all the jobs (2) then press the “Print” button (5)
  • To print a selection of the jobs, select the appropriate checkbox beside the jobs you want to print (3), then press the “Print” button (5)
  • To delete jobs from the printer’s queue, select the appropriate checkbox beside the jobs you want to delete (3), then press the “Trashcan” button (4)
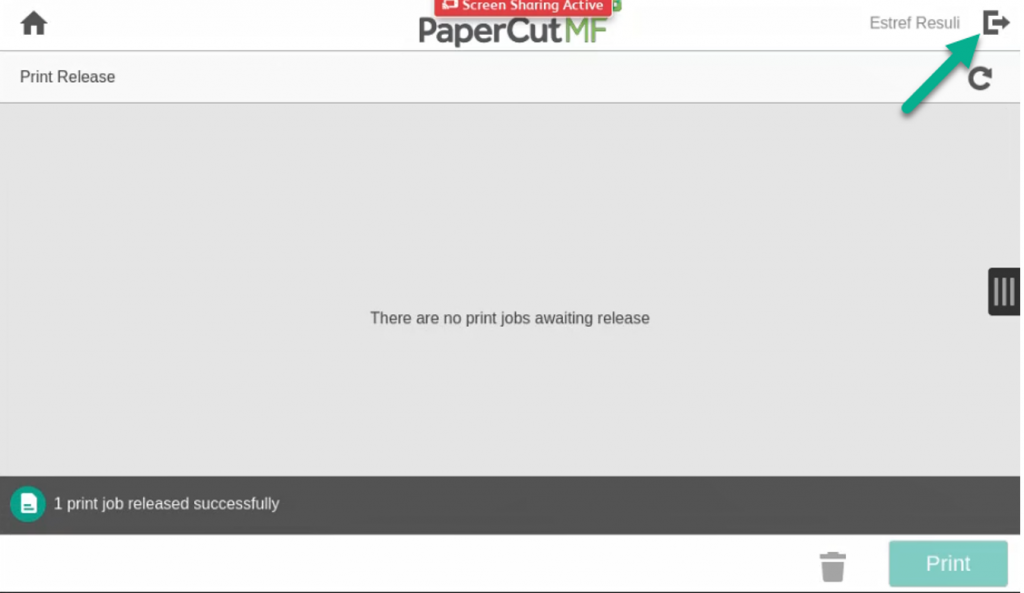
  1. To log off of the printer, press the “Log Out” icon on the top right next to your name
close
Scan to Email
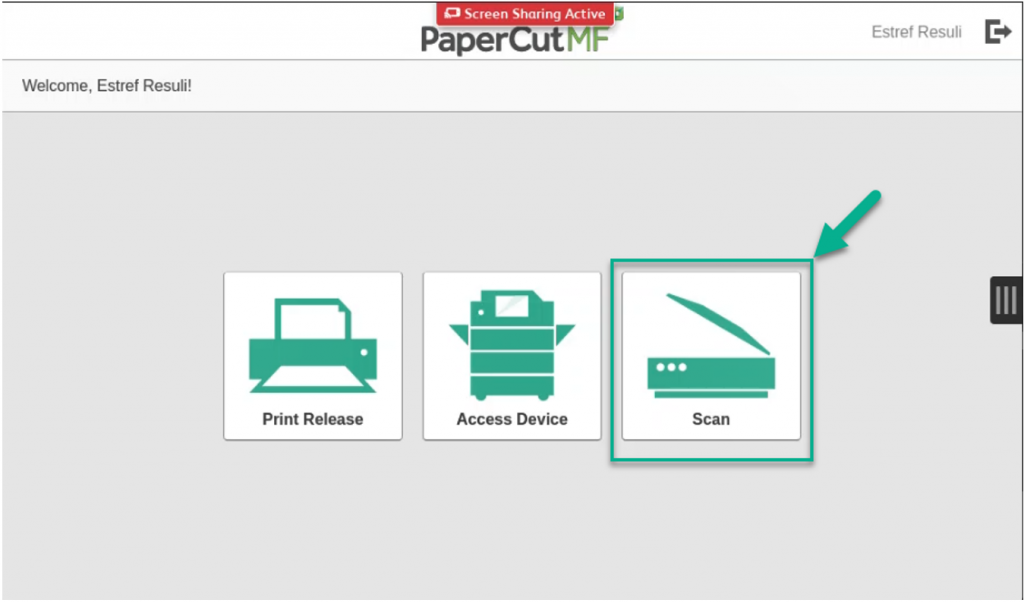
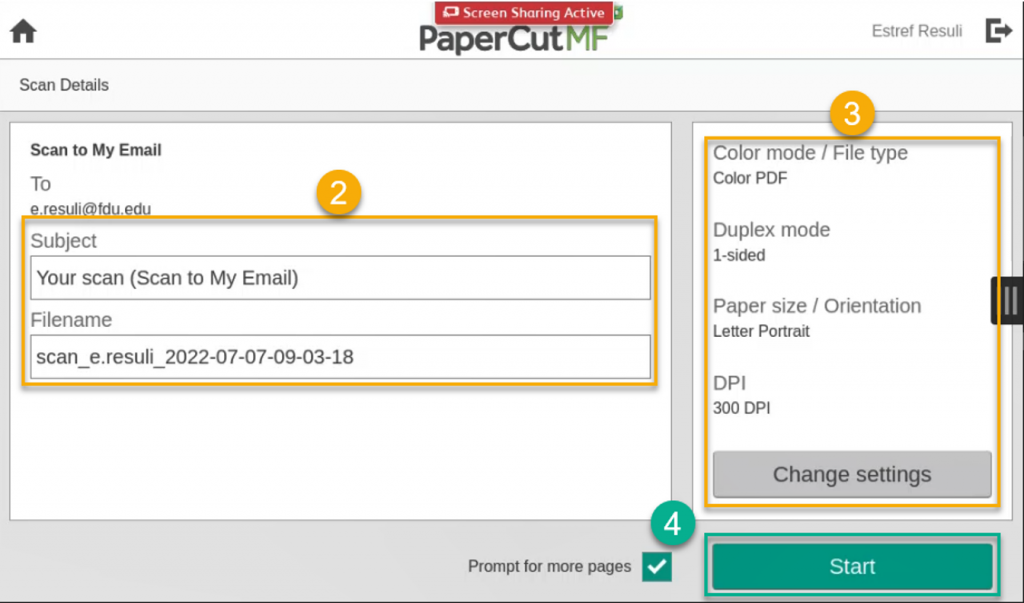
  1. To start a scan-to-email job, log into a printer and press the “Scan” button
  1. You can press the “Star“’ button (4) immediately to start scanning
    • Optionally you can edit the Subject and Filename entries (2) and the scan settings (3)
  1. To log off of the printer, press the “Log Out” icon on the top right next to your name
close
Copying
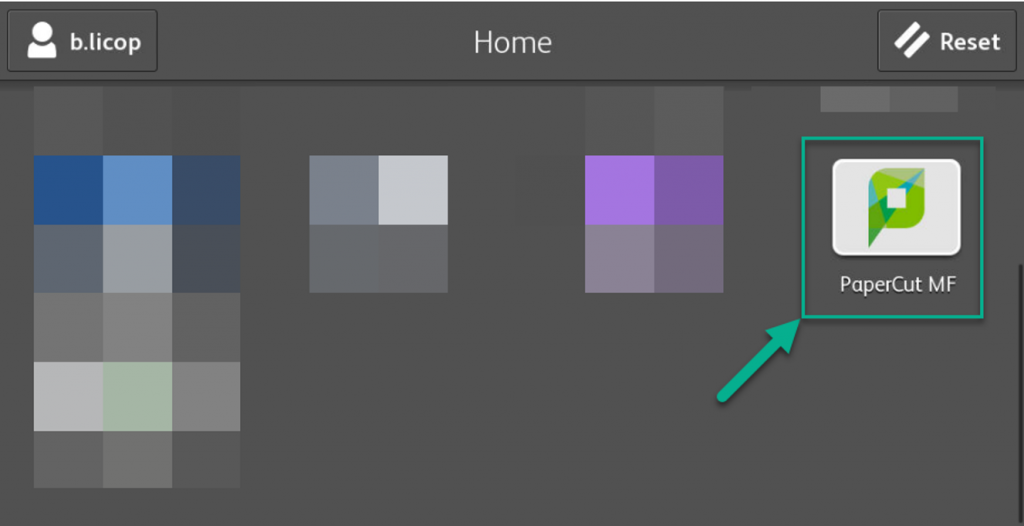
  1. To start a copy job, log into a printer and press the “Access Device” button
  1. Press “Access Device
  • To return to the PaperCut MF main screen, press the “PaperCut MF” button
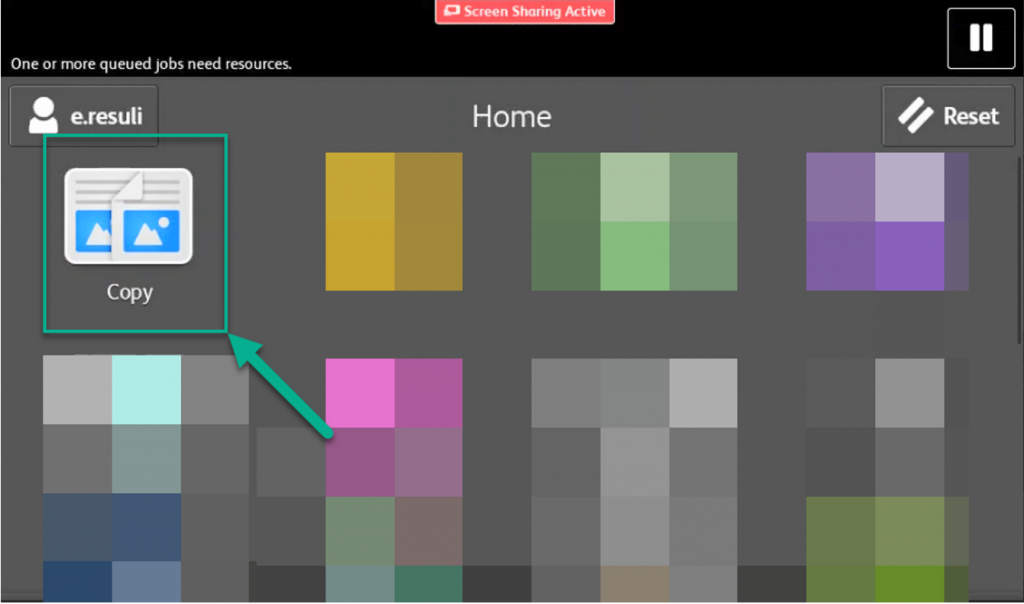
  1. To copy, press the “Copy” button
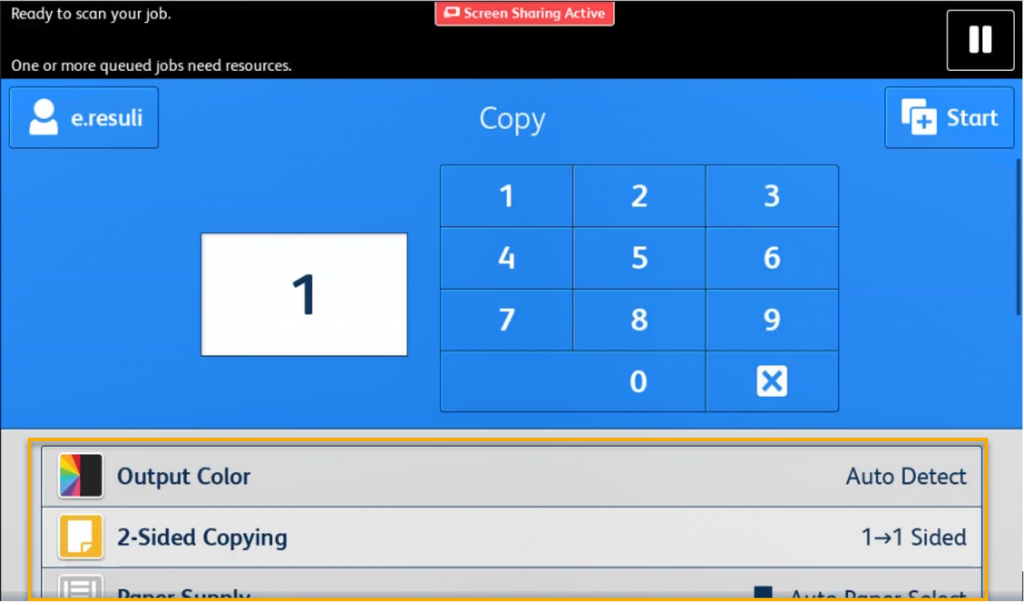
  1. Enter the number of copies and then press the “Star“’ button for the default selection (Auto Detect Color, 1-1 Sided copies). Optionally you can change the settings shown in the yellow box below, then press the “Star” button
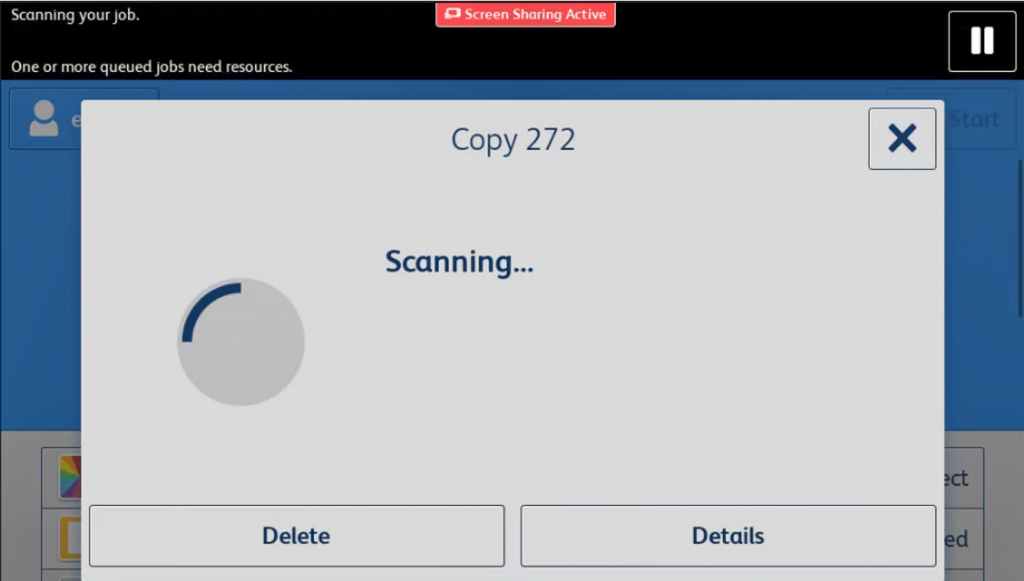
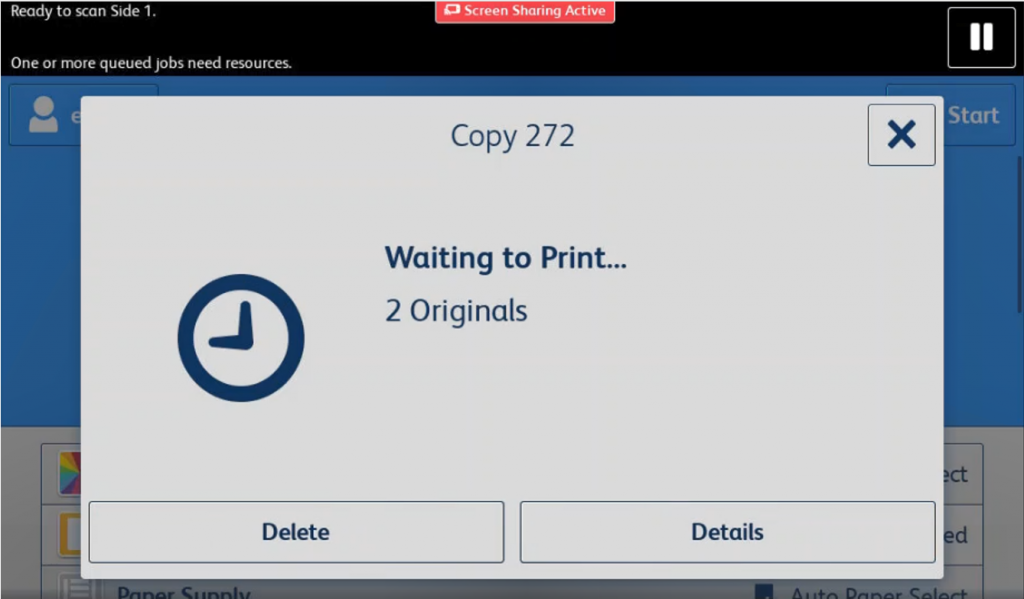
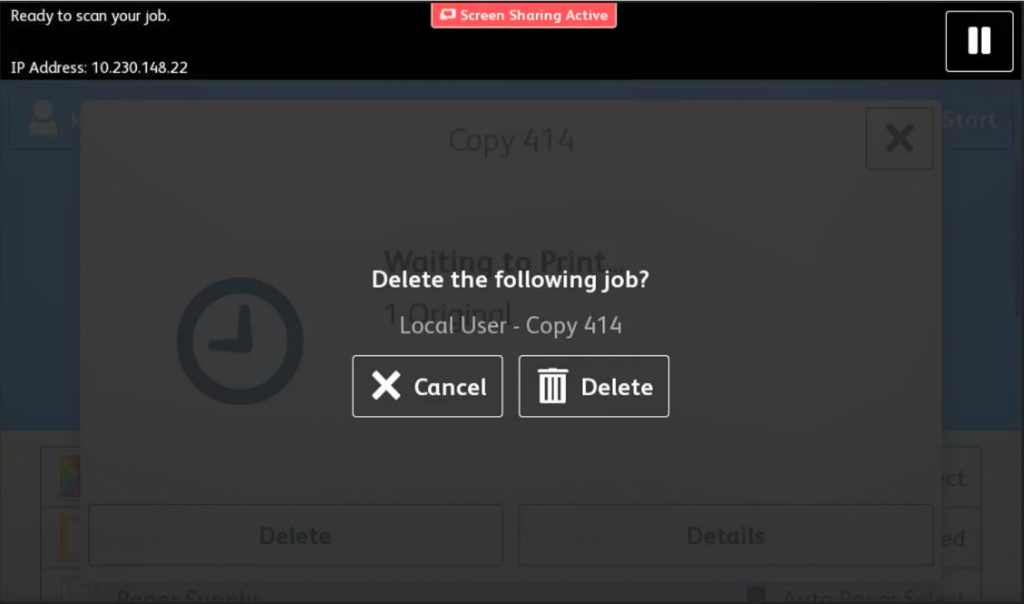
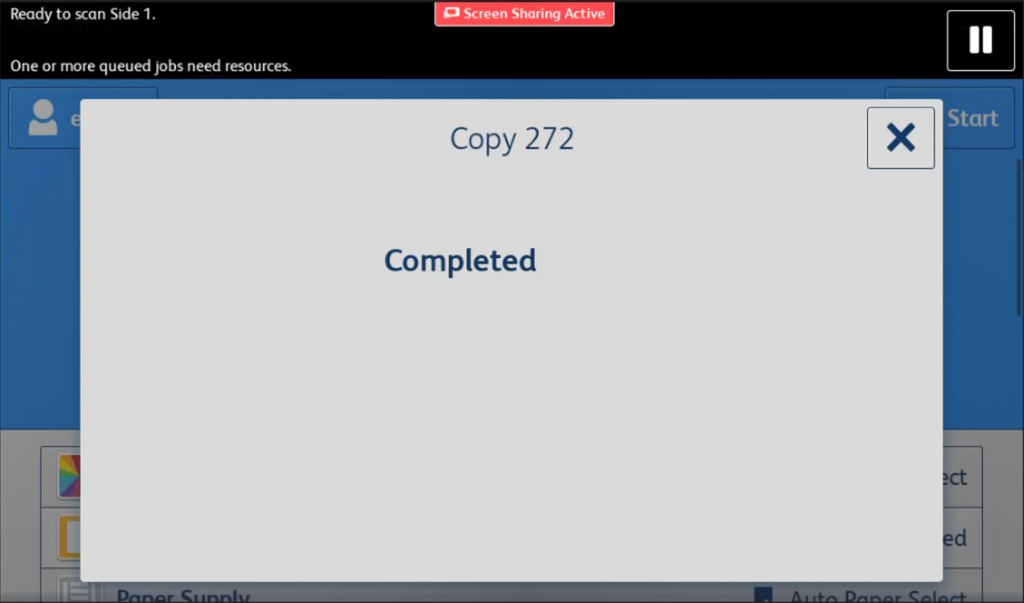
  • You can delete the job at any point in the previous screens by pressing the “Delete” button. If only N number of pages have been printed, you will only be charged N times
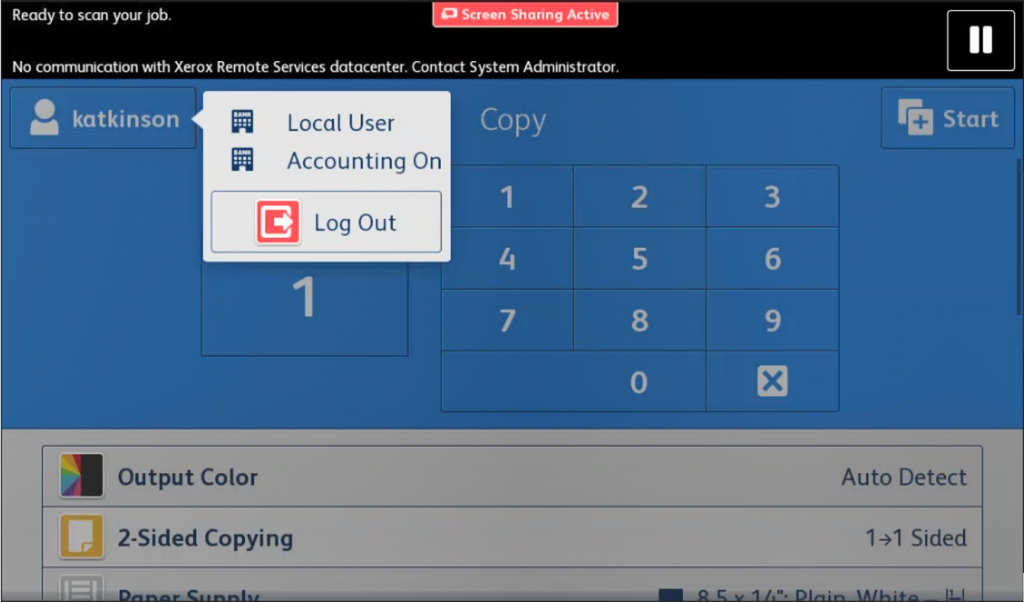
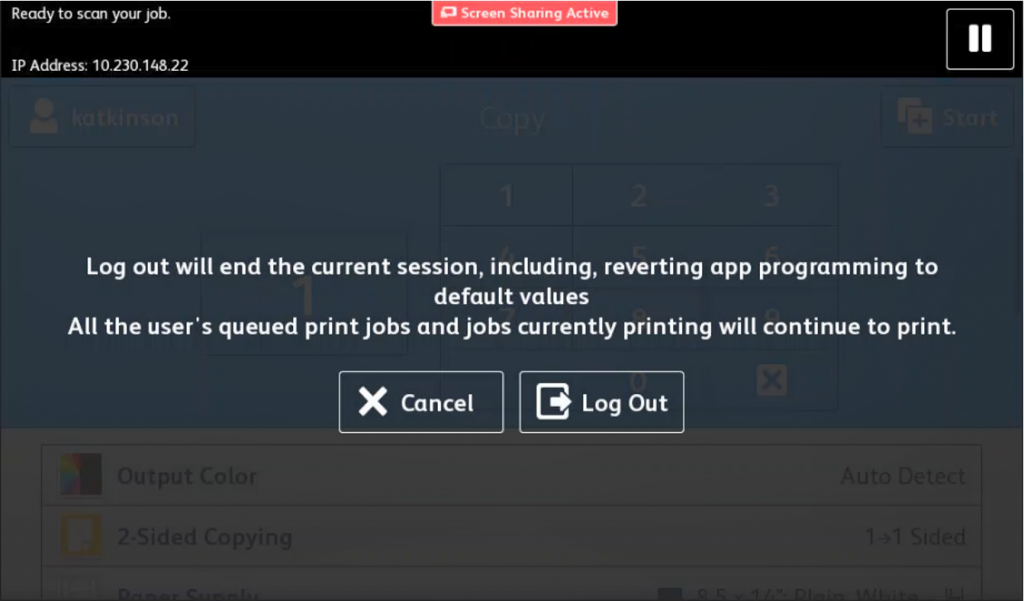
  1. To log off of the printer, press your username on the top left and then press the “Log Out” button.
  1. Press the “Log Out” button again
close

Accessing your Papercut Account

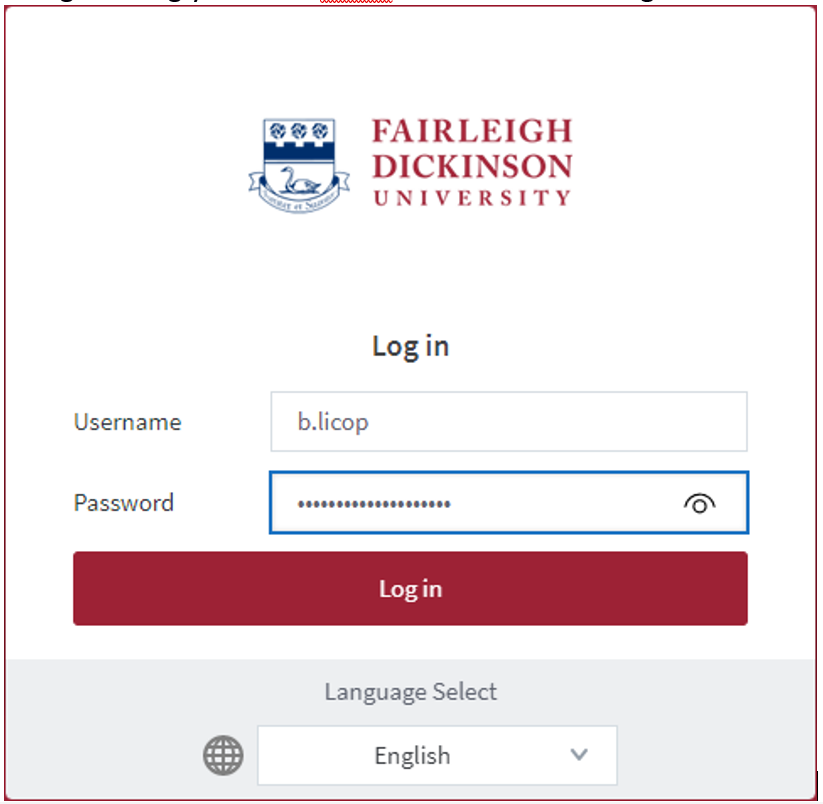
The user console can be accessed via vanpd-papercut.vancouver.fdu.edu.

  1. Log in using your FDU netID then select the “Login” button
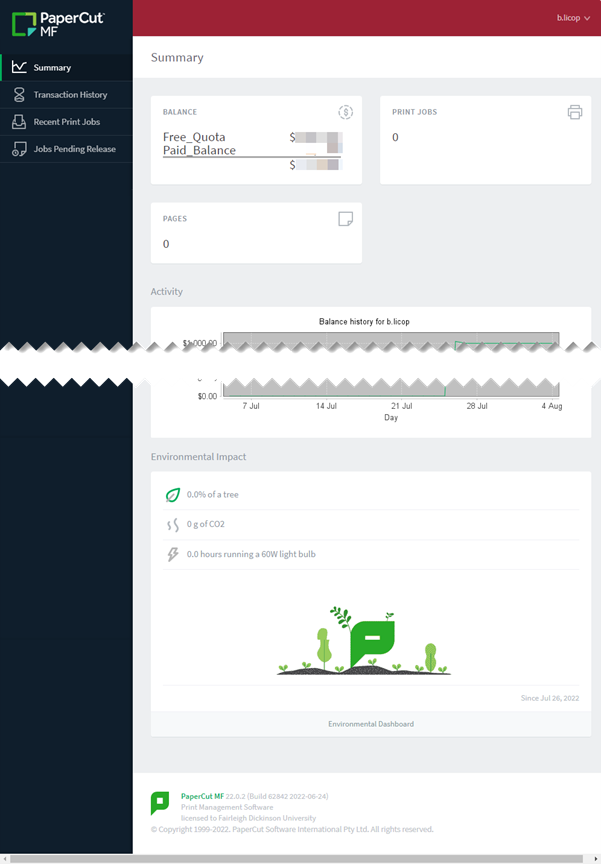
  1. You can review your Transaction History, Balances, Recent Print Jobs & Jobs Pending Release by selecting the appropriate tab on the left-hand side. You can also see your environmental impact according to your print, scan & copy activities
Last Modified:

Perceptive Experience Handbook

Resources for:
icon Close

Logging into Perceptive

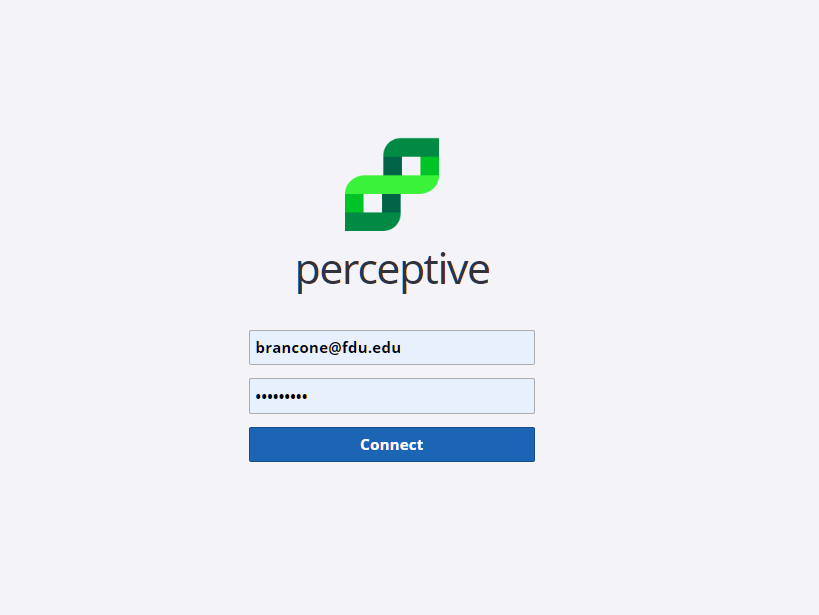
  1. To login, use your FDU NetID (Email credentials):
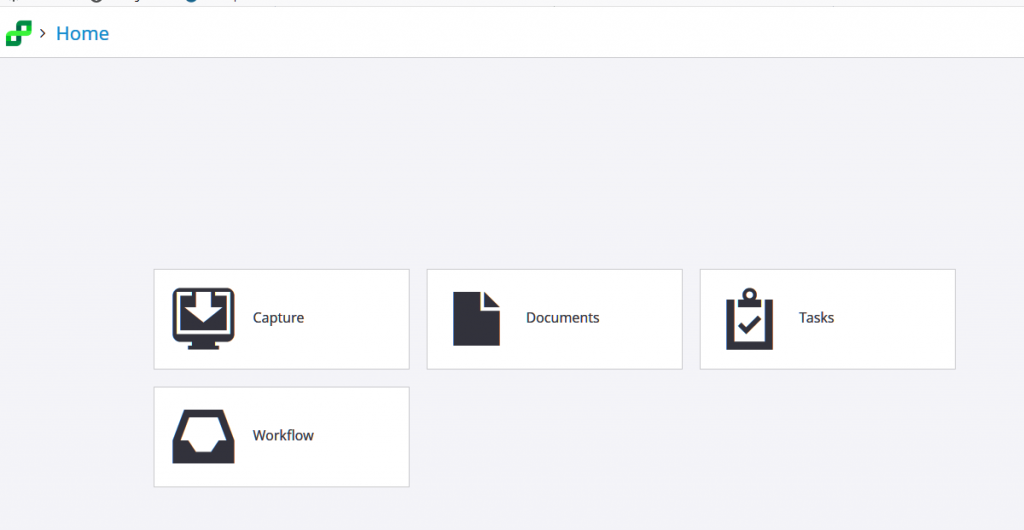
  1. After you login, you should have a screen that looks something like this:

Capture

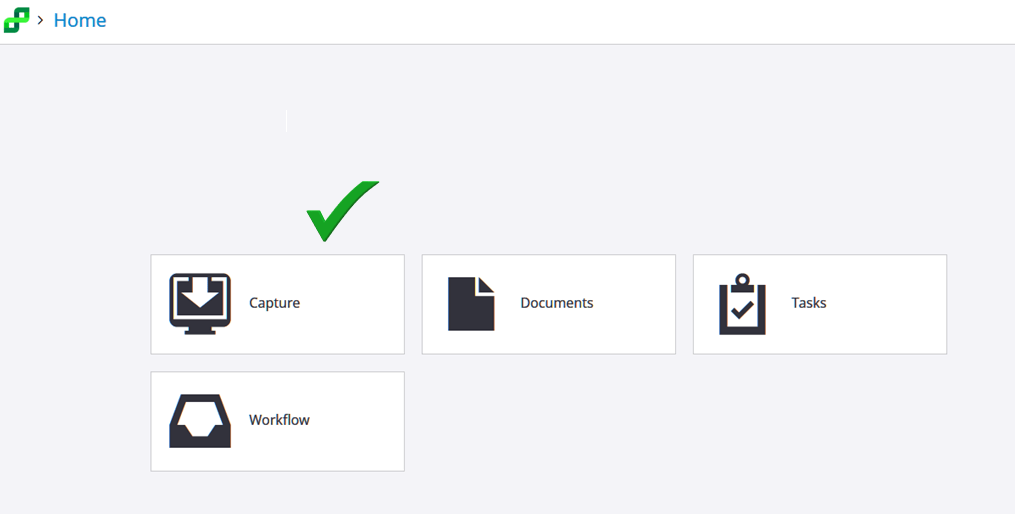
  1. To capture a document to store in Perceptive, click on the Capture tab on the main Experience screen.
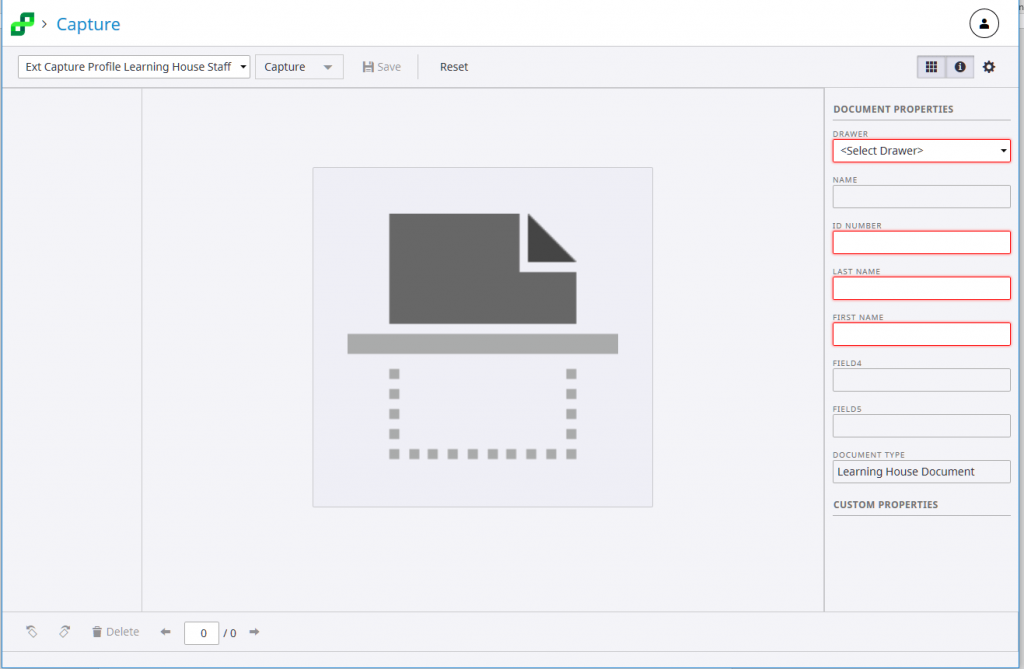
  1. Now the Capture screen will display.
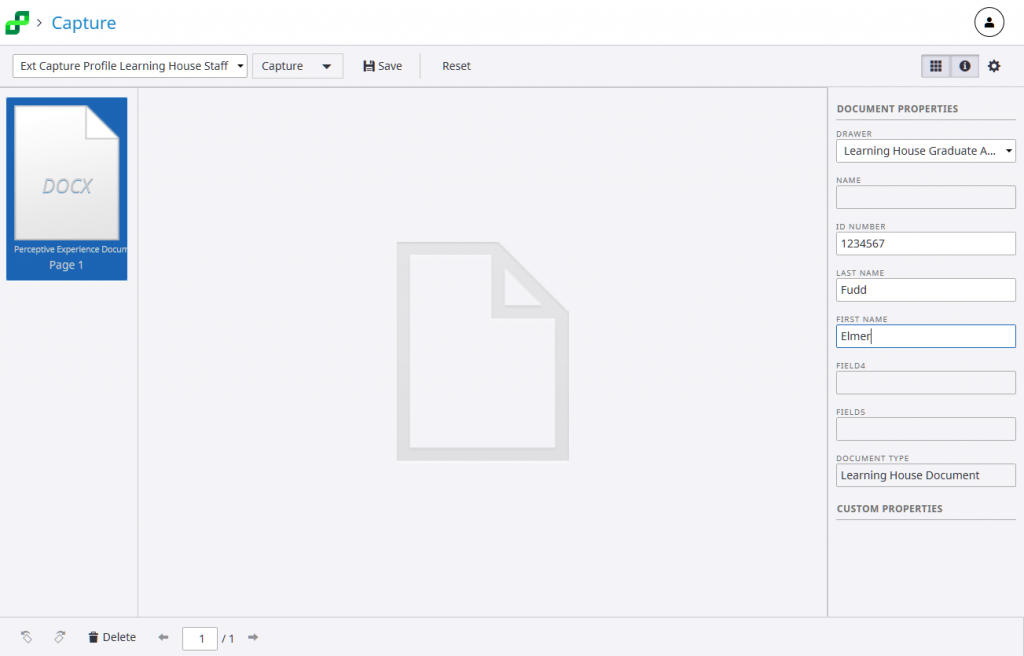
  2. Now you will choose the appropriate Application Plan to Use
  3. Make sure that in the box on the top left under the Perceptive logo and Capture has the correct Capture Profile you will use to store the document.  In this example, the Ext Capture Profile Learning House Staff has been chosen.  When chosen, the Document Properties box will appear on the right side of the screen with the appropriate field labels.
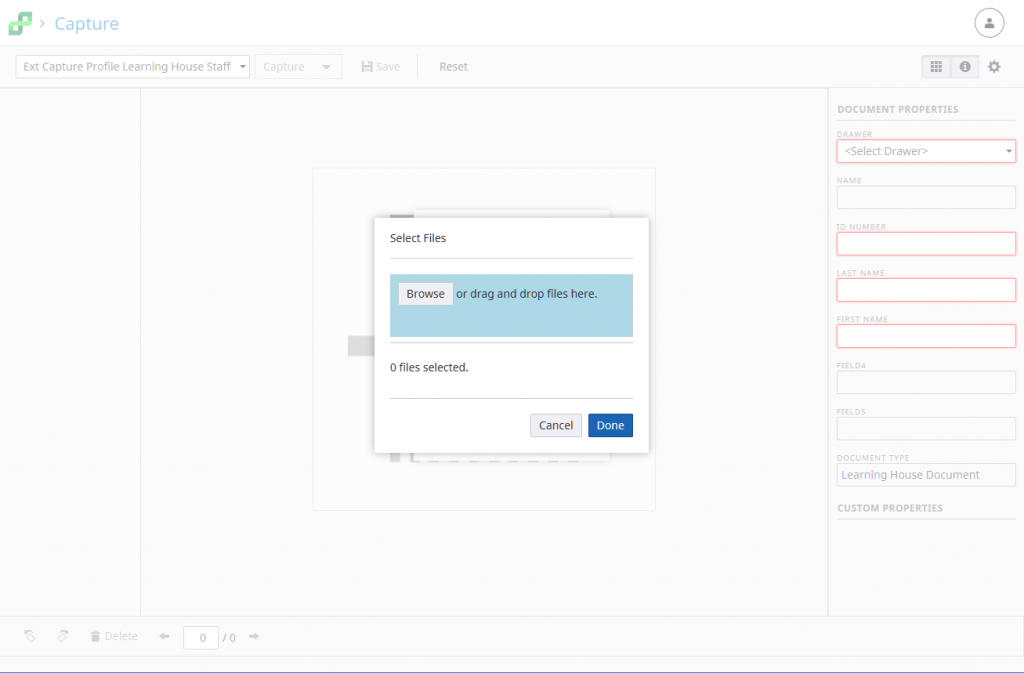
  1. Now click on the Capture tab next to the Capture Profile that you picked.  A new dialog box will appear:
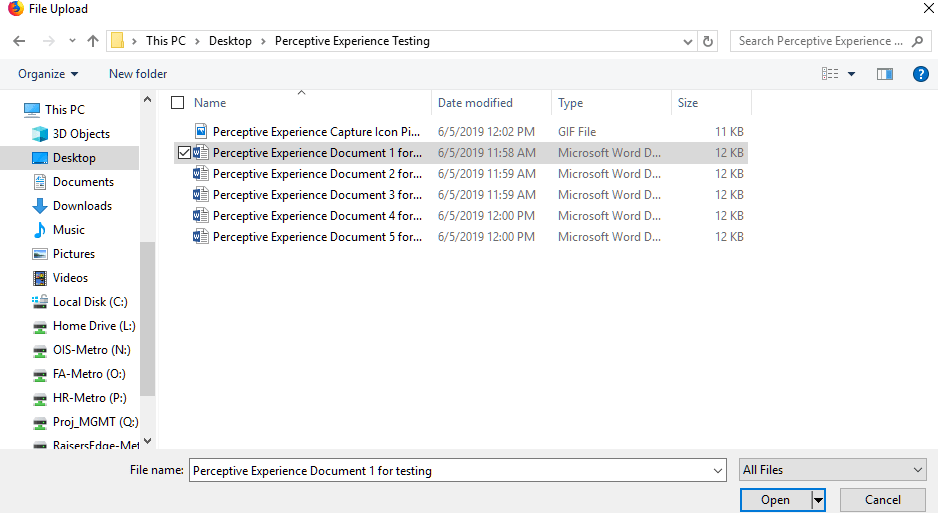
  1. Click on the Browse tab.  This will bring up File Explorer.  Choose the file you want to save to Perceptive. 
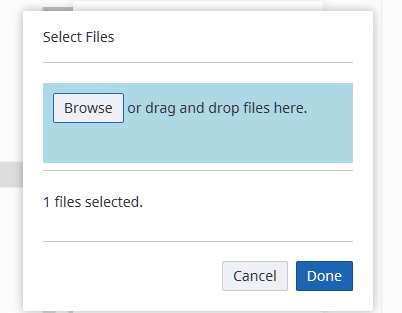
  1. When you click Open, it will bring you back to the Dialog Box.  There will be a pause and when the document has been selected, the message “1 file selected” will appear.  
  1. Click on the highlighted tab that says “Done”.
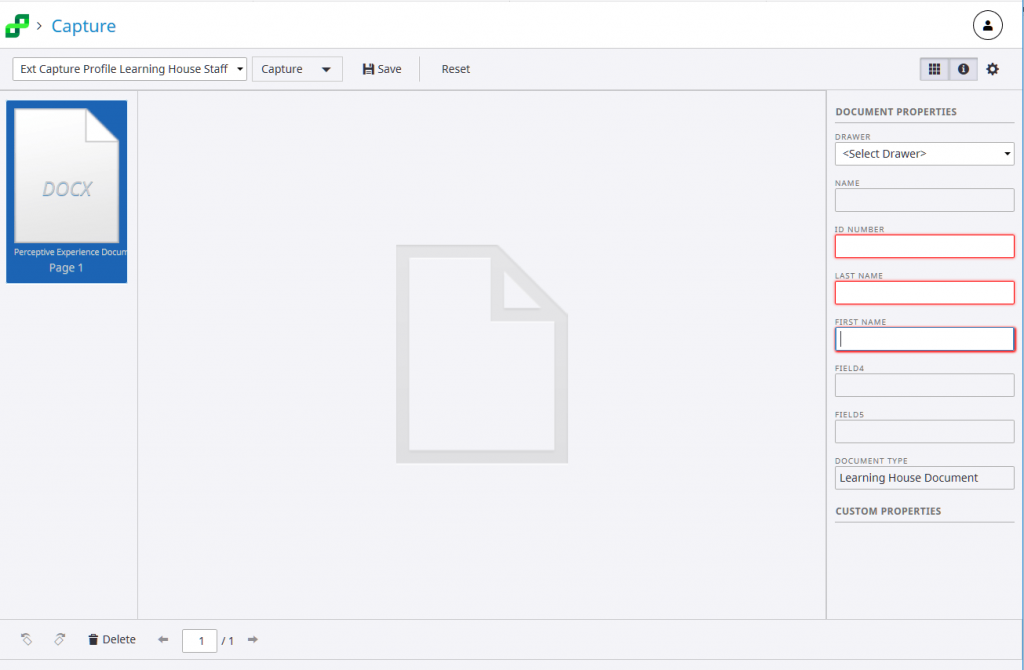
  2. The Capture screen re-appears and the selected document will appear in a box on the left.  The Document Properties box will re-appear on the right. 
  1. In the first field, choose the drawer in which you wish to store the document.  Now fill in the remaining fields with the appropriate information. 
  1. When done filling in the data, click on the Save tab at the top middle of the screen next to the Capture drop down.  
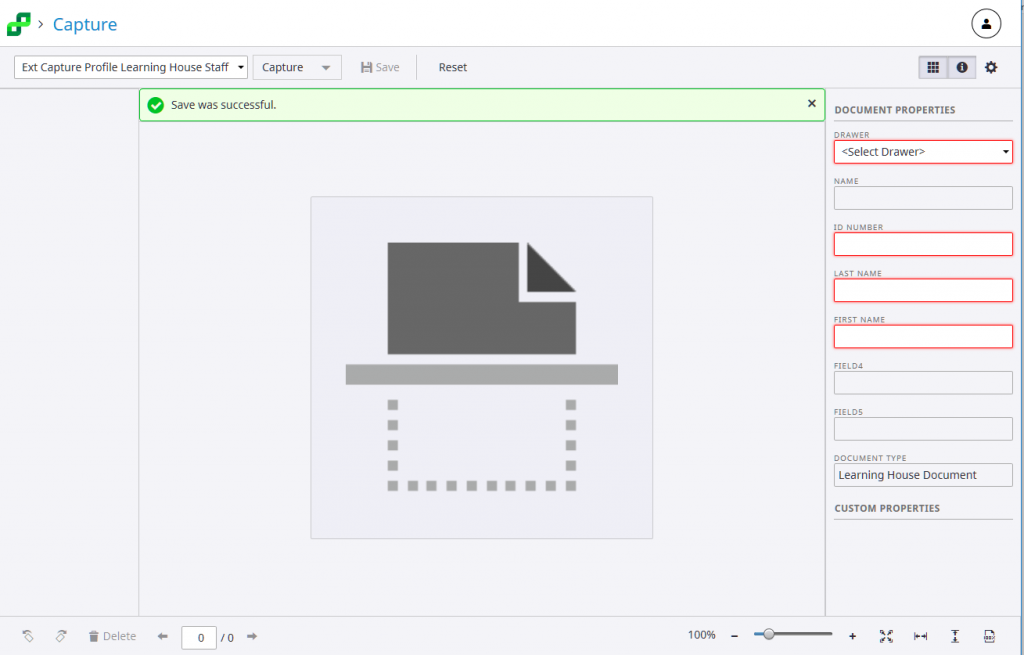
  2. Once you click Save, the document has been stored in Perceptive and you will see a “Success” message highlighted in green:
  1. The data that you entered will also disappear from the Document Properties box.  Now you are ready to capture your next document for Perceptive going through the same steps that you just went through.

Document Search

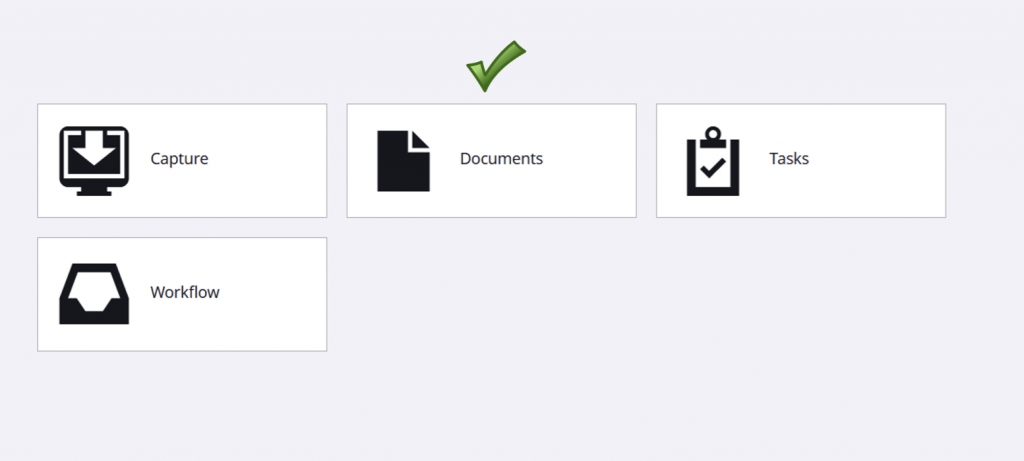
  1. To search for a document in Perceptive Experience, click on the Documents tab on the main Experience screen.
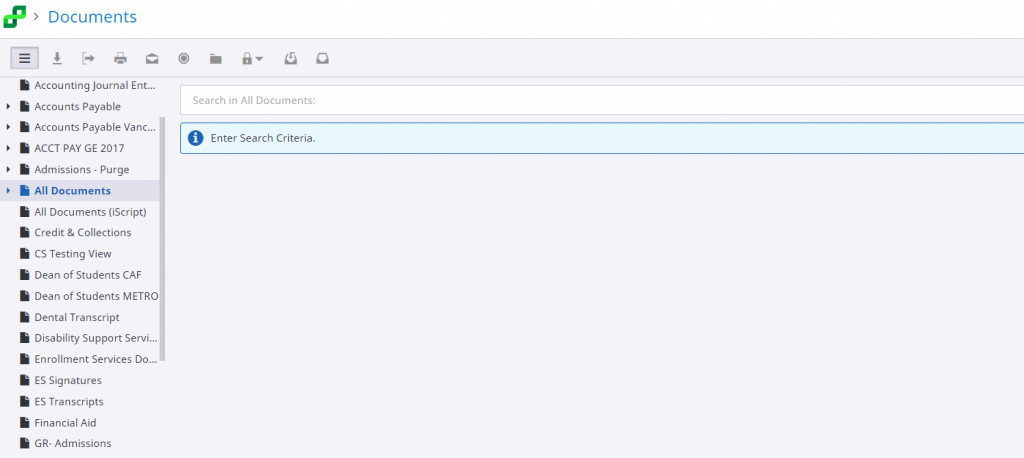
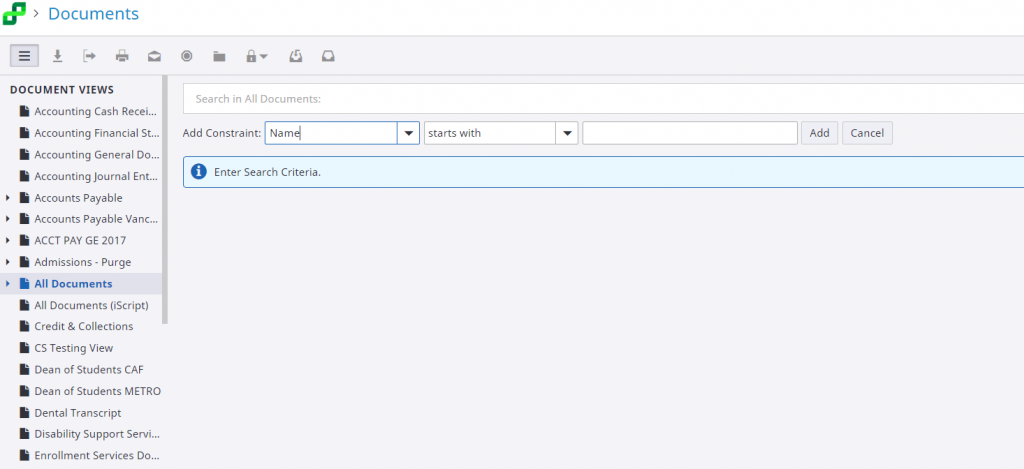
  1. Now the Documents Search screen will display.  On the left hand side, a column labeled “Document Views” will appear showing the drawers for which you will have access.  Please highlight and click on the appropriate drawer where you document resides.  

Also, two boxes will appear in the middle – a white box with the words “Search in the name of the highlighted drawer on the left”. The second blue box says Enter Search Criteria.

  • To enter search criteria, click inside the white box.  A new row of boxes will appear between the two original boxes.  These new boxes are the criteria and method you wish to conduct a search.  The first box is labeled “Add constraint”.  It is a dropdown box with a list of keys you may search on.  Name will always appear as the first entry.  Do not attempt to use that constraint.  It is not what you think it might be.   It is a parameter that we do not use.  Choose the constraint or key that you wish from the drop down – usually ID number or Last Name.  The second box is also a drop down box.  It is for the operation that will be performed – normally you would choose “starts with” or “equal to”.  The third box is where you would type in the actual value of the key you are looking for, usually the last name or ID number of the person you are searching for.  There is a wild card that you can use if you are unsure about the spelling of the key or the complete ID number.  The wildcard is the percent sign (%).  An example would be BRAN% or %ancon% or 01234%.  Also in the case of ID numbers, the leading zero is important to include.  If searching for ID# 0956712 using “equal to” you must make sure that the leading zero is included. 
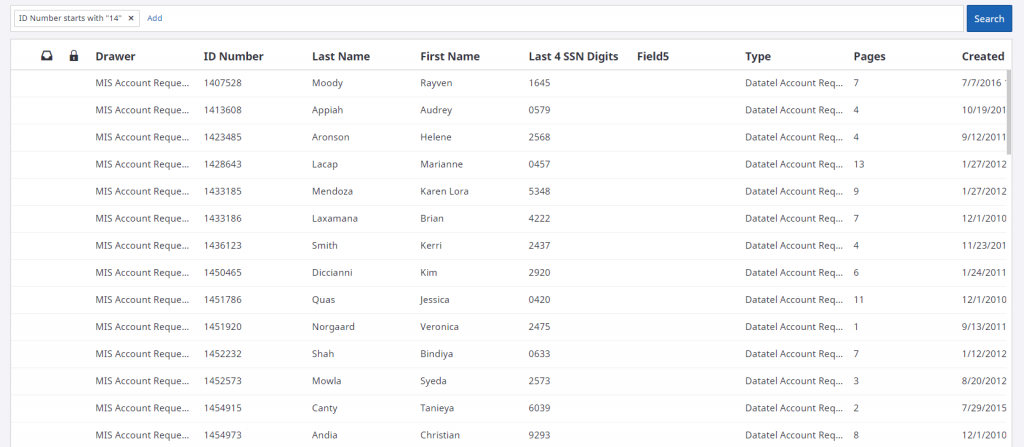
  • Below is an example of a search where I want to find MIS COLLEAGUE Account Requests for anyone who has an ID number beginning with “14”.  I would click on the clear white box to get the three prompt boxes.  I would then put in the Constraint (Key), then the operand and finally the value of what I am searching for – ID number – starts with – 14.  I would then click on the Add button and that gets entered into the previously blank search box.  You may add another constraint (key) if you like or just click on the blue Search button at the very right.
  • Here is another example below where I am looking for anyone in this drawer that has the string ‘ranc’ in the last name. Notice the operand and the placement of the % signs in the value field.
Last Modified:

Printing in The Computer Labs

Resources for:
icon Close

Cost and Billing

To prevent excessive printing, the Department of Computing Services charges students a small fee for printing in the FDU Computer Labs. Black and white printing costs $0.05 per page and color printing is $0.25 per page.

Each student pays a technology fee which includes $10.00 of lab printing for each of the fall, spring, and summer semesters. Printing charges above the $10.00 per semester will appear as a Printing Fee on the next tuition bill.  

The $10 per semester printing credit is a standard allotment that expires each semester and has no cash value. No refunds will be given for pages not printed and unused prints for each semester’s allotment do not carry forward.

FDU staff and faculty members can use lab printers on a limited basis without charge for the purpose on conducting FDU business. Please use your department’s printer(s) as your primary printing resource. Faculty and staff members are limited to 200 pages per semester. Any attempt to print past this quota will result in an error message stating that the account does not have enough credit.

Note: You are responsible for all activity on your account. If you share your password with others or forget to log out, you will be held responsible for any activity done via your account, including printing charges. Computing Services strongly recommends that you use non-trivial passwords and log out completely before leaving a workstation.

View and Manage your Lab Printing

PaperCut Icon
  1. Hovering your cursor on the Papercut tray icon shows the Balance
  1. When you click on the Papercut tray icon, it opens a new window as seen below:
  1. Clicking on the “Details…” button on the lower right of the Balance within the Papercut window opens a web browser that will let the user log in and see their job history

Receiving Credit for Printing Errors

Credit will be given for errors caused by the printer (paper jams, toner problems, etc.) In such situations, please take the bad printouts to a Lab Assistant in Dreyfuss, Dickinson Hall, or University Hall. Your information will be taken, and reimbursement will be made in the form of a credit applied to your total charge for the semester. Situations which could have been prevented before printing, such as extra blank pages at the end of a document, will not be reimbursed.

Can I Use My Own Paper in These Printers?

No. Jobs are printed as they are received. There is the possibility that after loading the printer with your paper someone will print a job that will then be printed out on your paper. Transparencies and mailing labels are not allowed in the lab printers due to the high heat that laser printers use and the potential for damage to the equipment.

Last Modified:

Reporting Phishing or Junk Emails

Resources for:
icon Close

The Report Message add-in works with Outlook to allow you to report suspicious messages to Microsoft and manage how your Microsoft 365 email account treats these messages.

Messages marked as junk by your Microsoft 365 email account are automatically moved to your Junk Email folder. However, spammers and phishing attempts are continually evolving. If you receive a junk email in your Inbox, you can use the Report Message add-in to send the message to Microsoft, helping improve spam filters. If you find an email in your Junk Email folder that is not spam, you can use the add-in to mark it as legitimate, move it to your Inbox, and report the false positive to help Microsoft enhance the filters.

What is Junk Email?

Junk email, often referred to as spam, consists of messages you do not want to receive. These emails may advertise unwanted products or contain content that is offensive. If you select the Junk option, a copy of the message may be sent to Microsoft to improve spam filters, and the message will be moved to your Junk Email folder.

What is Phishing?

Phishing is a tactic used to trick you into disclosing personal information, such as bank account numbers and passwords. Phishing messages often appear legitimate but contain deceptive links that lead to fake websites. If you select Phishing, a copy of the message may be sent to Microsoft to improve filters, and the message will be moved to your Junk Email folder.

For more information and tips on spotting phishing emails, please refer to the following support article:

How to Spot a Phishing Scam

Microsoft has recently updated the process for reporting phishing or junk emails in Microsoft 365 Outlook and classic Outlook clients. With this update, a new Report Message button is now available in a dedicated tab within the Outlook client.

Outlook Web and Desktop Client
Classic Outlook

Reporting a Message as Phishing/Junk

By default, the Report button is inactive (grayed out). To activate the button and report a message as phishing or junk, the email must first be highlighted.

To report a message as Phishing or Junk:

  1. Click on the email message you want to report
  2. Click the “Report” button
  3. Select either “Report phishing” or “Report junk” to properly submit the message

Note

Clicking Report Phishing will delete the email.

  1. Click “OK” on the confirmation window

A secondary window will appear, explaining that regularly reporting junk emails helps improve junk email filtering in the future.

What is a Legitimate Email?

A legitimate email is one that comes from a sender you know, are expecting, or that has been mistakenly marked as junk. If this happens, you can use the Report button to mark the message as Not Junk. This will move the message from your Junk Email folder back to your Inbox.

Reporting Messages as Not Junk:

  1. Click on the “Junk Email” folder in Outlook
  2. Select the email message you want to report as “Not Junk
  3. Click the “Report” button
  4. Select “Not Junk” to properly report the message

Tip

If a legitimate email has been mistakenly reported as phishing, please open a SAMI Support ticket by clicking the Get Support button below.

Last Modified: