After June 30, 2023, Transport Layer Security (TLS) 1.0 and 1.1 connection requests to Duo will not receive a response, resulting in blocked multi-factor authentication.
Who will be affected?
This may affect FDU community users using Windows 7, Windows 8.1, Android Devices with Android OS version 9 or lower, and Apple devices with iOS versions that don’t support TLS 1.2.
Check if you are using the supported endpoints by reading the information below:
Windows
Supported Windows operating system (OS) versions will support TLS 1.2 by default. If you are running a supported Windows OS, no action is required.
If your operating system was manually changed to disable TLS 1.2 for some reason, connection requests will fail. Verify your system is properly configured for TLS 1.2 with the suggested steps below.
Verifying TLS 1.2 on your Operating System
Check OS Version
Open the Windows Search box and type “About your PC” and click on “Open“
Under Windows Specifications, check which edition and version of Windows your device is running
Enabling TLS 1.2 on your Operating System
If your operating system was manually changed to disable TLS 1.2 for some reason, you can verify or configure your system for TLS 1.2.
Before making any changes, create a backup of the registry:
In the Windows Registry Editor, locate and click the “Protocols registry key” or “subkey“ that needs to be backed up
Click “File”, then “Export”
In the Export Registry File dialog box, select the filename and location of where to save the backup
Click “Save”
After creating a backup of the registry, follow the steps below to enable TLS 1.2 on your system:
Click the Start menu, type “regedit” and press the Enter key. The Registry Editor window should be opened.
Navigate to follow the registry path: HKEY_LOCAL_MACHINE\SYSTEM\CurrentControlSet\Control\SecurityProviders\SCHANNEL\Protocols
Check if the subkey of TLS v1.2 is enabled for both the server and the client. Each protocol’s state is controlled by two keys: Enabled and DisabledByDefault
Make sure the Enabled value is 1 and the DisabledByDefault value is 0 or missing, the protocol is enabled.
If the Enabled value is 1 but the DisabledByDefault value is 1, the protocol is disabled by default – it will not be used unless another host explicitly requests it during negotiation.
If the Enabled value is 0, the protocol is disabled
Restart the system to ensure the new settings take effect
close
DUO Mobile
Supported Duo Mobile applications running on supported OS versions will support TLS 1.2+ by default. If you are running a supported Duo Mobile application on a supported OS, no action is required.
Supported Android OS versions: Android 10.0 and greater
Supported iOS versions: iOS 14.0 and greater
Note
Using a mobile device with unsupported versions can still receive DUO push or generate one-time passcode as before, but it will prevent you from logging in to any systems that are accessed through our FDU Single Sign On Login Page.
Web Browsers
Common web browsers like Google Chrome, Microsoft Edge, Mozilla Firefox, Opera, etc. with their latest version are supporting TLS 1.2.
Note
If your browser was manually changed to disable TLS 1.2 for some reason, connection requests will fail. Please verify your browser is properly configured for TLS 1.2 with the suggested steps below.
Check TLS Support on a Web Browser
Chrome and Microsoft Edge
In the Windows menu search box, type “Internet Options”
In the Internet Properties window, on the Advanced tab, scroll down to the Security section
Make sure the “User TLS 1.2” checkbox is checked
Click “OK” and restart the browser
Mozilla Firefox
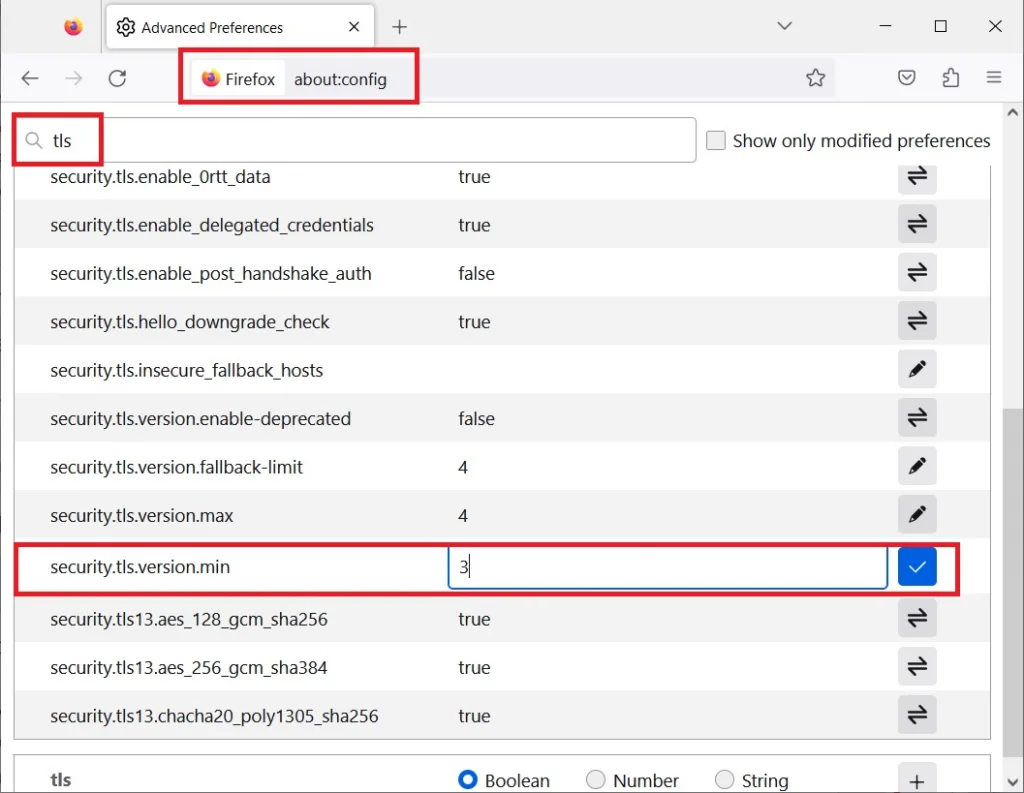
Open the Mozilla Firefox Browser
In the address bar, type “about:config” and press “Enter“
In the Search Field type “tls”. Find and double-click the entry for “security.tls. version. min”
Make sure the integer value is 3 to force a minimum protocol of TLS 1.2
Click “OK” and restart the browser
close
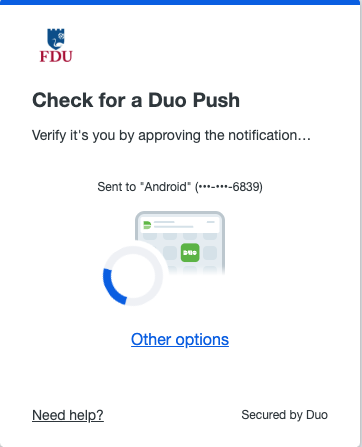
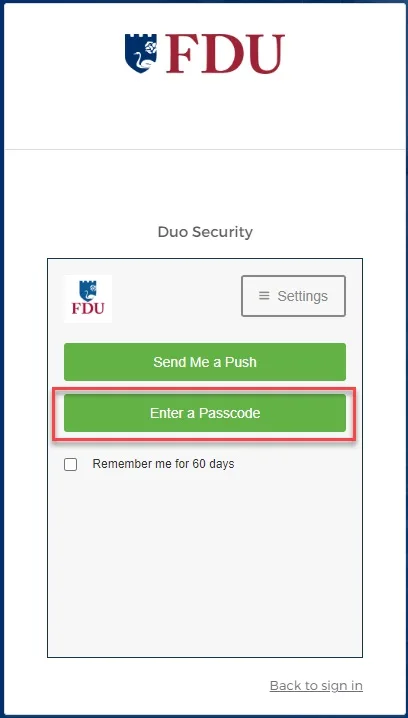
We understand that upgrading your device is not always an option. In these instances, you can still use Duo Passcodes to perform multi-factor authentication.
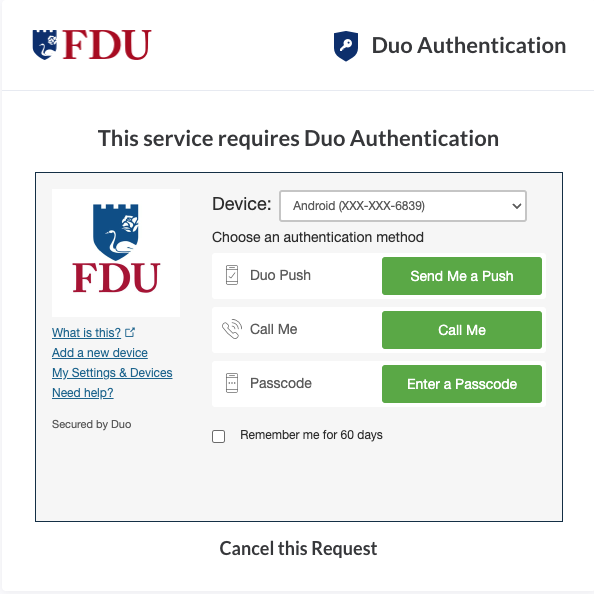
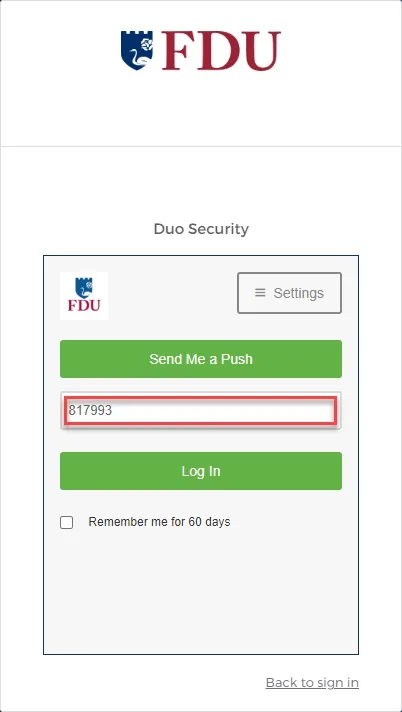
To use this method, select “Enter a passcode” upon receiving your browser’s Duo security prompt
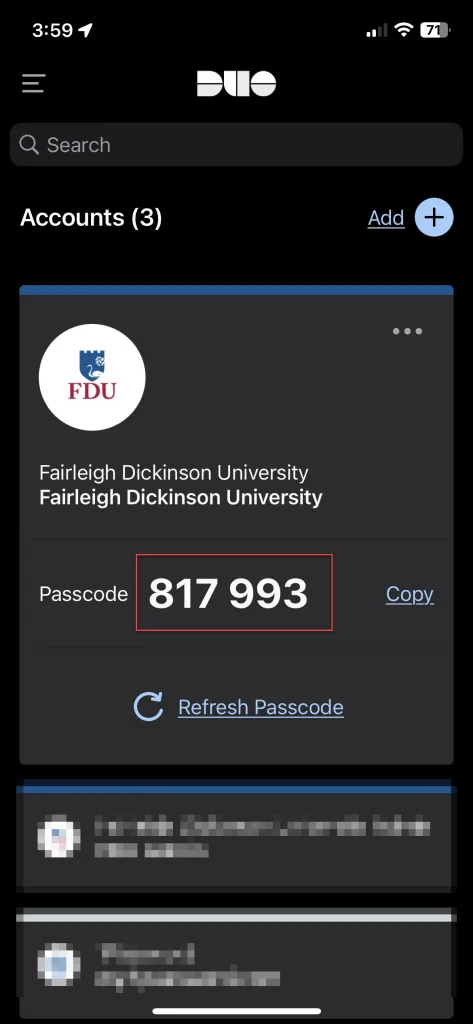
Next, open the Duo app and click “Show”. This will provide a six-digit passcode which you can enter into the browser prompt
Enter the six-digit passcode from the DUO app and click “Log in”
Echo360 helps instructors capture and extend those moments to improve student engagement before, during and after class.
Through our technology platform, students have 24/7 access to classroom discussion, presentation materials, and the lecture itself.
Getting Started with “Echo 360 Universal Capture: Personal“
Universal Capture: Personal is a stand-alone application designed to be used by instructors on their personal computers to generate video recordings. The software enables you to create video recording across multiple computing platforms via a unified interface. That means instructors can record and share video on Mac and Windows computers, inside or outside of the classroom, with an identical user experience on each device.
For those faculty members who do not yet have an Echo 360 account, it is necessary for you to login to Webcampus first. Therefore, please follow the directions below in order for you to have access to Echo360 environment. Once you have completed these steps via webcampus, thereafter users will be able to login directly to echo360.fdu.edu with their FDU NetID credentials.
Note
For those who already have an account in Echo360 please go to Step 13.
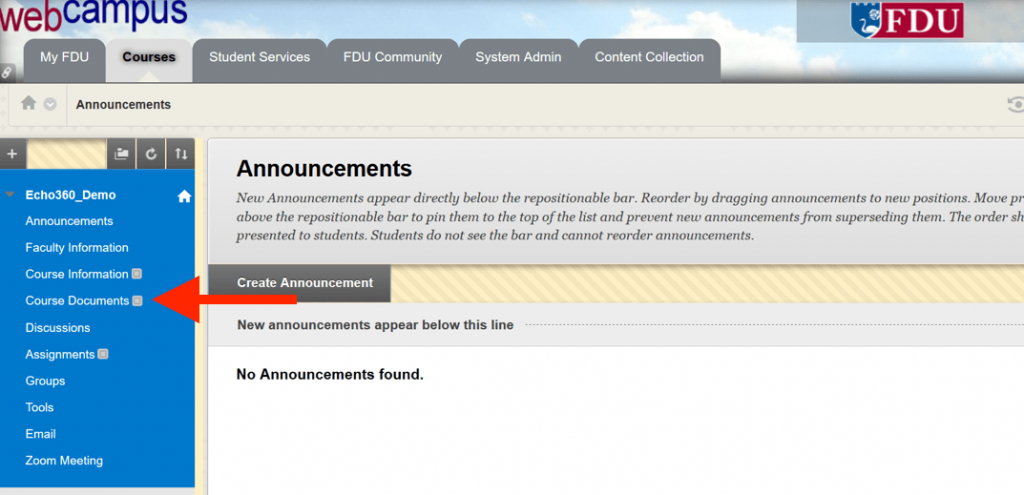
Login to Webcampus using your FDU NetID
Click on “Your Course“
Click on “Course Documents“
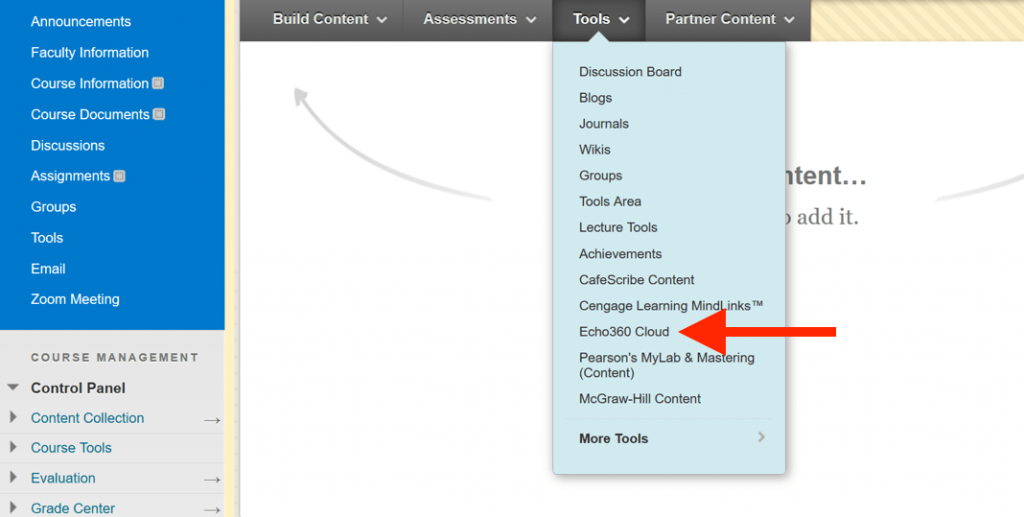
Click on “Tools“
Click on “Echo360 Cloud“
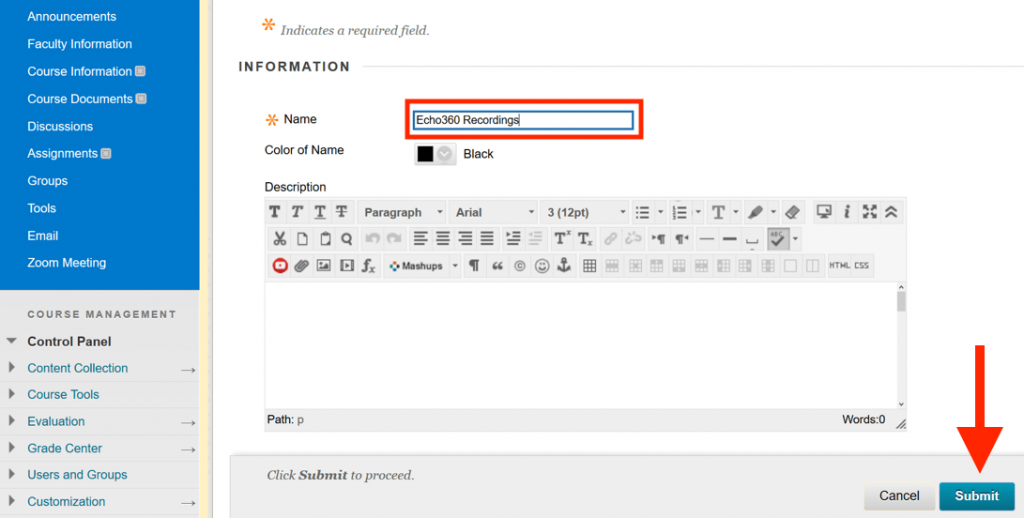
In this page, enter a Name that makes it clear this is the link for Echo360 class content, for example: “Echo360 Recordings”
Click “Submit“
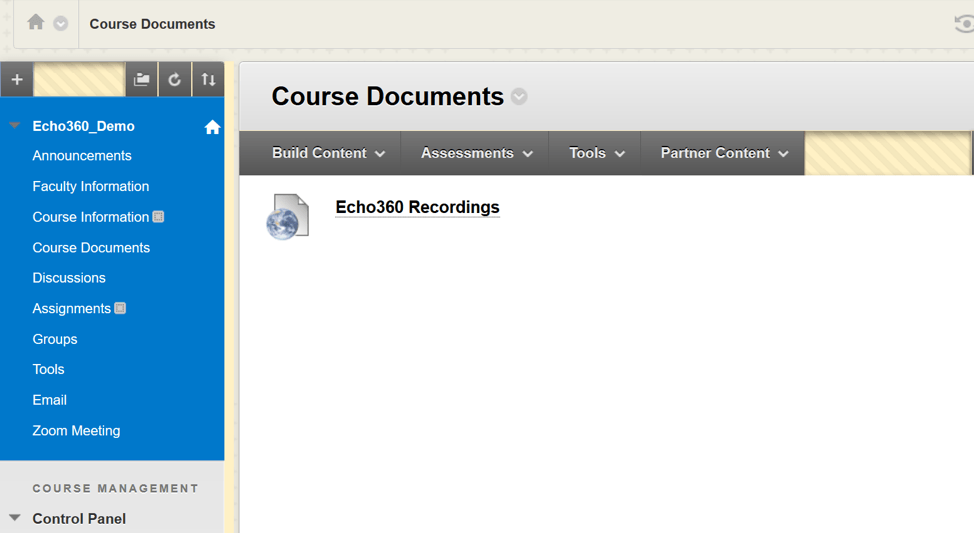
A new link will appear on your Course Documents page titled “Echo360 Recordings“. This maybe at the bottom of the Course Documents page
Click on the “Echo360 Recordings” link. This will redirect you to the Echo environment
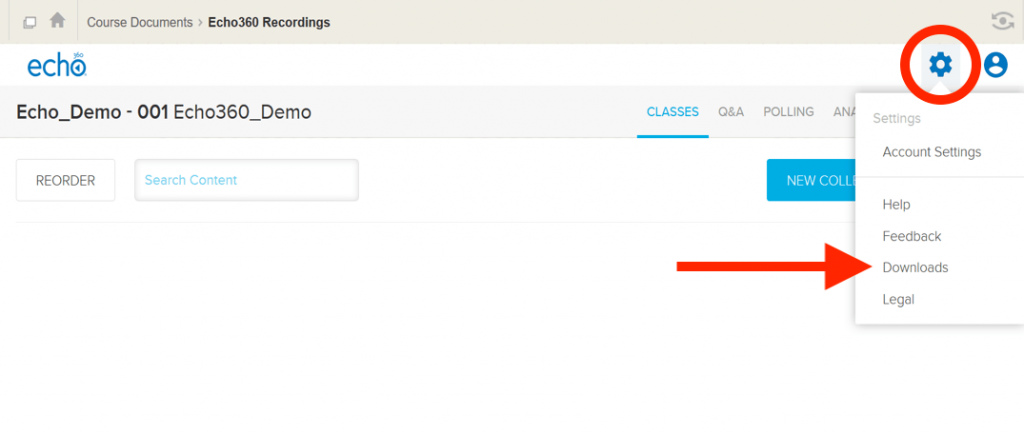
Click on the “Gear Icon” on the top right
Click on “Downloads“
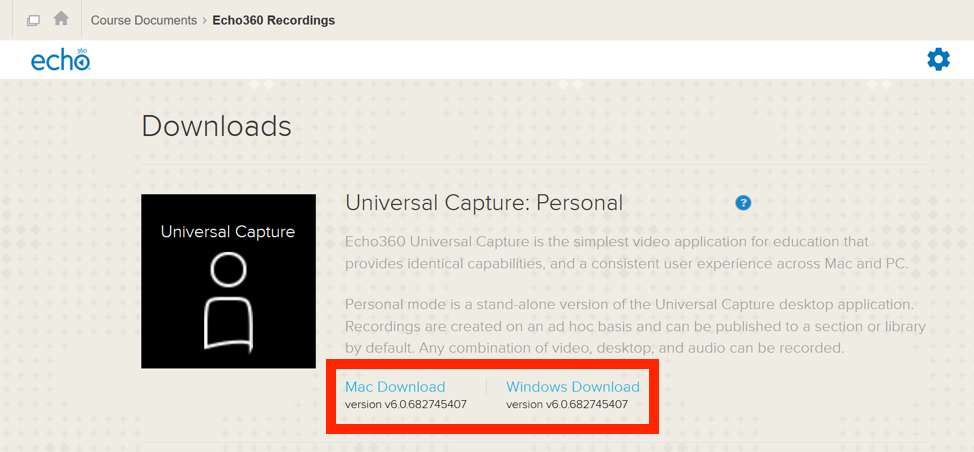
From the Universal Capture: Personal area of the Downloads page, select the link to download the installer appropriate for the type of computer/operating system you are running. After you have downloaded the personal capture, follow the instructions on how to capture your lectures using this tool
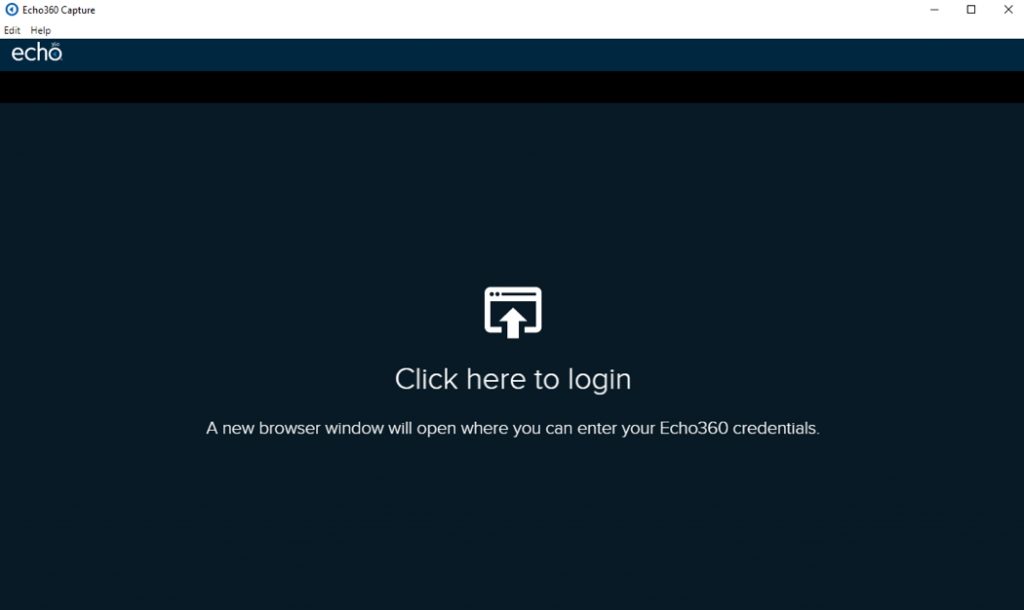
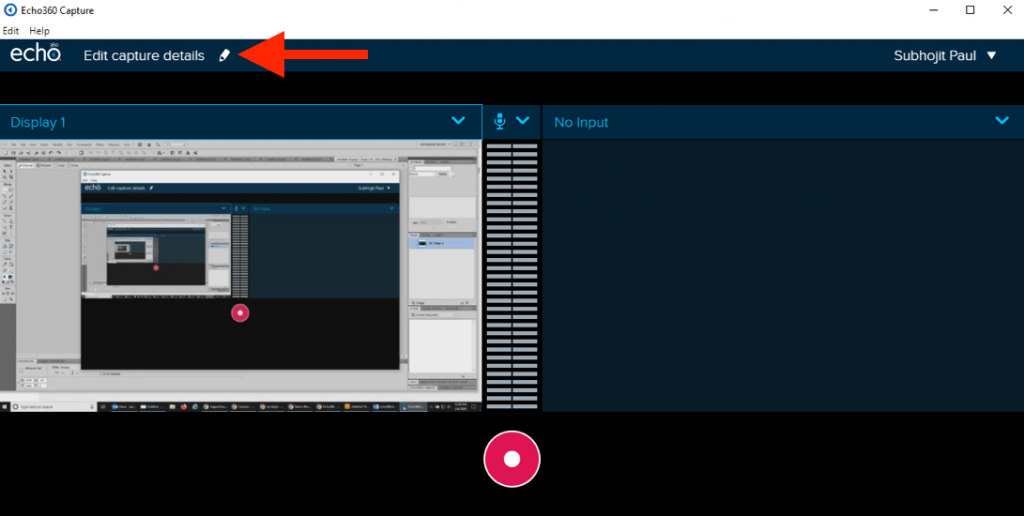
Once you have installed the software, please launch the Universal Capture: Personal application. If you see the following login screen, click on the link and login with your FDU NetID credentials
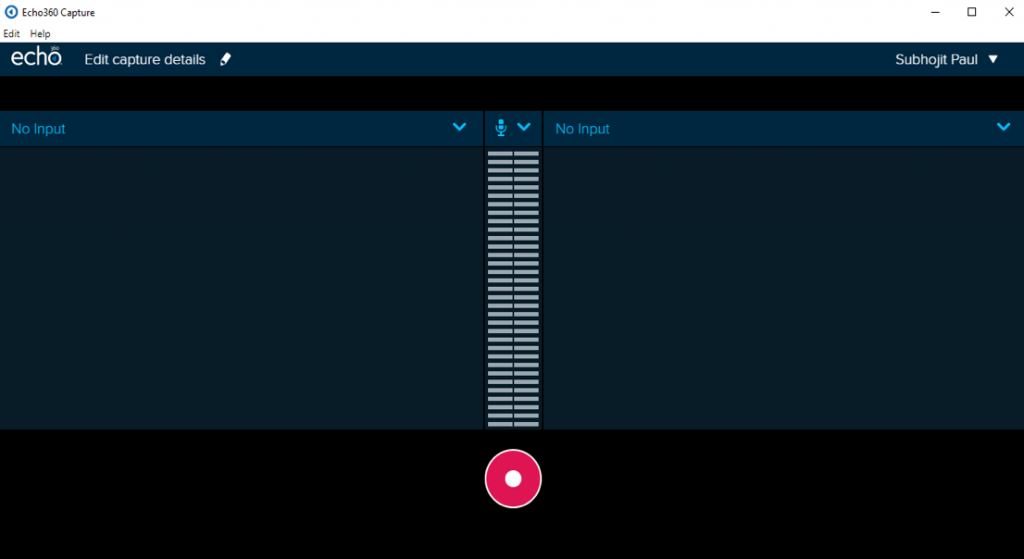
After logging in select the inputs you want to capture from the two drop down menu. If the drop down menu says No Input just select the option you want from the available sources
Left Input: Click on the dropdown menu to select your input for the left video channel (e.g. display, webcam, etc.).
The bars in the middle shows the volume levels of the audio capture.
Right Input: Click on the dropdown menu to select your input for the right video channel (e.g. display, webcam, etc.).
The Display option from the drop down menu chooses the application that you want to record from your computer for example a PowerPoint presentation.
Preview the inputs on the screen; to be sure, they will record properly.
Click the “Pencil Icon” or title to launch the Capture Details dialog box
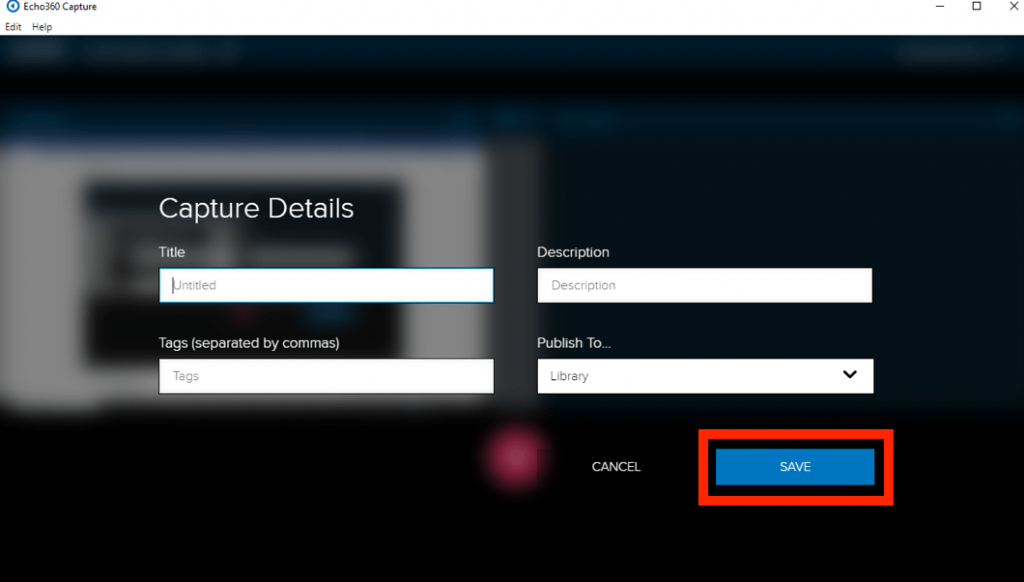
Enter a Title, add a Description or Tags and select a Publishinglocationfor the recording. By default, your recordings are published to your “Library” folder
Click “Save”
At this point, if you are going to present any materials via PowerPoint, Web or any other applications open it and minimize it
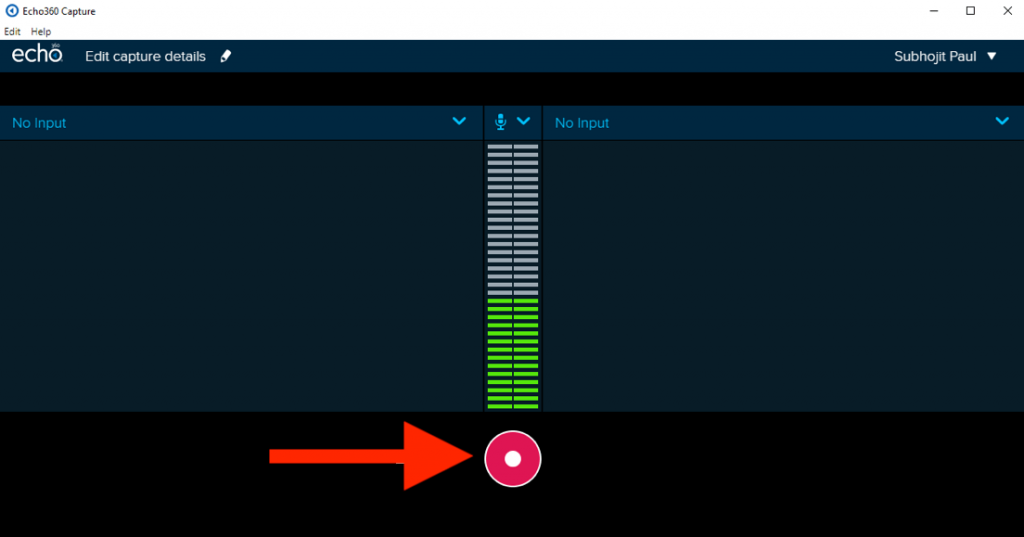
When you are ready, click the “Record” button. You will have 5 seconds before recording starts so you can switch to the material you want to present
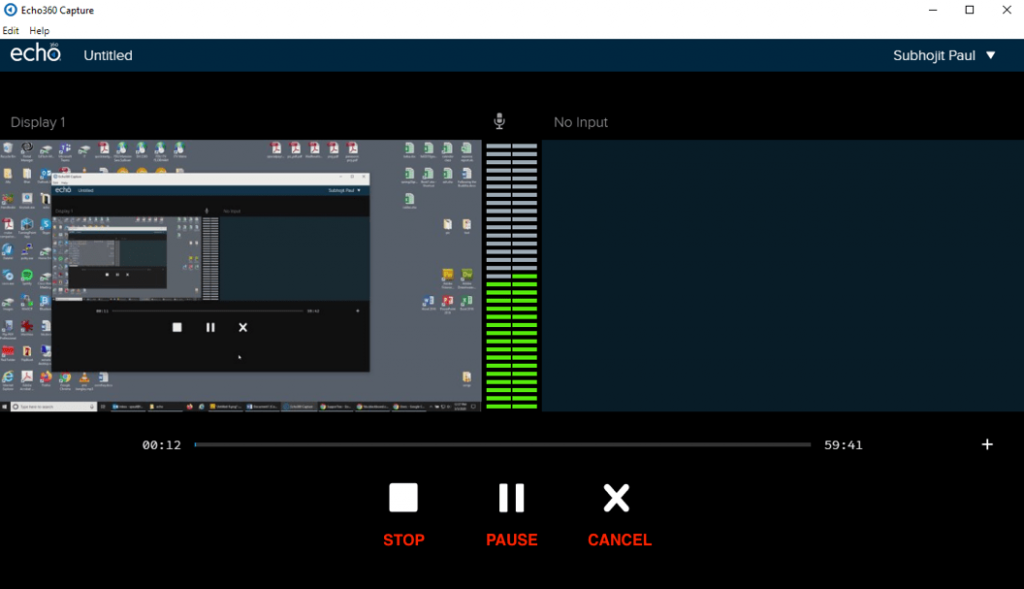
During a recording, you will have the option to Stop, Pause, or Cancel recording. Do not stop recording until you are totally finished with the session. If you click on the cancel button, it will cancel the entire recording
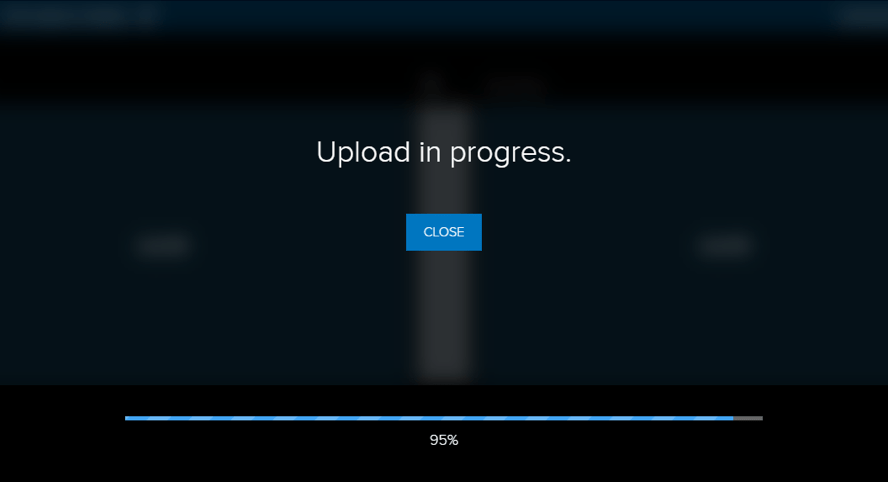
Once you stop the recording, you will receive a message and you can click on the “Close” option to exit the program. Once your recording process is finished, it will automatically publish to the location that you have specified. You will receive an email when processing is finished and you are able to view your recording
Viewing Recording
Once you receive the email, your video is online and ready to be viewed.
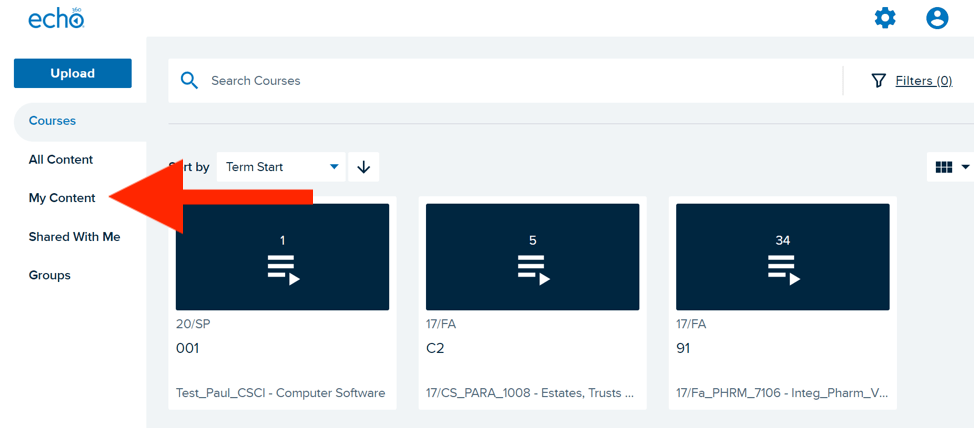
Click on the “My Content” tab on the left side of the window.
Click on the recording that you want to view
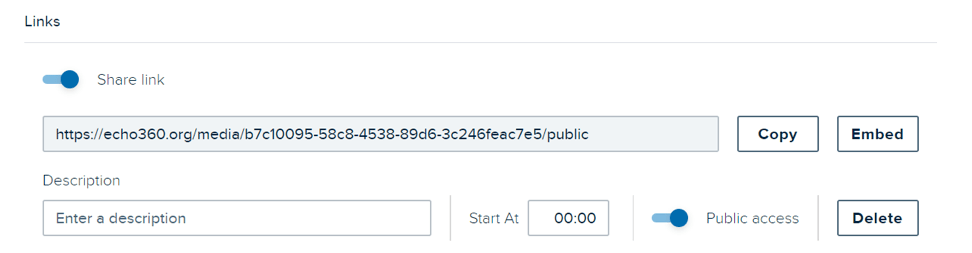
If you want users to view your recording, scroll down towards the bottom of the screen to the “Links” section. Copy the link and you can send it to users via email
COLLEAGUE uses single sign-on protocol for users to login. The login or user ID consists of the first part of the FDU NetID up until the @ sign in the NetID.
For instance, if your NetID webmail address is john.q.public@fdu.edu your COLLEAGUE login ID would be “john.q.public“
The password would be the exact same one that you use with your FDU NetID.
Virtru email encryption is the preferred method to send and view encrypted emails and files with your FDU email address. Available for FDU Faculty and Staff upon request. Click the link below to request access to Virtru Email Encryption.
If you are not approved for Virtru email encryption, the articles below are alternative, FDU OIRT and DSIRT approved methods for encrypting Microsoft Office and Adobe PDF files and comply with the University WISP.
According to FDU’s Written Information Security Program (WISP), in no case should they be sending or storing WISP protected information without the explicit authorization of the Chief Information Security Officer (CISO). If approved, these instructions will provide you with guidance on the methodology.
For more information, visit the link at the bottom of the page.
Effective September 1, 2026, requests for IT assistance with employee moves of up to five people must be coordinated through the Facilities department, preferably by someone with budget authority. Follow the process below to ensure the move is approved, assessed, and supported.
Employee Move Request Process
Before submitting a request, the employee must obtain approval to move from their department’s Vice President or Dean
In the past, website subscriptions and renewals were approved by University Systems and Security (USAS), as the department held the role of both Information Security and Networking. An email would be sent to the department, and approval would be gained via an email response.
With the separation of Information Security from University Systems and Networking (USAN), a new process has been created to better serve those within the FDU community that utilize external websites for services.
Moving forward, requests for website subscriptions and renewals should be requested through this form below:
If information is missing, a representative of the SAMI Service Desk might reply inquiring more about the request. When all information has been gathered, the ticket will be forwarded to our Information Security Officer. They will review the request, engage the Networking team if necessary, and then either approve or deny the request (via email response) or inquire further, before closing out the ticket.
We hope this new process will help identify, track, and move requests quickly through the process.
Technology enables nearly every part of Fairleigh Dickinson University’s mission. As that dependence grows, the way the Office of Information Resources and Technology (OIRT) engages with academic and administrative departments must evolve from reactive support to intentional partnership.
BRMO is the relationship layer of OIRT governance. It operates continuously through regular meetings, conversations, and planning cycles, ensuring IT stays connected to the University day to day and month to month. BRMO Practitioners are responsible for identifying significant needs through relationship conversations and ensuring those needs are properly shaped and elevated to IT leadership for planning, prioritization, and appropriate decision making.
Recognizing that different types of demand require different kinds of engagement, BRMO intentionally adapts how it partners with departments based on the nature of the demand. The Demand-to-Mindset model that follows makes this distinction explicit and actionable.
BRMO ensures that technology demand is not only surfaced, but aligned with the University’s strategic priorities, including academic excellence, student success, enrollment growth, and financial sustainability. Practitioners are expected to understand these institutional drivers and reflect them in how demand is shaped and elevated.
2. What BRMO Is (and Is Not)
BRMO is the relationship layer of OIRT, embedded in how IT leadership operates across the University. It does not introduce a new team; it formalizes a function that existing IT leaders already perform and raises it to a consistent institutional standard.
BRMO is a structured model for how OIRT builds and maintains partnerships with University departments. It is a proactive engagement function that surfaces technology needs, challenges, and ideas before they become formal requests. It is a bridge between departmental goals and IT planning and governance, and a feedback loop that helps OIRT understand whether it is delivering genuine value.
BRMO is not a help desk or escalation queue for IT support issues. It is not a project management or PMO function. It is not a replacement for existing IT service channels. It is not a guarantee that every request will be fulfilled. And it is not a committee that meets and produces reports; it is a living practice embedded in how IT leads.
BRMO operates within the reality of finite institutional resources. Not all demands can be fulfilled, and sequencing decisions are required. A core responsibility of the Practitioner is to help Business Partners understand constraints, tradeoffs, and timelines, ensuring expectations are realistic and aligned with OIRT capacity.
3. How BRMO Operates: Demand-Based Mindsets
BRMO operates through ongoing relationships between OIRT leaders and their assigned University departments. While relationships are continuous, the way BRMO engages is deliberately adjusted based on the type of demand being discussed.
The three BRMO mindsets are not roles, job titles, or maturity stages. They are intentional engagement postures, applied situationally based on the nature of the demand at hand. A single department may experience all three mindsets over time.
Type of Demand
Typical Characteristics
BRMO Mindset
Primary Focus
Key Capabilities Required
Run the University
Operational services, reliability, established processes
Broker
Clarity, predictability, and follow through
Service knowledge, communication, expectation management
Grow the University
Outcome improvement, prioritization, trade-offs
Account Executive
Shaping demand and aligning outcomes
Strong business acumen, outcome thinking, ability to challenge requests
Innovate for the University
Exploratory ideas, pilots, uncertainty
Innovation Incubator
Speed, learning, and experimentation
Comfort with ambiguity, facilitation, learning mindset
Run the University: Broker
Applied when demand is operational or stability focused: a service is not working, a process needs reliable support, or a department needs clarity on what IT is doing and when. Success is defined by reliability, clear communication, and trust. Business partners need to know that commitments will be kept and that they will be proactively informed rather than left to wonder.
Grow the University: Account Executive
Applied when demand is outcome focused or improvement oriented. Success depends heavily on business acumen and the ability to shape and prioritize demand before it enters formal governance. The Practitioner does not simply receive a request and pass it along; they engage deeply enough to ensure that what reaches IT planning reflects the department’s actual goals, not just its initial ask.
Innovate for the University: Innovation Incubator
Applied when demand is early stage or uncertain. Success is measured by learning speed, reduced friction, and informed decision making rather than scale. The Practitioner facilitates exploration, tolerates ambiguity, and helps a department move from a hypothesis to a proposition worth evaluating.
4. Roles and Responsibilities
BRMO Practitioners
BRMO Practitioners are IT leaders assigned accountability for managing the relationship with one or more University departments. They are typically directors, managers, or senior staff. Each Practitioner serves as the primary OIRT point of contact, advocate, and communications channel for their assigned business partners. Being a BRMO Practitioner is not an additional role; it is a core expectation of IT leadership at FDU.
Each Practitioner is accountable for the following:
Maintaining a regular meeting cadence with assigned business partners, at minimum quarterly and ideally monthly for active or complex relationships.
Setting and sharing a standing agenda that covers ongoing OIRT activities relevant to the department, open items, and dedicated space for the business partner to raise new topics.
Surfacing project ideas and technology needs from the University into OIRT planning and the appropriate prioritization processes.
Communicating proactively. Partners should never learn about OIRT changes, outages, or initiatives from someone other than their BRMO contact.
Serving as the escalation path when a business partner has a concern that normal service channels have not resolved.
Representing the business perspective in internal OIRT conversations, planning sessions, and prioritization discussions.
Tracking and following up on open commitments. If OIRT has committed to something, the Practitioner is accountable for ensuring it happens or for communicating clearly why it has not.
Sharing an annual OIRT roadmap summary relevant to each department so partners understand what is planned and why.
In addition to these responsibilities, Practitioners are expected to apply informed judgment and constructive challenge in their engagements. This includes questioning assumptions, guiding Business Partners toward outcome-based thinking, and ensuring that requests are aligned with institutional priorities rather than treated as transactional inputs. Practitioners represent both the voice of the business within OIRT and the broader interests of the University in their interactions with departments.
Business Partners
Business Partners are the leaders or designated representatives of FDU’s departments who engage with their assigned BRMO Practitioner. They may include deans, department heads, administrative directors, or their delegates. Their role is to represent the technology needs and priorities of their department, participate in regular engagement sessions, surface ideas and challenges, and provide feedback on OIRT services and initiatives. Business Partners are not expected to be technical; they are expected to be candid about what is working, what is not, and where technology could better support their goals.
Relationship Alignment
Each major University department or functional area will be assigned a primary BRMO Practitioner. The CIO’s office will maintain the master relationship map and review assignments annually or when organizational changes occur. Assignments should reflect the Practitioner’s domain knowledge, existing relationships, and workload. Where a department has complex or high volume technology needs, a secondary Practitioner may be assigned. The goal is that no department ever has to wonder who their IT contact is.
5. Engagement Model
Meeting Cadence
The standard BRMO engagement model is built around a regular rhythm of structured touchpoints. Monthly or bimonthly meetings between the Practitioner and the primary Business Partner form the core cadence, typically thirty to sixty minutes each. Quarterly business reviews are held for more complex relationships and include a broader view of IT services, performance, and upcoming changes. Annual planning conversations align IT priorities with departmental goals for the year ahead. Ad hoc check-ins address time-sensitive issues, major projects, or significant changes as they arise.
Practitioners should maintain brief notes from each meeting and a running list of open items for sharing and tracking with the CIO. The goal is continuity, not documentation for its own sake. The CIO will determine the preferred mechanism for note sharing, which may include shared documents or email summaries.
BRMO does not determine final prioritization decisions but ensures transparency into how those decisions are made. All significant demand entering IT planning is evaluated against consistent criteria, including alignment to institutional priorities, impact, risk, and resource capacity. Practitioners are responsible for helping Business Partners understand how decisions are reached and what tradeoffs are involved.
How Needs Surface and Get Addressed
When a Business Partner identifies a technology need, challenge, or idea, the Practitioner’s job is to receive it, assess it, and connect it to the right path within IT. Operational issues are directed to the appropriate IT service team, with the Practitioner monitoring for resolution. Enhancement requests, meaning improvements to existing systems or services, are logged and brought into the relevant IT planning cycle. New capability ideas involving significant investments, new systems, or cross-departmental initiatives are assessed for fit and, if viable, brought to IT leadership for prioritization and planning. Information needs are addressed directly by the Practitioner.
BRMO serves as the front door for technology demand. Once a need is appropriately shaped, it transitions into formal OIRT processes, including governance review, architecture assessment, prioritization, and delivery through project and service management functions. BRMO remains engaged throughout to ensure continuity of communication and alignment with the originating business need.
No idea or need should go unacknowledged. If IT cannot address something, the Practitioner is responsible for explaining why and, where possible, offering alternatives.
Escalation Path
If a business partner has a concern that cannot be resolved at the Practitioner level, the escalation path is: BRMO Practitioner, then IT Director or Manager, then CIO. Business Partners should always have a clear understanding of where their issue stands and who is accountable for it.
6. Desired Outcomes
For Business Partners
Every department should have a known, trusted OIRT contact who understands their goals and constraints and keeps them informed without being asked. Partners should feel confident that OIRT is aware of their needs and actively working to address them. They should have advance visibility into OIRT changes and initiatives that will affect their department, a clear path to surface ideas and escalate concerns, and the consistent experience of OIRT as a solutions-oriented partner in advancing their department’s mission.
For the IT Team
BRMO gives OIRT a structured understanding of each department’s priorities, challenges, and technology maturity. It provides earlier visibility into demand, enabling more effective planning and resource allocation. It reduces surprises for both OIRT and the FDU community it serves, and creates a more informed basis for prioritizing projects and investments. It also produces a clearer and more visible demonstration of the role technology plays in advancing FDU’s goals.
For FDU
At the institutional level, BRMO produces technology investments that more accurately reflect the University’s actual needs and priorities, increased transparency and confidence between OIRT and the departments it serves, and a stronger foundation for strategic planning and governance. Over time, OIRT should be recognized not as a technical utility but as a genuine partner in achieving FDU’s academic and operational mission.
7. Measuring Success
BRMO success is assessed through a focused set of experience-based measures that emphasize trust, clarity, and follow-through rather than activity volume.
Business Partner Satisfaction Score: an annual survey measuring partners’ experience of OIRT responsiveness, communication, and perceived value. Target: establish baseline within three months; improve by ten or more points by the end of Year 1.
Engagement Coverage: the percentage of assigned relationships with an active, documented engagement cadence. Target: 100 percent within six months.
Demand Visibility: the number of project ideas and technology needs surfaced through BRMO into OIRT planning. Target: establish baseline within three months and track the trend over time.
Open Item Resolution Rate: the percentage of commitments resolved or formally communicated within thirty days.
Escalation Frequency: tracked as a relationship health indicator. Sustained high escalation volume signals an engagement or process issue that warrants attention.
8. Maturity Milestones
BRMO is designed to mature deliberately over time, with each phase building on the one before it.
In the first six months, the focus is establishing the foundation. All relationships are assigned and visible. Meeting cadences are in place. An initial relationship health baseline is captured. The predominant mindset in this phase will be Broker: building trust, reducing ambiguity, and demonstrating consistent follow-through.
From six to twelve months, the emphasis shifts toward shaping demand. The first satisfaction survey is completed. Open item tracking is in place. An initial pipeline of University-sourced project ideas becomes visible in OIRT planning. Practitioners begin applying the Account Executive mindset in relationships where the conditions support it.
From twelve to twenty-four months, BRMO becomes embedded in IT leadership and planning routines. Business partners consistently report feeling informed, heard, and well served. All three mindsets are being applied situationally and with confidence.
Beyond twenty-four months, BRMO is a recognized and valued institutional capability. OIRT is consistently perceived as a strategic partner in advancing FDU’s mission. The demand pipeline is active, and BRMO insights inform OIRT’s annual planning process in a meaningful way.
9. Governance and Accountability
The BRMO function is owned by the CIO. Day-to-day operation is the responsibility of each BRMO Practitioner within their assigned relationships. The CIO, or a designated BRMO Lead, is responsible for maintaining the relationship assignment map, facilitating periodic Practitioner sync meetings, reviewing satisfaction data, and ensuring the framework is being applied consistently across the OIRT team.
Metrics and maturity progress are reviewed periodically to ensure the model continues to serve the University effectively. Where patterns of escalation, low satisfaction, or disengagement emerge, the CIO and relevant Practitioners will assess whether the issue reflects an individual relationship, a structural gap in the model, or a broader organizational need.
This charter will be reviewed annually. The CIO’s office will assess whether the framework is operating as intended, whether any structural changes are needed, and whether metric targets require adjustment. Business Partners will be invited to contribute to the review. Material changes to the charter require approval from the CIO and acknowledgment from IT leadership.
10. BRMO Assignments
The tables below show the current Strategic Points of Contact (SPOC) alignment for the University. Each OIRT department serves as the primary BRMO point of contact for the academic and administrative units listed beneath it.
Management Information Systems
Office of Enrollment Management, including:
• All Admissions
• Financial Aid
• Enrollment Services
Finance Department
Human Resources
University Advancement
Chief Information Officer
President’s Office & Leadership Team — CIO, including:
• SVP and University Provost
• SVP for University Operations
• SVP for Finance and Administration
• SVP for University Advancement
• VP Student Affairs
Vancouver Campus
Risk Management
Academic Technologies
All Academic Colleges & Schools
University Libraries
Office of the General Counsel
Educational Resources and Assessment
Institutional Research & Assessment
Center for Psychological Services
S CAPS
Computing Services
Student Affairs & Residence Life, including:
• Dean of Students
• Student Health Services
• Career Development
• Academic Support
Metro Athletics
Florham Athletics
Business Services
Facilities
Public Safety – Metro
Public Safety – Florham
University Operations, including:
• Auxiliary Services
• Mailroom
• Dining Services
Systems & Networking
University Communications
Appendix: Key Definitions
Term
Definition
BRMO
The Business Relationship Management Office is the collection of BRMO Practitioners and functions within FDU OIRT responsible for managing and developing the relationship between IT and the University’s academic and administrative departments. It is not a help desk escalation path; it is a strategic partnership function.
BRMO Practitioner
An IT leader assigned accountability for managing the relationship with one or more business units. Practitioners are typically existing IT leaders, not a separate team.
Business Partner
A leader or representative from a University department who engages with IT to surface needs, share priorities, and participate in planning conversations.
Stakeholder
Any faculty, staff, or student impacted by technology decisions made by IT. Each stakeholder group should have a Business Partner who can represent their interests.
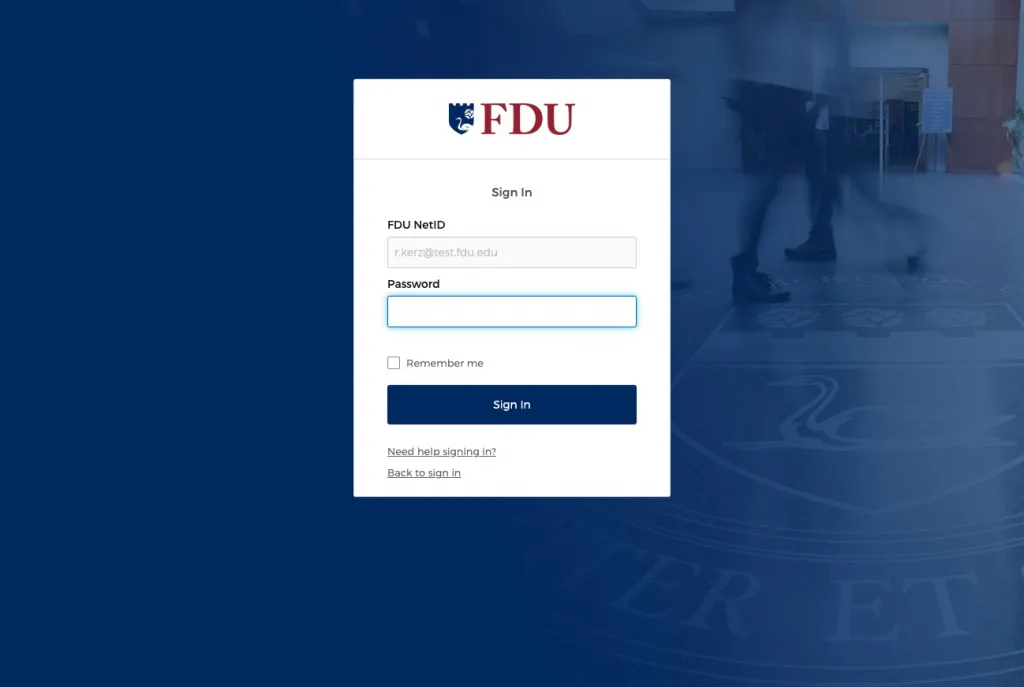
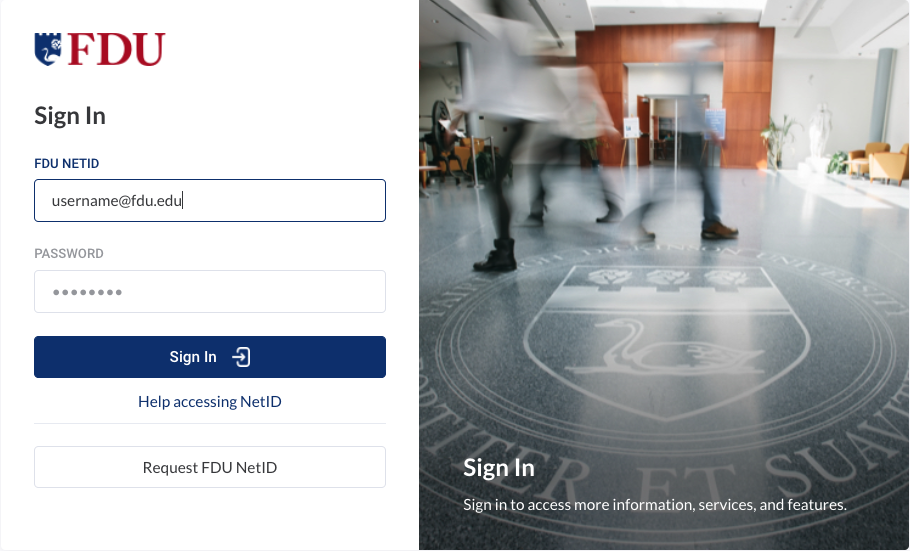
FDU’s Single Sign-On (SSO) experience has been improved and OKTA is the primary Single Sign-On provider. OKTA will replace our “Legacy” SSO login page for all applications over time.
OKTA SSO Login Page
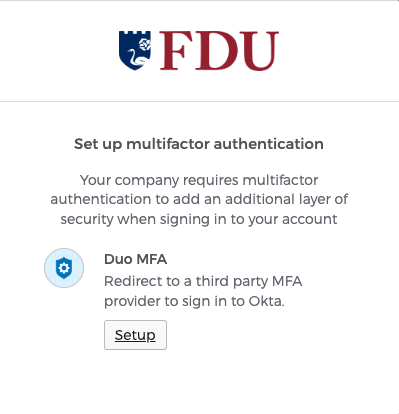
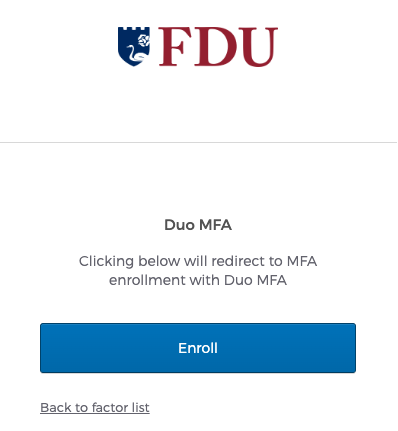
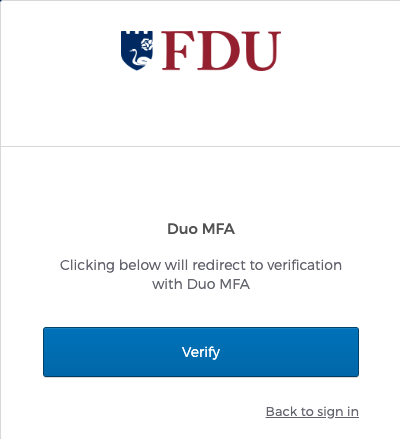
New and existing FDU NetID users who are logging into OKTA for the first time will need to finish setting up their multifactor authentication with DUO.
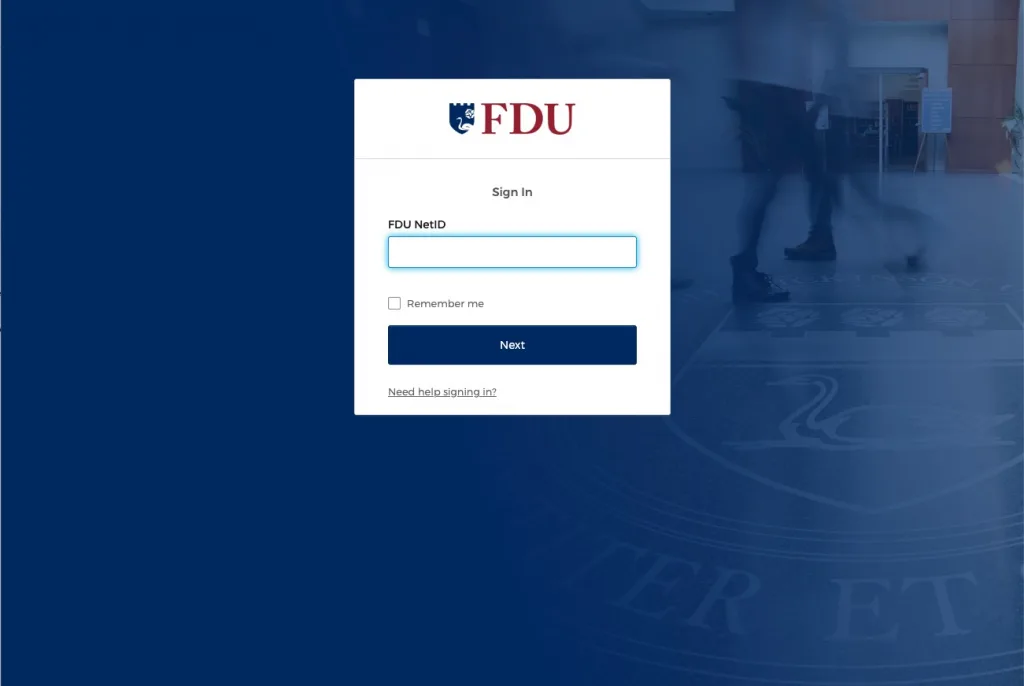
Enter your FDU NetID and click “Next“
Enter your FDU NetID Password and click “Sign In”
For existing users with DUO configured please skip to step 4. For new users please click “Setup” then “Enroll” to continue the process
For instructions on setting up DUO for the first time, refer to our “Quick Start Guide“
Virtru email encryption is a security enhancement to FDU’s Office 365 and Microsoft Outlook email environment, which provides Faculty and Staff the option of sending and receiving encrypted emails using their FDU email account.
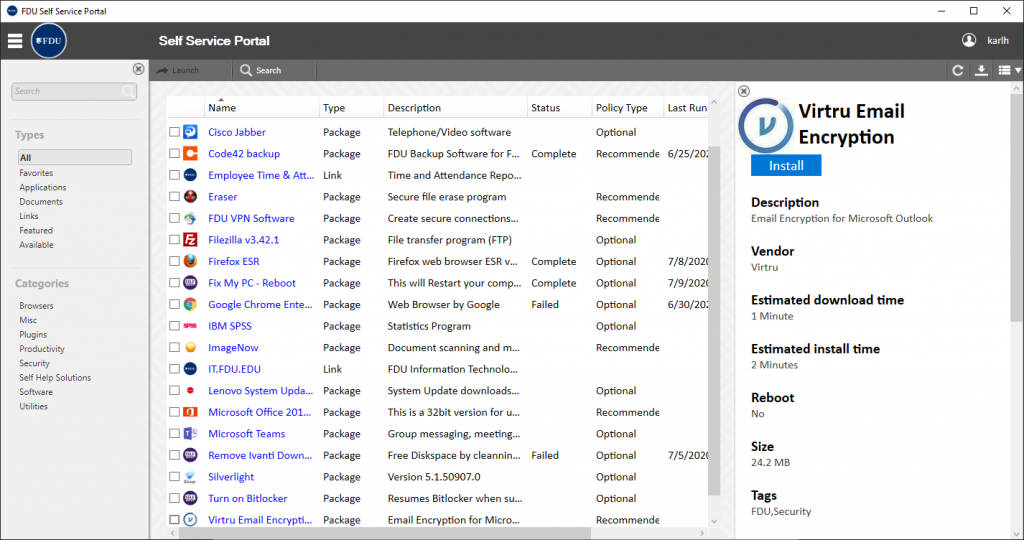
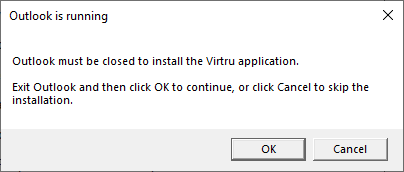
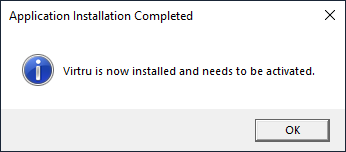
Virtru email encryption is a security enhancement to FDU’s Microsoft Office 365 and Microsoft Outlook email environment, which provides Faculty and Staff the option of sending and receiving encrypted emails using their FDU email account. Virtru for the Microsoft Outlookdesktop email client is available for installation for approved FDU Faculty and Staff via the FDUSelf Service Portal for Software on Windows 10 desktops and laptops owned by the University.
Virtru Email Client
The Virtru client provides a seamless experience when using the Microsoft Outlook desktop client. The Virtru Outlook plugin is only available on university laptops or desktops running Microsoft Windows.
Virtru for Office365
All Apple macOS users and users who access their FDU email through Office 365 can use Virtru email encryption to send sensitive information electronically.
Tip
Microsoft Office 365 is accessed by visiting office365.fdu.edu from any web browser.
Virtru’s Secure Reader is a platform that can be accessed within FDU’s Outlook on the Web (office365.fdu.edu) and right on your web browser by clicking the “Unlock Message” button in your Virtru secured email. From there, all you have to do is quickly validate you are an authorized recipient of that email or file. Once complete, you can read and reply to the secure email directly in your browser.
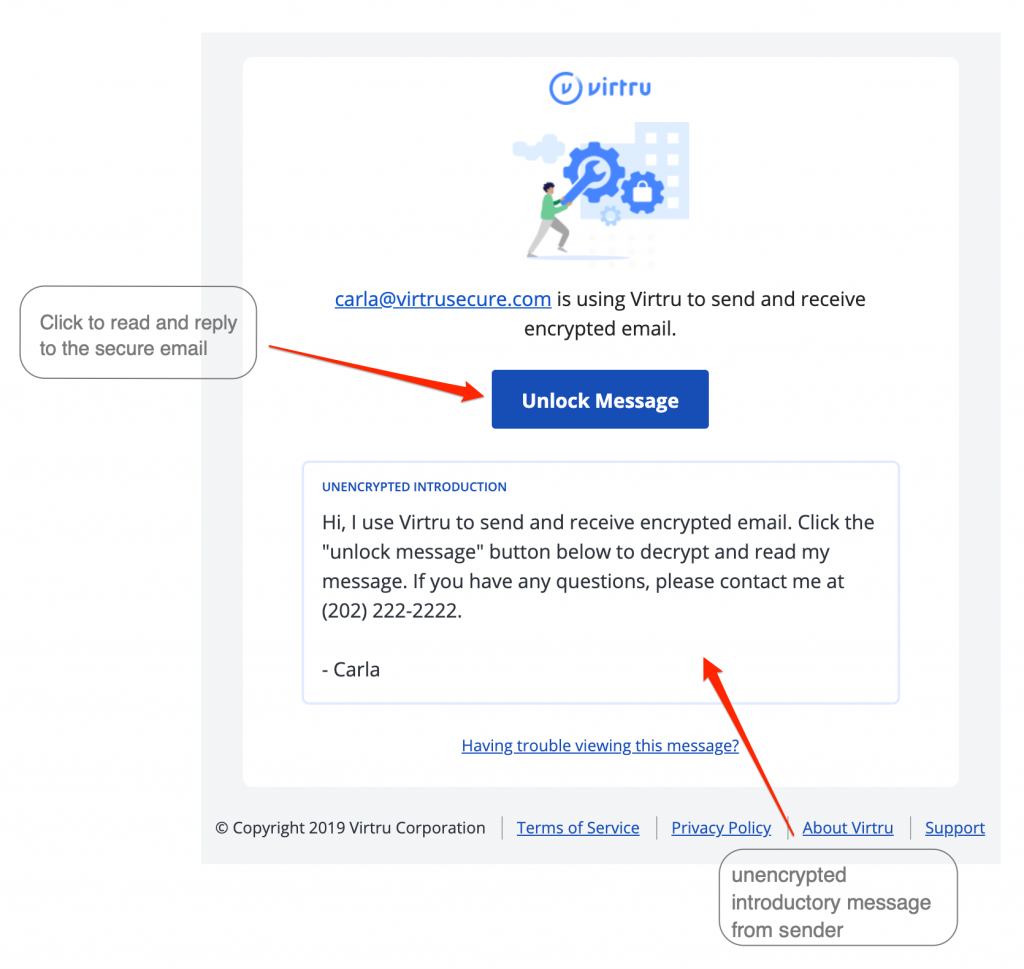
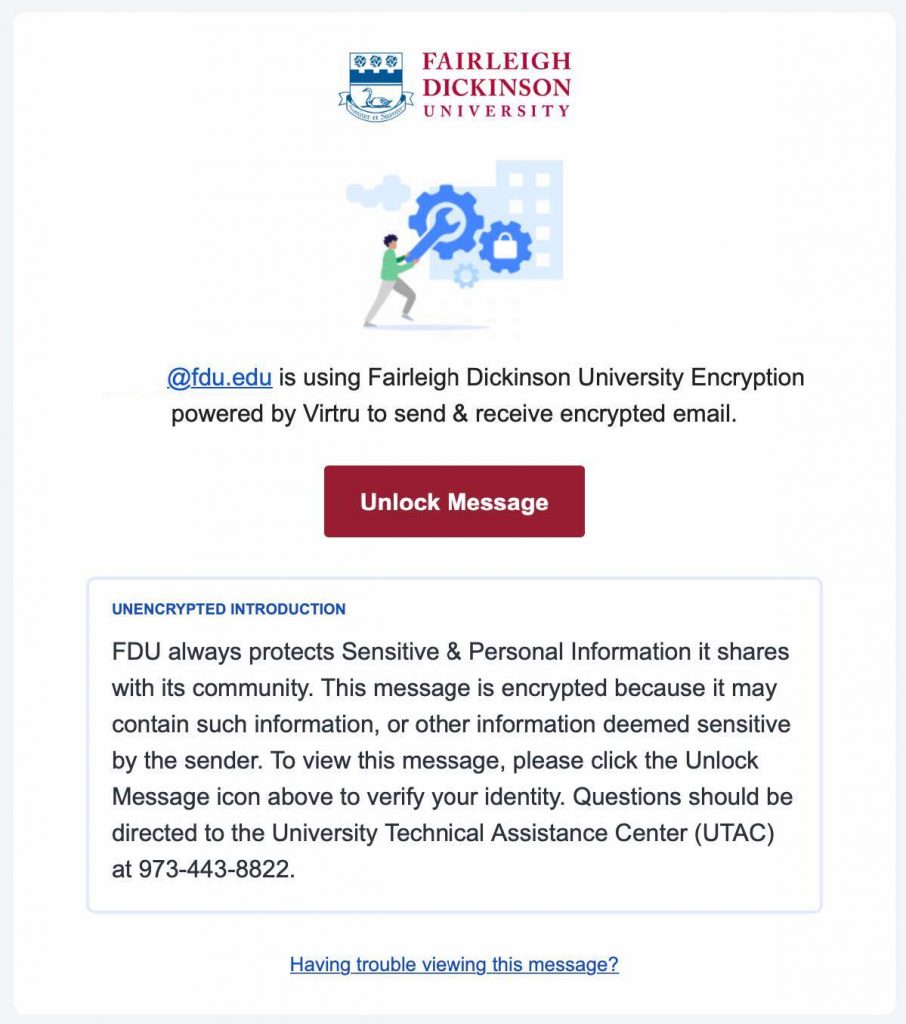
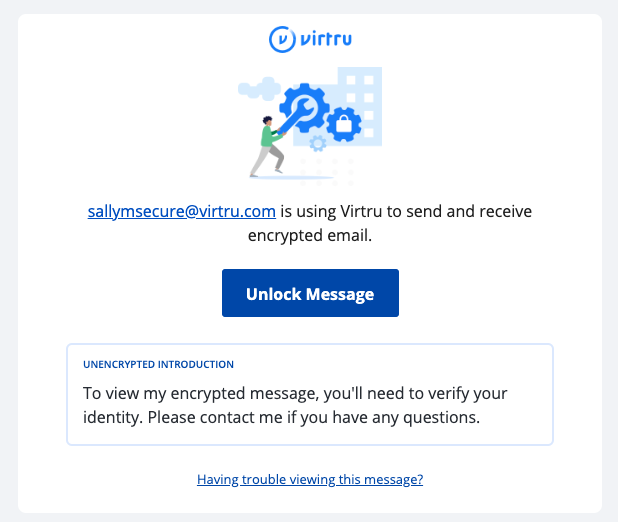
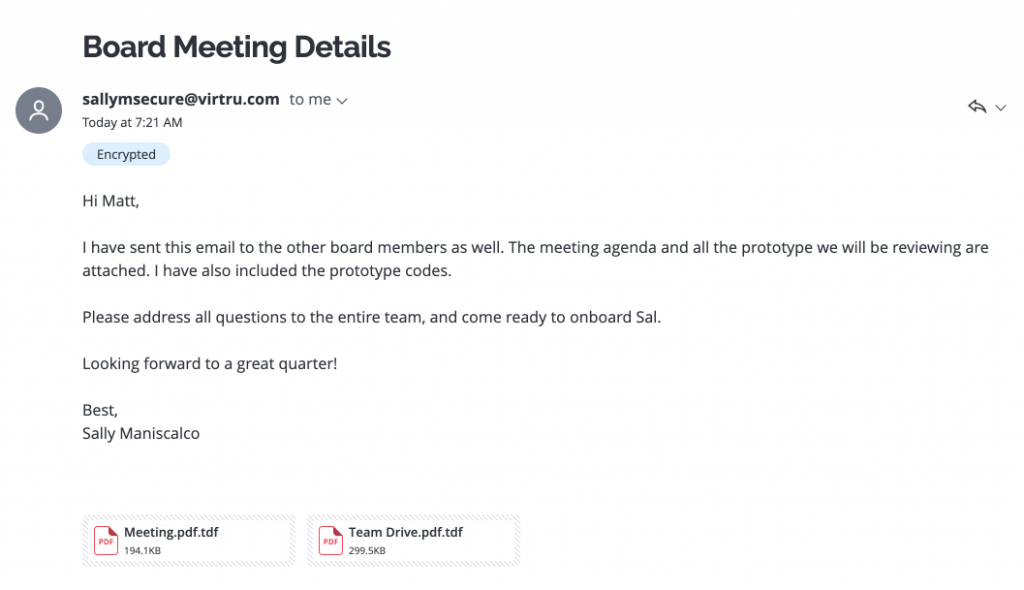
A secure message encrypted by Virtru will have a few key components, including a short unencrypted message from the sender, and a button that says “Unlock Message”.
Note
The Secure Reader is used when viewing encrypted emails from Microsoft Office on the web and any email client on mobile devices (AndroidOS and iOS)
Request Form
To obtain access to Virtru in order to send encrypted emails, you must fill out the request from below:
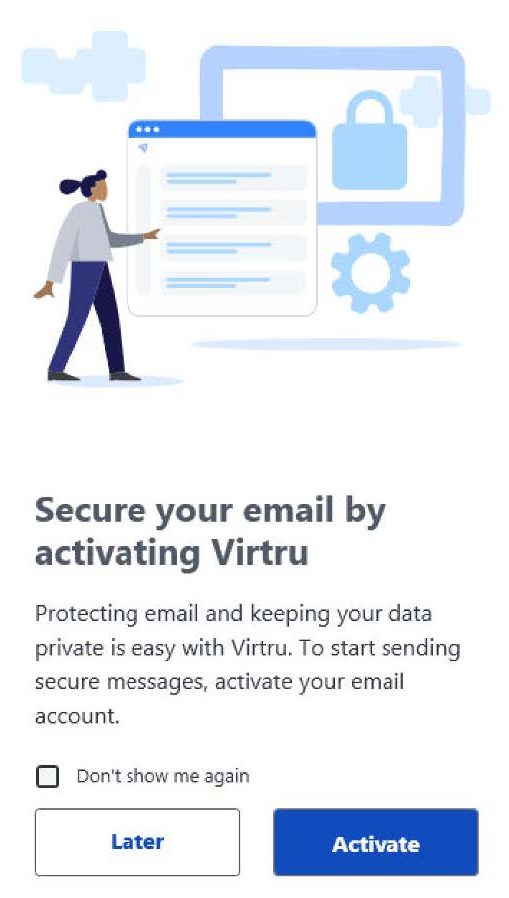
When you open Microsoft Outlook after the Virtru has been installed, you will be prompted to activate your Virtru plugin. Click “Activate“to begin. You may choose “Later” if you do not wish to activate at this time
Note
Check “Don’t show me again” before you click “Activate” or “Later” to prevent a pop-up window from re-appearing to prompt activation of un-activated account(s) whenever you start Outlook.
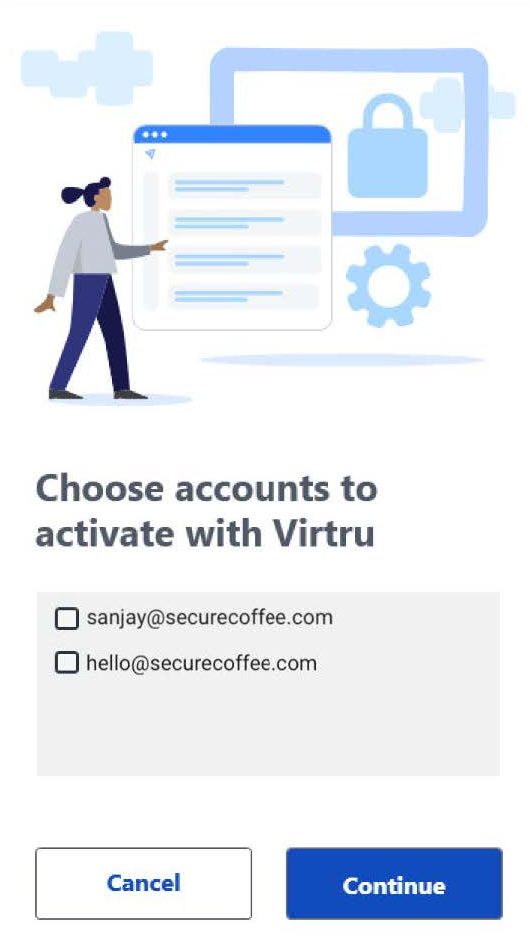
You will be presented with a list of FDU email accounts configured to use in Microsoft Outlook. If your Microsoft Outlook application is associated with multiple email accounts, click on only those you will need to use Virtru email encryption. Then click “Continue“
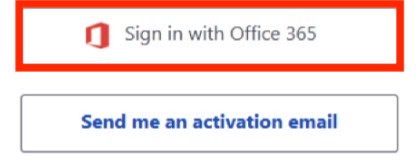
After selecting the proper accounts, you will have the choice of signing in with FDU’s email provider (Microsoft Office 365) or choosing to receive an activation email. Choose “Sign in with Office 365“
Activating Virtru through Office 365 Sign in
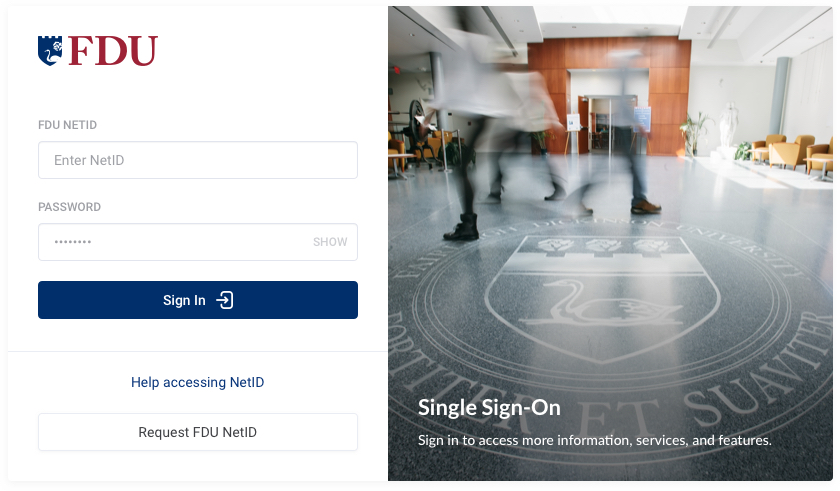
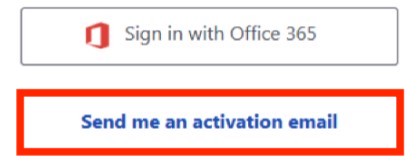
Enter your FDU NetID credentials when prompted and proceed through the FDU Single Sign-on webpage, including completing Duo Multi-Factor authentication. If you experience issues, choose to “Send me an activation email” and follow the directions given below in item
Note
If you cannot activate your account(s) using “Sign in with Office 365”, choose to “Send me an activation email.”
Activating Virtru through Activation Email
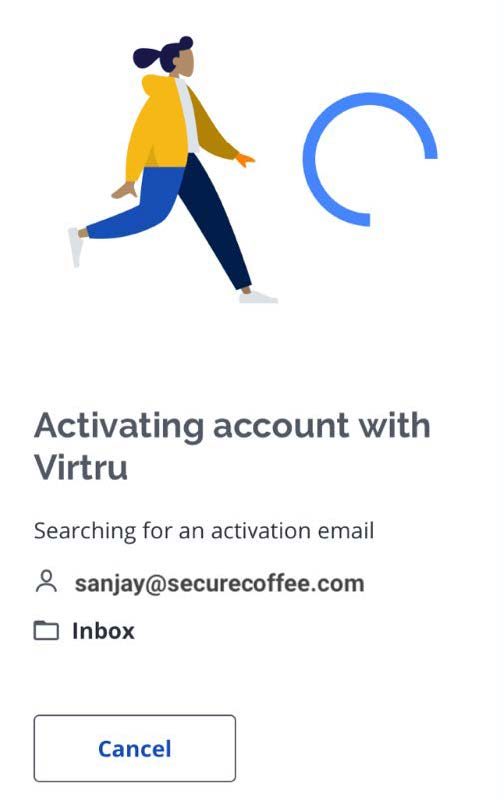
If you are unable to activate your account(s) using “Sign in with Office 365,” choose to “Send me an activation email.” The process will take a few moments to complete in the background
During this process, Virtru will send a unique email from noreply-activation@virtru.com to your mailbox. The Virtru plugin will search for this email in your inbox. When the activation email is found, Virtru will automatically delete the email from your email inbox, and the Virtru plugin will complete the activation
Tip
Click “Take a tour” for a brief walkthrough of your new Virtru features.
If your activation does not automatically complete in a few minutes, please contact the SAMI Service Desk.
Activating from the Virtru Menu
If you have disabled automatic activations, you can still activate Virtru on your account(s) at any time.
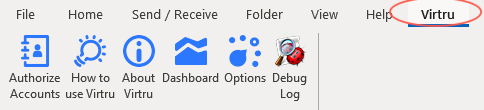
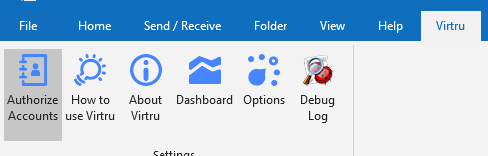
Select the ‘Virtru‘ menu tab from the top bar of the main Microsoft Outlook window
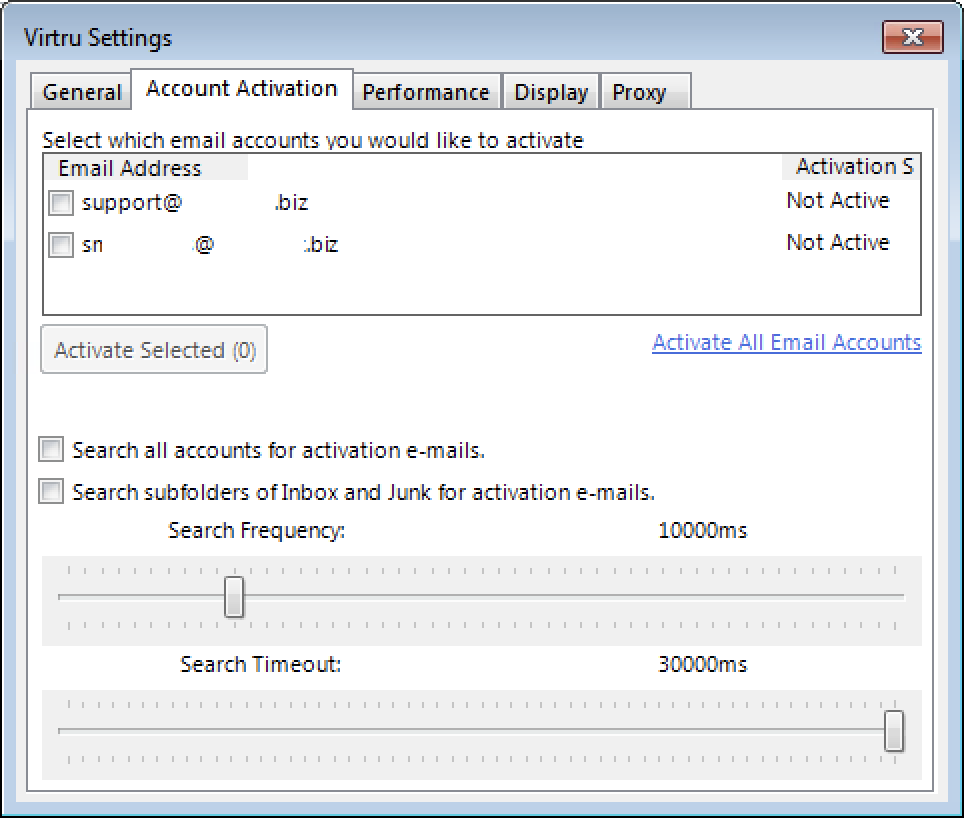
Choose “Authorize Accounts” or “Options“
If you select “Options,” go to the ‘Account Activation‘ menu tab, select your FDU email account, and click on “Activate Selected“
You will then follow the activation process already illustrated above in “Activating Virtru through Office 365 Sign-on“or “Activating Virtru through activation email” described above
FDU Virtru users will occasionally be required to reactivate their Virtru add-in due to the following:
You’ve cleared your registry
Your Virtru activation status has expired. For security purposes, Virtru will invalidate your activation status every
120 days for users accessing their own mailboxes
10 days for users accessing shared or delegated mailboxes
You are using Virtru on a new machine
You are automatically prompted when you need to re-activate. You can also proactively reactivate at any time via the ‘Virtru’ menu tab. This process was described above in “Activating from the Virtru Menu.”
Reset Activations
If you wish to fully deactivate all accounts in Microsoft Outlook, you can do so from the ‘Virtru’ menu tab:
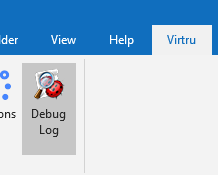
Click on the ‘Virtru‘ menu tab at the top of your Microsoft Outlook window and select “Debug Log“
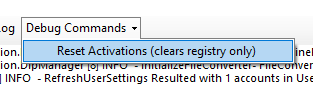
Click on the ‘Debug Commands‘ menu tab option and select the “Reset Activations (clears registry only)” option
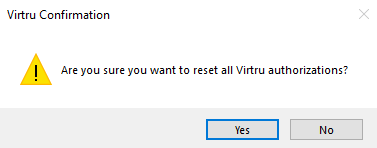
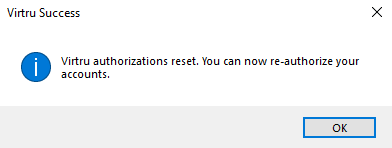
Click “Yes” and then “OK” to confirm the changes
From the ‘Virtru‘ menu tab, you can reauthorize by clicking on “Authorize Accounts“
With Virtru, you can easily protect your emails by encrypting messages and attachments in a few simple clicks.
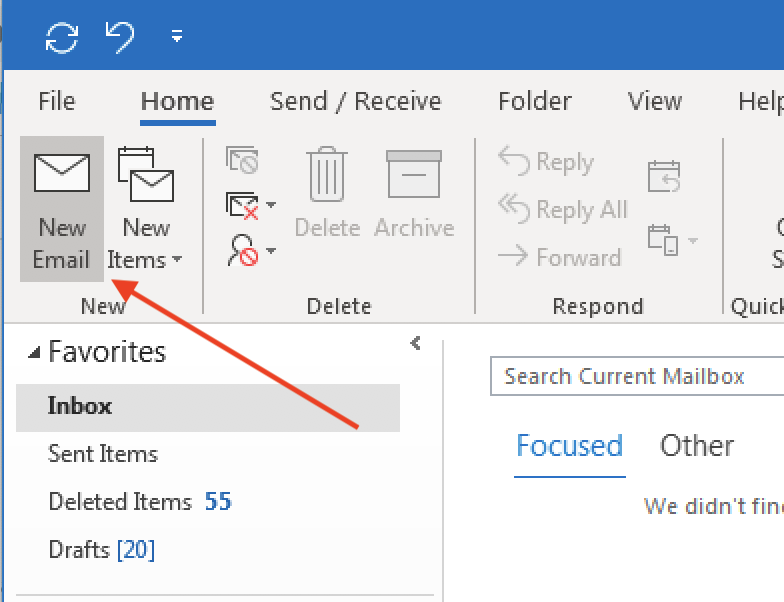
Left-click “New Email” from the main Outlook window
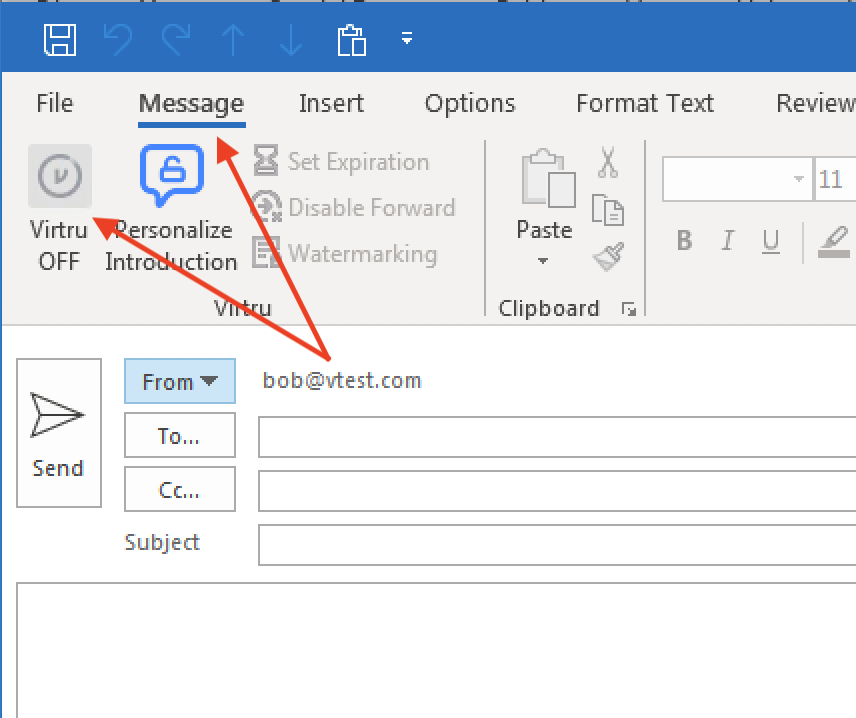
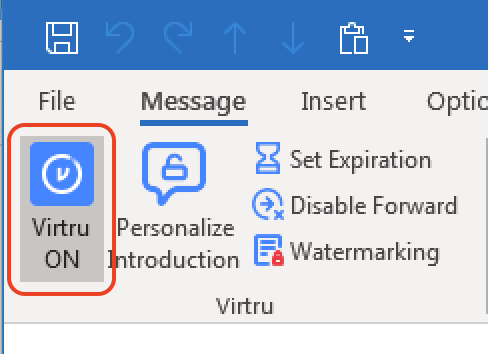
Open the ‘Message‘menutab and left-click the “Virtru button” to turn “Virtru ON.” The button should turn blue and read “Virtru ON”
Add recipients, a subject, the body of the email, and any relevant attachments
Tip
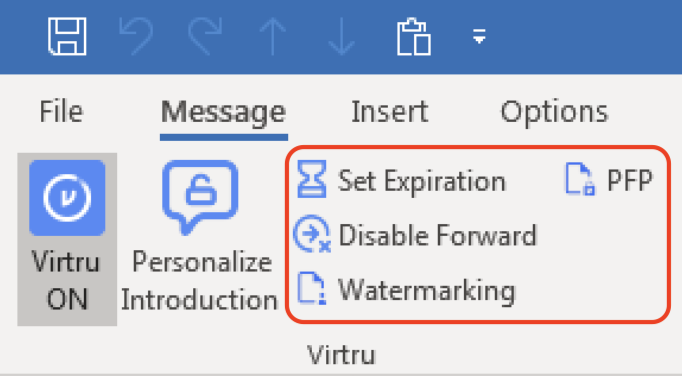
Additional security options for the message, including Disable Forwarding, setting an Expiration Date, and applying Watermarking and/or Persistent File Protection (PFP) to attachments are available to select for your Virtru-encrypted email. More details on these additional features can be on the “FDU Virtru Email Encryption Tutorial” under “Additional Resources.”
When your message is ready, click “Send.” You should see a brief animation letting you know that the message is “Encrypting” before it is fully sent
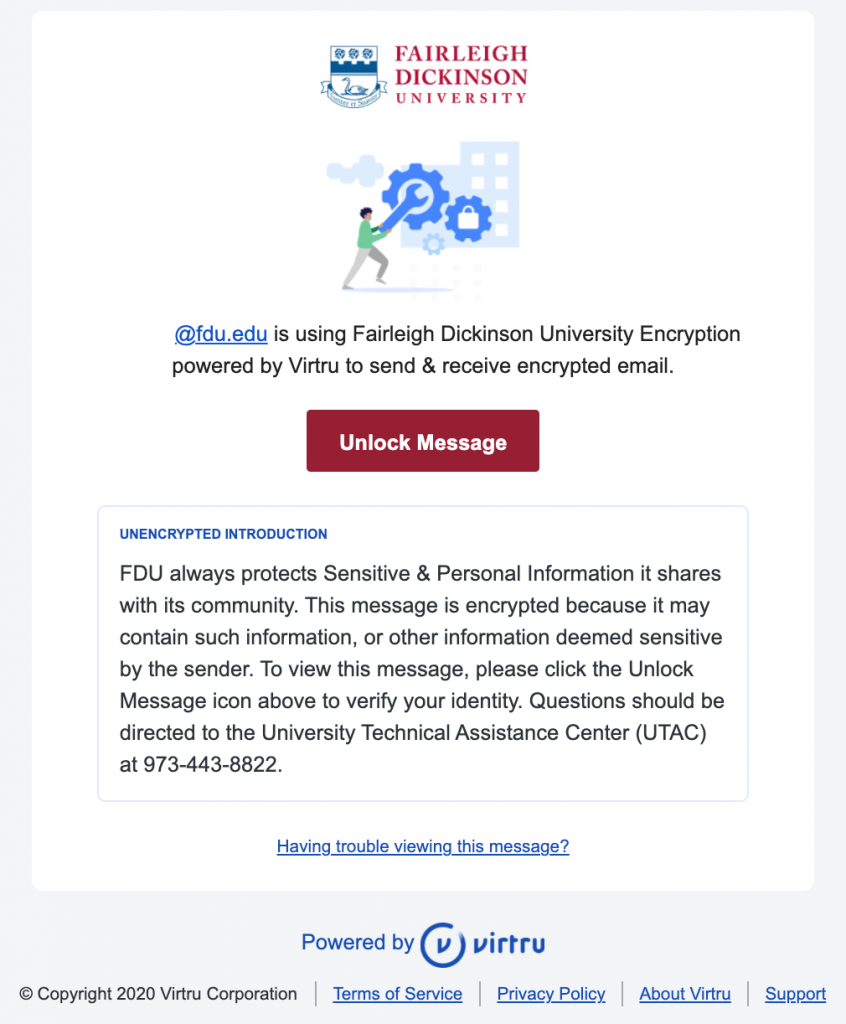
FDU Virtru-encrypted Email Introduction for Recipients
FDU includes a standardized introduction to inform the recipient that they are viewing a Virtru-encrypted email. Below is an example of what the recipient will see. If you have updated the introduction, it will be reflected accordingly
Personal Virtru-encrypted Email Introduction for Recipients
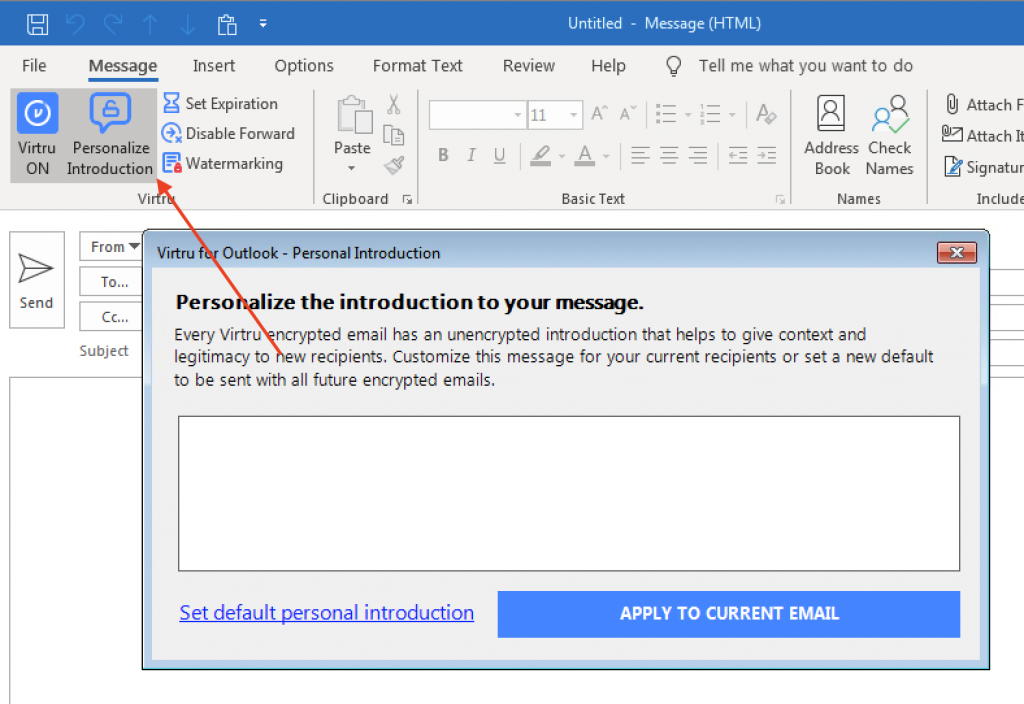
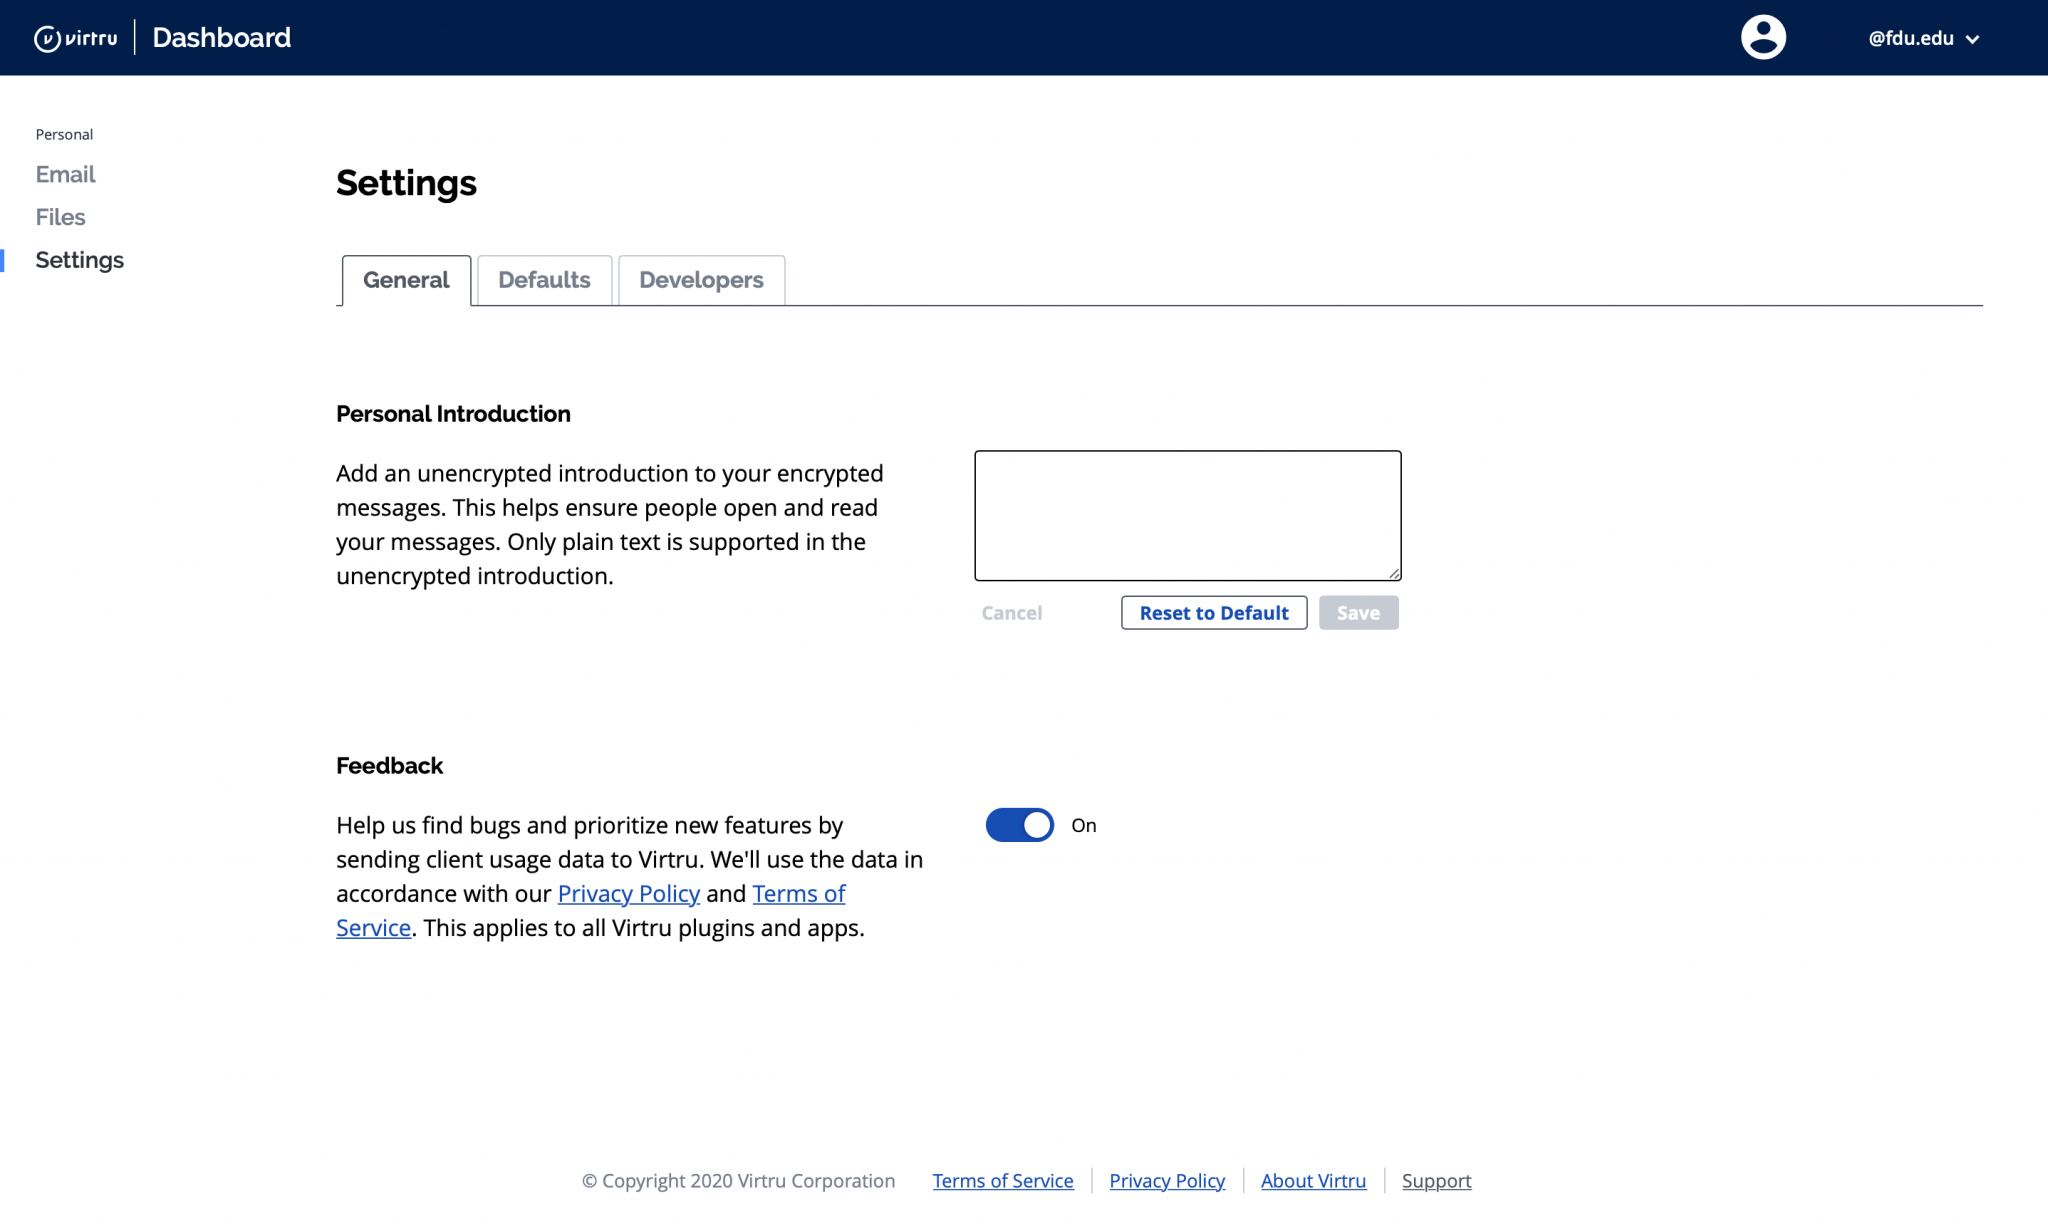
You can also set a one-time, unencrypted personal introduction for the message to either clarify the introduction of Virtru to the recipient or provide some context about the email. Left-click the “Personal Introduction” menu button in your email draft window.
Note
The Personal Introduction only supports plain text and line breaks. Special formatting is not supported.
Send a Virtru-encrypted Email on Microsoft Office 365
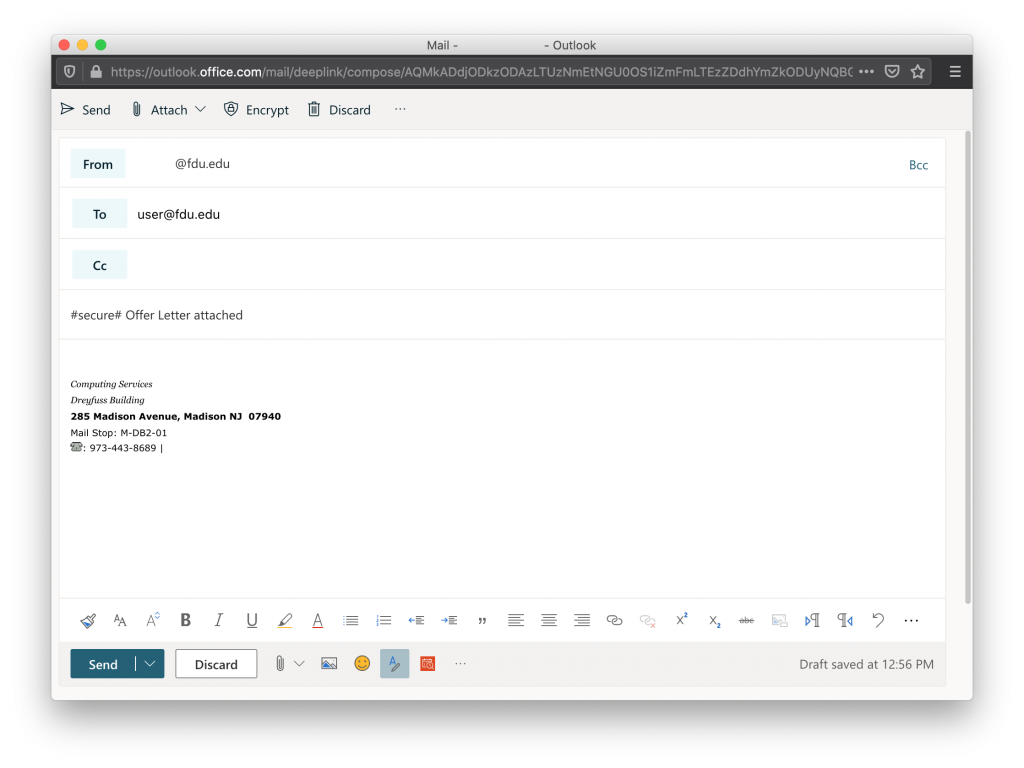
With Virtru, you can easily protect your emails by encrypting messages and attachments in a few simple clicks. To send Virtru encrypted emails from your Microsoft Office 365 email acount, simply prepend the subject line of your email as follows:
#secure#
Virtru-encrypted Email Recipient Experience
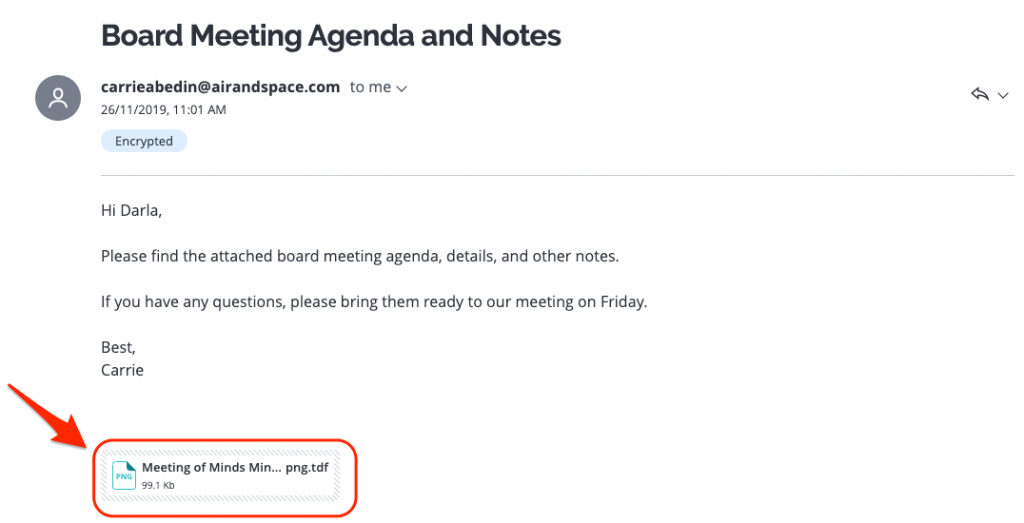
The recipient will receive an email that looks like this:
Read a Virtru Encrypted Email on Microsoft Office 365
In this article, we’ll show you how to quickly access and read your Virtru-secured message or attachment within Microsoft Office 365 using Virtru’s Secure Reader.
How to Access and Read your Message
Login to FDU’s Microsoft Office 365 web portal using any web browser. Enter your FDU NetID credentials
Open the Virtru-secured email in your inbox and left-click “Unlock Message.” A new tab will open
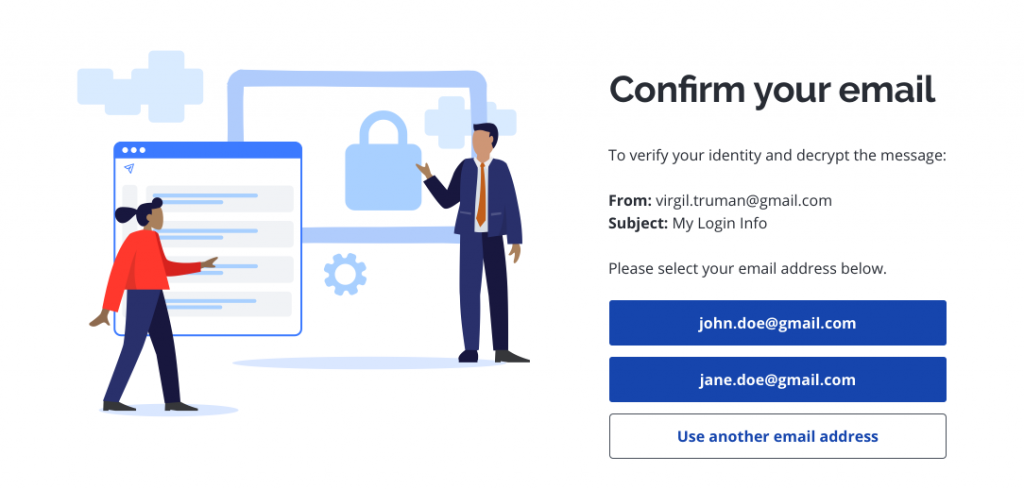
When prompted, select your FDU email address
Tip
If you don’t see yours listed, left-click “Use another email address” and enter your email address.
Note
Please be sure to verify using the exact email address to which the secure message was sent. If the email was sent to an alias, group address, or distribution list address, you will need to select or enter that exact email address rather than your personal address.
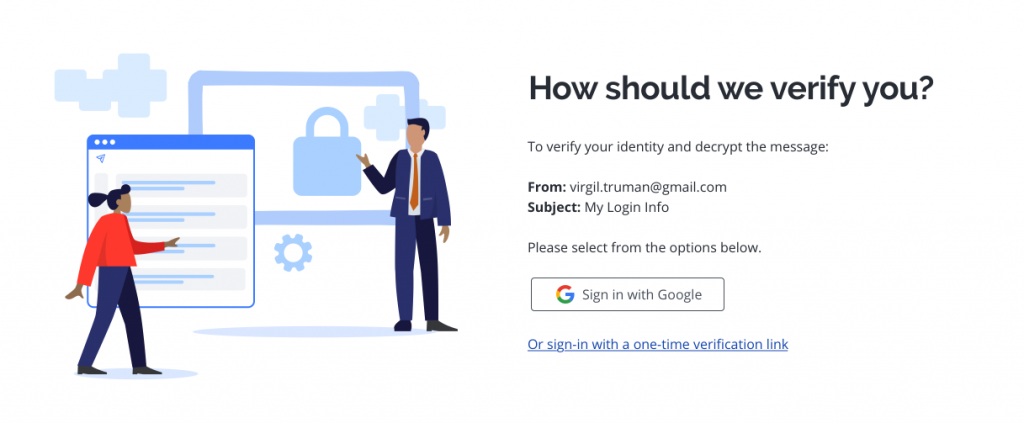
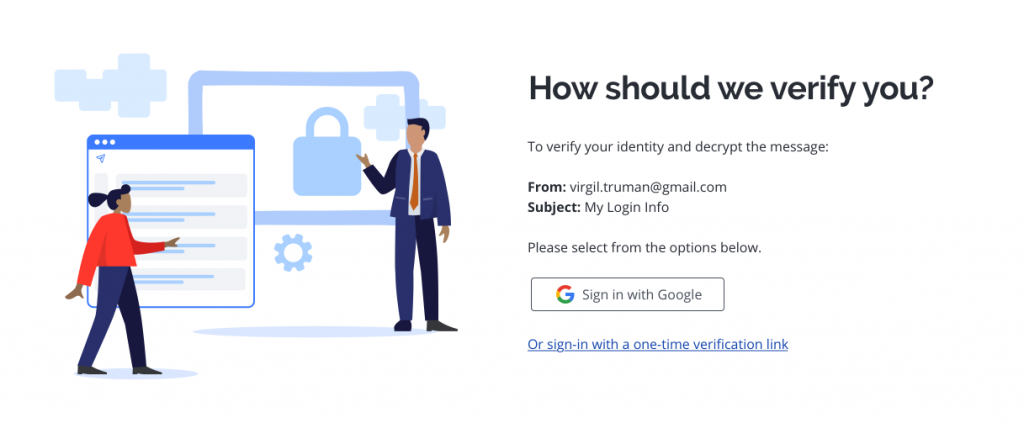
Choose how you’d like to verify your identity
Microsoft Office 365 users can use their FDU NetID credentials to log into the Secure Reader using “Sign In with Microsoft.” If you choose this route, you can skip step #5 below.
Alternatively, users may choose “Or sign-in with a one-time verification link.”
Warning
For emails sent to an alias, group address, or distribution list address, you will need to select the Or sign-in with a one-time verification link option. For group addresses and distribution list addresses, this action will send the verification email to all users on that group or distribution list.
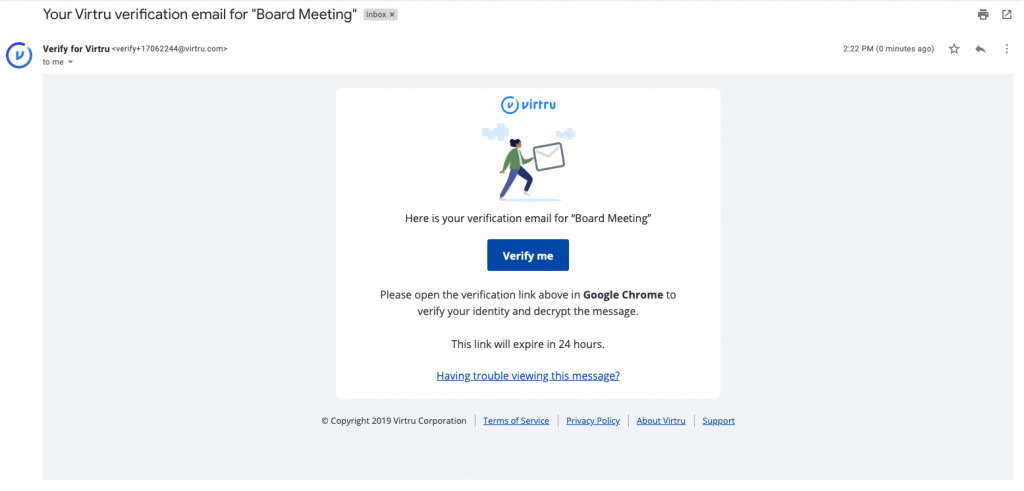
If you selected “Or sign-in with a one-time verification link,” check your inbox for your verification email. It will come from verify+xxxxxxxx@virtru.com (with each “x” being a digit). Open the verification email and left-click “View Message” to open your message
Note
Both the “Unlock Message” and “View Message” links need to be opened in the same browser on the same device in order to confirm your identity.
Please also note, Virtru offers a “cookie-less” verification pathway if we detect that tracking or cookies and local storage have been disabled in the browser. In these cases, we send a verification code via email. This code, once received, simply needs to be pasted into the proper field in your browser in order to grant access.
Your message will open the Virtru Secure Reader in a new tab in the browser. You will also be able to view and access attachments at this time
For a variety of reasons, some recipients may occasionally receive an error message when trying to open a secure email or attachment. If you are having problems accessing your secure email and/or files, please contact the SAMI Service Desk. for assistance.
Reply to a Virtru Encrypted Email on Microsoft Office 365
In this article, we’ll show you how to quickly reply to your Virtru-secured message or attachment within Microsoft Office 365 using Virtru’s Secure Reader.
How to Reply to a Secure Message
Login to FDU’s Microsoft Office 365 web portal using any web browser. Enter your FDU NetID credentials
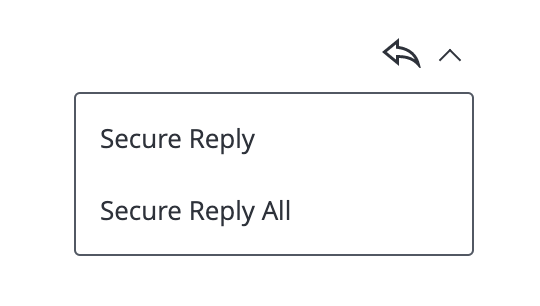
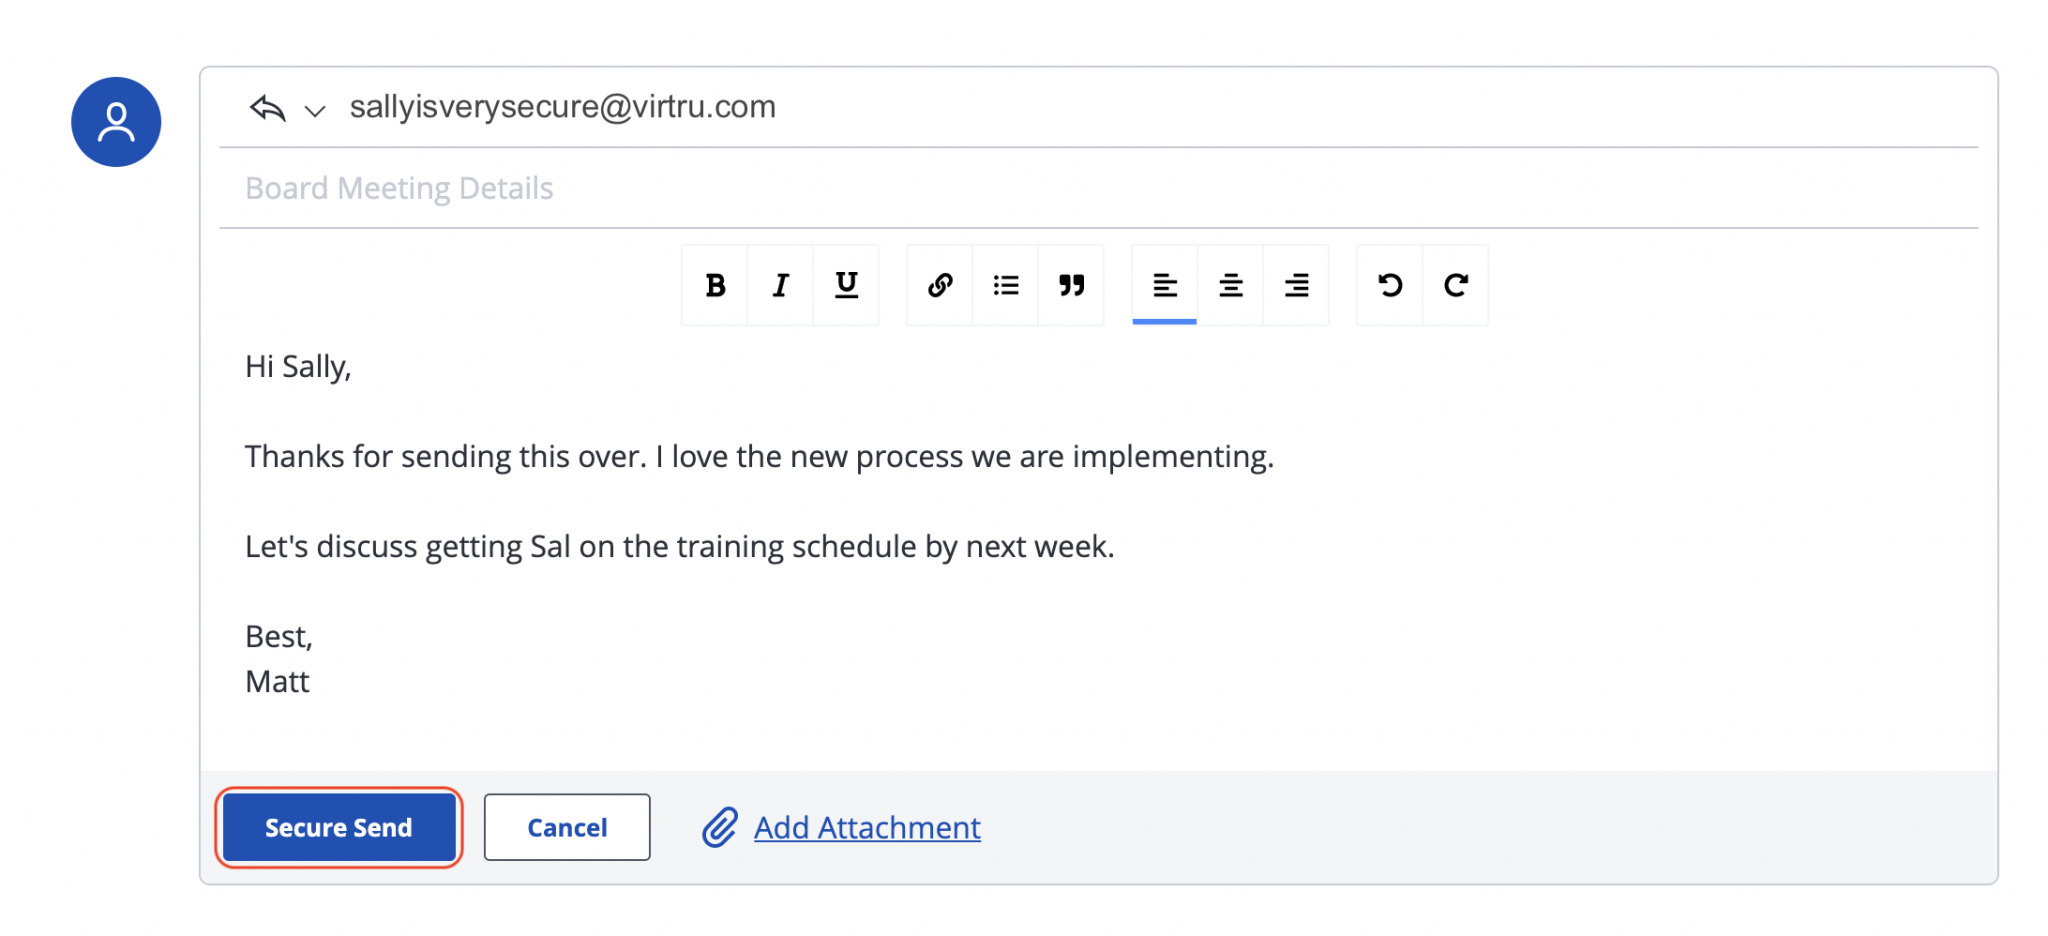
After successfully opening the Virtru-secured message, to send a “Secure Reply,” scroll down the page below the main message, or click the icon in the top right with the arrow pointing to the left. You may also click on the arrow next to it to reveal additional options such as “Secure Reply All“
Attachments can be added by clicking “Add Attachment.” These attachments will be sent securely as well
When you are ready to send your email, hit the “Secure Send” button. Both you and all applicable recipients will receive a copy of your reply. Please note that your secure reply will be sent from secure-reply@virtru.com
Viewing a Secure File or Attachment on Microsoft Office 365
This article covers the different options you have for viewing and downloading secure attachments and files within Microsoft Office 365 using Virtru’s Secure Reader. Depending on the type of attachment you’ve received, you can view your file directly in the Virtru Secure Reader or download the file to your computer. The Virtru Secure Reader can preview various file types, including PDF, Word documents, most image files, and plain text files.
Viewing Directly in the Secure Reader
Login to FDU’s Microsoft Office 365 web portal using any web browser. Enter your FDU NetID credentials
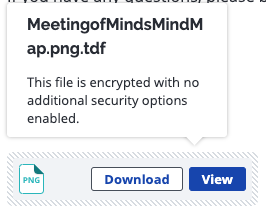
If you’ve received an attachment in a Virtru secured email or an encrypted file that was shared directly with you, you can hover over the file name and choose “View” or “View Protected file” to view the attachment right in your web browser
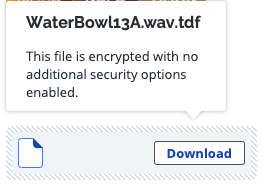
Downloading Unsupported File Types
If you’ve received a file that cannot be previewed in the Virtru Secure Reader, you will be prompted to download that file directly. There will be no “View”option.
Printing Attachments in the Secure Reader
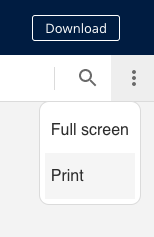
You can print a document from the Secure Reader by selecting the menu under the “Download “button and then selecting “Print.”You may also choose to download it first, then open and print via a preferred program on your computer.
Note
Note that printing via your web browser’s File>Print option will not print the document as expected.
Using the Virtru Dashboard for Microsoft Office 365 Users
Users who access their FDU email through the Microsoft Office 365 web portal and all Apple macOS users will need to use the Virtru Dashboard to manage all of Virtru’s security options.
To use the Virtru Dashboard, click the link below:
We will refer to the “Virtru Dashboard” many times, as this dashboard is used to change settings after an encrypted email has been sent. It is suggested that you bookmark this site for easy access.
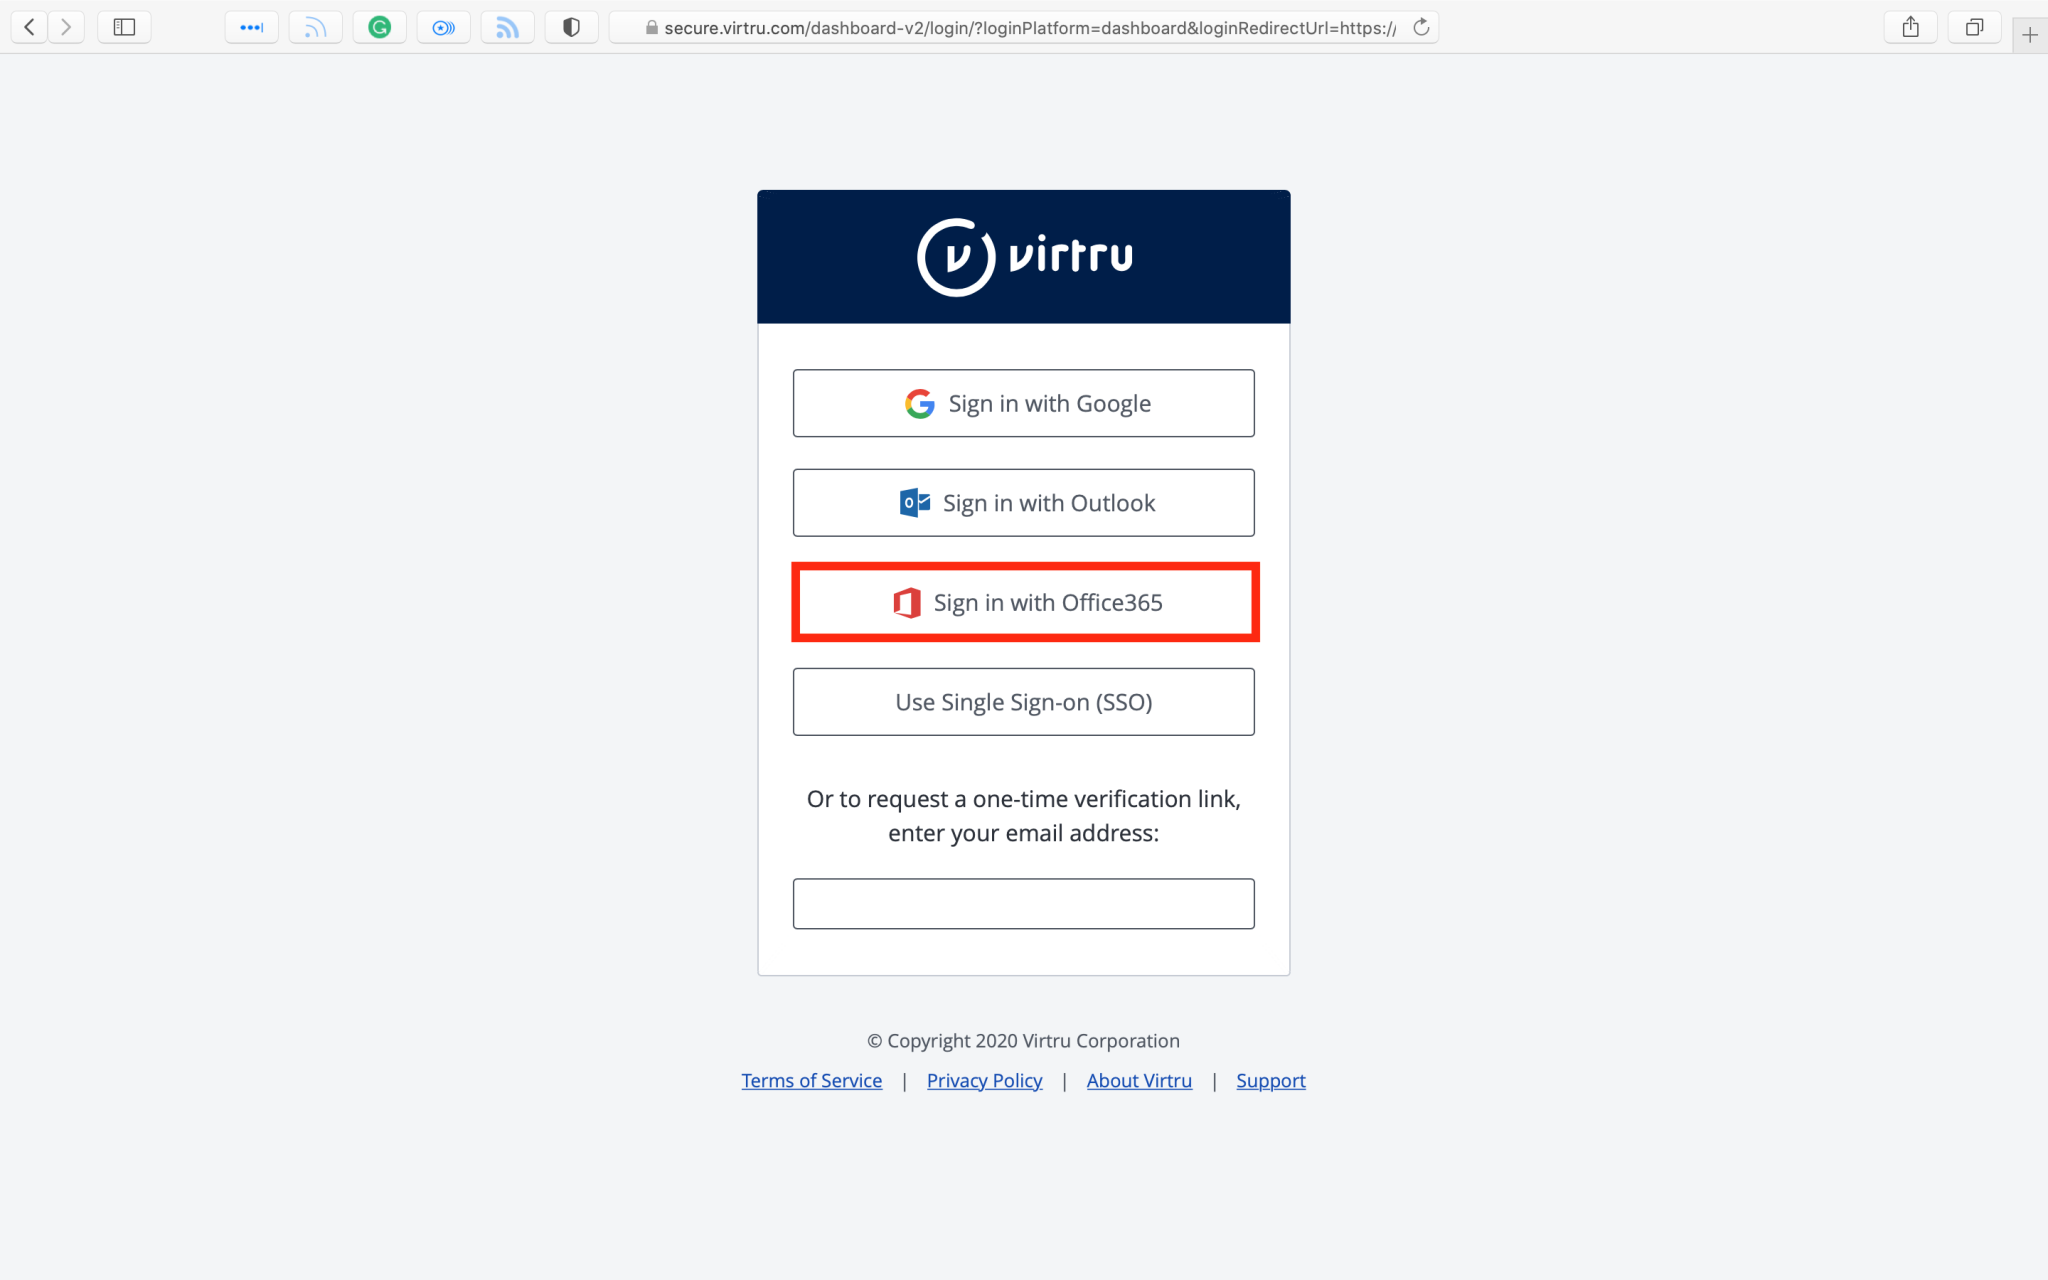
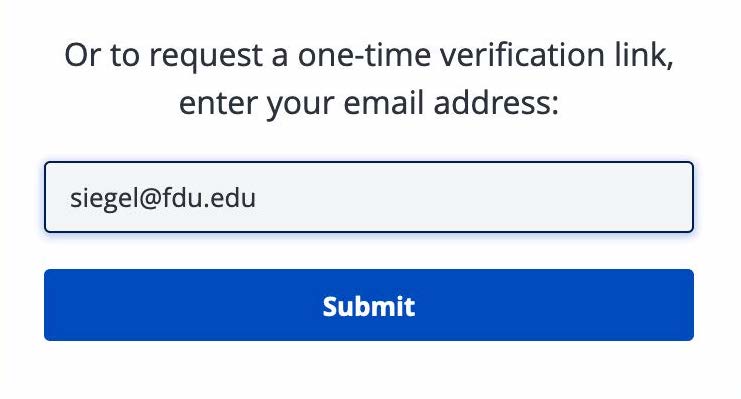
Choose “Sign in with Office365“, and skip to Step 5. If you choose to request a one-time verification link, enter your FDU email address and click on “Submit“
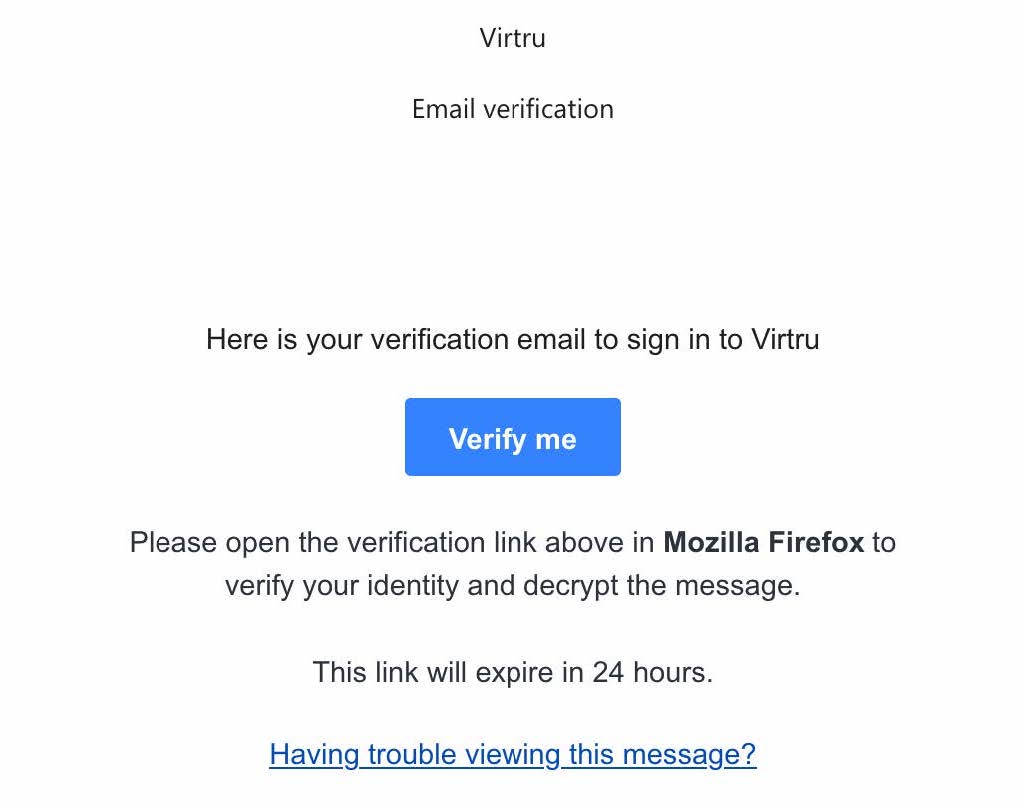
If you request the one-time verification link, you will receive an email from Verify for Virtru, as shown below. If you are using different web browsers, such as Google Chrome or Mozilla Firefox, it will be reflected in the email message accordingly
Click “Verify me” and choose “Copy Link Location.” Open a new browser tab and paste the link location into the URL space. Hit the “Enter” or “Return” key on your keyboard
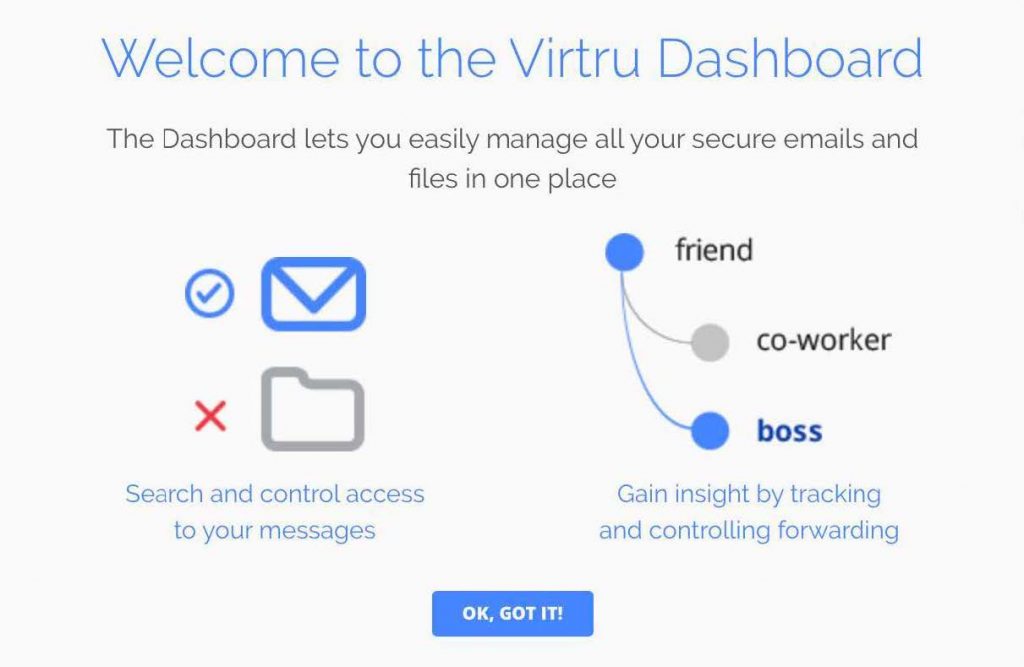
When you log in to the Virtru Dashboard for the first time, you will see the message below. Left-click “OK, GOT IT!“
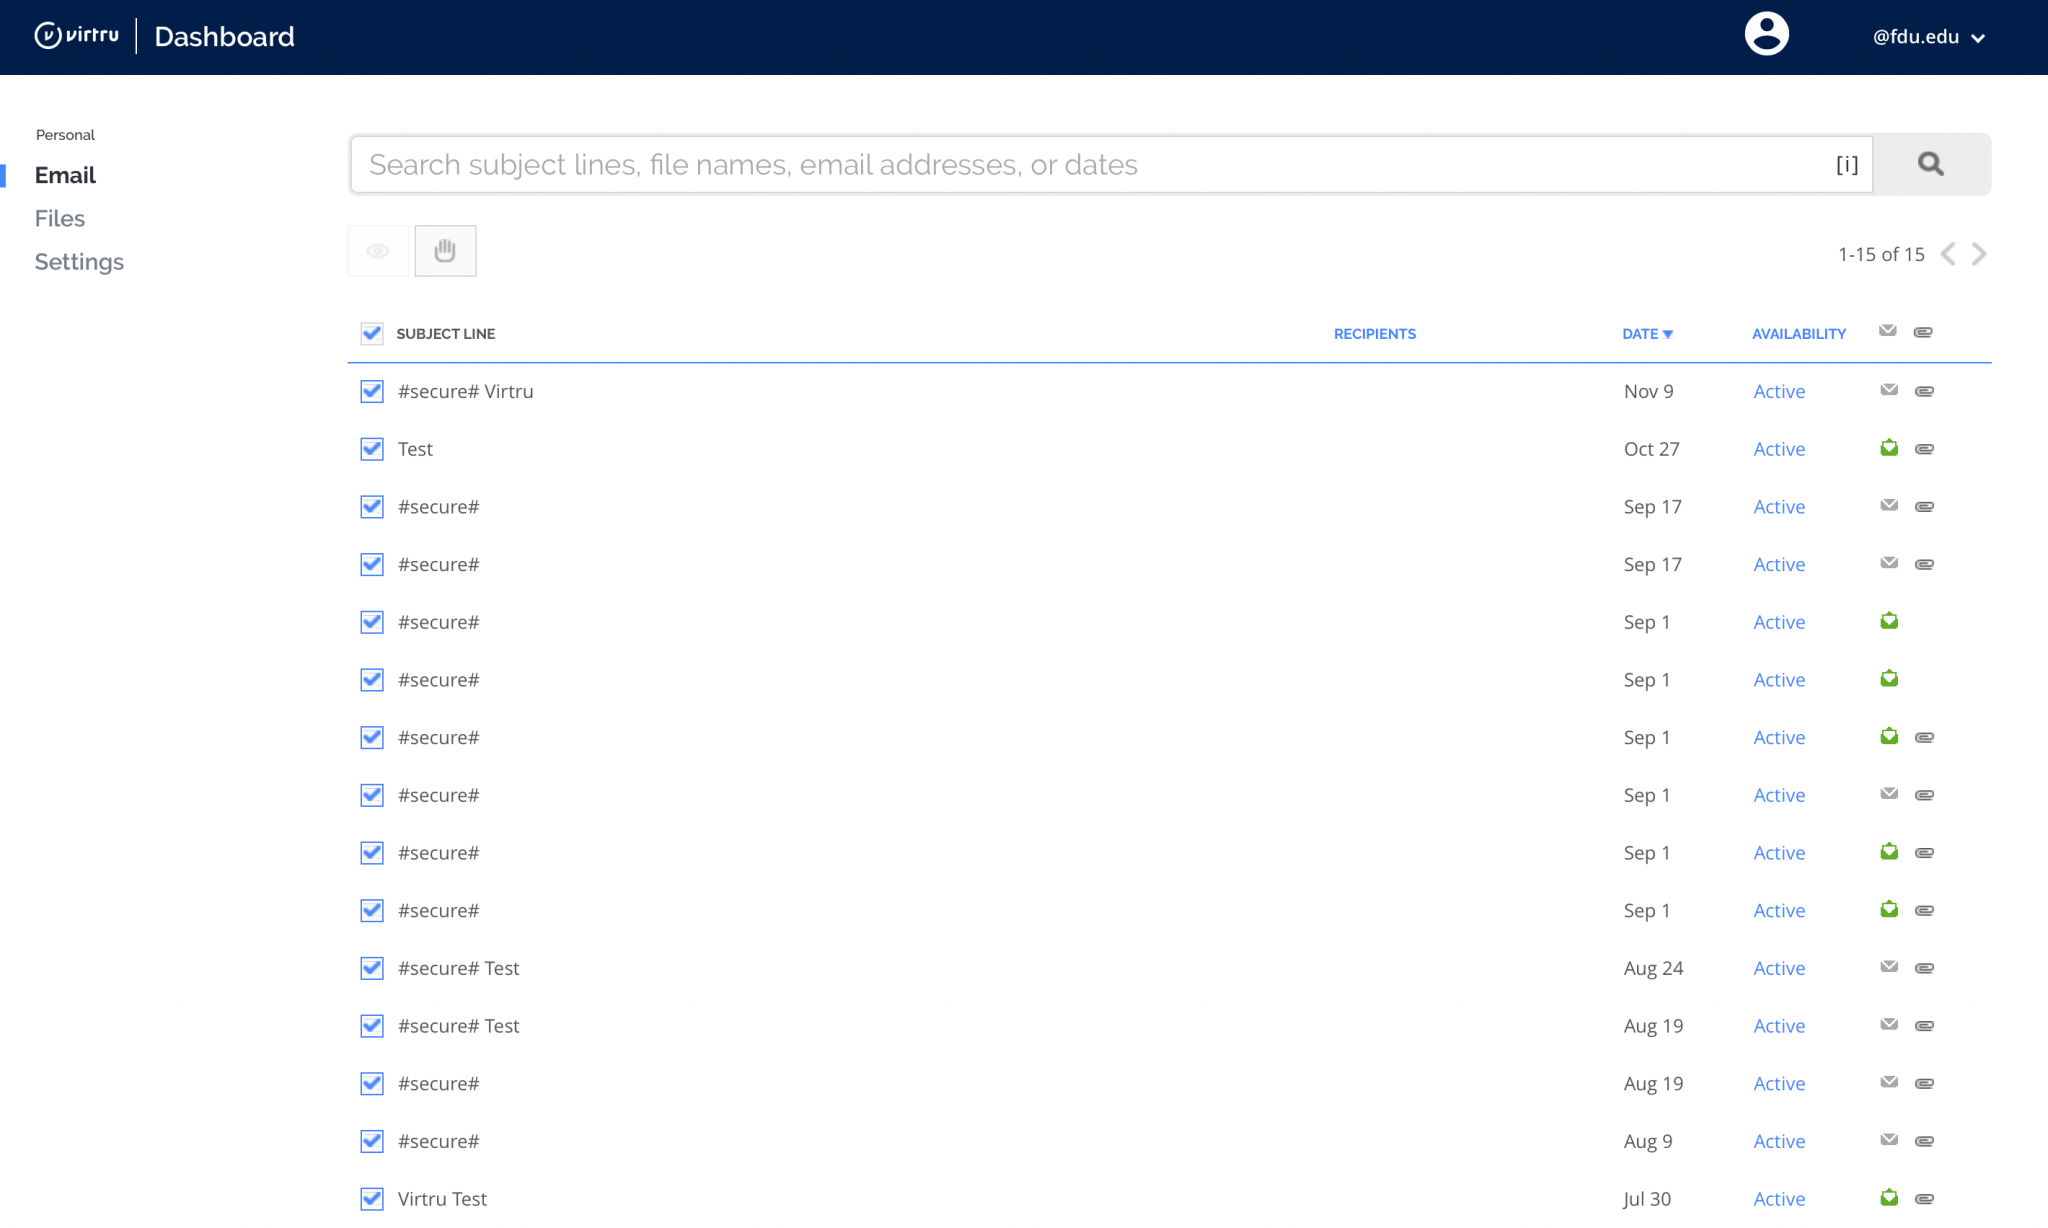
You will now be able to view Virtru encrypted emails or files you have sent, as well as open the ‘Settings‘ menu tab to set behaviors for your Virtru account
Manage Virtru’s Expiration Date Security Option in Outlook
In addition to encrypting messages and files, Virtru users have the ability to apply additional security settings to protected content. Among these settings is the option to apply an “Expiration Date” to an encrypted email or file.
Typically, if a Virtru email recipient receives an encrypted message or file, they can indefinitely access that content. However, as the owner of that content, you can restrict access after a particular point in time. If a recipient tries to access the content after expiration, they will receive a prompt indicating their access is expired.
Manage Virtru’s Expiration Date Security Option in the Virtru Dashboard
In addition to encrypting messages and files, Virtru users have the ability to apply additional security settings to protected content. Among these settings is the option to apply an “Expiration Date” to an encrypted email or file.
Typically, if a Virtru email recipient receives an encrypted message or file, they can indefinitely access that content. However, as the owner of that content, you can restrict access after a particular point in time. If a recipient tries to access the content after expiration, they will receive a prompt indicating their access is expired.
Manage Virtru’s Disable Forwarding Security Option in Outlook
In addition to encrypting messages and attachments, Virtru users have the ability to apply additional security settings to protected content. Among these settings is the option to apply “Disable Forwarding” to a Virtru-encrypted email.
Typically, if a Virtru plugin for Microsoft Outlook user receives an encrypted message, they can use Virtru to forward the email to a new party. This will add the new recipient as an authorized user and allow them to unlock the message. “Disable Forwarding,” however, ensures that your recipients can access the encrypted content but will stop any additional users from gaining access to the message. If the original recipient passes the email to a new party, then the new user will not be added as an authorized user and will not be able to unlock the message.
Manage Virtru’s Disable Forwarding Security Option in the Virtru Dashboard
In addition to encrypting messages and attachments, Virtru users have the ability to apply additional security settings to protected content. Among these settings is the option to apply “Disable Forwarding” to an encrypted email.
Manage Virtru’s Watermarking Security Option in Outlook
In addition to encrypting messages and attachments, Virtru users have the ability to apply additional security settings to protected content. Among these settings is the option to apply “Watermarking” to an encrypted file.
Typically, if a Virtru recipient receives an encrypted file, they can preview the file in the Virtru Secure Reader and download a decrypted copy locally. When “Watermarking” is applied to a secure file, recipients will only have access in the Secure Reader and will see their email address watermarked across the document.
The addition of the watermark is visible but transparent enough not to obscure the contents of the file when viewed. A recipient will not be able to download a local decrypted copy of the file.
This feature can be applied using the Virtru plugin for Microsoft Outlook or the Virtru Dashboard. It supports the following common file types:
Microsoft Office documents: .docx, .pptx, .xlsx
Common image file formats: .jpeg, .png
PDF documents
Note
Although newer Microsoft Office file types are supported, older versions (.doc, .ppt, .xls) are not compatible. Additionally, these other common file types are NOT supported: .msg, .zip, .md.
Mange Virtru’s Watermarking Security Option in the Virtru Dashboard
In addition to encrypting messages and attachments, Virtru users have the ability to apply additional security settings to protected content. Among these settings is the option to apply “Watermarking” to an encrypted file.
Typically, if a Virtru recipient receives an encrypted file, they can preview the file in the Virtru Secure Reader and download a decrypted copy locally. When “Watermarking” is applied to a secure file, recipients will only have access in the Secure Reader and will see their email address watermarked across the document.
The addition of the watermark is visible but transparent enough not to obscure the contents of the file when viewed. A recipient will not be able to download a local decrypted copy of the file.
This feature can be applied using theVirtru plugin for Microsoft Outlook or the Virtru Dashboard. It supports the following common file types:
Microsoft Office documents: .docx, .pptx, .xlsx
Common image file formats: .jpeg, .png
PDF documents
Note
Although newer Microsoft Office file types are supported, older versions (.doc, .ppt, .xls) are not compatible. Additionally, these other common file types are NOT supported: .msg, .zip, .md.
When a Virtru user sends encrypted content, they have full control over access to the message(s) and/or file(s). Even if a recipient receives encrypted content, the sender has the ability to revoke (or reauthorize) access at any time. Virtru even allows the sender to revoke access to specific recipients.
Note
Virtru can only revoke emails that were sent securely with Virtru. Any messages sent prior to having Virtru installed or messages sent unsecured after Virtru has been installed cannot be revoked.
Revoke Virtru Encrypted Content in the Virtru Dashboard
When a Virtru user sends encrypted content, they have full control over access to the message(s) and/or file(s). Even if a recipient receives encrypted content, the sender has the ability to revoke (or reauthorize) access at any time. Virtru even allows the sender to revoke access to specific recipients.
Note
Virtru can only revoke emails that were sent securely with Virtru. Any messages sent prior to having Virtru installed or messages sent unsecured after Virtru has been installed cannot be revoked.
Using Virtru’s Persistent File Protection (PFP) Security Option
Note
Please note that Persistent File Protection (PFP) Security Option is only available from the Virtru add-on to the Microsoft Outlook Desktop Application. It is not available when using Outlook on the Web (office365.fdu.edu) or the Virtru Dashboard.
In addition to encrypting messages and attachments, Virtru users have the ability to apply additional security settings to protected content. Among these settings is the option to apply “Persistent File Protection (PFP)” to an encrypted file.
PFP provides a secure file container that is portable, universally accessible, and built on top of open standards. Regardless of where files are stored, PFP allows you to select, protect, and share a file with anyone while maintaining full visibility into how it is being used and retaining the ability to revoke access at any time. Any file protected with PFP will convert into the .tdf.html file format. This ensures that the contents are only accessible in Virtru’s Secure Reader, and only authorized parties can view it.
This feature can be applied using the Virtru plugin for Microsoft Outlook on Windows Operating Systems only. It supports the following common file types:
Microsoft Office documents: .docx, .pptx, .xlsx
Common image file formats: .jpeg, .png
PDF documents
Note
Although newer Microsoft Office file types are supported, older versions (.doc, .ppt, .xls) are not compatible. Additionally, these other common file types are NOT supported: .msg, .zip, .md.
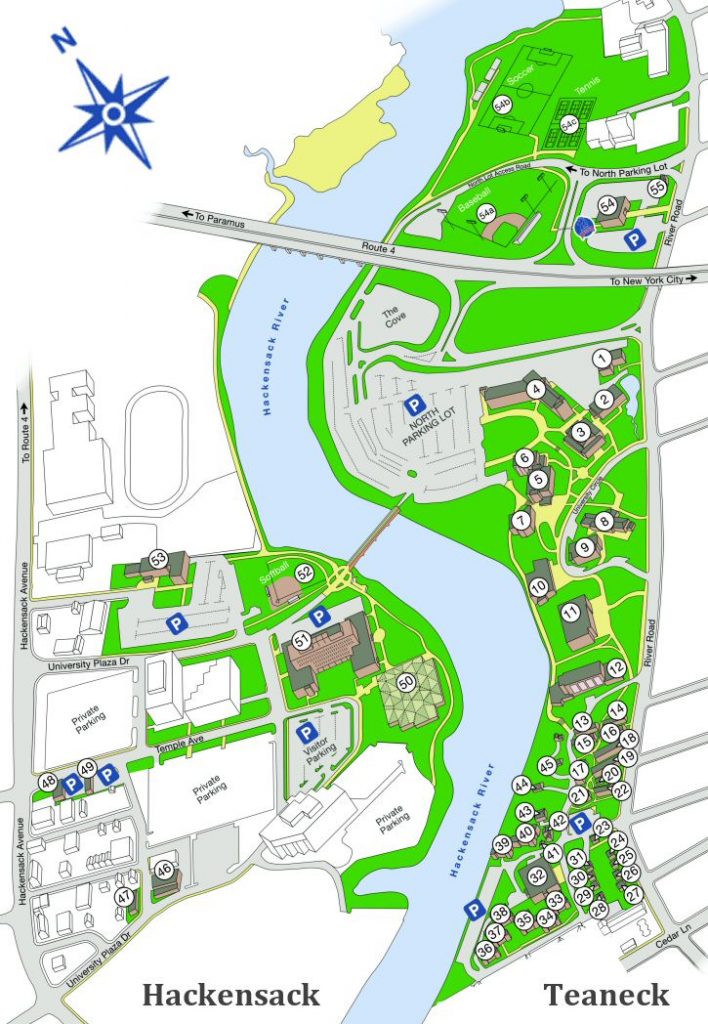
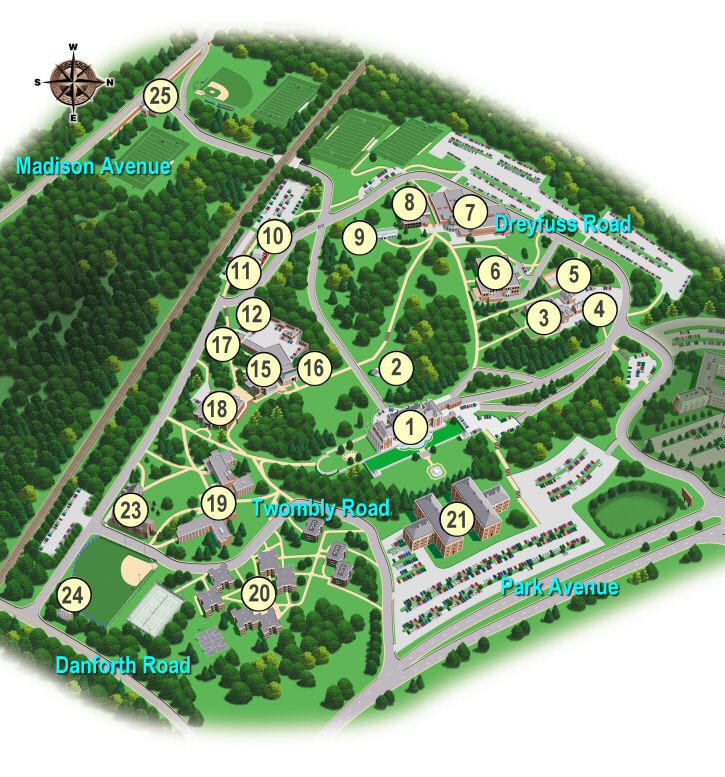
The maps below highlight the buildings at Fairleigh Dickinson University with wireless networking on the Metropolitan Campus, and College at Florham.
Metropolitan Campus
Click or Tap Image to Enlarge
1. Bancroft Hall – General Coverage 2. Williams Hall -– General Coverage 3. Fitness Center – General Coverage 4. Northpointe Residence Hall – General Coverage 5. Robison Hall – General Coverage 6. Robison Hall Annex – General Coverage 7. Muscarelle Center – General Coverage 8. Kron Administration Building – General Coverage 9. University Hall – General Coverage 10. Alumni Hall – General Coverage 11. Metropolitan Campus Library – General Coverage 12. Becton Hall – General Coverage 13. to 22. University Court Residence Halls 1 to 10 – General Coverage 23. Public Safety Office – General Coverage 24. Interfaith Chapel – General Coverage 25. International Student Services – General Coverage 26. EOF Office – General Coverage 27. 840 River Road – No Coverage 28. Housekeeping – No Coverage 29. 835 SUB Lane – General Coverage 30. 839 SUB Lane – No Coverage 31. Dean of Students – General Coverage 32. Greg Olsen Student Union – General Coverage 33. to 40. Linden Court Residence Halls – General Coverage 41. Knight Spot – General Coverage 42. Residence Life – General Coverage 43. Banta Coe House – No Coverage 44. River House – General Coverage 45. Student Counseling and Psychological Services – General Coverage 46. University Mail Services (10 Woodridge Ave) –General Coverage 47. External Building (1 Woodridge Ave) – No Coverage 48. Center for Psychological Services(131 Temple Ave) – General Coverage 49. Center for Psychological Services(139 Temple Ave) – General Coverage 50. Rothman Center – General Coverage 51. Dickinson Hall – General Coverage 52. Softball Field – No Coverage 53. Edward Williams Hall – General Coverage 54. Field House – General Coverage 54b. Naimoli Family Baseball Complex – No Coverage 54b. Soccer Field – General Coverage 54b. Tennis Courts – No Coverage 55. 1154 River Rd. – General Coverage
College at Florham
Click or Tap Image to Enlarge
1. Hennessy Hall(Mansion) – General Coverage 2. Reuter’s Rock – No Coverage 3. Science Building – General Coverage 4. East Cottage – General Coverage 5. West Cottage – General Coverage 6. Zen Building(Stadler-Zenner-Hoffmann La Roche) – General Coverage 7. Ferguson Recreation Center – General Coverage 8. Dreyfuss Building – General Coverage 9. Rothman Building(Admissions Office) – General Coverage 10. Black Box Theater – General Coverage 11. The Barn(Public Safety, Campus Facilities) – General Coverage 12. Chaine House – General Coverage 15. Monninger Center (Library) – General Coverage 16. Orangerie – General Coverage 17. Public Relations – General Coverage 18. Frank Santoloci Student Center – General Coverage 19. Twombly Residence Halls – General Coverage 20. Village Residence Halls – General Coverage 21. Park Avenue Residence Halls – General Coverage 23. Rutherford Residence Hall – General Coverage 24. Wellness Center – General Coverage 25. Gatehouse – General Coverage 25b. Baseball Field – General Coverage 25b. Soccer Field – No Coverage 25b. Football Field – General Coverage
To access Forms, you will be directed to our SAMI Support Portal where you will be asked to log in using your NETID and authenticate using Duo. Once you click “Next,” you will be forwarded to samisupport.fdu.edu in a new window or tab.



 Warning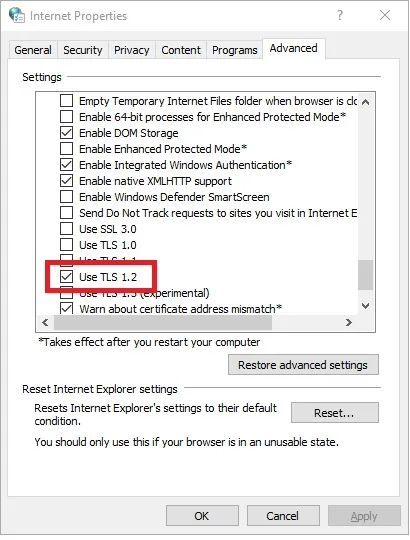
 Feedback
 Copy Link