The Computing Services department manages the University computer labs, develops and maintains the configurations of University owned laptop and desktop computers, performs maintenance and repairs on University owned software and hardware, deploys and maintains PC software site licenses, and provides general technical support for PCs at the University.
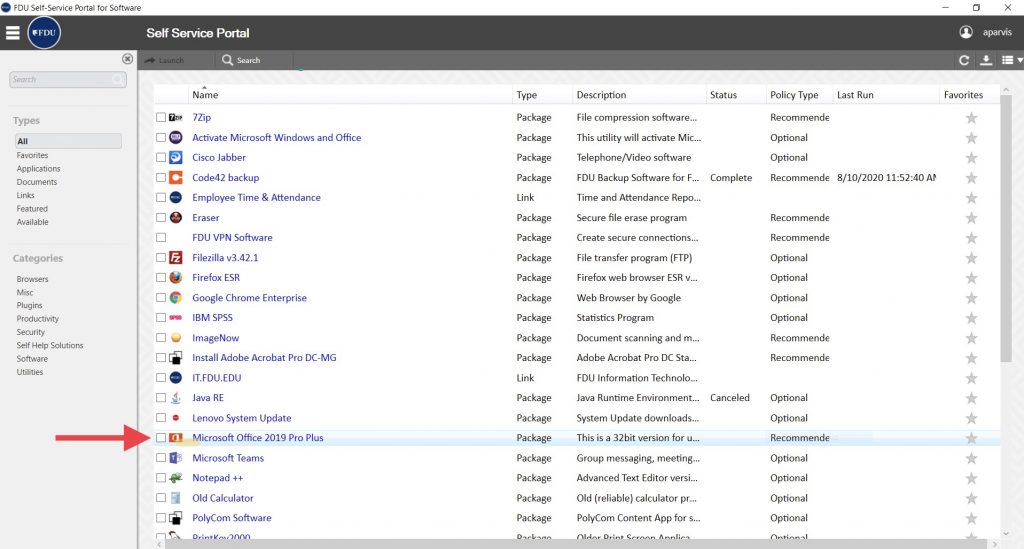
Microsoft Office 2019 Pro Plus is Fairleigh Dickinson University’s standard office productivity software suite used on all FDU-owned laptops and desktops.
Office 2019 Pro Plus is the current version installed on all university computer labs and Microsoft Office 2019 is the current version for all Apple macOS devices.
FDU Faculty and Staff in possession of a university-owned laptop or desktop who has Microsoft Office 2016 Pro Plus installed, may upgrade to the latest version of Office 2019 Pro Plus using the FDU Self Service Portal for Software. Follow the instructions below to upgrade.
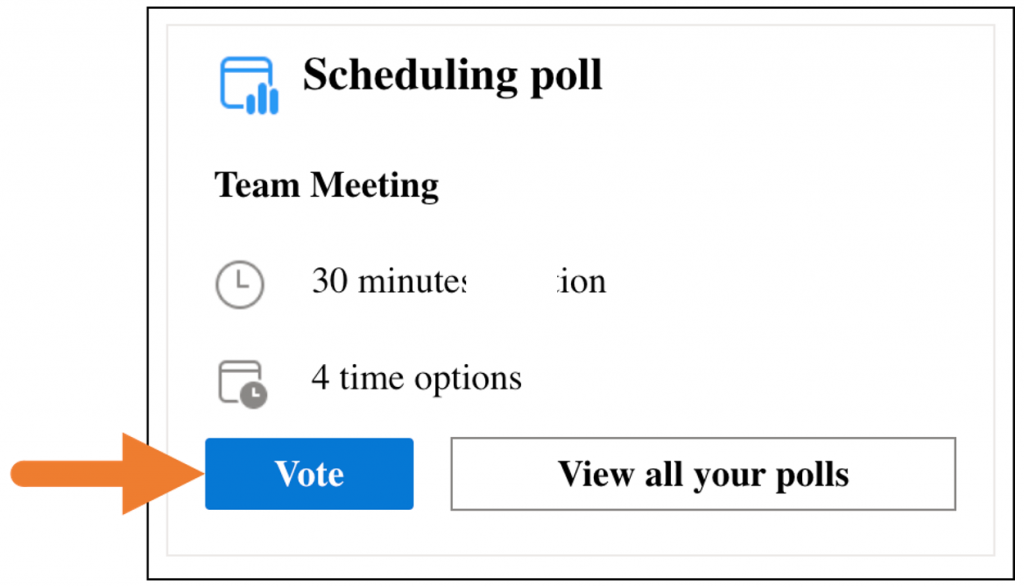
Through Microsoft Outlook’s Scheduling Poll (formerly FindTime), you can select a few possible meeting times and send attendees a link to a poll that allows them to vote for what meeting time works best for them. Once a consensus is reached, you schedule the meeting for the preferred time.
Scheduling Poll Icon
Like the Scheduling Assistant, the Scheduling Poll allows you to preview attendees’ FDU Outlook calendars (if available) so that the best possible options can be selected. This particular aspect of the feature will be less useful for attendees who…
DO NOT have FDU Outlook calendars
Have FDU Outlook calendars, but don’t keep them up-to-date
The Scheduling Poll has other convenient features, including email updates, the ability to schedule a meeting automatically, and more.
When using the Outlook web client, the Scheduling Poll feature is not available for emails composed in plain text. Emails must be composed in HTML.
Note
Doodle, a meeting scheduler add-in for Outlook, is not an approved application for use at FDU. Please use Microsoft Scheduling Poll as your meeting scheduling tool, as detailed in this article.
Where can I access the Scheduling Poll feature?
Windows
You can access the Scheduling Poll via the Mail or Calendar tabs of the Outlook desktop application.
In Mail, you can access the Scheduling Poll as follows:
Select “Reply with Scheduling Poll” on the “Home” tab when an email is open in the reading pane
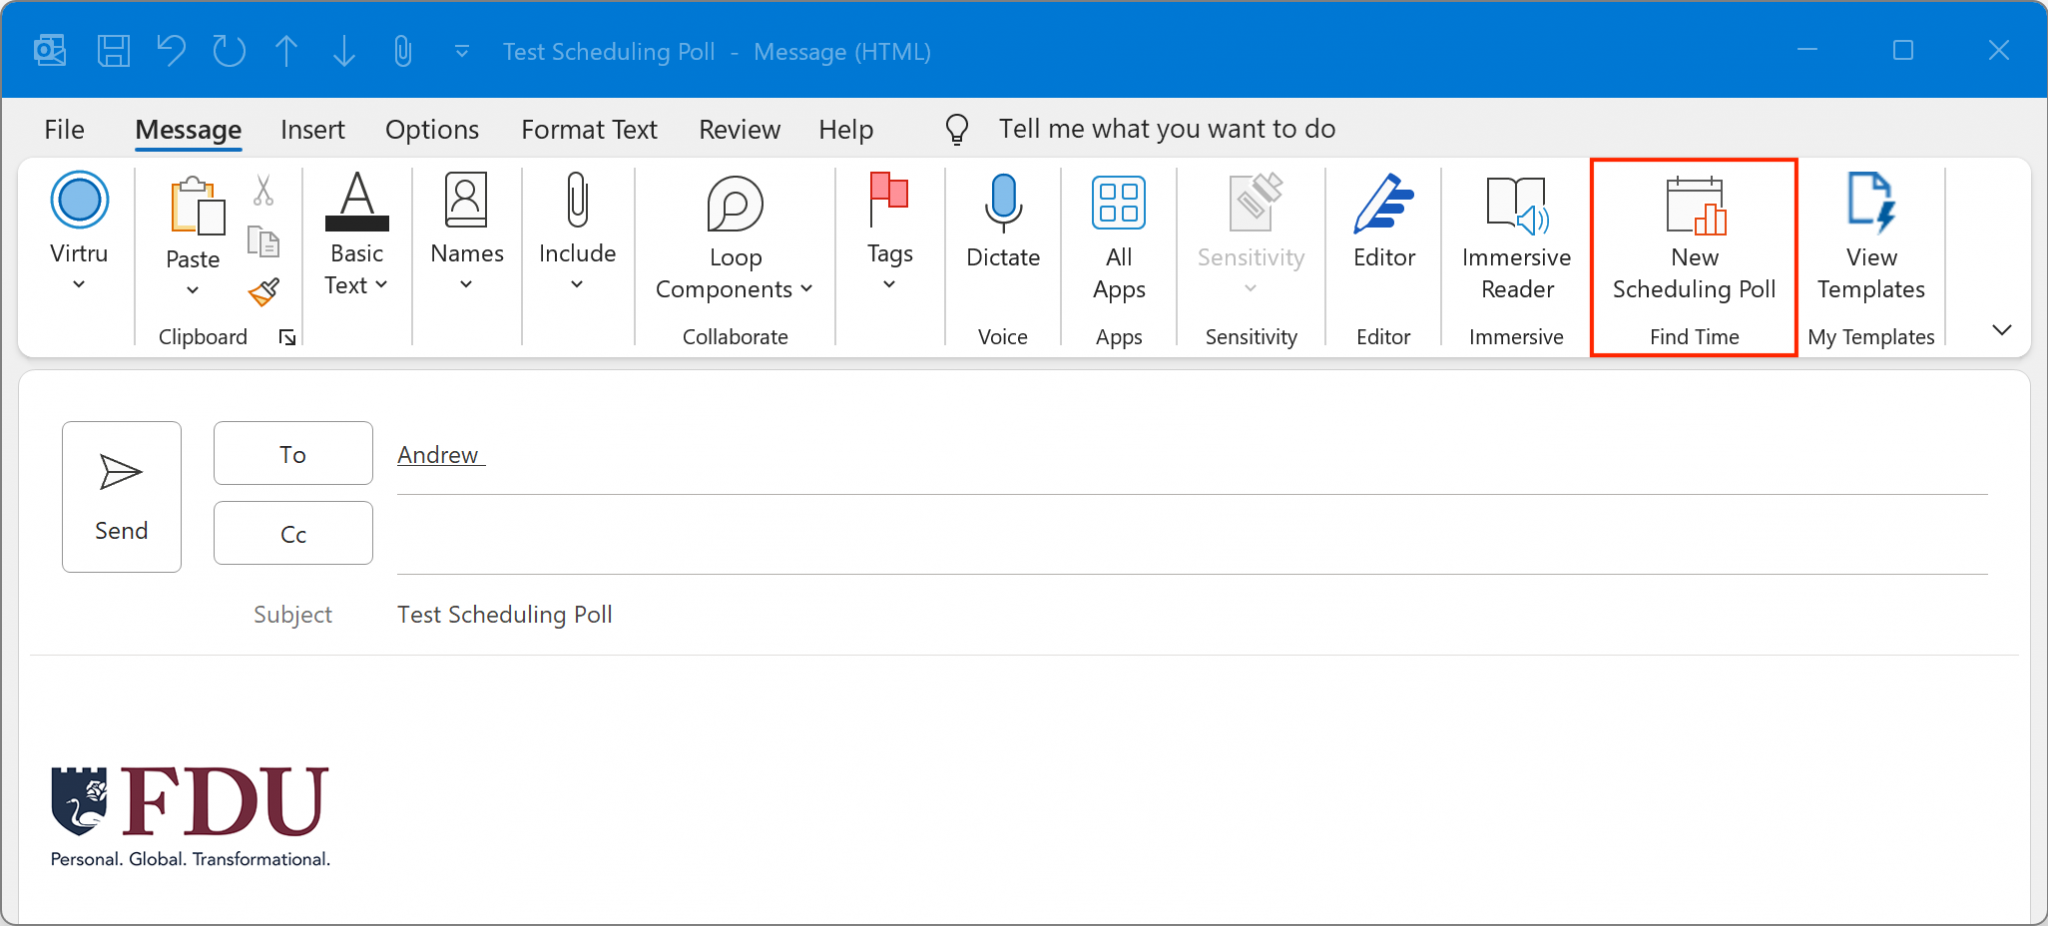
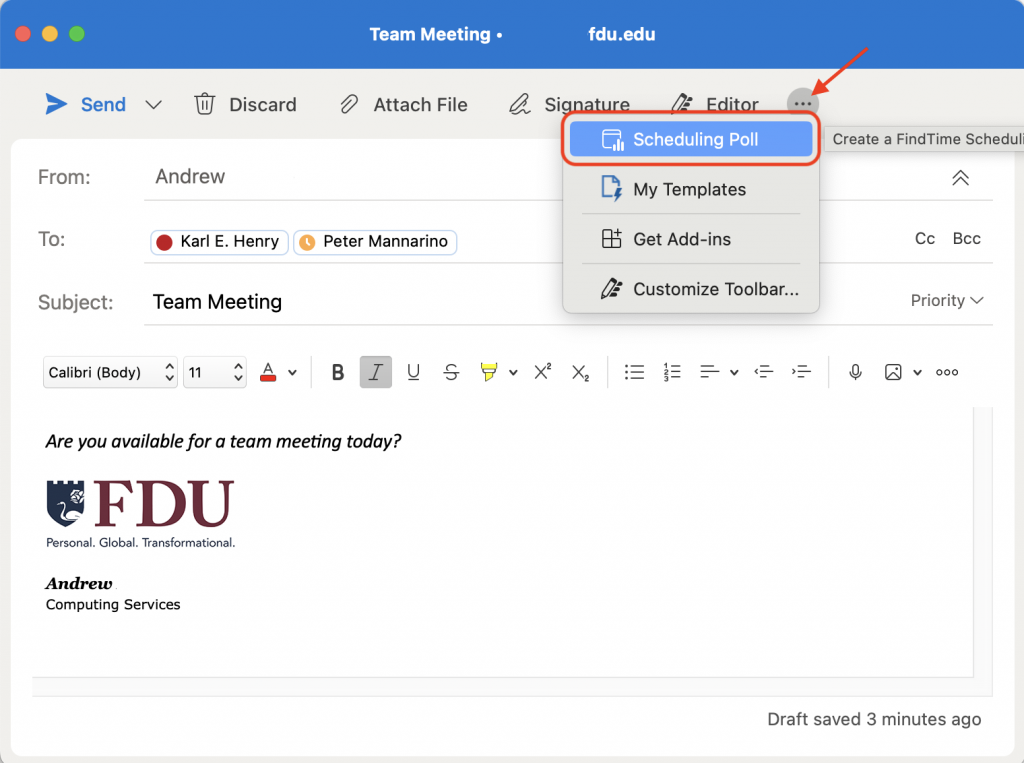
Launch the compose pane by either creating a new message or hitting reply/forward for an existing message. List required recipients in the “To” field and optional recipients in the “CC” field. Then, on the “Message” tab, select “New Scheduling Poll”
In Calendar, you can access the Scheduling Poll as follows:
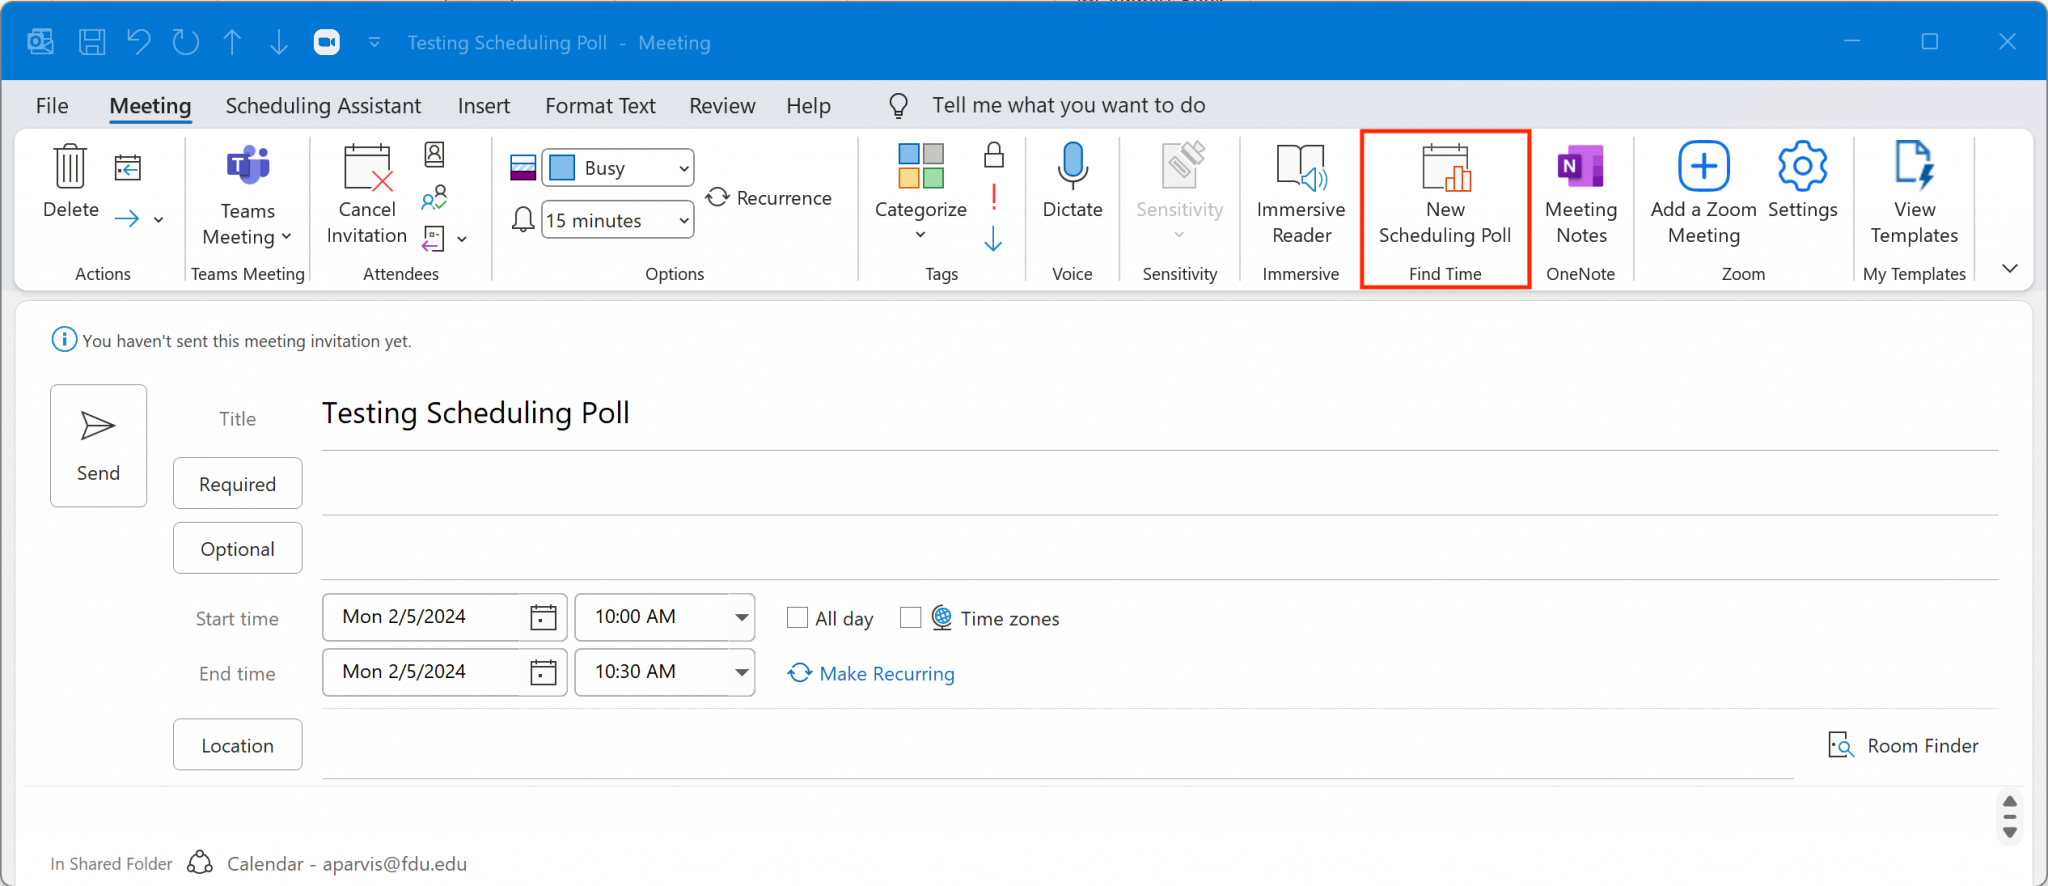
Either by launching the compose form to create a new meeting event or opening an existing event in the edit form. List required attendees in the “Required” field and optional attendees in the “Optional” field. Select “New Scheduling Poll” under the “Meeting” tab
Start a new message or event
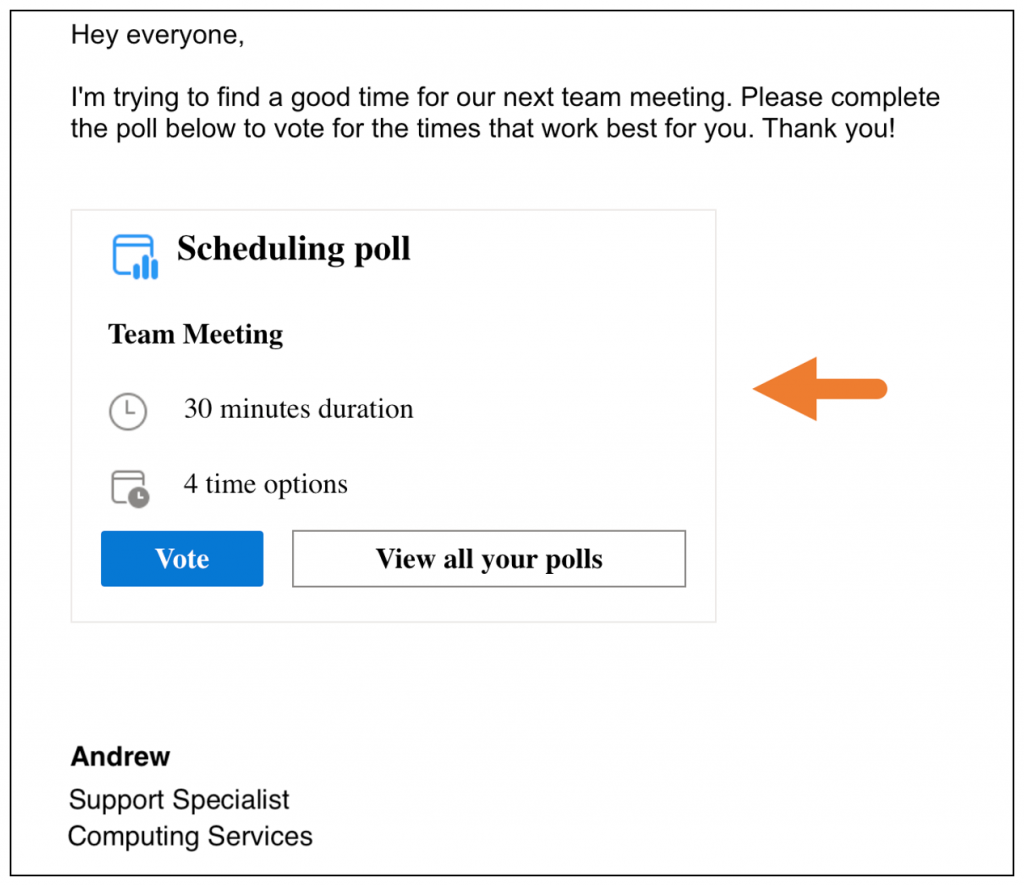
In the “Subject/Title” field, type what will eventually become the event’s name.
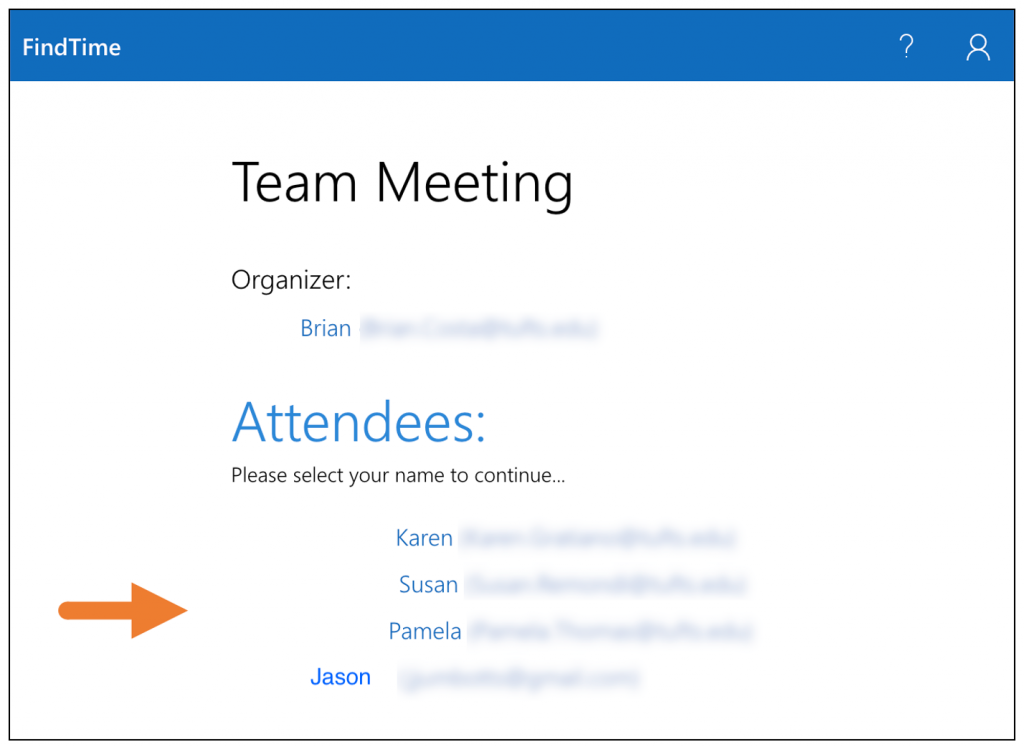
For example, “Team Meeting”
In the “To/Required” or Optional fields, add the people who will be attendees for this meeting. They do not all have to be from FDU. Scheduling Polls can be sent to and completed by non-FDU email addresses
Press into the body of the email and compose a message
Press into the area of the email body where you want the link to the Scheduling Poll to show up
Select the “Scheduling Poll” tab
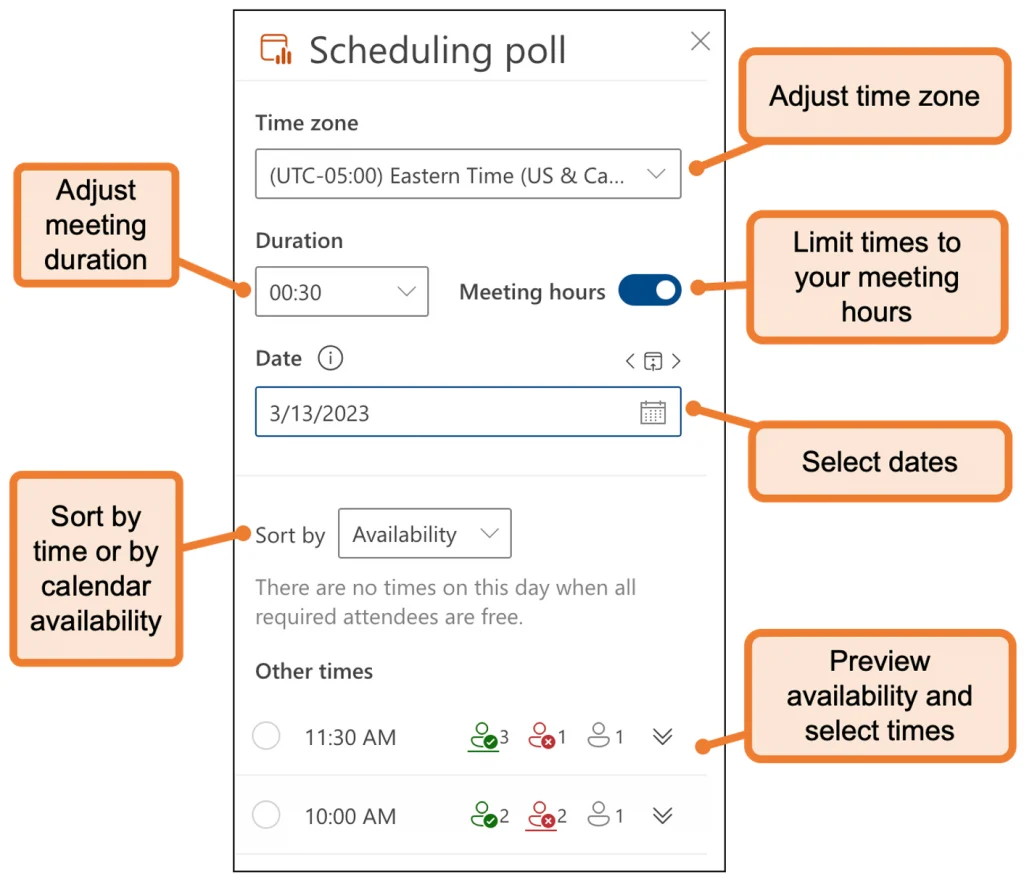
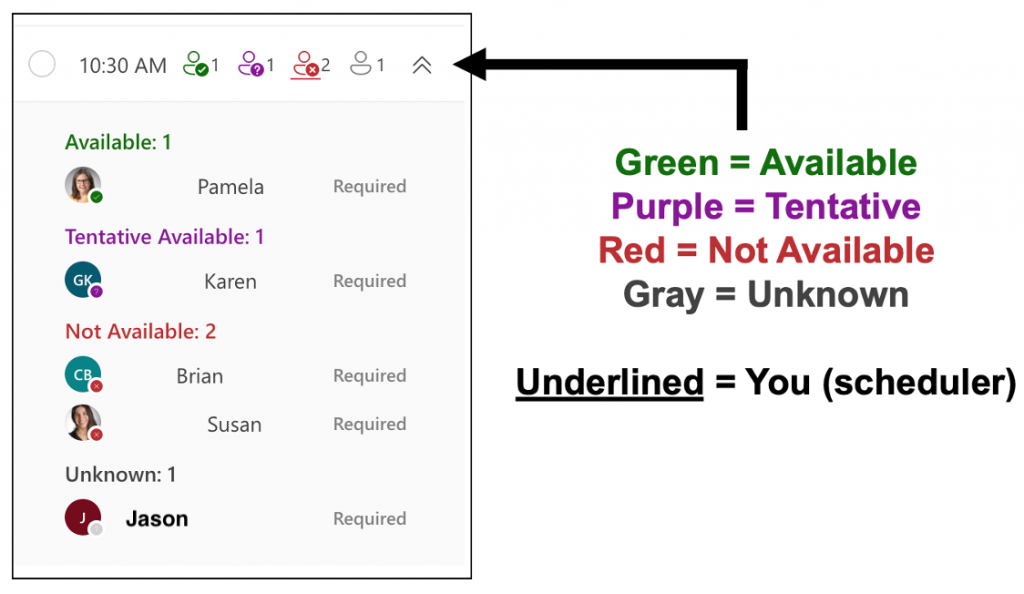
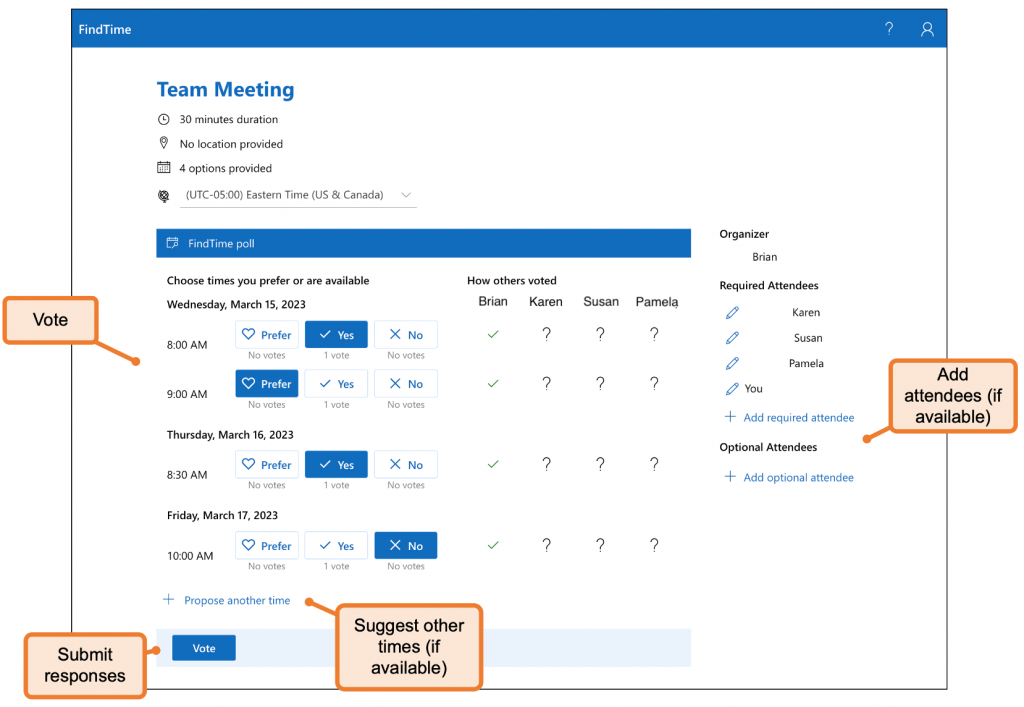
A Scheduling Poll panel will open. From here, you can adjust your meeting duration, move between dates, and preview the availability of your attendees
Note
When selecting times for your poll, you can preview attendees’ FDU Outlook calendars, if available.
Select times that work for as many attendees as possible, paying particular attention to the attendees whose attendance is most critical
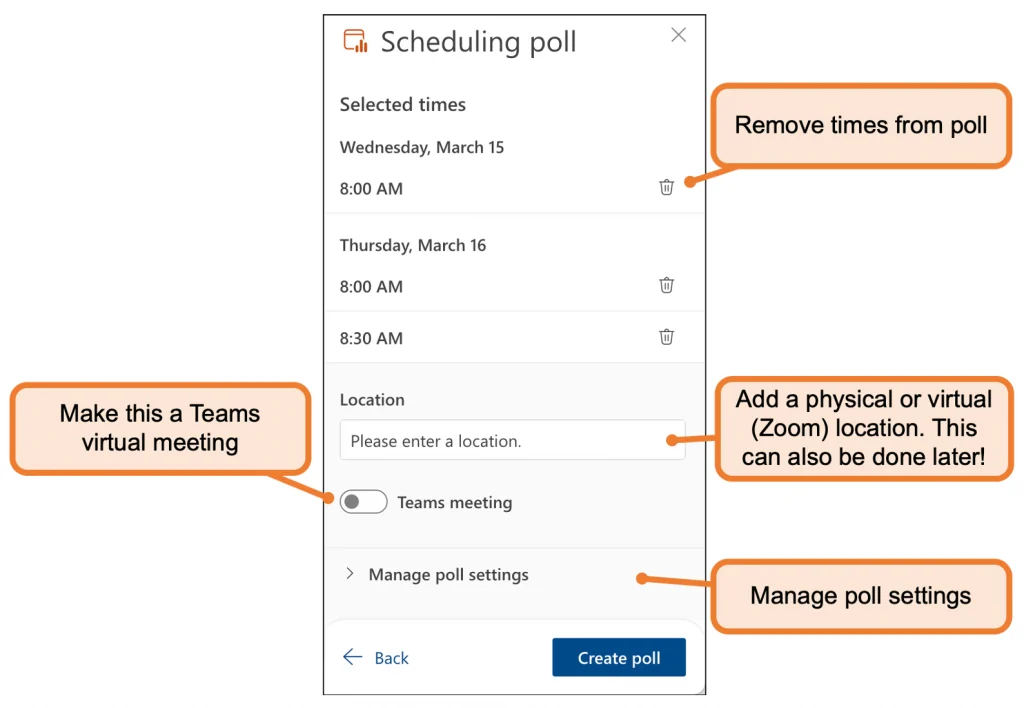
Press “Next” to proceed to the next step
A new panel will open with the ability to delete selected times or adjust the meeting location
Note
You can also turn the Teams meeting feature on if you want Outlook to automatically schedule a Teams virtual meeting for this event.
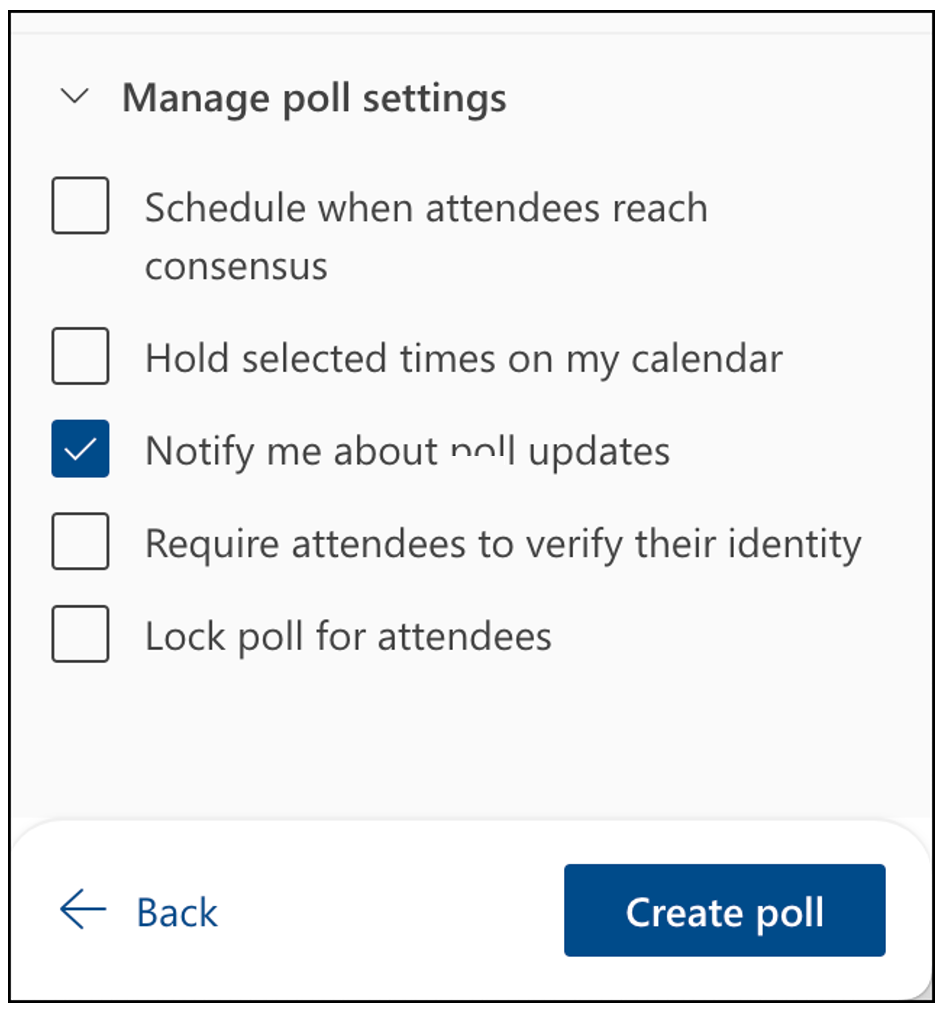
Press “Manage Poll Settings” to expand the menu. Options include:
Schedule when attendees reach consensus – Automatically schedules a meeting and sends out an invite to attendees if everyone agrees on a particular time. If multiple times work, the earliest one will be selected.
Hold selected times on my calendar – Puts a temporary hold on the scheduler’s calendar for each of the selected times. These holds are removed when the final invite is sent out.
Notify me about poll updates – Outlook will send an email update to the scheduler whenever an attendee submits their poll response.
Require attendees to verify their identity – Forces respondents to verify their identity either by logging in to their Outlook account or entering a numerical code that Microsoft sends them.
Lock poll for attendees – Prevents attendees from adding more people to the meeting or suggesting new meeting times.
When you’re ready, press “Create Poll”
A Scheduling Poll meeting link will be inserted into your email
close
macOS
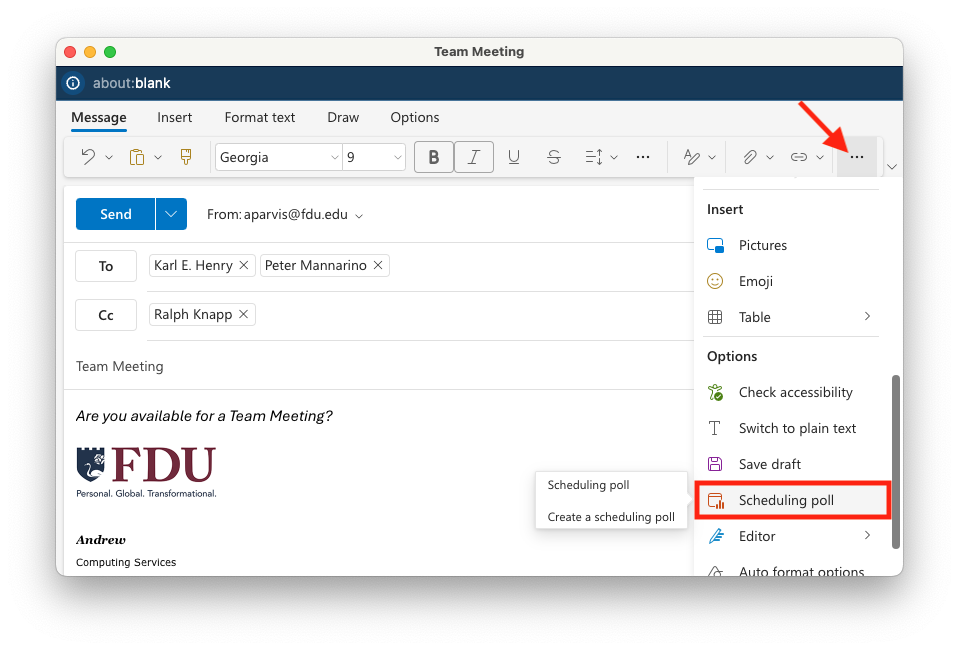
You can access “Scheduling Poll” via the Mail tab on the Outlook desktop application.
Open the Outlook desktop application on your Mac
Start a new email message
In the “Subject” field, type what will eventually become the name of the event. For example: “Team Meeting”
In the “To” field, add the people who will be attendees for this meeting. They do not all have to be from FDU (Scheduling Polls can be sent to and completed by non-FDU email addresses)
Press into the body of the email and compose a message
Press into the area of the email body where you want the link to the Scheduling Poll to show up
Press on the “More Options” button and select “Scheduling Poll”
A “Scheduling Poll” panel will open. From here, you can adjust your meeting duration, move between dates, and preview your attendees’ availability
Note
When selecting times for your poll, you can preview attendees’ FDU Outlook calendars, if available.
Select times that work for as many attendees as possible, paying particular attention to the attendees whose attendance is most critical
Click “Next” to proceed to the next step
A new panel will open with the ability to delete selected times or adjust the meeting location
Note
You can also turn the Teams meeting feature on if you want Outlook to automatically schedule a Teams virtual meeting for this event.
Press on “Manage Poll Settings” to expand the menu
When you’re ready, press “Create Poll”
A Scheduling Poll meeting link will be inserted into your email
close
Outlook on Web
You can access the “Scheduling Poll” feature via the Mail or Calendar web apps.
In the “Subject” field, type what will eventually become the name of the event. For example, “Team Meeting”
In the “To” field, add the people who will be attendees for this meeting. They do not all have to be from Fairleigh Dickinson University (Scheduling Polls can be sent to and completed by non-FDU email addresses)
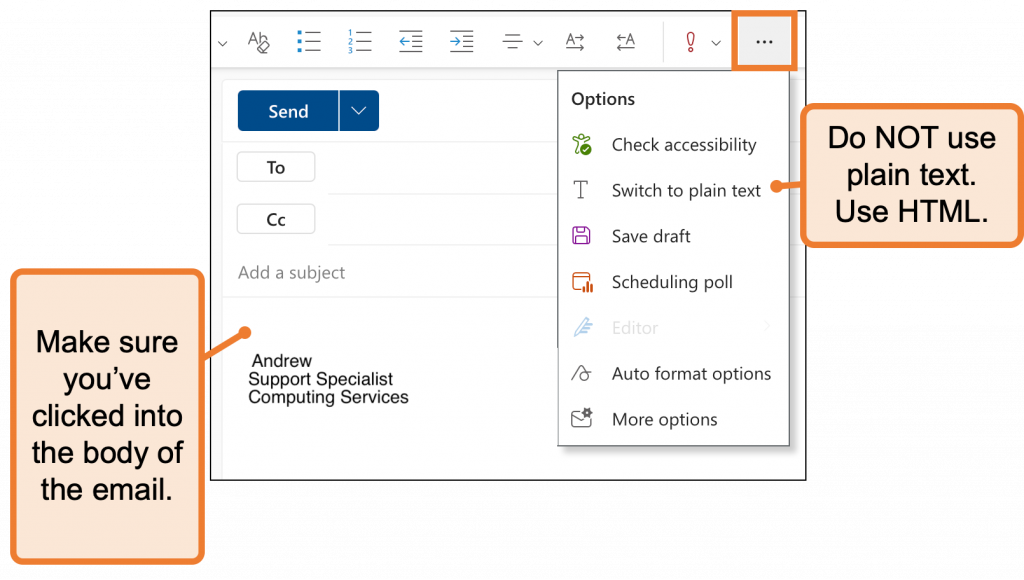
Press into the body of the email and compose a message
Press into the area of the email body where you want the link to the Scheduling Poll to show up
Press on the “More Options” button and select “Scheduling Poll”
Note
If the “Scheduling Poll” option is grayed out, make sure you have clicked into the body of the email and that your email is being composed in HTML and not plain text.
A “Scheduling Poll” panel will open. From here, you can adjust your meeting duration, move between dates, and preview your attendees’ availability
Note
When selecting times for your poll, you can preview attendees’ FDU Outlook calendars, if available.
Select times that work for as many attendees as possible, paying particular attention to the attendees whose attendance is most critical
Press “Next” to proceed to the next step
A new panel will open with the ability to delete selected times or adjust the meeting location
Note
You can also turn the Teams meeting feature on if you want Outlook to automatically schedule a Teams virtual meeting for this event.
Press on “Manage Poll Settings” to expand the menu
Schedule when attendees reach consensus – Automatically schedules a meeting and sends out an invite to attendees if everyone agrees on a particular time. If multiple times work, the earliest one will be selected.
Hold selected times on my calendar – Puts a temporary hold on the scheduler’s calendar for each of the selected times. These holds are removed when the final invite is sent out.
Notify me about poll updates – Outlook will send an email update to the scheduler whenever an attendee submits their poll response.
Require attendees to verify their identity – Forces respondents to verify their identity either by logging in to their Outlook account or entering a numerical code that Microsoft sends them.
Lock poll for attendees – Prevents attendees from adding more people to the meeting or suggesting new meeting times.
When you’re ready, press “Create Poll”
A Scheduling Poll meeting link will be inserted into your email
close
How do I finalize, vote, and manage a Scheduling Poll?
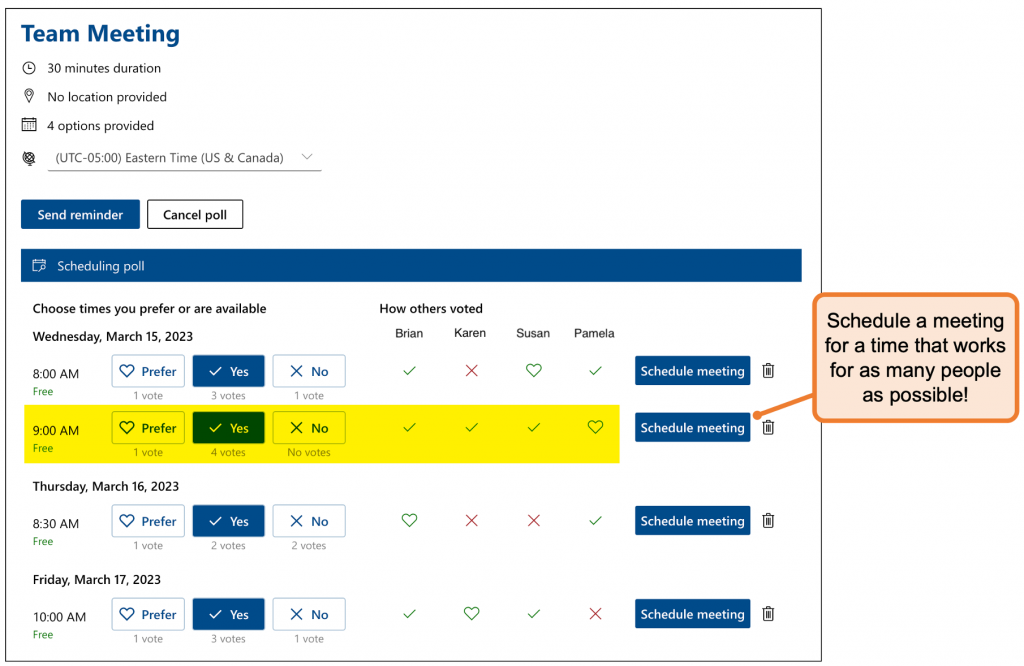
Sending a finalized Meeting Invite
This section describes how to manually send an invite from scheduling poll results. When setting up your poll, you can also have Outlook automatically send an invite if/when your attendees reach a consensus.
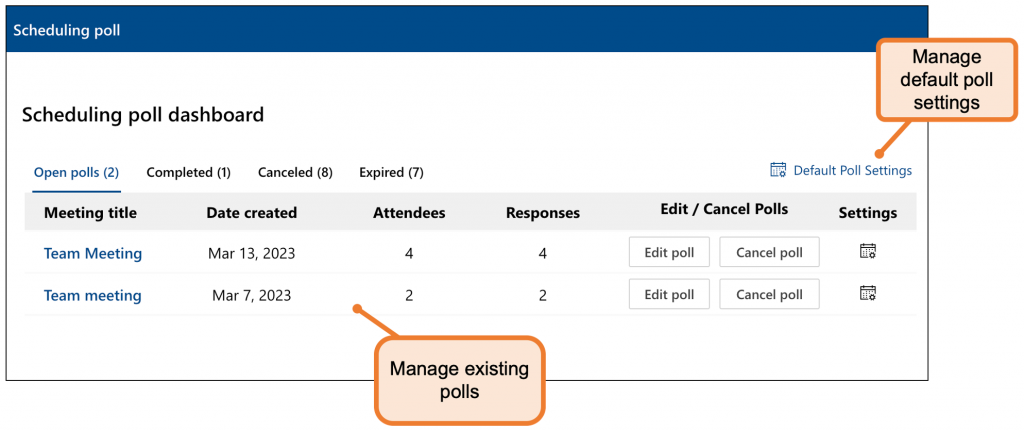
Visit the Scheduling Poll Dashboard on the Web and enter your FDU NetID credentials
Microsoft Teams is a unified communication and collaboration platform that combines persistent workplace chat, video meetings, file storage, and application integration. Here you will find documentation on how to install and use Teams and all of its features.
The page will automatically detect your operating system and redirect you to the appropriate desktop client (e.g. Windows, macOS) or mobile client (e.g. Android, Apple iOS).
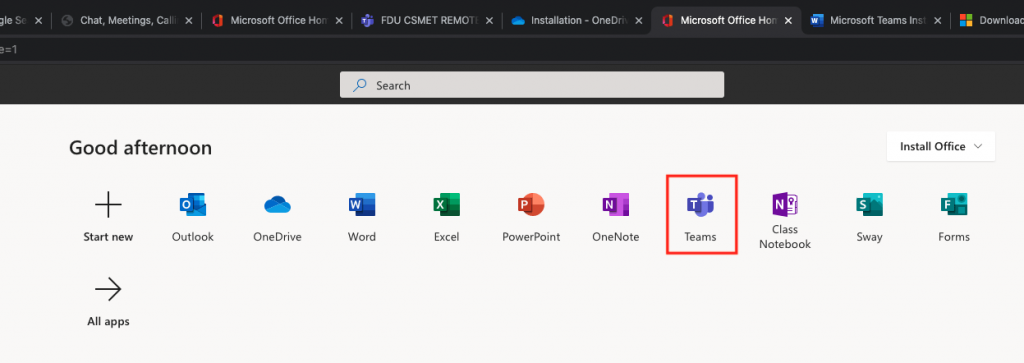
The Microsoft Teams application is automatically pushed to most university owned computers. To determine if you already have it installed, search for “Teams” using the Windows Search Bar or Spotlight Search on Apple devices. If you are working on a university computer and you cannot locate the Microsoft Teams application, you can install by following the instructions below.
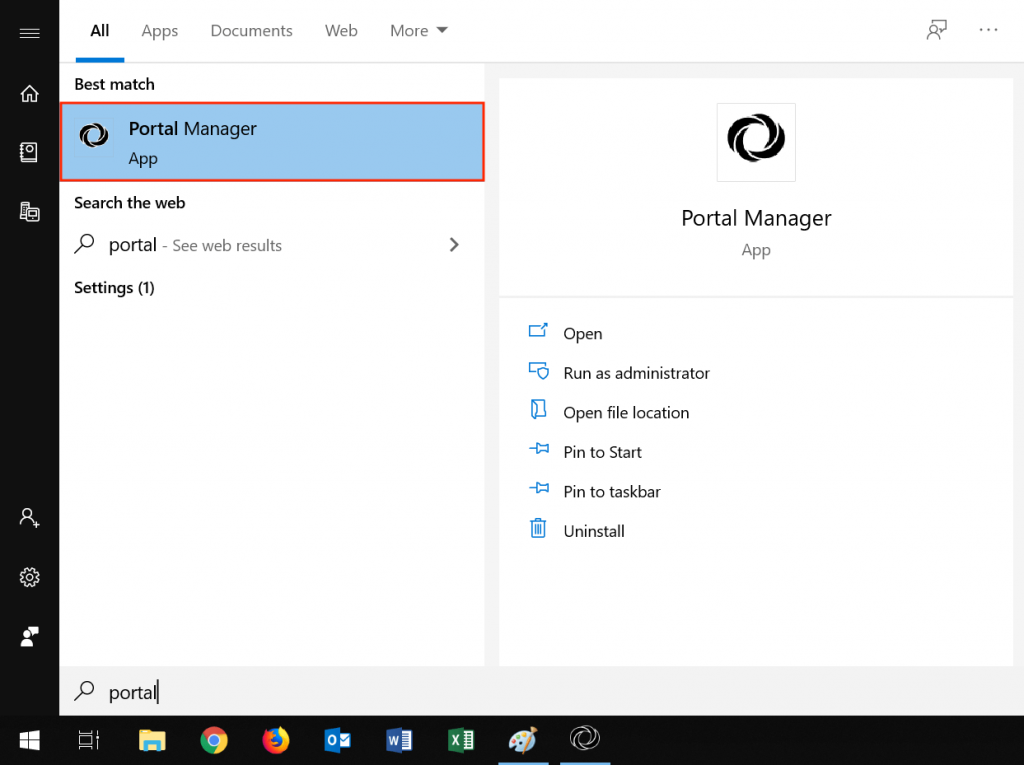
Windows – Portal Manager
Press the Windows key on your keyboard and type Portal Manager
Launch Portal Manager from the search results list
Select Microsoft Teams from the list and click Install
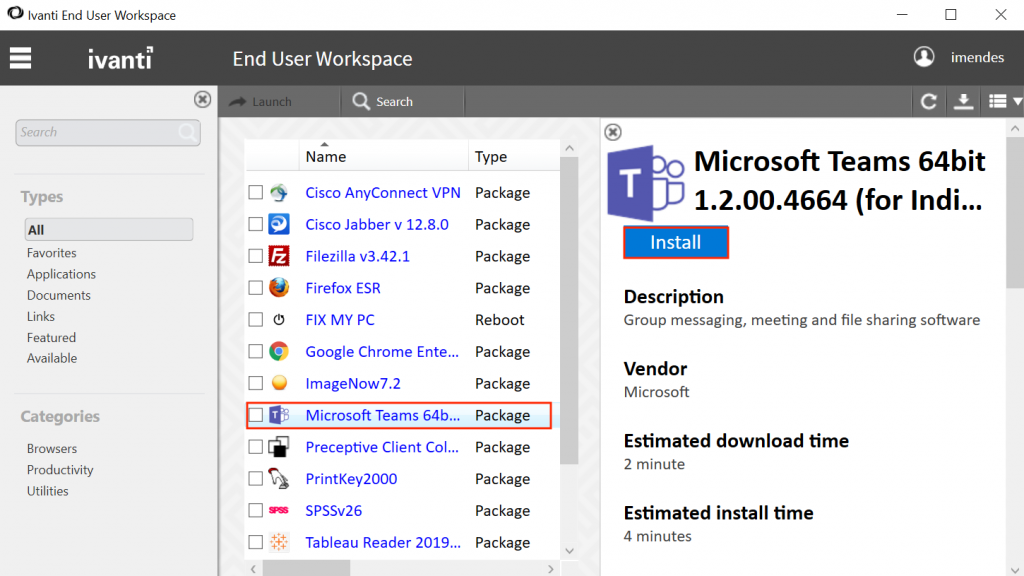
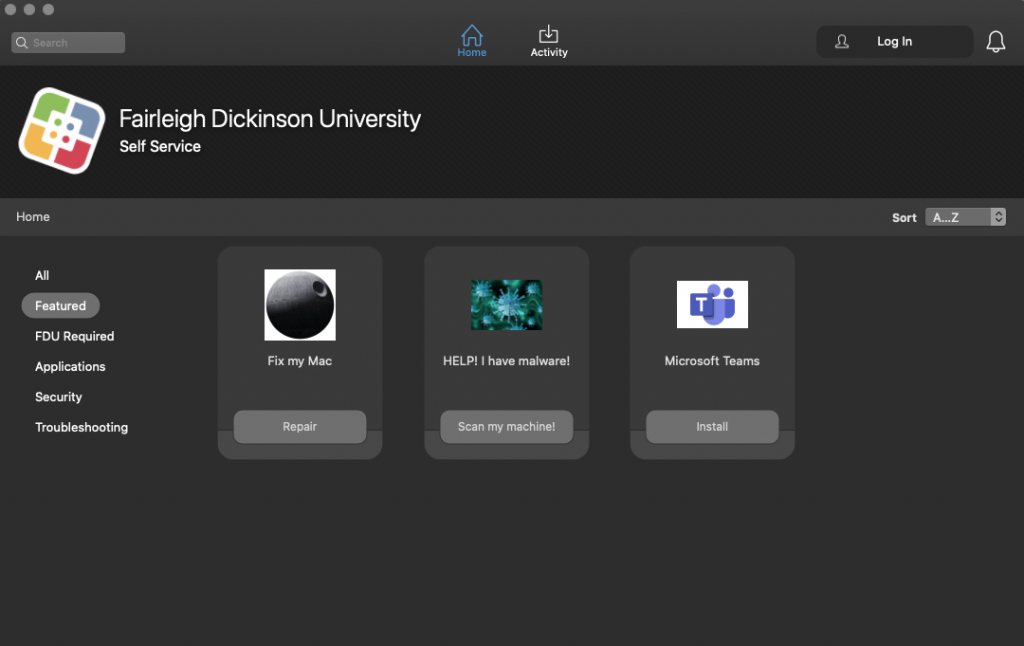
Mac – FDU Self Help
Press cmd+space on your keyboard and type FDU Self Service
Launch FDU Self Service from the spotlight search results
Locate and double click on Microsoft Teams. If Teams is already installed, it will not show up on the list
Web – Access the Office Web Application
The web client is a full, functional client that can be used from a variety of browsers including Google Chrome, Edge Browser, and Mozilla Firefox. Microsoft Teams will also be available on Safari soon.
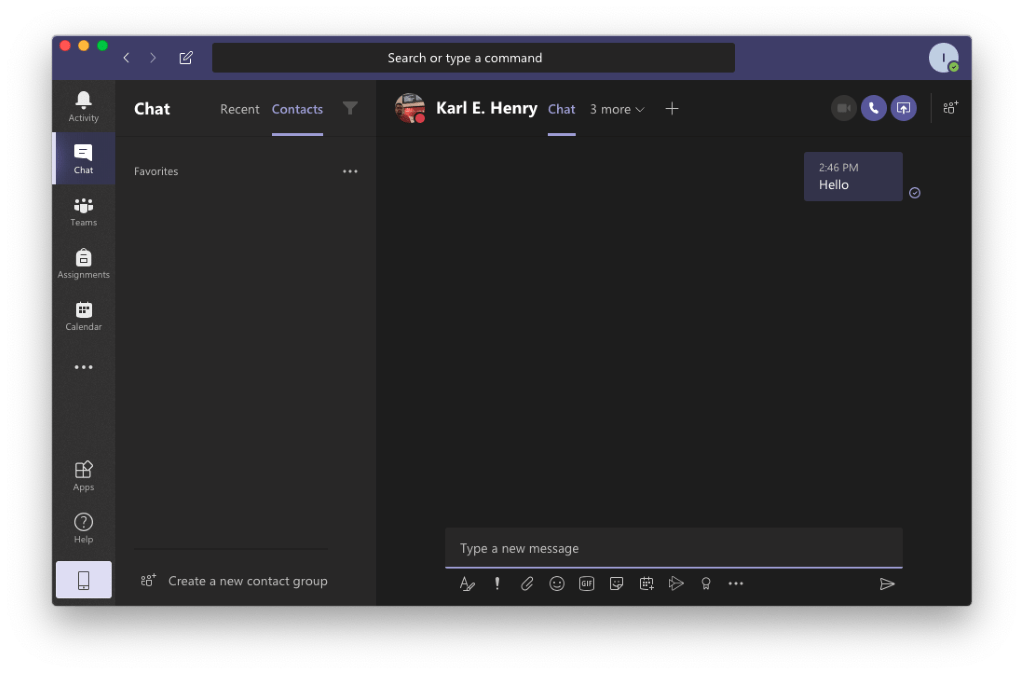
Teams allows for text-based conversations using the Chat feature. Although it does not replace email in all use cases, it is a great tool for asking quick questions or just saying hello. When using chat, please be mindful and adhere to FDU’s Written Information Security Program.
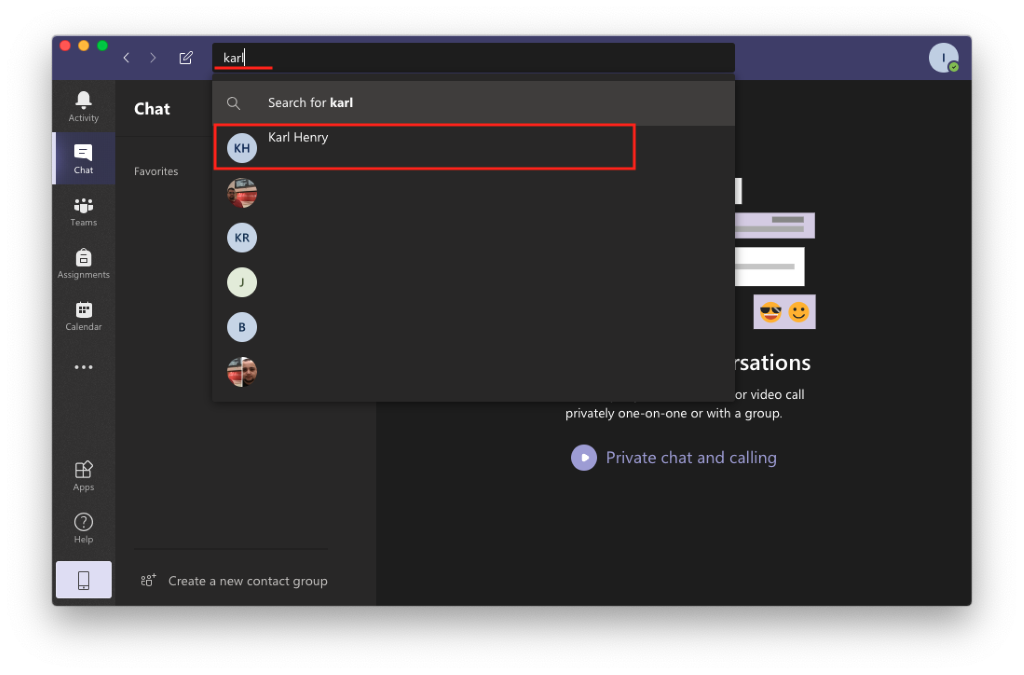
Select Chat from the left menu and then click on the top search bar
Type the name of the person you are attempting to locate and click on their name. Only FDU faculty, staff, and students are accessible in Microsoft Teams
You will be brought to the chat window and can start your conversation
The Chat window has many convenient tabs and shortcuts aimed at improving collaboration. Near the top of the screen, next to the name of the contact that you are chatting with, you will notice the default tabs, followed by a plus sign.
Tabs
The Chat tab contains the conversation
The Files tab contains all files shared in during the conversation
In two person conversations, the Organization tab shows your contact’s organization chart. This information is pulled from Office 365. Datatel remains the authoritative source for this information and the data contained here is not intended to be 100% accurate
In two person conversations, the Activity tab will list the latest activity of your contact
You can use the + sign to create a new tab from a file or an app. This can be a quick and convenient way to access a collaborative file that was previously shared in the conversation
To the right of these tabs are a series of shortcut icons which perform the following functions.
Shortcuts
a. The Video call icon starts a new video call b. The Audio call icon starts a new voice call c. The Screen sharing icon allows you to share your desktop or an application d. The Add people icon is used to invite additional people to the chat e. The Pop out chat icon creates a separate window with your chat
The Chat function allows you to have conversations with one person or groups of people. The pane on the left-hand side of the screen is split into Recent and Contacts. Contacts acts like a rolodex that allows you to store and sort a list of the people you contact most frequently. The Recent list will display your most recent conversations with single people or group messages.
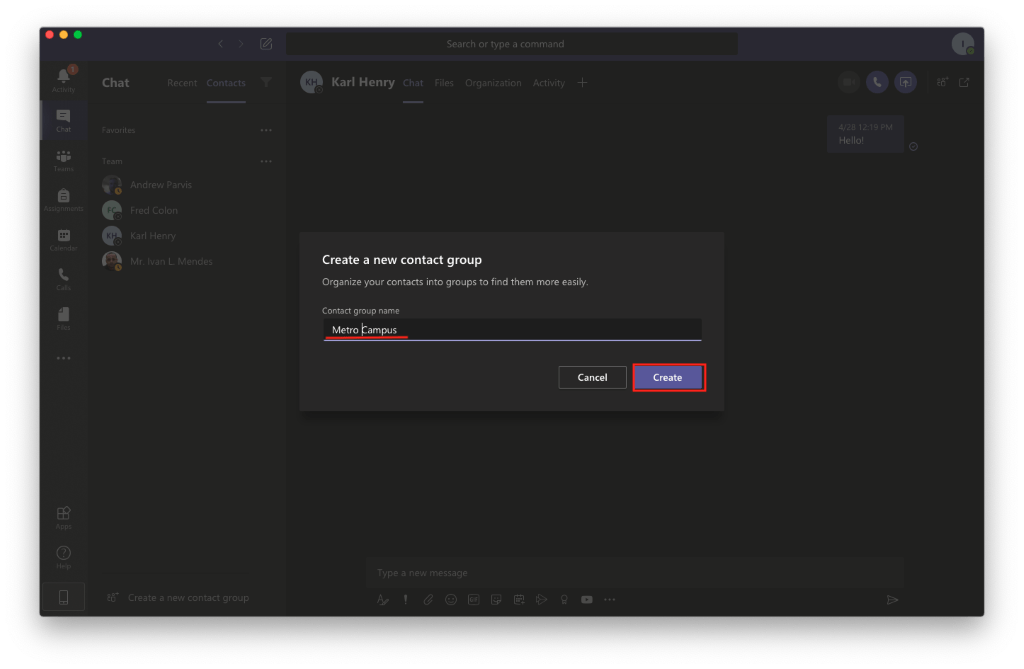
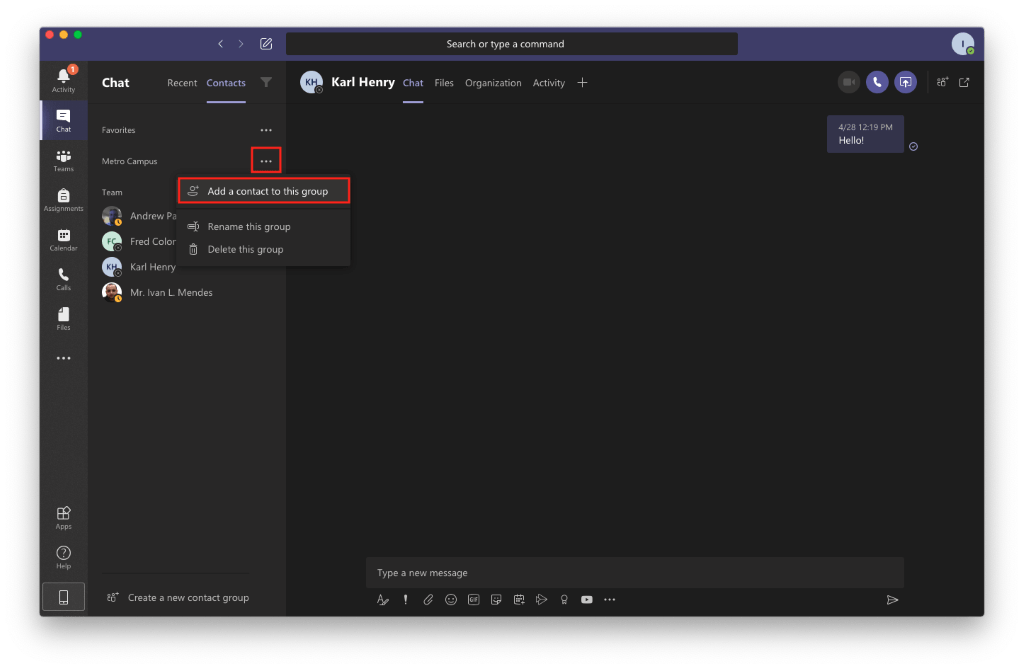
By default, the Contacts tab will already have a “Favorites” group. However, creating new groups can be a helpful way to organize your contacts. For example, you may wish to create a group for people that you are working with on a project or for people that you interact with from a department.
To create a new contact group, click “Create a new contact group” on the bottom of the pane
Enter a name for your group, and click “Create“
To add contacts to a group, click the “More options” icon (3 dots) next to the group name and select “Add a contact to this group” from the drop-down menu
Begin typing the name of your contact. Once you see their name appear, select it and select “Add“
You can add the same contact to as many groups as you would like. The chat with your contact will remain the same regardless of which group you are accessing the conversation from.
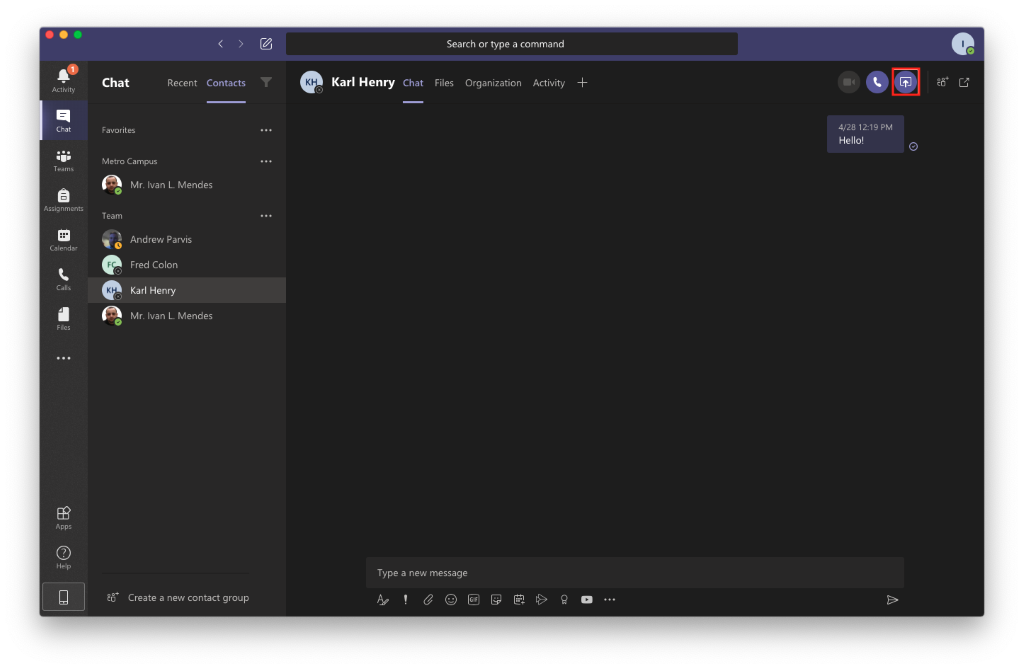
Screen sharing is one of Microsoft Teams’ most powerful collaborative features. You can show your screen to your colleagues and even grant them control to edit Microsoft Office files with you in real time.
Before you get started, make sure that you are using the installed version of Microsoft Teams, as the browser based OWA version does not support this functionality.
From the chat window or from an ongoing call, click on the “Screen sharing / Share” icon
You be given a choice to either share your desktop or an application from the Microsoft Office suite, click on the window you want to share
Once you select the screen you wish to share, the members of your chat or call will be able to view your screen and request access to remotely control your desktop or program.
You can only share your screen with a mobile device user if you are engaged in an active voice or video call with them.
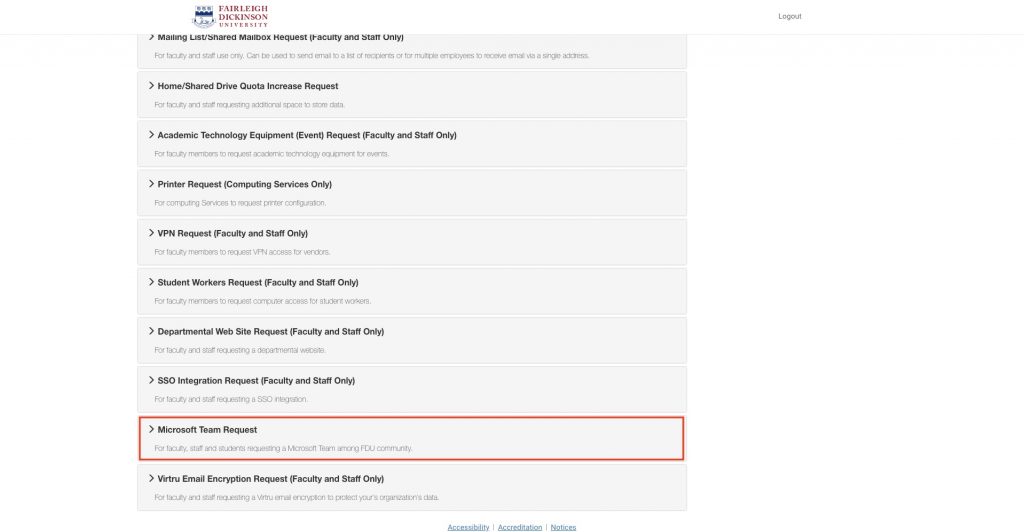
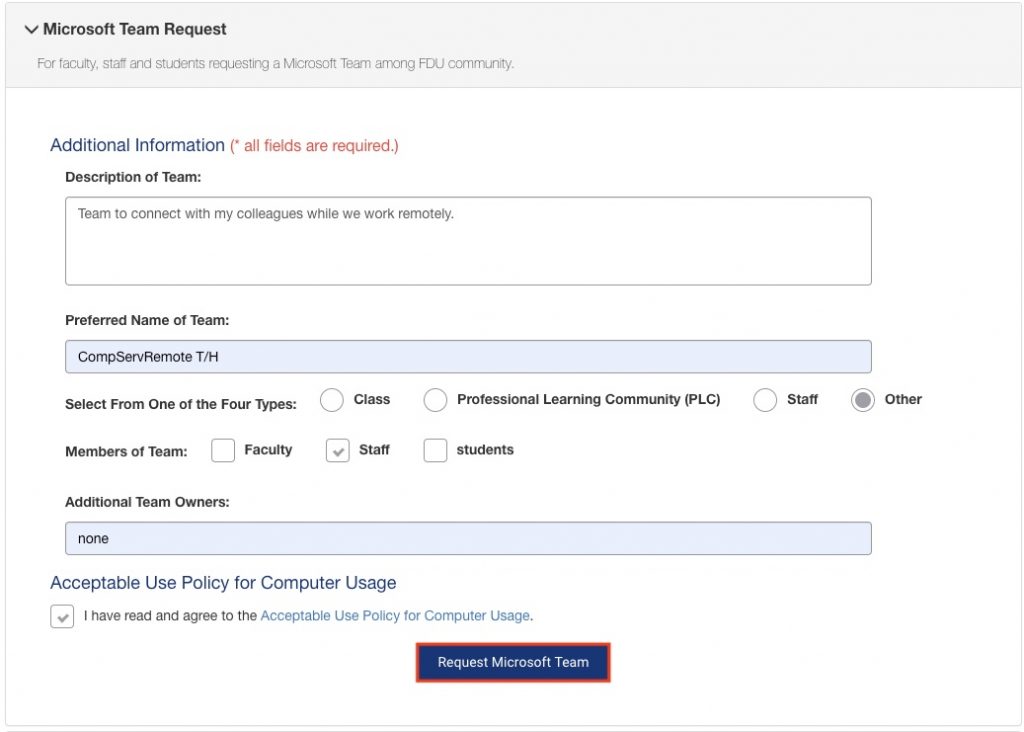
Creating a team provides remote team members with the ability to work together and share information via a common online space. You can also organize your information by creating channels to help optimize your team’s workflow.
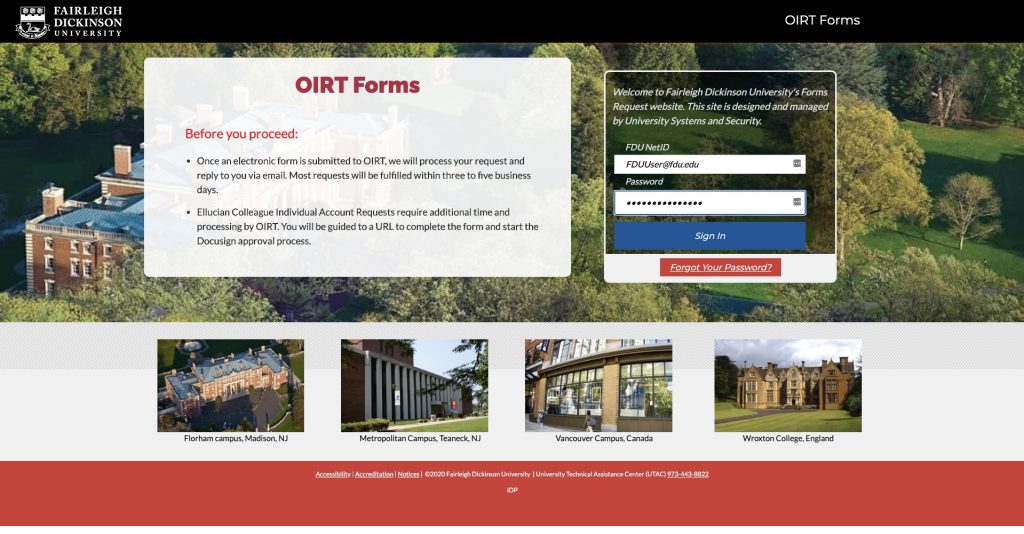
Navigate to the forms website and log in using you FDU NetID account information
Scroll down to Microsoft Team Request and click on it to expand the information
Fill out all the fields and click on the “Request Microsoft Team” button
Note
You can specify additional team owners. Owners will have rights to invite and make other changes to the team after its creation.
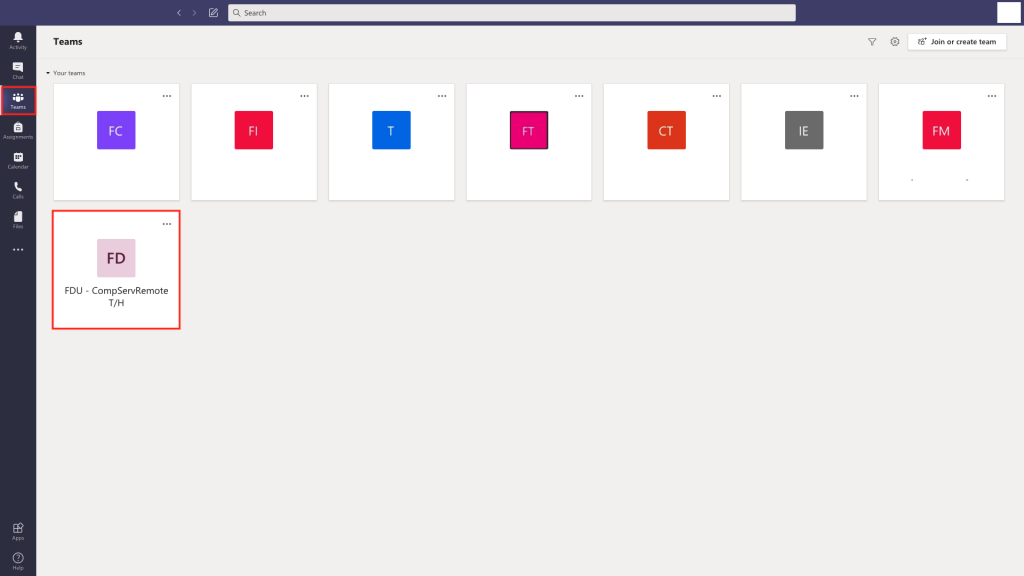
You should now see a screen informing you that your form was successfully submitted. Please allow 3 to 5 business days for the Team to be created
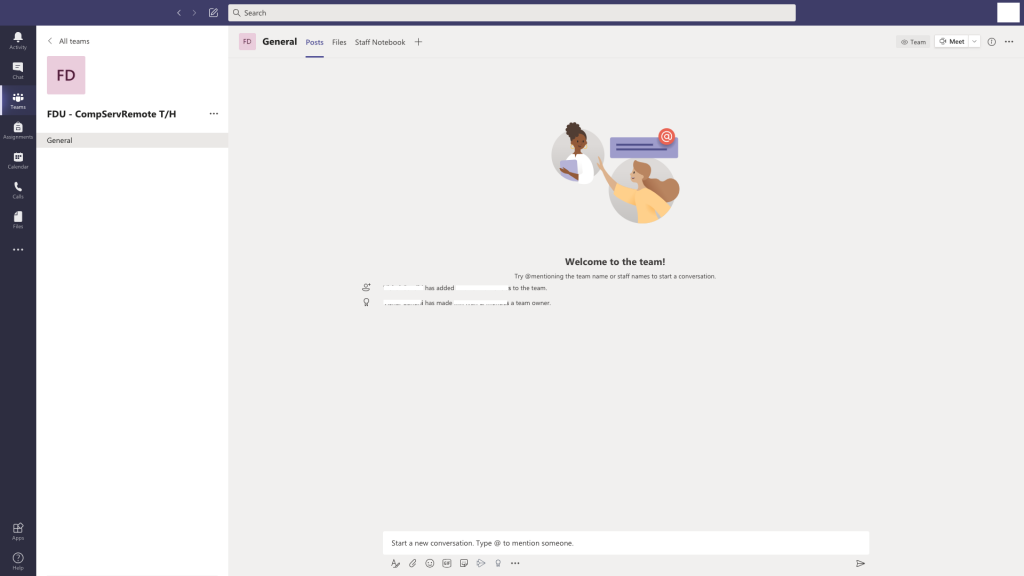
You will receive an email once the team is created. The next time you log in to Teams you will see your team listed in the Teams section
Click on your team to open the general channel. From here you can create channels, add users, and customize your team. Any team members that you add will receive an email notifying them that they were added to your team. The next time that they log in or open Teams, they will find the team listed in their Teams section
Channels are dedicated sections within a team. You can keep conversations organized by specific topics, projects, disciplines, or whatever works for your team! Channels are where conversations happen and where the work gets done. There can be public channels which are open to all team members or, if you require a more select audience, private channels can be open to a subset of your team.
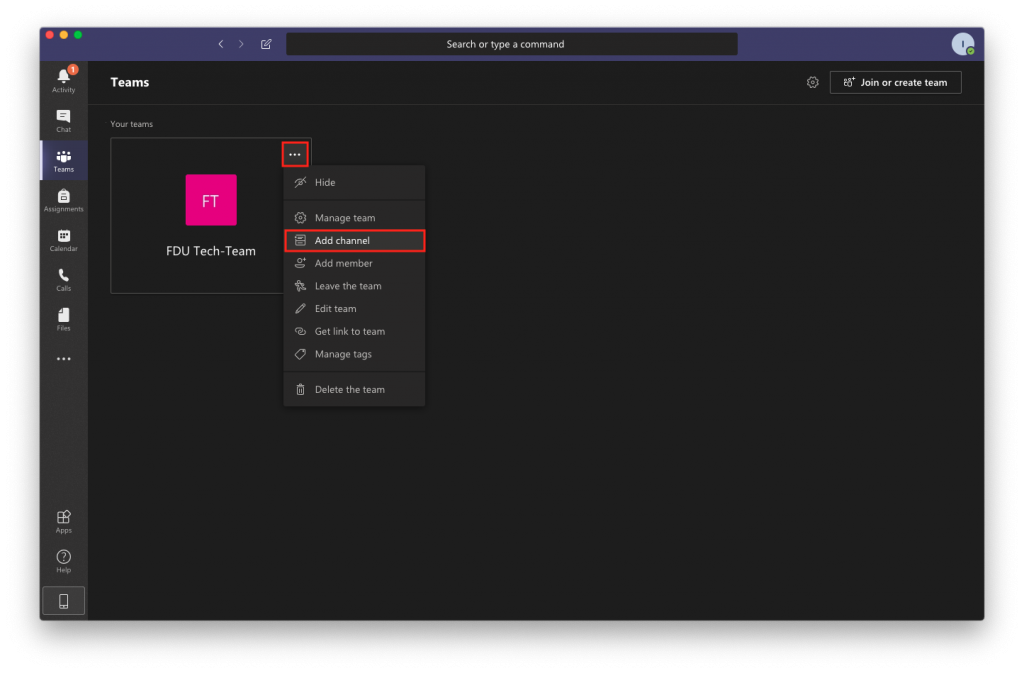
Select Teams from the menu on the left-hand side of the screen. If you have multiple teams, select your team of choice
Click on the “More options” icon (3 dots) next to the team name and select “Add channel“
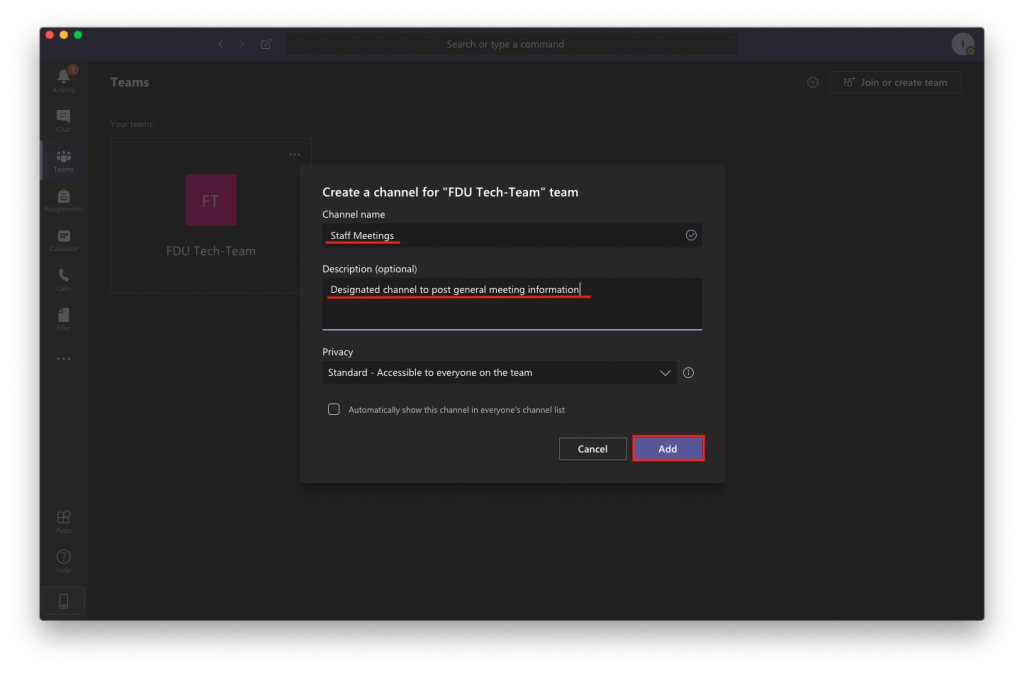
Give the channel a name. Optionally, you can write in a brief description as well
Select your channel’s preferred level of privacy and click “Add“
Standard channels are open for anyone to join.
Private channels are invitation only.
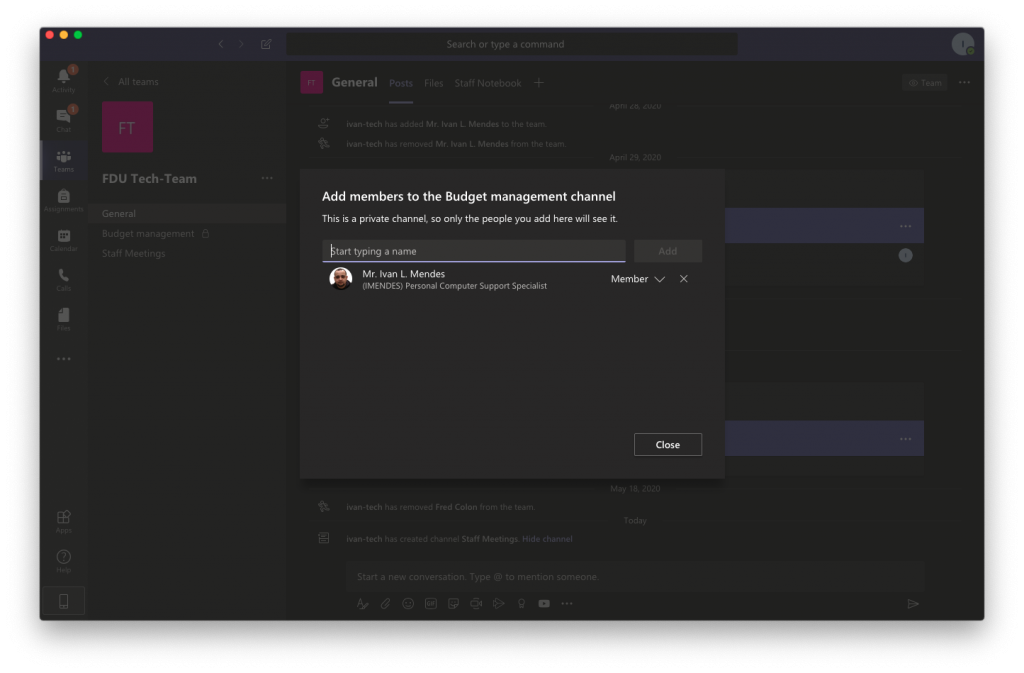
If you selected “Private” you will see a window that lets you add the team members that should have access to the channel. Once all members are added, click “Close“
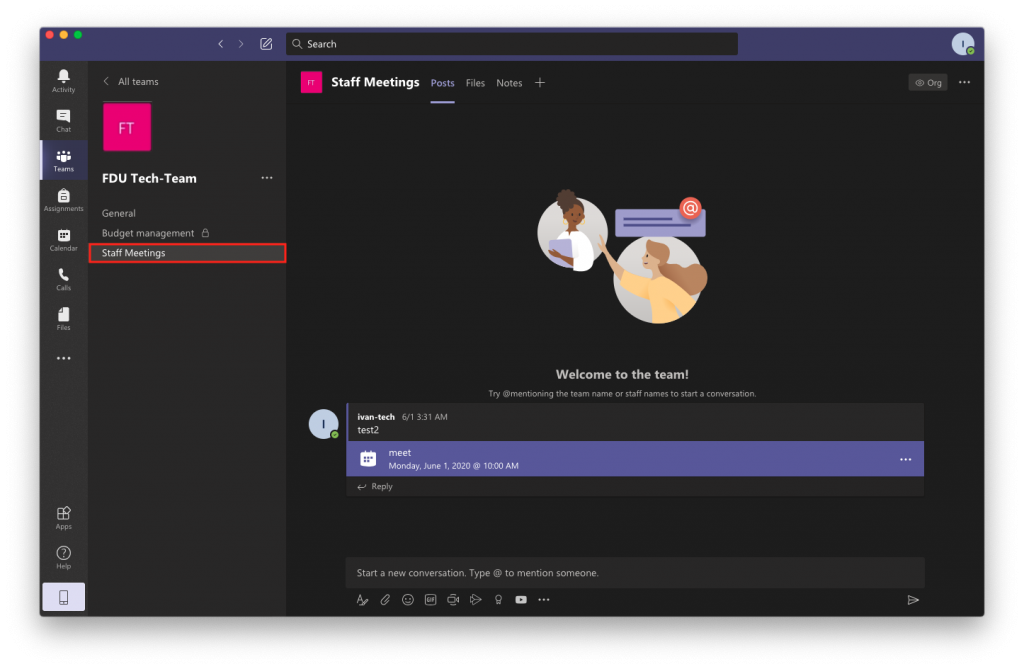
Once a channel is created it will show up under the General channel in the channels list. If the channel was set to Private, only the members can see it. Anyone who belongs to the channel can click on it to view its contents
Note
Since channels are sections within a team, it is not possible to add members to a channel that are not part of the team.
Now that your teams and channels are created, you can begin to take advantage of Microsoft Teams’ management features. Team management includes essential functions such as adding and removing members, assigning permissions for individual members, and managing your channels. You can also implement granular customizations such as setting parameters on the use of tags and emojis.
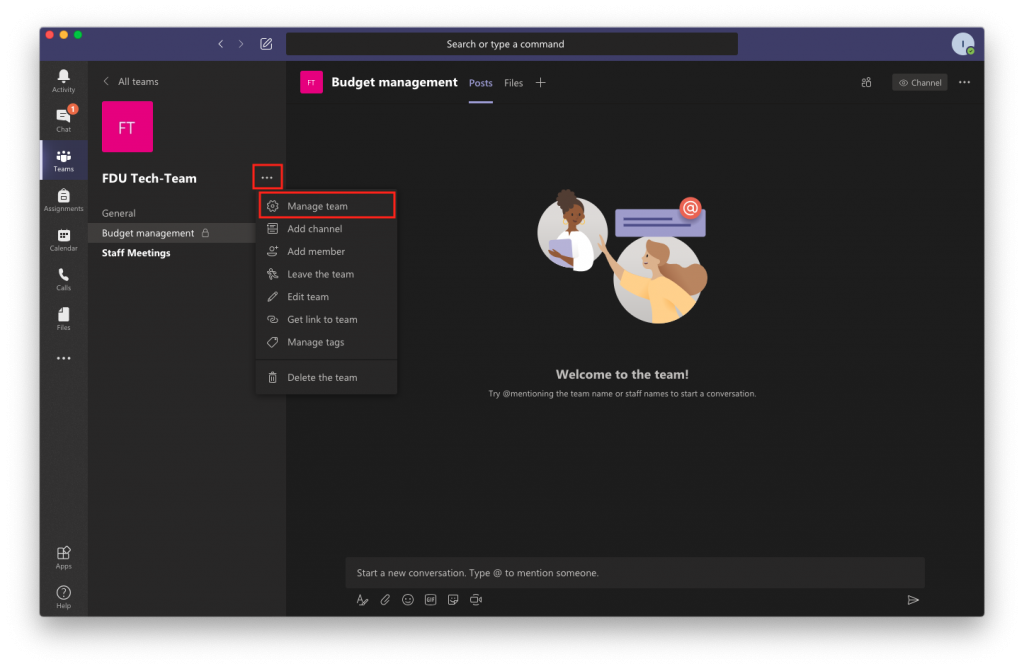
Select Teams from the left menu. If you have more than one team, click on your team
Click “More Options” icon (3 dots) next to the team name and select “Manage Team“. From here, you can select one of the following tabs
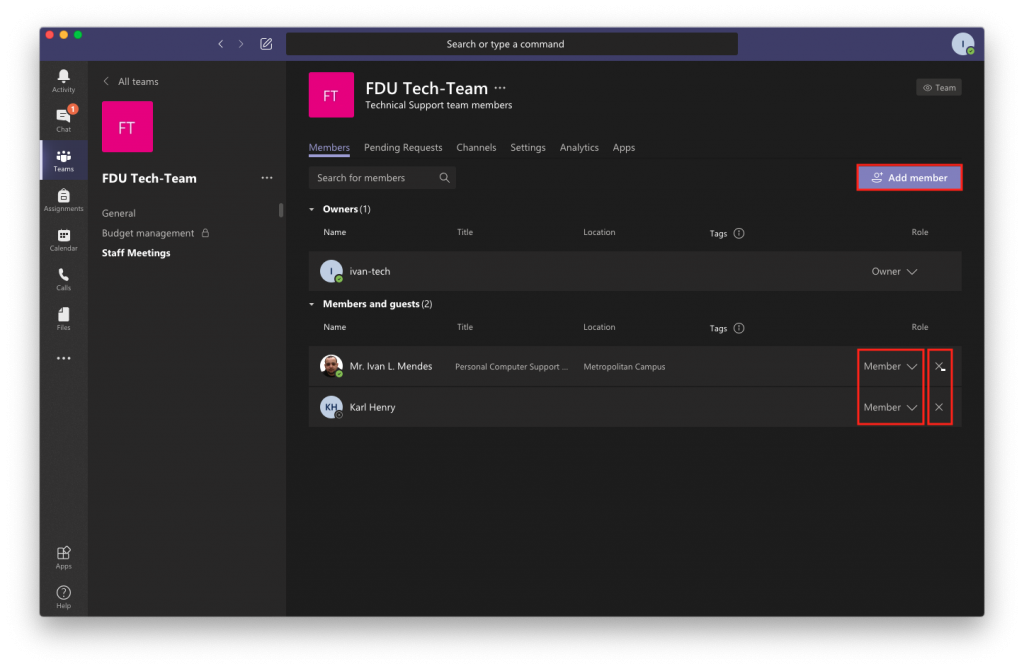
Manage Members Tab
Add a member by clicking “Add Member” button on the top right of the window
Remove a member by clicking “X” button on the right of their name
Use the drop-down menu to change a member’s role to Owner. This allows them full access to change settings
Manage Request Tab
Use this tab to accept or deny a person’s request to join your team
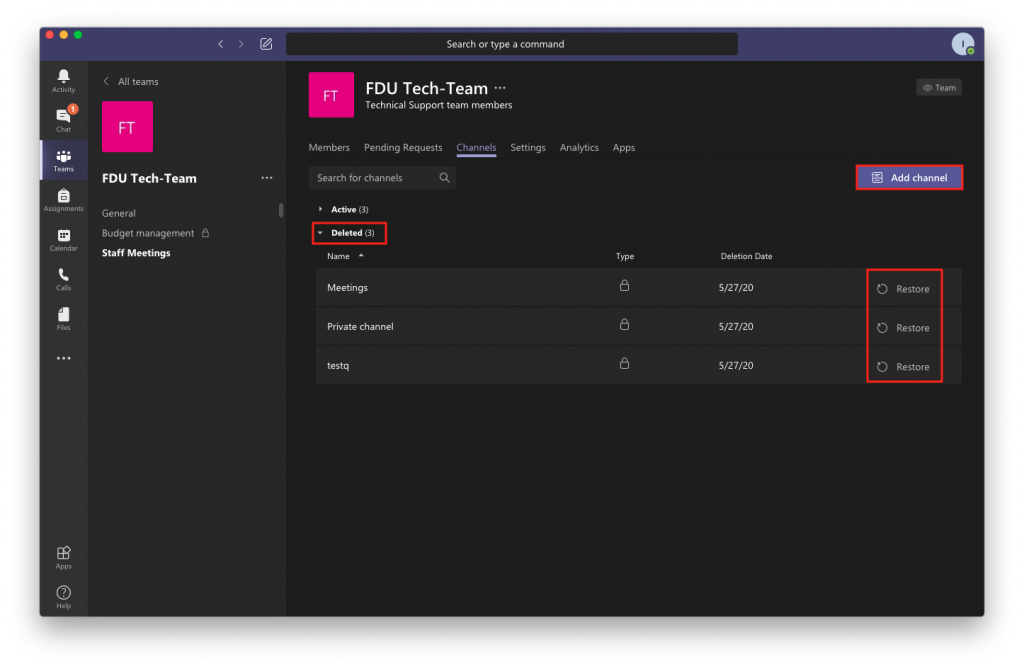
Manage Channels Tab
Create a channel by clicking the Add channel button on the top right of the window
You can restore deleted channels by expanding the Deleted list and clicking on Restore
Manage Settings Tab
The Team picture is an optional setting which allows you to set a profile picture for your team. You can upload your own image or use one of the colorful templates provided by Microsoft
Use Member permissions to set editing permissions for your team members
With the Guest permissions settings you can allow guests to create, update, and delete channels
@mentions lets you choose if you allow the @mention function to send notifications to individuals or entire channels
Team code will provide you with a join code that you can give out to new members. This will allow them to join without being placed in the Pending Requests section
Fun stuff lets you allow gifs and memes to be displayed on the channel
Use the Tags setting todecide who can use the tags feature. With tags, your team members can add labels help them better identify other members of the team
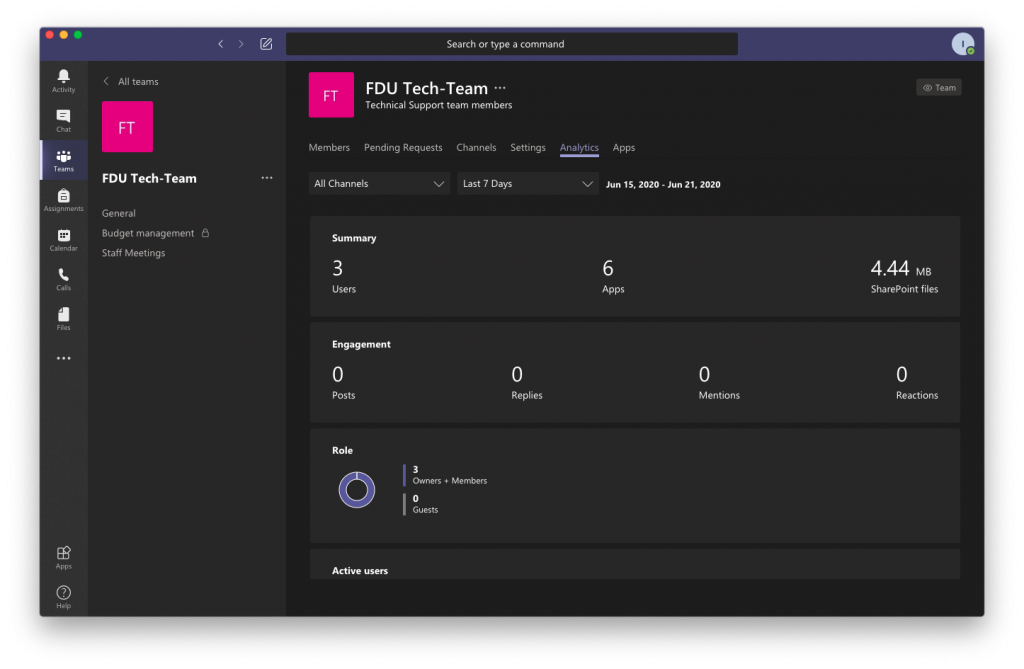
Manage Analytics Tab
The Analytics tab displays usage information for your team
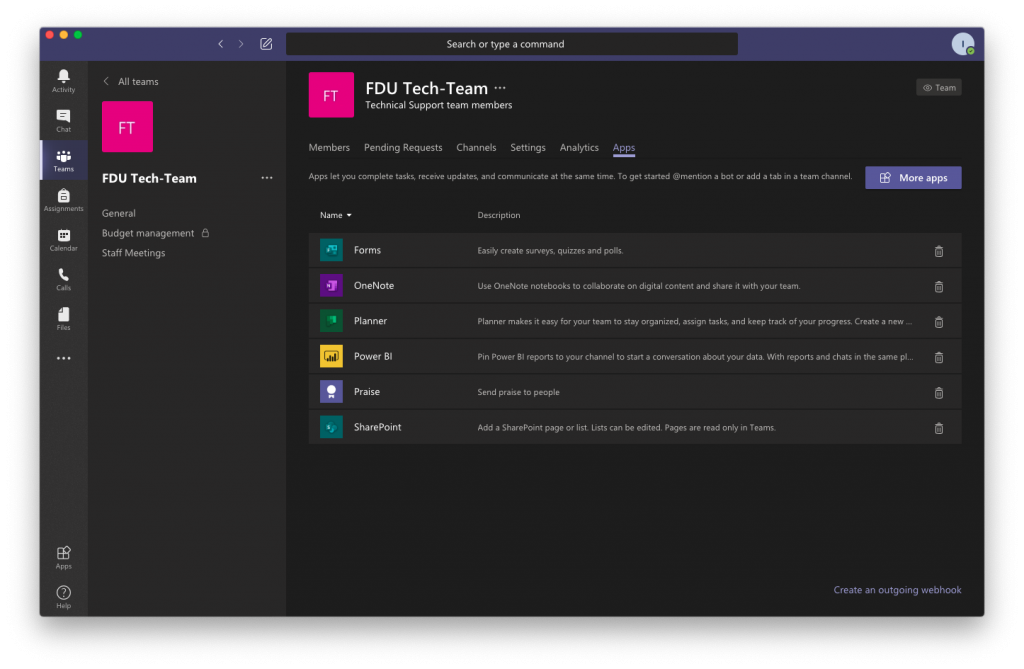
Manage Apps Tab
The Apps tab allows you to add or remove application plug ins for your channels
When you create a new team in Microsoft Teams, you’ll be asked to select from one of four teams.
Learn more in the table below about which team meets your teaching and learning goals.
Class
Professional Learning Community (PLC)
Staff
Other
Description
Teachers and students collaborating on group projects, assignments, and more.
Educators collaborating within a professional learning community. Examples:academic department, grade band, or group working on a shared goal.
Staff leaders and staff members collaborating on school administration and development.
Students and school employees collaborating in interest groups and clubs.
Team Owners & Team Members
Teachers are team owners and add students as team members.
Educators form the team and other educators join the team.
Staff leaders are team owners and add staff members as team members.
Any combination of students and school staff can form a team and add members.
Permissions
Teachers moderate student conversations and who can post where. Students only have write permission in certain areas.
Educators share equal read-write permissions.
Staff leaders control posting settings. Staff members only have write permission in certain areas.
Team members share equal read-write permissions unless the team owner(s) alter the settings.
Features
Class Notebook Assignments Conversations Files Video and audio calls Chat (if enabled) Pinning new tabs with documents or sites like Microsoft Forms
OneNote notebook Conversations Files Meetings Video and audio calls Chat (if enabled) Pinning new tabs with documents or sites
Staff Notebook Conversations Files Meetings Video and audio calls Chat (if enabled) Pinning new tabs with documents or sites
OneNote notebook Conversations Files Meetings Video and audio calls Chat (if enabled) Pinning new tabs with documents or sites
Educational Goals
Assign, track, and review student work Export grades Collaborate and communicate in the classroom Make announcements Administer quizzes and polls Work in student groups Share and organize rich content Invite virtual experts into the classroom
Collaborate in professional learning communities Communicate Make announcements Share work Organize virtual or face-to-face meetings Work in smaller groups Share and organize content
Oversee professional development, staff, and administrative goals Communicate Make announcements Share content and progress reports Work in smaller groups Organize virtual or face-to-face meetings
Collaborate and communicate with team members Make announcements Share content Organize virtual or face-to-face meetings Work in smaller groups
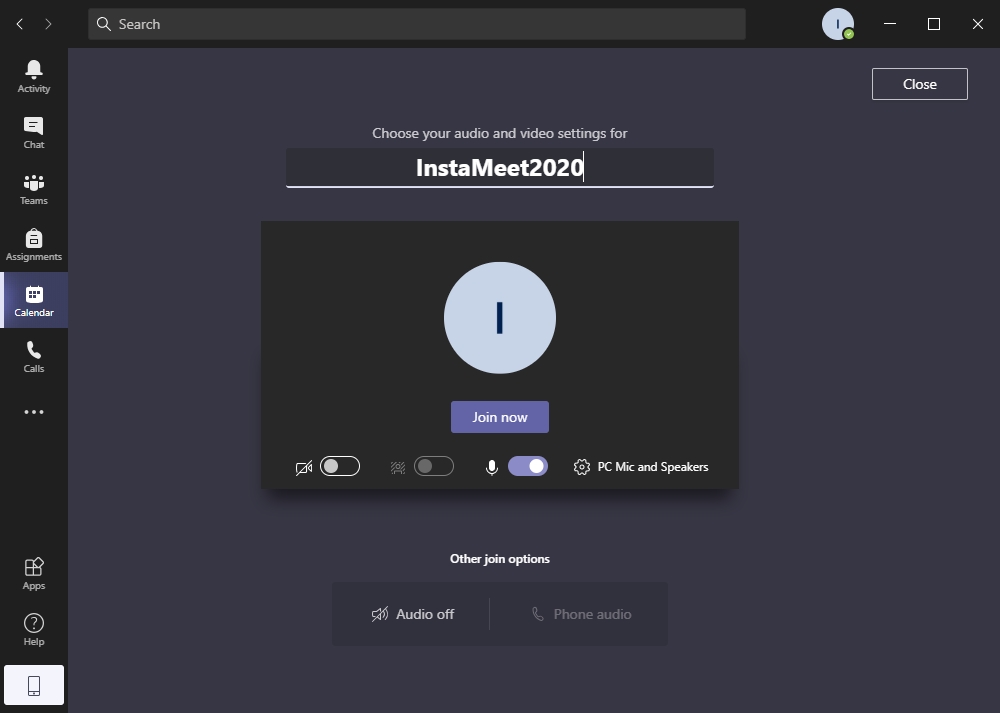
Instead of scheduling a meeting for a future date, you can start one right away and invite people in on the fly.
Select “Calendar” from the left-hand side of the screen and click “Meet Now“
Give your meeting a name, select audio and video options, and click on “Join Now“
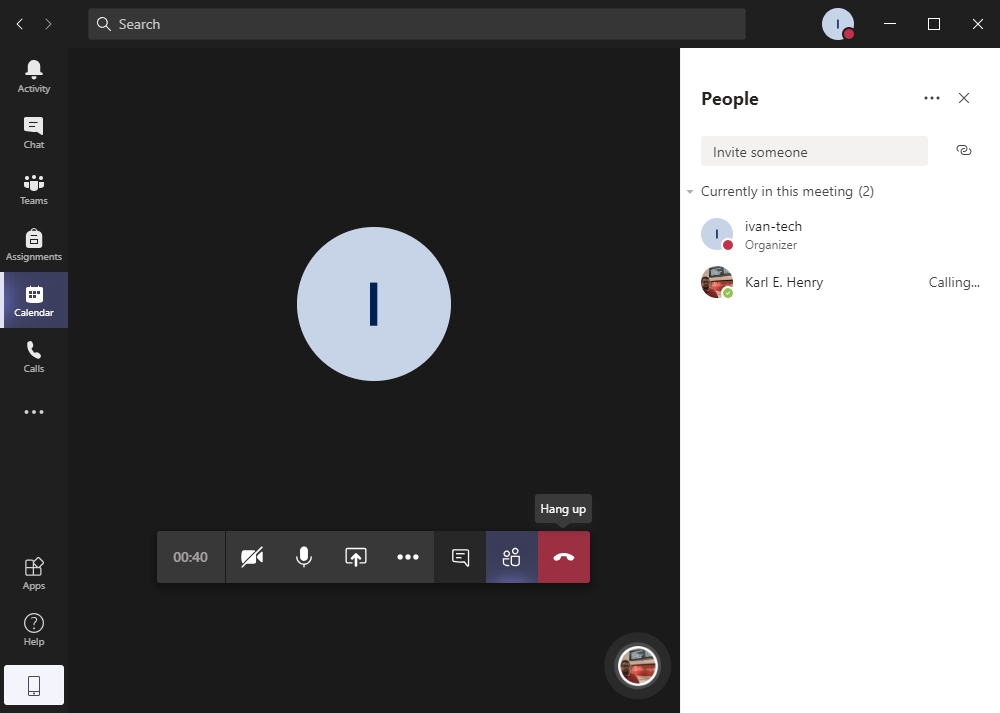
Your meeting should start with the Participants tab displayed so you can start inviting people right away. As you search for people and add them to your meeting, they will receive a call to be connected
4. As people accept the meeting invitation they will automatically be connected
Meetings in Teams include audio, video, and screen sharing. They’re one of the key ways to collaborate in Teams.
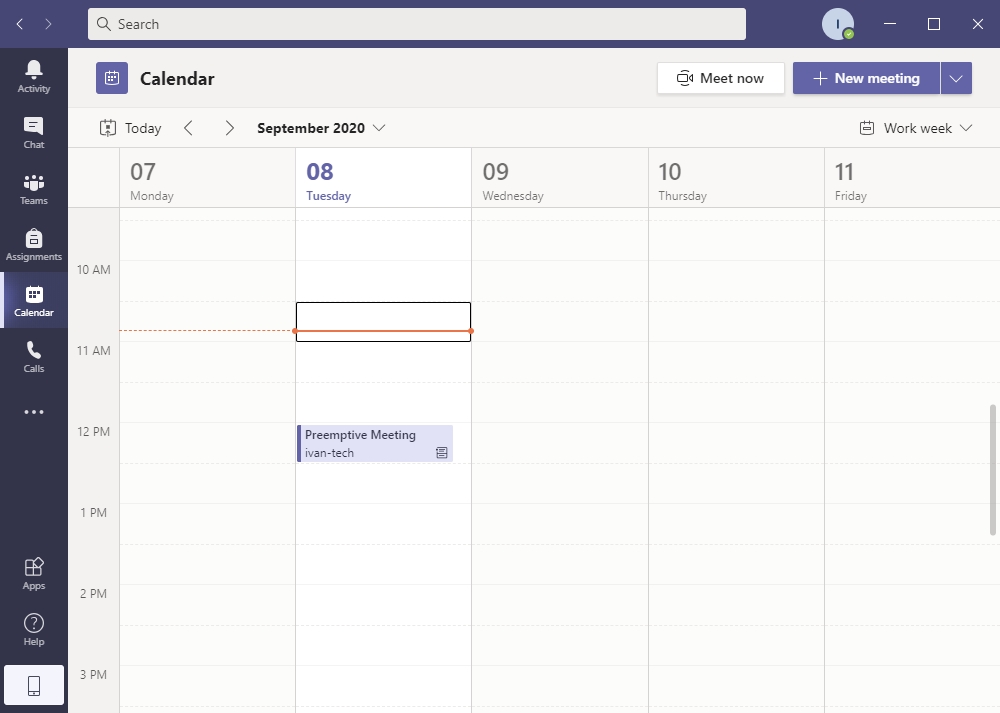
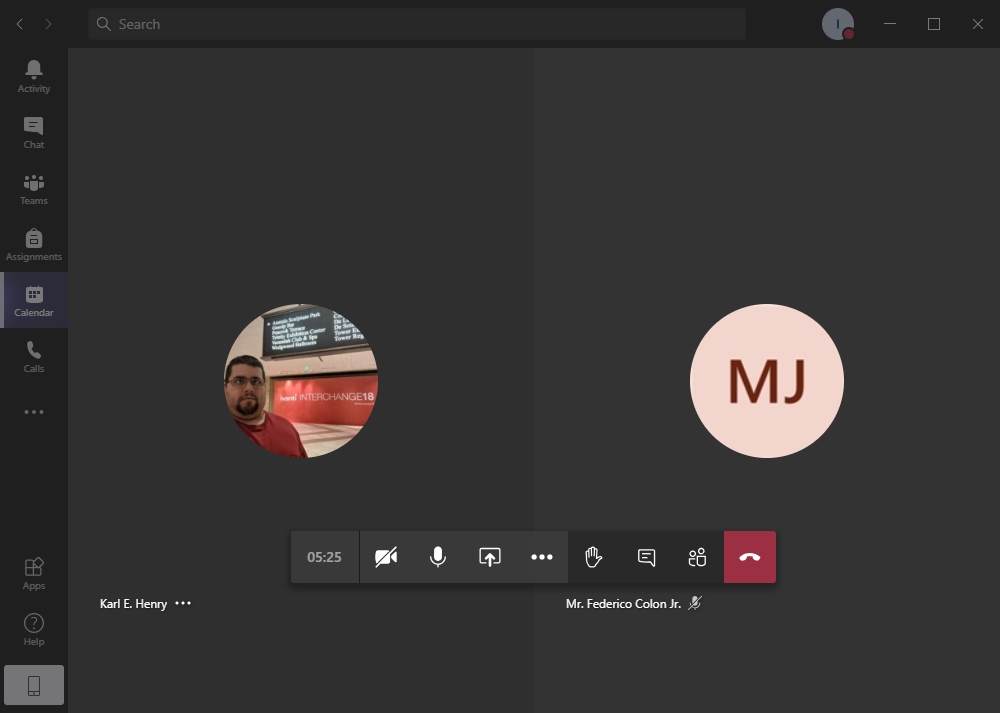
You can join a scheduled meeting by selecting the “Calendar” tab from the left menu, then finding and left-clicking on your meeting
Click “Join” button on the top of the page
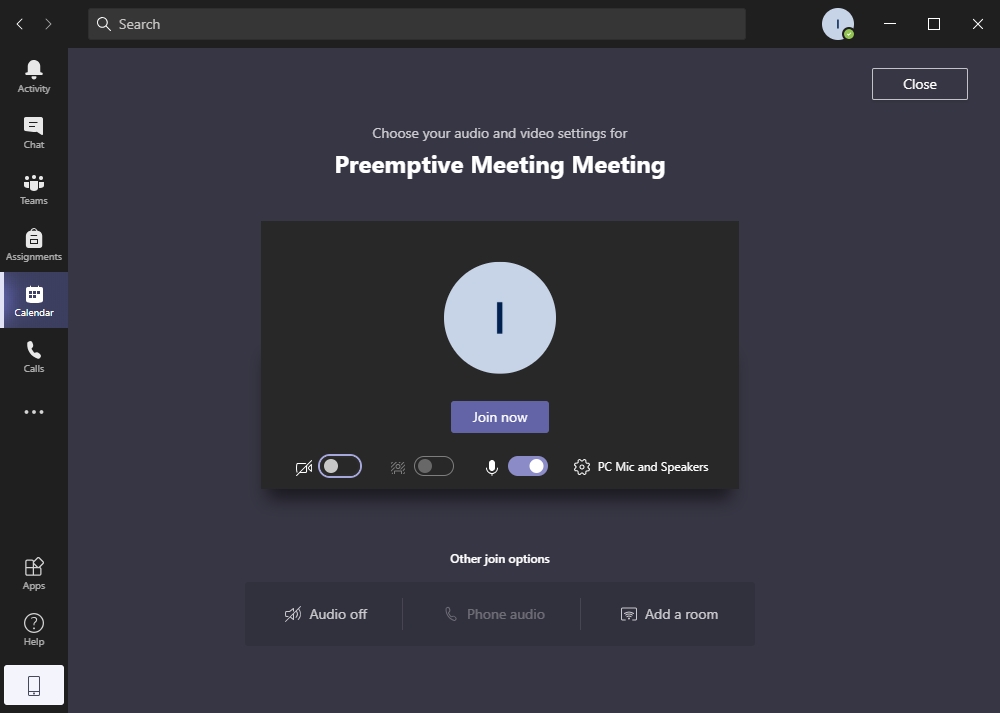
Select your video and microphone options, then left click “Join Now“
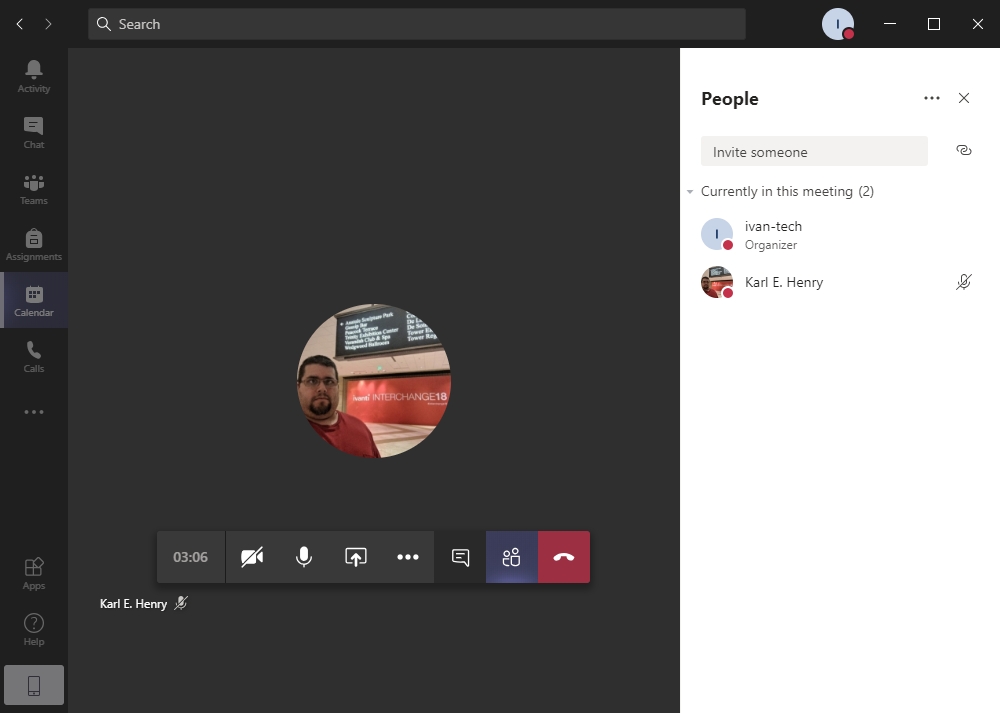
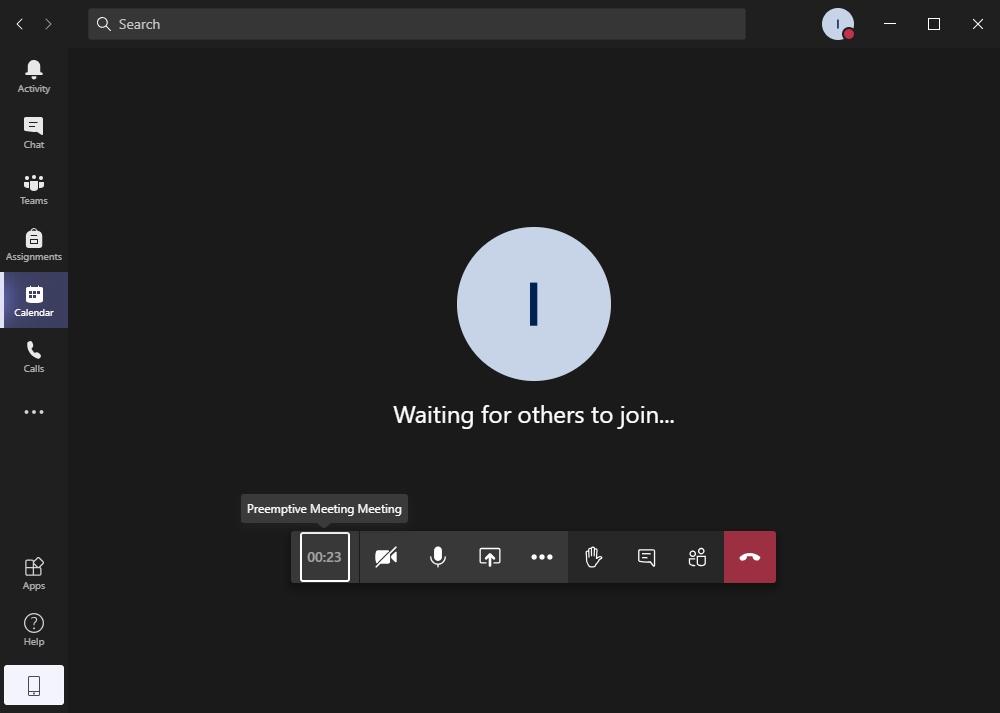
If you are the first participant that joined the meeting, you will see a black screen informing you that you are waiting for other members to join. As people join the meeting they will show up on the screen.
When you are done with the meeting, close it by clicking the red telephone icon to “Hang up” the call
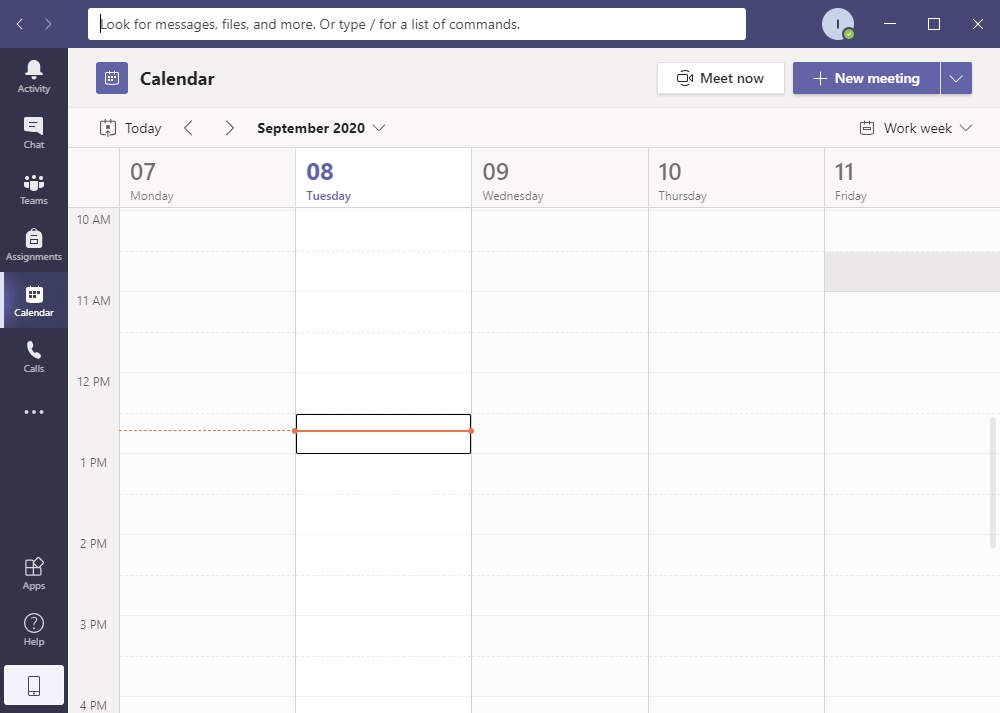
Due to Office 365 calendar integration, scheduling video and voice meetings on Microsoft Teams is simple and convenient.
Select the “Calendar” tab from the left-hand side of the screen. This screen displays your entire FDU Office 365 calendar. Next, click “New Meeting” button on the top right of the window
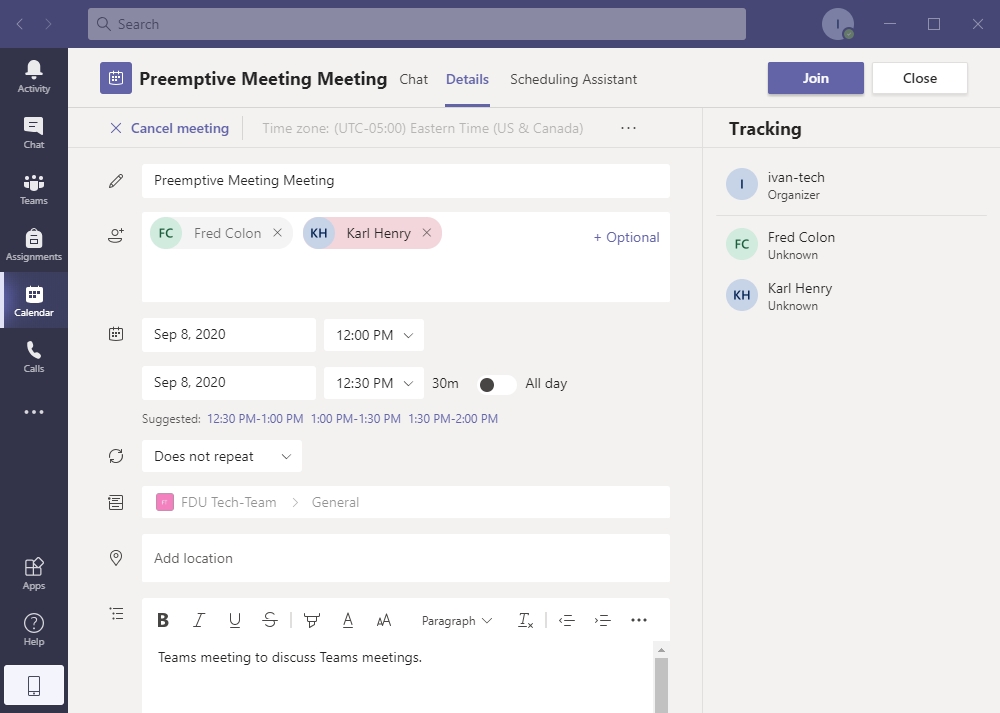
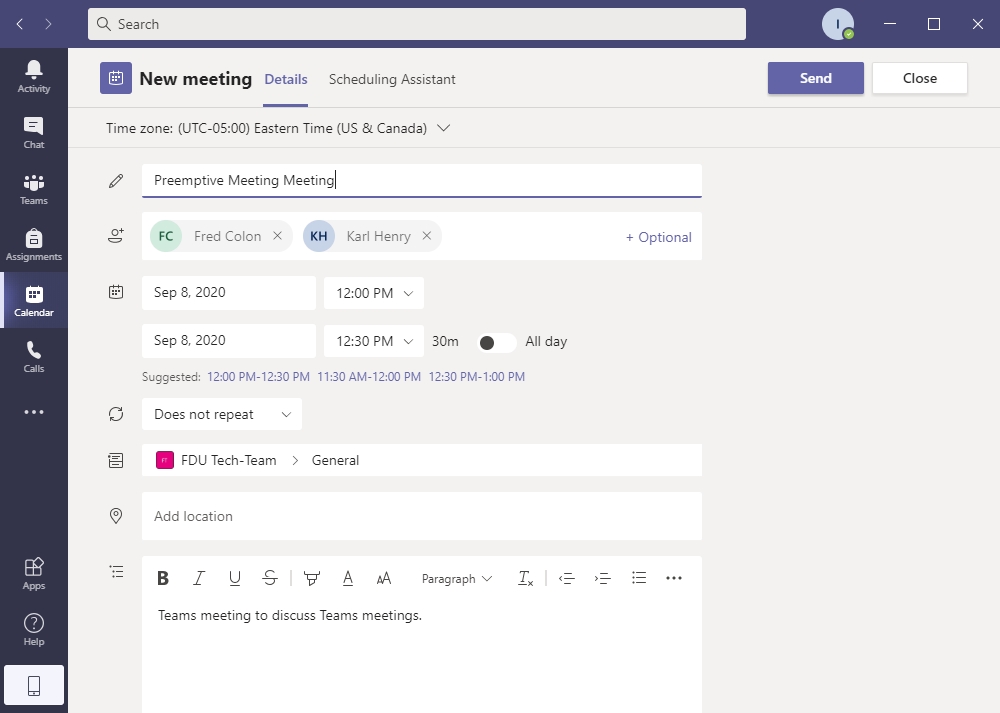
You will notice that the New Meeting window offers 2 tabs, Details and Scheduling Assistant
From the Details tab, enter the following information about your meeting:
Title
Required Attendees
Note
You can also add optional attendees by clicking +optional button
Time
Specify whether the meeting reoccurs
Add Channel is optional and lets you specify an entire Teams channel to receive a meeting notification
Add location is optional and enables you to select a physical location for members to meet at
Add details like the topic of discussion, meeting outline, etc
The Scheduling Assistant tab allows you to view the calendar of all attendees to check for availability. It is possible to adjust the meeting time on this tab
When finished, click the “Send” button on the top of the page. The meeting will be posted on the channel you selected and invites will be emailed to all requested attendees. The meeting will also show up on the calendar of the people who have accepted the meeting invitation
The Microsoft Workplace Discount Program is an employee purchase program with Microsoft for eligible faculty and staff of Fairleigh Dickinson University. The Workplace Discount Program allows eligible employees to buy an annual subscription to Microsoft 365 Family or Microsoft 365 Personal at a discount for use on personal devices.
FDU faculty and staff members with a valid work email address can begin signing up for the Microsoft Workplace Discount Program with their FDU email address. Notification of your Microsoft Workplace Discount Program eligibility is sent to your FDU email address inbox.
To confirm eligibility, visit the link below and enter your FDU email address.
Microsoft 365 is a subscription-based software service. The subscription includes premium Office applications like Word, Excel, PowerPoint, and Outlook. 1TB of OneDrive cloud storage, advanced security features, and support from Microsoft experts are also included with the subscription.
The Microsoft Workplace Discount Program offers two types of Microsoft 365 subscriptions at a discounted rate:
Microsoft 365 Personal – Includes subscription benefits mentioned above, for 1 person—discounted rate of 30%, $48.99 yearly or $6.99 monthly, usually $69.99 annually
Microsoft 365 Family – Includes subscription benefits mentioned above, for up to 5 people in your family—discounted rate of 30%, $69.99 yearly or $9.99 monthly, usually $99.99 annually
close
What is the difference between Office 2021 (one-time purchase) and Microsoft 365 (subscription)?
Microsoft 365 is a subscription-based software service that comes with premium apps like Word, Excel, PowerPoint, OneNote, Outlook, Publisher, and Access (Publisher and Access available on PC only). The apps can be installed on multiple devices, including PCs, Macs, iPads, iPhones, Android tablets, and Android phones. Microsoft 365 also comes with services like 1 TB of OneDrive storage, and Microsoft chat and phone support. With a subscription, you get the latest versions of the apps and automatically receive updates when they happen.
Office 2021 is sold as a one-time purchase, which means you pay a single, up-front cost to get Microsoft 365 apps for one computer. One-time purchases are available for both PCs and Macs. However, there are no upgrade options, which means if you plan to upgrade to the next major release, you’ll have to buy it at full price.
To learn more about the differences between Microsoft 365 and Office 2021 select the links below:
Confirm: If you are eligible, an email will be sent to your corporate email address inbox with a link that will validate your eligibility for the program
Sign In: Once your eligibility is confirmed and you register for the program with your personal Microsoft account that is associated with your personal email address, you can begin the purchase process by viewing the discounts available to you based on your Workplace Discount Program benefit eligibility
Shop: Your purchase is processed and completed in the Microsoft Store. You, the eligible employee, can install Microsoft 365 on your personal devices after the purchase is complete. Once you have purchased Microsoft 365 Family, you can share your subscription with up to 5 additional members of your household.
close
Installing your Microsoft 365 subscription software on a Mac or PC
Use your personal Microsoft Account and password when completing the installation and login credentials for your Office software. This is the same personal Microsoft Account used to complete the registration and purchase process of the Microsoft Workplace Discount Program. Your FDU e-mail address and credentials should not be used.
The following tutorial will guide you through the process of connecting a printer while on-campus. Faculty and Staff members should review the purchasing process before engaging with the process for connecting a printer.
Note
Wireless printing is not permitted on campus. The information below is for wired connections only.
Connecting a Printer for Students in the Residence Halls
Most new printers are plug and play compatible with Windows 10. When you receive your new printer, you can unbox it and remove any orange tape you see. After plugging in the power and turning the printer on, allow the printer to initialize (most new printers will have a display to show you it’s progress). When the printer finishes initializing, just connect the usb printer cable from the printer to your computer. Windows 10 should automatically install the printer for you.
close
Printer Purchasing Process for Faculty and Staff
All printer purchases for faculty and staff on-campus use must appear on OIRT’s list of approved printer models. For the most up to date list of approved printer models, please contact the Purchasing Department. The purchase of any printer not on the list must be pre-approved by the CIO.
Determining if a Printer will be Directly Connected or On-Network
Faculty and Staff Members have the option of either making a direct or network connection to the printer. A direct connection is when a printer is connected to a single computer and an on-network printer means that multiple parties can print to it. Generally speaking, unless a printer is shared by three or more employees, users should request a direct connect printer.
If you are planning to use a direct connection, simply purchase any printer contained on the Purchasing Department’s list of approved models and follow the instructions for “Installing a Local Printer” in the “Connecting a Printer for Faculty and Staff Members” section below.
If your new printer will be on-network, please ask your department to contact the SAMI Service Desk for USAN to investigate the viability of any data jacks in the vicinity of where the printer will be located. The full workflow for this process is shown in the following diagram.
Most new printers are plug and play compatible with Windows 10. When you receive your new printer, you can Most new printers are plug and play compatible with Windows 10. When you receive your new printer, you can unbox it and remove any orange tape you see. After plugging in the power and turning the printer on, allow the printer to initialize (most new printers will have a display to show you it’s progress). When the printer finishes initializing, you can just connect the usb printer cable from the printer to your computer. Windows 10 should automatically install the printer for you.
Connecting to a Network Printer
Employees are able to add network printers to their own machines.
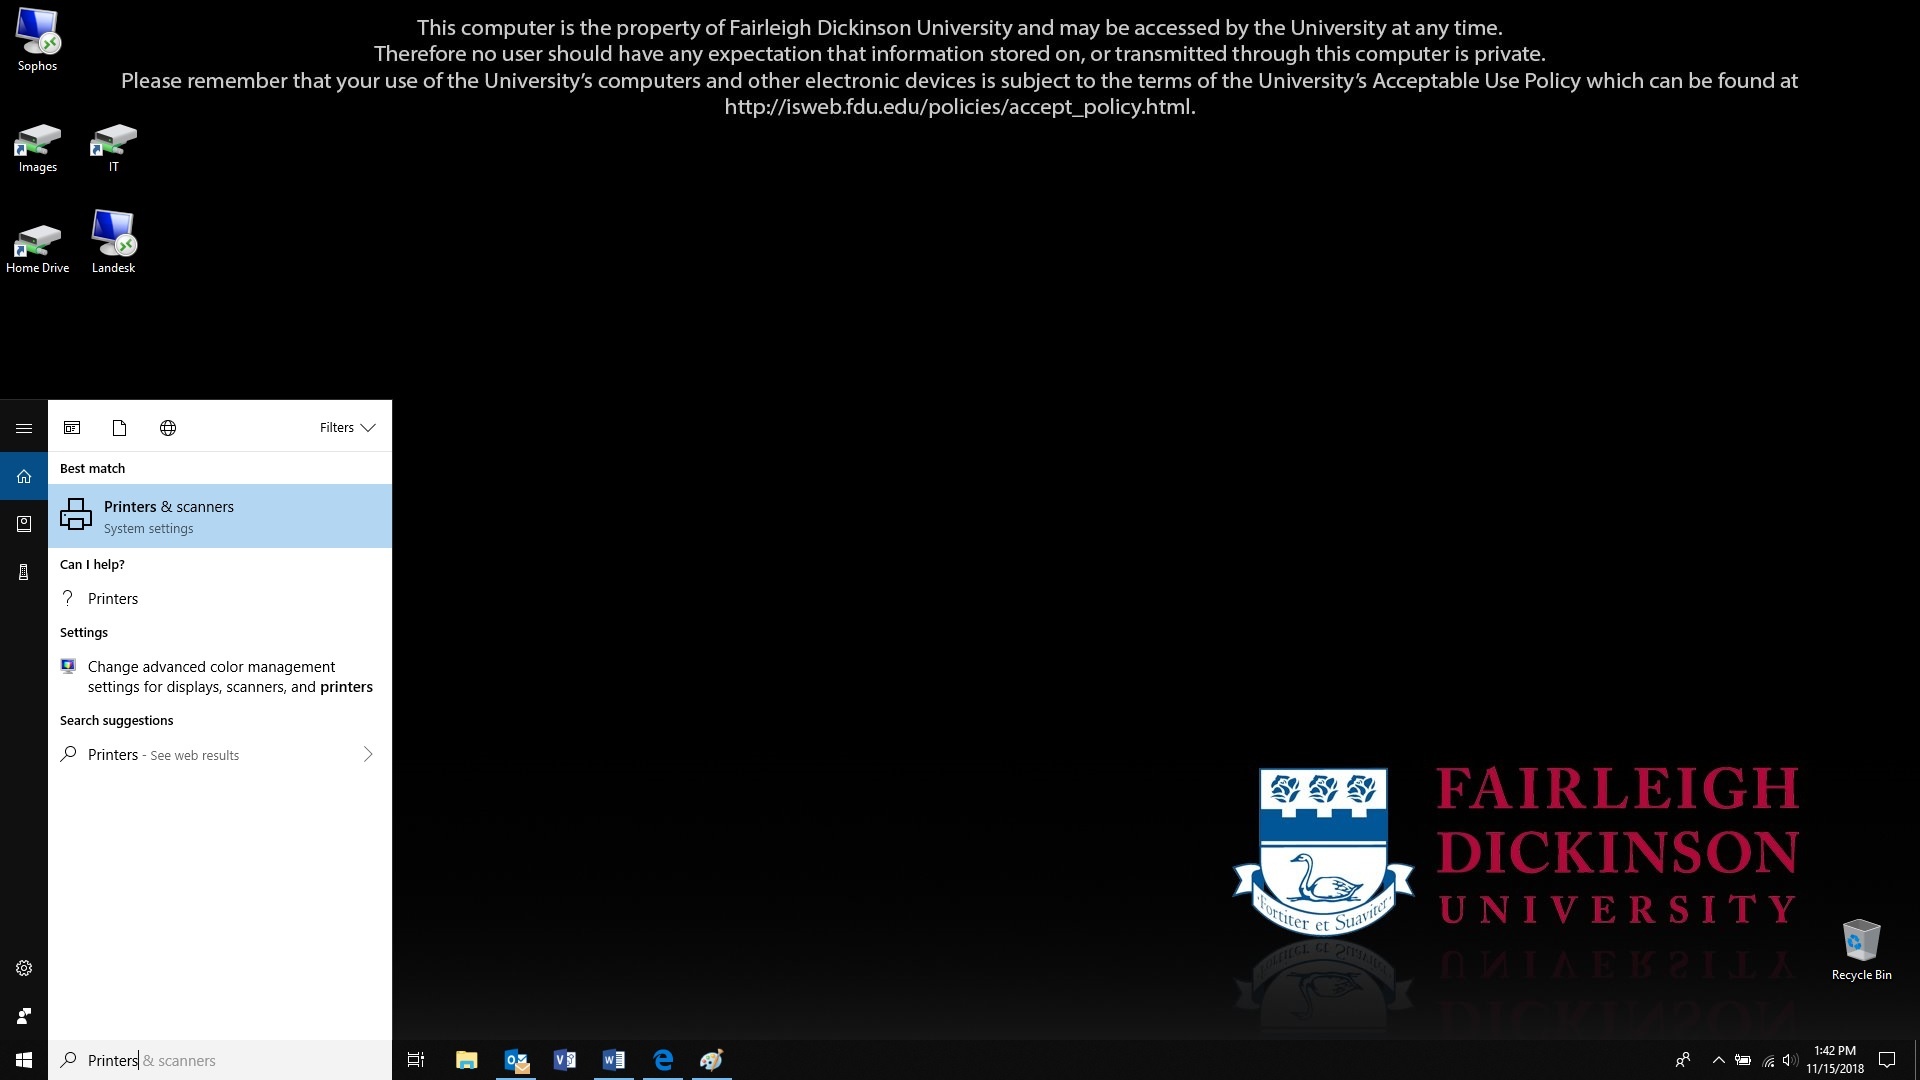
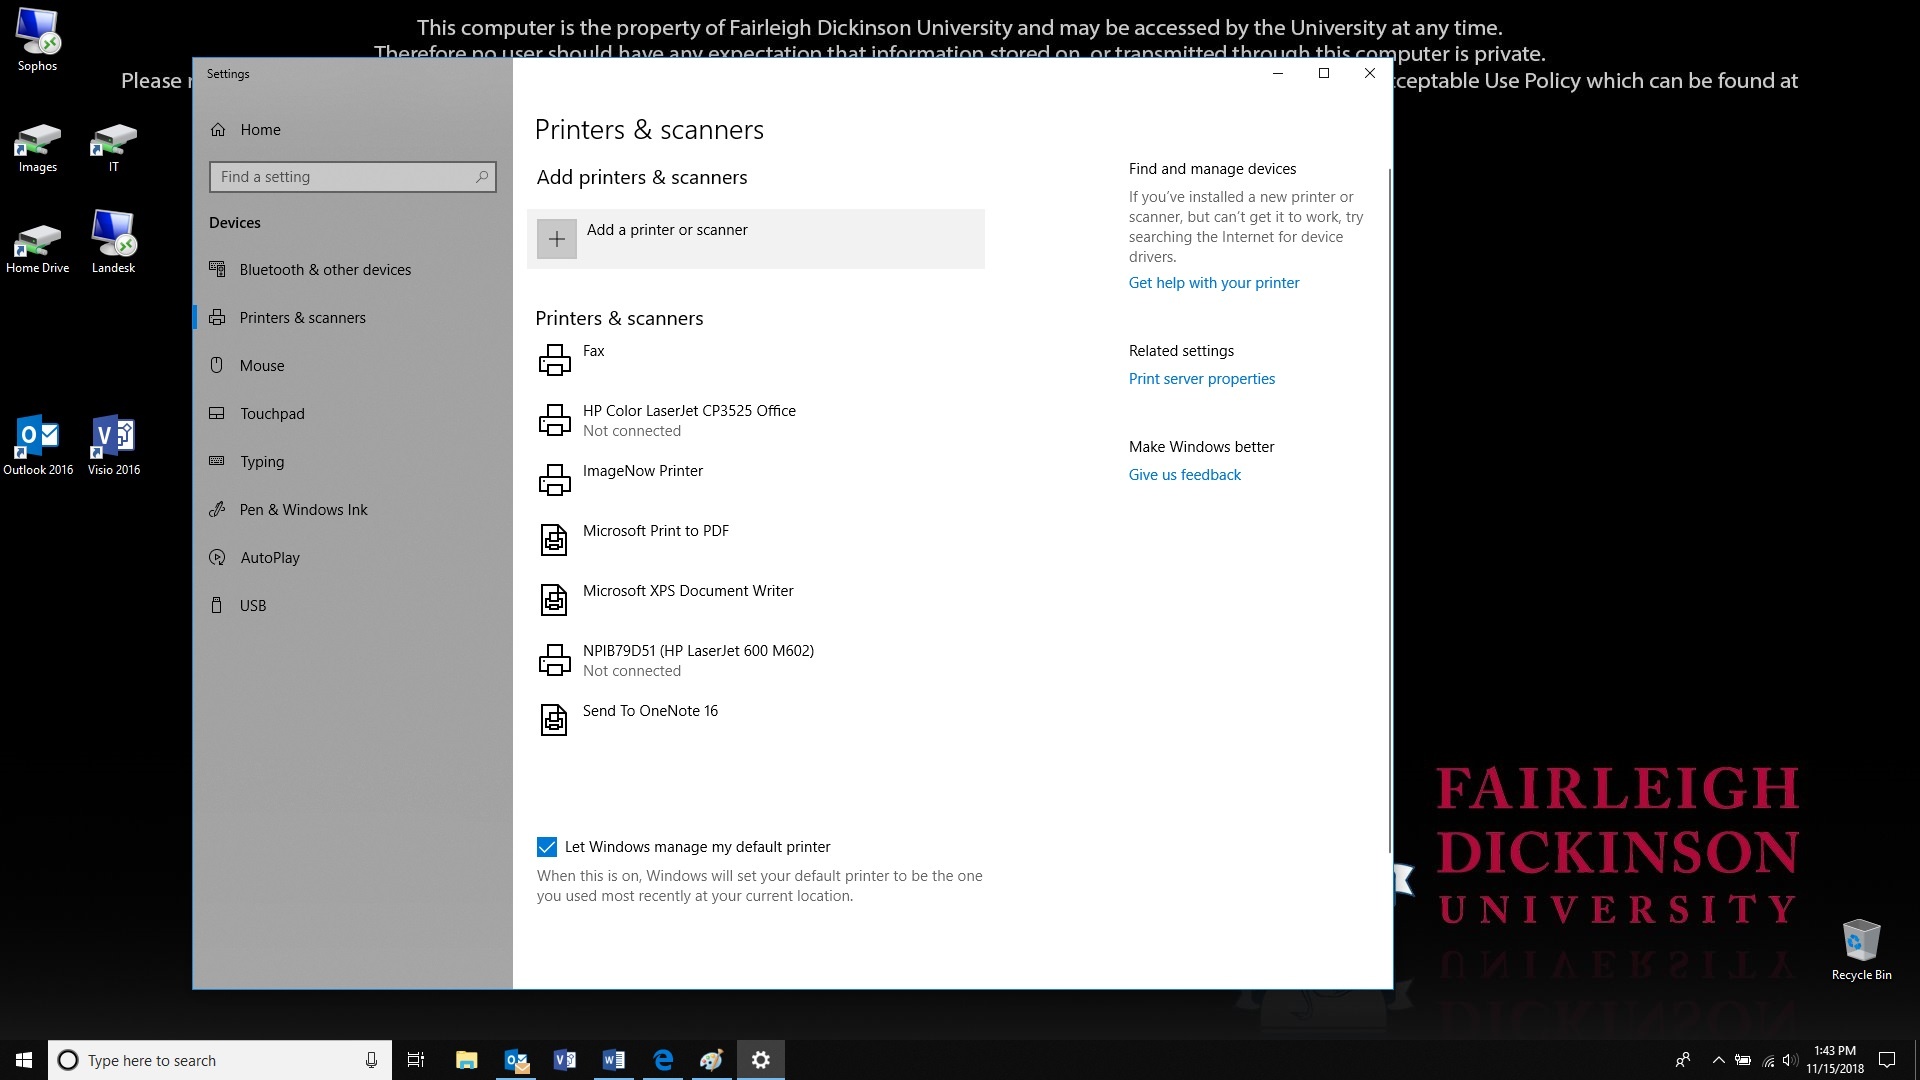
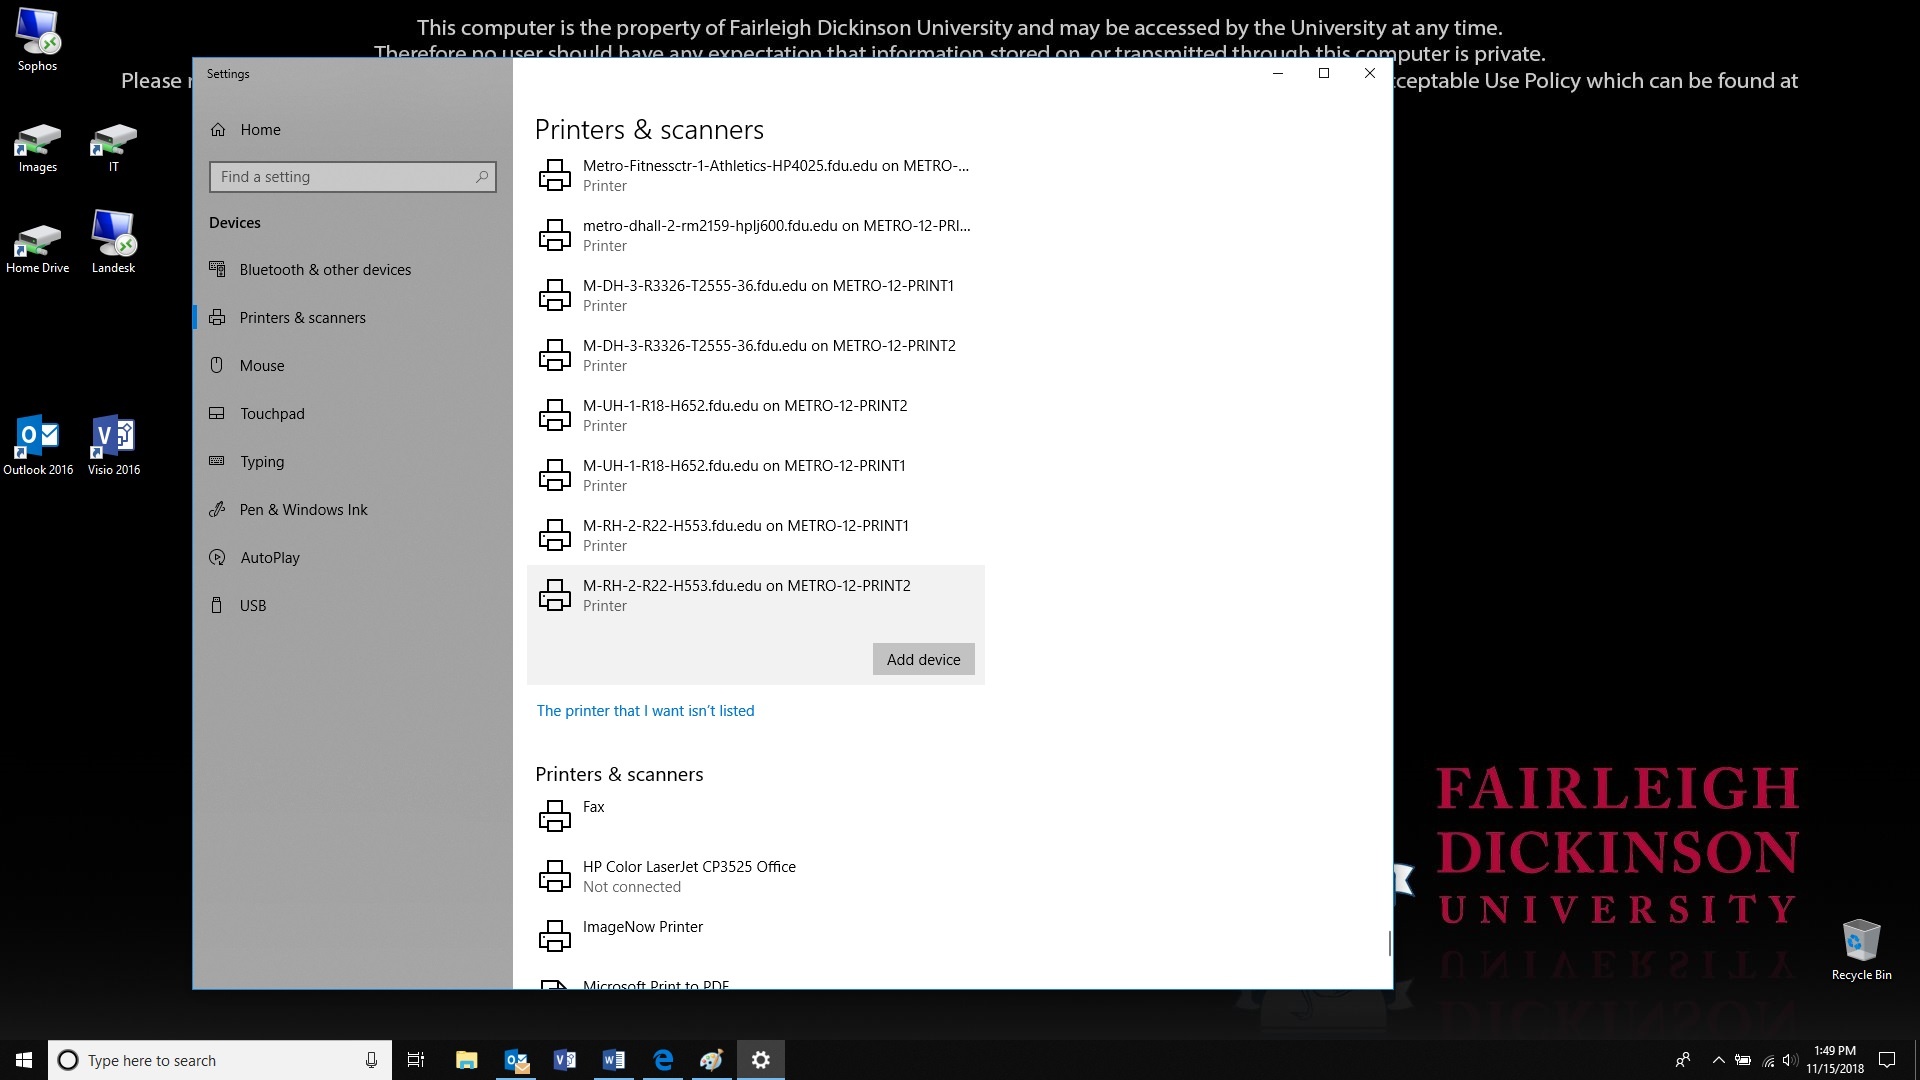
Do a search for printers, and click on “Printers & Scanners”
Click on “Add a printer or scanner”
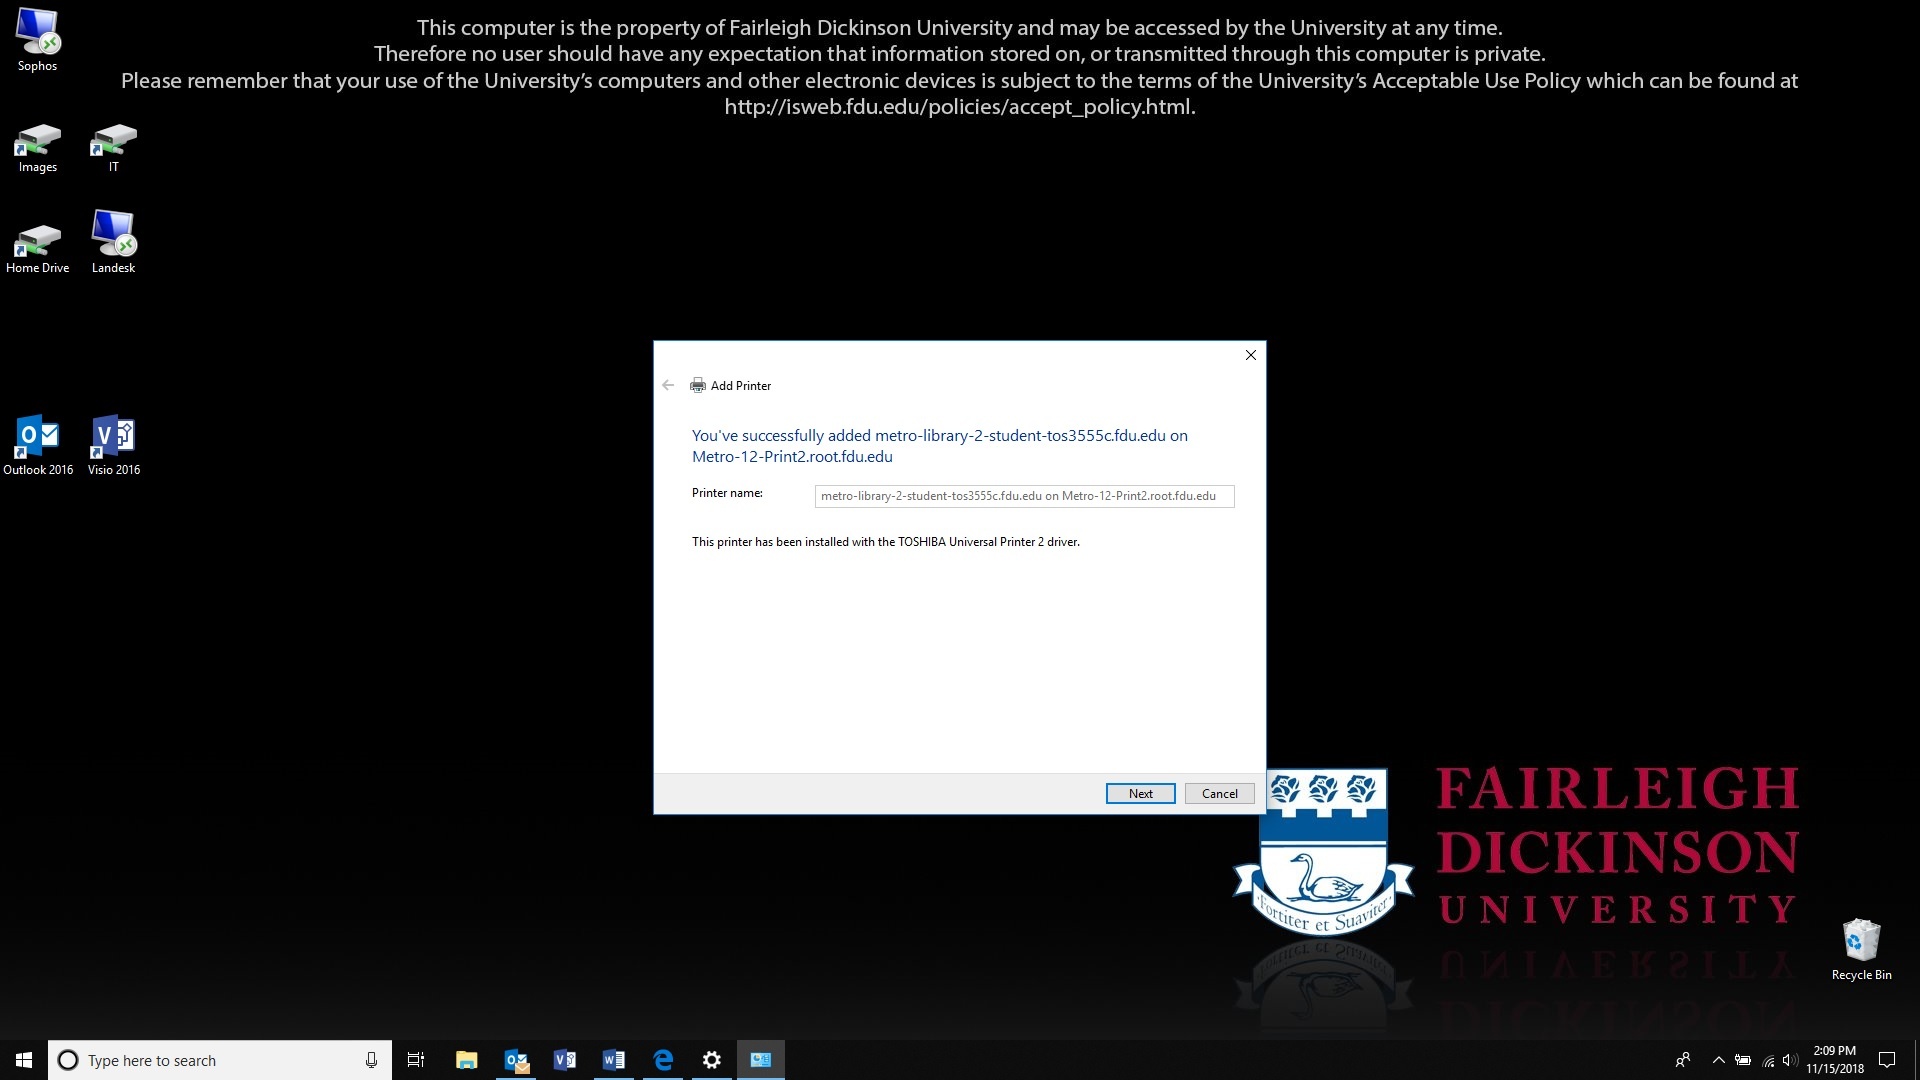
The list will start to populate and if you find your printer you can click on it and then click on “Add device”, otherwise scroll down to the bottom of the list and select “The printer I wanted wasn’t listed”
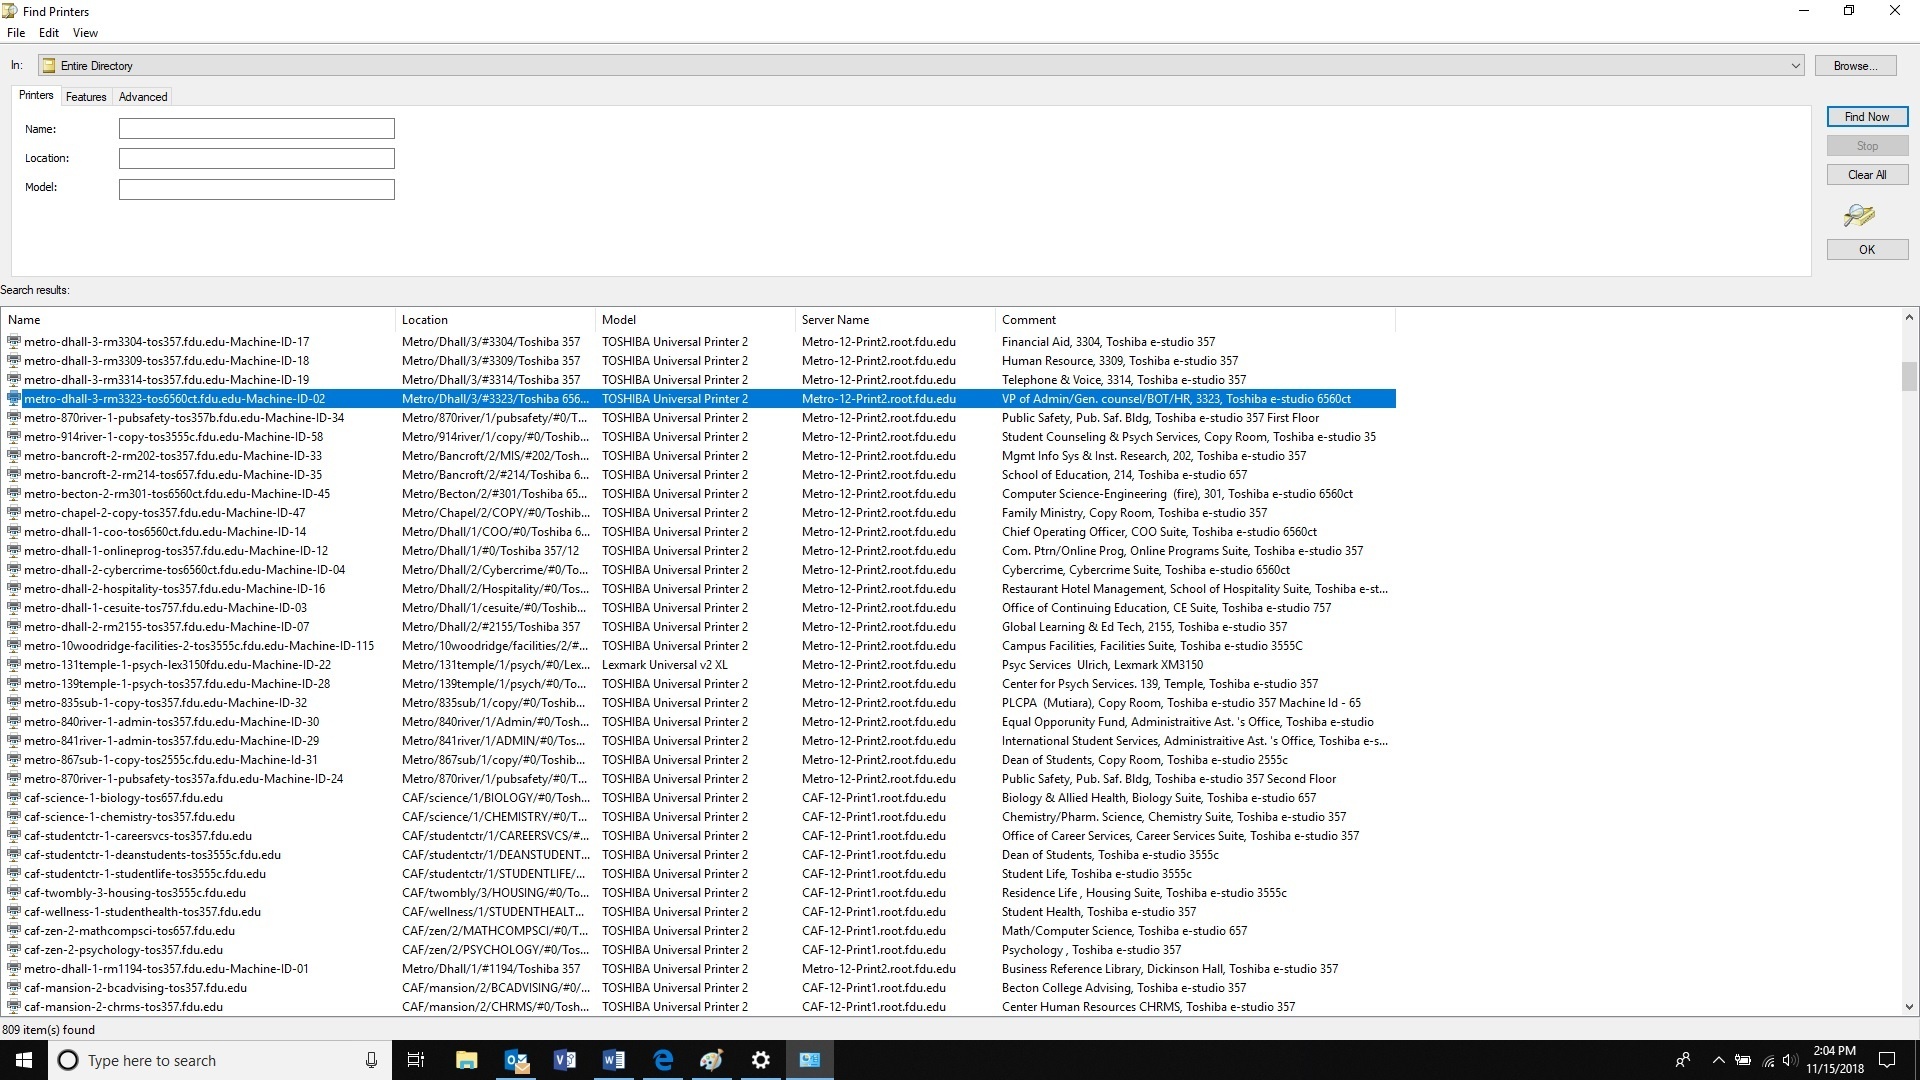
In the new dialog box, select “Find a printer in the directory” and click “Next”
Search for your printer and double click on it when you find it
A box will let you know that the printer was successfully installed. Click “Next”
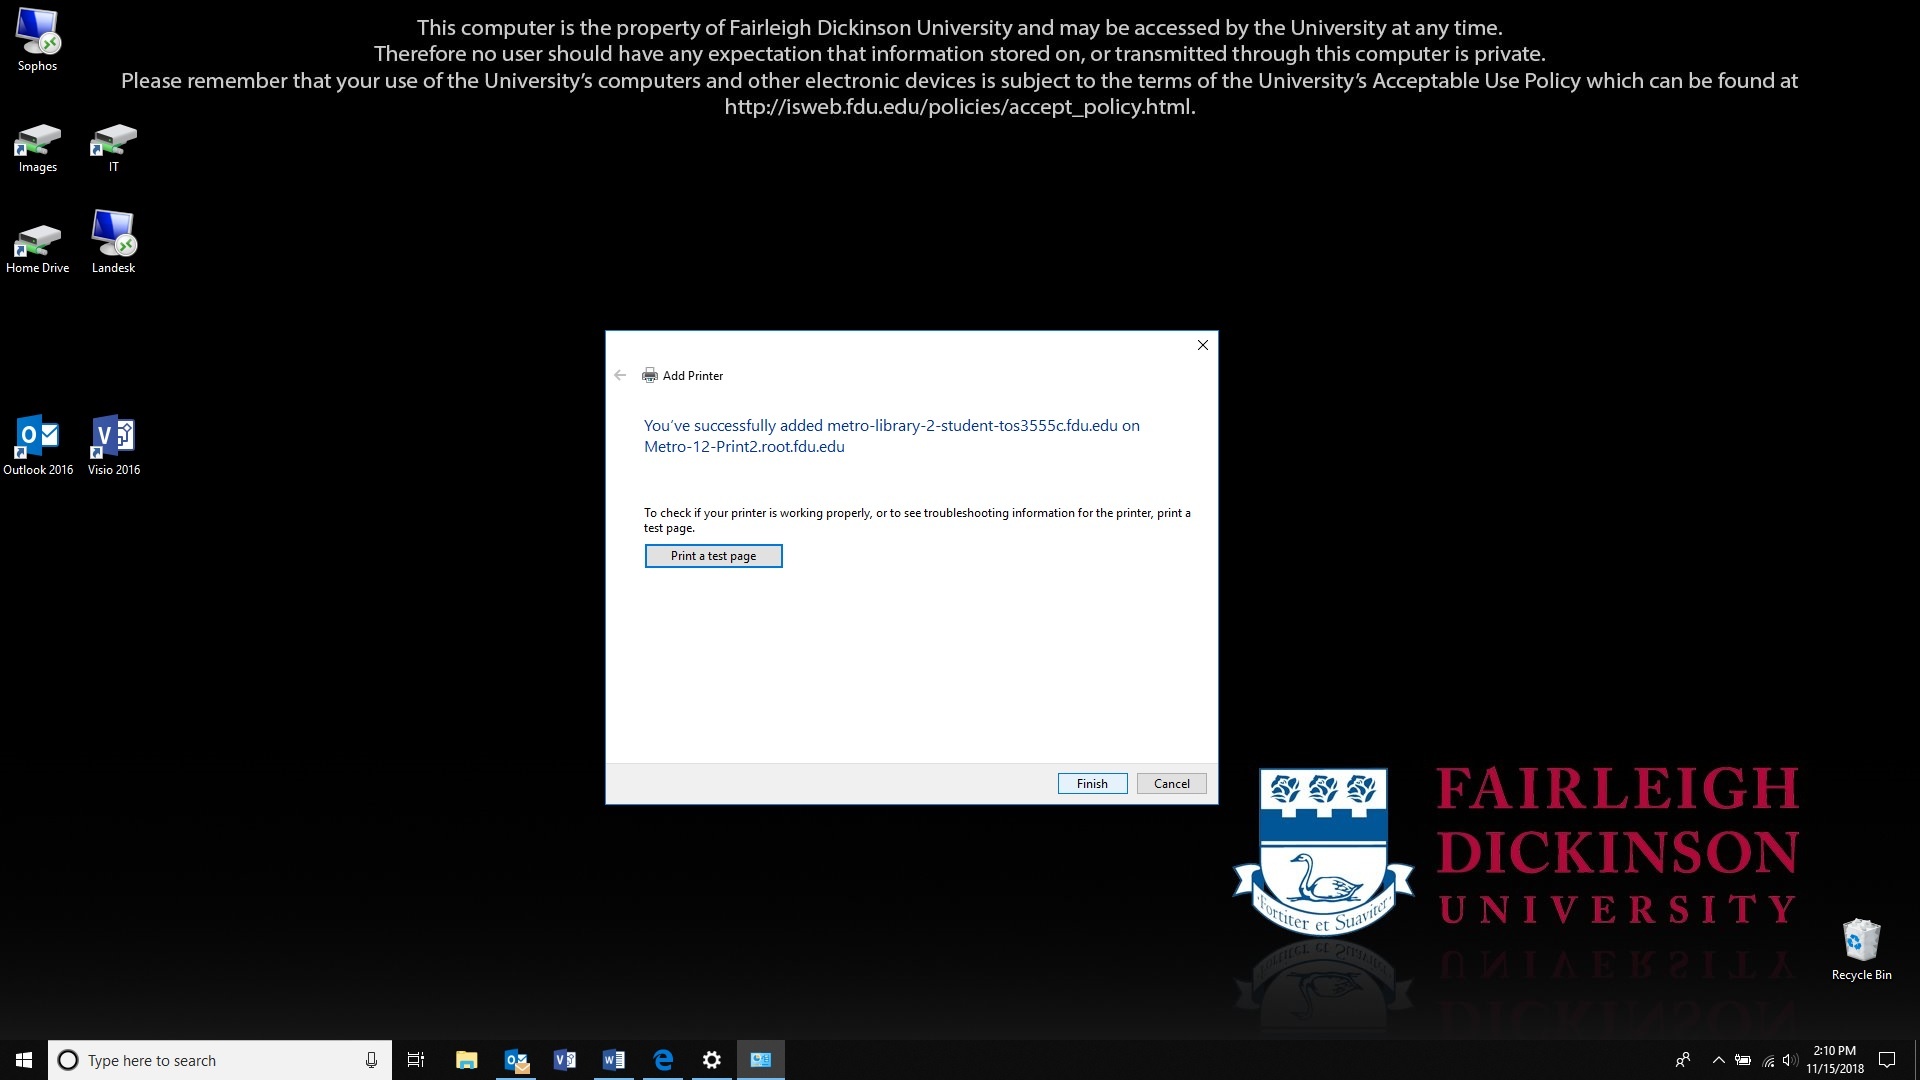
You can click on “Print a Test Page” to verify you are connected to the right printer otherwise click on “Finish”
The following PC laptop accessories for university-owned Apple MacBook Pro and Dell laptops may be purchased from our approved vendors. Please use the following PC laptop accessories list and vendor contact information below to help guide you when obtaining optional laptop accessories.
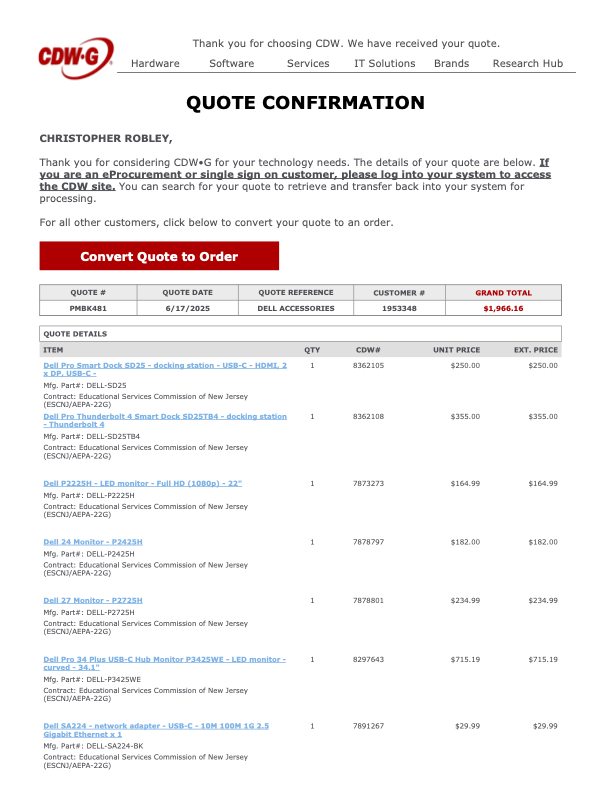
Dell Pro 14 Plus PC Laptop Accessories
A/C Adapters
Only one A/C adapter will be provided with the new Dell laptops. If a user needs a second A/C adaptor, they will need to order the part below.
Accessory
Description
Manufacturer Part Number
CDW Part Number
Cost
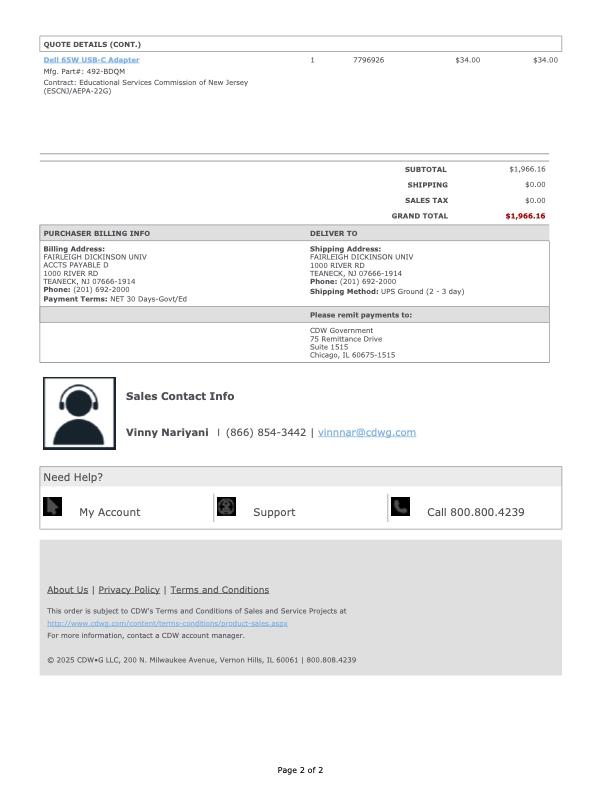
Dell 65W USB-C Adapter
Dell AC Power adaptor (USB-C)
492-BDQM
7796926
$34.00
*Prices are noted as of July 2025
close
Docking Stations
Accessory
Description
Manufacturer Part Number
CDW Part Number
Inputs
Cost
Multi-Monitor Docking Station
Dell Pro Smart Dock SD25 – docking station – USB-C – HDMI, 2 x DP, USB-C – 1GbE, 2.5GbE
DELL-SD25
8362105
1 HDMI 2 DisplayPort 1 USB-C
$250.00
Multi-Monitor Docking Station
Dell Pro Thunderbolt 4 Smart Dock SD25TB4 – docking station – Thunderbolt 4 – HDMI, 2 x DP, 2 x Thunderbolt 4, USB-C
DELL-SD25TB4
8362108
1 HDMI 2 DisplayPort 2 Thunderbolt 4 1 USB-C
$355.00
*Prices are noted as of July 2025
close
Keyboards
Keyboards will not need to be replaced for users that already have them. Users that are new to the PC laptop docking station setup may want to buy a wired USB keyboard. There are no IT requirements for purchasing keyboards; however, if users want to go with a basic model, they can order the below part number.
Accessory
Description
Manufacturer Part Number
CDW Part Number
Cost
Wired USB Keyboard
Dell KB216 – keyboard
KB216-BK-US
4306011
$22.93
*Prices are noted as of July 2025
close
Mice
There are no IT requirements for purchasing external wired USB mice; however, if a user wants to go with a basic model, they can order the below part number.
Accessory
Description
Manufacturer Part Number
CDW Part Number
Cost
Wired USB Mouse
Dell Optical Wired Mouse – MS116
MS116-BK
3938481
$22.93
*Prices are noted as of July 2025
close
Monitors
For users who already have a monitor and wish to use it with one of the new docking stations, your existing monitor must have either an HDMI or DisplayPort (DP) input connection. If your monitor only has a DisplayPort (DP) connection, you will need an HDMI to DisplayPort (DP) adapter. Users should check their current monitor connections for compatibility; if new monitors are required or desired, please choose from the list below.
Accessory
Description
Manufacturer Part Number
CDW Part Number
Inputs
Features
Cost
24″ External Monitor
Dell P2425H 24-inch Full HD LED Monitor
DELL-P2425H
7878797
1 HDMI 1 DisplayPort 1 VGA
Built-in Camera: No
Built-in USB Hub: Yes
$182.00
27″ External Monitor
Dell P2725H – LED monitor – Full HD (1080p) – 27″
DELL-P2725H
7878801
1 HDMI 1 DisplayPort 1 VGA
Built-in Camera: No
Built-in USB Hub: Yes
$234.99
34″ External Monitor
Dell Pro 34 Plus USB-C Hub Monitor P3425WE – LED monitor – curved – 34.1″
There are no IT requirements for purchasing an external wireless keyboard and mouse combo set; however, if a user would like to go with a basic model, they can order the below part number.
Accessory
Description
Manufacturer Part Number
CDW Part Number
Cost
Wireless Keyboard & Wireless Mouse
Logitech MK850 Performance Keyboard and Mouse (wireless)
920-008219
4540578
$67.07 from CDW-G
*Prices are noted as of July 2025
close
Lenovo Desktop PC Accessories
Keyboards
Keyboards will not need to be replaced for users that already have them. Users that are new to the PC laptop docking station setup may want to buy a wired USB keyboard. There are no IT requirements for purchasing keyboards; however, if users want to go with a basic model, they can order the below part number.
Accessory
Description
Part Number
Cost
Wired USB Keyboard
Lenovo Preferred Pro II USB Keyboard – US English
4X30M86879
$26.17 from CDW-G
close
Mice
There are no IT requirements for purchasing external wired USB mice; however, if a user wants to go with a basic model, they can order the below part number.
Accessory
Description
Part Number
Cost
USB Mouse
Lenovo Essential USB Mouse
4Y50R20863
$18.80 from CDW-G
close
Monitors
Accessory
Description
Part Number
Inputs
Features
Cost
24″ External Monitor
Lenovo ThinkVision T24v-30 – LED monitor – Full HD (1080p) – 23.8″
63D8MAR3US
HDMI, DisplayPort, VGA
Built-in Camera: Yes
Built-in USB Hub: Yes
$324.38 from CDW-G. This monitor is the preferred 24″ model to purchase if the the user requires a built-in web camera.
27″ External Monitor
Lenovo ThinkVision T27hv-30 – LED monitor – QHD – 27″
63D6UAR3US
HDMI, DisplayPort, USB-C
Built-in Camera: Yes
Built-in USB Hub: Yes
$628.58 from CDW-G. This monitor is the preferred 27″ model to purchase if the the user requires a built-in web camera.
close
Wireless Keyboard and Mouse Combo
There are no IT requirements for purchasing an external wireless keyboard and mouse combo set; however, if a user would like to go with a basic model, they can order the below part number.
Accessory
Description
Part Number
Cost
Wireless Keyboard
Logitech MK850 Performance Keyboard and Mouse (wireless)
920-008219
$67.07 from CDW-G
close
Apple MacBook Pro Laptop Accessories
A/C Power Adapters for 14-inch & 16-inch MacBook Pro
Accessory
Description
Part Number
Cost
A/C Power Adapter
Apple USB-C – Power Adapter – 96 Watt
MX0J2AM/A
$63.19 from CDW-G
A/C Power Adapter
Apple Power Cable – 24 pin USB-C to MagSafe 3 – 6.6 ft
MLYV3AM/A
$41.65 from CDW-G
close
Docking Stations
Accessory
Description
Part Number
Inputs
Cost
Single Monitor Docking Station or Hub
HyperDrive Ultimate USB-C Hub – This model supports a single external monitor setup. One HDMI port supports video resolutions up to 4K at 30 Hz. Featuring three USB 3.1 Gen 1 Type-A ports, 1 USB Type-C Power Delivery port, one ethernet port, and one 3.5mm audio jack, plus SD and microSD card readers.
HD30FGRAY
1 HDMI, 1 Mini DisplayPort, 1 VGA
$89.99 from B&H.com. This model is the preferred single monitor hub to purchase
Dual-Monitor Docking Station or Hub
HYPER HyperDrive Viper 10-in-2 USB Type-C Hub (Space Gray) – This model is essential for connecting up to two external monitors. This hub provides two HDMI and three USB 3.1 Gen 1 Type-A ports, as well as ports for Gigabit Ethernet, 3.5mm audio, and USB Type-C with 60W of power delivery. UHS-1 SD and microSD card readers are also present.
HD392-GRAY
2 HDMI
$129.99 from CDW-G. $129.99 from B&H.com. This model is the preferred dual-monitor hub to purchase
Single Monitor Docking Station or Hub
HYPER Hyperdrive 4-In-1 USB Type-C Hub – This model supports a single external monitor setup. Supports a single 4K display at 60 Hz via the one HDMI port. Featuring two USB 3.2 Gen 1 Type-A ports and one USB Type-C port to deliver up to 100W of pass-through power to your laptop or tablet.
HD41
1 HDMI
$59.99 from B&H.com. This model does not contain an ethernet port
Single Monitor Docking Station or Hub
HyperDrive 5-Port USB Type-C Hub – This model supports a single external monitor setup. Supports a single 4K monitor at 60 Hz via the one HDMI port. Features two USB Type-A ports, one ethernet port, and one USB Type-C port to deliver up to 86W of power to your laptop or tablet.
HDMB2
1 HDMI
$84.59 from CDW-G
Single Monitor Travel Hub or Docking Station
Lenovo Powered USB-C Travel Hub – This model supports a single external monitor setup. Features one ethernet port, one USB Type-A port, one USB 3.1 Gen 1 Type-A port, and one USB-C power port.
4X90S92381
1 HDMI, 1 VGA
$82.28 from CDW-G
close
Monitors
Accessory
Description
Part Number
Inputs
Features
Cost
24″ External Monitor
ASUS ProArt PA247CV – LED monitor – Full HD (1080p) – 23.8″
PA247CV
HDMI, DisplayPort, USB-C
Built-in Camera: No Built-in USB Hub: Yes
$201.69 from CDW-G
You may also refer to the Lenovo Desktop PC Accessories – Monitors section above to select an external monitor for the Apple MacBook Pro.
close
Accessories
USB Flash Drives
There are no IT requirements for purchasing USB flash drives. USB 3.0 is recommended. Users are reminded about adhering to the Written Information Security Program (WISP). No WISP-protected data may be placed on external devices without specific authorization, as indicated in the policy.
close
External Hard Drives
There are no IT requirements for purchasing external hard drives. USB 3.0 is recommended. Users are reminded about the Written Information Security Program (WISP). No WISP-protected data may be placed on external devices without specific authorization as indicated in the policy.
close
Printers / Scanners
For a current list of approved printers and scanners, please reach out to the Purchasing Department. Please remember that most printers don’t have USB printer cables included upon purchase.
Note
While most modern printers support wireless connectivity, wireless printing capabilities may not be enabled on any printer without the explicit authorization of the Director of Networking.
close
Purchasing
FDU Purchasing
To purchase any of the laptop accessories listed above, please submit a PO to the Purchasing Department. Users need to get a quote from either vendor through the contact information below. Please reference the item numbers from the attached quotes. Unless stated otherwise, the products listed are currently available. Prices may vary. Other University approved vendor reseller information and common products that departments may be interested in purchasing can be found by visiting:
Departments should consolidate orders as much as possible. There is no additional discount for quantity. Departments should designate the ‘ship to’ to their respective department. Vendors’ contact information is listed below.
close
Sample Purchase Order (PO) Quotes
Tip
View the Sample PO quotes to help guide you when obtaining your own quote prior to submitting to the Purchasing Department.
The instructions below pertain to any Vancouver user that will use the Secure Print, Scan to email, and Copy functions of the Xerox printers.
Account Balances
Vancouver users have the following account balances listed below:
Free Quota, is a designated account balance that is applied to all the students and is auto-replenished on schedule – before the start of the semester. This is the first balance that gets deducted after which the secondary “Paid_Balance” goes into effect.
Paid Balance is the amount credited onto a student’s account when they pay for extra printing credits.
Each user listed below has a specified amount of Free Quota replenished according to a schedule:
Adjuncts: $1000.00 replenished at the start of the school year
Student IT Assistants And Student Workers: $200.00 replenished at the start of every school term
Staff and Faculty: $1000.00 replenished at the start of every school term
Students: $10.00 replenished at the start of every school term
Paid Balance Reload / Replenishment
The instructions below are for Students on how to reload/replenish their Paid Balances:
Go to Enrollment Services to pay for the amount they wish to recharge
Bring the receipt to IT Office to request the reload for their Paid Balance
Logging In
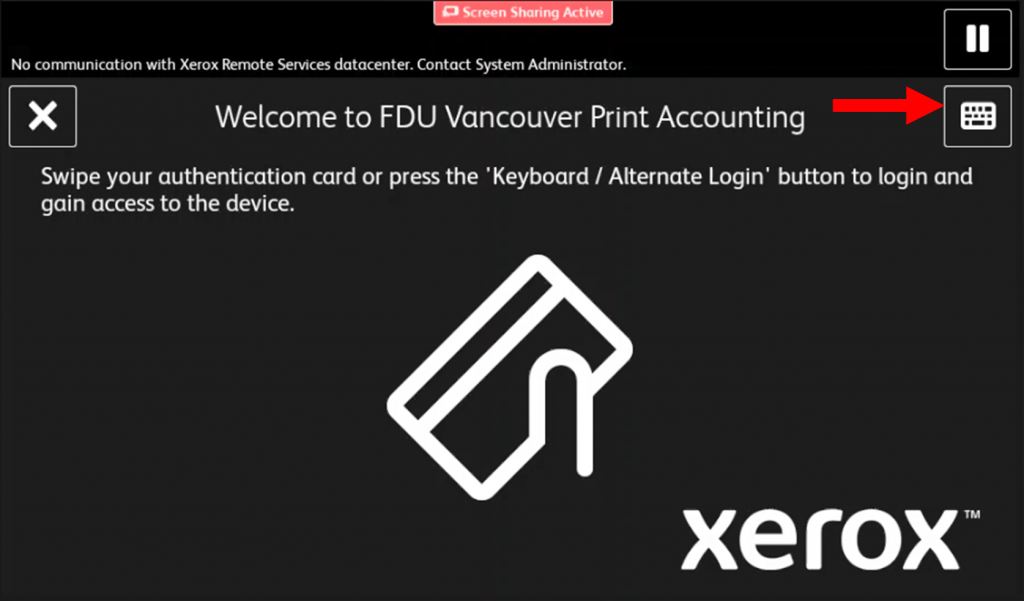
Users can either swipe their badge or use their FDU NetID and password to log in. To use your credentials press the “Keyboard” button on the top right of the screen
If upon swiping your badge the following screen appears on the Xerox printer screen. Enter your credentials to associate them with your account. For a detailed walkthrough, play the video below:
close
Checking Account Balance on Printer
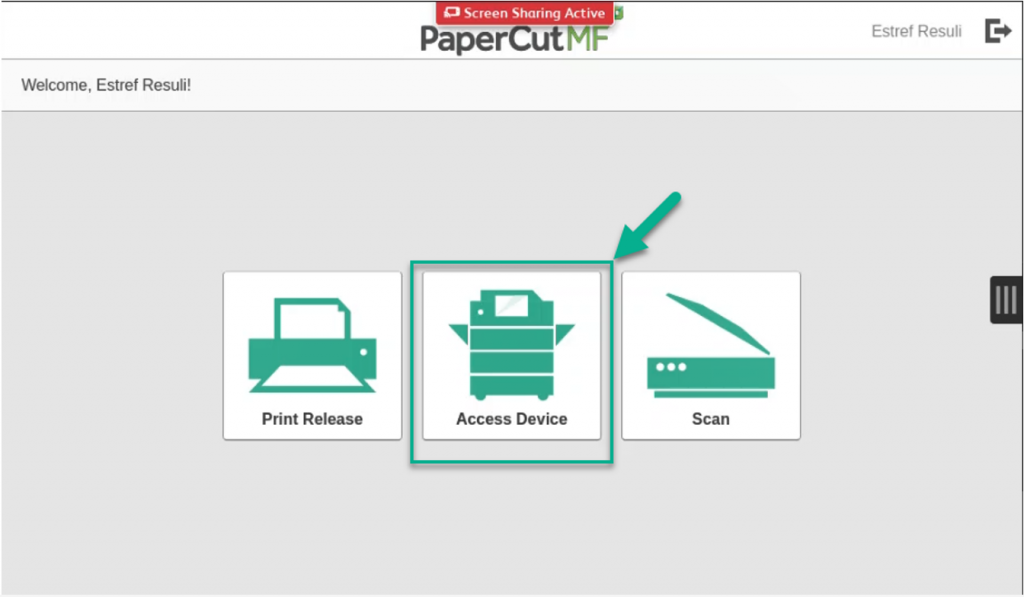
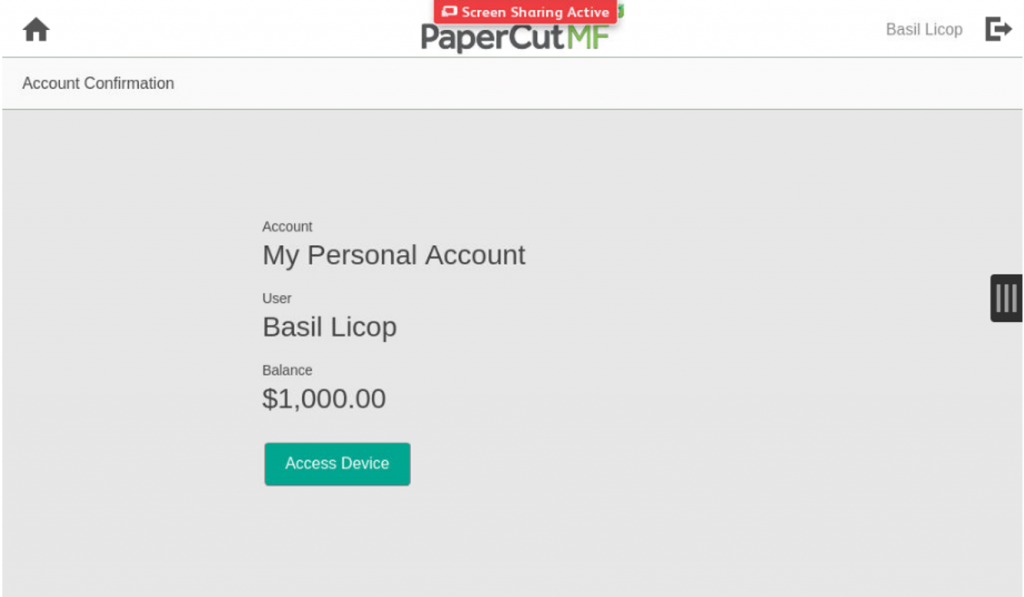
To check your total balance from the printer, log into that printer and press the “Access Device” button. The balance will be displayed on the screen.
close
Secure Print
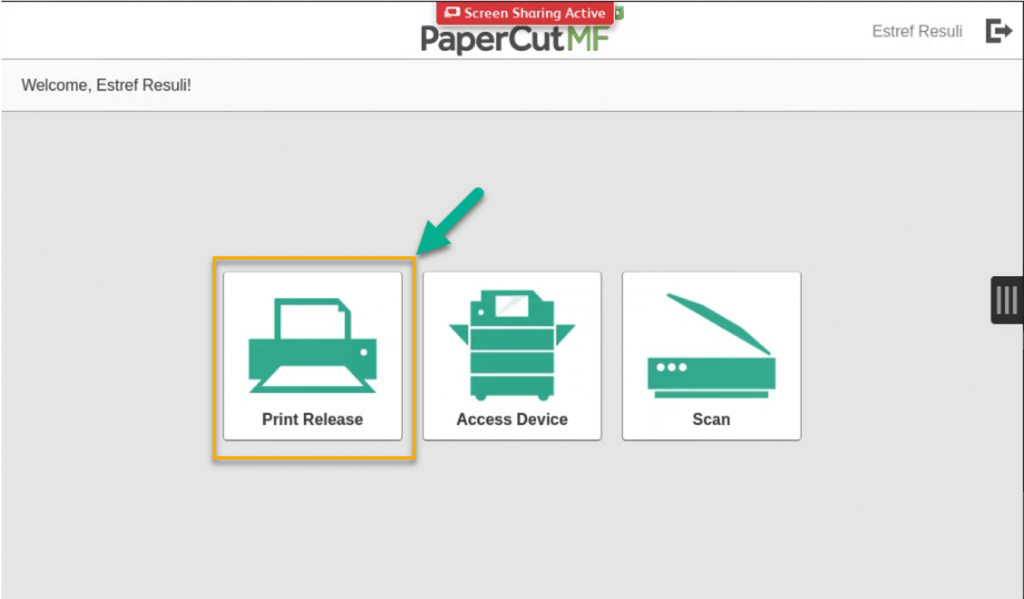
To release a print job after you have sent a print job to the appropriate printer and logged into that printer. Press the “Print Release” button
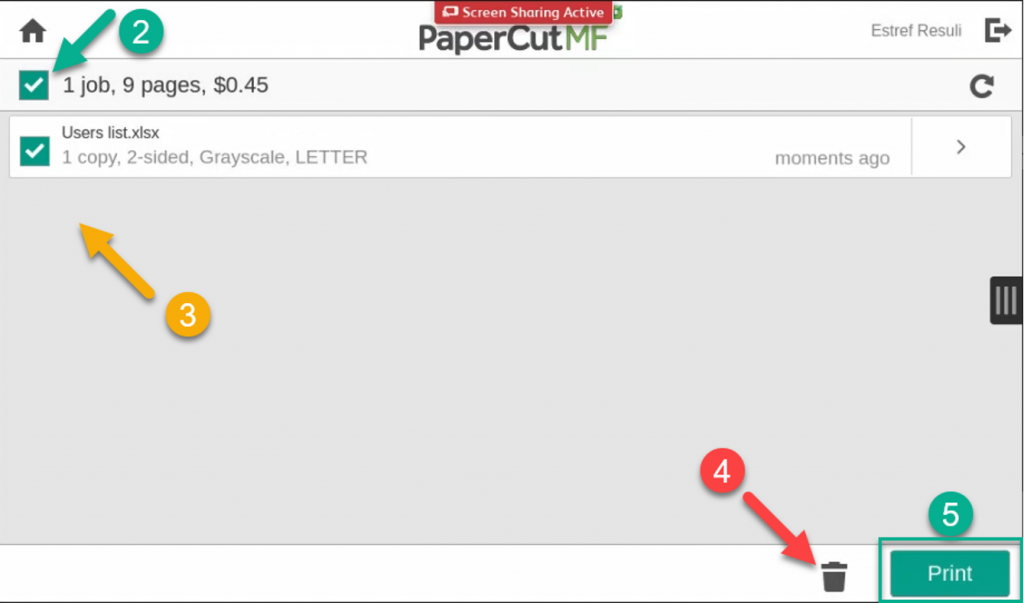
To print all jobs under the queue press the checkbox above all the jobs (2) then press the “Print” button (5)
To print a selection of the jobs, select the appropriate checkbox beside the jobs you want to print (3), then press the “Print” button (5)
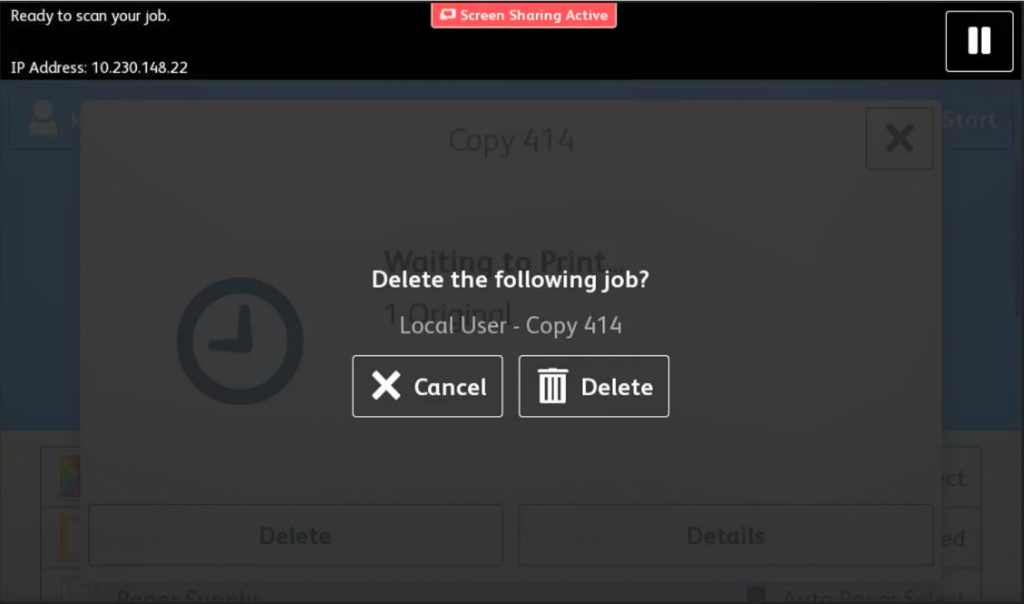
To delete jobs from the printer’s queue, select the appropriate checkbox beside the jobs you want to delete (3), then press the “Trashcan” button (4)
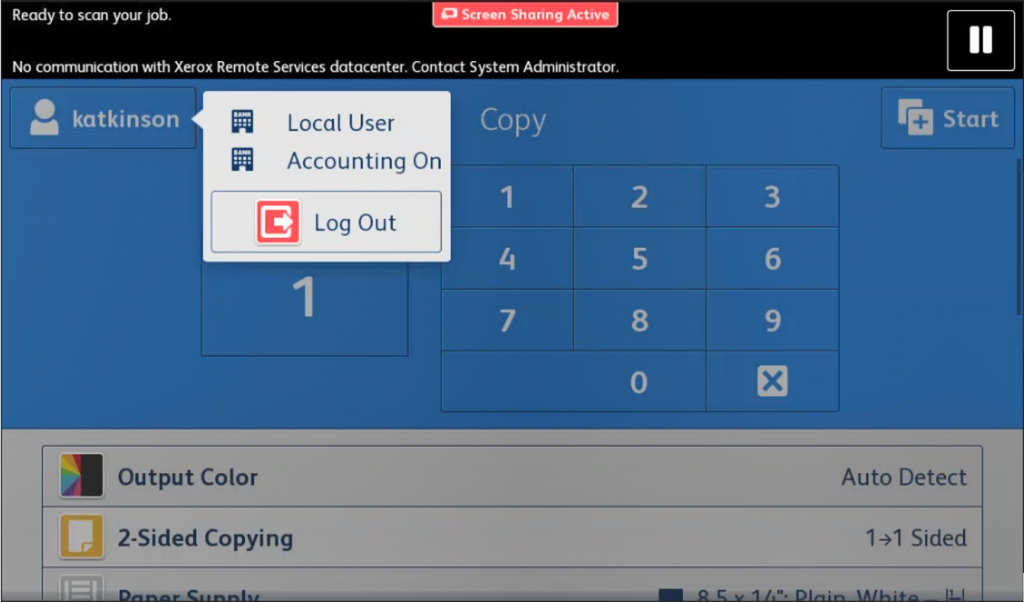
To log off of the printer, press the “Log Out” icon on the top right next to your name
close
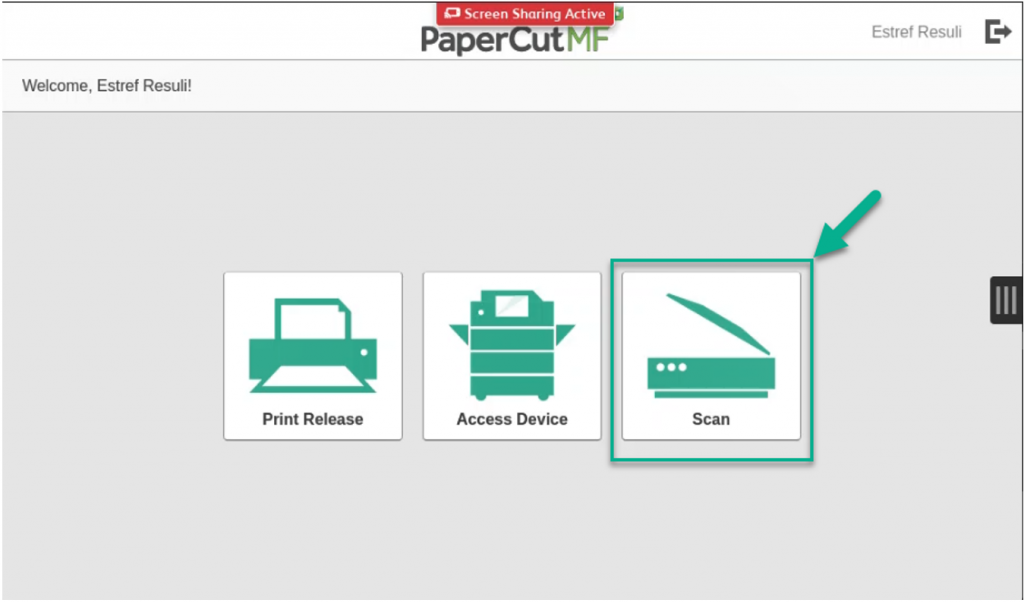
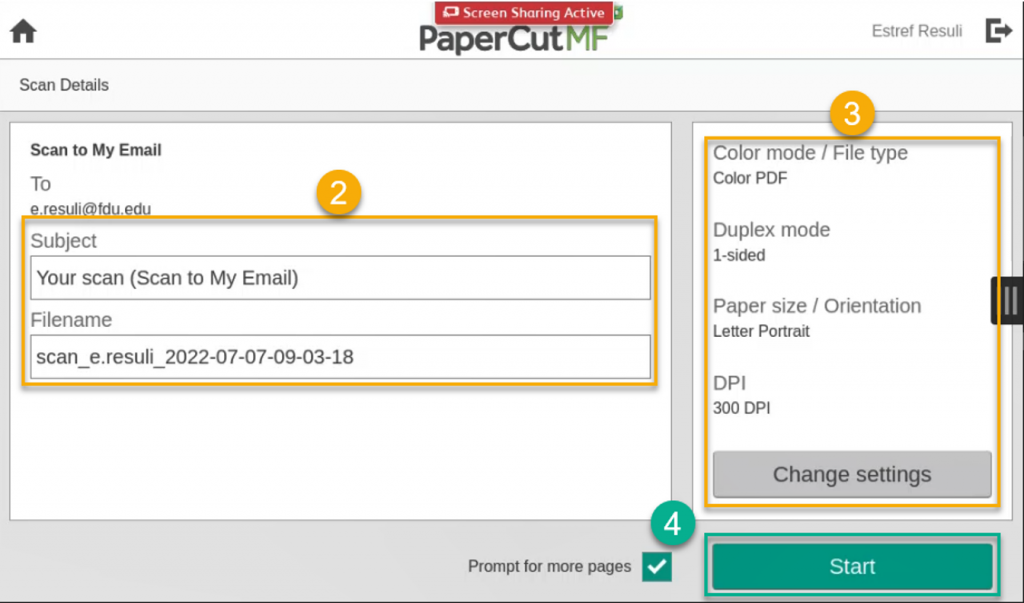
Scan to Email
To start a scan-to-email job, log into a printer and press the “Scan” button
You can press the “Star“’ button (4) immediately to start scanning
Optionally you can edit the Subject and Filename entries (2) and the scan settings (3)
To log off of the printer, press the “Log Out” icon on the top right next to your name
close
Copying
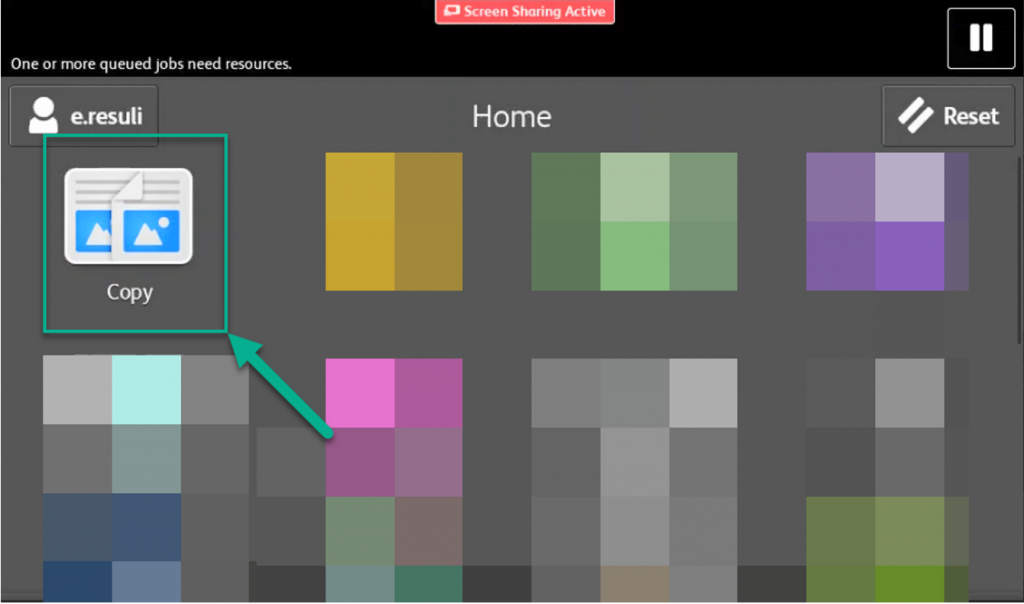
To start a copy job, log into a printer and press the “Access Device” button
Press “Access Device“
To return to the PaperCut MF main screen, press the “PaperCut MF” button
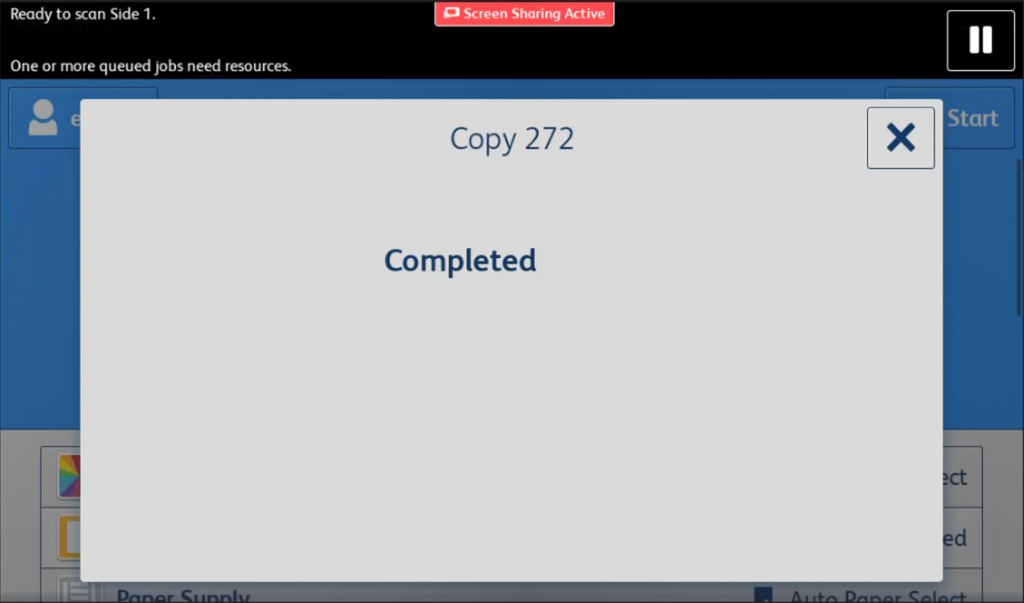
To copy, press the “Copy” button
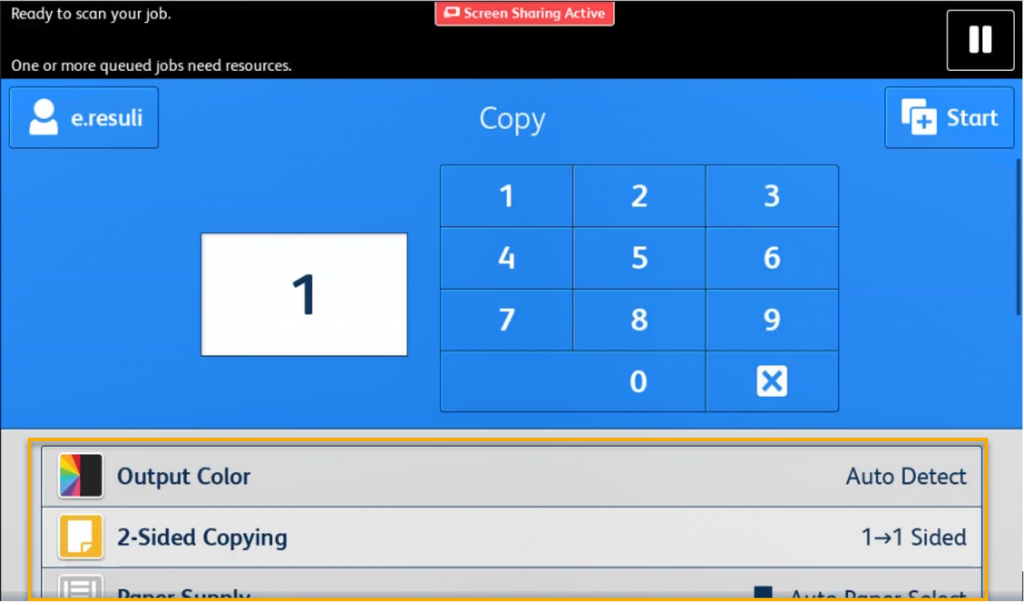
Enter the number of copies and then press the “Star“’ button for the default selection (Auto Detect Color, 1-1 Sided copies). Optionally you can change the settings shown in the yellow box below, then press the “Star” button
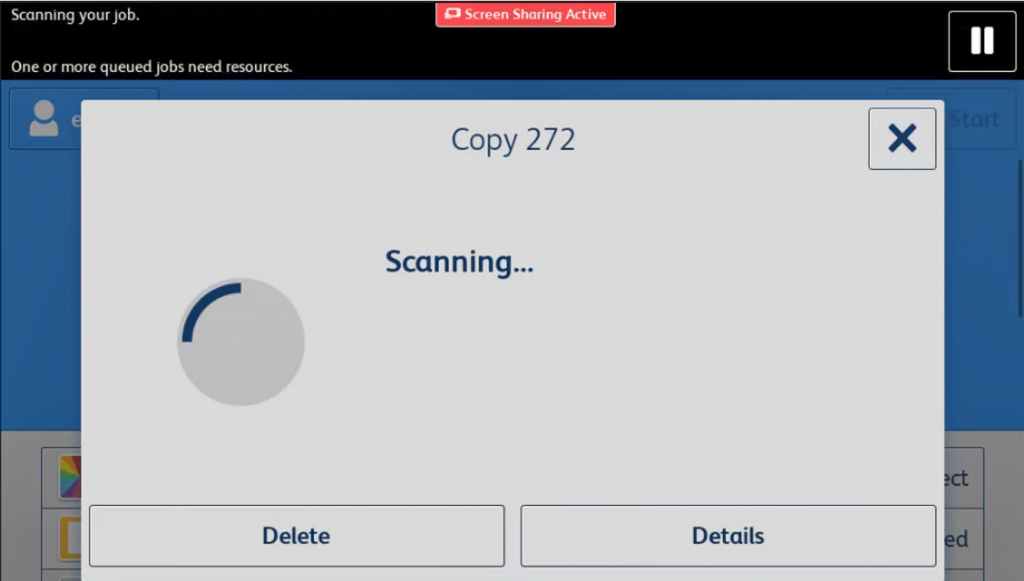
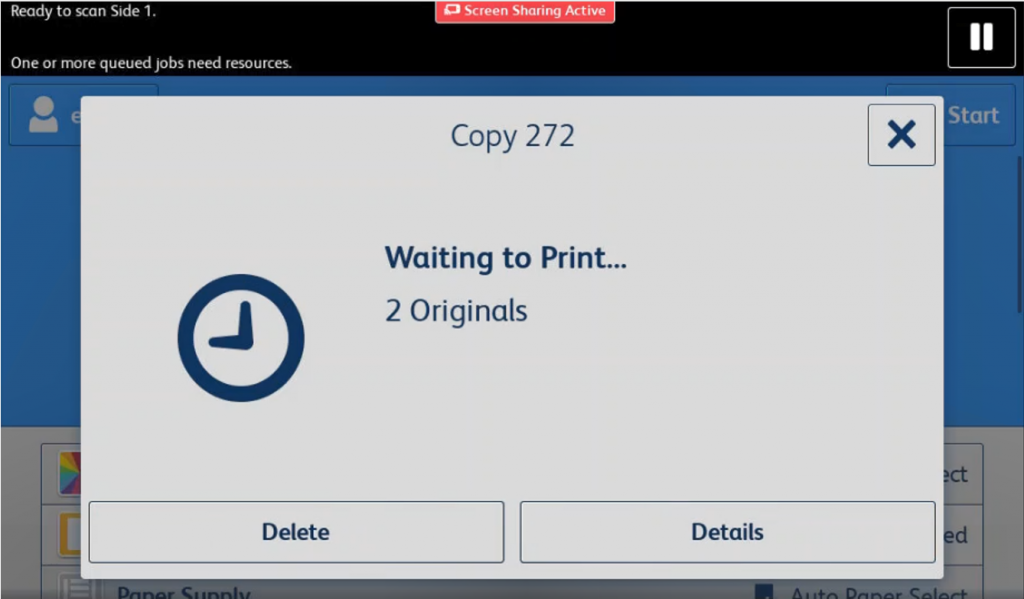
You can delete the job at any point in the previous screens by pressing the “Delete” button. If only N number of pages have been printed, you will only be charged N times
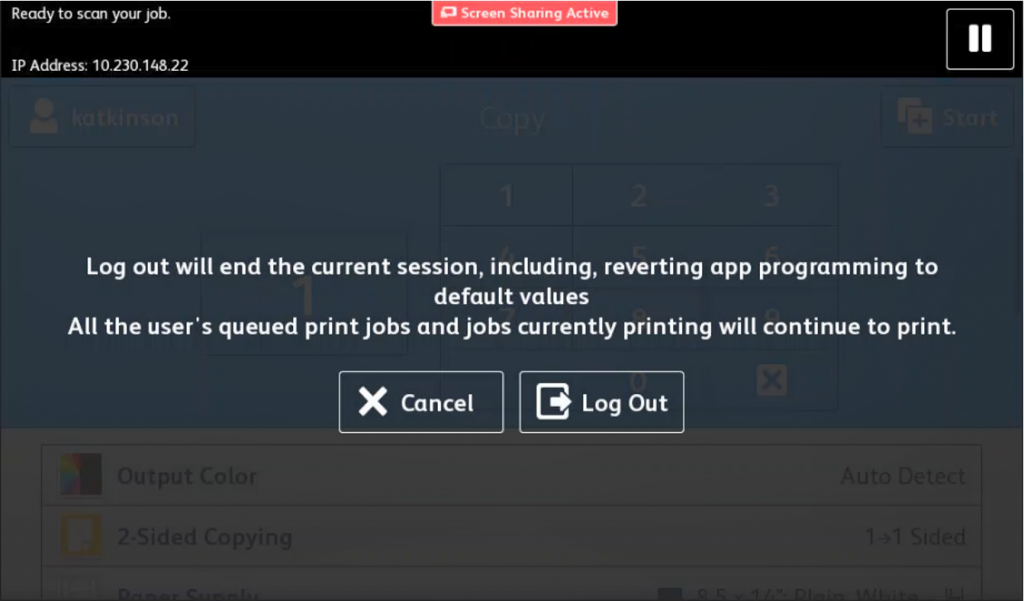
To log off of the printer, press your username on the top left and then press the “Log Out” button.
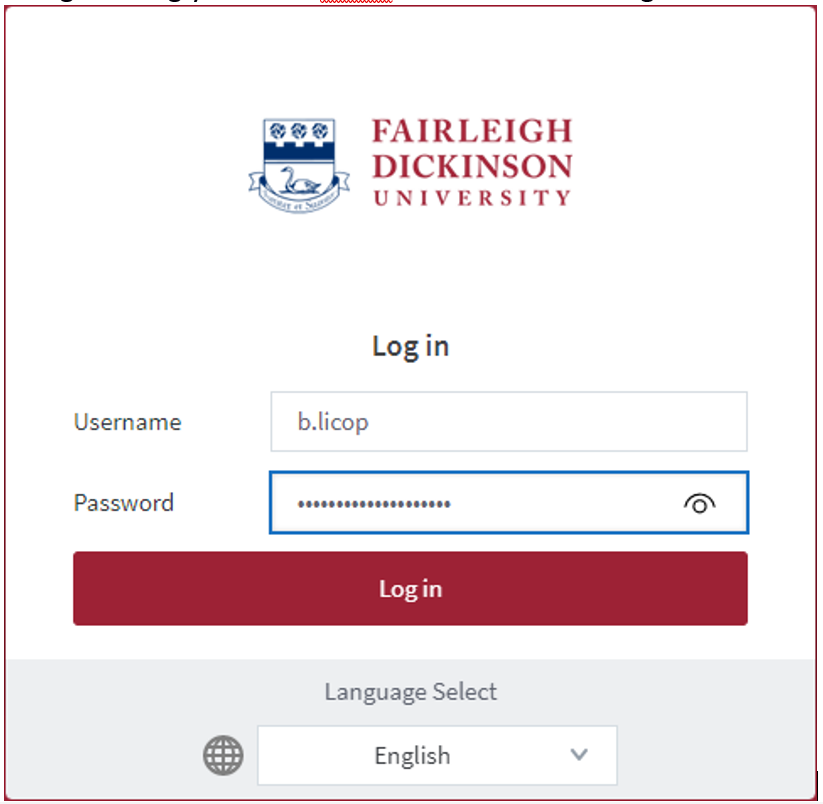
Log in using your FDU netID then select the “Login” button
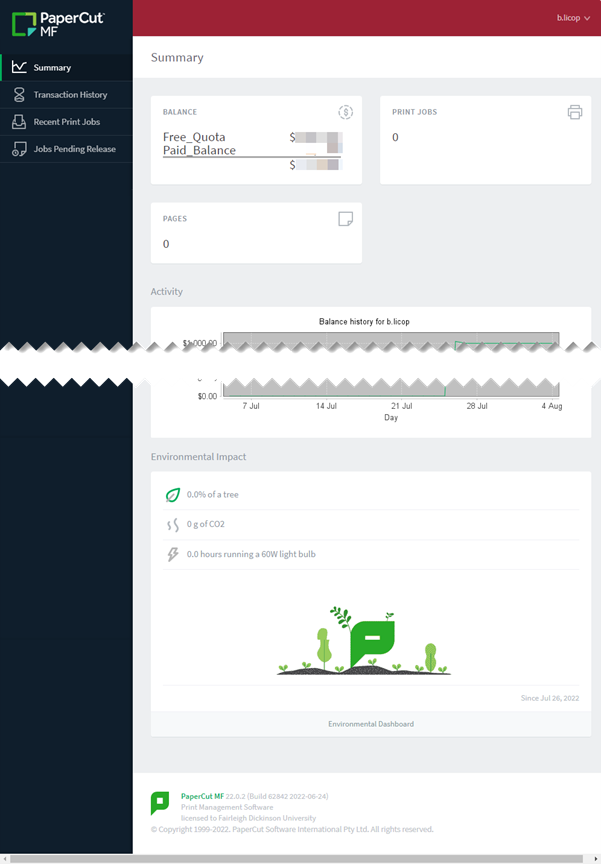
You can review your Transaction History, Balances, Recent Print Jobs & Jobs Pending Release by selecting the appropriate tab on the left-hand side. You can also see your environmental impact according to your print, scan & copy activities
To prevent excessive printing, the Department of Computing Services charges students a small fee for printing in the FDU Computer Labs. Black and white printing costs $0.05 per page and color printing is $0.25 per page.
Each student pays a technology fee which includes $10.00 of lab printing for each of the fall, spring, and summer semesters. Printing charges above the $10.00 per semester will appear as a Printing Fee on the next tuition bill.
The $10 per semester printing credit is a standard allotment that expires each semester and has no cash value. No refunds will be given for pages not printed and unused prints for each semester’s allotment do not carry forward.
FDU staff and faculty members can use lab printers on a limited basis without charge for the purpose on conducting FDU business. Please use your department’s printer(s) as your primary printing resource. Faculty and staff members are limited to 200 pages per semester. Any attempt to print past this quota will result in an error message stating that the account does not have enough credit.
Note: You are responsible for all activity on your account. If you share your password with others or forget to log out, you will be held responsible for any activity done via your account, including printing charges. Computing Services strongly recommends that you use non-trivial passwords and log out completely before leaving a workstation.
View and Manage your Lab Printing
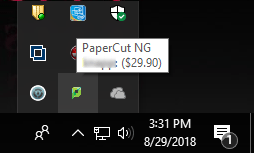
PaperCut Icon
Hovering your cursor on the Papercut tray icon shows the Balance
When you click on the Papercut tray icon, it opens a new window as seen below:
Clicking on the “Details…” button on the lower right of the Balance within the Papercut window opens a web browser that will let the user log in and see their job history
Receiving Credit for Printing Errors
Credit will be given for errors caused by the printer (paper jams, toner problems, etc.) In such situations, please take the bad printouts to a Lab Assistant in Dreyfuss, Dickinson Hall, or University Hall. Your information will be taken, and reimbursement will be made in the form of a credit applied to your total charge for the semester. Situations which could have been prevented before printing, such as extra blank pages at the end of a document, will not be reimbursed.
Can I Use My Own Paper in These Printers?
No. Jobs are printed as they are received. There is the possibility that after loading the printer with your paper someone will print a job that will then be printed out on your paper. Transparencies and mailing labels are not allowed in the lab printers due to the high heat that laser printers use and the potential for damage to the equipment.
Being connected to the internet suggests that the internet is connected to you. Without concern and proper safeguards to protect the information you share, you are at a greater risk of cybercrime.
The university assumes its share of responsibility to protect sensitive information but you must do the same. The vast majority of data and identify thefts are not the result of enterprise breaches but a direct consequence of individuals who are complacent about sharing sensitive information or unaware of the risks.
Please take a moment to review this video to obtain a better understanding of how you can help protect yourself from cybercrime.
According to FDU’s Written Information Security Program (WISP), in no case should they be sending or storing WISP protected information without the explicit authorization of the Chief Information Security Officer (CISO). If approved, these instructions will provide you with guidance on the methodology.
If you do not have a university issued laptop or desktop, you must download and install 7-Zip on your computer in order to proceed with the instructions. Please follow the following steps in order to download and install 7-Zip on to your personal device:
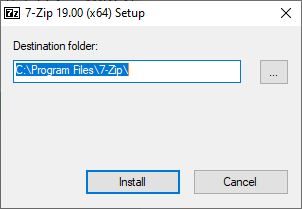
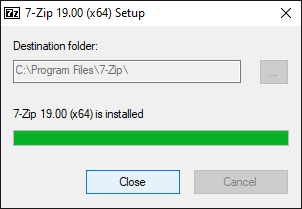
Launch the 7-Zip installer “7z1900-x64.exe” or “7z1900.exe”
NOTE: The Installer file name may change as newer versions are released.
Click “Yes” if asked to run an unknown app from User Access Control
Click “Install” on the setup screen
7-Zip will now install, when completed, click “Close“
Preparing an Encrypted 7-Zip File
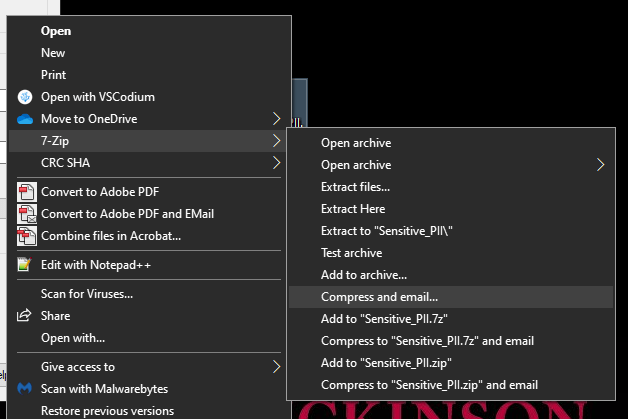
Single “Right” click on the file
Highlight “7-Zip”
Navigate and “Left” click on “Compress and Email…”
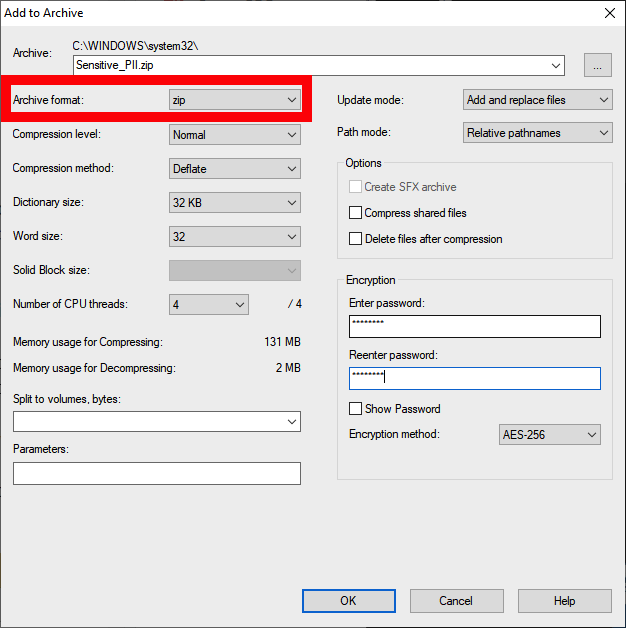
Change Archive Format to “ZIP”
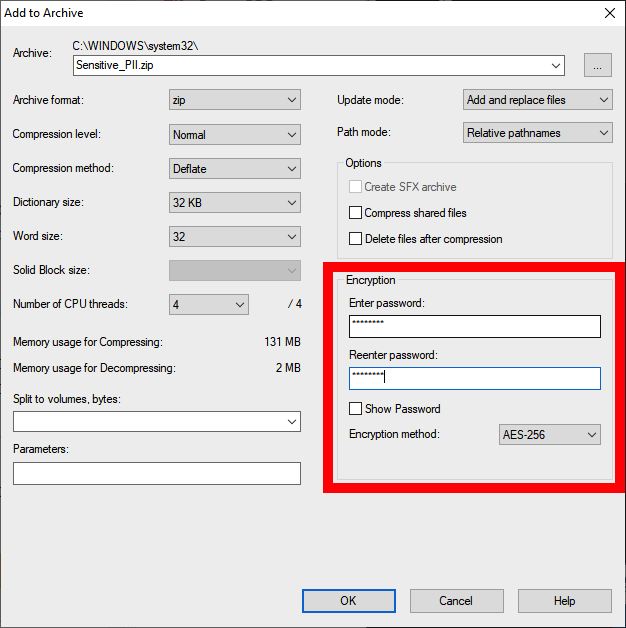
Enter and Retype a password in the “Encryption Section” and check the box to “Encrypt file names”
Change the Encryption Method to “AES-256“
NOTE: The password must be a complex password that contains the following:
At least one capital letter
At least 2 numbers 0-9
At least 1 special character (%, ^, &, ! , @ , !, ….)
Be at least 8 characters long
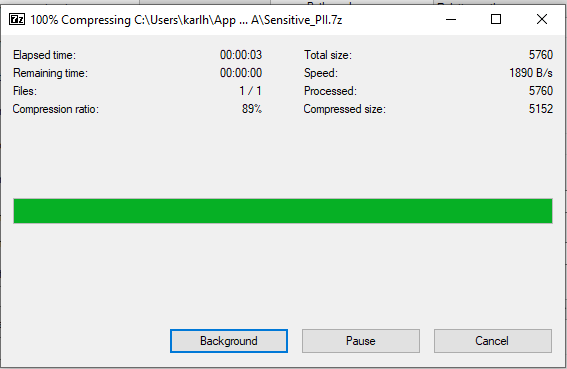
Click “OK“
NOTE: A progress bar will open to encrypt and zip the file. Depending on the size of the file, this may take a few minutes.
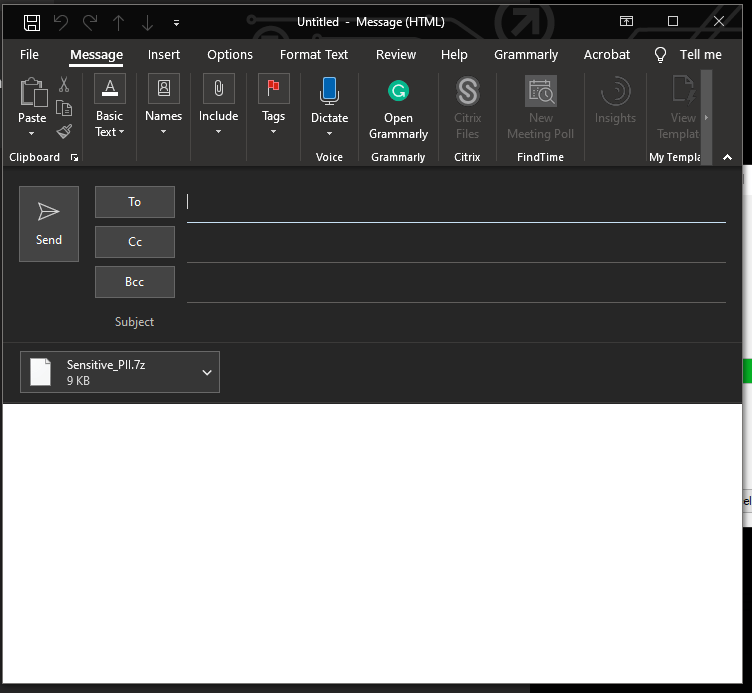
An email message to compose your new email with the compressed and encrypted file will appear
Address and compose your email as desired
CAUTION: Never send an email that contains both the password and file together. These must be sent separately.
Compose and send a separate email, or place a phone call, to the receiving parties which contains the password for the compressed file for them to read
NOTE: Without the password, the receiving party will not be able to open and view the file.
Opening an Encrypted 7zip File
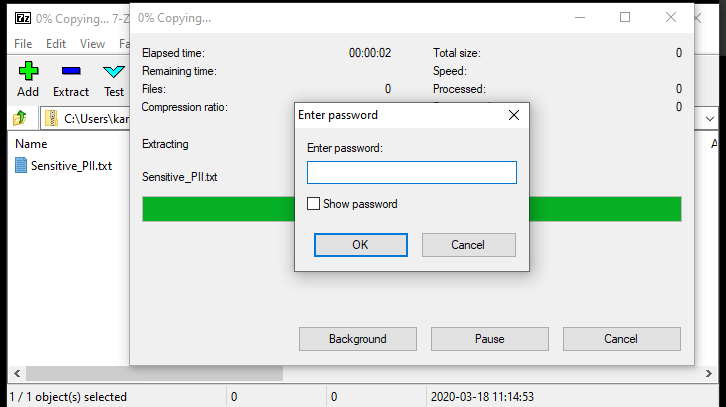
Open the email that contains the encrypted file
Click the arrow “V“’ and select “Save As”
From the saved location open the encrypted file
Enter the password provided to you from the sender
Once the password is entered correctly, the enclosed document will then load, and you can make any changes and save inside the protected file. If needed, the file can be returned to the sender with needed information.
NOTE: The Archive Window must not be closed if making any changes that need to be saved.
IMPORTANT: After the document is no longer needed, the encrypted file should be SECURELY DELETED from your hard drive. At no time should this be saved for later use.
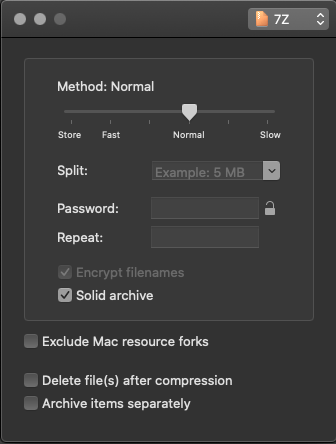
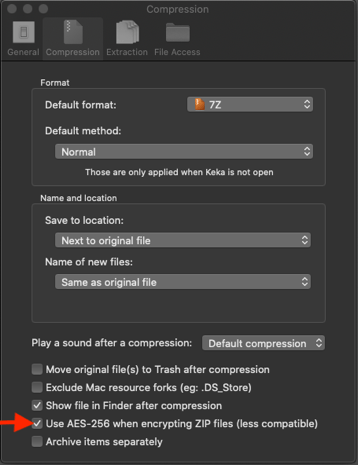
Open Keka Preferences and check the box next to Use AES-256 when encrypting ZIP files (less compatible)
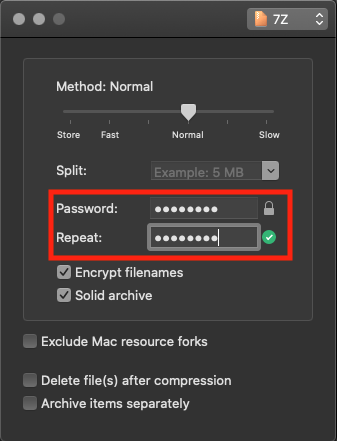
Set a password for the file
Drag your file onto Keka to compress and encrypt. The encrypted file will be placed next to the original file
If you need to extract an encrypted file, simply drag it onto the Keka window and enter the file password in the prompt. The file will be extracted in the same location as the original
To access Forms, you will be directed to our SAMI Support Portal where you will be asked to log in using your NETID and authenticate using Duo. Once you click “Next,” you will be forwarded to samisupport.fdu.edu in a new window or tab.


 Email
Email 

