Information

Computing Services Computer Labs

Resources for:
icon Close

Fall Semester 2024 Computer Labs Hours

August 26th, 2024 to December 18th, 2024

Computing Services has multiple computer labs in our
New Jersey Campuses for classroom instruction and student use.

Florham Campus

Dreyfuss Building
BuildingMonTueWedThurFriSatSun
Dreyfuss
Building
8AM-
11PM
8AM-
11PM
8AM-
11PM
8AM-
11PM
8AM-
5PM
10AM-
5PM
12PM-
9PM
Dreyfuss
211, 212, 213
8AM-
11PM
8AM-
11PM
8AM-
11PM
8AM-
11PM
8AM-
5PM
10AM-
5PM
12PM-
9PM

Rooms:

  • D206
  • D207
  • D208

  • D209
  • D211
  • D212
  • D213

Phone:

(973)-443-8689

close

Metropolitan Campus

Dickinson Hall – Hackensack
BuildingMonTueWedThurFriSatSun
Dickinson
Hall
8AM-
11PM
8AM-
11PM
8AM-
11PM
8AM-
11PM
8AM-
5PM
CLOSEDCLOSED

Rooms:

  • Lab A (DH2163)
  • Lab B (DH2164)
  • Lab C (DH2165)

Phone:

(201)-692-7111

close
University Hall – Teaneck
BuildingMonTueWedThurFriSatSun
University Hall8AM-
11PM
8AM-
11PM
8AM-
11PM
8AM-
11PM
8AM-
5PM
10AM-
6PM
2PM-
10PM

Rooms:

  • Front Lab (UH 22)
  • Back Lab (UH 28)
  • UH Side Lab

Phone:

(201)-692-7112

close
Student Union Building – Teaneck

Rooms:

  • Multipurpose Room 135

Phone:

(201)-692-2222

Tip

The Student Union Building Multipurpose Room will be locked at all times. To gain access to the Student Union Building computer lab, you will need to contact Public Safety at (201)-692-2222.

close

Note

Computer Lab hours of operation are subject to change based on utilization throughout the semester. Lab computers are available on a first-come-first-serve basis unless reserved for classes. Class reservations are posted at the lab entrances.

Last Modified:

Connecting a Non-PC Device to Wi-Fi

Resources for:
icon Close

This article is intended for students, staff, and faculty who wish to connect their non-PC, IoT, gaming, or streaming devices to the FDU-Wireless network. Devices that require registration include gaming consoles (such as Xbox, PlayStation, Switch) and streaming devices (like Amazon Fire Stick, Apple TV, and Roku).

Note

FDU-Wireless is only for non-PC, IoT, gaming, or streaming devices that do not support WPA2 Enterprise authentication or features a web browser.

Registering a Non-PC Device for use on FDU-Wireless Network

Use the link and directions below to register and manage wireless network access for your non-PC devices.

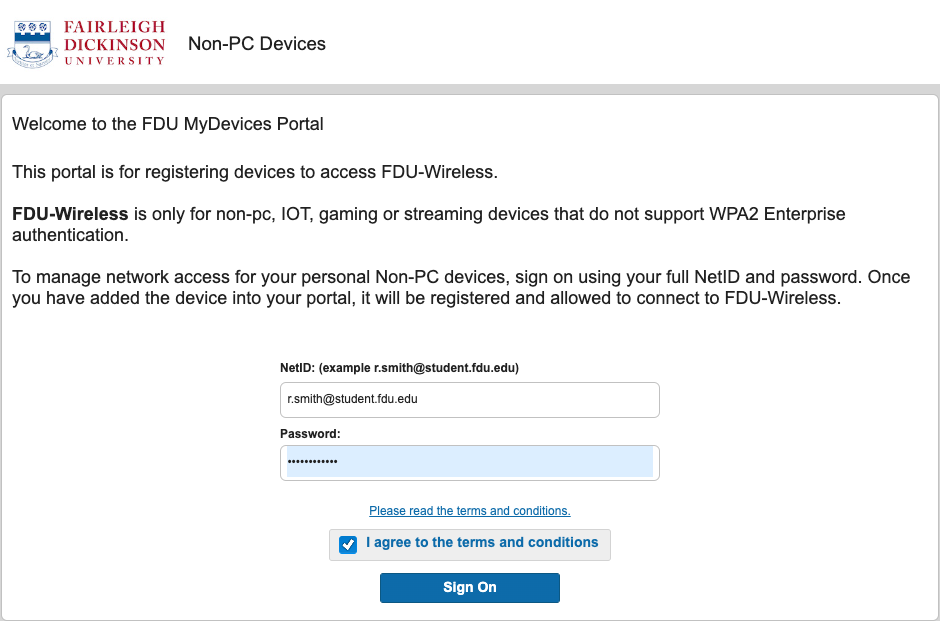
  1. Sign in into FDU MyDevices portal using the link below using your FDU NetID. Make sure to check “I agree to the terms and conditions” button before clicking “Sign On

FDU MyDevices Portal

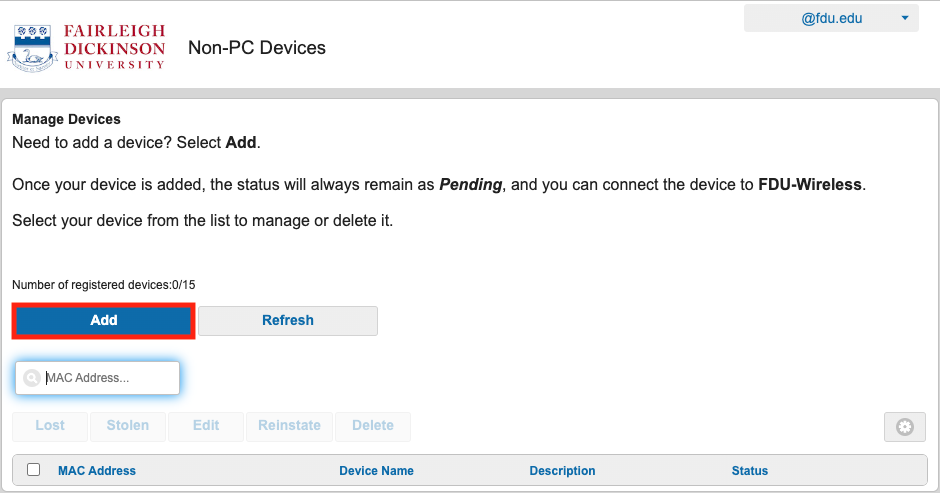
  1. Select “Add” to begin registering a device
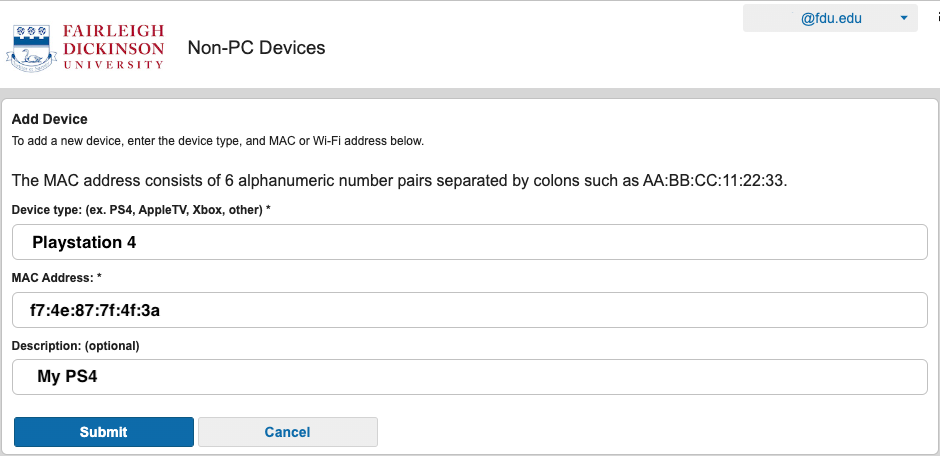
  1. Enter your device type and your device’s MAC Address into the corresponding text boxes. An optional description may be entered for your device as well. Your device’s MAC Address must be entered to register the device and continue. Refer to your devices manufacture for instructions on how to obtain the devices MAC Address. When finished, select “Submit

Tip

Some devices have their MAC Address labeled alongside it’s Serial number.

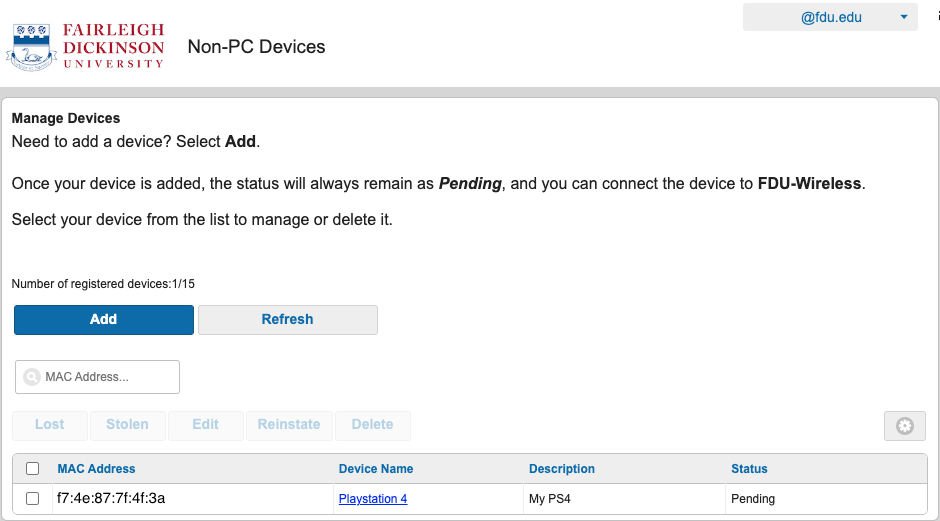
Your device should now be listed on MyDevices Portal and allowed to connect to the FDU-Wireless network. It may be necessary to select the FDU-Wireless network on your device or restart your device before successfully connecting to the wireless network

Note

Once your device is added, the status will always remain as Pending. However you will be able to connect the device to FDU-Wireless regardless of this status.

Last Modified:

Copyright Enforcement Policy

Resources for:
icon Close

Fairleigh Dickinson University vigorously enforces United States copyright law. When utilizing the FDU Local Area Network or FDU provided Internet Access, you are required to adhere to all existing US copyright laws.

To view the full statement of law, please visit:

Failure to comply with this document can result in FDU disciplinary action as well as civil and criminal penalties.

Last Modified:

Cost Associated with Production and Post Production

Resources for:
icon Close

Production Services

Multimedia Services operates as a cost recovery center, ensuring our pricing remains competitive and significantly lower than external video production studios, without compromising on production value.

Our pricing structure is straightforward: video production services are offered at a flat rate of $150.00 per hour, making high-quality production accessible and affordable.

Post Production

When it comes to post-production, our rates are equally transparent, set at a flat rate of $50.00 per hour. The total time required for editing a project can vary, but on average, it ranges between 20 to 30 hours, depending on the complexity of the project, its duration, and the number of revisions needed during the preview stages.

ADA Captioning

In line with ensuring all online distributed videos are ADA compliant, our services include closed captioning and transcription. While platforms like YouTube automatically generate captions, they might not always be perfectly accurate. For videos requiring 100% accuracy in transcription, or for content hosted on platforms other than YouTube, we offer professional transcription services at an additional cost to meet all accessibility standards.

Last Modified:

CrashPlan Backup Email Alert

Resources for:
icon Close

Backup Alert Email Notifications

CrashPlan Backup will send users an email alert notifying them of any incomplete backups of their devices.

  • The CrashPlan Backup email alert will be sent from “CrashPlan <noreply@crashplan.com>
  • The Subject line of the email will be labeled with: “[External]Critical: [Name of Device] not backed up

Backup Alert

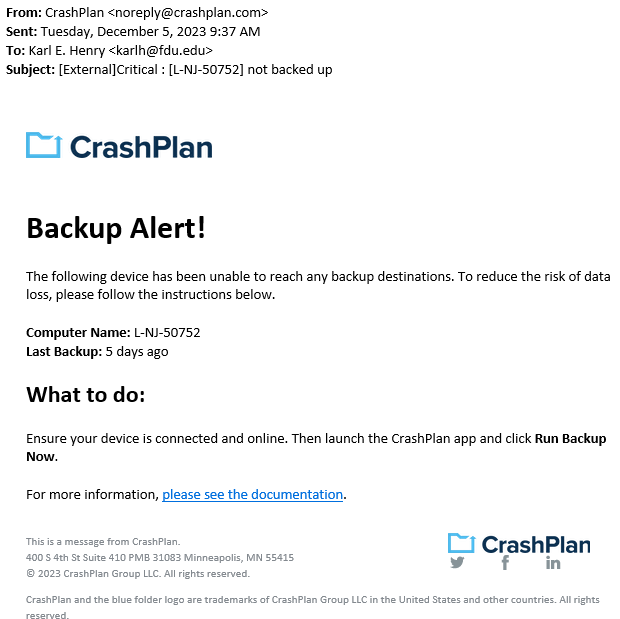
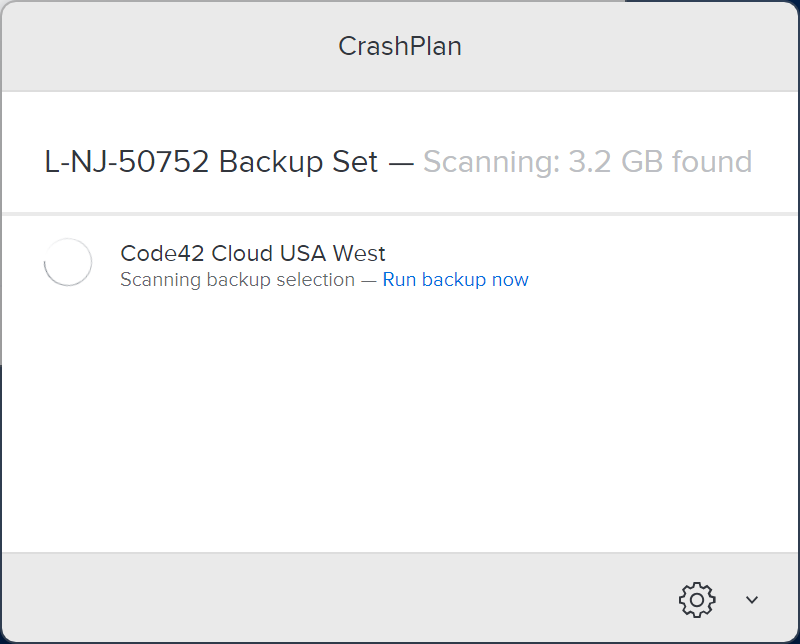
You will receive an alert when your computer hasn’t backed up to CrashPlan for 5 calendar days. The email will look like the example below:

CrashPlan Backup Alert Email Notification

What to do if you get a backup alert

After receiving a CrashPlan Backup alert email, you should locate the device the email specifies in need of backup. The CrashPlan Backup device name will be listed in the Subject: line and Computer Name: line of the CrashPlan backup alert email.

For Windows Devices

To locate the name of a CrashPlan Backup device:

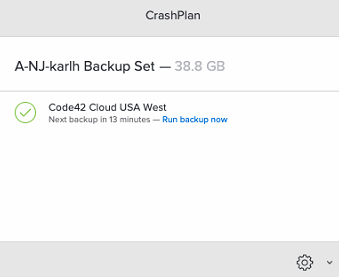
  1. Click the CrashPlan Backup icon in the Windows System Tray, also referred to as the notification area.

CrashPlan Backup icon

  1. Click “Run Backup now

Tip

The Windows System Tray or notification area is usually located on the bottom right of the Windows taskbar, next to the displayed digital clock.

Ensure the CrashPlan backup application displays the same name as the CrashPlan Backup alert email you received.

close
For macOS Devices

After locating the correct specified device stated in the CrashPlan backup alert email, force a backup of the device by performing the following:

  1. Click the “CrashPlan Backup” System Tray or macOS menu bar Icon

CrashPlan Backup Icon

  1. Click “Run Backup now

Note

The backup may take some time to complete. This depends on the length of time since CrashPlan Backup’s last completed backup and the amount of new data that needs to be backed up.

close
Last Modified:

DUO FAQ’s

Resources for:
icon Close

Two-factor Authentication

Two-factor authentication also referred to as multi-factor authentication, provides an additional layer of security when logging in to a website. Two-factor authentication is becoming the standard in cybersecurity. Google, Apple, and other services all have their two-factor authentication methods. In short, passwords are no longer sufficient in protecting our sensitive data; we’ve got to add another layer of security to our accounts.

FAQ’s for DUO Authentication

    • DUO Push – if you have the DUO Mobile App installed on your smartphone or tablet, you can receive a push notification. From the app, you can approve or deny the login attempt.
    • Passcodes via DUO Mobile App – If you have the DUO Mobile app installed, you can receive a single passcode by tapping the FDU logo in the mobile app. This code must be used immediately.
    • Passcodes via SMS (Faculty/Staff Only) – users can receive a one-time use code via text message. To get you a one-time code, click Enter Passcode, then click on the blue button “Text me new codes.”  These codes do not expire, and they are valid until used.    You do not have to have a smartphone for this option.
    • Phone Call (Faculty/Staff Only) – you can receive a phone call on your mobile phone or landline phone. The call will give instructions on approving or denying the login attempt.
  • DUO is required for all FDU Staff, Faculty, and Students.

  • If you opt-out of the DUO Mobile Application push notifications, there are a variety of passcode options to utilize as your second verification method.

    • Passcodes via DUO Mobile App – If you have the DUO Mobile app installed, you can receive a single passcode by tapping the FDU logo in the mobile app. This code must be used immediately.


    • Passcodes via SMS (Faculty/Staff Only) – users can receive a one-time use code via text message. To get you one-time code click Enter Passcode, then click on the blue button “Text me new codes.”These codes do not expire, and they are valid until used. You do not have to have a smartphone for this option.


  • Selecting this option will allow you to bypass DUO authentication for the next 60 days. This only works if cookies are enabled, and you are logging in from the same computer and browser. You will still be prompted to verify once – with your username and password. You will not be able to access your settings on that particular browser during the 60 days. Please note that if you have tools or policies running that regularly delete or clean cookies, the remember me feature will not work. If you do need to access your settings (perhaps to add another device), just try another browser or visit the FDU Self-Service Portal. Remember me will not work if your browser is set to private browsing mode.

  • The remember me feature relies on browser cookies. For remember me to work, your Internet browser must allow cookies to be stored. Visit your browser content settings to ensure cookies are being stored. Some departments on campus do not allow cookies to be stored. If the remember me feature does not work on your browser, check with desktop support in your area.

  • If you do not have your device with you, you can obtain a batch of temporary passcodes. To obtain a temporary passcode, call the Fairleigh Dickinson University Technical Assistance Center (UTAC).  Each of the passcodes can only be used once and will expire in 7 days.

    NOTE: If you have lost your device, please report it to the Fairleigh Dickinson University Technical Assistance Center (UTAC).  We want to ensure someone else does not maliciously authenticate your account with your device.

  • DUO is available to all faculty,staff, and Students. At this time, DUO is not available to FDU retirees, past employees, or alumni.

  • Yes, the passcode option on the DUO app does not require WiFi or cellular connectivity, it even works on airplane mode. To use this option, visit the DUO app on your smartphone, and tap the key icon to obtain a passcode. Enter the passcode into the DUO prompt when logging into any website that requires DUO authentication.

  • DUO Authentication is required by any application the utilizes the university Single Sign-On (SSO) service.  Examples of some websites that require DUO authentication are listed below.

    • WebAdvisior
    • WebCampus
    • Office365 (Office365.fdu.edu)
    • Blackboard
    • Zoom
  • You may have trouble receiving push requests if there are network issues between your phone and Duo’s service. Many phones have difficulty determining whether to use the Wi-Fi or cellular data channel when checking for push requests and simply turning the phone to airplane mode and back to normal operating mode again often resolves these types of issues, if there is a reliable internet connection available. Similarly, the issue may be resolved by turning off the Wi-Fi connection on your device and using the cellular data connection.

    Check the time and date on your phone and make sure they are correct. If the date and time on your phone are manually set, try changing your device’s configuration to sync date and time automatically with the network.

    iOS users can run a troubleshooting tool from within Duo Mobile version 3.32.0 or later. To run the tool:

    1. Open the Duo Mobile app on your iOS device and tap the Edit button in the top left of the accounts list screen, then tap the name of the account for you aren’t receiving push requests.
    2. Next, tap the Get Started button in the “Missing Notifications?” section of the “Account Details” screen.
    3. Duo Mobile performs the test. If any step fails, you’ll receive further troubleshooting suggestions. After taking the suggested actions, press “Run test again” to retry.

    The steps that Push Troubleshooting performs automatically are as follows:

    • Check device settings.
    • Check internet connectivity.
    • Check that the device can contact Duo’s cloud service.
    • Attempts to send a test Duo Push notification.

    Should none of these actions help, see the Duo Knowledge Base for additional iOS and Android troubleshooting steps.

    If you can’t get Duo Push working on your own, you can log in with a passcode generated by the Duo Mobile app and send a new activation link to your phone.

    If you’ve tried the suggestions here but can’t get Duo Push working or reactivate your device yourself, please contact the Fairleigh Dickinson University Technical Assistance Center (UTAC).

  • Press the red “X to deny access to your account, then promptly change your FDU NetID password.

  • Yes! Visit the app store on your smartphone to download DUO Mobile.

    DUO for iOS >

    DUO for Android >

    NOTE: Google Play Services are required to receive push notifications on Android. Users without Google Play Services installed will have to “fetch” by swiping down in the DUO Mobile app.

    1. If your phone number has not changed, login to FDU Self-Service Portal then choose the “Call my Phone” option.
    2. Choose your device from the list, and then click “Device Options” next to your phone.
    3. Next click the “Reactivate Duo Mobile” button (you will need to install the Duo app on your phone to proceed). Then follow the instructions to activate DUO Mobile on your new device.

    If you have a new phone number, you will first need to obtain a temporary passcode (see the ‘What are Passcodes?’ section above).

    1. Login to FDU Self-Service Portal and enter the temporary passcode.
    2. Click on “Add a new device.”
    3. Once you complete adding your new device, please delete the device you are replacing.
  • Yes, you can add devices by visiting your DUO settings. When you see the DUO prompt with the three notification options, click “Settings” at the top right.

    NOTE: If you are using the Remember Me for 60 days feature, you will need to visit FDU Self-Service Portal access your settings.)

    After you click Settings, click “Add a New Device“. You can register smartphones, cell phones, tablets, and landline phones.

  • The DUO smartphone application serves only to provide two-factor authentication. It does not access any personal information on your device, nor does it track your location. Learn more about DUO’s commitment to privacy on its website.

  •  A “bypass code” is a temporary passcode created by an administrator for a specific user to access a Duo-protected application. These are generally, used as “backup codes,” so that enrolled users who are having problems with their mobile devices (e.g., mobile service is disrupted, the device is lost or stolen, etc.) or who temporarily cannot use their enrolled devices (on a plane without mobile data services) can still access their Duo-protected systems.

    A user must have a valid Duo authentication device enrolled (like a phone or iPad) to use a bypass code to authenticate. Bypass codes are not intended as a user’s only 2FA method.

    Bypass codes expire after being used the allowed number of times, or after an administrator-defined amount of time. Once a bypass code is created, the timeout and allowed uses cannot be extended.

    If you need a Bypass code please visit SAMI Support, where you can request additional information from UTAC or search our extensive IT knowledge base. While SAMI Support provides the quickest and easiest access for IT support, you can always contact UTAC by phone at (973) 443-8822 or email at fdutac@fdu.edu.

  • For additional support, please visit the Fairleigh Dickinson University Technical Assistance Center (UTAC).

Last Modified:

DUO Remember Me

Resources for:
icon Close

The “remember me” option is displayed by Duo when you sign in with FDU NetID on the web. After providing your second factor for authentication, Duo will present you with a prompt asking if you would like to have this device remembered for future logins. Selecting “Yes, this is my device” sets the “remember me” status for Duo.

Use the “remember me” option to reduce how often you have to sign in with two-factor authentication (2FA) on the same web browser. It’s safe to use on trusted computers and lasts for 30 days.

Refer to our Duo Quick Start Guide below for instructions on using the “remember me” option within the context of the overall sign-in experience.

Use “remember me” on trusted computers

The “remember me” option is safe to use on computers and devices that you can trust to protect your browser. Examples include managed workstations at work, lab computers that require you to sign in, and personal computers, laptops, tablets, and mobile devices that protect your browser from use by others.

Do not use “remember me” on public or shared computers Do not use “remember me” on public or shared computers

The “remember me” option shouldn’t be used on computers and devices that don’t protect your browser, such as public or shared computers, and computers you don’t sign in to and cannot lock to protect your browser.

FAQ

What is the “remember me” option?

The “remember me” option is a feature of Duo that tells your browser to remember that you have confirmed your identity using your 2FA device. If you confirm that “Yes, this is my device” when authenticating with Duo, you won’t have to use your 2FA device as often on that browser. For example, if you use it on your computer at work, it reduces how often you have to sign in with 2FA at work; but your laptop at home will still ask you to sign in with 2FA.

Why would I want to use it?

The “remember me” option saves you time and reduces distraction by reducing how often you have to use your 2FA device. If you routinely use the Duo callback method, it also saves the FDU money in telephony costs.

Is “Remember Me” safe? Doesn’t it defeat the purpose of 2FA?

The “remember me” option is safe to use on computers and devices that you can trust to protect your browser. It doesn’t defeat the purpose of 2FA because the convenience it provides is limited to each computer and browser that you choose to use it on. If you or anyone else tries to sign in with your FDU NetID on a different computer or browser, 2FA will be required.

How long does it last?

The “remember me” option lasts 30 days. It saves a secure cookie on your browser to track the time until you need to use your 2FA device again. If your browser clears cookies this will remove “remember me” until you re-select it.

Why is the “remember me” duration 30 days?

30 days is the current “remember me” duration because it is often enough to remind you that 2FA is turned on, but not so often to be annoying. While some institutions use shorter or longer durations, 30 days is a common duration at peer institutions.

How do I clear it on my current browser?

If the “remember me” option is enabled on the browser you’re using right now, clear your cookies for duosecurity.com. To clear it on other browsers, repeat this process on each of them.

How do I reset it on a browser I no longer control?

If you enabled the “remember me” option on a browser you no longer control, Please open a support ticket by clicking Support at the top of the page, or visiting samisupport.fdu.edu.

Note

When FDU IT resets your “remember me”, it will clear it on all your browsers, including those you no longer control. Once it has been reset, you can enable it again on your current browser(s).

close
Troubleshooting

I’m using the “remember me” option, and I still have to use my 2FA device more often than every 30 days. Why is that?

Some system owners require you to reauthenticate with 2FA every time you access their systems for security, regardless of using the “remember me” option (workday for example). This can increase how often you have to sign in with 2FA. If you find you are regularly asked for 2FA on some sites despite the “remember me” option, but not other websites this is likely the cause. Other contributing factors include how many different computers you use, how many different browsers you use on these computers, whether or not you use the “remember me” option on all of them, how your browsers are configured to use cookies, and how often you clear your browser cookies.

Why do some system owners override the “remember me” option and reauthenticate me every time I sign in?

System owners decide to reauthenticate you based on what institutional and personal data they need to protect, and what threats and risks they need to guard against. Some of them reauthenticate you because they are concerned about unauthorized access from unattended browser sessions, and forcing you to reauthenticate is one way to re-establish that it’s you.

Why isn’t the “remember me” option working for me? Are there things that prevent it from working correctly?

The “remember me” option requires the use of browser cookies, so it may not work as expected in these circumstances:

  • You are accessing a site that overrides the “remember me” option
  • You cleared your browser cookies
  • You started using a different browser
  • You started using a different computer or device
  • You are using a private browsing mode
  • You disabled the use of browser cookies
  • Your browser doesn’t allow cookies to be saved
  • You use a browser extension that blocks cookies
close

Last Modified:

DUO TLS Support

Resources for:
icon Close

Warning Warning

After June 30, 2023, Transport Layer Security (TLS) 1.0 and 1.1 connection requests to Duo will not receive a response, resulting in blocked multi-factor authentication.

Who will be affected?

This may affect FDU community users using Windows 7, Windows 8.1, Android Devices with Android OS version 9 or lower, and Apple devices with iOS versions that don’t support TLS 1.2.

Check if you are using the supported endpoints by reading the information below:

Windows

Supported Windows operating system (OS) versions will support TLS 1.2 by default. If you are running a supported Windows OS, no action is required.

Unsupported Versions for Windows Operating Systems

Note

If your operating system was manually changed to disable TLS 1.2 for some reason, connection requests will fail. Verify your system is properly configured for TLS 1.2 with the suggested steps below.

Verifying TLS 1.2 on your Operating System

Check OS Version

  • Open the Windows Search box and type “About your PC” and click on “Open
  • Under Windows Specifications, check which edition and version of Windows your device is running

Enabling TLS 1.2 on your Operating System

If your operating system was manually changed to disable TLS 1.2 for some reason, you can verify or configure your system for TLS 1.2.

Before making any changes, create a backup of the registry:

  1. In the Windows Registry Editor, locate and click the “Protocols registry key” or “subkey
    that needs to be backed up
  2. Click “File”, then “Export”
  3. In the Export Registry File dialog box, select the filename and location of where to save the backup
  4. Click “Save”

After creating a backup of the registry, follow the steps below to enable TLS 1.2 on your system:

  1. Click the Start menu, type “regedit” and press the Enter key. The Registry Editor window should be opened.
  2. Navigate to follow the registry path: HKEY_LOCAL_MACHINE\SYSTEM\CurrentControlSet\Control\SecurityProviders\SCHANNEL\Protocols
  3. Check if the subkey of TLS v1.2 is enabled for both the server and the client. Each protocol’s state is controlled by two keys: Enabled and DisabledByDefault
  4. Make sure the Enabled value is 1 and the DisabledByDefault value is 0 or missing, the protocol is enabled.
  5. If the Enabled value is 1 but the DisabledByDefault value is 1, the protocol is disabled by default – it will not be used unless another host explicitly requests it during negotiation.
  6. If the Enabled value is 0, the protocol is disabled
  7. Restart the system to ensure the new settings take effect
close

DUO Mobile

Supported Duo Mobile applications running on supported OS versions will support TLS 1.2+ by default. If you are running a supported Duo Mobile application on a supported OS, no action is required.

  • Supported Android OS versions: Android 10.0 and greater
  • Supported iOS versions: iOS 14.0 and greater

Note

Using a mobile device with unsupported versions can still receive DUO push or generate one-time passcode as before, but it will prevent you from logging in to any systems that are accessed through our FDU Single Sign On Login Page.

Web Browsers

Common web browsers like Google Chrome, Microsoft Edge, Mozilla Firefox, Opera, etc. with their latest version are supporting TLS 1.2.

Note

If your browser was manually changed to disable TLS 1.2 for some reason, connection requests will fail. Please verify your browser is properly configured for TLS 1.2 with the suggested steps below.

Check TLS Support on a Web Browser

Chrome and Microsoft Edge

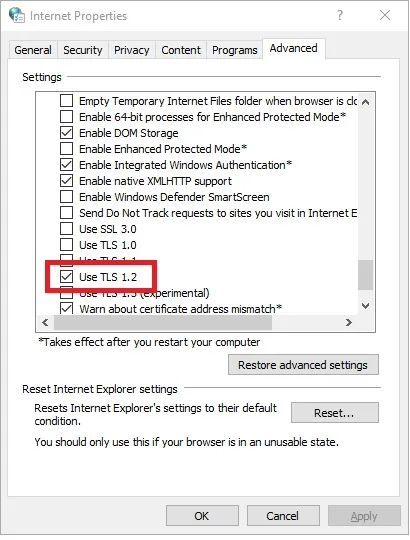
  1. In the Windows menu search box, type “Internet Options”
  2. In the Internet Properties window, on the Advanced tab, scroll down to the Security section
  3. Make sure the “User TLS 1.2” checkbox is checked
  1. Click “OK” and restart the browser

Mozilla Firefox

  1. Open the Mozilla Firefox Browser
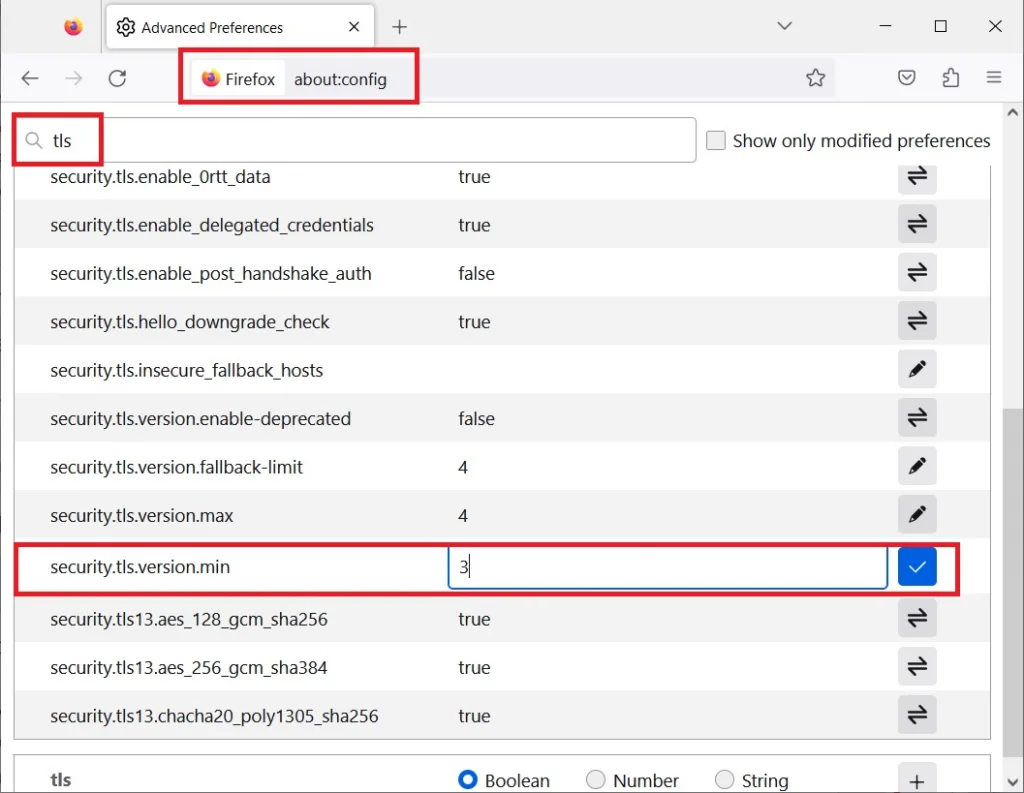
  2. In the address bar, type “about:config” and press “Enter
  3. In the Search Field type “tls”. Find and double-click the entry for “security.tls. version. min”
  4. Make sure the integer value is 3 to force a minimum protocol of TLS 1.2
  1. Click “OK” and restart the browser
close

We understand that upgrading your device is not always an option. In these instances, you can still use Duo Passcodes to perform multi-factor authentication.

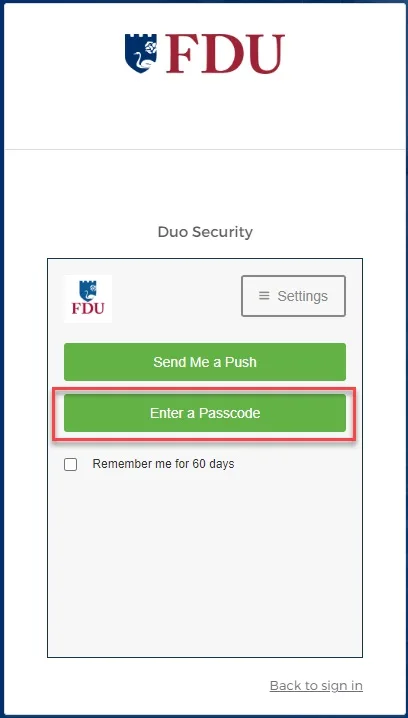
  1. To use this method, select “Enter a passcode” upon receiving your browser’s Duo security prompt
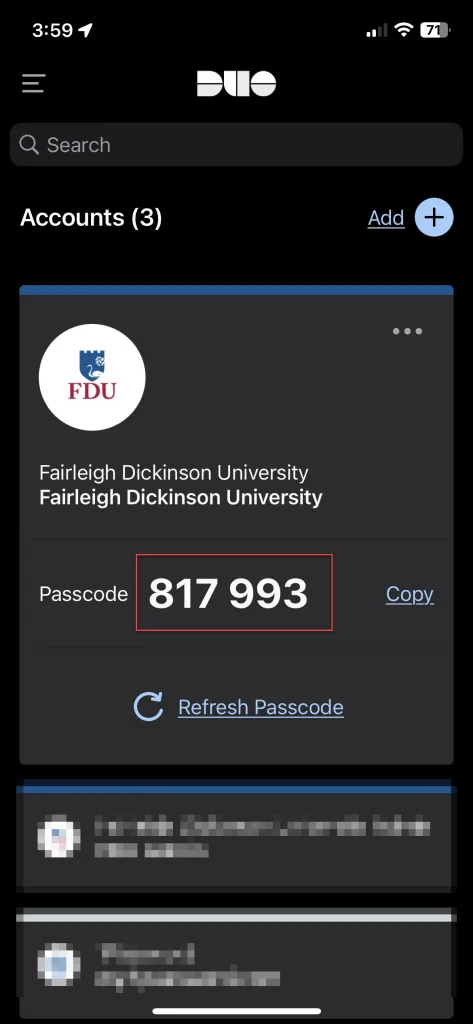
  1. Next, open the Duo app and click “Show”. This will provide a six-digit passcode which you can enter into the browser prompt
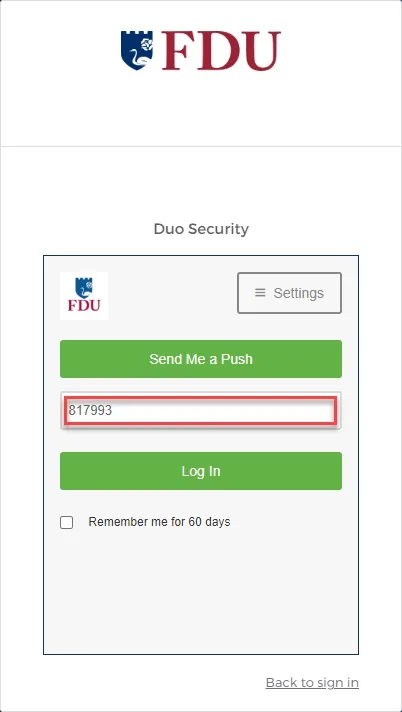
  1. Enter the six-digit passcode from the DUO app and click “Log in”
Last Modified:

Echo360

Resources for:
icon Close

Echo360 helps instructors capture and extend those moments to improve student engagement before, during and after class.

Through our technology platform, students have 24/7 access to classroom discussion, presentation materials, and the lecture itself.

Getting Started with “Echo 360 Universal Capture: Personal

Universal Capture: Personal is a stand-alone application designed to be used by instructors on their personal computers to generate video recordings. The software enables you to create video recording across multiple computing platforms via a unified interface. That means instructors can record and share video on Mac and Windows computers, inside or outside of the classroom, with an identical user experience on each device.

For those faculty members who do not yet have an Echo 360 account, it is necessary for you to login to Webcampus first. Therefore, please follow the directions below in order for you to have access to Echo360 environment. Once you have completed these steps via webcampus, thereafter users will be able to login directly to echo360.fdu.edu with their FDU NetID credentials.

Note

For those who already have an account in Echo360 please go to Step 13.

  1. Login to Webcampus using your FDU NetID
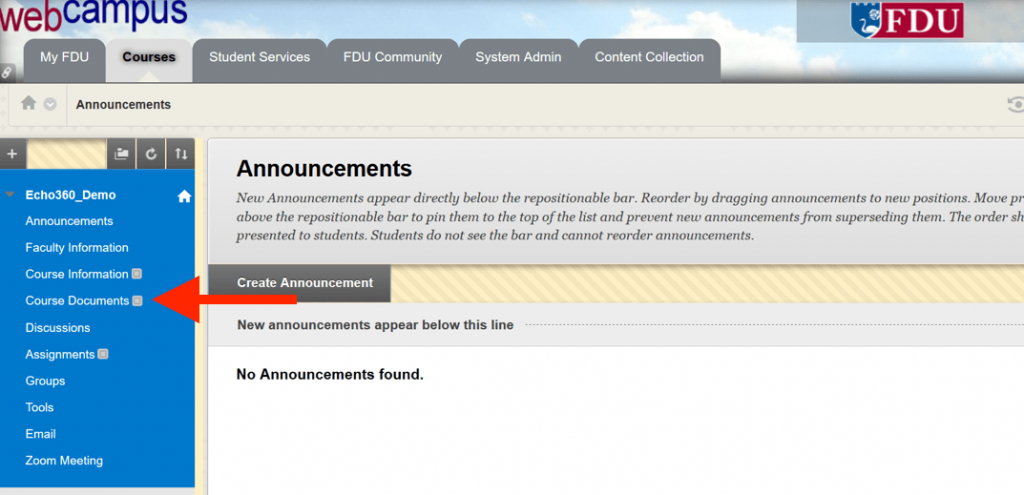
  2. Click on “Your Course
  3. Click on “Course Documents
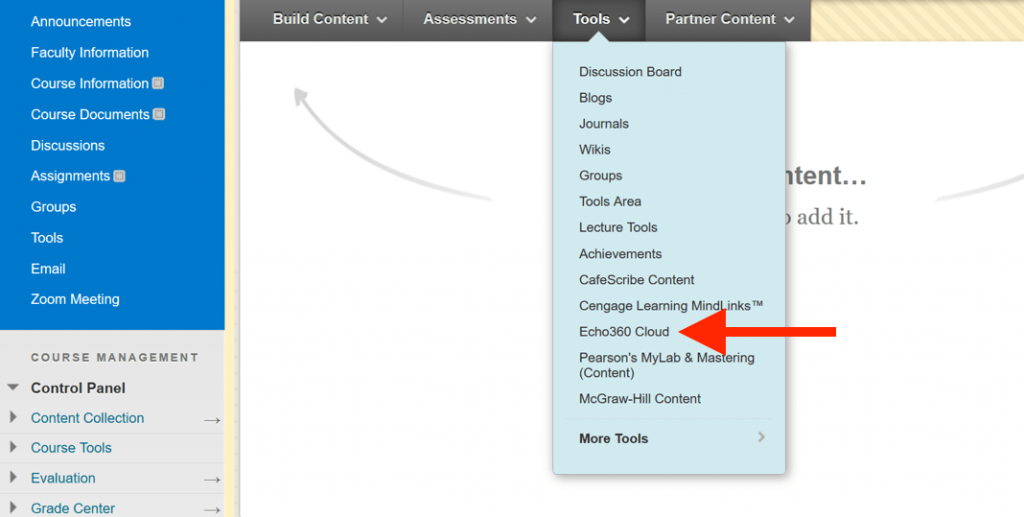
  1. Click on “Tools
  2. Click on “Echo360 Cloud
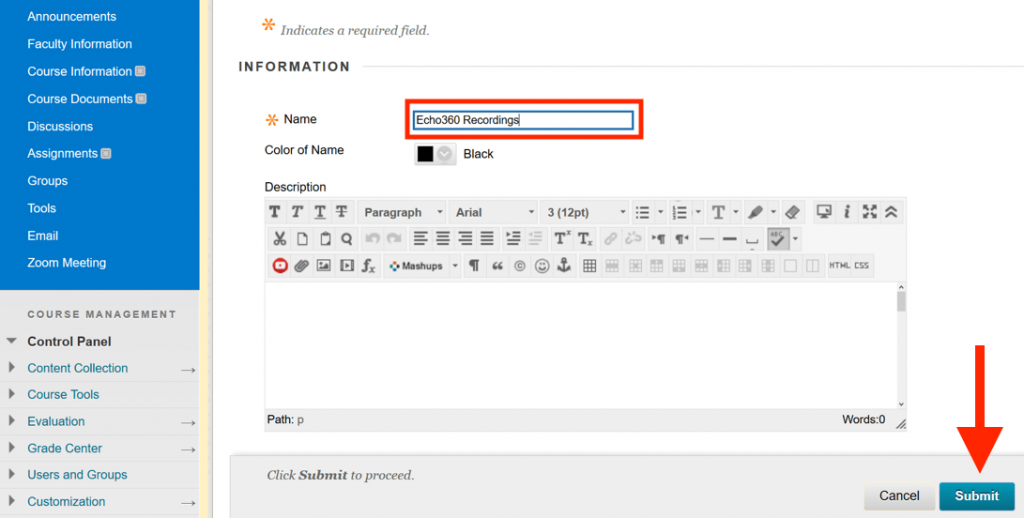
  1. In this page, enter a Name that makes it clear this is the link for Echo360 class content, for example: “Echo360 Recordings”
  2. Click “Submit
  1. A new link will appear on your Course Documents page titled “Echo360 Recordings“. This maybe at the bottom of the Course Documents page
  2. Click on the “Echo360 Recordings” link. This will redirect you to the Echo environment
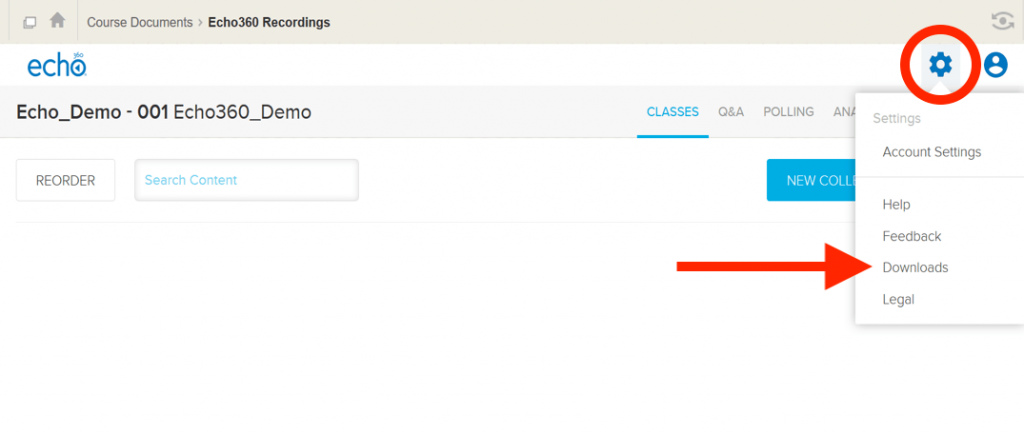
  1. Click on the “Gear Icon” on the top right
  2. Click on “Downloads
  1. From the Universal Capture: Personal area of the Downloads page, select the link to download the installer appropriate for the type of computer/operating system you are running. After you have downloaded the personal capture, follow the instructions on how to capture your lectures using this tool
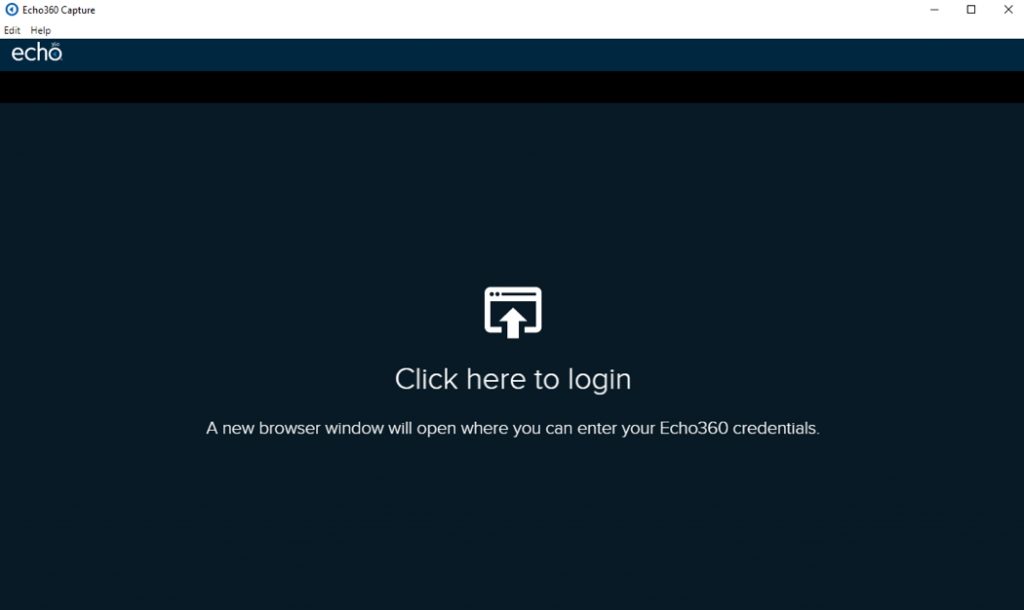
  1. Once you have installed the software, please launch the Universal Capture: Personal application. If you see the following login screen, click on the link and login with your FDU NetID credentials
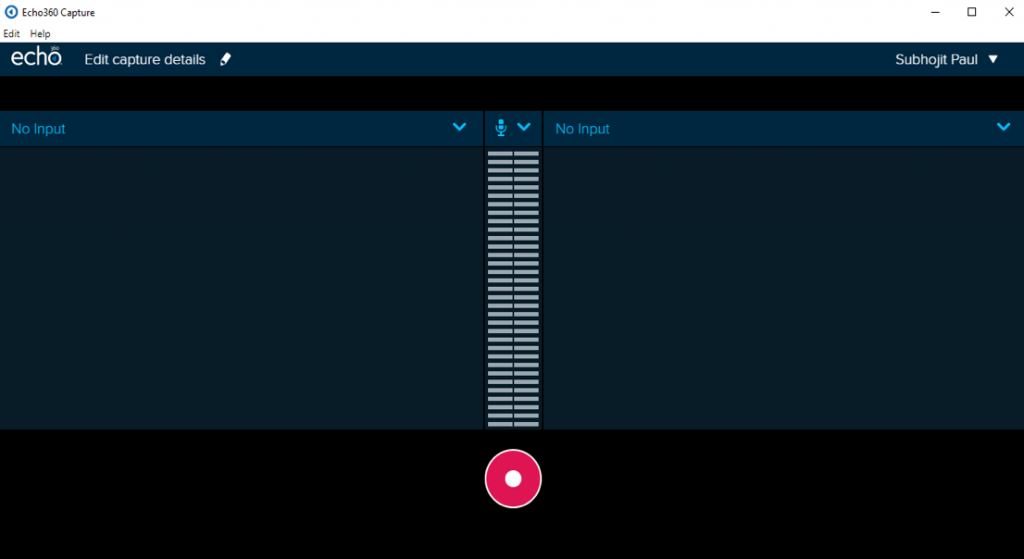
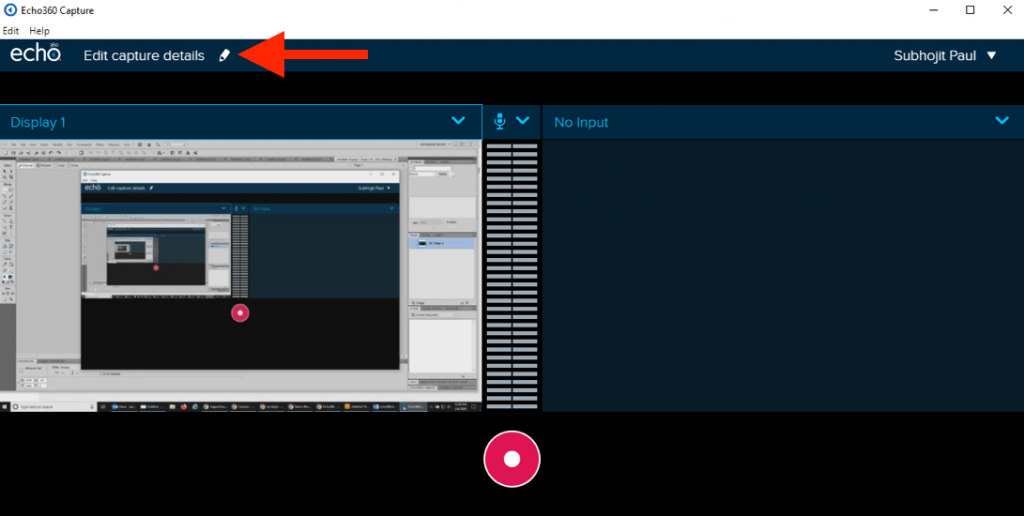
  1. After logging in select the inputs you want to capture from the two drop down menu. If the drop down menu says No Input just select the option you want from the available sources
    • Left Input: Click on the dropdown menu to select your input for the left video channel (e.g. display, webcam, etc.).
    • The bars in the middle shows the volume levels of the audio capture.
    • Right Input: Click on the dropdown menu to select your input for the right video channel (e.g. display, webcam, etc.).
    • The Display option from the drop down menu chooses the application that you want to record from your computer for example a PowerPoint presentation.
    • Preview the inputs on the screen; to be sure, they will record properly.
  1. Click the “Pencil Icon” or title to launch the Capture Details dialog box
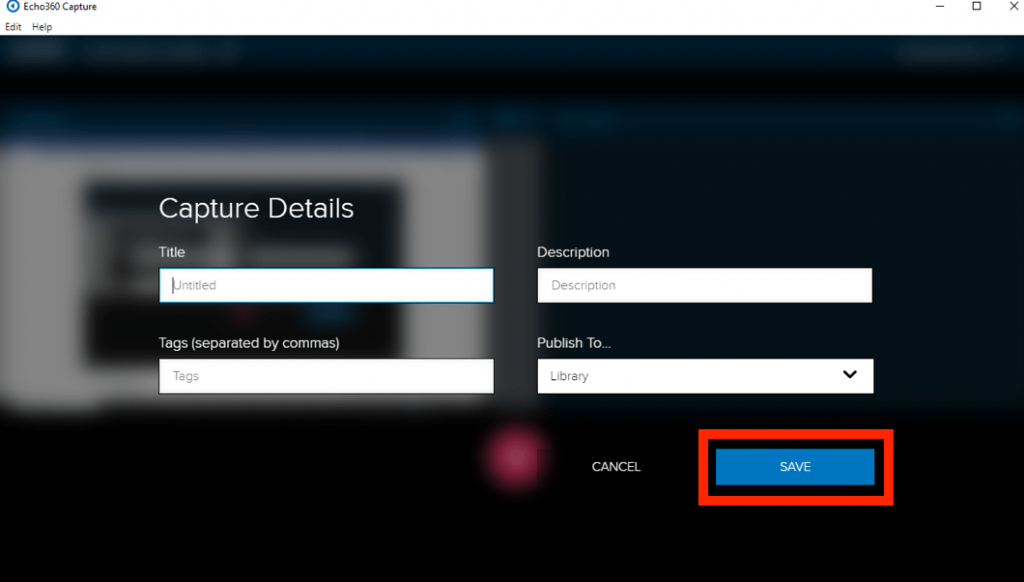
  1. Enter a Title, add a Description or Tags and select a Publishing location for the recording. By default, your recordings are published to your “Library” folder
  2. Click “Save
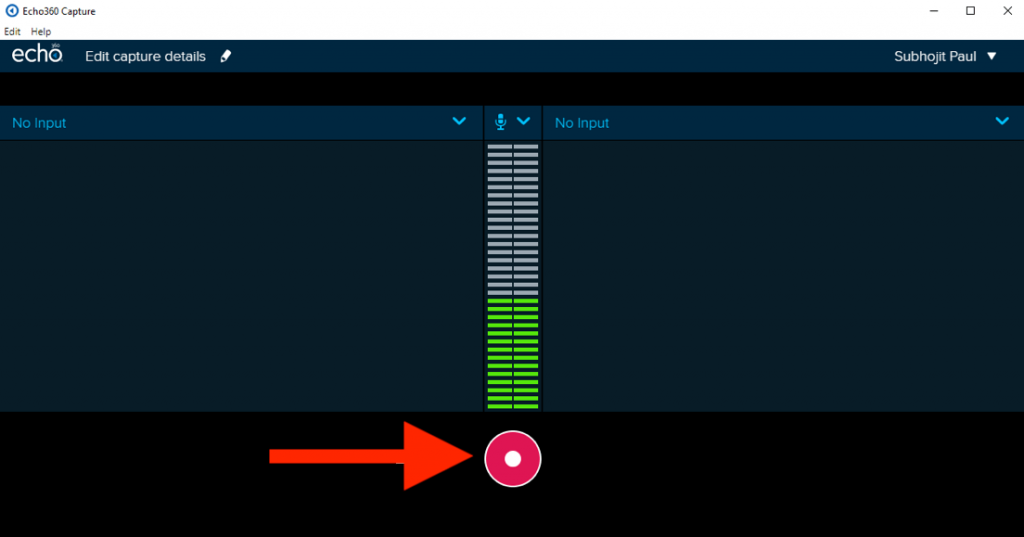
  1. At this point, if you are going to present any materials via PowerPoint, Web or any other applications open it and minimize it
  2. When you are ready, click the “Record” button. You will have 5 seconds before recording starts so you can switch to the material you want to present
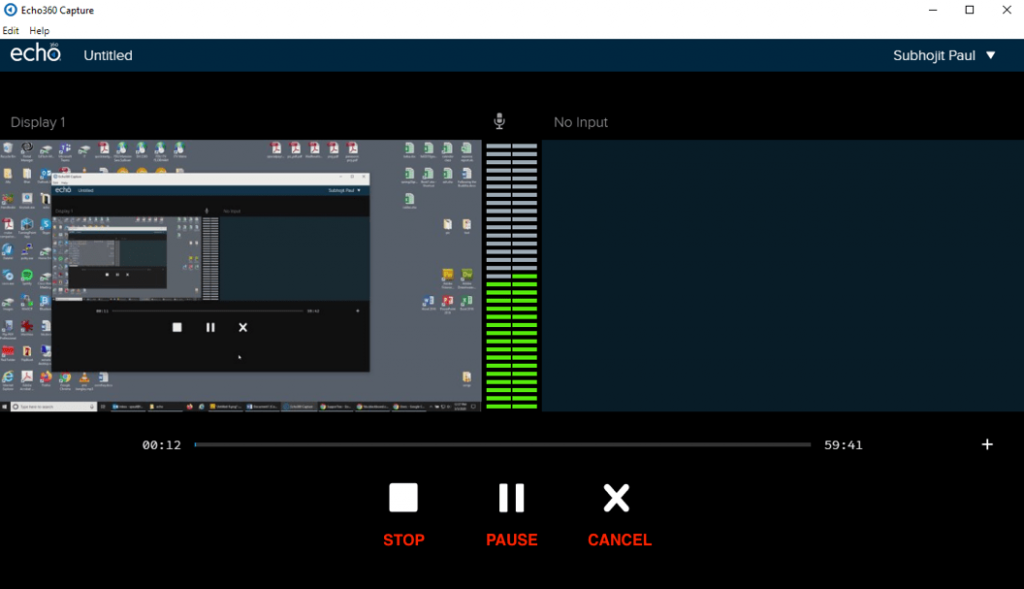
  1. During a recording, you will have the option to Stop, Pause, or Cancel recording. Do not stop recording until you are totally finished with the session. If you click on the cancel button, it will cancel the entire recording
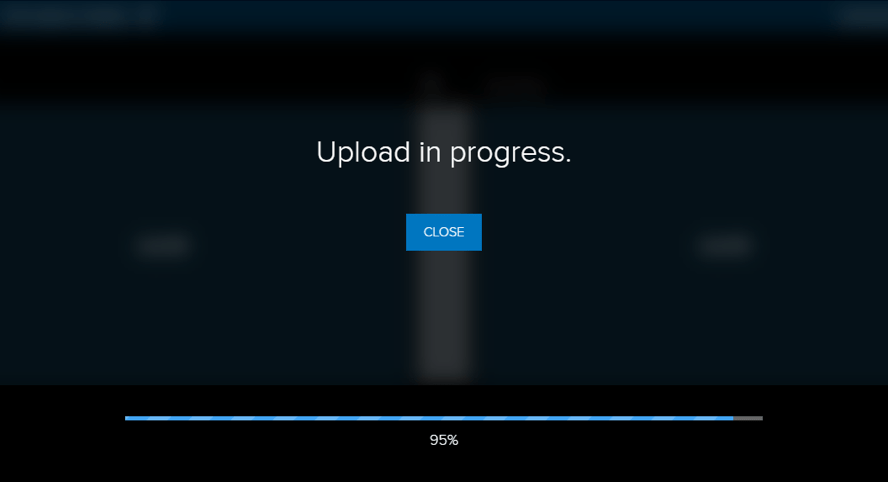
  • Once you stop the recording, you will receive a message and you can click on the “Close” option to exit the program. Once your recording process is finished, it will automatically publish to the location that you have specified. You will receive an email when processing is finished and you are able to view your recording

Viewing Recording

Once you receive the email, your video is online and ready to be viewed.

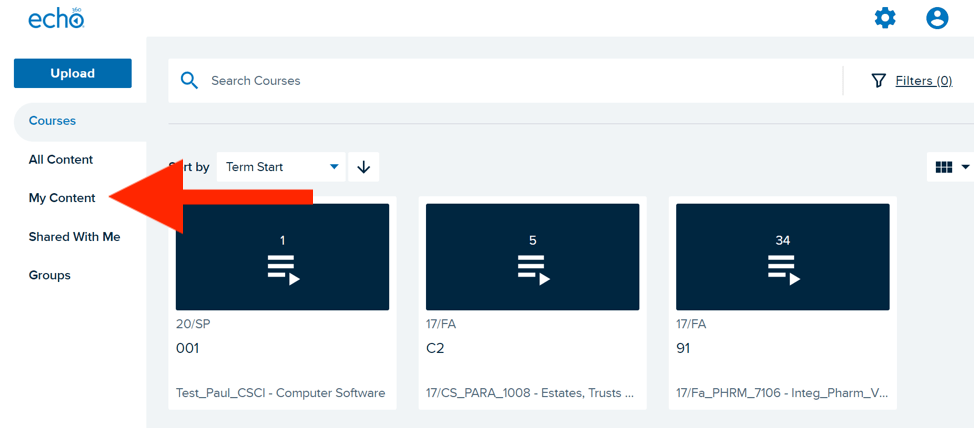
  1. Log back into echo360.fdu.edu
  2. Click on the “My Content” tab on the left side of the window.
  3. Click on the recording that you want to view
  1. If you want users to view your recording, scroll down towards the bottom of the screen to the “Links” section. Copy the link and you can send it to users via email
Last Modified:

Ellucian COLLEAGUE Password Information

Resources for:
icon Close

Accessing Ellucian COLLEAGUE

COLLEAGUE uses single sign-on protocol for users to login. The login or user ID consists of the first part of the FDU NetID up until the @ sign in the NetID.

For instance, if your NetID webmail address is john.q.public@fdu.edu your COLLEAGUE login ID would be “john.q.public

The password would be the exact same one that you use with your FDU NetID.

Last Modified: