icon

University Systems and Networking

University Systems and Networking (USAN) oversees the University's Data Centers and Wired / Wireless Network. We support both the Metropolitan and Florham campuses, as well as our international campuses in Vancouver and Wroxton. USAN enables the access, flow and storage of information within the University while defending our network against all threats and maintaining the integrity of our data.

Help Desk
background
Search Department Resources

DUO TLS Support

Resources for:
icon Close

Warning Warning

After June 30, 2023, Transport Layer Security (TLS) 1.0 and 1.1 connection requests to Duo will not receive a response, resulting in blocked multi-factor authentication.

Who will be affected?

This may affect FDU community users using Windows 7, Windows 8.1, Android Devices with Android OS version 9 or lower, and Apple devices with iOS versions that don’t support TLS 1.2.

Check if you are using the supported endpoints by reading the information below:

Windows

Supported Windows operating system (OS) versions will support TLS 1.2 by default. If you are running a supported Windows OS, no action is required.

Unsupported Versions for Windows Operating Systems

Note

If your operating system was manually changed to disable TLS 1.2 for some reason, connection requests will fail. Verify your system is properly configured for TLS 1.2 with the suggested steps below.

Verifying TLS 1.2 on your Operating System

Check OS Version

  • Open the Windows Search box and type “About your PC” and click on “Open
  • Under Windows Specifications, check which edition and version of Windows your device is running

Enabling TLS 1.2 on your Operating System

If your operating system was manually changed to disable TLS 1.2 for some reason, you can verify or configure your system for TLS 1.2.

Before making any changes, create a backup of the registry:

  1. In the Windows Registry Editor, locate and click the “Protocols registry key” or “subkey
    that needs to be backed up
  2. Click “File”, then “Export”
  3. In the Export Registry File dialog box, select the filename and location of where to save the backup
  4. Click “Save”

After creating a backup of the registry, follow the steps below to enable TLS 1.2 on your system:

  1. Click the Start menu, type “regedit” and press the Enter key. The Registry Editor window should be opened.
  2. Navigate to follow the registry path: HKEY_LOCAL_MACHINE\SYSTEM\CurrentControlSet\Control\SecurityProviders\SCHANNEL\Protocols
  3. Check if the subkey of TLS v1.2 is enabled for both the server and the client. Each protocol’s state is controlled by two keys: Enabled and DisabledByDefault
  4. Make sure the Enabled value is 1 and the DisabledByDefault value is 0 or missing, the protocol is enabled.
  5. If the Enabled value is 1 but the DisabledByDefault value is 1, the protocol is disabled by default – it will not be used unless another host explicitly requests it during negotiation.
  6. If the Enabled value is 0, the protocol is disabled
  7. Restart the system to ensure the new settings take effect
close

DUO Mobile

Supported Duo Mobile applications running on supported OS versions will support TLS 1.2+ by default. If you are running a supported Duo Mobile application on a supported OS, no action is required.

  • Supported Android OS versions: Android 10.0 and greater
  • Supported iOS versions: iOS 14.0 and greater

Note

Using a mobile device with unsupported versions can still receive DUO push or generate one-time passcode as before, but it will prevent you from logging in to any systems that are accessed through our FDU Single Sign On Login Page.

Web Browsers

Common web browsers like Google Chrome, Microsoft Edge, Mozilla Firefox, Opera, etc. with their latest version are supporting TLS 1.2.

Note

If your browser was manually changed to disable TLS 1.2 for some reason, connection requests will fail. Please verify your browser is properly configured for TLS 1.2 with the suggested steps below.

Check TLS Support on a Web Browser

Chrome and Microsoft Edge

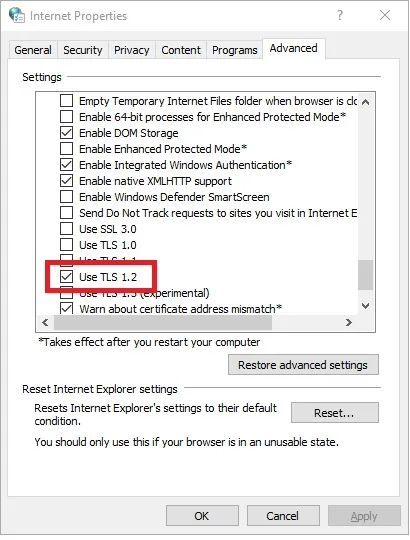
  1. In the Windows menu search box, type “Internet Options”
  2. In the Internet Properties window, on the Advanced tab, scroll down to the Security section
  3. Make sure the “User TLS 1.2” checkbox is checked
  1. Click “OK” and restart the browser

Mozilla Firefox

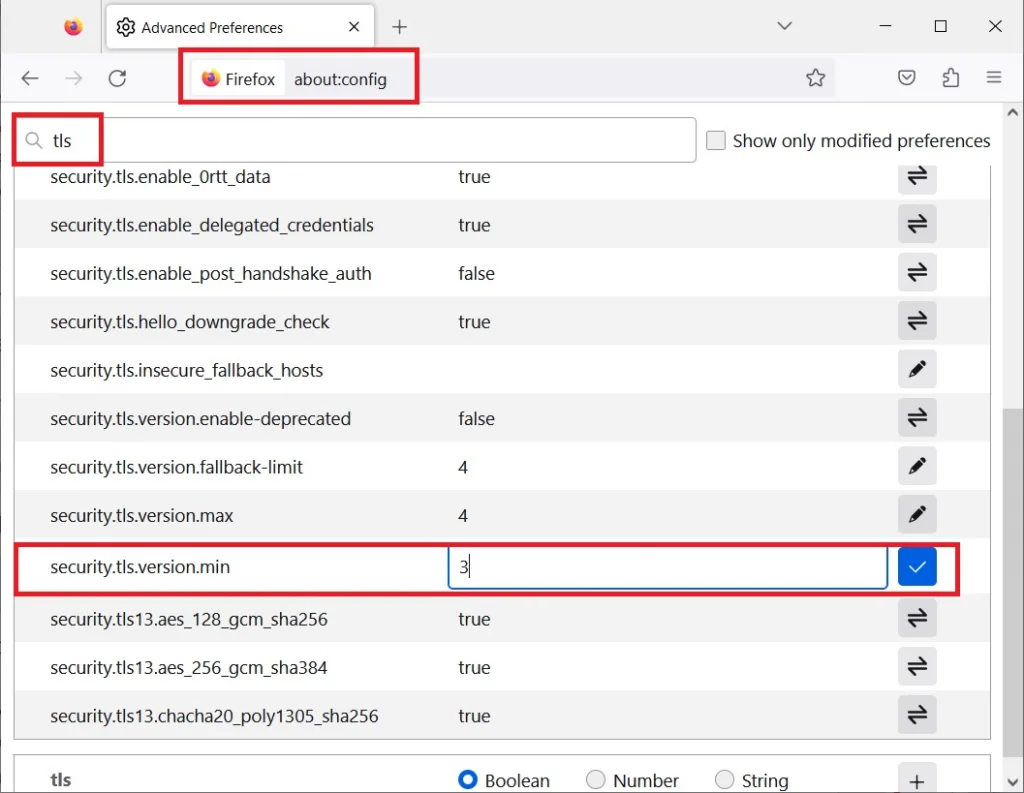
  1. Open the Mozilla Firefox Browser
  2. In the address bar, type “about:config” and press “Enter
  3. In the Search Field type “tls”. Find and double-click the entry for “security.tls. version. min”
  4. Make sure the integer value is 3 to force a minimum protocol of TLS 1.2
  1. Click “OK” and restart the browser
close

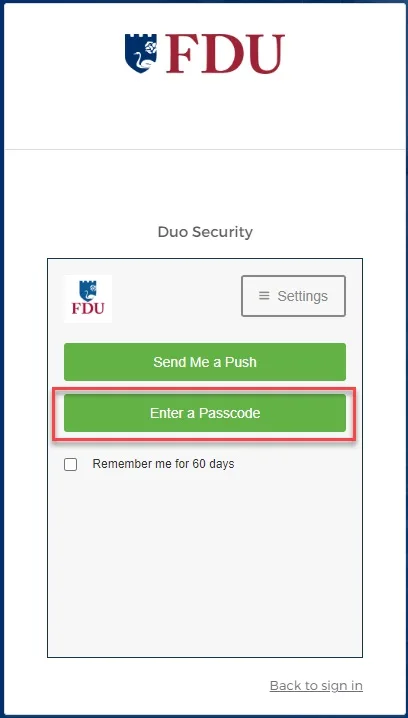
We understand that upgrading your device is not always an option. In these instances, you can still use Duo Passcodes to perform multi-factor authentication.

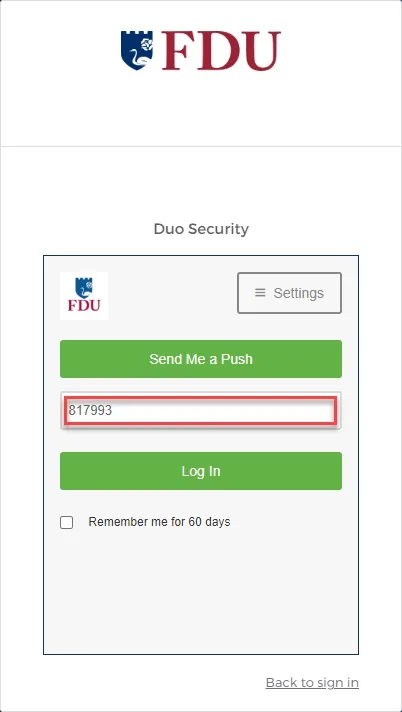
  1. To use this method, select “Enter a passcode” upon receiving your browser’s Duo security prompt
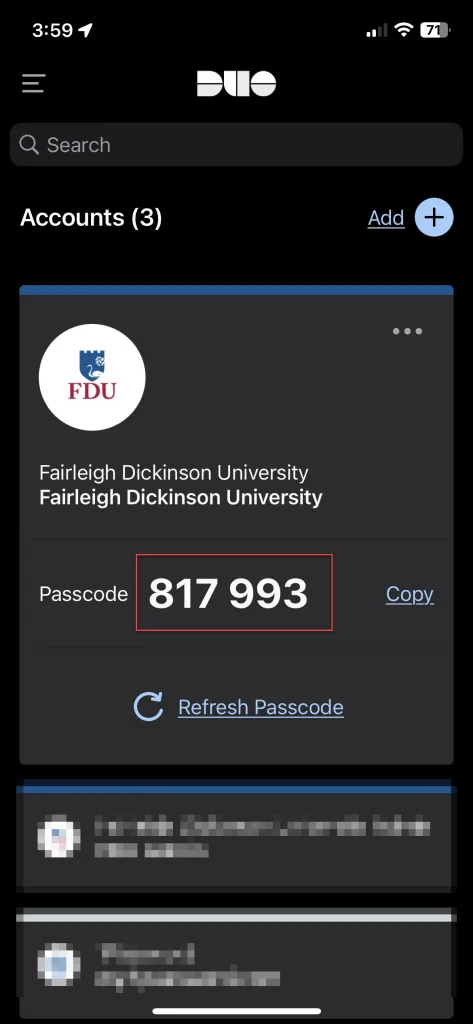
  1. Next, open the Duo app and click “Show”. This will provide a six-digit passcode which you can enter into the browser prompt
  1. Enter the six-digit passcode from the DUO app and click “Log in”
Last Modified:

External Website / Hosted Service Subscriptions & Renewals

Resources for:
icon Close

In the past, website subscriptions and renewals were approved by University Systems and Security (USAS), as the department held the role of both Information Security and Networking. An email would be sent to the department, and approval would be gained via an email response.

With the separation of Information Security from University Systems and Networking (USAN), a new process has been created to better serve those within the FDU community that utilize external websites for services.

Moving forward, requests for website subscriptions and renewals should be requested through this form below:

If information is missing, a representative of UTAC might reply inquiring more about the request. When all information has been gathered, the ticket will be forwarded to our Information Security Officer. They will review the request, engage the Networking team if necessary, and then either approve or deny the request (via email response) or inquire further, before closing out the ticket.

We hope this new process will help identify, track, and move requests quickly through the process.

Last Modified:

FDU Anywhere Tutorial

Resources for:
icon Close

FDU provides remote access to many of the software applications typically found in university computer labs.
index

Index

What is FDU Anywhere?

FDU provides remote access to many software applications typically found in university computer labs. This new Virtual Desktop Infrastructure (VDI) gives users access to a Windows desktop environment along with many General Lab Software, without requiring downloading and installing programs on a user’s personal equipment. The service, called FDU Anywhere, is powered by University Systems and Networking (USAN) and can be found at anywhere.fdu.edu.

FDU Anywhere

Using FDU Anywhere is like walking into one of FDU’s computer labs. Upon logging in with your FDU NetID and password, you will have access to the virtual platform. To find a list of currently available software on FDU Anywhere, use the FDU Software Catalog. A listing of available Free and Open Source software can also be found by visiting the FDU Software Catalog.

The FDU Software Catalog provides an up-to-date catalog of software available to Faculty, Staff, and Students at the university:

System & Network Requirements

System Requirements

FDU Anywhere is a powerful resource with a lightweight footprint. In order to utilize FDU Anywhere, you must have the following:

  • Any device with a browser that supports HTML 5 will work. HTML 5 is supported by almost all desktop and mobile browsers including Google Chrome, Apple Safari, Microsoft Edge, and Mozilla Firefox
  • An internet connection
  • FDU NetID credentials

Note

The Cisco Scure Client VPN is required to access FDU Anywhere. FDU IT is working on removing this requirement and will send out a Tech Alert once this has been completed.

Tip

Your system hardware specifications may impact the performance of FDU Anywhere, such as systems with less than 8GB of memory.

Network Requirements

For the best experience, while using FDU Anywhere, your network should:

  • Have a download speed of at least 5Mb/s or more
  • If your download speed falls below 5Mb/s, the connection could become unstable and cause issues with your stream
  • Have an upload speed of 5Mb/s or higher
  • An upload speed of 5Mb/s is enough to use a basic mouse, keyboard, and controller. More bandwidth-heavy devices such as webcams, microphones, and external storage devices can use up to 100Mb/s
  • Wired network connections are preferred over Wi-Fi network connections whenever possible
  • Wired network connections are more stable and offer more bandwidth over Wi-Fi

For graphics-intensive applications, like Adobe Creative Cloud and Autodesk, we recommend using a wired network connection instead of Wi-Fi, ideally with a bandwidth of 5 Mbp/s.

Wi-Fi networks with 5Ghz rated wireless connections are preferred over 2.4Ghz wireless routers and provide better performance.

VPN Applications and Connections

Warning Warning

The use of any VPN Software within FDU Anywhere is not allowed. Using a VPN client in FDU Anywhere may interrupt your session and disable your access for approximately 15 minutes.

Testing your Connection

Your experience with FDU Anywhere greatly depends on your internet connection. Testing your connection can help you identify and correct most issues.

To test your Internet connection speed, click the link below:

Internet Speed Test

Note

Fairleigh Dickinson University is not affiliated with Netflix. The link was provided as an aid to help determine your bandwidth.

Using FDU Anywhere

FDU Anywhere is available to all students and accessible by following the instructions below:

Accessing FDU Anywhere

  1. From any web browser, visit “anywhere.fdu.edu

FDU Anywhere

Tip

For the best overall experience using FDU Anywhere, Google Chrome is the browser of choice.

Note

The Cisco Scure Client VPN is required to access FDU Anywhere. FDU IT is working on removing this requirement and will send out a Tech Alert once this has been completed.

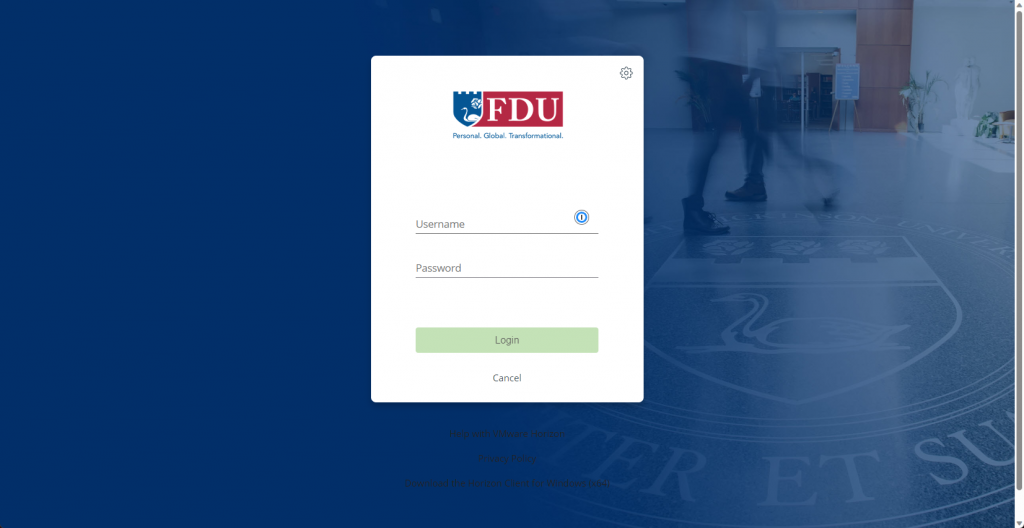
  1. Use your FDU Credentials (NetID and associated password) to complete the login to the FDU Anywhere

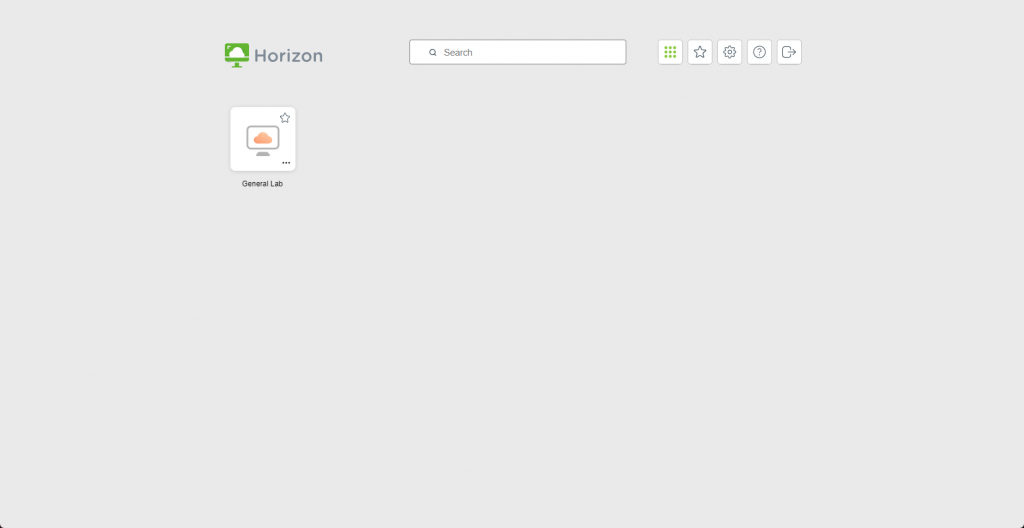
General Lab

Note

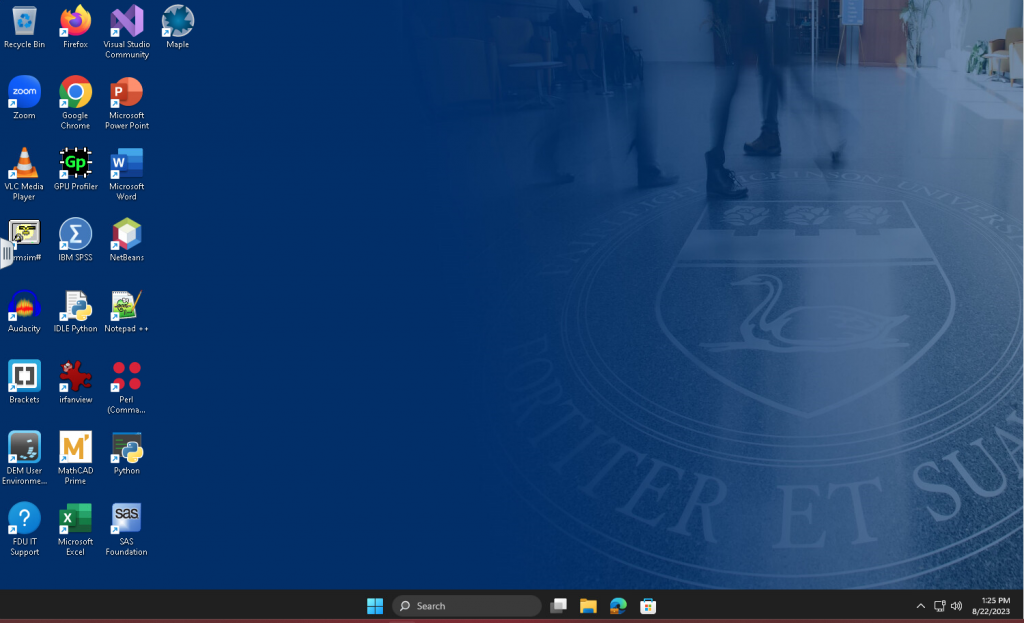
When you login to the General Lab experience, it may take about 60 seconds to get to the desktop. This is because your profile is being created or loaded.

  1. The selected app or desktop opens in a new browser tab

Note

Depending on your screen resolution, your desktop experience view may differ from the picture above.

Log Out of FDU Anywhere

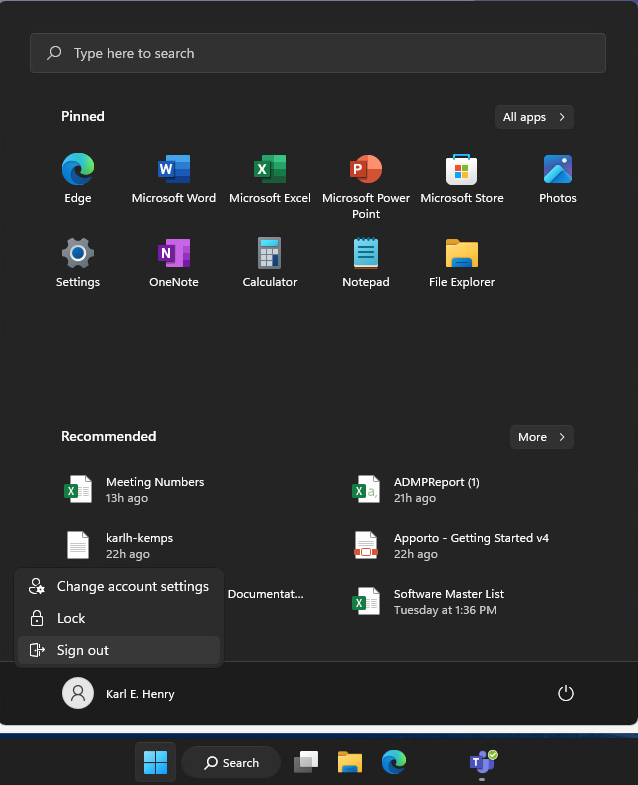
Logging out is a critical step in making sure others continue to be able to easily access FDU Anywhere services. To log out of FDU Anywhere, follow these steps:

  1. Single click the Windows “Start “Button
  2. Single click On your “Name
  3. Single click on “Sign Out
  1. On the upper left-hand side, click the “Hamburger” menu icon
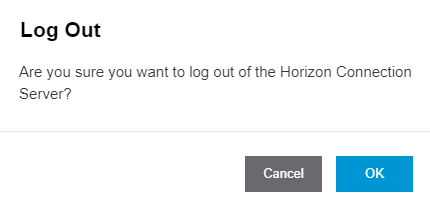
  1. Single click on “Log Out
  1. Single click on “OK” to confirm Logout

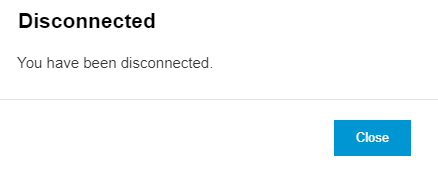
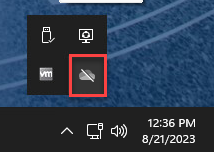
You have now been logged out of FDU Anywhere.

Automatic Session Logout Policy

In order to help make FDU Anywhere as available as possible to all students, accounts that have been inactive (or idle) for 15 minutes will automatically be logged out.

Accessing and Using OneDrive

There are many ways in which you can access and save files within FDU Anywhere. Fairleigh Dickinson University highly recommends saving all files on your FDU Microsoft 365 OneDrive which is accessible within FDU Anywhere. There will be a first-time setup and initialization process required in order to use OneDrive within FDU Anywhere.

Setup and Initialization Process

Accessing your Microsoft 365 OneDrive account is done easily by following these instructions:

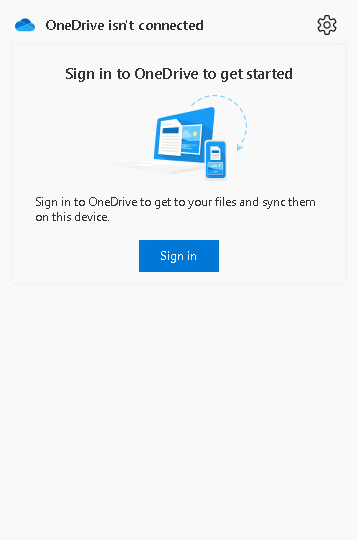
  1. From the FDU Anywhere General Lab, single click on the “OneDrive” icon from the system tray
  1. Single click the “Sign In” button
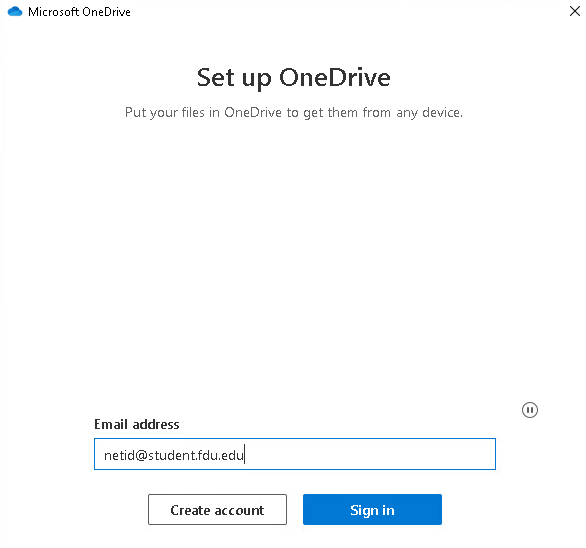
  1. Enter your FDU NetID and single click “Next“. Follow the FDU standard single sign-on prompts to complete the login process
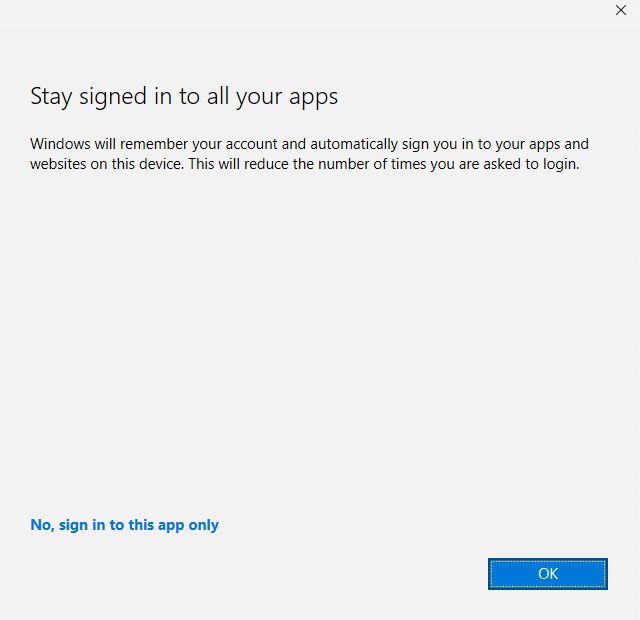
  1. Once the login process is completed, you will be asked to register your device or single click “OK
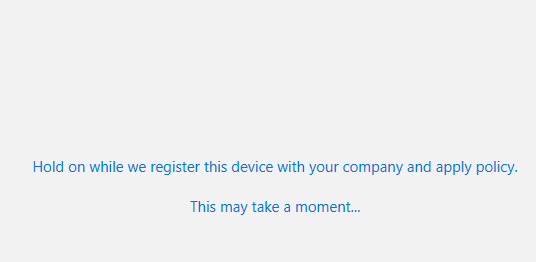
  1. It will take a moment to register the application, it will automatically proceed to the next screen
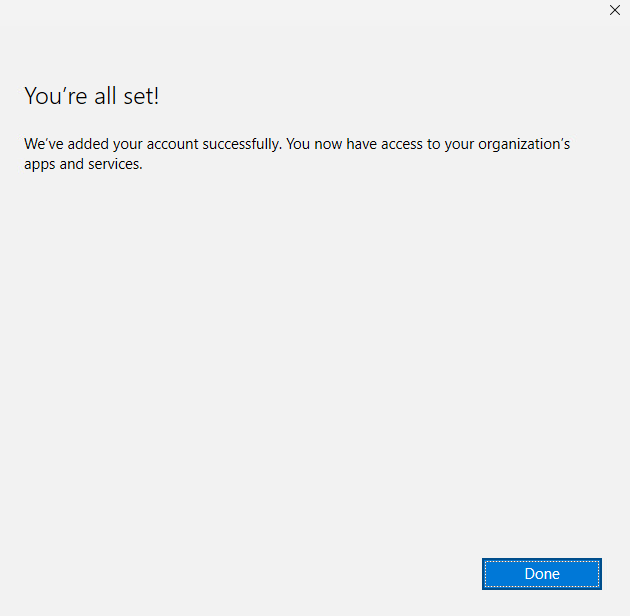
  1. Single click on “Done
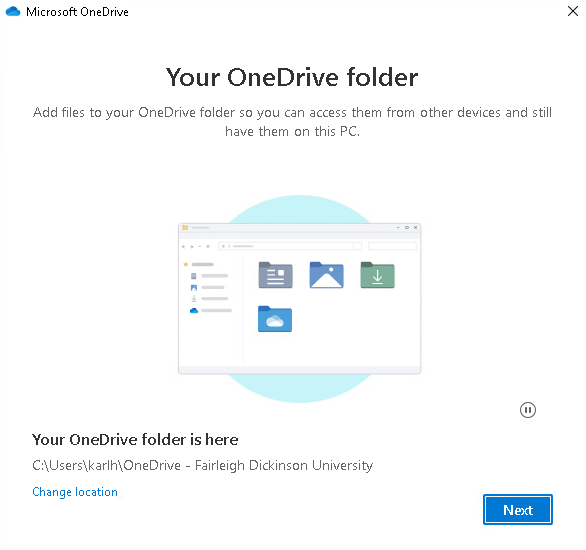
  1. You have now successfully logged into OneDrive, single click “Next
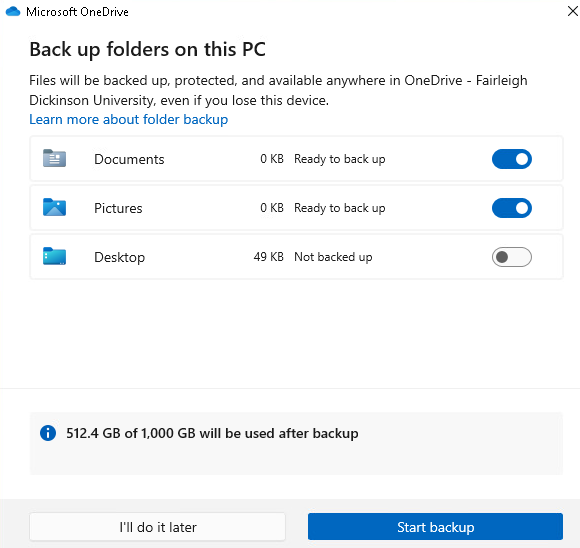
  1. Microsoft OneDrive may prompt you to backup your folders, make sure you toggle “Desktop” and single click “Start Backup

Note

Backup up folders will ensure your data is backed up to Microsoft OneDrive. Any data not stored in Microsoft OneDrive will be deleted once you log out of your session or have been disconnected.

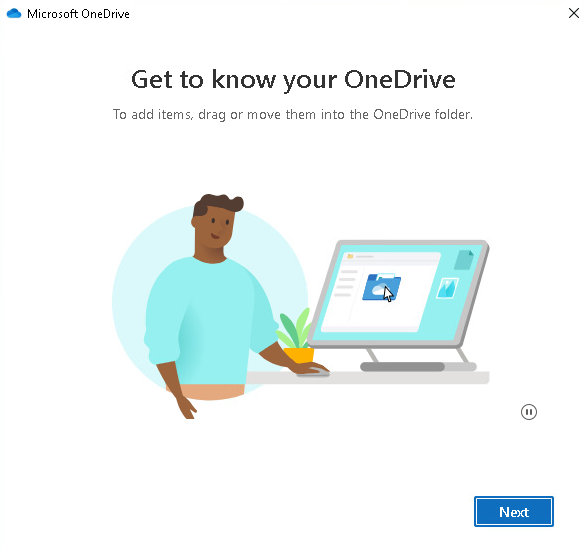
  1. A brief overview will be given on OneDrive, to begin, single click “Next
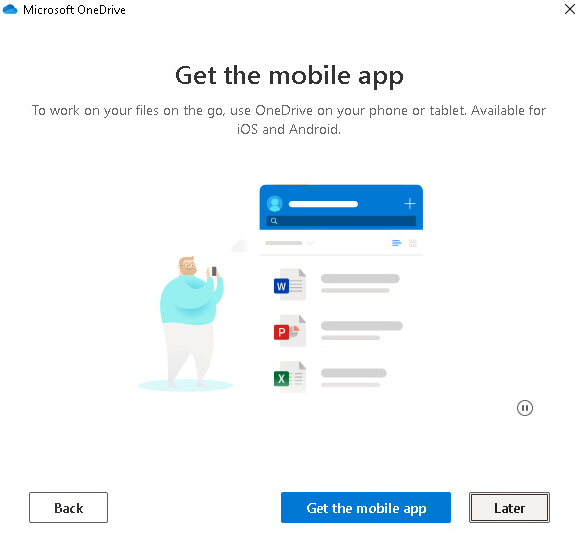
  1. When the tutorial is finished, single click “Later
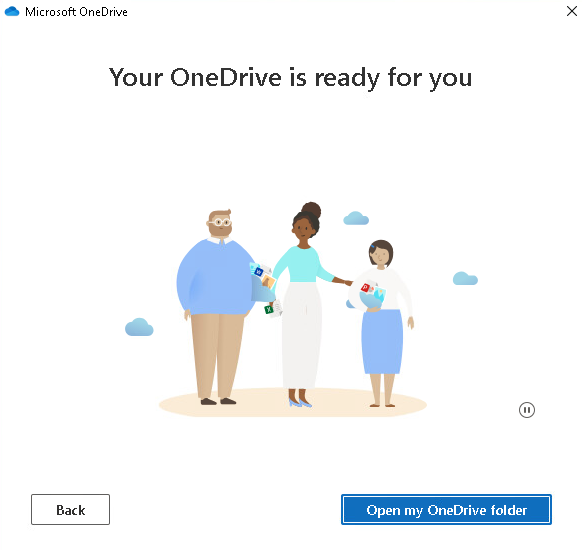
  1. OneDrive setup is complete and ready to use. Click the “X” to close the window or “Open My OneDrive Folder” to access files

Using OneDrive

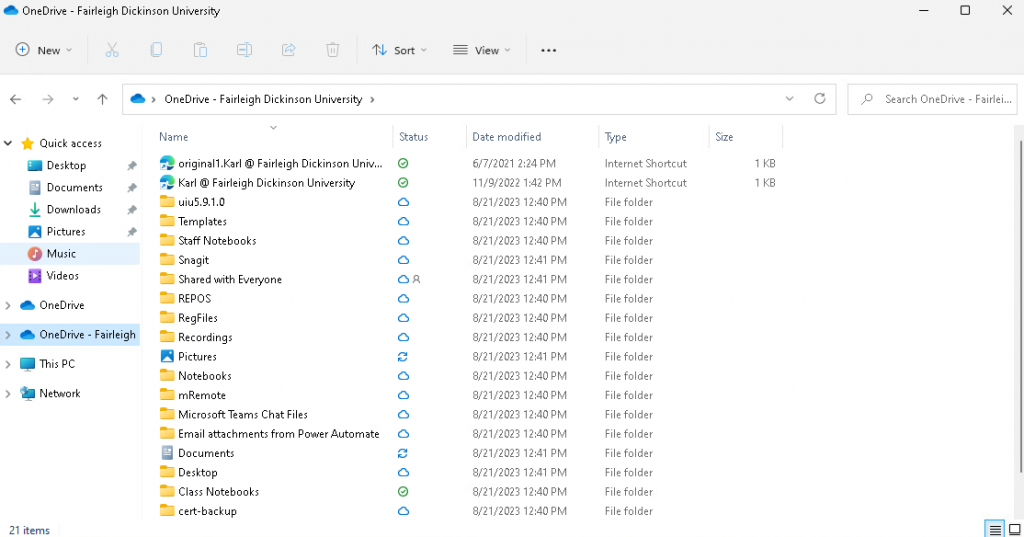
Using Microsoft OneDrive within FDU Anywhere is very similar to accessing, saving and opening files on a computer. Just open up File Explorer and look for OneDrive – Fairleigh Dickinson University.

Zipping Files

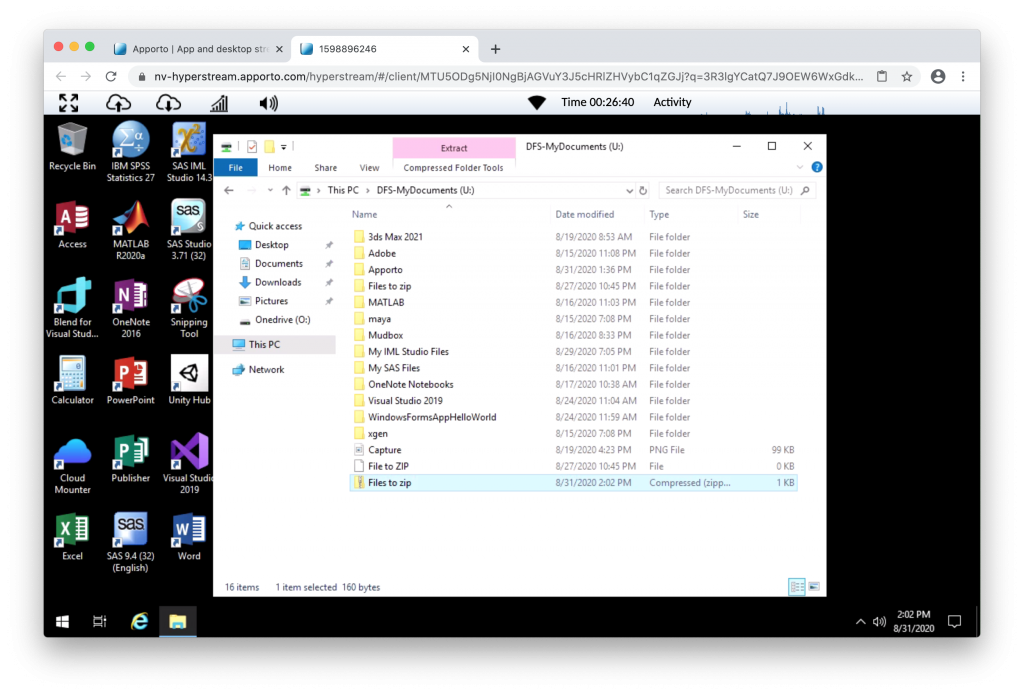
if you need to zip files in order to submit them to Webcampus, please follow these instructions:

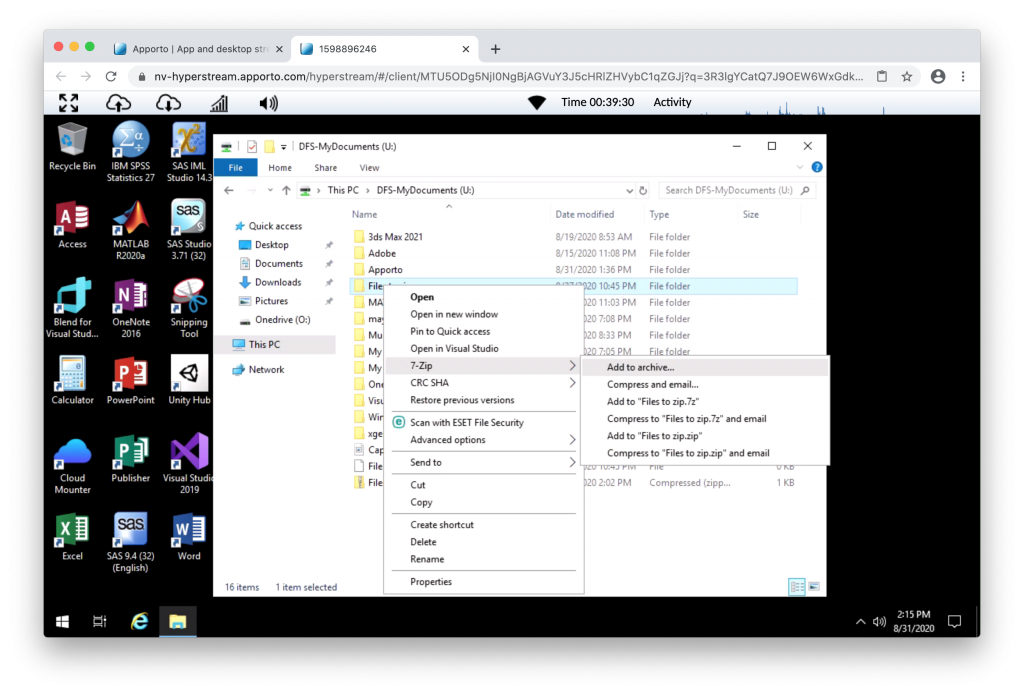
  1. Single click the file or folder

Note

For macOS users, you can use the “Two Finger” click method on the trackpad in order to initiate the right click. For additional information, please see the link below for “FDU Anywhere – Keyboard Shortcuts”.

  1. Right click on 7-zip then click “Add to Archive
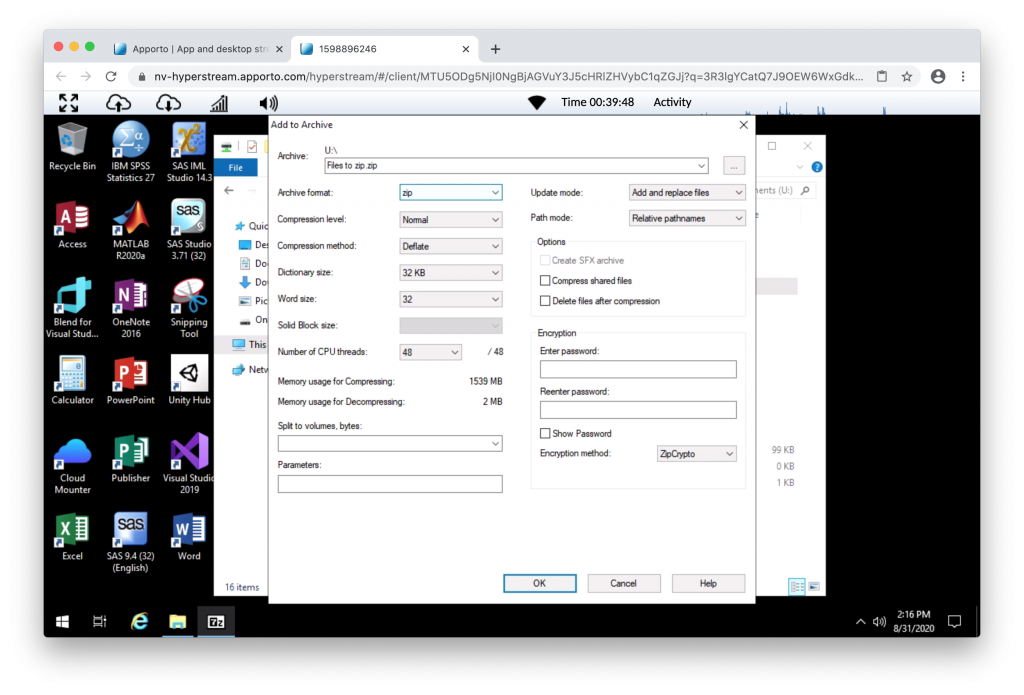
  1. Change Archive Format to “zip” like in the picture below then click “OK” to zip your files

The zip archiving process could take some time depending on the size of the file. Once completed, the file will be in the same location as the folder is. You can then email or upload your file to your professor.

Alternate Way to Zip Files

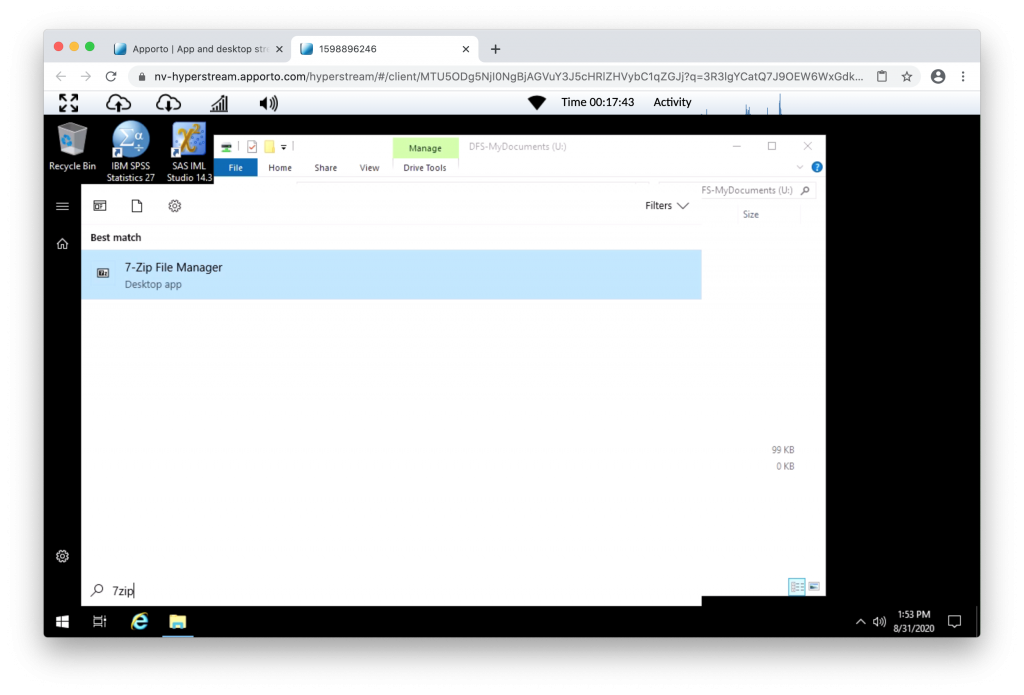
  1. Click “Start” on the taskbar on the left-hand side
  2. Type “7zip” and 7-zip File Manager will appear. Click on “7-zip File Manager
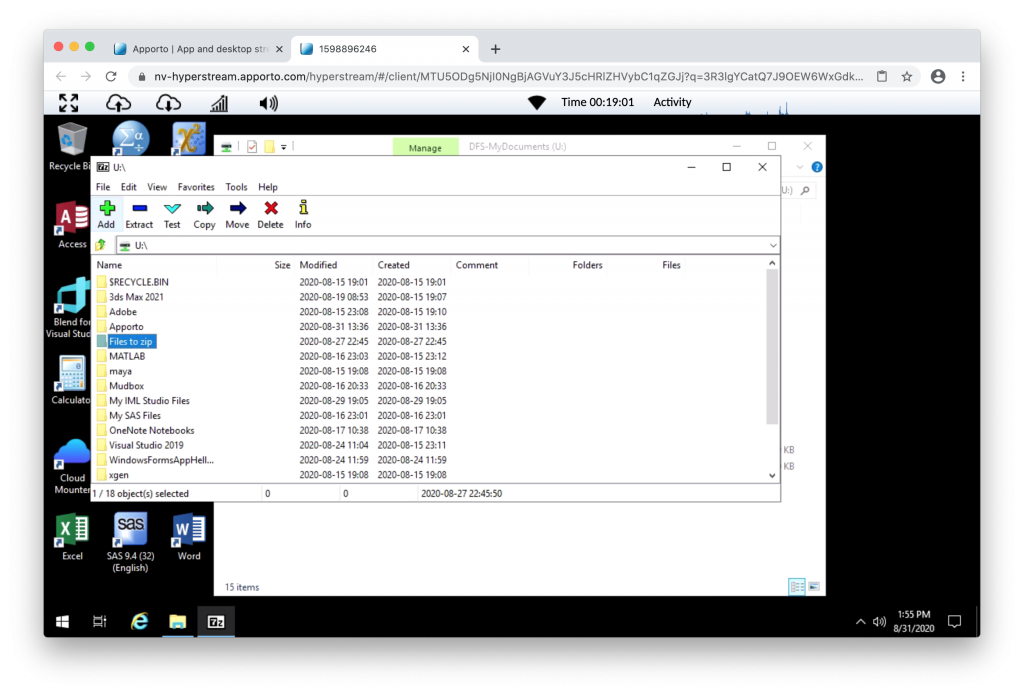
  1. Click on “7-Zip File Manager
  2. Navigate to the location of your saved file/folder and click to highlight, then click the “Add” button at the top
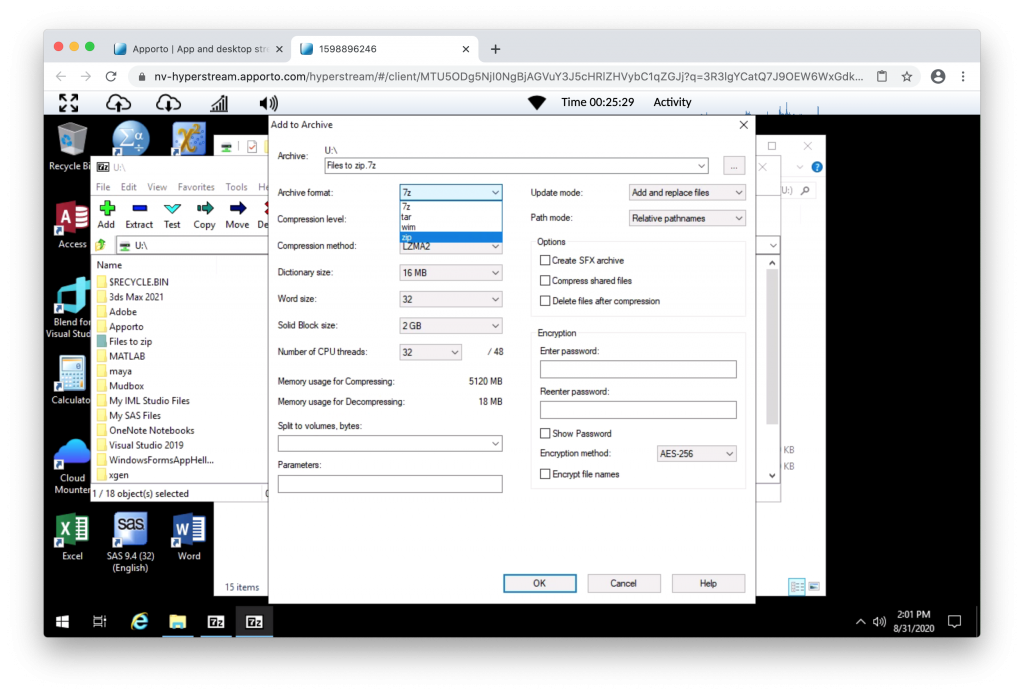
  1. Change Archive Format to zip and then click “OK” to zip your files

The file will now be zipped and you will find your file in the same folder as the project folder or file you wanted to zip.

Note

The zip archive could take some time depending on the size of the file. Once completed, the file will be in the same location as the folder is. You can then email or upload your file to your professor.

Submitting Files to WebCampus

In order to successfully submit your coursework to WebCampus, it is best to use the Google Chrome, Mozilla Firefox or Microsoft Edge web browser located on the desktop of FDU Anywhere.

In order to submit your coursework to Webcampus, you can log on from within FDU Anywhere. For more information on Webcampus visit:

Keyboard Shortcuts

Sometimes you may want to copy and paste content from your own computer to an FDU Anywhere desktop or application. You can do this using the copy-and-paste menus or keyboard shortcuts, for example, “Ctrl+C” and “Ctrl+V“.

Note

FDU Anywhere only allows copying from your personal computer into the FDU Anywhere desktop.

If you are unable to copy and paste for any reason, we recommend using our FDU OneDrive service to access any files not found in FDU Anywhere.

Copy files from Windows OS Devices

Windows OS to FDU Anywhere

  1. Highlight the text you want to copy from your computer
  2. Press “CTRL+C” to copy the selected text
  3. Move the cursor to the paste location in FDU Anywhere
  4. Press “CTRL+V” to paste the text
close
Copy Files from Apple OS Devices

Your macOS to FDU Anywhere

  1. Highlight the text you want to copy from your computer
  2. Press “COMMAND+C “to copy the selected text
  3. macOS also supports “CTRL+C

Tip

You may find it easier to use CTRL + C when copying content to FDU Anywhere, so you don’t have to switch back and forth between COMMAND + CTRL.

  1. Move the cursor to the paste location in “FDU Anywhere
  2. Press “CTRL+V” to paste the text
close

Note

The copy and paste functions DO NOT work across all applications and browsers, including the copying and pasting of images. This is a limitation inherent in browser clipboards. We recommend the Google Chrome web browser for optimal clipboard capabilities.

Getting Support

For additional support, open up a support request by clicking the link below:

SAMI Support

Network Optimization

If you are experiencing issues while using FDU Anywhere, please use the following tips as guidelines to help improve your experience.

Power-cycle your Modem / Router

Power cycling your modem and router allows them to reset and re-establish a connection to your Internet Service Provider (ISP). Shut down your computer and unplug your modem/router. Plug them back in after 60 seconds and watch the lights on your modem/router. Once the lights are on and steady, start your computer.

Keep all your Local Components Up-to-date

Check that your modem/router and your local computer are totally up to date. This includes the operating system, driver, and browser updates.

Disconnect / Turn off any Devices that are not in use

Some devices could be using bandwidth while on standby. Gaming consoles, for example, might download and install updates. Turn off these devices to keep your bandwidth free.

Use an Ethernet Cable

Using a wired Ethernet connection will make your connection more stable and eliminate additional latency compared to a wireless connection.

Change your Wi-Fi Configuration

If a wired Ethernet connection is not possible or your device requires a wireless connection:

  • Connect to a 5GHz wireless network. Some routers offer both 2.4GHz connections and 5GHz
  • Place your devices (such as a computer or smartphone) and your router closer to each other

Note

You may need to contact your internet service provider for help with rebooting your router and/or to configure your wireless settings correctly.

Last Modified:

FDU Jamf Connect Login and Credential Sync 

Resources for:
icon Close

Welcome to our comprehensive guide on utilizing the FDU Jamf Connect for login and NETID credential synchronization on macOS. This article is tailored for the staff, faculty, and students at FDU, providing a detailed walkthrough of the Jamf Connect login interface.

Tip

Connecting to FDU-Secure is not supported on this login screen. Please use a wired connection while on campus.

Jamf Connect Interface Walkthrough

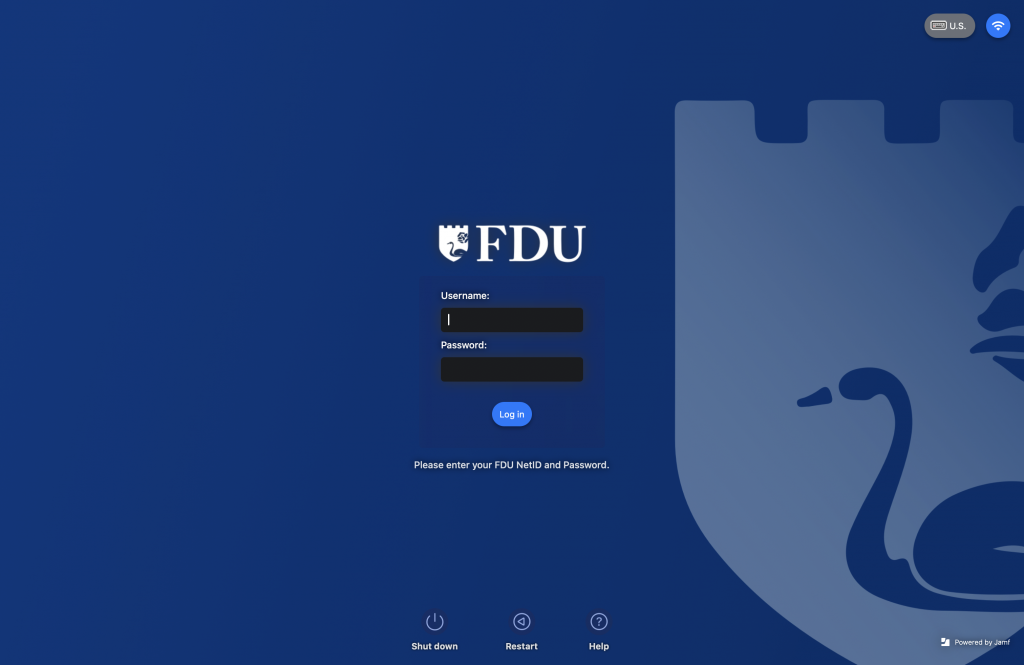
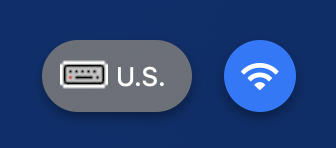
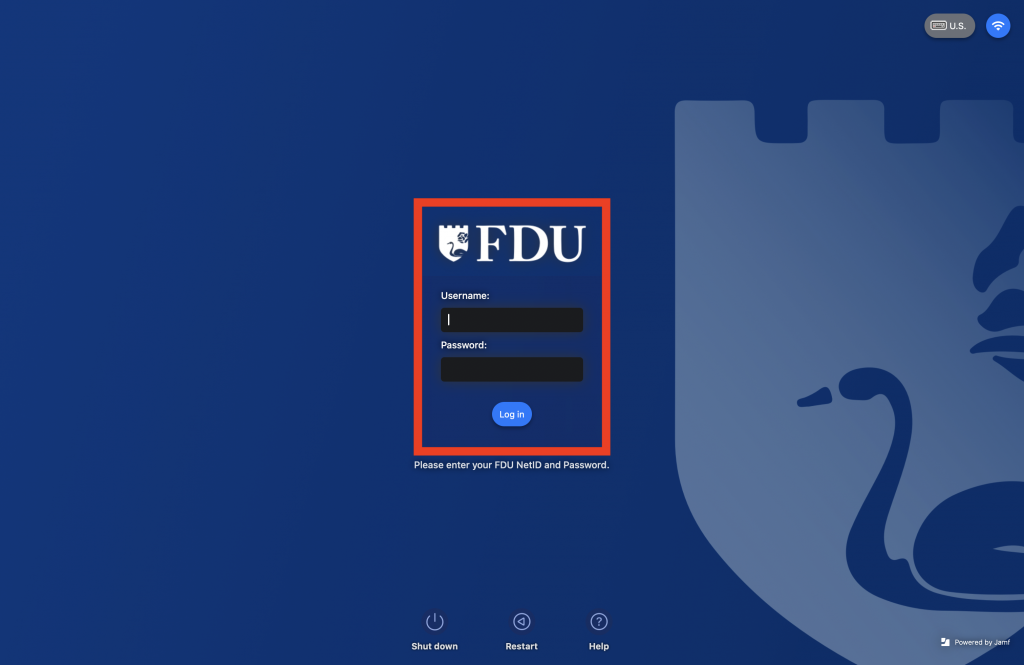
The Jamf Connect login screen consists of three sections: The login fields, the function buttons, and language and Wi-Fi.

The login fields are used to enter the NetID and password while the login button initiates the login. The username can be entered in any form that is recognized by Okta.

  • Shut down: Powers the machine off
  • Restart: Reboot the machine
  • Help: Opens a mini browser to the FDU IT site
  • Language Selection: Changes language
  • Wi-Fi: Allows selection of wireless network
close
Logging into Jamf Connect
  1. Enter your “FDU NetID” and “Password” and click the “Login” button
  • You will see the message “Creating your account on this Mac” while the account is being created on the Mac
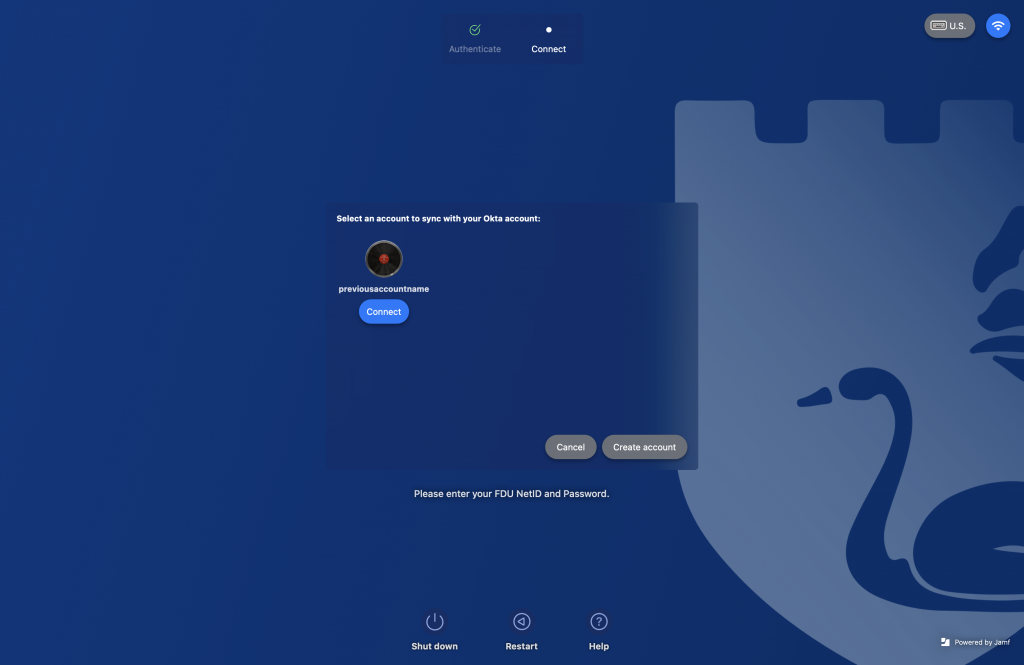
  • If you are using a non-standard account name that does not match your FDU NetID, you will be able to select this account at login and link it to your NetID
  1. Locate the account and click “Connect” to link it to your NetID. If you do not wish to link the existing, account click “Create Account” to proceed with a new account

Note

Any data stored under the old account will not be accessible if choose not to link it. 

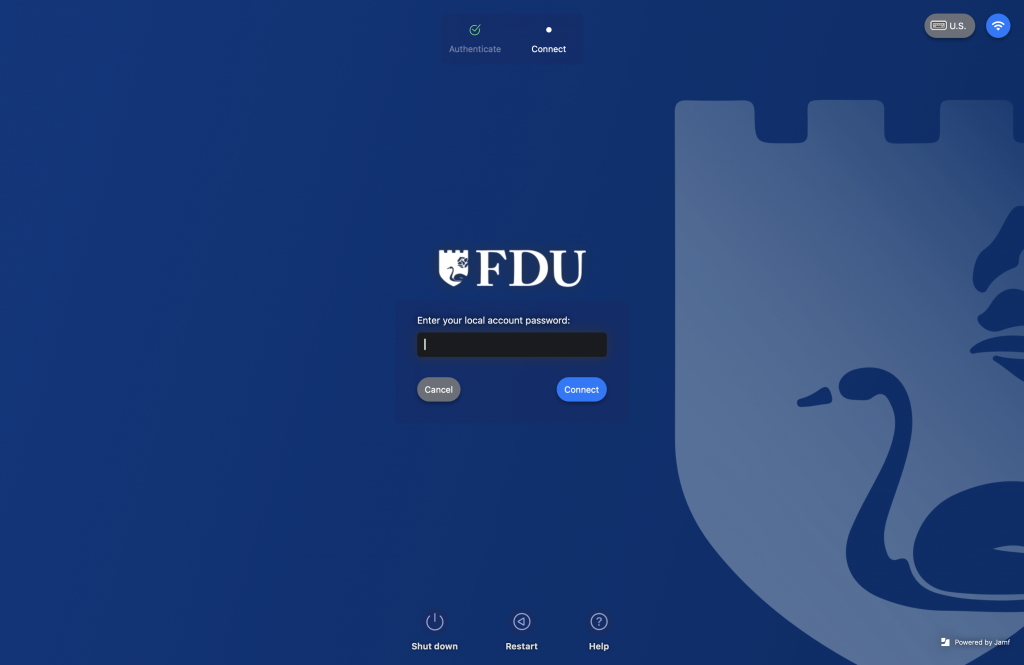
  1. You will be prompted to enter the “existing password” for the local account. Click “Connect” to complete the link.
close
Synchronize NETID Password via Jamf Connect App

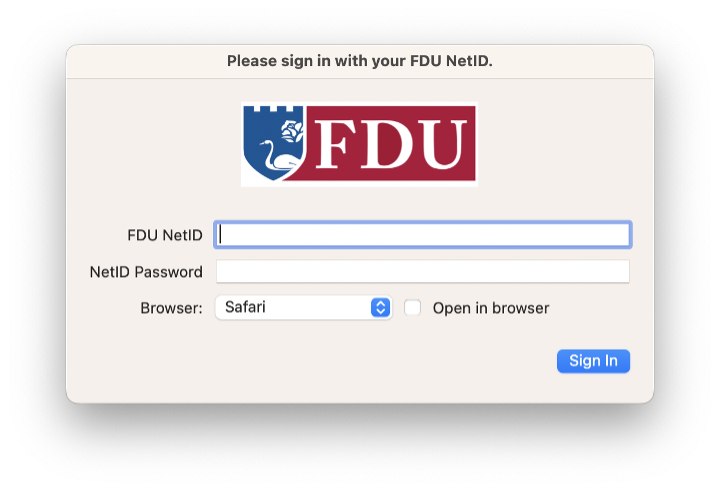
The Jamf Connect app is used to synchronize domain credentials with the local machine credentials.

  1. Enter your “FDU NETID” and “Password” and click the “Sign In” button
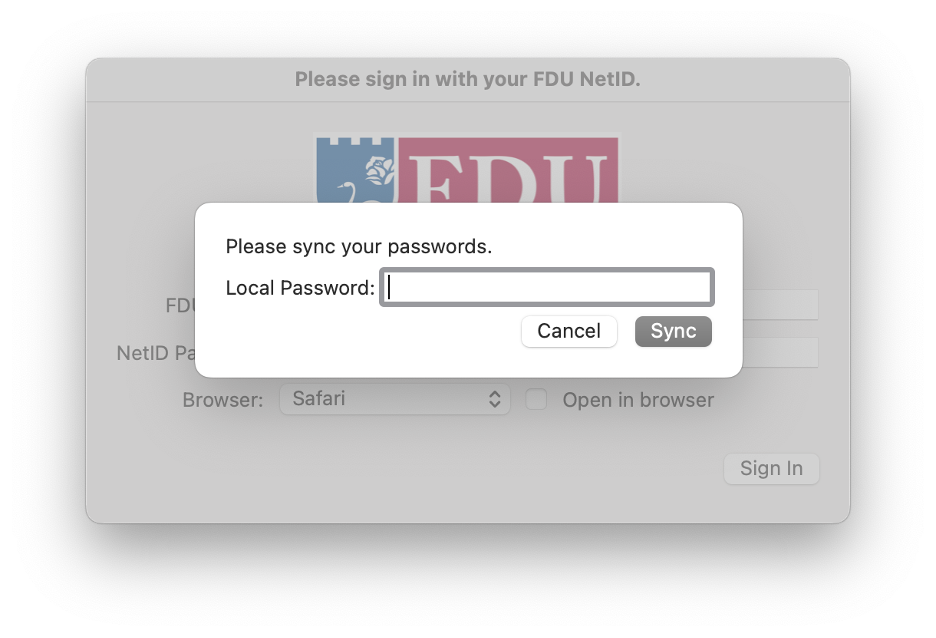
  1. If your NETID password is out-of-sync, you will be prompted to sync them by entering the Local Password you use to sign into the machine. Click “Sync” to sync the new NETID password
close
Last Modified:

FDU Self Service Portal for Software

Resources for:
icon Close

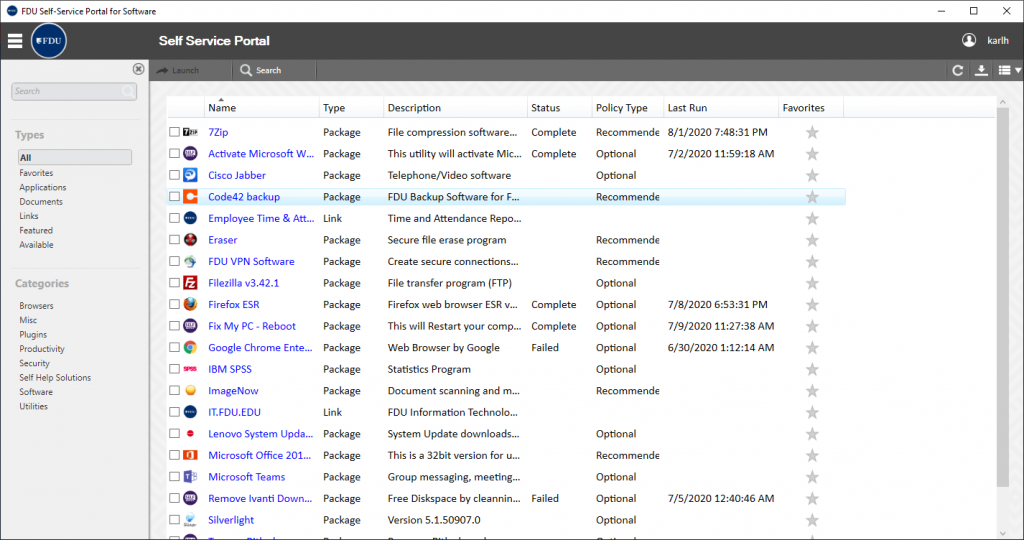
The FDU (Fairleigh Dickinson University) Self-Service Portal for Software is a a tool designed to enhance our community’s access to software and desktop related information. With the Self-Service Portal for Software, our Faculty and Staff can easily locate and install pre-loaded software onto FDU owned computers. Simply launch the portal and you will be presented with a variety of applications, each sanctioned and supplied by FDU. This portal will provide an easily searchable way to view all new applications made available to the user community, including Microsoft Teams, Cisco Jabber, the FDU VPN, and many more.

FDU Self Service Portal Icon

How to Use and Access the FDU Self Service Portal for Software

Windows
  1. Locate the FDU Self-Service Portal for Software icon on the desktop and double-click it to launch the application or…
    1. Select the ‘Windows’ logo/start button on the bottom left of the desktop
    2. Type ‘FDU Self Service Portal for Software’ into the search bar
    3. Left click ‘FDU Self Service Portal for Software’ app to launch
FDU Self-Service Portal for Software on Windows Devices
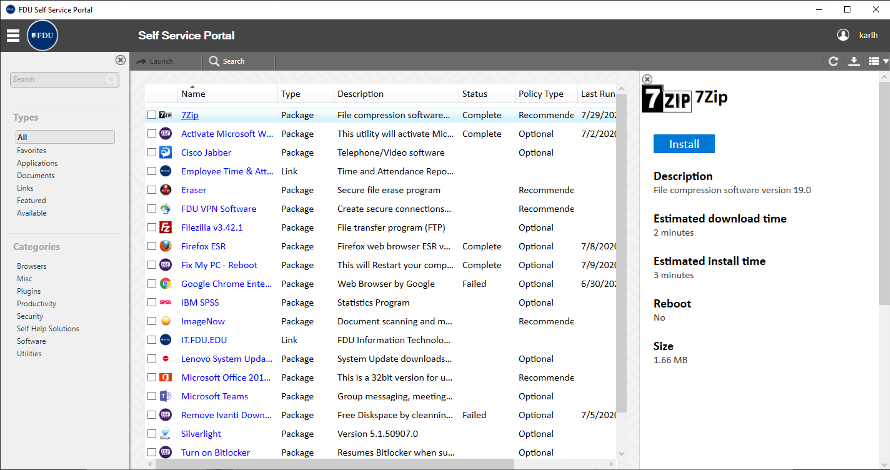
  1. To install a program, click on the name of the application, then click on the “Install” button to the right
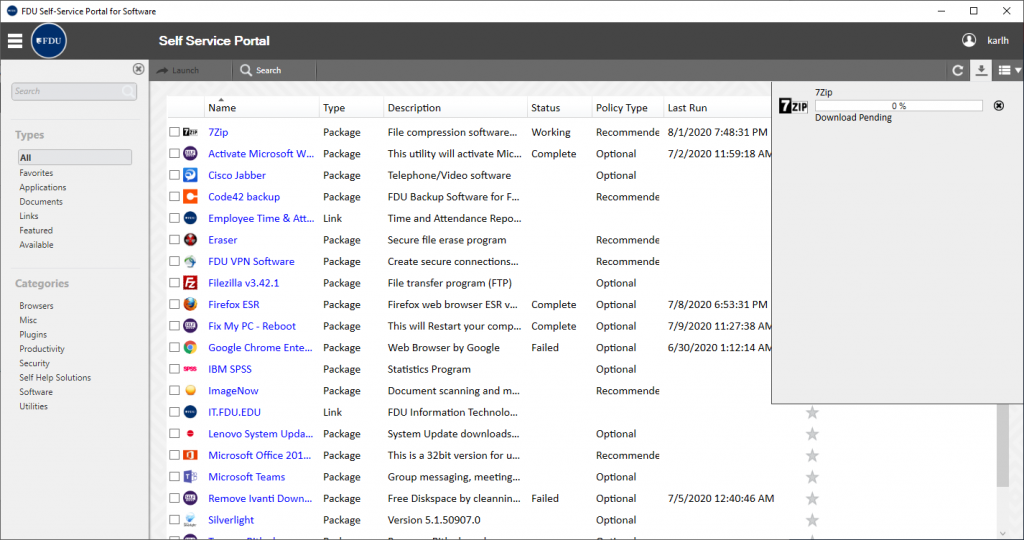
  1. A progress window will provide updates as the program is installed on your system. When complete, the Status column should indicate “Complete
  1. After the selected application finished downloading, it will automatically install and when completed, the status will show as “Completed
close
macOS
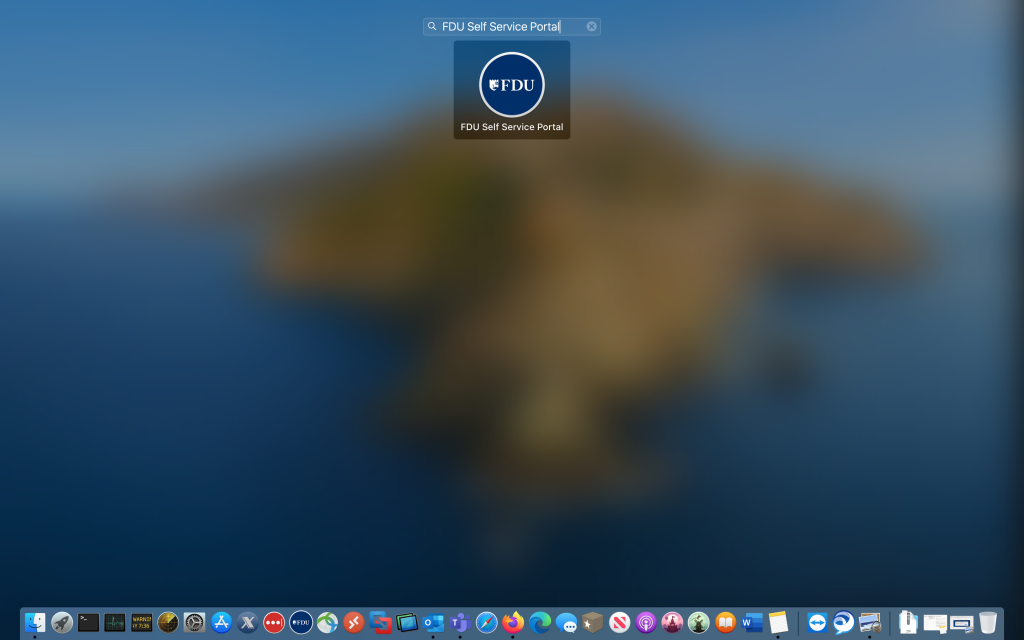
  1. Open the ‘Applications’ folder and locate and click the ‘FDU Self Service Portal’ icon or…
  • Select the ‘Launchpad’ icon from the dock

Launchpad Icon

  • Type ‘FDU Self Service Portal
  • Click the ‘FDU Self Service Portal’ icon to launch
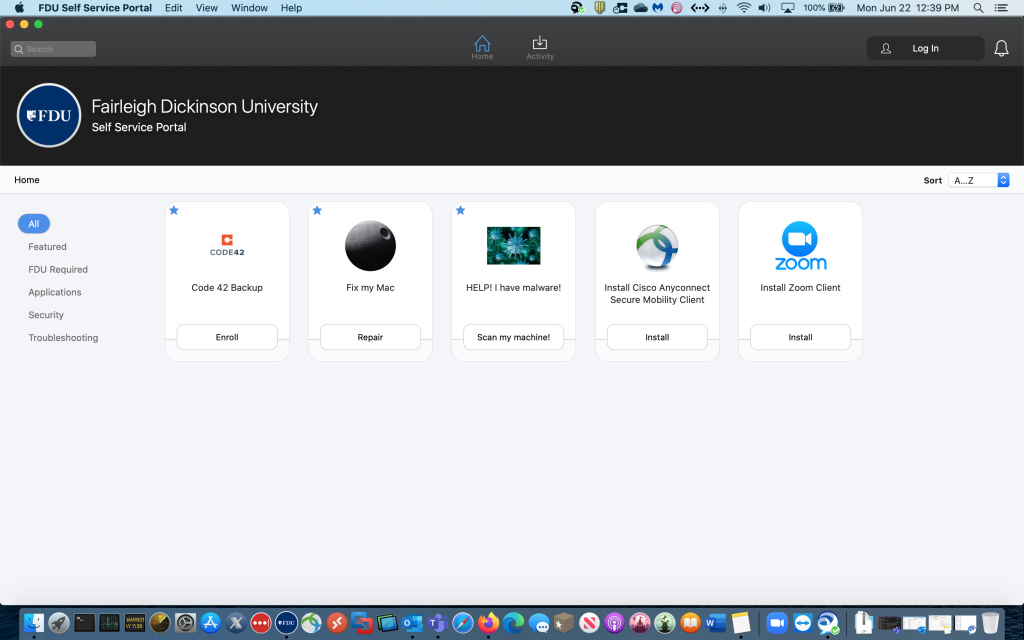
FDU Self-Service Portal for macOS Devices
close
iOS & iPadOS
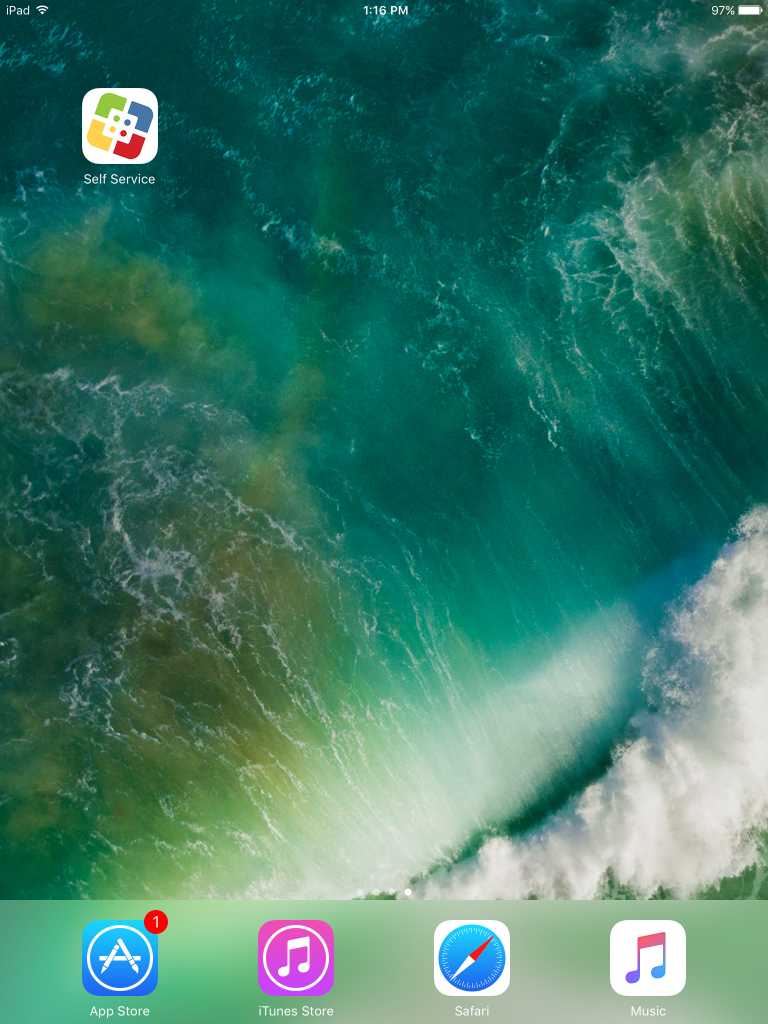
  1. Find the ‘Self Service Portal’ app icon and tap to launch
FDU Self Service Portal App on iPadOS

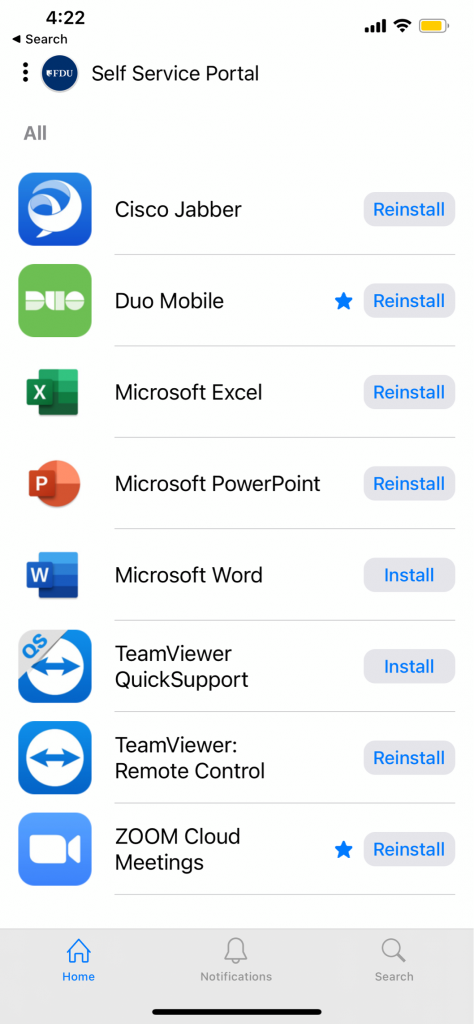
FDU Self Service Portal App on iOS

  1. Click ‘Install’ to install the requested item onto your device

Note:

The Android version of the FDU Self Service Portal will be available in the future.

Once the FDU Self-Service Portal application is open, you may then continue to select and install your desired software application. You may also access and use any self-service troubleshooting solutions that are available to you from within the FDU Self-Service Portal as well.

close
Last Modified:

FDU SSO Login Guide

Resources for:
icon Close

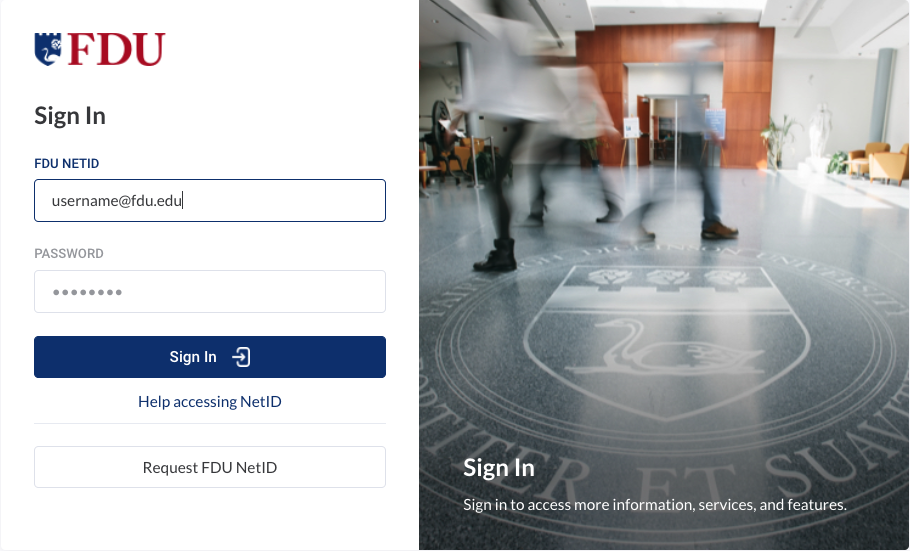
FDU’s Single Sign-On (SSO) experience has been improved and OKTA is the primary Single Sign-On provider. OKTA will replace our “Legacy” SSO login page for all applications over time.

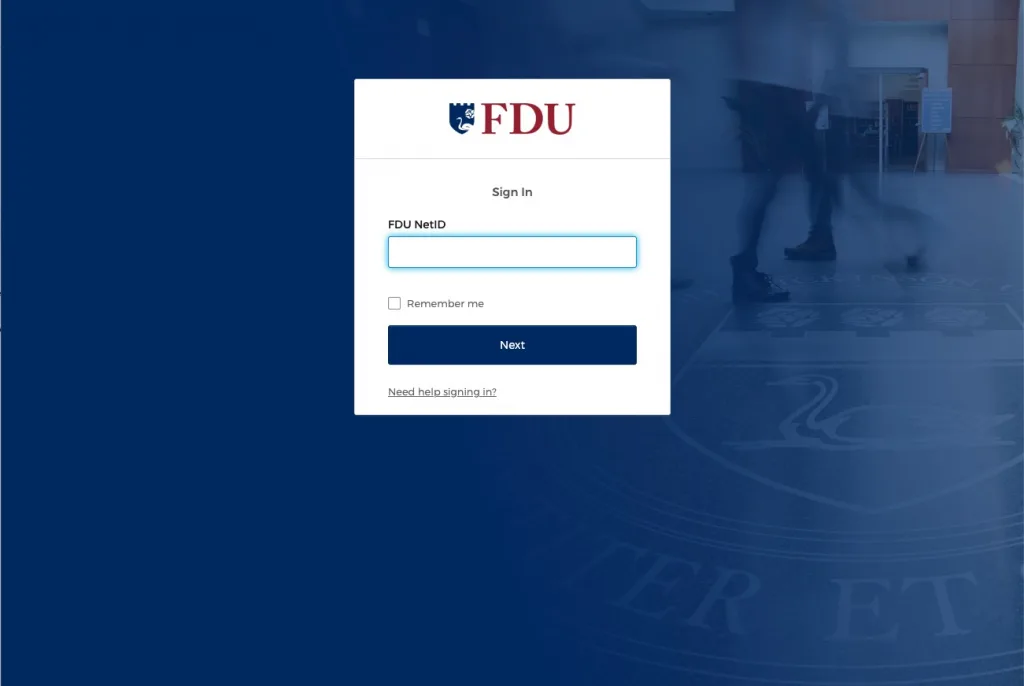
OKTA SSO Login Page

New and existing FDU NetID users who are logging into OKTA for the first time will need to finish setting up their multifactor authentication with DUO.

  1. Enter your FDU NetID and click “Next
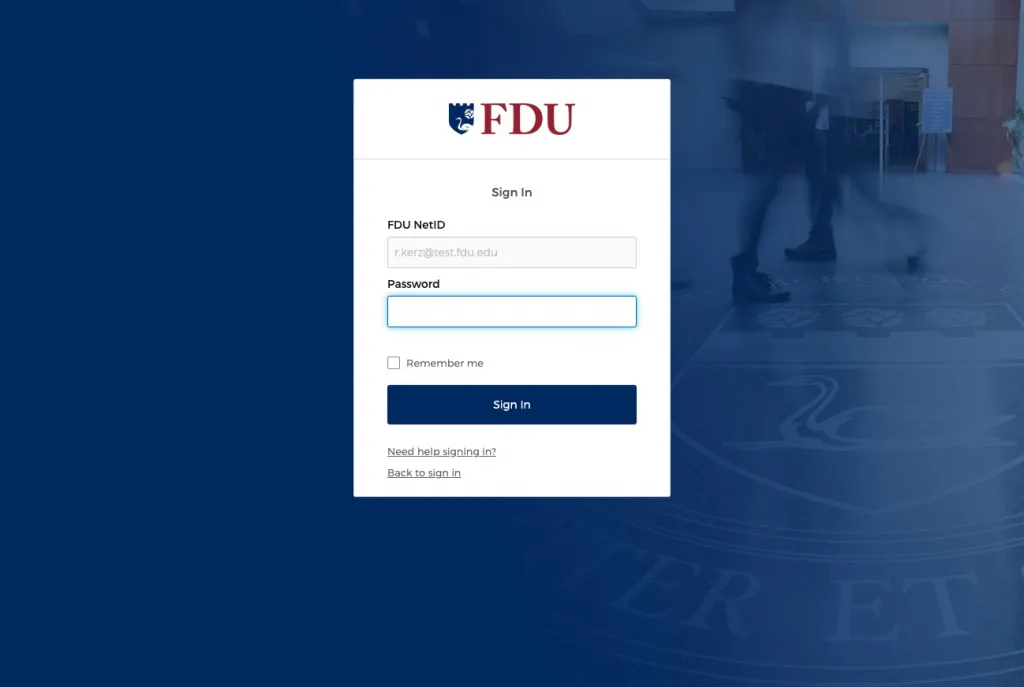
  1. Enter your FDU NetID Password and click “Sign In”
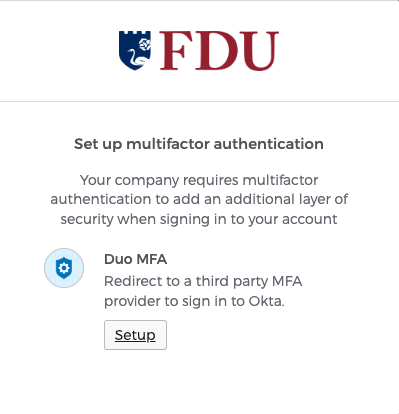
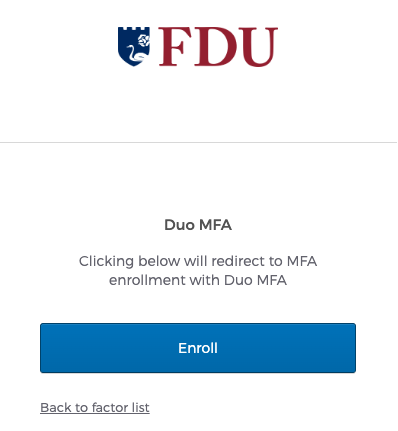
  1. For existing users with DUO configured please skip to step 4. For new users please click “Setup” then “Enroll” to continue the process

For instructions on setting up DUO for the first time, refer to our “Quick Start Guide

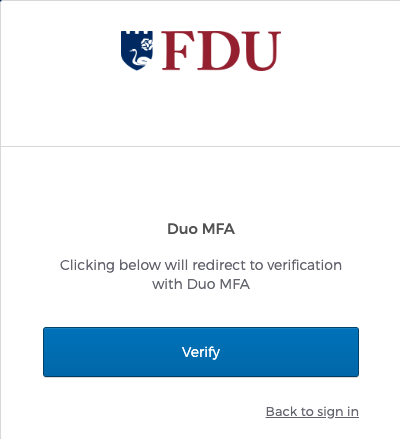
  1. If you are an existing DUO user, a prompt will be shown to redirect you to verification with Duo MFA. Click “Verify” to continue
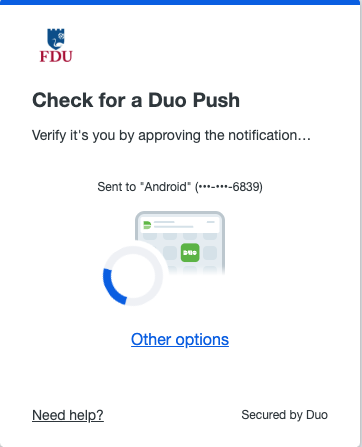
  1. Duo will automatically send a DUO Push to your registered device. Accept the DUO Push on your device to continue the authentication process
  1. If don’t want to use DUO Push to authenticate, select “Other Options” and choose your preferred method from the list

Legacy SSO Login Page

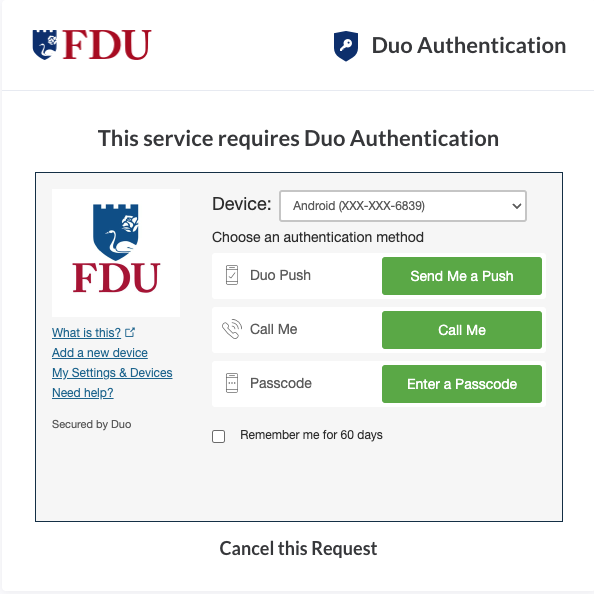
  1. Enter your FDU NetID and Password and click “Sign In
  1. Authenticate using DUO using any of the authentication options shown
Last Modified:

FDU Virtru Email Encryption Tutorial

Resources for:
icon Close

Virtru email encryption is a security enhancement to FDU’s Office 365 and Microsoft Outlook email environment, which provides Faculty and Staff the option of sending and receiving encrypted emails using their FDU email account.

index

Index

What is Virtru Email Encryption

Virtru email encryption is a security enhancement to FDU’s Microsoft Office 365 and Microsoft Outlook email environment, which provides Faculty and Staff the option of sending and receiving encrypted emails using their FDU email account. Virtru for the Microsoft Outlook desktop email client is available for installation for approved FDU Faculty and Staff via the FDU Self Service Portal for Software on Windows 10 desktops and laptops owned by the University.

Virtru Email Client

The Virtru client provides a seamless experience when using the Microsoft Outlook desktop client. The Virtru Outlook plugin is only available on university laptops or desktops running Microsoft Windows.

Virtru for Office365

All Apple macOS users and users who access their FDU email through Office 365 can use Virtru email encryption to send sensitive information electronically.

Tip

Microsoft Office 365 is accessed by visiting office365.fdu.edu from any web browser.

What is Virtru Secure Reader?

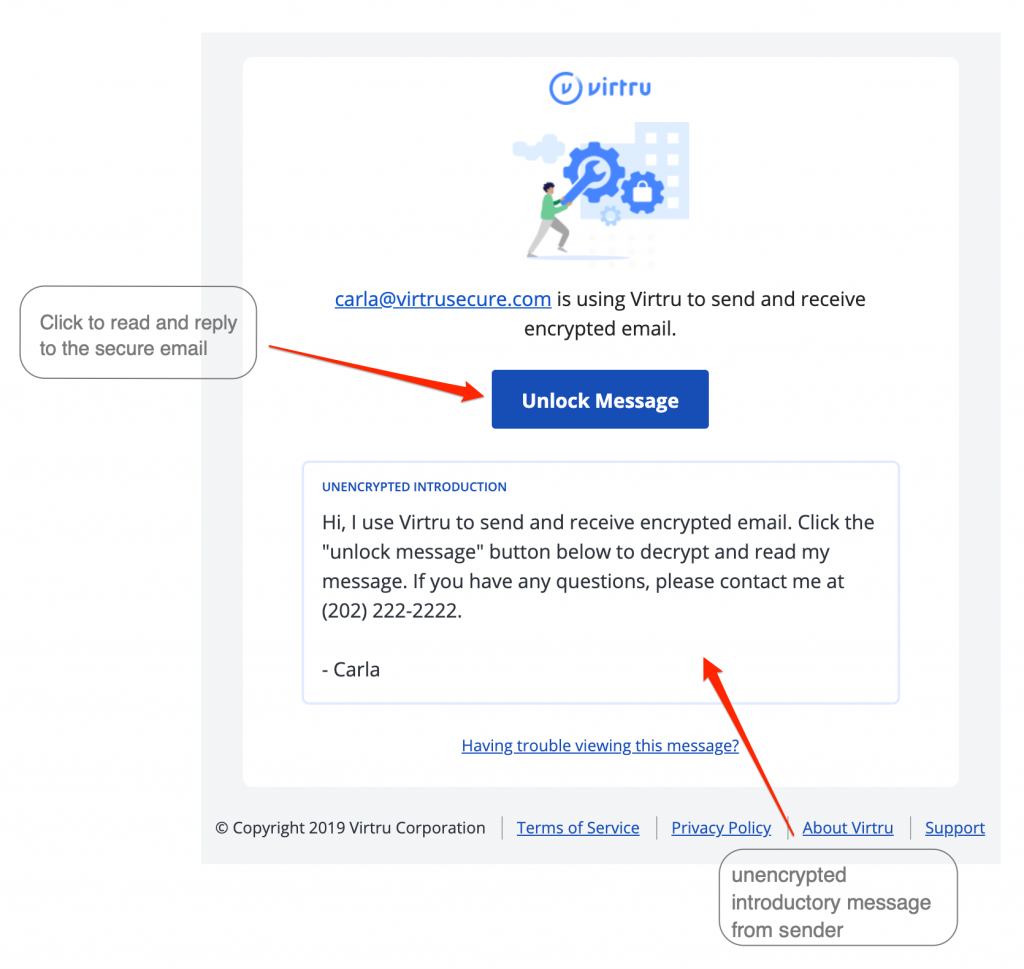
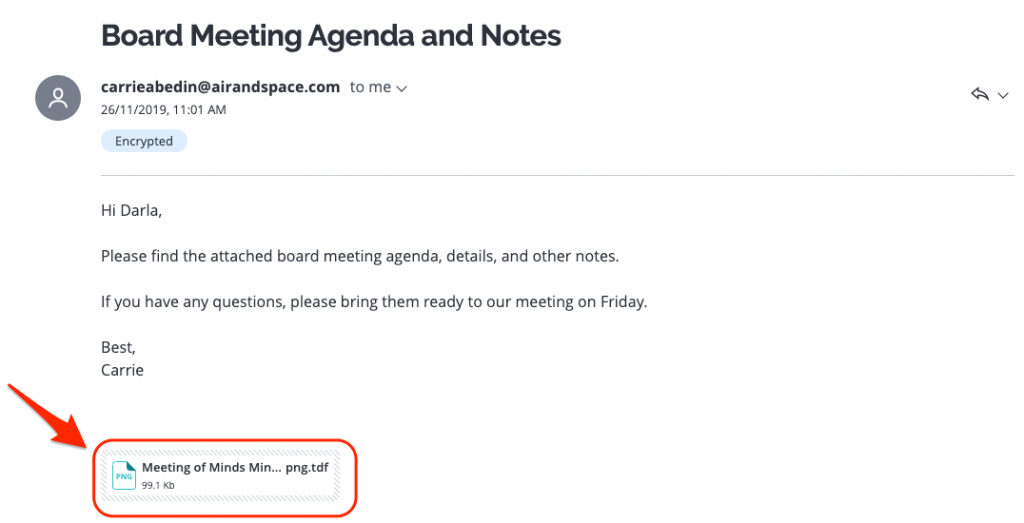
Virtru’s Secure Reader is a platform that can be accessed within FDU’s Outlook on the Web (office365.fdu.edu) and right on your web browser by clicking the “Unlock Message” button in your Virtru secured email. From there, all you have to do is quickly validate you are an authorized recipient of that email or file. Once complete, you can read and reply to the secure email directly in your browser.

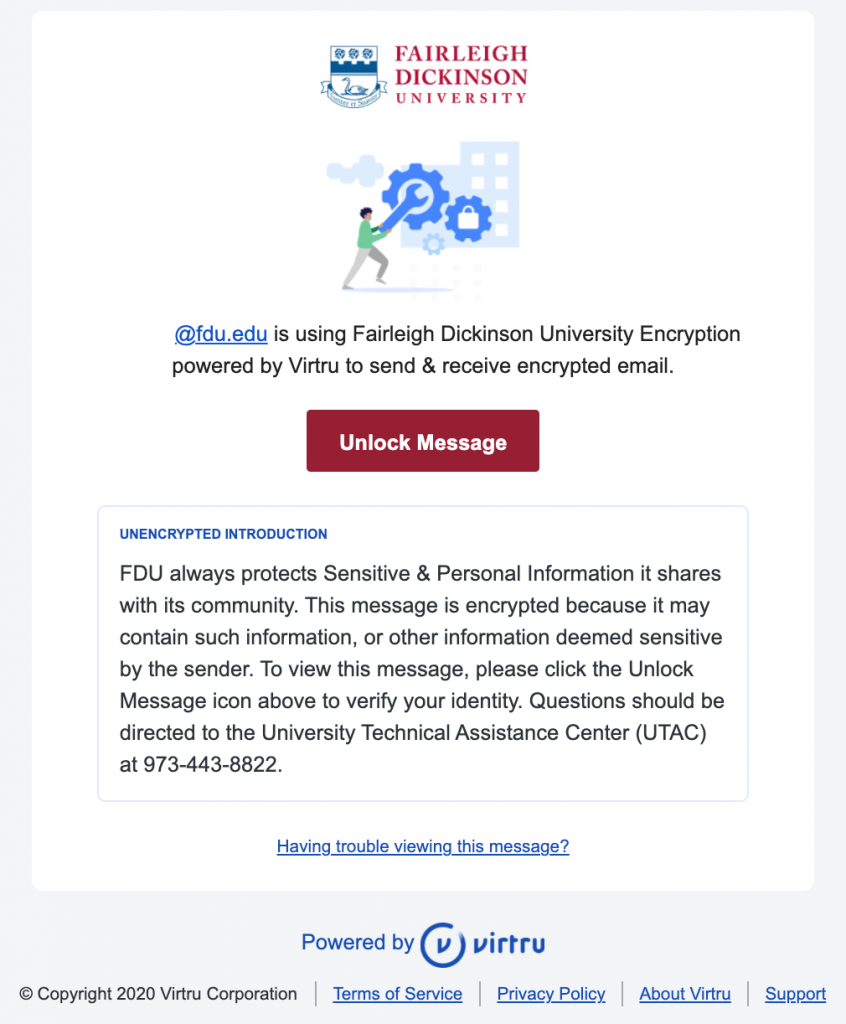
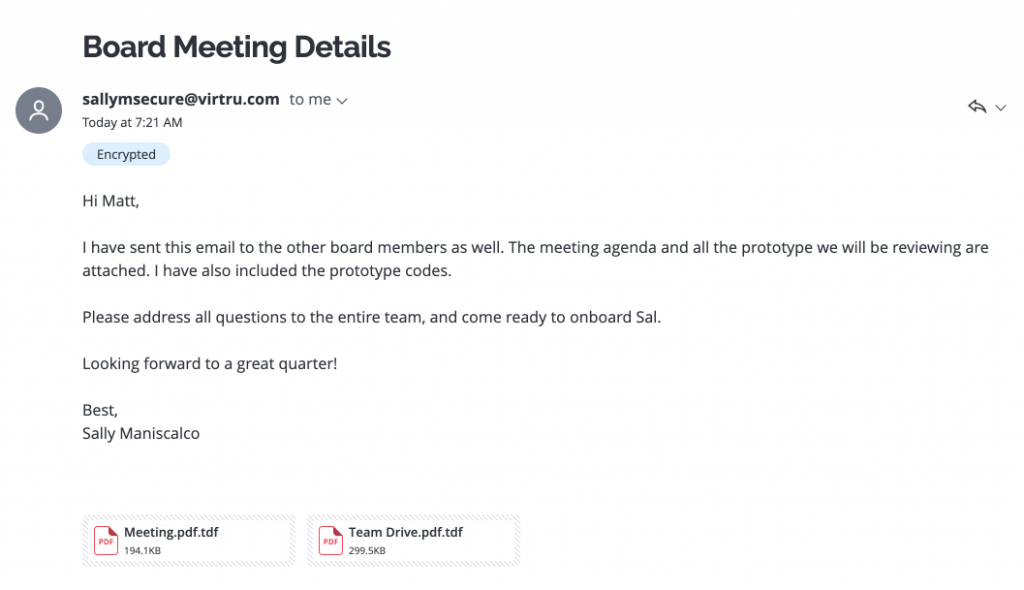
A secure message encrypted by Virtru will have a few key components, including a short unencrypted message from the sender, and a button that says “Unlock Message”.

Note

The Secure Reader is used when viewing encrypted emails from Microsoft Office on the web and any email client on mobile devices (AndroidOS and iOS)

Request Form

To obtain access to Virtru in order to send encrypted emails, you must fill out the request from below:

For additional support, please contact the Fairleigh Dickinson University Technical Assistance Center (UTAC).

Installing Virtru onto a University PC

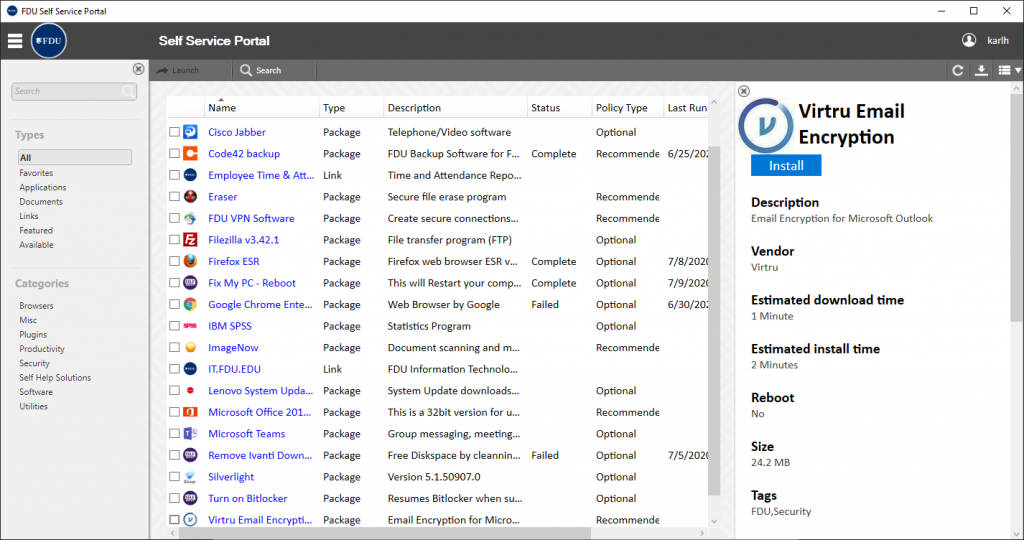
  1. Open the FDU Self Service Portal for Software application. Locate and left-click Virtru Email Encryption and then click “Install

For additional information on the FDU Self Service Portal for Software, please click the following link:

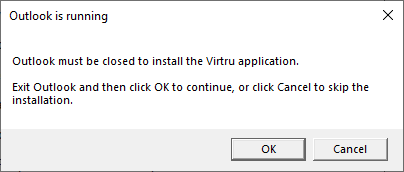
  1. A message box will appear notifying that Microsoft Outlook needs to be closed. Click “OK” and the installation will continue

Note

This window will only appear if the Microsoft Outlook Client is running.

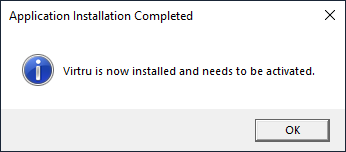
  1. A message will appear when Virtru is finished installing. Click “OK” to finalize the process

Virtru is now ready to be activated.

Activating Virtru on a University PC

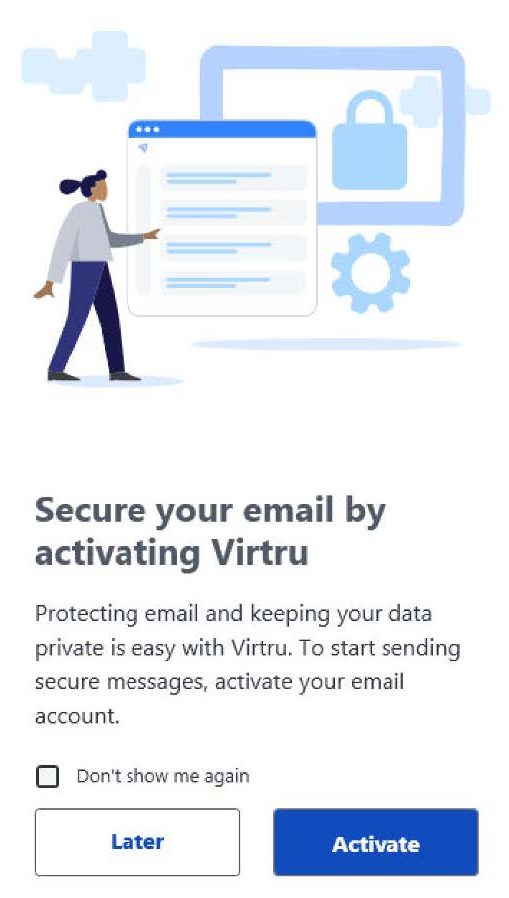
  1. When you open Microsoft Outlook after the Virtru has been installed, you will be prompted to activate your Virtru plugin. Click “Activate to begin. You may choose “Laterif you do not wish to activate at this time

Note

Check “Don’t show me again” before you click “Activate” or “Later” to prevent a pop-up window from re-appearing to prompt activation of un-activated account(s) whenever you start Outlook.

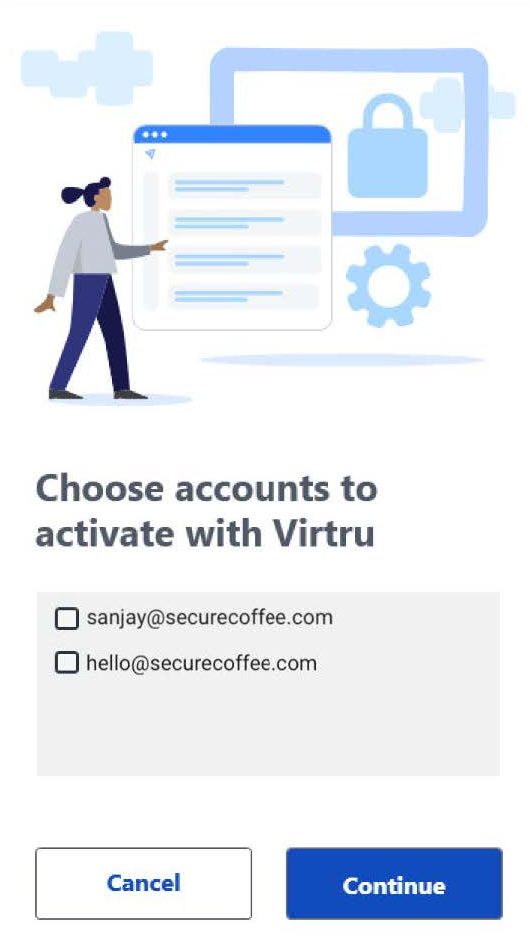
  1. You will be presented with a list of FDU email accounts configured to use in Microsoft Outlook. If your Microsoft Outlook application is associated with multiple email accounts, click on only those you will need to use Virtru email encryption. Then click “Continue
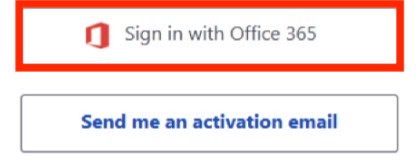
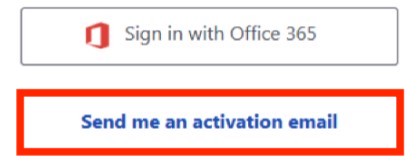
  1. After selecting the proper accounts, you will have the choice of signing in with FDU’s email provider (Microsoft Office 365) or choosing to receive an activation email. Choose “Sign in with Office 365

Activating Virtru through Office 365 Sign in

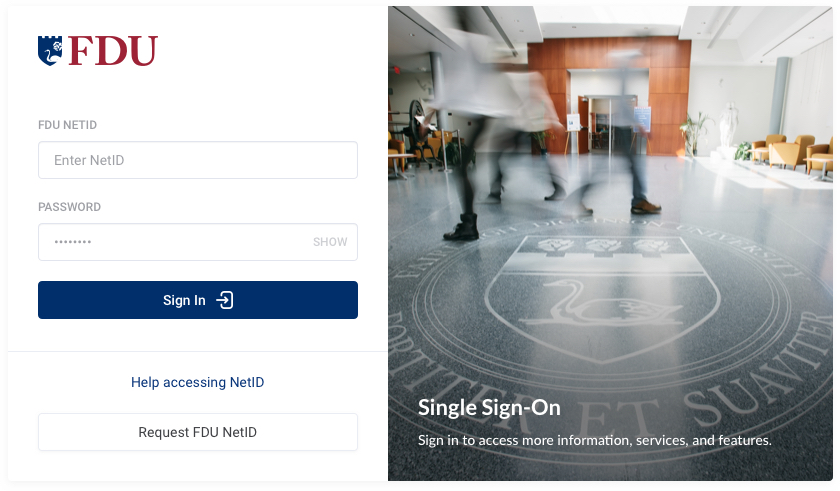
  1. Enter your FDU NetID credentials when prompted and proceed through the FDU Single Sign-on webpage, including completing Duo Multi-Factor authentication. If you experience issues, choose to “Send me an activation email” and follow the directions given below in item

Note

If you cannot activate your account(s) using “Sign in with Office 365”, choose to “Send me an activation email.”

Activating Virtru through Activation Email

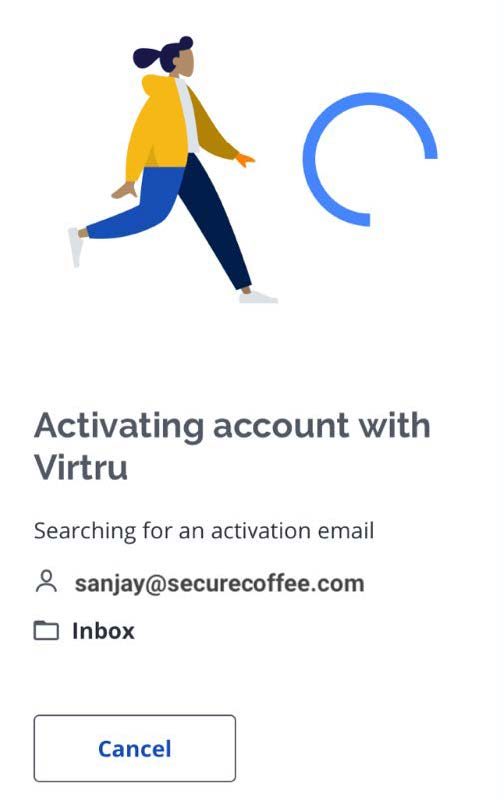
  1. If you are unable to activate your account(s) using “Sign in with Office 365,” choose to “Send me an activation email.” The process will take a few moments to complete in the background
  1. During this process, Virtru will send a unique email from noreply-activation@virtru.com to your mailbox. The Virtru plugin will search for this email in your inbox. When the activation email is found, Virtru will automatically delete the email from your email inbox, and the Virtru plugin will complete the activation

Tip

Click “Take a tour” for a brief walkthrough of your new Virtru features.

If your activation does not automatically complete in a few minutes, please contact the Fairleigh Dickinson University Technical Assistance Center (UTAC).

Activating from the Virtru Menu

If you have disabled automatic activations, you can still activate Virtru on your account(s) at any time.

  1. Select the ‘Virtru‘ menu tab from the top bar of the main Microsoft Outlook window
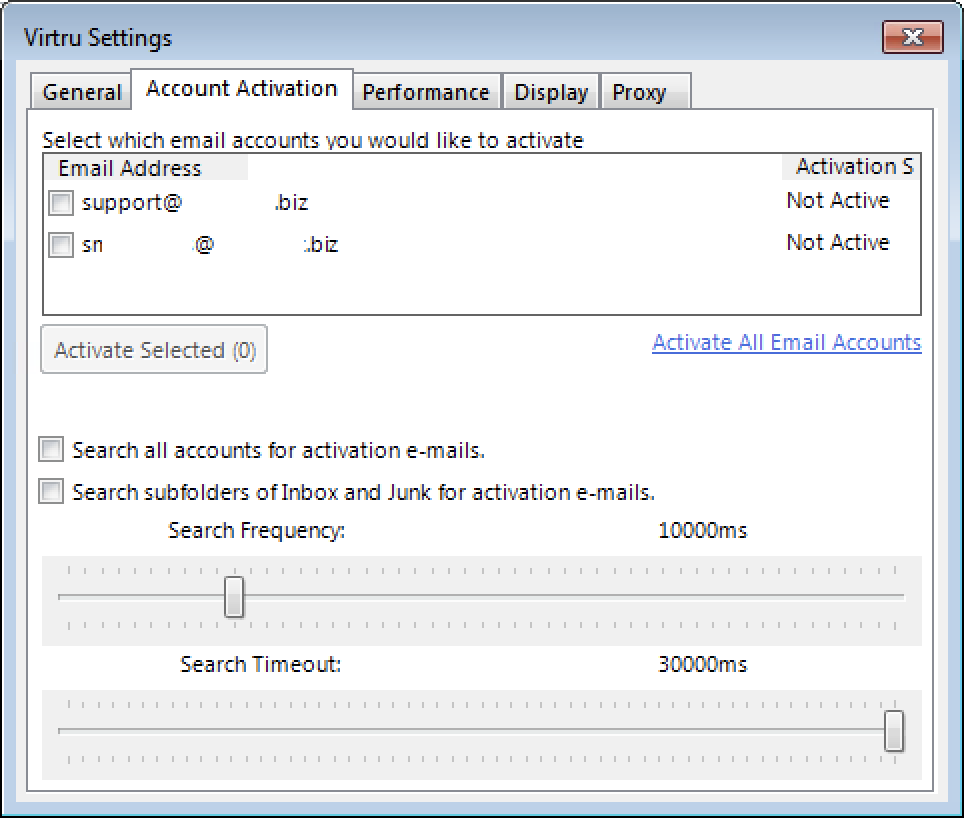
  1. Choose “Authorize Accounts” or “Options
  1. If you select “Options,” go to the ‘Account Activation‘ menu tab, select your FDU email account, and click on “Activate Selected
  1. You will then follow the activation process already illustrated above in “Activating Virtru through Office 365 Sign-on or “Activating Virtru through activation email” described above

Re-enabling a Virtru Account

FDU Virtru users will occasionally be required to reactivate their Virtru add-in due to the following:

  • You’ve cleared your registry
  • Your Virtru activation status has expired. For security purposes, Virtru will invalidate your activation status every
    • 120 days for users accessing their own mailboxes
    • 10 days for users accessing shared or delegated mailboxes
  • You are using Virtru on a new machine

You are automatically prompted when you need to re-activate. You can also proactively reactivate at any time via the ‘Virtru’ menu tab. This process was described above in “Activating from the Virtru Menu.”

Reset Activations

If you wish to fully deactivate all accounts in Microsoft Outlook, you can do so from the ‘Virtru’ menu tab:

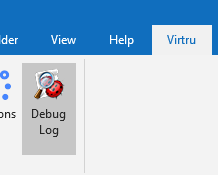
  1. Click on the ‘Virtru‘ menu tab at the top of your Microsoft Outlook window and select “Debug Log
  1. Click on the ‘Debug Commandsmenu tab option and select the “Reset Activations (clears registry only)” option
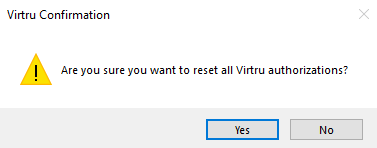
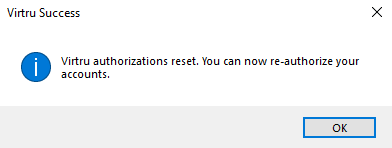
  1. Click “Yes” and then “OK” to confirm the changes
  1. From the ‘Virtrumenu tab, you can reauthorize by clicking on “Authorize Accounts

Virtru Walkthrough Video

Send a Virtru-encrypted Email in Outlook

With Virtru, you can easily protect your emails by encrypting messages and attachments in a few simple clicks.

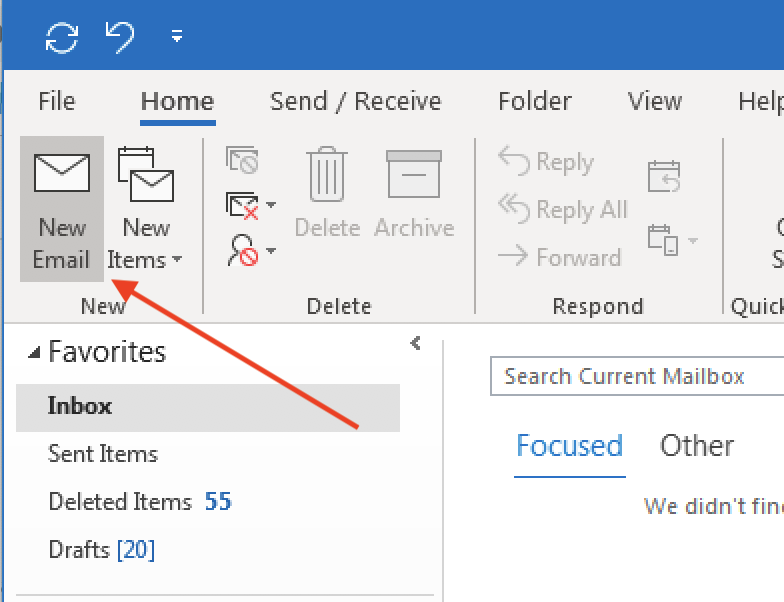
  1. Left-click “New Email” from the main Outlook window
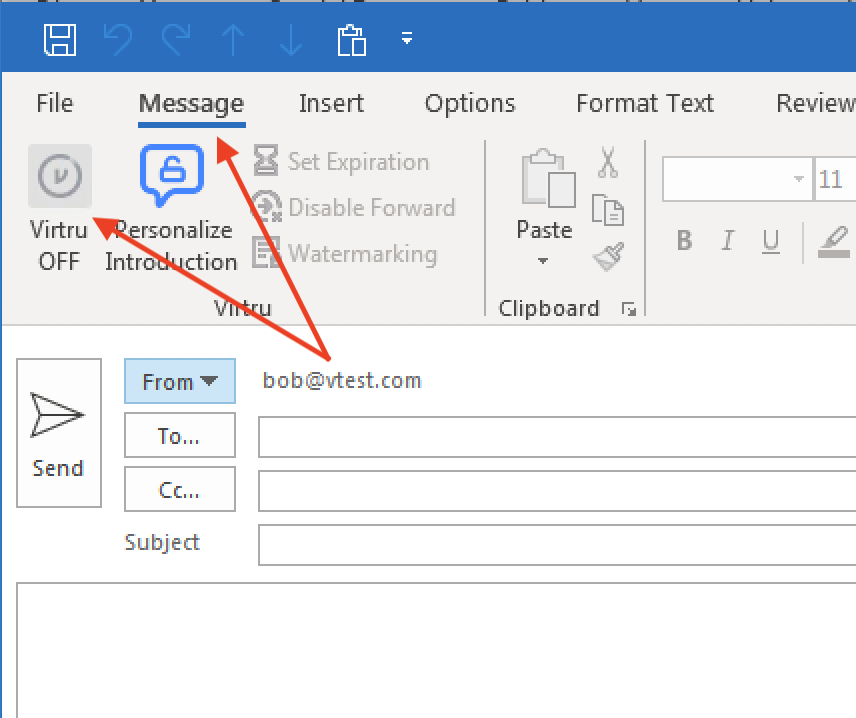
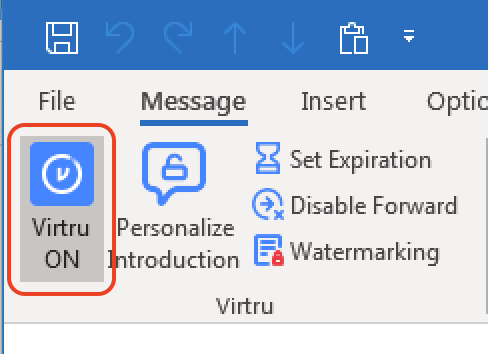
  1. Open the ‘Message menu tab and left-click the “Virtru button” to turn “Virtru ON.” The button should turn blue and read “Virtru ON
  1. Add recipients, a subject, the body of the email, and any relevant attachments

Tip

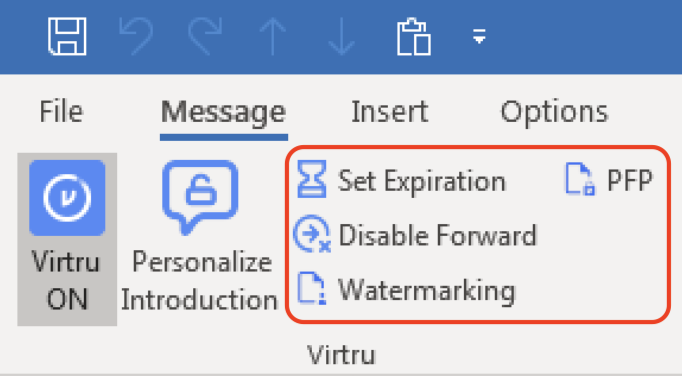
Additional security options for the message, including Disable Forwarding, setting an Expiration Date, and applying Watermarking and/or Persistent File Protection (PFP) to attachments are available to select for your Virtru-encrypted email. More details on these additional features can be on the “FDU Virtru Email Encryption Tutorial” under “Additional Resources.”

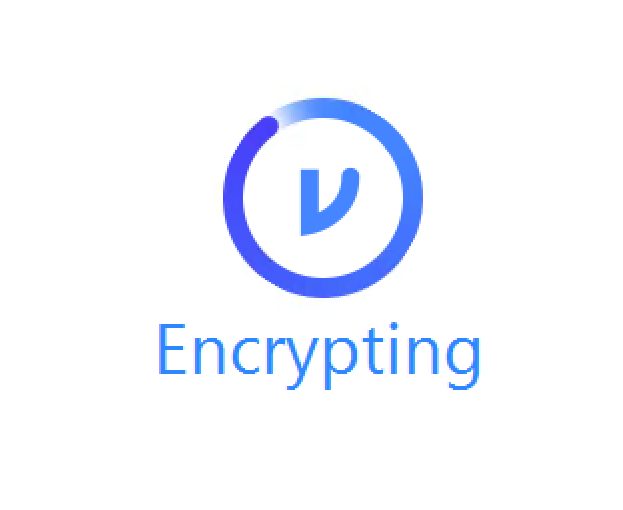
  1. When your message is ready, click “Send.” You should see a brief animation letting you know that the message is “Encrypting” before it is fully sent

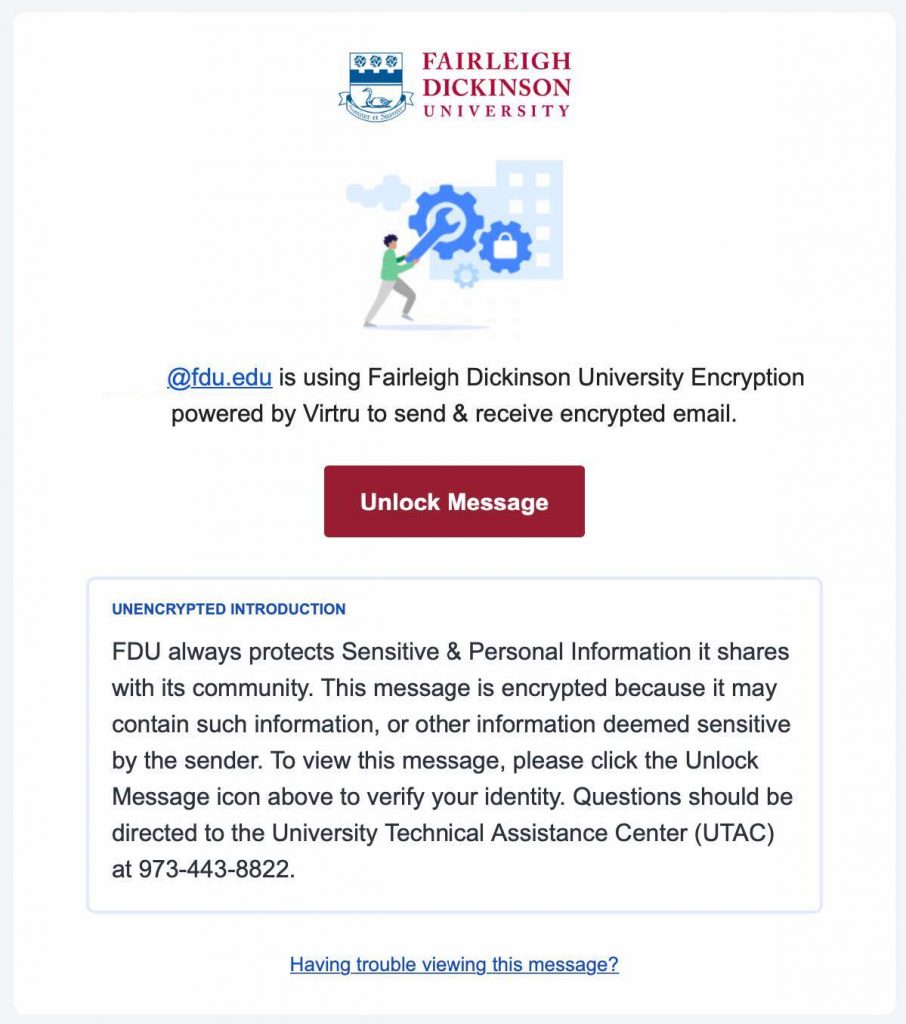
FDU Virtru-encrypted Email Introduction for Recipients

FDU includes a standardized introduction to inform the recipient that they are viewing a Virtru-encrypted email. Below is an example of what the recipient will see. If you have updated the introduction, it will be reflected accordingly

Personal Virtru-encrypted Email Introduction for Recipients

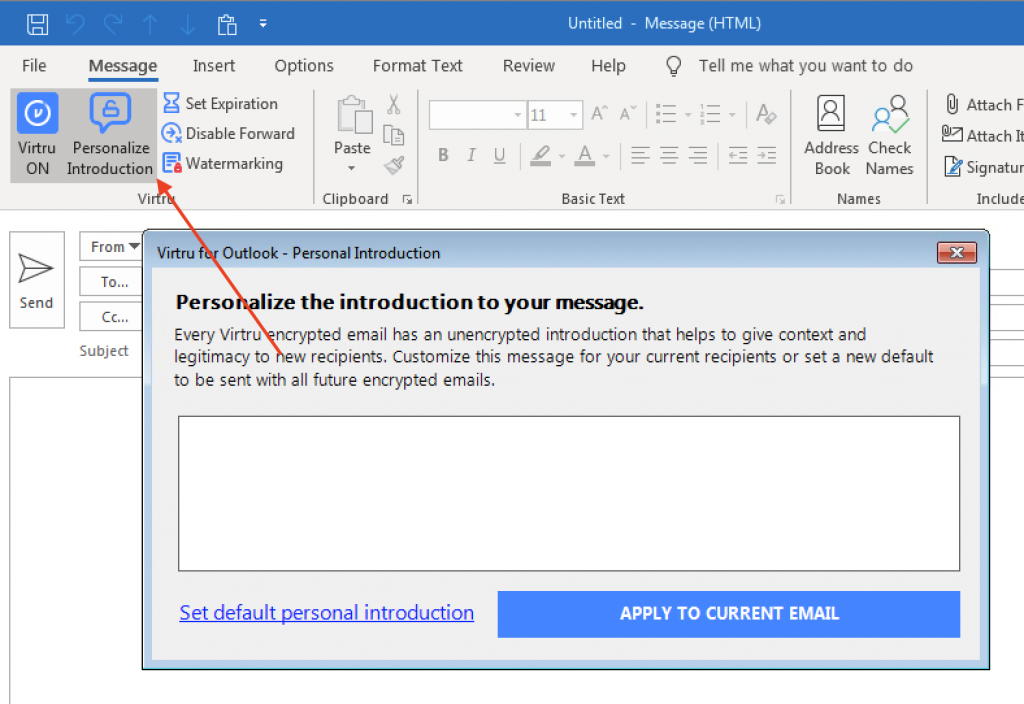
You can also set a one-time, unencrypted personal introduction for the message to either clarify the introduction of Virtru to the recipient or provide some context about the email. Left-click the “Personal Introduction” menu button in your email draft window.

Note

The Personal Introduction only supports plain text and line breaks. Special formatting is not supported.

Send a Virtru-encrypted Email on Microsoft Office 365

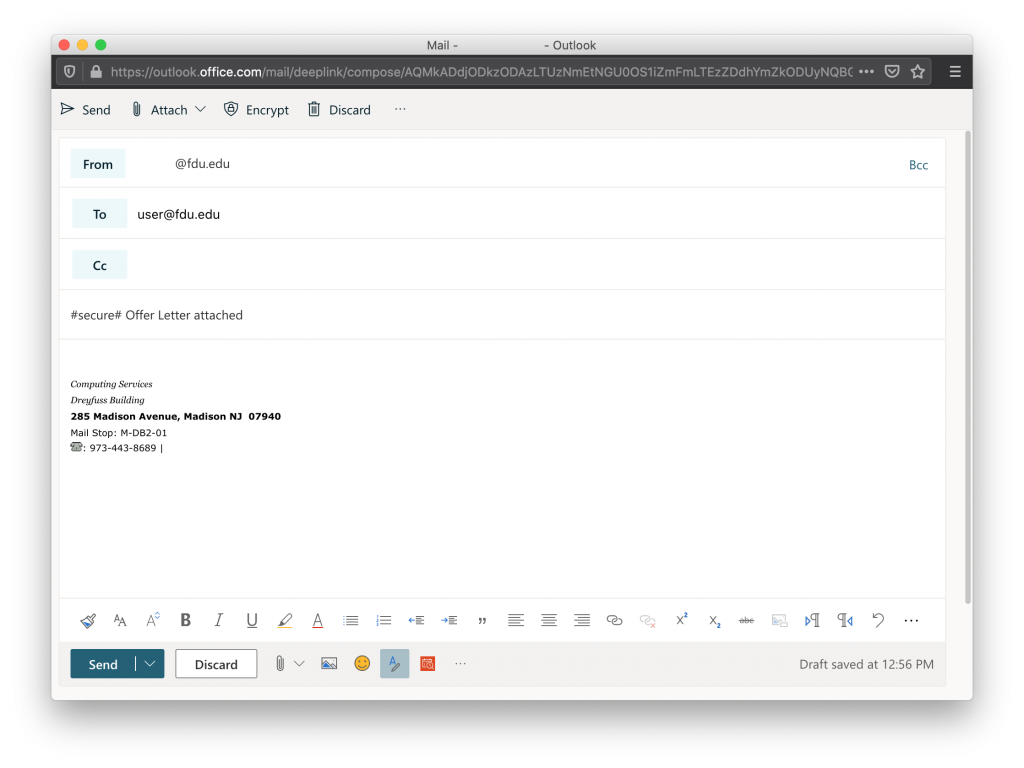
With Virtru, you can easily protect your emails by encrypting messages and attachments in a few simple clicks. To send Virtru encrypted emails from your Microsoft Office 365 email acount, simply prepend the subject line of your email as follows:

#secure#

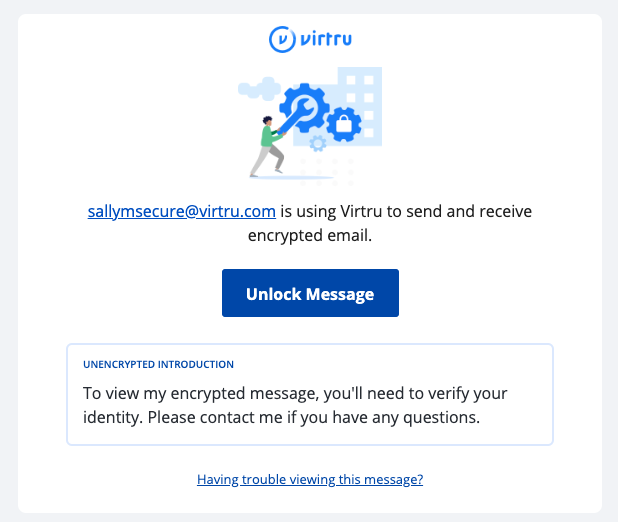
Virtru-encrypted Email Recipient Experience

The recipient will receive an email that looks like this:

Read a Virtru Encrypted Email on Microsoft Office 365

In this article, we’ll show you how to quickly access and read your Virtru-secured message or attachment within Microsoft Office 365 using Virtru’s Secure Reader.

How to Access and Read your Message

  1. Login to FDU’s Microsoft Office 365 web portal using any web browser. Enter your FDU NetID credentials
  1. Open the Virtru-secured email in your inbox and left-click “Unlock Message.” A new tab will open
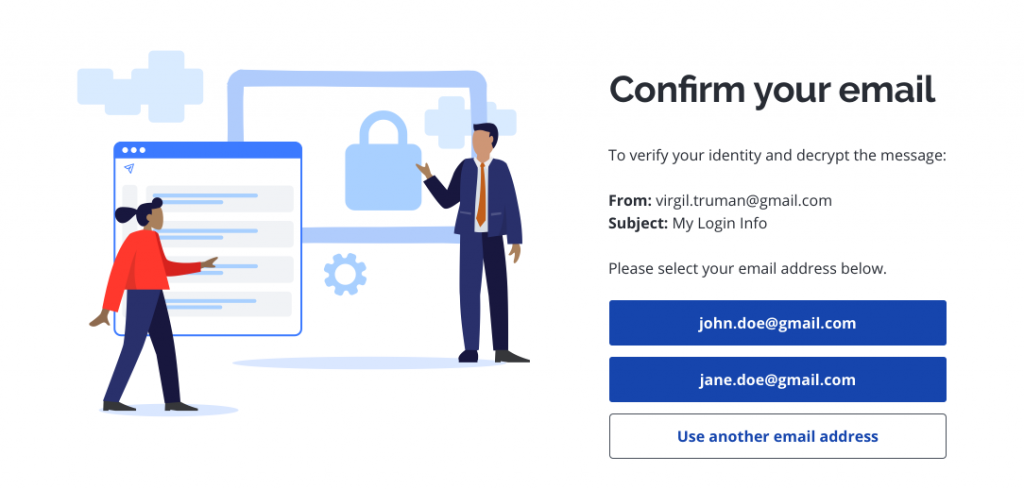
  1. When prompted, select your FDU email address

Tip

If you don’t see yours listed, left-click “Use another email address” and enter your email address.

Note

Please be sure to verify using the exact email address to which the secure message was sent. If the email was sent to an alias, group address, or distribution list address, you will need to select or enter that exact email address rather than your personal address.

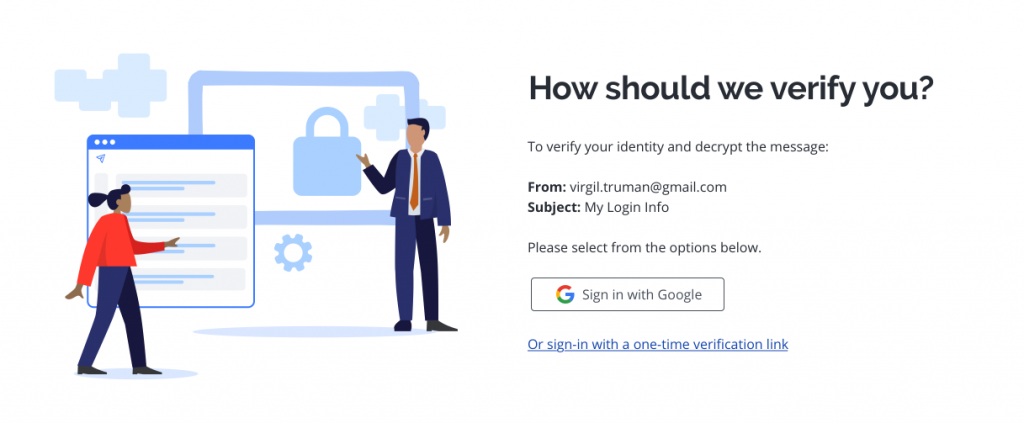
  1. Choose how you’d like to verify your identity
    • Microsoft Office 365 users can use their FDU NetID credentials to log into the Secure Reader using “Sign In with Microsoft.” If you choose this route, you can skip step #5 below.
    • Alternatively, users may choose “Or sign-in with a one-time verification link.”

Warning Warning

For emails sent to an alias, group address, or distribution list address, you will need to select the Or sign-in with a one-time verification link option. For group addresses and distribution list addresses, this action will send the verification email to all users on that group or distribution list.

  1. If you selected “Or sign-in with a one-time verification link,” check your inbox for your verification email. It will come from verify+xxxxxxxx@virtru.com (with each “x” being a digit). Open the verification email and left-click “View Message” to open your message

Note

Both the “Unlock Message” and “View Message” links need to be opened in the same browser on the same device in order to confirm your identity.

Please also note, Virtru offers a “cookie-less” verification pathway if we detect that tracking or cookies and local storage have been disabled in the browser. In these cases, we send a verification code via email. This code, once received, simply needs to be pasted into the proper field in your browser in order to grant access.

  1. Your message will open the Virtru Secure Reader in a new tab in the browser. You will also be able to view and access attachments at this time

For a variety of reasons, some recipients may occasionally receive an error message when trying to open a secure email or attachment. If you are having problems accessing your secure email and/or files, please contact the Fairleigh Dickinson University Technical Assistance Center (UTAC) for assistance.

Reply to a Virtru Encrypted Email on Microsoft Office 365

In this article, we’ll show you how to quickly reply to your Virtru-secured message or attachment within Microsoft Office 365 using Virtru’s Secure Reader.

How to Reply to a Secure Message

  1. Login to FDU’s Microsoft Office 365 web portal using any web browser. Enter your FDU NetID credentials
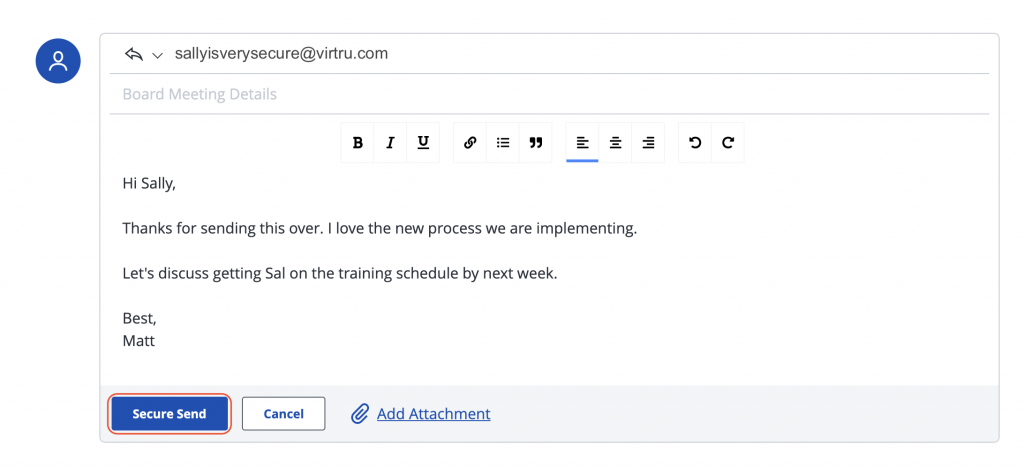
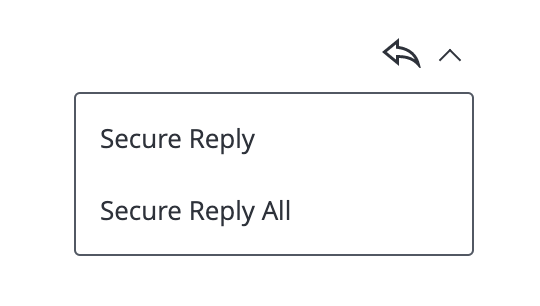
  1. After successfully opening the Virtru-secured message, to send a “Secure Reply,” scroll down the page below the main message, or click the icon in the top right with the arrow pointing to the left. You may also click on the arrow next to it to reveal additional options such as “Secure Reply All
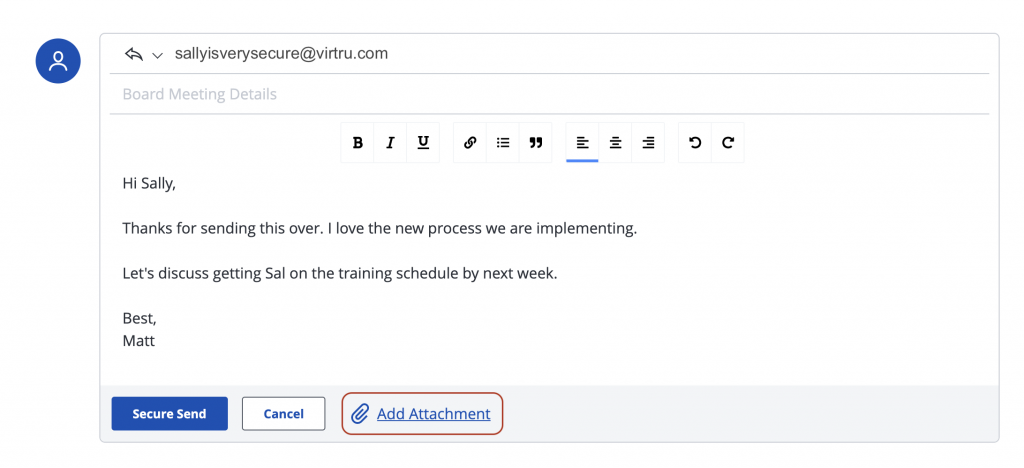
  1. Attachments can be added by clicking “Add Attachment.” These attachments will be sent securely as well
  1. When you are ready to send your email, hit the “Secure Send” button. Both you and all applicable recipients will receive a copy of your reply. Please note that your secure reply will be sent from secure-reply@virtru.com

Viewing a Secure File or Attachment on Microsoft Office 365

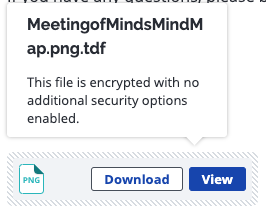
This article covers the different options you have for viewing and downloading secure attachments and files within Microsoft Office 365 using Virtru’s Secure Reader. Depending on the type of attachment you’ve received, you can view your file directly in the Virtru Secure Reader or download the file to your computer. The Virtru Secure Reader can preview various file types, including PDF, Word documents, most image files, and plain text files.

Viewing Directly in the Secure Reader

  1. Login to FDU’s Microsoft Office 365 web portal using any web browser. Enter your FDU NetID credentials
  1. If you’ve received an attachment in a Virtru secured email or an encrypted file that was shared directly with you, you can hover over the file name and choose “View” or “View Protected file” to view the attachment right in your web browser

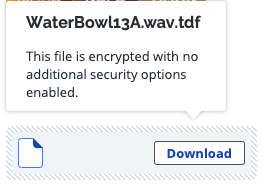
Downloading Unsupported File Types

If you’ve received a file that cannot be previewed in the Virtru Secure Reader, you will be prompted to download that file directly. There will be no “View” option.

Printing Attachments in the Secure Reader

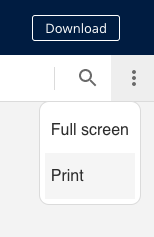
You can print a document from the Secure Reader by selecting the menu under the “Downloadbutton and then selecting “Print.” You may also choose to download it first, then open and print via a preferred program on your computer.

Note

Note that printing via your web browser’s File>Print option will not print the document as expected.

Using the Virtru Dashboard for Microsoft Office 365 Users

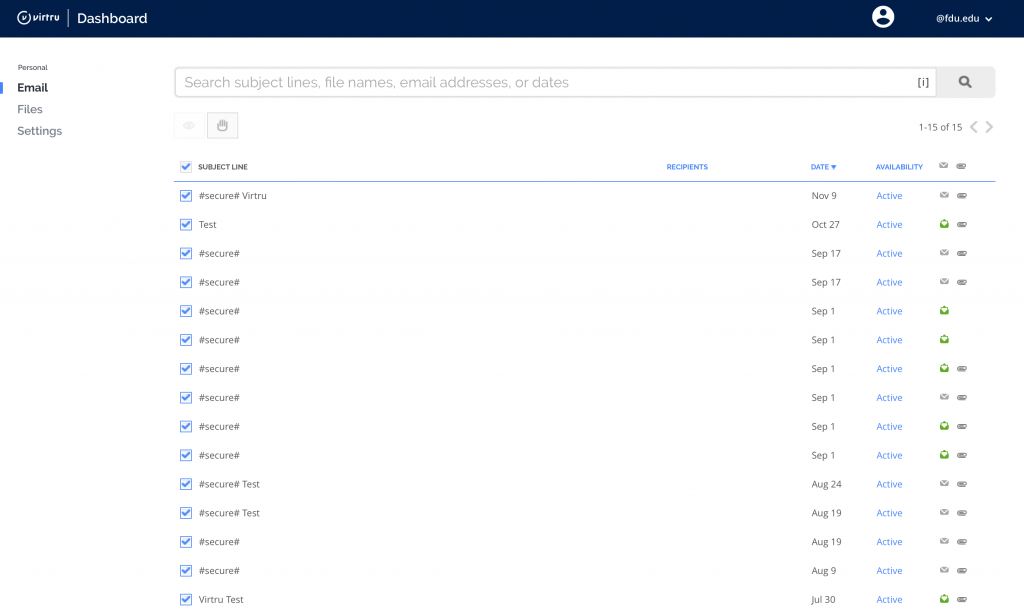
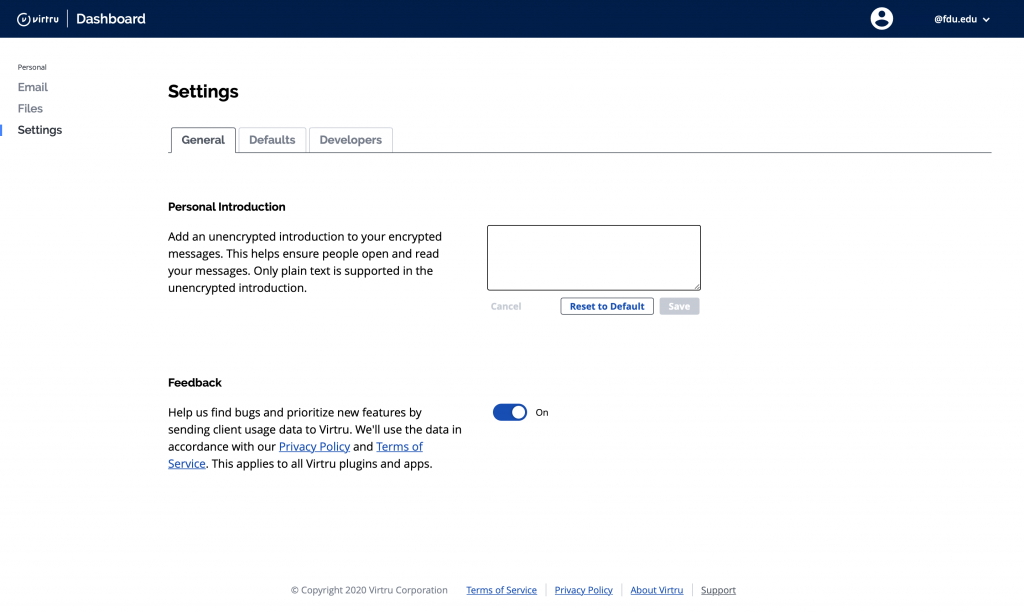
Users who access their FDU email through the Microsoft Office 365 web portal and all Apple macOS users will need to use the Virtru Dashboard to manage all of Virtru’s security options.

  1. To use the Virtru Dashboard, click the link below:

Tip

We will refer to the “Virtru Dashboard” many times, as this dashboard is used to change settings after an encrypted email has been sent. It is suggested that you bookmark this site for easy access.

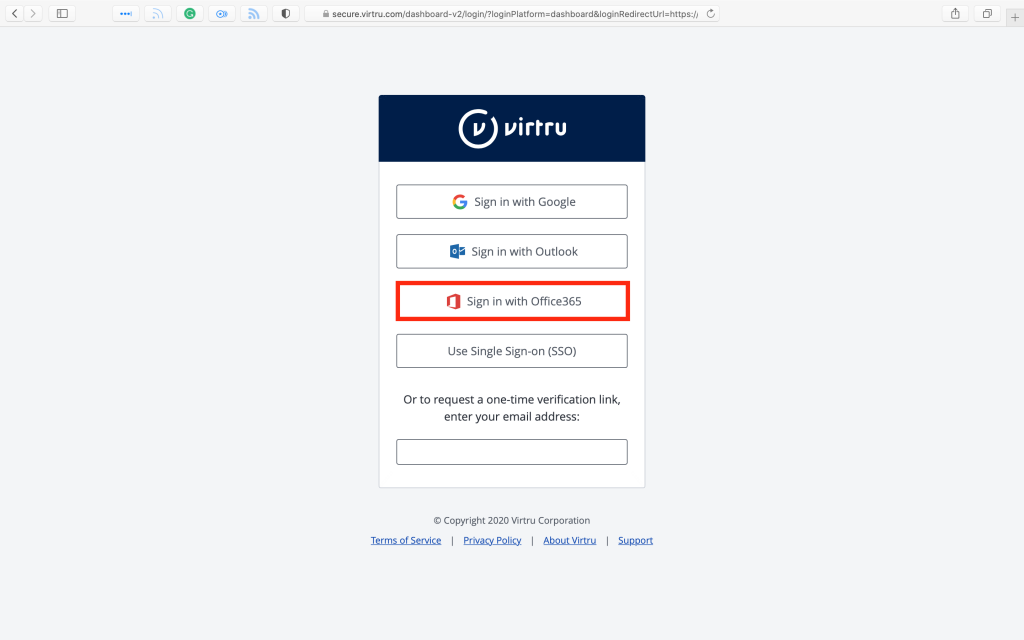
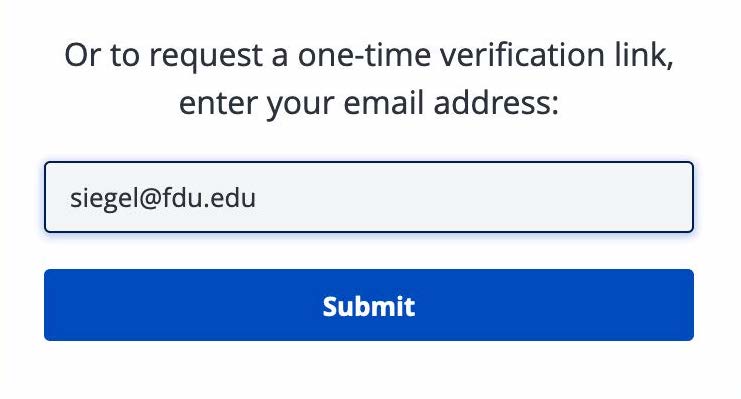
  1. Choose “Sign in with Office365“, and skip to Step 5. If you choose to request a one-time verification link, enter your FDU email address and click on “Submit
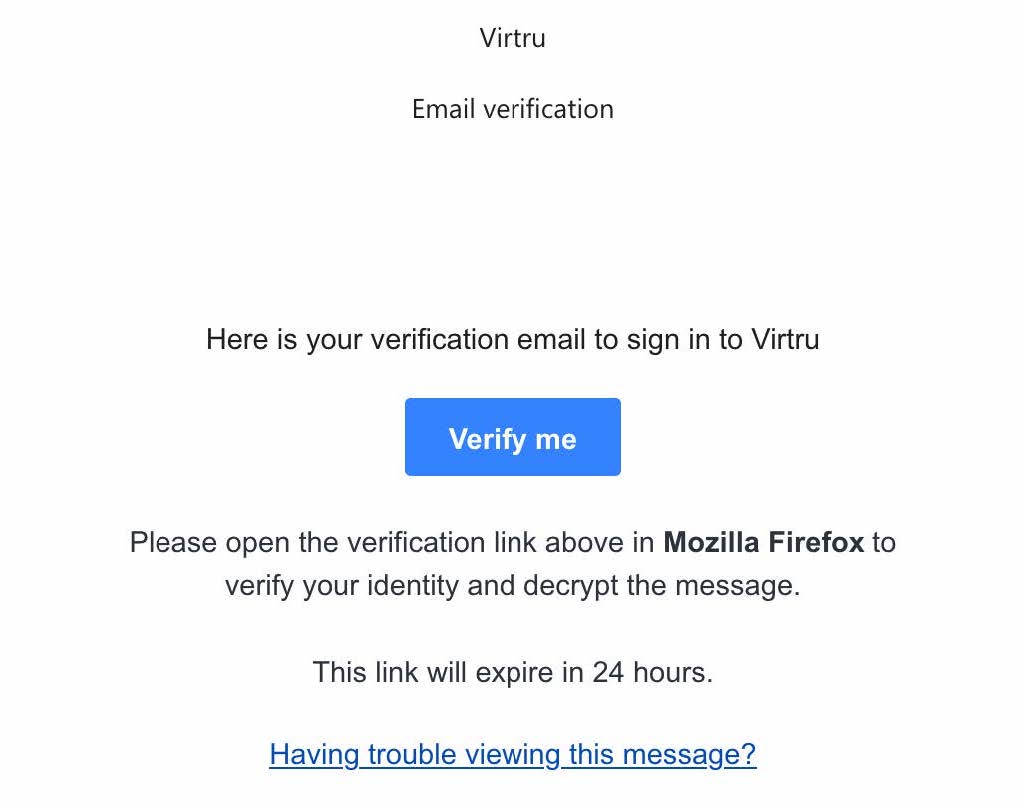
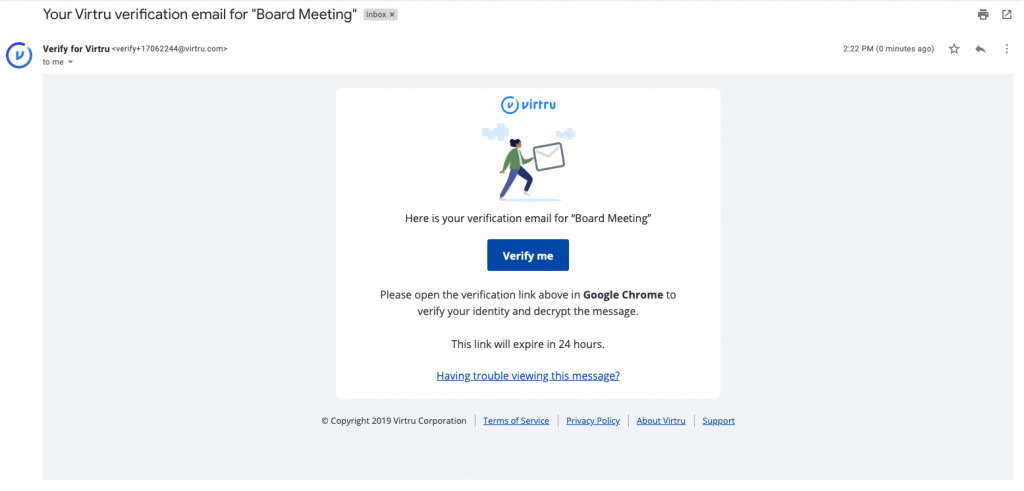
  1. If you request the one-time verification link, you will receive an email from Verify for Virtru, as shown below. If you are using different web browsers, such as Google Chrome or Mozilla Firefox, it will be reflected in the email message accordingly
  1. Click “Verify me” and choose “Copy Link Location.” Open a new browser tab and paste the link location into the URL space. Hit the “Enter” or “Return” key on your keyboard
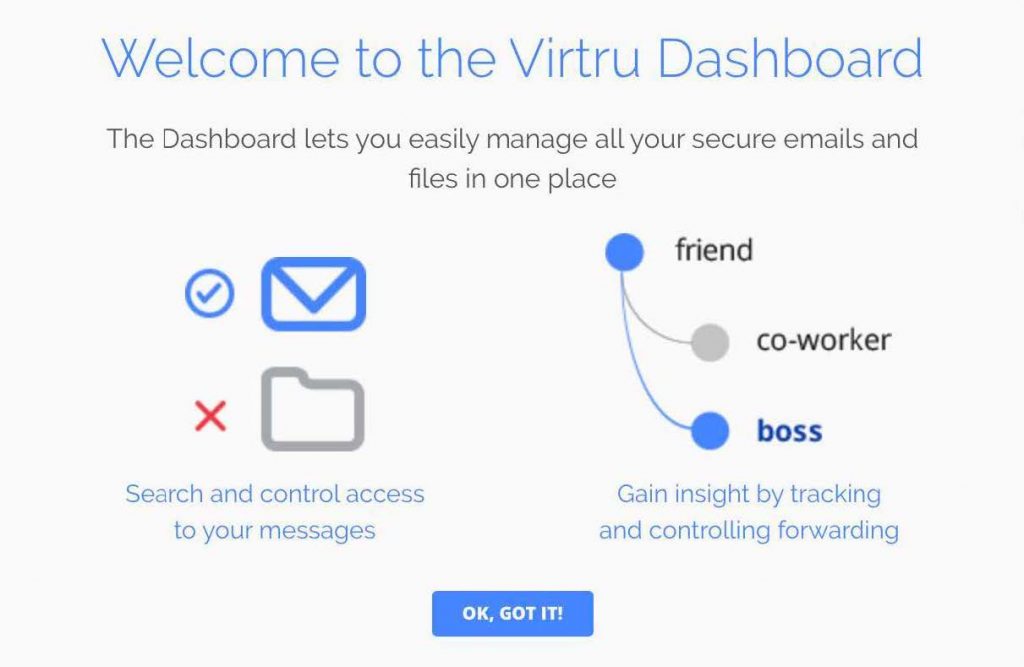
  1. When you log in to the Virtru Dashboard for the first time, you will see the message below. Left-click “OK, GOT IT!
  1. You will now be able to view Virtru encrypted emails or files you have sent, as well as open the ‘Settings‘ menu tab to set behaviors for your Virtru account

Manage Virtru’s Expiration Date Security Option in Outlook

In addition to encrypting messages and files, Virtru users have the ability to apply additional security settings to protected content. Among these settings is the option to apply an “Expiration Date” to an encrypted email or file.

Typically, if a Virtru email recipient receives an encrypted message or file, they can indefinitely access that content. However, as the owner of that content, you can restrict access after a particular point in time. If a recipient tries to access the content after expiration, they will receive a prompt indicating their access is expired.

Manage Virtru’s Expiration Date Security Option in the Virtru Dashboard

In addition to encrypting messages and files, Virtru users have the ability to apply additional security settings to protected content. Among these settings is the option to apply an “Expiration Date” to an encrypted email or file.

Typically, if a Virtru email recipient receives an encrypted message or file, they can indefinitely access that content. However, as the owner of that content, you can restrict access after a particular point in time. If a recipient tries to access the content after expiration, they will receive a prompt indicating their access is expired.

Manage Virtru’s Disable Forwarding Security Option in Outlook

In addition to encrypting messages and attachments, Virtru users have the ability to apply additional security settings to protected content. Among these settings is the option to apply “Disable Forwarding” to a Virtru-encrypted email.

Typically, if a Virtru plugin for Microsoft Outlook user receives an encrypted message, they can use Virtru to forward the email to a new party. This will add the new recipient as an authorized user and allow them to unlock the message. “Disable Forwarding,” however, ensures that your recipients can access the encrypted content but will stop any additional users from gaining access to the message. If the original recipient passes the email to a new party, then the new user will not be added as an authorized user and will not be able to unlock the message.

Manage Virtru’s Disable Forwarding Security Option in the Virtru Dashboard

In addition to encrypting messages and attachments, Virtru users have the ability to apply additional security settings to protected content. Among these settings is the option to apply “Disable Forwarding” to an encrypted email.

Manage Virtru’s Watermarking Security Option in Outlook

In addition to encrypting messages and attachments, Virtru users have the ability to apply additional security settings to protected content. Among these settings is the option to apply “Watermarking” to an encrypted file.

Typically, if a Virtru recipient receives an encrypted file, they can preview the file in the Virtru Secure Reader and download a decrypted copy locally. When “Watermarking” is applied to a secure file, recipients will only have access in the Secure Reader and will see their email address watermarked across the document.

The addition of the watermark is visible but transparent enough not to obscure the contents of the file when viewed. A recipient will not be able to download a local decrypted copy of the file.

This feature can be applied using the Virtru plugin for Microsoft Outlook or the Virtru Dashboard. It supports the following common file types:

  • Microsoft Office documents: .docx, .pptx, .xlsx
  • Common image file formats: .jpeg, .png
  • PDF documents

Note

Although newer Microsoft Office file types are supported, older versions (.doc, .ppt, .xls) are not compatible. Additionally, these other common file types are NOT supported: .msg, .zip, .md.

Mange Virtru’s Watermarking Security Option in the Virtru Dashboard

In addition to encrypting messages and attachments, Virtru users have the ability to apply additional security settings to protected content. Among these settings is the option to apply “Watermarking” to an encrypted file.

Typically, if a Virtru recipient receives an encrypted file, they can preview the file in the Virtru Secure Reader and download a decrypted copy locally. When “Watermarking” is applied to a secure file, recipients will only have access in the Secure Reader and will see their email address watermarked across the document.

The addition of the watermark is visible but transparent enough not to obscure the contents of the file when viewed. A recipient will not be able to download a local decrypted copy of the file.

This feature can be applied using the Virtru plugin for Microsoft Outlook or the Virtru Dashboard. It supports the following common file types:

  • Microsoft Office documents: .docx, .pptx, .xlsx
  • Common image file formats: .jpeg, .png
  • PDF documents

Note

Although newer Microsoft Office file types are supported, older versions (.doc, .ppt, .xls) are not compatible. Additionally, these other common file types are NOT supported: .msg, .zip, .md.

Revoke Virtru Encrypted Content in Outlook

When a Virtru user sends encrypted content, they have full control over access to the message(s) and/or file(s). Even if a recipient receives encrypted content, the sender has the ability to revoke (or reauthorize) access at any time. Virtru even allows the sender to revoke access to specific recipients.

Note

Virtru can only revoke emails that were sent securely with Virtru. Any messages sent prior to having Virtru installed or messages sent unsecured after Virtru has been installed cannot be revoked.

Revoke Virtru Encrypted Content in the Virtru Dashboard

When a Virtru user sends encrypted content, they have full control over access to the message(s) and/or file(s). Even if a recipient receives encrypted content, the sender has the ability to revoke (or reauthorize) access at any time. Virtru even allows the sender to revoke access to specific recipients.

Note

Virtru can only revoke emails that were sent securely with Virtru. Any messages sent prior to having Virtru installed or messages sent unsecured after Virtru has been installed cannot be revoked.

Using Virtru’s Persistent File Protection (PFP) Security Option

Note

Please note that Persistent File Protection (PFP) Security Option is only available from the Virtru add-on to the Microsoft Outlook Desktop Application. It is not available when using Outlook on the Web (office365.fdu.edu) or the Virtru Dashboard.

In addition to encrypting messages and attachments, Virtru users have the ability to apply additional security settings to protected content. Among these settings is the option to apply “Persistent File Protection (PFP)” to an encrypted file.

PFP provides a secure file container that is portable, universally accessible, and built on top of open standards. Regardless of where files are stored, PFP allows you to select, protect, and share a file with anyone while maintaining full visibility into how it is being used and retaining the ability to revoke access at any time. Any file protected with PFP will convert into the .tdf.html file format. This ensures that the contents are only accessible in Virtru’s Secure Reader, and only authorized parties can view it.
This feature can be applied using the Virtru plugin for Microsoft Outlook on Windows Operating Systems only. It supports the following common file types:
  • Microsoft Office documents: .docx, .pptx, .xlsx
  • Common image file formats: .jpeg, .png
  • PDF documents

Note

Although newer Microsoft Office file types are supported, older versions (.doc, .ppt, .xls) are not compatible. Additionally, these other common file types are NOT supported: .msg, .zip, .md.

Last Modified:

FDU Wireless Network Coverage Maps for NJ Campus’

Resources for:
icon Close

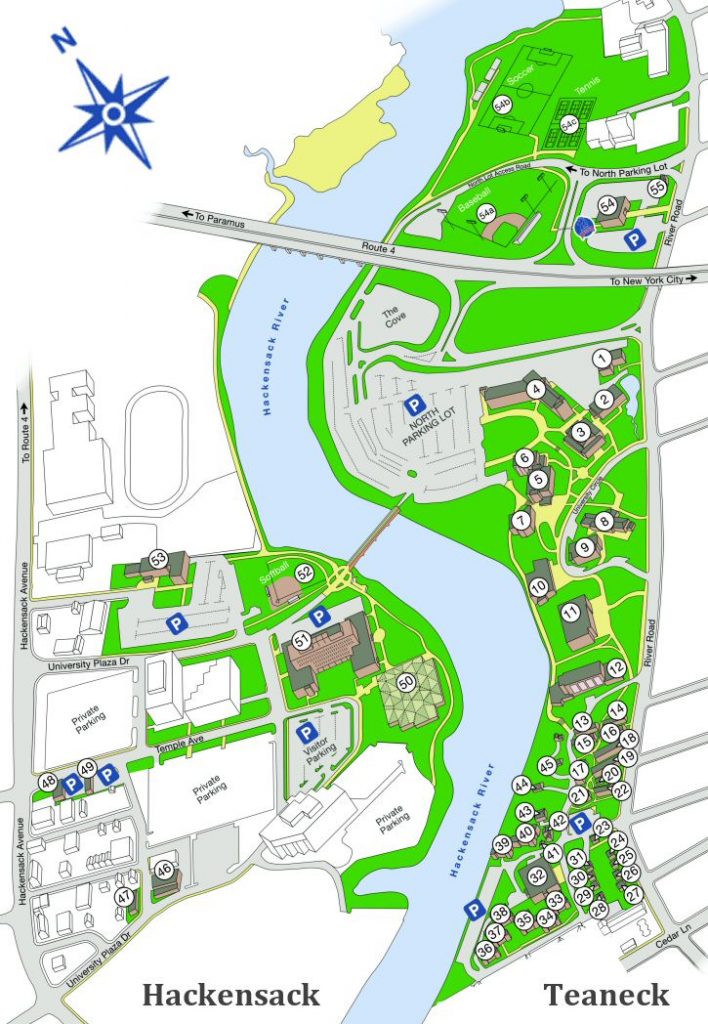
The maps below highlight the buildings at Fairleigh Dickinson University with wireless networking on the Metropolitan Campus, and College at Florham.

Metropolitan Campus

Click or Tap Image to Enlarge

1. Bancroft Hall – General Coverage
2. Williams Hall -– General Coverage
3. Fitness Center – General Coverage
4. Northpointe Residence Hall – General Coverage
5. Robison Hall – General Coverage
6. Robison Hall Annex – General Coverage
7. Muscarelle Center – General Coverage
8. Kron Administration Building – General Coverage
9. University Hall – General Coverage
10. Alumni Hall – General Coverage
11. Metropolitan Campus Library – General Coverage
12. Becton Hall – General Coverage
13. to 22. University Court Residence Halls 1 to 10 – General Coverage
23. Public Safety Office – General Coverage
24. Interfaith Chapel – General Coverage
25. International Student Services – General Coverage
26. EOF Office – General Coverage
27. 840 River RoadNo Coverage
28. HousekeepingNo Coverage
29. 835 SUB Lane – General Coverage
30. 839 SUB LaneNo Coverage
31. Dean of Students – General Coverage
32. Greg Olsen Student Union – General Coverage
33. to 40. Linden Court Residence Halls – General Coverage
41. Knight Spot – General Coverage
42. Residence Life – General Coverage
43. Banta Coe HouseNo Coverage
44. River House – General Coverage
45. Student Counseling and Psychological Services – General Coverage
46. University Mail Services (10 Woodridge Ave) General Coverage
47. External Building (1 Woodridge Ave)No Coverage
48. Center for Psychological Services (131 Temple Ave) – General Coverage
49. Center for Psychological Services (139 Temple Ave) – General Coverage
50. Rothman Center – General Coverage
51. Dickinson Hall – General Coverage
52. Softball FieldNo Coverage
53. Edward Williams Hall – General Coverage
54. Field House – General Coverage
54b. Naimoli Family Baseball ComplexNo Coverage
54b. Soccer Field – General Coverage
54b. Tennis CourtsNo Coverage
55. 1154 River Rd. – General Coverage

College at Florham

Click or Tap Image to Enlarge

1. Hennessy Hall (Mansion) – General Coverage
2. Reuter’s RockNo Coverage
3. Science Building – General Coverage
4. East Cottage – General Coverage
5. West Cottage – General Coverage
6. Zen Building (Stadler-Zenner-Hoffmann La Roche) – General Coverage
7. Ferguson Recreation Center – General Coverage
8. Dreyfuss Building – General Coverage
9. Rothman Building (Admissions Office) – General Coverage
10. Black Box Theater – General Coverage
11. The Barn (Public Safety, Campus Facilities) – General Coverage
12. Chaine House – General Coverage
15. Monninger Center (Library) – General Coverage
16. Orangerie – General Coverage
17. Public Relations – General Coverage
18. Frank Santoloci Student Center – General Coverage
19. Twombly Residence Halls – General Coverage
20. Village Residence Halls – General Coverage
21. Park Avenue Residence Halls – General Coverage
23. Rutherford Residence Hall – General Coverage
24. Wellness Center – General Coverage
25. Gatehouse – General Coverage
25b. Baseball Field – General Coverage
25b. Soccer FieldNo Coverage
25b. Football Field – General Coverage

Last Modified:

Home/Department Shared Drive Quota Limit Email

Resources for:
icon Close

Home drives and departmental shared drives come with a limited capacity of data storage, known as a quota. When a drive reaches 85% of that quota, both the departmental shared drive manager as well as the user uploading the content that puts a drive over that threshold will receive a message from psadmin@fdu.edu as seen below.

By informing the share manager and providing the name of the share affected, the share manager has an opportunity to respond to the notification prior to any disruptions to day-to-day workflows.

Upon receiving this email, the share owner should:

  1. Review and confirm that all uploaded content is required for current business purposes
  2. Review and consolidate any duplicated items
  3. Remove any documents, files, or pictures no longer needed

Note

Shared drives are not intended for archival purposes. We ask that the share manager please remove documents, files or pictures that are no longer actively required.

These measures will resolve most shared drive quota issues. If the shared drive is still nearing its storage quota, please fill out the Home/Department Share Management Form using the link below:

Home/Department Share Management Form

Last Modified:

How do I use Oracle on Opus

Resources for:
icon Close

What’s Oracle?

Oracle is a multi-model relational database management system, mainly designed for enterprise grid-computing and data warehousing. It is one of the first choices for enterprises for cost-effective solutions for their applications and data management. It supports SQL as a query language to interact with the database.

Now let’s discuss how to use Oracle in the FDU environment.

Accessing Oracle

FDU provides Oracle access to students and faculty on the Opus server. The Oracle environment is provided to support coursework and skill development.

Opus users are automatically granted access to Oracle after first successful login (It may take up to six hours before access is available).

If you do not already have Opus access you will need to request access by completing the Form:

Opus (Linux) Form

Access to the Opus server is restricted to FDU networks only. If you are off campus and would like to access Opus for your Oracle work you will need to use FDU’s Virtual Private Network (VPN).

You will need to use SSH to connect to the Opus server:

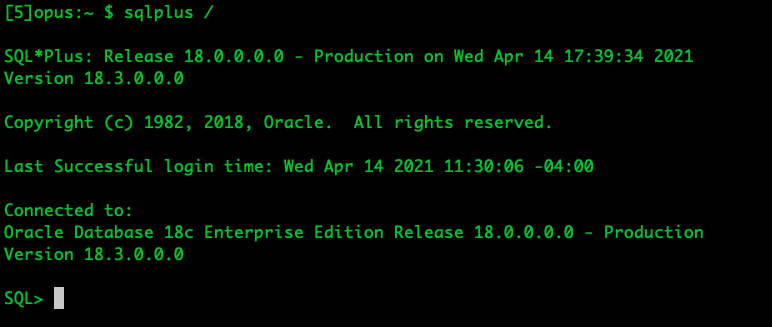
The Oracle Database is accessed using the SQL Plus utility, which has a command-line interface. To start using SQL Plus simply type “sqlplus /” on the Opus command line.

Interactive use can then start by entering a SQL statement (terminated by a semicolon), a PL/SQL block, or another command. For example:

SQL> select 'Hello world' as example from dual;

EXAMPLE
--------------------------------
Hello world
Last Modified:
FAQ
  • An alias is an additional email address that will direct mail to your FDU email account. Creating an alias for your account can be a useful strategy. For instance, if you are spearheading a project, it may be easier to solicit replies to an address that contains the name of the project than it would be to garner responses to your existing email address. If this solution interests you, please fill out the Email Alias form.

  • Due to the cavernous email storage offered on the Office365 platform, there has been little to no demand for FDU staff and faculty members to request an increased mail quota. Office365 email provides enough capacity for even our most prolific users. However, if special circumstances make you the exception to this rule, you can request a quota increase by completing the Quota request form.

  • FDU’s Acceptable Use Policy prohibits running software that accepts incoming connections from other computers. Programs such as BitTorrent or other P2P file sharing hosting program all contain server components that allow others to connect to your computer and retrieve files from your system. In addition to the legal implications of sharing copyrighted materials, file sharing software creates a security concern. Improper use of these programs could result in the compromise of your private files and may leave your system open to attacks from other computers.
  • Phishing involves the use of e-mail messages that appear to come from your bank or another trusted business in an attempt to scam the user into surrendering private information that will be used for identity theft. The phishing e-mail typically ask you to click a link to visit a Web site, where they are asked to update personal information, such as passwords and credit card, social security, and bank account numbers

    Scammers have become increasingly sophisticated in creating fraudulent emails and Web sites that look authentic. These emails and Web sites often appear to be from legitimate companies and include images and logos of these organizations.

  • The Network ID (NetID) is a Windows Active Directory account uniquely assigned to each student, faculty & staff. It serves as your login to many computing and networking services including FDU Email.

  • FDU’s Opus is a Red Hat Linux based server. Opus provides an environment for FDU students, staff, and faculty to practice using software such as:

    • Expect
    • Gcc
    • Gzip
    • Aspell (Ispell replacement)
    • Java (Now 1.8.0_181)
    • Make
    • Ncurses
    • Tcl
    • Tcsh
    • Tcl/Tk
    • Strace (Trace)
    • Emacs
    • Bison
    • Nano (Formerly Pico)
    • Perl
    • LaTeX
    • A2ps
    • Links (Lynx Alternative)

    If you require access to Opus, please fill out the form.

  • In order to provide a safe and stable computing environment, the FDU-Wireless and FDU-Secure wireless networks require NetID authentication. However, in certain instances our students, staff and faculty members will need to work on campus with people from outside of our community. This can include vendors, contractors, visiting scholars, or even a visiting family member or friend. In these instances, the FDU community member can sponsor a guest for temporary wireless access.  The sponsor of a guest account will be responsible for the actions of his or her guest. Please ensure that your guest(s) follow FDU’s Acceptable Use Policy for Computer Usage

  • In order to provide a safe and secure network environment, FDU IT requires devices to authenticate to the FDU network before connecting. This works well for computing devices such as desktop computers, laptop computers, and mobile devices such as tablets and phones. Most other electronics, including gaming consoles and streaming video boxes, cannot properly authenticate to the network. In these instances, we ask you to register the device using the online form below. Please note that each user on our network is entitled to register up to 5 devices.

Staff Directory
Anthony Licandro University Systems and Networking Senior Network Operations Manager
Atif Warriach University Systems and Networking Systems Administrator (Linux)
Basil Licop University Systems and Networking Office 365 Systems Administrator
Charles Ciccotto University Systems and Networking Operations Manager
Christopher Bland University Systems and Networking Systems Manager Lead
Christopher Robley University Systems and Networking Director of Systems
Cory Palacios Merino University Systems and Networking IT Assistant – Vancouver
Danovan Golding University Systems and Networking Senior System Technology Manager
Djeams Muse University Systems and Networking Network Analyst
Estref Resuli University Systems and Networking Technician Operations – Vancouver
Joshua Chan University Systems and Networking Systems Analyst
Juan Estrella University Systems and Networking Network Analyst
Juan Montufar University Systems and Networking Network Analyst
Karl Henry University Systems and Networking Senior Desktop Engineer
Kevin Atkinson University Systems and Networking Systems & Network Infrastructure Manager – Vancouver
Leslie McRae University Systems and Networking Operations Systems Analyst
Matt Gugel University Systems and Networking Senior Desktop Engineer
Michael Reekie University Systems and Networking Director of Networking
Rafael Alix University Systems and Networking Network Analyst
Shashi Patel University Systems and Networking Network Analyst
Stuart Alper University Systems and Networking Associate Vice President
Thomas Grassi University Systems and Networking Junior Systems Administrator
Torence Bobbitt University Systems and Networking User Support Helpdesk Technician
Vishal Gandhi University Systems and Networking Systems Analyst / Application Developer / Email Specialist