Resources

Explore our comprehensive IT resource library to discover a wealth of helpful information tailored to your needs. Utilize our filters to refine your search by role at FDU, department, or specific service for a more personalized experience.

Help Desk
Resources Header

Reporting Phishing or Junk Emails

Resources for:
icon Close
Outlook Web Access (Office365.fdu.edu)
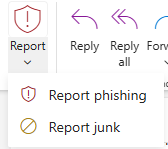
  1. Click on the email that you would like to Mark as Junk or Mark as Phishing
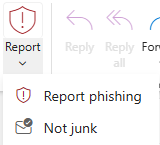
  1. Click the down arrow next to the Junk button
  1. Click on the appropriate button to report the email (Junk, Phishing or Block)
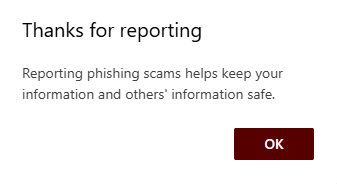
  1. Once you report the email, a copy of the email is automatically sent to the FDU University Systems team and Microsoft for review to improve the spams going forward
close
Microsoft Outlook for Windows or Mac
  1. Click on the email that you would like to Mark as Junk or Mark as Phishing
  1. Click on the Report Message button
  1. Click the appropriate option button (Junk or Phishing)
  1. Once you report the email, a copy of the email is automatically sent to the FDU University Systems team and Microsoft for review to improve the spams going forward
close
Last Modified:

Reporting Threatening or Harassing Phone Calls

Resources for:
icon Close

If a call is threatening or harassing, immediately contact Public Safety at:

Campus Security Phone Numbers

  • Metro Campus: extension x2222, 1-(201)-692-2222
  • Florham Campus: extension x8888, 1-(973)-443-8888
  • Cambie Building: 1-(604)-786-6098
  • Georgia Building: 1-(236)-990-7036

For Emergencies For Emergencies

Call 911 if an emergency arises; in life-threatening situations or to report crimes in progress

Last Modified:

Safeguard Rules Under The Gramm-Leach-Bliley Act

Resources for:
icon Close

Responsible Office: Data Security Incident Response Team (DSIRT)
Responsible Official: Chief Information Officer, Chief Information Security Officer
DSIRT Approval: Neal M. Sturm on behalf of DSIRT

Effective Date: 12/01/2022
Last Review Date: 11/22/2022
Last Revision Date: 11/22/2022


  1. Purpose: This Policy sets the standards for developing, implementing, and maintaining reasonable administrative, technical, and physical safeguards to protect the security, confidentiality, and integrity of information covered by applicable provisions of the Gramm-Leach-Bliley Act (“GLBA”) and associated regulations. In particular, this document describes various measures being taken by FDU to (i) ensure the security and confidentiality of covered information, (ii) protect against any anticipated threats or hazards to the security of these records, and (iii) protect against the unauthorized access or use of such records or information in ways that could result in substantial harm or inconvenience (collectively, the “Program”). The practices described in this Policy are in addition to any institutional policies and procedures that may be required pursuant to other federal and state laws and regulations, including, without limitation, the Family Educational Rights and Privacy Act (“FERPA”).
  1. Scope of Program: The Program applies to any record containing “nonpublic personal information” about a student or other individual who has a continuing relationship with the University, whether the record is in paper, electronic, or other form, and which is handled or maintained by or on behalf of the University (“covered information”).(1) This includes any information that a student or other individual provides to FDU in connection with financial aid and tuition/fee collection efforts.

(1) Nonpublic personal information means: (i) personally identifiable financial information; and (ii) any list, description, or other grouping of consumers (and publicly available information pertaining to them) that is derived using any personally identifiable financial information that is not publicly available. “Personally identifiable financial information” means any information that a consumer provides to FDU to obtain a financial product or service, any information about a consumer resulting from a transaction involving a financial product or service between FDU and that consumer, or information that FDU otherwise obtains about a consumer in connection with the provision of a financial product or service to that consumer. A “consumer” is an individual, including a student, who obtains or has obtained a financial product or service from FDU that is to be used primarily for personal, family, or household purposes, or that individual’s legal representative. Examples include information an individual provides to FDU on an application for financial aid, account balance information and payment history, the fact that a student has received financial aid from FDU, and any information that FDU collects through an internet “cookie” in connection with a financial product or service.

  1. Roles and Responsibilities: Compliance and cooperation with this Policy is the responsibility of every employee at all levels within FDU. FDU’s Vice President and Chief Information Officer (CIO), assisted by the Chief Information Security Officer (the “CISO”), has the overall responsibility for coordinating information security pursuant to this Policy. The CIO or CISO may designate other representatives of FDU to help oversee and coordinate particular elements of the Program. The team will work closely with other members of the Office of Information Resources and Technology (OIRT), the Data Security & Incident Response Team (“DSIRT”), the University Risk Manager, the Vice President for Human Resources, and the General Counsel, as well as relevant academic and administrative units throughout the University to implement the Program.
  1. Risk Assessment: The CIO and CISO will help the relevant offices of FDU to identify reasonably foreseeable internal and external risks to the security, confidentiality, and integrity of covered information that could result in the unauthorized disclosure, misuse, alteration, destruction, or other compromise of the information; and to assess the sufficiency of the safeguards in place to controls these risks. This effort will be embodied in a risk assessment document.

    The risk assessment is a written document that includes:

    (i) Criteria for the evaluation and categorization of identified security risks or threats that FDU faces;

    (ii) Criteria for the assessment of the confidentiality, integrity, and availability of FDU’s information systems and covered information, including the adequacy of the existing controls in the context of the identified risks or threats that FDU faces; and

    (iii) Requirements describing how identified risks will be mitigated or accepted based on the risk assessment and how the information security program will address the risks.
  1. Access Controls: The Program includes implementing and periodically reviewing access controls, including technical and, as appropriate, physical controls to:

    (i) Authenticate and permit access only to authorized users to protect against the unauthorized acquisition of covered information; and

    (ii) Limit authorized users’ access only to covered information that they need to perform their duties and functions, or, in the case of third parties, to access their own information.

The Program is designed to identify and help manage safeguards for the data, personnel, devices, systems, and facilities that enable FDU to achieve its mission – efforts are prioritized in accordance with our objectives and risk strategy.

FDU has adopted authentication and access controls as needed to implement the “principle of least privilege” around accessing covered data, meaning that no user should have access greater than is necessary for legitimate FDU purposes Data owners within each applicable University unit approve and periodically review access. This includes a periodic review by the Office of Enrollment Services of all users who have access to Enrollment Services security tracks in the Colleague System and a periodic review by other administrative departments that maintain students’ financial aid information regarding user access to the information.

These efforts also include employee training regarding these controls. The OIRT will coordinate with representatives in FDU’s Office of Finance, Office of Financial Aid, Enrollment Services and other offices to evaluate on a regular basis the effectiveness of the University’s training, procedures, and practices relating to access to and use of student records, including financial aid information as well as financial information. This evaluation will include assessing the effectiveness of the University’s current policies and procedures in this area. All employees are required to train in FDU’s Written Information Security Program (WISP) (training.fdu.edu), which program is incorporated by reference into this Policy.

  1. Monitoring Unauthorized Users and Use: FDU has implemented policies, procedures, and controls designed to monitor and log the activity of authorized users and detect unauthorized access or use of, tampering with, covered information. Various specific measures are identified in Appendix 1.

    These measures will include assessing the University’s current policies and procedures relating to FDU’s Acceptable Use Policy for Computer Usage, Confidentiality Agreement and Security Policy, FDU Procedure on Handling Data on Separating Employees, Password Policy, Policy for Acceptable Use of Email, Software Compliance & Distribution Policy, and Written Information Security Program. The CISO will also coordinate with the CIO and the OIRT to assess procedures for monitoring potential information security threats associated with software systems and for updating such systems by, among other things, implementing patches or other software fixes designed to deal with known security flaws.
  1. Monitoring the Effectiveness of Safeguards: FDU periodically conducts penetration tests and vulnerability assessments on its network and key information systems. These measures are designed to test and monitor the effectiveness of the safeguards’ key controls, systems, and procedures, including those to detect actual and attempted attacks on, or intrusions into, FDU’s information systems.

    For those systems where continuous monitoring (or other methods to detect, on an ongoing basis, changes in information systems that may create vulnerabilities), is not practical, FDU will conduct:

    (i) Annual penetration testing on FDU’s information systems identified by OIRT based on relevant identified risks under the risk assessment; and

    (ii) Vulnerability assessments of FDU’s information systems, including systemic scans or reviews of information systems designed to identify publicly known security vulnerabilities in FDU’s information systems based on the risk assessment, at least every six months; and whenever there are material changes to FDU’s operations or business arrangements; and whenever there are circumstances that OIRT knows (or has reason to know) may have a material impact on FDU’s information security program.
  1. Detecting, Preventing and Responding to Attacks: The OIRT and University Risk Manager will on a regular basis evaluate procedures for and methods of detecting, preventing, and responding to attacks or other system failures and existing network access and security policies and procedures, as well as procedures for coordinating responses to network attacks and developing incident response teams and policies. The FDU Data Security Incident & Response Team implements all aspects of, oversees other Departments’ adherence to, and documents all incident response activities. Upon determination by the CISO and General Counsel that a Security Incident triggers breach notification laws, the University will report the breach to relevant federal or state regulatory authorities by their designated methods; and, where applicable, the U.S. Department of Education, including details about date of breach (suspected or known); impact of breach (e.g. number of records); method of breach (e.g. hack, accidental disclosure); information security program point of contact – email and phone details; remediation status (e.g. complete, in process); and next steps (as needed).

    These measures will be documented in a comprehensive incident response plan that addresses:

    (i) The goals of the incident response plan;

    (ii) The internal processes for responding to a security event;

    (iii) The definition of clear roles, responsibilities, and levels of decision-making authority;

    (iv) External and internal communications and information sharing;

    (v) Identification of requirements for the remediation of any identified weaknesses in information systems and associated controls;

    (vi) Documentation and reporting regarding security events and related incident response activities; and

    (vii) The evaluation and revision as necessary of the incident response plan following a security event.
  1. Overseeing In-House Developed Applications and External Service Providers: The OIRT leadership working in collaboration with the CISO will help ensure that software applications and solutions developed in-house by FDU, including modifications to third-party programs, meet the safeguard standards of this Policy. The CIO, CISO and other appropriate OIRT leaders will also coordinate with FDU’s contract review teams to raise awareness of, and to institute methods for, selecting and retaining only those service providers that can maintain appropriate safeguards for nonpublic financial information of students and other third parties to which they will have access. In addition, the CIO and CISO will work with the General Counsel and the University Risk Manager to develop and incorporate standard, contractual protections applicable to third-party service providers, which will require the providers to implement and maintain appropriate safeguards.

    Utilizing a variety of automated risk assessment tools such as Bitsight, OIRT periodically assesses FDU’s service providers on the risk they present and the continued adequacy of their safeguards.
  1. Encryption: FDU adopts methods to protect by encryption covered information held or transmitted by the University by encrypting both in transit over external networks and at rest. To the extent that encryption of covered information, either in transit over external networks or at rest, is infeasible, FDU secures the covered information using effective alternative compensating controls reviewed and approved by the CISO.
  1. Multifactor authentication: FDU has implemented multi-factor authentication for any individual accessing the University’s information systems, except where the CISO has approved in writing the use of reasonably equivalent or more secure access controls.

    Multi-factor authentication is defined as authentication through verification of at least two of the following types of authentication factors:

    (1) Knowledge factors, such as a password;

    (2) Possession factors, such as a token; or

    (3) Inherence factors, such as biometric characteristics.
  1. Data Retention and Disposal Controls: FDU has in place procedures for the secure disposal of covered information in any format, consistent with the University’s operations and other legitimate business purposes, except where required to be retained by law or regulation, or where targeted disposal is not reasonably feasible due to the manner in which the information is maintained. Where information is not needed to be retained, the University will take reasonable measures to include processes for disposal of covered information no later than two years after the last date the information is used for legitimate University purposes. The Program includes periodic review of our data retention policy to minimize the unnecessary retention of data.
  1. Adjustments to Program: Risk assessment activities will be periodically performed to reexamine the reasonably foreseeable internal and external risks to the security, confidentiality, and integrity of covered information that could result in the unauthorized disclosure, misuse, alteration, destruction, or other compromise of such information, and to reassess the sufficiency of any safeguards in place to control these risks. The CISO is responsible for evaluating and recommending adjustments to the program based on the undertaken risk identification and assessment activities, as well as any material changes to FDU’s operations or other circumstances that may have a material impact on the Program.
  1. Reports to the Board: The Vice President of OIRT will submit written reports to the Board of Trustees at least once each calendar year. The report will include the following information:

    (1) The overall status of the Program and FDU’s compliance with the safeguard requirements under the GLBA;

    (2) Material matters related to the Program, addressing issues such as risk assessment, risk management and control decisions, service provider arrangements, results of testing, security events or violations and management’s responses thereto, and recommendations for changes in the information security program.

The CIO may approve deviations to the processes set forth in this Policy to meet changing conditions at the University, so long as such deviations are designed to achieve the safeguard goals set forth in this Policy and do not violate the GLBA and other applicable laws.

Appendix 1
Certain Additional Specific Safeguards

Periodically (generally at least once each year), leaders from applicable University departments and units are surveyed regarding their processes for safeguarding covered information, using a standard template. Results are compiled and conveyed to the CIO for review and follow-up, including adopting and incorporating results in the University-wide Risk Assessment.

The CIO will determine which departments and units should receive the assessment survey, based on their handling of covered information. Currently, the units are: OIRT, Office of Enrollment Services, Credits and Collections, Admissions, International Admissions, Financial Aid, Veteran Services, Accounts Payable, Management Information Systems, Conference & Summer Programs, School of Pharmacy, and the Controller’s Office.

The standard assessment template is as follows.

  1. Designate an employee or employees to coordinate the unit’s information security program.
  2. Identify reasonably foreseeable internal and external risks to the security, confidentiality, and integrity of customer information that could result in the unauthorized disclosure, misuse, alteration, destruction or other compromise of such information, and assess the sufficiency of any safeguards in place to control these risks. At a minimum, such a risk assessment should include consideration of risks in each relevant area of your operations, including:
  • Unauthorized disclosure of sensitive information by employees through intentional or unintentional methods.
  • Unauthorized access, disclosure, misuse, alteration or destruction of information on hosts.
  • Detection and prevention of attacks on the systems.
  • Unsecured transmission of data.
  • Physical security of computer systems, network equipment, backups and paper materials.
  • Managing data integrity and system failures.
  1. Design and implement information safeguards to control the risks you identify through risk assessment, and regularly test or otherwise monitor the effectiveness of the safeguards’ key controls, systems, and procedures.
  1. Unauthorized disclosure of sensitive information by employees through intentional or unintentional methods:
  2. Unauthorized access, disclosure, misuse, alteration or destruction of information on hosts:
  3. Detection and prevention of attacks on the systems:
  4. Unsecured transmission of data:
  5. Physical security of computer systems, network equipment, backups and paper materials:
  6. Managing data integrity and system failures:
  1. Oversee service providers, by: (1) Taking reasonable steps to select and retain service providers that are capable of maintaining appropriate safeguards for the customer information at issue; and (2) Requiring FDU’s service providers by contract to implement and maintain such safeguards.
  1. Evaluate and adjust FDU’s information security program in light of the results of the testing and monitoring required by this Policy; any material changes to FDU’s operations or business arrangements; or any other circumstances that are known or have reason to be known as having a material impact on FDU’s information security program.

The following is an example of a completed assessment survey, from OIRT:

Gramm Leach Bliley Security Program
Office of Information Resources Technology
Standards for Safeguarding Customer Information

(a) Designate an employee or employees to assist the CIO in the coordination of the Program.

In addition to the CISO, the Director of Systems and the Director of Networking are the designated employees for the Office of Information Resources Technology

(b) Identify reasonably foreseeable internal and external risks to the security, confidentiality, and integrity of customer information that could result in the unauthorized disclosure, misuse, alteration, destruction or other compromise of such information, and assess the sufficiency of any safeguards in place to control these risks. At a minimum, such a risk assessment should include consideration of risks in each relevant area of your operations, including:

  • Unauthorized disclosure of sensitive information by employees through intentional or unintentional methods.
  • Unauthorized access, disclosure, misuse, alteration or destruction of information on hosts.
  • Detection and prevention of attacks on the systems.
  • Unsecured transmission of data.
  • Physical security of computer systems, network equipment, backups and paper materials.
  • Managing data integrity and system failures.

(c) Design and implement information safeguards to control the risks you identify through risk assessment, and regularly test or otherwise monitor the effectiveness of the safeguards’ key controls, systems, and procedures.

  1. Unauthorized disclosure of sensitive information by employees through intentional or unintentional methods:
  • Employees go through mandatory Written Information Security Program (WISP) Training
  • Prior to any IT requests, User Information Is checked against WISP to ensure they are current with training
  • Employees are provided training and are closely observed by managers before being given access to sensitive information. Training includes password policy and management, physical security of cabinets, storage, and equipment rooms, and recognizing fraudulent attempts to obtain sensitive information.
    • Policy, social engineering, keystrokes loggers, etc.
  • All employees must sign and accept the University’s “Acceptable Use Policy” and the “Confidentiality Agreement” if applicable.
  • Requests for sensitive information are directed to individuals with proper training and authority to review the request.
  • Potential employees are subjected to a background check before being hired by the University.
  • Updated IT Informational website that includes documentation of all policies and procedures specific to securing data.
  • Use of Data Loss Prevention tool to proactively monitor and correct non-compliance issues
  • Access to information is granted only to the extent required for the employee to perform their job functions.

2) Unauthorized access, disclosure, misuse, alteration or destruction of information on hosts:

  • Passwords are required for access to any system with sensitive information.
  • Strong password policies are in place where possible.
  • Multi-factor authentication to access sensitive systems for all faculty, adjuncts, staff and students.
  • Multi-factor authentication for all admin accounts.
  • Auditing systems (e.g. Change Management Process, Netwrix, Microsoft ATP) are used to track and report on changes to critical files.
  • Notifications of employee terminations are received prior to or on date of termination. Immediate notification is received when circumstances warrant instant suspension of access to systems.

3) Detection and prevention of attacks on the systems:

  • Auditing systems (e.g., Netwrix) are used to detect attempts to breach systems or alter system configurations.
  • System logs are reviewed daily for evidence of attacks.
  • Policies are in place to regularly apply patches to systems.
  • A firewall is in place for perimeter protection.
  • Obsolete systems are being replaced by newer systems that are better supported by hardware and software vendors. Most systems include host-based firewalls.
  • The wired portion of the university network is entirely switched to minimize the possibility of packet sniffing and other similar attacks.
  • WPA2 Enterprise is deployed and available for wireless accessible locations.
  • Endpoint protection software is in place, which automatically updates servers & clients.

4) Unsecured transmission of data:

  • Connections to all systems are using modern cryptographic techniques.
  • University standard practice is to use HTTPS for web services; all publicly accessible web traffic is proxied through load balancers.
  • SFTP is used to transmit data to various vendors securely.
  • EFax services deployed, ensuring fax transmission are encrypted both in transit and at rest.
  • Virtru software for encrypted email communication of sensitive and Personally Identifiable Information
  • 7-Zip is used to encrypt files being sent to and from vendors.

5) Physical security of computer systems, network equipment, backups and paper materials:

  • All computer systems and core network equipment are physically secured in locked rooms or cabinets.
  • Essential services are monitored for availability and alerts are sent when a system or service becomes unavailable.
  • Printed material with personal information is shredded when no longer needed.
  • The main datacenters and several ancillary MDF’s have heat and humidity detection systems as well as a fire suppression system.
  • Alarms with motion detectors are in place in all data centers. The university department of Public Safety monitors the alarms.
  • Security cameras are set and on 24 hour recording on both main data centers
  • A card access system controls access to the data centers and IT administrative offices.

6) Managing data integrity and system failures:

  • Daily backups of host systems are performed.
  • Network hardware configurations are backed up weekly.
  • Out of band capabilities exist to support network management and large-scale outages.
  • Continual off-site backup of all FDU owned workstations.
  • Mirroring of networked file services across campuses is occurring.
  • UPS systems provide backup power to central data centers.
  • Extending backup capabilities to include off-site backup of all University systems
  • A backup generator is in place for the main data centers.
  • A disaster recovery plan has been developed.

(d) Oversee service providers, by: (1) Taking reasonable steps to select and retain service providers that are capable of maintaining appropriate safeguards for the customer information at issue; and (2) Requiring FDU’s service providers by contract to implement and maintain such safeguards.

Contracts require appropriate safeguarding measures be taken by the vendor. Third Party Assessment evaluation using Industry best practice tools prior to executing contracts.

(e) Evaluate and adjust FDU’s information security program in light of the results of the testing and monitoring required by this Policy; any material changes to FDU’s operations or business arrangements; or any other circumstances that are known or have reason to be known as having a material impact on FDU’s information security program.

OIRT continually performs extensive reviews of applicable written policies and has a continuous program in place to review applicable policies and procedures.

OIRT periodically (generally annually) performs an eMail Phishing test to all full-time faculty and staff. FDU uses a third party as the tool for performing the test. Individuals who fail the Phishing test are required to complete remedial training with a passing score. Supervisors are made aware of those who fail the test and are encouraged to speak with their employees.

OIRT conducts comprehensive vulnerability assessments aligned to the NIST Risk Management Framework (RMF) that included external vulnerability scanning, penetration testing, netflow analysis of our IP ranges, review of IT and cybersecurity-specific and FDU-wide documentation, and dark web footprinting.

OIRT takes action to increase the cadence of monitoring and reacting to server, desktop and mobile device alerts, ensure compliance of website configurations and deploy security measures to ensure security of email system and reduce spoofing of emails.


Last Modified:

Safeguards Against Cybercrime

Resources for:
icon Close

Being connected to the internet suggests that the internet is connected to you. Without concern and proper safeguards to protect the information you share, you are at a greater risk of cybercrime.

The university assumes its share of responsibility to protect sensitive information but you must do the same. The vast majority of data and identify thefts are not the result of enterprise breaches but a direct consequence of individuals who are complacent about sharing sensitive information or unaware of the risks.

Please take a moment to review this video to obtain a better understanding of how you can help protect yourself from cybercrime.

Last Modified:

SAMI Support Public Request Form

Resources for:
icon Close

The SAMI Support portal requires a valid NetID and password, along with DUO multi-factor authentication, for access. Upon entry, users can create new tickets, review open or closed requests, and explore the IT Knowledgebase for solutions to common issues. Access the support portal using the button below:

SAMI Support Portal

If you need to open a request and cannot access SAMI Support for any of the reasons below, please complete this request form to contact the Fairleigh Dickinson University Technical Assistance Center (UTAC). A member of the IT support team will assist you via phone call or email.

  • I do not have a valid University issued NetID
  • I am not able to authenticate through DUO
  • I have not set up my DUO account
  • I am a vendor without a University issued NetID
  • I am an admitted student
  • I am a newly hired employee or adjunct
  • My FDU account is locked
  • I need my Net ID password reset and have already attempted to do that through identity.fdu.edu

Tip

The form below is not compatible with Dark Mode. For an optimal experience, disable Dark Mode either in your device’s system settings or directly from the FDU IT website menu bar.

SAMI Support Public Request

Last Modified:

Secure Deletion Steps for Personal Information

Resources for:
icon Close

Introduction

This document outlines the university approved process for securely deleting Personal Information (PI) and Protected Health Information (PHI) after the PI or PHI has been encrypted.

Prerequisite

Eraser Portable® Secure Data Remove software needs to be installed on your computer. Please contact the Fairleigh Dickinson University Technical Assistance Center (UTAC) to request the installation of this software. A member of USAN will assist with the installation and setup of the software.

Document Deletion Process

To securely delete an unencrypted version of a document that contain PI and/or PHI that has been encrypted, complete the following steps:

  1. Find the “Secure Deletion” shortcut folder on your computer desktop screen
  2. Cut and paste the unencrypted version of the file to be deleted into this folder
  3. Find the “Eraser Portable” shortcut folder on your computer desktop screen and click to open the folder
  4. Double Click on “EraserPortable.exe“. The screen below will appear
  5. Click on the Green Run arrow to erase the file securely
secure 1
  1. A dialogue box will appear
  1. Click “Yes
  2. When the deletion process completes, you will see a report appear
  1. You may check your “Secure Deletion” folder to see if all documents have been erased

Outlook E-mail Deletion Process

To securely remove emails which contain PI and PHI from your Outlook client, complete the following steps:

  1. Delete the email from your Inbox and/or Sent items folder
  2. Delete the email from your Deleted Items
  3. Go to “Recover Deleted Items
  4. Highlight Deleted Items Folder
  1. Then go to Folder > Recover Deleted Items
  1. Highlight email which requires permanent deleting and select “Purge Selected Items” and then click “OK“. Now message is permanently out of your email system
  1. Finally, click “OK” on the following screen
secure8
Last Modified:

Secure Encryption Steps for Personal Information

Resources for:
icon Close

This document outlines the University approved process for securely encrypting Personally Identifiable Information (PII).

Prerequisite

7Zip software needs to be installed on the end user’s computer. Please contact the Fairleigh Dickinson University Technical Assistance Center (UTAC) to request the installation of this software. If justification is needed, notify UTAC that 7Zip is needed to encrypt documents containing PII.

Process

Encrypting Files and Folders

To encrypt a single file, find the file in your directory (or where you have it saved).

  1. Right click on the document (do not open the document)
  2. On the drop down menu, Find 7zip
  3. Click “Add to archive…
  4. When 7zip opens, there are three (3) settings which need to be changed:
    • Archive Format = Select zip from drop down
    • Encryption Method = select AES-256 from drop down
    • Check “show password” and type in a password that the user creates
    • Click “OK
    • A 7Zip Archive with the encrypted document will now appear in your directory

NOTE: Do not utilize any password that you use to access internal systems. The password cannot be recovered if forgotten.

Editing Encrypted Files and Folders

When editing an encrypted file or folder, you must make sure that you leave the 7zip archive open. If you close the archive, you will be able to work on the document, but it will not save.

Opening an Encrypted File or Folder

To open an encrypted file or folder:

  1. Right click on the 7Zip archive
  2. On the drop down menu, find 7Zip
  3. Click on the first “Open archive”
  4. Click to open your document

Saving an Encrypted File or Folder

To save an encrypted file or folder:

  1. Save the document as normal
  2. Upon closing document, the 7Zip archive will prompt the user to save the changes
Last Modified:

Self-Service Tutorial

Resources for:
icon Close

Self-Service is an interactive web application that enables students, faculty, and staff to view their individual information contained in FDU’s student information system. Students can use Self-Service to do things like view their financial aid, pay their bills, and register for classes. Likewise, faculty will use Self-Service to verify enrollment and enter grades.

To navigate the Tutorial, scroll down to the Index. From there you can navigate to any portion of the Tutorial by clicking on any “Part”.

index

Index

What is Degree Audit? Degree Audit is an online version of your check sheet, which allows you to track your academic requirements. On Degree Audit you can see what degree requirements you’ve completed, which are in progress, and which courses you have left to complete your degree.

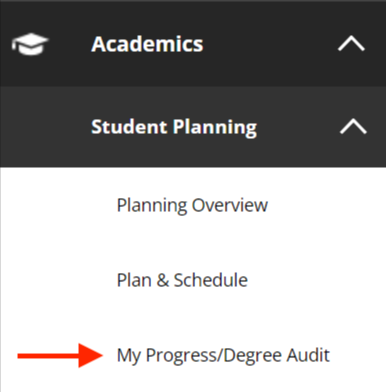
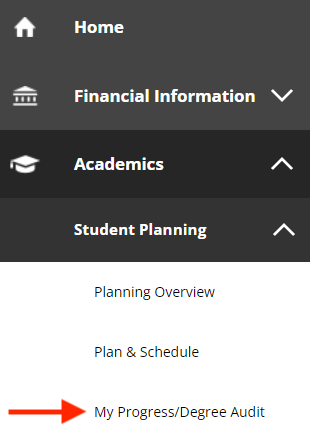
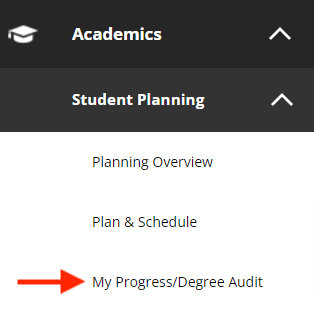
  1. On the left-hand side of the page, you will find your menus. Click on the menu called “Academics” and then click on “Student Planning.” Navigate to “My Progress/Degree Audit
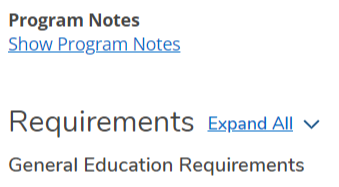
  1. Click on “Expand All” if you’d like to see all the requirements for your degree 
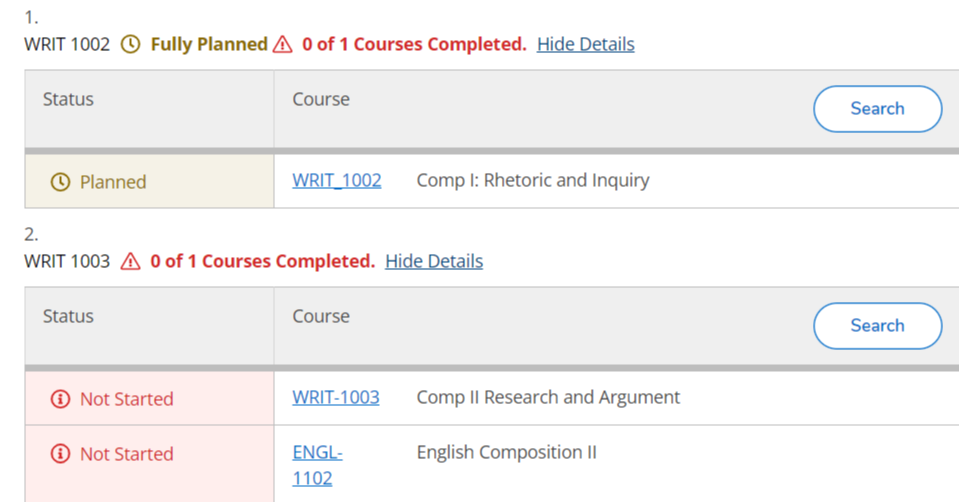
  1. Any action you have taken towards completing each requirement will be noted in the “Status” column
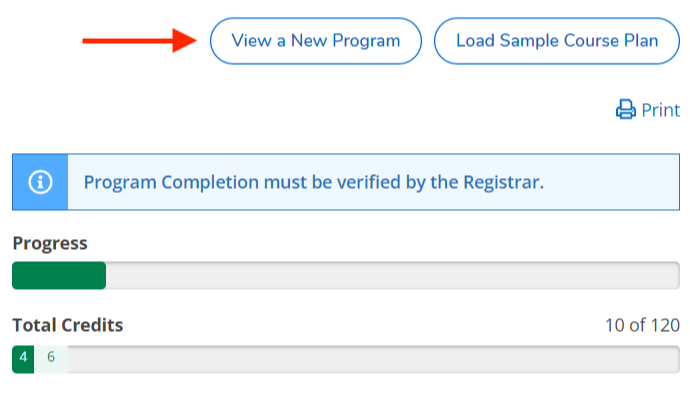
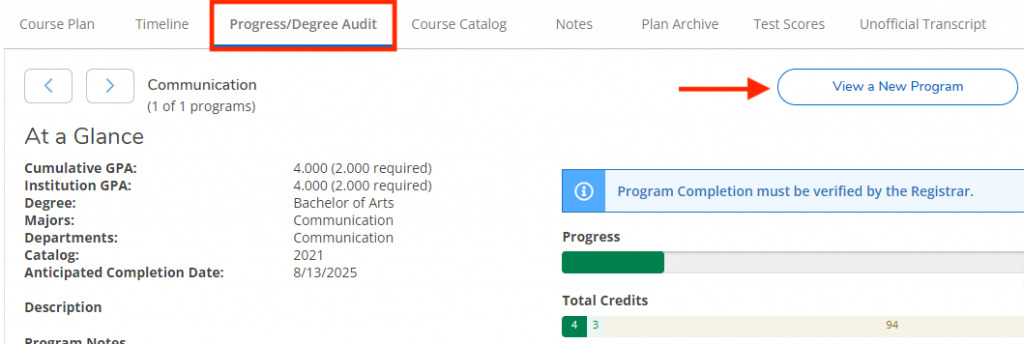
  1. If you would like to see what it would look like if you switched to a different program, then click on “View a New Program” at the top of your Degree Audit
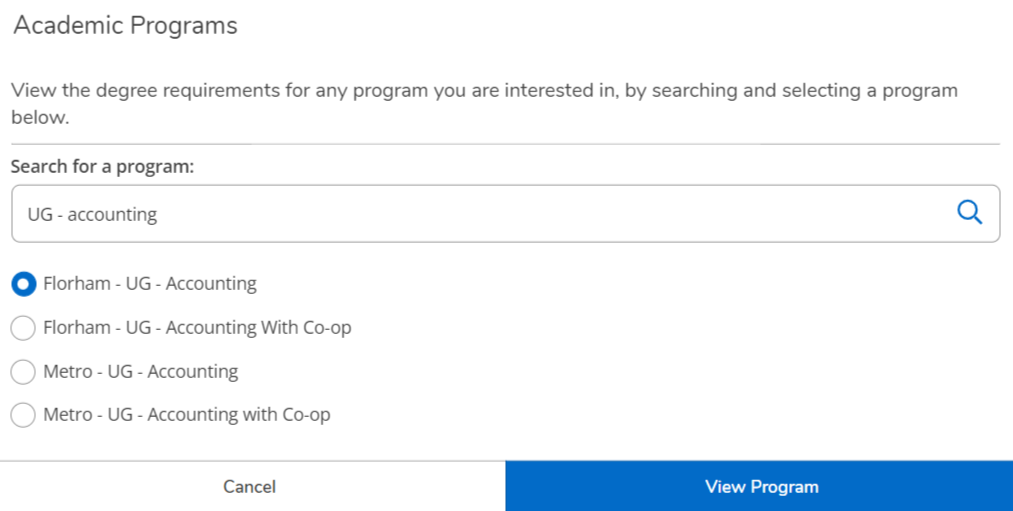
  1. Use the search bar to find the program you are interested in. Select the program and click “View Program
  1. If you no longer want to view this program, click the “X” to remove it

If you have any questions or need assistance,
please open a SAMI Support ticket, email selfserviceadmin@fdu.edu, or call (973)-443-8822.

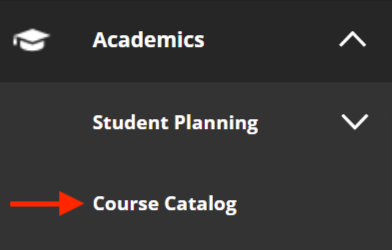
  1. On the left-hand side of the page, you will find your menus. Click on the menu called “Academics” and navigate to the “Course Catalog
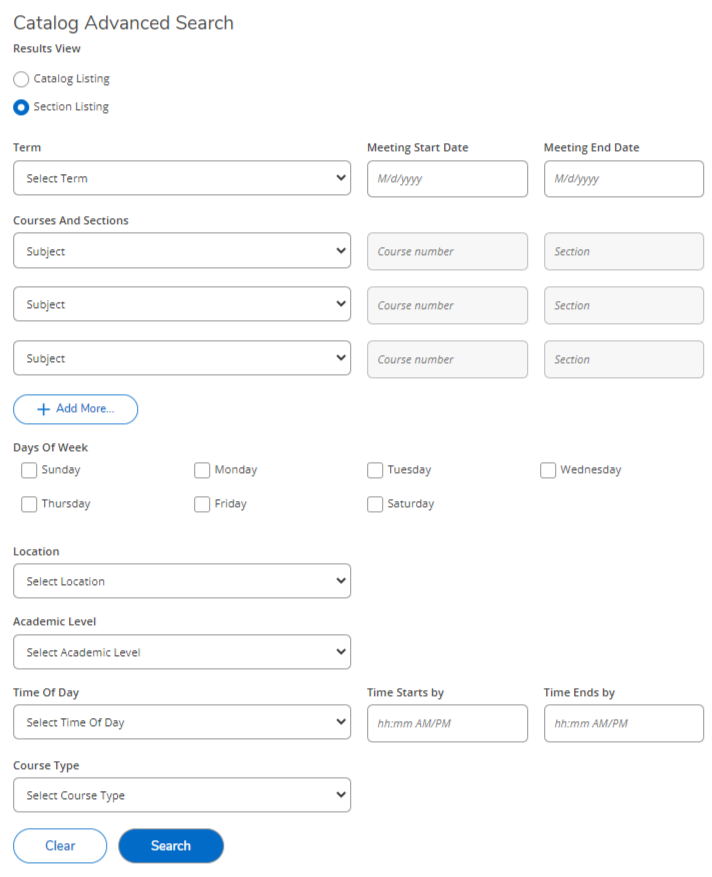
  1. Fill in as many fields as you’d like for your course search. It is suggested that you at least select a term and a subject. Click the blue “Search” button to get your results
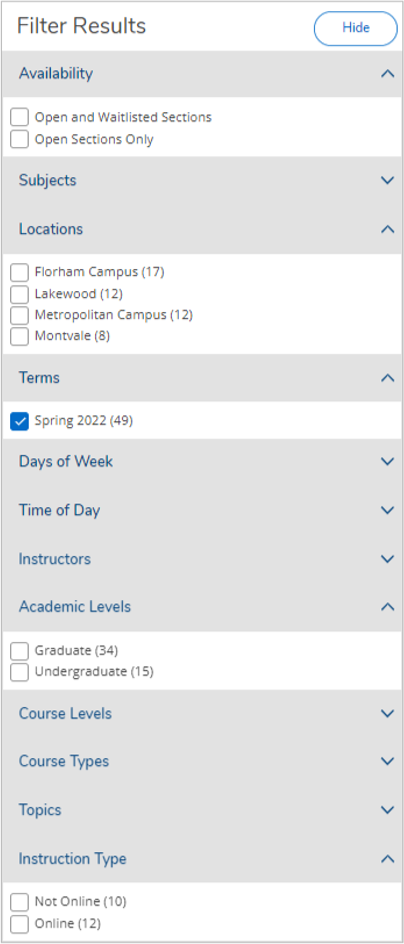
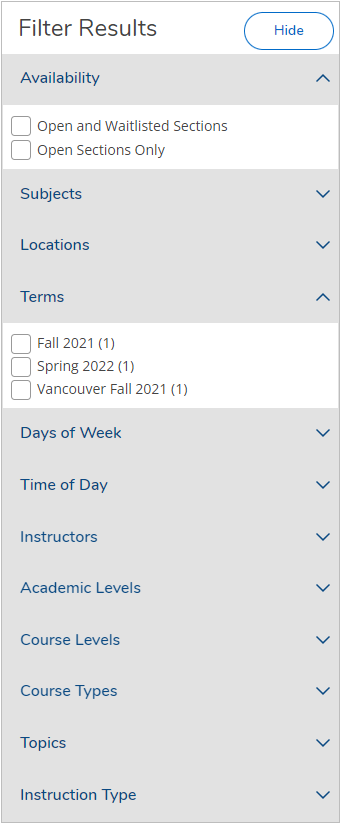
  1. You can narrow down your results further using the filters on the left-hand side
    • Click on the “Hide” button to hide the filter menu and allow the results to fill your screen
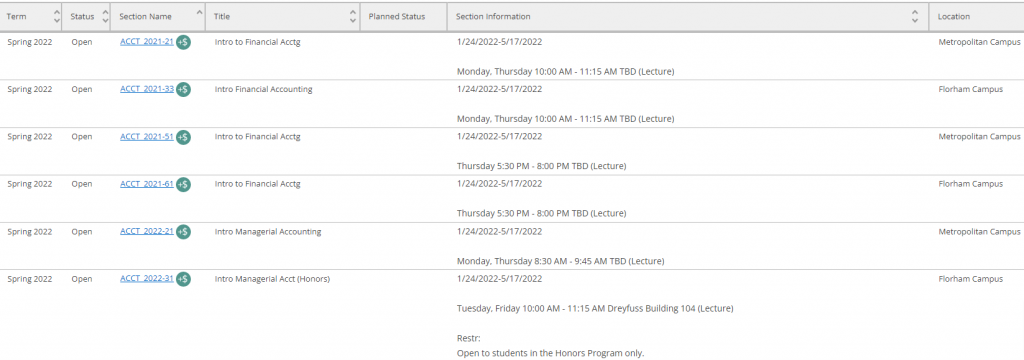
  1. You can click on the arrows in the header row to change how the results are sorted

Note

Section notes and restrictions can be found in the “Section Information” column.


If you have any questions or need assistance,
please open a SAMI Support ticket, email selfserviceadmin@fdu.edu, or call (973)-443-8822.

  1. You can search for courses by using the Course Catalog or your Degree Audit page. In this article, we will use the Degree Audit page method
  1. Go to the menu on the left, select “Academics” from the options, and expand the “Student Planning” from the dropdown. Press “My Progress/Degree Audit” 
  1. Find the requirements you are looking to fulfill. Press on the “Search” button to find sections for every course that will meet this degree requirement

Note

If you know exactly which course you are interested in, then you can click directly on that course code to view its sections.

  1. Narrow down your results using the filters on the left-hand side.

Tip

Make sure to choose the correct semester.

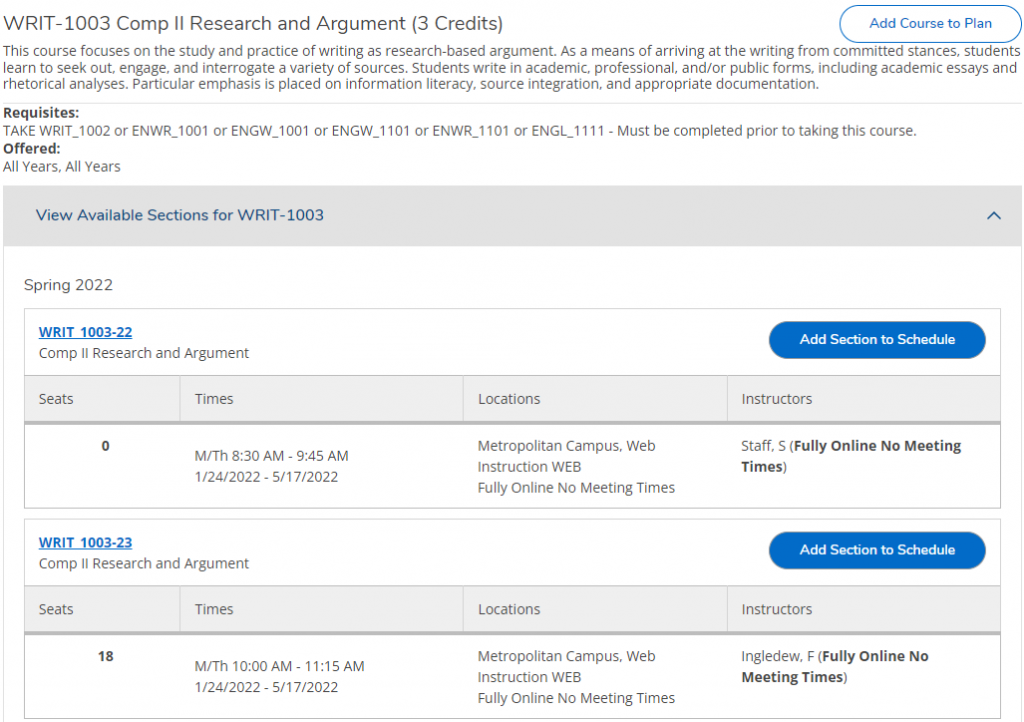
  1. Within the results, click on the grey bar that says “View Available Sections” for the course you’d like to add to your schedule. Find a section that fits on your schedule and click “Add Section to Schedule
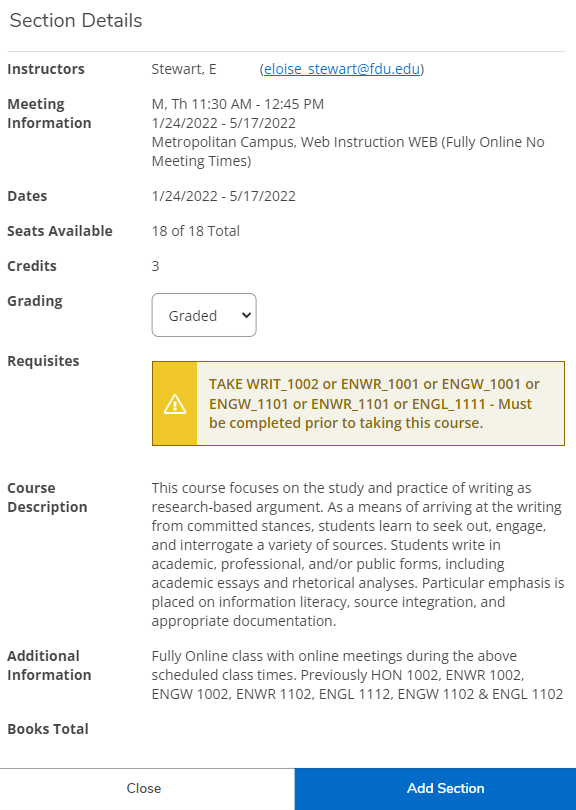
  1. Review the Section Details that pop up. If you still wish to add this section to your schedule, then click “Add Section
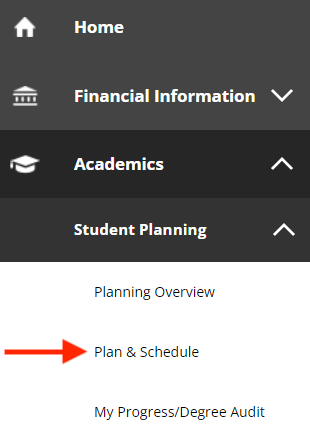
  1. To confirm the section appears on your schedule, navigate to the “Plan & Schedule” page
  1. To confirm the section appears on your schedule, navigate to the “Plan & Schedule” page

Tip

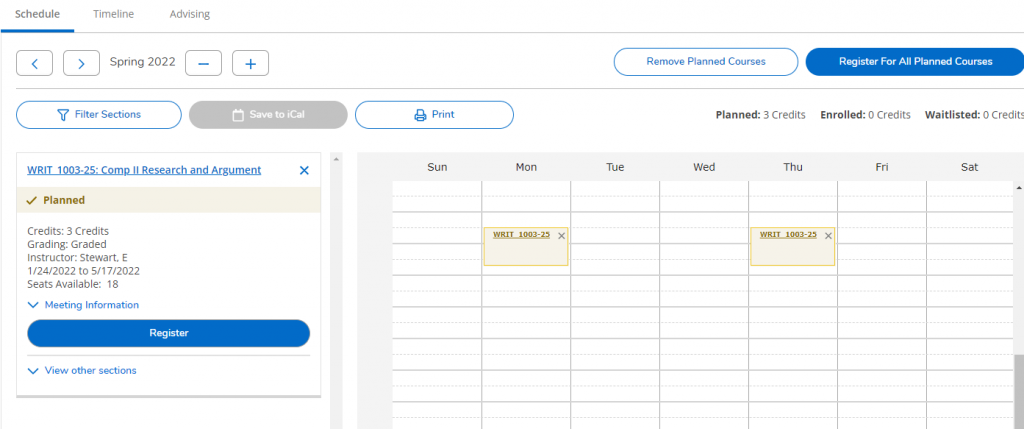
Sections can be removed by clicking on the “x” in the top right corner of the section.

  1. Repeat this process to add more courses to your schedule in preparation for priority registration

Important Important

Planning a section does not guarantee you have a spot in that section.


If you have any questions or need assistance,
please open a SAMI Support ticket, email selfserviceadmin@fdu.edu, or call (973)-443-8822.

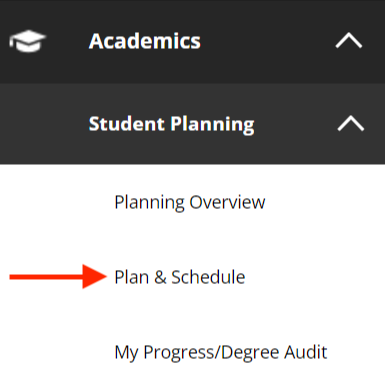
  1. On the left-hand side of the page, you will find your menus. Click on the menu called “Academics” and then click on “Student Planning.” Navigate to “Plan & Schedule
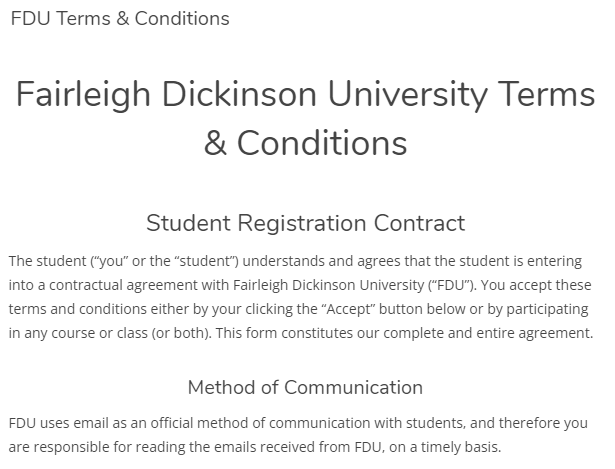
  1. The first time you come to this page for a given semester, you will be presented with the FDU Terms and Conditions Student Registration Contract. Scroll down to agree. You only need to do this once per term
Scroll all the way down to the “I Agree” Button
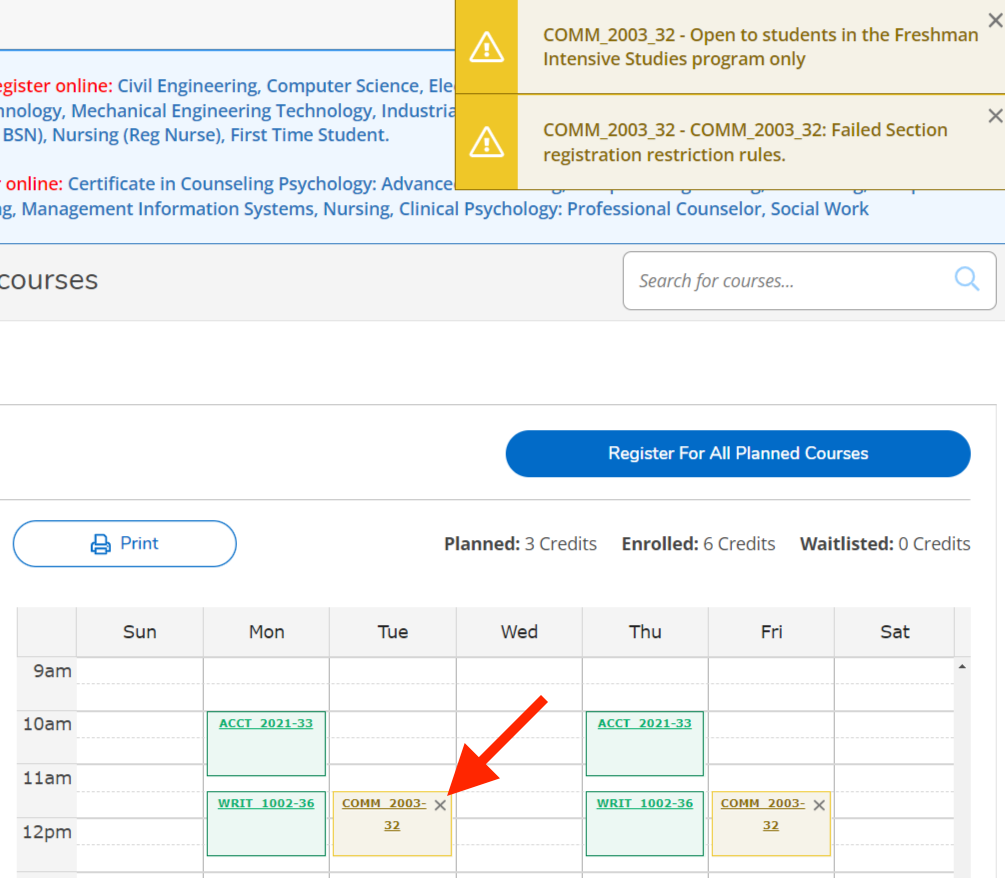
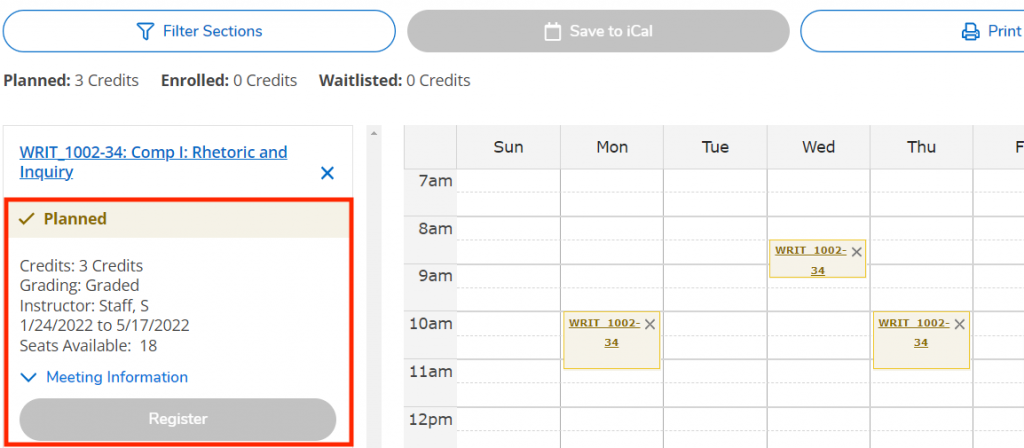
  1. Your planned courses will appear on the Plan & Schedule page and will be color-coded in yellow. If you have not planned your courses, please review how to in Section 1 – Part 3 “How to Plan Your Schedule Using Self-Service”
  1. If you have any holds, then they will appear in the top right corner of the page. You will need to resolve your holds before you can register for classes
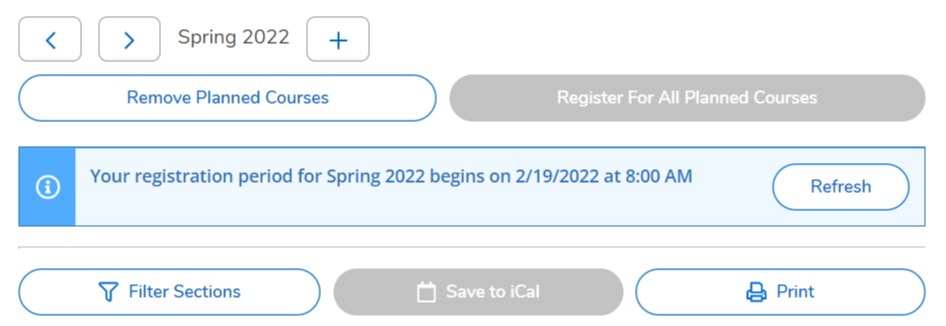
  1. You will need to be mindful of your priority registration date. You will find a banner above your planned schedule informing you of the date and time you can register for classes
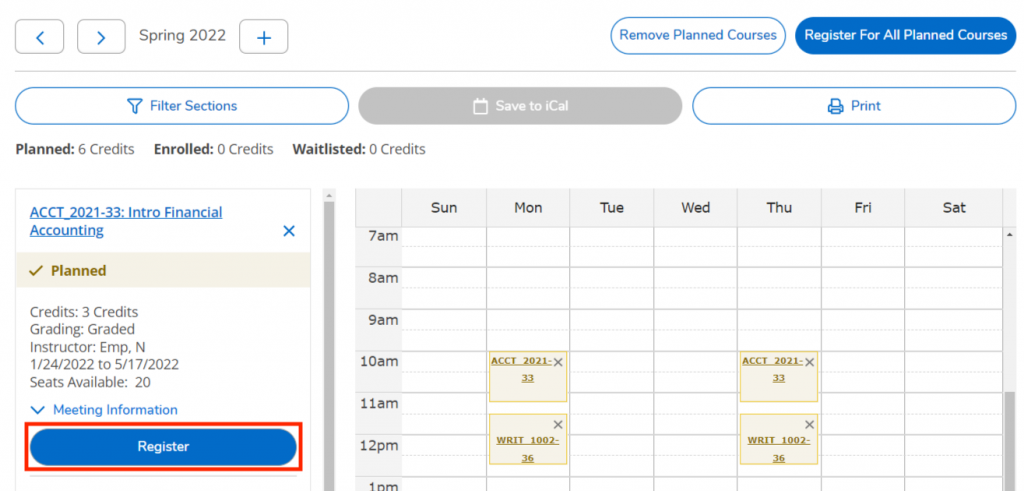
  1. Once all holds have been resolved and your priority registration date/time has arrived, you can register for all your courses by clicking on “Register For All Planned Courses.” If you would like to register for each course one at a time, then click on “Register” within each course tile
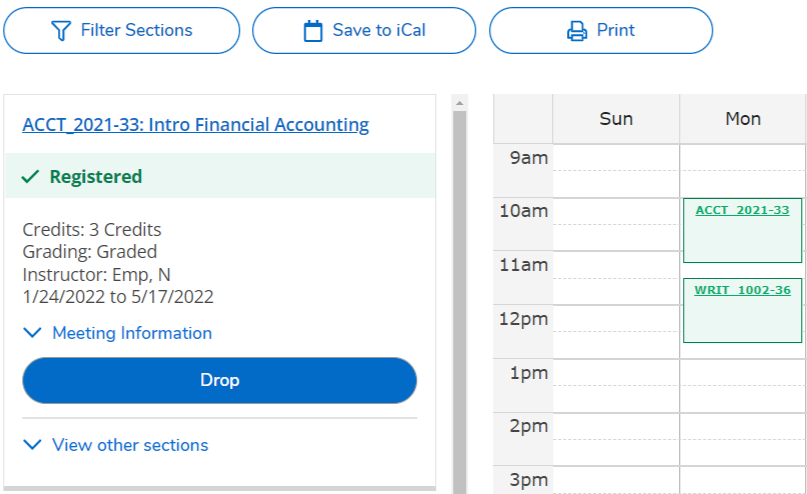
  1. Successful registrations will turn green and say “Registered
  1. If you are ineligible for any of your planned sections, then the course will remain yellow and planned. You will get an alert in the top right corner explaining why you were unable to register for that section
    • Click “x” on the section to remove it from your schedule
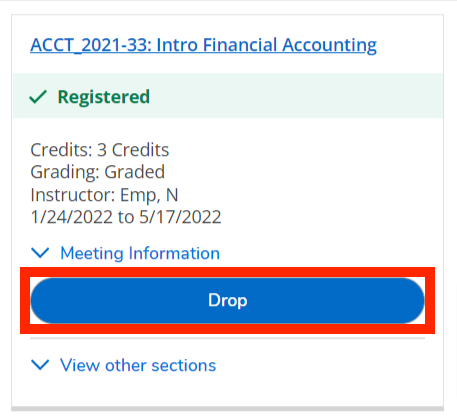
  1. If you need to drop a course during Priority Registration or Add/Drop, then click on “Drop” within the course tile

If you have any questions or need assistance,
please open a SAMI Support ticket, email selfserviceadmin@fdu.edu, or call (973)-443-8822.

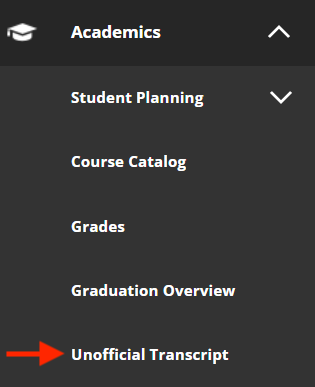
  1. On the left-hand side of the page, you will find your menus. Click on the menu called “Academics” and click on the “Unofficial Transcript” button
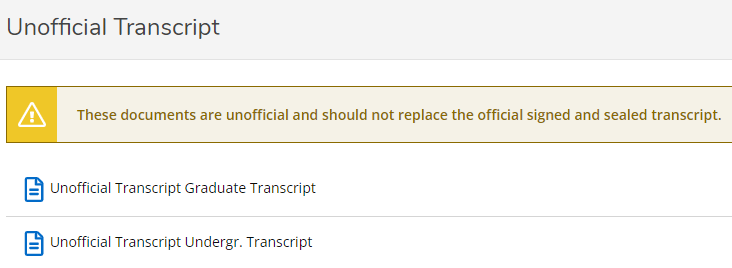
  1. Select the transcript you wish to download by clicking on its text

Important Important

These documents are unofficial and do not replace official signed and sealed transcripts. To order official transcripts you must go to www.getmytranscript.org.

  1. After clicking on the transcript text, a pdf document will download. Open this document to view your unofficial transcript.

If you have any questions or need assistance,
please open a SAMI Support ticket, email selfserviceadmin@fdu.edu, or call (973)-443-8822.

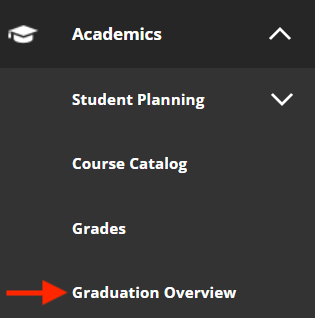
  1. On the left-hand side of the page, you will find your menus. Select “Academics” from the side menu and then select “Graduation Overview
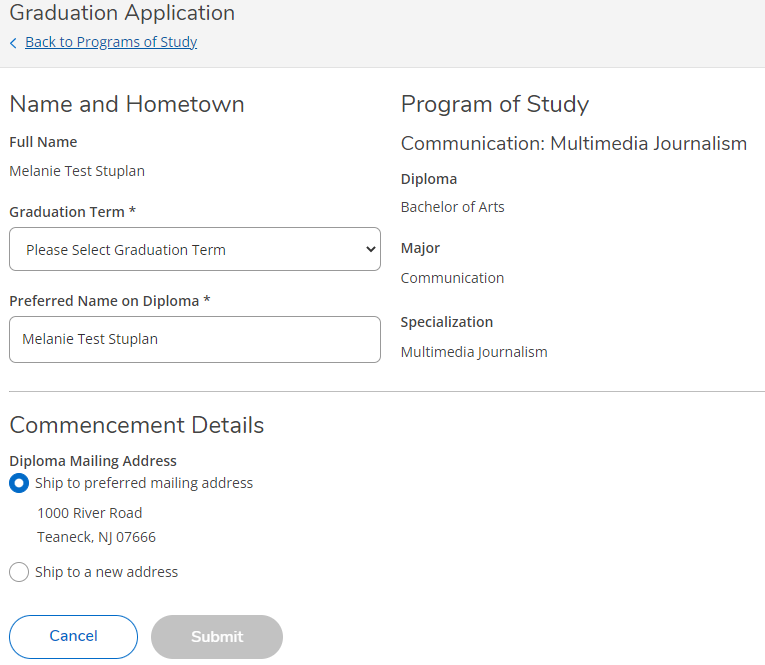
  1. Press “Apply” next to the program from which you wish to graduate
  1. Select your “Graduation Term” and type in your “Preferred Name on Diploma.” Select the address you would like your diploma sent to. Once these fields are filled in, you must confirm everything is correct and press “Submit

Important Important

Upon submitting the graduation application, students will be charged the appropriate fee in accordance with the degree they are seeking. Please do not apply more than once.


If you have any questions or need assistance,
please open a SAMI Support ticket, email selfserviceadmin@fdu.edu, or call (973)-443-8822.

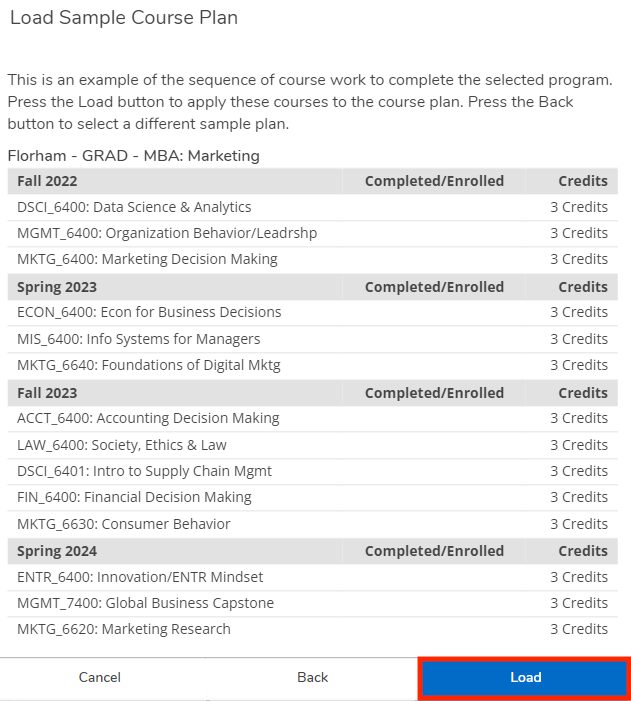
What is a course plan? A course plan is an example of the sequence of coursework you need to complete for your selected program. This will load courses onto your plan for current and future semesters. This will allow you to map out the courses you must take for your degree. 

Note

Not every program has a course plan available.

  1. On the left-hand side of the page, navigate to “Academics.” Within the “Student Planning” dropdown menu, press “My Progress/Degree Audit
  1. On the top right side of the page, press “Load Sample Course Plan
  1. Select your first term from the drop-down menu and select your program using the first radio button
  1. Press on “Preview Plan” at the bottom of the window
  1. Review the sample course plan and press “Load
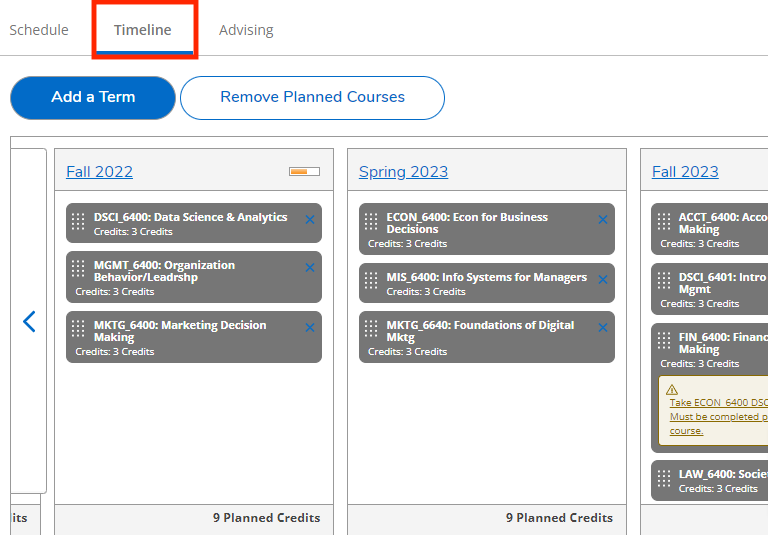
  1. Use the Timeline tab to view the courses that were loaded onto your plan. Make any adjustments, if needed

If you have any questions or need assistance,
please open a SAMI Support ticket, email selfserviceadmin@fdu.edu, or call (973)-443-8822.

  1. On the left-hand side of the page, you will find your menus. Click on the menu called “Academics.” Within the “Student Planning” menu, click on “Plan & Schedule
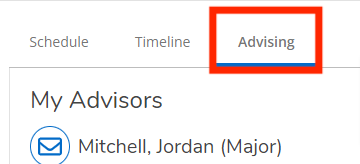
  1. Go to the “Advising” tab. Here you will see the names of your advisors
  1. You can leave a message for your advisor by typing in the “Compose a Note” box and clicking “Save Note
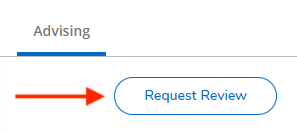
  1. Click “Request Review” to have your advisor notified that your schedule is ready to be reviewed and approved

If you have any questions or need assistance,
please open a SAMI Support ticket, email selfserviceadmin@fdu.edu, or call (973)-443-8822.

If a class you have planned is full and has a waitlist enabled, then follow these steps to join the waitlist. Please note that there is no guarantee that you will get a spot in the course section.

Note

Students have the option to place themselves on the waitlist to see if a seat becomes available in the course section. For a course that offers waitlisting as an option, plus-ins are no longer a standard practice; neither an advisor nor a professor can approve a plus-in for a class. All registration rules and restrictions apply to waitlisting, so you may not be able to place yourself on a waitlist if you are not eligible. If you encounter difficulties adding yourself to a waitlist due to restrictions, you should reach out to your Academic Advisor for assistance.

  1. Go to the “Academics” menu, click on “Student Planning,” and navigate to “Plan & Schedule
  1. Find the section that is full. If the waitlist is active, you will see a “Waitlist” button
  1. Once you’ve joined the waitlist, the number of waitlisted students will increase by one and you will have the option to drop off the waitlist
  1. When a spot opens in the section, you will get a notification sent to your FDU email address

Note

You will only have until 11:59 PM EST on the day specified in the email to register for the section. If you do not register on time, the spot will be offered to the next person on the waitlist.

  1. There will now be a “Register” button on the section within the Plan & Schedule page. Click on it to register for the waitlisted course

If you have any questions or need assistance,
please open a SAMI Support ticket, email selfserviceadmin@fdu.edu, or call (973)-443-8822.

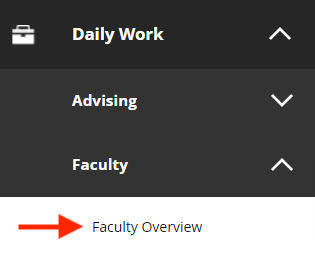
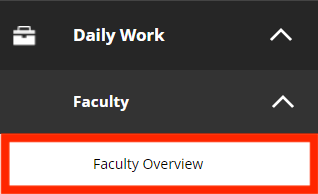
  1. On the left-hand side of the page, you will find your menus. Click on the toolbox icon, called “Daily Work”, and navigate to the “Faculty” submenu. Within this submenu, click on “Faculty Overview
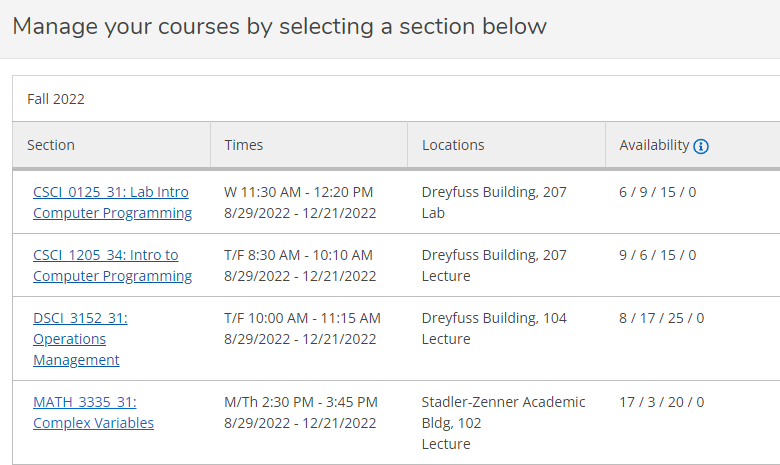
  1. Click on the row of the course you wish to verify the enrollment
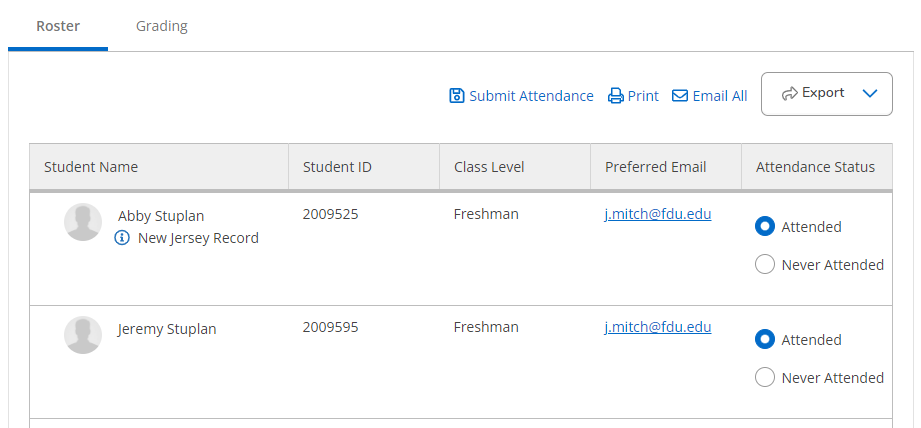
  1. Within the “Roster” tab, you will see the list of students currently enrolled in the course. Use the radio buttons to select whether the student has “Attended” or “Never Attended
  1. Once you have completed verifying enrollment, you must click on “Submit Attendance
  1. Click on “Submit” in the pop-up window to complete the process

Important

Once you’ve submitted attendance, you cannot make any changes in Self-Service. If you need to make a change, you must contact Enrollment Services: Metro Campus – esteafdu@fdu.edu AND/OR Florham Campus esmadfdu@fdu.edu.

  1. After you’ve submitted the enrollment verification, you will see a green notification at the top of the page letting you know you were successful

If you have any questions or need assistance,
please open a SAMI Support ticket, email selfserviceadmin@fdu.edu, or call (973)-443-8822.

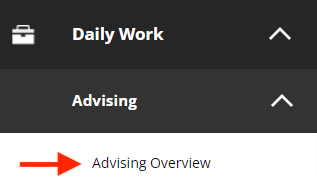
  1. On the left-hand side of the page, you will find your menus. Click on the toolbox icon, called “Daily Work”, and navigate to the “Advising” submenu. Within this submenu, click on “Advising Overview
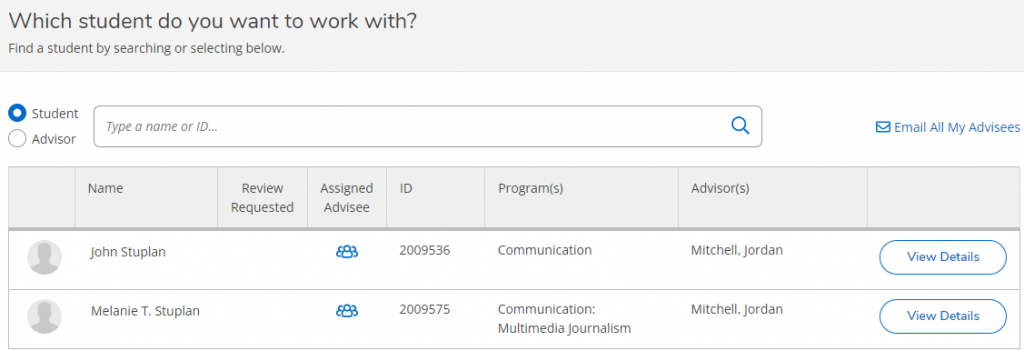
  1. Find the student you wish to advise using the prepopulated table of assigned advisees or by searching for their name or ID number in the search bar.

Note

You can search for any student, whether you are their advisor or not, by using the search bar.

  1. Click on the “View Details” button for the record of interest
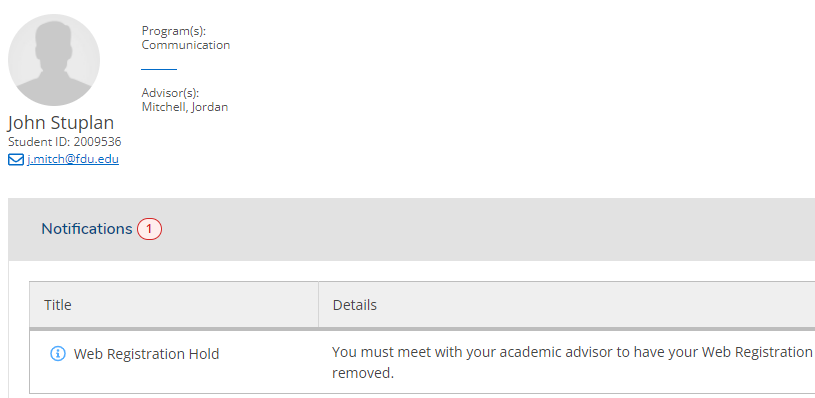
  1. Click on the “Notifications” bar to expand it and view any holds on the student’s account
  1. Underneath the “Notifications” bar, you will find all the tabs you can use to gain a well-rounded view of the student’s academic progress
  • Click on “Course Plan” to view the courses the student has registered for or is planning to register for
  • Click on “Progress/Degree Audit” to view the student’s Degree Audit. Within this tab, you can click on “View a New Program” to see what it would look like if this student switched programs
  • Click on “Test Scores” to see any official test scores that have been submitted to FDU and recorded in Colleague
  • Click on “Grades” to view the student’s midterm and final grades broken down by semester
  • Click on “Remove Hold” to remove the web registration hold from the student’s account. You will need to select the hold you wish to remove and click on “Remove Selected”

If you have any questions or need assistance,
please open a SAMI Support ticket, email selfserviceadmin@fdu.edu, or call (973)-443-8822.

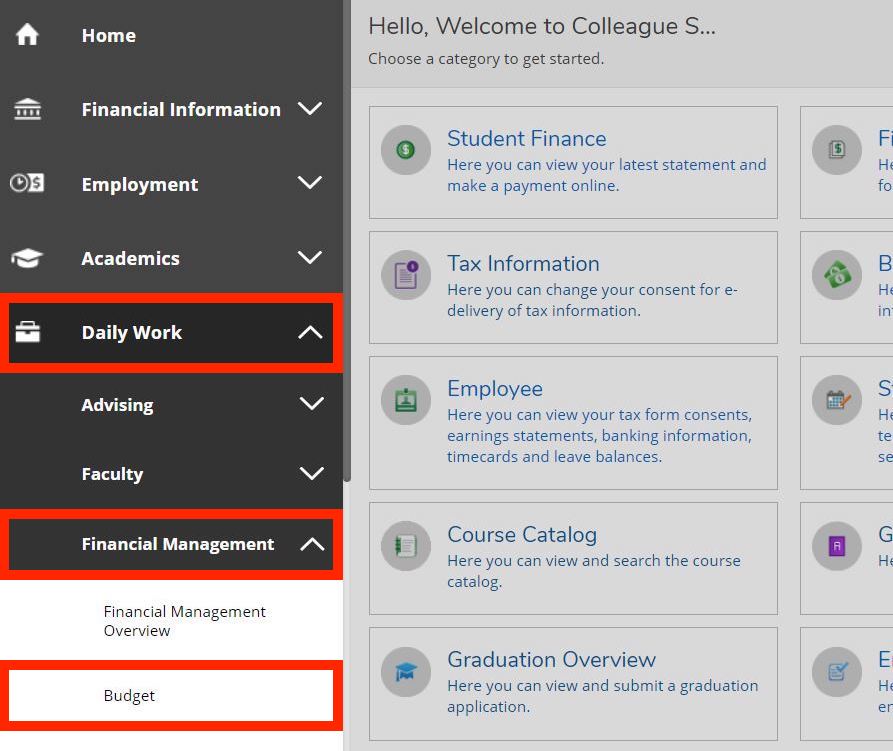
  1. On the left-hand side of the page, you will find your menus. Click on the toolbox icon, called “Daily Work”, and navigate to the “Financial Management” sub-menu. Within this sub-menu, click on “Budget
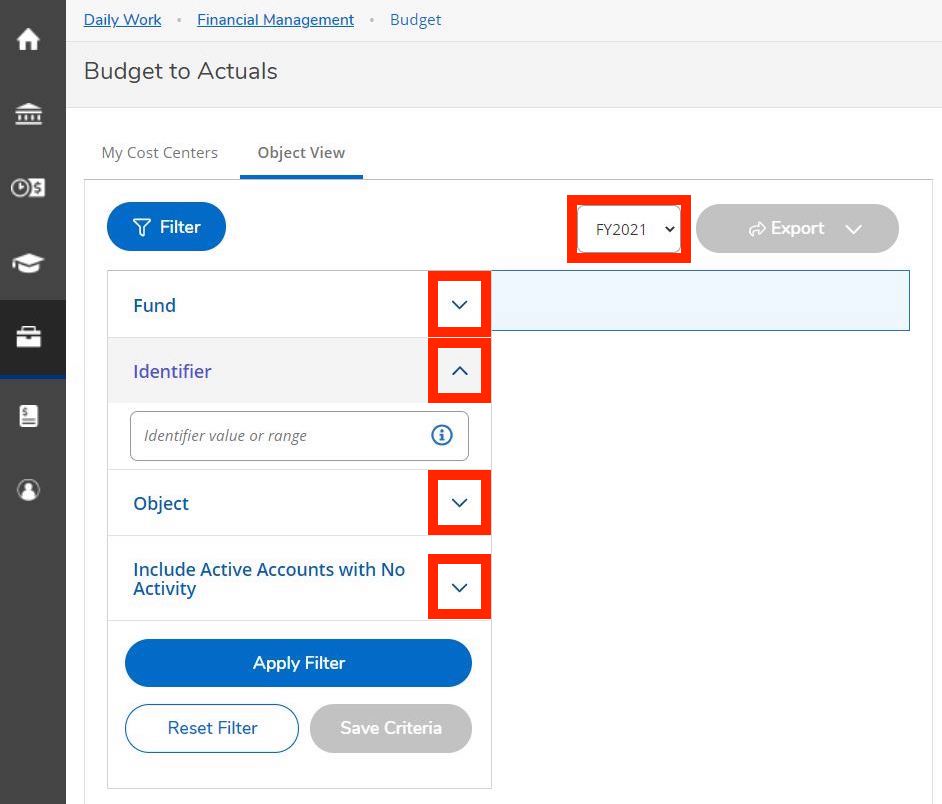
  1. On the “Budget to Actuals” page, there will be options to filter your reports. By clicking on any of the arrows, you can expand or collapse the filter options. Once expanded, a field will appear where you can type the criteria you would like to search for. Additionally, you can change the Fiscal Year using the drop-down menu at the top of the page
  1. Using “Identifier” as an example, you can type in your value(s) in the following ways. Hit “Enter” after each value to include in the search
    • Type in the individual identifier, ex: 067110
    • Type in the range of identifiers, ex: 067110-067115
    • Type in the identifiers separated by commas, ex: 067110, 067111, 067115
  1. Click “Apply Filter” when done entering values. Your results will appear to the right of your filter menu
  1. If you need to change your filters:
    • Open up the filter options by clicking on the blue “Filter” button
    • You can add more values by typing them into the field, hitting “Enter”, and applying the filter again
    • You can remove individual values by clicking on the “X” next to the value
    • You can start over completely by clicking “Reset Filter
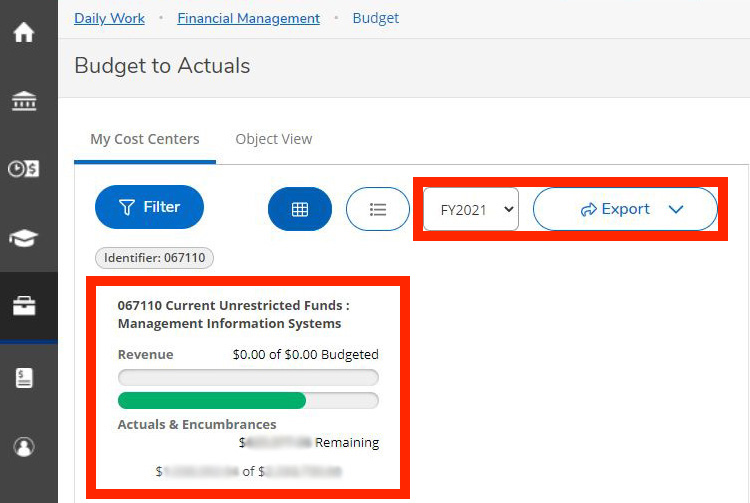
  1. If you are satisfied with your filter options and would like to detail in on a specific budget, then click anywhere on the budget you would like to view
  1. Click anywhere within a row to view more details. The “Financial Health” column will display a yellow alert symbol if the budget is over 85% spent
  1. Continue to click on rows or documents to view more details. Download any page with an “Export” icon if you need to view it in Excel. You can click Back in your browser to go back a page
  1. On the left-hand side of the page, you will find your menus. Click on the toolbox icon, called “Daily Work”, and navigate to the “Financial Management” sub-menu. Within this sub-menu, click on “Budget
  1. On the “Budget to Actuals” page, there will be options to filter your reports. By clicking on any of the arrows, you can expand or collapse the filter options. Once expanded, a field will appear where you can type the criteria you would like to search for. Additionally, you can change the Fiscal Year using the drop-down menu at the top of the page
  1. Using “Identifier” as an example, you can type in your value(s) in the following ways. Hit “Enter” after each value to include in the search
    • Type in the individual identifier, ex: 067110
    • Type in the range of identifiers, ex: 067110-067115
    • Type in the identifiers separated by commas, ex: 067110, 067111, 067115
  1. Click “Apply Filter” when done entering values. Your results will appear to the right of your filter menu
  1. If you need to change your filters:
    • Open up the filter options by clicking on the blue “Filter” button
    • You can add more values by typing them into the field, hitting “Enter”, and applying the filter again
    • You can remove individual values by clicking on the “X” next to the value
    • You can start over completely by clicking “Reset Filter
  1. If you are satisfied with your filter options and would like to detail in on a specific budget, then click anywhere on the budget you would like to view
  1. Click anywhere within a row to view more details. The “Financial Health” column will display a yellow alert symbol if the budget is over 85% spent
  1. Continue to click on rows or documents to view more details. Download any page with an “Export” icon if you need to view it in Excel. You can click Back in your browser to go back a page
Note

Anytime you see the FY drop-down menu at the top of the page, you can change the FY you are viewing. Likewise, whenever you see the Export drop-down menu, you can download the information in your current view into a CSV file and open in Excel.


If you have any questions or need assistance,
please open a SAMI Support ticket, email selfserviceadmin@fdu.edu, or call (973)-443-8822.

  1. Go to the “Daily Work” menu, click on “Faculty,” and then click on “Faculty Overview
  1. Select the course for which you need to enter midterm grades
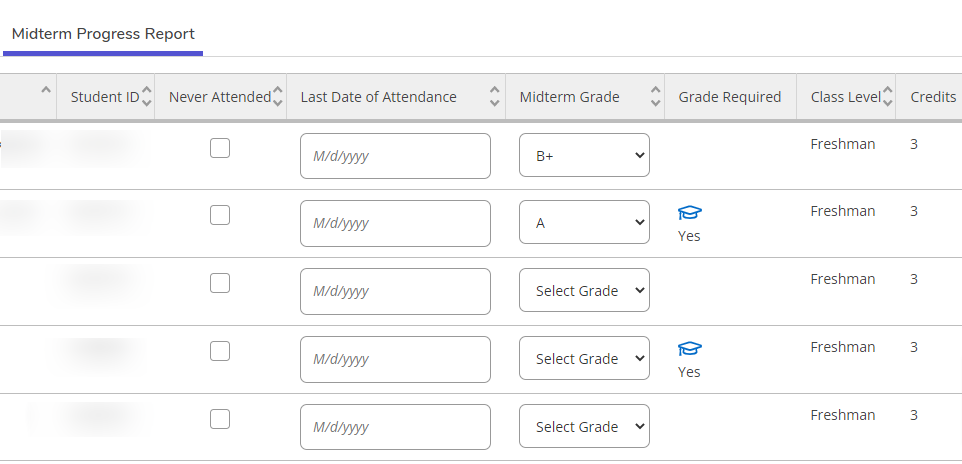
  1. Within the “Grading” tab, select the “Midterm Progress Report” tab
  1. Use the drop-down menu to select the grade for each student

Note

The “Grade Required” column will indicate which students MUST be given a midterm grade.

Note

There is no Submit button for Midterm grading. Grades are automatically saved when selected from the drop-down. Midterm grades may be changed at anytime, if needed.


If you have any questions or need assistance,
please open a SAMI Support ticket, email selfserviceadmin@fdu.edu, or call (973)-443-8822.

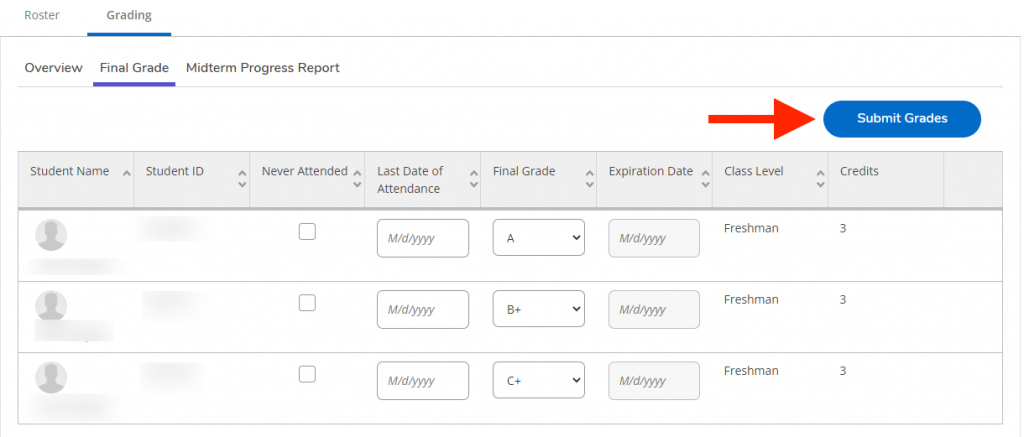
  1. Go to the “Daily Work” menu, click on “Faculty,” and then click on “Faculty Overview
  1. Select the course for which you need to enter final grades
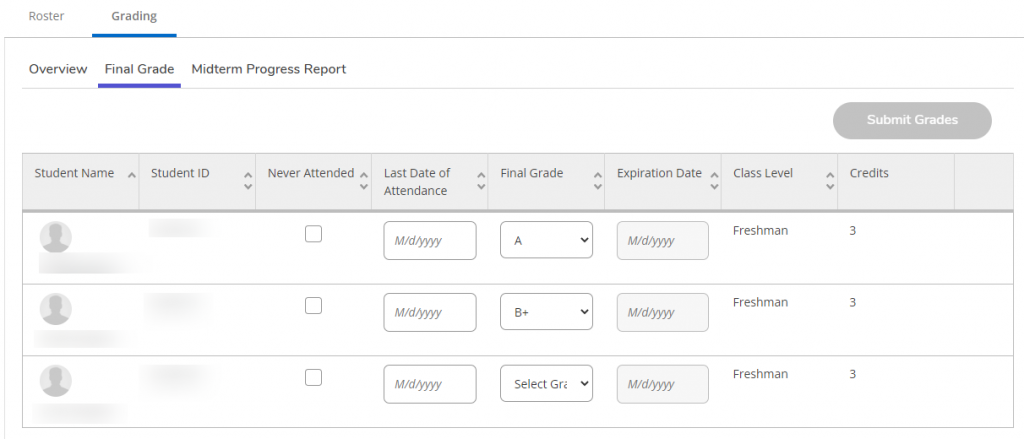
  1. Within the “Grading” tab, select the “Final Grade” tab
  1. Use the drop-down menu to select the grade for each student

Note

A grade must be entered for every student in order to submit grades.

  1. Once all grades have been entered, you must click the “Submit Grades” button to save and submit your work

Note

You have a short window where you can change grades and resubmit in Self-Service. However, once grades have been verified in Colleague, you will no longer be able to make a change in Self-Service. You will then need to go through the Change of Grade process.


If you have any questions or need assistance,
please open a SAMI Support ticket, email selfserviceadmin@fdu.edu, or call (973)-443-8822.

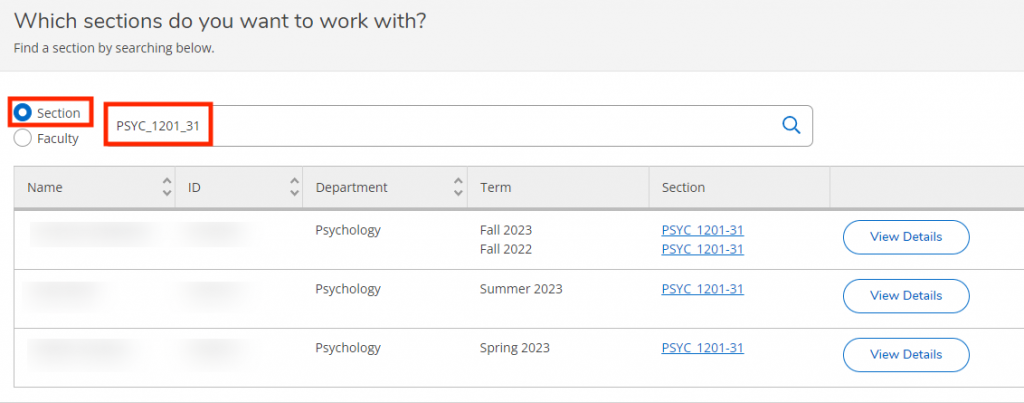
  1. Go to the Daily Work menu and click on “Departmental Oversight“. Within this menu, click on “Departmental Overview
  1. To search for a section by course code, click on the “Section radio button. Type in the section information using the following valid formats only:
    • Subject Code Only – Ex: PSYC
    • Catalog Number – Ex: PSYC_1201
    • Specific Section – Ex: PSYCH_1201_31
  1. To search for all the sections being taught by a specific faculty member, click on the “Faculty” radio button. Type in the faculty member’s name using the following valid formats only:
    • First Name Last Name – Ex: Bob Smith
    • Last Name, First Name – Ex: Smith, Bob
  1. Once you’ve found the section or faculty member you searched for, click on “View Details
  1. To view the Enrollment Verification or Midterm/Final grades associated with a specific section, click on the section name
  1. Enrollment Verification can be found in the Roster tab and Midterm/Final grades can be found in the Grading tab

Note

You will not be able to submit grades on behalf of a faculty member. You can only view the grades that have been submitted.


If you have any questions or need assistance,
please open a SAMI Support ticket, email selfserviceadmin@fdu.edu, or call (973)-443-8822.

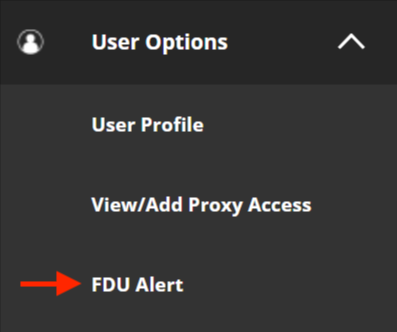
  1. On the left-hand side of the page, you will find your menus. Click on the menu called “User Options” and then click on “FDU Alert
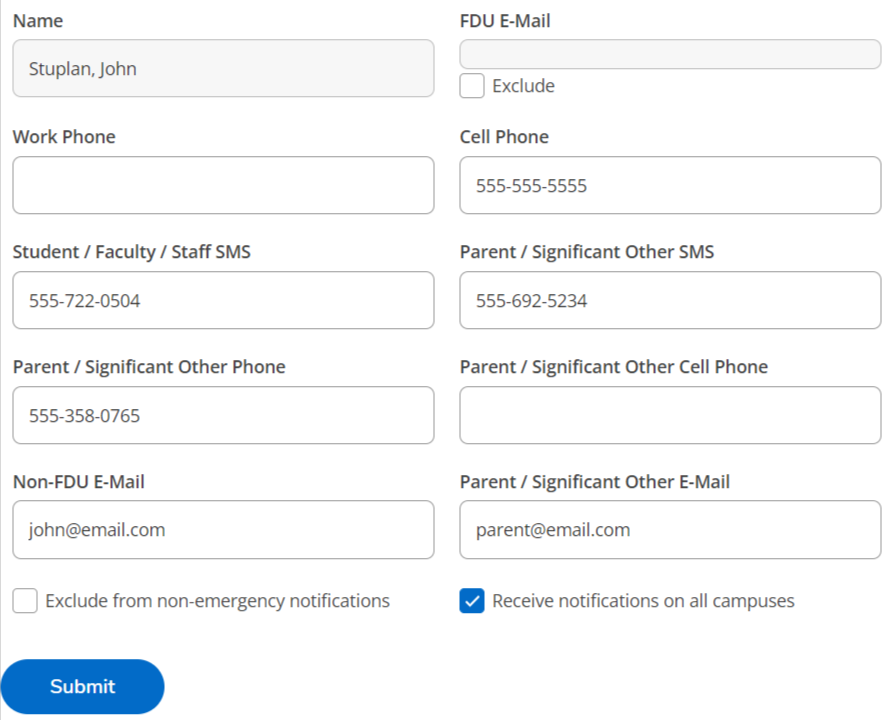
  1. Fill in the alert information presented on the page. If information already exists in these fields, make sure the information is up to date. Click “Submit” when finished

If you have any questions or need assistance,
please open a SAMI Support ticket, email selfserviceadmin@fdu.edu, or call (973)-443-8822.

What is a Proxy? A Proxy is a person to whom you grant permission to sign into your Self-Service account to access selected student records.

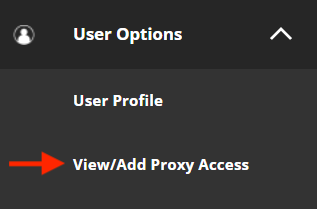
  1. On the left-hand side of the page, you will find your menus. Press on the menu called “User Options” and then press on “View/Add Proxy Access” 
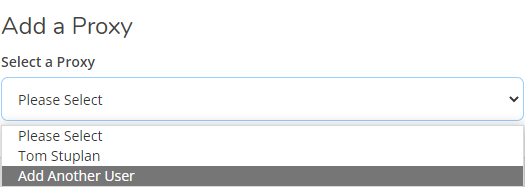
  1. Use the drop-down to add a proxy. If you see the person’s name, select them from the list and confirm their information. If you do not see their name, click on “Add Another User
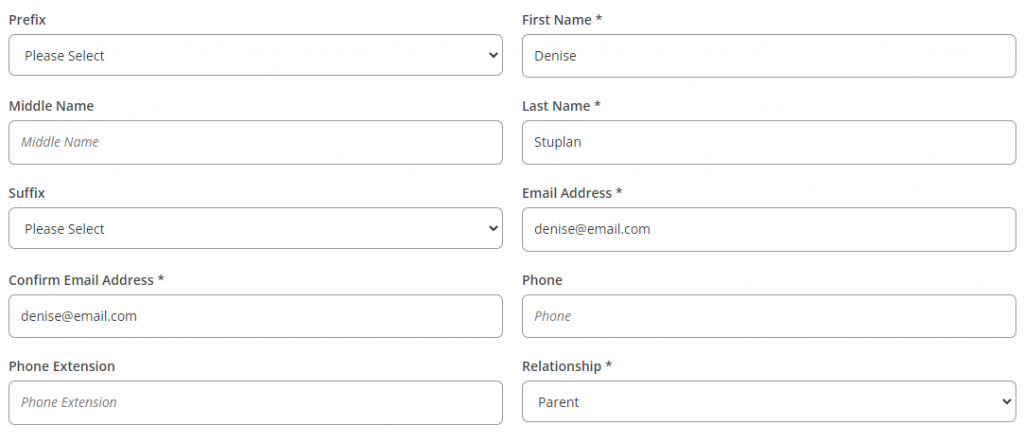
  1. You must fill in the personal information for the proxy
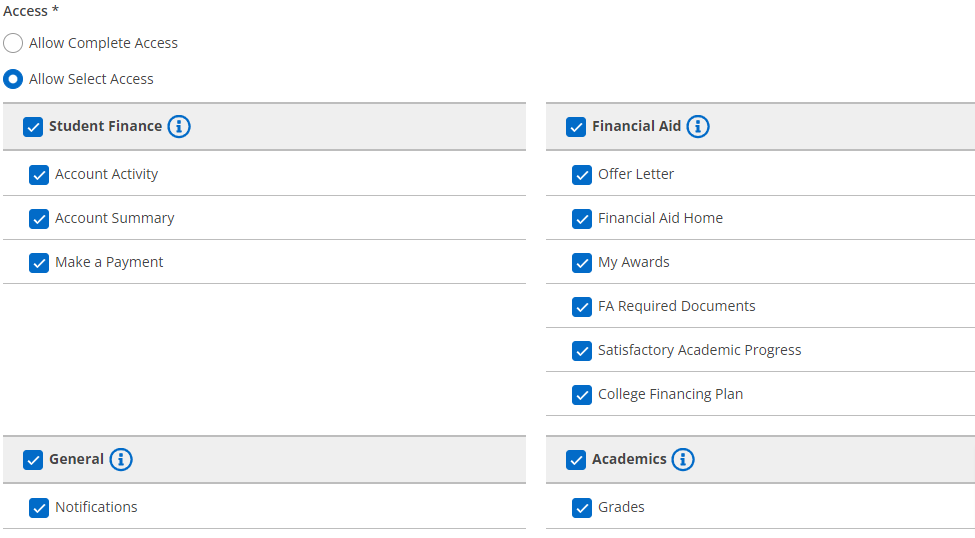
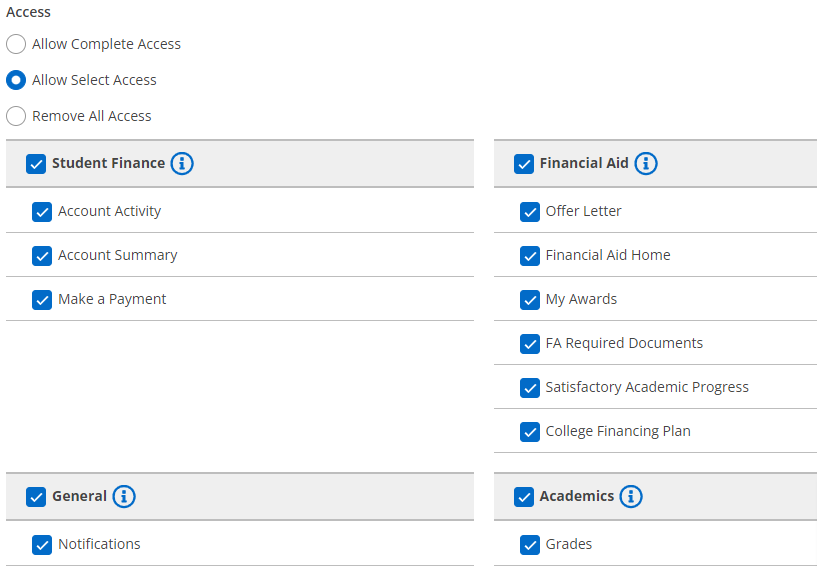
  1. You can pick and choose what access you want to give to this proxy
  1. You must agree to the Disclosure Agreement and press “Submit” 
  1. You will be prompted to enter your Single-Sign-On password again and press “Submit” 
  1. If you add a new user, you might get the following pop-up message. If you do, press “Continue
  1. Now your proxy will be listed on the “View/Add Proxy Access” page

Note

Proxies will receive an email any time access is granted or revoked.

  1. If you want to change a proxy’s access at any time, simply click on the pencil next to their row
  1. Add or remove access by selecting the appropriate checkboxes. You can also remove all access entirely by selecting the “Remove All Access” radio button. Click “Save” to submit your changes

Important Important

If you are giving a proxy access to “Make a Payment” you must also make them an authorized user in TouchNet.

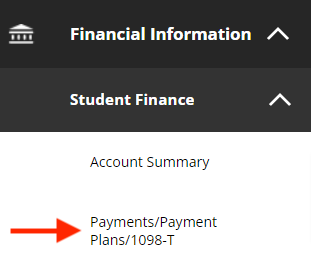
  1. To give access to Make a Payment via an authorized user, click on “Payments/Payment Plans/1098-T” within the “Student Finance” menu
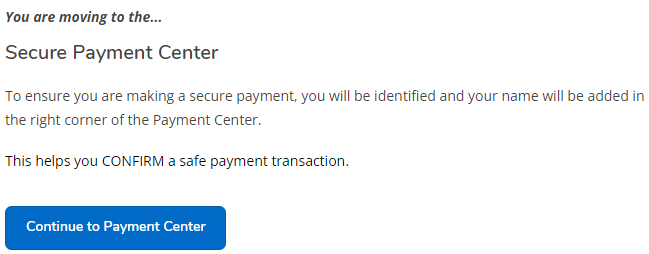
  1. Click on “Continue to the Payment Center” to navigate to TouchNet
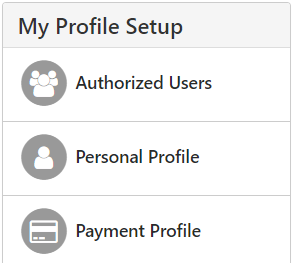
  1. Click on “Authorized Users” to add your proxy as an authorized user to pay your bill. Follow the instructions to add the authorized user

If you have any questions or need assistance,
please open a SAMI Support ticket, email selfserviceadmin@fdu.edu, or call (973)-443-8822.

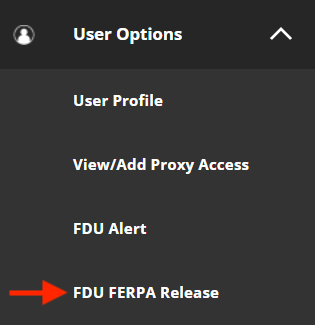
  1. On the left-hand side of the page, you will find your menus. Click on the menu called “User Options” and then click on “FDU FERPA Release
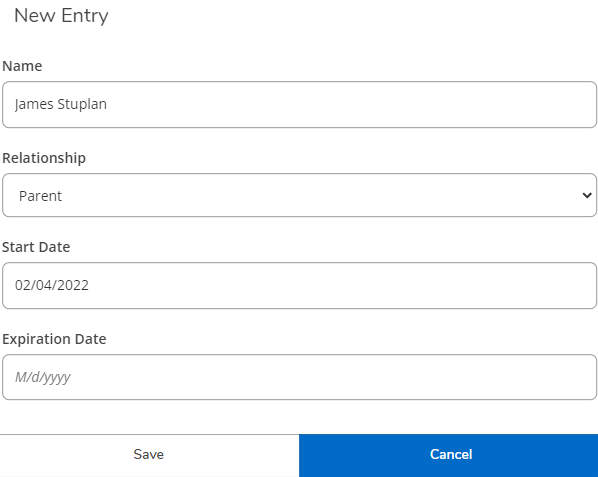
  1. Click on “Add a Contact” to add a new contact, a person to whom you want to grant access to your information

Important

By completing the information on this page, you are authorizing administrators, staff, and faculty members of Fairleigh Dickinson University to release information pertaining to academic records, financial aid, student bill/account and disciplinary records to the contacts you have noted. This waiver remains in effect throughout your tenure as a student at the University. If you wish to cancel the permissions this waiver authorizes, you may do so by updating the details on this page. Please be advised that this waiver DOES NOT apply to services provided by Health and Counseling services. All records pertaining to medical care and psychological services remain confidential.

  1. Adding a contact: Fill in the contact’s name, relationship, and the start date (the date that this will become effective). The expiration date is optional and can be changed at any point. Click “Save
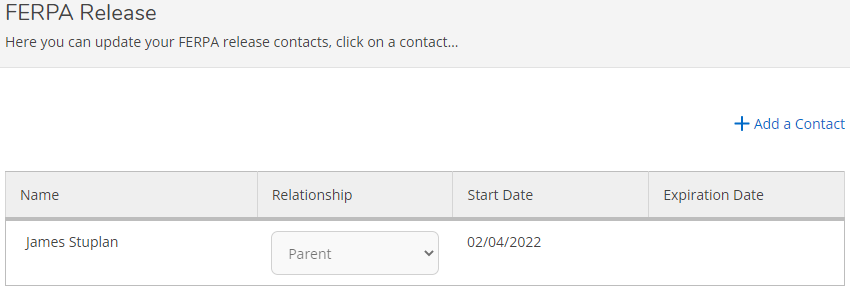
  1. You will now see this contact listed on the FDU FERPA Release page
  1. If you want to end the permissions of a contact, press on the row containing their name
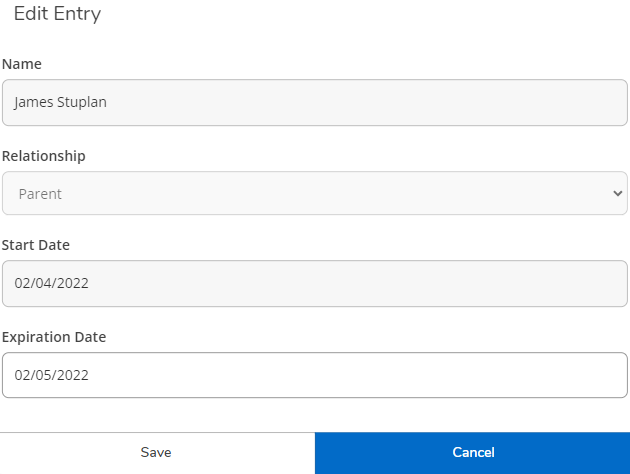
  1. Fill in an expiration date to end their permissions on that date. Press “Save
  1. Repeat the steps above to add or change your contacts

If you have any questions or need assistance,
please open a SAMI Support ticket, email selfserviceadmin@fdu.edu, or call (973)-443-8822.

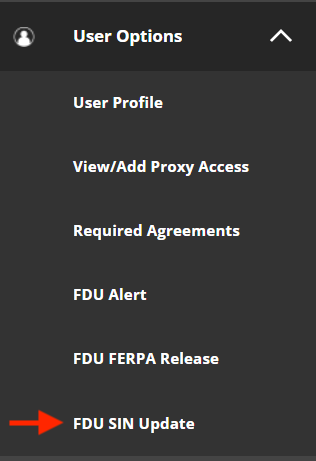
  1. Go to the “User Options” menu and click on “FDU SIN Update
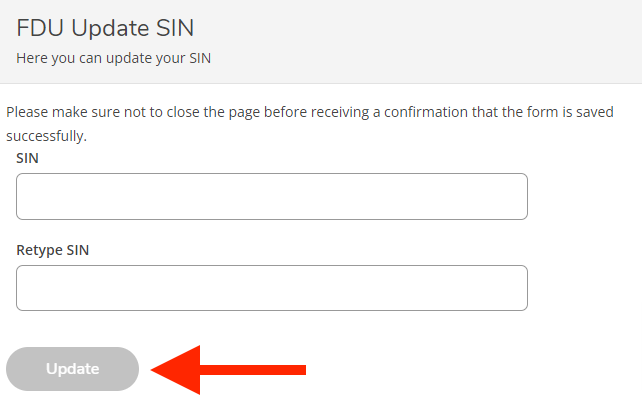
  1. Enter your SIN into the empty fields and click “Update
  1. You will know your submission is successful if you get a “SIN Updated” alert in the top right corner of the page

If you have any questions or need assistance,
please open a SAMI Support ticket, email selfserviceadmin@fdu.edu, or call (973)-443-8822.

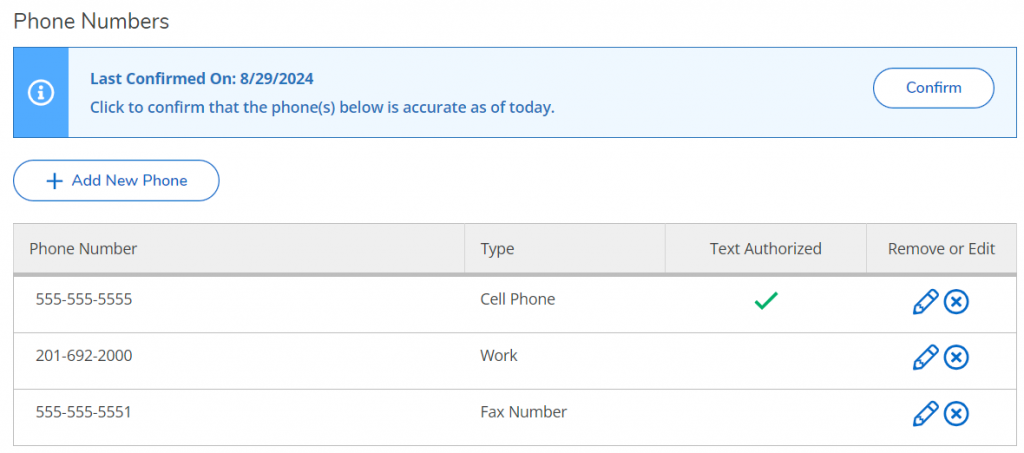
The phone numbers the University has on file to communicate with you are displayed in your User Profile in Self-Service. If the information is incorrect in any way, you can update your contact data using the steps below.

Faculty/Staff

Please note that the phone number you enter under the ‘Work’ phone type will be publicly available in the FDU Faculty/Staff directory. Ensure that the number you provide for ‘Work’ is the one you want colleagues, students, and others to use to contact you.

  1. Go to the “User Options” menu and press on “User Profile”
  1. Scroll down to the “Phone Numbers” section
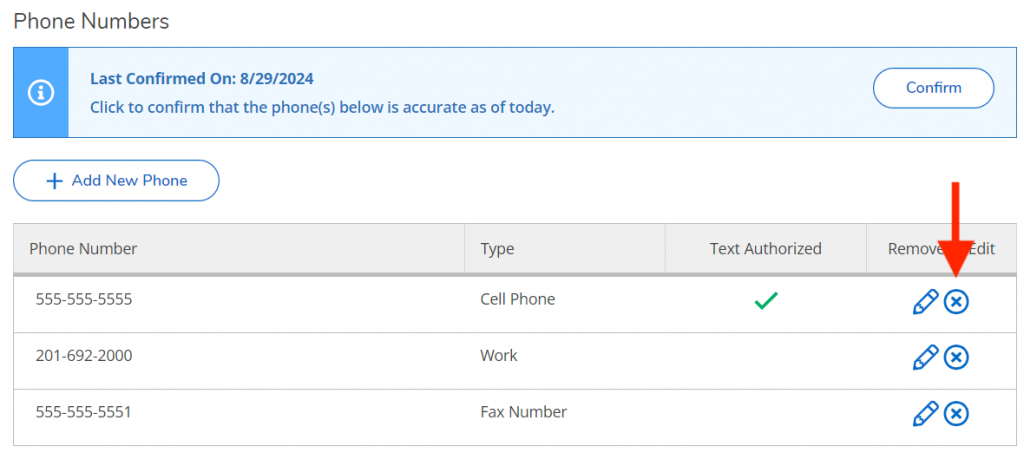
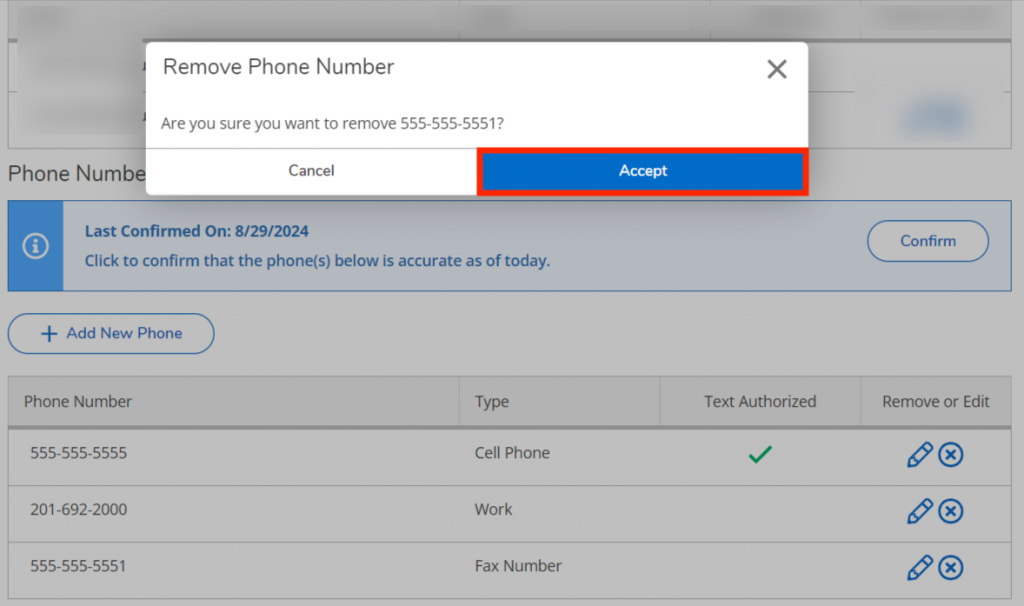
  1. If any of the phone numbers listed are no longer yours, you can press the “X” icon in the Remove or Edit column to delete them. Press “Accept” to confirm the deletion
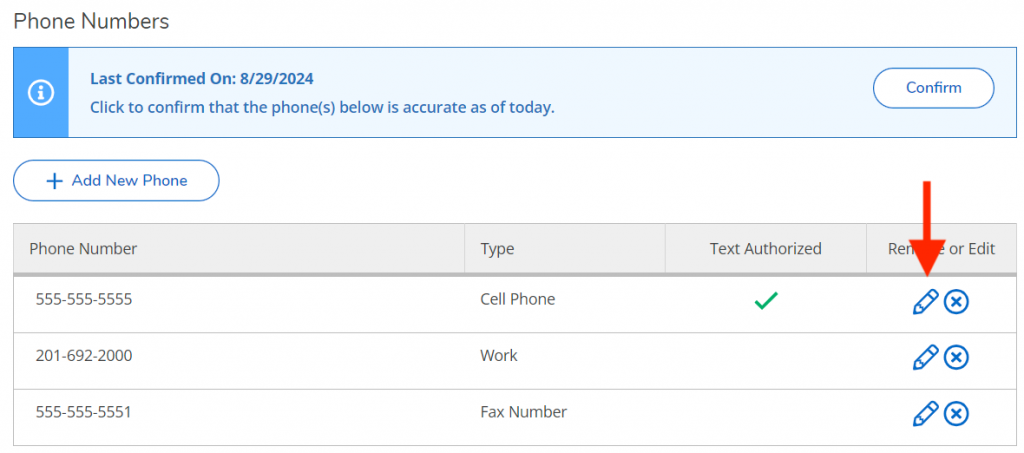
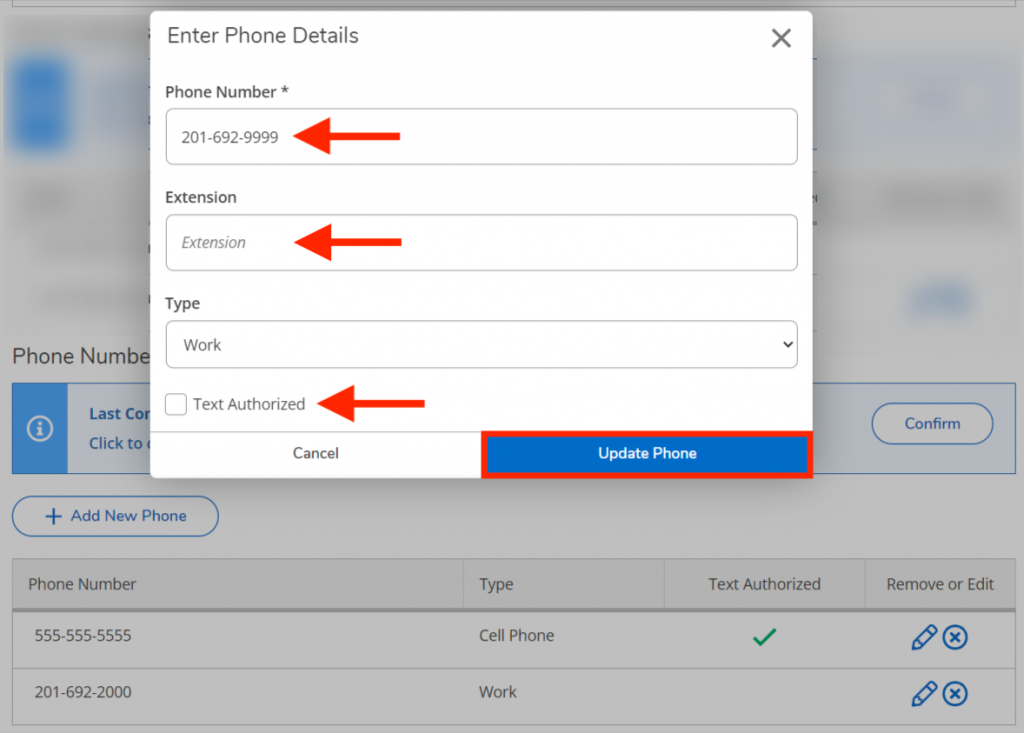
  1. If any of the numbers listed need to be corrected or updated, press the “Pencil” icon. Change the information that appears in the pop-up window and press “Update Phone”
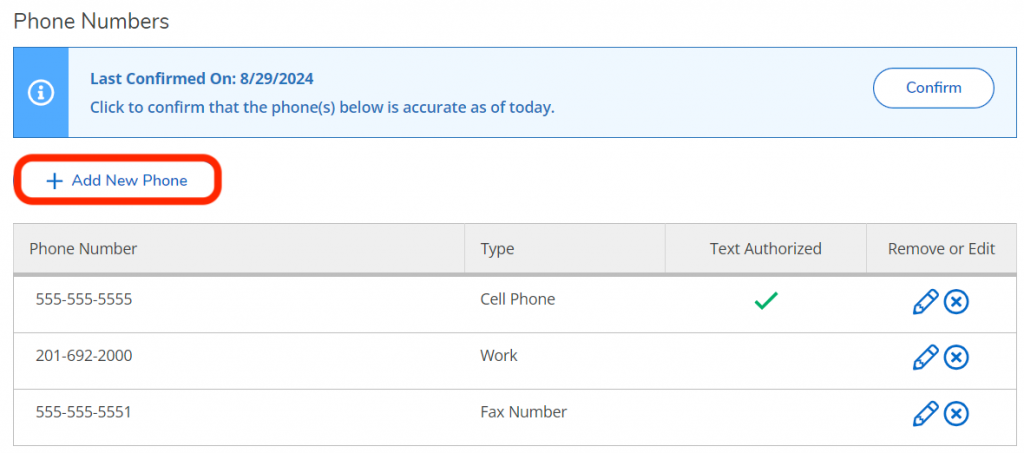
  1. If you need to add a new phone number to your record, press “+ Add New Phone”. In the pop-up window, fill in the number, and extension (if applicable), type, and select if you allow this number to be texted. Then press “Add Phone”

If you have any questions or need assistance,
please open a SAMI Support ticket, email selfserviceadmin@fdu.edu, or call (973)-443-8822.

Last Modified:

Sending an Encrypted File Using Email

Resources for:
icon Close

According to FDU’s Written Information Security Program (WISP), in no case should they be sending or storing WISP protected information without the explicit authorization of the Chief Information Security Officer (CISO). If approved, these instructions will provide you with guidance on the methodology.

Instructions for Windows

If you do not have a university issued laptop or desktop, you must download and install 7-Zip on your computer in order to proceed with the instructions. Please follow the following steps in order to download and install 7-Zip on to your personal device:

  1. Download 7-Zip:
  1. Launch the 7-Zip installer “7z1900-x64.exe” or “7z1900.exe

NOTE: The Installer file name may change as newer versions are released.

  1. Click “Yes” if asked to run an unknown app from User Access Control
  2. Click “Install” on the setup screen
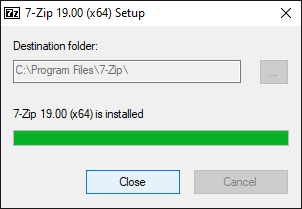
  1. 7-Zip will now install, when completed, click “Close

Preparing an Encrypted 7-Zip File

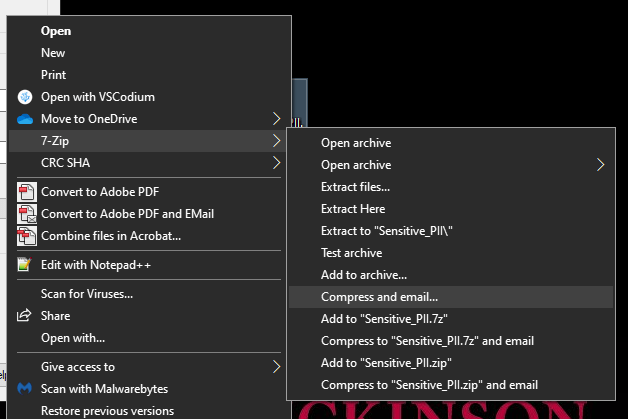
  1. Single “Right” click on the file
  2. Highlight “7-Zip
  3. Navigate and “Left” click on “Compress and Email…
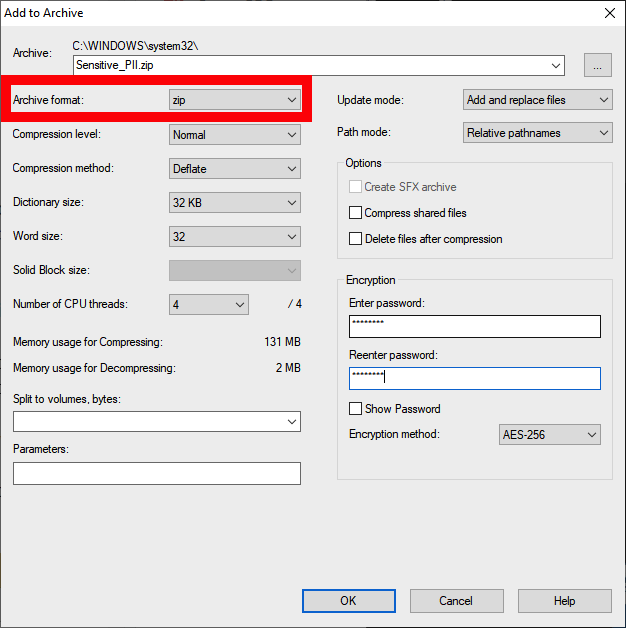
  1. Change Archive Format to “ZIP
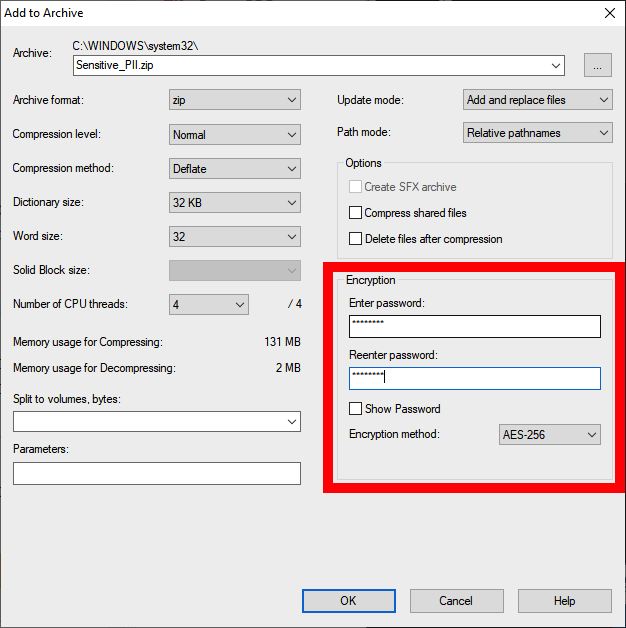
  1. Enter and Retype a password in the “Encryption Section” and check the box to “Encrypt file names
  2. Change the Encryption Method to “AES-256

NOTE: The password must be a complex password that contains the following:

  • At least one capital letter
  • At least 2 numbers 0-9
  • At least 1 special character (%, ^, &, ! , @ , !, ….)
  • Be at least 8 characters long
  1. Click “OK

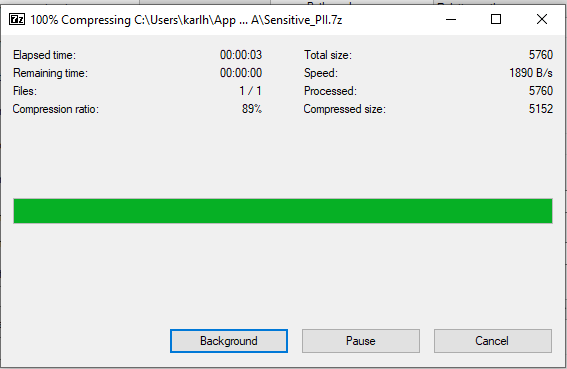
NOTE: A progress bar will open to encrypt and zip the file. Depending on the size of the file, this may take a few minutes.

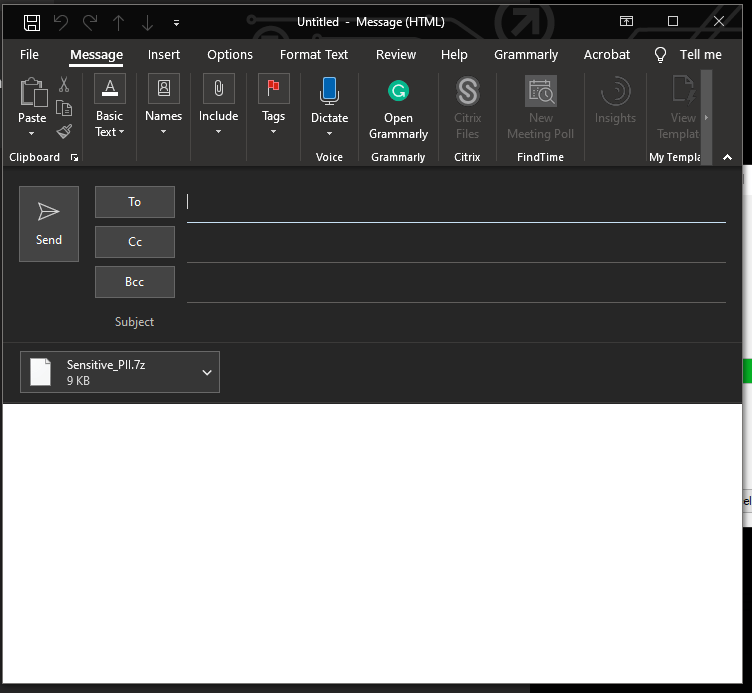
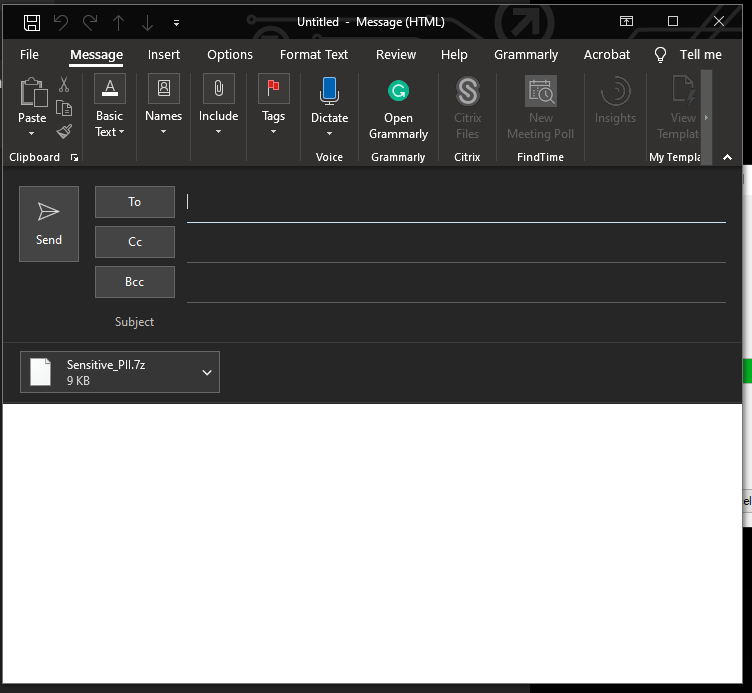
  1. An email message to compose your new email with the compressed and encrypted file will appear
  1. Address and compose your email as desired

CAUTION: Never send an email that contains both the password and file together. These must be sent separately.

  1. Compose and send a separate email, or place a phone call, to the receiving parties which contains the password for the compressed file for them to read

NOTE: Without the password, the receiving party will not be able to open and view the file.

Opening an Encrypted 7zip File

  1. Open the email that contains the encrypted file
  2. Click the arrow “V“’ and select “Save As
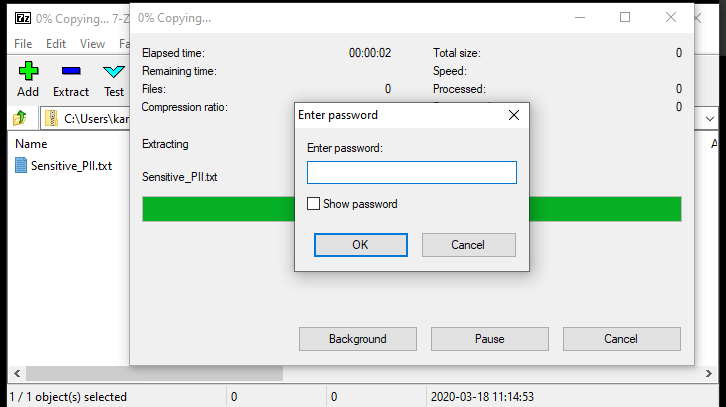
  1. From the saved location open the encrypted file
  2. Enter the password provided to you from the sender

Once the password is entered correctly, the enclosed document will then load, and you can make any changes and save inside the protected file. If needed, the file can be returned to the sender with needed information.

NOTE: The Archive Window must not be closed if making any changes that need to be saved.

IMPORTANT: After the document is no longer needed, the encrypted file should be SECURELY DELETED from your hard drive. At no time should this be saved for later use.

Instructions for macOS

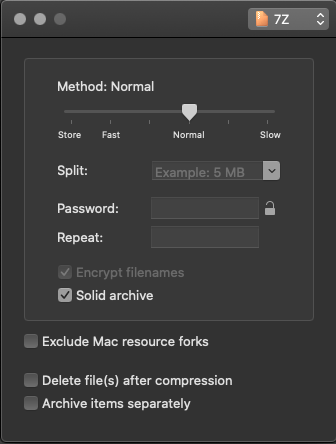
  1. Download Keka:
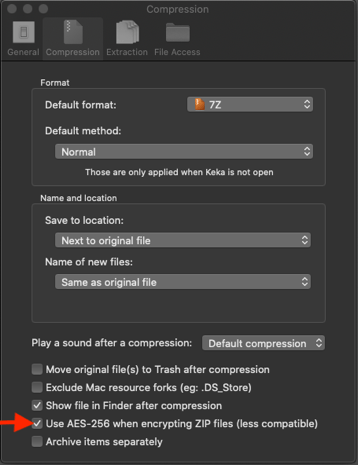
  1. Open Keka Preferences and check the box next to Use AES-256 when encrypting ZIP files (less compatible)
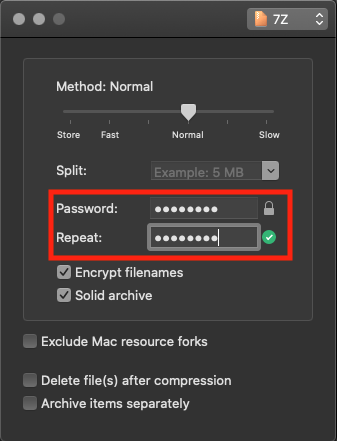
  1. Set a password for the file
  1. Drag your file onto Keka to compress and encrypt. The encrypted file will be placed next to the original file
  2. If you need to extract an encrypted file, simply drag it onto the Keka window and enter the file password in the prompt. The file will be extracted in the same location as the original
Last Modified:

Setting up and Accessing the FDU VPN Client

Resources for:
icon Close
Download and Install The FDU VPN Client

FDU’s VPN Client Software, is also known as the “Cisco AnyConnect Secure Mobility Client”.

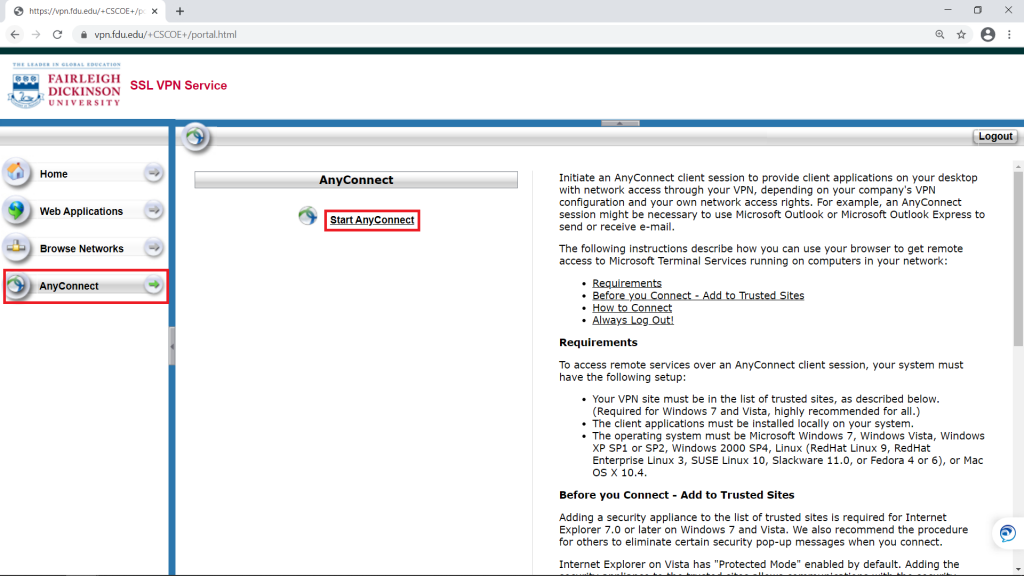
  1. Use any web browser (Google Chrome, Mozilla Firefox, Safari) to navigate to vpn.fdu.edu. Please refrain from using the Internet Explorer web browser when installing the FDU VPN Client
  1. Select your role within the University from the Group pulldown menu and enter your NetID Information in the username and password fields (user@fdu.edu)
  1. On the left-hand side menu, click on “AnyConnect“, then click on “Start AnyConnect”
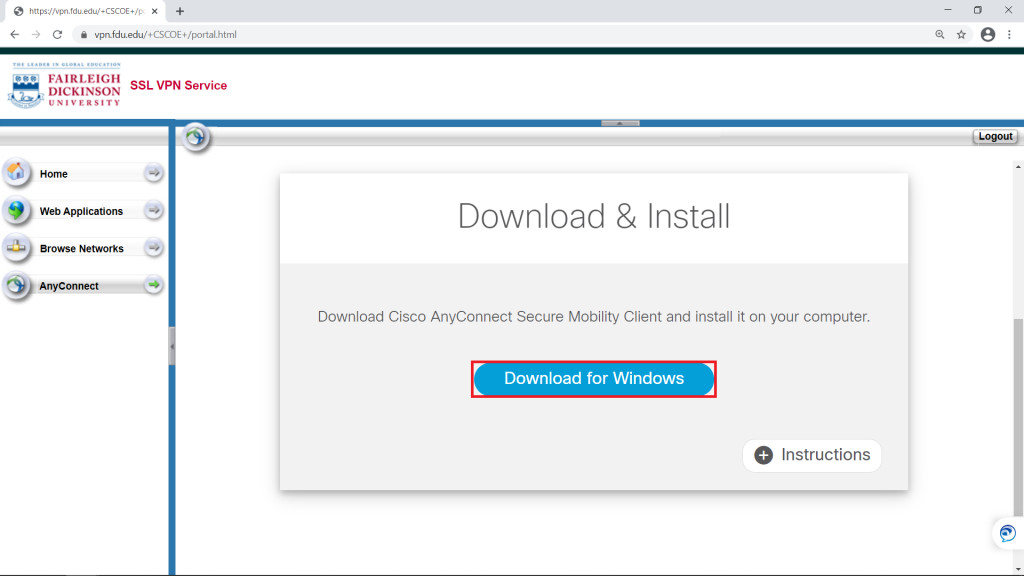
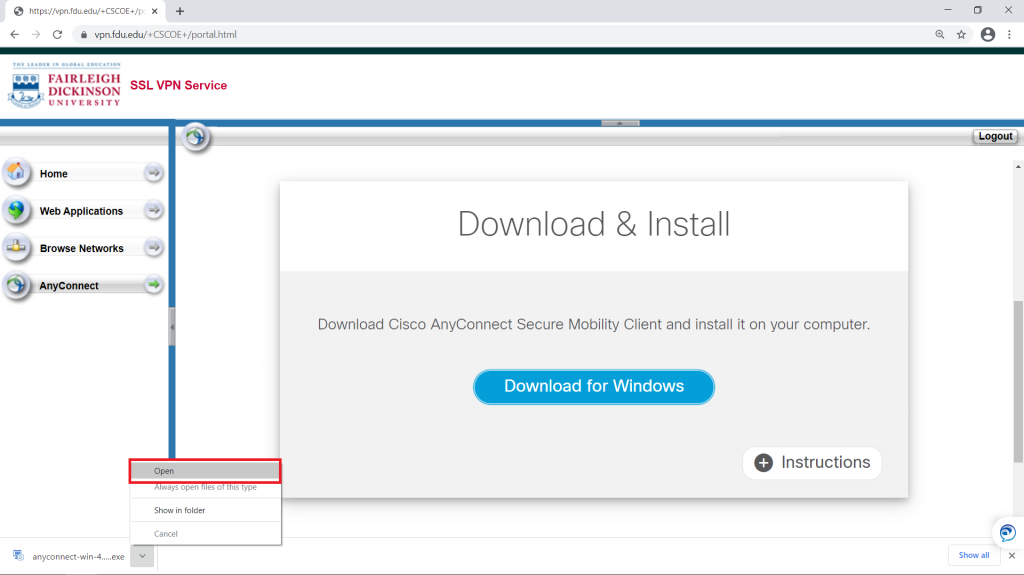
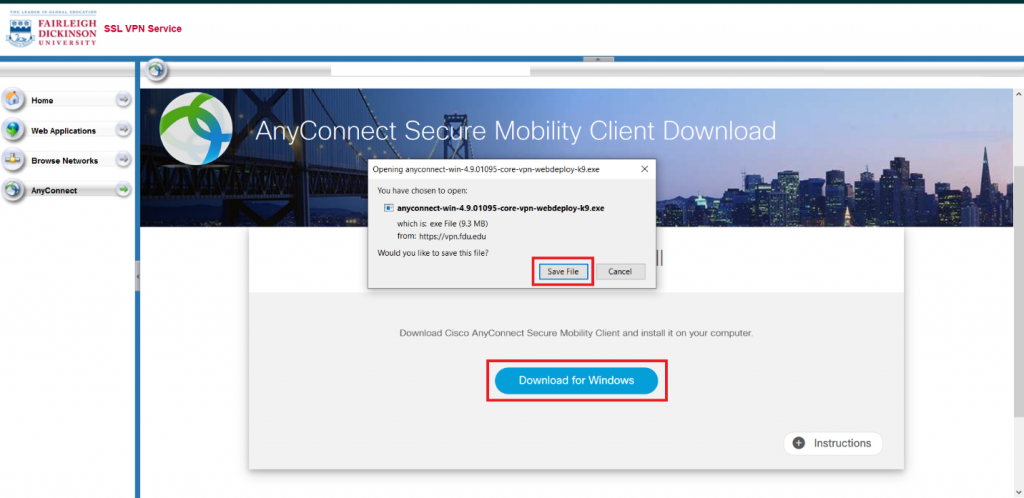
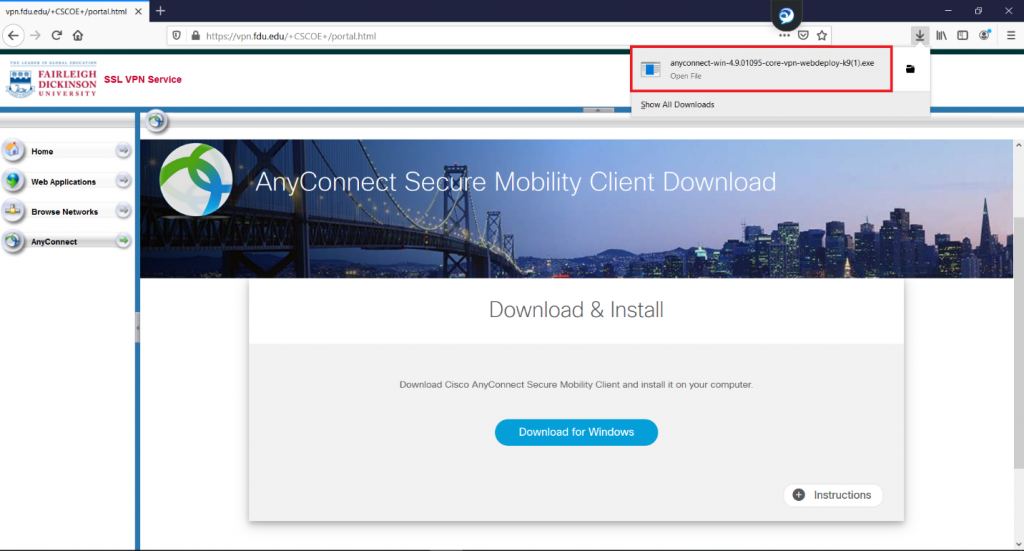
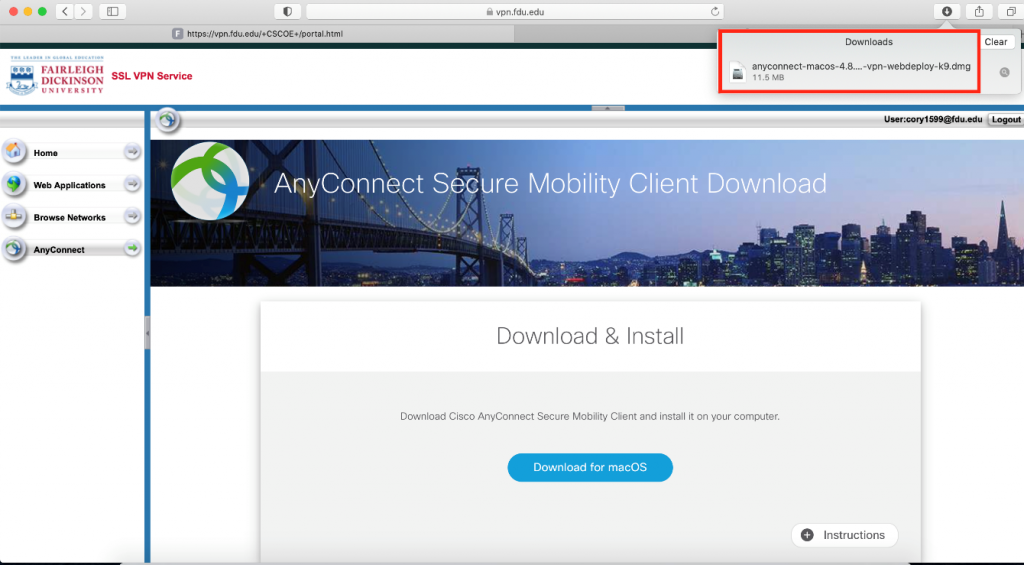
  1. Download the VPN applet by clicking on “Download for Windows” or “Download for macOS” depending on your operating system. The browser will then download the VPN software client. When finished downloading, click on the file and select “open” within your browser

Chrome

Firefox

Safari

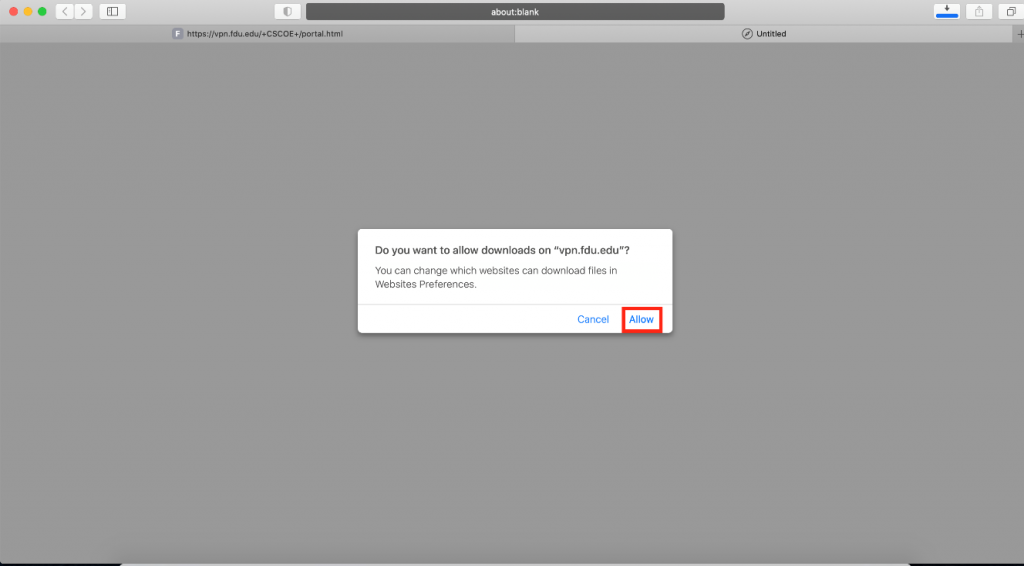
The browser will open a new window asking for permission to download the applet, click on “Allow”. When finished downloading, double click on the file to open the installation package and start the installation process.

  1. Follow the steps prompted to accept all changes and grant requested permissions to install FDU VPN software. Note, Java Runtime Environment software may also need to be installed. A copy of the software download will be prompted to be installed or can be accessed using the link below:
  1. The installation will continue, and an icon for the “Cisco AnyConnect Secure Mobility Client” with a “lock” icon will appear in your system tray once the installation is complete
close
Configuring The FDU VPN
  1. Log into your computer
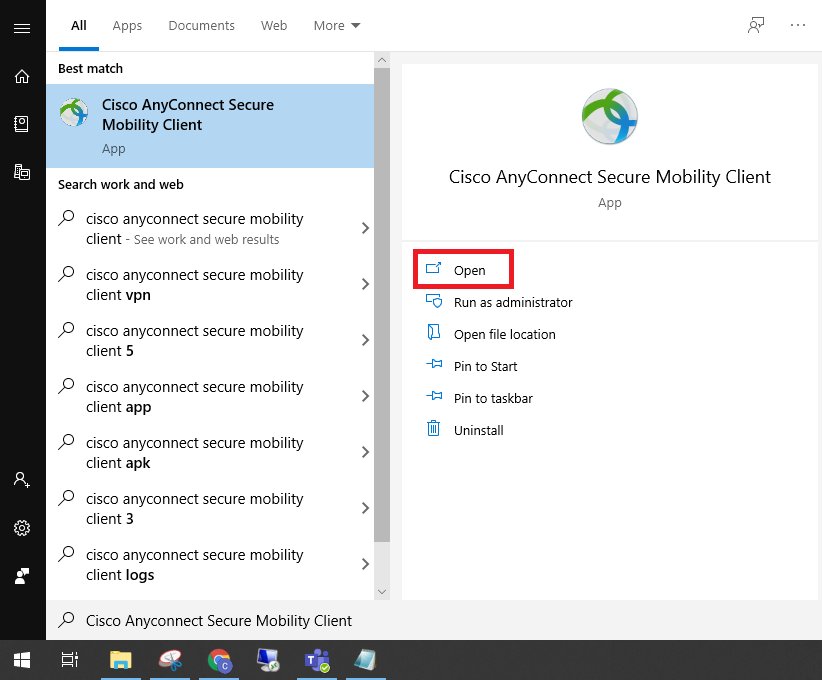
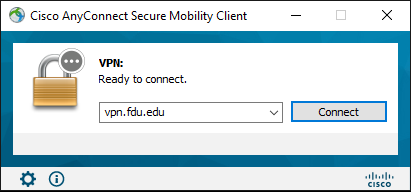
  1. Launch the Cisco AnyConnect Secure Mobility Client from the Start Menu. Ensure the address “vpn.fdu.edu” is entered into the corresponding text box and then press the “Connect” button
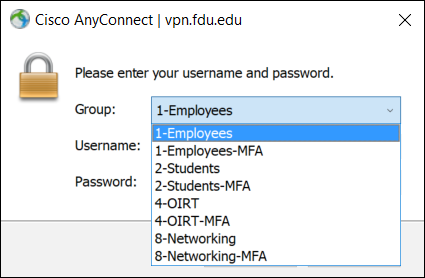
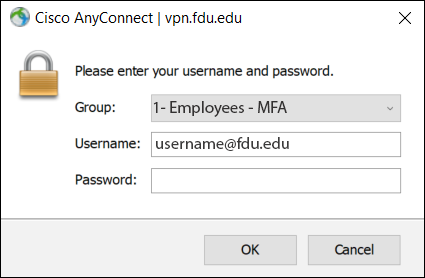
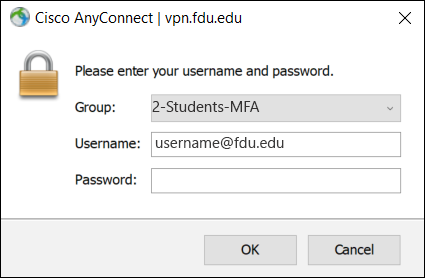
  1. Select your correct Group name on the dropdown menu, then enter your FDU NetID username and current FDU NetID password in the corresponding boxes. Click “OK
Dropdown Options
Example for Employees
Example for Students
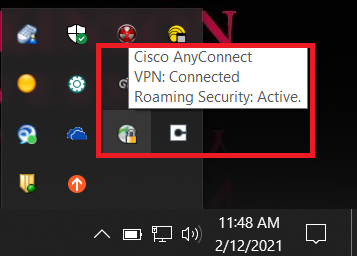
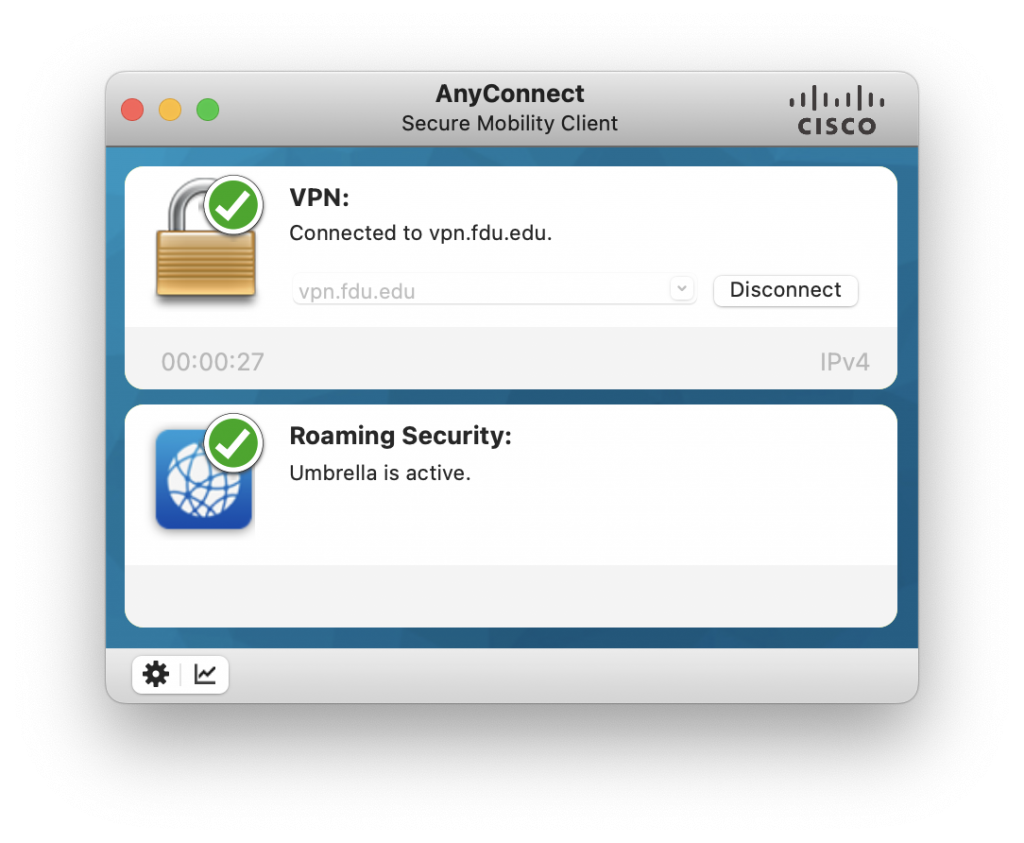
  1. Ensure a successful connection was made by checking on your system tray at the bottom right portion of your screen, or if on macOS, the client application window will display a screen check over the lock icon
Windows
macOS
close
Logging into The FDU VPN

The following instructions are the same for both Windows and macOS users.

  1. Register with Duo MFA
  • If you are an existing Duo user, please skip to Step 2
  • For new Duo users, please follow the guide below for registering your DUO Account
  1. Launch the “Cisco AnyConnect Secure Mobility Client” from the Start Menu or your Mac’s application folder if on macOS
  1. Ensure the address “vpn.fdu.edu” is entered into the corresponding text box and then click the “Connect” button
  1. Select your correct Group name on the dropdown menu
  1. Enter your FDU NetID username and current FDU NetID password in the corresponding boxes. Click “OK
Example for Employees
Example for Students
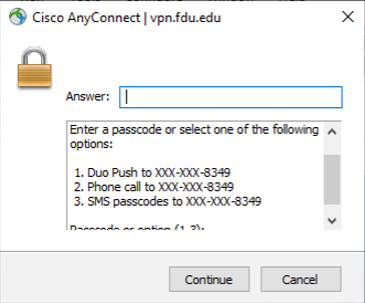
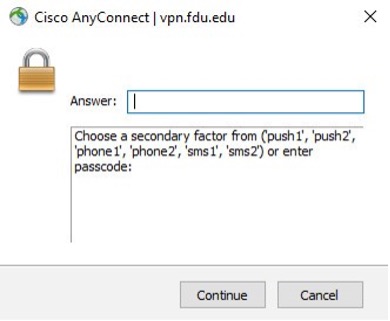
  1. In response, you’ll receive the Duo challenge dialog box. To use the preferred method type push in the Answer: dialog box, then click “Continue
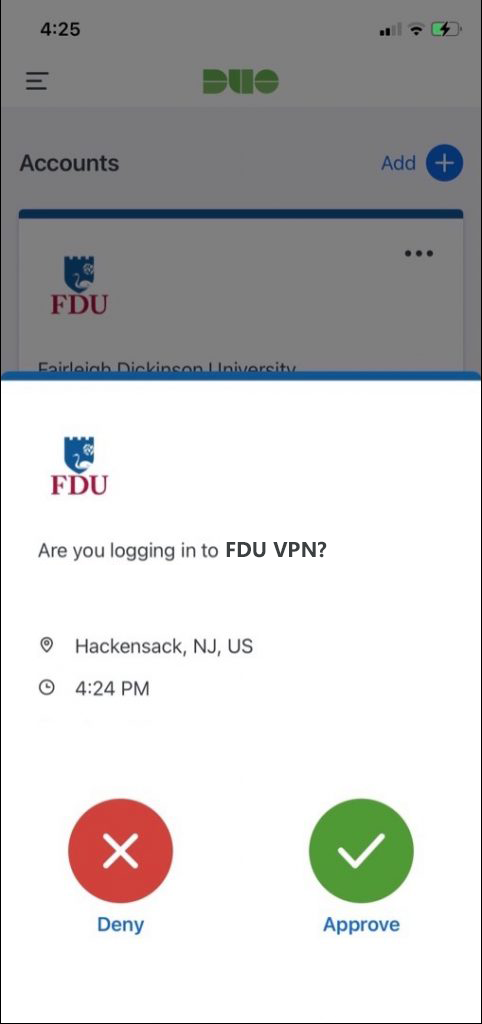
  1. Tap “Approve” on the Duo login request received at your phone
  1. Ensure a successful connection was made by checking on your system tray at the bottom right portion of your screen, or if on macOS, the client application window will display a screen check over the lock icon
Windows
macOS

Additional DUO Information

Users with multiple registered Duo devices will need to enter push1 for their primary device or push2 for their backup device. If you are unsure which device is your primary or secondary device, open the Duo Mobile app on your mobile device, click Fairleigh Dickinson University and enter the passcode displayed.

Additional DUO Authentication Options

TypeInstructions
Push (Preferred)Push a login request to your phone (if you have Duo Mobile installed and activated on your iOS or Android device). Review the request and tap “Approve” to log in.
PasscodeOpen the Duo Mobile App. Tap “Fairleigh Dickinson University” and the passcode will be displayed, or call the Fairleigh Dickinson University Technical Assistance Center (UTAC) for a passcode.
PhoneHave Duo call your phone to authenticate your login.(Users with multiple devices will need to include a number indicating desired device i.e. Phone2). This option is only available to Faculty, Staff and approved Students.
SMSHave Duo text a passcode to your phone. (Users with multiple devices will need to include a number indicating desired device i.e. SMS2).

NOTE: This option is only available to Faculty, Staff and approved Students.

Additional Resources for Cisco DUO

close
Last Modified: