Explore our comprehensive IT resource library to discover a wealth of helpful information tailored to your needs. Utilize our filters to refine your search by role at FDU, department, or specific service for a more personalized experience.
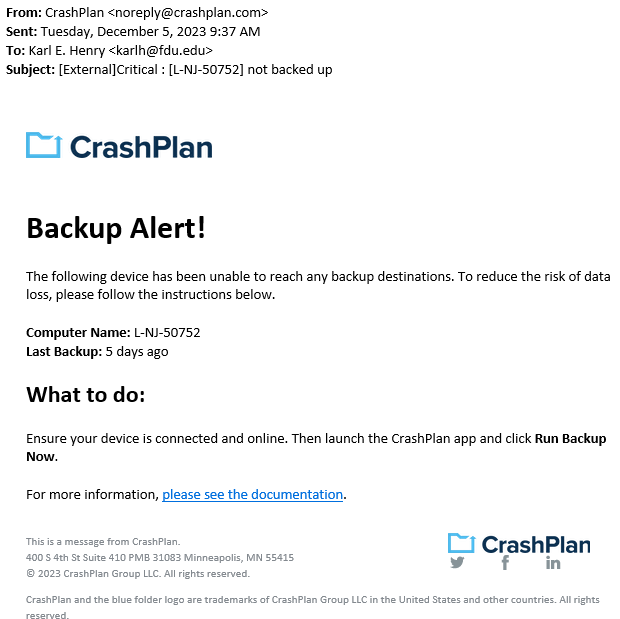
CrashPlan Backup will send users an email alert notifying them of any incomplete backups of their devices.
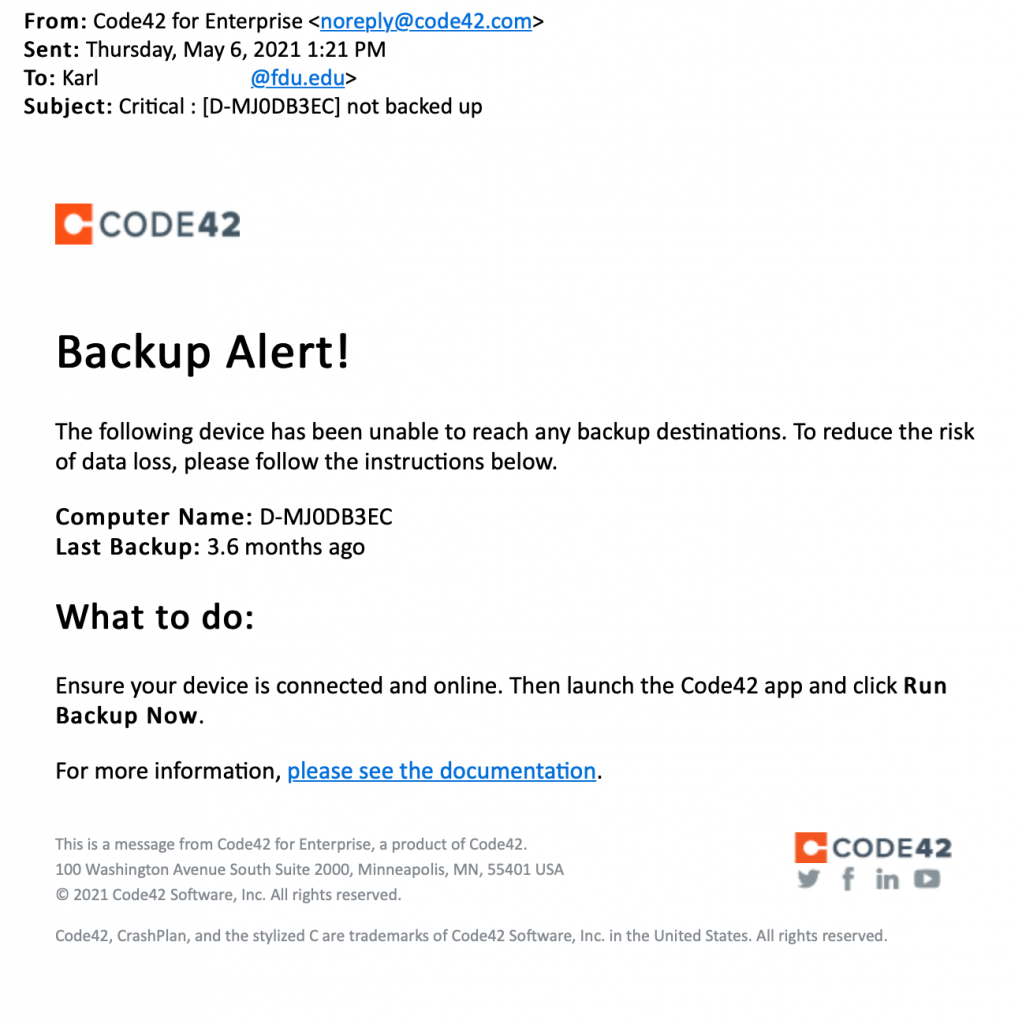
The CrashPlan Backup email alert will be sent from “CrashPlan <noreply@crashplan.com>”
The Subject line of the email will be labeled with: “[External]Critical: [Name of Device] not backed up“
Backup Alert
You will receive an alert when your computer hasn’t backed up to CrashPlan for 5 calendar days. The email will look like the example below:
CrashPlan Backup Alert Email Notification
What to do if you get a backup alert
After receiving a CrashPlan Backup alert email, you should locate the device the email specifies in need of backup. The CrashPlan Backup device name will be listed in the Subject: line and Computer Name: line of the CrashPlan backup alert email.
For Windows Devices
To locate the name of a CrashPlan Backup device:
Click the CrashPlan Backup icon in the Windows System Tray, also referred to as the notification area.
CrashPlan Backup icon
Click “Run Backup now“
Tip
The Windows System Tray or notification area is usually located on the bottom right of the Windows taskbar, next to the displayed digital clock.
Ensure the CrashPlan backup application displays the same name as the CrashPlan Backup alert email you received.
close
For macOS Devices
After locating the correct specified device stated in the CrashPlan backup alert email, force a backup of the device by performing the following:
Click the “CrashPlan Backup” System Tray or macOS menu bar Icon
CrashPlan Backup Icon
Click “Run Backup now“
Note
The backup may take some time to complete. This depends on the length of time since CrashPlan Backup’s last completed backup and the amount of new data that needs to be backed up.
CrashPlan is a backup agent that will back up all data on a university device under the primary owner’s profile. The backup sets can be used for restoring data to a machine, whether it has been reformatted, replaced, or compromised. This document will outline the steps needed to install, activate, and restore data to a new or existing device.
CrashPlan is required on all University provided desktops and laptops to backup all University Business data to prevent data loss.
Who Can use CrashPlan?
CrashPlan is presently licensed for full-time faculty and full-time staff only. The University mandates CrashPlan for proper data security practices. If a user has personal data that they wish to exclude from being backed up, a folder labeled “Personal Documents” can be found and utilized in your “Documents” folder. This folder and its contents will be ignored by CrashPlan when your system is being backed up.
Personal Documents folder locations:
Windows PC
C:\users\username\Documents\Personal Documents\
macOS
/users/username/documents/Personal Documents/
Tip
If the Personal Documents folder does not exist in your Documents folder, you can manually create it and the folder will be automatically ignored by CrashPlan.
Is My Data Secure?
CrashPlan uses AES-256 encryption is used when storing your backups and can only be accessed by theCrashPlan account owner and administrators.
What is Backed Up?
All data found in a user profile will be backed up by CrashPlan.
Location of User Profile:
Windows PC
C:\users\UserName\
macOS
/users/username/
Warning
Any data not stored in the user profile will NOT be backed up by CrashPlan. It is highly encouraged to store university business data within your user profile.
To install CrashPlanon your Windows PC, please follow the instructions below.
Note
CrashPlan is being automatically deployed to all systems owned by Faileigh Dickinson University.
Before Installing CrashPlan, you must be logged in as the owner of the machine using your NetID Credentials.
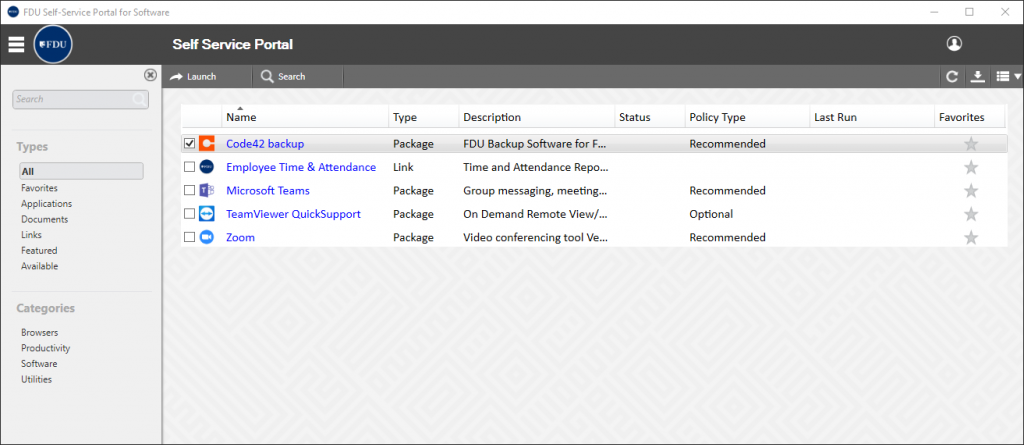
Open FDU Self Service Portal for Software on your University PC
Click on CrashPlan Backupand then click “Install” on the right-hand side
Note
It could take several minutes for the client to make the first connection and start the first backup.
The entire process will take approximately 5-7 minutes, depending on your internet speed. Once CrashPlanis installed, your account is automatically provisioned in the CrashPlansystem, and your backup will begin shortly.
To install CrashPlan on your macOS device, please follow the instructions below.
Note
CrashPlan is being automatically deployed to all systems owned by Faileigh Dickinson University.
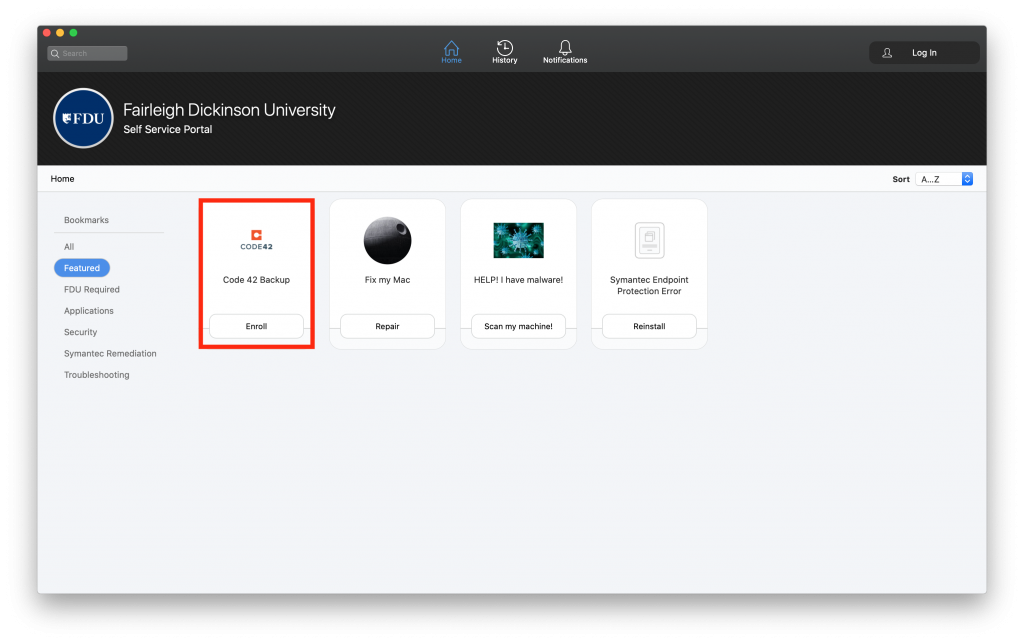
Locate the FDU Self Service Portal in your applications folder or locating the icon on your dock
Locate CrashPlan Backup and click “Enroll”
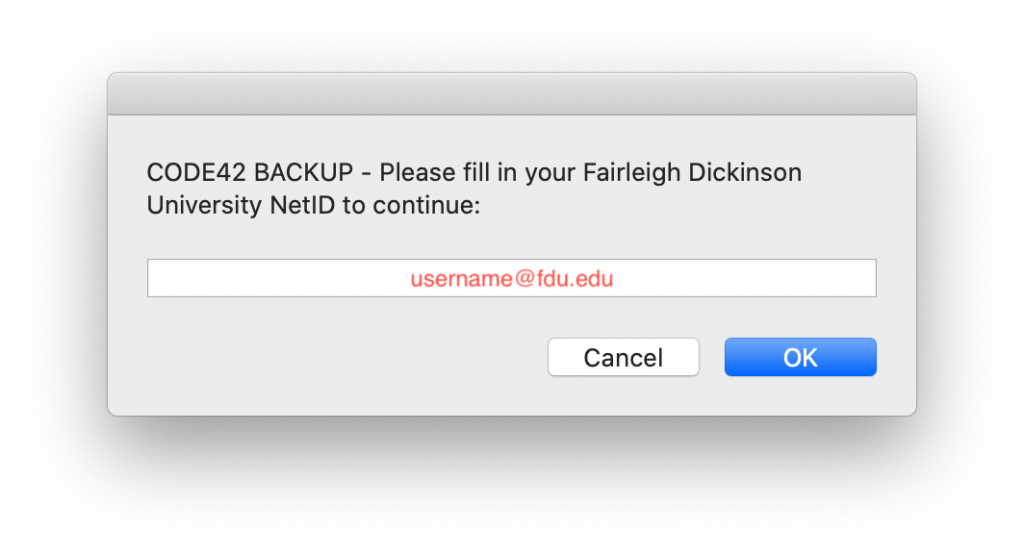
After the package installs, you will be prompted to enter your FDU email address and then click “OK“
Note
It could take several minutes for the client to make the first connection and start the first backup.
The entire process will take approximately 5-7 minutes, depending on your internet speed. Once CrashPlan is installed, your account is automatically provisioned in the CrashPlan system, and your backup will begin shortly.
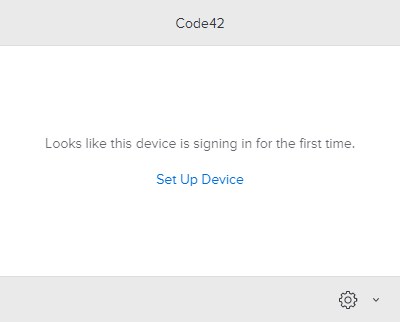
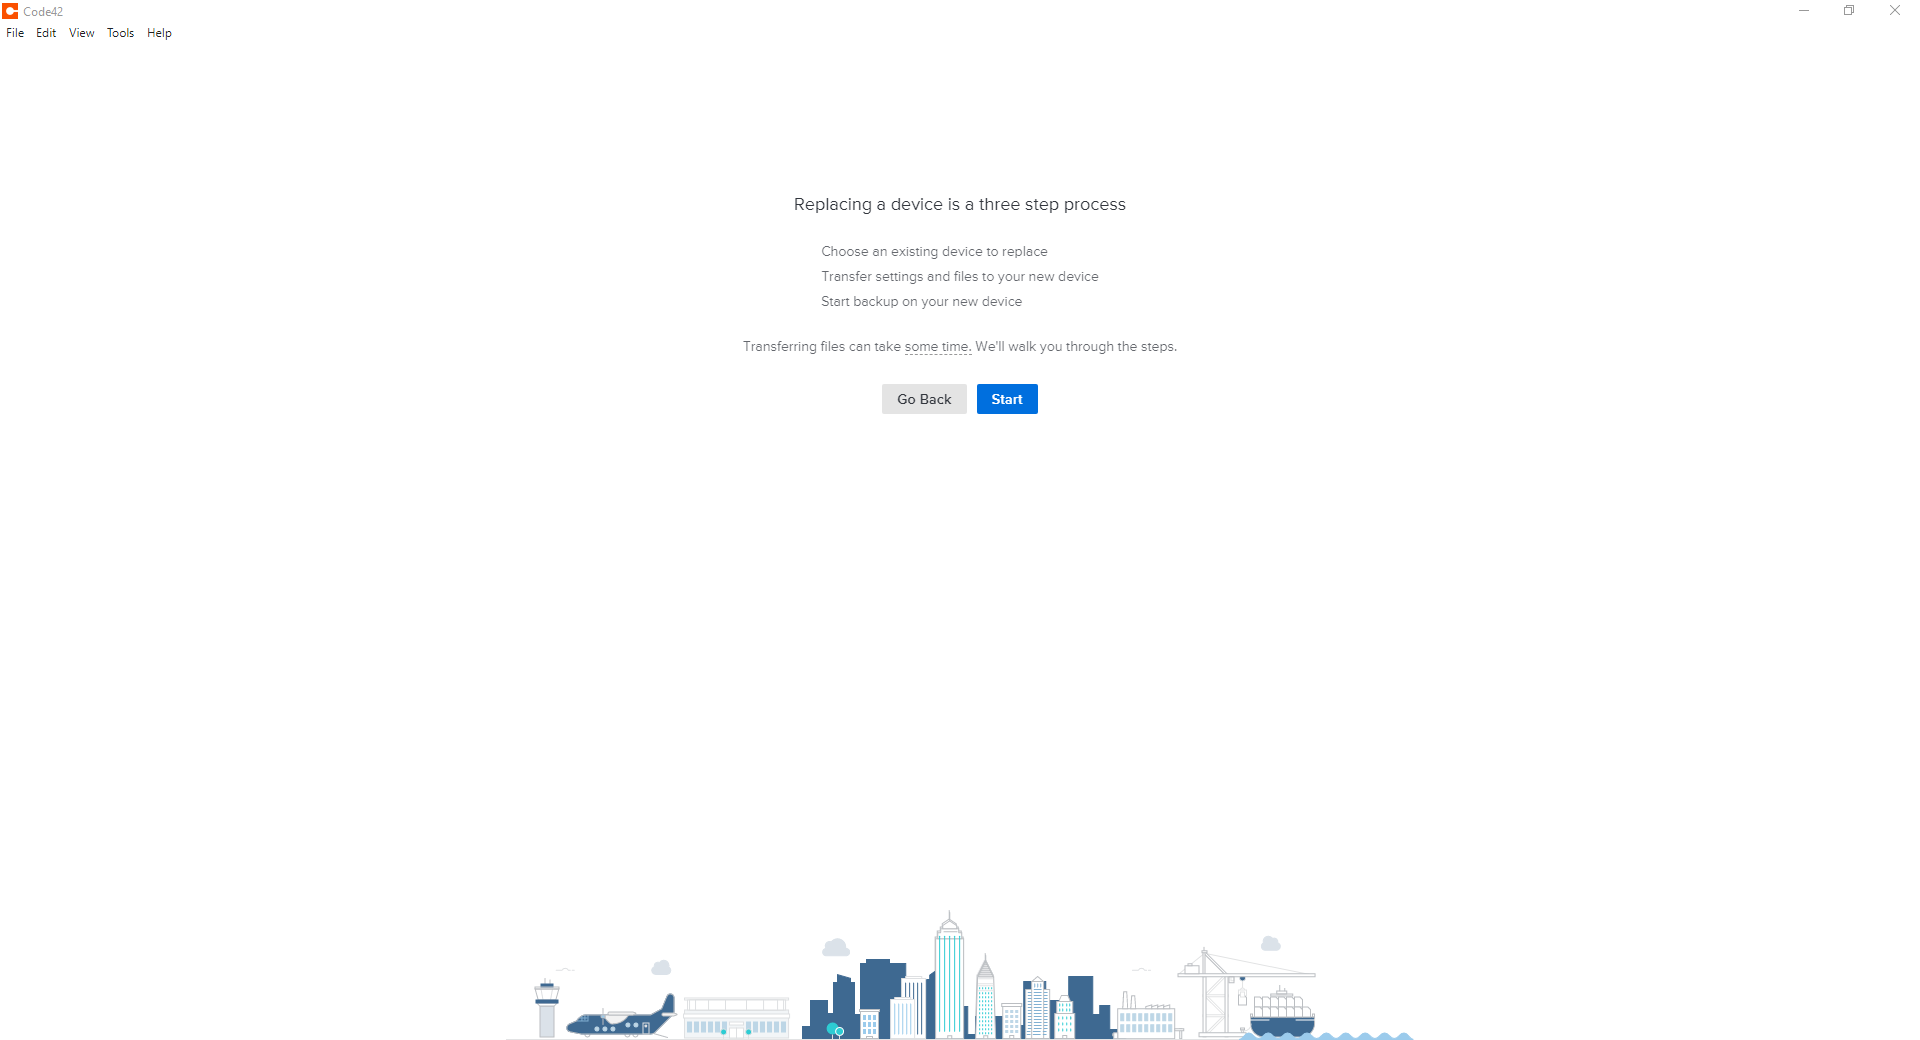
This process is used when someone will be assigned a second device and wishes to have it backed up or if the CrashPlan needs to be re-installed on the same device. Because an account already exists, it cannot be provisioned automatically. It must be manually setup either to replace an existing device or create a new backup set on the second computer.
Note
In order to proceed, CrashPlan must be installed prior to continuing, please refer back to the Install instructions for your operating system from the CrashPlan User Guide. A link is found at the bottom of this page.
Tip
A backup set is CrashPlan’s way of describing the backup configuration and what files are being backed up.
Click on the CrashPlan app in the system tray (PC) or Menu bar (macOS) and then click “Setup Device”
If prompted, log in to the FDU NetID Portal and proceed through the FDU single sign-on process
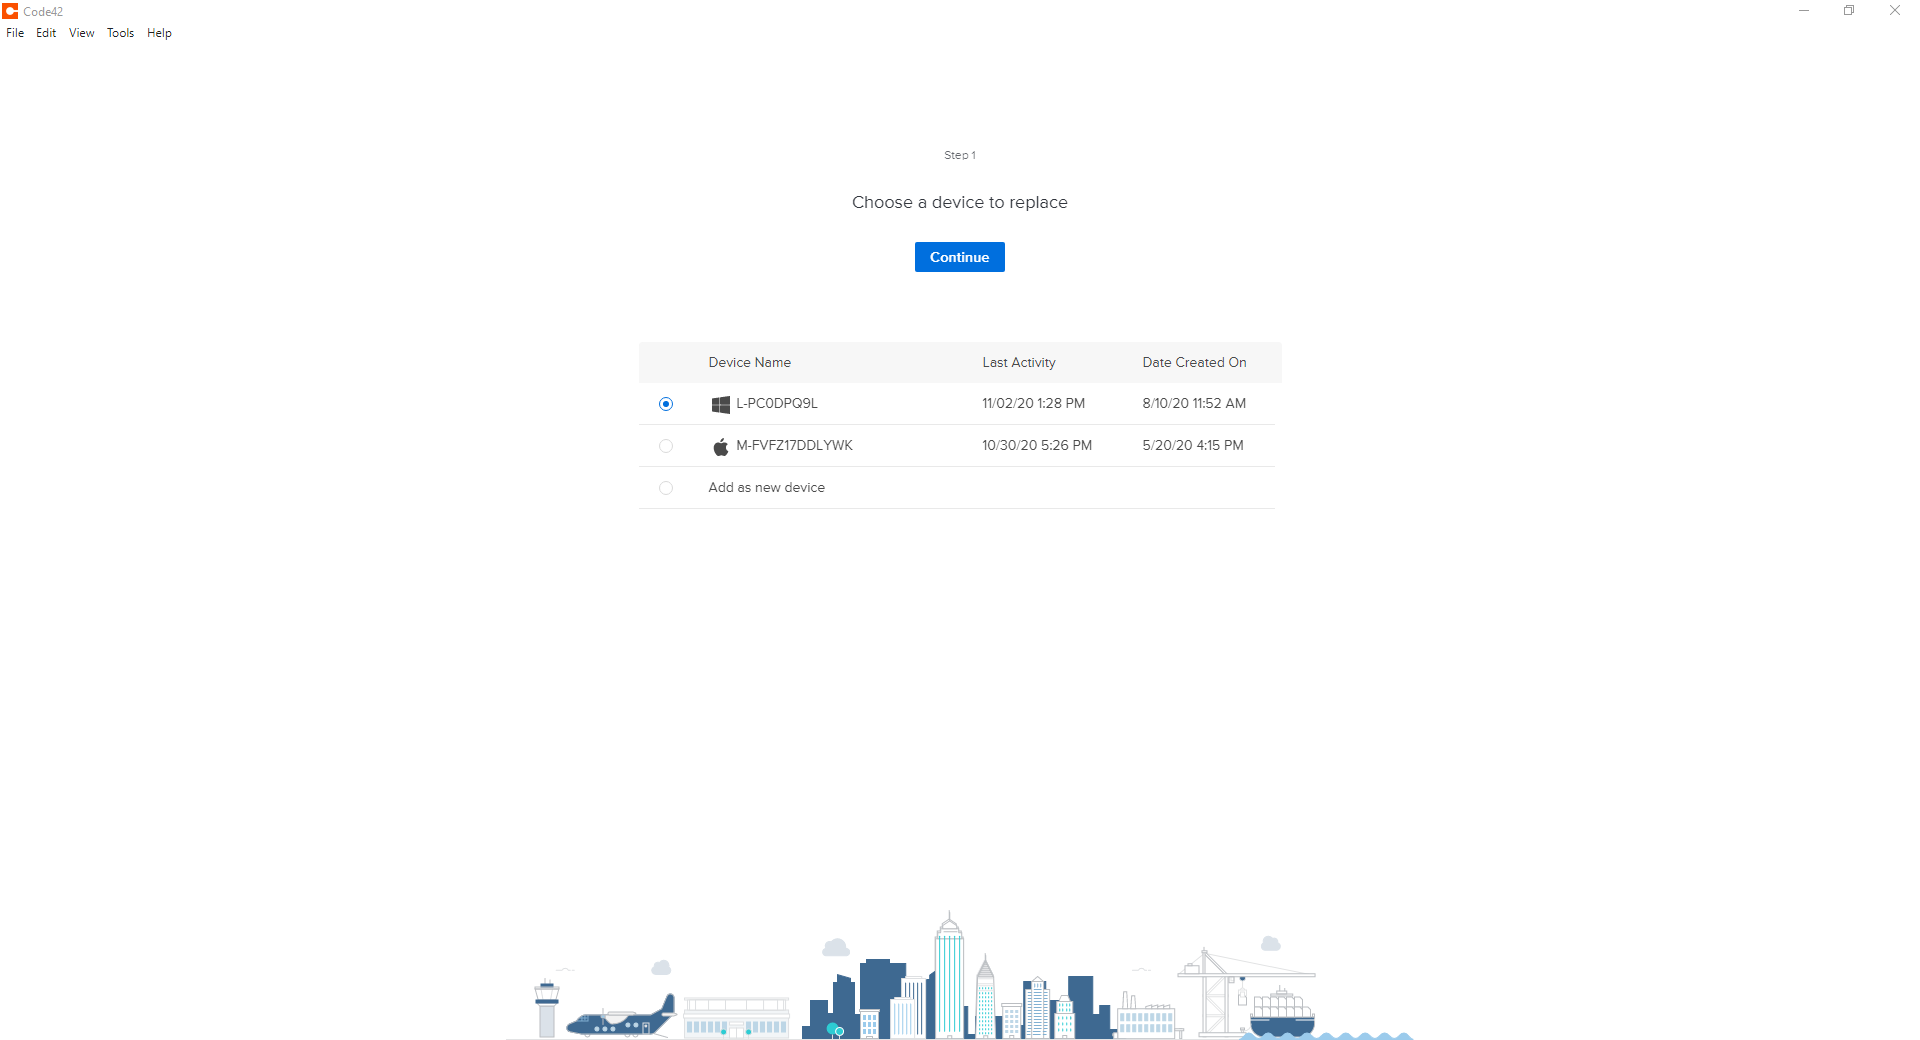
Click “Replace Existing”
Click “Start” to continue with the replace existing device process
Select the device from the list you are replacing and click “Continue”
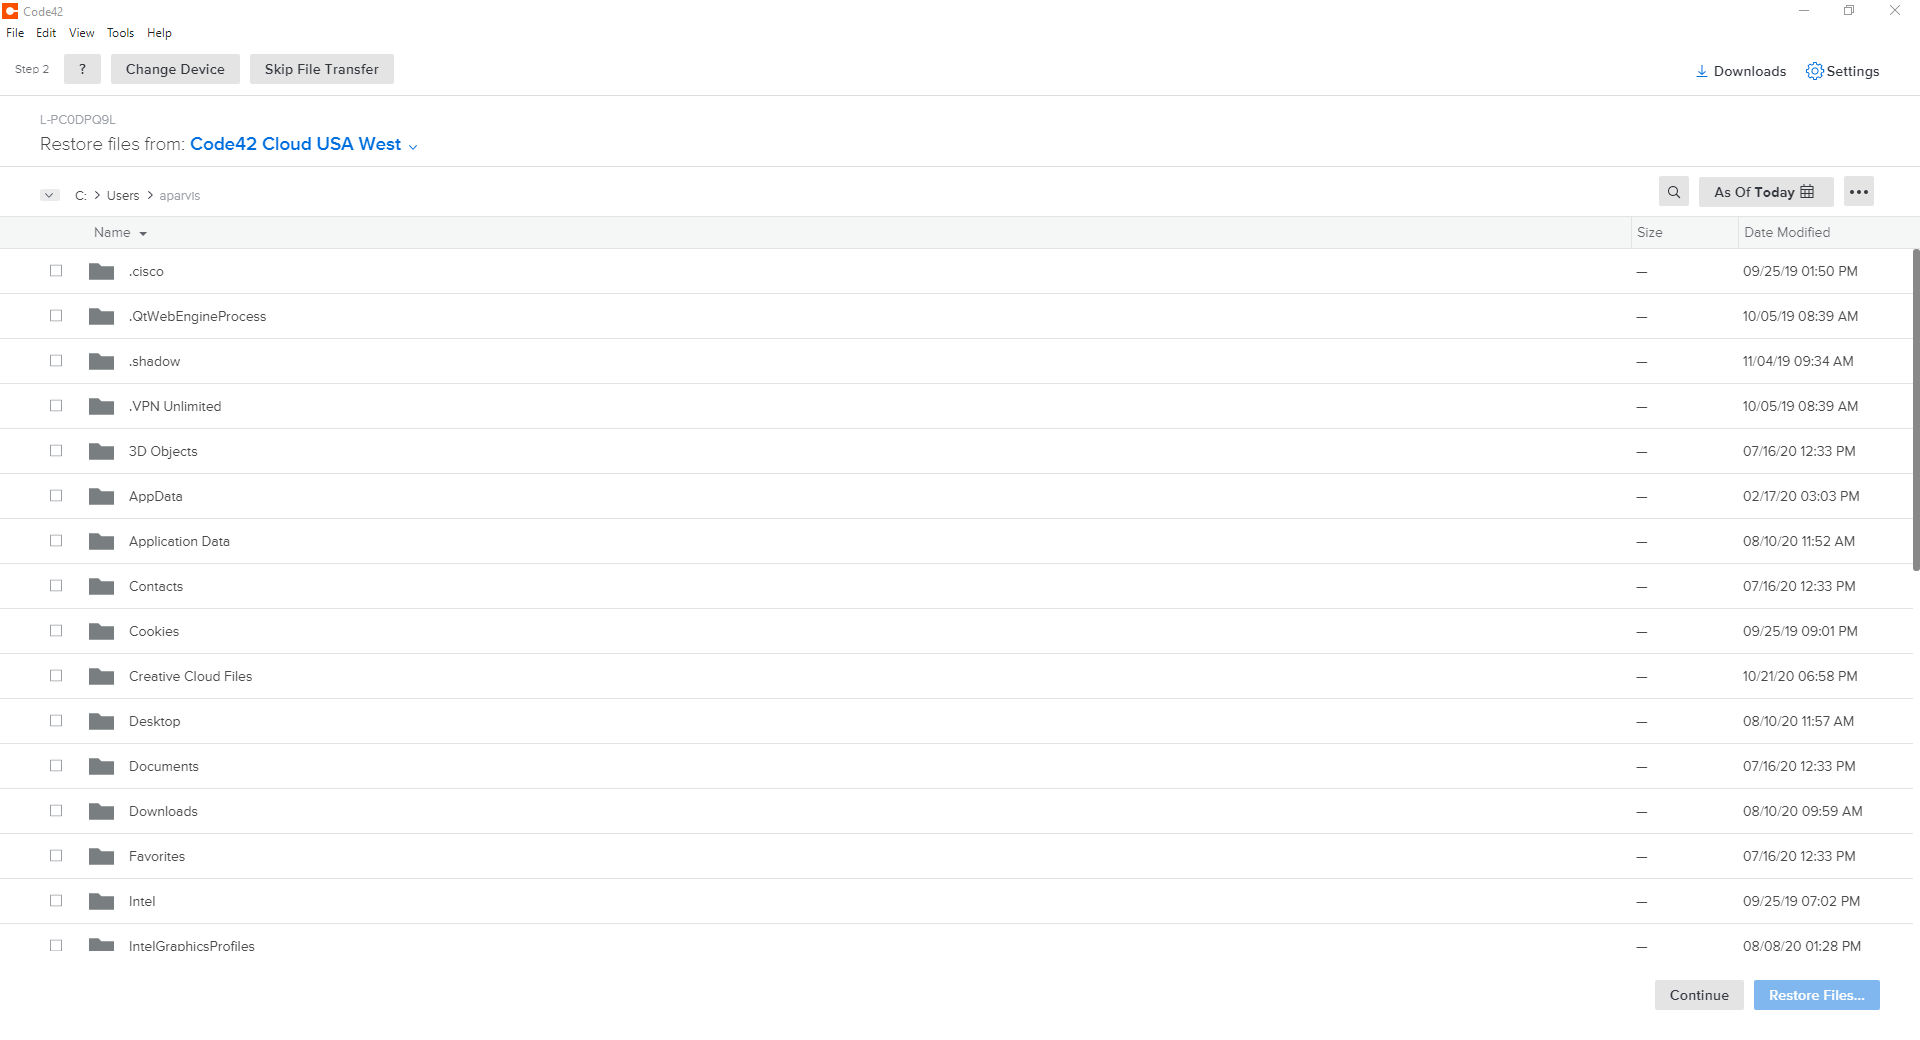
Click “Select Files” on the following window
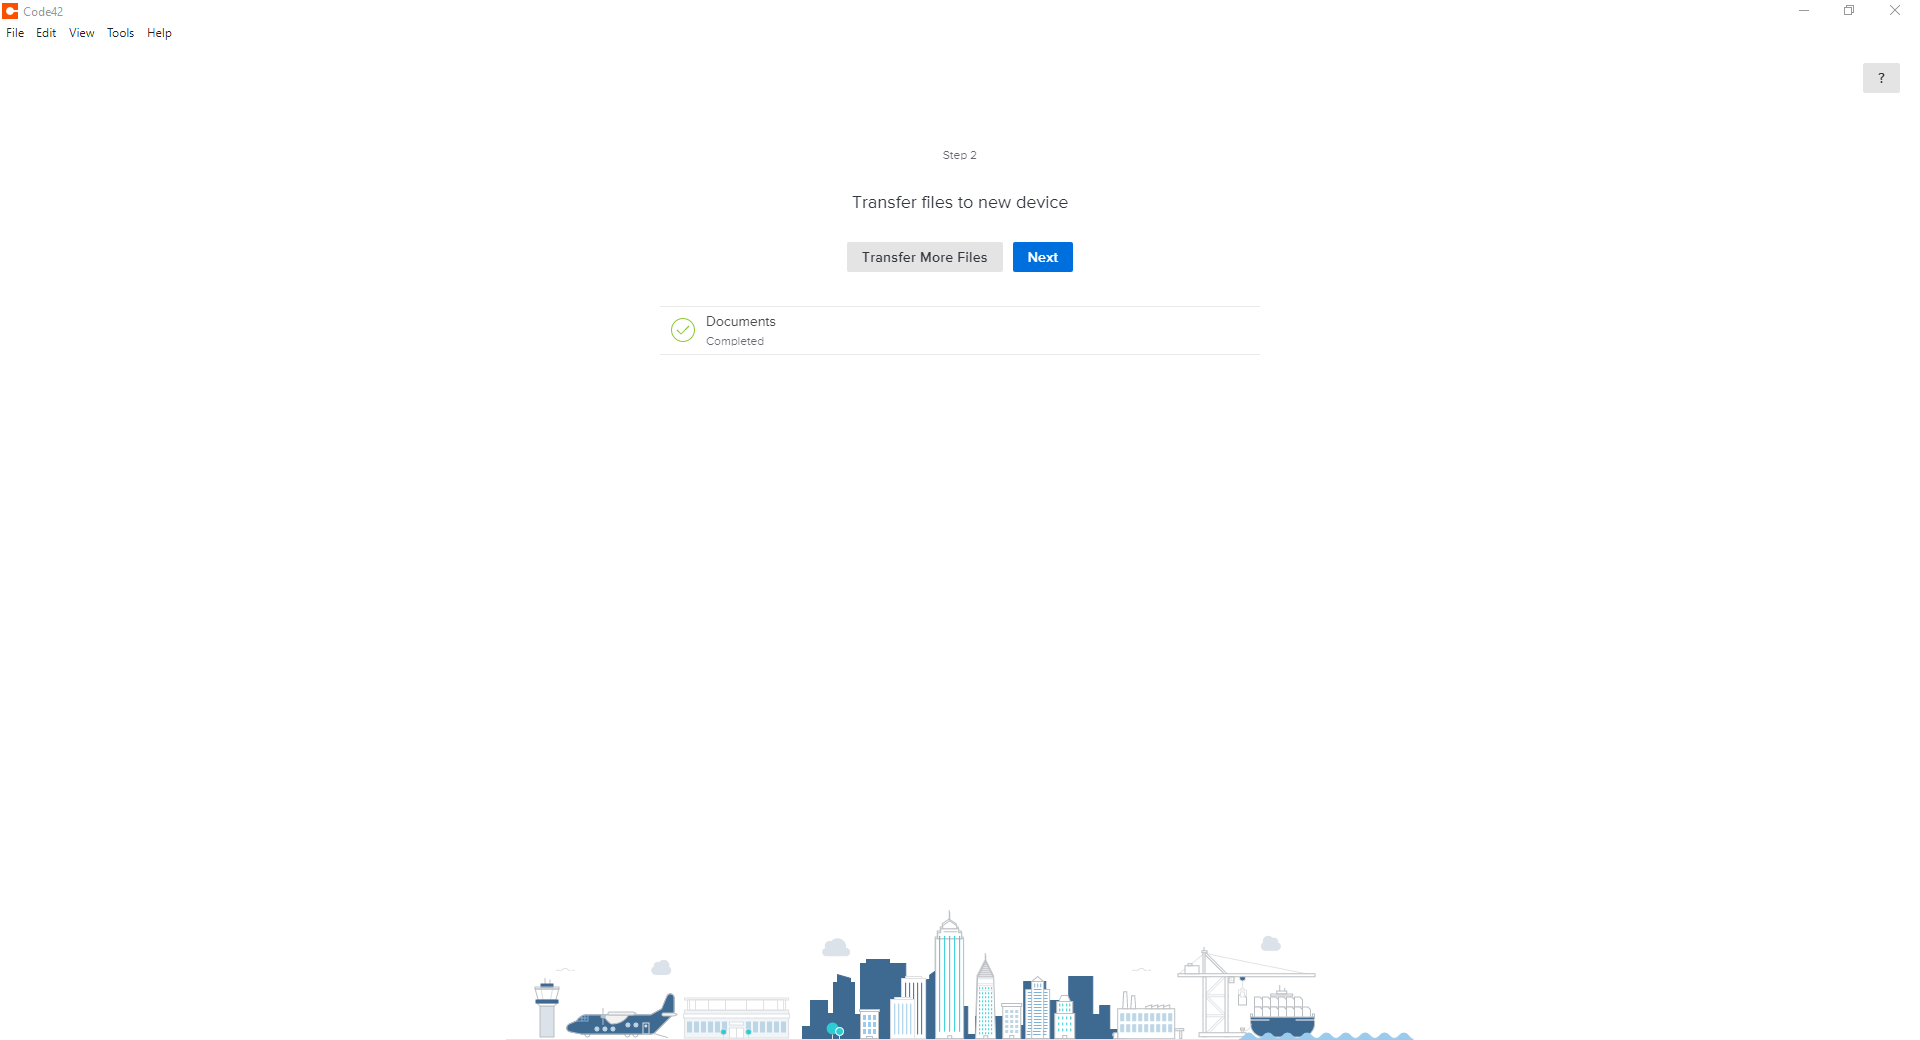
Select and Choose which files you wish to replace by placing a checkmark next to each. When finished, click “Restore Files”
The next window will allow you to select how you wish to restore your files. Make your selections and click “Go”
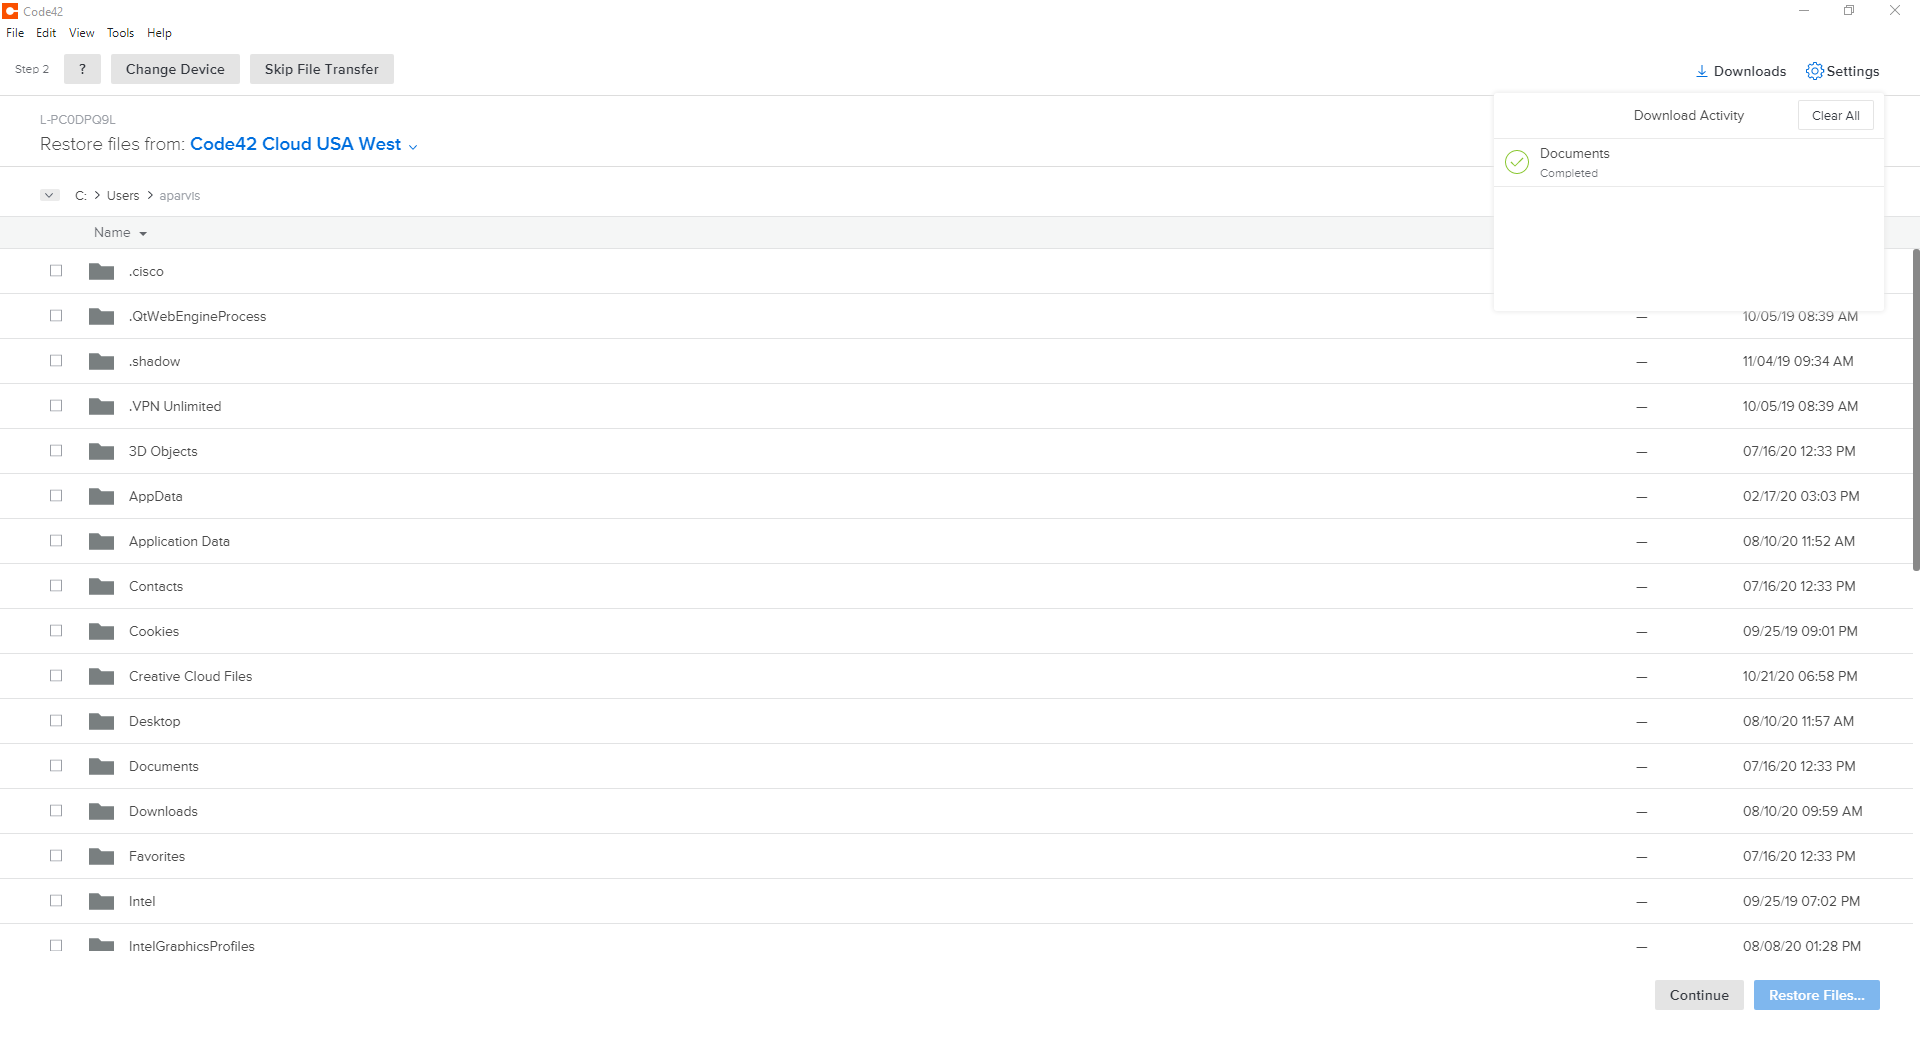
The next window will display download progress for the restore process. You can continue forward by clicking “Continue” at the bottom
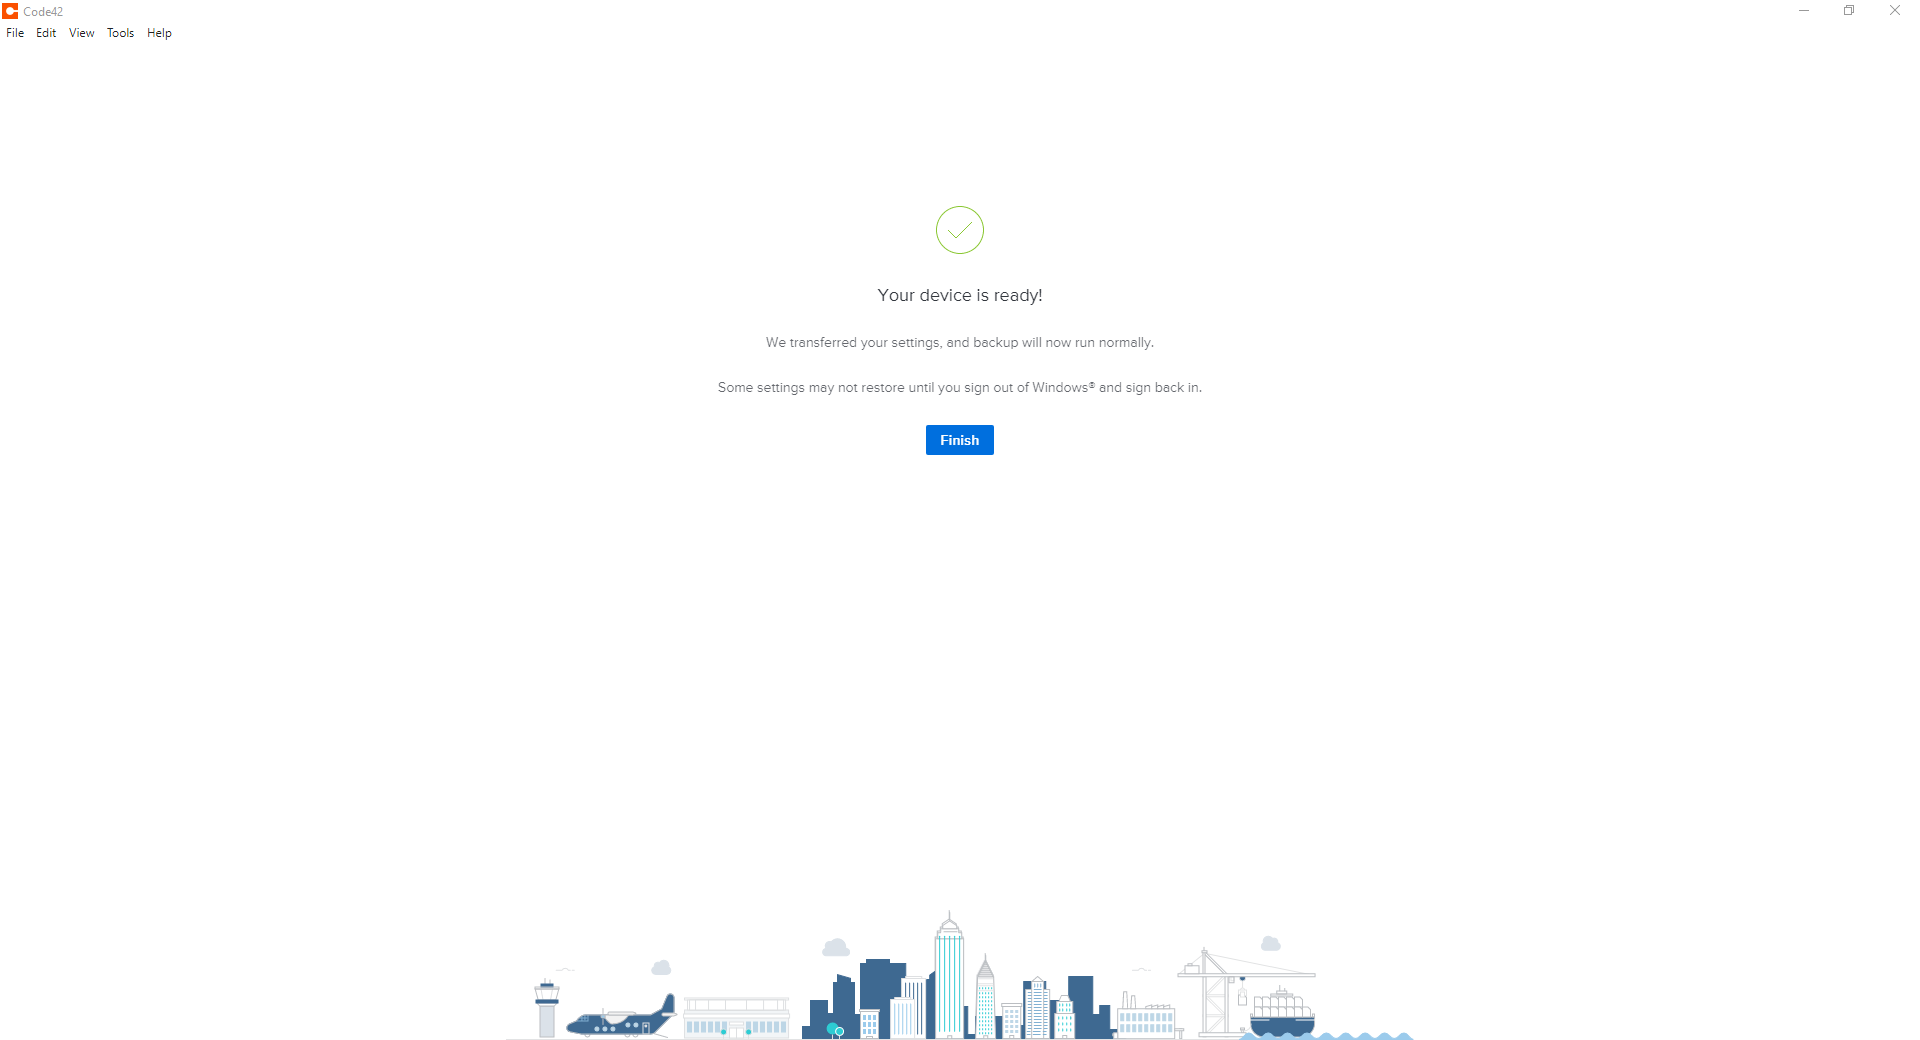
The next window Downloads the Files to your device. When the transfer is completed, click “Next”
Tip
You can close this window and continue working or you can click transfer more files and repeat the steps for additional files. This will extend the time it needs to restore.
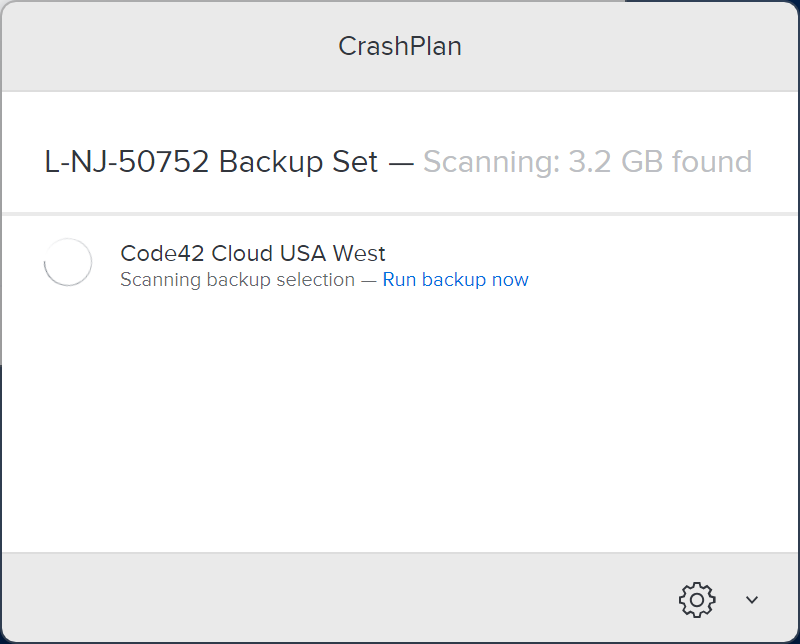
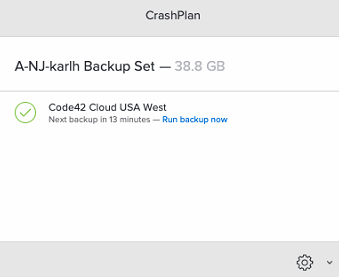
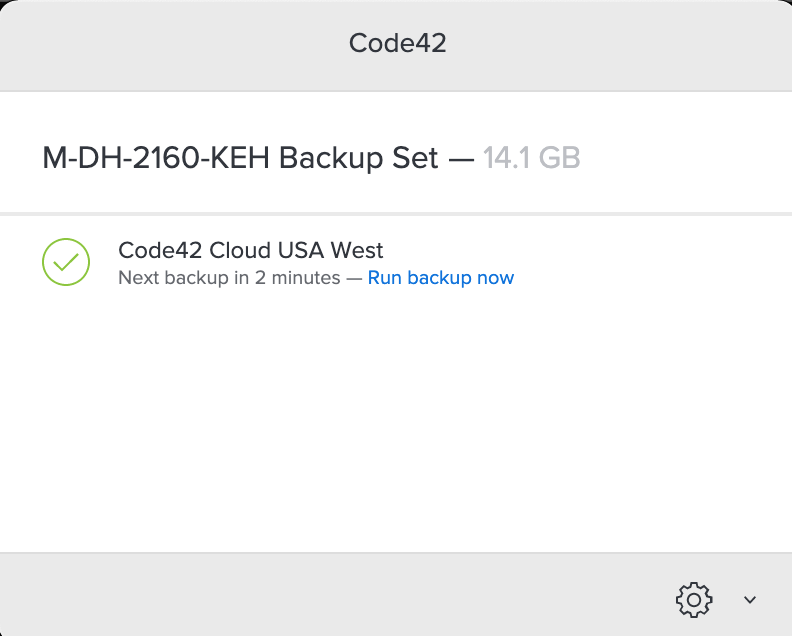
If you are unsure if you have CrashPlan installed and backing up your system, this quick guide will help give you some comfort.
Click on theCrashPlan icon from the system tray on Windows and the menu bar on macOS
CrashPlan Icon
The Progress will be displayed like in the Figure below
Note
Depending on your backup size, this could take anywhere from a few minutes to a few days. CrashPlan will continue to run and backup in the background. After the first successful backup, incremental backups will occur.
CrashPlan allows you to manage your backup sets. If you want to review your backup set or request assistance, please contact the SAMI Service Desk to initiate a support request.
Accidentally deleted or unable to find a file? CrashPlan can help. Please follow the following guidelines in restoring lost or previous versions of files.
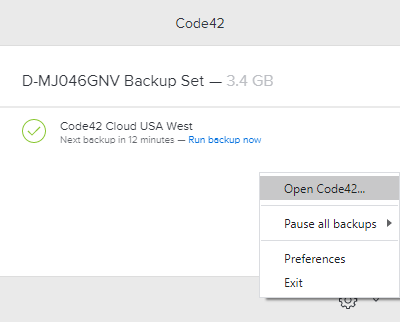
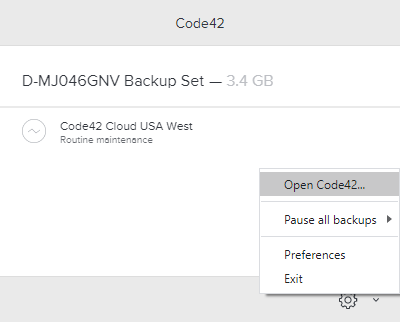
Click the CrashPlan System Tray or macOS menu bar Icon
CrashPlan Icon
Left-click on the gear symbol and left-click on “Open CrashPlan….”
If prompted, log in to the FDU Single sign-on Portal and proceed through the FDU DUO Multifactor authentication procedures
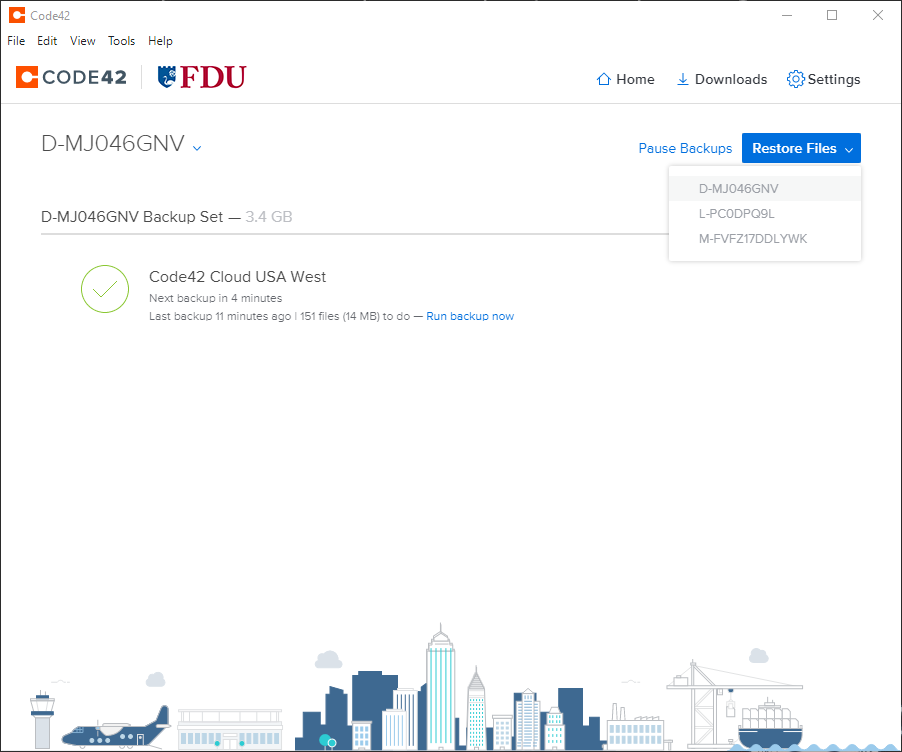
Click “Restore Files”
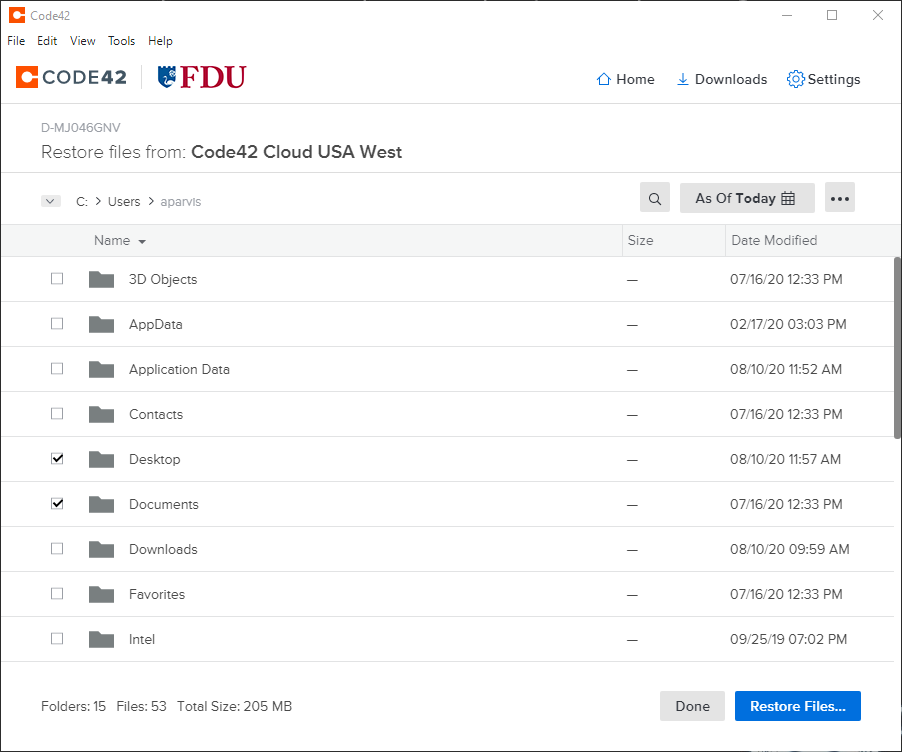
Select the device you wish to restore from
Note
If you have more than one backup device, please select the device from where you want to restore the file from.
You can select a date range from when you wish to restore from on the right-hand side
Navigate to the folder(s) and/or file(s) you wish to restore and place a check next to each one
Click “Restore Files”
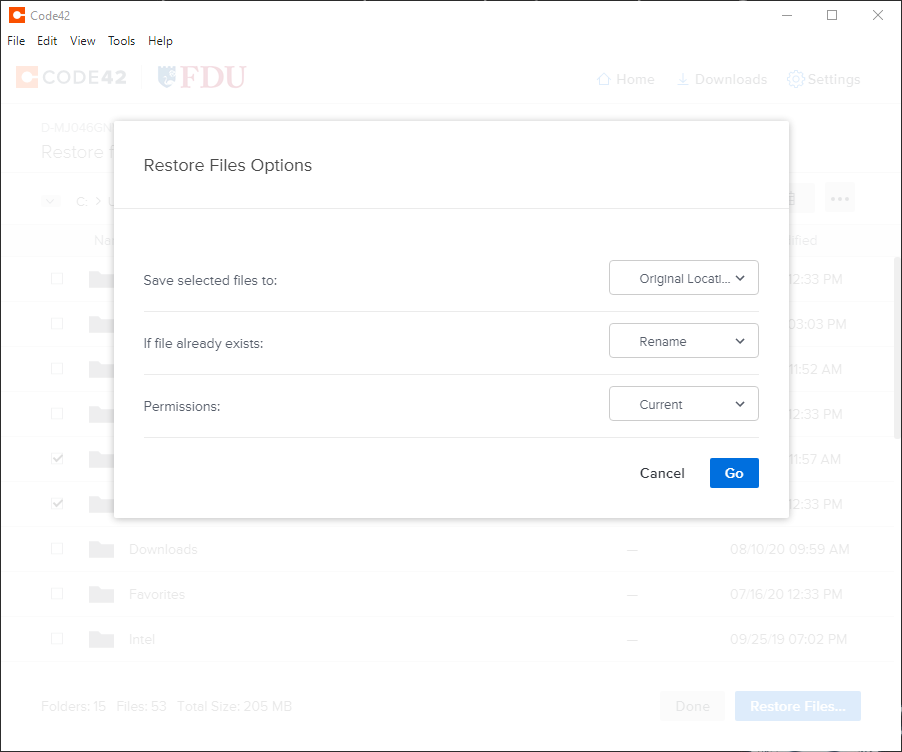
Select how CrashPlan will restore your files. Click “Go” when finished
Note
Above are the recommended options for restoring files, this will help you find them more easily.
The time it takes to restore your files will depend on how much data is being restored, available system resources, and available bandwidth.
Using CrashPlan you can create backup sets that will back up your data to additional devices utilizing a schedule. This is useful to have immediate access to critical files in the event of data loss.
This guide is only needed if you wish to have a local backup of your data.
Note
If you schedule multiple backup sets to run at specific times and the backup sets go to the same destination, ensure that these times do not overlap. This ensures good backup performance.
Click the CrashPlan System Tray or macOS menu bar Icon
CrashPlan Icon
Left-click on the gear symbol and left-click on “Open CrashPlan….”
If prompted, log in to the FDU Single Sign-on Portal and proceed through the FDU DUO Multi-factor authentication procedures
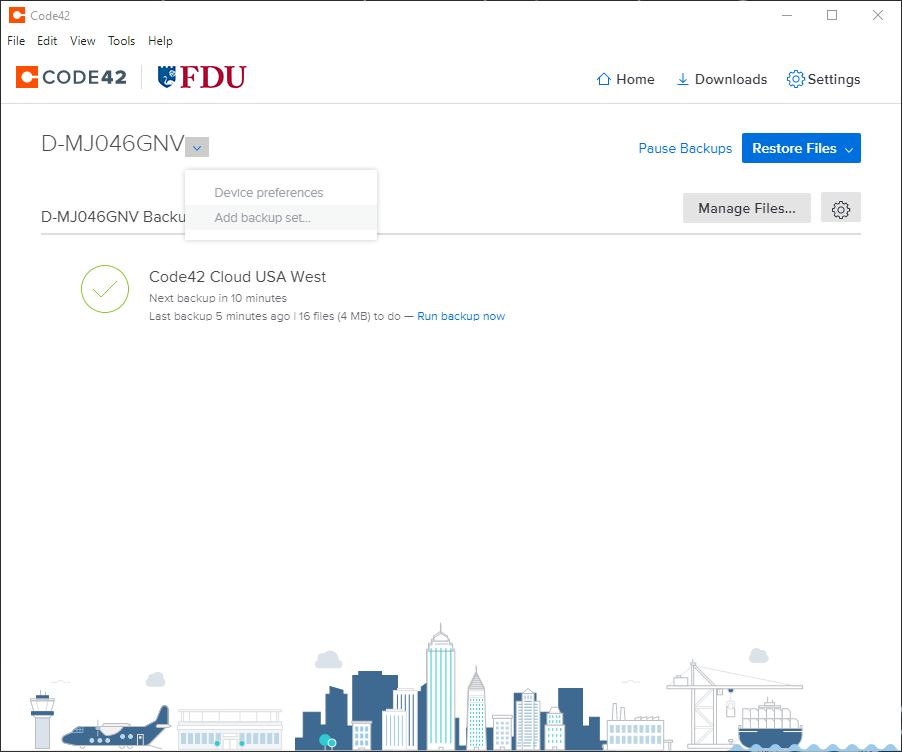
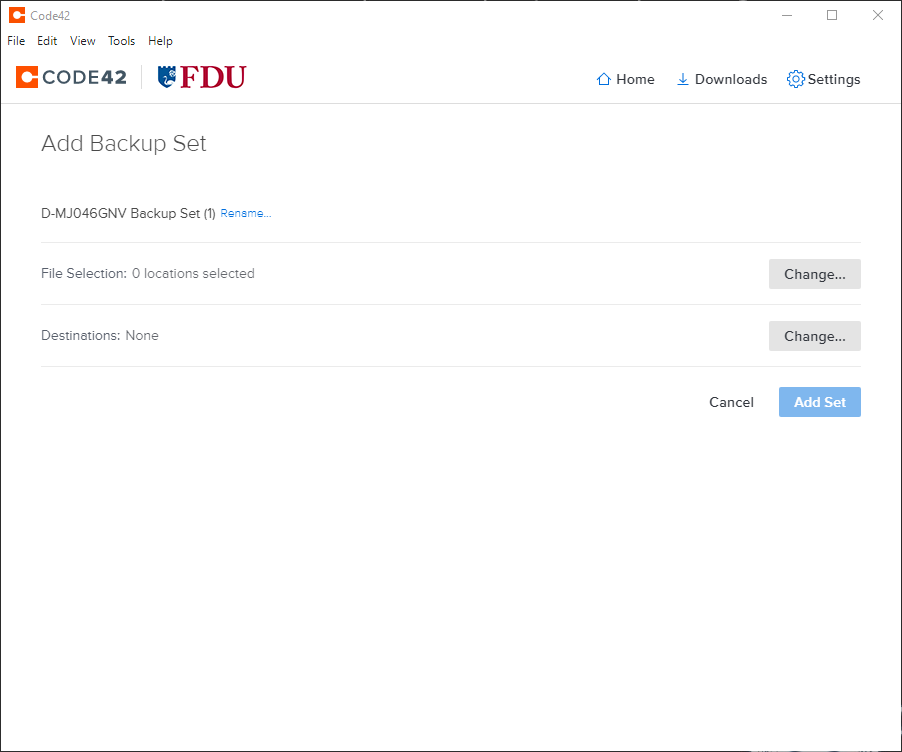
From the CrashPlan console window, click the “Dropdown Arrow” symbol next to your device name to drop down a menu, then click “Add Backup Set…”
The next window will be the Add Backup Set configuration window.
Note
The “Add Set” button will be un-clickable until it is completely configured.
Click “Rename” to label your backup set
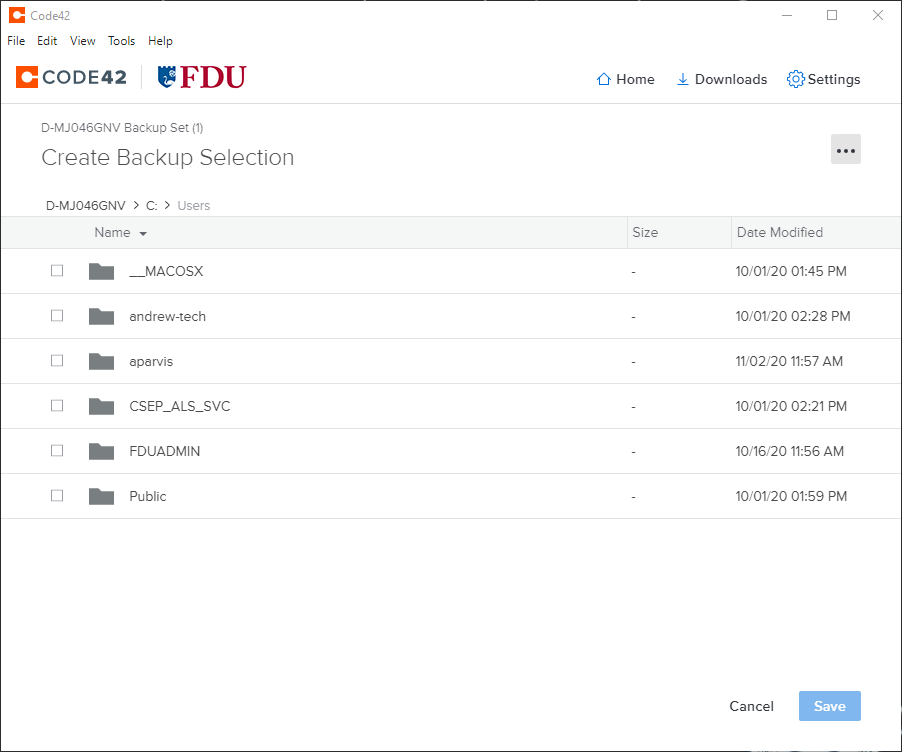
Changing Selected Files, click “Change”, and select the files and folders you wish to backup to a local destination
When finished click “Save“
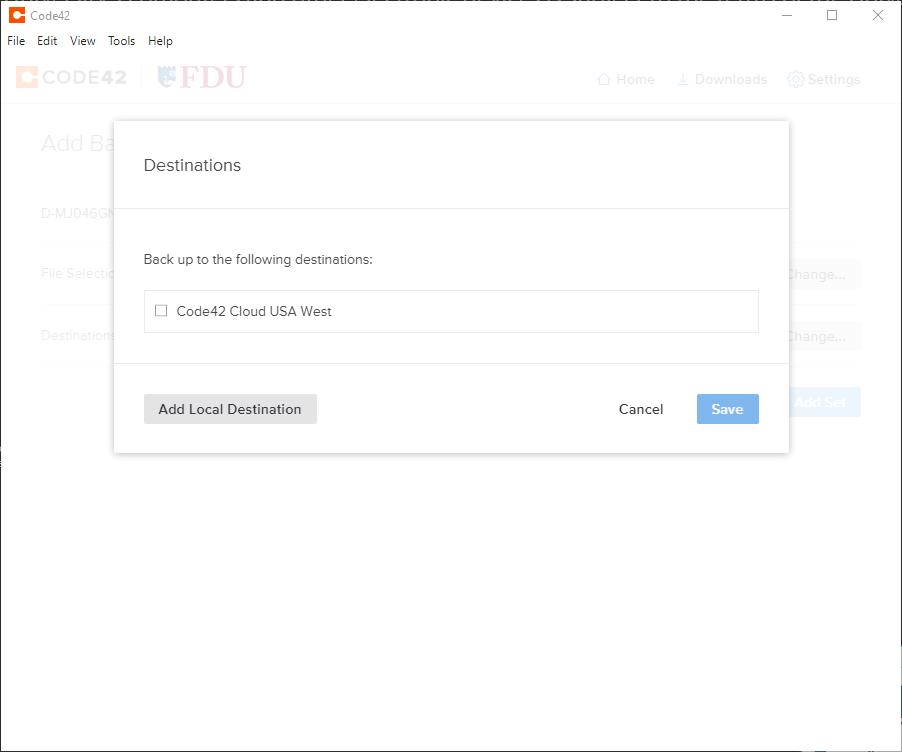
Click “Change” to set your destination for your backup
Select your destination by clicking “Add Local Destination (usually an external hard drive) and click “Save“
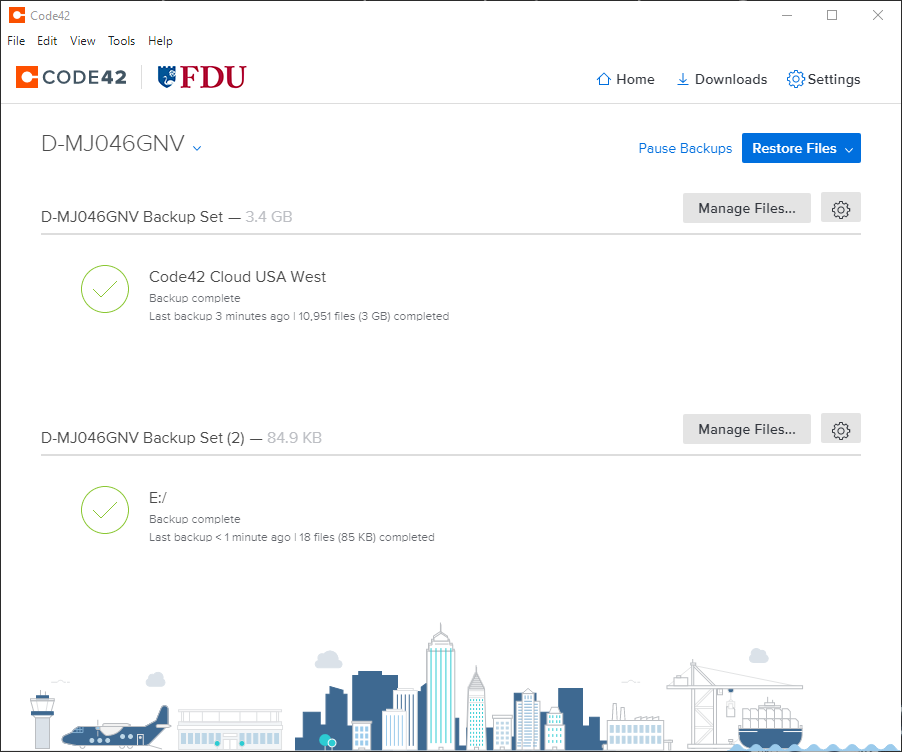
Click “Add Set” to finalize the setup and start backing up to a local location
Your new back upset is finished and will begin backing up as configured.
CrashPlan will send users an email alert notifying of any incomplete backups of their devices.
The CrashPlan email alert will be sent from CrashPlan for Enterprise <noreply@crashplan.com>
The Subject line of the email will be labeled with: Critical: [Name of Device] not backed up
Backup Alert
You will receive an alert when your computer hasn’t backed up to CrashPlan for 5 calendar days. The email will look like the example below:
CrashPlan Backup Alert Email Notification
What to do if you get a backup alert
After receiving a CrashPlan backup alert email, you should locate the device the email specifies in need of backup. The CrashPlan device name will be listed in the Subject: line and Computer Name: line of the CrashPlan backup alert email. To locate the name of a CrashPlan device, left-click the CrashPlan “C” symbol icon in the Windows System Tray, also referred to as the notification area.
Tip
The Windows System Tray or notification area is usually located on the bottom right of the Windows taskbar, next to the displayed digital clock.
For macOS users left-click CrashPlan symbol icon on the macOS icon menu bar. The CrashPlan device name will be displayed in the console. Ensure the CrashPlan application displays the same name as the CrashPlan backup alert email you received.
CrashPlan Symbol Icon
CrashPlan Device Name
After locating the correct specified device stated in the CrashPlan backup alert email, force a backup of the device by performing the following:
Left-click the “CrashPlan” System Tray or macOS menu bar Icon
CrashPlan Icon
Left-click “Run backup now“
Note
The backup may take some time to complete. This depends on the length of time since CrashPlan’s last complete backup and the amount of new data needed to be backed up.
Whether you’re working at home or the office, OneDrive makes it easy to create new documents and share your files. You can even collaborate with others on a document.
In the following external article, you’ll learn how to create documents and folders. It will go over how to share your files with different groups of people, as well as the various collaboration tools available in Office 365.
Generative Artificial Intelligence (GenAI) is a technology capable of generating new text, images, video, and other data by analyzing and modeling existing datasets. This policy ensures that all members of the FDU Community understand that entering information into publicly available GenAI applications may contribute that data to the application’s training models, potentially making it accessible beyond the university and exposing confidential information.
Additionally, this policy defines the responsible use and data security requirements for GenAI by University faculty, staff, and students. These requirements supplement existing data security policies established by OIRT. Accordingly, diligence must be maintained to protect the confidentiality, integrity, and availability of Administrative Data and Education Records that may be accessed, processed, or generated through GenAI applications.
Confidential, Restricted, or Official Use Only Information must not be entered into any publicly available or commercial GenAI application unless an approved agreement is in place with the Chief Information Security Officer (CISO) or the Chief Information Officer (CIO). This agreement must include appropriate data security requirements in compliance with university policies.
WISP protect information shall not be entered into any private GenAI application without prior approval from the Chief Information Security Officer (CISO) or the Chief Information Officer (CIO). Additionally, if the application is not owned and administered by Fairleigh Dickinson University, an approved use agreement must be executed with the application provider and must include appropriate data security requirements in compliance with university policies.
Each GenAI application handling Confidential, Restricted, or Official Use Only Information must have an Acceptable Use Policy (AUP) defining its terms of use, data collection policies, and user responsibilities. Faculty may include the AUP in course syllabi if GenAI is permitted for use in the course.
Output from a GenAI application must be reviewed by the submitter of the request for confidentiality, integrity, accuracy, fairness, regulatory compliance, and academic attribution with unintended bias before publication or ingestion into another University system in accordance with current FDU Information Security policies located on IT.FDU.EDU.
Confidential, Restricted, or Official Use Only Information must not be retained within GenAI systems after processing, particularly in products and services not hosted by FDU. If the GenAI system allows data deletion, the data must be securely removed once processing is complete unless retention is legally or regulatory required. If deletion is not feasible due to system limitations, alternative measures must be implemented to ensure data confidentiality, such as anonymization or eliminating sensitive data before inputting it into the system.
A disclaimer must clearly indicate when GenAI is used to generate data or influence decision-making. This ensures transparency regarding the nature and origin of the information provided.
In the event of a suspected or confirmed data security incident involving a GenAI system, users must immediately report the incident to the Data Security Incident Response Team (DSIRT) by creating a SAMI Support ticket. If you are unable to log into SAMI Support via your Net ID username and password, use the public form.
Appendix I
Key AI Definitions
Submitter—End user (student, faculty member, staff) inputting a query or prompt into an AI tool or product
Generate— the process of creating new content such as text, images, audio, video, or other forms of data based on patterns and information learned from existing datasets
Generator–A system, tool, or mechanism that creates new content
Ingestion— the process of inputting, integrating, and processing data into a system
Appendix II
DATA SECURITY INCIDENT RESPONSE TEAM (ROLES AND RESPONSIBILITIES)
The Data Security Incident Response Team membership includes the Chief Operating Officer, the Chief Information Officer, the Chief Information Security Officer, the Chief Academic Officer, the University General Counsel and the University Risk Manager. Each member of the Data Security Incident Response Team (DSIRT) has responsibilities related to the security of all the organization’s sensitive information. The DSIRT members listed below have specific responsibilities regarding the reporting and handling of data security incidents. Note that one person may serve in multiple roles.
Senior Vice President and Chief Financial Officer: Frank Barra Office: 201-692-2237; Email: fbarra@fdu.edu
Chief Information Officer (CIO): Neal Sturm Office: 201-692-8689; Email: sturm@fdu.edu
Chief Information Security Officer (CISO): Kimberley Dawn Dunkerley Office: 201-692-7672; Email: ddunkerley@fdu.edu
Privacy Officer: Kimberley Dawn Dunkerley Office: 201-692-7672; Email: ddunkerley@fdu.edu
Senior Vice President and University Provost: Benjamin Rifkin Office: 201-692-7093; Email: brifkin@fdu.edu
Office of the General Counsel: Steve Nelson Office: 201-692-2466; Email: snelson@fdu.edu
University Risk Manager: Gail Lemaire Office: 201-692-7083; Email: lemaire@fdu.edu
Vancouver Campus Executive: Wilfred Zebre Office: 604-648-4462; Email: wilfred_zerbe@fdu.edu
Associate Vice President for MIS: Saul Kleinman Office: 201-692-2065; Email: saul@fdu.edu
Click on the three dots and select Settings.Select Advanced to show the advanced settings. Select Content settings.Select Cookies.Click the garbage can icon to delete the cookies.
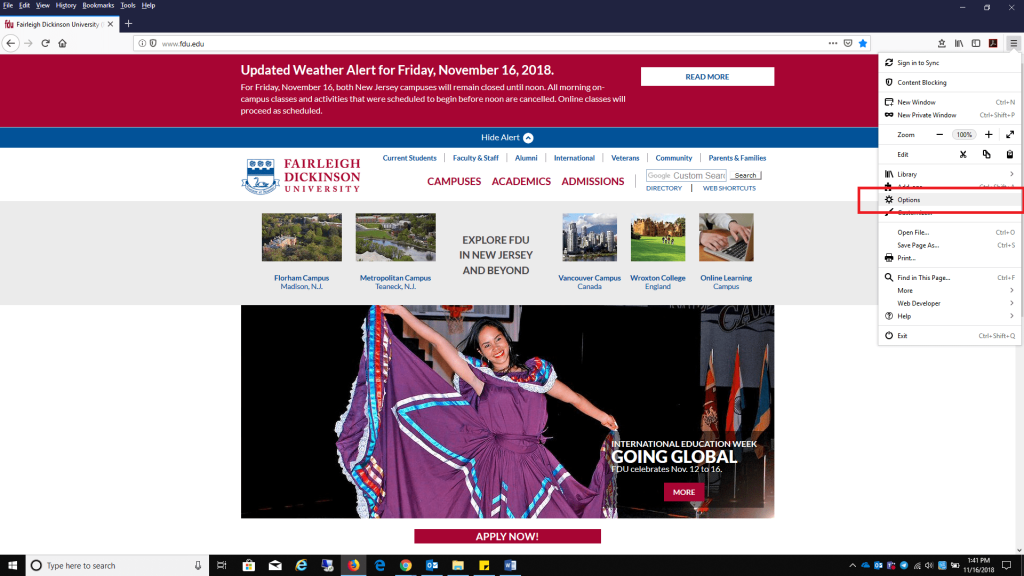
Click on the three lines and select OptionsSelect the Privacy & Security tab and click Manage Data found under Cookies and Site Data.Select fdu.edu and select Remove Selected, select Save Changes when finished.
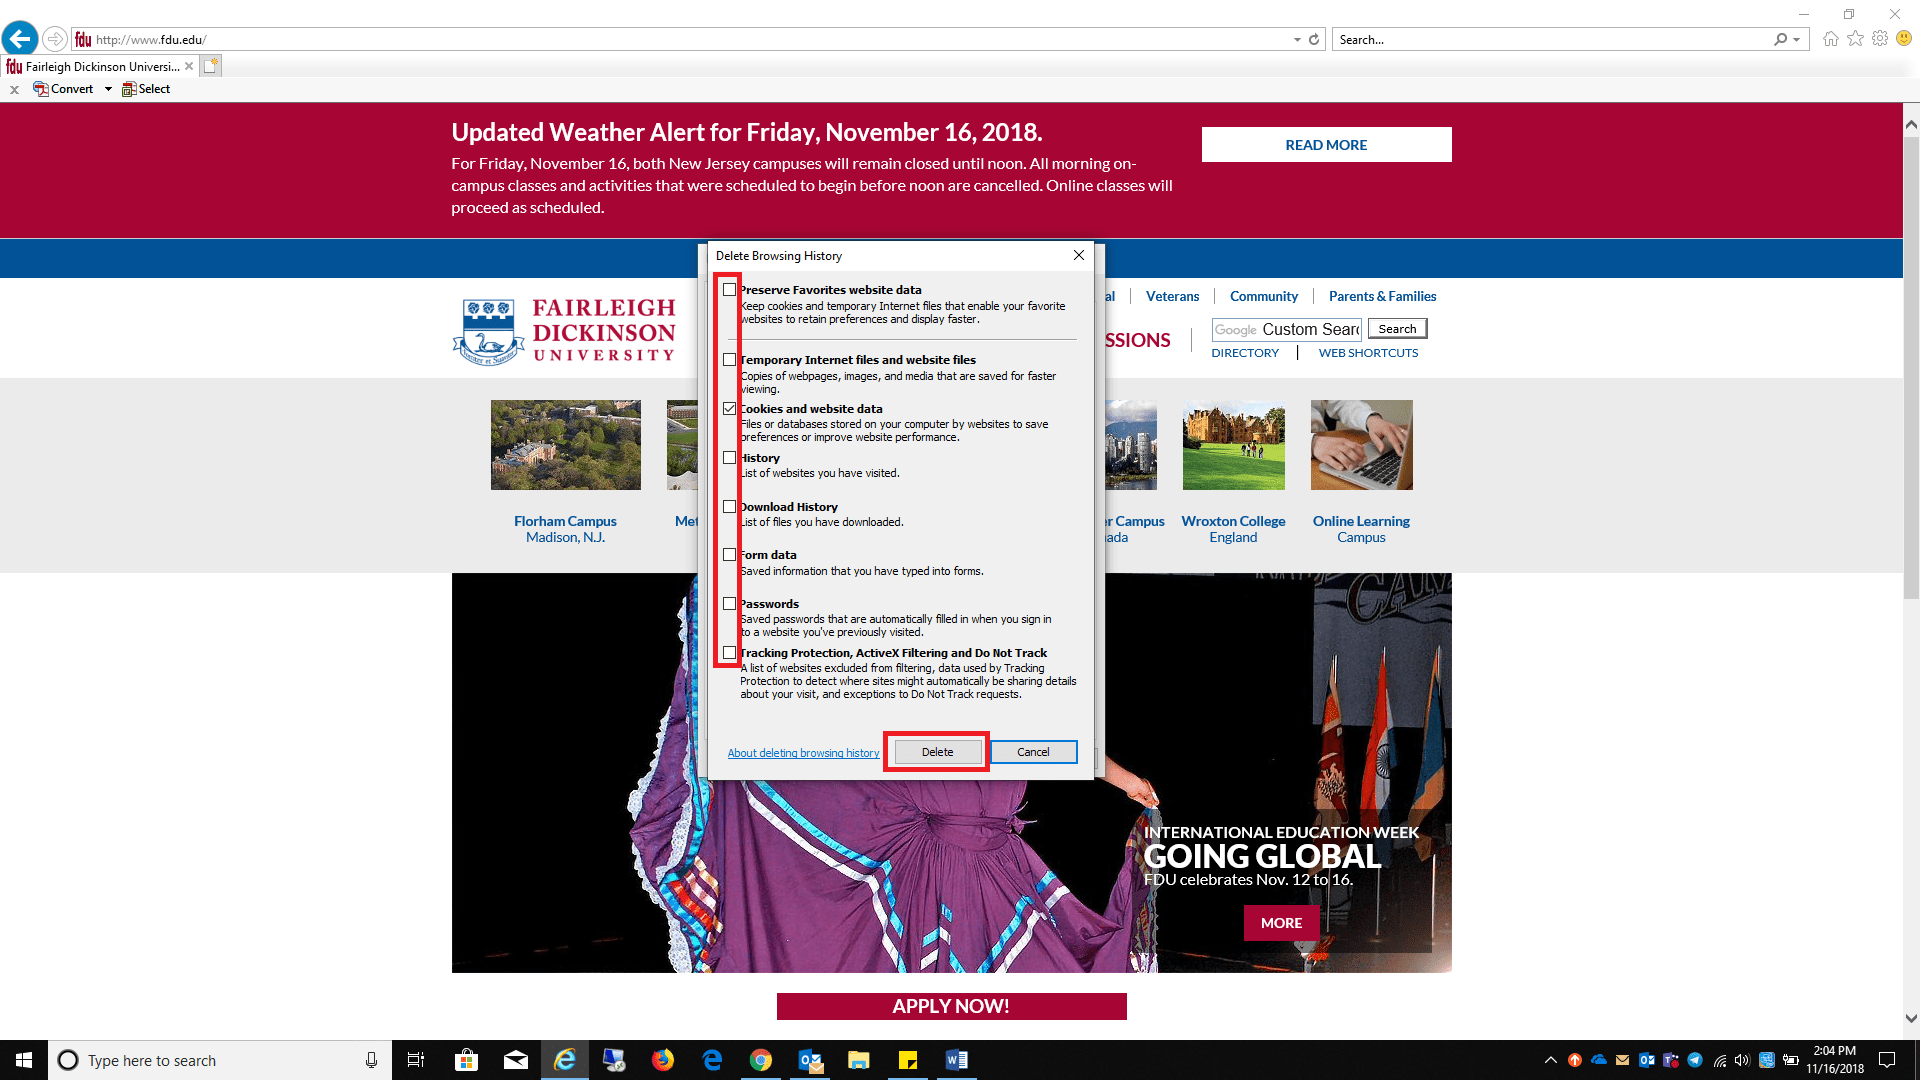
Click on the Settings “Gear” located on the top right of the browser, select Internet OptionsDelete in the Browser History sectionUncheck all boxes listed, except Cookies and website data, click Delete when finished
In an effort to maintain the reputation, security, continuity, and technical oversight of university assets considered part of our overall catalog of services, the Office of Information and Resource Technology is issuing a new policy concerning domain names affiliated with Fairleigh Dickinson University. Affiliation with FDU is determined by OIRT in conjunction with the Offices of General Counsel and Communications and Marketing.
II. POLICY
All domain registrations that have an affiliation with the University must be registered through OIRT. An affiliation is defined as a domain that identifies the University as part of its naming nomenclature and houses content specific to the University or any function, whether administrative, academic, or student related to the University. To request a new domain, please complete the following:
You may also try emailing your questions to domainregistrar@fdu.edu.
In addition to the domain registration, ongoing certification renewals and any backend technical configurations will be managed by OIRT. All costs associated with the domain will be charged back to the department.
Any department that today independently manages/operates a University domain as defined above or has obtained a domain with any affiliation with FDU must notify OIRT of the existence of that domain so ownership can be moved over to OIRT management. Please contact OIRT by sending all available information to domainregister@fdu.edu. A member of OIRT will work with the department to move the ownership over properly. All content of any domain, as well as plug-ins or any other functionality of the domain, will be reviewed by OIRT but are the responsibility of the individual departments.
III. IN CASE OF QUESTIONS
All questions relating to the Domain Registration Policy can be addressed to the VP & CIO of Fairleigh Dickinson University.
To access Forms, you will be directed to our SAMI Support Portal where you will be asked to log in using your NETID and authenticate using Duo. Once you click “Next,” you will be forwarded to samisupport.fdu.edu in a new window or tab.


 Select Advanced to show the advanced settings. Select Content settings.
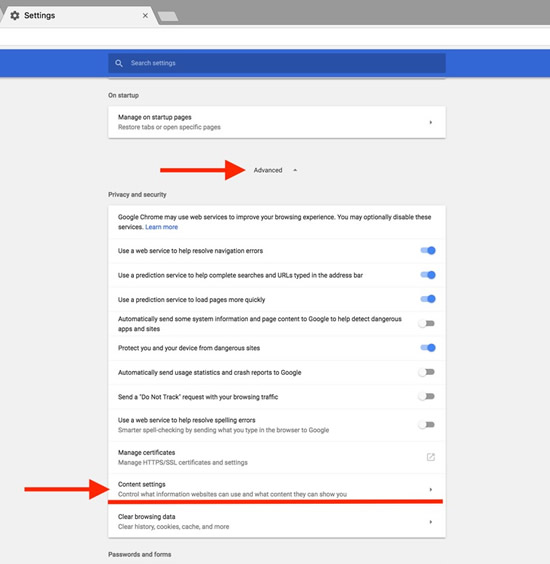 Select Cookies.
 Click the garbage can icon to delete the cookies.
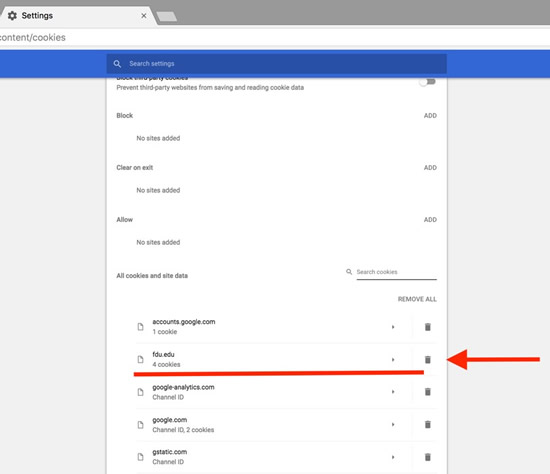
 Select the Privacy & Security tab and click Manage Data found under Cookies and Site Data.
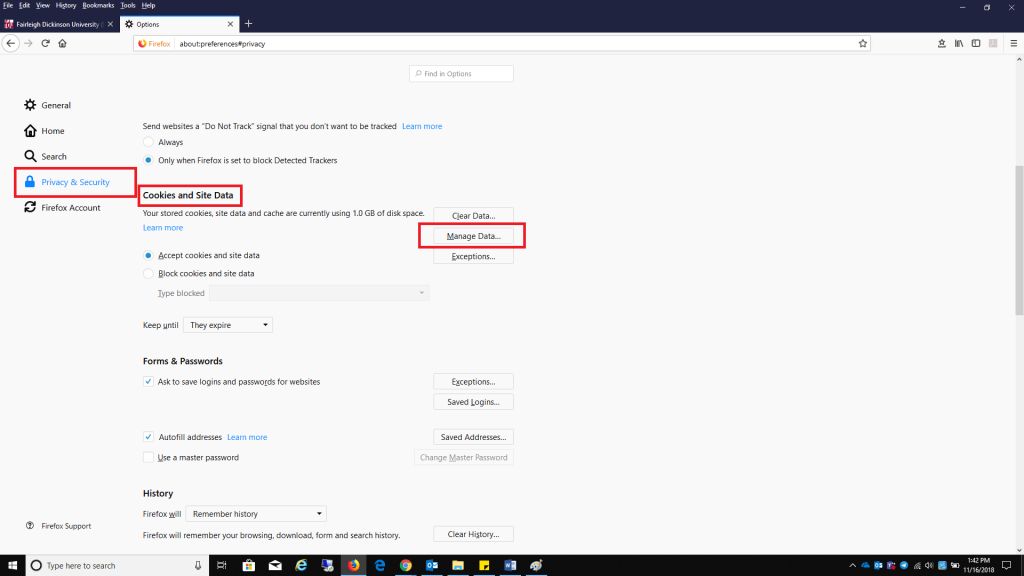 Select fdu.edu and select Remove Selected, select Save Changes when finished.
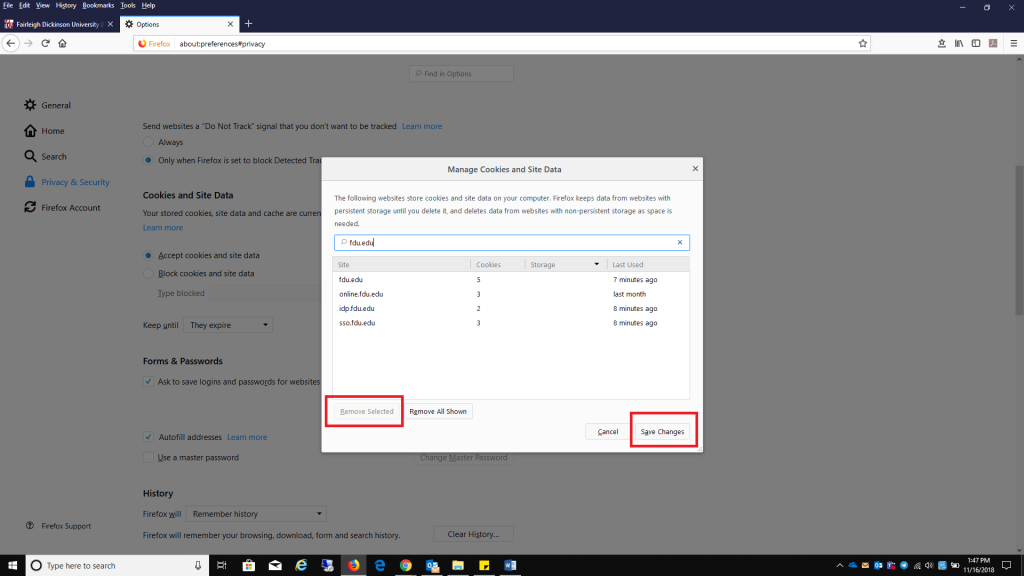
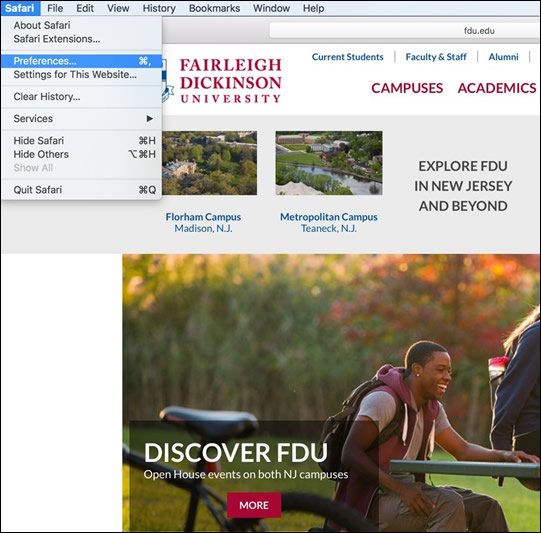 Select Manage Website Data
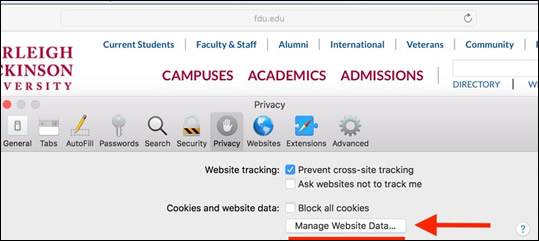 Select fdu.edu and click Remove.
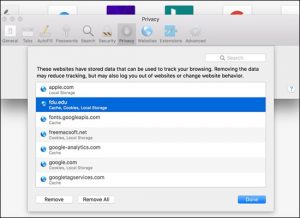
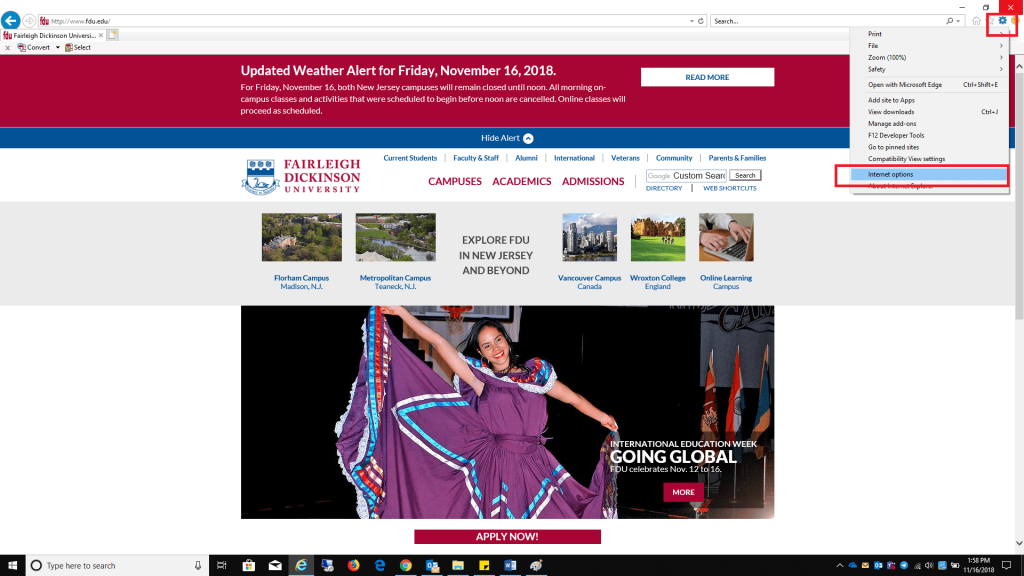 Delete in the Browser History section
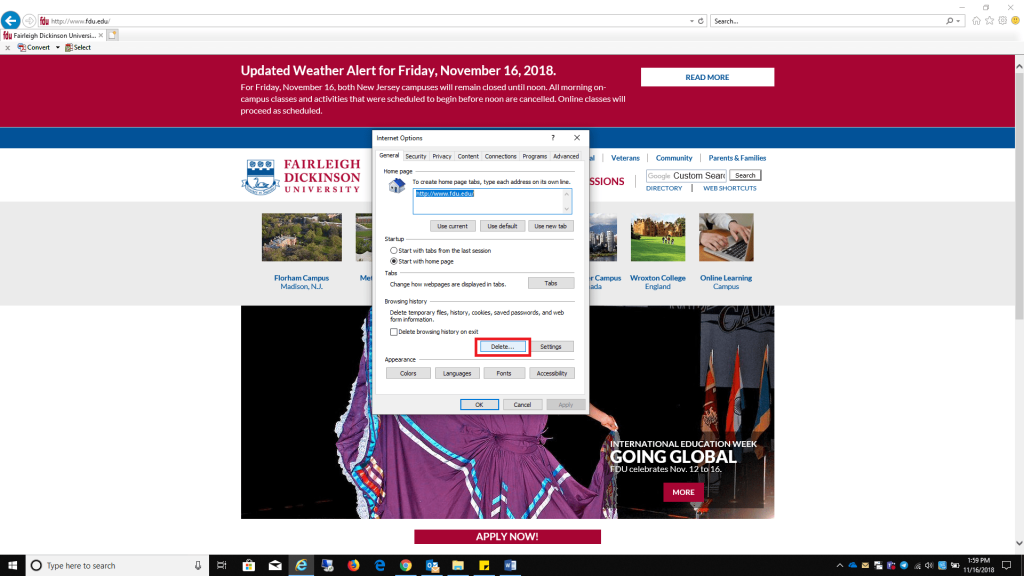 Uncheck all boxes listed, except Cookies and website data, click Delete when finished