This guide is designed to assist you in mastering both the classic and updated versions of the DUO Device Management Portal. It simplifies the process of modifying existing devices and integrating new ones into your multi-factor authentication setup.
Legacy DUO Device Management Portal
Accessing the legacy DUO Management Portal
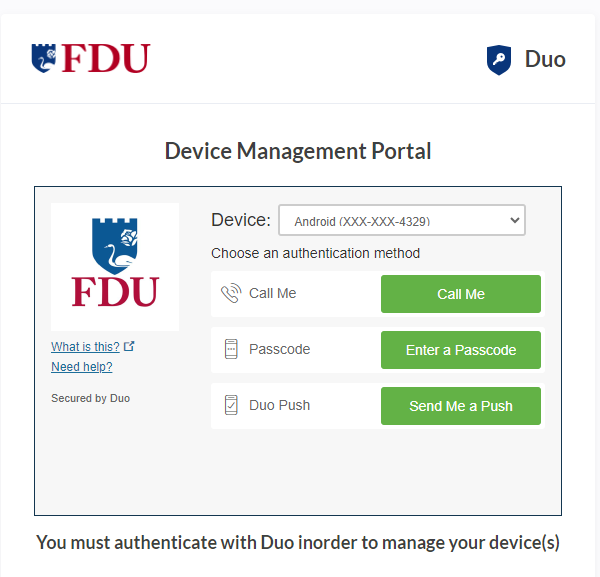
In a Desktop or Laptop browser visit the “DUO Management Portal“. You will be prompted to authenticate through SSO and complete the Multi-factor Authentication process
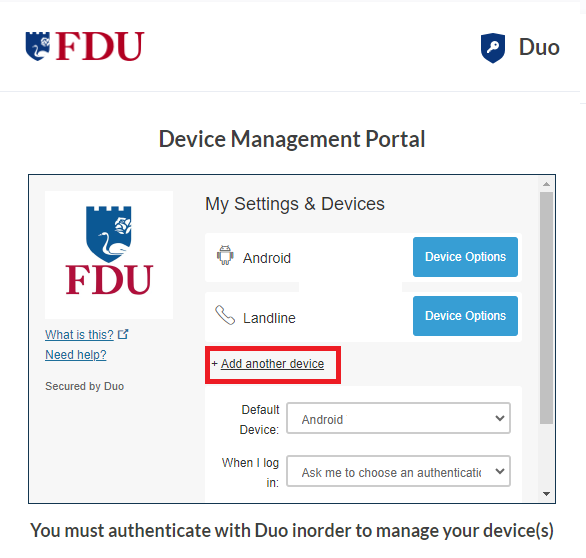
After authenticating you’ll see the DUO Management Portal. This is where you can enroll new devices, reactivate, edit, or delete your existing devices
close
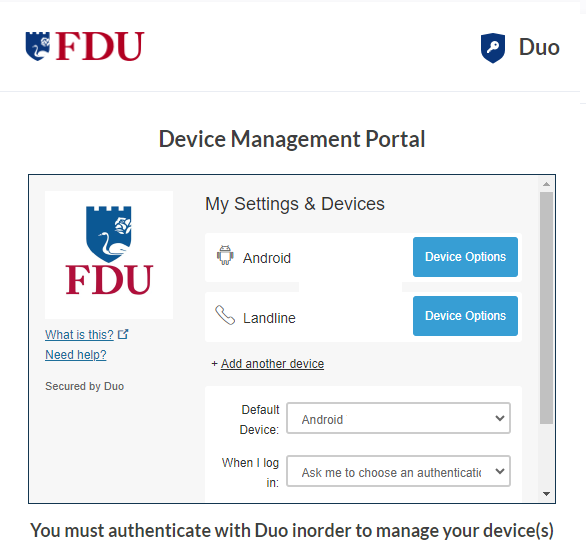
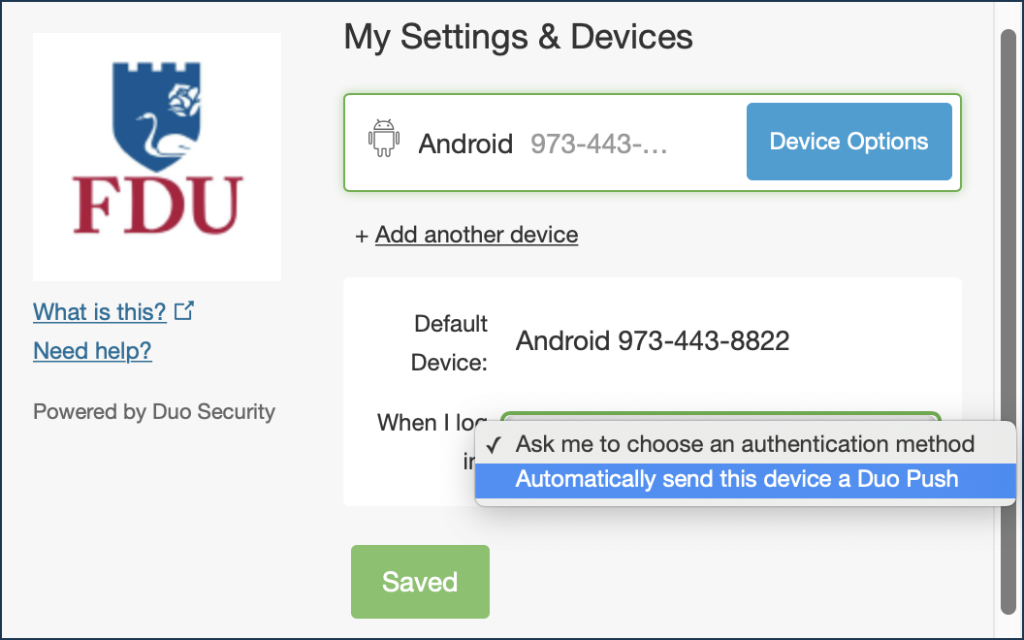
Default Authentication Options
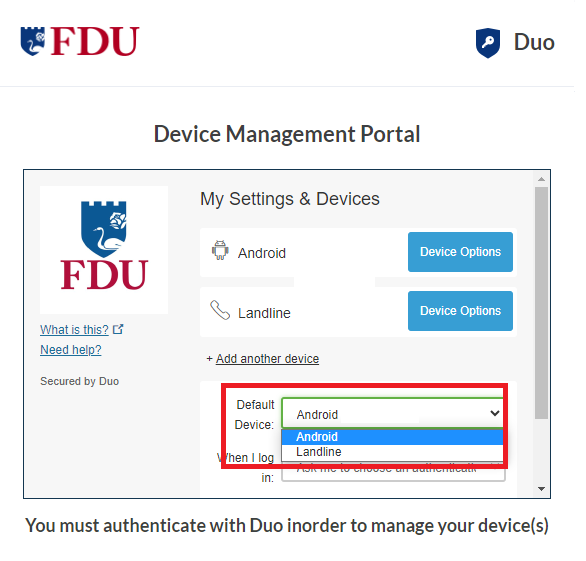
If you authenticate with more than one device, you can specify which you would like to be the default.
Click the “Default Device” drop-down menu and pick your default device for authentication. Click “Save” if you’re done making changes
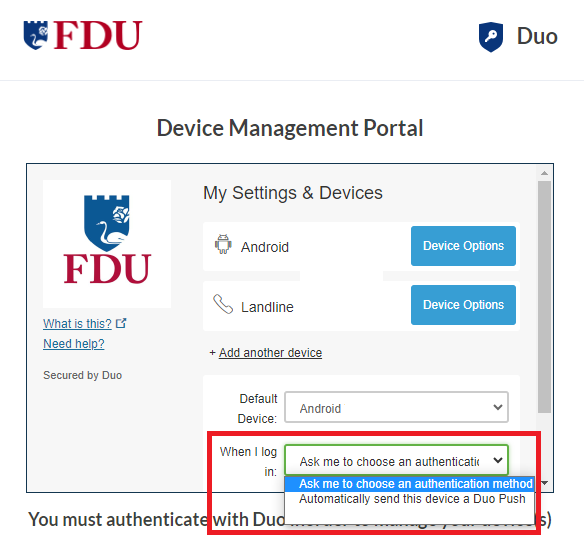
You can choose which authentication method you prefer to use when logging in by clicking on the “When I log in” drop-down menu
Ask me to choose an authentication method: it will prompt you to select an option every time you log in
Automatically send this device a DUO Push: it will automatically send a DUO Push to your default device
close
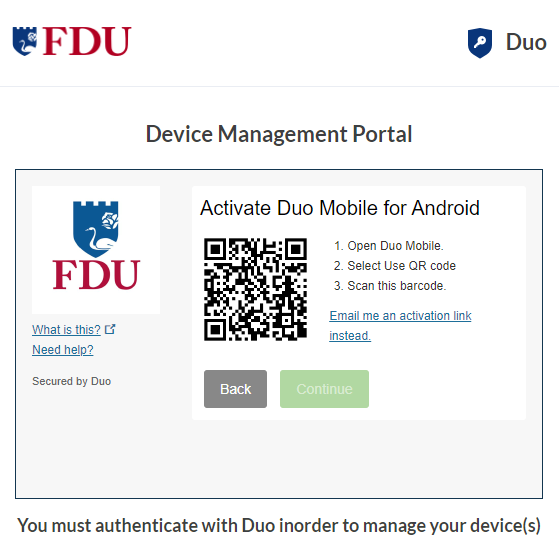
Reactivate Duo Mobile
Click on “Reactivate DUO Mobile” if you need to get DUO Push working on your phone, for example, if you replaced your phone with a new model but kept the same phone number.
After answering some questions about your device, you’ll receive a new QR code to scan with your phone, which will complete the DUO Mobile activation process
close
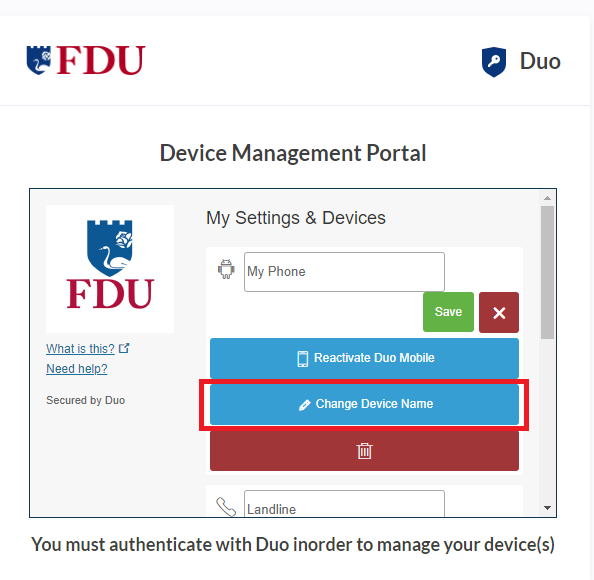
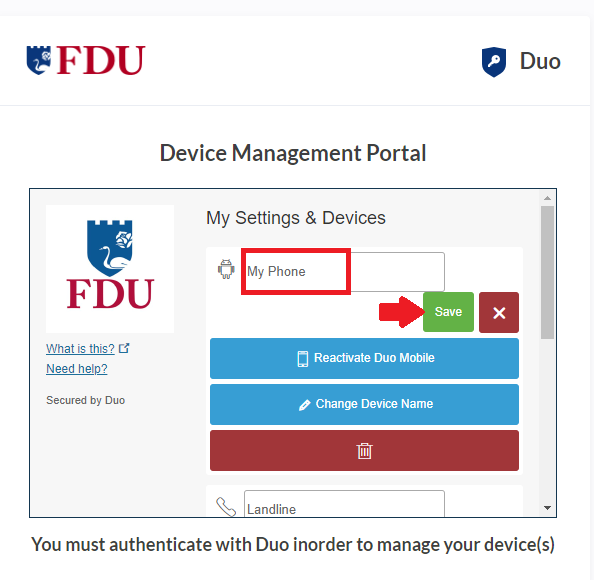
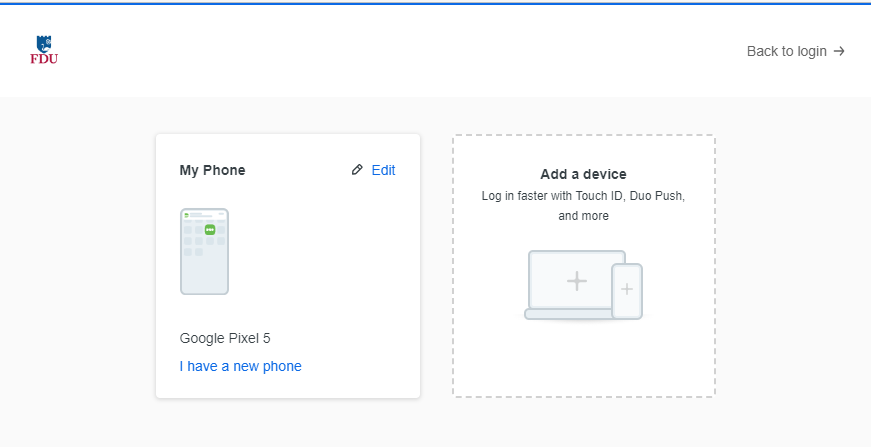
Change Device Name
Click on “Change Device Name” to open up an interface to change the display name of your phone
Type in the new name and click “Save“
close
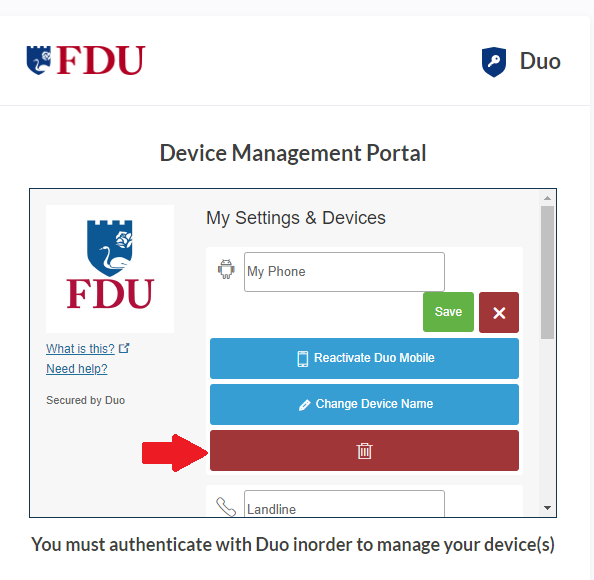
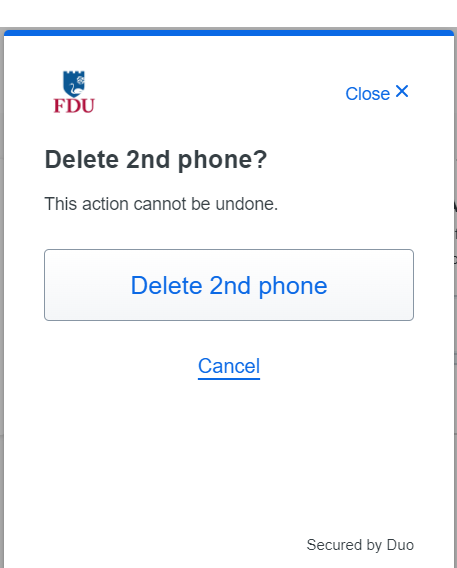
Remove Device
Click the “trash” icon button to delete a device
Confirm that you want to remove the device by clicking on “Remove“. The device will be deleted. It will no longer be able to approve DUO authentication requests.
Note
You may not remove your last device. If you wish to remove it, first add another, then delete the original. If you are unable to delete a device, contact your administrator to have it removed.
close
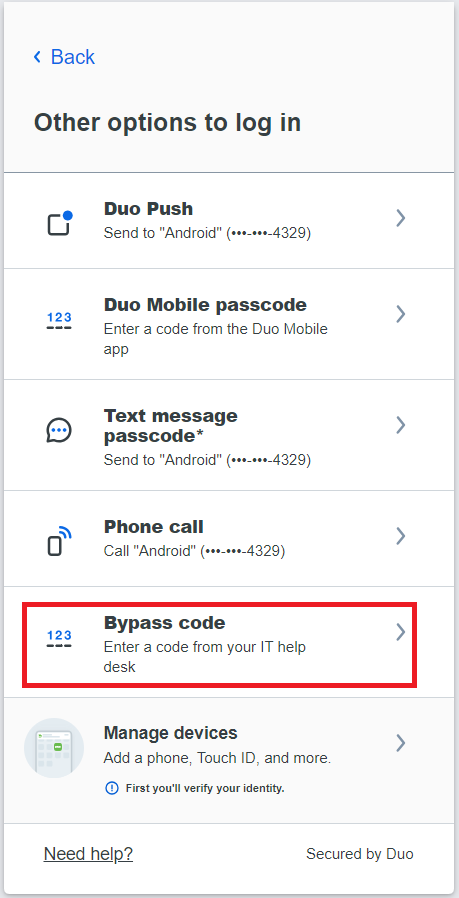
Add New Device
To add a new authentication device, click “Add another device” link on the right side of the DUO Prompt. You’ll be taken to the new device enrollment prompt
You can use the DUO Quick Start Guide for instructions on how to enroll a new device
Accessing Updated Device Management in the DUO Universal Prompt
You can add additional verification methods, manage your existing devices, or reactivate DUO Mobile for DUO Push from the DUO Universal Prompt.
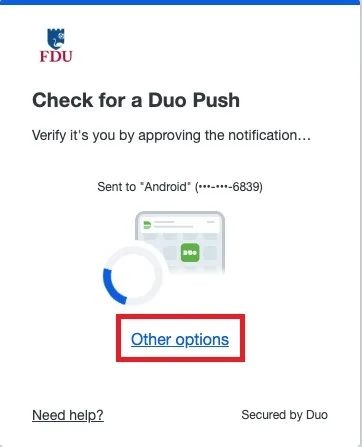
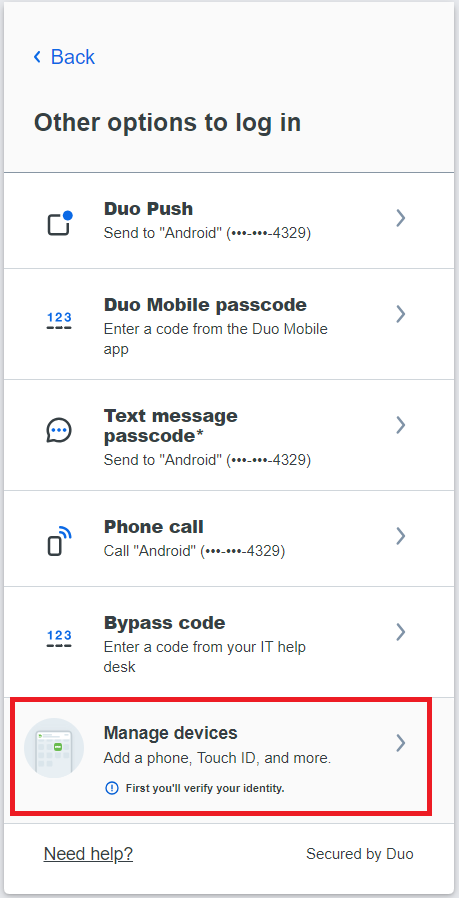
When logging in to an application with the Universal Prompt Click the “Other Options” link on the authentication page to view your list of available methods
Click on “Manage devices” at the end of the list to enter the device management portal
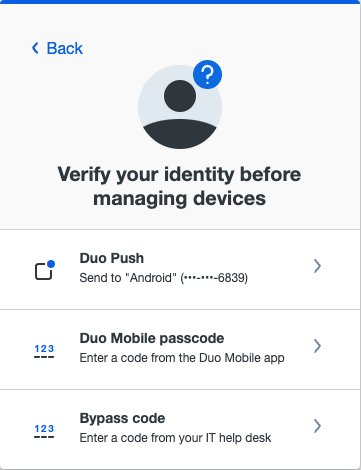
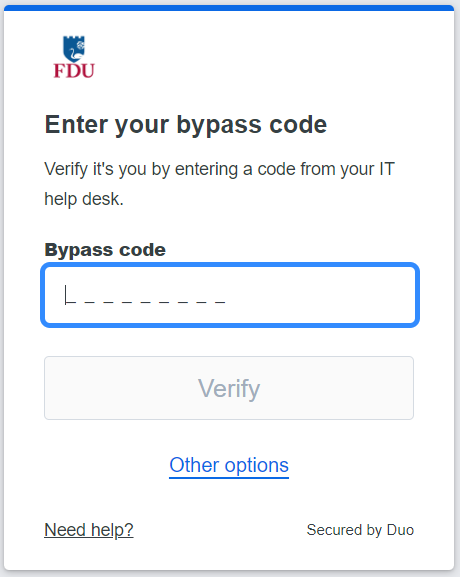
You will be prompted to verify your identity by completing the DUO Multifactor Authentication process. Select your preferred authentication method from the listed options to continue
After approving a DUO authentication request you can see the Device Management Portal with all your registered devices.
close
Add New Device
To add a new method of verifying your identity in DUO, click “Add a device” and follow the enrollment process described in the DUO Quick Start Guide, starting on Step 3.
The difference between adding a new device from the Device Management Portal and during first-time enrollment is that when you have finished enrolling the new device you return to the Device Management Portal to view all your registered devices, including the new one, instead of continuing to log into an application.
close
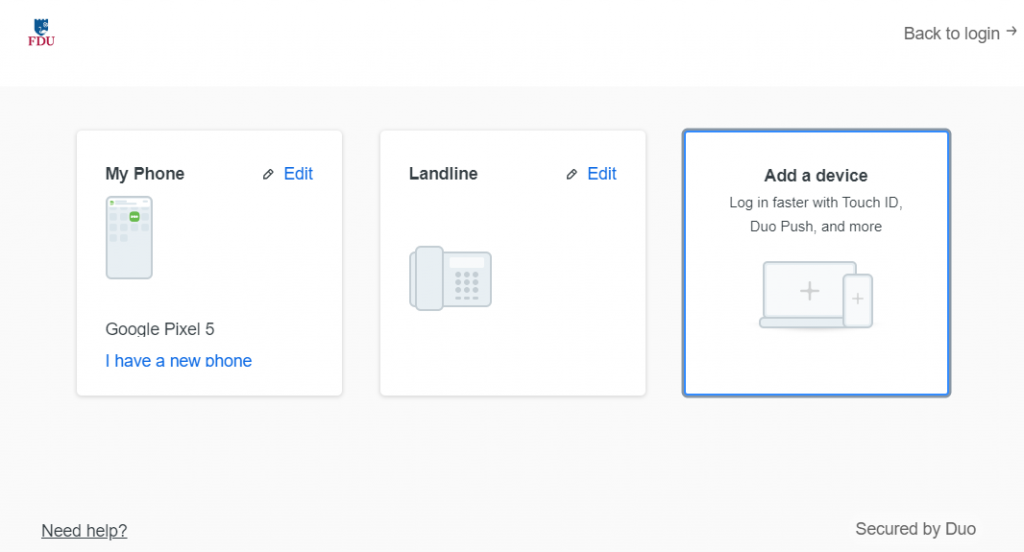
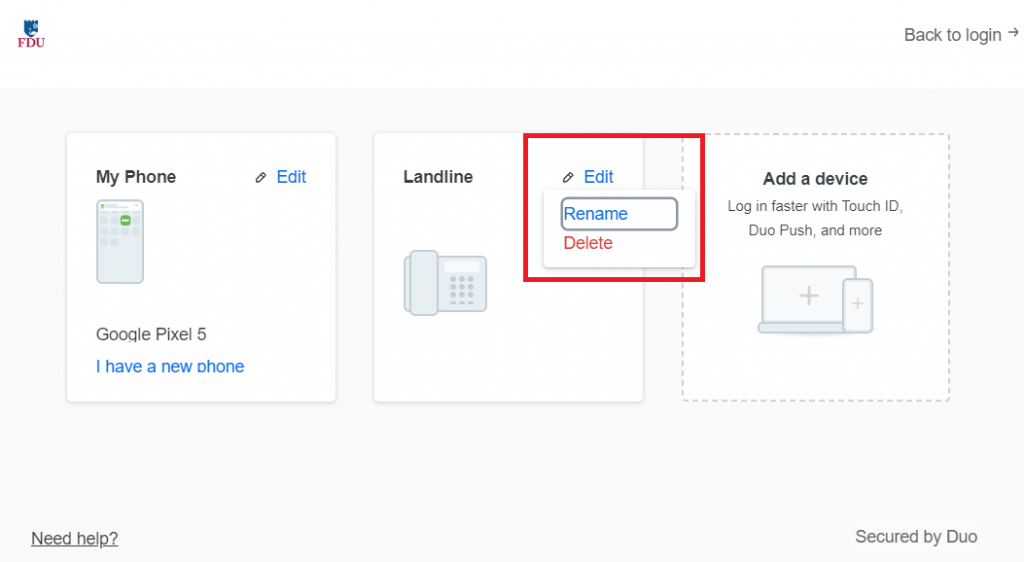
Rename or Remove a Device
Click the “Edit” button on the device you would like to rename or remove to view the drop down menu
Then click either “Rename” or “Delete“
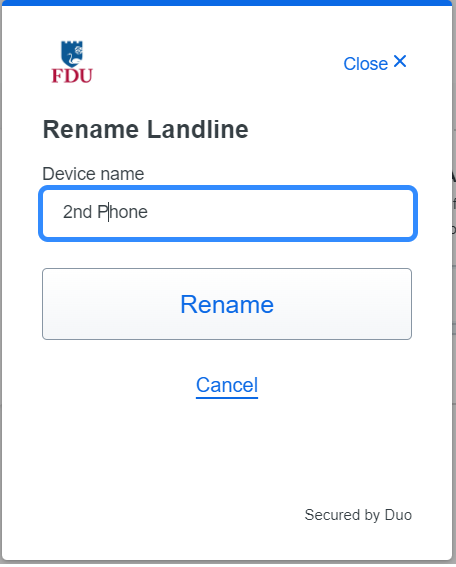
When renaming a device, type the new name for your device, then click on “Rename” to save your changes
When Deleting a device, confirm your selection to delete
close
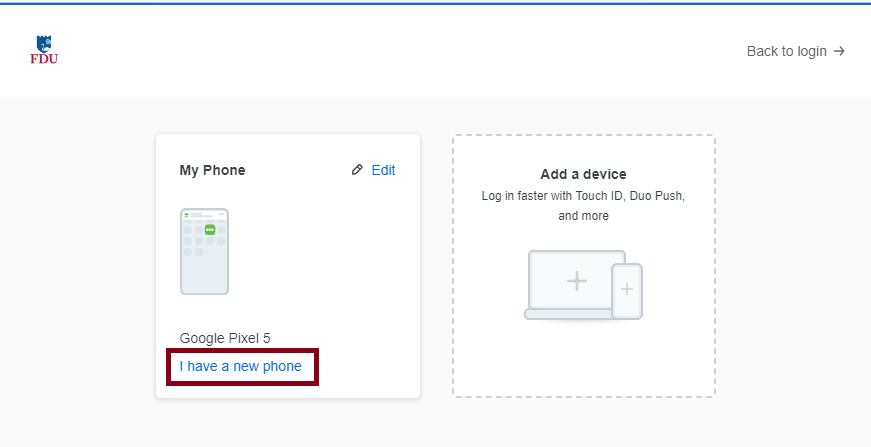
Reactivate DUO Mobile for an Existing Device
If you have replaced the phone you activated for DUO Push, you can reactivate DUO Push if you have the same phone number.
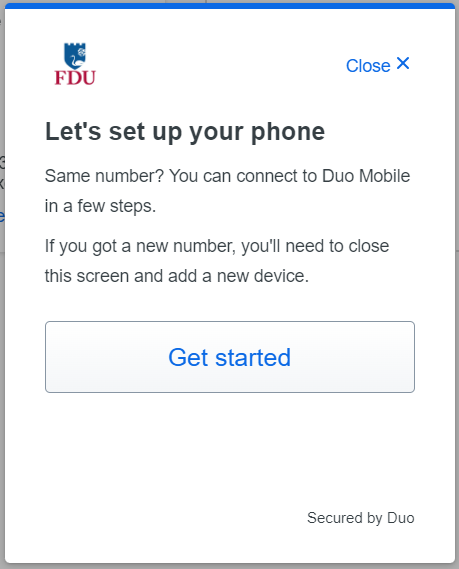
Click on “I have a new phone” for the device you want to reactivate
Click “Get Started” to continue
Click on “Send me a passcode” or “Call my phone” then proceed to follow the instructions prompted to complete the reactivation process
close
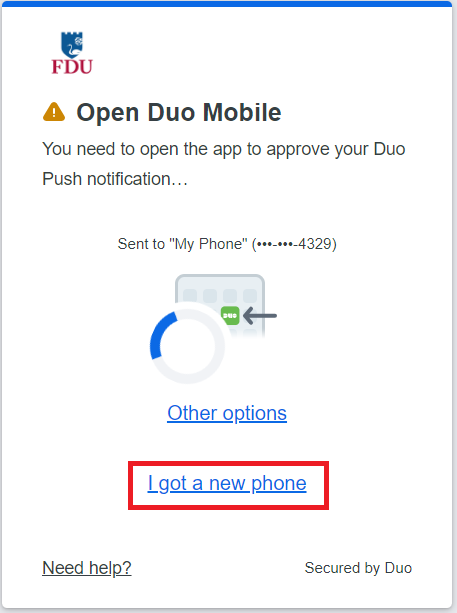
Reactivate DUO Mobile outside of the Device Management Portal
Let the DUO Push authentication time out
Click on the “I got a new phone” link shown in the Universal Prompt
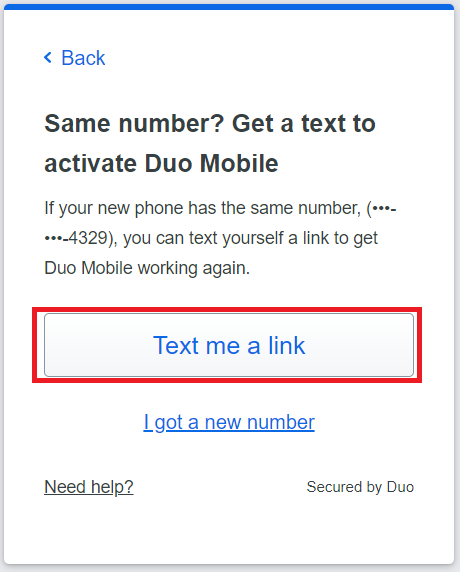
If you still use the same phone number as you did when you first set up the phone to use DUO Push, then click or tap the “Text me a link” button
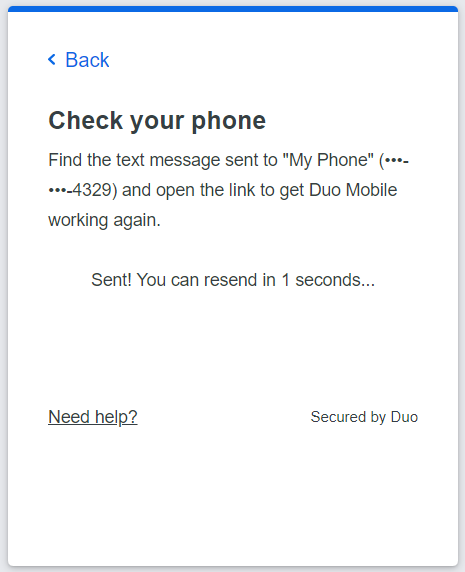
When the text message with the link arrives on your phone, tap it to automatically reactivate DUO Mobile on your phone to use DUO Push again. If you don’t have DUO Mobile installed be sure to install it before you try to open the activation link in the text message.
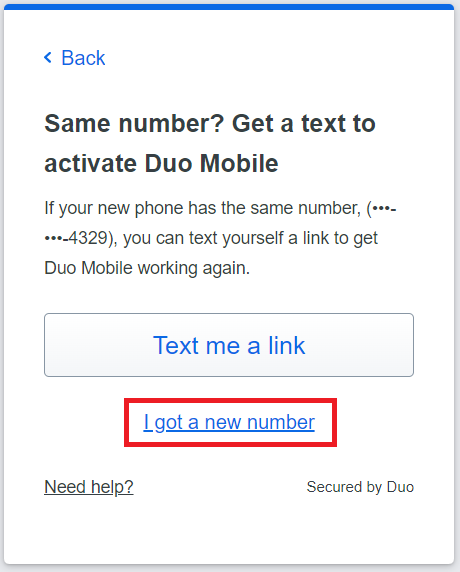
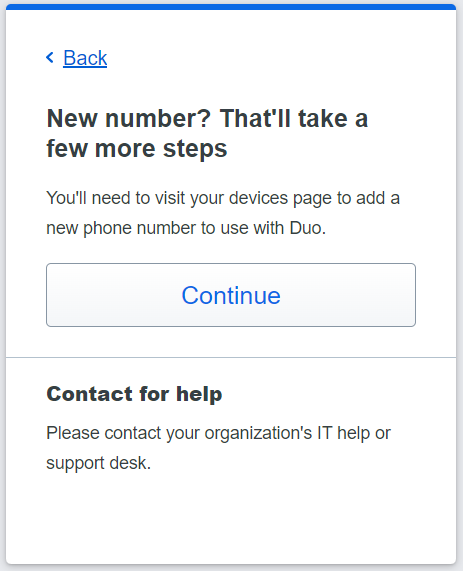
If you are using a different phone number than the one you first set up, then press on “I got a new number“
Press “Continue” to proceed to the DUO Device Management Portal, where you can complete the steps to “Adding a New Device“and set up DUO Push on the new phone
Note
You will need to verify your identity with a different DUO verification method, so if you don’t have one available you will need to contact the SAMI Service Desk for help.
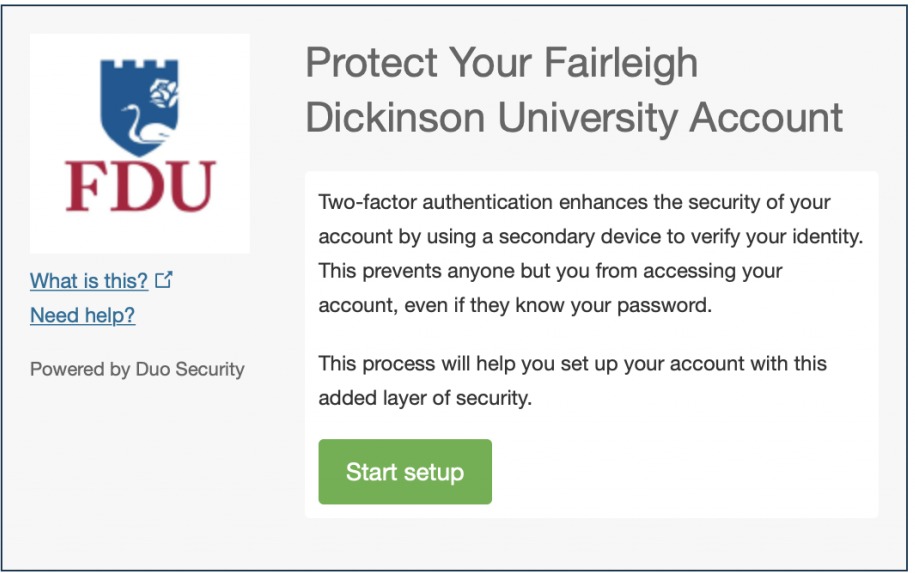
DUO two-factor authentication adds a second layer of security to your FDU NetID. It requires two factors to verify identity. These factors include something you know – your FDU NetID and password, and something you have – a phone or passcode, to authenticate and gain access to your account on FDU services. Passwords alone no longer provide adequate protection against cyber hacking. DUO is required for all current FDU students.
Install DUO Mobile App
The DUO app is available for mobile phones and tablets. You can directly access the DUO Mobile Security App using these links:
In a Desktop or Laptop browser visit the DUO Management Portal to begin the activation process by enrolling your device. Activation requires scanning a QR code with the DUO app’s built-in scanner
Duo prompts you to enroll the first time you visit the DUO Management Portal using a browser or a client application that shows the interactive Duo web-based prompt
Supported Browsers: Chrome, Firefox, Safari, Edge, Opera, and Internet Explorer 8 or later. Some browsers do not support all of DUO’s authentication devices (for example, Security Keys won’t work with Internet Explorer). For the widest compatibility with DUO’s authentication methods, we recommend recent versions of Chrome and Firefox.
Click “Start setup” to begin enrolling your device
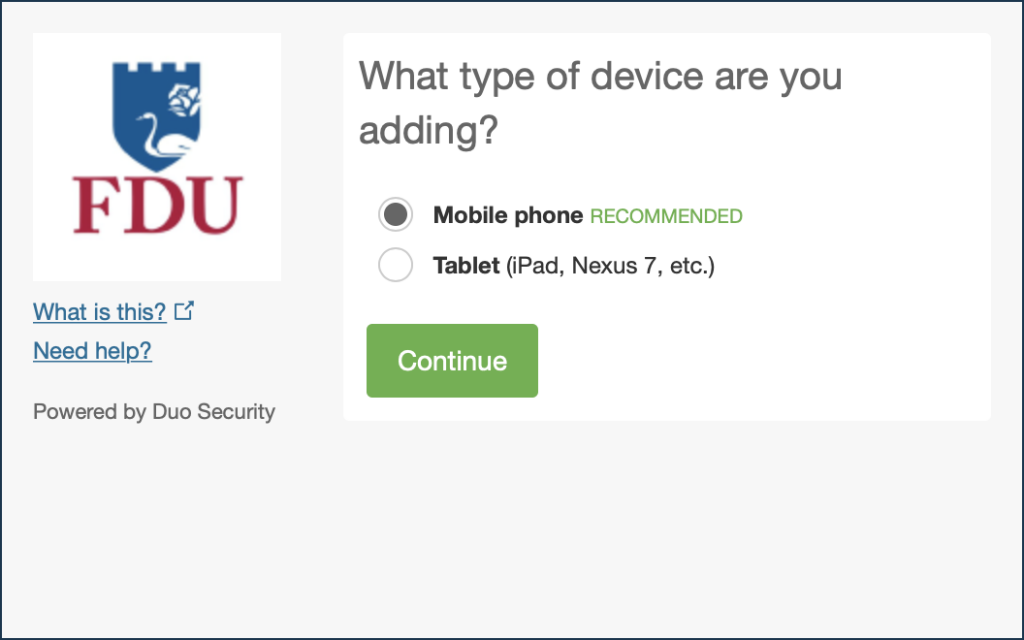
Select the type of device you’d like to enroll and click “Continue“. We recommend using a smartphone for the best experience, but you can also enroll iPadOS and Android tablets
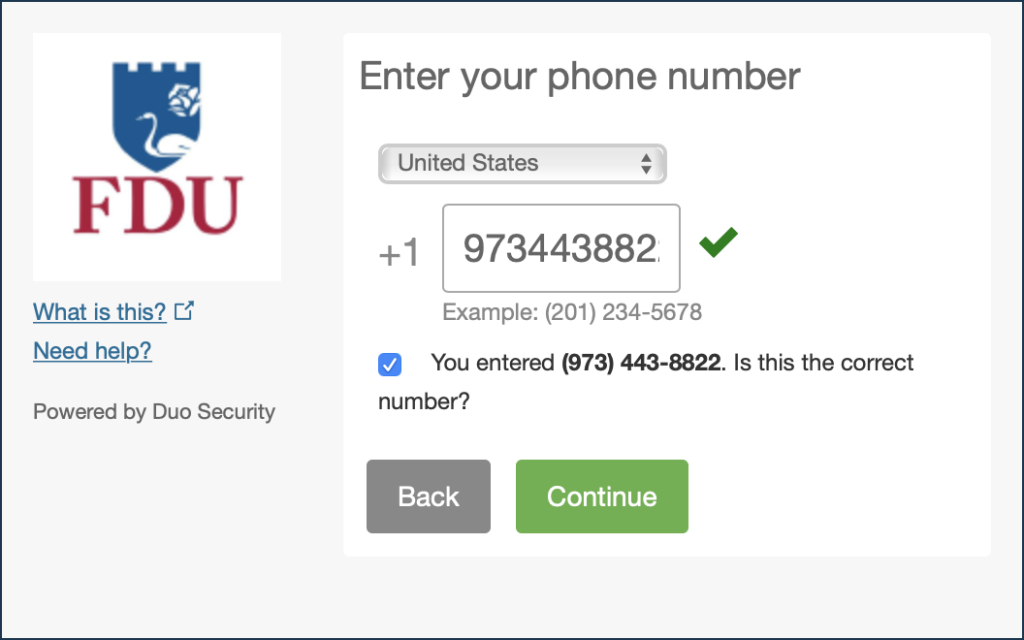
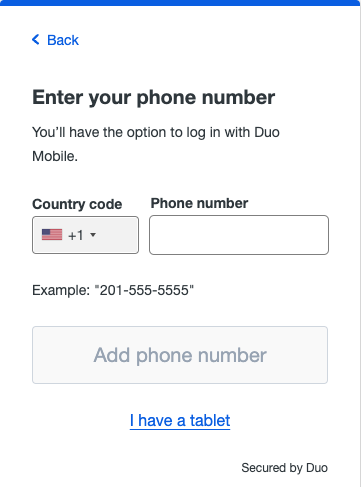
Select your country from the drop-down list and type your phone number. Use the number of your smartphone or cell phone that you installed the DUO Mobile Security App on in the Step 1
Double-check that you entered it correctly, check the box, and click “Continue“
Note
If you’re enrolling a tablet you aren’t prompted to enter a phone number.
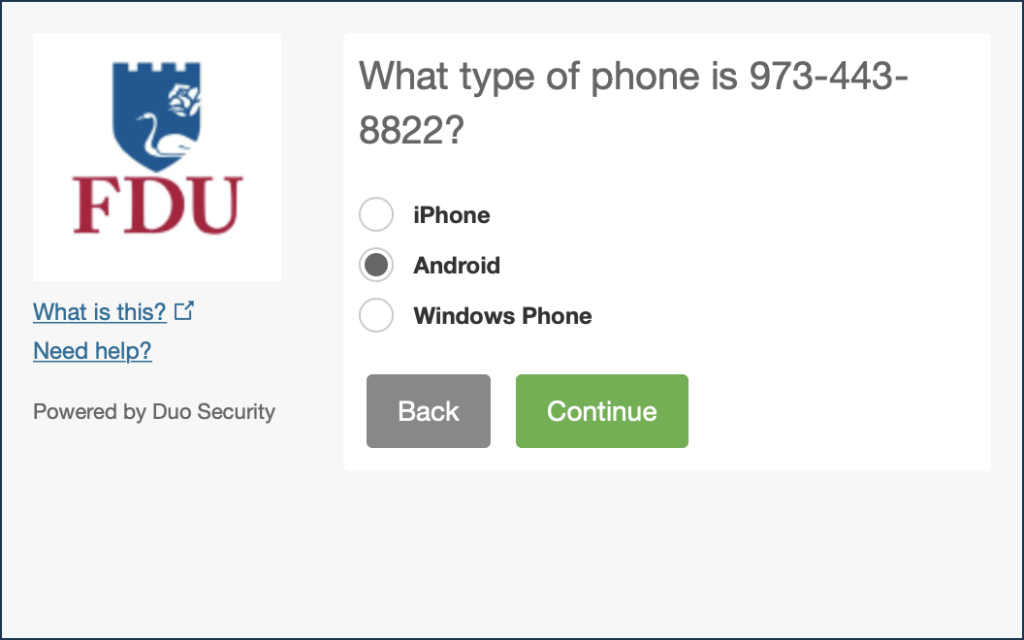
Choose your device’s operating system and click “Continue“
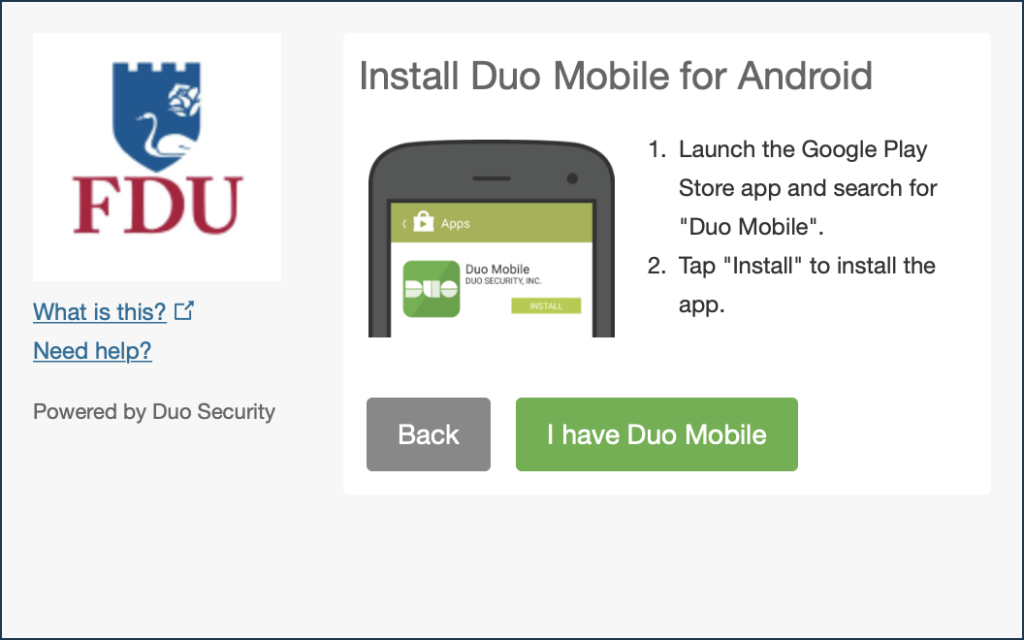
Click “I have DUO Mobile installed”
If you have not completed installing the DUO Mobile App in Step 1 please complete now by following the platform-specific instructions on the screen. After installing the app return to the enrollment window
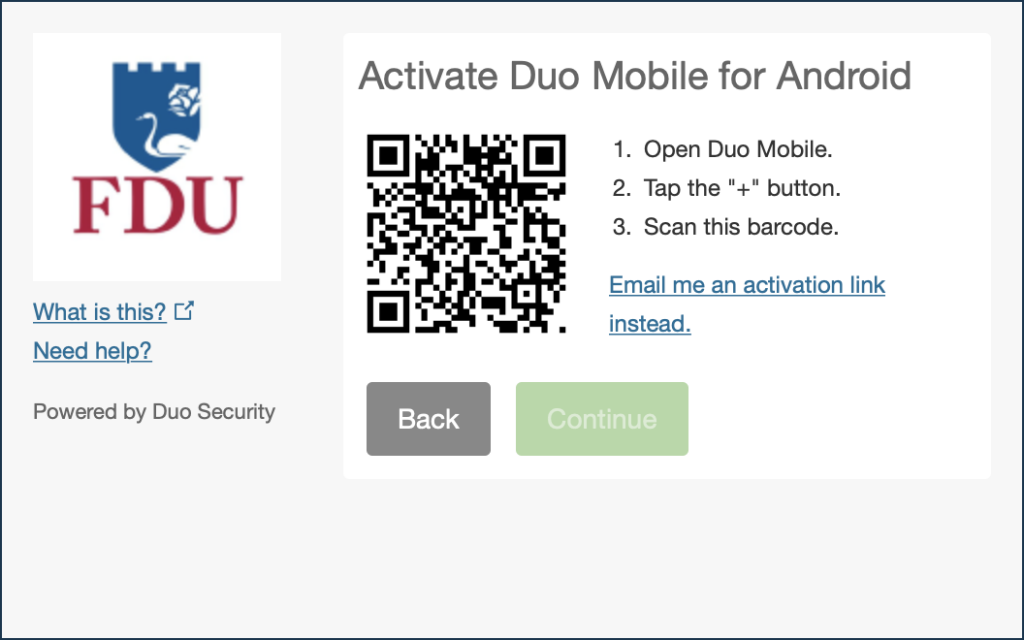
Activating the app links it to your account so you can use it for authentication
On iPhone or Android, activate DUO Mobile by scanning the barcode with the app’s built-in barcode scanner. Follow the platform specific instructions for your device:
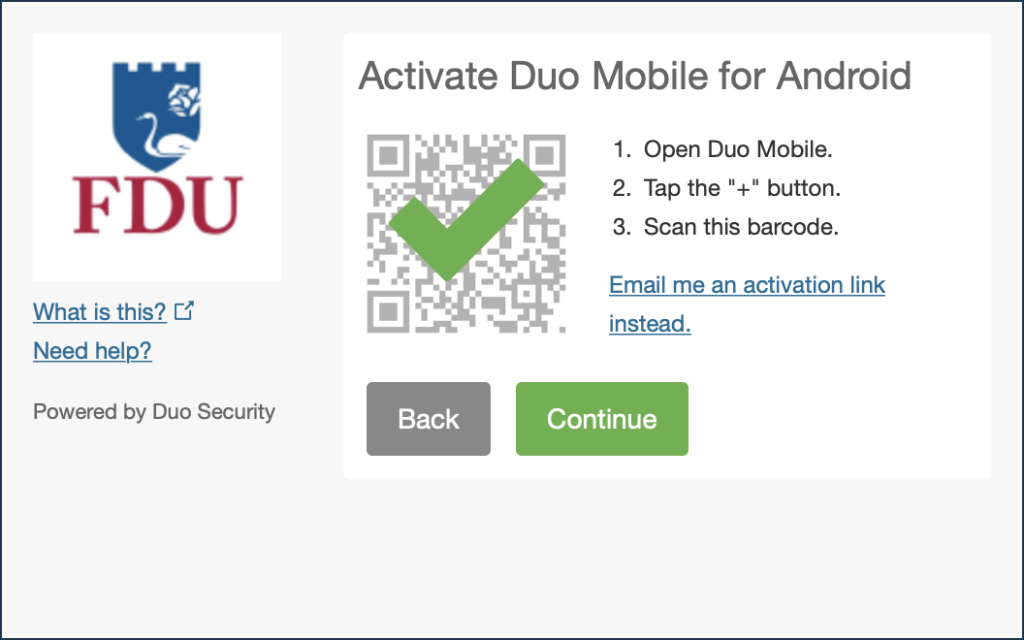
The “Continue” button is clickable after you scan the barcode successfully
Can’t scan the barcode? Click “Or, have an activation link emailed to you instead” and follow the instructions
Once activated click “Continue” to complete registration
Configure Device Options (Optional)
You can use Device Options to give your phone a more descriptive name, or you can click “Add another device” to start the enrollment process again and add a second phone or another authenticator
If this is the device you’ll use most often with DUO then you may want to enable automatic push requests by changing the “When I log in:” option and changing the setting from “Ask me to choose an authentication method” to “Automatically send this device a DUO Push” and click “Save“. With one of the automatic options enabled DUO automatically sends an authentication request via push notification to the DUO Mobile app on your smartphone.
Your device is ready to approve DUO push authentication requests. Click “Send me a Push” to give it a try. All you need to do is tap “Approve” on the DUO login request received at your phone
With DUO activated on your account, and with your device enrolled, you are ready to use DUO. When logging in, you will have two authentication options. Review the options below to determine what works best for you.
Tip
We recommend the push notification to your smartphone, it’s the easiest. You can also check the box “Remember Me for 60 Days” to only perform the authentication once every two months on that device.
close
OKTA Initiated DUO Activation
Note
This step requires a Desktop or Laptop browser.
FDU NetID users who are logging into OKTA for the first time will be prompted to enroll using a browser or a client application that shows the interactive Duo web-based prompt.
Click on “Enroll” to continue
You will be redirected to verify with DUO MFA. Click on “Set up” then “Next” to continue
Supported Browsers: Chrome, Firefox, Safari, Edge, Opera, and Internet Explorer 8 or later. Some browsers do not support all of DUO’s authentication devices. For the widest compatibility with Duo’s authentication methods, we recommend recent versions of Chrome and Firefox.
Choose “DUO Mobile” as your verification method
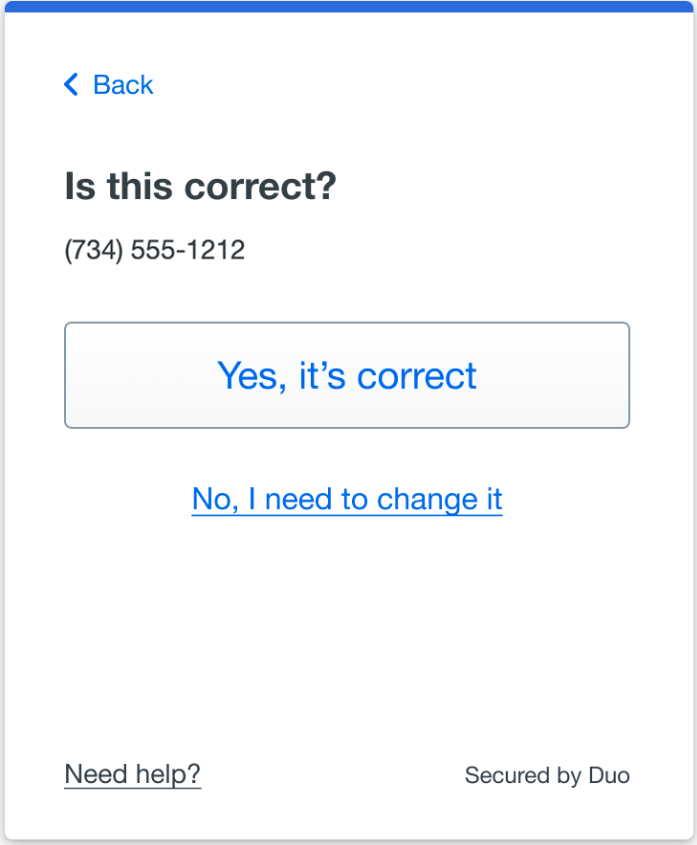
Select your country from the drop-down list and type your mobile phone number. Use the number of your smartphone or cell phone that you installed the DUO Mobile Security App. Click on “Add phone number” to continue
Note
If you’re enrolling a tablet, don’t enter a phone number and click on “I have a tablet” instead
Double-check that you entered your information correctly. Click on “Yes, it’s correct” to continue if the information is correct
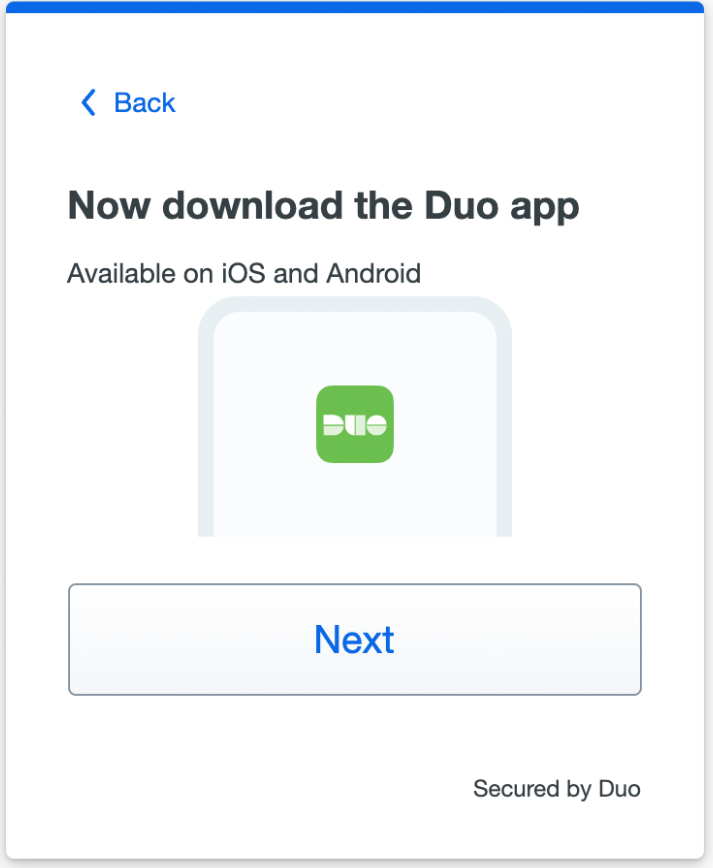
Click “Next” if you downloaded the DUO app as instructed in the first step
If you have not completed installing the DUO Mobile App please complete now by following the platform-specific instructions on the screen. After installing the app return to the enrollment window
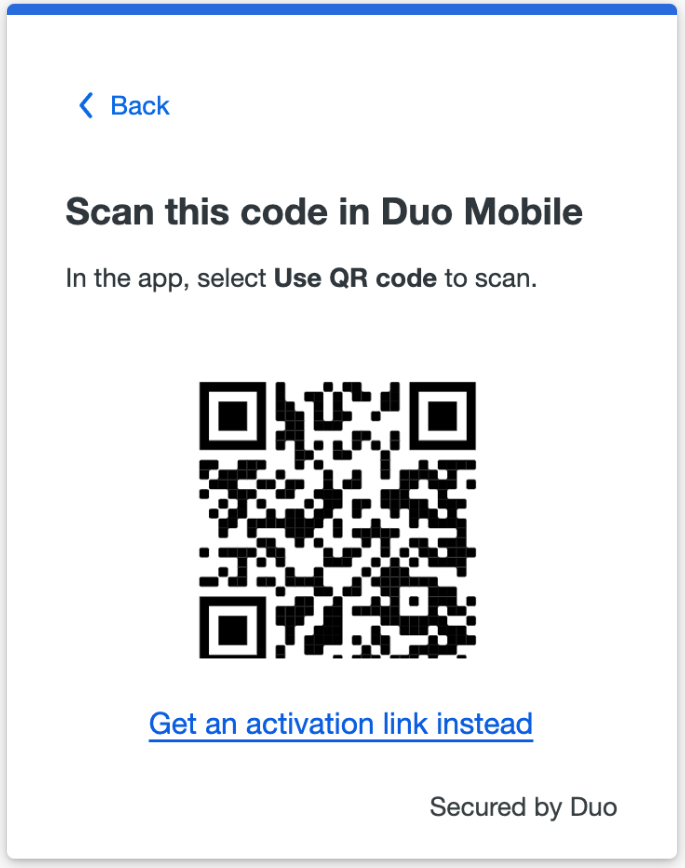
Open the DUO Mobile app on your phone or tablet and add this account by scanning the QR code shown on-screen
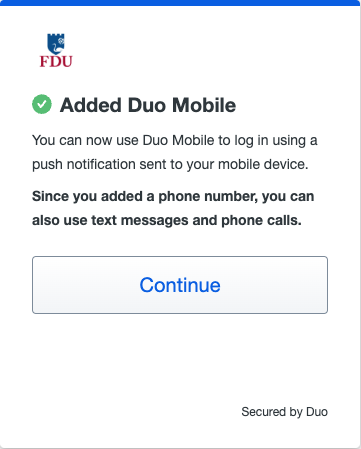
When you receive confirmation that DUO Mobile was added click “Continue“
Note
If you aren’t able to scan the QR code, click on “Get an activation link instead” and then enter your email address to send the activation link to yourself. Open your email address on your Mobile device where you installed DUO Mobile. Follow the instructions in the email to activate the new account in DUO Mobile.
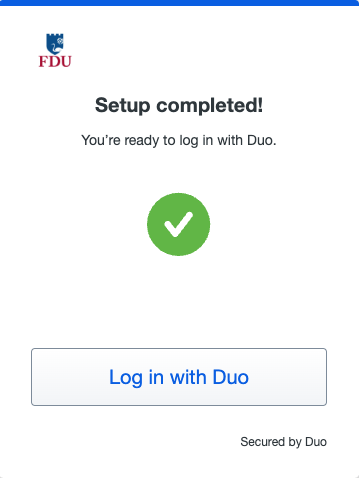
Once the setup is completed, click on “Log in with DUO“
close
Authentication Options
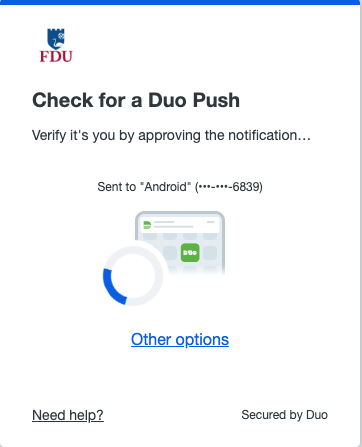
With DUO activated on your account, and with your device enrolled, you are ready to use DUO. When logging in, you will automatically receive a DUO Push but will also have the choice to select from “Other Options“. Review the options below to determine what works best for you.
Tip
We recommend the push notification to your smartphone, it’s the easiest form of authentication.
These are the different ways in which you can use DUO:
Duo Push
Once you have activated DUO Authentication, Duo will automatically send a DUO Push to your registered device. Open the notification on your device, and you’ll see a green checkmark and a Red “x“. Simply tap the “Green Checkmark” to approve the authentication request and gain access to your account.
VPN users select the number corresponding to Push or type “push“. Users with multiple devices will need to include a number indicating desired device i.e. push2.
close
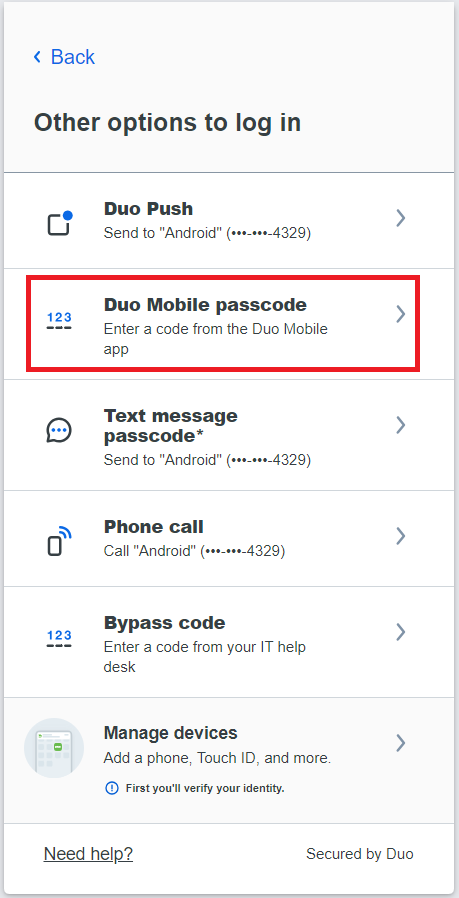
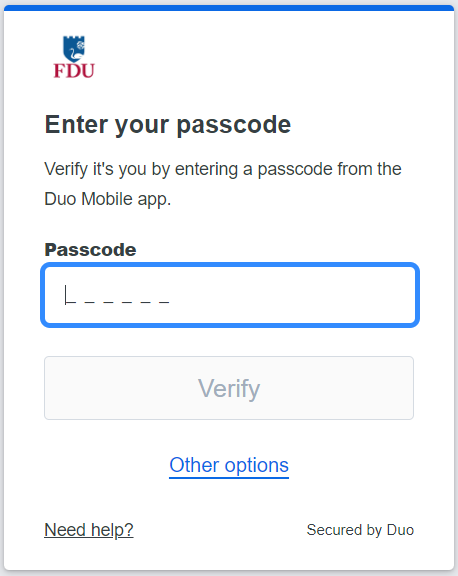
DUO Mobile Passcode
Once you have activated Duo Authentication, you can use the DUO mobile app to generate passcodes. This option does not require wifi or data, so this is a great option if you’re traveling or if you have limited or no cell/Internet service. Open your DUO mobile app, tap the FDU logo and it will reveal a passcode. During login, choose the enter a passcode option, enter the code and you’re in.
close
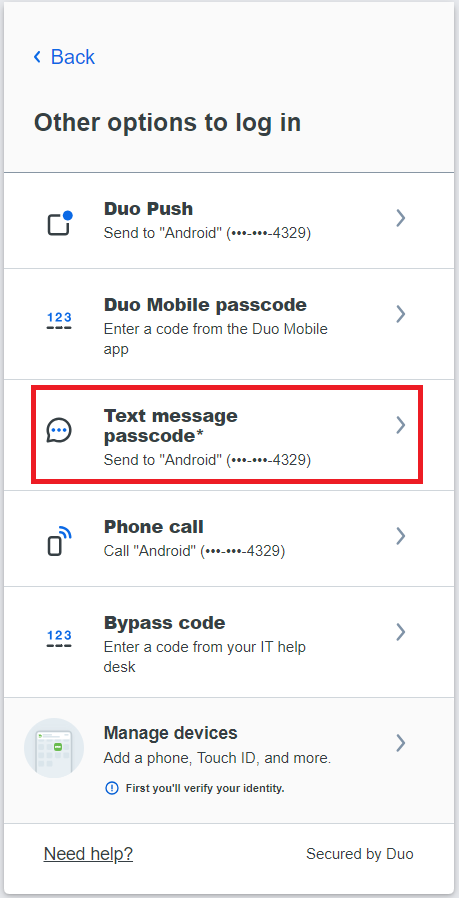
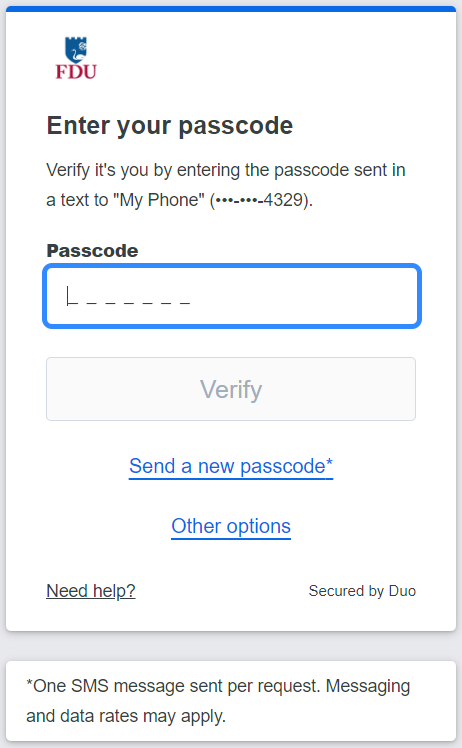
Text Message Passcode (Faculty/Staff)
You can receive a one-time use code via text message. To get your one-time code click on “Text message passcode“. When you land on the text message page, it will show that a text message was just sent to you with a passcode.
VPN users select the number corresponding to SMS passcode or type “SMS“. Users with multiple devices will need to include a number indicating desired device i.e. sms2.
Note
These text message passcodes do not expire, and they are valid until used. You do not have to have a smartphone for this option.
close
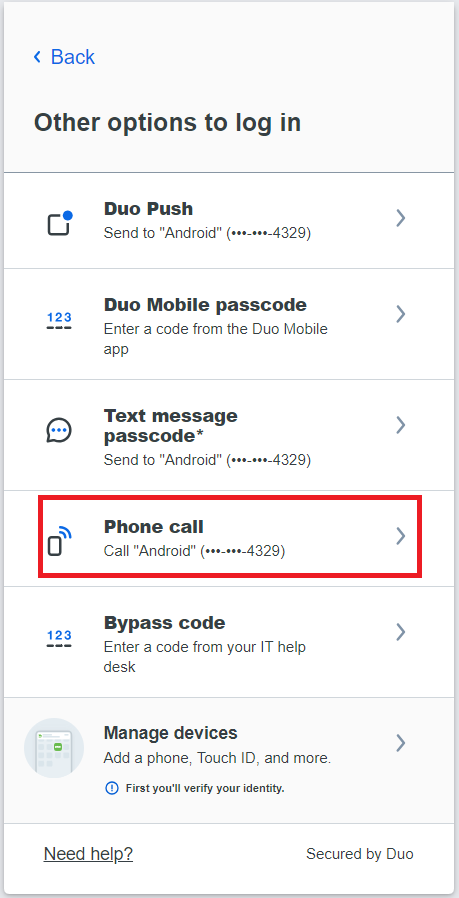
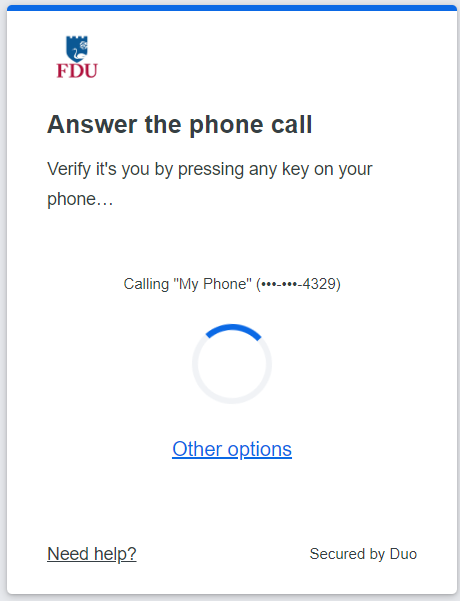
Phone Call (Faculty/Staff)
Click the “Phone call” option and DUO will call your phone. Answer the phone call from DUO and follow the voice instructions to log in to the application.
VPN users select the number corresponding to Phone Call or type “phone“. Users with multiple devices will need to include a number indicating desired device i.e. phone2.
How Do I Change Settings or Enroll Another Device?
You can use the DUO Management Portal to easily edit and add new devices. For instructions on how to access the DUO Management Portal, follow the steps using the link below:
DUO two-factor authentication adds a second layer of security to your FDU NetID. It requires two factors to verify identity. These factors include something you know – your FDU NetID and password, and something you have – a phone or passcode, to authenticate and gain access to your account on FDU services. Passwords alone no longer provide adequate protection against cyber hacking. DUO is required for all current FDU students. Please follow the steps below.
Install DUO Mobile App
The DUO app is available for Android, iOS and iPadOS. Use the links below to install DUO on your mobile device.
In a Desktop or Laptop browser visit the DUO Management Portal to begin the activation process by enrolling your device. Activation requires scanning a QR code with the DUO app’s built-in scanner
Supported Browsers: Chrome, Firefox, Safari, Edge, Opera, and Internet Explorer 8 or later. Some browsers do not support all of DUO’s authentication devices (for example, Security Keys won’t work with Internet Explorer). For the widest compatibility with DUO’s authentication methods, we recommend recent versions of Chrome and Firefox.
Click “Start setup” to begin enrolling your device
Select the type of device you’d like to enroll and click “Continue“. We recommend using a smartphone for the best experience, but you can also enroll iOS/Android tablets
Select your country from the drop-down list and type your phone number. Use the number of your smartphone or cell phone that you installed the DUO Mobile Security App on in the Step 1
Double-check that you entered it correctly, check the box, and click “Continue“
Note
If you’re enrolling a tablet you aren’t prompted to enter a phone number.
Choose your device’s operating system and click “Continue“.
Click “I have DUO Mobile installed”
If you have not completed installing the DUO Mobile App in Step 1 please complete now by following the platform-specific instructions on the screen. After installing the app return to the enrollment window
Activating the app links it to your account so you can use it for authentication
On iPhone, Android, and Windows Phone activate DUO Mobile by scanning the barcode with the app’s built-in barcode scanner. Follow the platform specific instructions for your device:
The “Continue” button is clickable after you scan the barcode successfully
Can’t scan the barcode? Click “Or, have an activation link emailed to you instead” and follow the instructions
Once activated click “Continue” to complete registration
close
Configure Device Options (Optional)
You can use Device Options to give your phone a more descriptive name, or you can click “Add another device” to start the enrollment process again and add a second phone or another authenticator
If this is the device you’ll use most often with DUO then you may want to enable automatic push requests by changing the “When I log in:” option and changing the setting from “Ask me to choose an authentication method” to “Automatically send this device a DUO Push” and click “Save“. With one of the automatic options enabled DUO automatically sends an authentication request via push notification to the DUO Mobile app on your smartphone.
Your device is ready to approve DUO push authentication requests. Click “Send me a Push” to give it a try. All you need to do is tap “Approve” on the DUO login request received at your phone
With DUO activated on your account, and with your device enrolled, you are ready to use DUO. When logging in, you will have two authentication options. Review the options below to determine what works best for you.
Tip
We recommend the push notification to your smartphone, it’s the easiest. You can also check the box “Remember Me for 60 Days” to only perform the authentication once every two months on that device.
close
Authentication Options
There are two ways you can use DUO:
Push Notification
Once the DUO mobile app is installed, you can select to receive a DUO notification on your smartphone. Open the notification, and you’ll see a green checkmark, and a red X. Simply tap the “GreenCheckmark” to gain access.
Passcodes
You can use the DUO mobile app to generate passcodes. This option does not require wifi or data, so this is a great option if you’re traveling or if you have limited or no cell/internet service. Open your DUO mobile app, tap the FDU logo and it will reveal a passcode. During login, choose the enter a passcode option, enter the code and you’re in.
If you do not have your device with you, don’t worry. You can contact the SAMI Service Desk for a temporary passcode. These passcodes can be entered in the DUO prompt on your computer.
close
How Do I Change Settings or Enroll Another Device?
To change settings or enroll another device, visit DUO Management Portal or any DUO-supported application. When you get to the DUO prompt, click the “Settings” button and choose to add a new device or access your settings.
Echo360 helps instructors capture and extend those moments to improve student engagement before, during and after class.
Through our technology platform, students have 24/7 access to classroom discussion, presentation materials, and the lecture itself.
Getting Started with “Echo 360 Universal Capture: Personal“
Universal Capture: Personal is a stand-alone application designed to be used by instructors on their personal computers to generate video recordings. The software enables you to create video recording across multiple computing platforms via a unified interface. That means instructors can record and share video on Mac and Windows computers, inside or outside of the classroom, with an identical user experience on each device.
For those faculty members who do not yet have an Echo 360 account, it is necessary for you to login to Webcampus first. Therefore, please follow the directions below in order for you to have access to Echo360 environment. Once you have completed these steps via webcampus, thereafter users will be able to login directly to echo360.fdu.edu with their FDU NetID credentials.
Note
For those who already have an account in Echo360 please go to Step 13.
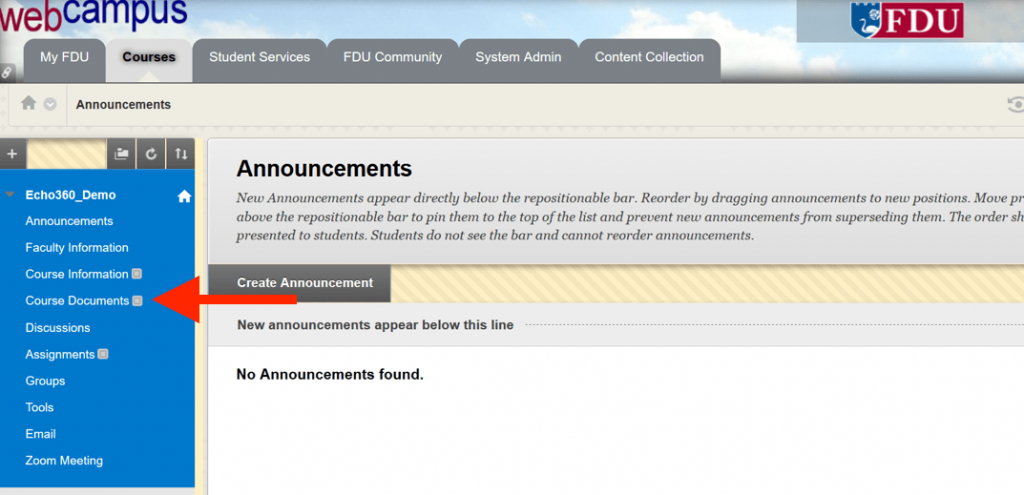
Login to Webcampus using your FDU NetID
Click on “Your Course“
Click on “Course Documents“
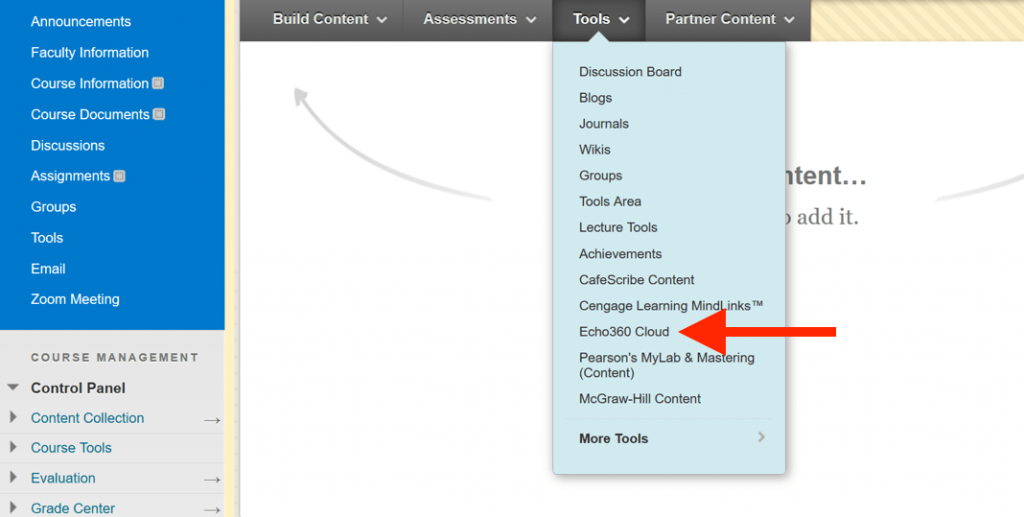
Click on “Tools“
Click on “Echo360 Cloud“
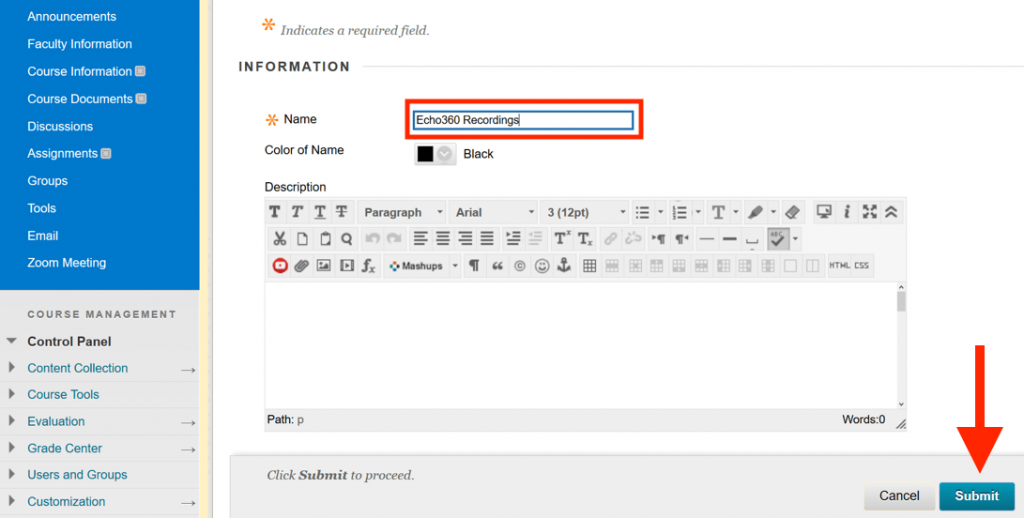
In this page, enter a Name that makes it clear this is the link for Echo360 class content, for example: “Echo360 Recordings”
Click “Submit“
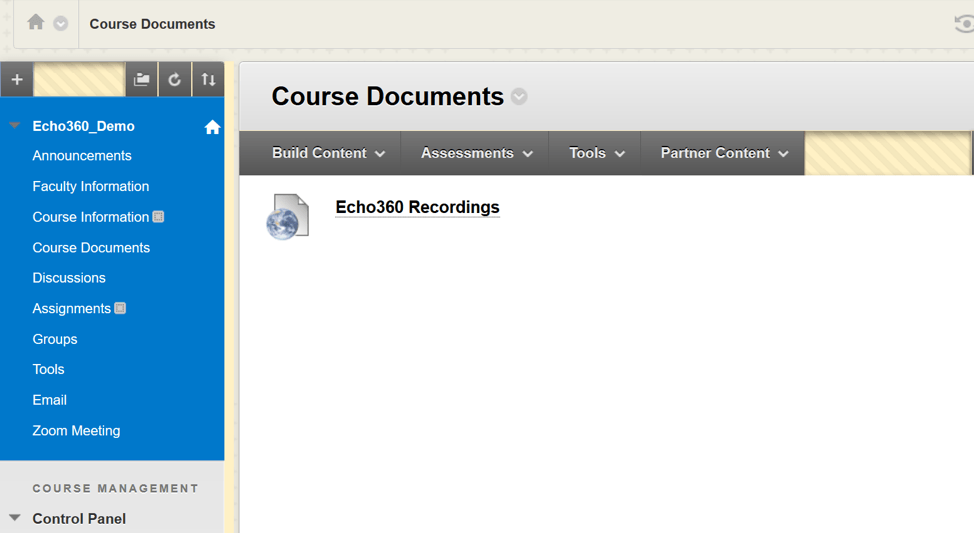
A new link will appear on your Course Documents page titled “Echo360 Recordings“. This maybe at the bottom of the Course Documents page
Click on the “Echo360 Recordings” link. This will redirect you to the Echo environment
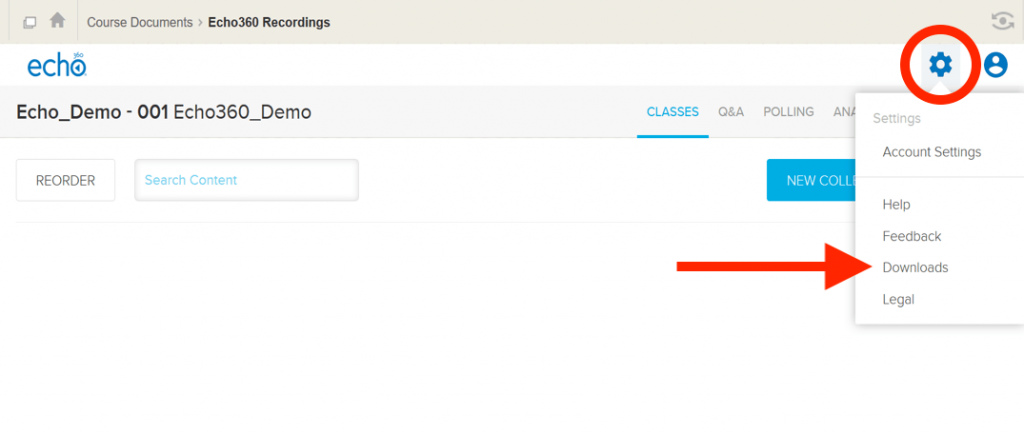
Click on the “Gear Icon” on the top right
Click on “Downloads“
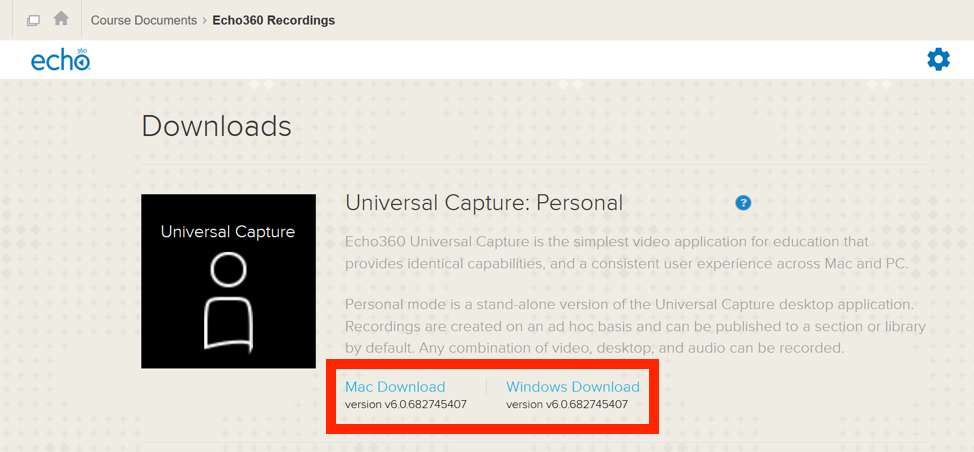
From the Universal Capture: Personal area of the Downloads page, select the link to download the installer appropriate for the type of computer/operating system you are running. After you have downloaded the personal capture, follow the instructions on how to capture your lectures using this tool
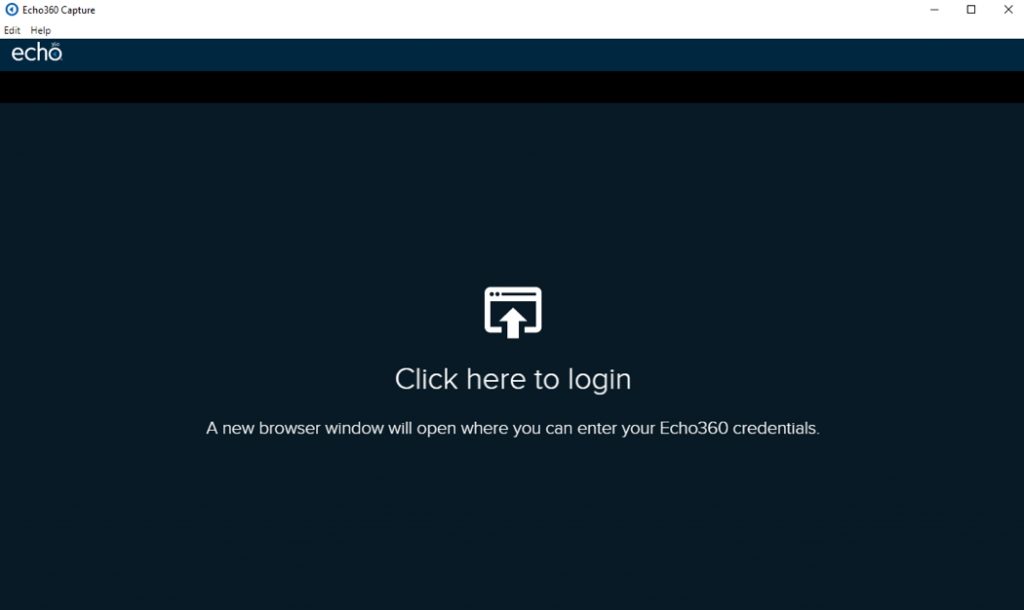
Once you have installed the software, please launch the Universal Capture: Personal application. If you see the following login screen, click on the link and login with your FDU NetID credentials
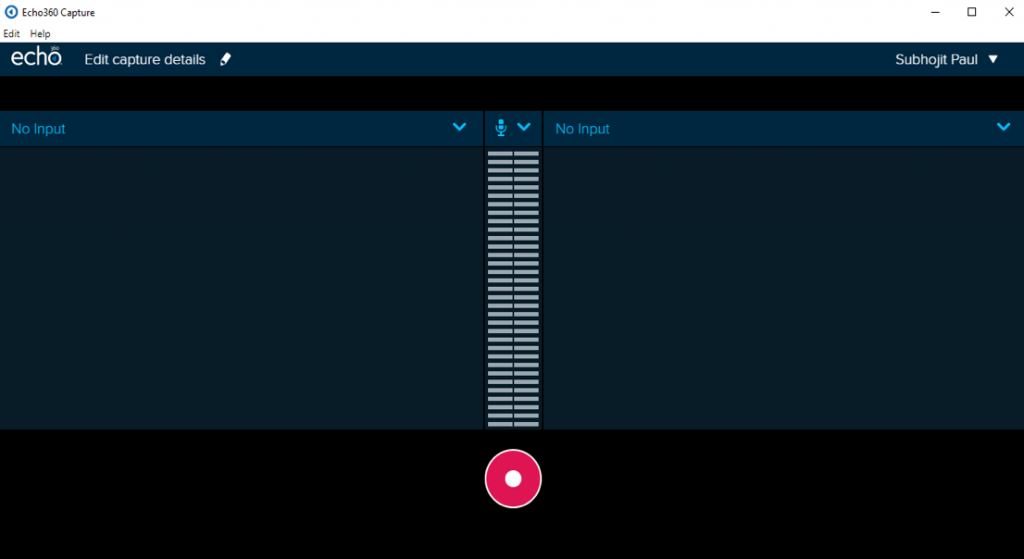
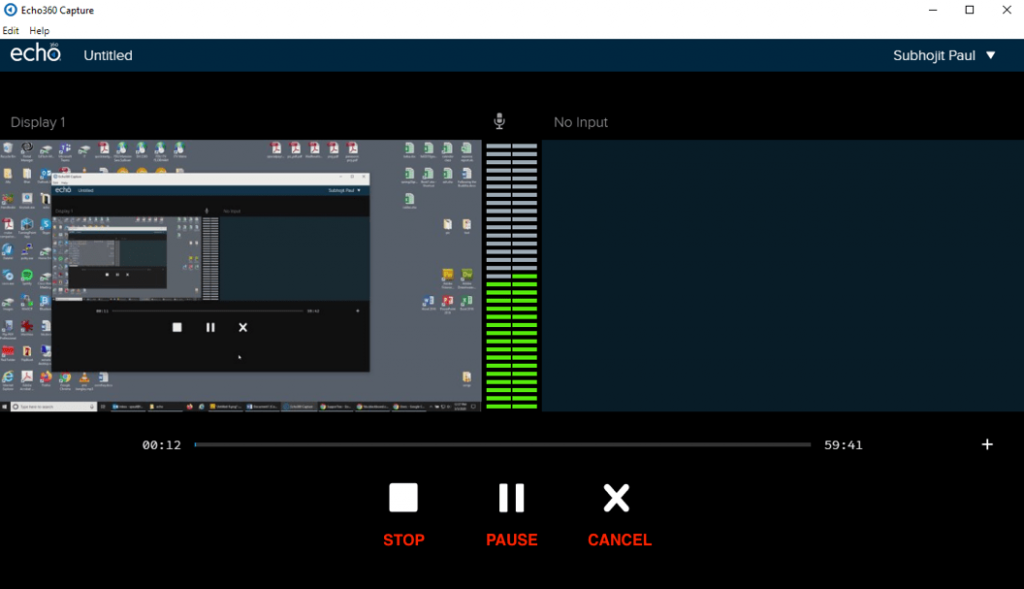
After logging in select the inputs you want to capture from the two drop down menu. If the drop down menu says No Input just select the option you want from the available sources
Left Input: Click on the dropdown menu to select your input for the left video channel (e.g. display, webcam, etc.).
The bars in the middle shows the volume levels of the audio capture.
Right Input: Click on the dropdown menu to select your input for the right video channel (e.g. display, webcam, etc.).
The Display option from the drop down menu chooses the application that you want to record from your computer for example a PowerPoint presentation.
Preview the inputs on the screen; to be sure, they will record properly.
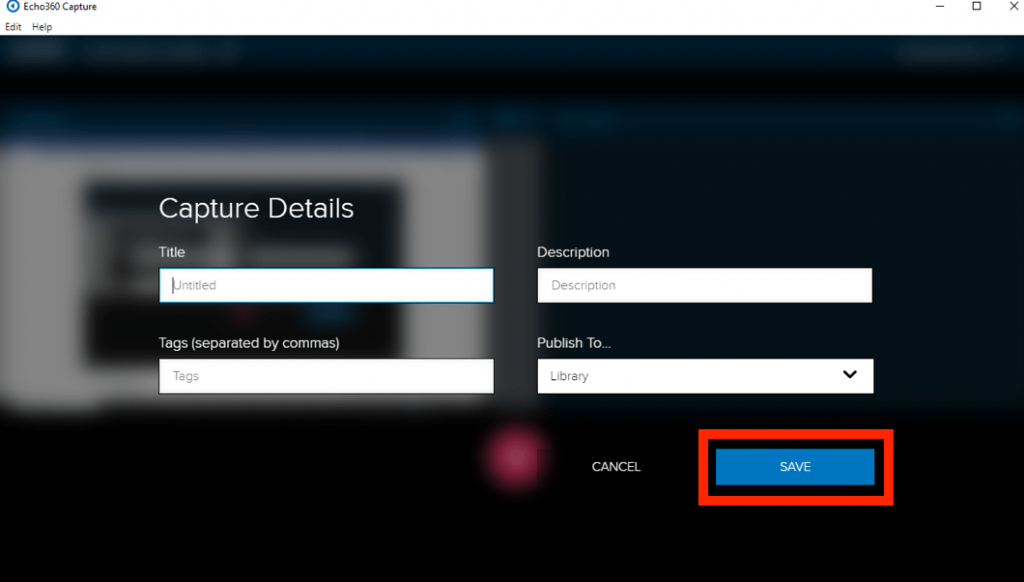
Click the “Pencil Icon” or title to launch the Capture Details dialog box
Enter a Title, add a Description or Tags and select a Publishinglocationfor the recording. By default, your recordings are published to your “Library” folder
Click “Save”
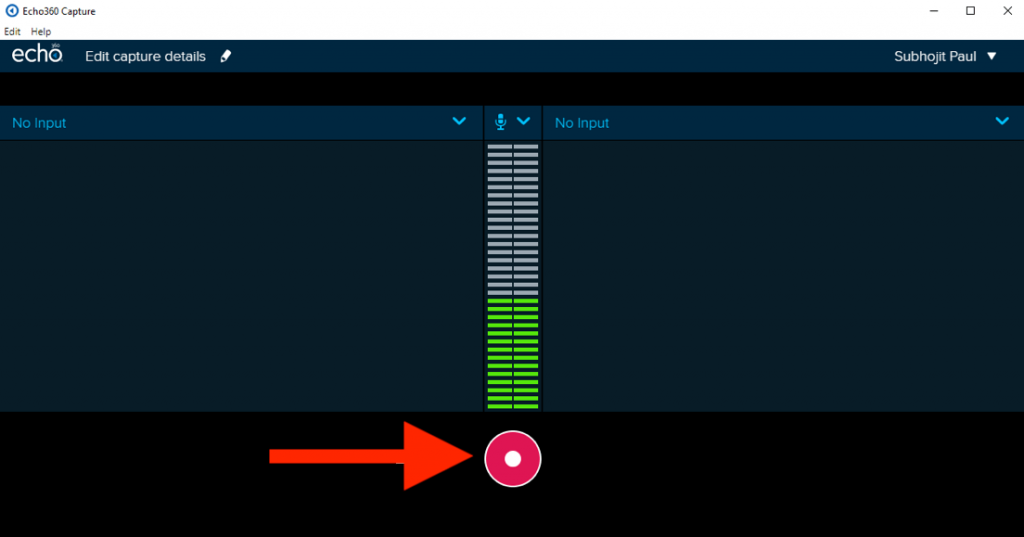
At this point, if you are going to present any materials via PowerPoint, Web or any other applications open it and minimize it
When you are ready, click the “Record” button. You will have 5 seconds before recording starts so you can switch to the material you want to present
During a recording, you will have the option to Stop, Pause, or Cancel recording. Do not stop recording until you are totally finished with the session. If you click on the cancel button, it will cancel the entire recording
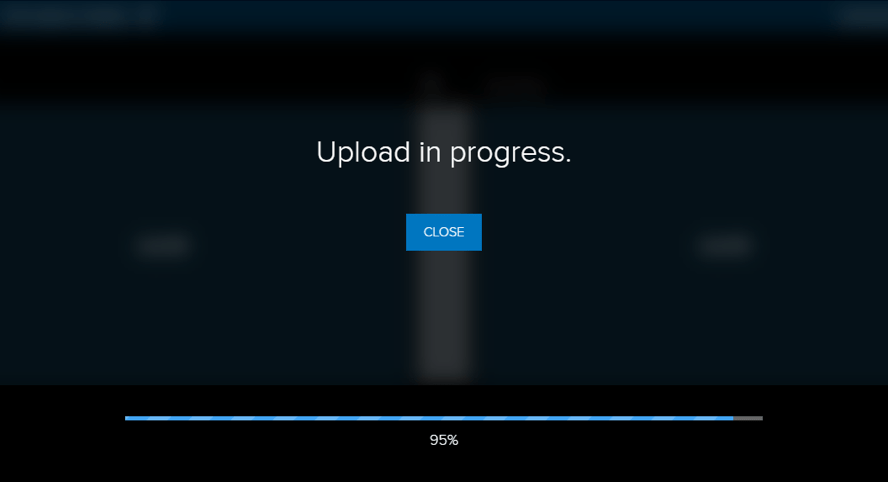
Once you stop the recording, you will receive a message and you can click on the “Close” option to exit the program. Once your recording process is finished, it will automatically publish to the location that you have specified. You will receive an email when processing is finished and you are able to view your recording
Viewing Recording
Once you receive the email, your video is online and ready to be viewed.
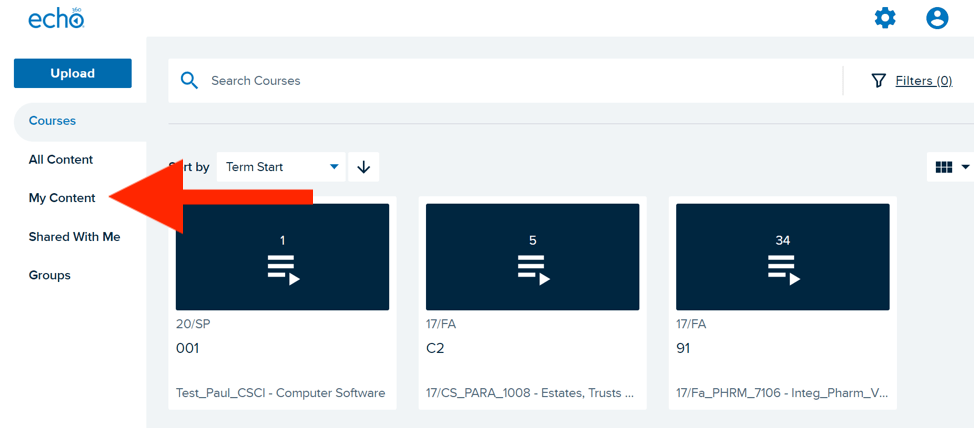
Click on the “My Content” tab on the left side of the window.
Click on the recording that you want to view
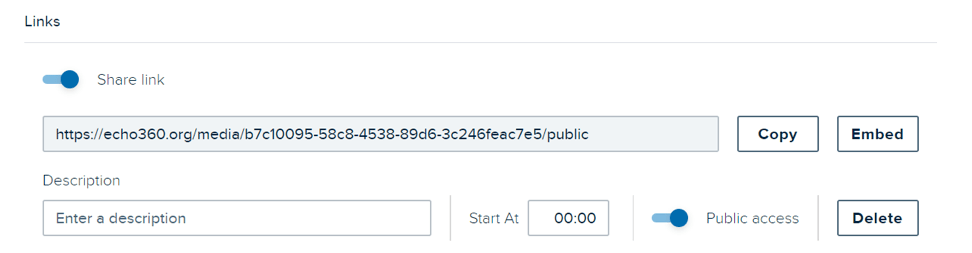
If you want users to view your recording, scroll down towards the bottom of the screen to the “Links” section. Copy the link and you can send it to users via email
COLLEAGUE uses single sign-on protocol for users to login. The login or user ID consists of the first part of the FDU NetID up until the @ sign in the NetID.
For instance, if your NetID webmail address is john.q.public@fdu.edu your COLLEAGUE login ID would be “john.q.public“
The password would be the exact same one that you use with your FDU NetID.
Virtru email encryption is the preferred method to send and view encrypted emails and files with your FDU email address. Available for FDU Faculty and Staff upon request. Click the link below to request access to Virtru Email Encryption.
If you are not approved for Virtru email encryption, the articles below are alternative, FDU OIRT and DSIRT approved methods for encrypting Microsoft Office and Adobe PDF files and comply with the University WISP.
According to FDU’s Written Information Security Program (WISP), in no case should they be sending or storing WISP protected information without the explicit authorization of the Chief Information Security Officer (CISO). If approved, these instructions will provide you with guidance on the methodology.
For more information, visit the link at the bottom of the page.
Follow these easy to use instructions for encrypting Word, Excel, and Acrobat files using built-in features.
Encrypting Word & Excel Documents
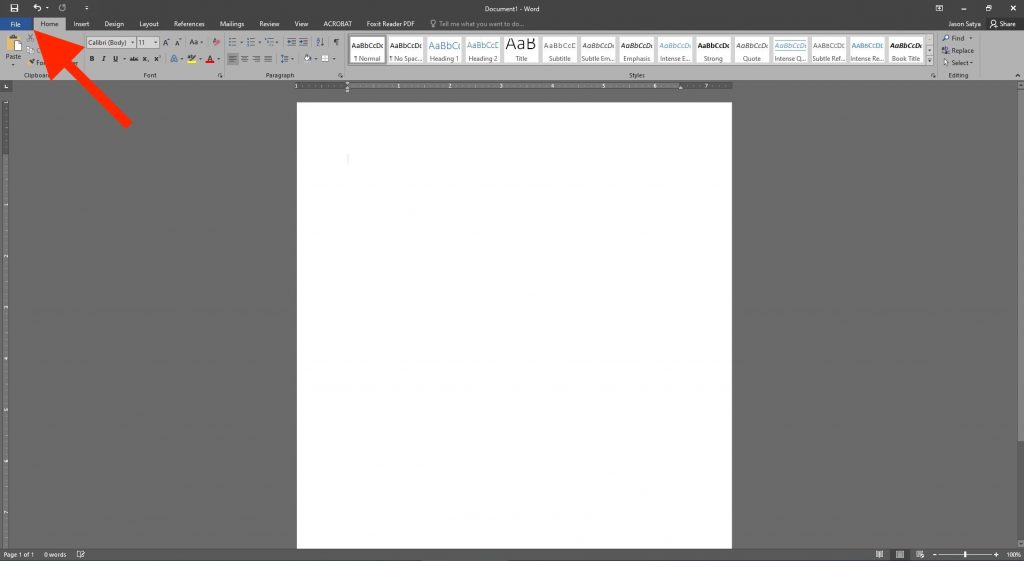
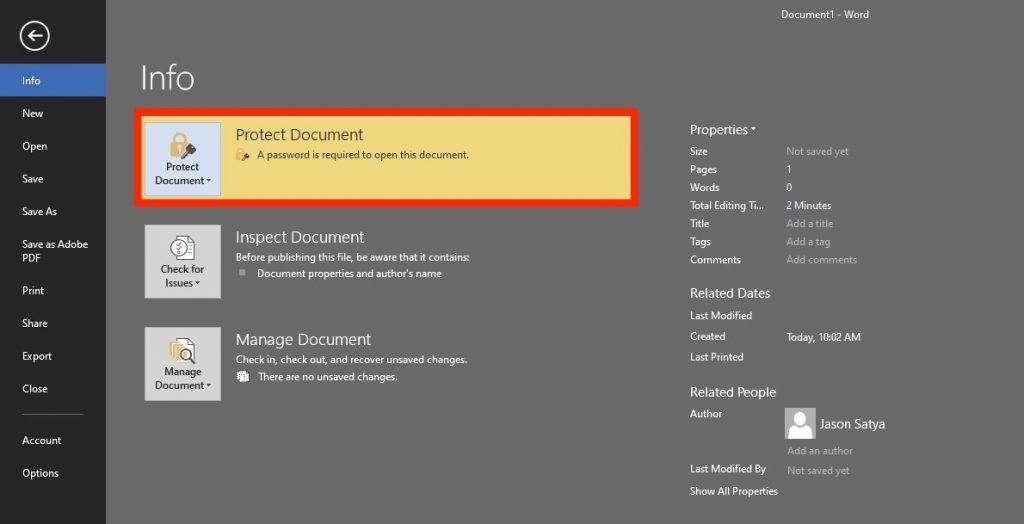
For Word and/or Excel files, first click on File on the upper left-hand corner
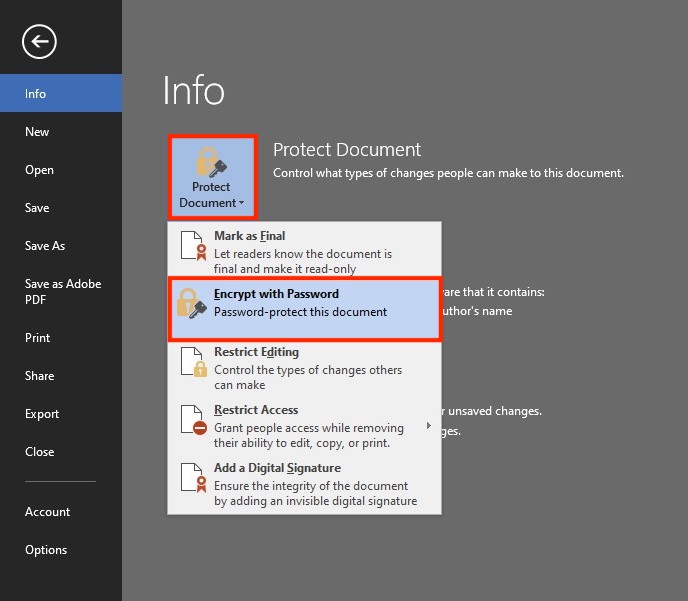
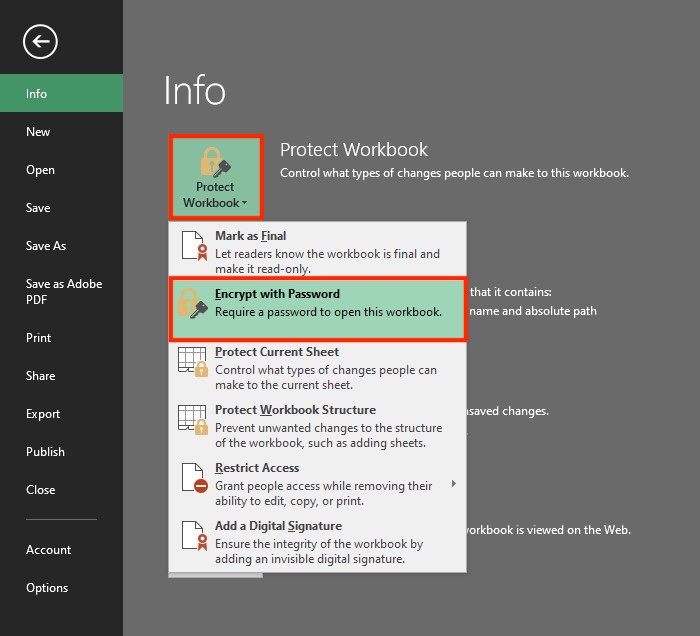
Under the Info tab, click on Protect Document for WordandProtectWorkbook for Excel followed by Encrypt with Password
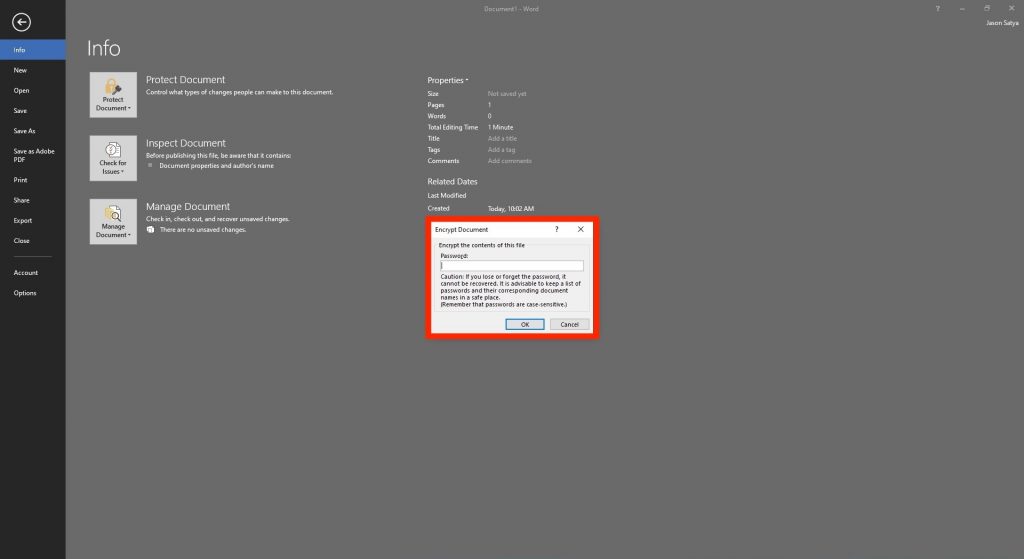
Enter a password in the pop-up window. Re-enter the password in the next window to confirm
The below message will confirm your document has been password-protected
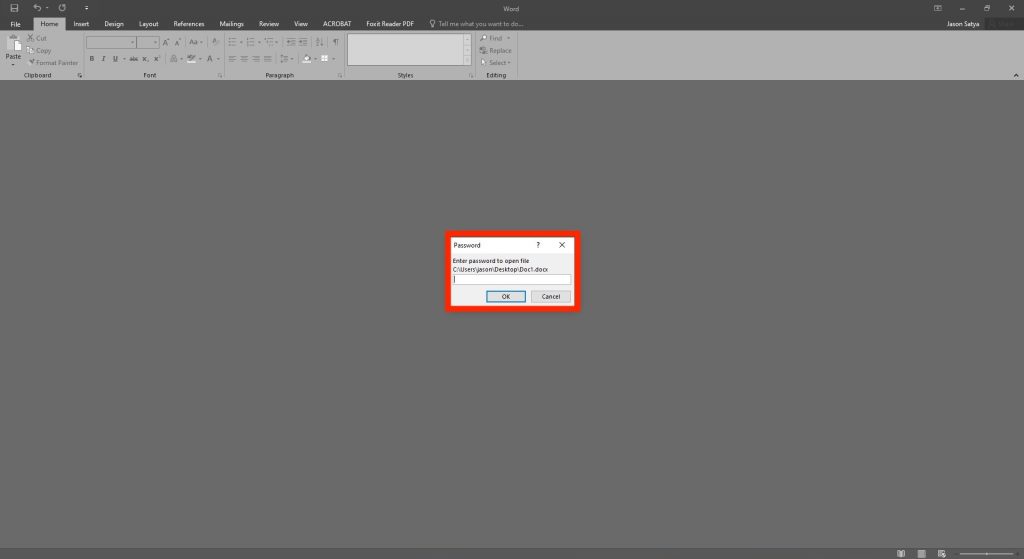
To open a password-protected file, double-click on the file and enter the created password
close
Encrypting PDF Files
NOTE:
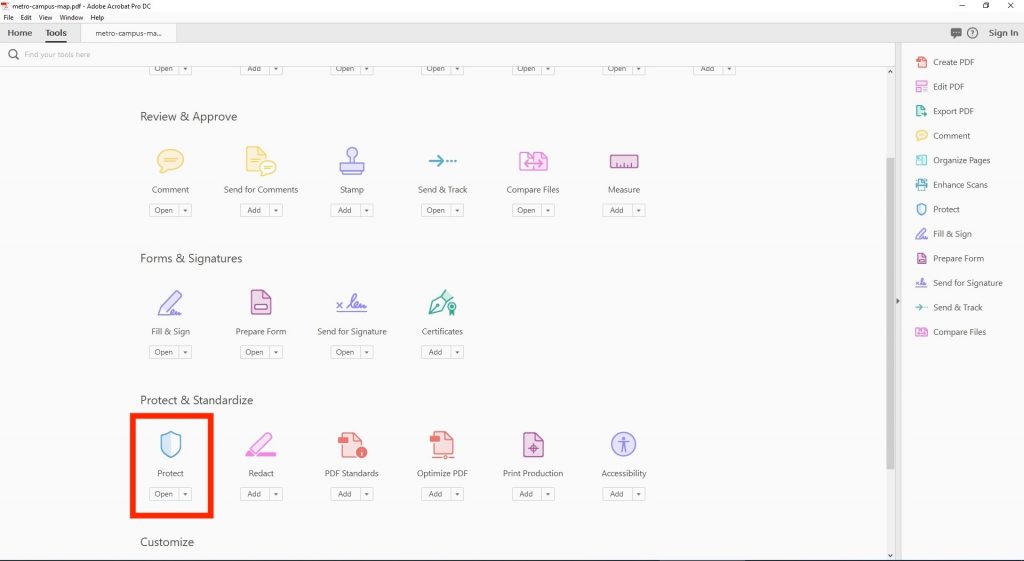
Adobe Acrobat Pro DC or Adobe Acrobat for macOS is needed to encrypt PDF files with a password. This feature is not available in the free version of Adobe Acrobat Reader DC.
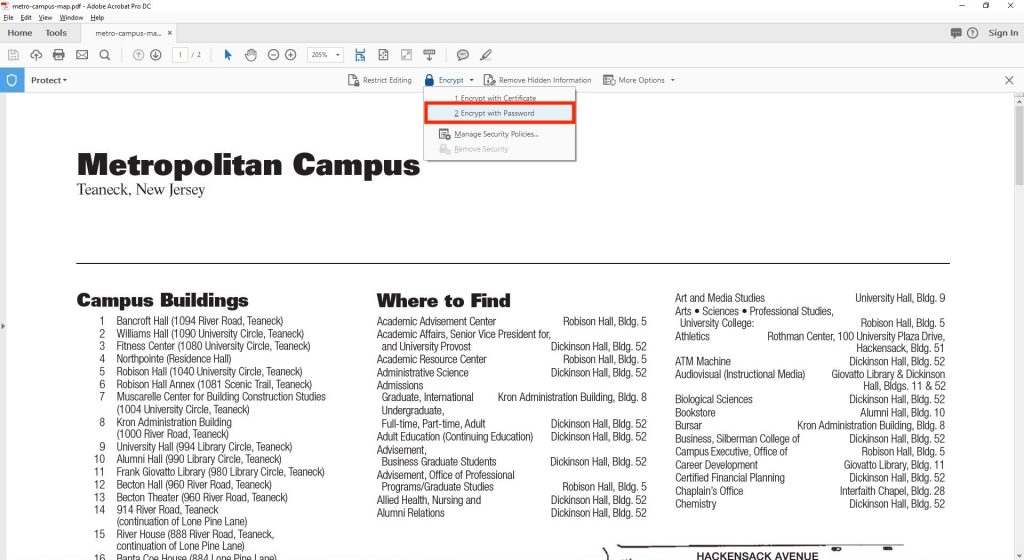
Select Toolson the Navigation Taband then select Protect
On the Protect Tab select Encrypt
Select Encrypt with Password. Then select Yes on the security pop-up window
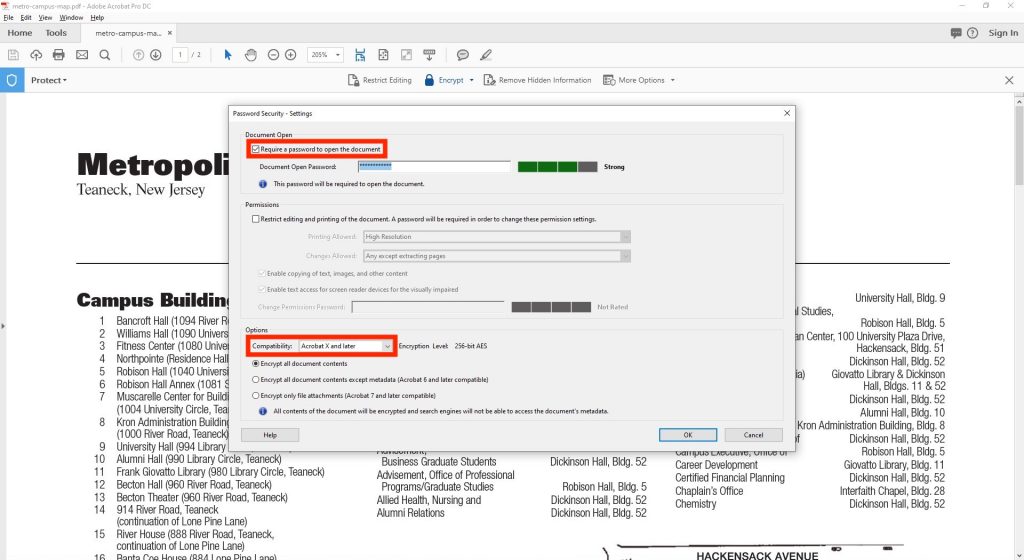
Check Require a Password to Open the Document and then choose a strong password. Under compatibility, choose Acrobat X and laterto change the encryption method to 256-bit.
Confirm the password when requested. Please note that the document WILL NOT be fully encrypted until it is saved
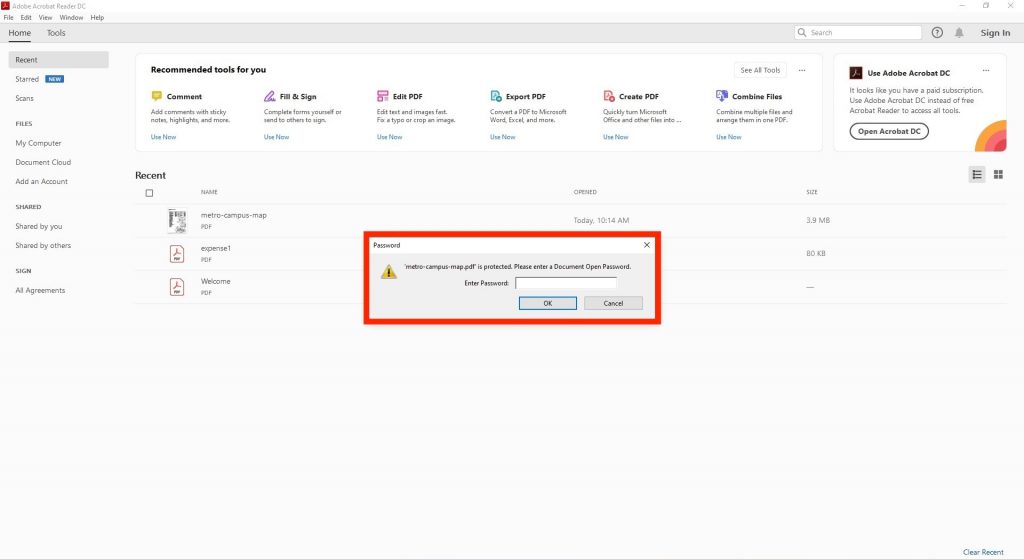
To open the file, double-click the file and enter the created password.
To maintain a secure and productive Microsoft Teams experience at Fairleigh Dickinson University, it’s important to understand how to manage external communication requests, recognize brand impersonation attempts, and report suspicious content. This guide offers clear, step-by-step instructions to help you stay secure while using Teams.
Managing Incoming Requests from External Users
To ensure your Teams environment remains secure, review and manage requests from individuals outside of FDU before accepting any communication.
Steps to Manage External User Requests:
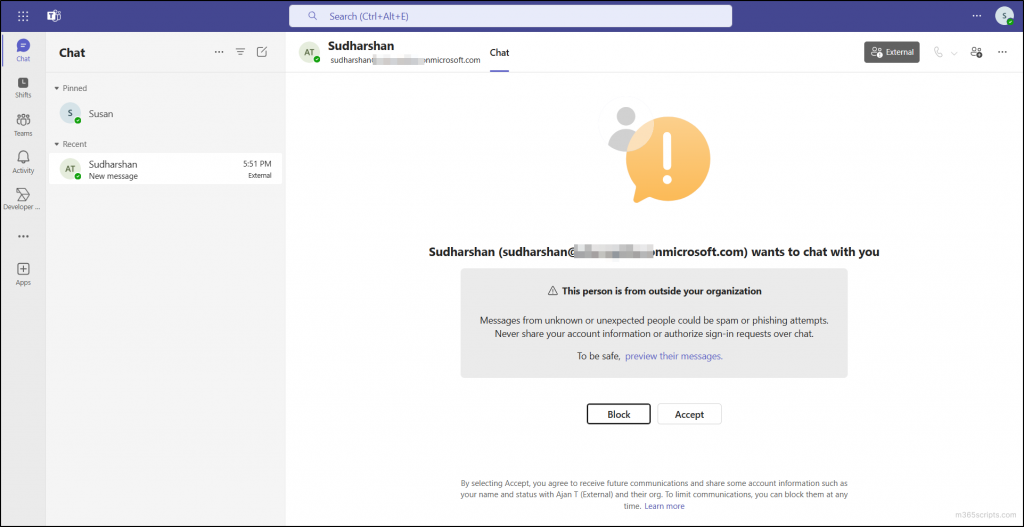
Initial Notification: When someone outside FDU tries to initiate a chat, you will receive a notification indicating they are external to your organization
Review the Request: Examine the name and any provided details. Be cautious of unfamiliar or suspicious names
Choose an Action:
Click “Accept” if you recognize the individual and have a valid reason to communicate
Click “Block” if the person is unfamiliar or seems suspicious. Blocking prevents further contact
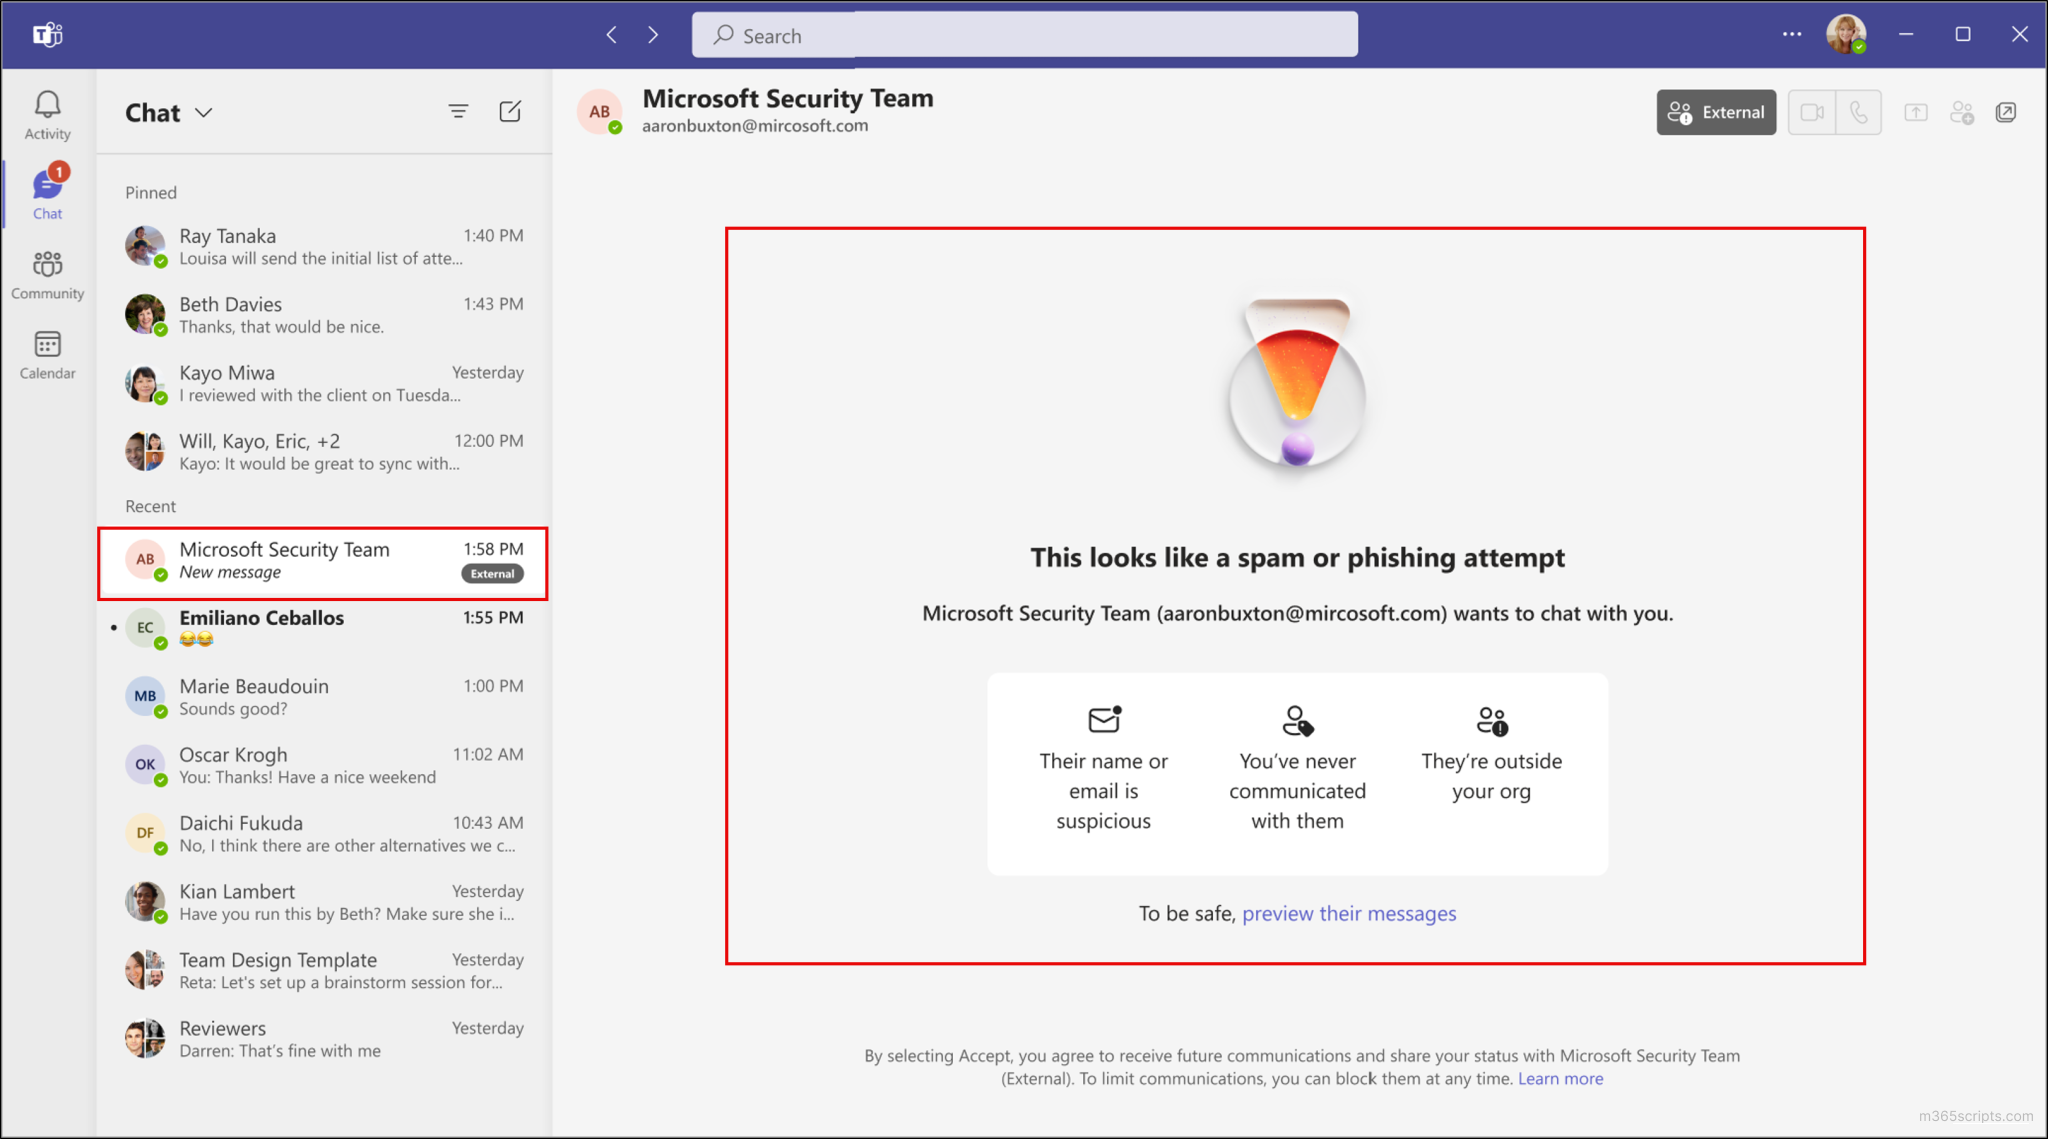
Protecting Against Brand Impersonation in Teams Chat
Microsoft Teams now detects potential brand impersonation attempts automatically. This feature alerts you if an external user’s message seems suspicious.
Steps to Protect Yourself:
First Message Analysis: Teams evaluates the external user’s name and email for impersonation risks
High-Risk Alert: If a potential threat is detected, Teams will display a prominent warning with one or more of the following:
The sender’s name or email resembles a known FDU entity
No previous communication history with the sender
The sender is outside your organization
Review the Message Content: Click “Preview their messages” and read the message carefully. Watch for urgent requests or unusual links/attachments
Second Warning (If Applicable): If you proceed to accept, Teams may display another warning about the associated risks
Make Your Decision: Use the alerts and message content to decide whether to continue the conversation
Reporting Suspicious Content
Reporting suspicious messages, calls, or users within Teams helps FDU’s security team manage potential threats effectively.
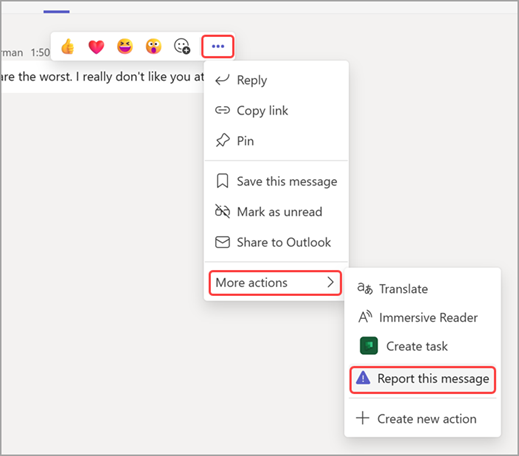
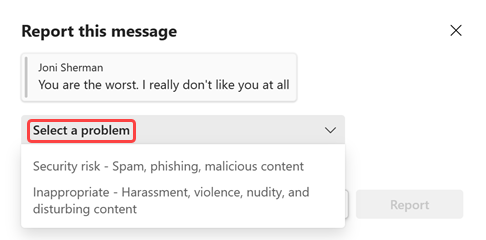
Reporting Messages from Internal User:
Hover Over the Message: Place your cursor over the suspicious message.
Click the “More options” (…) icon > More actions > Report this message.
In the dialog that opens, verify Security risk – Spam, phishing, malicious content is selected, then click “Report”
In the confirmation dialog, click “Close”
Reporting Messages from External Sender:
If you receive a suspicious message from an external sender (e.g., @outlook.com, @live.com), the “Report this message”option in Teams will not be available.
To report a suspicious message from an external source, you must create a SAMI support ticket:
Click “Get Support” button located at the bottom of this article
Create a support ticket and include all relevant details about the suspicious message
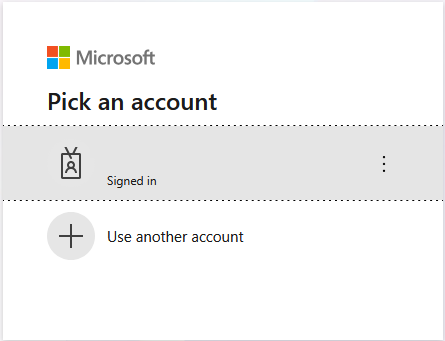
Sign in using your FDU account, enter your FDU username and password, complete DUO MFA verification by selecting “Approve”, and then select your Microsoft account (your FDU account)
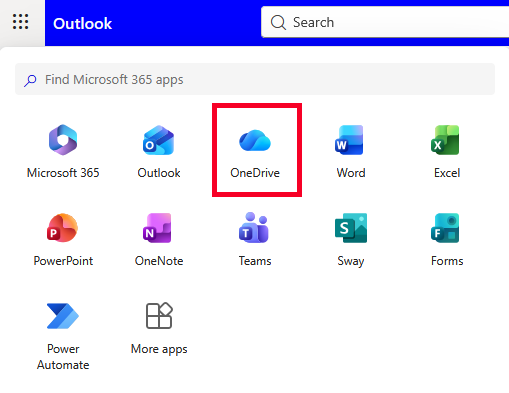
After signing in, you will be taken to Web Outlook by default
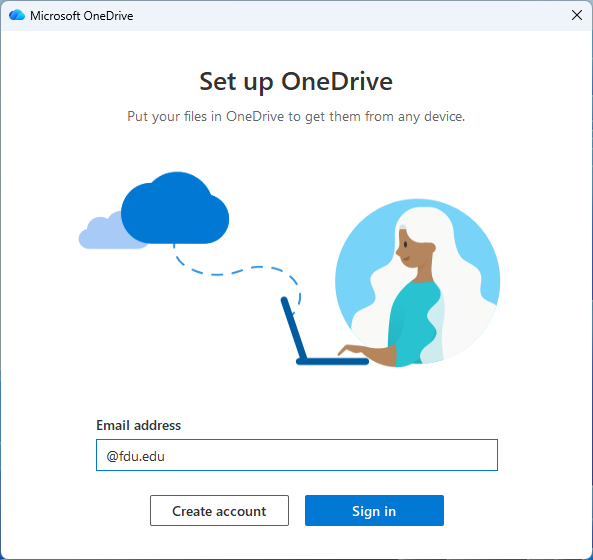
Click the “App Launcher” (9 dots in the top-left corner)
Click “OneDrive”
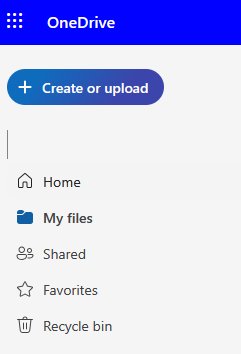
In the left column, click “My Files”
All files on your OneDrive will be displayed under My Files. To select all files, hover to the left of “Name”
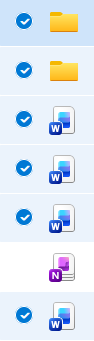
Note
OneNote files cannot be downloaded in bulk. If a downloaded folder contains a OneNote notebook, the .zip file will include an error message in a .txt file.
Unselect any OneNote notebooks
Click “Download” icon
OneDrive will prepare a .zip file which will download to your computer
close
OneDrive Client
Install the Microsoft OneDrive client for Windows or macOS
FDU provides remote access to many software applications typically found in university computer labs. This new Virtual Desktop Infrastructure (VDI) gives users access to a Windows desktop environment along with many General Lab Software, without requiring downloading and installing programs on a user’s personal equipment. The service, called FDU Anywhere, is powered by University Systems and Networking (USAN) and can be found at anywhere.fdu.edu.
Using FDU Anywhere is like walking into one of FDU’s computer labs. Upon logging in with your FDU NetID and password, you will have access to the virtual platform. To find a list of currently available software on FDU Anywhere, use the FDU Software Catalog. A listing of available Free and Open Source software can also be found by visiting the FDU Software Catalog.
The FDU Software Catalog provides an up-to-date catalog of software available to Faculty, Staff, and Students at the university:
FDU Anywhere is a powerful resource with a lightweight footprint. In order to utilize FDU Anywhere, you must have the following:
Any device with a browser that supports HTML 5 will work. HTML 5 is supported by almost all desktop and mobile browsers including Google Chrome, Apple Safari, Microsoft Edge, and Mozilla Firefox
An internet connection
FDU NetID credentials
Tip
Your system hardware specifications may impact the performance of FDU Anywhere, such as systems with less than 8GB of memory.
Network Requirements
For the best experience, while using FDU Anywhere, your network should:
Have a download speed of at least 5Mb/s or more
If your download speed falls below 5Mb/s, the connection could become unstable and cause issues with your stream
Have an upload speed of 5Mb/s or higher
An upload speed of 5Mb/s is enough to use a basic mouse, keyboard, and controller. More bandwidth-heavy devices such as webcams, microphones, and external storage devices can use up to 100Mb/s
Wired network connections are preferred over Wi-Fi network connections whenever possible
Wired network connections are more stable and offer more bandwidth over Wi-Fi
For graphics-intensive applications, like Adobe Creative Cloud and Autodesk, we recommend using a wired network connection instead of Wi-Fi, ideally with a bandwidth of 5 Mbp/s.
Wi-Fi networks with 5Ghz rated wireless connections are preferred over 2.4Ghz wireless routers and provide better performance.
VPN Applications and Connections
Warning
The use of any VPN Software within FDU Anywhere is not allowed. Using a VPN client in FDU Anywhere may interrupt your session and disable your access for approximately 15 minutes.
Testing your Connection
Your experience with FDU Anywhere greatly depends on your internet connection. Testing your connection can help you identify and correct most issues.
To test your Internet connection speed, click the link below:
For the best overall experience using FDU Anywhere, Google Chrome is the browser of choice.
Use your FDU Credentials (NetID and associated password) to complete the login to the FDU Anywhere
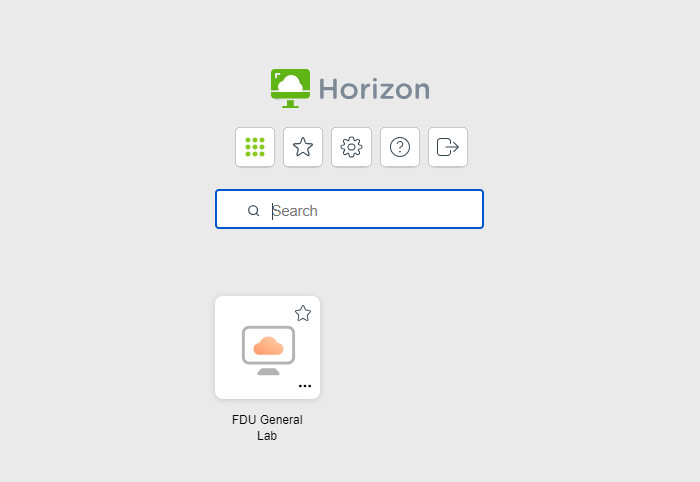
General Lab
Note
When you login to the General Lab experience, it may take about 60 seconds to get to the desktop. This is because your profile is being created or loaded.
The selected app or desktop opens in a new browser tab
Note
Depending on your screen resolution, your desktop experience view may differ from the picture above.
Log Out of FDU Anywhere
Logging out is a critical step in making sure others continue to be able to easily accessFDU Anywhere services. To log out of FDU Anywhere, follow these steps:
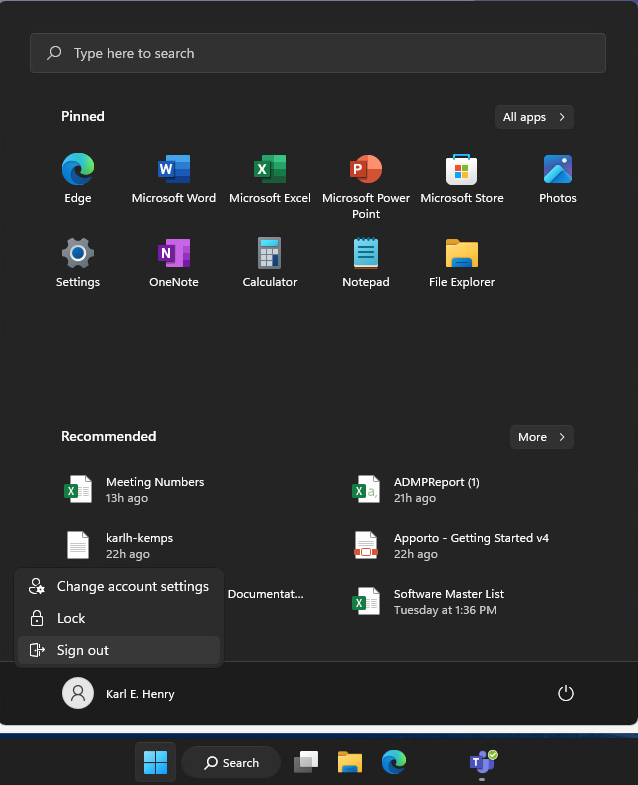
Click the Windows “Start” button
Click your “Name“
Click “Sign Out“
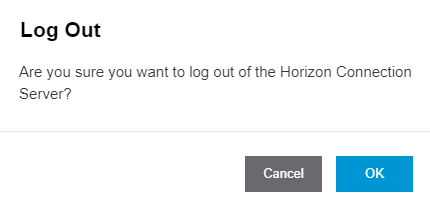
On the upper left-hand side, click the “Hamburger” menu icon
Click “Log Out“
Click “OK” to confirm Logout
Automatic Session Logout Policy
To help make FDU Anywhere as available as possible to all students, accounts that have been inactive (or idle) for 15 minutes will automatically be logged out.
There are many ways in which you can access and save files within FDU Anywhere. Fairleigh Dickinson University highly recommends saving all files on your FDU Microsoft 365 OneDrive which is accessible within FDU Anywhere. There will be a first-time setup and initialization process required to use OneDrive within FDU Anywhere.
Setup and Initialization Process
Accessing your Microsoft 365 OneDrive account is done easily by following these instructions:
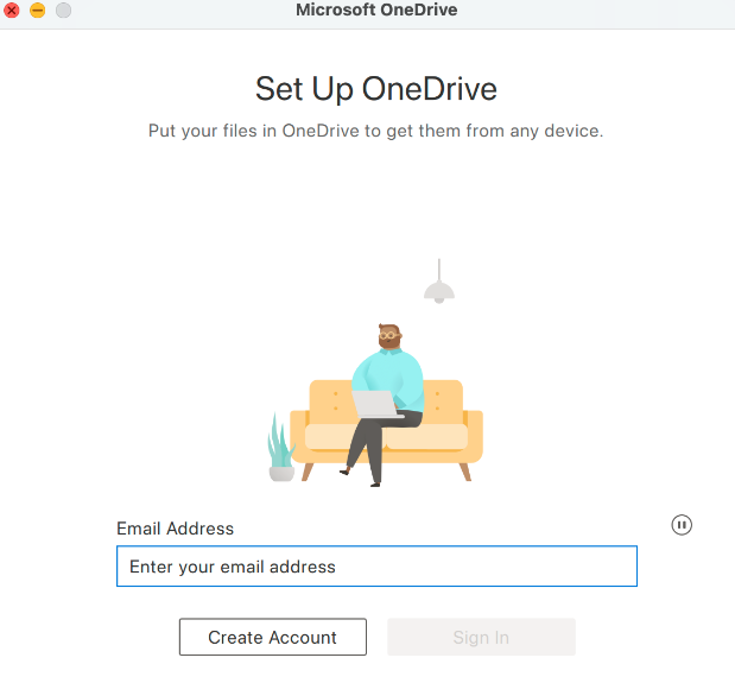
From the FDU Anywhere General Lab, single click on the “OneDrive” icon found on the Windows desktop
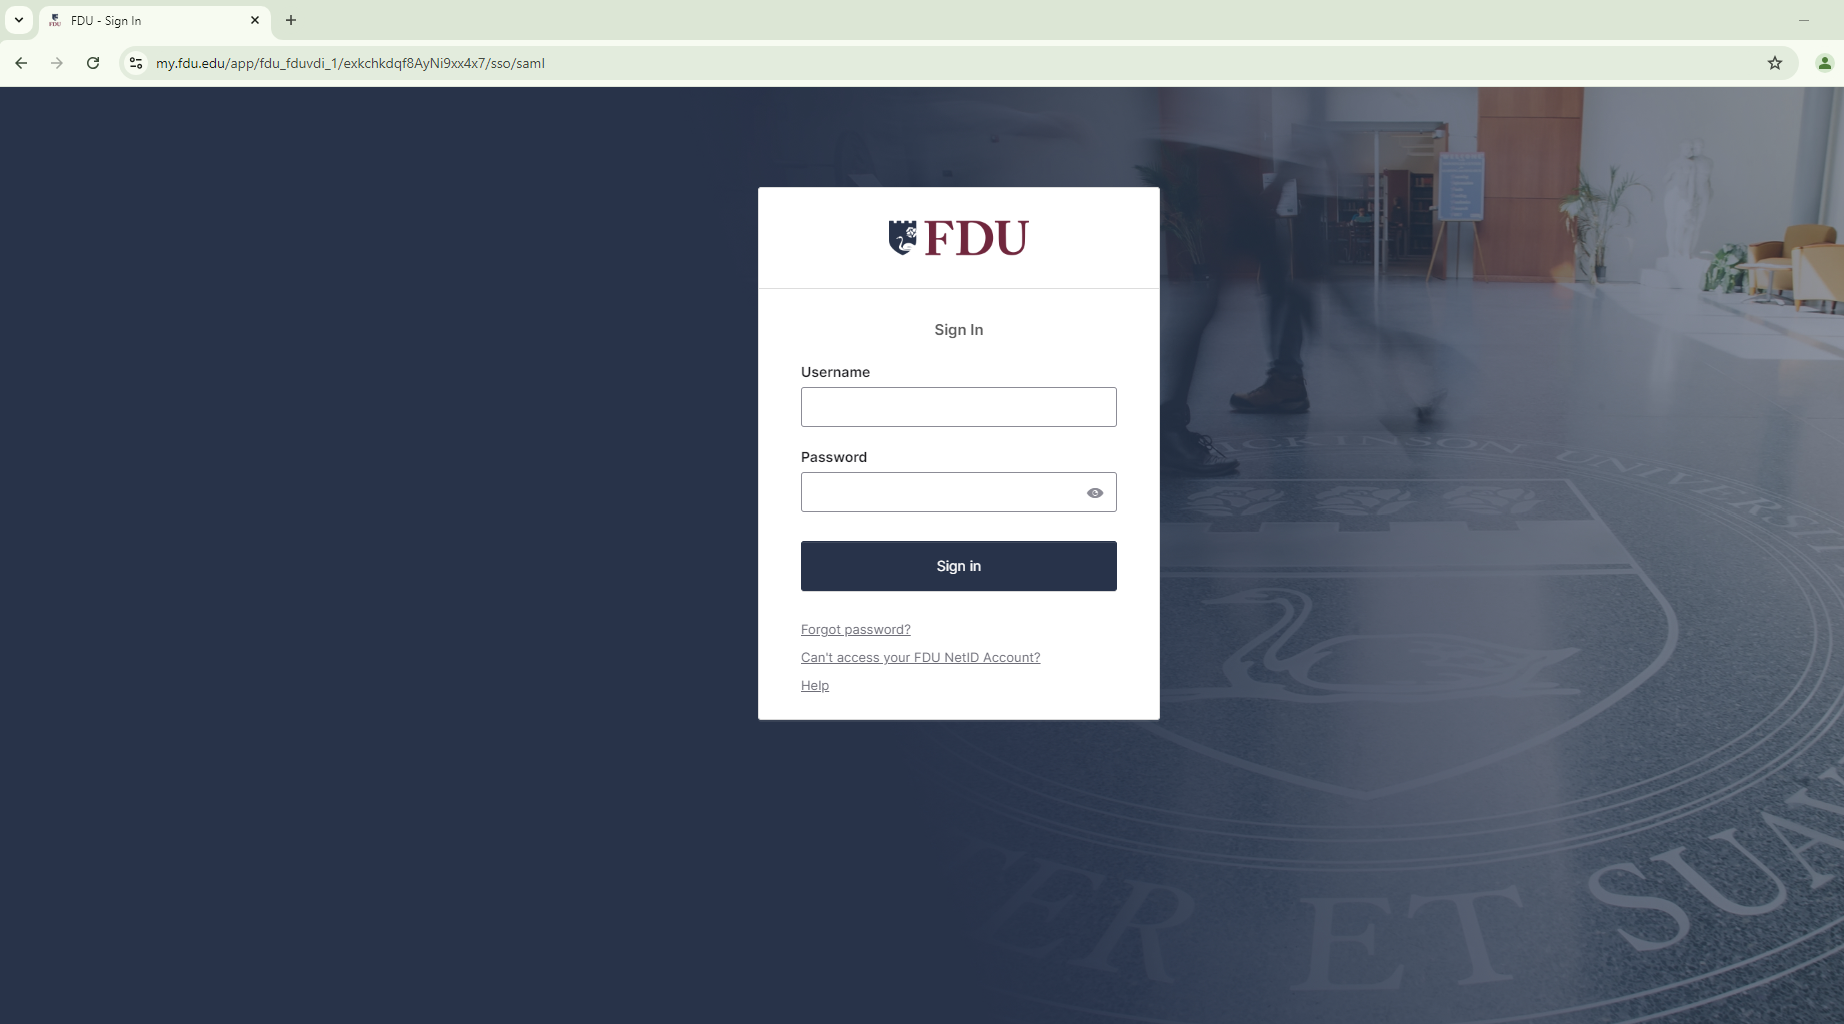
Enter your FDU NetID and click “Next”
Follow the FDU standard single sign-on prompts to complete the login process
Note
Your FDU NetID may already be filled in, just click Sign in.
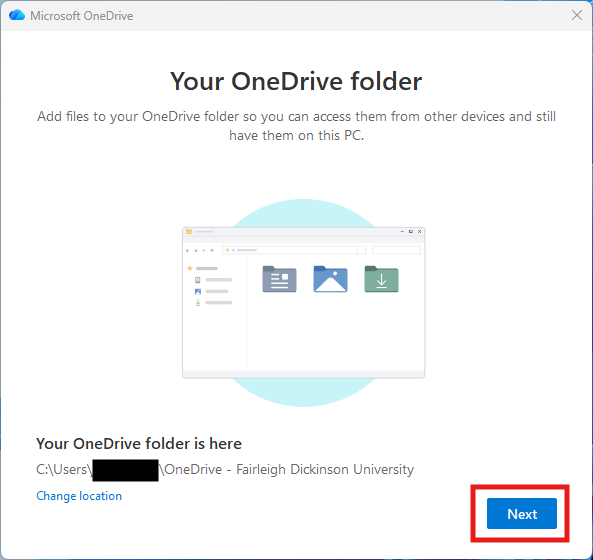
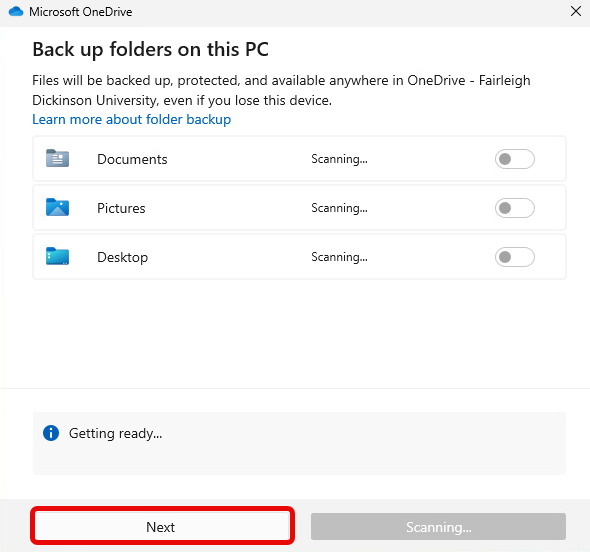
You have successfully logged into OneDrive, click “Next“
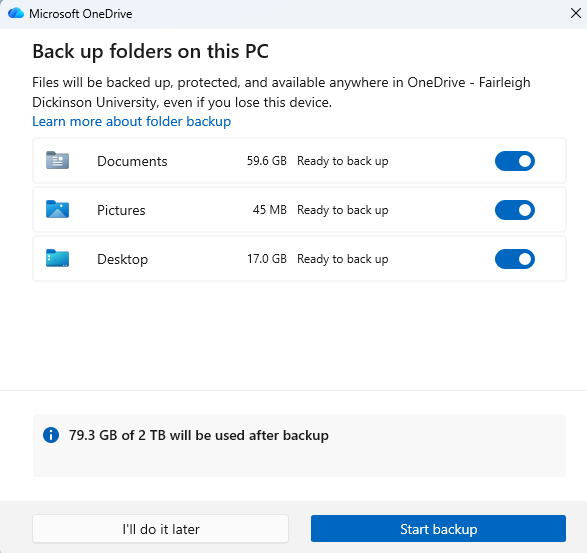
Microsoft OneDrive may prompt you to backup your folders, click “Next” to skip this step
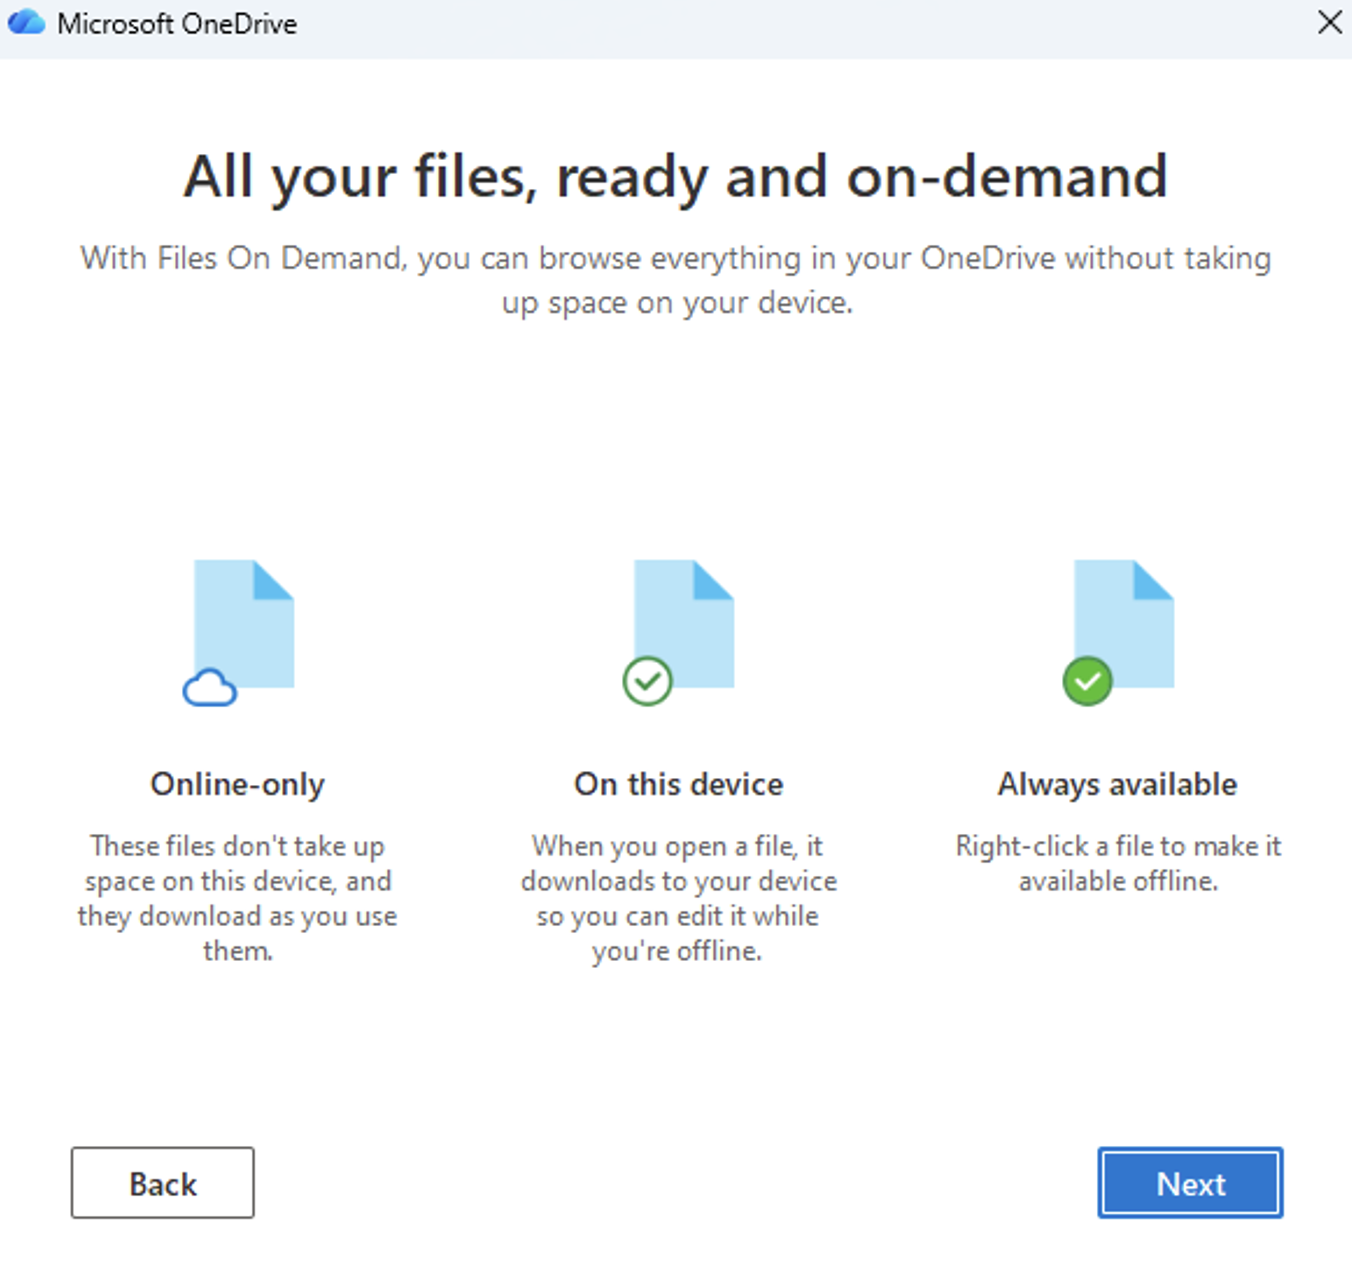
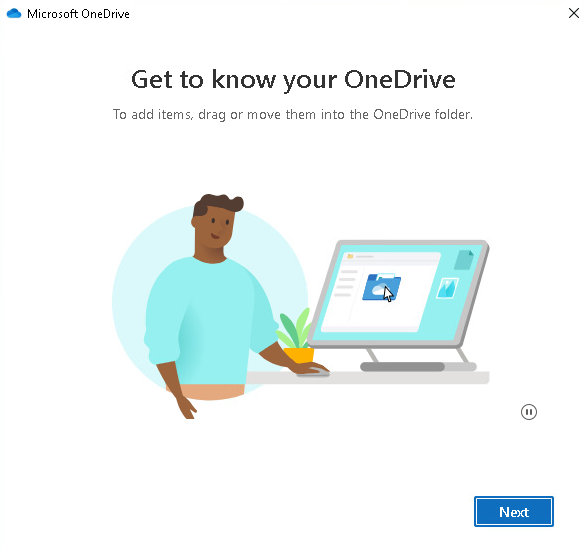
A brief overview will be given on OneDrive, to begin, click “Next“
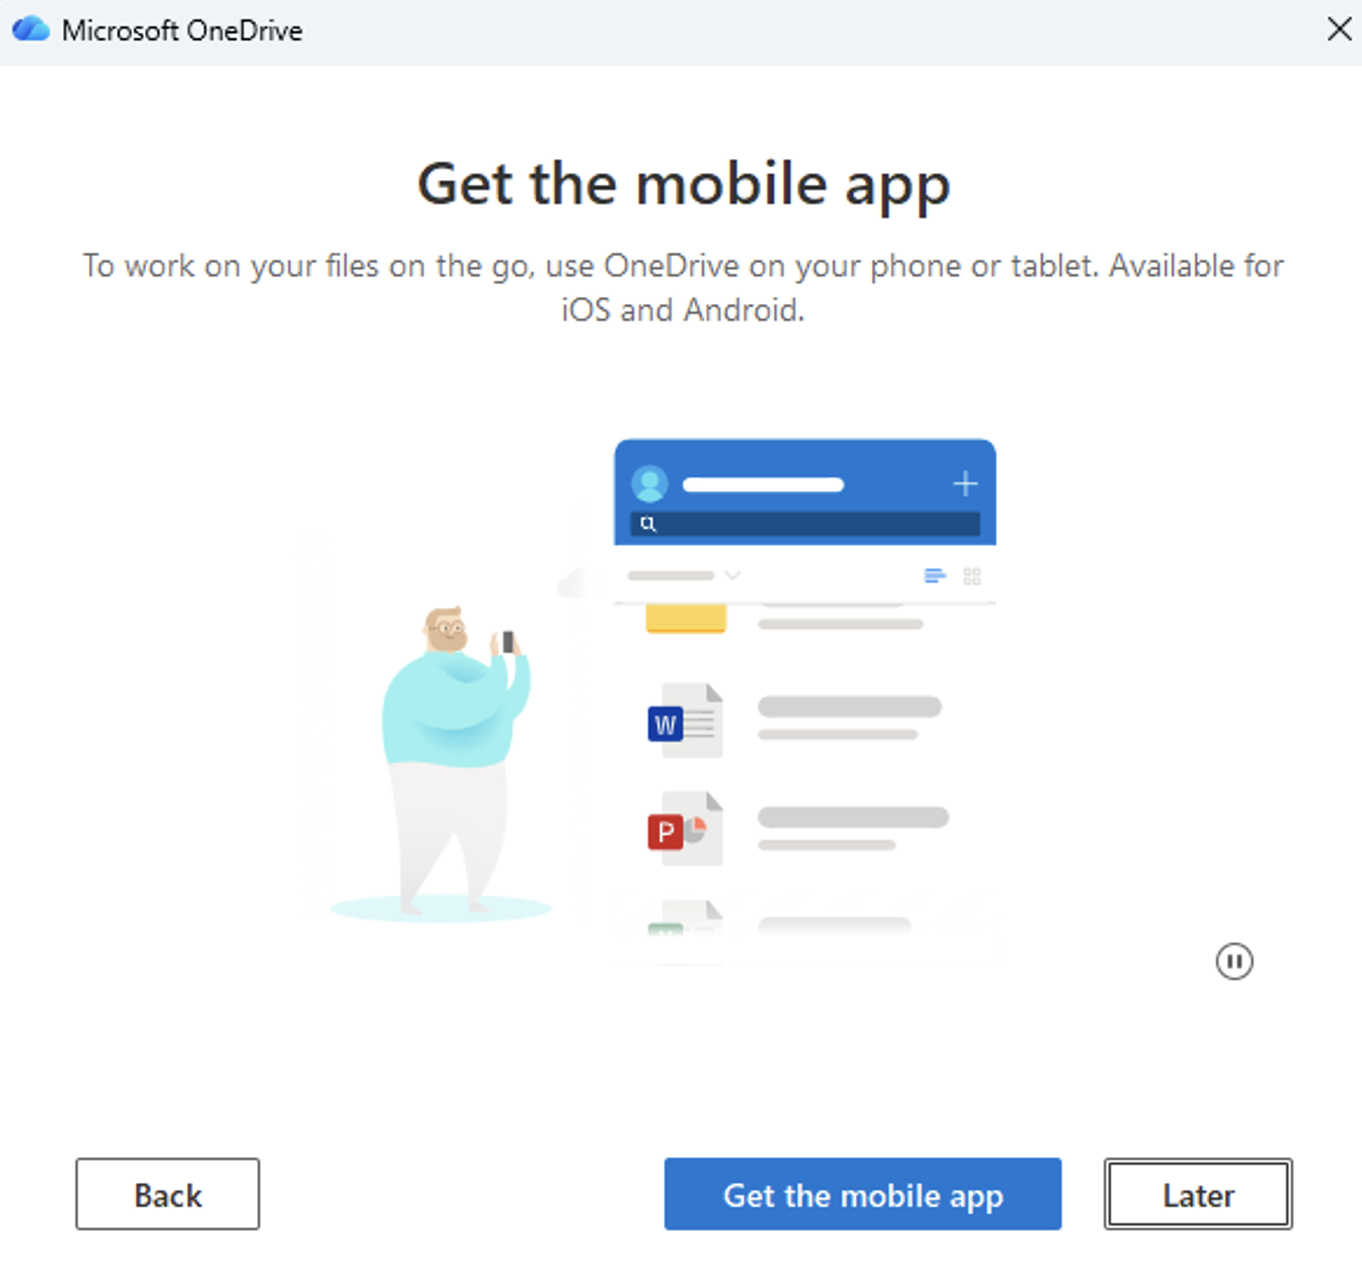
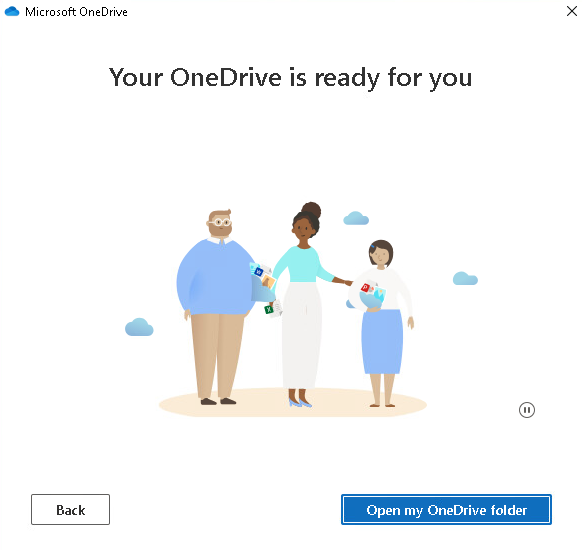
When the tutorial is finished, click “Later“
OneDrive setup is complete and ready to use. Click the “X” to close the window or “Open My OneDrive Folder” to access files
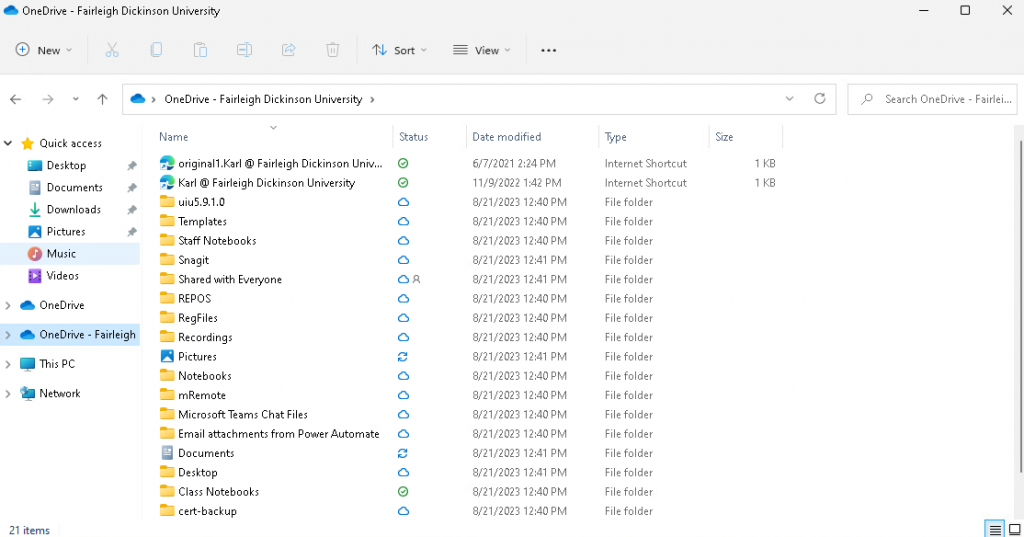
Using OneDrive
Using Microsoft OneDrive within FDU Anywhere is very similar to accessing, saving, and opening files on a computer. Just open up File Explorer and look for OneDrive – Fairleigh Dickinson University.
if you need to zip files to submit them to Webcampus, please follow these instructions:
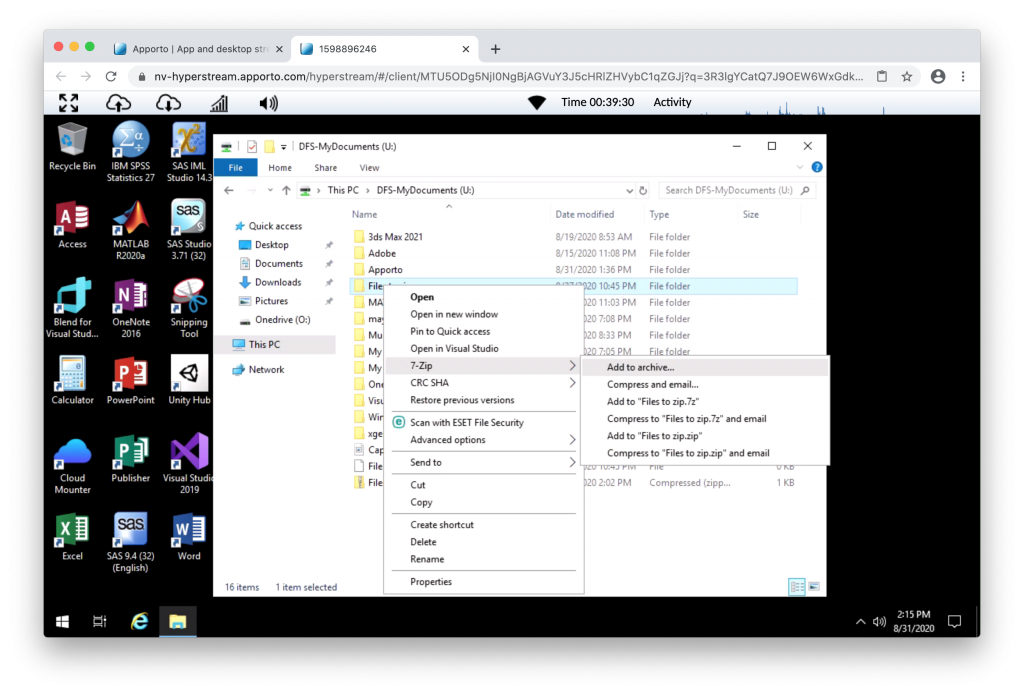
Click the file or folder
Note
For macOS users, you can use the “Two Finger” click method on the trackpad in order to initiate the right click. For additional information, please see the link below for “FDU Anywhere – Keyboard Shortcuts”.
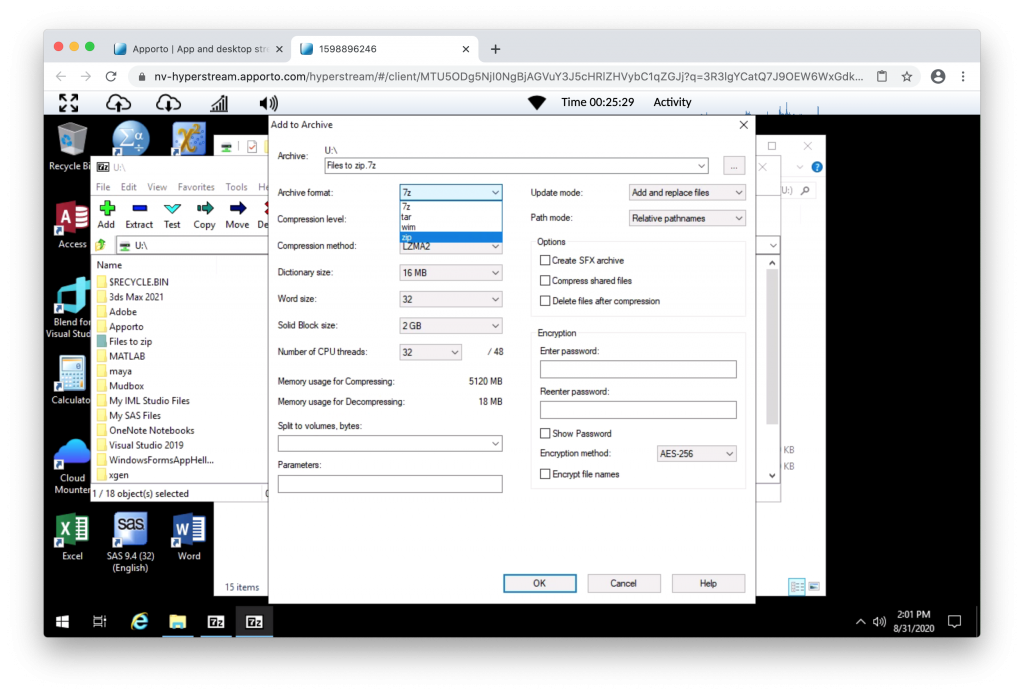
Click on 7-zip then click “Add to Archive“
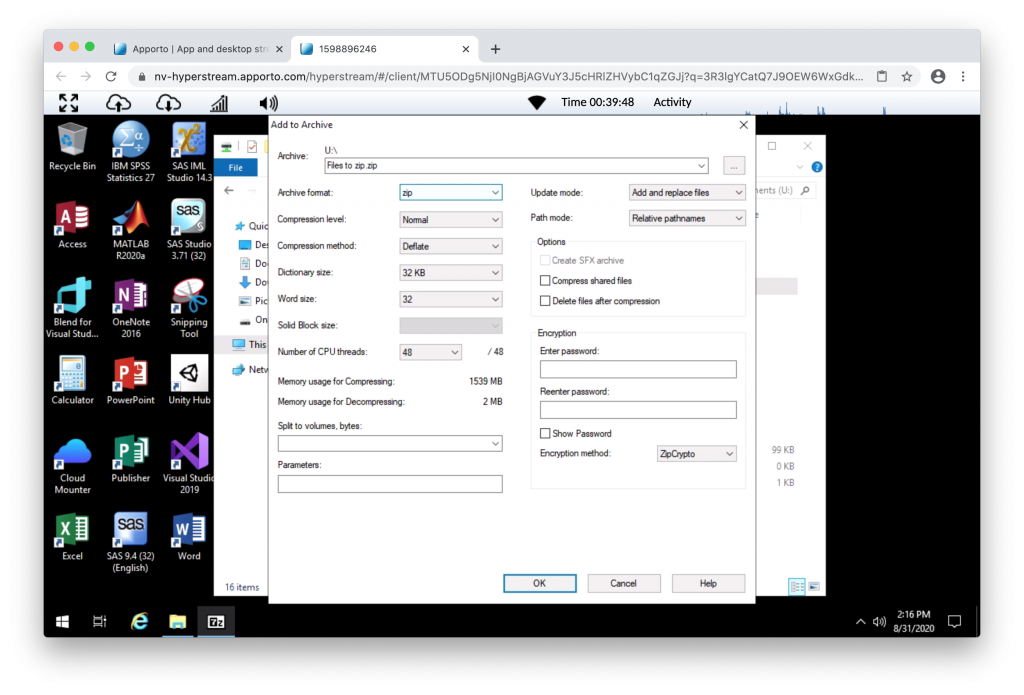
Change Archive Format to “zip” like in the picture below, then click “OK” to zip your files
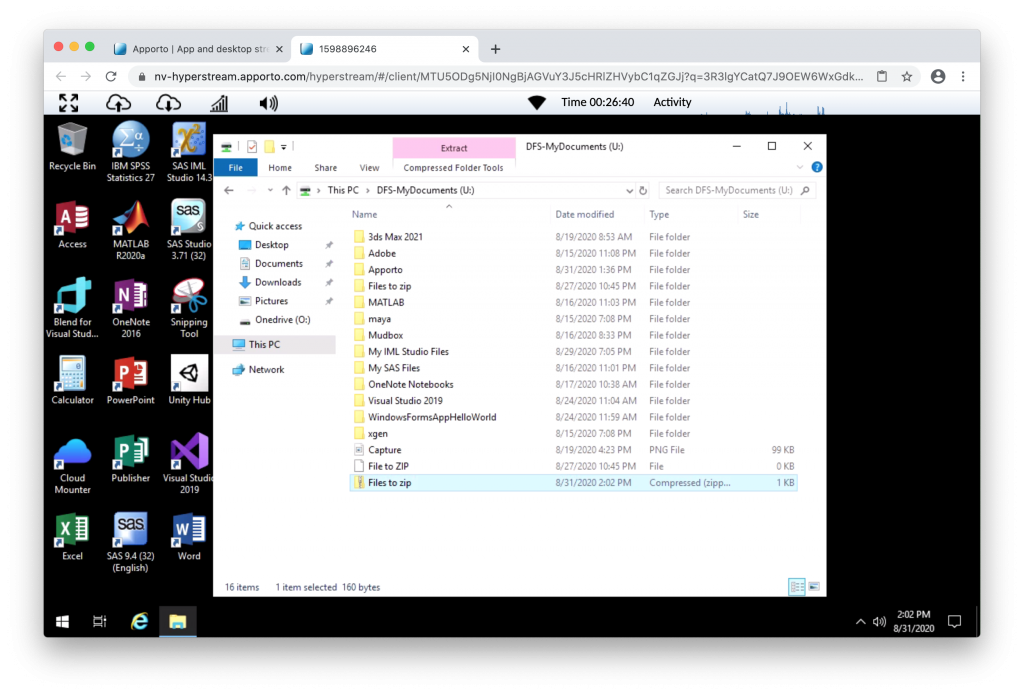
The zip archiving process could take some time depending on the size of the file. Once completed, the file will be in the same location as the folder. You can then email or upload your file to your professor.
Alternate Way to Zip Files
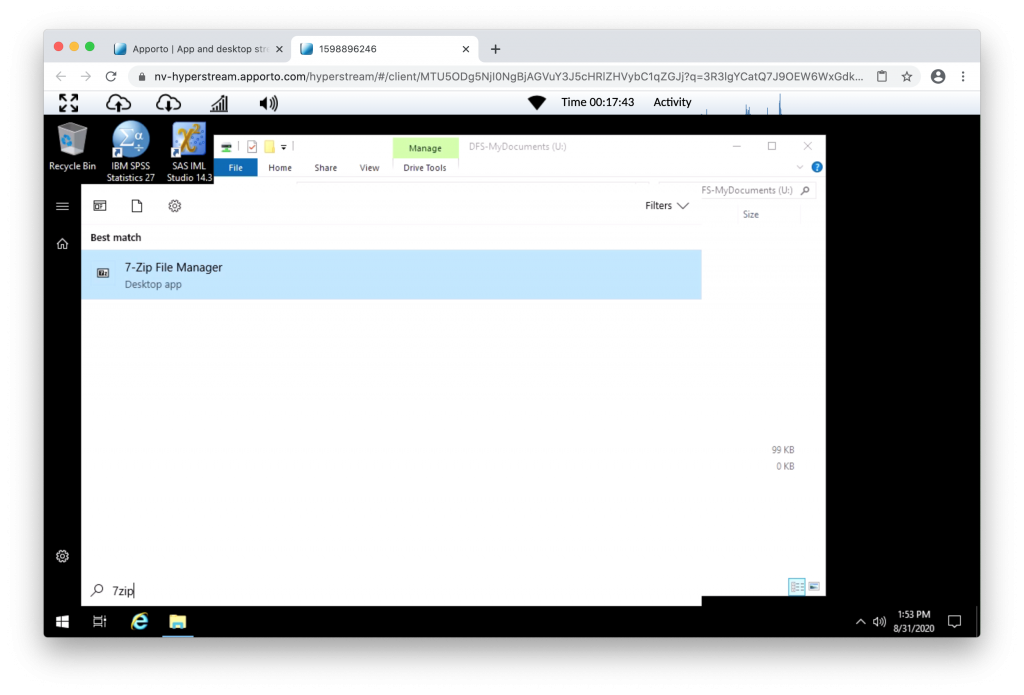
Click “Start” on the taskbar on the left-hand side
Type “7zip” and click on 7-zip File Manager that appears
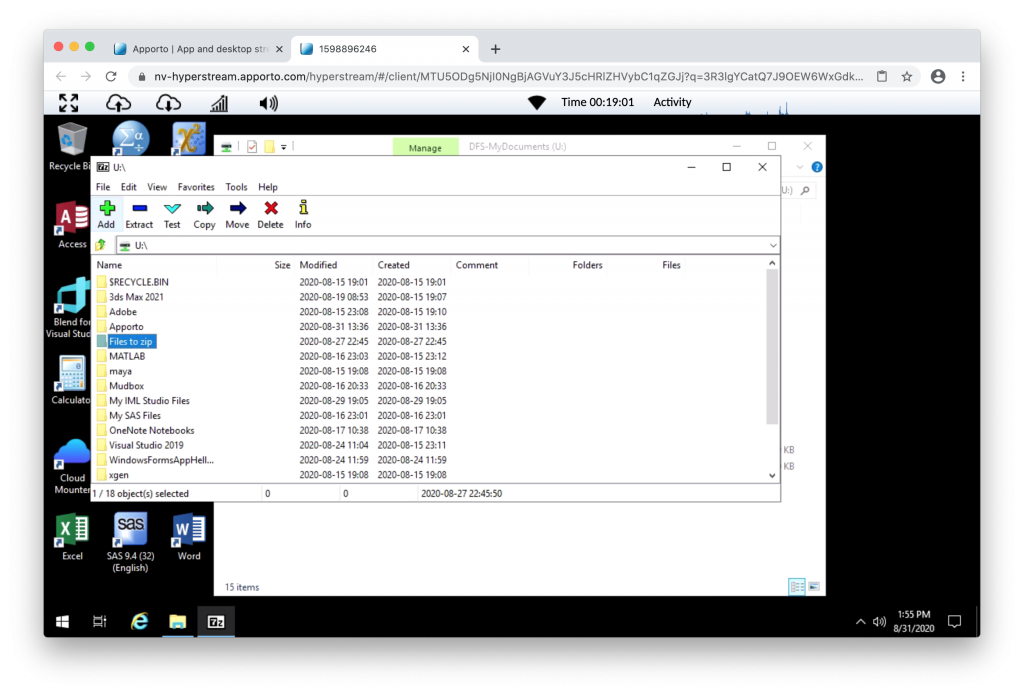
Navigate to the location of your saved file/folder and click to highlight, then click the “Add” button at the top
Change “Archive Format” to “zip” and then click “OK” to zip your files
The file will now be zipped and you will find your file in the same folder as the project folder or file you wanted to zip.
Note
The zip archive could take some time depending on the size of the file. Once completed, the file will be in the same location as the folder is. You can then email or upload your file to your professor.
Submitting Files to WebCampus
To successfully submit your coursework to WebCampus, it is best to use the Google Chrome, Mozilla Firefox, or Microsoft Edge web browser located on the desktop of FDU Anywhere.
To submit your coursework to Webcampus, you can log on from within FDU Anywhere. For more information on Webcampus visit:
Sometimes you may want to copy and paste content from your own computer to an FDU Anywhere desktop or application. You can do this using the copy-and-paste menus or keyboard shortcuts, for example, “Ctrl+C” and “Ctrl+V“.
Note
FDU Anywhere only allows copying from your personal computer into the FDU Anywhere desktop.
If you cannot copy and paste for any reason, we recommend using our FDU OneDrive service to access any files not found in FDU Anywhere.
Copy files from Windows OS Devices
Windows OS to FDU Anywhere
Highlight the text you want to copy from your computer
Press “CTRL+C” to copy the selected text
Move the cursor to the paste location in FDU Anywhere
Press “CTRL+V” to paste the text
close
Copy Files from Apple OS Devices
Your macOS to FDU Anywhere
Highlight the text you want to copy from your computer
Press “COMMAND+C “to copy the selected text
macOS also supports “CTRL+C“
Tip
You may find it easier to use CTRL + C when copying content to FDU Anywhere, so you don’t have to switch back and forth between COMMAND + CTRL.
Move the cursor to the paste location in “FDU Anywhere“
Press “CTRL+V” to paste the text
close
Note
The copy and paste functions DO NOT work across all applications and browsers, including the copying and pasting of images. This is a limitation inherent in browser clipboards. We recommend the Google Chrome web browser for optimal clipboard capabilities.
If you are experiencing issues while using FDU Anywhere, please use the following tips as guidelines to help improve your experience.
Power-cycle your Modem/Router
Power cycling your modem and router allows them to reset and re-establish a connection to your Internet Service Provider (ISP). Shut down your computer and unplug your modem/router. Plug them back in after 60 seconds and watch the lights on your modem/router. Once the lights are on and steady, start your computer.
Keep all your Local Components Up-to-date
Check that your modem/router and your local computer are totally up to date. This includes the operating system, driver, and browser updates.
Disconnect/Turn off any Devices that are not in use
Some devices could be using bandwidth while on standby. Gaming consoles, for example, might download and install updates. Turn off these devices to keep your bandwidth free.
Use an Ethernet Cable
Using a wired Ethernet connection will make your connection more stable and eliminate additional latency compared to a wireless connection.
Change your Wi-Fi Configuration
If a wired Ethernet connection is not possible or your device requires a wireless connection:
Connect to a 5GHz wireless network. Some routers offer both 2.4GHz connections and 5GHz
Place your devices (such as a computer or smartphone) and your router closer to each other
Note
You may need to contact your internet service provider for help with rebooting your router and/or to configure your wireless settings correctly.
To access Forms, you will be directed to our SAMI Support Portal where you will be asked to log in using your NETID and authenticate using Duo. Once you click “Next,” you will be forwarded to samisupport.fdu.edu in a new window or tab.