Information

Shared Mailbox in Outlook

Resources for:
icon Close

A shared mailbox makes it easy for a group of people to read and send emails from one public email address, like info@fdu.edu. When a person in the group replies to a message sent to the shared mailbox, the email appears to be from the shared address, not from the individual user. Shared mailboxes can also be used to provide a shared calendar, allowing multiple users to schedule and view calendar tasks.

Request Access to an FDU Shared Mailbox

Users can request a new shared mailbox by completing and submitting the “Distribution Group/Shared Mailbox Request” form found below. Users needing access to a specific FDU shared mailbox account may request access by reaching out to the shared mailbox owner. To fulfill this request, the shared mailbox owner will open a support case with the SAMI Service Desk.

Add a Shared Mailbox to Outlook

Windows
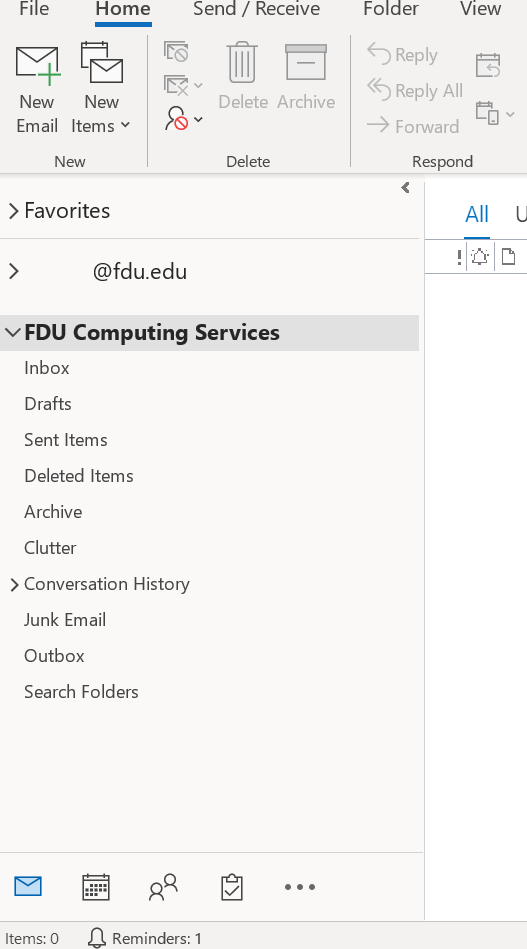
  1. The shared mailbox should automatically display in your folder pane on the left-hand side of your Outlook application within 24 hours of its creation. Closing and restarting the Outlook application maybe necessary if you do not see it after 24 hours
Note

Before you can use a shared mailbox, the Microsoft 365 admin for the university has to add you as a member.

If you cannot open a shared mailbox, please contact the SAMI Service Desk and open a support request.

close
macOS
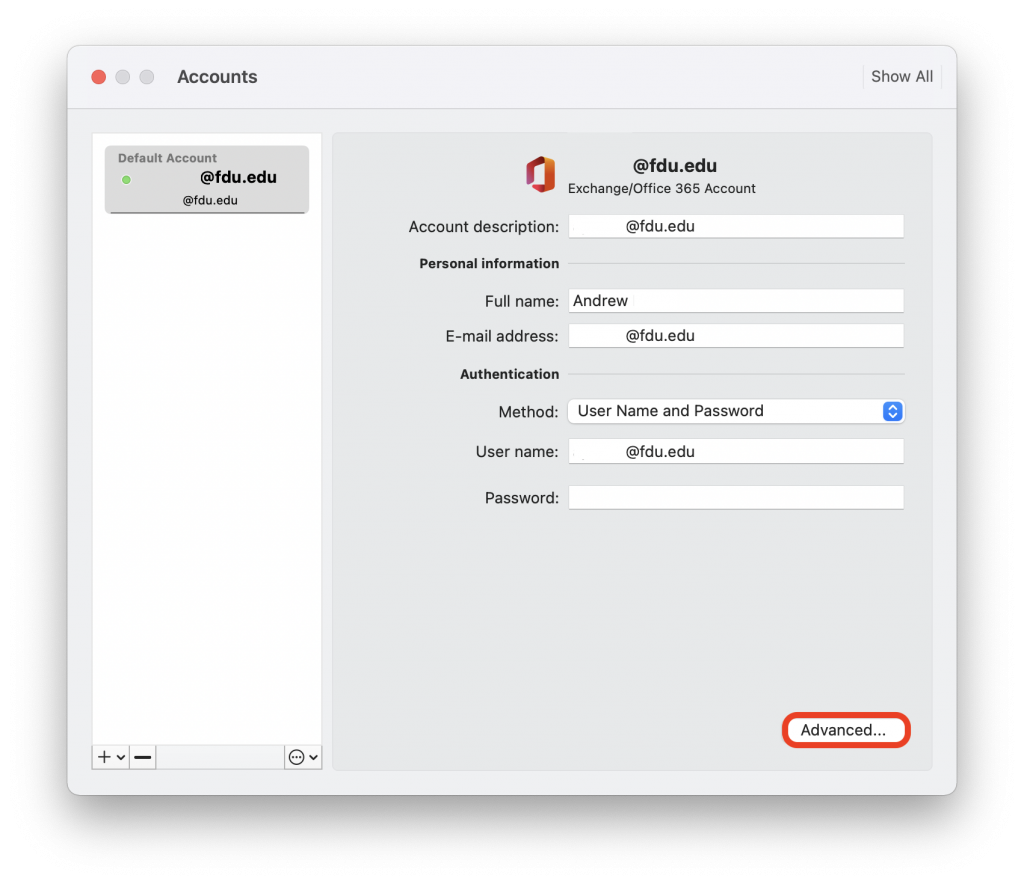
  1. Select Tools from the Outlook menu bar at the top of the screen, then choose Accounts
  1. Select the Advanced… tab
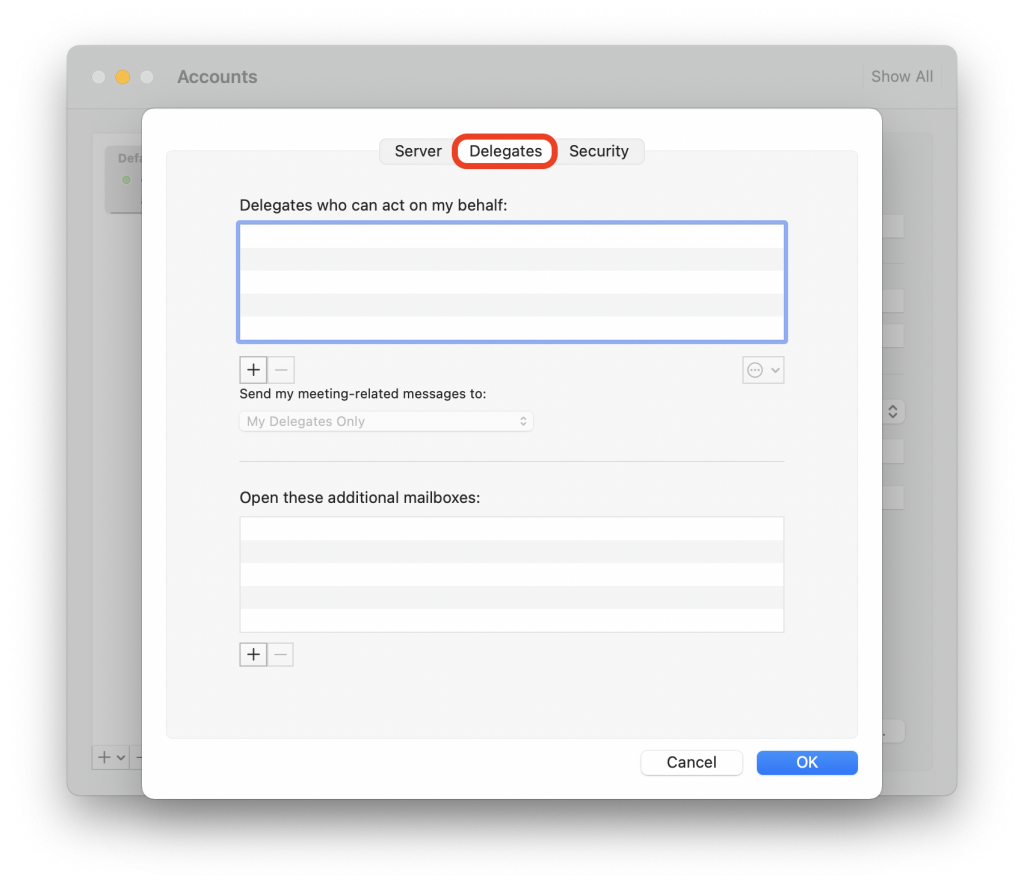
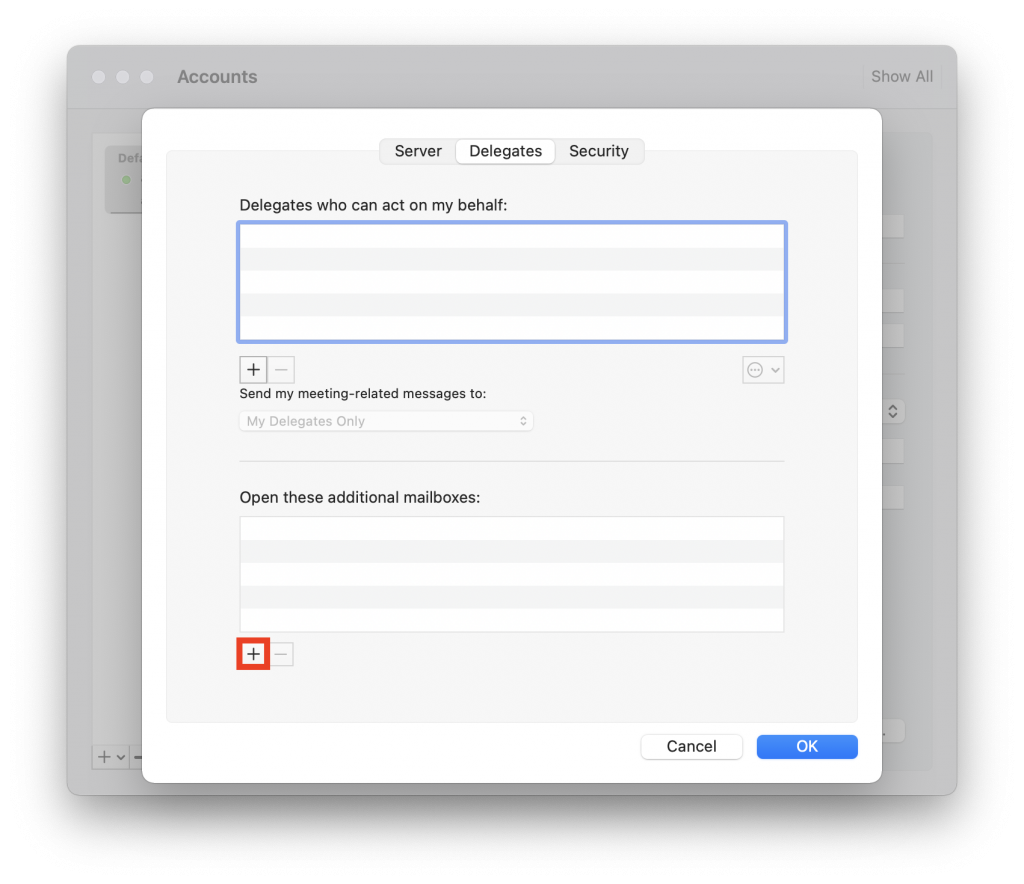
  1. Select the Delegates tab
  1. Click the + button, located under Open these additional mailboxes:
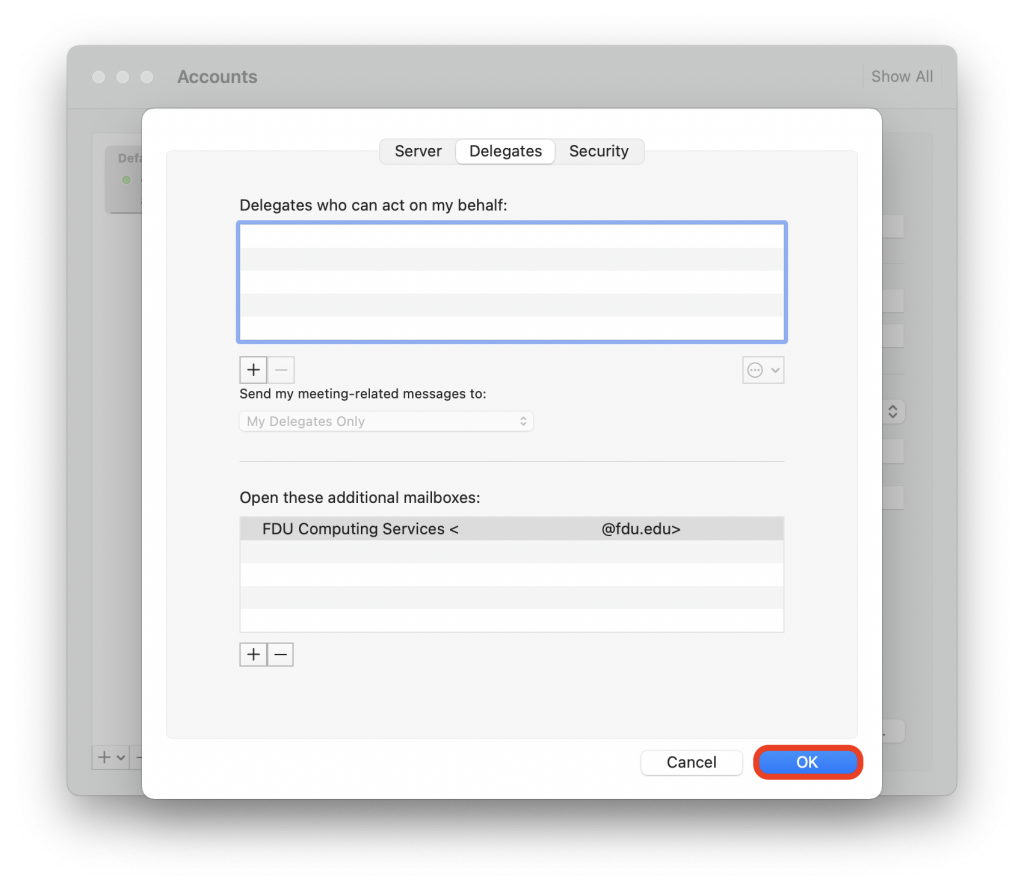
  1. Type or select your correct shared mailbox, and then select Add
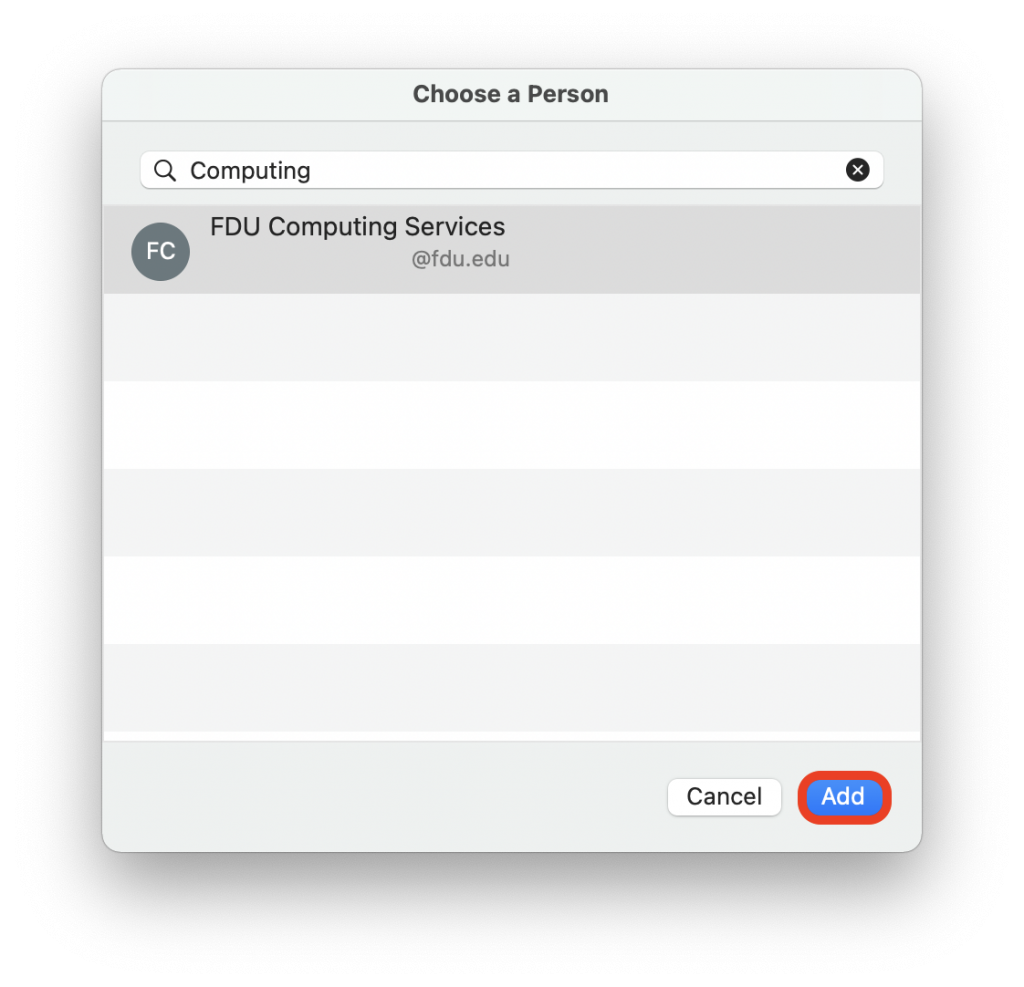
  1. Select the OK tab
  1. You should now see your shared mailbox listed on the left-hand side of your Outlook email application window
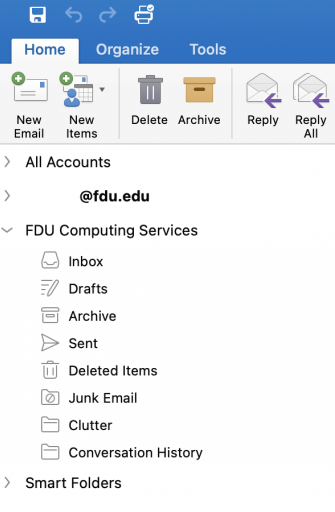
Note

This is a one-time process only. You do not need to follow the above steps to add this to Outlook on your macOS device again.


If you cannot open a shared mailbox, please contact the SAMI Service Desk and open a support request.

New Outlook version on macOS

Some macOS users may take advantage of the “New Outlook” version of the Outlook application. You can identify which Outlook version you are using by locating the “New Outlook” slider tab button on the top right of the application.

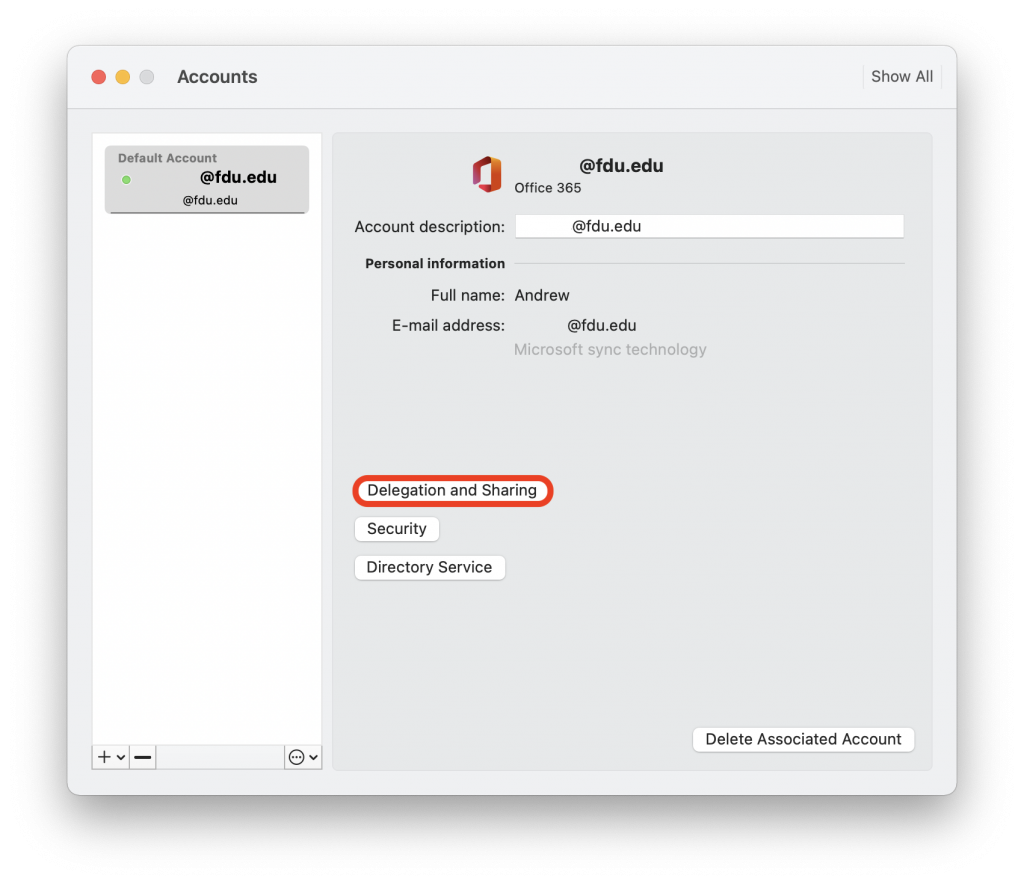
  1. Select Tools from the Outlook menu at the top of the screen, then choose Accounts
  1. Select the Delegation and Sharing tab
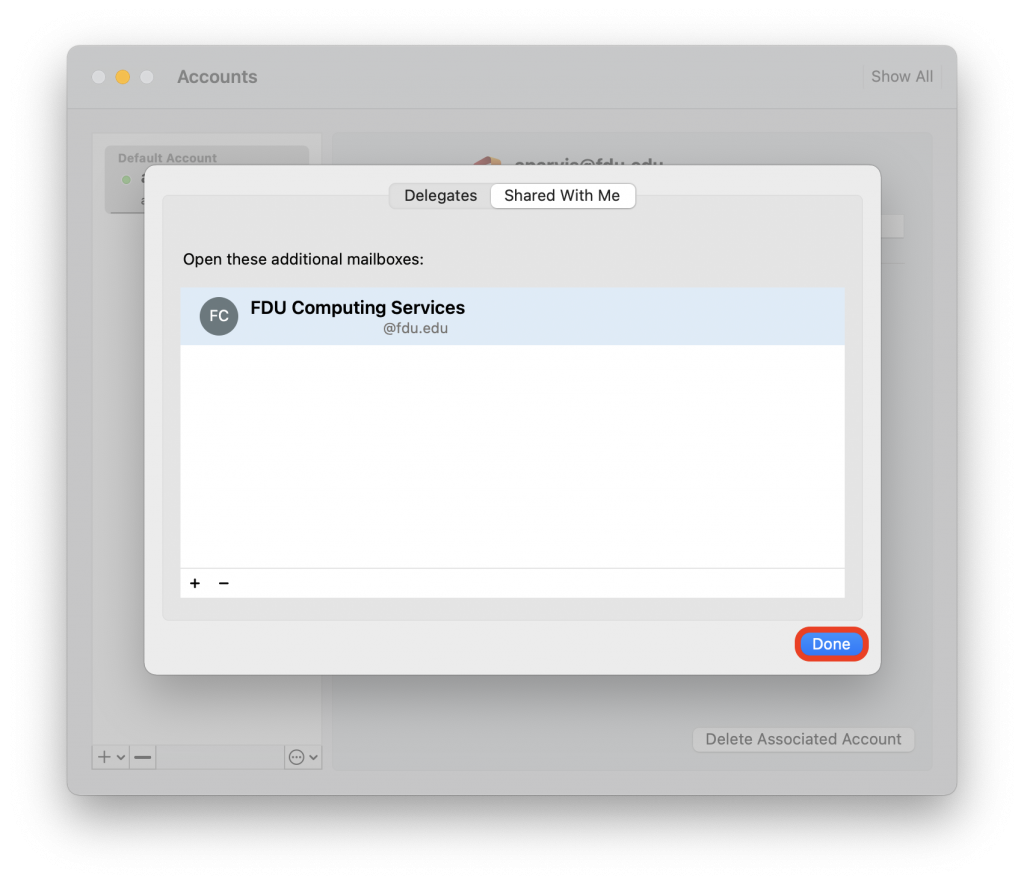
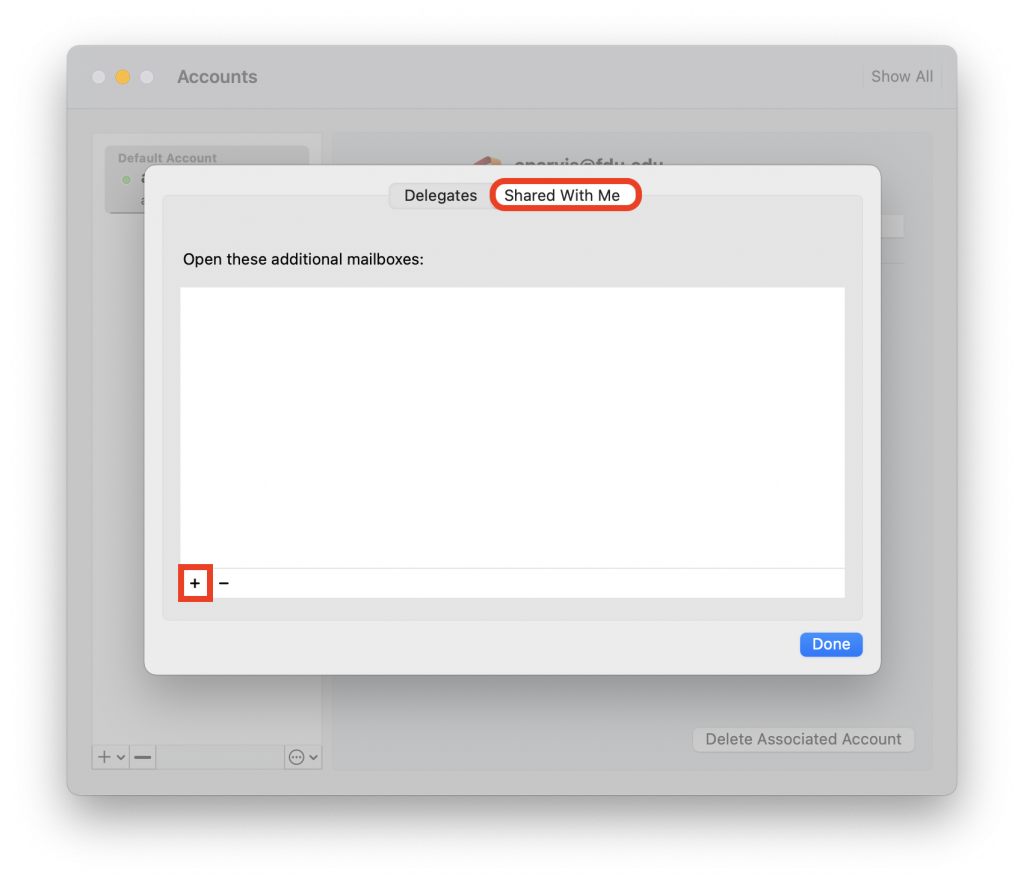
  1. Choose the Shared With Me tab and then select the + button
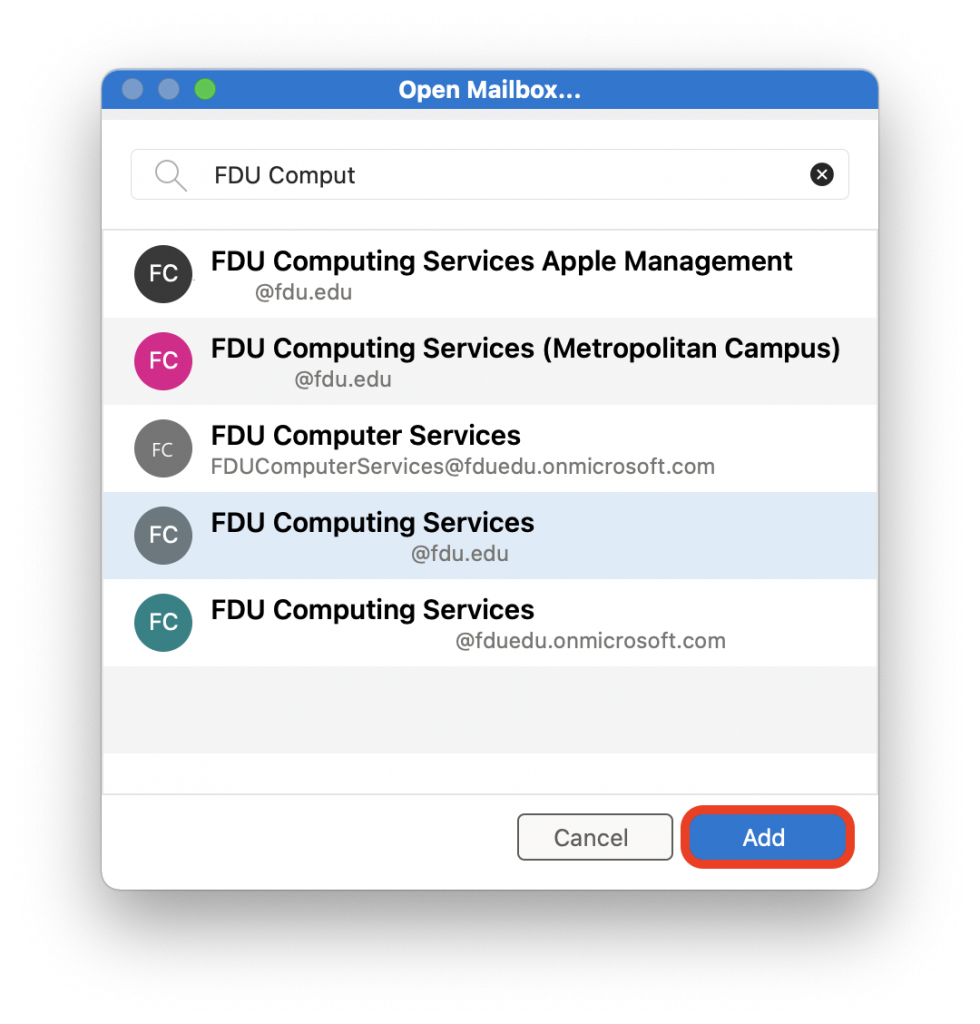
  1. Begin to type the shared mailbox name or its email address, choose the correct shared mailbox before selecting Add, and finally Done when finished
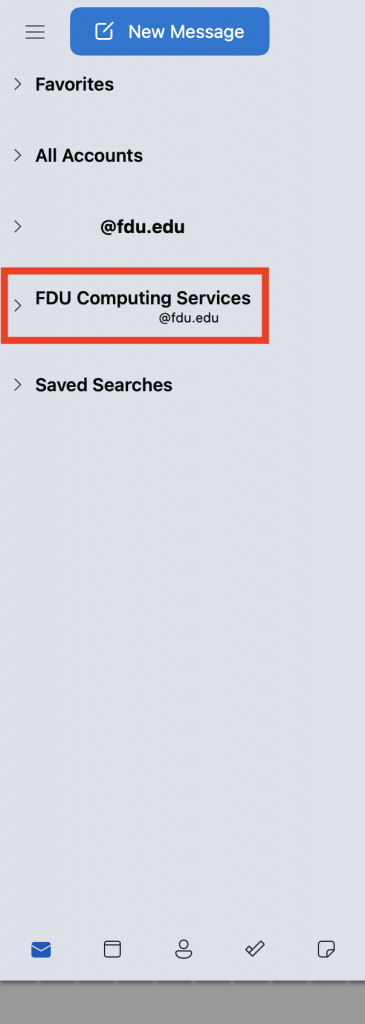
  1. You should now see your shared mailbox, located on the left-hand side of your Outlook application window
Note

This is a one-time process only. You do not need to follow the above steps to add this to Outlook on your macOS device again.

If you cannot open a shared mailbox, please contact the SAMI Service Desk and open a support request.

close
office365.fdu.edu / Outlook Web App
  1. Navigate to the FDU Office 365 Portal webpage
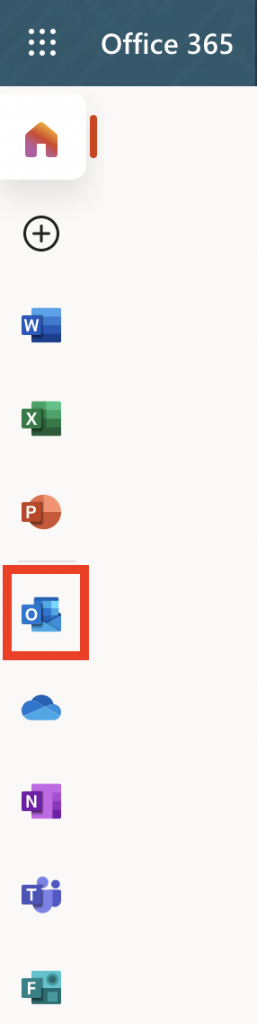
  1. Select the Outlook web app icon, located on the left-hand side of your display
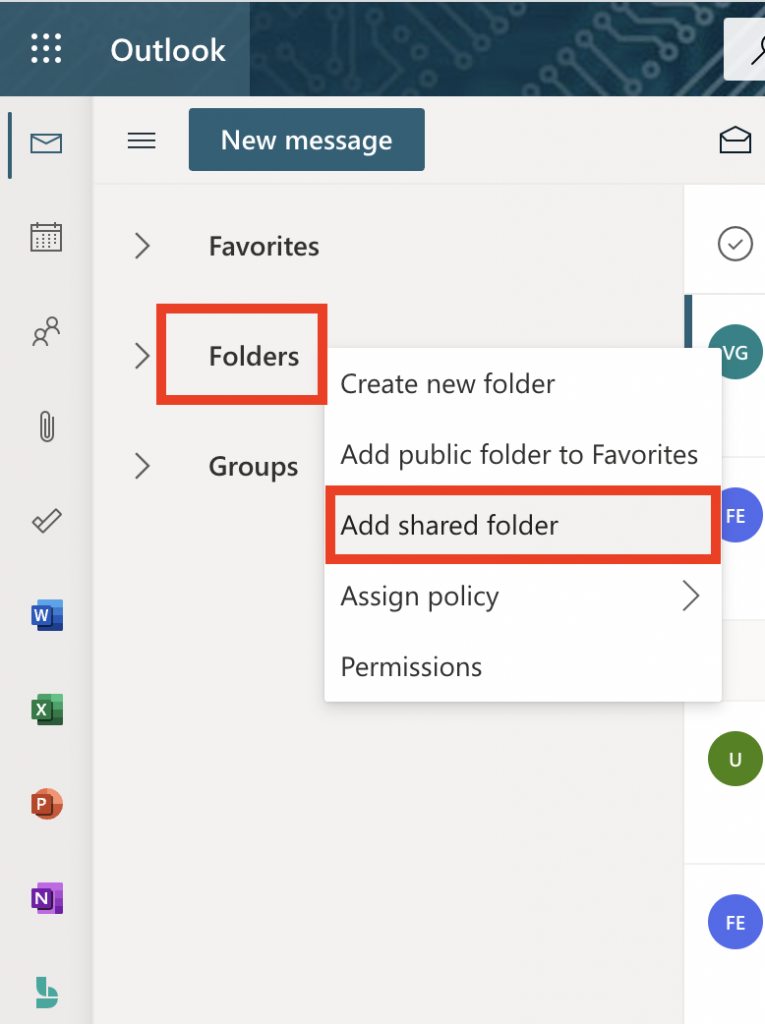
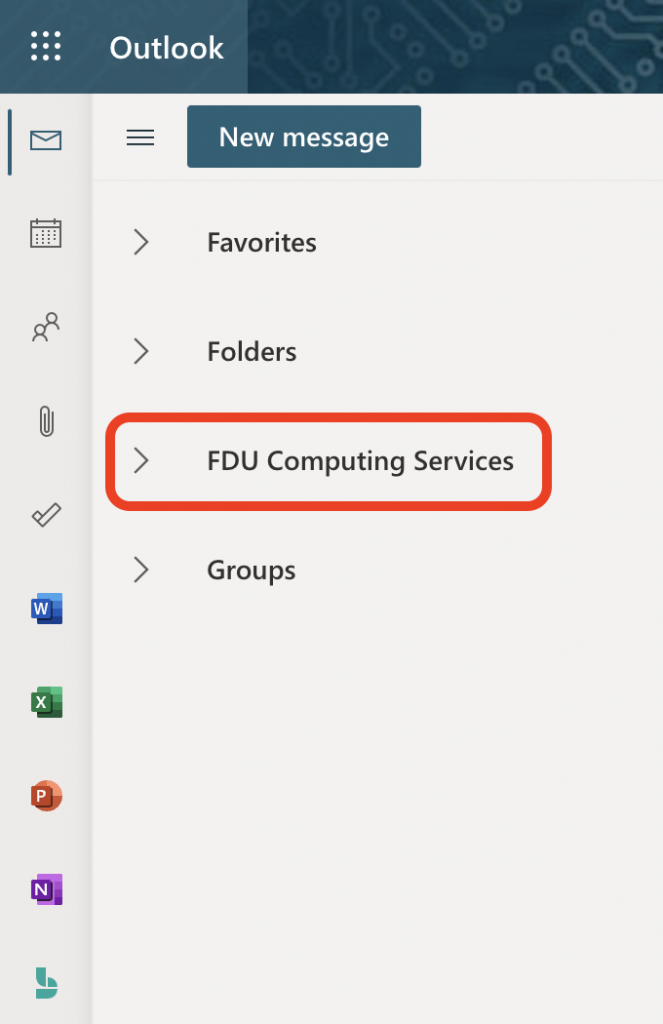
  1. Right-click on the Folders option located on the left side of the menu; a small drop-down menu should display. Select Add shared folder
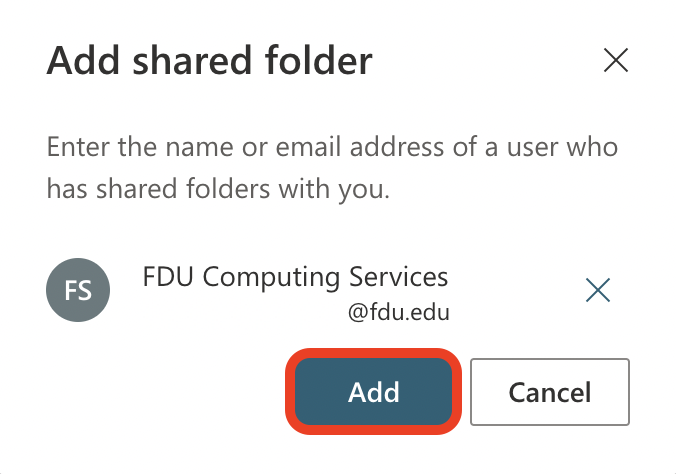
  1. Begin typing the email address for the shared mailbox, auto-populated suggestions will be displayed. Select the correct shared mailbox address and click Add
  1. You should now see the added shared mailbox located on left side of your Outlook web email window
Note

This was a one-time process. You do not need to follow the above steps to add this to your account again. You will automatically see the shared mailbox when you sign in to your account next time.


If you cannot open a shared mailbox, please contact the SAMI Service Desk and open a support request. 

close
Android and iOS
  1. Sign in to your primary FDU email account in the Microsoft Outlook for Android or iOS app
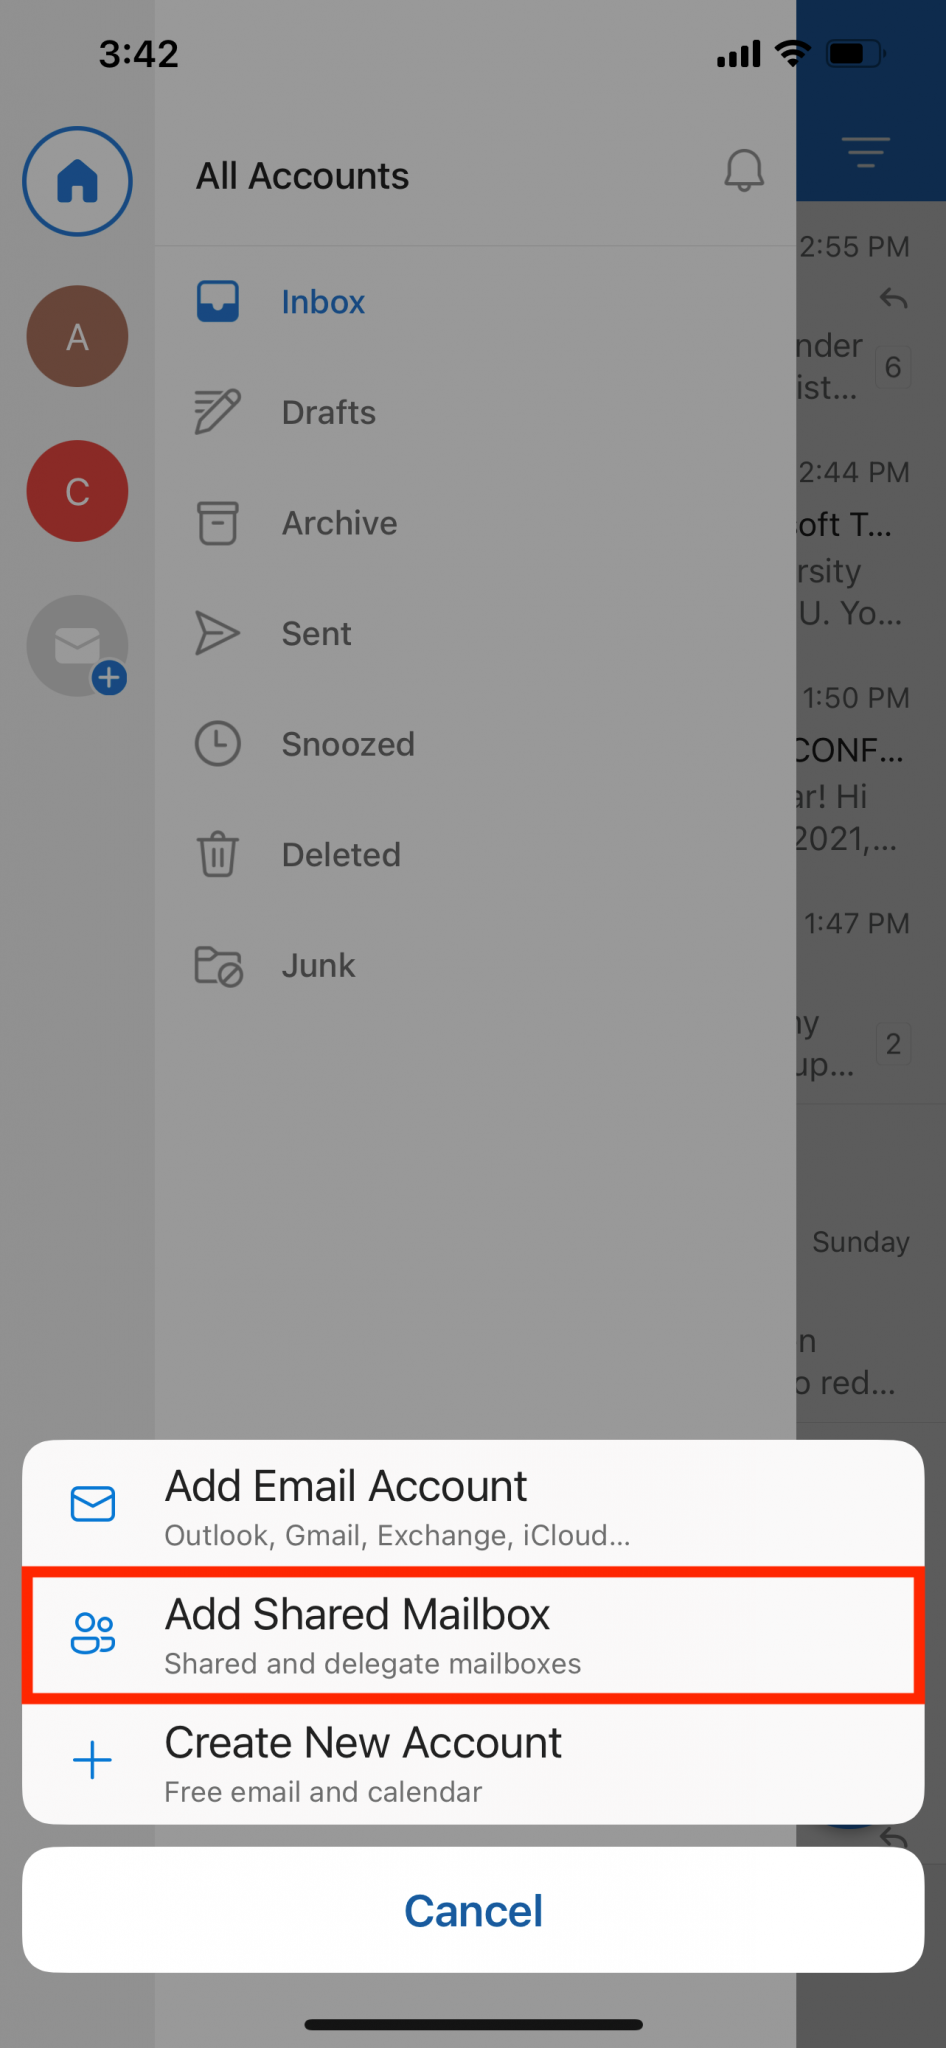
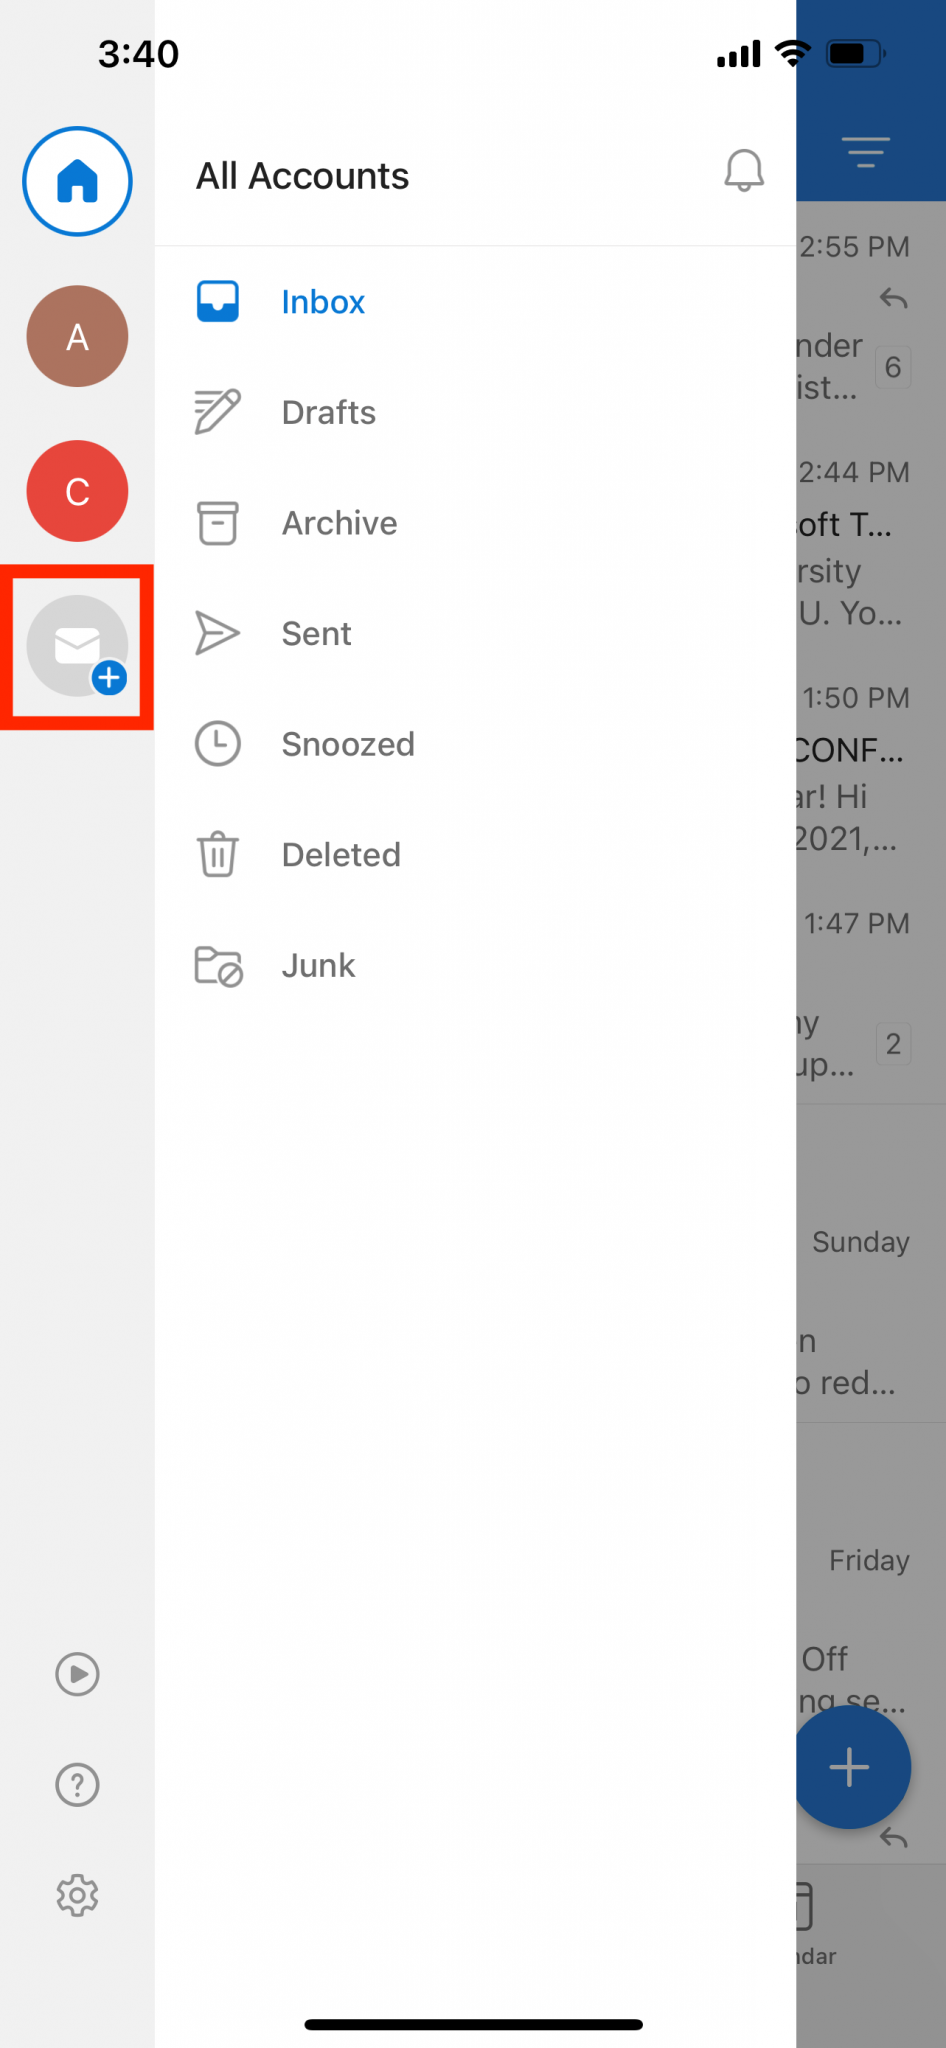
  2. Tap the Add Account button in the left navigation pane, then tap Add Shared Mailbox
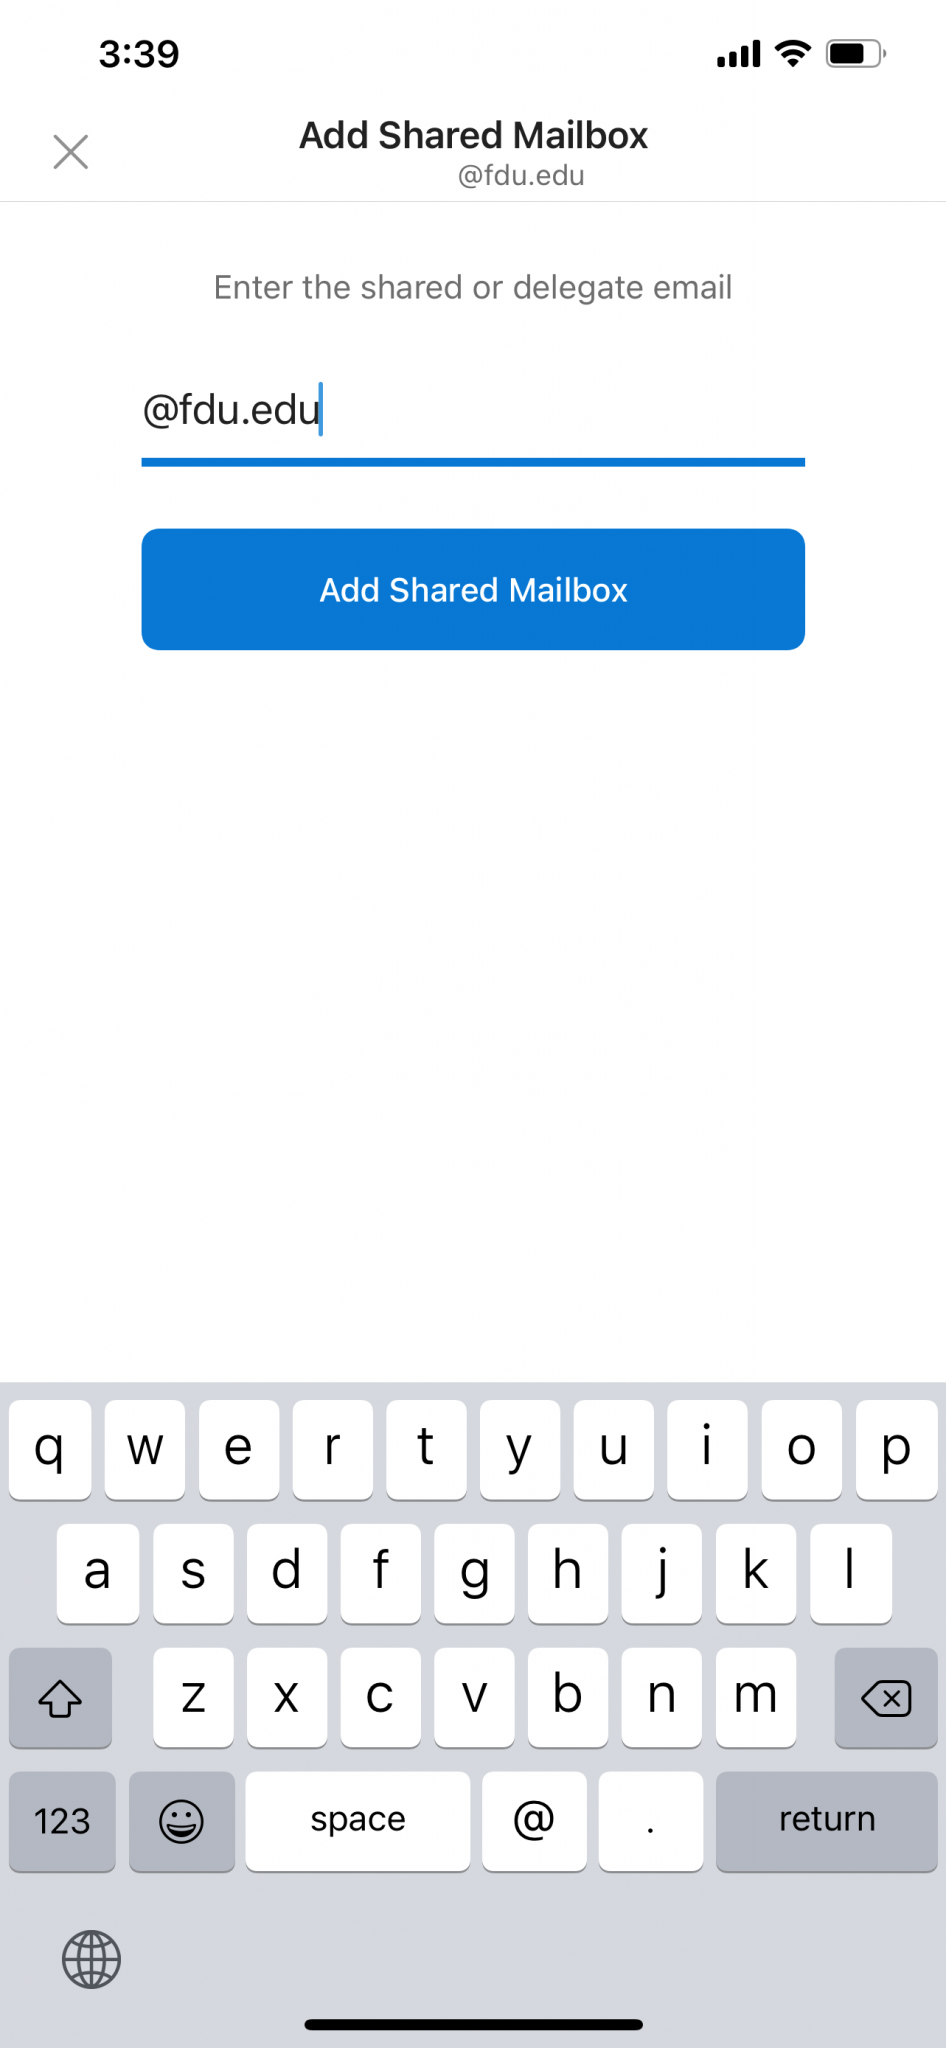
  1. Enter the name of the shared mailbox and tap Add Shared Mailbox when finished
Note

If you have multiple accounts in Outlook Mobile, select the account that has permissions to access the shared mailbox.

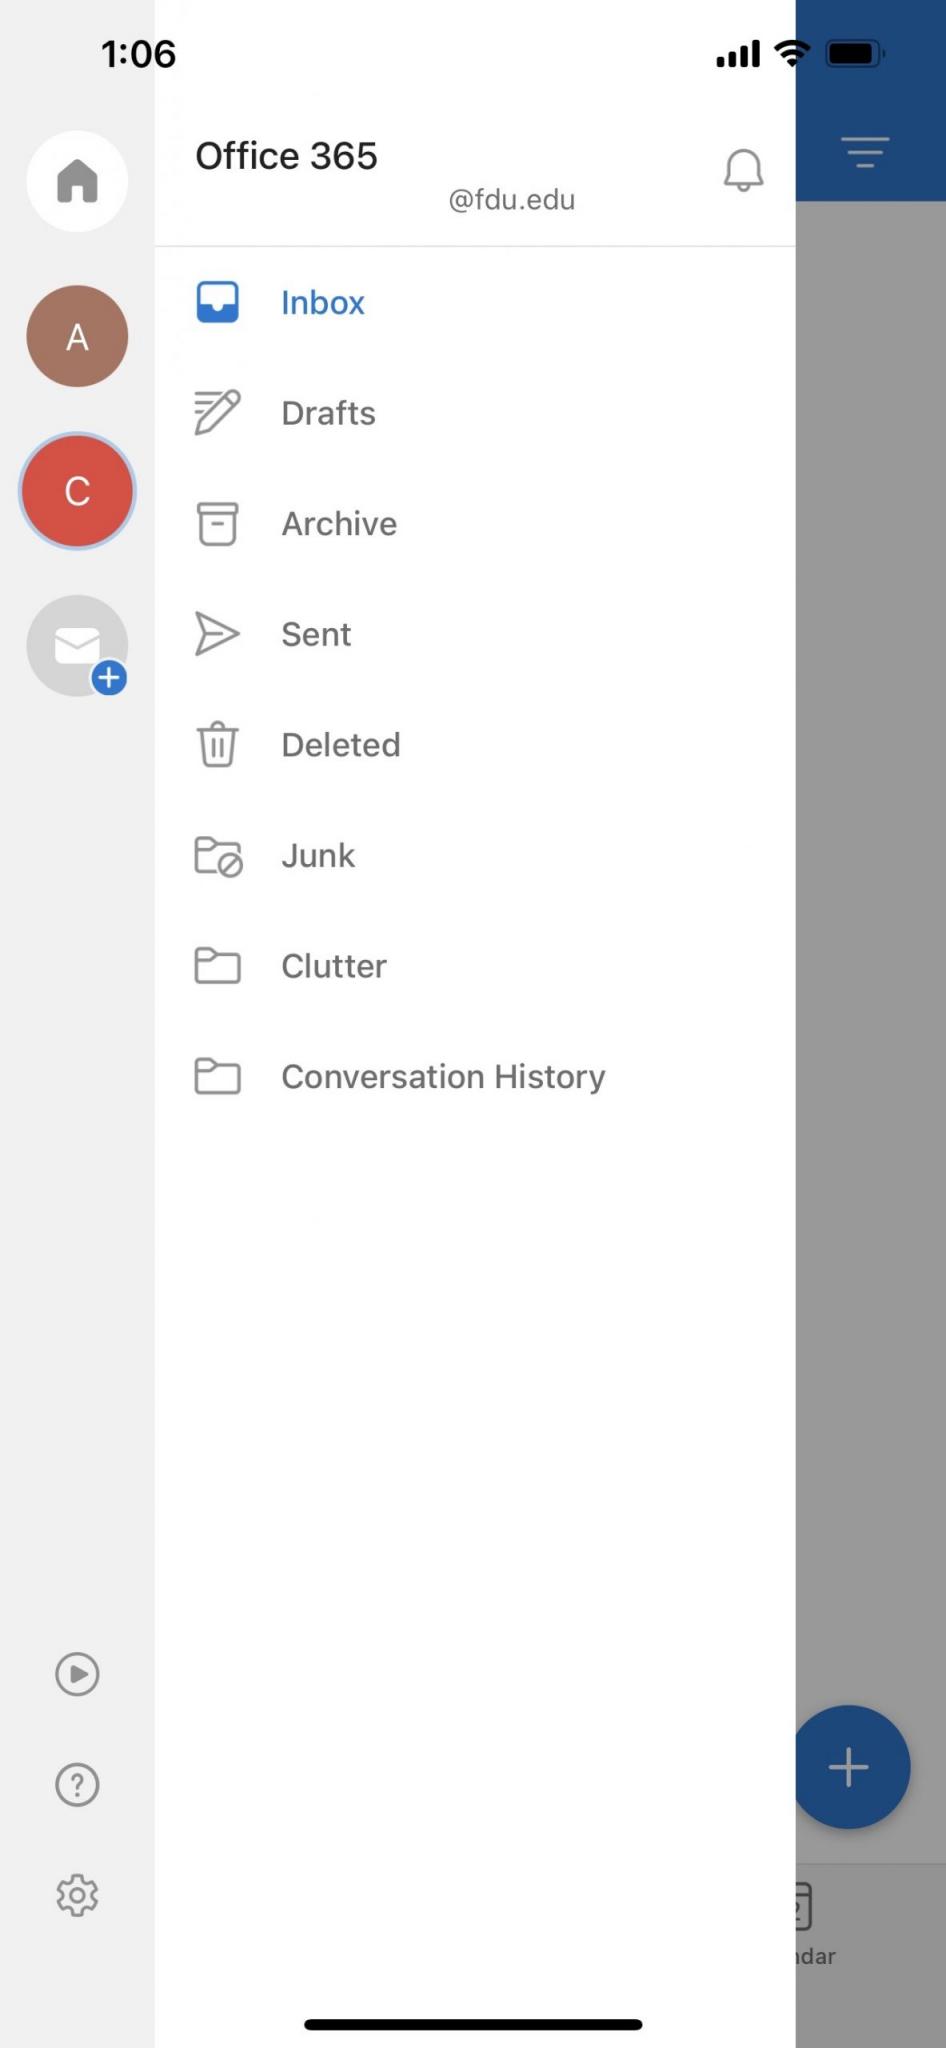
  1. After the account setup process completes, the shared mailbox will display in your account list within the Outlook for Android or iOS app
Tip

To remove a shared mailbox, go to Settings > Accounts. Then tap on the shared mailbox and select Delete Account.

close

Send Email from a Shared Mailbox

Windows / macOS
  1. Open Outlook
  2. Choose New Email to start a new message
  3. If you don’t see the From field at the top of your message, choose Options, and select the From tab
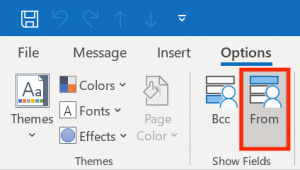
  1. Click From in the message, and change to the shared email address

Note

If you don’t see your shared email address displayed, choose “Other email address…” Enter the full email address for the shared mailbox in the blank or search for the email address by clicking “From” tab. Click “OK” when finished.

  1. Finish typing your message and then choose Send

Note

From now on when you want to send a message from your shared mailbox, the address will be available in your “From” drop down list.

Whenever you send a message from your shared mailbox, your recipients will only see the shared email address in the message.

close
office365.fdu.edu / Outlook Web App
  1. Choose New Message
  2. Choose From and change to the desired shared email address

Note

If you don’t see your shared email address displayed, choose “Other email address…” Enter the full email address for the shared mailbox, then select the appropriate shared email address from the auto populated list when finished.

  1. Finish typing your message and then choose Send
close
Last Modified:

Software Request Guidelines for University Computers and Computer Labs

Resources for:
icon Close

Departments wishing to obtain software, whether it is for use by the department or to be installed in the FDU computer labs and/or FDU Anywhere, should plan appropriately to provide adequate time to acquire the software and make it available to users.

The following steps should be used as a guide when planning to obtain software for instructional or business use:

Tip

Plan a minimum of 3 weeks for a contract review before a PO can be processed. See contract review requirements and order process by visiting the link at the bottom of the page.

  1. Selection of product
  2. Creation of Purchase Order (PO) and approval by department/dean/chair
  3. Technology review and approval by OIRT
  4. New vendor processing, if necessary
  5. Contract review
  6. Software purchase and delivery to FDU
  7. Software preparation. Plan up to 60 days to allow for items such as:
    • Creating configurations for FDU’s needs and environment
    • Setting up license servers or other required systems
    • Integration with other systems (e.g., Single Sign On)
    • Testing mass deployment (if for the computer labs)
    • Integration with FDU Anywhere (if needed) assuming the software is licensed and approved for VDI enviroment
  8. Testing and confirmation of proper functionality by the requestor (instructor)
  9. Final installation on computers

Note

Even if the software has no cost to FDU, per the Office of the General Counsel and the Contract Review Policy, if the software requires you to agree to terms and conditions, it’s an agreement that must be reviewed

Please begin by completing the Computing Services > Lab Reservation & Lab Software Request (Faculty & Staff NJ Only)

SAMI Forms

Last Modified:

Student Technology Resources

Resources for:
icon Close

Fairleigh Dickinson University provides an extensive array of technological resources and services tailored for our students. This guide is designed to assist students in navigating and utilizing these tools effectively, ensuring they can easily set up, access, and manage their accounts, while also offering comprehensive information on each service.

ID and Email

FDU NetID

Your FDU NetID verifies who you are and ensures the privacy of your personal information. Your FDU NetID and your NetID password will provide access to a variety of IT resources including your Self-Service, WebCampus, Office365, and Email.

To obtain your NetID, follow the guide below:

close
Changing your FDU NetID Password

To protect the University and our Students from cyber attacks and other malicious activity, we require that everyone in our community to periodically change their password.

To change your password, follow the guide below:

close
DUO Multi-factor Authentication

To successfully use your NetID to access your accounts, you will need Two-Factor Authentication with Cisco DUO MFA.

Two-factor authentication adds a second layer of security to your FDU NetID. It requires two factors to verify identity. These factors include something you know – your FDU NetID and password, and something you have – a phone or passcode, to authenticate and gain access to your account on FDU services. Passwords alone no longer provide adequate protection against cyber hacking. DUO is required for all current FDU students.

To set up your mobile device with DUO MFA, follow the guide below:

Additionally, refer to our FAQ for commonly asked questions about DUO:

close
Email and Office 365

Students can access their emails through any Web browser using their NetID and password to log in. To access our email, visit the Office 365 Portal:

Office 365 Portal

Students can also access their FDU Email accounts on their mobile devices by installing the Outlook app. For instructions to setting up your FDU Email account in the Outlook app, follow the guide below:

Current students who are registered for classes for the current term, or a future term have access to Microsoft Office 365 Suite applications. For more information, visit the links below:

close

Academic Systems

Webcampus

Webcampus is a course content management system. FDU’s Webcampus is also known as the Blackboard System. On-line courses are taught through this system which also allows for interaction between the student and faculty member as well as on-line class discussions.

To learn more about how to access Webcampus, review the guide below:

close
Self-Service

Self-Service is an interactive web application that enables students to view their individual information contained in FDU’s Student Information System. Students can use Self-Service to do things like view their financial aid, pay their bills, and register for classes.

Review the Tutorial below to learn how to use Self Service:

close

Connectivity

Connecting to the FDU Wireless Network

Using your FDU NETID, you can connect to the FDU Wireless Network. For instructions view the links below:

close

Security

Security Resources

Understanding and implementing cybersecurity measures is crucial for protecting your personal and institutional information. This section provides essential resources to help you navigate the landscape of cyber threats.

Stay safe online by reviewing the articles below:

close

Software

Available Software for FDU Students

Fairleigh Dickinson University has both licensed and open-source software, that is offered for academic and/or personal use for students. The links below point out to commonly used software, both licensed and open source, that are offered for academic and/or personal use to all Fairleigh Dickinson University faculty, staff and students.


In our digital learning environment, mastering online tools is essential for academic success. These resources are designed to guide you through the process of engaging in classes virtually via Zoom and accessing your files on OneDrive.

close

Printing and Labs

Computer Labs and Printing

Computing Services has multiple computer labs available on both New Jersey Campuses for classroom instruction and student use.

close
Virtual Labs

FDU also provides remote access to many of the software applications typically found in university computer labs through our platform FDU Anywhere. You can access it using your FDU NetID credentials using the link below:

FDU Anywhere

Review the FDU Anywhere Tutorial below to learn how to use our virtual labs:

close

For any IT related questions and support, contact the SAMI Service Desk:

SAMI Support

Last Modified:

Use SFTP or SCP to Upload Files to a FDU Linux Server

Resources for:
icon Close

What’s SFTP and SCP?

Secure File Transfer Protocol (SFTP) is a file protocol for transferring large files over the web. It builds on the File Transfer Protocol (FTP) and includes Secure Shell (SSH) security components. This term is also known as Secure Shell (SSH) File Transfer Protocol. Secure copy protocol (SCP) is another method to securely transfer files between a your local PC and a remote host or between two remote hosts. It is also based on the Secure Shell (SSH) protocol.

Linux / Mac

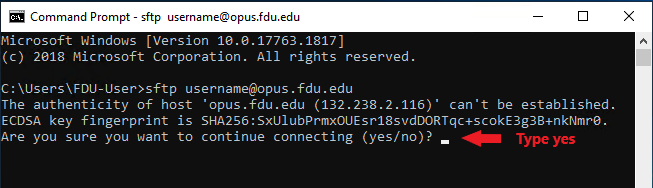
If you are running a Linux or Mac computer, SFTP and SCP clients are already installed, so you don’t need to download anything using those OS. You can open up a terminal window and run the either command like below to connect to a remote Linux server.

sftp username@opus.fdu.edu

or

scp filename username@132.238.2.116:

Windows

Option 1: Use WinSCP (Recommended)

You will need to download and install WinSCP:

Download WinSCP

  1. Launch the WinSCP program
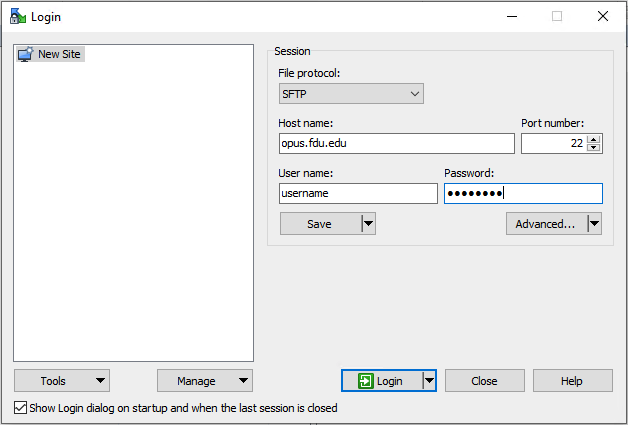
  2. In the login window, click “New Site
  1. Fill out the information as follows:
    • Host name: Enter opus.fdu.edu
    • User name: (username on FDU Linux servers will be the part of your FDU NetID to the left of the @ sign)
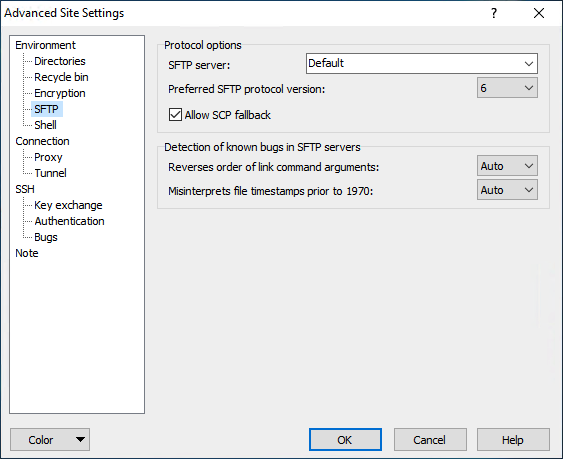
  2. Click “Advanced…
    • Select “Environment > SFTP” and enable “Allow SCP fallback
  1. Click “OK
  2. Click “Save“, enter a name for the connection, and click “OK
  3. In the WinSCP login window, select the connection name and click “Login

Option 2:

Install Putty, which also includes PSCP (SCP for Windows) and SFTP (SFTP for Windows):

Download Putty

Please select the latest version of MSI (‘Windows Installer’) for your computer (32-bit or 64-bit)

Optionally you may choose to download only pscp.exe(SCP for Windows) or “psftp.exe” (SFTP for Windows) and copy into the folder where you need to use it.

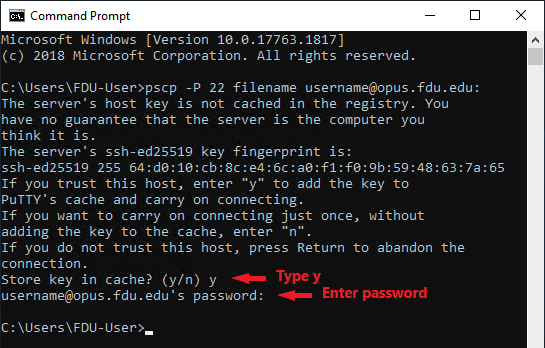
Once you have installed your program of choice, you’ll be able to launch each command from the Command Line of Windows.

pscp -P 22 filename username@opus.fdu.edu:
psftp username@opus.fdu.edu

Note

You may need to accept the server’s host key the first time you connect the Linux server.

Last Modified:

Use SSH to Log into Opus Linux Server

Resources for:
icon Close

Accessing the Opus server

The Opus server can be access using secure transport protocols such as SSH and SFTP. Access is only allowed from campus networks. All off campus users will need to access Opus using FDU’s Virtual Private Network (VPN) to use the Opus server

What’s SSH?

SSH stands for Secure Shell, which was invented in 1995 to replace the insecure Telnet (Telecommunication Network). It’s now the primary way for system administrators to securely log into remote Linux servers over the public Internet. Although it looks and acts the same as Telnet, all communications over the SSH protocol are encrypted to prevent packet sniffing.

Linux / Mac

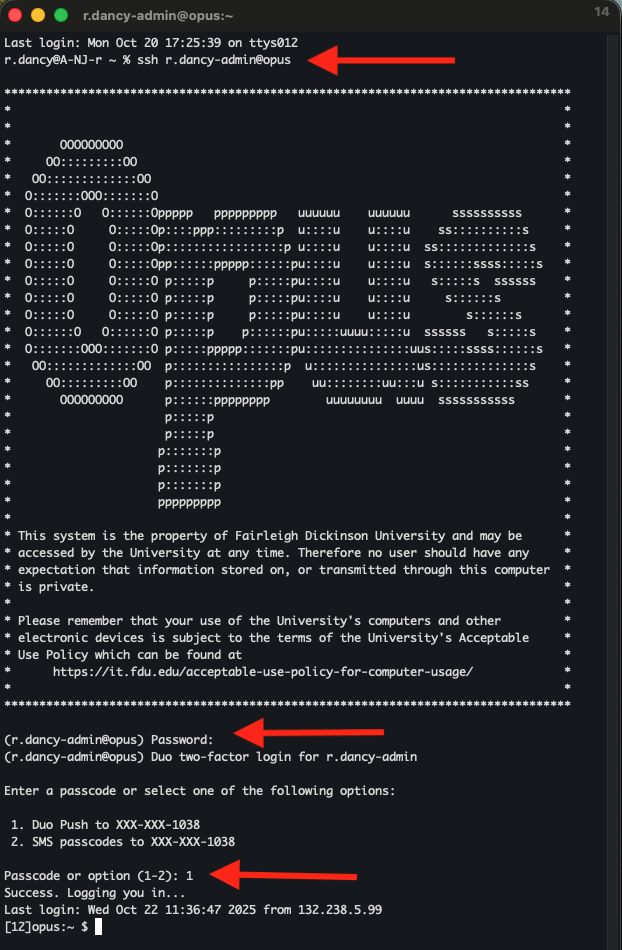
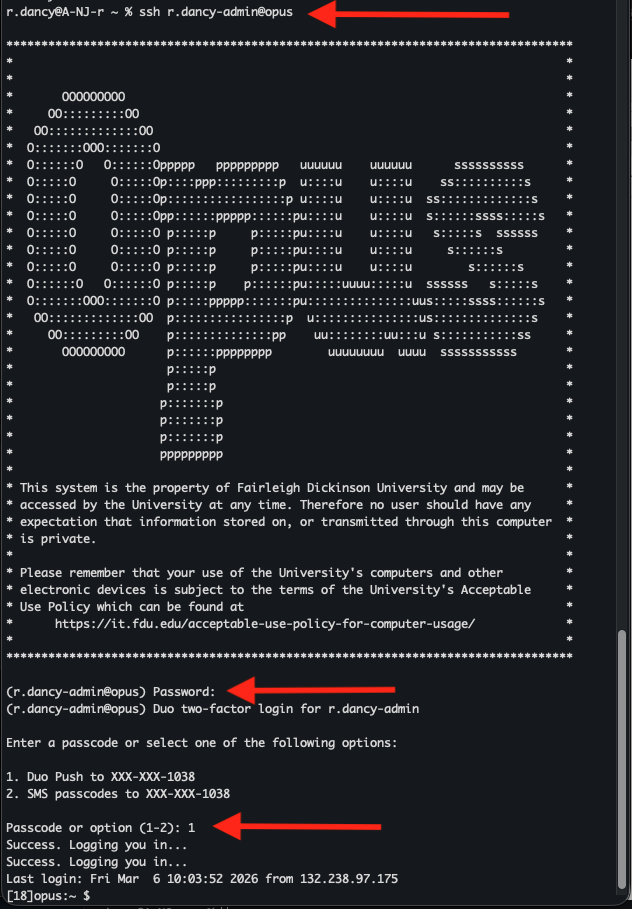
If you are running a Linux or Mac computer, SSH client is installed by default. You can open up a terminal window and run the ssh command like below to connect to a remote Linux server.

ssh username@opus.fdu.edu

or

ssh username@132.238.2.116

After your initial login, you’ll be prompted for multi-factor authentication (MFA). Enter the passcode from your Duo app or enter the on-screen number to initiate Duo Push.

Now let’s discuss how to use SSH on Windows.

Windows

Method 1: Windows 11’s Built-in SSH Client

The Microsoft PowerShell team decided to port OpenSSH (both the client and the server) to Windows in 2015. It finally arrived in Windows 10’s Fall Creator Update in 2017 and is enabled by default in the April 2018 Update.

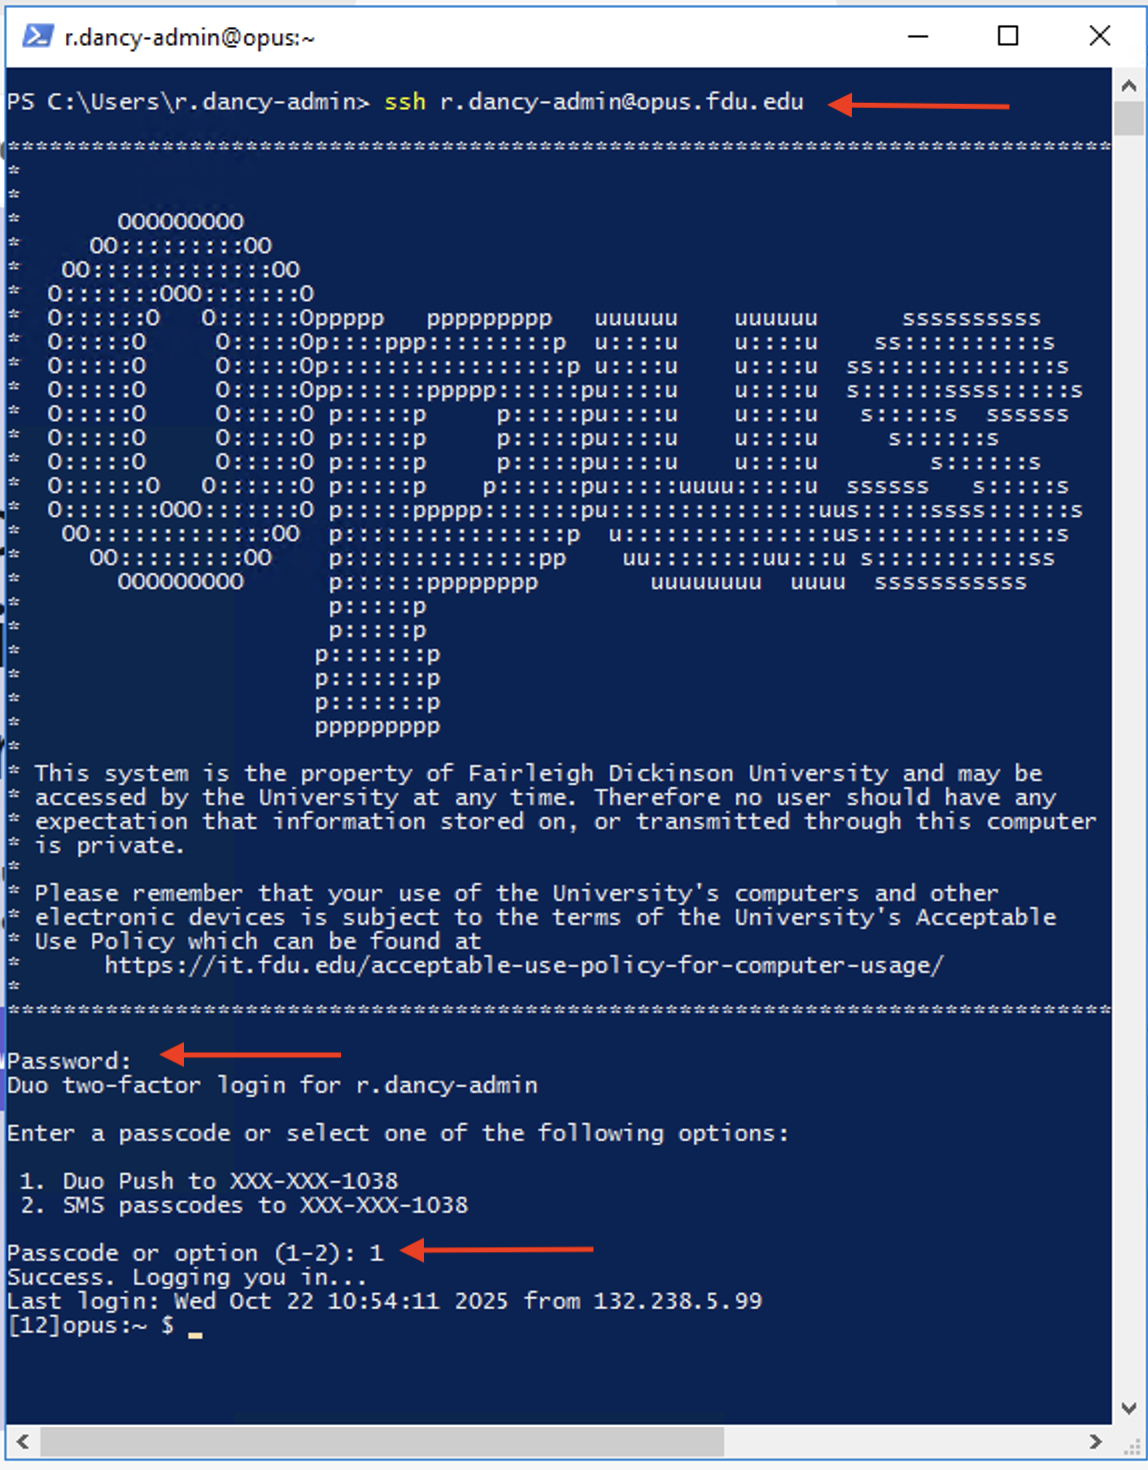
To use the OpenSSH client on Windows 11, simply open a PowerShell window or a command prompt window and run the ssh command. For example, if I want to connect to the Opus Linux server on the FDU network, I would run

ssh username@opus.fdu.edu

username on FDU Linux servers will be the part of your FDU NetID to the left of the @ sign (username@fdu.edu becomes just username) and opus.fdu.edu is name the Linux server you want to access (The IP address of the Linux server can also be used). The first time you connect to a Linux computer, you will be prompted to accept the host key. Then enter your password to login. After login, you can run Linux commands to do tasks.

Note

If you want to paste a password into the PowerShell window, you need to right-click the mouse and press Enter.

After your initial login, you’ll be prompted for multi-factor authentication (MFA). Enter the passcode from your Duo app or enter the on-screen number to initiate Duo Push.

To log out from the Linux box, run the “exit” command or press “Ctrl+D“.

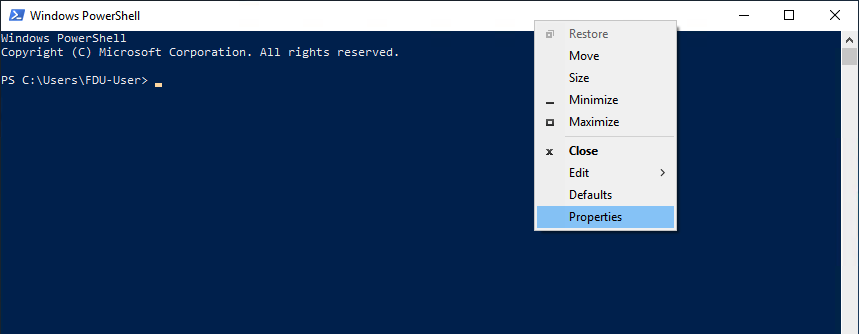
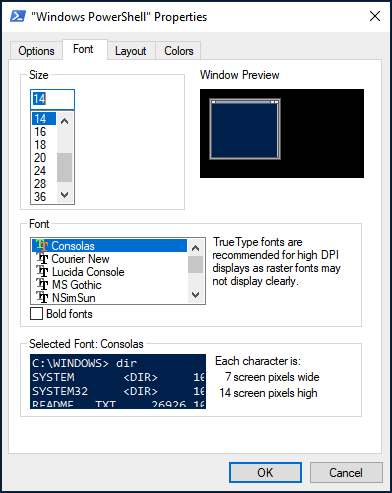
The default font size in PowerShell Window is very small. To change it, right-click the titlebar and select properties, then you can change the font size, and the background color.

Method 2: Use SSH in Windows Subsystem for Linux

Windows Subsystem for Linux (WSL) enables you to run native Linux command-line tools directly on Windows 11. If you are a system administrator, WSL is probably an overkill for just using SSH because it would install and run a Linux distro (without graphical user interface) on your Windows 11 desktop. WSL is created for web developers or those who need to work on open-source projects. You can use not only SSH but also other Linux command line tools (Bash, sed, awk, etc).

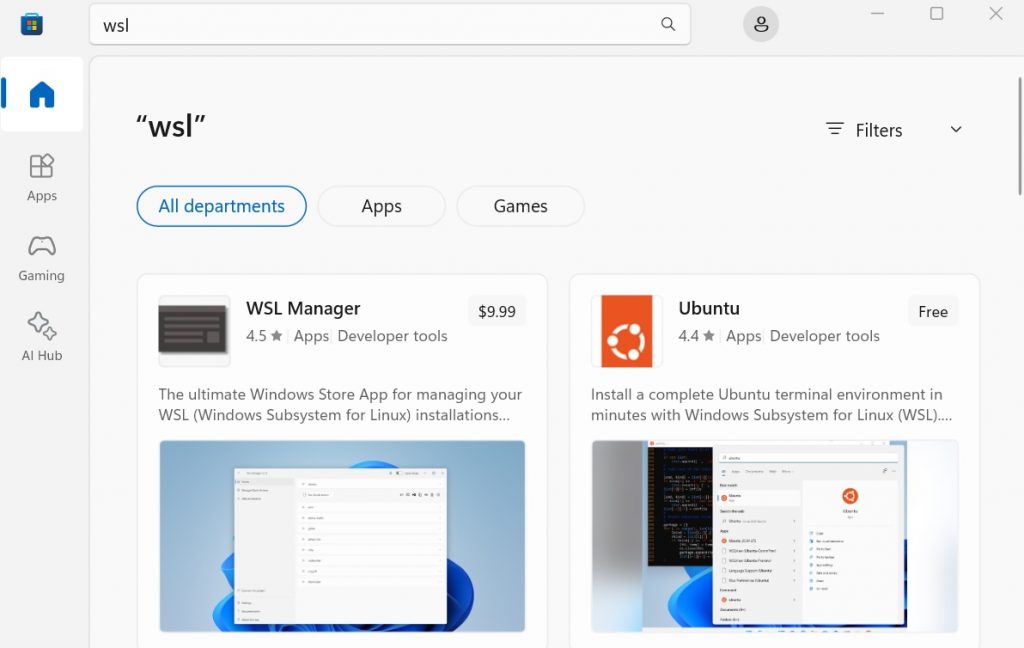
Open the Microsoft Store and enter “WSL” in the search box. Select Run Linux on Windows and install a Linux distro of your choice.

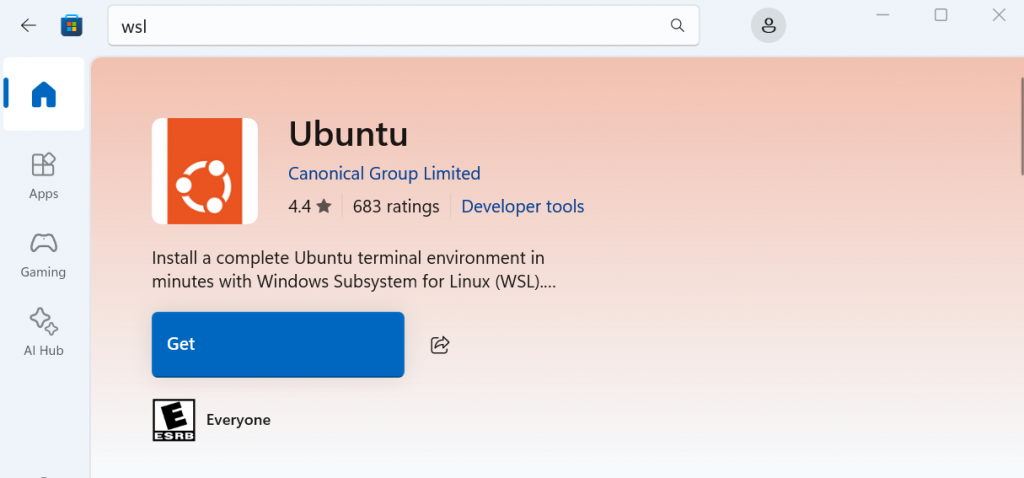
For example, I choose “Ubuntu” and click the “Get” button to install it.

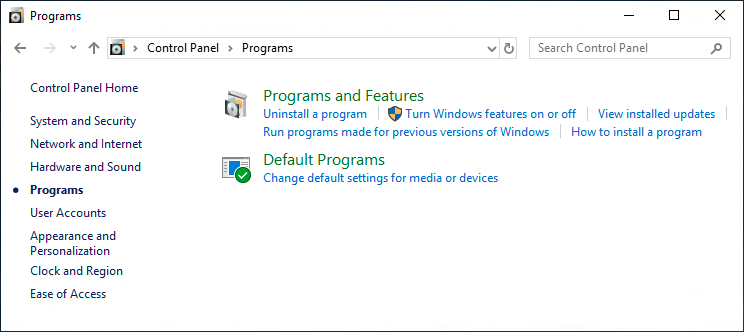
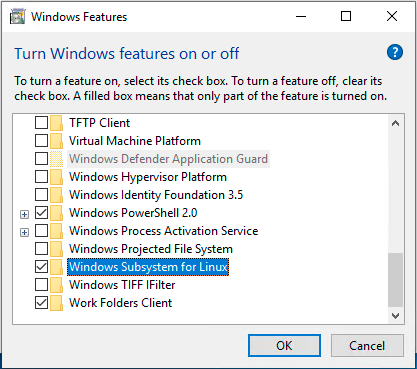
Once your Linux distro is installed, open the Control Panel and select Programs => Turn Windows features on or off. Tick on the checkbox of Windows Subsystem for Linux to enable this feature. (You may need to reboot your Windows PC for this change to take effect.)

Next, you can launch the Linux distro from the start menu by search the distro’s name. The first time you launch it, you need to create a user and set a password.

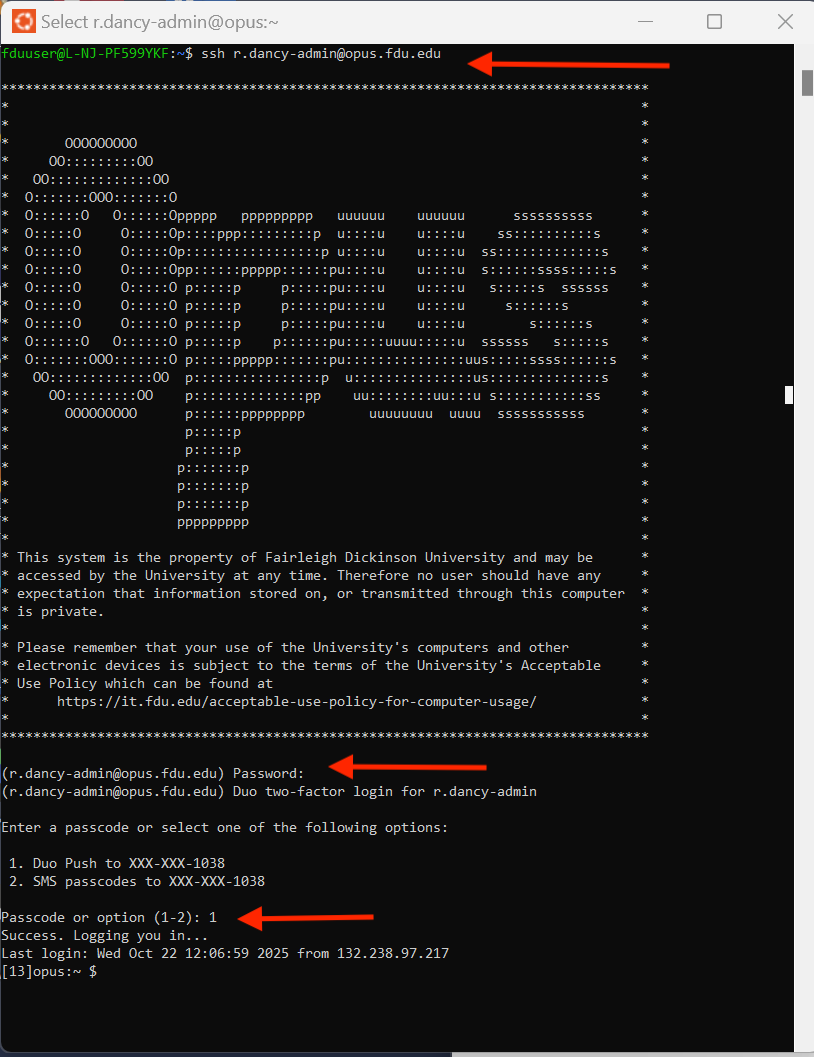
After that, you can use the ssh command like below to connect to a Linux server or PC that runs a SSH server.

ssh username@opus.fdu.edu

After your initial login, you’ll be prompted for multi-factor authentication (MFA). Enter the passcode from your Duo app or enter the on-screen number to initiate Duo Push.

Method 3: Use Putty

Putty is a well-known and the most popular SSH client on Windows before the arrival of Windows OpenSSH client and Windows Subsystem for Linux. To use SSH with Putty, you need to download the Putty program from the official website and install it.

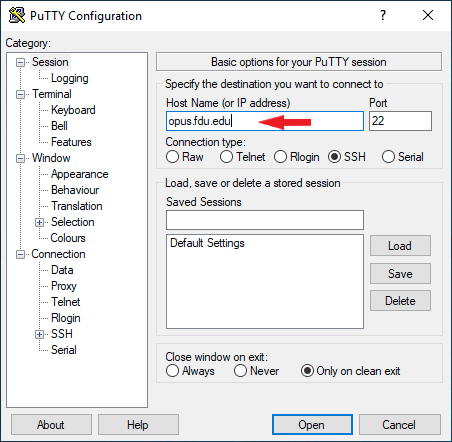
Launch Putty from the Start menu. Then enter the IP address or hostname of the Linux box and click the Open button to connect to it.

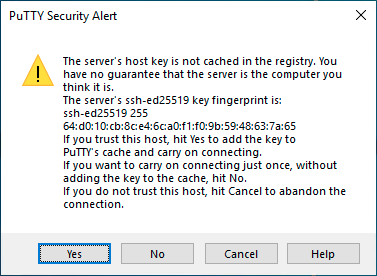
Accept the host key and you will be prompted to enter the username and password.

After your initial login, you’ll be prompted for multi-factor authentication (MFA). Enter the passcode from your Duo app or enter the on-screen number to initiate Duo Push.

Tip

When you type in your password, the cursor doesn’t move, but it’s actually accepting your password. To paste text into Putty, first press Ctrl+C to copy the text, then go to Putty window and press the right-button of your mouse.

Last Modified:

Video Conversion

Resources for:
icon Close

Multimedia Services acknowledges the occasional need to present video materials originally produced in outdated formats. Common conversions include transitioning from VHS, DV, DVD to more current digital formats like .mp4 or .mov. While we do not directly offer conversions of physical media, we facilitate these processes by outsourcing to a trusted vendor specialized in such conversions, ensuring that your valuable content is updated and accessible in modern formats.

Last Modified:

Video Production Services

Resources for:
icon Close

When scheduling a video production on or off Campus, it is important to provide a detailed description of what is expected, and what is most important. This will allow the Multimedia Services to anticipate any issues depending upon the location.

Off Campus Video Production

When recording off campus it is important to communicate the exact event location and contact information of anyone who is overseeing the venue. For secure office buildings it will be necessary that security be advised that a video crew will be arriving and to include the name(s) of the crew and the nature of the production. Also, it should be noted that recording in certain areas, both public and private locations may be prohibited or require a permit.

Additional Costs

Due to the nature of some off-campus productions there may be some additional costs, such as tolls, parking and fuel.


Last Modified:

Video Project Concept Assistance

Resources for:
icon Close

Creative Collaboration and Conceptualization

If you have a basic concept and a target audience in mind but are unsure about the visual direction of your video, our team is here to help. We excel in assisting clients through the creative process, ensuring that your initial idea is developed into a clear, effective video that aligns with your goals.

Utilizing Inspirational Examples

Sharing examples of videos that resonate with your vision can be incredibly beneficial for your project. These references help us understand the style, tone, and messaging you aspire to communicate to your audience. By analyzing these examples, we can collaboratively create a unique and tailored video that meets your specific needs and expectations.

Last Modified:

Ways to Lead Productive and Inclusive Zoom Classes

Resources for:
icon Close

Here are 5 ways to lead productive & inclusive Zoom Classes with your students.

  1. As facilitator, plan ahead. Identify partners to help fill Zoom Class roles. If you can, identify a:
    • Co-host in case you have technical problems
    • Moderator: to monitor and respond to chats
    • Coordinator: to keep track of time and take notes
  2. Share rules of engagement at the start of your class
    • Keep your video on
    • Mute yourself unless speaking
    • Introduce yourself before you speak
  3. Ensure all students have equal access to shared content
    • Share content ahead of class or by using Zoom chat
    • Think agenda, slides, notes, reference materials
  4. Be sure students have an equal chance to engage
    • Invite student s to speak up, and do this at multiple points during the class
  5. Be intentional about class activities
    • Conduct activities that work for all students, ensuring a similar experience
Last Modified:

Zoom Live Training

Resources for:
icon Close

Zoom experts host free and interactive live training webinars daily. Get up to speed in less than an hour. Please select the time zone that fits best for you when registering for one of our live training webinars.

Last Modified: