
1. Executive Summary
The purpose of the Information Technology Strategic Plan (ITSP) is to leverage information technology to advance the mission of the University, to help achieve the goals identified in the University Strategic Plan, and to shape the future direction for information technology (IT) initiatives to create a competitive advantage for the University.
The ITSP is the culmination of an in-depth process that involved strategic thinking, research on IT and higher education trends, and discussions about technology needs with the University community. The Technology Plan was envisioned and created with guidance from administrators, staff, faculty, and students. The Plan will provide direction and set IT priorities for the next three to five years.
2. Governance Overview
The mission of IT is to provide services that are critical to the front-line mission of the institution: teaching and research. IT provides services that are critical to all of the other services that are directly or indirectly supporting the mission of the institution (e.g., business operations, academic and student support, research operations, auxiliaries, data security). Most importantly, IT provides important services directly to all students.
IT resource needs will always outstrip available resources, thereby requiring strategic prioritization of how resources are deployed, within the context of the mission of the institution. IT security, business continuity and compliance needs require sensible and enforceable policies that support, rather than unduly interfere with, the mission of the institution. Appropriately balancing central and local IT activities requires frequent recalibration and every member of the University community (student, faculty, and staff) is a direct stakeholder in the success of our IT enterprises.
Governance Committee Activities
- Evaluate and recommend technology related policies and procedures
- Recommend IT service and project priorities for the University
- Advise on the implementation of the IT Strategic Plan
- Advise on the development of future versions of the IT Strategic Plan
- Identify existing campus technology committees and working groups, then develop and maintain a framework that connects them back to this Committee for purposes of information-sharing
- Review proposals, recommendations, and input from other campus technology committees and working groups make recommendations for further action
- Provide recommendations for effective use of campus-wide technology resources
- Support the CIO (and appropriate others) in campus-wide monitoring of and ensuring compliance with best practices, IT policies/processes, and institutional priorities
- Provide input regarding technology project and service proposals into the University budget process
- Recommend approval of all proposed technology projects and services that meet certain criteria (e.g., affects a certain number of users, affects more than one division or unit)
- Make recommendations for aligning IT professional resources to institutional goals with respect to FDU’s IT organizational structure and standards for compensation and competency
- Recommend approval of procurement of all technology services and products that meet certain criteria (e.g., a large project over a certain dollar threshold)
- Implement a simplified and consistent cost and funding model for services. Fewer and more consistent funding models that work within the constraints of unit budgets and grants, incentivize adoption and retirement of services, provide transparency to costs, and support interdisciplinary work are crucial to supporting the goals in this strategic plan.
- Create and adopt a consistent decision frameworks and simpler funding models to guide funding decisions for existing and new services.
- Create the ability to procure subscription-based services aligned to the frequency and speed at which new services enter the technology market.
- Utilize advisory groups composed of members from throughout the University to recommend, and advocate for, appropriate service investment decisions, such as subsidization and retirement.
3. Fronts of Focus
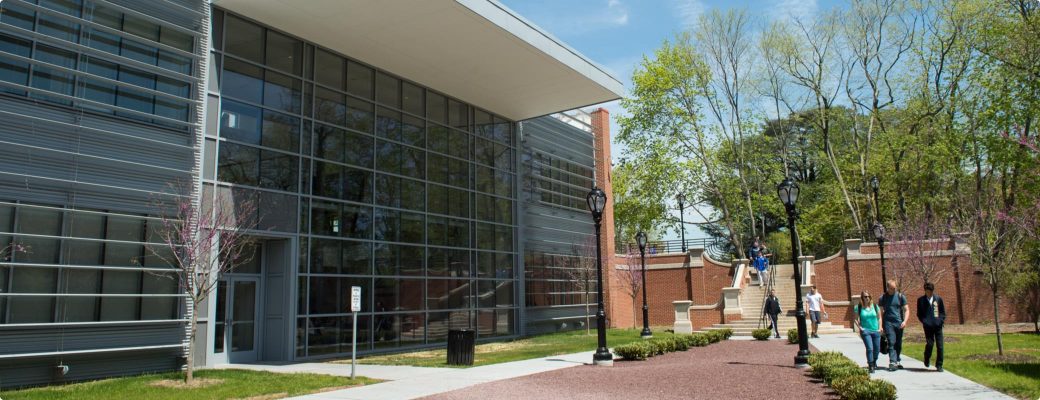
3.1 New Jersey Campuses
New Jersey (USA)
3.2 Wroxton College
Wroxton College (UK) is the British campus of Fairleigh Dickinson University, situated in the ancestral home of Lord North at Wroxton Abbey in Oxfordshire. The Abbey is located in the Village of Wroxton, which lies in a dip on the northeast edge of an ironstone escarpment bordering the Cotswolds.
The main College building is Wroxton Abbey, home of Wroxton College, a fully modernized Jacobean mansion on 56 acres of its own lawns, lakes and woodlands. It now houses the College’s classrooms and seminar rooms, the library, fully modernized student lodging facilities, and computer laboratories.
Wroxton College is a unique experience both culturally and academically for students seeking to extend their horizons. Students come to Wroxton from more than 250 colleges and universities to participate in academic programs offered by resident British faculty and visiting British scholars and corporate professionals. The academic offerings are supplemented by a program of tours to various historic sites, artistic and cultural centers, and places of political and commercial significance.
Wroxton College has been a travel abroad campus which will be expanded to support new degree programs. Work is already underway to upgrade the technology infrastructure to support enhanced telephony, intranet, internet, smart classrooms, and videoconferencing. Full degree programs may require additional IT investment strategies to fully realize the potential of this charming campus location as a full degree granting location. Management of the Wroxton College IT infrastructure and support has been outsourced under the supervision of the CIO and University Systems and Network (USAN).
3.3 Vancouver campus
The Vancouver Campus (BC) offers accredited professional degree programs to international students with majors in business administration and information technology. Students majoring in business administration are required to complete a concentration in international business and may elect to complete a second concentration in entrepreneurship, finance, information technology, or marketing. Students majoring in information technology typically complete a minor in business administration. They also have optional concentrations in Network and Systems Administration or Web Technology.
The University also offers a Bachelor of Arts – Individualized Studies degree. A Master in Administrative Science degree and a Master of Science in Hospitality Management Studies are offered at the graduate level. In addition, the Vancouver campus offers a Pre-University Program which provides advanced English-language training for students who meet the requirements for admission but require additional training in English (in speaking and/or writing) prior to matriculating in a degree program.
The Vancouver campus boasts an excellent and dedicated core of full- and part-time faculty; a new, state-of-the art facility; small class sizes; close working relations between students, faculty and staff; and an intensive and unrivaled student support system focused on individual student success.
Growth at the Vancouver campus has demanded a facilities and IT program to increase administrative and instructional spaces. Having outgrown the existing Vancouver campus space, FDU will assume additional non collocated spaces (temporarily) while FDU plans for the construction of a new and larger facility to house the FDU Vancouver campus. As these locations come on-line over the next five years, FDU will standardize on platform, systems, and network capabilities to scale and tie into the larger FDU network infrastructure.
3.4 Student Success
Outreach programs are a necessity in higher education. Students rely on their instructors to set the tone for the course and seek their instructor’s guidance and mentoring throughout their time spent together in the course. Students, in general, need to know that their success in the classroom is important to both their instructor and the university.
Even more importantly, direct instructor outreach is an essential tool for success for online learning programs as students do not have face-to-face interaction with their instructors as they would in an on ground setting. Without direct instructor contact with the student, the student’s need for validation of their efforts from the instructor and institution is not met, which can lead to the student becoming disengaged within the class and/or the institution.
Online student tracking system net retention awards. The implementation of a tracking system assists in identifying at-risk students to develop individualized plans to assist the student in creating a positive educational experience. By instructors or advisors identifying the individual needs of the student, better strategies can be developed to serve the student population. It is important to note that instructor-student interaction plays a large role in the traditional on-campus environment for retention and student success.
Based on the current research and literature regarding student retention rates and the need of proactive approaches, two general conclusions can be made: The need for instructor-student interaction is a factor in the student’s success whether the learning environment is a traditional on-campus program or online program and the degree and approach of instructor-student interaction for online learning environments must be proactive in the online learning environment.
4. Guiding Principles for Plan Development
| Technology Impact | Does the strategy recognize and acknowledge that changes in technology can have significant impact to the University as a whole? |
| Commitment to Investing in People | Does the strategy recognize a need to invest professional development to leverage modern technologies? |
| Representation from across the University | Does the development of the strategy include representation from the distributed units found on most campuses? |
| Update Mechanism | Does the strategy provide a mechanism for updating it? |
| Easy to Understand | Can the goals of the strategy be easily understood, and applied to daily operations within units? |
| Pathway to Success | Does the strategy include an assessment of the current state, a vision of the future, and a pathway for achieving the desired future state? |
| Tangible Outcomes | Does the strategy provide a clear picture of what success looks like with a defined outcome? |
| Understanding of the Influences | Does the strategy allow the reader to understand the influences and pressures on the University? |
| Descriptive not Prescriptive | Does the strategy provide a description of the outcomes without describing individual tasks that must be accomplished? |
5. IT Strategic Goals
FDU seeks to develop an environment where information is easily leveraged to strengthen FDU’s leadership in collaborative research and learning, with appropriate levels of security and privacy. The continued growth of data-based research, learning analytics, and interdisciplinary collaboration requires data to be more available and accessible. At the same time, security, privacy, and regulatory compliance are critical and increasingly difficult to achieve. FDU will seek to be a leader in creating an environment that balances these often competing needs.
FDU will spur growth in the computational and data sciences by creating a unified university-wide research IT ecosystem that enables cost-effective and at-scale provisioning of on premise and cloud-based computing, storage, networking, and visualization services and tools.
The university is a learning laboratory geared towards discovery and positioned to change how the world teaches and learns. FDU will support an experience by capturing information about the university environment and using this information to advance research in the learning sciences. The learning laboratory will support the development of new applications and innovations in teaching and learning. The full experience of the student will be personalized to each individual, both inside and outside the classroom, increasing access, affordability, and inclusion.
FDU seeks to deliver an environment with minimal administrative burden for mission related work. Increasing compliance requirements combined with complex business processes consume time and resources that would be better directed to teaching students and conducting research. FDU must take an end-to-end approach to service design and development to eliminate waste and apply technology that makes administrative processes and adherence to compliance requirements less burdensome.
Understanding and advancing technology’s role in defining the student experience on campus (from applicants to alumni).
6. Strategic Alignment with FDU Mission, Vision, and Values
6.1 Education and Outreach
Outreach programs have been implemented in higher learning institutions to increase student retention and satisfaction. The challenges of outreach can increase when students are in an online environment. Online students do not have physical contact with their instructor and classmates and this can cause students to feel isolated and discouraged. Online higher learning institutions can approach outreach at various levels: no formalized outreach program for instructors, a formalized outreach program for instructors incorporating required outreach periodically throughout the course for at risk students, or a formalized outreach program for instructors incorporating weekly outreach throughout the course for at risk students.
6.2 Research Computing
FDU will champion open and advance conversations with the State of NJ and other institutions of higher education partners to develop a strategy for advancing the State as a national hub for computational and data science innovation. The development of an “open cloud infrastructure” that enables universities, government, and the business community to conduct collaborative research through sharing computational and data analytics technologies.
Provide a unified FDU research computing and data environment to enable collaboration and innovation. By bridging the “health to campus” research computing and data divide, FDU will accelerate the development of cross-campus and cross-agency interdisciplinary research initiatives, attract nationally recognized leaders in computational and data science, and realize a return on investment in computational and data science exceeding our peers.
We will coordinate and expand the research support community across the university, providing support that goes beyond narrow technical issues and complements domain-specific expertise with knowledge of best practices and available resources.
6.3 Information Security and Risk Management
Information security is not a risk that can be contained to technology operations alone. Information security risks are strategic risks to the institution and require a comprehensive, enterprise risk management (ERM) approach in order to be effectively addressed.
The IT profession is undergoing its own remaking that is every bit as monumental as higher education’s. The economic and political pressures on higher education have been placing constraints on its IT workforce. Higher education is not as intrinsically attractive a place for IT staff to work as it once was, and there are many other options that offer higher salaries, more interesting and more modern challenges, greater professional development, and better benefits. IT managers are challenged on multiple fronts. They need to attract and retain the best talent. They need to adapt the existing workforce to new roles and techniques. They need to work with non-IT managers to enlist functional staff in the critical roles that these staff can play in new technology-related initiatives. The work won’t get done without people, and the “people part” has become very difficult.
- Expand the cyber security awareness program (including mandatory training for staff and faculty)
- Continually review policies, content, and strategies to stay abreast of current threats and mitigations
- Two Step Authentication
- Annual Network Intrusion and end-user Phishing awareness and testing
- Make it easier to keep sensitive information secure and meet compliance requirements by providing guidelines, tools, and services to the entire community, based on data or system sensitivity, not unit
- Develop a risk-based security strategy that keeps pace with security threats and challenges
6.4 Administrative Systems
We must aggressively streamline the administrative systems in order to reduce administration and compliance burden on users. This initiative will increase the amount of time people in the FDU community spend working on their mission and improve the user experience when using technology. It will also help prepare the systems for an eventual move to a cloud-based provider, which will reduce the total cost of ownership, and expand the capacity for value-added initiatives to further the university’s mission.
- Optimize and standardize current end-to-end business processes to use industry best practices that are provided by our administration systems.
- Standardize management reports for university units, in order to increase consistency in reporting while decreasing the total number of reports.
- Review current administrative system customizations and remove or streamline changes that are unused or increase complexity for users.
- Eliminate shadow and supplemental administrative systems and reports when it is possible to combine multiple systems into a common solution.
- Nurture a university-wide IT community that delivers services and solutions in partnership, as a single team, regardless of organizational lines. Many initiatives in this strategy require IT cooperation across the university. A collaborative IT community that crosses the organizational boundaries, and has a diverse set of viewpoints, will provide consistently timely and effective support to faculty, students, and staff, in order to improve their productivity and retention.
7. Advancing the FDU Mission
7.1 OIRT
The Office of Information Resources and Technology provides secure, innovative, reliable, and integrated technology solutions, quality services, and information resources.
OIRT will strive to create a collaborative and secure IT environment that attracts and retains the best students, faculty, and staff by providing a common foundation of anytime / anywhere technology that focuses on strategically funding targeted technology capabilities to support FDUs academic, administrative, and outreach goals. To achieve this, FDU must:
- Ensure that a collaborative IT Governance Model is deployed that continually focuses on prioritizing, funding and driving community-valued IT services
- Recognize that having a secure and robust underlying technology infrastructure is critical to providing all other technology services
- Identify core IT services and assess cost effectiveness and use potential savings to fund strategically targeted projects
- Mobilize collaborative campus constituencies to identify and address common goals
- Streamline administrative processes and systems to provide more seamless and automated service to all campus stakeholders
- Have consistent and strong executive support to ensure that the ITSP is supported
- Excite students and faculty to leverage technology to improve learning and research outcomes
7.2 Teaching and Learning
7.2.1 Classroom Technology
It has been demonstrated that when technology is integrated into lessons, students are expected to be more interested in the subjects they are studying. Technology provides different opportunities to make learning more fun and enjoyable in terms of teaching same things in new ways. For instance, delivering teaching through gamification, taking students on virtual field trips and using other online learning resources. Technology can encourage a more active participation in the learning process which can be hard to achieve through a traditional lecture environment.
No one learns in the same way because of different learning styles and different abilities. Technology provides great opportunities for making learning more effective for everyone with different needs. For example, students can learn at their own speed, review difficult concepts or skip ahead if they need to. What is more, technology can provide more opportunities for struggling or disabled students. Access to the Internet gives students access to a broad range of resources to conduct research in different ways, which in turn can increase the engagement.
Students can practice collaboration skills by getting involved in different online activities. For instance, working on different projects by collaborating with others on forums or by sharing documents on their virtual learning environments. Technology can encourage collaboration with students in the same classroom, same school and even with other classrooms around the world.
By using technology in the classroom, both teachers and students can develop skills essential for the 21st century. Students can gain the skills they will need to be successful in the future. Modern learning is about collaborating with others, solving complex problems, critical thinking, developing different forms of communication and leadership skills, and improving motivation and productivity. What is more, technology can help develop many practical skills, including creating presentations, learning to differentiate reliable from unreliable sources on the Internet, maintaining proper online etiquette, and writing emails. These are very important skills that can be developed in the classroom.
With countless online resources, technology can help improve teaching. Teachers can use different apps or trusted online resources to enhance the traditional ways of teaching and to keep students more engaged. Virtual lesson plans, grading software and online assessments can help teachers save a lot time. This valuable time can be used for working with students who are struggling. What is more, having virtual learning environments in schools enhances collaboration and knowledge sharing between teachers.
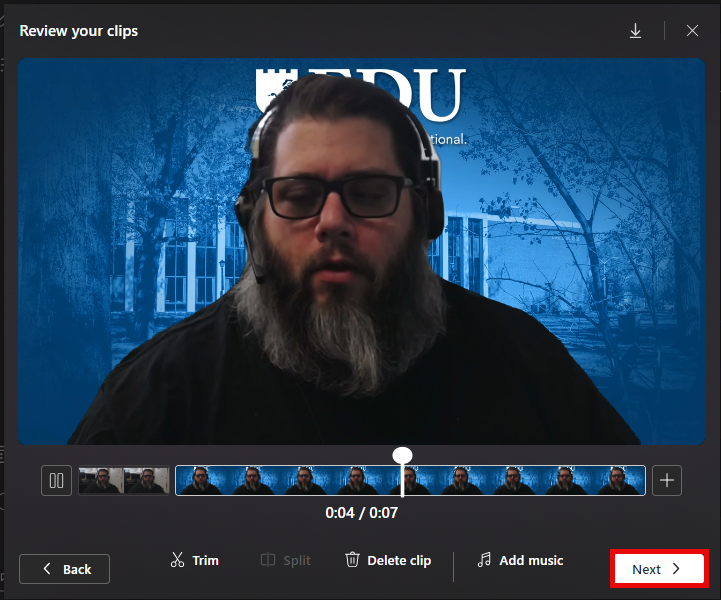
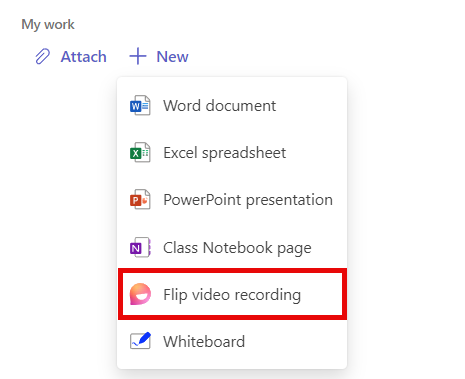
7.2.2 Lecture Capture and Distribution
Lecture capture is the process of recording classroom lectures as videos, and making them available for students to review after the class. The term “lecture capture” is actually quite broad and can be used to describe a variety of solutions, software, and hardware. One may need to record something as simple as audio and PowerPoint point slides. Or, you might want to capture a camera, computer screen, separate microphone, and webcam all for one class. Lecture capture solutions take on many forms depending on how each individual intends to use them.
Since recordings using software-based systems can be done on a standard PC or Mac — or even a mobile device — a lecture can be captured in a lecture hall, an office, or even on-site at a hospital. Capturing lectures helps keep students from falling behind. Less than 40 percent of full-time students complete their bachelor’s degree on time. In some cases, a student’s normal schedule may be interrupted due to illness or family emergency. The more sessions a student misses, the more likely they are to drop a class or even drop out of the program. Often, dropped classes are not offered again until the following academic year, putting the student further behind and driving up the cost of their education.
Video conferencing (VC) technology is becoming more reliable and robust, while hardware and software costs have fallen, making lecture capture a strong strategic capability to improve student success and retention.
7.2.3 ITV / VC
Education is evolving faster than ever. Educators are facing increasing demands as a result of new curriculum standards. While higher education institutions are increasingly competing through distance learning programs, distance learning programs can be enhanced by providing more interactive and synchronous learning resulting in improved student performance. Administrative staff can also more efficiently communicate across campus, across the state/district, or the globe.
The need for ITV is drastically increasing. In the past, ITV systems were large, expensive, and required special hook-ups. Today, there are numerous options to enable ITV capabilities in more locations across FDUs campuses, at reduced costs with increased performance. As these technologies become more mainstream and robust, OIRT will support the implementation to enhance learning, collaboration, and efficiencies. The classroom technology provided in different spaces is dependent upon size, function, and how knowledge and skills are exchanged in an educational context, and considers the interactions that take place during learning.
The future state of FDU requires a significant increase in the number of locations equipped with videoconferencing (VC) capabilities, without the high cost of dedicated VC equipment. FDU will benefit greatly from a standardized software based video platforms installed in all meeting, conference, labs, and instructional spaces.
| The need to connect researchers to research studies in progress without the burden of travel requirements | ITV connects researchers to research studiesIn-progress – no matter the location. For example, FDU research fellows can connect with grad students conducting supporting research in a variety of remote locations. The ability to cut travel time and expense saves research teams precious time needed to complete work without exceeding department budgets or research grants. |
| The need to provide a collaborative platform for research teams | ITV makes it easy for researchers from different campuses, universities or locations to collaborate with one another. Researchers can connect within minutes for scheduled or ad hoc meetings – all that’s needed is a webcam-equipped device and an internet connection. |
| The need to bring researchers and stakeholders together | When researchers are able to connect with key stakeholders such as grantors, the result is increased visibility, knowledge sharing and accountability over the course of projects that may involve grants and require many months or years to complete. Enhanced communication helps researchers to provide stakeholders with timely and informative updates on progress. |
| The need to publish and disseminate information and research for continued analysis and practical use | Research is by nature dynamic, being analyzed and updated after its initial publication. ITV platforms extend access to and use of published work so that researchers can easily conduct webcasts or live lectures and record these sessions for archival and later use. |
8. IT Strategic Plan Goals, Objectives, and Key Strategies
8.1 IT Strategic Plan (ITSP) Roadmap
| Goals | Objectives |
|---|---|
| 1. Advance the academic mission of the University through innovative and effective technologies, resources, and services. | 1.1: Leverage technologies and information resources for recruitment and retention efforts and to support student services. 1.2: Provide technology systems and services to enhance student learning and to foster curricular innovation. 1.3: Provide technology infrastructure and support for research, scholarship, and creative activities. |
| 2. Leverage our reliable, secure, and efficient information technology infrastructure and maximize staff potential to foster innovation and excellence. | 2.1: Maintain and enhance the IT infrastructure to support the operations of the University. 2.2: Provide a secure computing environment that ensures data privacy and integrity and mitigates cyber-security threats. 2.3: Ensure a strong IT workforce capable of achieving the information technology goals of the University. 2.4: Align funding and explore new funding sources essential for IT operations and new strategic initiatives. |
| 3. Advance business processes and operational efficiencies through effective implementation of information technology. | 3.1: Support, upgrade, and enhance current business processes, tools, and administrative systems. 3.2: Evaluate and implement new technologies to improve operational efficiency. 3.3: Ensure excellent service to enable the effective use of technology, resources, and systems by the University community. |
| 4. Provide technologies to enhance communications with the greater University community and the world. | 4.1 Leverage web, social media, and mobile technologies to provide effective and consistent content delivery. 4.2 Support effective means of internal and external communications for all University constituent groups. 4.3 Institutionalize knowledge centered support (KCS) and self service capabilities. |
Goal 1: Advance the academic mission of the University through innovative and effective technologies, resources, and services.
Objective 1.1: Leverage technologies and information resources for recruitment and retention efforts and to support student services.
Key Strategies:
- Optimize the effectiveness of Customer Relationship Management (CRM) software to improve communication and engagement with prospective and current students.
- Deploy data analytics to shape strategy and decision making in enrollment management.
- Identify, evaluate, and implement enhancements to processes supported by the Student Information System (SIS).
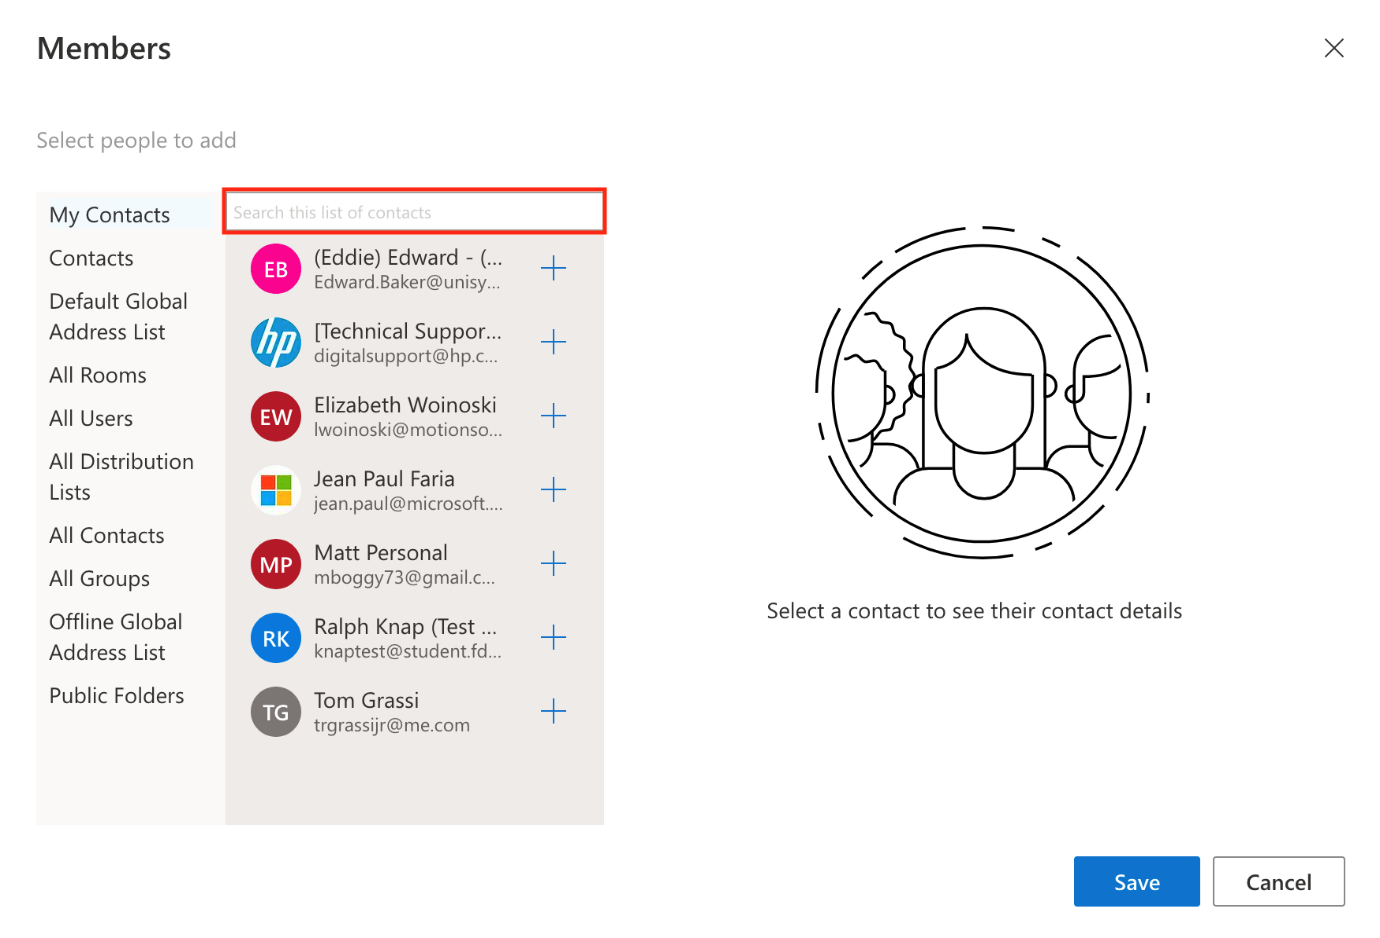
- Investigate and implement technological solutions to foster communication and interaction between students, faculty, and advisors (Outreach)
- Deploy an early alert system to identify and engage at-risk students.
- Manage system implementations and integrations that support multiple student success initiatives.
2024 OIRT Update:
The following completed initiatives were driven by the focus to continually improve the student experience;
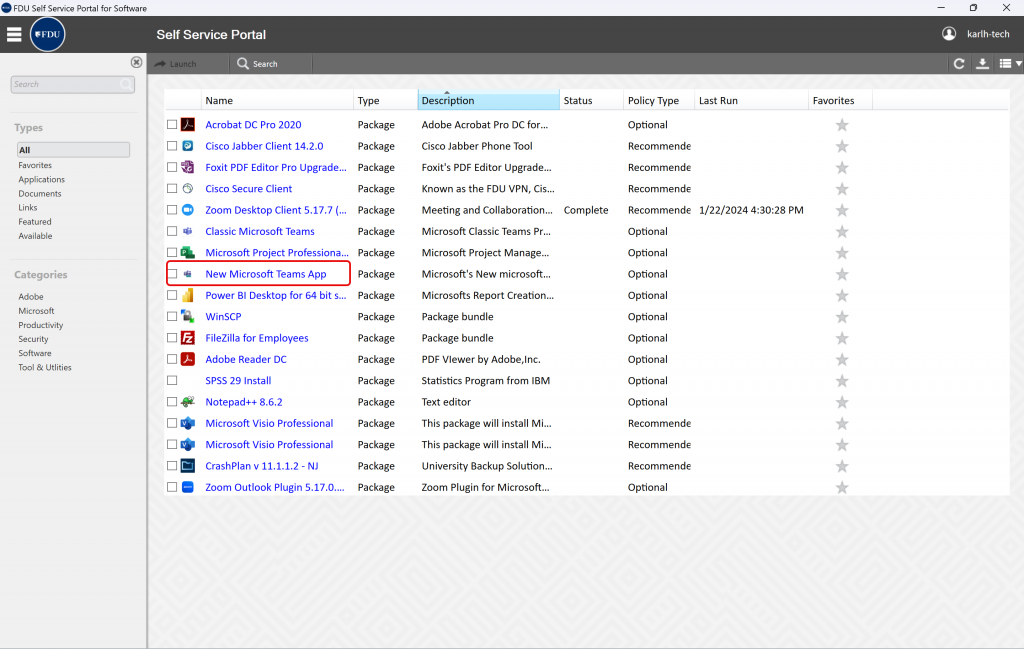
- Implemented Ellucian Experience as the interface for all Ellucian processes
- Implemented Ellucian Self-Service, replacing Web Advisor, for improving the course registration process
- Implemented Ellucian Advise to improve retention/graduation rates through proactive alerting and earlier potential intervention by advisors for at-risk students
- Implemented Chrome River for more an accurate and faster electronic expense tracking and processing
- Expanded use of DocuSign to streamline forms processing across various university departments
Objective 1.2: Provide technology systems and services to enhance student learning and to foster curricular innovation.
Key Strategies:
- Create individual and campus-wide opportunities for faculty, staff, and students to explore, evaluate, and implement new technologies to improve teaching, learning, and innovation.
- Provide dependable IT-enabled classrooms, computer labs, and virtual learning spaces.
- Develop a BYOD capability and strategy.
- Provide students with mobile access to lab software (via VDI?).
- Enhance video content management and distribution system.
- Provide a robust Learning Management System (LMS) and instructional technology to support ubiquitous learning, learning analytics, and adaptive learning.
- Enhance training options and diverse training modalities for faculty and students.
- Expand ePortfolio technologies to enhance the creation and preservation of personal learning experiences.
- Improve IT literacy to ensure competency in common IT skills for all students.
- Enable the ubiquitous use of iPads w/MDM and apps.
2024 OIRT Update:
- Zoom has been standardized across FDU for interactive remote learning and other video conferencing opportunities with the rollout in over 93 locations to date and increasing improving student experience over ITV
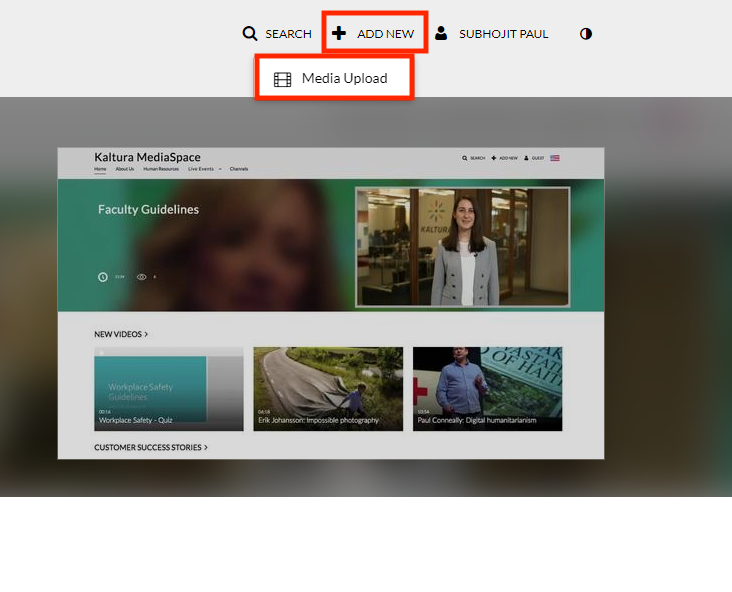
- Kaltura video repository system (Media Space) has been implemented as a repository with online courses in BlackBoard
Objective 1.3: Provide technology infrastructure and support for research, scholarship, and creative activities.
Key Strategies:
- Provide responsive support and innovative technical solutions to meet the needs of faculty and departments.
- Expand expertise in high-performance computing, open-source, and open-standard environments.
Goal 2: Leverage our reliable, secure, and efficient information technology infrastructure and maximize staff potential to foster innovation and excellence.
Objective 2.1: Maintain and enhance the IT infrastructure to support the operations of the University.
Key Strategies:
- Provide a robust, resilient, and reliable wired and wireless data network infrastructure.
- Maintain and upgrade data center hardware and software to ensure scalability to meet future needs.
- Provide a robust and reliable voice communications infrastructure.
- Develop a strategy for integration of personally owned devices to provide secure and effective access to enterprise data and services.
- Develop a cloud computing strategy based on benefits, return on investment, security, and data privacy risks.
- Identify and implement improvements that reduce power consumption within the IT environment.
- Develop an IoT (internet of things) capability and strategy.
2024 OIRT Update:
- Developed Wireless Infrastructure Strategic Plan
- Measured current wireless needs and requirements
- Enhanced wireless infrastructure with capacity capable of accommodating the growing number of devices with quicker turnaround for callers while maintaining security
- Wireless capacity study and heatmap completed and is under review to prioritize additional capacity where critically necessary
- Upgrading/replacing infrastructure equipment for continuous High Availability of critical technology products and services
- Storage Area Network Upgrade
Objective 2.2: Provide a secure computing environment that ensures data privacy and integrity and mitigates cyber-security threats.
Key Strategies:
- Create a comprehensive IT security position to help address the challenges with information security, network security, disaster recovery, and compliance issues.
- Develop an information security framework based on accepted best practices and standards that will be the basis of managing and mitigating cyber-security threats.
- Implement and maintain hardware and software essential for institutional information security.
- Educate the campus community about information security issues through various training modalities and opportunities.
- Enhance, operationalize, and periodically test the IT disaster recovery plan.
2024 OIRT Update:
- Implementation of DUO for consistent multi-factory authentication for university applications
- Established WISP program for mandatory continuing education and compliance tracking
- Established policy for Annual Penetration Testing and semi-annual vulnerability assessments with followup remediation plans and action items
- Firewall and DDoS services implemented to further protect University resources
- Partnering with 3rd Party Monitoring Service for continuous monitoring and alerts for potential high vulnerability threats
Objective 2.3: Ensure a strong IT workforce capable of achieving the information technology goals of the University.
Key Strategies:
- Provide technical and leadership professional development opportunities for IT employees.
- Provide flexibility in scheduling and projects to allow staff time to work with innovative technologies.
- Recruit, develop, and retain a strong permanent staff and student staff.
- Establish cases for new employee positions focused on the strategic needs of the University and the Technology Plan.
- Execute an IT staffing skills assessment and deliver a professional development plan to stay ahead of the learning curve.
2024 OIRT Update:
- Leadership development opportunities in various platforms, examples in Rising Leaders Forum and Gartner Symposiums
- Current staff trained and now Apple Certified able to service a large portion of FDU’s devices
Objective 2.4: Align funding and explore new funding sources essential for IT operations and new strategic initiatives.
Key Strategies:
- Demonstrate and communicate, through a transparent and inclusive governance process, how IT directly impacts the core institutional missions of teaching, research, scholarship, and service to the community.
- Develop metrics and quantitative measures to establish the effectiveness of IT projects.
- Develop a long-range capital plan for IT including funding for lifecycle replacement of hardware and systems including classroom technology.
- Identify opportunities to administer centralized software licenses for cost-savings, operational efficiency, and security
- Implement Virtual Desktop Infrastructure (VDI).
- Explore opportunities for external funding for IT related projects.
2024 OIRT Update:
- CapEx planning with major project tracking shared with IT Executive Governance committee twice a year for review
- Launched OIRT resource and capacity study
- Developing Project Rationalization and Prioritization Framework within OIRT before potential rollout to key business stakeholders
Goal 3: Advance business processes and operational efficiencies through effective implementation of information technology.
Objective 3.1: Support, upgrade, and enhance current business processes, tools, and administrative systems.
Key Strategies:
- Provide ongoing support for existing administrative processes and business systems.
- Streamline workflow and automate business processes to improve business efficiency and reduce the use of paper.
- Enhance interfaces between administrative systems to optimize efficiency and ensure the integrity of shared data.
- Provide access to data and analytical tools to support administrative decision making and compliance.
- Leverage existing systems and platforms to improve the on/off boarding processes.
Objective 3.2: Evaluate and implement new technologies to improve operational efficiency.
Key Strategies:
- Research and deploy a new file storage solution that meets organizational needs including cost, usability, security, compliance, and scalability.
- Deploy a course catalog system for academic departments to effectively manage course information.
- Conduct an ERP feasibility study and evaluate business processes to assess whether a new ERP can improve the administrative functions of the University.
- Identify and implement new business technologies and systems, including e-commerce options, which can improve the administrative functions of the University.
- Investigate and implement technological solutions to help assessment initiatives.
- Publish an online service catalog that outlines the services IT that provides.
- Research and deploy a solution for managing, searching, and archiving digital assets such as photographs and videos.
2024 OIRT Update:
- Working with multiple 3rd party resources, a customization study was undertaken to determine the readiness for modernizing the current SIS environment, both database and platform, in preparation for the eventual migration to a SaaS hosted model
Objective 3.3: Ensure excellent service to enable the effective use of technology, resources, and systems by the University community.
Key Strategies:
- Develop and enhance training using various modalities for students, faculty, and staff.
- Work with departments to provide training on enterprise technologies.
- Identify and implement a common service and support philosophy, including the use of IT service management tools and processes where it will improve the service and support experience for faculty, students, and staff.
- Identify and implement ways to further strengthen the helpdesk operations, including self-help capabilities, knowledgebase, and AI as a means of reducing the number of support requests.
- Enhance communications to keep the University community informed of changes in the IT environment.
2024 OIRT Update:
- Partnered with key stakeholders across various student facing departments to ensure OIRT engagement with new and existing students about available technology services and support opportunities
- Established and maintaining various communication channels ensuring University constituents are aware of impending changes and potential disruption to technology services
- Annual deployment of surveys to key constituents to better understand the technology support experience and find opportunities for improvement
- Lecture capture system implemented university wide allowing pre-recorded lectures to be viewed by students on-demand
- Video Repository System for centrally managed and dedicated student and staff training videos
- Enhanced antiplagiarism tool integrated into the Learning Management System increasing academic integrity while reducing faculty resource time
Goal 4: Provide technologies to enhance communications with the greater University community and the world.
Objective 4.1: Leverage web, social media, and mobile technologies to provide effective and consistent content delivery.
Key Strategies:
- Deploy a web content management system (CMS) to improve web usability, accessibility, and content delivery.
- Create a strategy to enhance University’s web and social media presence.
- Improve the social media presence of departments to engage with users more effectively.
- Implement a mobile application to provide content and functionality uniquely suited to mobile devices.
- Increase the number of technology rich classrooms including ITV capability.
- Evaluate, and where appropriate, implement services as they become available to meet institutional needs.
2024 OIRT Update:
- Dedicated OIRT resource assigned for establishing and maintaining consistent branding experience across distribution platforms
- Conducting scheduled review of shared OIRT documentation for accuracy and relevancy as part of self-service and knowledge transfer
Objective 4.2: Support effective means of internal and external communications for all University constituent groups.
Key Strategies:
- Develop a comprehensive plan for digital signage across the campus.
- Optimize the effectiveness of the University calendar, event, and notification systems.
- Research and provide technical solutions to enhance communications with alumni, the community, and donors.
- Leverage VoIP capabilities to improve communications throughout the University.
Objective 4.3: Institutionalize knowledge centered support (KCS) and self service capabilities.
Key Strategies:
- Develop and implement just in time knowledge centered support (KCS) methodologies.
- Develop an in-house knowledge base and self-service capabilities to ubiquitously deliver support content.
- Foster student internships as an innovation center to develop and publish creative content.
- Champion the development and distribution of institution-wide content on any device, at any time.
2024 OIRT Update:
- Implemented and enhanced existing products with self-service capabilities
- Student Information System
- ITSM platform
8.1.1 ERP Evaluation
ERP projects impact the entire organization – they are not limited to just financial and operating metrics. The disruption is felt during both implementation and in the production environment. Missteps due to a lack of strategy can cost time as well as financial resources. Over half of ERP projects fail to achieve their planned business objectives.
An ERP strategy is an ongoing communication tool for the business. Accountability for ERP success is shared between IT and other institutional business units. An actionable roadmap provides a clear path to benefits realization. Align the ERP strategy and roadmap with business priorities; securing buy-in from the business for the program including the identification of gaps, needs, and opportunities in relation to business processes; ensuring the most critical areas are addressed and to assess alternatives for the critical path(s) most relevant to FDU’s direction. Upon completion, a roadmap that promotes structure and accountability by categorizing and prioritizing work initiatives, and by identifying resources, timelines, and investment.
8.1.2 VoIP
The aging POTS infrastructure will become too expensive to upkeep, and telecom companies are investing in the latest technology like fiber optic cables and 5G. VoIP is built on internet protocols and works via Ethernet cable, Wi-Fi, and even LTE. One can make VoIP calls from any internet connected device – including traditional desktop phones (older models just require a small adapter to connect to Ethernet ports).
VoIP is constantly evolving and due to the nature of VoIP contracts (monthly subscription-based), customers can take advantage of software and hardware advancements without having to pay more. It’s a competitive market, so new features and even greater reliability and security protocols are being put into place.
Most importantly is the promise VoIP brings as a springboard from which one can access new business communication capabilities. It’s a great first step on the road to fully Unified Communications, which integrates voice calling with other advanced office communication features like video conferencing.
The promise of unified messaging (a business term for the integration of different electronic messaging and communications media technologies into a single interface, accessible from a variety of different devices) will enable efficiencies and streamline communications channels throughout the University.
Objectives
- Expanding unified communications capabilities to extend the campus telephone experience to off-campus and mobile devices
8.1.3 Virtual Labs
Classroom technology is evolving rapidly. Virtual laboratories are making it easier and less expensive for students to do experiments remotely. Here are some of the benefits of virtual labs:
- Flexible access. Perhaps the most often cited benefit of any online learning is that it can be done at the student’s convenience and when he or she learns best. The same is true of virtual laboratories if the experiments are on the student’s own time. In some cases, a virtual lab may be used during regular class time which narrows this benefit but still allows flexibility for the teacher who is not limited by using resources within a strict timeframe.
- Instant feedback. Students can redo experiments on the spot while they are still in a critical thinking mode. All the results are recorded, making communication between teachers and students more efficient too. Experiments no longer have a “one chance” option and students can analyze what went wrong immediately and give it another shot.
- Top-notch equipment. Schools and students that use virtual labs have access to cutting-edge technology when it comes to experimentation. Companies that build and maintain virtual labs must compete with each other to stay ahead of technology progression and that raises the quality of options for students. With a virtual lab, students do not have to settle on outdated, yet expensive, equipment because a school cannot afford to replace it consistently.
- Lower costs. There is a fee associated with using virtual labs but the capital and maintenance costs are drastically reduced. Instead of one school footing the bill for resources, the cost is split among the clients of the particular virtual lab. This allows school to provide a better learning experience for students at a fraction of the cost.
2024 OIRT Update:
- SIM Lab implemented with the support of OIRT providing a stable and reliable real-world experience to the School of Pharmacy
8.1.3.1 VR and AR in Data Visualization
Harnessing the combined power of Virtual Reality (VR), Augmented Reality (AR) and Artificial Intelligence (AI), enhancing the process of data analysis, presentation, collaboration, and general daily work flow. Revolutionizing the way we interact with information, data analysis, and presentation.
2024 OIRT Update:
Supporting the School of Nursing in piloting VR for training
8.1.3.2 STEM
Virtual and Augmented Reality are poised to profoundly transform the STEM curriculum. In this article, we offer several inspiring examples and key insights on the future of immersive learning and the sciences. Immersive technologies will revolutionize learning through experiential simulations, modelling and spatial representation of data, and a sense of presence in contextual gamification.
Understanding our place in the universe, building the next Martian Rover, designing new transportation systems, fostering sustainable communities, modeling economic stability — finding the solution for these pressing and interconnected challenges brings us to STEM and STEAM in teaching and learning. The movement behind STEAM advocates incorporating the arts and humanities to the science, technology, engineering and math curriculum.
8.1.4 VDI – Virtual Desktop Infrastructure
Desktop virtualization is software technology that separates the desktop environment and associated application software from the physical client device that is used to access it. Desktop virtualization can be used in conjunction with application virtualization, user profile management systems, now termed “user virtualization,” to provide a comprehensive desktop environment management system. In this mode, all the components of the desktop are virtualized, which allows for a highly flexible and much more secure desktop delivery model. In addition, this approach supports a more complete desktop disaster recovery strategy as all components are essentially saved in the data center and backed up through traditional redundant maintenance systems. If a user’s device or hardware is lost, the restore is straightforward and simple, because the components will be present at login from another device. In addition, because no data are saved to the user’s device, if that device is lost, there is much less chance that any critical data can be retrieved and compromised.
8.1.4.1 System Architectures
Desktop virtualization implementations are classified based on whether the virtual desktop runs remotely or locally, on whether the access is required to be constant or is designed to be intermittent, and on whether or not the virtual desktop persists between sessions. Typically, software products that deliver desktop virtualization solutions can combine local and remote implementations into a single product to provide the most appropriate support specific to requirements. The degrees of independent functionality of the client device is necessarily interdependent with the server location and access strategy. Virtualization is not strictly required for remote control to exist. Virtualization is employed to present independent instances to multiple users and requires a strategic segmentation of the host server and presentation at some layer of the host’s architecture. The enabling layer—usually application software—is called a hypervisor.
8.1.4.2 Remote Desktop Virtualization
Remote desktop virtualization implementations operate in a client/server computing environment. Application execution takes place on a remote operating system which communicates with the local client device over a network using a remote display protocol through which the user interacts with applications. All applications and data used remain on the remote system with only display, keyboard, and mouse information communicated with the local client device, which may be a conventional PC/laptop, a thin client device, a tablet, or even a smartphone.
Remote desktop virtualization is frequently used in:
- Distributed environments with high availability requirements and where desk-side technical support is not readily available, such as branch campuses.
- Environments where high network latency degrades the performance of conventional client/server applications.
- Environments where remote access and data security requirements create conflicting requirements that can be addressed by retaining all (application) data within the data center – with only display, keyboard, and mouse information communicated with the remote client.
Remote desktop virtualization is also used as a means of providing access to Windows applications on non-Windows endpoints (including tablets, smartphones, and non-Windows-based desktop PCs and laptops). Remote desktop virtualization can also provide a means of resource sharing, to distribute low-cost desktop computing services in environments where providing every user with a dedicated desktop PC is either too expensive or otherwise unnecessary. For IT administrators, this means a more centralized, efficient client environment that is easier to maintain and able to respond more quickly to the changing needs of the user and business.
8.2 Organizational Evolution
8.2.1 CIO | University President | FDU Alignment
We must reposition the role of IT leadership as an integral strategic partner of institutional leadership in achieving institutional missions. This requires change leadership to assist institutional constituents (including the IT staff) to adapt to the increasing pace of technology change and to communicate effectively to stakeholders.
Mastering the basics
- Filter through the alignment jargon by asking the right questions
- Get a comprehensive look into the business from FDU’s President’s perspective
Ensure that IT stays on the right path
- Stay on track with the President’s vision for the future of FDU
- Invest in technologies that suit academic and business needs
Target alignment efforts effectively
- Determine how IT can best support FDU’s top priorities
- Address gaps by understanding the differences between the CIO and the University President
Deliver and communicate IT progress
- Use the right indicators and metrics to evaluate your IT department
- Deliver results in a way that allows the stakeholders to recognize IT progress
- Build common leadership language, strengths and a culture of inclusion by investing in a continuing leadership development program and ongoing activities that bring IT leaders at all levels together
2024 OIRT Update:
- Increasing OIRT presence in business governance and steering committees creating a bidirectional relationship with various stakeholders;
- President’s Leadership Team
- OIRT Executive Governance
- Data Governance Committee
- Introduction of the Academic Technologies BRMO department to better align the core business and OIRT
- OIRT teams establishing relationships with key stakeholders within individual departments creating strategic alignment and fostering a partner-type relationship
- With the implementation of the ITSM platform, key data is now captured and available allowing for measurement of current OIRT performance and opportunities for improvement
- Continuous Process Improvement Team in place to review customer feedback and find new opportunities to improve the customer experience
- Feedback process implemented recording Customer Satisfaction
- Scheduled review of Incident resolution time between OIRT and 3rd party Help Desk to ensure consistent and improving turnaround times
- Quarterly newsletter published with relevant articles about the work within OIRT, article writers are comprised of non-managing personnel
- Daily operations dashboard leveraging with near real-time statistics and auto update features made available for viewing with key stakeholders
8.2.2 Develop a Technical Skills Sourcing Plan
The IT organization must acquire skills in the five trending areas – mobility, cloud, big data, social media, and security – within the next few years, or risk running a skills deficit. We must decide whether to retrain existing staff, hire new staff, contract, or outsource the work; poor decisions here will result in higher costs, delays, or inadequate quality. Having chosen a particular direction, IT must move quickly to define skill requirements and find appropriate talent, often in a very competitive market.
All industries are expected to be affected by the talent gap in the coming years. We need to plan ahead to address our organization’s future needs as the demand for talent far exceeds the supply of available professionals. We need to identify the skills that will be needed to meet our organization’s short- and long-term initiatives in order to systematically source skills. Then, we can develop roles that align with these skills and create the action plan to acquire skills.
- Plan for the inevitable. All industries are expected to be affected by the talent gap in the coming years. We need to plan ahead to address our organization’s future needs.
- Base acquisition decisions on the five key factors to define skill needs. Create an impact scale for the five key factors (data criticality, durability, availability, urgency, and frequency) that reflects our organizational strategy, initiatives, and pressures.
- A skills gap will always exist to some degree. The threat landscape is constantly changing, and our workforce’s skill sets must evolve as well.
Ensuring adequate staffing capacity and staff retention in the face of retirements, new sourcing models, growing external competition, rising salaries, and the demands of technology initiatives on both IT and non-IT staff. Balancing and rightsizing IT priorities and budget to support IT-enabled institutional efficiencies and innovations in the context of institutional funding realities
2024 OIRT Update:
- OIRT has taken a Standardization First approach for the planning, implementation, and support phases for both Wroxton and Vancouver campuses
- Site Agnostic Implementation and Support Teams
- Continued adoption of Ellucian Colleague and related products throughout campuses where applicable
8.2.3 Best Practices and Frameworks
Adopting IT Service Management (ITSM) principles is key towards organizational maturity and agility. ITIL, CoBit, and CIMM offer frameworks to optimize and standardize current end-to-end business processes to use industry best practices that are provided by our administration systems. We need to evaluate, and where appropriate, implement ITSM best practices to meet institutional needs.
2024 OIRT Update:
- FDU managed ITSM software (TOPDesk) rolled out and now capturing data and metrics for technology resources.
- Modules released include Ticket Management, Project Management, and Change Management, Contract Management
- Adopting an Agile type of approach for product management and delivery ensuring continuous alignment with organizational demand
8.3 Professional Development
Develop a professional development plan to engage, enlighten, cross train, and reward IT staff for acquired knowledge, implementation, and process improvements.
9. Measures of Plan Success – KPIs
| Security Posture Index | Industry recognize security index, measured quarterly against peer universities. |
| Client Satisfaction (students) | The percent of students satisfied with Technology Services. |
| Client Satisfaction (faculty) | The percent of faculty satisfied with Technology Services. |
| Client Satisfaction (Staff) | The percent of staff satisfied with Technology Services. |
| Calls resolved on first contact | Percent of support incidents resolved on the first contact with the UTAC |
| Unplanned Effort | Percent of technology resource time spent on unplanned work in each quarter |
| ROI and Digital Foundation Ecosystem | Number of technology projects that yield a positive return on investment. |
| Strategic Alignment Index | The measure of the contribution of technology projects to the achievement of the FDUs institutional goals, determined in collaboration with the client. |
10. Conclusion
11. Acknowledgements
This work has incorporated independent research, interviews with students, faculty, and staff, technology vendors and industry analysts. Many ideas, thoughts, and strategies were developed from peer institutions, EDUCAUSE, Gartner, InfoTech, and others.
This plan represents a refined and collective process to forecast educational and technological trends that will change the face of higher education.
12. Appendix
12.1 Scope of IT at FDU – An Overview
Fairleigh Dickinson University IT provides the following services:
- Administrative systems which enables the fish and administrative functions by providing systems that support the achievement of institutional goals services include access to management of student business and public safety systems as well as facilitating integration between the systems.
- Client support which provides clients with a digital workspace that enables effective performance. Services include desktop and software management, printers, Storage Solutions, research computing, and much more.
- Communication Services that promotes information sharing some communication and collaboration, enabling the FDU community to work together effectively. Services include online collaboration, video conferencing, messaging, email, event services, and digital signage.
- Teaching and Learning supports achievement of student success by fostering the 21st century teaching and learning environment. Services include academic support resources such as Blackboard, technology in classrooms and smart computing labs, lecture capture, and more.
- Analytics and reporting enables decision makers by providing a full range of reporting and business intelligence tools. Services include data analysis and mining, predictive analytics and then, creation of interactive dashboards, data visualization, and ad hoc reports.
- Mobile and Web Services empowers the FDU community to engage their clients using dynamic, secure recognizable web and mobile solutions. Services include custom application development, business process Automation Solutions, web site hosting and management, web content management, user experience, and mobile app development.
- Consulting Services assists clients in the optimizing use the technology to solve challenging institutional needs. Services include research consulting, visualization, three D modeling, project management, process improvement, new technology solution valuations, and more.
- Cyber Security Services reduces the risk of cyber security threats by protecting FDU’s technology assets. Services include secure computing such as data protection and encryption, and vulnerability scans.
12.2 University IT Strategic Plan Teams
12.3 University IT Strategic Plan Documents
12.4 Technology Budget
Operating:
For FY19, the total operating budget was $5.7M. Of that, almost $1.7M represented software licensing; another $800,000 represents contracted Help Desk and contracted tier 1.5 technical support; $870K represents equipment leases (laptops, desktops & Servers); $696K represents equipment service contracts; 500K represents Internet and Inter-campus data lines; and $195K represents telephone services. In total, the contractual commitment of the OIRT budget was about 4.761M or 83%, leaving about $940K available for office operations, data and lab center operations, non-contracted repairs and maintenance; and the ability to meet new demands for services as they come up. While this budget might appear significant, when you consider the size and scope of the University combined with the continuing and growing demands from faculty and students, coupled with the needs and desires to use technology as an instrument of recruitment and retention, these dollars are small by any measurement.
Compensation:
The OIRT compensation budget for FY19 was $5.1M which includes a $296K (6%) vacancy factor. For years leading up to Y2K, our ability to hire and retain employees was extremely challenging and our vacancy was therefore high. As a result, the vacancy factor was created to help balance the budget based on the reality of spending and the difficulty in fully funding the budget. While Y2K may have been over nineteen years ago, that vacancy factor still haunts us and causes an operational challenge to balancing the budget each year.
Another piece noteworthy of mentioning is that of the total compensation budget, $155,000 (3%) is allocated to student assistants. These student assistants operate (or staff) the computer labs which are open more than seventy hours per week. At the Metropolitan campus, this includes two separate locations (Dickinson Hall and University Hall). At the Florham campus, it includes lab assistants in Dreyfuss, ZEN and the Library.
The Technology Fee:
Created, approved and communicated as a dedicated fee in 1999, this fee was established to help meet the growing demands of technology. It was further agreed that this fee would increase as necessary with the additional funds going directly back to OIRT in support of its mission.
Based on a twelve month look back on actuals, the total revenue generated by the Technology fee is approximately $5.9M. This represents 54% of the OIRT combined Operating and compensation budgets.
IT Capital Refurbishment Plan and Budget:
During the latter half of 2017, we developed a five-year (2017-2022) CAPEX IT plan to provide financial vision and guidance in making CAPEX investments that keep our physical assets up to date and thus allowing us to remain competitive and maintain service levels at the University. The primary drivers of the CAPEX plan are to help cut costs and boost efficiency; replace or upgrade old assets; meet new requirements or take advantage of opportunities; and help the University gain and maintain competitive advantage. A capital budget in the amount of $1M per year has been set aside and is under the control of the Senior VP for Finance and Administration.
IT Capital Enhancement Plan and Budget:
What is not included in any of the budgets above is capital funding for new innovative initiatives. The budget above maintains and enhances the status quo. Working with the Deans and members of the IT Executive Governance Committee, we will develop a baseline set of new priorities coupled with the associated costs. While no funding sources will be initially identified, this plan, coupled with the priorities and costs, will act as a framework for planning to that end.
12.5 Imperatives, Objectives and Tactics
12.5.1 ERP Evaluation
ERP projects impact the entire organization – they are not limited to just financial and operating metrics. The disruption is felt during both implementation and in the production environment. Missteps due to a lack of strategy can cost time as well as financial resources. Over half of ERP projects fail to achieve their planned business objectives.
An ERP strategy is an ongoing communication tool for the business. Accountability for ERP success is shared between IT and other institutional business units. An actionable roadmap provides a clear path to benefits realization. Align the ERP strategy and roadmap with business priorities; securing buy-in from the business for the program.
Identification of gaps, needs, and opportunities in relation to business processes; ensuring the most critical areas are addressed.
Assess alternatives for the critical path(s) most relevant to our organization’s direction.
Develop a roadmap that promotes structure and accountability by categorizing and prioritizing work initiatives, and by identifying resources, timelines, and investment.
12.5.1.1 Analysis of Current Portfolio
| Activities | Outputs | |
|---|---|---|
| 1.1 | Conduct an inventory collection of key ERP applications. | ERP application inventory |
| 1.2 | Conduct an inventory of key processes related to the ERP applications. | ERP processes compiled |
| 1.3 | Develop a high-level current state map of applications. | Current state of application portfolio |
12.5.1.2 ERP Needs and Solution Alternatives
| Activities | Outputs | |
|---|---|---|
| 2.1 | Determine remediation alternatives for current applications and validate with IT. | Future application needs |
| 2.2 | Review future solution alternatives for ERP – maintain, augment, optimize, transform, hybrid vs. cloud, etc. | Alternative solutions |
12.5.1.3 ERP Gap Analysis and Strategic Initiatives
| Activities | Outputs | |
|---|---|---|
| 3.1 | Using gap analysis, identify application initiatives and categorize by objective. | Gap analysis |
| 3.2 | Define and prioritize application portfolio business value metrics. | ERP portfolio objectives |
12.5.1.4 ERP Roadmap
Should FDU make the decision to migrate/adopt to another ERP platform
| Activities | Outputs | |
|---|---|---|
| 4.1 | Prioritize application initiatives. | |
| 4.2 | Develop 3-5-year ERP roadmap. | Detailed 3-5-year ERP roadmap |
| 4.3 | Develop main executive communication messages | Executive communication messages |
12.6 Supporting Documentation
12.6.1 eSports
The idea of colleges fielding teams for video games, an oddity just several years ago, now supports an athletic conference and is seeing major growth. What was perhaps a wild pipe dream decades ago has come true: colleges are paying students scholarships to play video games.
The concept of collegiate eSports has blossomed and become much more organized in recent years. Some smaller private institutions view gaming as a way to attract prospective students amid enrollment downturns, and even a number of Division I colleges and universities have entered this digital arena. Video games support an athletic conference and is seeing major growth and colleges are paying students scholarships to play video games.
The system works like this: Institutions form teams that train and compete with other institutions in some of the nation’s most popular strategy and battle video games. Those players often maintain stringent practice schedules that occupy a massive chunk of time, not unlike a typical athlete’s regimen.
Coupled with game design and development program, exclusively for students who want to design a new generation of video games and virtual reality on multiple platforms, it allows students to pursue their dreams and ambitions within the lucrative entertainment and software industry.
Game based learning, such as the initiative at Texas A&M, Design Teams brainstorms each game’s concept, mechanics, and background, incorporating learning objectives and prototyping concepts to test their validity. The Concept Team develops the look and feel, creating a style that effectively conveys the topics while engaging players. The 3D Team, specialized in procedural generation using technical modeling software executes the game’s visual target on a more massive scale. The Engineering Team brings all of the work to life, programming and integrating both the mechanics and art assets and performing quality assurance testing. Finally, the Management Team oversees and tracks the progress of all teams and operations, ensuring the quality and integrity of each project.
Employees/students are paid above minimum wage, receive royalties for any commercialized products they have worked on, and—most important—gain exceptional game development experience and exposure before graduating college.
With skilled and complete production teams, the help of subject matter experts, and a passion for game development, such programs have managed to create balanced interactive experiences that are both entertaining and educational.
12.6.2 Virtual Labs
Earlier this year, the Stanford Human Computer Interaction Lab released a free virtual reality simulation, The Stanford Ocean Acidification Experience, which transports students to a simulated ocean of the future. The goal of the simulation is to educate, spread awareness and inspire action on the issue of ocean acidification. Director Jeremy Bailenson and his team developed the experience in collaboration with Stanford marine biologists Fiorenza Micheli, Kristy Kroeker and Roy Pea, a professor at Stanford Graduate School of Education.
Designed as a field trip to a location that few scientists will ever visit in person, students use the HTC Vive headset to observe the effect of carbon dioxide on marine life and collect samples from the ocean floor. The simulation is one of many virtual experiences developed by the Lab in its mission to use VR in research and to “improve everyday life, such as conservation, empathy, and communications systems.”
Stanford Virtual Human Interaction Lab Ocean Acidification Experience
At the University of Michigan–Ann Arbor, a variety of STEM projects are supported through MIDEN (Michigan Immersive Digital Experience Nexus), formerly known as the CAVE. The CAVE concept was originally developed through the groundbreaking work at the University of Illinois at Chicago. CAVE environments create an immersive experience by projecting stereo images on the inner surfaces of a room-sized cube. Users wear special glasses that, along with an optical motion-tracking system, help render digital objects in response to the viewer’s position. Since the system is “see-through” users can see their own hands and actual physical objects can be brought into the space.
The College of Engineering uses MIDEN to experiment with 3-D building models to better understand the structural stability of engineering projects. Students and faculty in other programs use it for architectural walkthroughs, virtual reconstruction of archeological sites, human ergonomic studies and training scenarios for dangerous situations.
Among a variety of projects at Texas A&M, students and faculty in the Immersive Mechanics Visualization Lab are bringing computational and experimental data into AR and VR environments. In virtual reality, 3D CAD models can be manipulated and refined within virtual worlds, turning industrial design into a highly intuitive and collaborative process.
In addition to their work in the lab, Professor Darren Hartl and undergraduate student Michayal Mathew connected with high school students to help them prepare for an international STEM competition, by inserting their 3D CAD designs into a virtual world, which allowed aerodynamic experts to provide feedback on their car models using Tilt Brush.
As Matthew pointed out, “To be honest, seeing things in 2-D on a whiteboard just doesn’t cut it, because almost all our important concepts are three-dimensional.” For Professor Hartl, these projects serve as an opportunity to assess whether his graduate students can improve their intuition about their results by interacting with data in virtual environments.
Immersive Software Platforms
If you can turn your data into a VR world, how about stepping into a VR science lab? This is what Labster and other software platforms are doing to bring immersive technology into the STEM classroom. Labster has developed a suite of advanced lab simulations that encourage open-ended investigation. With a gamified experience, students can play the role of a CSI-type forensics analyst who solves a crime. More importantly, the simulations provide access to high-cost NGS machines and electron microscopes that many institutions are unable to afford. While today Labster is a platform for learning, tomorrow’s science research will likely happen over distributed virtual environments.
Students as Creators
While research centers will continue to build advanced immersive labs, the developments in standalone VR headsets and software platforms like Unity and Unreal engine are driving a democratization of immersive experiences. New VR native applications like Tilt Brush will enable our students to become creators in virtual worlds. They will not only have the opportunity to observe unseen phenomena but to prototype solutions to complex problems.
NYU’s Tandon School of Engineering made a splash with its Tandon Labs experience at the 2017 SXSW Gaming Expo. Incoming students at Tandon for a second year were sent a 3D cardboard viewer in their acceptance packages. It took them into a game-like environment that “. . . enables users to explore and engage with a microscopic, intracellular world.”
The game built on the research by Alesha Castillo, an assistant professor in the Department of Mechanical and Aerospace Engineering, the project was done in collaboration with NYU’s Mobile Augmented Reality Lab, and a graduate student from the Integrated Digital Media program. Using a female undergraduate to narrate the experience, it also helps support Tandon’s commitment to diversity. Projects like this inspire and encourage collaboration across disciplines.
Immersive Technologies and the Future of STEM

Scientists are also using immersive technologies to communicate difficult concepts to the broader public. Brian Greene, the director of Columbia’s Center for Theoretical Physics, uses VR to explain string-theory which posits that the universe exists in more than three dimensions. As part of the World Science Festival in New York, Greene taught a featured session on string theory with students from across the world wearing VR headsets. We can expect to see many more immersive global experiences transforming the classroom.
At NASA, scientists and engineers use Microsoft’s HoloLens mixed reality headset to collaborate in building a true-to-scale visualization of the next Martian Rover in an embodied experience, which is something unique to immersive technologies. They also use HoloLens to “teleport” to Mars “walk on” the Martian surface to determine the optimal path of the current Rover. While today this only available to people at JPL, in the future researchers and students from universities and libraries across the world will be able to participate in the explorations of the solar system.
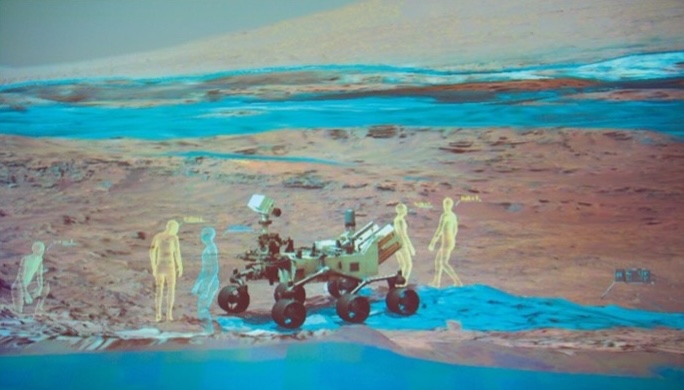
All these projects are a window into the future of STEM education. Immersive technologies along with AI, computer vision and machine learning will transform engineering, enable scientists to visualize data to advance exploration research, and provide new opportunities for collaboration between faculty and students and across disciplines.