Resources

Explore our comprehensive IT resource library to discover a wealth of helpful information tailored to your needs. Utilize our filters to refine your search by role at FDU, department, or specific service for a more personalized experience.

Help Desk
Resources Header

Telephone True Up Policy

Resources for:
icon Close

Below is the policy regarding the return of Cisco Desk phones that are no longer in use.

The process, known as the “Telephone True-Up Process,” commences with a departmental request to remove currently active phones from service. The department is required to initiate the process by submitting a “True Up – Cisco Desk Phone Form” containing the necessary equipment details. Submission of this form generates a support ticket with Voice Services, initiating the removal process for the specified active phones from service.

The True Up – Cisco Desk Phone Form is accessible within the SAMI Support Portal via the link below:

True Up – Cisco Desk Phone Form

Once on the portal, navigate to Forms > Staff & Faculty > True Up – Cisco Desk Phone Form.

Warning Warning

Do not remove the phones without the help from an IT department technician.

Leave these phones in place and mark them with a Post-It Note that provides the HOST/MAC address of the phone. This ensures easy identification when a technician arrives to retrieve the device.

There are two methods to find the HOST/MAC address:

  1. Press the gear button on the phone and use the central navigation key to scroll to “Phone Information.”
  2. Alternatively, this information is also listed on the back of the phone.

The True-Up process is carried out annually, around June, coinciding with the end of the University’s Fiscal Year. The new True-Up cycle begins on July 1st with the commencement of the new Fiscal Year. Phones can be removed at any point during the year and stored until the next True-Up. However, billing for these phones continues until the end of the Fiscal Year.

Note

If you remove a phone but retain the line for services like voicemail, call forwarding, or Jabber, there is a monthly charge of $20 that will continue to be applied for these services.

Last Modified:

Trouble Connecting to Zoom

Resources for:
icon Close

If you are scheduled to attend class using Zoom and you run into technical difficulties, here are some steps you can take.

Common Fixes for Zoom Connection Issues

  1. Do. Not. Panic. This shift to distance learning is a sudden change. We will do everything we can to support your learning
    • Try your best to progress through the steps and troubleshooting resources below. Join when you are able. You can use the chat or hand-raising function once you join the class to let the faculty know if you have questions.
  2. Try to exit Zoom and open it again
  3. Try to restart your device and re-open Zoom
  4. Check that you do not have pop-ups blocked. Also check that you have “allowed” the Zoom browser extension to operate, if needed
  5. Try on a different device, if you have access to one. If you do not have access to a different device, proceed to step 6
  6. If you still cannot access Zoom after taking these steps, please contact the University Technical Assistance Center (UTAC) with a description of the problem (e.g., error message that you received). Please also bring the issue to the attention of your instructor so they can let you know what you missed in the class session that you were unable to attend

More Resources for Troubleshooting with Zoom

The following troubleshooting guide gives support for all devices that Zoom supports.

Last Modified:

Use SFTP or SCP to Upload Files to a FDU Linux Server

Resources for:
icon Close

What’s SFTP and SCP?

Secure File Transfer Protocol (SFTP) is a file protocol for transferring large files over the web. It builds on the File Transfer Protocol (FTP) and includes Secure Shell (SSH) security components. This term is also known as Secure Shell (SSH) File Transfer Protocol. Secure copy protocol (SCP) is another method to securely transfer files between a your local PC and a remote host or between two remote hosts. It is also based on the Secure Shell (SSH) protocol.

Linux / Mac

If you are running a Linux or Mac computer, SFTP and SCP clients are already installed, so you don’t need to download anything using those OS. You can open up a terminal window and run the either command like below to connect to a remote Linux server.

sftp username@opus.fdu.edu

or

scp filename username@132.238.2.116:

Windows

Option 1: Use WinSCP (Recommended)

You will need to download and install WinSCP:

Download WinSCP

  1. Launch the WinSCP program
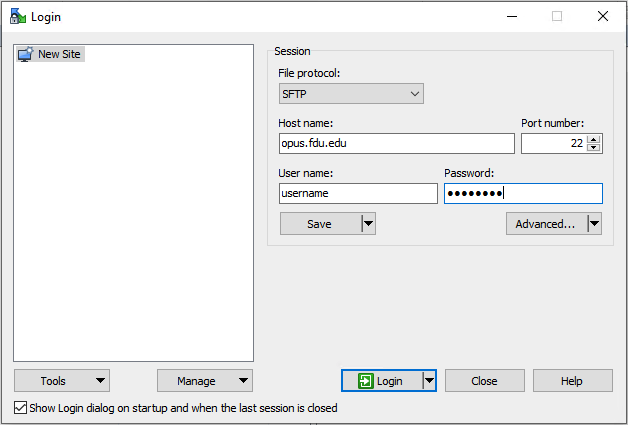
  2. In the login window, click “New Site
  1. Fill out the information as follows:
    • Host name: Enter opus.fdu.edu
    • User name: (username on FDU Linux servers will be the part of your FDU NetID to the left of the @ sign)
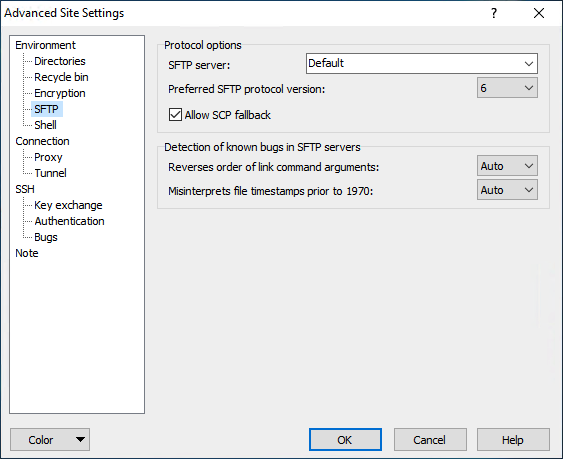
  2. Click “Advanced…
    • Select “Environment > SFTP” and enable “Allow SCP fallback
  1. Click “OK
  2. Click “Save“, enter a name for the connection, and click “OK
  3. In the WinSCP login window, select the connection name and click “Login

Option 2:

Install Putty, which also includes PSCP (SCP for Windows) and SFTP (SFTP for Windows):

Download Putty

Please select the latest version of MSI (‘Windows Installer’) for your computer (32-bit or 64-bit)

Optionally you may choose to download only pscp.exe(SCP for Windows) or “psftp.exe” (SFTP for Windows) and copy into the folder where you need to use it.

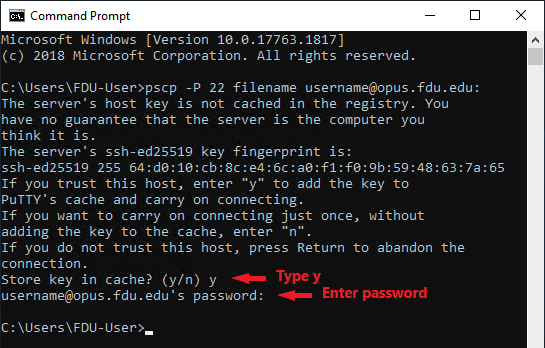
Once you have installed your program of choice, you’ll be able to launch each command from the Command Line of Windows.

pscp -P 22 filename username@opus.fdu.edu:
psftp username@opus.fdu.edu

Note

You may need to accept the server’s host key the first time you connect the Linux server.

Last Modified:

Use SSH to Log into Opus Linux Server

Resources for:
icon Close

Accessing the Opus server

The Opus server can be access using secure transport protocols such as SSH and SFTP. Access is only allowed from campus networks. All off campus users will need to access Opus using FDU’s Virtual Private Network (VPN) to use the Opus server

What’s SSH?

SSH stands for Secure Shell, which was invented in 1995 to replace the insecure Telnet (Telecommunication Network). It’s now the primary way for system administrators to securely log into remote Linux servers over the public Internet. Although it looks and acts the same as Telnet, all communications over the SSH protocol are encrypted to prevent packet sniffing.

Linux / Mac

If you are running a Linux or Mac computer, SSH client is installed by default. You can open up a terminal window and run the ssh command like below to connect to a remote Linux server.

ssh username@opus.fdu.edu

or

ssh username@132.238.2.116

Now let’s discuss how to use SSH on Windows.

Windows

Method 1: Windows 10’s Built-in SSH Client

The Microsoft PowerShell team decided to port OpenSSH (both the client and the server) to Windows in 2015. It finally arrived in Windows 10’s Fall Creator Update in 2017 and is enabled by default in the April 2018 Update.

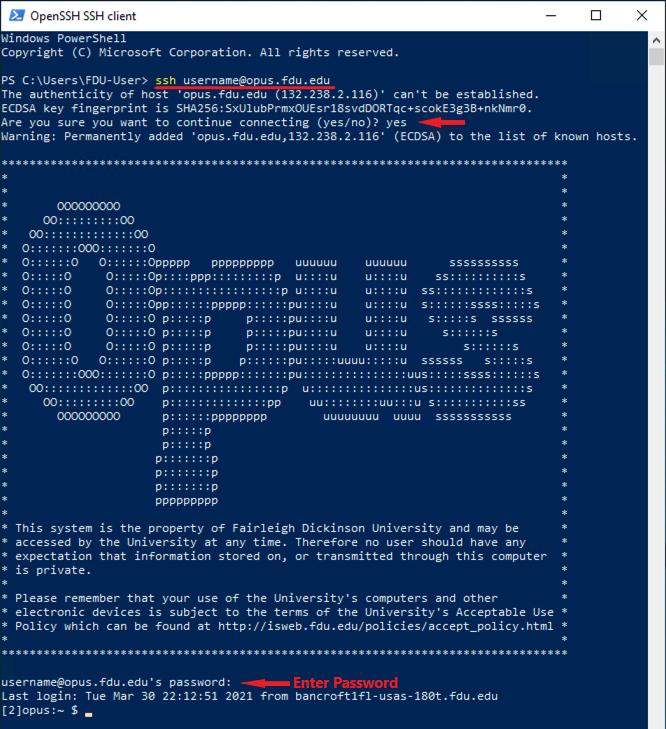
To use the OpenSSH client on Windows 10, simply open a PowerShell window or a command prompt window and run the ssh command. For example, if I want to connect to the Opus Linux server on the FDU network, I would run

ssh username@opus.fdu.edu

username on FDU Linux servers will be the part of your FDU NetID to the left of the @ sign (username@fdu.edu becomes just username) and opus.fdu.edu is name the Linux server you want to access (The IP address of the Linux server can also be used). The first time you connect to a Linux computer, you will be prompted to accept the host key. Then enter your password to login. After login, you can run Linux commands to do tasks.

Note

If you want to paste a password into the PowerShell window, you need to right-click the mouse and press Enter.

To log out from the Linux box, run the “exit” command or press “Ctrl+D“.

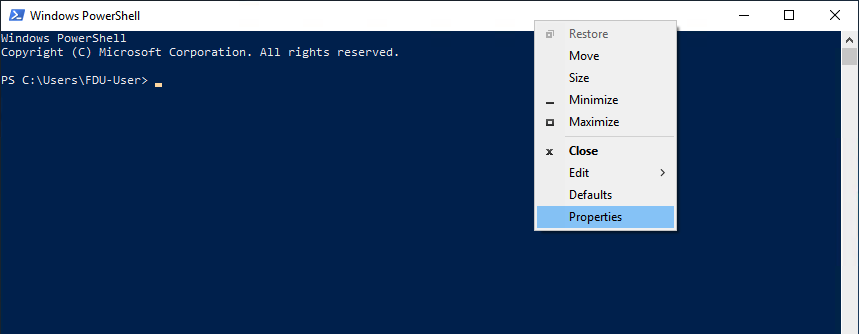
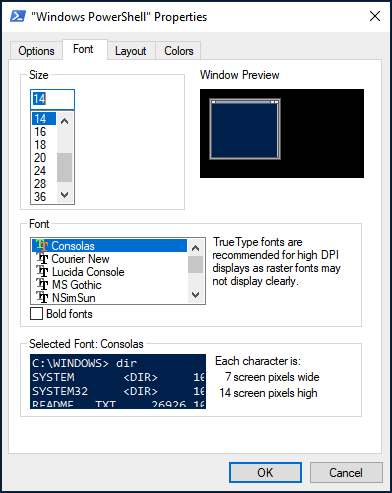
The default font size in PowerShell Window is very small. To change it, right-click the titlebar and select properties, then you can change the font size, and the background color.

Method 2: Use SSH in Windows Subsystem for Linux

Windows Subsystem for Linux (WSL) enables you to run native Linux command-line tools directly on Windows 10. If you are a system administrator, WSL is probably an overkill for just using SSH because it would install and run a Linux distro (without graphical user interface) on your Windows 10 desktop. WSL is created for web developers or those who need to work on open-source projects. You can use not only SSH but also other Linux command line tools (Bash, sed, awk, etc).

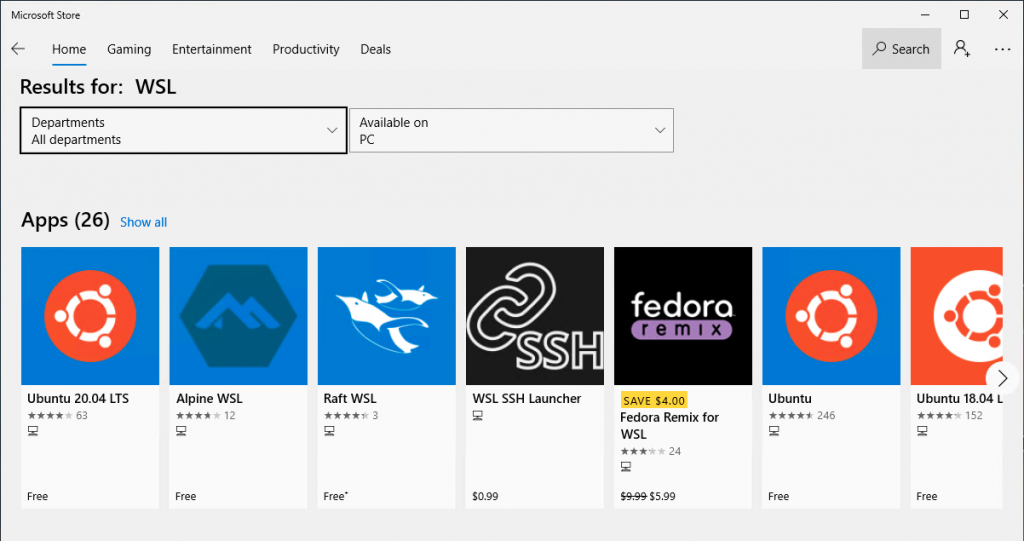
Open the Microsoft Store and enter “WSL” in the search box. Select Run Linux on Windows and install a Linux distro of your choice.

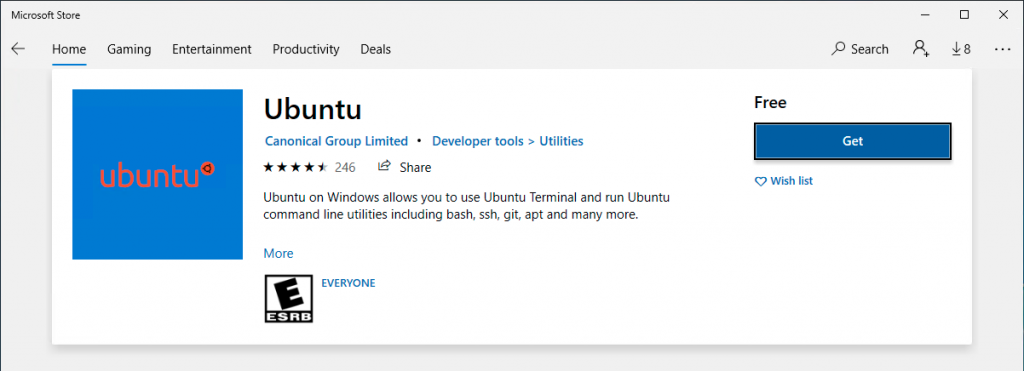
For example, I choose “Ubuntu” and click the “Get” button to install it.

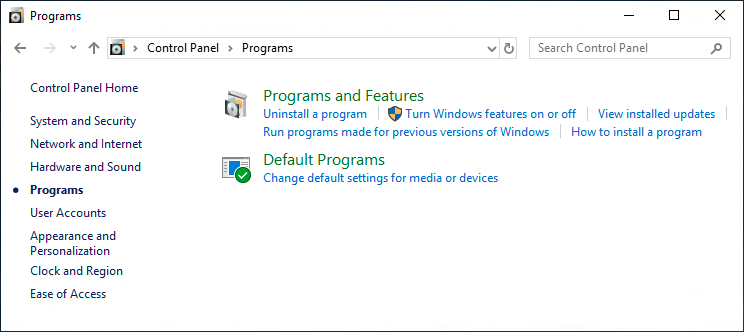
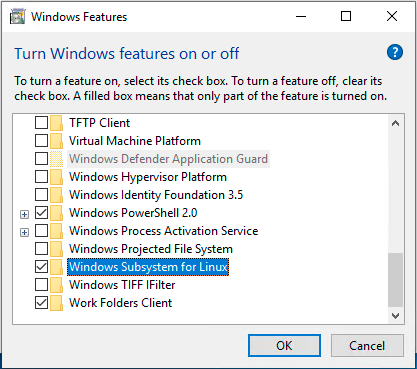
Once your Linux distro is installed, open the Control Panel and select Programs => Turn Windows features on or off. Tick on the checkbox of Windows Subsystem for Linux to enable this feature. (You may need to reboot your Windows PC for this change to take effect.)

Next, you can launch the Linux distro from the start menu by search the distro’s name. The first time you launch it, you need to create a user and set a password.

After that, you can use the ssh command like below to connect to a Linux server or PC that runs a SSH server.

ssh username@opus.fdu.edu

Method 3: Use Putty

Putty is a well-known and the most popular SSH client on Windows before the arrival of Windows OpenSSH client and Windows Subsystem for Linux. To use SSH with Putty, you need to download the Putty program from the official website and install it.

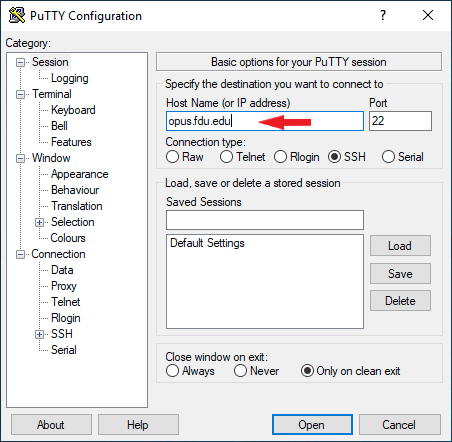
Launch Putty from the Start menu. Then enter the IP address or hostname of the Linux box and click the Open button to connect to it.

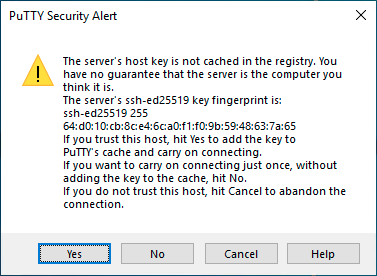
Accept the host key and you will be prompted to enter the username and password.

Tip

When you type in your password, the cursor doesn’t move, but it’s actually accepting your password. To paste text into Putty, first press Ctrl+C to copy the text, then go to Putty window and press the right-button of your mouse.

Last Modified:

Use The FDU Shared Drive Management Portal

Resources for:
icon Close

Introduction

This document provides information about the use of the FDU Shared Drive Management Portal. It describes navigation of the website in detail to facilitate proper use of this resource.

Logging In

To access the Shared Drive Management Portal, navigate to this URL to login: sharemanagement.fdu.edu

Once you have logged in with your NetID, you will see a list of the shares you own or have been given authorization to manage in the left‐hand column. If you are the owner of the share, your name will appear in the panel on the right side under “Shared Drive Owner”. If you are not the share owner, your name will be listed on the right side panel under “Delegated Administrator”. To switch between shares you manage, select the appropriate share name from the list in the left side panel.

Note

Underneath the Shared Drive Owner information, you will see an area for Delegated Administrator information. Delegated Administrators are people you wish to grant the ability to add and/or delete Shared Drive Members. It is important to understand that while a Share Owner can delegate membership responsibilities to others, the Share Owner is always the primary person responsible for the management of any Personal Information or Protected Health Information contained within that share.  The Share Owner has the sole accountability for the data managed and viewed within their share.

Adding Members and Delegated Administrators

To add a member to the share, click on the down‐arrow at the right of the “Add User to Share” button and choose the type of user you would like to add from the drop‐down menu. You can choose from Employee, Administrator, or Student. Then, enter either the last name or the FDU NetID of the person you would like to add into the text box. If more than one name appears, choose the person you want to add.

A pop‐up window will appear asking you to confirm or cancel the add.

The individual’s information will be added to the list of members at the bottom of the page. When you add Delegated Administrators, they will appear in the list to the right, and the Owners/Administrators count will increase. It is important to note that Delegated Administrators can not add additional Delegated Administrators.

As you add more members or Delegated Administrators, the count of members for each will increase. When viewing members of a share, the “Number of rows:” menu can be used to select 12, 24, 36, or All rows to view.

Currently, all Shared Drive Members are granted Read/Write access to the contents of the Share. Future updates to this application will allow you to choose Read Only or Read/Write access rights to each new Member. Meanwhile, the Share Owner can contact University Systems and Networking at help@fdu.edu to request Read Only access for a new member.

From time to time, a Share Owner or Delegated Administrator might try to add a new member to a drive to which an existing drive letter cannot be assigned. If that happens, the following message will appear, and the Share Owner or Administrator will need to contact the Fairleigh Dickinson University Technical Assistance Center (UTAC) to have that member added.

Deleting Members

You will notice a check‐box to the left of each Administrator and Member of the share. To delete an Administrator or a Member, click the check‐box next to it. You can click on multiple check‐boxes. When you have selected all the Members or Delegated Administrators you wish to delete, click on the “Delete Selected Delegated Administrators” or “Delete Selected Members” button to delete all the selected Administrators/Members. The lists and the counters will be updated to reflect the change. It is important to note that Delegated Administrators can not delete other Delegated Administrators.

Downloading Members

To download a list of Shared Drive Members in .csv format, click on the “Download Members” button.

A new file will be placed in your Downloads folder called “ShareDriveMembers.csv”. When imported into a spreadsheet application, it will look similar to this (you will see the actual FDU NetID).

Requesting a New Shared Drive

To request a new Shared Drive, please follow the link below:

Last Modified:

Using Google Takeout

Resources for:
icon Close
Google Takeout logo, with icons of several Google services being packed into a box.

Google Takeout is a tool developed by Google that allows you to export and download a copy of various types of data currently stored in your Google account, such as Drive or Mail. You can store the data locally on your computer or upload it to another third-party cloud storage service. This document provides instructions for getting started with Google Takeout and using it in common scenarios.

Note

Google Takeout does not maintain sharing or permissions on files and folders that are exported.

Your export request can take anywhere from a few minutes to several days to process, depending on the type and amount of data being exported, and the number of users using the tool simultaneously.

Google provides this service “as is” and without administrative support. The IT department at FDU cannot diagnose or assist with problems you might encounter.

Getting Started

To begin, decide which types of data you want to export from your FDU Google account. For example, Google Takeout lets you pick which folders in Drive to export if you do not want to copy your entire Drive. In this case, organize the Drive files you want to export into folders you can easily select before starting the export process.

Tip

It is recommended to separate your exports into individual requests by service. For example, create one request for Gmail data and another for Drive data. If one of the services fails during the export, Google Takeout will cancel the entire export, and you will have to restart the process.

After deciding on the types of data you want to export and organizing them appropriately, you can proceed with logging in to the tool.

  1. Go to Google Takeout using the link below (it is recommended to use the Google Chrome browser)

Google Takeout

  1. Enter your “@student.fdu.edu” email address if prompted, then click “Next
    • You will be redirected to the FDU NETID login, where you should log in with your FDU credentials and authenticate with two-factor authentication if prompted

Once logged in, Google services that have your data will be automatically selected on the Google Takeout page.

  • If you want to manually pick and choose the data to export, follow the on-screen instructions
  • For specific scenarios, refer to the sections that follow in this document, which provide instructions for exporting and downloading data from Google Drive, Mail, and other Google services like Calendar, Contacts, and Photos

Important

The exported data may not include recent changes made between the time the export is requested and when it is ready to download.

Learn more about the data limitations in Google’s support documentation:

Google Takeout Documentation

Export Google Drive (My Drive) Files

If you want to export and download only your Google Drive files to your personal computer or other non-FDU storage services, follow these instructions:

  1. Follow the instructions in the “Getting Started
  2. Click “Deselect all” in the upper-right corner of the Products section
  3. Scroll down until you find “Drive” and then press the check box beside “Drive
  4. Click “Advanced settings,” then check both options under “Additional Files” and click “OK
  5. Click “All Drive data included
    • You can keep all files and folders selected or select specific folders you prefer to export
    • Click “OK
  1. Scroll to the bottom and click “Next step
  2. Leave “Frequency” set to “Export once
  3. Adjust the “File type & Size” settings as needed (defaults are .zip and 2GB)
  4. Click “Create export

A confirmation of your choices and the expected start date for the export will be displayed.

Note on Drive Files

  • For every file, you will notice a .JSON file. The .JSON file contains all the metadata for each file, including the creation date, modification date, and permission information. The file itself (not the .JSON one) does not contain the associated metadata except the creation date. (The .JSON format is a simple text format that can be read by any text editor or word processor)

Refer to “Download My Google Files” section below for additional information on what happens next and how to proceed after submitting your Takeout data export request.

close
Export Your Google Data to a Personal Dropbox

To export your Google data to a personal (non-FDU) Dropbox account, follow these instructions:

  1. Follow the instructions in the “Getting Started” section
  2. Click “Deselect all” in the upper-right corner of the Products section
  3. Scroll down and find “Drive” then check the box beside “Drive
  4. Click “Advanced settings“, then check both options under “Additional Files
  5. Click “OK
  1. Click “All Drive data included
  2. Choose the folders to export if necessary, then click “OK
  3. Select “Add to Dropbox” from the “Destination” drop-down menu
  4. Leave “Frequency” set to “Export once
  5. Adjust the “File type & size” settings as needed (defaults are .zip and 2GB)
  6. Click “Link accounts and create export
  7. Log in to your personal Dropbox to give Google access to export
    • After authorization, your export will either be “in progress” or “completed

Refer to “Download My Google Files” section below for additional information on what happens next and how to proceed after submitting your Takeout data export request.

close
Export Your Google Mail

To export and download only your Google Mail to your personal computer:

  1. Follow the instructions in the “Getting Started” section
  2. Click “Deselect all” in the upper-right corner of the Products section
  3. Scroll down and find “Mail” then check the box beside “Mail
  4. Click “All Mail data included
    • You can keep all messages or select specific labels to export
    • Click “OK
  1. Scroll down and click “Next step
  2. Leave “Frequency” set to “Export once
  3. Adjust the “File type & size” settings if necessary (defaults are .zip and 2GB)
  4. Click “Create export

A confirmation and the expected start date for the export will be displayed.

Note on Google Mail

  • Google Takeout provides email in the .MBOX format. The .MBOX format is a simple text format that can be read by any text editor or word processor (like Microsoft Word). This can be useful if you only need to keep your email for archival purposes. You can also import the .MBOX files into any third-party mail client that supports the format or special purpose programs for transferring email between accounts

Refer to “Download My Google Files” section below for additional information on what happens next and how to proceed after submitting your Takeout data export request.

close
Export Other Google Data

If you want to export data from other Google services, such as Calendar, Photos, or Contacts follow these instructions:

  1. Follow the instructions in the “Getting Started” section
  2. Click “Deselect all” in the upper-right corner of the Products section
  3. Scroll through the list and check the services whose data you’d like to include
  4. Adjust settings for each service as needed:

Calendar

  • Check the box beside “Calendar
  • Click “All calendars included
  • The tool will display all calendars you created in Google Calendar. You can either keep them all selected or click “Deselect all” and select specific calendars you’d prefer to export
  • Click “OK

Contacts

  • Check the box beside “Contacts
  • Click “vCard format
  • The tool will give you the option to choose which file format you’d like to use to export your contacts. If you intend to use the export with macOS or iOS devices, then keep the default vCard format setting. Otherwise, click the drop-down menu and select “CSV” for use with Microsoft Outlook or another personal Google account
  • Click “OK

Photos

  • Check the box beside “Google Photos
  • Click “All photo albums included
  • The tool will display all the albums you have in your account. You can either keep them all selected or click “Deselect all” and select specific albums you’d prefer to export
  • Click “OK
  1. Scroll to the bottom and click “Next step
  2. Leave “Frequency” set to “Export once
  3. Adjust the “File type & size” settings as needed (defaults are .zip and 2GB).\
  4. Click “Create export

Note for Contacts

  • Google Contact files will either be in the .VCF or .CSV file format, depending on which format you chose while going through the Takeout process
    • .VCF is best for macOS or iOS apps
    • .CSV is best for Microsoft Outlook or another personal Google account
  • Your download may include multiple folders, representing different sources of contacts. Each folder will contain the images that are included with each contact (.JPG files) and a single .VCF or .CSV file containing the actual contacts
  • Although the download includes the contacts’ profile pictures, they are not associated with the corresponding contacts and may or may not appear when you import the .VCF/.CSV files, which is dependent on the program that is importing them

Note for Google Photos

  • For every file, you will notice a .JSON file. The .JSON file contains all the metadata for each file, including the creation date, modification date, and permission information. The file itself (not the .JSON one) does not contain the associated metadata except the creation date. (The .JSON format is a simple text format that can be read by any text editor or word processor)

A confirmation and the expected start date for the export will be displayed.

Refer to “Download My Google Files” section below for additional information on what happens next and how to proceed after submitting your Takeout data export request.

close

Download My Google Files

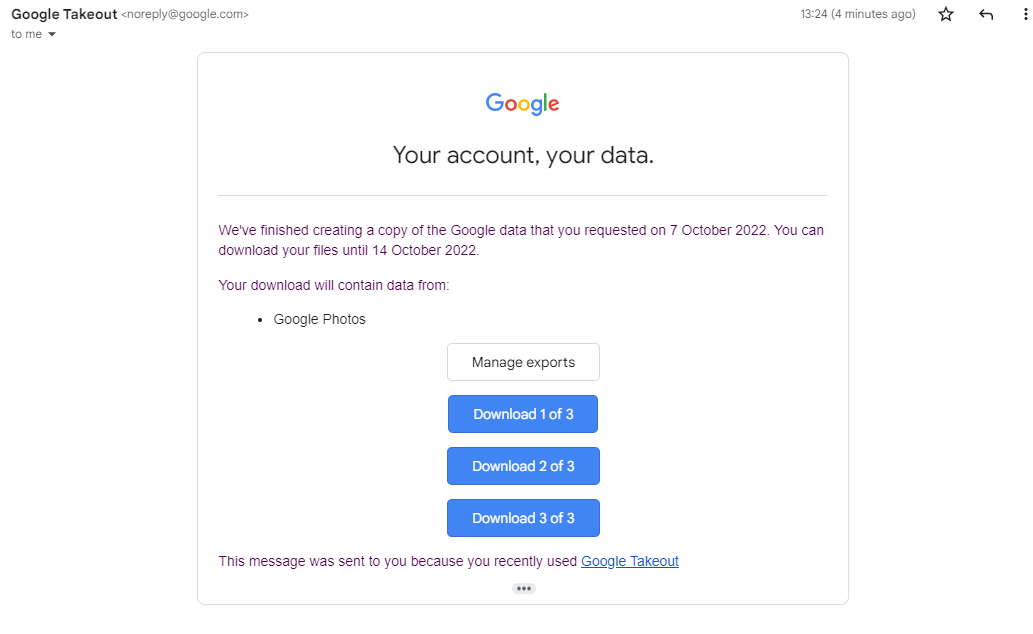
Your export request may take a few minutes to several days to complete. FDU IT has no control over this process. Wait until you receive an email from noreply@google.com (example below) with a link for downloading or viewing your data.

Caution Caution

Avoid retrying the same Takeout request while it is processing, as it will create duplicates and may cause confusion. You can submit separate requests for other data types if needed.

Ensure that your Google Takeout data matches the original data in your FDU Google account. If data is missing, you may retry the process or manually download your files.

Important

Google Takeout does not delete data from your FDU account. You will need to manually delete any data you no longer need after exporting.

Last Modified:

Using Respondus LockDown Browser and Monitor

Resources for:
icon Close

LockDown Browser is a specialized browser that secures the testing environment in Blackboard Learn. When students use LockDown Browser to take a test on Blackboard, they are prevented from printing, copying, navigating to other websites, accessing other applications, or closing the test until it is submitted for grading. Tests designed to work with LockDown Browser cannot be accessed using standard web browsers.

System Requirements 

Windows

  • Windows 10 (including x86 32-bit and 64-bit processors and ARM 64-bit processors using x86 emulation), Windows 8, and Windows 7
  • 2 GB RAM
  • 200 MB of free Hard Disk space

Windows 10S

Windows 10S is not a compatible operating system.

macOS

  • macOS 10.12 to 10.15
  • 2 GB RAM
  • 200 MB of free Hard Disk space

iOS

  • iOS 11.0+

Older Operating Systems

LockDown Browser and Respondus Monitor may continue to run in older operating systems that have reached “end-of-life” but students may encounter unexpected results.

close
Setting up and Using Respondus LockDown Browser Monitor
  1. Log into your course in webcampus and deploy a test. This step is important, as you will not be able to use Respondus LockDown Browser unless you have created and deployed a test
  1. From the Control Panel locate the “Course Tools” section and select the link “Respondus LockDown Browser
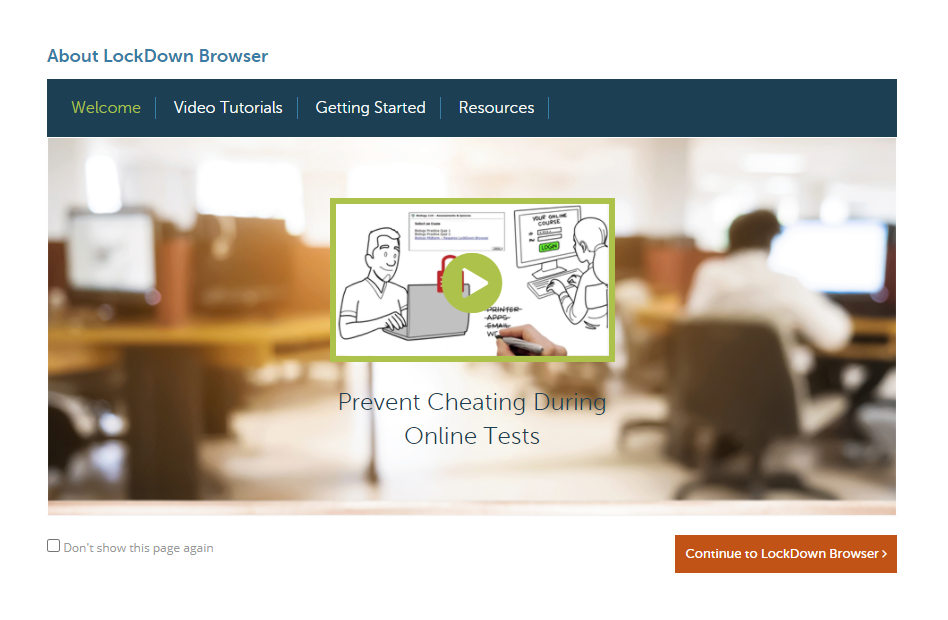
  1. Click “Continue to LockDown Browser
  1. Click the arrow next to the exam you want to implement “Lockdown Browser” and click on “Settings
  1. Click “Require Respondus LockDown Browser for this exam
  1. Click “Advanced Settings” and choose the options that you want to enable for the exam
  1. The first setting will prevent students from exiting the browser until the exam is completed
  1. The second setting will allow students to take the exam with an iPad, using the free LockDown Browser app
  1. The third setting will allow students to access a list of specified web domains during the test
  1. The fourth and fifth settings allow instructors to provide students with a calculator or print function in the LockDown Browser toolbar

Tip

For additional information, select the explain link that follows each setting

  1. Click “Save and Close” to apply the settings
close
Respondus Monitor 

Respondus Monitor is a webcam feature for LockDown Browser that records students during online, non-proctored exams. When this feature is enabled for a test, students are required to use a webcam and microphone with LockDown Browser. After the exam is complete, an instructor can review the details of the assessment, even the recorded videos.

To give students the option to either take the exam with a webcam or in a proctored testing lab, select Either Respondus Monitor or a proctored lab can be used to take this exam. A test password will then be required to access the test in proctored settings.

  1. Click “Respondus Monitor for this Exam
  1. Then select the items to be included in the “Startup Sequence”, the steps a student must complete before the start of an exam
  1. Choose “Save and Close

Your exam will now require the use of LockDown Browser and Respondus Monitor.

close
Installing the Chromebook Extension

LockDown Browser for Chromebook minimally requires the version of ChromeOS that Google makes available via their Long Term Support (LTS) channel. For more information:

Long Term Support Channel Update for ChromeOS

Respondus recommends keeping your Chromebook updated to the most recent version that is available via Google’s ChromeOS “Stable” Channel:

Chrome Releases

To install the new extension on a student-owned Chromebook, students must use the regular LockDown Browser installation link provided by your school. They will not be able to find the app by searching the Chrome Web Store directly. The installation link will redirect them to the Chrome Web Store, where they should select “Add to Chrome” to install the LockDown Browser extension.

close
Last Modified:

Using UC Softphone with Multiple Lines

Resources for:
icon Close

When multiple lines are enabled in Unified Communications (UC) Softphone, a drop down of the available lines will be displayed near the bottom of the “Contacts” windows.


To Make a Call

  1. Click on the arrow near the number displayed.
  2. Choose the line (Number) you desire to call from.
  3. Make the call as normal.

When receiving a call, the caller ID will display the line from which the call is coming from.

A call can be made or received from all the available lines.

Last Modified:

Vendor Access Policy for Networking & Computing

Resources for:
icon Close

As the demand for access by on-site vendors increases, Fairleigh Dickinson University has created a Vendor Access Policy for Networking and Computing. The intent of the policy is to define the categories of non-employees that are on our campuses and provide rules and guidelines around their networking & computing needs. All business units should utilize the Contract Review Process which has been instituted by the Office of the General Counsel prior to initiating any of the below processes. Fully executed contracts that have been reviewed and approved may be requested by members of OIRT prior to providing any access for the non-employees below.

Effective Date: 3/1/2023
Last Revision: 1/14/2024

Contractors/Consultants

The University employs individuals from companies that perform work on behalf of the University and expressly for the University. Examples could be an employee from a staffing agency working within IT to augment the staff in assisting with a series of projects, or an individual hired from an agency to work within Human Resources to assist in processing forms. These individuals are hired under contracts and are held tothe terms and conditions of those contracts. In most cases, working as part of the University, these individuals need computing functionality identical to those of university hired staff, as they are acting on behalf of the University & fulfilling a role specific to the University. All work done by these individuals is part of the university’s data property, and therefore, these individuals should be provided with University issued devices such as desktop/laptop computers, landline phone extensions, etc.

Individuals hired from companies outside of the University to conduct business on behalf of the University must meet the following guidelines and are provided with the following access:

  1. The hiring manager or department head must complete an HR Personal Information Notice (PIN) to begin the process.
  2. Contractors/Consultants will always be issued a University NetID in the format of Firstinitial.Lastname@v.fdu.edu.
  3. Once the NetID has been created & communicated to the hiring manager, a Vendor Employee Technology Form must be completed if the contractor/consultant needs access to certain FDU systems. The form to be found in the Staff and Faculty Forms tile of SAMISupport.

SAMI Support

  1. All Contractors/Consultants are required to complete the Written Information Security Program (WISP) training immediately after an account is provisioned. Validation of completion is needed within the first 30 days.
    1. WISP training reminder on day 15
    2. WISP training daily reminder every day after day 15
    3. Disable account day 30 with an email sent to the manager
  2. All contractors/consultants must read and accept the following additional policies:
    1. Policy for the acceptable use of email
    2. Acceptable use policy for computer usage
    3. FDU alert policy
    4. Password policy
  3. Contractors/Consultants will be able to sign up for FDU Alert through Colleague Self-Service. Instructions can be found here:
  1. Contractors/consultants issued a university managed laptop/desktop are entitled to an email address without the vendor designation at the request of the hiring manager. This would be requested by the manager through the Vendor Employee Technology Form by clicking the “Convert Vendor NetID” box.

Note

It is strongly recommended that contractors/consultants be issued University managed equipment. Access to certain systems may be denied if personal equipment is used.

  1. Contractors/consultants must be terminated at the end of their contract using the same methodology utilized for current faculty and staff. It is the unshared responsibility of the managing department to submit termination paperwork per the HR process for any contractor/consultant who had been issued a NetID.

Volunteers

The University utilizes volunteers in non-paying positions during the school year. Examples of these roles include but are not limited to preceptors & chaplains. These individuals do not need access to any University systems with the exception of email. As such, they need access to Internet services & email but they do not require an FDU managed laptop/desktop.

Volunteers must meet the following guidelines and are provided the following access:

  1. Volunteers will be issued a NetID in the format of Firstinitial.Lastname@v.fdu.edu to be able to authenticate to FDU’s wireless network (and wired network in the future).
  2. Volunteers are required to complete the Written Information Security Program (WISP) training immediately after an account is provisioned. Validation of completion is needed within the first 30 days.
    1. WISP training reminder on day 15
    2. WISP training daily reminder every day after day 15
    3. Disable account day 30 with an email sent to the manager
  3. All volunteers must read and accept the following additional policies:
    1. Policy for the acceptable use of email
    2. Acceptable use policy for computer usage
    3. FDU alert policy
    4. Password policy
  4. Volunteers will be able to sign up for FDU Alert through Colleague Self-service. Instructions can be found here:
  1. All volunteer accounts will expire at the end of the fiscal year and must be renewed by their FDU manager by completing a PIN form.
  2. Volunteers must be terminated at the end of their contract using the same methodology utilized for current faculty and staff. It is the unshared responsibility of the managing department to submit termination paperwork per the HR process for any contractor/consultant who had been issued a NetID.

On-Campus Vendors

The University outsources various functions to entities (Vendors) that operate independently but work exclusively on our campuses and provide services for our faculty, staff & students. These employees are individually managed by their corporate entities and are largely held accountable by their corporate management.

While on campus, employees of these vendors might need access to the Internet to interact with their corporate websites or communicate with their corporate managers. In many cases today and in most all cases in the future, these employees will need to authenticate through the University’s network in order to conduct their business. The University has established a process whereby the Fairleigh Dickinson University department responsible for that vendor completes the Human Resource forms necessary in order to create a non-employee record within our Colleague system.

Employees of on-campus vendors must meet the following guidelines and are provided the following access:

  1. Vendor employees will be issued a NetID in the format of Firstinitial.Lastname@v.fdu.edu to be able to authenticate to FDU’s wireless network (and wired network in the future).
  1. Vendor employees will be able to add their contact information to FDU Alert by sending an email to fdunotify@fdu.edu
  2. All vendor employee accounts will expire at the end of the fiscal year and must be renewed by their FDU manager by completing a PIN form.
  3. Vendor employees must be terminated through FDU’s systems when they either are removed from their assignment at Fairleigh Dickinson University or are terminated by their employer using the same methodology utilized for current faculty and staff. It is the unshared responsibility of the managing department to submit termination paperwork per the HR process for any contractor/consultant who had been issued a NetID.

Elevated Vendor Privileges

From time to time, the employee of an on-campus vendor might have justification for having access to FDU email or a need to access systems and/or applications that reside behind FDU’s firewalls. If such a case is identified, the FDU department responsible for that vendor would need to contact the Director of Systems with a formal request for additional vendor access. The FDU department must present solid business justification for the elevated access. The Director of Systems will review each request and either approve or reject the request based on business needs and security posture. The Director of Systems might consult with the Data Security & Incident Response Team before providing an answer.

Employees of on-campus vendors approved for elevated access must meet the following guidelines and are provided the following access:

  1. Vendor employees will be issued a NetID in the format of Firstinitial.Lastname@v.fdu.edu to be able to access FDU’s wireless network (and wired network in the future).
  2. All vendor employees are required to complete the Written Information Security Program (WISP) training immediately after an account is provisioned. Validation of completion is needed within the first 30 days.
    1. WISP training reminder on day 15
    2. WISP training daily reminder every day after day 15
    3. Disable account day 30 with an email sent to the manager.
  3. Vendor employees will be able to sign up for FDU Alert through self-service. Instructions can be found here:
  1. All vendor employees with elevated access must read the following additional policies:
    1. Policy for the acceptable use of email
    2. Acceptable use policy for computer usage
    3. FDU alert policy
    4. Password policy
  2. If the vendor employee needs to access FDU systems and/or applications, issuance of a University managed laptop/desktop may be required. This would be at the expense of the requesting department.
  3. Upon departmental request, vendor employees will only be provided access to the specific University Systems and applications approved by the Director of Systems.
  4. All vendor employee accounts will expire at the end of the fiscal year and must be renewed by their FDU manager by completing a PIN form.
  5. Vendor employees must be terminated through FDU’s systems when they either are removed from their assignment at Fairleigh Dickinson University or are terminated by their employer using the same methodology utilized for current faculty and staff. It is the unshared responsibility of the managing department to submit termination paperwork per the HR process for any contractor/consultant who had been issued a NetID.

Last Modified: