Editing projects can vary greatly in complexity, from straightforward cuts to those requiring specific graphics, logos, music tracks, and lower-thirds. To ensure a smooth and efficient editing process, it’s important to communicate these requirements to our team prior to production. This allows us to be prepared and begin editing shortly after the video has been recorded.
For more complex video projects, involving a variety of unique elements like graphics, B-ROLL, transitions, voiceovers, and music tracks, collaboration between the editor and producer is key. This process typically involves the editor sending raw footage to the producer, who then uses the Frame.io platform to make edit decisions and provide additional stylistic guidance.
A preview version is created based on this feedback and emailed back to the producer for review. This cycle of review and revision may require several iterations, potentially two to four passes, before reaching a final version. This final product is then subject to approval by individuals responsible for the video project, ensuring that it meets all necessary standards and criteria.
To prevent excessive printing, the Department of Computing Services charges students a small fee for printing in the FDU Computer Labs. Black and white printing costs $0.05 per page and color printing is $0.25 per page.
Each student pays a technology fee which includes $10.00 of lab printing for each of the fall, spring, and summer semesters. Printing charges above the $10.00 per semester will appear as a Printing Fee on the next tuition bill.
The $10 per semester printing credit is a standard allotment that expires each semester and has no cash value. No refunds will be given for pages not printed and unused prints for each semester’s allotment do not carry forward.
FDU staff and faculty members can use lab printers on a limited basis without charge for the purpose on conducting FDU business. Please use your department’s printer(s) as your primary printing resource. Faculty and staff members are limited to 200 pages per semester. Any attempt to print past this quota will result in an error message stating that the account does not have enough credit.
Note: You are responsible for all activity on your account. If you share your password with others or forget to log out, you will be held responsible for any activity done via your account, including printing charges. Computing Services strongly recommends that you use non-trivial passwords and log out completely before leaving a workstation.
View and Manage your Lab Printing
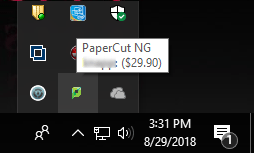
PaperCut Icon
Hovering your cursor on the Papercut tray icon shows the Balance
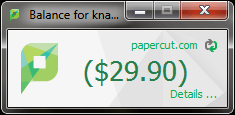
When you click on the Papercut tray icon, it opens a new window as seen below:
Clicking on the “Details…” button on the lower right of the Balance within the Papercut window opens a web browser that will let the user log in and see their job history
Receiving Credit for Printing Errors
Credit will be given for errors caused by the printer (paper jams, toner problems, etc.) In such situations, please take the bad printouts to a Lab Assistant in Dreyfuss, Dickinson Hall, or University Hall. Your information will be taken, and reimbursement will be made in the form of a credit applied to your total charge for the semester. Situations which could have been prevented before printing, such as extra blank pages at the end of a document, will not be reimbursed.
Can I Use My Own Paper in These Printers?
No. Jobs are printed as they are received. There is the possibility that after loading the printer with your paper someone will print a job that will then be printed out on your paper. Transparencies and mailing labels are not allowed in the lab printers due to the high heat that laser printers use and the potential for damage to the equipment.
Multimedia Services ensures the long-term preservation of all video material by storing and backing it up indefinitely on Sony CI, our cloud-based video storage library. This comprehensive backup encompasses everything from raw footage and project files to graphic files and the final program. Should your video project require updates in the future, we have the capability to access and revise the project as needed.
Project Delivery
Multimedia Services delivers final program material using Frame.io, offering a rapid, secure way to send large files. This platform facilitates team collaboration with features for leaving time-coded notes. While the Frame.io link enables previews and approvals by project stakeholders, it is not intended for long-term storage. After video approval and download, the content is archived and the link will expire.
Should you require access to a completed project, please email danielpando@fdu.edu.
Note
If you need to access to a previously completed project after the Frame.io link expires, requesting a new link may take 3-5 business days.
Qualtrics is a simple web-based survey tool that provides the opportunity to conduct online survey research, evaluations, and many other data collection activities.
One of the many advantages is the ease of learning to use Qualtrics to:
Build surveys with multiple question styles
Distribute the surveys with a website link (there are other ways to distribute as well)
Analyze data collected
Of great importance, the university currently has a license for all faculty, staff, and students (some caveats with student accounts discussed if you all desire)
Benefits of Qualtrics
Simple and intuitive formatting of surveys
Visually appealing for respondents and survey builder
The Report Message add-in works with Outlook to allow you to report suspicious messages to Microsoft and manage how your Microsoft 365 email account treats these messages.
Messages marked as junk by your Microsoft 365 email account are automatically moved to your Junk Email folder. However, spammers and phishing attempts are continually evolving. If you receive a junk email in your Inbox, you can use the Report Message add-in to send the message to Microsoft, helping improve spam filters. If you find an email in your Junk Email folder that is not spam, you can use the add-in to mark it as legitimate, move it to your Inbox, and report the false positive to help Microsoft enhance the filters.
What is Junk Email?
Junk email, often referred to as spam, consists of messages you do not want to receive. These emails may advertise unwanted products or contain content that is offensive. If you select the Junk option, a copy of the message may be sent to Microsoft to improve spam filters, and the message will be moved to your Junk Email folder.
What is Phishing?
Phishing is a tactic used to trick you into disclosing personal information, such as bank account numbers and passwords. Phishing messages often appear legitimate but contain deceptive links that lead to fake websites. If you select Phishing, a copy of the message may be sent to Microsoft to improve filters, and the message will be moved to your Junk Email folder.
For more information and tips on spotting phishing emails, please refer to the following support article:
Microsoft has recently updated the process for reporting phishing or junk emails in Microsoft 365 Outlook and classic Outlook clients. With this update, a new Report Message button is now available in a dedicated tab within the Outlook client.
Outlook Web and Desktop Client
Classic Outlook
Reporting a Message as Phishing/Junk
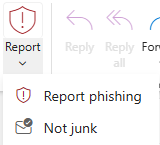
By default, the Report button is inactive (grayed out). To activate the button and report a message as phishing or junk, the email must first be highlighted.
To report a message as Phishing or Junk:
Click on the email message you want to report
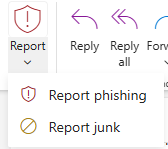
Click the “Report” button
Select either “Report phishing” or “Report junk” to properly submit the message
Note
Clicking Report Phishing will delete the email.
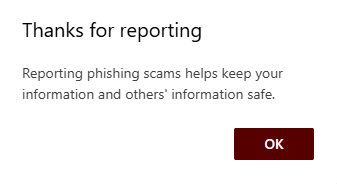
Click “OK” on the confirmation window
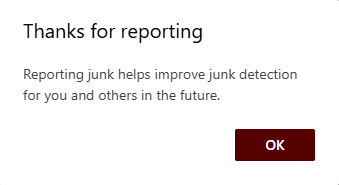
A secondary window will appear, explaining that regularly reporting junk emails helps improve junk email filtering in the future.
What is a Legitimate Email?
A legitimate email is one that comes from a sender you know, are expecting, or that has been mistakenly marked as junk. If this happens, you can use the Report button to mark the message as Not Junk. This will move the message from your Junk Email folder back to your Inbox.
Reporting Messages as Not Junk:
Click on the “Junk Email” folder in Outlook
Select the email message you want to report as “Not Junk“
Click the “Report” button
Select “Not Junk” to properly report the message
Tip
If a legitimate email has been mistakenly reported as phishing, please open a SAMI Support ticket by clicking the Get Support button below.
Being connected to the internet suggests that the internet is connected to you. Without concern and proper safeguards to protect the information you share, you are at a greater risk of cybercrime.
The university assumes its share of responsibility to protect sensitive information but you must do the same. The vast majority of data and identify thefts are not the result of enterprise breaches but a direct consequence of individuals who are complacent about sharing sensitive information or unaware of the risks.
Please take a moment to review this video to obtain a better understanding of how you can help protect yourself from cybercrime.
SAMI Shorts are brief informational videos that provide key insights on a variety of IT-related topics. Most videos run 45–90 seconds, include closed captioning, and are also available in text format. As new SAMI Shorts are released, we will periodically share them with the community via email. You may also receive a related SAMI Short as part of a response to a SAMI Support ticket.
The SAMI Support portal requires a valid NetID and password, along with DUO multi-factor authentication, for access. Upon entry, users can create new tickets, review open or closed requests, and explore the IT Knowledgebase for solutions to common issues. Access the support portal using the button below:
If you need to open a request and cannot access SAMI Support for any of the reasons below, fill out the SAMI Support Public Request form to contact the SAMI Service Desk. A member of the service desk will assist you via phone call or email.
I do not have a valid University issued NetID
I am not able to authenticate through DUO
I have not set up my DUO account
I am a vendor without a University issued NetID
I am an admitted student
I am a newly hired employee or adjunct
My FDU account is locked
I need my Net ID password reset and have already attempted to do that through identity.fdu.edu
Tip
The form below is not compatible with Dark Mode. For an optimal experience, disable Dark Mode either in your device’s system settings or directly from the FDU IT website menu bar.
Sign in to the FDU Single-Sign-On (SSO) page using your FDU NetID credentials
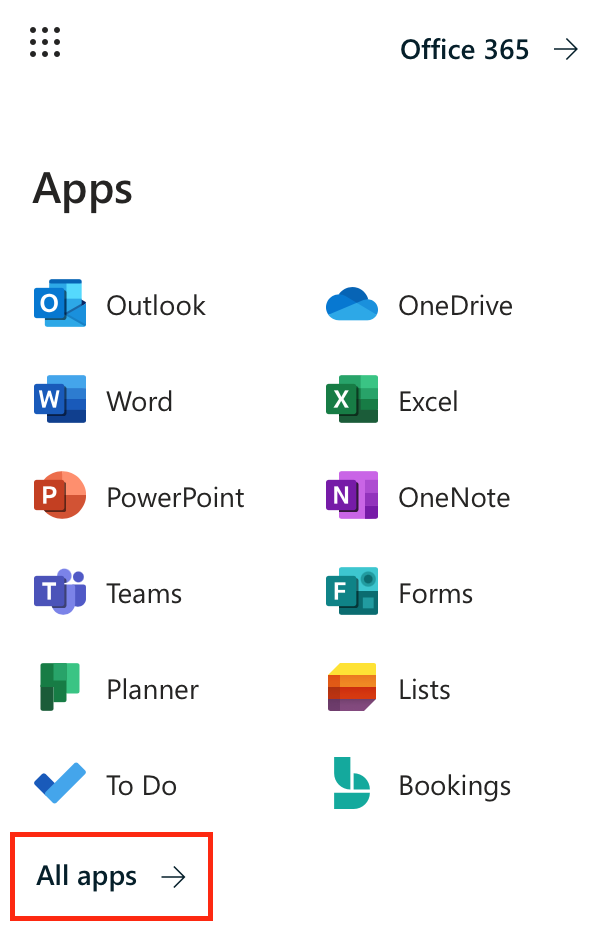
In the upper left corner, click the dotted square and select All Apps
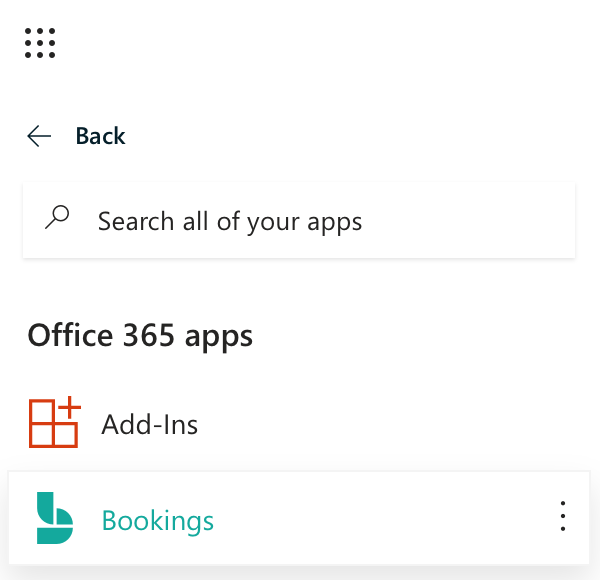
In the All Apps menu, choose Bookings
Microsoft Bookings will open. Click the Get it Now button to begin
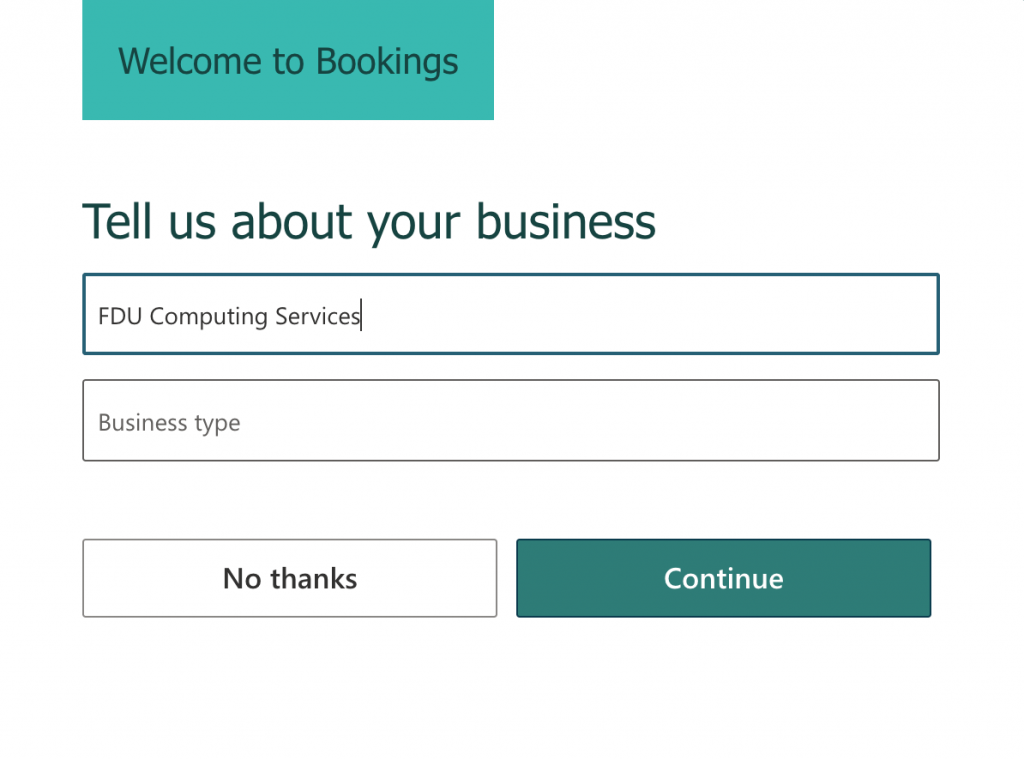
The next page will ask for two pieces of information: Business nameandBusiness type. Enter your Department name or your First and Last Name. Click Continue
Note
Designating a Business Type is not required to be able to Continue.
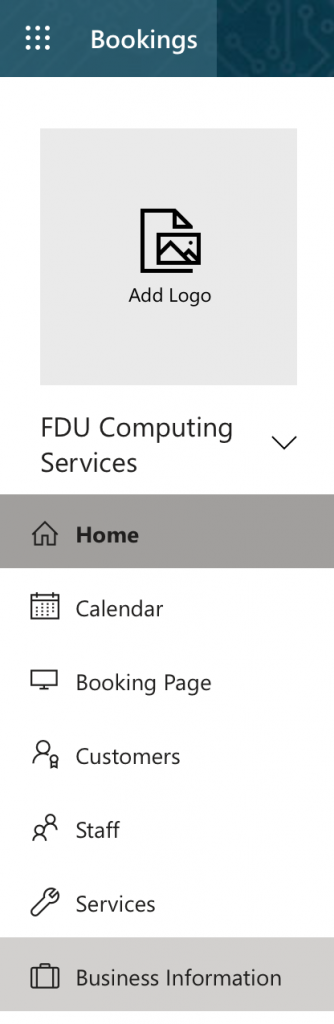
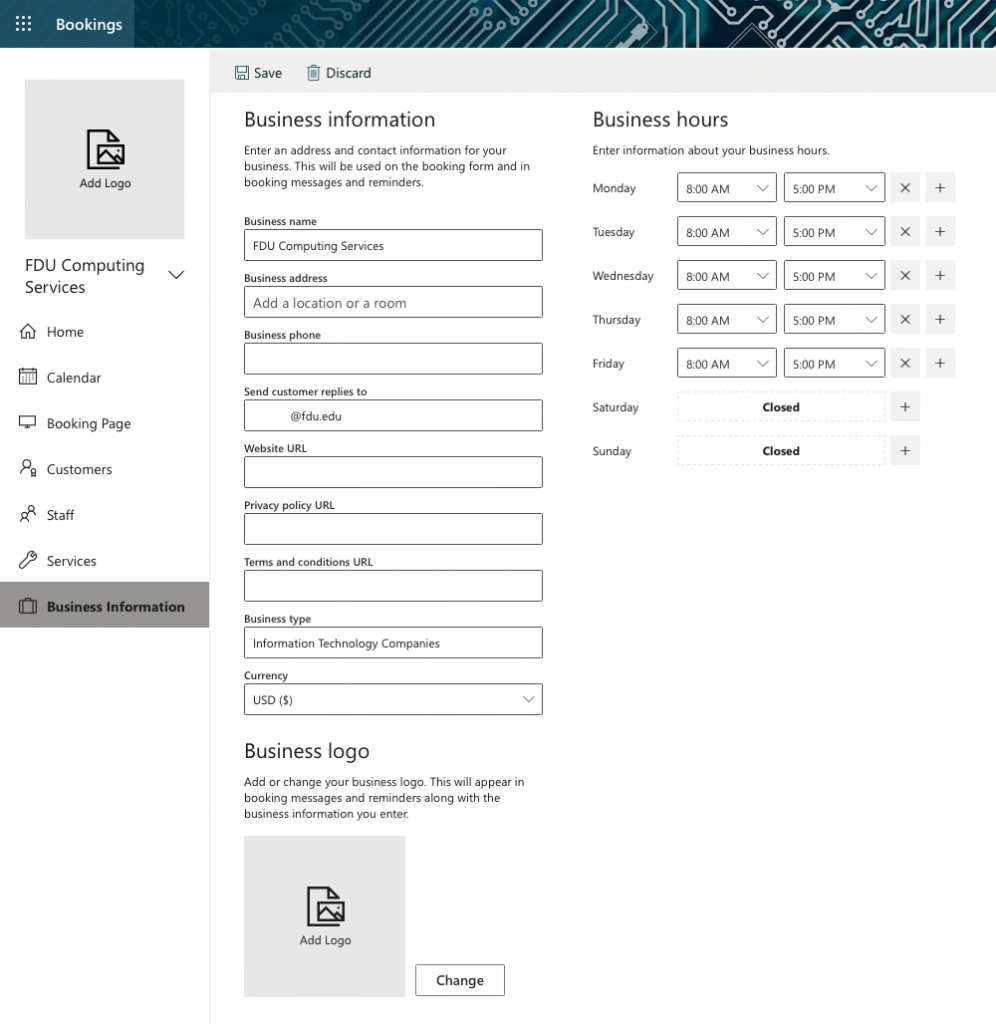
Once your Bookings page loads, the first section you should complete is Business Information. Click Business Information in the left menu
On the Business Information page, you can enter your business or department address, other contact information, upload a business logo, and set up your business hours
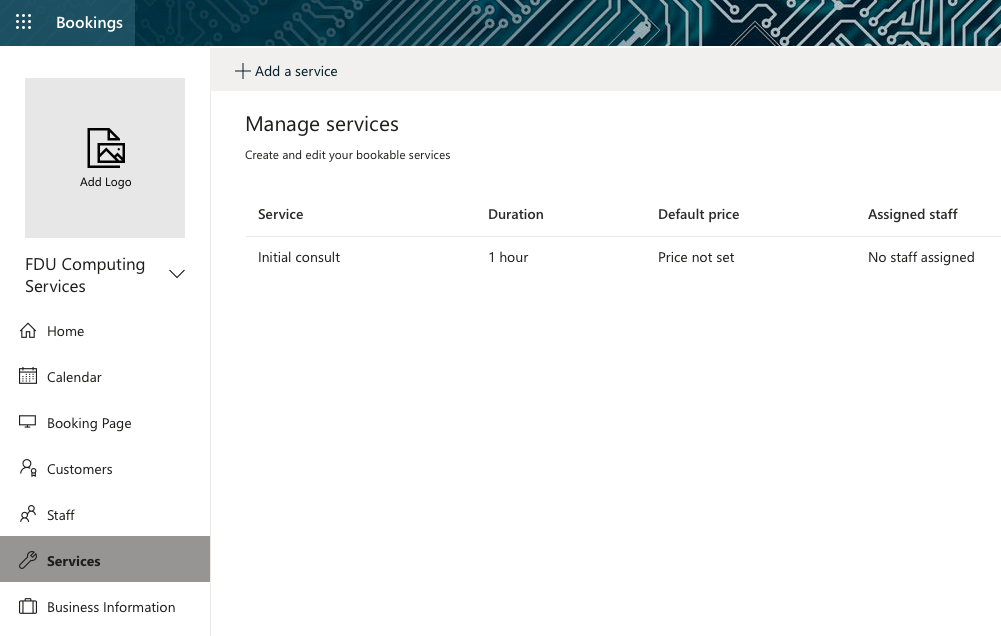
Next, set up your service offerings. Click Services from the left menu
Note
By default, Microsoft Bookings will add a service called “Initial Consult.” You can click the pencil next to this service and make it your own, OR you can add a new service by clicking Add a service at the top of the screen.
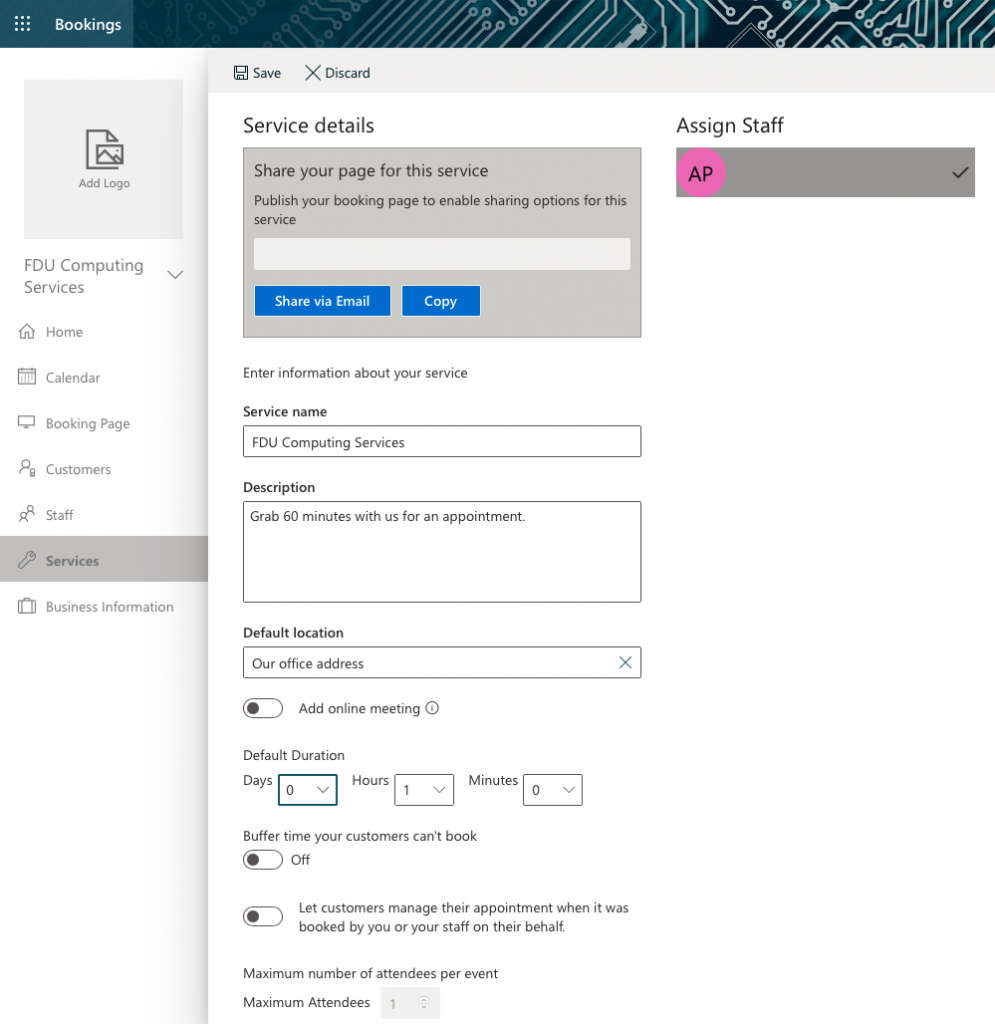
Once you’re on the service-editing page, enter your service details, including name, description, and location. When you start typing an address in the default location, suggested locations will populate. Below are explanations for the other fields on the service-editing screen:
Duration: You can enter how long you want the duration to last in days, hours, minutes, and set a buffer time when customers cannot book.
Reminders: You can have the system send customers email reminders before their scheduled appointment. Click the pencil to edit the text.
Leave Publishing options checked.
Online Scheduling Options: This is where you can manage the settings for when customers can book services.
You can choose to use the default scheduling policy by leaving the option checked, OR
You can manage the settings for your scheduling policy by unchecking the option. If you choose this option, we recommend setting the Minimum lead time to 24 and the maximum lead time to 30 days.
Don’t forget to click Save at the top of the Service details page
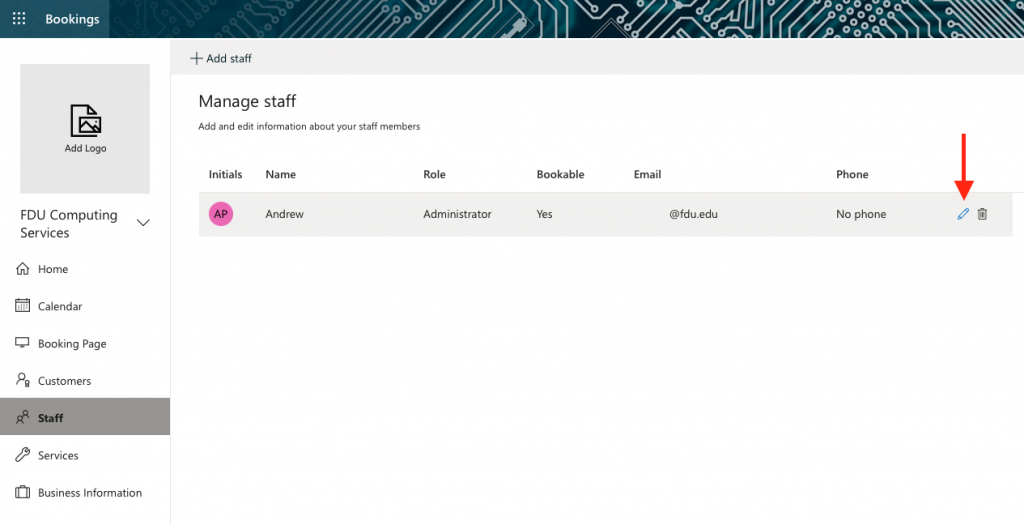
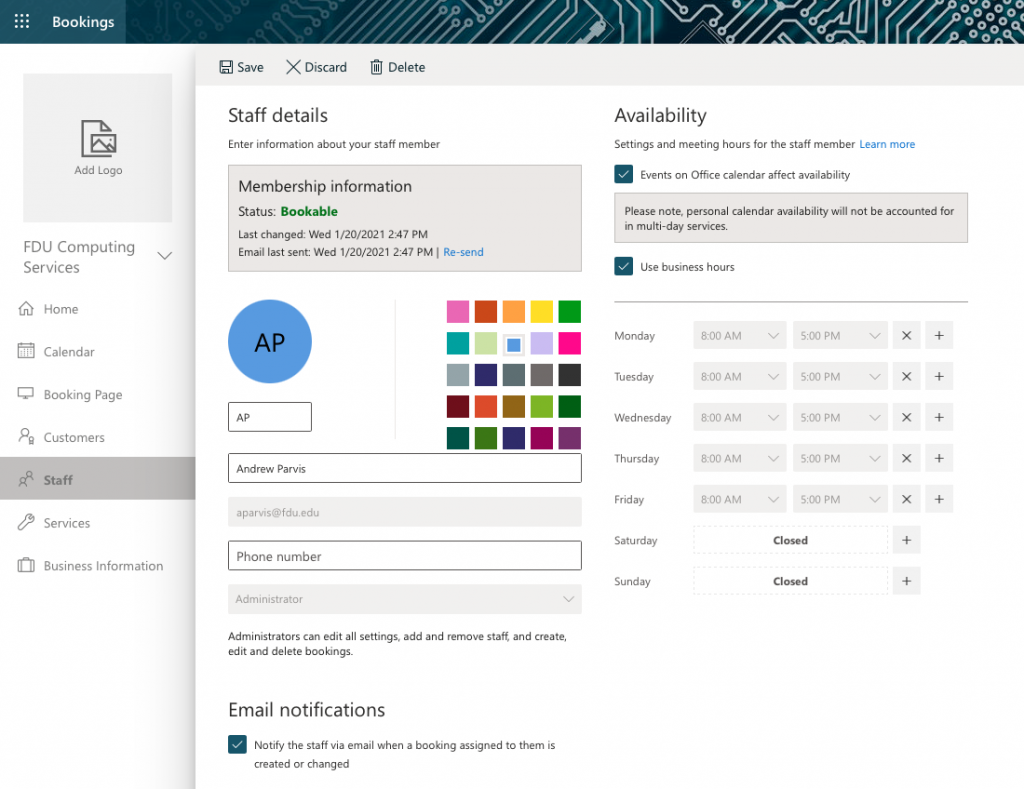
Next, click Staff from the left menu. Click the pencil next to your name to edit your information. Also, you may add any staff or faculty members in your department by clicking the + Add staff button
On this page, you can add information about yourself, including your office or department phone number and whether to receive email notifications (we recommend keeping this option checked). Click Save when finished
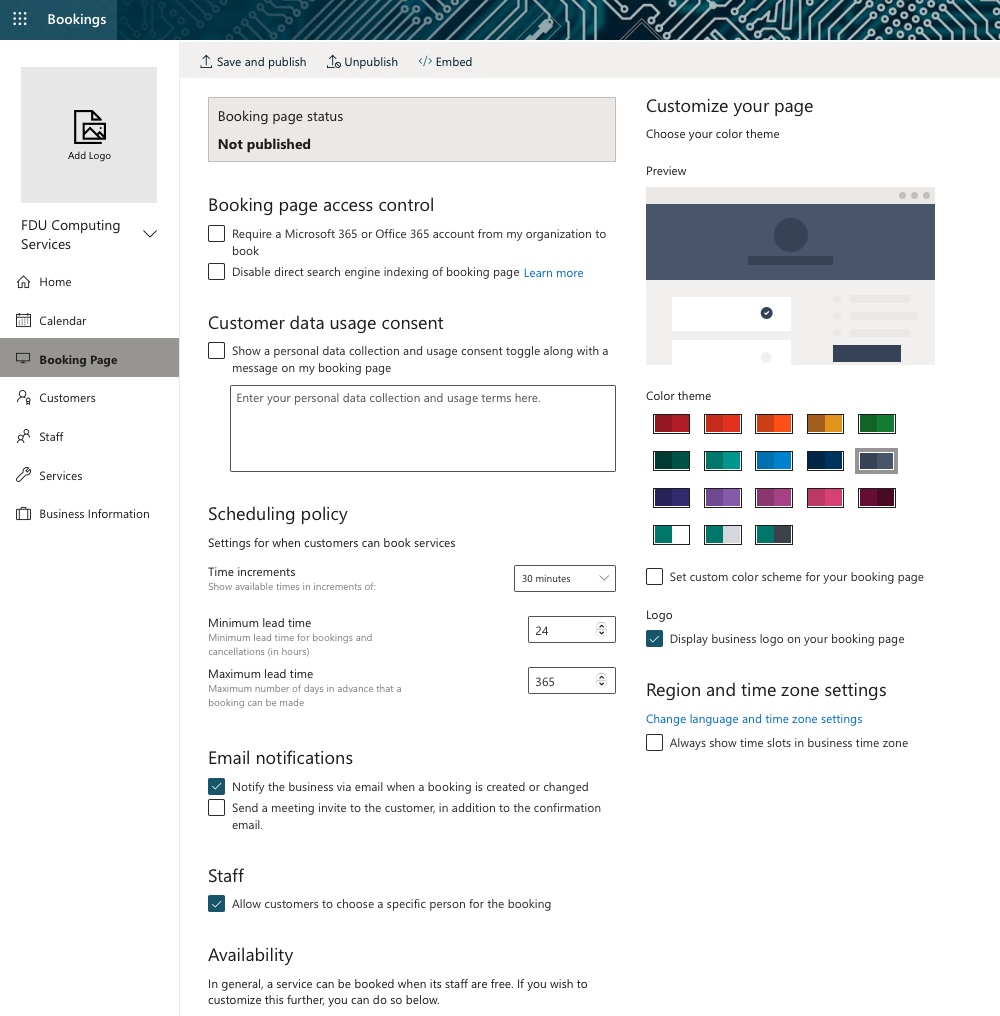
Next, select Booking page from the left navigation pane.
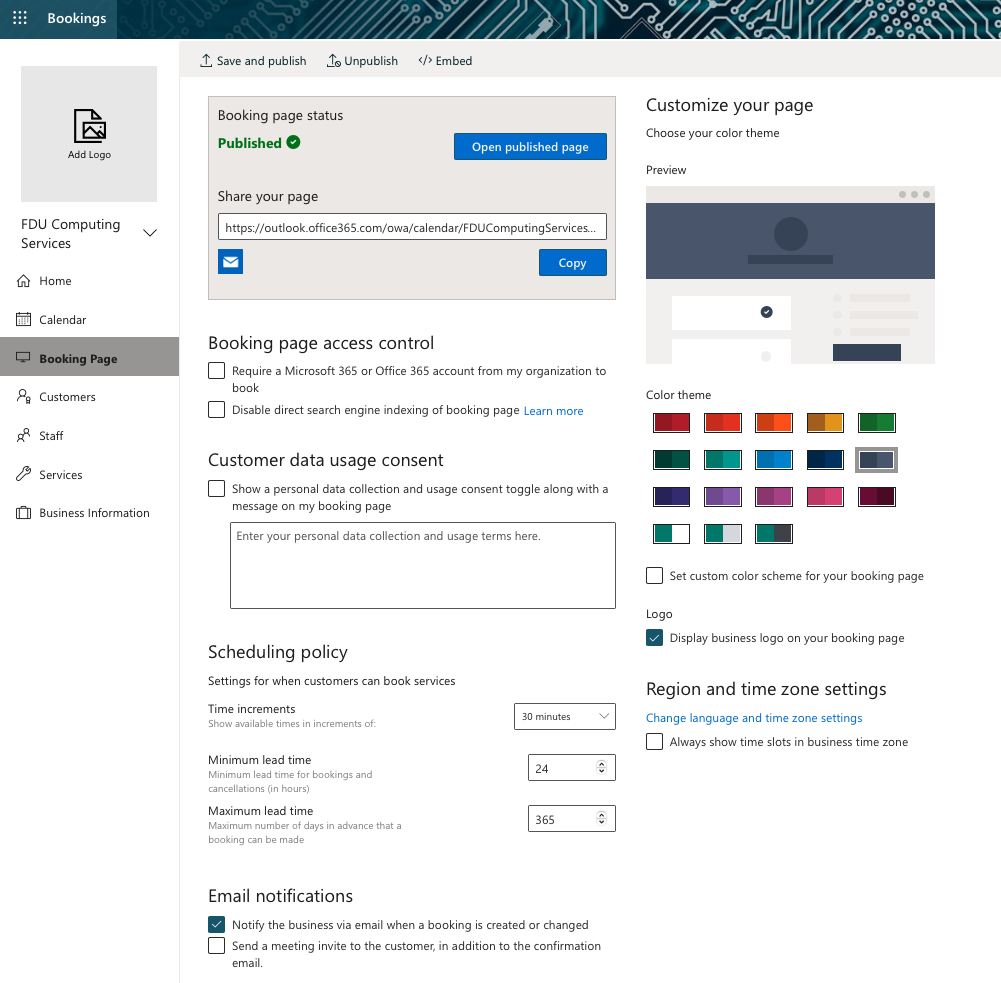
Booking page Status: Since this is the first time you are setting up your Bookings page, your status is set to Not published. Once you finish customizing your page and clicking Save, the status will change to Published.
Customer data usage consent (optional): Where you can customize a message for your visitors to consent to your site collecting their personal data.
Scheduling Policy: Where you can set site-wide scheduling policies. We recommend the following settings:
Minimum lead time: 24
Maximum lead time: 30
Email Notifications: Notifies you when an appointment is made.
Staff: You can allow customers to choose who they want to meet with. However, you can uncheck this option if you do not have any staff.
Customize your page: Choose a color theme for your bookings page.
Lastly, click Save and Publish
Once you click Save and publish, your Bookings site is now live! You can view your published page by clicking Open published page and share your page with others by copying the link
A shared mailbox makes it easy for a group of people to read and send emails from one public email address, like info@fdu.edu. When a person in the group replies to a message sent to the shared mailbox, the email appears to be from the shared address, not from the individual user. Shared mailboxes can also be used to provide a shared calendar, allowing multiple users to schedule and view calendar tasks.
Request Access to an FDU Shared Mailbox
Users can request a new shared mailbox by completing and submitting the “Distribution Group/Shared Mailbox Request” form found below. Users needing access to a specific FDU shared mailbox account may request access by reaching out to the shared mailbox owner. To fulfill this request, the shared mailbox owner will open a support case with the SAMI Service Desk.
The shared mailbox should automatically display in your folder pane on the left-hand side of your Outlook application within 24 hours of its creation. Closing and restarting the Outlook application maybe necessary if you do not see it after 24 hours
Note
Before you can use a shared mailbox, the Microsoft 365 admin for the university has to add you as a member.
If you cannot open a shared mailbox, please contact the SAMI Service Desk and open a support request.
close
macOS
Select Tools from the Outlook menu bar at the top of the screen, then choose Accounts
Select the Advanced… tab
Select the Delegates tab
Click the + button, located under Open these additional mailboxes:
Type or select your correct shared mailbox, and then select Add
Select the OK tab
You should now see your shared mailbox listed on the left-hand side of your Outlook email application window
Note
This is a one-time process only. You do not need to follow the above steps to add this to Outlook on your macOS device again.
If you cannot open a shared mailbox, please contact the SAMI Service Desk and open a support request.
New Outlook version on macOS
Some macOS users may take advantage of the “New Outlook” version of the Outlook application. You can identify which Outlook version you are using by locating the “New Outlook” slider tab button on the top right of the application.
Select Tools from the Outlook menu at the top of the screen, then choose Accounts
Select the Delegation and Sharing tab
Choose the Shared With Me tab and then select the + button
Begin to type the shared mailbox name or its email address, choose the correct shared mailbox before selecting Add, and finally Done when finished
You should now see your shared mailbox, located on the left-hand side of your Outlook application window
Note
This is a one-time process only. You do not need to follow the above steps to add this to Outlook on your macOS device again.
If you cannot open a shared mailbox, please contact the SAMI Service Desk and open a support request.
Select the Outlook web app icon, located on the left-hand side of your display
Right-click on the Folders option located on the left side of the menu; a small drop-down menu should display. Select Add shared folder
Begin typing the email address for the shared mailbox, auto-populated suggestions will be displayed. Select the correct shared mailbox address and click Add
You should now see the added shared mailbox located on left side of your Outlook web email window
Note
This was a one-time process. You do not need to follow the above steps to add this to your account again. You will automatically see the shared mailbox when you sign in to your account next time.
If you cannot open a shared mailbox, please contact the SAMI Service Desk and open a support request.
close
Android and iOS
Sign in to your primary FDU email account in the Microsoft Outlook for Android or iOS app
Tap the Add Account button in the left navigation pane, then tap Add Shared Mailbox
Enter the name of the shared mailbox and tap Add Shared Mailbox when finished
Note
If you have multiple accounts in Outlook Mobile, select the account that has permissions to access the shared mailbox.
After the account setup process completes, the shared mailbox will display in your account list within the Outlook for Android or iOS app
Tip
To remove a shared mailbox, go to Settings > Accounts. Then tap on the shared mailbox and select Delete Account.
close
Send Email from a Shared Mailbox
Windows / macOS
Open Outlook
Choose New Email to start a new message
If you don’t see the From field at the top of your message, choose Options, and select the From tab
Click From in the message, and change to the shared email address
Note
If you don’t see your shared email address displayed, choose “Other email address…” Enter the full email address for the shared mailbox in the blank or search for the email address by clicking “From” tab. Click “OK” when finished.
Finish typing your message and then choose Send
Note
From now on when you want to send a message from your shared mailbox, the address will be available in your “From” drop down list.
Whenever you send a message from your shared mailbox, your recipients will only see the shared email address in the message.
close
office365.fdu.edu / Outlook Web App
Choose New Message
Choose From and change to the desired shared email address
Note
If you don’t see your shared email address displayed, choose “Other email address…” Enter the full email address for the shared mailbox, then select the appropriate shared email address from the auto populated list when finished.
To access Forms, you will be directed to our SAMI Support Portal where you will be asked to log in using your NETID and authenticate using Duo. Once you click “Next,” you will be forwarded to samisupport.fdu.edu in a new window or tab.