icon

University Systems and Networking

University Systems and Networking (USAN) oversees the University's Data Centers and Wired / Wireless Network. We support both the Metropolitan and Florham campuses, as well as our international campuses in Vancouver and Wroxton. USAN enables the access, flow and storage of information within the University while defending our network against all threats and maintaining the integrity of our data.

Support
background
Search Department Resources

Student Technology Resources

Resources for:
icon Close

Fairleigh Dickinson University provides an extensive array of technological resources and services tailored for our students. This guide is designed to assist students in navigating and utilizing these tools effectively, ensuring they can easily set up, access, and manage their accounts, while also offering comprehensive information on each service.

ID and Email

FDU NetID

Your FDU NetID verifies who you are and ensures the privacy of your personal information. Your FDU NetID and your NetID password will provide access to a variety of IT resources including your Self-Service, WebCampus, Office365, and Email.

To obtain your NetID, follow the guide below:

close
Changing your FDU NetID Password

To protect the University and our Students from cyber attacks and other malicious activity, we require that everyone in our community to periodically change their password.

To change your password, follow the guide below:

close
DUO Multi-factor Authentication

To successfully use your NetID to access your accounts, you will need Two-Factor Authentication with Cisco DUO MFA.

Two-factor authentication adds a second layer of security to your FDU NetID. It requires two factors to verify identity. These factors include something you know – your FDU NetID and password, and something you have – a phone or passcode, to authenticate and gain access to your account on FDU services. Passwords alone no longer provide adequate protection against cyber hacking. DUO is required for all current FDU students.

To set up your mobile device with DUO MFA, follow the guide below:

Additionally, refer to our FAQ for commonly asked questions about DUO:

close
Email and Office 365

Students can access their emails through any Web browser using their NetID and password to log in. To access our email, visit the Office 365 Portal:

Office 365 Portal

Students can also access their FDU Email accounts on their mobile devices by installing the Outlook app. For instructions to setting up your FDU Email account in the Outlook app, follow the guide below:

Current students who are registered for classes for the current term, or a future term have access to Microsoft Office 365 Suite applications. For more information, visit the links below:

close

Academic Systems

Webcampus

Webcampus is a course content management system. FDU’s Webcampus is also known as the Blackboard System. On-line courses are taught through this system which also allows for interaction between the student and faculty member as well as on-line class discussions.

To learn more about how to access Webcampus, review the guide below:

close
Self-Service

Self-Service is an interactive web application that enables students to view their individual information contained in FDU’s Student Information System. Students can use Self-Service to do things like view their financial aid, pay their bills, and register for classes.

Review the Tutorial below to learn how to use Self Service:

close

Connectivity

Connecting to the FDU Wireless Network

Using your FDU NETID, you can connect to the FDU Wireless Network. For instructions view the links below:

close

Security

Security Resources

Understanding and implementing cybersecurity measures is crucial for protecting your personal and institutional information. This section provides essential resources to help you navigate the landscape of cyber threats.

Stay safe online by reviewing the articles below:

close

Software

Available Software for FDU Students

Fairleigh Dickinson University has both licensed and open-source software, that is offered for academic and/or personal use for students. The links below point out to commonly used software, both licensed and open source, that are offered for academic and/or personal use to all Fairleigh Dickinson University faculty, staff and students.


In our digital learning environment, mastering online tools is essential for academic success. These resources are designed to guide you through the process of engaging in classes virtually via Zoom and accessing your files on OneDrive.

close

Printing and Labs

Computer Labs and Printing

Computing Services has multiple computer labs available on both New Jersey Campuses for classroom instruction and student use.

close
Virtual Labs

FDU also provides remote access to many of the software applications typically found in university computer labs through our platform FDU Anywhere. You can access it using your FDU NetID credentials using the link below:

FDU Anywhere

Review the FDU Anywhere Tutorial below to learn how to use our virtual labs:

close

For any IT related questions and support, contact the SAMI Service Desk:

SAMI Support

Last Modified:

Use SFTP or SCP to Upload Files to a FDU Linux Server

Resources for:
icon Close

What’s SFTP and SCP?

Secure File Transfer Protocol (SFTP) is a file protocol for transferring large files over the web. It builds on the File Transfer Protocol (FTP) and includes Secure Shell (SSH) security components. This term is also known as Secure Shell (SSH) File Transfer Protocol. Secure copy protocol (SCP) is another method to securely transfer files between a your local PC and a remote host or between two remote hosts. It is also based on the Secure Shell (SSH) protocol.

Linux / Mac

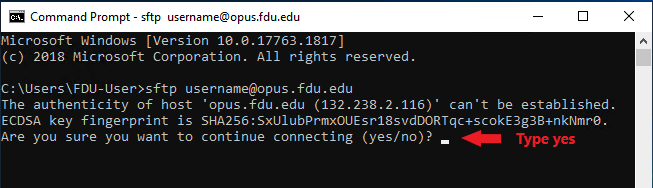
If you are running a Linux or Mac computer, SFTP and SCP clients are already installed, so you don’t need to download anything using those OS. You can open up a terminal window and run the either command like below to connect to a remote Linux server.

sftp username@opus.fdu.edu

or

scp filename username@132.238.2.116:

Windows

Option 1: Use WinSCP (Recommended)

You will need to download and install WinSCP:

Download WinSCP

  1. Launch the WinSCP program
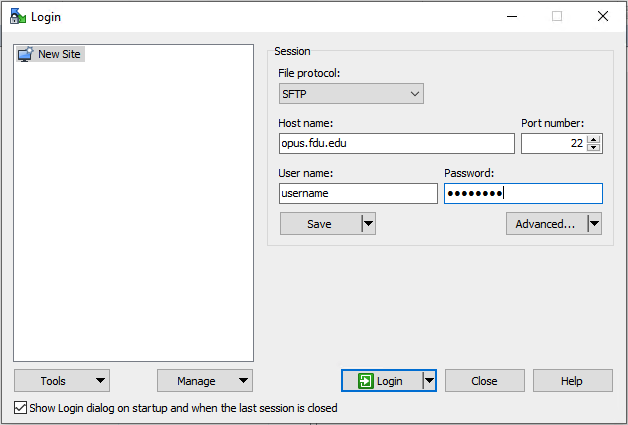
  2. In the login window, click “New Site“
  1. Fill out the information as follows:
    • Host name: Enter opus.fdu.edu
    • User name: (username on FDU Linux servers will be the part of your FDU NetID to the left of the @ sign)
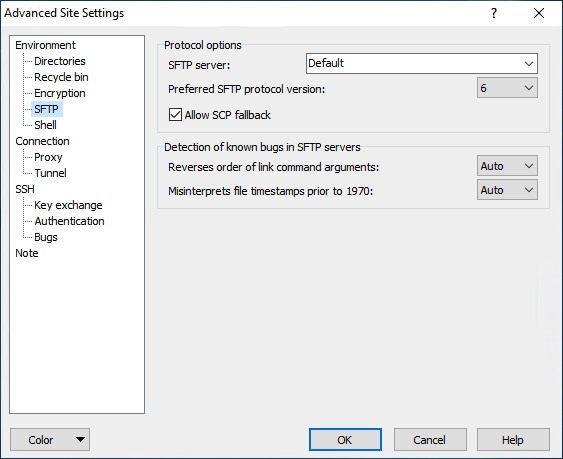
  2. Click “Advanced…”
    • Select “Environment > SFTP” and enable “Allow SCP fallback“
  1. Click “OK“
  2. Click “Save“, enter a name for the connection, and click “OK“
  3. In the WinSCP login window, select the connection name and click “Login“

Option 2:

Install Putty, which also includes PSCP (SCP for Windows) and SFTP (SFTP for Windows):

Download Putty

​Please select the latest version of MSI (‘Windows Installer’) for your computer (32-bit or 64-bit)

Optionally you may choose to download only “pscp.exe“(SCP for Windows) or “psftp.exe” (SFTP for Windows) and copy into the folder where you need to use it.

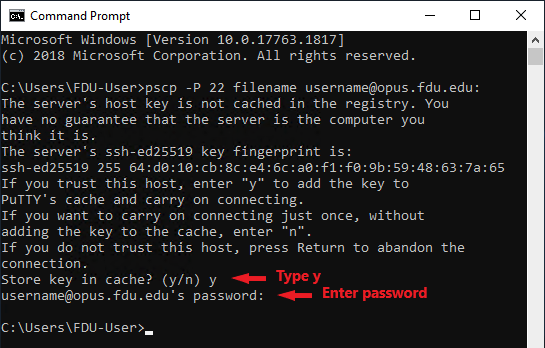
Once you have installed your program of choice, you’ll be able to launch each command from the Command Line of Windows.

pscp -P 22 filename username@opus.fdu.edu:
psftp username@opus.fdu.edu

Note

You may need to accept the server’s host key the first time you connect the Linux server.

Last Modified:

Use SSH to Log into Opus Linux Server

Resources for:
icon Close

Accessing the Opus server

The Opus server can be access using secure transport protocols such as SSH and SFTP. Access is only allowed from campus networks. All off campus users will need to access Opus using FDU’s Virtual Private Network (VPN) to use the Opus server

What’s SSH?

SSH stands for Secure Shell, which was invented in 1995 to replace the insecure Telnet (Telecommunication Network). It’s now the primary way for system administrators to securely log into remote Linux servers over the public Internet. Although it looks and acts the same as Telnet, all communications over the SSH protocol are encrypted to prevent packet sniffing.

Linux / Mac

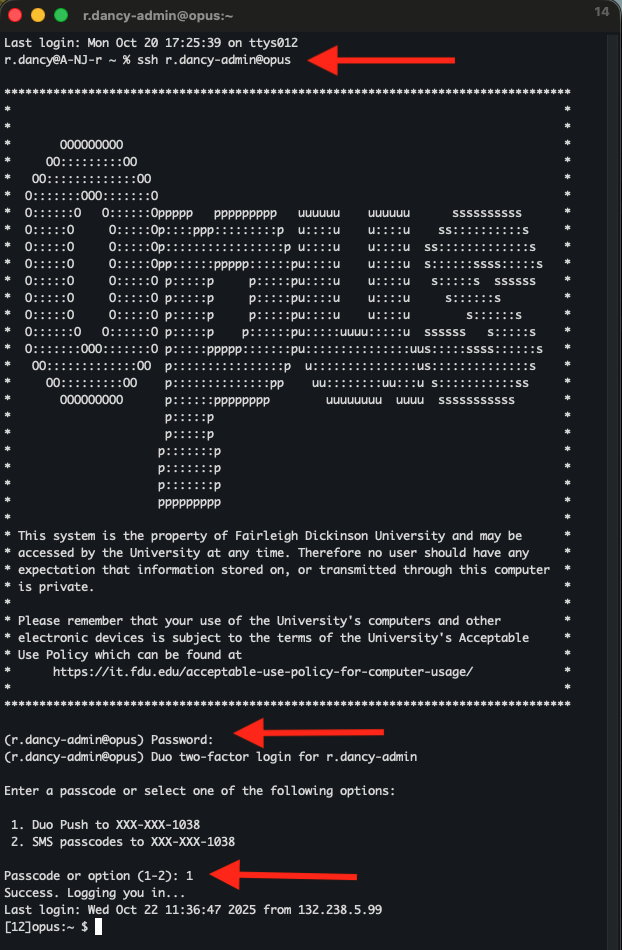
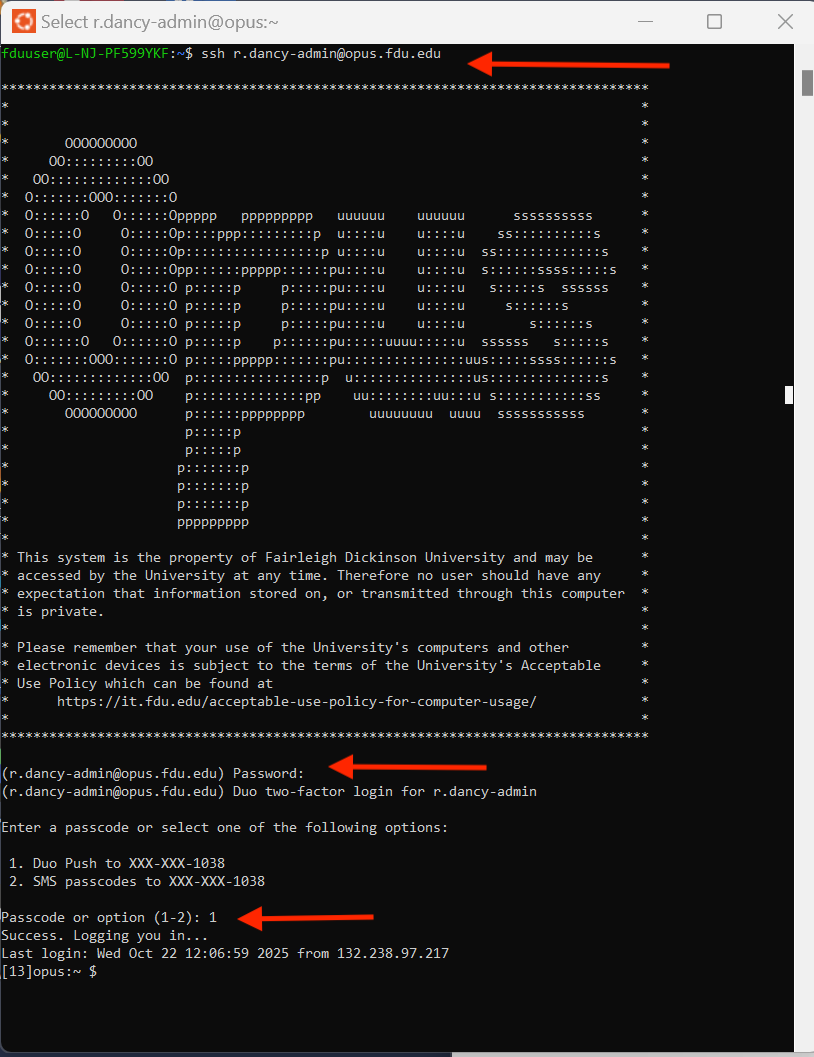
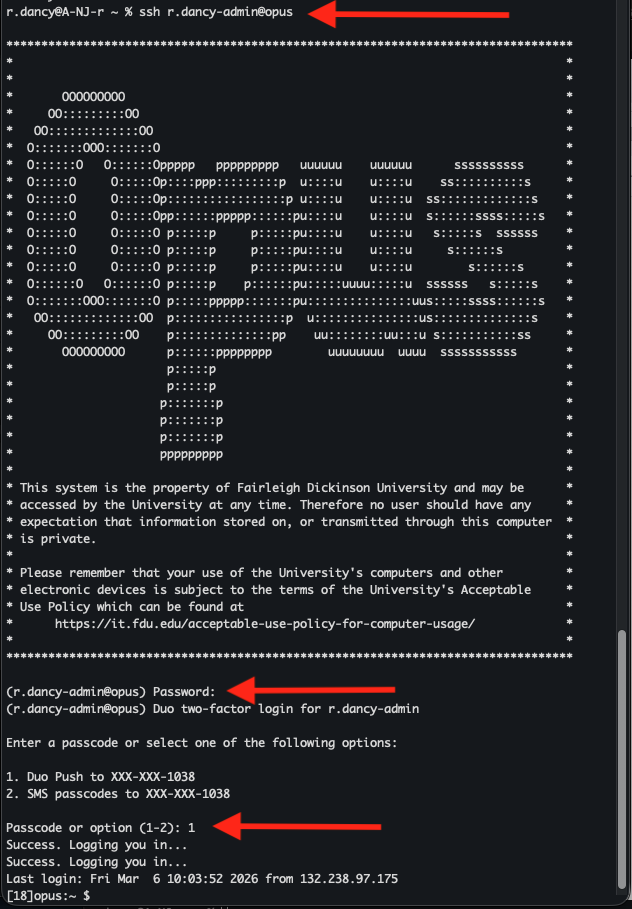
If you are running a Linux or Mac computer, SSH client is installed by default. You can open up a terminal window and run the ssh command like below to connect to a remote Linux server.

ssh username@opus.fdu.edu

or

ssh username@132.238.2.116

After your initial login, you’ll be prompted for multi-factor authentication (MFA). Enter the passcode from your Duo app or enter the on-screen number to initiate Duo Push.

Now let’s discuss how to use SSH on Windows.

Windows

Method 1: Windows 11’s Built-in SSH Client

The Microsoft PowerShell team decided to port OpenSSH (both the client and the server) to Windows in 2015. It finally arrived in Windows 10’s Fall Creator Update in 2017 and is enabled by default in the April 2018 Update.

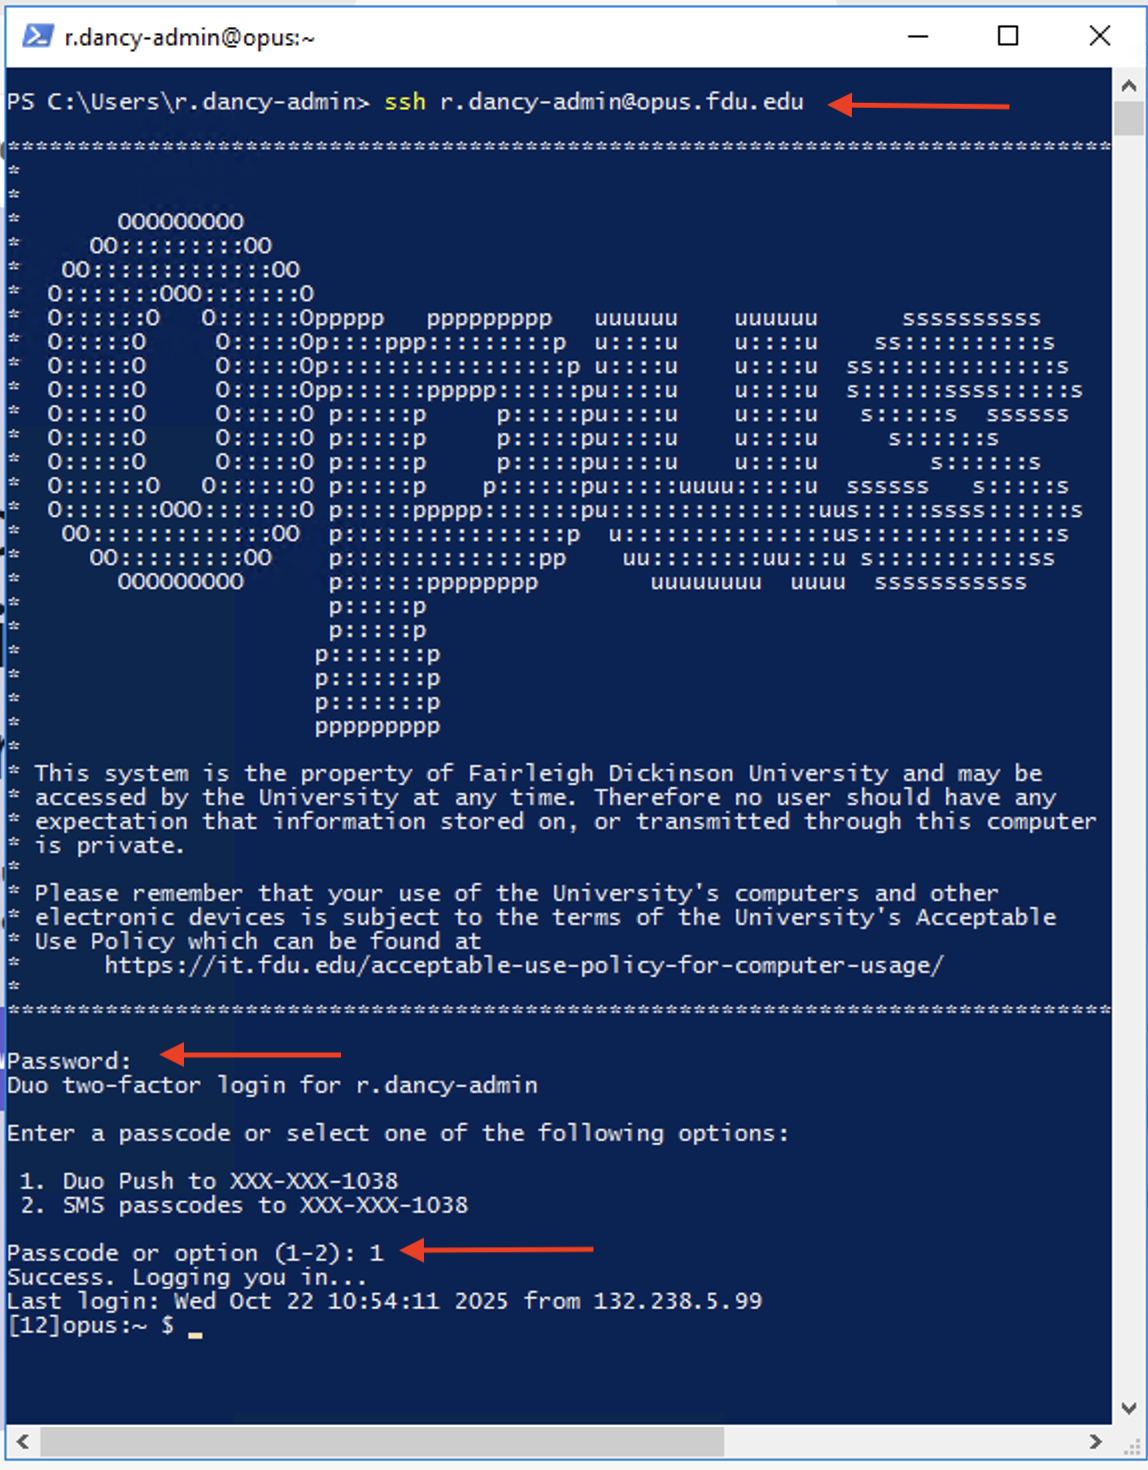
To use the OpenSSH client on Windows 11, simply open a PowerShell window or a command prompt window and run the ssh command. For example, if I want to connect to the Opus Linux server on the FDU network, I would run

ssh username@opus.fdu.edu

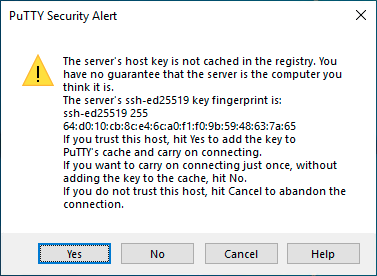
username on FDU Linux servers will be the part of your FDU NetID to the left of the @ sign (username@fdu.edu becomes just username) and opus.fdu.edu is name the Linux server you want to access (The IP address of the Linux server can also be used). The first time you connect to a Linux computer, you will be prompted to accept the host key. Then enter your password to login. After login, you can run Linux commands to do tasks.

Note

If you want to paste a password into the PowerShell window, you need to right-click the mouse and press Enter.

After your initial login, you’ll be prompted for multi-factor authentication (MFA). Enter the passcode from your Duo app or enter the on-screen number to initiate Duo Push.

To log out from the Linux box, run the “exit” command or press “Ctrl+D“.

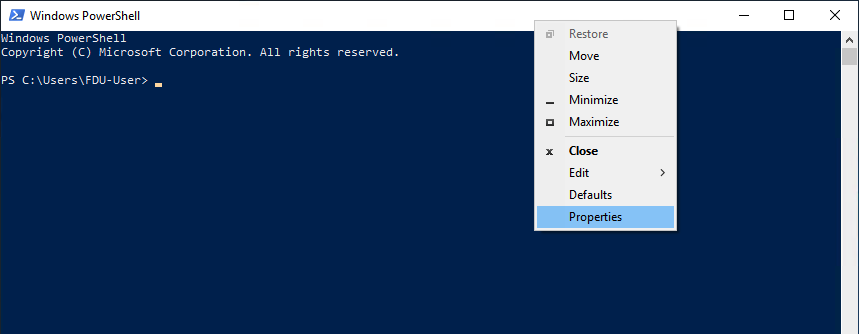
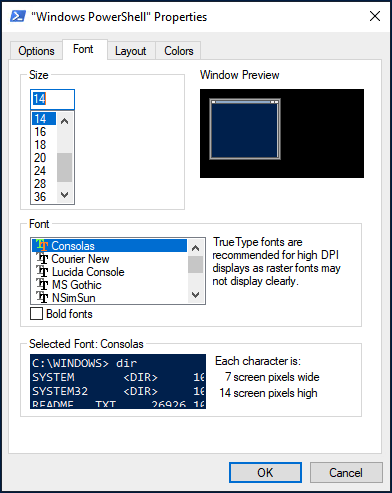
The default font size in PowerShell Window is very small. To change it, right-click the titlebar and select properties, then you can change the font size, and the background color.

Method 2: Use SSH in Windows Subsystem for Linux

Windows Subsystem for Linux (WSL) enables you to run native Linux command-line tools directly on Windows 11. If you are a system administrator, WSL is probably an overkill for just using SSH because it would install and run a Linux distro (without graphical user interface) on your Windows 11 desktop. WSL is created for web developers or those who need to work on open-source projects. You can use not only SSH but also other Linux command line tools (Bash, sed, awk, etc).

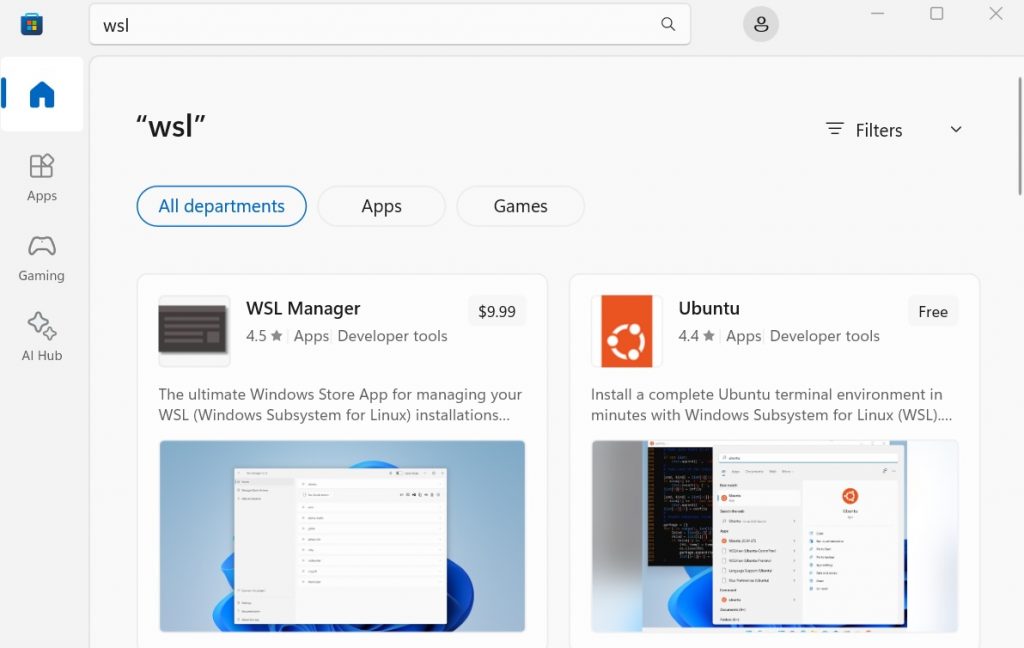
Open the Microsoft Store and enter “WSL” in the search box. Select Run Linux on Windows and install a Linux distro of your choice.

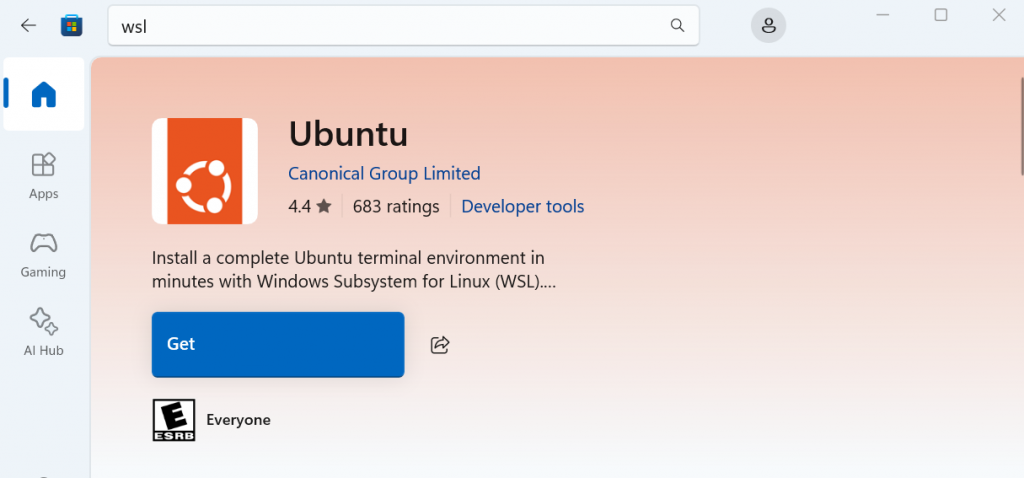
For example, I choose “Ubuntu” and click the “Get” button to install it.

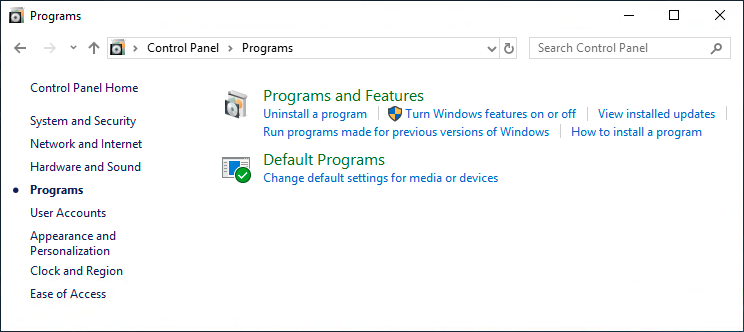
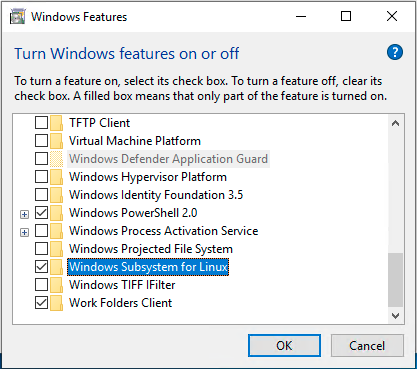
Once your Linux distro is installed, open the Control Panel and select Programs => Turn Windows features on or off. Tick on the checkbox of Windows Subsystem for Linux to enable this feature. (You may need to reboot your Windows PC for this change to take effect.)

Next, you can launch the Linux distro from the start menu by search the distro’s name. The first time you launch it, you need to create a user and set a password.

After that, you can use the ssh command like below to connect to a Linux server or PC that runs a SSH server.

ssh username@opus.fdu.edu

After your initial login, you’ll be prompted for multi-factor authentication (MFA). Enter the passcode from your Duo app or enter the on-screen number to initiate Duo Push.

Method 3: Use Putty

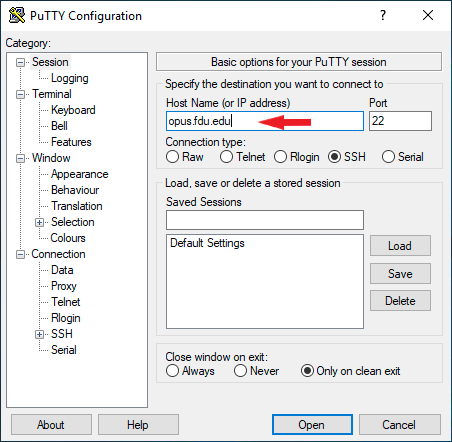
Putty is a well-known and the most popular SSH client on Windows before the arrival of Windows OpenSSH client and Windows Subsystem for Linux. To use SSH with Putty, you need to download the Putty program from the official website and install it.

Launch Putty from the Start menu. Then enter the IP address or hostname of the Linux box and click the Open button to connect to it.

Accept the host key and you will be prompted to enter the username and password.

After your initial login, you’ll be prompted for multi-factor authentication (MFA). Enter the passcode from your Duo app or enter the on-screen number to initiate Duo Push.

Tip

When you type in your password, the cursor doesn’t move, but it’s actually accepting your password. To paste text into Putty, first press Ctrl+C to copy the text, then go to Putty window and press the right-button of your mouse.

Last Modified:

Use The FDU Shared Drive Management Portal

Resources for:
icon Close

Introduction

This document provides information about the use of the FDU Shared Drive Management Portal. It describes navigation of the website in detail to facilitate proper use of this resource.

Logging In

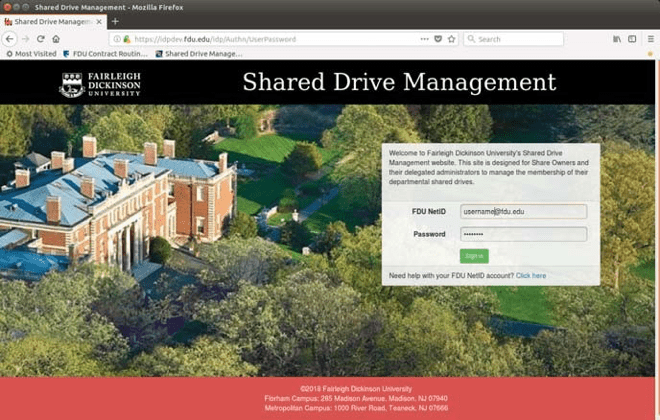
To access the Shared Drive Management Portal, navigate to this URL to login: sharemanagement.fdu.edu

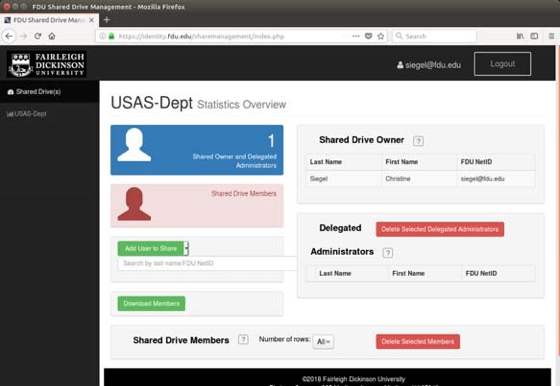
Once you have logged in with your NetID, you will see a list of the shares you own or have been given authorization to manage in the left‐hand column. If you are the owner of the share, your name will appear in the panel on the right side under “Shared Drive Owner”. If you are not the share owner, your name will be listed on the right side panel under “Delegated Administrator”. To switch between shares you manage, select the appropriate share name from the list in the left side panel.

Note

Underneath the Shared Drive Owner information, you will see an area for Delegated Administrator information. Delegated Administrators are people you wish to grant the ability to add and/or delete Shared Drive Members. It is important to understand that while a Share Owner can delegate membership responsibilities to others, the Share Owner is always the primary person responsible for the management of any Personal Information or Protected Health Information contained within that share.  The Share Owner has the sole accountability for the data managed and viewed within their share.

Adding Members and Delegated Administrators

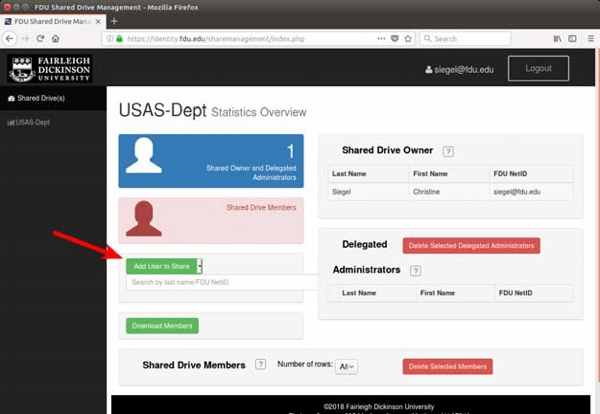
To add a member to the share, click on the down‐arrow at the right of the “Add User to Share” button and choose the type of user you would like to add from the drop‐down menu. You can choose from Employee, Administrator, or Student. Then, enter either the last name or the FDU NetID of the person you would like to add into the text box. If more than one name appears, choose the person you want to add.

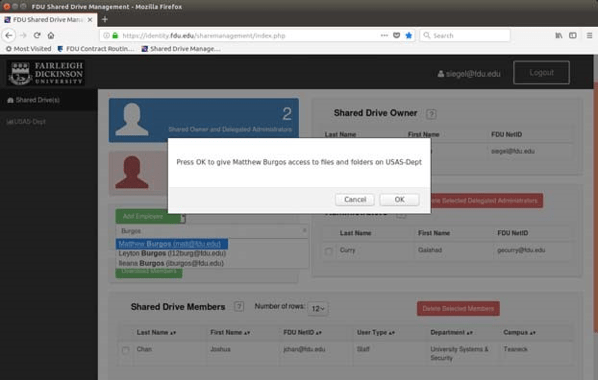
A pop‐up window will appear asking you to confirm or cancel the add.

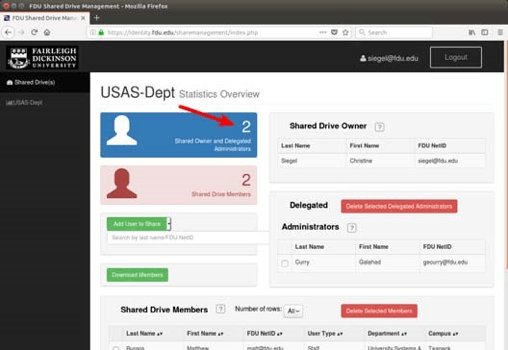
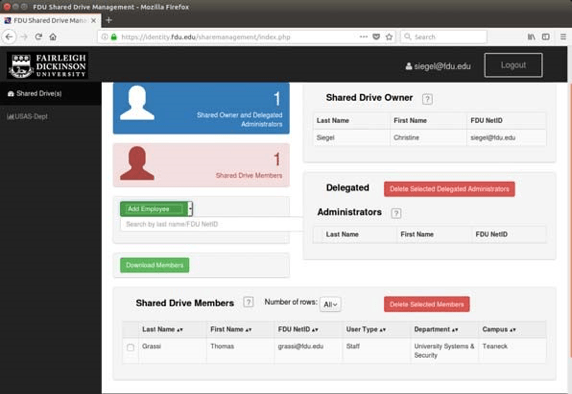
The individual’s information will be added to the list of members at the bottom of the page. When you add Delegated Administrators, they will appear in the list to the right, and the Owners/Administrators count will increase. It is important to note that Delegated Administrators can not add additional Delegated Administrators.

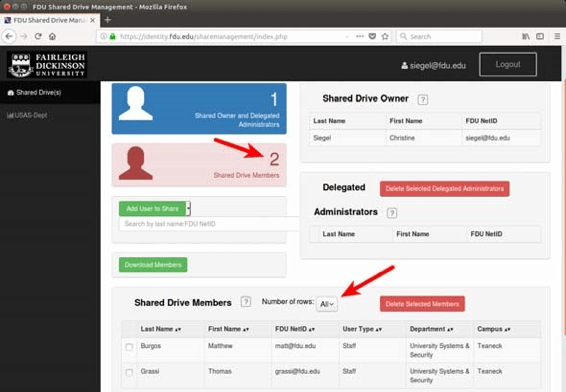
As you add more members or Delegated Administrators, the count of members for each will increase. When viewing members of a share, the “Number of rows:” menu can be used to select 12, 24, 36, or All rows to view.

Currently, all Shared Drive Members are granted Read/Write access to the contents of the Share. Future updates to this application will allow you to choose Read Only or Read/Write access rights to each new Member. Meanwhile, the Share Owner can contact University Systems and Networking at help@fdu.edu to request Read Only access for a new member.

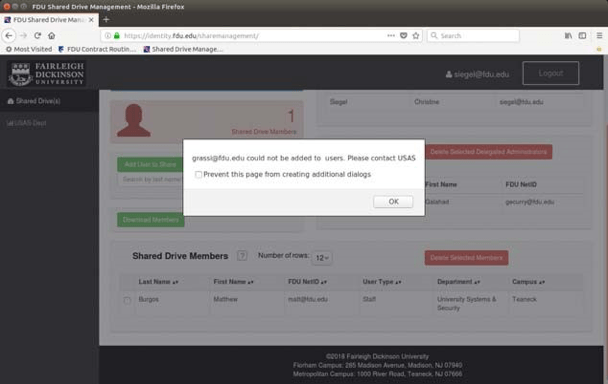
From time to time, a Share Owner or Delegated Administrator might try to add a new member to a drive to which an existing drive letter cannot be assigned. If that happens, the following message will appear, and the Share Owner or Administrator will need to contact the SAMI Service Desk to have that member added.

Deleting Members

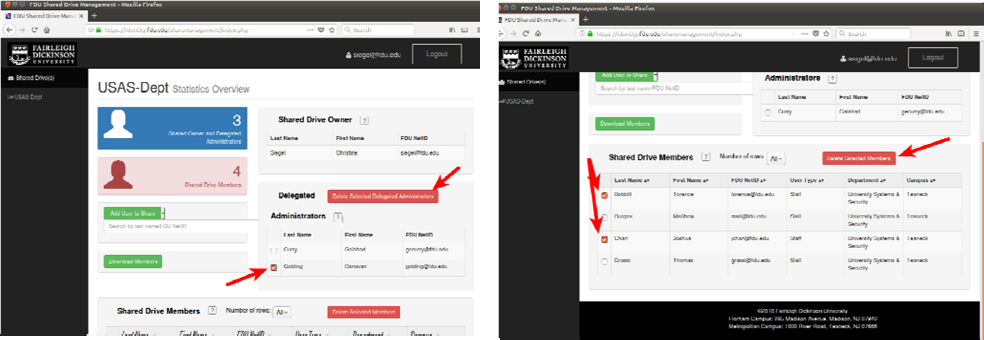
You will notice a check‐box to the left of each Administrator and Member of the share. To delete an Administrator or a Member, click the check‐box next to it. You can click on multiple check‐boxes. When you have selected all the Members or Delegated Administrators you wish to delete, click on the “Delete Selected Delegated Administrators” or “Delete Selected Members” button to delete all the selected Administrators/Members. The lists and the counters will be updated to reflect the change. It is important to note that Delegated Administrators can not delete other Delegated Administrators.

Downloading Members

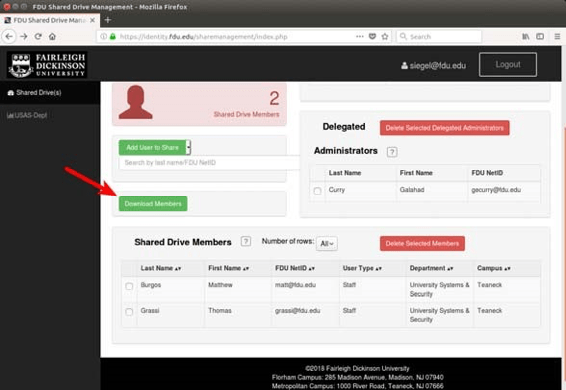
To download a list of Shared Drive Members in .csv format, click on the “Download Members” button.

A new file will be placed in your Downloads folder called “ShareDriveMembers.csv”. When imported into a spreadsheet application, it will look similar to this (you will see the actual FDU NetID).

Requesting a New Shared Drive

To request a new Shared Drive, please follow the link below:

Last Modified:

Using Google Takeout

Resources for:
icon Close
Google Takeout logo, with icons of several Google services being packed into a box.

Google Takeout is a tool developed by Google that allows you to export and download a copy of various types of data currently stored in your Google account, such as Drive or Mail. You can store the data locally on your computer or upload it to another third-party cloud storage service. This document provides instructions for getting started with Google Takeout and using it in common scenarios.

Note

Google Takeout does not maintain sharing or permissions on files and folders that are exported.

Your export request can take anywhere from a few minutes to several days to process, depending on the type and amount of data being exported, and the number of users using the tool simultaneously.

Google provides this service “as is” and without administrative support. The IT department at FDU cannot diagnose or assist with problems you might encounter.

Getting Started

To begin, decide which types of data you want to export from your FDU Google account. For example, Google Takeout lets you pick which folders in Drive to export if you do not want to copy your entire Drive. In this case, organize the Drive files you want to export into folders you can easily select before starting the export process.

Tip

It is recommended to separate your exports into individual requests by service. For example, create one request for Gmail data and another for Drive data. If one of the services fails during the export, Google Takeout will cancel the entire export, and you will have to restart the process.

After deciding on the types of data you want to export and organizing them appropriately, you can proceed with logging in to the tool.

  1. Go to Google Takeout using the link below (it is recommended to use the Google Chrome browser)

Google Takeout

  1. Enter your “@student.fdu.edu” email address if prompted, then click “Next”
    • You will be redirected to the FDU NETID login, where you should log in with your FDU credentials and authenticate with two-factor authentication if prompted

Once logged in, Google services that have your data will be automatically selected on the Google Takeout page.

  • If you want to manually pick and choose the data to export, follow the on-screen instructions
  • For specific scenarios, refer to the sections that follow in this document, which provide instructions for exporting and downloading data from Google Drive, Mail, and other Google services like Calendar, Contacts, and Photos

Important

The exported data may not include recent changes made between the time the export is requested and when it is ready to download.

Learn more about the data limitations in Google’s support documentation:

Google Takeout Documentation

Export Google Drive (My Drive) Files

If you want to export and download only your Google Drive files to your personal computer or other non-FDU storage services, follow these instructions:

  1. Follow the instructions in the “Getting Started“
  2. Click “Deselect all” in the upper-right corner of the Products section
  3. Scroll down until you find “Drive” and then press the check box beside “Drive“
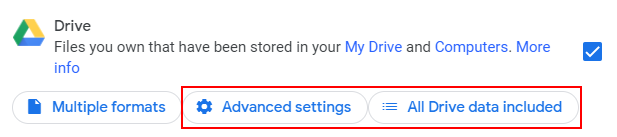
  4. Click “Advanced settings,” then check both options under “Additional Files” and click “OK“
  5. Click “All Drive data included”
    • You can keep all files and folders selected or select specific folders you prefer to export
    • Click “OK“
  1. Scroll to the bottom and click “Next step“
  2. Leave “Frequency” set to “Export once“
  3. Adjust the “File type & Size” settings as needed (defaults are .zip and 2GB)
  4. Click “Create export“

A confirmation of your choices and the expected start date for the export will be displayed.

Note on Drive Files

  • For every file, you will notice a .JSON file. The .JSON file contains all the metadata for each file, including the creation date, modification date, and permission information. The file itself (not the .JSON one) does not contain the associated metadata except the creation date. (The .JSON format is a simple text format that can be read by any text editor or word processor)

Refer to “Download My Google Files” section below for additional information on what happens next and how to proceed after submitting your Takeout data export request.

close
Export Your Google Data to a Personal Dropbox

To export your Google data to a personal (non-FDU) Dropbox account, follow these instructions:

  1. Follow the instructions in the “Getting Started” section
  2. Click “Deselect all” in the upper-right corner of the Products section
  3. Scroll down and find “Drive” then check the box beside “Drive“
  4. Click “Advanced settings“, then check both options under “Additional Files“
  5. Click “OK“
  1. Click “All Drive data included”
  2. Choose the folders to export if necessary, then click “OK“
  3. Select “Add to Dropbox” from the “Destination” drop-down menu
  4. Leave “Frequency” set to “Export once“
  5. Adjust the “File type & size” settings as needed (defaults are .zip and 2GB)
  6. Click “Link accounts and create export“
  7. Log in to your personal Dropbox to give Google access to export
    • After authorization, your export will either be “in progress” or “completed“

Refer to “Download My Google Files” section below for additional information on what happens next and how to proceed after submitting your Takeout data export request.

close
Export Your Google Mail

To export and download only your Google Mail to your personal computer:

  1. Follow the instructions in the “Getting Started” section
  2. Click “Deselect all” in the upper-right corner of the Products section
  3. Scroll down and find “Mail” then check the box beside “Mail“
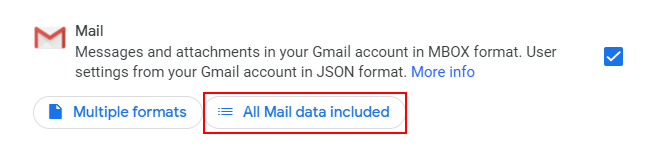
  4. Click “All Mail data included”
    • You can keep all messages or select specific labels to export
    • Click “OK“
  1. Scroll down and click “Next step“
  2. Leave “Frequency” set to “Export once“
  3. Adjust the “File type & size” settings if necessary (defaults are .zip and 2GB)
  4. Click “Create export“

A confirmation and the expected start date for the export will be displayed.

Note on Google Mail

  • Google Takeout provides email in the .MBOX format. The .MBOX format is a simple text format that can be read by any text editor or word processor (like Microsoft Word). This can be useful if you only need to keep your email for archival purposes. You can also import the .MBOX files into any third-party mail client that supports the format or special purpose programs for transferring email between accounts

Refer to “Download My Google Files” section below for additional information on what happens next and how to proceed after submitting your Takeout data export request.

close
Export Other Google Data

If you want to export data from other Google services, such as Calendar, Photos, or Contacts follow these instructions:

  1. Follow the instructions in the “Getting Started” section
  2. Click “Deselect all” in the upper-right corner of the Products section
  3. Scroll through the list and check the services whose data you’d like to include
  4. Adjust settings for each service as needed:

Calendar

  • Check the box beside “Calendar“
  • Click “All calendars included“
  • The tool will display all calendars you created in Google Calendar. You can either keep them all selected or click “Deselect all” and select specific calendars you’d prefer to export
  • Click “OK“

Contacts

  • Check the box beside “Contacts“
  • Click “vCard format”
  • The tool will give you the option to choose which file format you’d like to use to export your contacts. If you intend to use the export with macOS or iOS devices, then keep the default vCard format setting. Otherwise, click the drop-down menu and select “CSV” for use with Microsoft Outlook or another personal Google account
  • Click “OK“

Photos

  • Check the box beside “Google Photos“
  • Click “All photo albums included”
  • The tool will display all the albums you have in your account. You can either keep them all selected or click “Deselect all” and select specific albums you’d prefer to export
  • Click “OK“
  1. Scroll to the bottom and click “Next step“
  2. Leave “Frequency” set to “Export once“
  3. Adjust the “File type & size” settings as needed (defaults are .zip and 2GB).\
  4. Click “Create export“

Note for Contacts

  • Google Contact files will either be in the .VCF or .CSV file format, depending on which format you chose while going through the Takeout process
    • .VCF is best for macOS or iOS apps
    • .CSV is best for Microsoft Outlook or another personal Google account
  • Your download may include multiple folders, representing different sources of contacts. Each folder will contain the images that are included with each contact (.JPG files) and a single .VCF or .CSV file containing the actual contacts
  • Although the download includes the contacts’ profile pictures, they are not associated with the corresponding contacts and may or may not appear when you import the .VCF/.CSV files, which is dependent on the program that is importing them

Note for Google Photos

  • For every file, you will notice a .JSON file. The .JSON file contains all the metadata for each file, including the creation date, modification date, and permission information. The file itself (not the .JSON one) does not contain the associated metadata except the creation date. (The .JSON format is a simple text format that can be read by any text editor or word processor)

A confirmation and the expected start date for the export will be displayed.

Refer to “Download My Google Files” section below for additional information on what happens next and how to proceed after submitting your Takeout data export request.

close

Download My Google Files

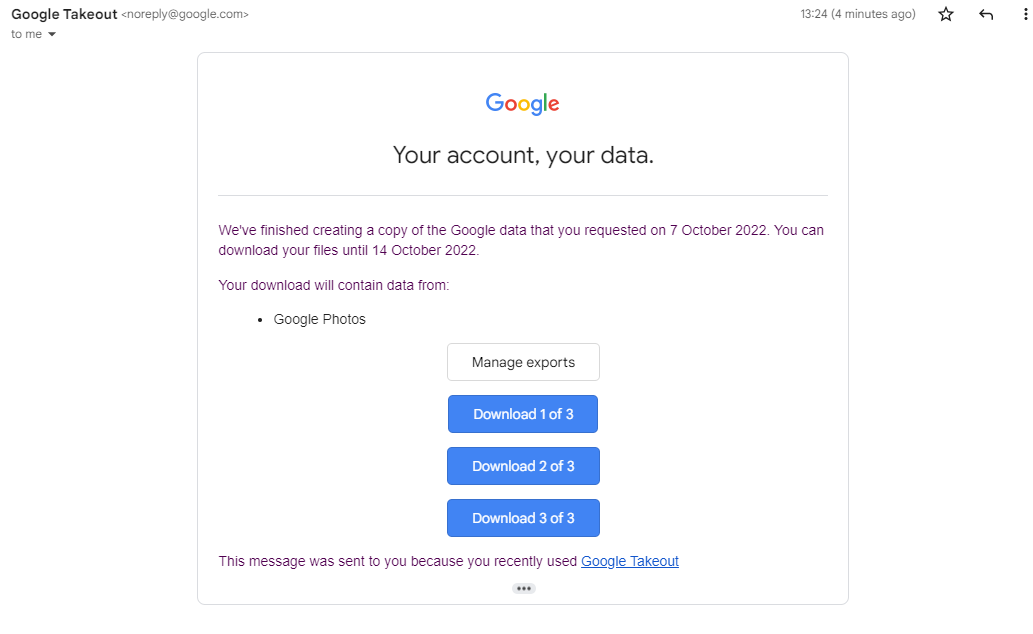
Your export request may take a few minutes to several days to complete. FDU IT has no control over this process. Wait until you receive an email from noreply@google.com (example below) with a link for downloading or viewing your data.

Caution Caution
Avoid retrying the same Takeout request while it is processing, as it will create duplicates and may cause confusion. You can submit separate requests for other data types if needed.

Ensure that your Google Takeout data matches the original data in your FDU Google account. If data is missing, you may retry the process or manually download your files.

Important

Google Takeout does not delete data from your FDU account. You will need to manually delete any data you no longer need after exporting.

Last Modified:

Vancouver Time Zone Change

Resources for:
icon Close

Vancouver will remain on UTC−07:00 year-round. On Sunday, November 1, 2026, clocks in Vancouver will not move back one hour. Restart your devices before November 1 and check upcoming meetings to help prevent scheduling errors.

What OIRT Is Doing

Windows computers: OIRT is setting up University-managed Windows computers to use a temporary time zone that matches Vancouver’s year-round UTC−07:00 offset. Your computer may show Yukon Standard Time or an IT-configured Mountain Standard Time setting. After OIRT installs Microsoft’s official update, your computer will automatically switch to the new Pacific Time British Columbia setting.

Mac computers: Your Mac will receive Apple’s updated time zone information after you install the required updates and restart. Keep Vancouver selected as your location.

Step 1: Restart Your Devices Before November 1

  1. Save your work and restart your computer to finish installing pending updates and applying time zone changes
  2. Install available updates and restart any phones and tablets you use for University email or calendars

Step 2: Check Your Computer Time Zone

For Windows

  1. Open “Settings” > “Time & language” > “Date & time”
  2. Check that the temporary Yukon option shows UTC−07:00. The British Columbia option should appear after OIRT installs the official update
  3. Contact the IT Service Desk if the setting looks incorrect; do not change the clock manually

For macOS

  1. Open “System Settings” > “General” > “Date & Time”
  2. Confirm that your device uses Vancouver and automatic date and time settings

Warning Warning

Do not select a generic Mountain Time option yourself. Some Mountain Time settings still change seasonally and will not match Vancouver throughout the year.

Step 3: Review Your Outlook Settings

Classic Outlook for Windows generally uses your computer’s time zone. If you set the Outlook time zone manually, select “(UTC−07:00) Yukon” while FDU uses the temporary setting.

Outlook on the web and new Outlook have separate calendar settings.

  1. Open “Settings” > “Calendar” > “View” > “Time zones” and verify the display time zone
  2. Select “(UTC-07:00) Pacific Time (British Columbia)” as the display time zone

Outlook for Mac: Updating macOS may not resolve every Outlook calendar issue. If Outlook for Mac shows inconsistent meeting times, use Outlook on the web to review or correct the affected meetings.

Step 4: Review Meetings Beginning November 1

Updating your devices may not correct meetings that are already scheduled.

  1. Check appointments and recurring meetings, especially those with colleagues outside British Columbia
  2. For meetings you organize, verify the intended time and time zone, send corrections when necessary, and recheck room reservations
  3. Ask the organizer to correct invitations you received

After November 1

  1. Confirm that your device clock and important meeting times are correct
  2. Restart again if your clock is wrong
  3. If clock errors, missing calendar availability, or inconsistent meeting times continue, contact the FDU IT Service Desk. Include your device type, Outlook version, selected time zone, and an example of the problem.

FAQ

  • No. Vancouver will stay on UTC−07:00. Let your IT-managed time zone settings control the clock.

  • Yukon uses UTC−07:00 year-round, so it matches Vancouver while OIRT installs the British Columbia time zone update.

  • The time difference between Vancouver and places that still change their clocks will vary during the year. Confirm the intended local time with the organizer instead of assuming the time difference will stay the same.

Last Modified:

Vendor Access Policy for Networking & Computing

Resources for:
icon Close

As the demand for access by on-site vendors increases, Fairleigh Dickinson University has created a Vendor Access Policy for Networking and Computing. The intent of the policy is to define the categories of non-employees that are on our campuses and provide rules and guidelines around their networking & computing needs. All business units should utilize the Contract Review Process which has been instituted by the Office of the General Counsel prior to initiating any of the below processes. Fully executed contracts that have been reviewed and approved may be requested by members of OIRT prior to providing any access for the non-employees below.

Effective Date: 3/1/2023
Last Revision: 1/14/2024

Contractors/Consultants

The University employs individuals from companies that perform work on behalf of the University and expressly for the University. Examples could be an employee from a staffing agency working within IT to augment the staff in assisting with a series of projects, or an individual hired from an agency to work within Human Resources to assist in processing forms. These individuals are hired under contracts and are held tothe terms and conditions of those contracts. In most cases, working as part of the University, these individuals need computing functionality identical to those of university hired staff, as they are acting on behalf of the University & fulfilling a role specific to the University. All work done by these individuals is part of the university’s data property, and therefore, these individuals should be provided with University issued devices such as desktop/laptop computers, landline phone extensions, etc.

Individuals hired from companies outside of the University to conduct business on behalf of the University must meet the following guidelines and are provided with the following access:

  1. The hiring manager or department head must complete an HR Personal Information Notice (PIN) to begin the process.
  2. Contractors/Consultants will always be issued a University NetID in the format of Firstinitial.Lastname@v.fdu.edu.
  3. Once the NetID has been created & communicated to the hiring manager, a Vendor Employee Technology Form must be completed if the contractor/consultant needs access to certain FDU systems. The form to be found in the Staff and Faculty Forms tile of SAMISupport.

SAMI Support

  1. All Contractors/Consultants are required to complete the Written Information Security Program (WISP) training immediately after an account is provisioned. Validation of completion is needed within the first 30 days.
    1. WISP training reminder on day 15
    2. WISP training daily reminder every day after day 15
    3. Disable account day 30 with an email sent to the manager
  2. All contractors/consultants must read and accept the following additional policies:
    1. Policy for the acceptable use of email
    2. Acceptable use policy for computer usage
    3. FDU alert policy
    4. Password policy
  3. Contractors/Consultants will be able to sign up for FDU Alert through Colleague Self-Service. Instructions can be found here:
  1. Contractors/consultants issued a university managed laptop/desktop are entitled to an email address without the vendor designation at the request of the hiring manager. This would be requested by the manager through the Vendor Employee Technology Form by clicking the “Convert Vendor NetID” box.

Note

It is strongly recommended that contractors/consultants be issued University managed equipment. Access to certain systems may be denied if personal equipment is used.

  1. Contractors/consultants must be terminated at the end of their contract using the same methodology utilized for current faculty and staff. It is the unshared responsibility of the managing department to submit termination paperwork per the HR process for any contractor/consultant who had been issued a NetID.

Volunteers

The University utilizes volunteers in non-paying positions during the school year. Examples of these roles include but are not limited to preceptors & chaplains. These individuals do not need access to any University systems with the exception of email. As such, they need access to Internet services & email but they do not require an FDU managed laptop/desktop.

Volunteers must meet the following guidelines and are provided the following access:

  1. Volunteers will be issued a NetID in the format of Firstinitial.Lastname@v.fdu.edu to be able to authenticate to FDU’s wireless network (and wired network in the future).
  2. Volunteers are required to complete the Written Information Security Program (WISP) training immediately after an account is provisioned. Validation of completion is needed within the first 30 days.
    1. WISP training reminder on day 15
    2. WISP training daily reminder every day after day 15
    3. Disable account day 30 with an email sent to the manager
  3. All volunteers must read and accept the following additional policies:
    1. Policy for the acceptable use of email
    2. Acceptable use policy for computer usage
    3. FDU alert policy
    4. Password policy
  4. Volunteers will be able to sign up for FDU Alert through Colleague Self-service. Instructions can be found here:
  1. All volunteer accounts will expire at the end of the fiscal year and must be renewed by their FDU manager by completing a PIN form.
  2. Volunteers must be terminated at the end of their contract using the same methodology utilized for current faculty and staff. It is the unshared responsibility of the managing department to submit termination paperwork per the HR process for any contractor/consultant who had been issued a NetID.

On-Campus Vendors

The University outsources various functions to entities (Vendors) that operate independently but work exclusively on our campuses and provide services for our faculty, staff & students. These employees are individually managed by their corporate entities and are largely held accountable by their corporate management.

While on campus, employees of these vendors might need access to the Internet to interact with their corporate websites or communicate with their corporate managers. In many cases today and in most all cases in the future, these employees will need to authenticate through the University’s network in order to conduct their business. The University has established a process whereby the Fairleigh Dickinson University department responsible for that vendor completes the Human Resource forms necessary in order to create a non-employee record within our Colleague system.

Employees of on-campus vendors must meet the following guidelines and are provided the following access:

  1. Vendor employees will be issued a NetID in the format of Firstinitial.Lastname@v.fdu.edu to be able to authenticate to FDU’s wireless network (and wired network in the future).
  1. Vendor employees will be able to add their contact information to FDU Alert by sending an email to fdunotify@fdu.edu
  2. All vendor employee accounts will expire at the end of the fiscal year and must be renewed by their FDU manager by completing a PIN form.
  3. Vendor employees must be terminated through FDU’s systems when they either are removed from their assignment at Fairleigh Dickinson University or are terminated by their employer using the same methodology utilized for current faculty and staff. It is the unshared responsibility of the managing department to submit termination paperwork per the HR process for any contractor/consultant who had been issued a NetID.

Elevated Vendor Privileges

From time to time, the employee of an on-campus vendor might have justification for having access to FDU email or a need to access systems and/or applications that reside behind FDU’s firewalls. If such a case is identified, the FDU department responsible for that vendor would need to contact the Director of Systems with a formal request for additional vendor access. The FDU department must present solid business justification for the elevated access. The Director of Systems will review each request and either approve or reject the request based on business needs and security posture. The Director of Systems might consult with the Data Security & Incident Response Team before providing an answer.

Employees of on-campus vendors approved for elevated access must meet the following guidelines and are provided the following access:

  1. Vendor employees will be issued a NetID in the format of Firstinitial.Lastname@v.fdu.edu to be able to access FDU’s wireless network (and wired network in the future).
  2. All vendor employees are required to complete the Written Information Security Program (WISP) training immediately after an account is provisioned. Validation of completion is needed within the first 30 days.
    1. WISP training reminder on day 15
    2. WISP training daily reminder every day after day 15
    3. Disable account day 30 with an email sent to the manager.
  3. Vendor employees will be able to sign up for FDU Alert through self-service. Instructions can be found here:
  1. All vendor employees with elevated access must read the following additional policies:
    1. Policy for the acceptable use of email
    2. Acceptable use policy for computer usage
    3. FDU alert policy
    4. Password policy
  2. If the vendor employee needs to access FDU systems and/or applications, issuance of a University managed laptop/desktop may be required. This would be at the expense of the requesting department.
  3. Upon departmental request, vendor employees will only be provided access to the specific University Systems and applications approved by the Director of Systems.
  4. All vendor employee accounts will expire at the end of the fiscal year and must be renewed by their FDU manager by completing a PIN form.
  5. Vendor employees must be terminated through FDU’s systems when they either are removed from their assignment at Fairleigh Dickinson University or are terminated by their employer using the same methodology utilized for current faculty and staff. It is the unshared responsibility of the managing department to submit termination paperwork per the HR process for any contractor/consultant who had been issued a NetID.

Last Modified:

Vendor Security Assessment

Resources for:
icon Close

This Vendor Cybersecurity Assessment Form is designed to evaluate and assure the strength and comprehensiveness of the cybersecurity practices followed by our vendors. By completing this form, the FDU Point of Contact will help us to understand the existing cybersecurity measures better, identify potential areas of vulnerability, and maintain a reliable, secure network within our FDU ecosystem. This rigorous assessment is crucial in our broader cybersecurity strategy, minimizing risks and fortifying data security.

Warning Warning

The form below is not compatible with dark mode. For an optimal experience, disable dark mode either in your device’s system settings or directly from the FDU IT website.

Last Modified:

Wired Network Requirements for Labs, Desktops, and Digital Displays

Resources for:
icon Close

Computing equipment in University computer labs, desktop computers assigned to employees or student workers, and all digital displays must connect to the FDU network through a wired (Ethernet) connection. This requirement applies across all departments and campuses. Laptop computers are not covered by this policy.

Why Wired Ethernet Is Required

University computer labs are provisioned for wired connectivity. Consistent performance and dedicated bandwidth help maintain standard system images, deliver software updates and security patches, and support sustained data transfers. Wireless connectivity does not meet these requirements for lab and desktop environments.

Wired and Wireless Connections

Wired Ethernet

A wired connection uses a physical Ethernet cable to connect a device to the network through a switch or router, which provides access to the internet.

Advantages

  • Typically faster and more consistent speeds.
  • Lower latency, which benefits real-time applications.
  • A wired connection is generally more secure because it is harder to intercept.
  • Unaffected by Wi-Fi congestion or radio interference.
  • Reliable for large file transfers and critical systems.

Tradeoffs

  • Requires physical cabling and is less flexible.
  • Cabling, labor, and infrastructure can make installation more costly.
  • Less convenient for mobile devices.
  • Equipment can be harder to move or reconfigure.

Wireless (Wi-Fi)

A wireless connection uses radio waves (Wi-Fi) to connect devices through a wireless access point to the network. These devices include laptops, phones, tablets, and Internet of Things (IoT) equipment.

Advantages

  • Mobility and flexibility within Wi-Fi range.
  • Can be easier to set up and expand.
  • No cable is needed at each device, reducing clutter.
  • Supports phones, tablets, laptops, and IoT devices.
  • Useful for guest access and temporary setups.

Tradeoffs

  • Speeds can be slower than wired connections and vary with the Wi-Fi standard and network load.
  • Higher latency can affect real-time applications.
  • Other devices and walls can interfere with a Wi-Fi connection.
  • Wireless connections can be less secure and more susceptible to eavesdropping if not properly secured.
  • Signal strength can vary with distance, creating weak-signal areas or dead zones.

Choosing the Right Connection

Wired is best when maximum speed, reliability, and security matter, especially for critical systems, large file transfers, and fixed workstations.

Wireless is best when mobility, flexibility, and convenience matter, especially for mobile devices, guests, temporary setups, and areas where running cables is impractical.

The Bottom Line

Both wired and wireless connections have a place. Modern networks often combine them to balance speed, security, flexibility, and coverage. At FDU, this general comparison does not change the requirement for labs, desktop computers, and digital displays covered by this policy: they must use wired Ethernet.

Requirements

  • Connect all lab computing equipment, including workstations, printers, and peripherals that require network access, through wired Ethernet.
  • Connect all desktop computers assigned to employees or student workers through wired Ethernet, regardless of location.
  • Connect all digital displays, including monitors in common areas, classrooms, and athletic venues, through wired Ethernet. Any ancillary device that requires internet access must also use a wired connection.
  • Do not use wireless connectivity in place of a required wired connection.

Exceptions

Any deviation, including a request to design or configure a lab or desktop environment for wireless connectivity, requires prior written approval from the Associate Vice President of Systems and Networking. Do not proceed with a wireless design or implementation until that approval is granted.

Cost of a Data Jack

The requesting department is responsible for the cost of providing an Ethernet data jack for an individual workstation.

Last Modified:

Wireless Guest Account Creation

Resources for:
icon Close

Fairleigh Dickinson University regularly hosts on-campus visitors requiring access to our wireless network. As a security measure, in order to provide access to our Network, an FDU faculty member, staff member, or student must sponsor the guest(s) that they are providing access to. The sponsor takes responsibility for the Internet usage of their guests and ensures that they adhere to FDU’s Acceptable Use Policy for Computer Usage.

Choosing the Correct Account Type

  • Accounts can be created for up to 8 days
  • The sponsor can manage accounts (extend time, delete, suspend or reset password)
  • Account creation requires a valid FDU NetID to create
  • A single Guest Account (Known Guest) can be created or generic accounts (5 devices per account with the ability to create 10 generic accounts at once) can be created through this function

For events that will have a large audience, a Group Account may be needed. If you are a faculty or staff member and you require this account type, please create a sponsored guest account and then create a SAMI Support ticket. This can be accomplished by visiting SAMISupport.fdu.edu.

Please provide the support desk with the following information:

Please provide support desk with the following information: 

  • Guest account name
  • The name that you would like to use for your Group account
  • Faculty/staff sponsor name, contact number and e-mail address
  • Location for the event (Building, Room, Classroom, etc.)
  • Time and date of the event

Once the ticket is created, OIRT (Office of Information Resource Technology) will contact you within 3 business days to complete the Group account activation.

EduRoam

Fairleigh Dickinson is a member of Eduroam (education roaming) which provides secure, world-wide roaming access service for the international research and education community. If your guest is coming from another Higher Education institution that is also a member of Eduroam, they will not require an FDU guest account. Instead, they can gain access to our Network simply by logging into the eduroam network with their regular credentials.

(Available on Metro and Florham Campus Only)

Creating and Managing an FDU Wireless Guest Account

Creating a FDU Wireless Guest Account
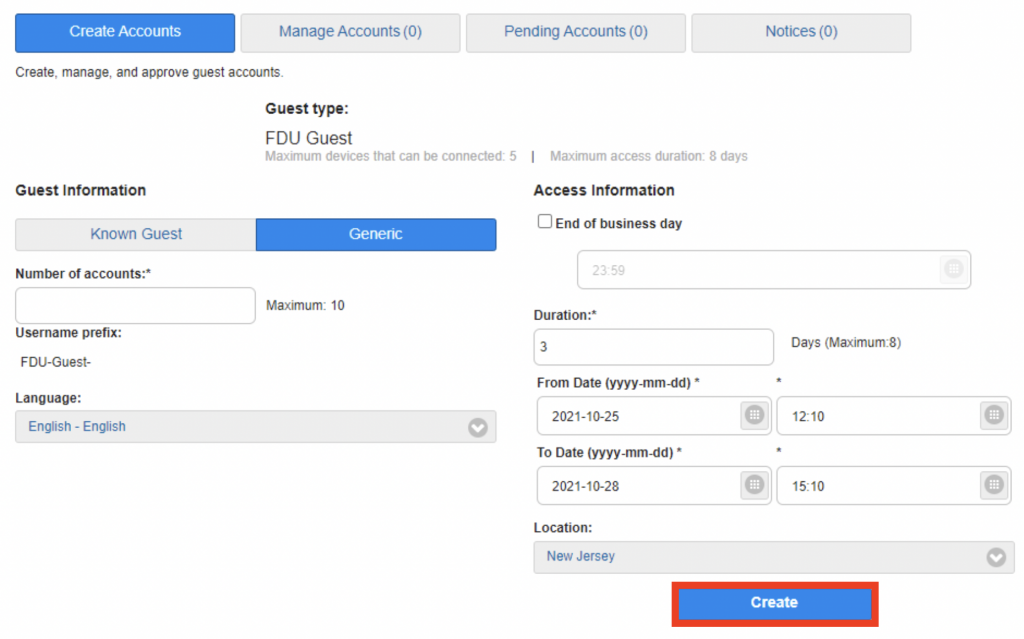
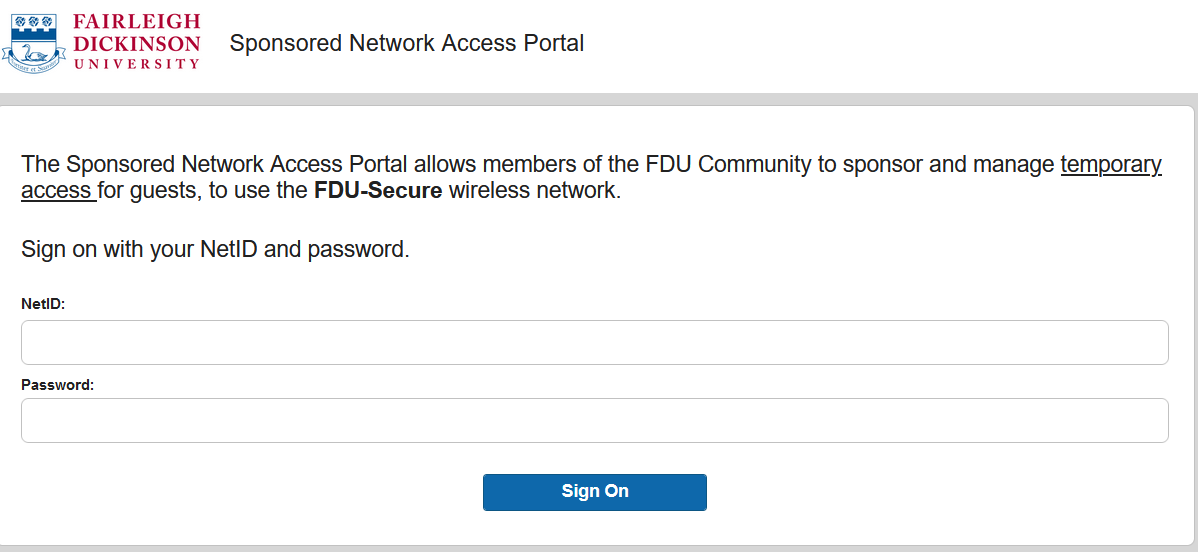
  1. Log into access.net.fdu.edu using your NetID and password
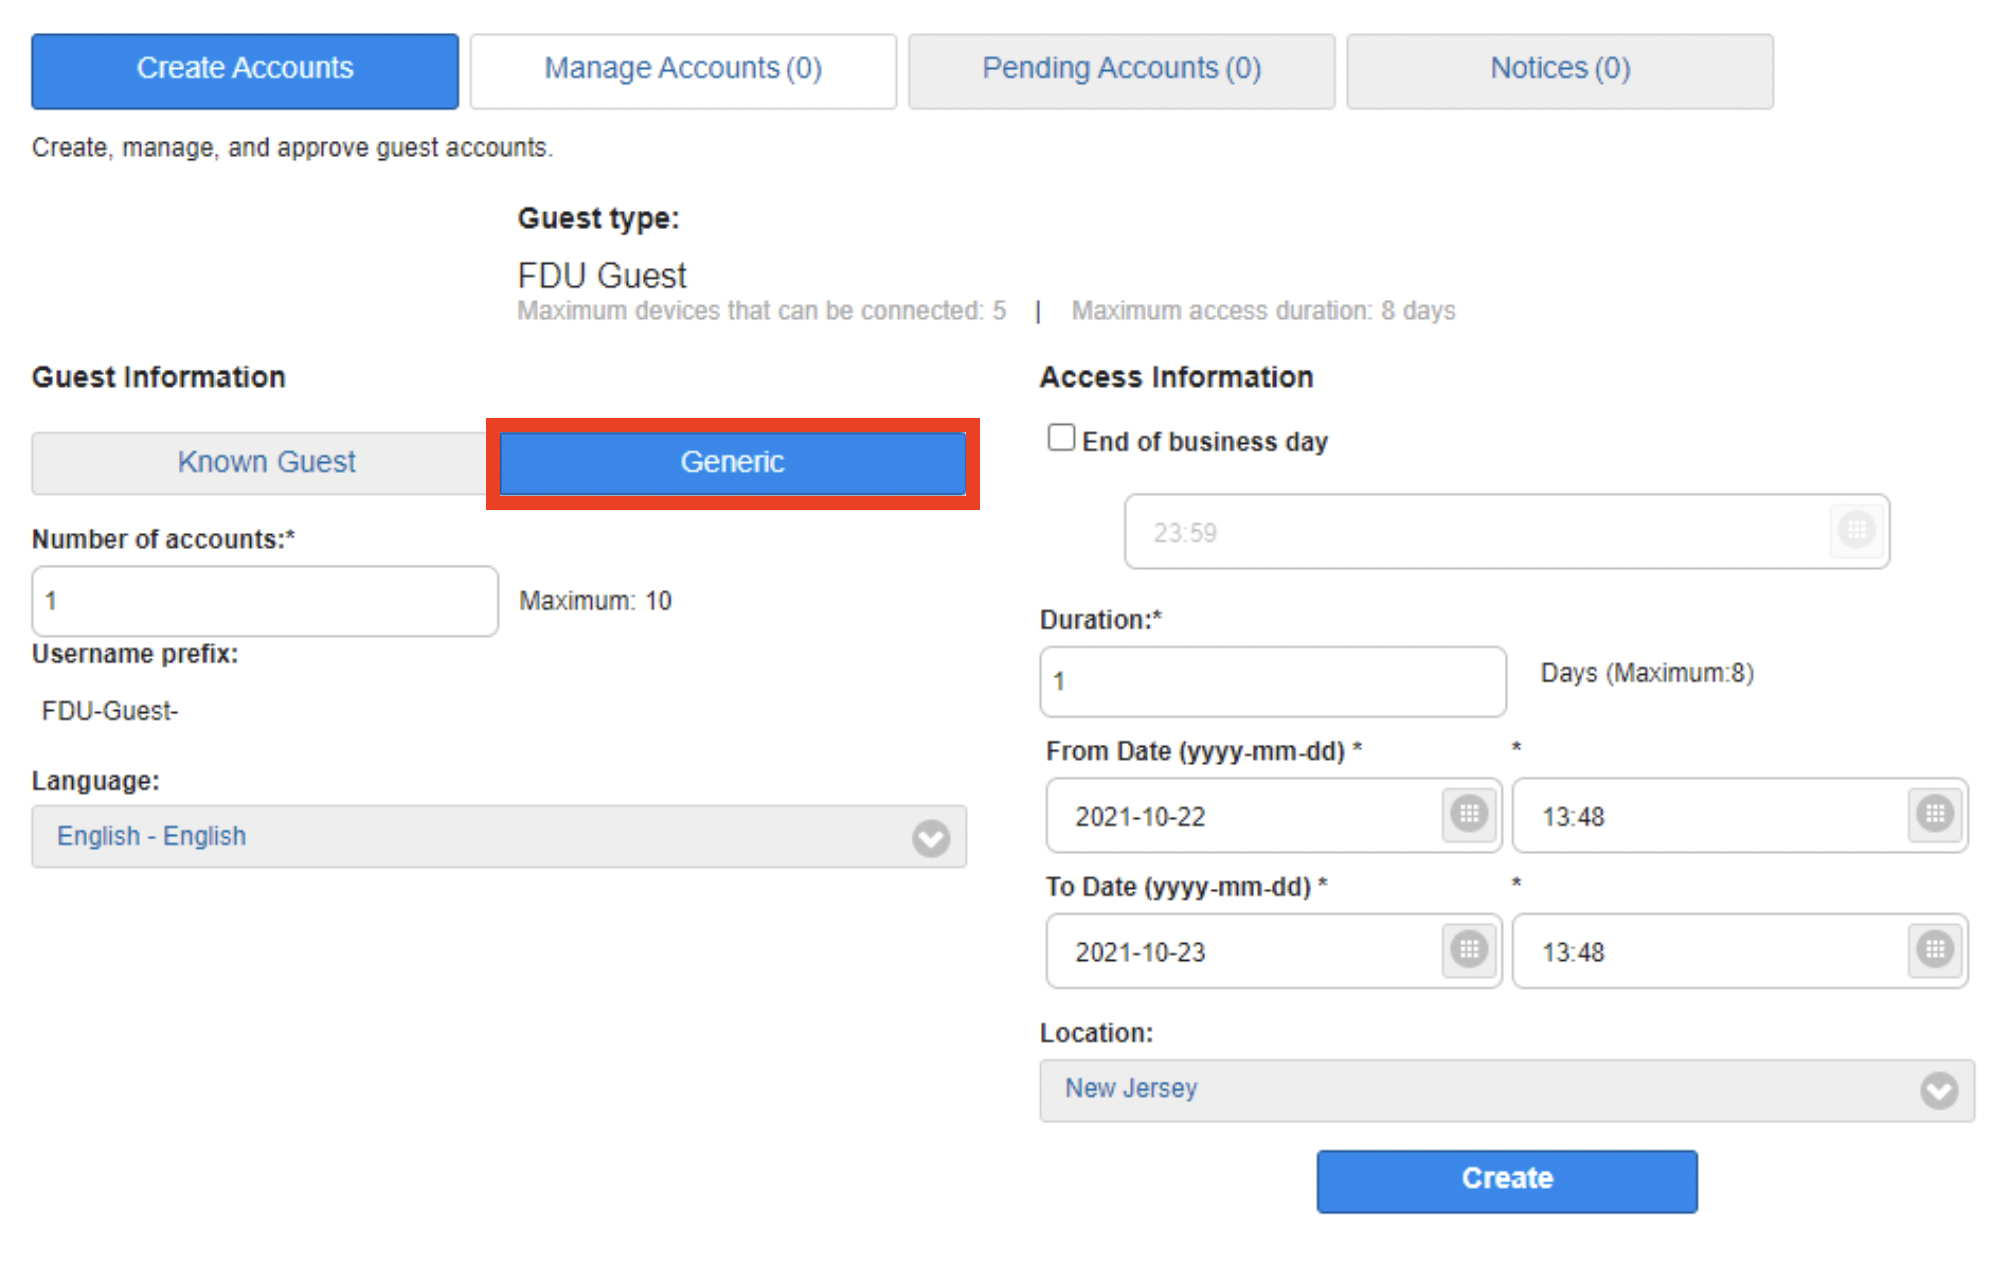
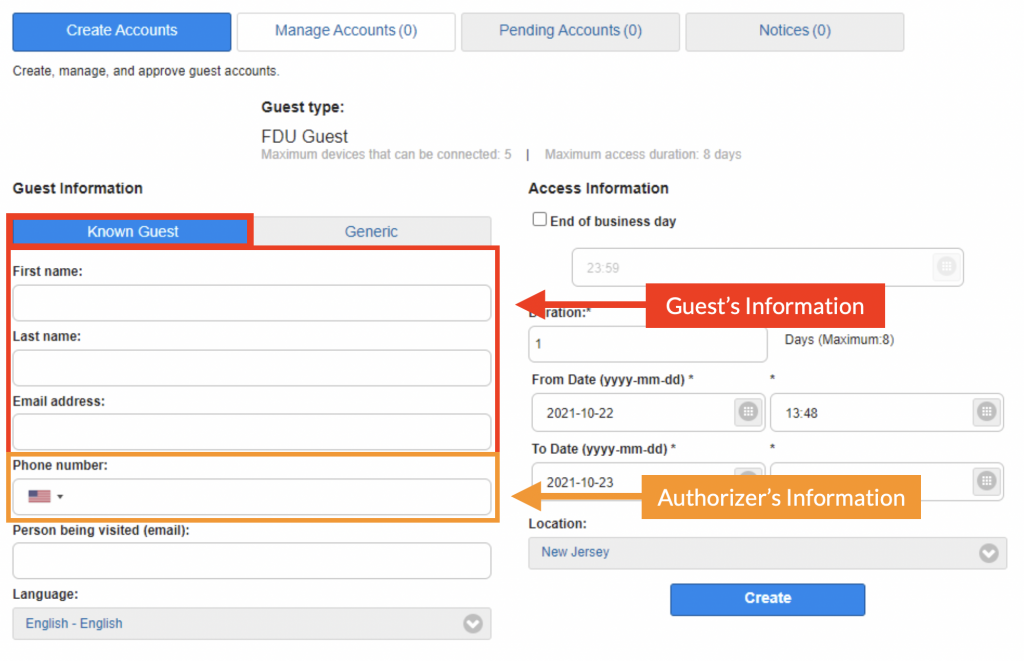
  1. Click the “Generic” or “Known Guest” button
  • Generic – This option allows you to create up to 10 accounts concurrently without entering your guest’s information
  • Known Guest – This option allows you to create an account with guest information. You need to input the guest’s “First name”, “Last name”, “Email address”, and “Phone number”. You also need to enter your own FDU email address
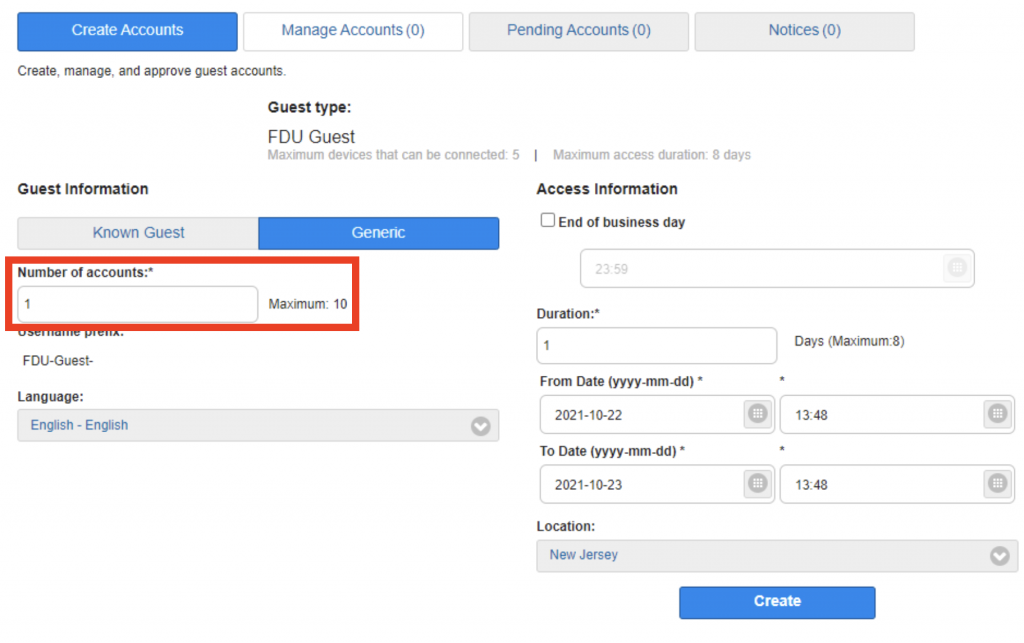
  1. If you have selected “Generic”, enter the number of accounts that you would like to create (maximum of 10)
  1. The remaining instructions are for both known guests and generic accounts. Choose how long you want the guest account to be active
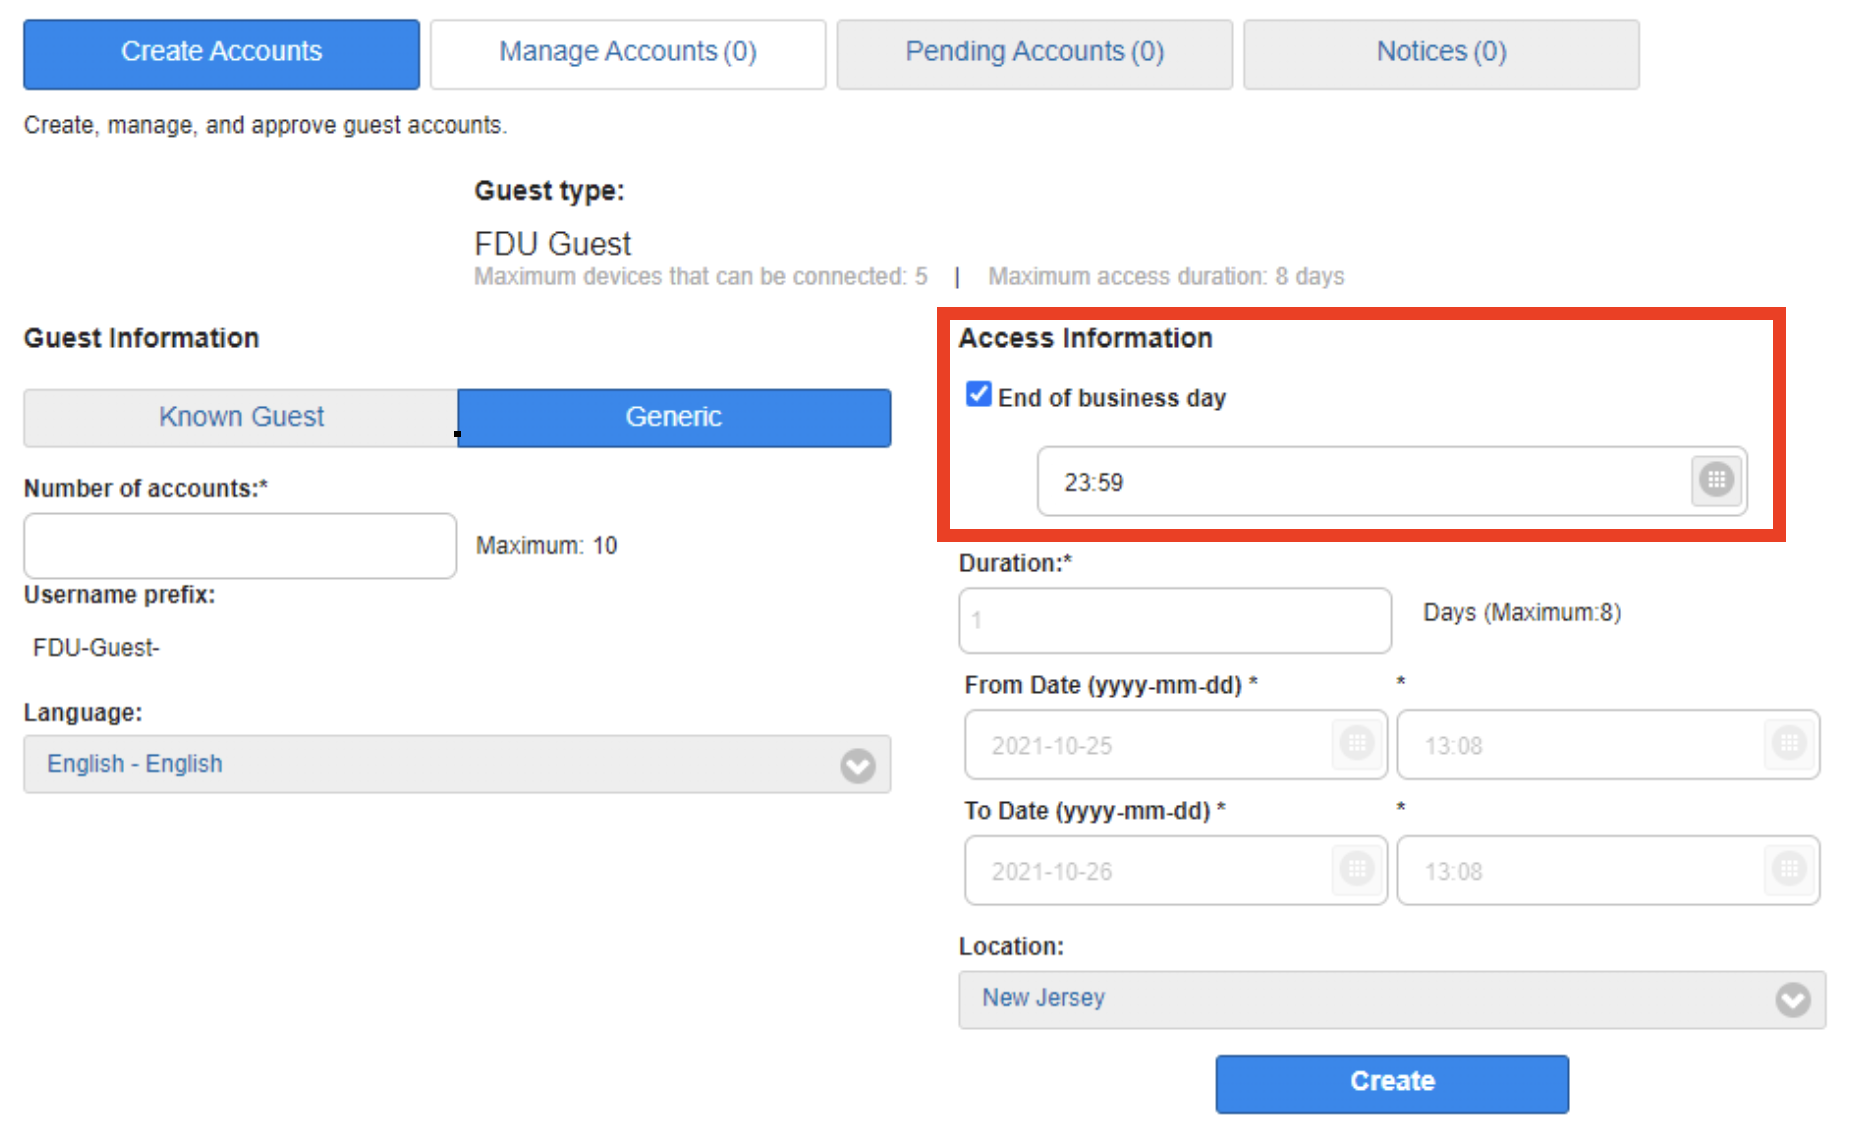
  • First Option – Click the box next to “End of business day” if your guest only requires access through the end of the day
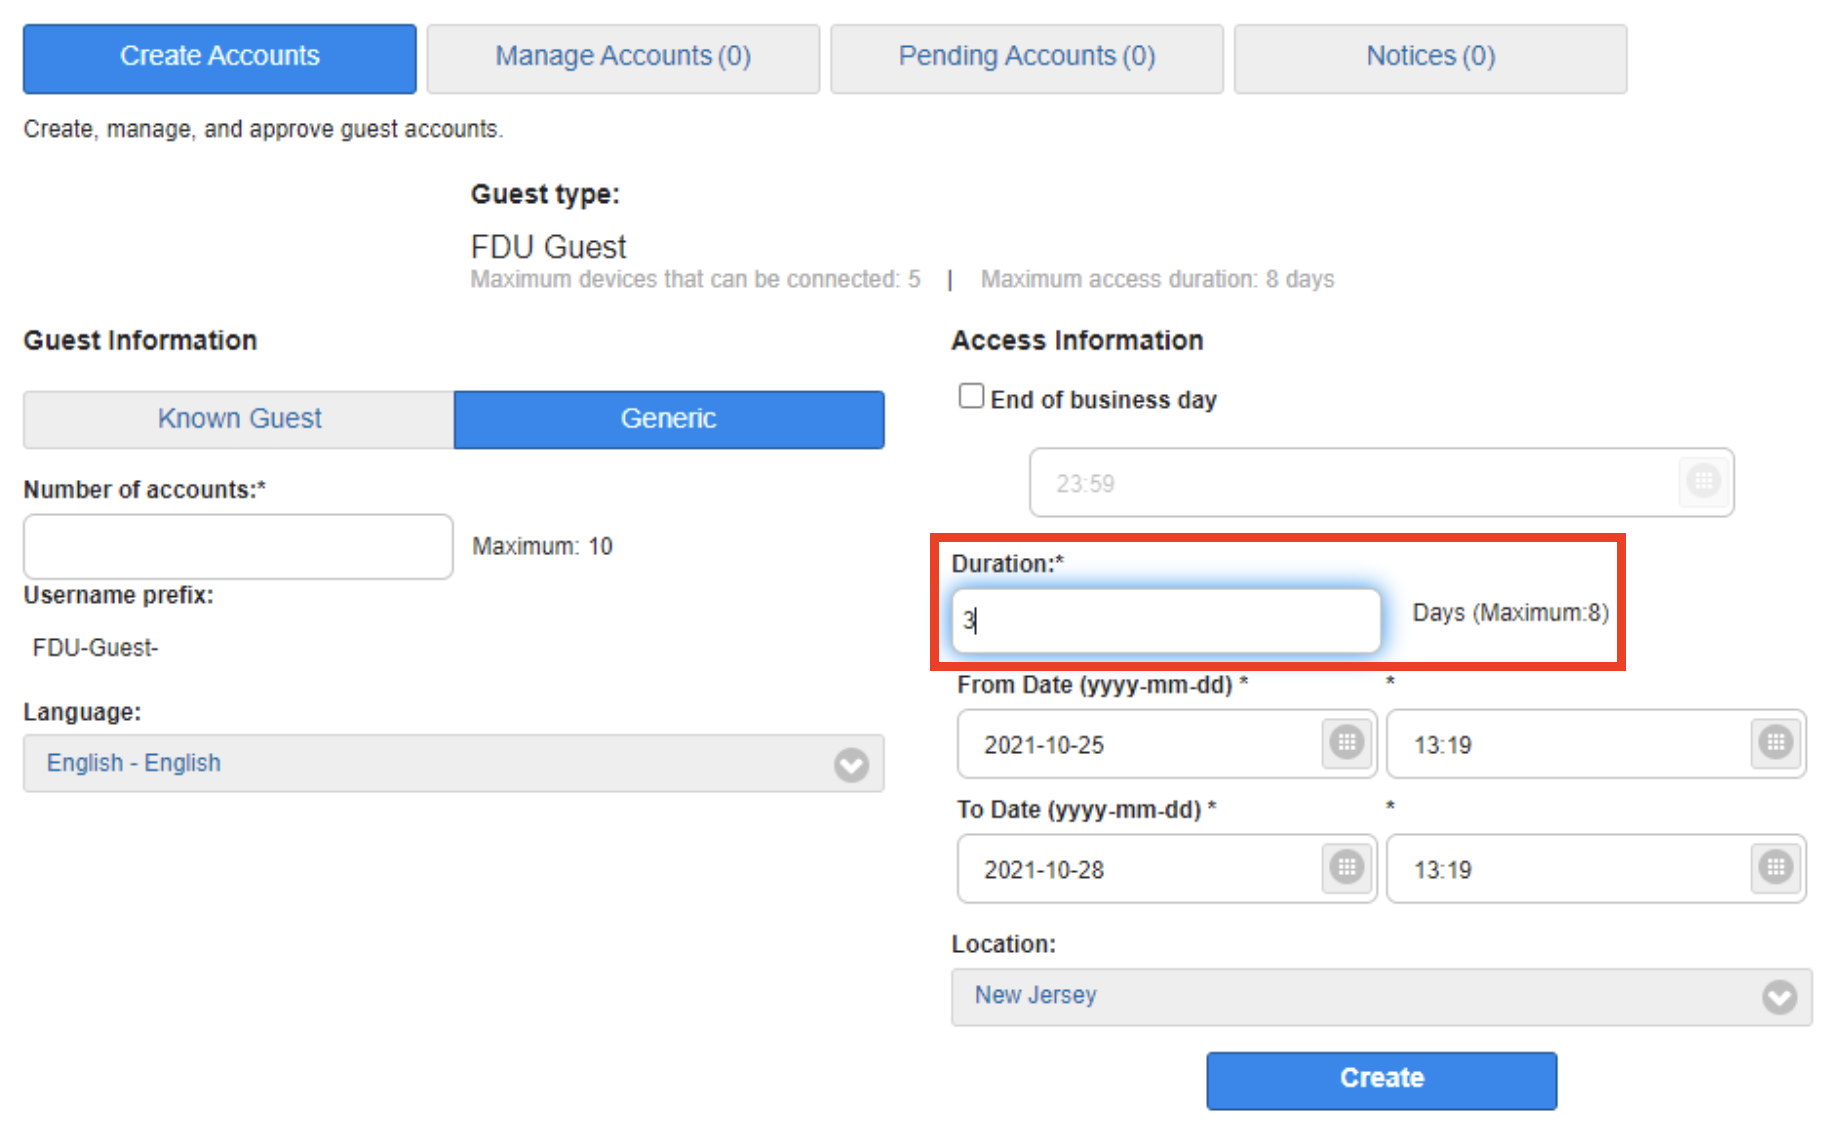
  • Second Option – Type the number of days required in the “Duration” box (maximum of 8). The “From Date” and “To Date” will automatically change based on the requested duration
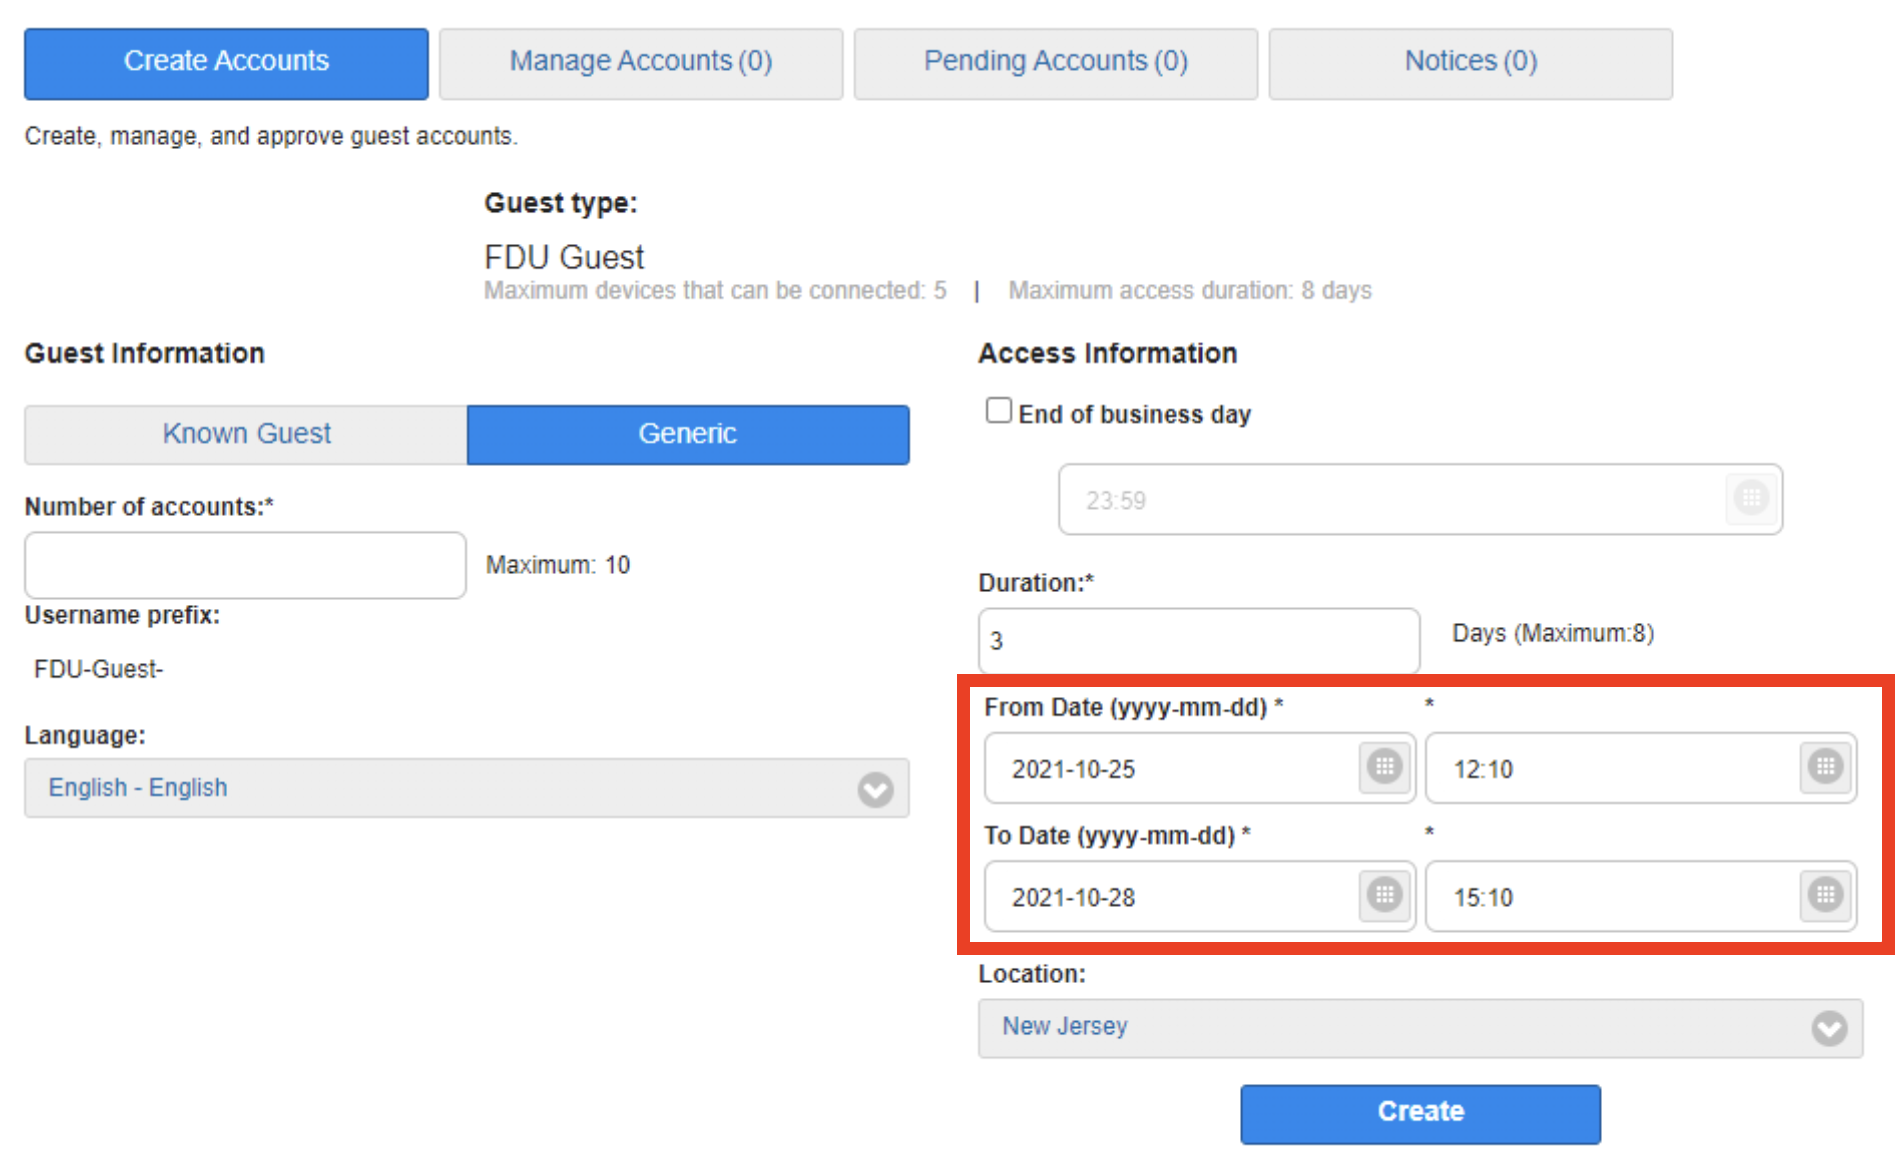
  • Optional – If needed, you can select an exact date and time for the guest account access to begin and end (24:00 format)
  1. Click the “Create” button
close
Managing a FDU Wireless Guest Account
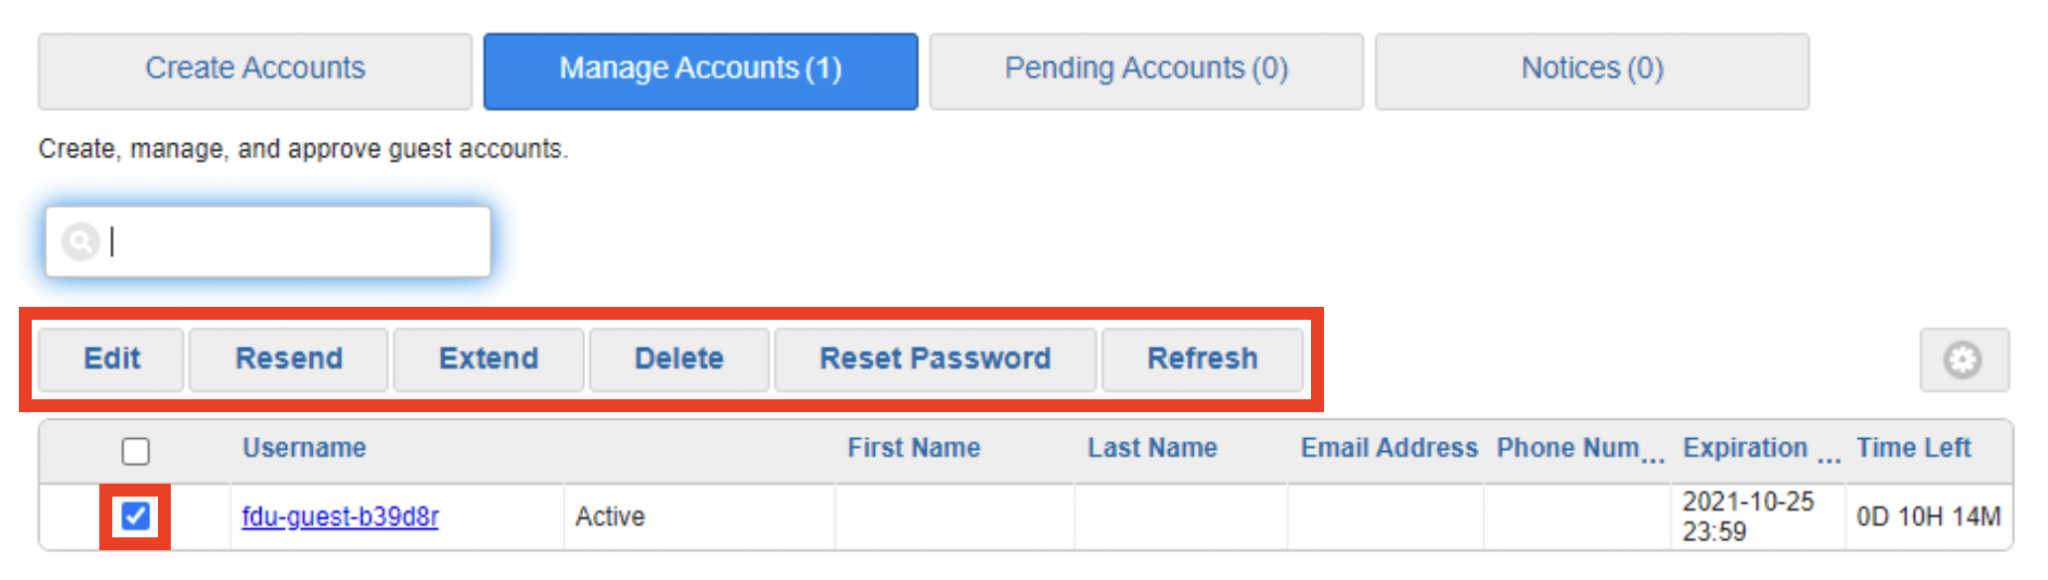
  1. Log into access.net.fdu.edu using your NetID and password
  1. Click the “Manage Accounts” tab
  1. Check the box next the account that you would like to update. You can now use the following administrative functions
  • Edit: Modify any information entered during account creation
  • Resend: Print or email the account username and password
  • Extend: Add additional time to the account. The maximum total duration of 8 days will still apply
  • Delete: Immediately delete the account
  • Reset Password: This will reset the password and either print or email the new password
close

Support

For additional support, please contact the SAMI Service Desk.

Last Modified:
FAQ
  • An alias is an additional email address that will direct mail to your FDU email account. Creating an alias for your account can be a useful strategy. For instance, if you are spearheading a project, it may be easier to solicit replies to an address that contains the name of the project than it would be to garner responses to your existing email address. If this solution interests you, please fill out the Email Alias form.

  • Due to the cavernous email storage offered on the Office365 platform, there has been little to no demand for FDU staff and faculty members to request an increased mail quota. Office365 email provides enough capacity for even our most prolific users. However, if special circumstances make you the exception to this rule, you can request a quota increase by completing the Quota request form.

  • FDU’s Acceptable Use Policy prohibits running software that accepts incoming connections from other computers. Programs such as BitTorrent or other P2P file sharing hosting program all contain server components that allow others to connect to your computer and retrieve files from your system. In addition to the legal implications of sharing copyrighted materials, file sharing software creates a security concern. Improper use of these programs could result in the compromise of your private files and may leave your system open to attacks from other computers.

  • Phishing involves the use of e-mail messages that appear to come from your bank or another trusted business in an attempt to scam the user into surrendering private information that will be used for identity theft. The phishing e-mail typically ask you to click a link to visit a Web site, where they are asked to update personal information, such as passwords and credit card, social security, and bank account numbers

    Scammers have become increasingly sophisticated in creating fraudulent emails and Web sites that look authentic. These emails and Web sites often appear to be from legitimate companies and include images and logos of these organizations.

  • The Network ID (NetID) is a Windows Active Directory account uniquely assigned to each student, faculty & staff. It serves as your login to many computing and networking services including FDU Email.

  • FDU’s Opus is a Red Hat Linux based server. Opus provides an environment for FDU students, staff, and faculty to practice using software such as:

    • Expect
    • Gcc
    • Gzip
    • Aspell (Ispell replacement)
    • Java (Now 1.8.0_181)
    • Make
    • Ncurses
    • Tcl
    • Tcsh
    • Tcl/Tk
    • Strace (Trace)
    • Emacs
    • Bison
    • Nano (Formerly Pico)
    • Perl
    • LaTeX
    • A2ps
    • Links (Lynx Alternative)

    If you require access to Opus, please fill out the form.

  • In order to provide a safe and stable computing environment, the FDU-Wireless and FDU-Secure wireless networks require NetID authentication. However, in certain instances our students, staff and faculty members will need to work on campus with people from outside of our community. This can include vendors, contractors, visiting scholars, or even a visiting family member or friend. In these instances, the FDU community member can sponsor a guest for temporary wireless access.  The sponsor of a guest account will be responsible for the actions of his or her guest. Please ensure that your guest(s) follow FDU’s Acceptable Use Policy for Computer Usage. 

  • In order to provide a safe and secure network environment, FDU IT requires devices to authenticate to the FDU network before connecting. This works well for computing devices such as desktop computers, laptop computers, and mobile devices such as tablets and phones. Most other electronics, including gaming consoles and streaming video boxes, cannot properly authenticate to the network. In these instances, we ask you to register the device using the online form below. Please note that each user on our network is entitled to register up to 5 devices.

Christopher Robley University Systems and Networking Director of Systems
Michael Reekie University Systems and Networking Director
Stuart Alper University Systems and Networking Associate Vice President
Anthony Licandro University Systems and Networking Manager
Atif Warriach University Systems and Networking Systems Administrator (Linux)
Basil Licop University Systems and Networking Office 365 Systems Administrator
Charles Ciccotto University Systems and Networking Operations Manager
Christopher Bland University Systems and Networking Systems Manager Lead
Cory Palacios Merino University Systems and Networking IT Assistant – Vancouver
Danovan Golding University Systems and Networking Senior System Technology Manager
Djeams Muse University Systems and Networking Network Analyst
Estref Resuli University Systems and Networking Technician Operations – Vancouver
Joshua Chan University Systems and Networking Systems Analyst
Juan Estrella University Systems and Networking Network Analyst
Juan Montufar University Systems and Networking Network Analyst
Karl Henry University Systems and Networking Senior Desktop Engineer
Kevin Atkinson University Systems and Networking Systems & Network Infrastructure Manager – Vancouver
Leslie McRae University Systems and Networking Operations Systems Analyst
Matt Gugel University Systems and Networking Senior Desktop Engineer
Rafael Alix University Systems and Networking Network Analyst
Shashi Patel University Systems and Networking Network Analyst
Thomas Grassi University Systems and Networking Junior Systems Administrator
Torence Bobbitt University Systems and Networking User Support Helpdesk Technician
Vishal Gandhi University Systems and Networking Systems Analyst / Application Developer / Email Specialist