Virtru email encryption is a security enhancement to FDU’s Office 365 and Microsoft Outlook email environment, which provides Faculty and Staff the option of sending and receiving encrypted emails using their FDU email account.

Index
What is Virtru Email Encryption
Virtru email encryption is a security enhancement to FDU’s Microsoft Office 365 and Microsoft Outlook email environment, which provides Faculty and Staff the option of sending and receiving encrypted emails using their FDU email account. Virtru for the Microsoft Outlook desktop email client is available for installation for approved FDU Faculty and Staff via the FDU Self Service Portal for Software on Windows 10 desktops and laptops owned by the University.
Virtru Email Client
The Virtru client provides a seamless experience when using the Microsoft Outlook desktop client. The Virtru Outlook plugin is only available on university laptops or desktops running Microsoft Windows.
Virtru for Office365
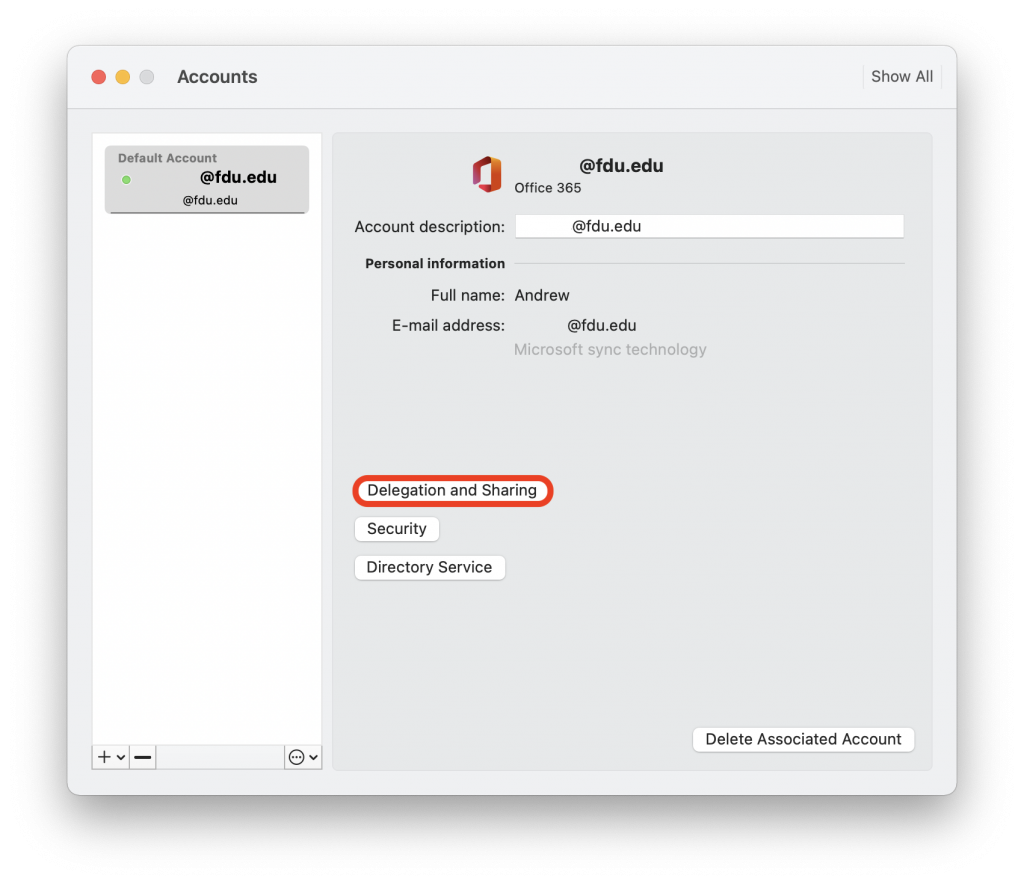
All Apple macOS users and users who access their FDU email through Office 365 can use Virtru email encryption to send sensitive information electronically.
Tip
Microsoft Office 365 is accessed by visiting office365.fdu.edu from any web browser.
What is Virtru Secure Reader?
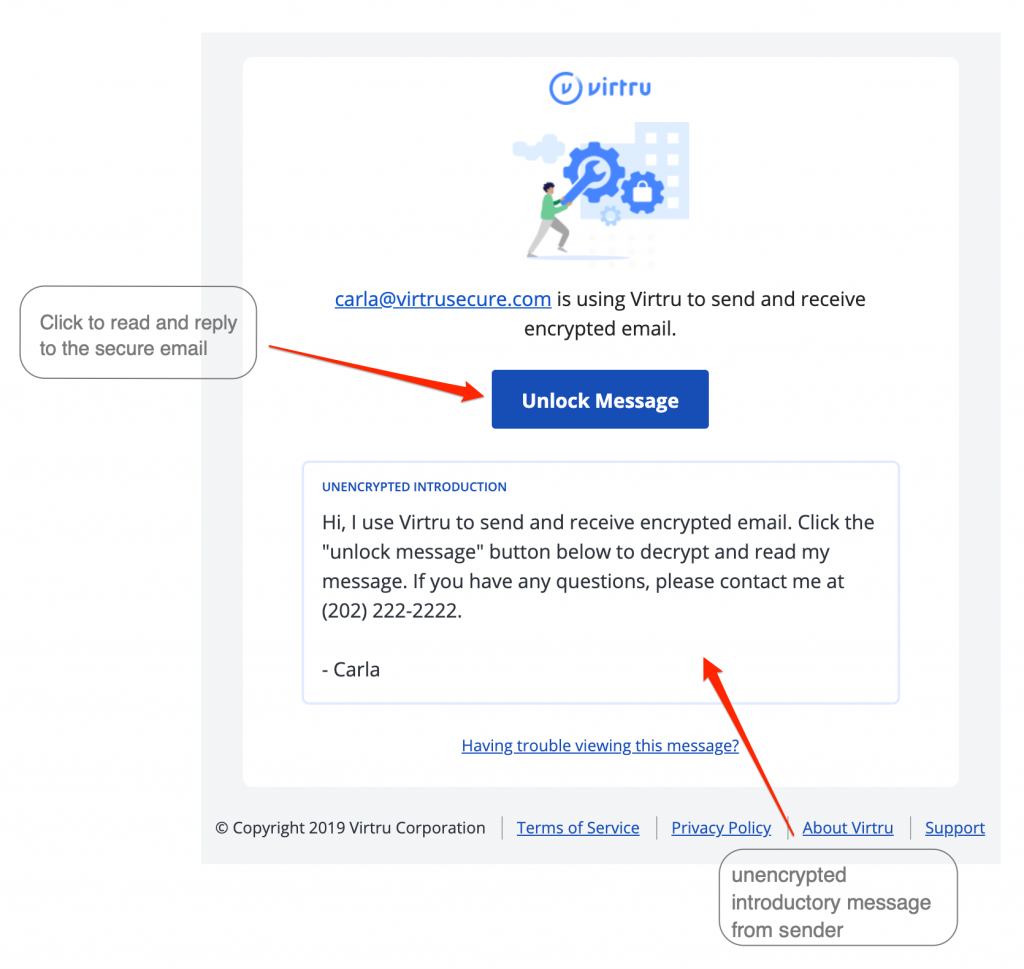
Virtru’s Secure Reader is a platform that can be accessed within FDU’s Outlook on the Web (office365.fdu.edu) and right on your web browser by clicking the “Unlock Message” button in your Virtru secured email. From there, all you have to do is quickly validate you are an authorized recipient of that email or file. Once complete, you can read and reply to the secure email directly in your browser.
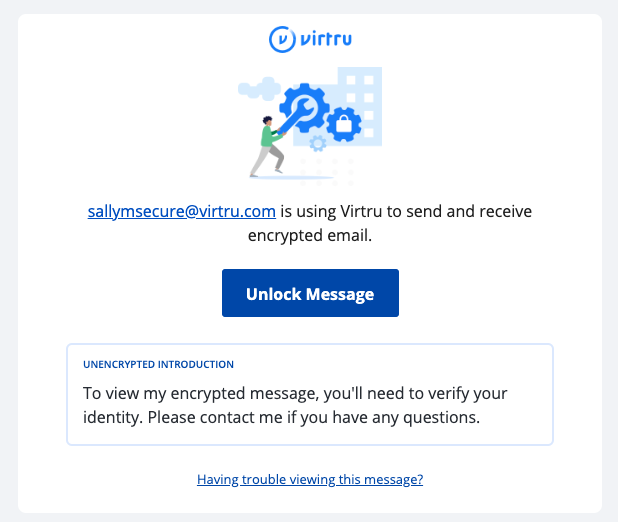
A secure message encrypted by Virtru will have a few key components, including a short unencrypted message from the sender, and a button that says “Unlock Message”.
Note
The Secure Reader is used when viewing encrypted emails from Microsoft Office on the web and any email client on mobile devices (AndroidOS and iOS)
Request Form
To obtain access to Virtru in order to send encrypted emails, you must fill out the request from below:
For additional support, please contact the SAMI Service Desk.
Installing Virtru onto a University PC
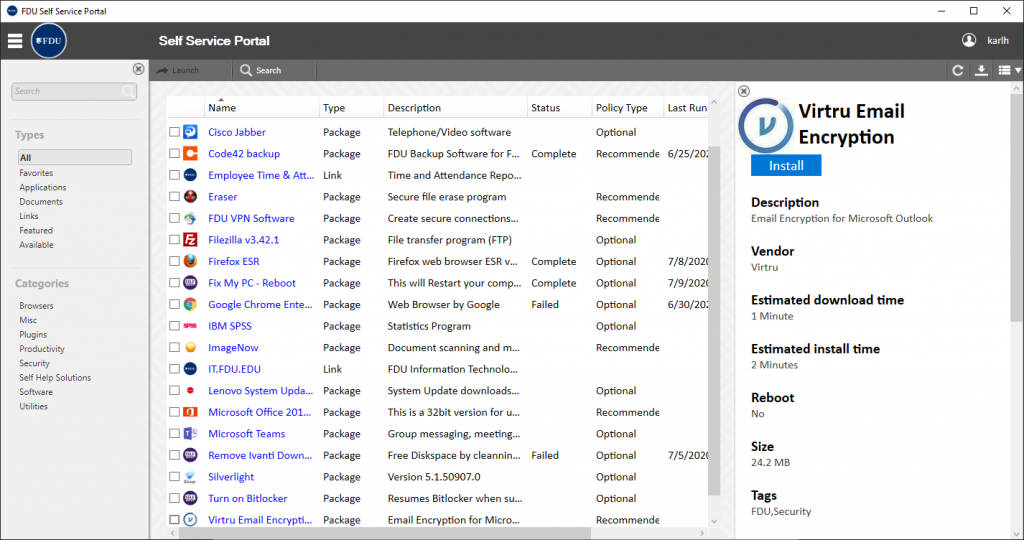
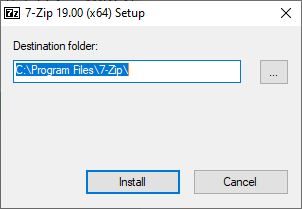
- Open the FDU Self Service Portal for Software application. Locate and left-click Virtru Email Encryption and then click “Install“
For additional information on the FDU Self Service Portal for Software, please click the following link:
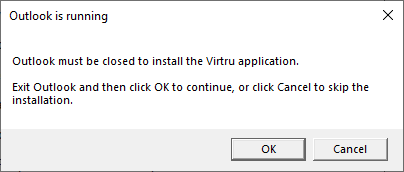
- A message box will appear notifying that Microsoft Outlook needs to be closed. Click “OK” and the installation will continue
Note
This window will only appear if the Microsoft Outlook Client is running.
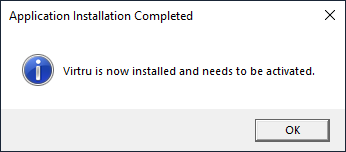
- A message will appear when Virtru is finished installing. Click “OK” to finalize the process
Virtru is now ready to be activated.
Activating Virtru on a University PC
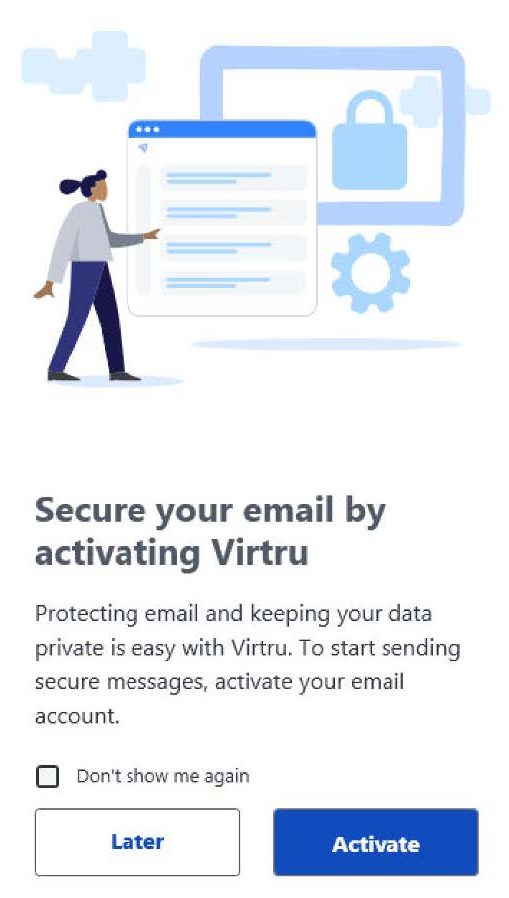
- When you open Microsoft Outlook after the Virtru has been installed, you will be prompted to activate your Virtru plugin. Click “Activate“ to begin. You may choose “Later” if you do not wish to activate at this time
Note
Check “Don’t show me again” before you click “Activate” or “Later” to prevent a pop-up window from re-appearing to prompt activation of un-activated account(s) whenever you start Outlook.
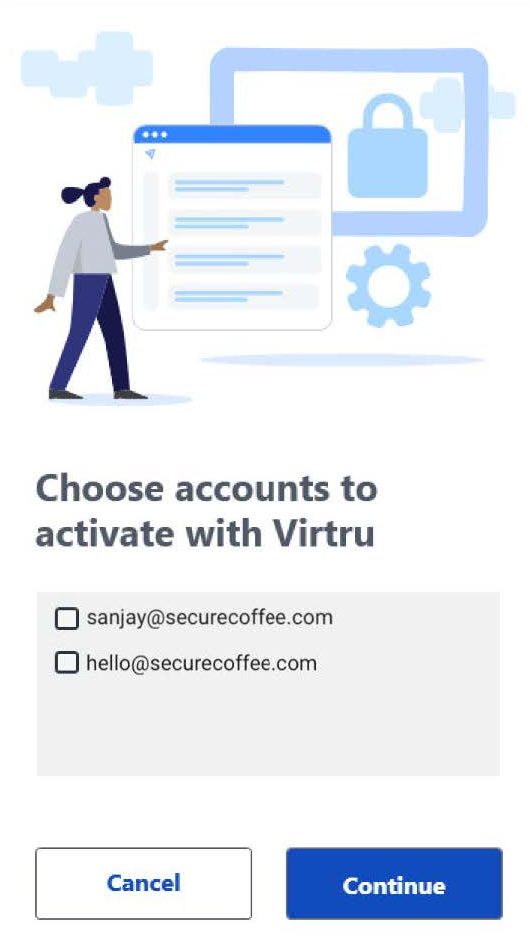
- You will be presented with a list of FDU email accounts configured to use in Microsoft Outlook. If your Microsoft Outlook application is associated with multiple email accounts, click on only those you will need to use Virtru email encryption. Then click “Continue“
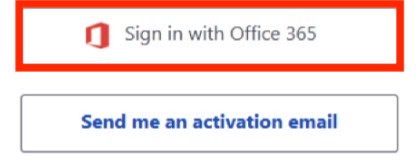
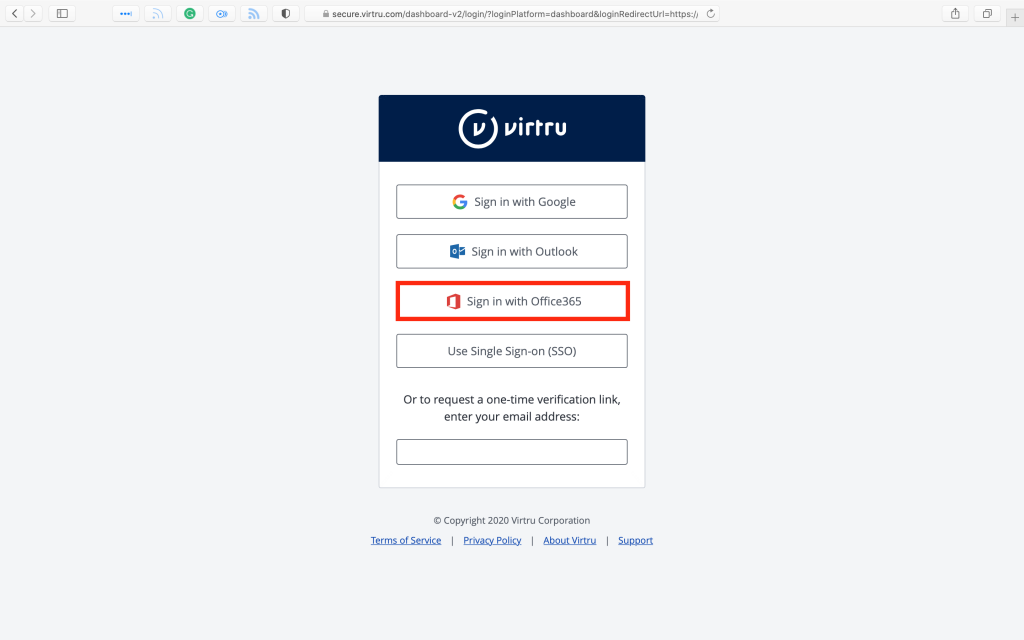
- After selecting the proper accounts, you will have the choice of signing in with FDU’s email provider (Microsoft Office 365) or choosing to receive an activation email. Choose “Sign in with Office 365“
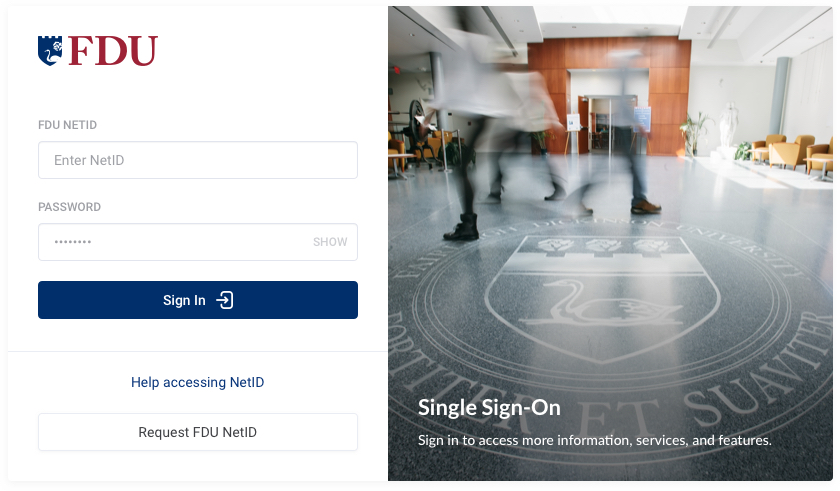
Activating Virtru through Office 365 Sign in
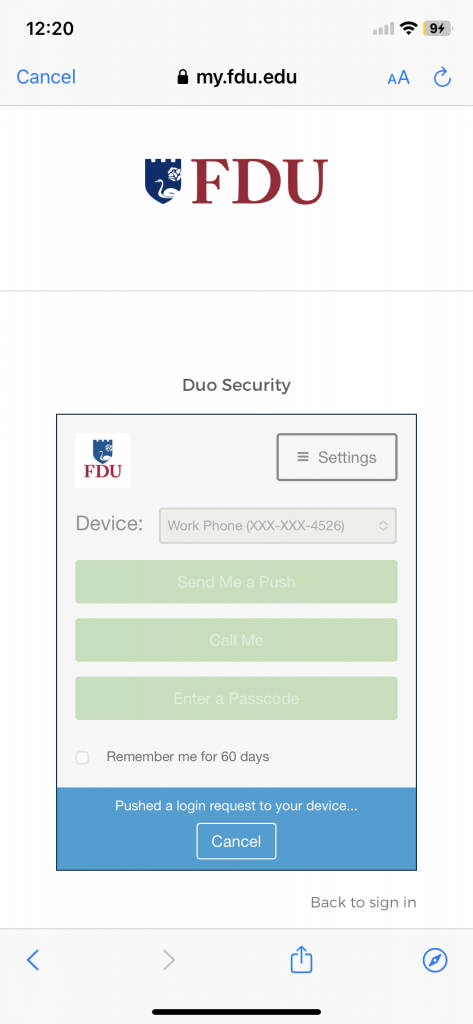
- Enter your FDU NetID credentials when prompted and proceed through the FDU Single Sign-on webpage, including completing Duo Multi-Factor authentication. If you experience issues, choose to “Send me an activation email” and follow the directions given below in item
Note
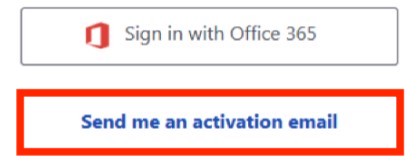
If you cannot activate your account(s) using “Sign in with Office 365”, choose to “Send me an activation email.”
Activating Virtru through Activation Email
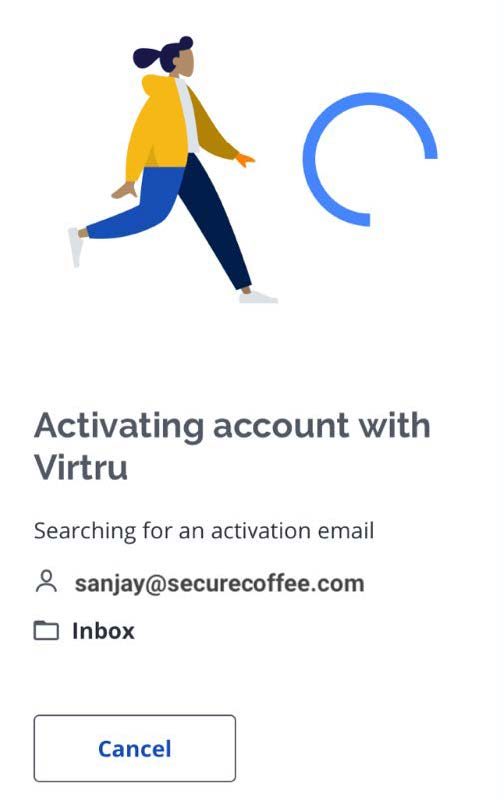
- If you are unable to activate your account(s) using “Sign in with Office 365,” choose to “Send me an activation email.” The process will take a few moments to complete in the background
- During this process, Virtru will send a unique email from noreply-activation@virtru.com to your mailbox. The Virtru plugin will search for this email in your inbox. When the activation email is found, Virtru will automatically delete the email from your email inbox, and the Virtru plugin will complete the activation
Tip
Click “Take a tour” for a brief walkthrough of your new Virtru features.
If your activation does not automatically complete in a few minutes, please contact the SAMI Service Desk.
Activating from the Virtru Menu
If you have disabled automatic activations, you can still activate Virtru on your account(s) at any time.
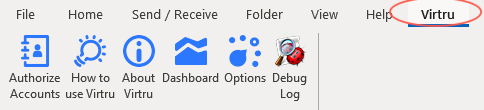
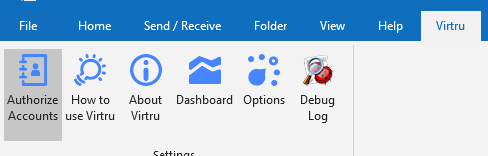
- Select the ‘Virtru‘ menu tab from the top bar of the main Microsoft Outlook window
- Choose “Authorize Accounts” or “Options“
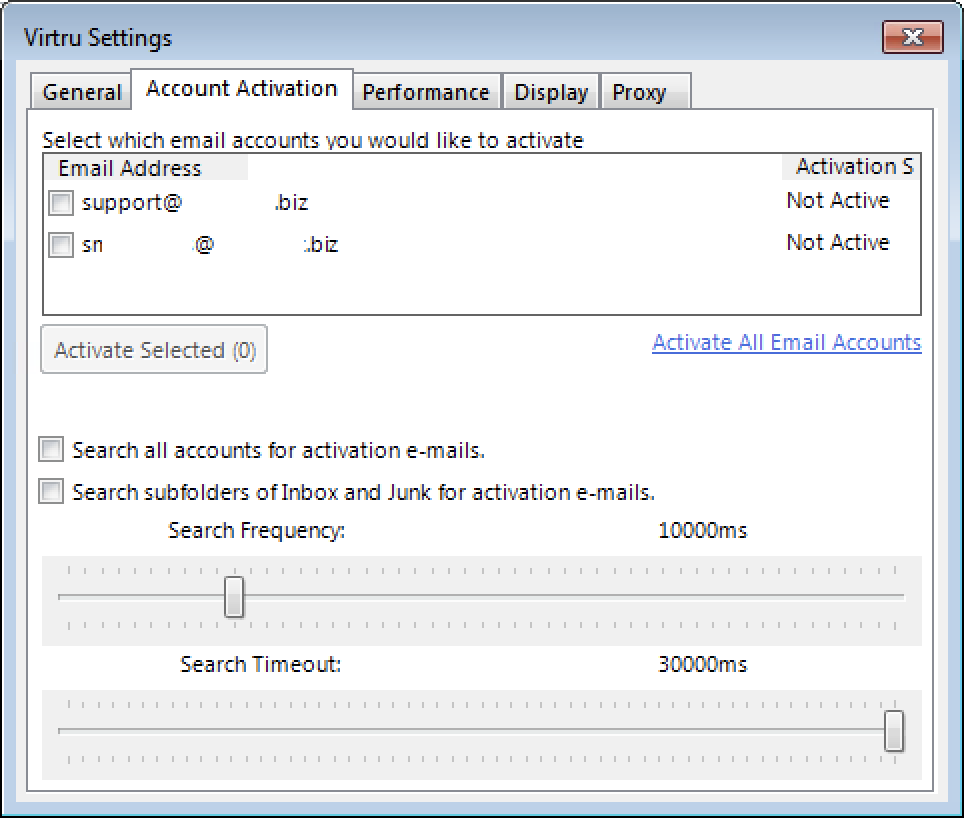
- If you select “Options,” go to the ‘Account Activation‘ menu tab, select your FDU email account, and click on “Activate Selected“
- You will then follow the activation process already illustrated above in “Activating Virtru through Office 365 Sign-on“ or “Activating Virtru through activation email” described above
Re-enabling a Virtru Account
FDU Virtru users will occasionally be required to reactivate their Virtru add-in due to the following:
- You’ve cleared your registry
- Your Virtru activation status has expired. For security purposes, Virtru will invalidate your activation status every
- 120 days for users accessing their own mailboxes
- 10 days for users accessing shared or delegated mailboxes
- You are using Virtru on a new machine
You are automatically prompted when you need to re-activate. You can also proactively reactivate at any time via the ‘Virtru’ menu tab. This process was described above in “Activating from the Virtru Menu.”
Reset Activations
If you wish to fully deactivate all accounts in Microsoft Outlook, you can do so from the ‘Virtru’ menu tab:
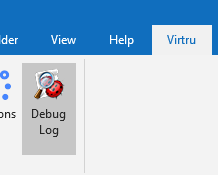
- Click on the ‘Virtru‘ menu tab at the top of your Microsoft Outlook window and select “Debug Log“
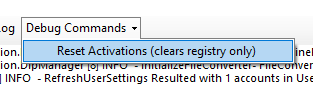
- Click on the ‘Debug Commands‘ menu tab option and select the “Reset Activations (clears registry only)” option
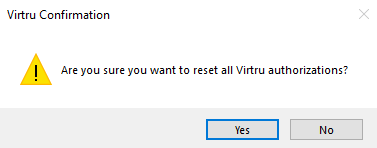
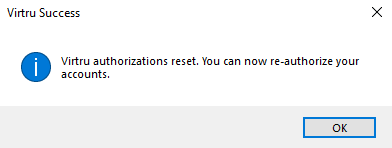
- Click “Yes” and then “OK” to confirm the changes
- From the ‘Virtru‘ menu tab, you can reauthorize by clicking on “Authorize Accounts“
Virtru Walkthrough Video
Send a Virtru-encrypted Email in Outlook
With Virtru, you can easily protect your emails by encrypting messages and attachments in a few simple clicks.
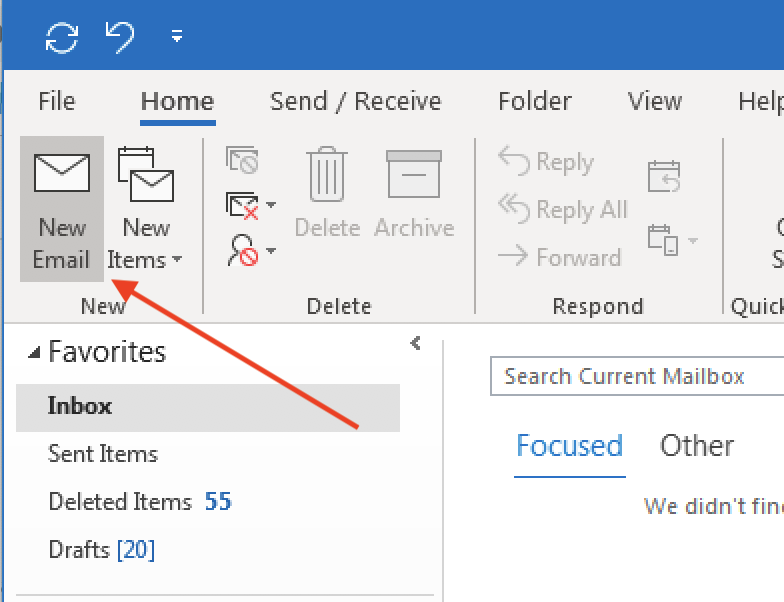
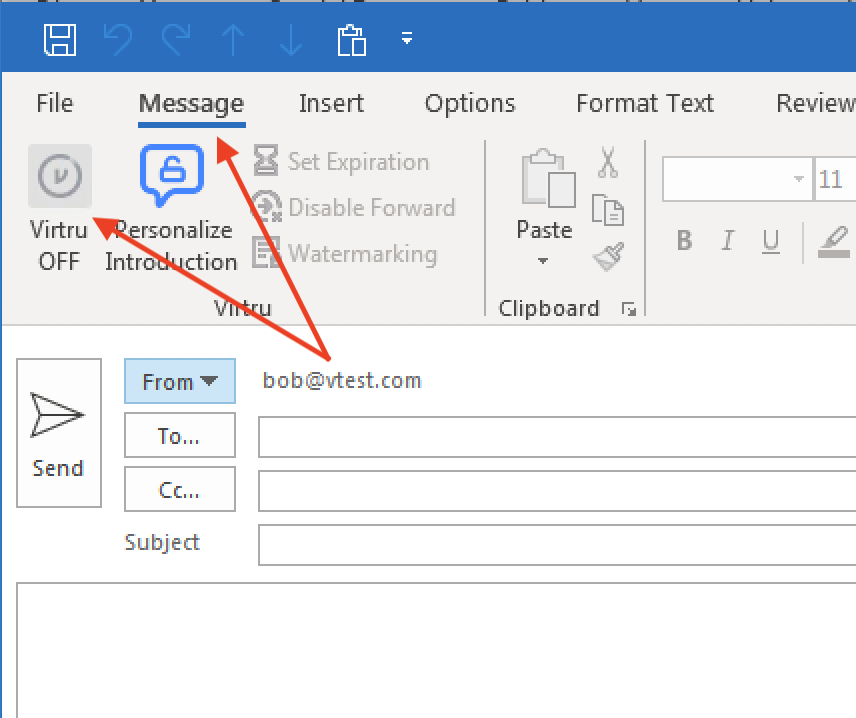
- Left-click “New Email” from the main Outlook window
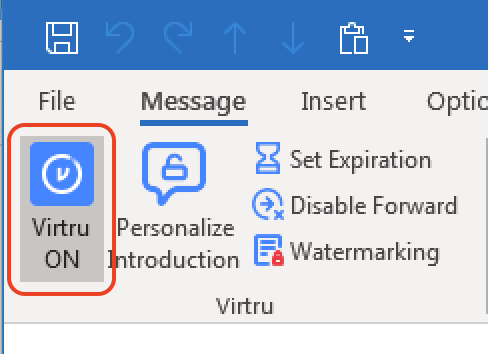
- Open the ‘Message‘ menu tab and left-click the “Virtru button” to turn “Virtru ON.” The button should turn blue and read “Virtru ON”
- Add recipients, a subject, the body of the email, and any relevant attachments
Tip
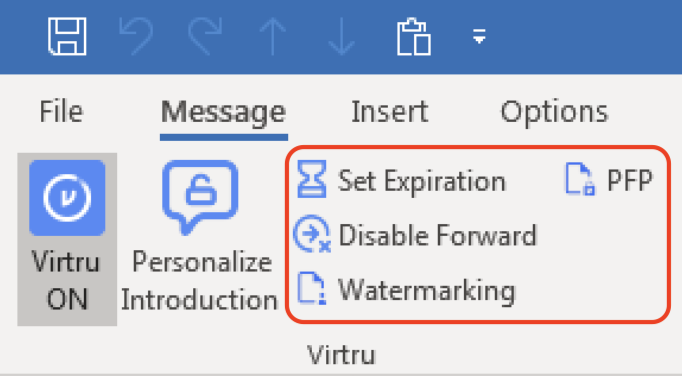
Additional security options for the message, including Disable Forwarding, setting an Expiration Date, and applying Watermarking and/or Persistent File Protection (PFP) to attachments are available to select for your Virtru-encrypted email. More details on these additional features can be on the “FDU Virtru Email Encryption Tutorial” under “Additional Resources.”
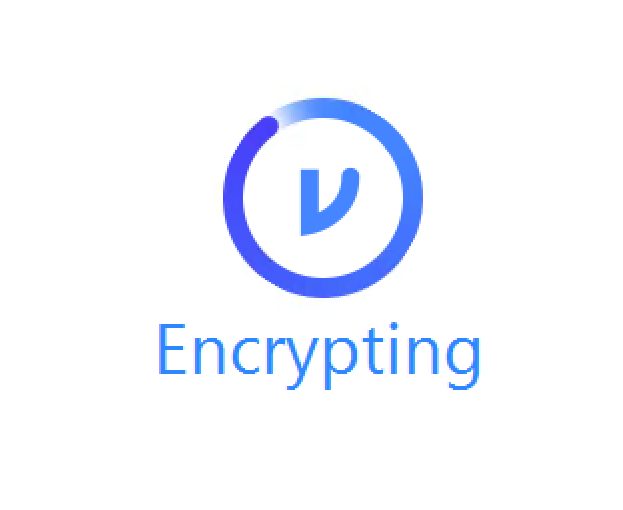
- When your message is ready, click “Send.” You should see a brief animation letting you know that the message is “Encrypting” before it is fully sent
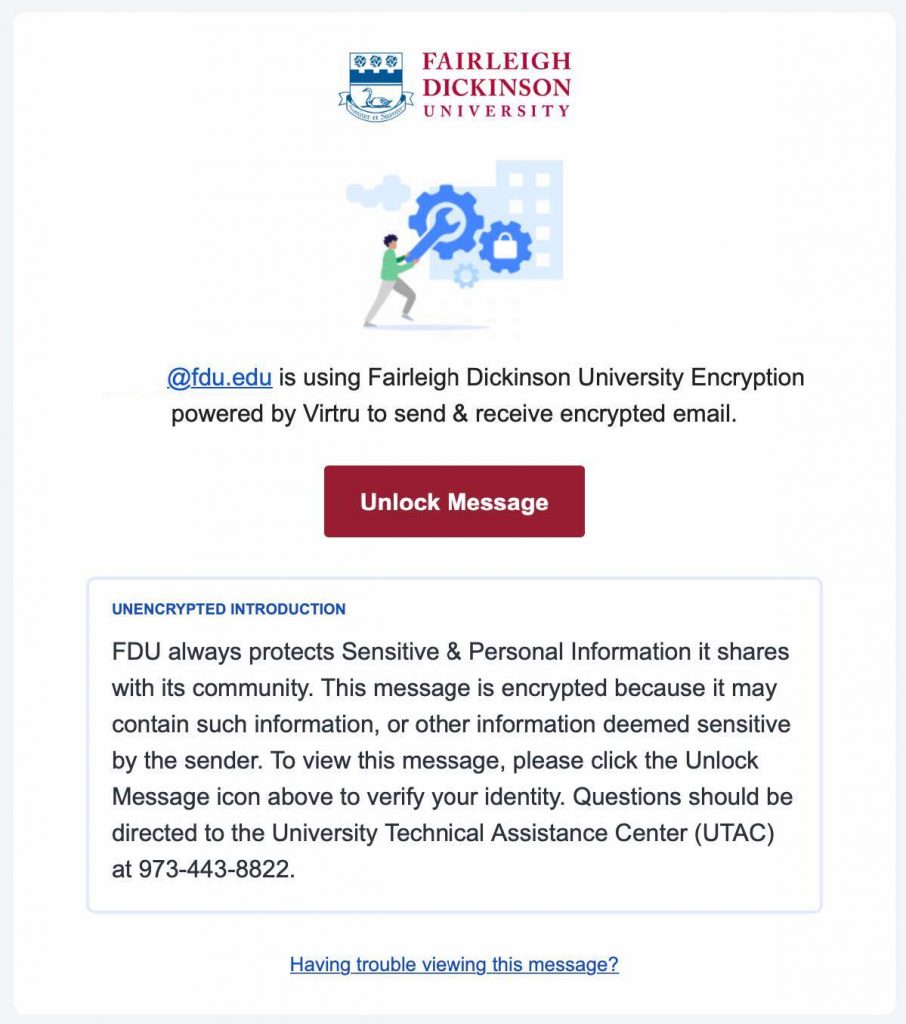
FDU Virtru-encrypted Email Introduction for Recipients
FDU includes a standardized introduction to inform the recipient that they are viewing a Virtru-encrypted email. Below is an example of what the recipient will see. If you have updated the introduction, it will be reflected accordingly
Personal Virtru-encrypted Email Introduction for Recipients
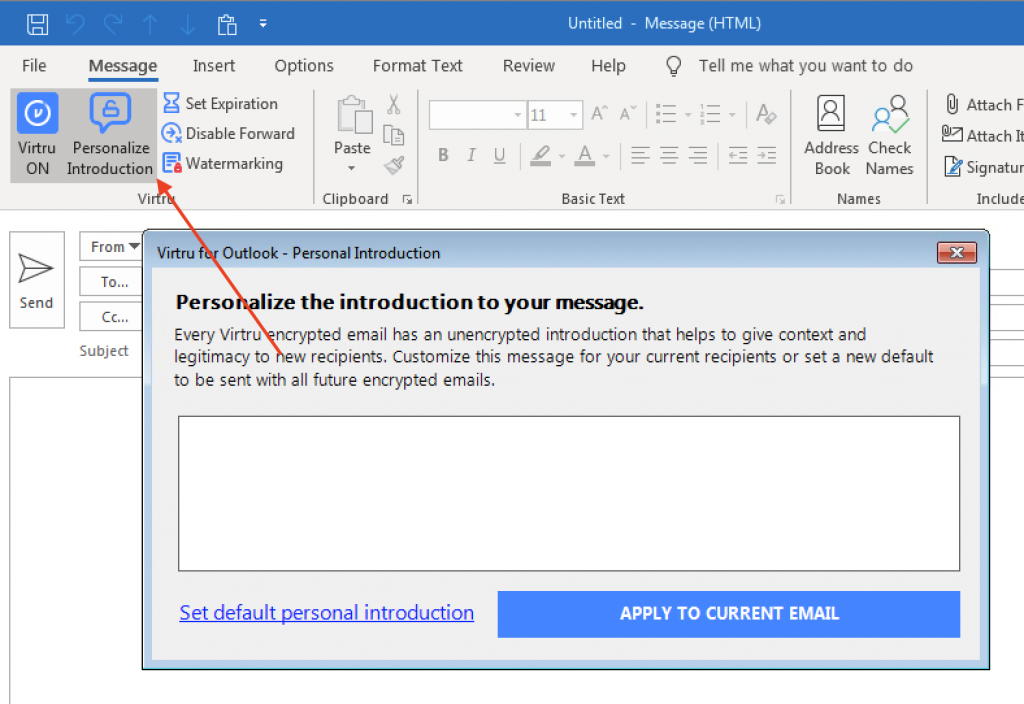
You can also set a one-time, unencrypted personal introduction for the message to either clarify the introduction of Virtru to the recipient or provide some context about the email. Left-click the “Personal Introduction” menu button in your email draft window.
Note
The Personal Introduction only supports plain text and line breaks. Special formatting is not supported.
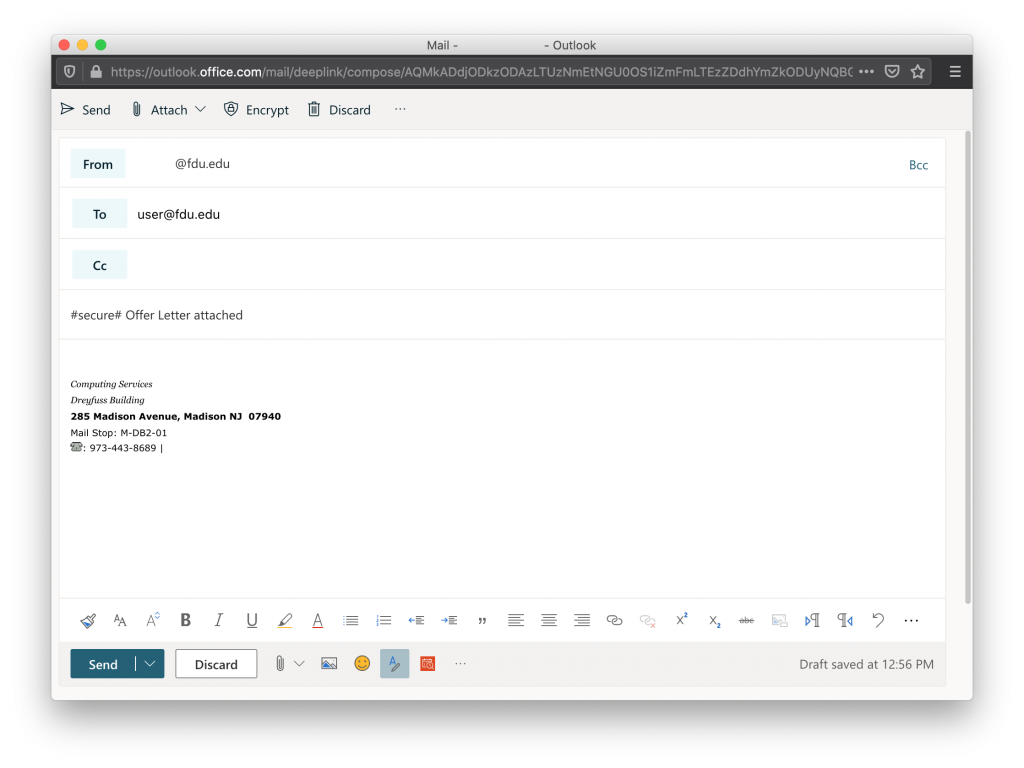
Send a Virtru-encrypted Email on Microsoft Office 365
With Virtru, you can easily protect your emails by encrypting messages and attachments in a few simple clicks. To send Virtru encrypted emails from your Microsoft Office 365 email acount, simply prepend the subject line of your email as follows:
#secure#
Virtru-encrypted Email Recipient Experience
The recipient will receive an email that looks like this:
Read a Virtru Encrypted Email on Microsoft Office 365
In this article, we’ll show you how to quickly access and read your Virtru-secured message or attachment within Microsoft Office 365 using Virtru’s Secure Reader.
How to Access and Read your Message
- Login to FDU’s Microsoft Office 365 web portal using any web browser. Enter your FDU NetID credentials
- Open the Virtru-secured email in your inbox and left-click “Unlock Message.” A new tab will open
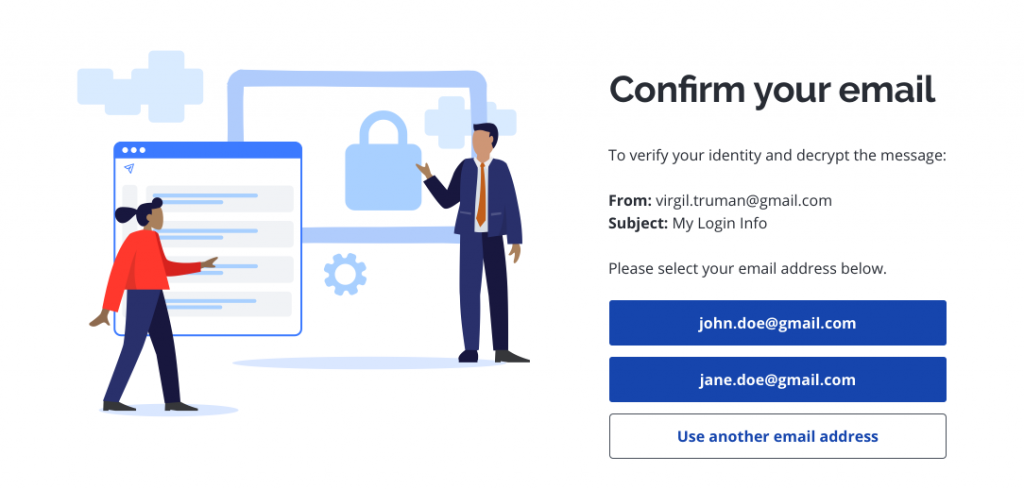
- When prompted, select your FDU email address
Tip
If you don’t see yours listed, left-click “Use another email address” and enter your email address.
Note
Please be sure to verify using the exact email address to which the secure message was sent. If the email was sent to an alias, group address, or distribution list address, you will need to select or enter that exact email address rather than your personal address.
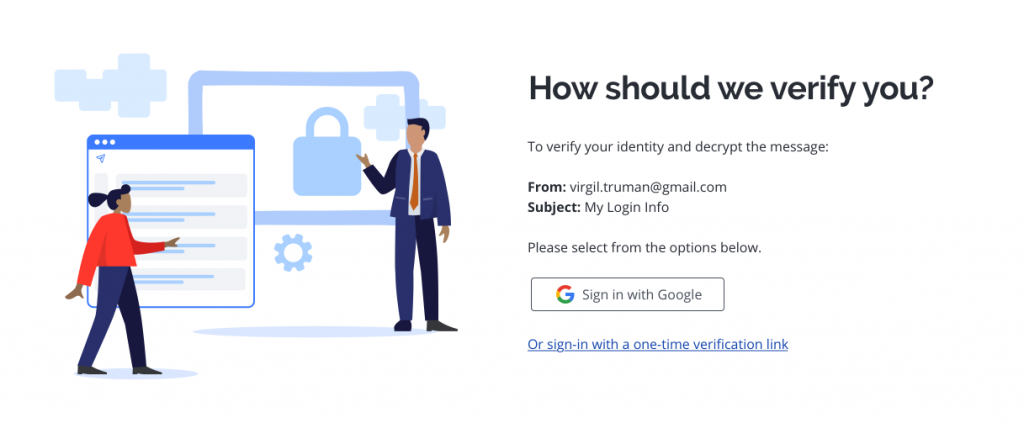
- Choose how you’d like to verify your identity
- Microsoft Office 365 users can use their FDU NetID credentials to log into the Secure Reader using “Sign In with Microsoft.” If you choose this route, you can skip step #5 below.
- Alternatively, users may choose “Or sign-in with a one-time verification link.”
 Warning
For emails sent to an alias, group address, or distribution list address, you will need to select the Or sign-in with a one-time verification link option. For group addresses and distribution list addresses, this action will send the verification email to all users on that group or distribution list.
- If you selected “Or sign-in with a one-time verification link,” check your inbox for your verification email. It will come from verify+xxxxxxxx@virtru.com (with each “x” being a digit). Open the verification email and left-click “View Message” to open your message
Note
Both the “Unlock Message” and “View Message” links need to be opened in the same browser on the same device in order to confirm your identity.
Please also note, Virtru offers a “cookie-less” verification pathway if we detect that tracking or cookies and local storage have been disabled in the browser. In these cases, we send a verification code via email. This code, once received, simply needs to be pasted into the proper field in your browser in order to grant access.
- Your message will open the Virtru Secure Reader in a new tab in the browser. You will also be able to view and access attachments at this time
For a variety of reasons, some recipients may occasionally receive an error message when trying to open a secure email or attachment. If you are having problems accessing your secure email and/or files, please contact the SAMI Service Desk. for assistance.
Reply to a Virtru Encrypted Email on Microsoft Office 365
In this article, we’ll show you how to quickly reply to your Virtru-secured message or attachment within Microsoft Office 365 using Virtru’s Secure Reader.
How to Reply to a Secure Message
- Login to FDU’s Microsoft Office 365 web portal using any web browser. Enter your FDU NetID credentials
office365.fdu.edu
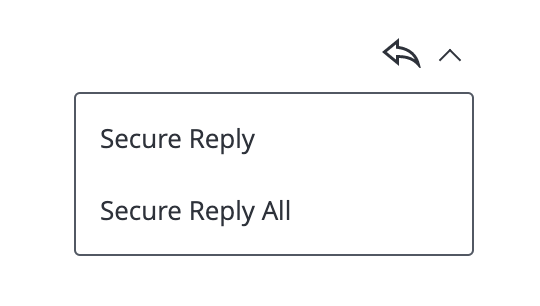
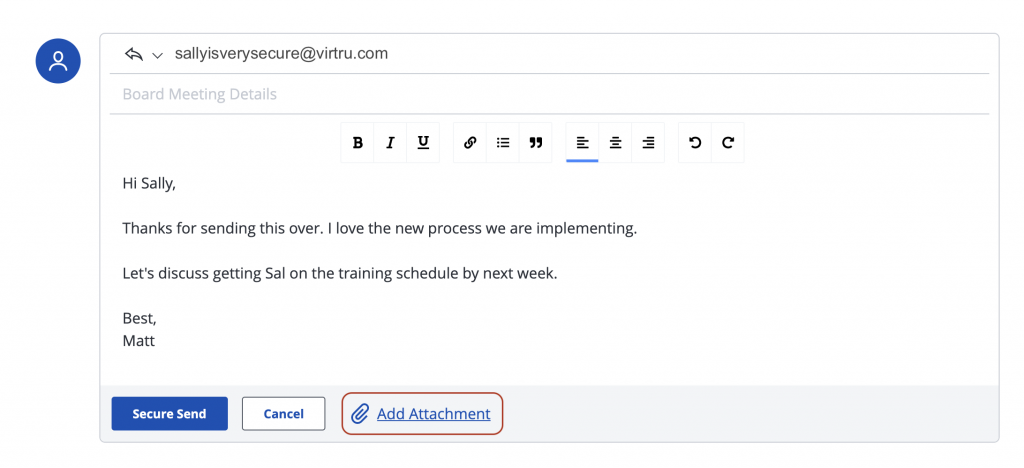
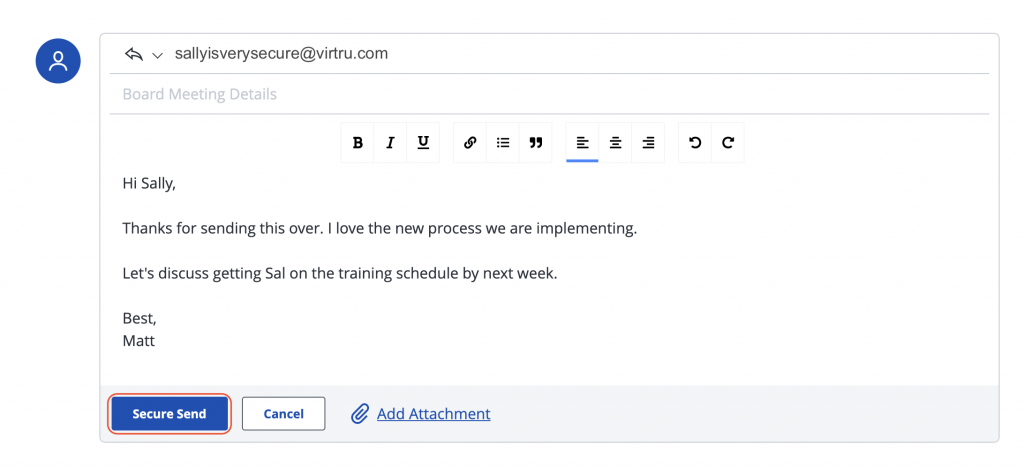
- After successfully opening the Virtru-secured message, to send a “Secure Reply,” scroll down the page below the main message, or click the icon in the top right with the arrow pointing to the left. You may also click on the arrow next to it to reveal additional options such as “Secure Reply All“
- Attachments can be added by clicking “Add Attachment.” These attachments will be sent securely as well
- When you are ready to send your email, hit the “Secure Send” button. Both you and all applicable recipients will receive a copy of your reply. Please note that your secure reply will be sent from secure-reply@virtru.com
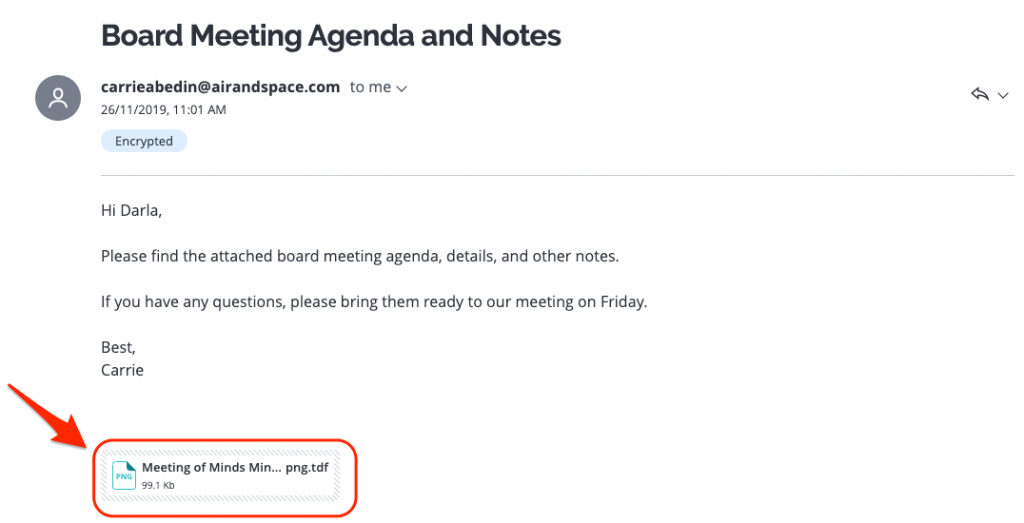
Viewing a Secure File or Attachment on Microsoft Office 365
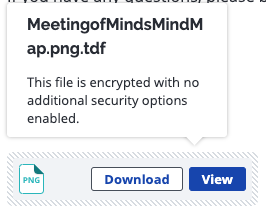
This article covers the different options you have for viewing and downloading secure attachments and files within Microsoft Office 365 using Virtru’s Secure Reader. Depending on the type of attachment you’ve received, you can view your file directly in the Virtru Secure Reader or download the file to your computer. The Virtru Secure Reader can preview various file types, including PDF, Word documents, most image files, and plain text files.
Viewing Directly in the Secure Reader
- Login to FDU’s Microsoft Office 365 web portal using any web browser. Enter your FDU NetID credentials
- If you’ve received an attachment in a Virtru secured email or an encrypted file that was shared directly with you, you can hover over the file name and choose “View” or “View Protected file” to view the attachment right in your web browser
Downloading Unsupported File Types
If you’ve received a file that cannot be previewed in the Virtru Secure Reader, you will be prompted to download that file directly. There will be no “View” option.
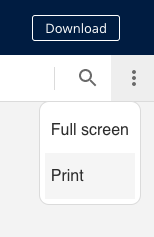
Printing Attachments in the Secure Reader
You can print a document from the Secure Reader by selecting the menu under the “Download “button and then selecting “Print.” You may also choose to download it first, then open and print via a preferred program on your computer.
Note
Note that printing via your web browser’s File>Print option will not print the document as expected.
Using the Virtru Dashboard for Microsoft Office 365 Users
Users who access their FDU email through the Microsoft Office 365 web portal and all Apple macOS users will need to use the Virtru Dashboard to manage all of Virtru’s security options.
- To use the Virtru Dashboard, click the link below:
Virtru Dashboard
Tip
We will refer to the “Virtru Dashboard” many times, as this dashboard is used to change settings after an encrypted email has been sent. It is suggested that you bookmark this site for easy access.
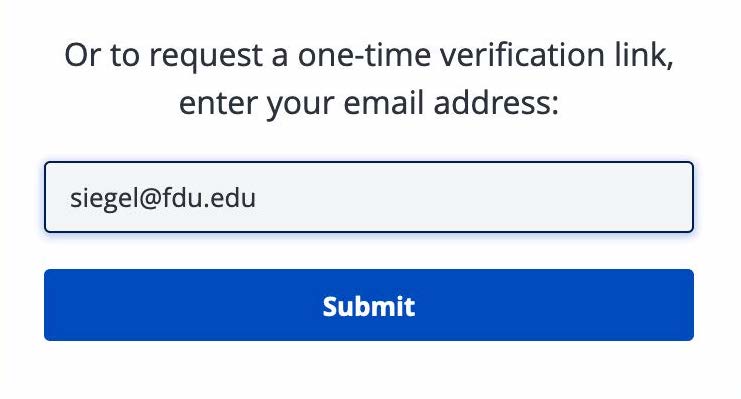
- Choose “Sign in with Office365“, and skip to Step 5. If you choose to request a one-time verification link, enter your FDU email address and click on “Submit“
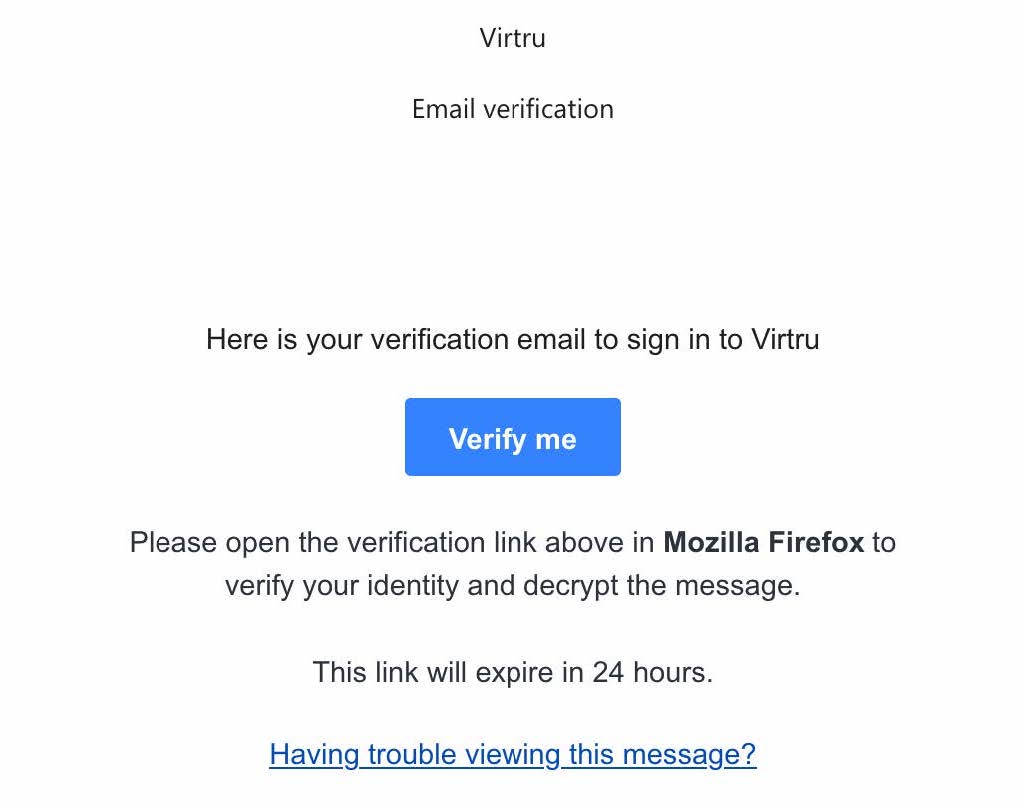
- If you request the one-time verification link, you will receive an email from Verify for Virtru, as shown below. If you are using different web browsers, such as Google Chrome or Mozilla Firefox, it will be reflected in the email message accordingly
- Click “Verify me” and choose “Copy Link Location.” Open a new browser tab and paste the link location into the URL space. Hit the “Enter” or “Return” key on your keyboard
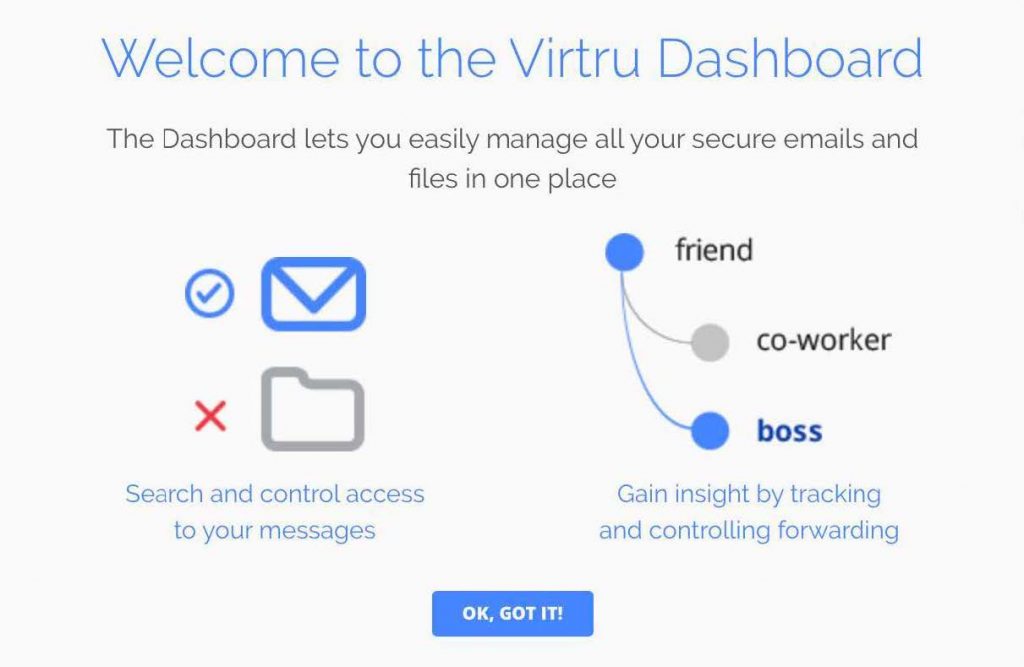
- When you log in to the Virtru Dashboard for the first time, you will see the message below. Left-click “OK, GOT IT!“
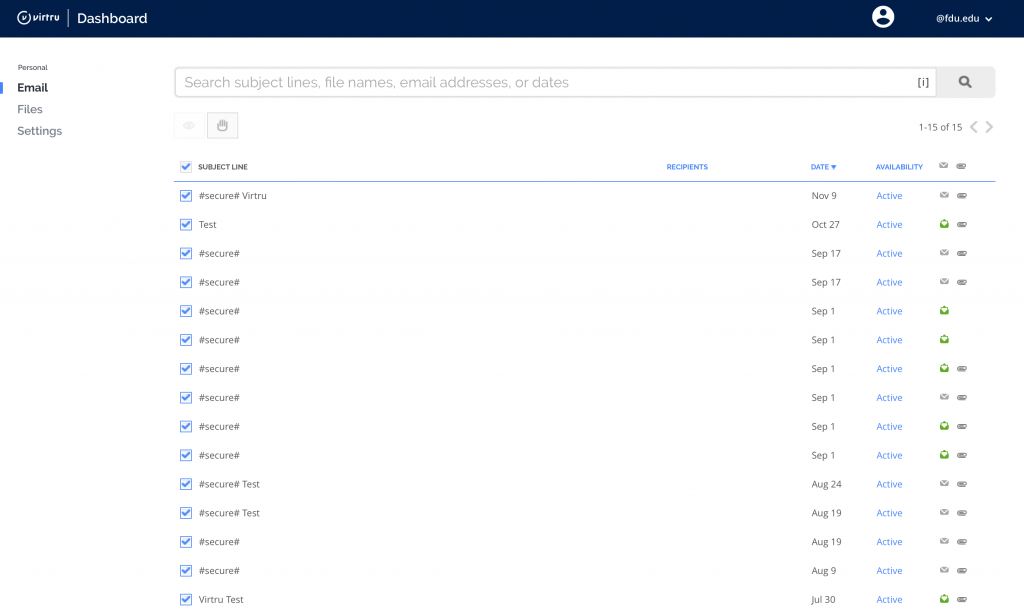
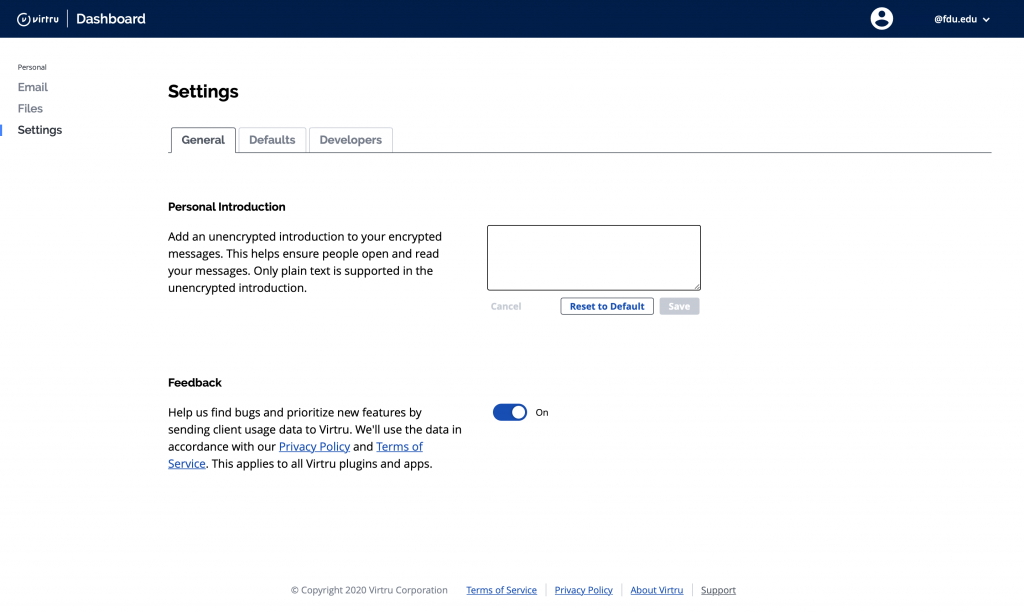
- You will now be able to view Virtru encrypted emails or files you have sent, as well as open the ‘Settings‘ menu tab to set behaviors for your Virtru account
Manage Virtru’s Expiration Date Security Option in Outlook
In addition to encrypting messages and files, Virtru users have the ability to apply additional security settings to protected content. Among these settings is the option to apply an “Expiration Date” to an encrypted email or file.
Typically, if a Virtru email recipient receives an encrypted message or file, they can indefinitely access that content. However, as the owner of that content, you can restrict access after a particular point in time. If a recipient tries to access the content after expiration, they will receive a prompt indicating their access is expired.
Manage Virtru’s Expiration Date Security Option in the Virtru Dashboard
In addition to encrypting messages and files, Virtru users have the ability to apply additional security settings to protected content. Among these settings is the option to apply an “Expiration Date” to an encrypted email or file.
Typically, if a Virtru email recipient receives an encrypted message or file, they can indefinitely access that content. However, as the owner of that content, you can restrict access after a particular point in time. If a recipient tries to access the content after expiration, they will receive a prompt indicating their access is expired.
Manage Virtru’s Disable Forwarding Security Option in Outlook
In addition to encrypting messages and attachments, Virtru users have the ability to apply additional security settings to protected content. Among these settings is the option to apply “Disable Forwarding” to a Virtru-encrypted email.
Typically, if a Virtru plugin for Microsoft Outlook user receives an encrypted message, they can use Virtru to forward the email to a new party. This will add the new recipient as an authorized user and allow them to unlock the message. “Disable Forwarding,” however, ensures that your recipients can access the encrypted content but will stop any additional users from gaining access to the message. If the original recipient passes the email to a new party, then the new user will not be added as an authorized user and will not be able to unlock the message.
Manage Virtru’s Disable Forwarding Security Option in the Virtru Dashboard
In addition to encrypting messages and attachments, Virtru users have the ability to apply additional security settings to protected content. Among these settings is the option to apply “Disable Forwarding” to an encrypted email.
Manage Virtru’s Watermarking Security Option in Outlook
In addition to encrypting messages and attachments, Virtru users have the ability to apply additional security settings to protected content. Among these settings is the option to apply “Watermarking” to an encrypted file.
Typically, if a Virtru recipient receives an encrypted file, they can preview the file in the Virtru Secure Reader and download a decrypted copy locally. When “Watermarking” is applied to a secure file, recipients will only have access in the Secure Reader and will see their email address watermarked across the document.
The addition of the watermark is visible but transparent enough not to obscure the contents of the file when viewed. A recipient will not be able to download a local decrypted copy of the file.
This feature can be applied using the Virtru plugin for Microsoft Outlook or the Virtru Dashboard. It supports the following common file types:
- Microsoft Office documents: .docx, .pptx, .xlsx
- Common image file formats: .jpeg, .png
- PDF documents
Note
Although newer Microsoft Office file types are supported, older versions (.doc, .ppt, .xls) are not compatible. Additionally, these other common file types are NOT supported: .msg, .zip, .md.
Mange Virtru’s Watermarking Security Option in the Virtru Dashboard
In addition to encrypting messages and attachments, Virtru users have the ability to apply additional security settings to protected content. Among these settings is the option to apply “Watermarking” to an encrypted file.
Typically, if a Virtru recipient receives an encrypted file, they can preview the file in the Virtru Secure Reader and download a decrypted copy locally. When “Watermarking” is applied to a secure file, recipients will only have access in the Secure Reader and will see their email address watermarked across the document.
The addition of the watermark is visible but transparent enough not to obscure the contents of the file when viewed. A recipient will not be able to download a local decrypted copy of the file.
This feature can be applied using the Virtru plugin for Microsoft Outlook or the Virtru Dashboard. It supports the following common file types:
- Microsoft Office documents: .docx, .pptx, .xlsx
- Common image file formats: .jpeg, .png
- PDF documents
Note
Although newer Microsoft Office file types are supported, older versions (.doc, .ppt, .xls) are not compatible. Additionally, these other common file types are NOT supported: .msg, .zip, .md.
Revoke Virtru Encrypted Content in Outlook
When a Virtru user sends encrypted content, they have full control over access to the message(s) and/or file(s). Even if a recipient receives encrypted content, the sender has the ability to revoke (or reauthorize) access at any time. Virtru even allows the sender to revoke access to specific recipients.
Note
Virtru can only revoke emails that were sent securely with Virtru. Any messages sent prior to having Virtru installed or messages sent unsecured after Virtru has been installed cannot be revoked.
Revoke Virtru Encrypted Content in the Virtru Dashboard
When a Virtru user sends encrypted content, they have full control over access to the message(s) and/or file(s). Even if a recipient receives encrypted content, the sender has the ability to revoke (or reauthorize) access at any time. Virtru even allows the sender to revoke access to specific recipients.
Note
Virtru can only revoke emails that were sent securely with Virtru. Any messages sent prior to having Virtru installed or messages sent unsecured after Virtru has been installed cannot be revoked.
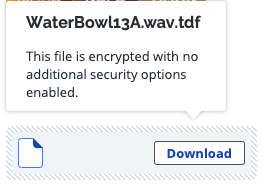
Using Virtru’s Persistent File Protection (PFP) Security Option
Note
Please note that Persistent File Protection (PFP) Security Option is only available from the Virtru add-on to the Microsoft Outlook Desktop Application. It is not available when using Outlook on the Web (office365.fdu.edu) or the Virtru Dashboard.
In addition to encrypting messages and attachments, Virtru users have the ability to apply additional security settings to protected content. Among these settings is the option to apply “Persistent File Protection (PFP)” to an encrypted file.
PFP provides a secure file container that is portable, universally accessible, and built on top of open standards. Regardless of where files are stored, PFP allows you to select, protect, and share a file with anyone while maintaining full visibility into how it is being used and retaining the ability to revoke access at any time. Any file protected with PFP will convert into the .tdf.html file format. This ensures that the contents are only accessible in Virtru’s Secure Reader, and only authorized parties can view it.
This feature can be applied using the Virtru plugin for Microsoft Outlook on Windows Operating Systems only. It supports the following common file types:
- Microsoft Office documents: .docx, .pptx, .xlsx
- Common image file formats: .jpeg, .png
- PDF documents
Note
Although newer Microsoft Office file types are supported, older versions (.doc, .ppt, .xls) are not compatible. Additionally, these other common file types are NOT supported: .msg, .zip, .md.